Transcripts
1. Intro: Getting started creating 3D designs with Adobe Dimension is the fastest and easiest way to turn your ideas into a three-dimensional world. Using it as a tool to bring your designs to life is a great way to realize your creative vision. In this class, I will share with you how to use the most intuitive program to start creating three dimensional content, Adobe Dimension. You will learn everything important so that you can create 3D design fluently. Hi, I'm Eveling and I am a graphic designer and 3D artist from Perú and I invite you to take this 3D course. This class will be easier to follow and don't have to be experienced or have other special skills to start creating this kind of art. Adobe Dimension is extremely quick, fun and easy to create. This class is designed for everyone interested in getting started with engaging 3D content quickly. and if you are a beginner and wants to get into this fascinating world, or already have knowledge in other 3D programs, but you want to explore simple and intuitive new ways to quickly design or maybe focus on your creative vision and add new skill to your workflow and explore new ways to create, this class is for you. By the end of this class, you will be able to get a great and very fast composition in 3D and get started easily in this three-dimensional world by creating design with Adobe Dimension.
2. Your First 3D Composition Project: The project for this class excites me because it is a project to create your first 3D composition. and this project is ideal because it will make it easier for you to bring your creative ideas to the 3D world in the easiest way there is. We will work with Adobe Dimension, the software that makes creative work much easier for beginners and you'll see how fast and easy it will be to create your first 3D design. To start your project, you will see inspiration and we talk about how to look for some creative ideas to use as a reference. And for this class, you will need the motivation to learn new techniques and want to express yourself through abstract composition and of course, Adobe Dimension and Adobe Photoshop installed on your computer. In your final project, I'II be looking for a variety of shapes, colors, textures, and composition that you have learned in this class. I think one of the ways to be happy is to share what you create. So I invite you to upload your project to the Project Gallery section, so we can also take inspiration from your project and feel free to share what you liked the most, your learning process and more. I can't wait to see what you create, you will not believe how much you can achieve by using Adobe Dimension as 3D initation program. If you have any questions, feel free to reach out to me. See you In the next lesson.
3. Get Inspiration: In this lesson, we'll talk about some components that can help inspire you and some tips I recommend you try to do for the class project. This lesson will help you in your creative process. Now, let's talk about creativity. What is creativity? Creativity is putting imagination to work, is the process of having valuable new ideas. But what can help you get creative? First, confidence. Making sure we have an atmosphere of self-confidence, is essential for creative growth. One point you can start doing is to receive negatively judging, your creative impulses or new ideas. Try to build trust, try to capture every creative thought you have. For it, you can use a notebook, write down any idea you have without judging them. And this list you create will help when you need new inspiration. Another thing that can help with creativity is listen to music. A study on creative thinking techniques has shown that listening to uplifting music allows you to have more divergent thoughts. That is, it motivates you to have a varied original thoughts or ideas. Music can help to deal with mood. When we listen to music that edifies us, we feel joyful and positive emotion, increase our mentality, desire to explore and play. For this, if you are looking for inspiration through music, I left a playlist that I have created with very stimulating sounds. Listen to what you love. Sometimes we are not so aware of thing we like, so you need to pose and look at you to know what things you are happy about and what things you love. Based on these two, look for things that stimulate you visually that they're motivating when it comes to grading. The artistic brain is sensory, so filling our minds picture, we should our artistic brain. You can create notes throughout your day and the activities you do. Take note of everything you find inspiring and motivating. and place it in a moodboard. Next thing you can do is identify your inspiration. For example, every time I make a 3D design, I try to put what thing I like. I know perfectly well that I like art history, and I chose that theme to be inspired by the creating of this project. First, I chose a theme I love. In this case, I chose art history. Then I chose one of my favorite art eras, in this case is Impressionism. Then I chose the artist I like the most for that movement. In this case is Monet. Then I decided to search for and identify one of his work that it please me the most is Still Life with Melon, 1872. Working with that breakdown of themes is that came to look at a piece of Monet art to be inspired by the creation of my 3D composition. I was inspired by its beautiful color palate, and constructing geometry shape of the table and around fruits as I picture out motive. I work on it as an inspiration to create something mine. I recommend that you try to identify those themes you like and move them to your 3d design. In the next lesson, we'll start using the most intuitive 3D design program and you will know how to use its interface.
4. Adobe Dimension Interface: In this lesson, we'll see what you need to know to start your creative journey with Adobe Dimension. Let's review the user interface and see an overview of that workspace. You'll see how easy it will be to use it. When you start in Adobe Dimension, you'll see two types of working mode; design mode and render mode. Let's explore the first one. Design mode. This is the main editing mode and this is where you will work on your composition. This Adobe Dimension mode shows us different fundamental tools to create. Let's look at each of them quickly. The first one is toolbar, is the one of the left side. These tools are used to interact with this scene content. Then let's look at the Canvas. It is the whole area of the center, and that's where we're going to add the element of our design, and that's where we'll create scene composition. Let's look at the top of the control bar. Here we can manipulate the zoom level and preview quality. Now, let's look at the panel on the right. The first is the scene panel, here is the full description of everything to add to the scene like models, materials, cameras, lights. Before the scene pane is the action pane. It is an access area that allows us to quickly have some function of d element of the scene. This pane changes depending on the object you selected. And finally, let's look at the properties panel. It's a context area where we can manipulate in detail some attributes of the element added to the scene, and the properties will change, be different depending on which object is selected. Now, let's review the second mode, render mode. This mode helps us to create quality final images, and we will use it at the end of our composition to process that image of our design in PSD or PNG format. This mode features the Canvas. Here we can see the final image as it rendered. In the upper right, you will find the Render settings panel, here we can configure the renderings, how to choose the perspective of the camera to render, file name, and image quality to render. Finally, you will find the render status panel. In this area, the states of advances of the rendering will be displayed, as well as the time it will take to render. This function of time is one of the ones that I like the most about these 3D program since all other programs do not have this option. Now that we've taken a tour of that interface and located each of these options, let's learn in the next lesson how to use your workspace to start designing. You will see that it's very intuitive and easy-to-use functions.
5. Adobe Dimension Workspace: In this lesson, you'll learn how easy it is to use the Adobe Dimension's workspace. We'll see how to select objects, how to move them, align them and distribute them. We'll also see how 3D objects are composed. Knowing these simple functions, you can start creating whatever you want. To get us started, let's see how to select objects. On the toolbar, you will find the Select tool that allows you to move, rotate, and scale. The three tools allow us to select and deselect objects. In the case that we have an Adobe Dimension group, it give us the ease of moving several objects at once with this option, that they can be moved together quickly. To deselect all object, click on the canvas area. For another kind of selection, use the Magic tool to select part of the objects. Use the Selection Size Settings to refine the size of the selections. Now, we will see something extremely important within that geometry in 3D. Before you start creating your own 3D geometry it's important to understand what it's made off. In 3D, objects have vertical, Y, horizontal, X, and depth, Z coordinates, which mark exactly the virtual place of the object in the scene. X is left and right, Y is up and down, Z is front and back. The Gizmo Handles are color coded to represent the axes. They correspond to, for example, red for the X-axis, green for the Y-axis, and blue for the Z-axis. With these coordinates, the geometry has three simple elements: vertices, adjust, and faces. The vertices are small point that are together and connect from edges, and this connection from figures called polygons. With the coordinate clear, we will now see how to move to 3D objects. Just a following shortcuts: V for move, S, a scale, and R, rotate. Click an object to select using the Move -click- and drag tool to move it across the ground, or use another coordinates to move it sideways or up and down. Using this Scaler tool, click the object and drag it to resize it, or use the coordinate to straight it and change it shape. The Rotate tool and its handles, it will allow you to rotate freely. Align and Distribute. To align, select at least two objects. In the Action panel, click the Align and Distribute action, a 3D widget will be appear. Click the Drop handle to align the side of the object. The handle in the center of each axis aligns the center of the object. When you done aligning, click the Align and Distribute action to turn it off. Now that we see Adobe Dimension's workspace and you know how to select, move, and align objects, let's see in the next lesson how you can add texture, light, and camera to your composition.
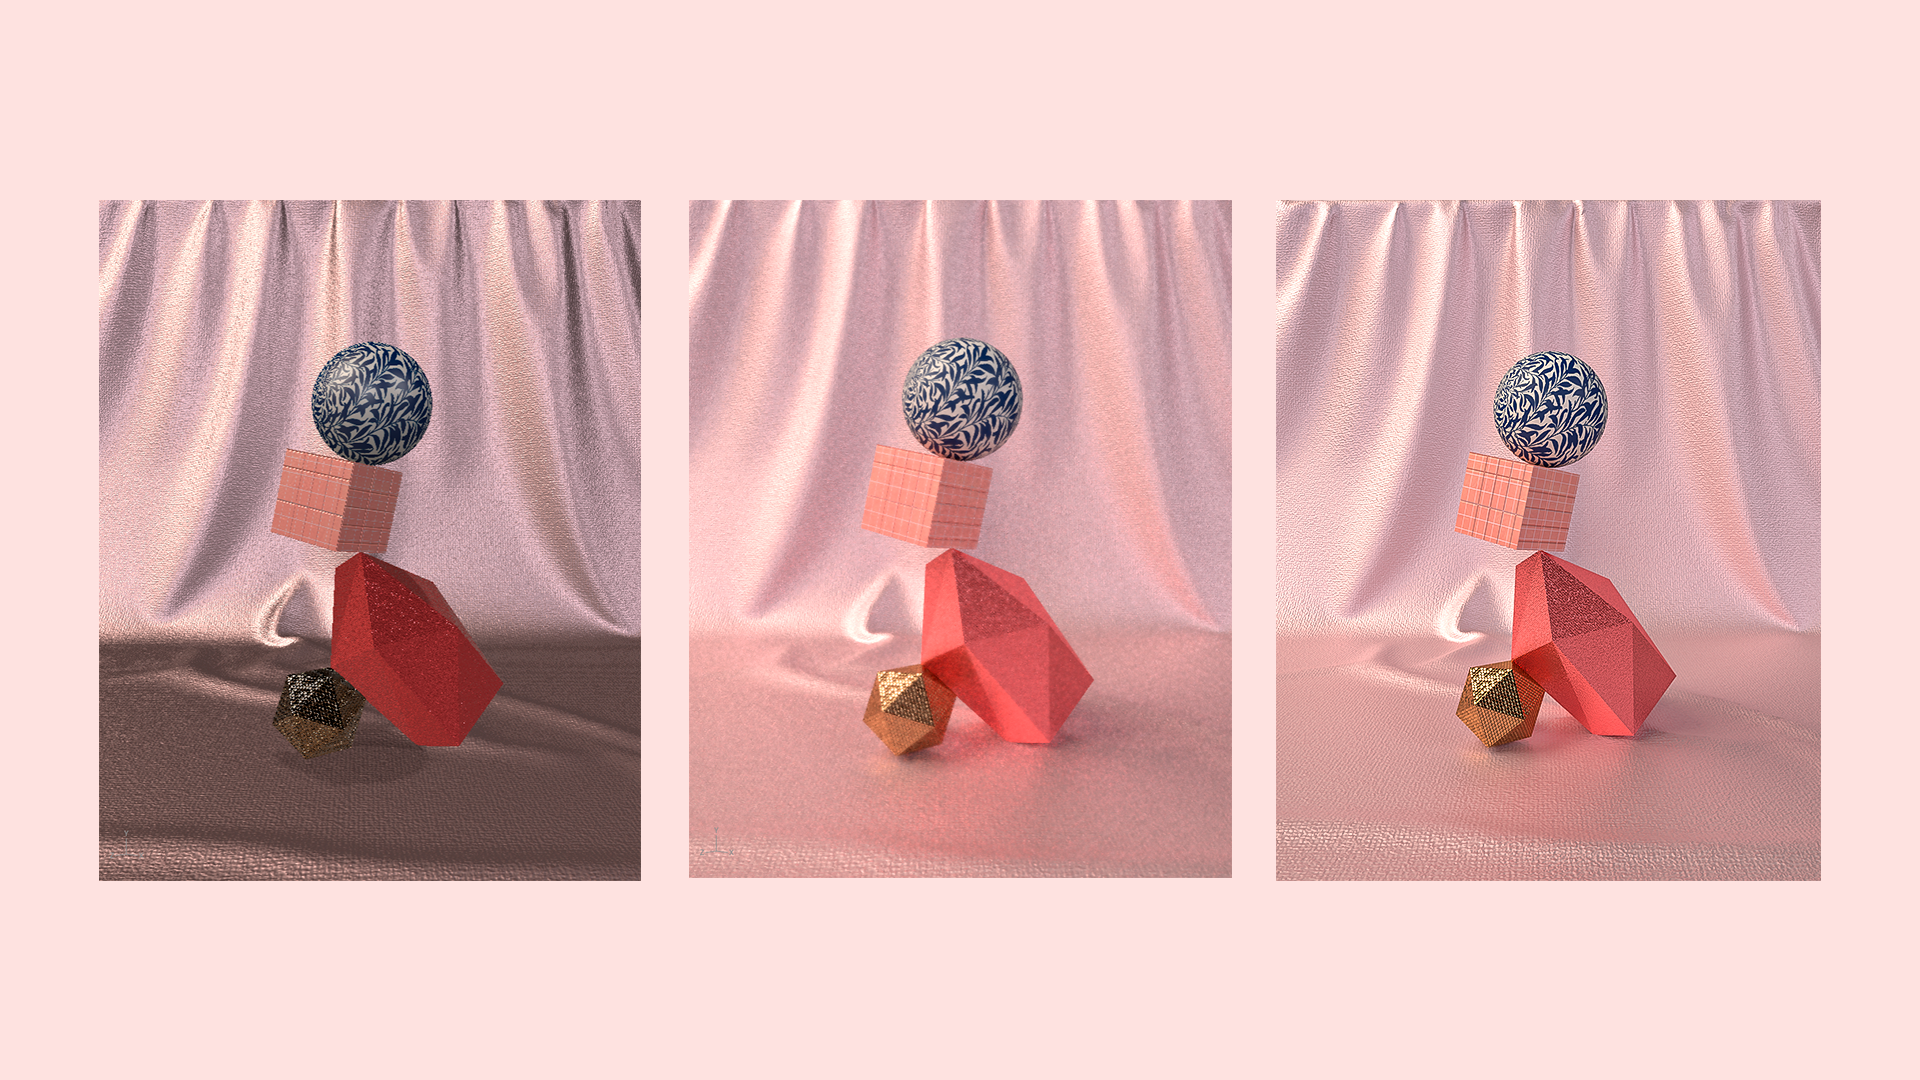
6. Materials, Lights & Camera: In this lesson, we'll move on to something more fun. We'll see how to apply texture to object through Adobe Dimension materials, and we will import any other that we want to add. We'll all see how easy it is to illuminate and the light option we can use. Finally, we'll talk about the camera and its settings. I have prepared supporting material on that theory of materials and some of their properties. It is a PDF which is located in the Resources part of that course. Download and review it so that you take it into account and know what you are doing when changing the parameters to the materials. Now, let's start looking at the materials. Let's go to the action panel. Click on the "Color Swatch" to select a color or to enter a color value. We can also change the attributes of opacity, roughness or metallic. If you want to give a special look to the surface of the objects, there is the option to use an image, just drag or choose the image to the color swatch. You can control the position, rotation, and scale of the material in this area. You can also find and choose material options in this panel, a Standard Adobe materials and Substance materials. You can try and explore each of them in your designs. One of my favorite things within this 3d program, unlike others is the use of lighting is extremely easy to use, is intuitive and it's ready to use. Take advantage of this Adobe Dimension option to quickly create layouts Let's start talking about Dimension's lighting types. Environment lights, for this, let's select an ambient light. This lighting option is panoramic images that spherically surround a 3D scene, and provide lighting, shadows, and reflection based on the image information, which is reflecting the entire overall scene environment. A simple scene illuminated with two different ambient lights has a different finish in objects. We can give different look to our render with these small changes like these pictures. We also have the ease of changing that intensity, rotation, and coloring option of the image until you have the desired results. Now, we'll see the directional light. This light allows us to create custom lighting. They also exist in a full sphere around the entire scene. You can add multiple lights and change their position and look different with the position of the shadows, change the color and height independently. Then we can check its color. We can share rotation, height, and intensity parameters. Finally, dimension also include sunlight. This light generates artificial sunlight and has realistic some behavior on objects. We can play with changing the parameter or intensity, height, rotation, opacity and also color it. Chose a specific color to give design a special style. Finally, we'll see how to use the camera in Dimension. In 3D, you can control your view of the world through the use of a virtual camera. Before you can control the camera, you must use the controls on the toolbar. First, click on the "Orbit Tool", It arcs your camera around, rotating your viewing angle. Second, the paint tools allows you to move your camera along the scene's field of view. Dolly tool help move the camera forward and backward. For quick access to the use of this camera option, use the following targets, orbit one, paint two, and dolly three. For mouse, use the right button of two orbit, middle mouse button to paint, and a scroll to dolly. We can add different perspective of our work with the camera markers. Putting a new perspective add a new group. These view changes will be saved and we can render the one we like the most in the end. Having us to the operation of the materials, lights, and camera is essential for now to be able to start making your design. In the next lesson, you will design your first study design in Adobe Dimension.
7. Design Your First 3d Composition: It's time to create your first design with Adobe Dimension. Remember Get Inspiration lesson? There we talked about how I was inspired to create this piece and I encourage you to consider it and you can create cool designs that convey who you are and what you like. Let's start with the composition. I'll create a composition that has a contrast of balance and tension between objects. Although the composition is based on geometry figures. They can interact in a special way to attract a focus of attention and make the final design attractive. The first thing is to define the dimension of the design. Set canvas size. To do this, let's image and resize the Canvas. I will use 1080 by 1350px and I'm going to reduce my eyesight to 60 percent. Let's give it a name and save it. We will choose the set of our composition in introductory assets here and let's choose one of the Dimension's ready models. For this project, I will use that the curtain. Let's set the curtain and now let's easily add the composition elements. Drag the chosen object to the scene. With the S key, we enlarge the object, with R rotate. We add the other shapes and position them. I want to create some harmony but at the same time tension, so I have decided to add the shapes in this way. This is the hardest part of this whole process because you have to make harmonies composition. But in this case, I have chosen to take into account the concept of balance and tension. You choose the concepts that stick to the theme of your taste and accommodate each of the elements in such a way that is visually attractive. You can start by its sketching, or do it intuitively that way I do. Now that you've played with the figures and given that context within the concept to choose. In the next lesson, we'll add texture and play with them.
8. Give it Style to Your Composition: [MUSIC] Now that we have the composition ready, we will move to one of my favorite parts. Add the materials, and give a special style to the design through the textures. To chose materials, Adobe Dimension contains several ready-made materials. It's as easy as choosing the one you want, and dragging it into the object. It's so easy. To apply materials, which is material in the input assets here, I will start testing the material on the curtain. Let's change the color. Then let's try roughness, Repeat, I'll add 2, and that's all. Another way to add texture to materials is to use images. I looked for the texture or patterns I like the most for my design and I'm guided by the color and texture palette of Monet's chosen work. and created my own mix of textures for the design. Once we have chosen the images for the elements, we select the way we will apply images. Let's to panel action, then select material, base color, click "Image", and load the image. We repeat the same process for other elements that we want to use images. For the Icosahedron, I will use Substance materials, Bronze Hexagonal Mosaics, and I repeat the pattern to 3.1 For the crystal, I will use a material that soft, I will change the color, metallic. With these easy ways to apply material We can create an attractive design and Adobe Dimension allows us to have these easy and practicality uses according to the style you want to break it. In the next lesson, we will see the final step of this process. Rendering. [MUSIC]
9. Render Your Composition: Another very relevant feature of the Adobe Dimension program is its render format and its settings. They are extremely simple compared to other programs, and the results of the render have a high quality. We already know that rendering is a process of converting 3D information into a 2D image. Well now, Dimension does three types of rendering. First is interactive view. This is the view we have when designing. The next is preview. It is the view enabled in design mode through the control bar and the preview of the rendering improves and brings us very close to the final result of the render. The final is the final rendering. This is the final results of that 3D design in a 2D images. and It is produced by the render mode. To render, we activate render mode and in render settings, we add the name. Then we chose the render quality. Quality refers to the amount of noise or grain shown in the final image. We chose high-quality. Next, we configure the place where the rendering will be save. Finally, we export the format. In PSD format, if you want to perform a subsequent work or PNG, if you don't need to do anything more and want to share it as it is. The render times in Dimension are very fast. A great advantage of the program is allows us to know how long it will be ready. Now that we've gone through the whole abstract art design process, with geometric figures in Adobe Dimension. We know that it is a super intuitive program that will make it easier for us to make 3D pieces. I'll wait for you in the next lesson to review the later steps in this class together.
10. Keep Learning!: Congratulations, you have made it to the end of this class. I hope you have enjoyed this class as much as I have enjoyed creating it. During the course, we've seen everything from how to start planning the process from theme, inspiration, and choice to final design rendering. You may have noticed that Adobe dimension is a super intuitive 3D tool. I will say the easiest to highlight with quality results in no time. The important thing about creating art is that it has its own identity, reflect it, and try to achieve it. Keep in mind that you can create your composition and give it that special style you want to represent. And please share what you've created in the Project section. freely share your thoughts, any comments, or queries you have in that Description section. Remember to download the PDF document, which you can download from the class Resources. If you want to keep learning about 3D, check it out my other class about Cinema4D, is called Geometry Shapes in Cinema4D: Create your own 3D World. Please, if you liked this class, follow me and you will be notified when other new class is out. You can also follow me on Instagram to see more of my art. I am eve_3d, you come follow me there. And if you upload your artwork on Instagram, please tag me. I can't wait to see what you'll create. Finally, please leave me a review, all your comments will be valuable for me. Let me know if the class made yours expectations and what video you enjoy the most. And thank you for joining me in this class. I hope you have enjoyed it and learning something new. See you next time.
 Eveling Salazar, 3D Designer - Graphic Designer