Transcripts
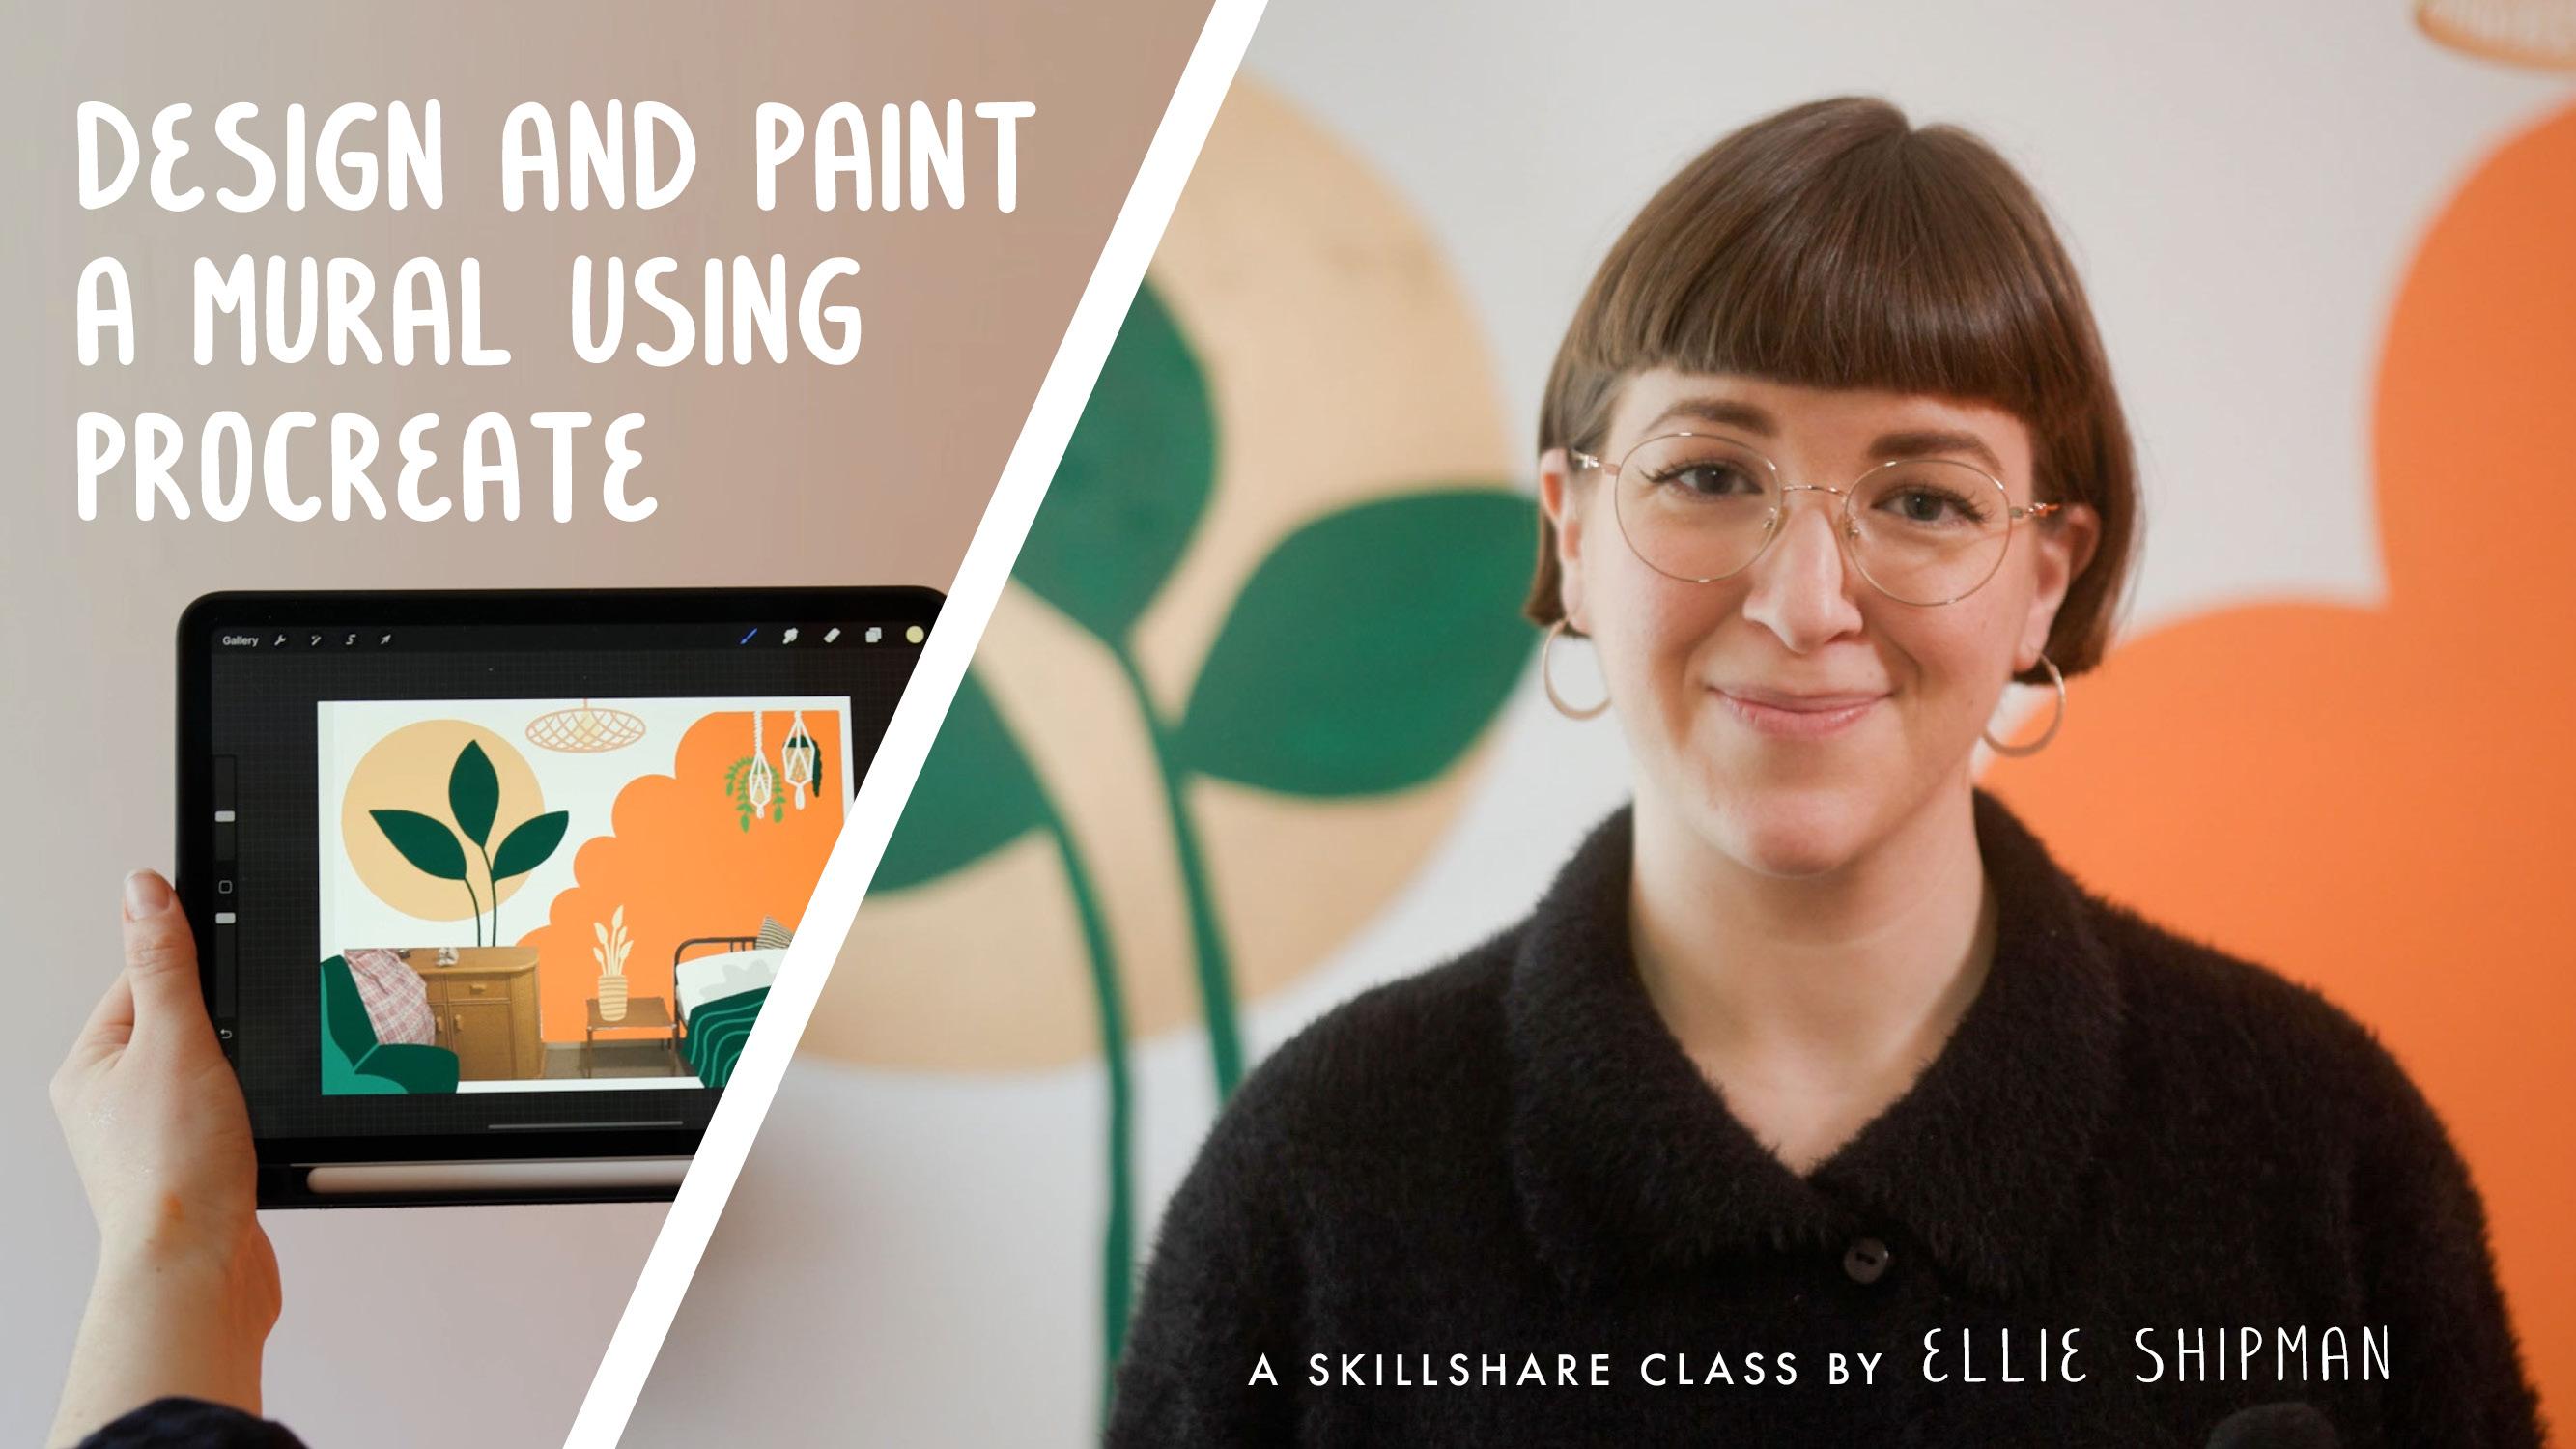
1. Class Project: Design and Paint a Mural Using Procreate: Hello, I'm Ellie Shipman, a Participatory Artist, and Illustrator. Some things I like to make include maps, exhibitions, fabric design, public art, and illustration. I've recently moved home and I'm so excited to put color everywhere. For this class, I'd like to invite you to design and plan a mural in Procreate and then paint it in real life in your room. Let's bring some joy into our homes. Our creative journey will include a site analysis and finding inspiration around your home, making a Pinterest board, a mood board from your photos, planning and designing your mural in Procreate, sketching it onto the wall, and finally painting it in real life. You will learn and develop a range of skills in this class, from workflow tips in Procreate to how to transfer a digital design into a real-life product. You'll be invited to upload key milestones into the project gallery. This could be anything from your mood board and your initial research, photos of your home, to your planning and design stages, and finally, a photo of your finished mural. This class is for anyone looking to develop that illustration and interior design skills and explore creative possibilities in Procreate. You will need your iPad and an Apple pencil or similar drawing tool to complete this class. You will also need a few basic materials like a pencil to sketch onto the wall, cardboard, scissors, and wall paint. I'll go through the resources with you later in the class. I have created some example files and resources which you can find under Project Resources tab to help you in your design process. Some tips before we get started. You might want to visit your local DIY store to pick up some paint swatches. These can be helpful for planning your color palette when we start designing our mural. Keep an open mind, your digital design might look different from your final mural that, that is part of the fun. Have a read of the project description, download the resources, and check where to upload your work, and then let's get started.
2. Inspiration Photos: In this lesson, we are going to be gathering some visual inspiration from around our own homes. We're going to grab our cameras and go for a walk about to see if we can gather some interesting textures, shapes, and colors to inform our mural design. Your mural redesign might want to be similar to your existing style or reference it, or you might want to go for something completely different, but it's really nice to bring in some of these motifs as we start designing in Procreate. Let's grab our camera and get started. Now that we've had a walk around our house and gathered some inspiration photos, transfer them from your camera to your iPad or laptop, and let's have a look through them. You can start to notice different shapes and textures and themes that might be coming from your photos. For mine, I've got these really big, broad leaf shapes and a dark green color. Again, this rubber plant. I've got some textures with this woven wicker which might go into a boho theme. Again, quite a large oval leaf shape with some other colors coming in like this vibrant pink. Circles have been quite a theme as I've looked around my home, so this gold circle inside the lamp shade which has got some quite nice texture on it as well and some really vibrant colors. Alongside the green, we've got some oranges and pinks in this vintage Hmong skirt which I really love. Again, a gold circle in this brass plate with this Indian engraving on it and some detail of the patterns within that. Circles have come up in this plant and these little clementines and with a really beautiful orange color as well. Again, the orange and green is coming through a bit of a theme. It doesn't have to just be photos of objects around your home. It could be food, you could look through your wardrobe for inspiration. Really, it can be anything, so just have fun and play around with your camera until you come up with about 10-15 photos. Then let's move on to the next lesson where we'll be making a mood board.
3. Making a Moodboard: In this lesson, we're going to be making a moodboard of the photos we've taken from around our home. This moodboard is to help us start gathering our ideas for our mural and looking at recurring themes which might have come from our home. This might be color, pattern, texture, and anything else you might notice. In the project resources tab, there is a template for the moodboard in Procreate, you're welcome to use this or you can make your own. Let's get started. I've gathered together the photos in an album on my iPad, and now I'm going to start inserting them into this moodboard. To do that, I've just put them all in an album, I haven't edited them because it's just for visual reference at the moment, we don't need to spend time doing that. You're welcome to do that if you prefer. Here are my photos, and select one and drop it right in. Immediately you can resize it and I've got snapping on, so it will just snap to the grid that I've made. It can be quite rough. The grid that I've made, which should be on the resource. If you go to Canvas edit drawing guide. This is a square canvas and the grid size is 57 pixels but you can use any. I'm just going to carry on inserting photos as we go to get some themes, and partly like the orange, little clementines. It will match the size of the original photo and the circle. You might want to change the sizes to make them bigger or smaller, have different emphasis. This texture was nice, and again don't worry too much about the gaps between the photos, they will be a little bit uneven. If I want to do a moodboard which is really accurate, I'd use InDesign. I make frames to drop the photo is in but for the purposes of our own reference is fine to do it like this. Well, so we got texture and some really nice colors in the scale to go with these clementines. She going to swap the clementine picture around. Make it a bit smaller and make this one a bit more central. Already that's got some cohesiveness, as I said but I'm just going to add a few more, see where else if we go. We've got some stripes in this leaf, and we've got some nice circles, these little ones. Again, it mirrors these clementines, add one more thing, this golds play, again, is lovely. A lovely gold with circle. If it doesn't quite line up like this one, you can tap above or to the sides, which gives it a slightly more accurate alignment, but I think that will do for now. With my moodboard, I can see that there are some themes which are emerging as I've taken photos. I've got quite a lot of circles as a common kind of shape in the plants, the clementines and some objects, and these kind of colors of a deep dark green and are brighter orange and pinks are coming through as well as the gold. Those are my notes for it. If you'd like, you could make some notes and just scribble over and I'll do that now just as a reminder for myself. Let's see. I quite like to use the 6B sketching pencil in Procreate brushes for just making those, because it flows quite nicely. Let's see, we've got some circles coming out in here and here. You've got gold, bright colors and orange, and we've also got these kind of oval leaf shapes. So that's our moodboard and before we finish here, I'd like to make a color palette as a starting point of an idea for the colors for our mural. I'll show you how to do that quickly. I've made a kind of color swatch with just these black dots, and all you need to do is just to put your finger or cursor onto an object that you like the color off, which will appear in the color swatch. That's going to go into everything. Make sure you're on the right layer, and then just drag and drop it into one of these little swatches here. Let's get this nice blue. It's a bit lighter than I thought. It's nicer version and I really love these, really vibrant pinks and we've got a nice orange scale, kind of deep green, even darker. I think that's a bit too dark. Looks nice and this kind of lighter gold color. There we have it, our moodboard. We're just starting to get some of these ideas and in the next lesson, we're going to look at Pinterest. So start thinking about how these might apply to our wall. See you then.
4. Mural Research Using Pinterest: In this lesson, we're going to be looking at Pinterest to start gathering some ideas from outside our own homes. In the last lesson, we've made our mood board which gathers some content from around the room where our mural will be but this time we'll be looking at some external inspiration. When you're ready, set up a new board on Pinterest, you might want to call it home mural or mural inspiration or something along those lines and then let's have a look and see what we can find. This is my board and I'm going to take you through it and I'm going to make some notes on themes emerging in my mural ideas as I go, so let's have a look. These are some I've already started gathering just to get some starting points. I can see there's quite a lot of recurring colors here already, these kind of peachy-pastely colors. A lot of people actually actively doing the mural, which is nice, showing it can be really handmade. These kind of scalloped edges which are all over Pinterest at the moment and they're arch raised as well, and these really beautiful leaf murals as well. It's also nice to see furniture and flooring interacting with the mural behind it and that might be something you can think about in your own home. Pinterest will suggest more ideas for this board once you've already gathered some but let's go back to the search terms and see what we can find for your fresh new board. Let's type in, I mean there's already lots of suggestions that Pinterest will show for you. It knows I've made this wall mural boards, so its already saying, "Wall murals, colorful apartments, cardboard art," stuff like that, so let's just search wall murals and see what comes up. There's a lot of different ranges of different styles here from abstract, leaf shapes, line work, more detailed work, layers, and faded perspective drawings as well, stencils and removable vinyls as well but I tend to like the more homemade stuff, this is nice. Let's see this one, a little bigger. This is a really lovely one where this person used the whole board, which is quite a big space and made some really lovely abstract shapes on it. I'm going to save that to my board. Oops home mural inspiration. I really love this artist, Martcellia Liunic. She's an illustrator and her work is really playful and she often does illustrations on walls and houses, internally and externally so let's save that one. It's really playful and fun using these kind of faces in the design as well, which I love. This is quite fun, different artist he's just done some different little icons around a small bathroom, let me save that as well. Once you've had to search around for a while, go back to your board and start to look at what themes are emerging for you, so let's get back. Now that we've added some more ideas to our mural, have a look at the themes which are starting to emerge. For me, I've got some really lovely examples of abstract shapes and some bright bold colors. I've also got these kind of little characters and illustrative pieces emerging as well as leaves and squiggly shapes. I'm going to use my iPad to just make some notes of these themes to bear in mind as I plan my mural design. I've made a little brainstorm diagram here just using a pencil to start making some notes. I've got faces and illustrative features, I've got plants, abstract shapes, and quite a lot of mark making which is bit more organic. Then I've got colors, which are kind of nude or neutral, alongside quite bold and vibrant. Okay. As you make some notes, you might want to draw some tiny little sketches of some of the key shapes which are starting to emerge for you. At the end of the session, take a screenshot of your Pinterest board or a favorite section of it and upload it to the project gallery. It'd be really nice to see your ideas starting to come together.
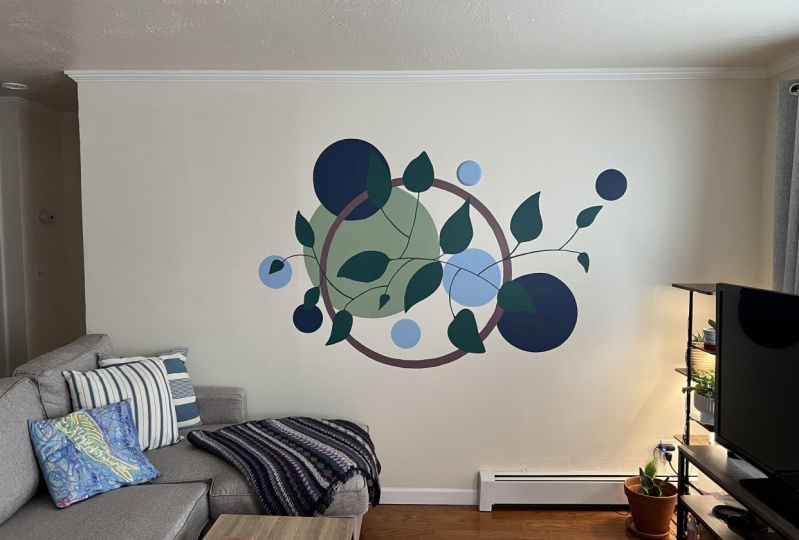
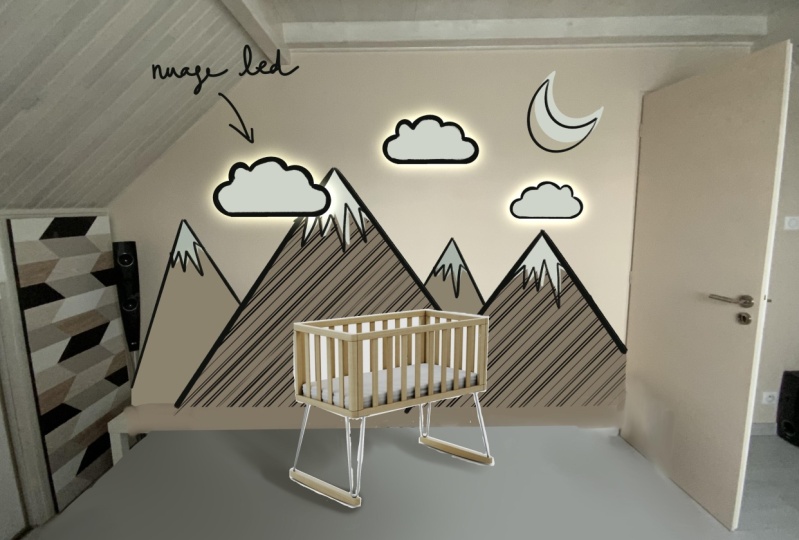
5. Sketching Your Mural in Procreate: In this lesson, we're going to start actually sketching our design. We've gathered inspiration from around our home through taking photos and making a mood board and color palette, we've looked at Pinterest from some external ideas, and now we can actually start drawing our own designs. Let's get back to opening Procreate, and I've set up a canvas here of 5,500 by 4,000 pixels, which is quite a high res canvas. You can really do it at any size, but as long as it's roughly the same proportions as the wall that you'll draw your photo of. That's inside the photo that we've taken of our wall. If you haven't done that yet, now's the time. Make sure to get as straight on as possible to the wall, because that will just help drawing over as one flat plane. I'm going to go to Insert a photo, find our picture, and insert in. You could leave it with wide space around the edges if you want, you might want to make notes so do a color palette or any other ideas around the edges. But I prefer mine to be right over to the edge so it's just one kind of flat photo. When you've placed your photo, let's lock the layer so we don't draw directly onto it and make a new layer to start our sketching. Sketcher Lock and add new layer. I like sketching with the dry ink brush, it's really smooth but, has a rough edge, but applies very smoothly. It's quite nice to start drawing some big bold shapes, which is what I want my mural to be. I've made a palette here with mural colors in it. These were the ones that I collected from my mood board. You might want to do the same. Remember, this is just starting point for our color palette and we can always change it as we go. I'm going to start with this orange color. In my Pinterest research I noticed lots of scalloped edges, which I really like but I think a lot of them are very even, and I'd like mine to be a bit more cloud shaped, and a bit more bold. I'm going to start by doing that kind of shape from this top corner. Let's see. Now it's okay to draw over any furniture or things which might be in the way on your photo, just use the wool shapes as a guide. Then let's fill that shape. You can already get a sense of how the room might look with this, just a one design in it. But I'm going to build up some layers and do some different ideas as we go. Add another layer and do a layer slightly behind that one, with the same color. I'd like this wall to just be plain. Let's make sure these shapes are all joined up, so that when you fill them it makes one plane. I'm going to make that color a little bit darker, I mean. Then you can start to see that the wall is a different plane, a different surface. Add another layer. I want the same thing to happen over in this side as well. When I looked at my mood board, the shapes that came up a lot were the circles and a gold color. I would like a really big gold cycle on the side of the wall. This was taken from gold but lets lighten a bit. Just doesn't look very nice when it's not shiny. Let's do a circle. You can just hold an edit shape to create a perfect circle and fill that. The moment this yellow looks a bit too much like a sun for me, I think I'd like it to be actually a bit darker, a bit more like the original color. Let's darken a bit. Yeah, I think that's better. Let's add another layer to join these two up and give some more interest on the side of the room. For me in my Pinterest research and mood board, the plants, leaf shapes were common themes. I think a plant would be a nice feature in this room. I've got this green, but I'd like to change it to something a bit darker. Maybe that. Let's bring this up. As you're designing, think about what the room is going to be used for. This room of ours is a guest room and it will be our future baby's nursery. So I wanted something that would be appropriate for adults to stay in and also for our child. So I think this design is neutral, and fun, and playful and without it being too babyish and still retaining some interest in some dynamism. Let's just readjust this a little bit. We've got a base coat on the wall at the moment, but as you can see, it's quite patchy so I'm just going to do a white background to this mural to just make it pop a little bit more in the sketch. Again, you can click and hold to get a nice straight line and then let's just connect that. Now with all of these layers, if you want to see what's going on behind it, you could always change the opacity. So let's some play around with that. Just take that down a little bit. So then you can see the shadow coming in from the window here on the left side. With all my Pinterest research and the things that really appealed to me most was the really simple bold shapes. So I'm actually happy with this as a sketch, and I don't think it needs too much other detail. I think the gold will be a metallic paint in the end. So think that'll add a level of shine and dynamism there when the rest of it will be mapped. So that's something you can also think about is any special treatments or special elements in the paint you might want to find. If you have furniture in the room and you want to make it a bit more obvious, you can sort of cut it out or delete around it. Again, let's take the opacity down, a few layers is behind, so we can see it. Then I'm just going to erase rather the sections of it from this layer. With the furniture in this room, I know that this bed is going to go there. We're going to put some other furniture in the other corner. You might want to start sketching in some furniture as well to see how your mural might look behind and in front of things. Let's add another layer, lets group the mural layered together and name it. Then add another layer for some quick sketching of some furniture, or some accessories. I'm going to put a pillow here. As you can see, I'm not making any kind of straight lines here, just doing really quick rough sketch, because it's just to help us visualize it. It doesn't have to be perfect. Again, you might want to think about how bases from the mural can come into the arrangement of furniture as well and bringing this plan into reference that leaves of the mural. I think that will do for now. I hope you're happy with your design. I'm really pleased with how mines turned out. I feel it reflects what I've gathered in my Pinterest and mood board research. I'd love to see how you're getting on. So please upload your final design to the Project Gallery. In the next lesson, we're going to be rolling up our sleeves and transferring this design onto the wall in our homes. See you then.
6. Painting Your Mural in Your Home: In this lesson, we are finally going to be drawing our mural onto the wall and painting it. Let's collect the materials that we'll need to get started. The materials you'll need to paint a mural onto the wall are a pencil for sketching the design. We're going to be using a cardboard template, but you can draw freehand if you want. You'll need cardboard and scissors. You'll also need a paint palette or roller palette, paint roller, the wall paint itself, and a couple of different types of paint brushes. I've also got some sandpaper, which we're going to use to prepare the wall and just smooth out any rough bumps on the wall. You might also want to use Polyfilla to fill any holes, and make sure you let that dry fully before we start painting. You might want to use different thickness paint brushes. I'm going to use a quite narrow wall paint brush and also a regular paintbrush I use for acrylics to get the fine detail. So I'm just going to use those two brushes and a roller for all of my painting needs. But you might have different space and need more specific things, so have a think about what you might need and let's start gathering them now. As mentioned at the beginning, if you're not allowed to paint on the walls of your home but you still want to design a mural, you could look into some different options for custom wallpaper or vinyl printing. There are quite a lot of different websites which offer removable wallpaper, where you can upload your own designs, or vinyl stickers, where you can upload a shape or design that can be actually cut out, and then you can apply it to your wall surface. I'll share some links for those in the Class Resources. We can use our image that we've drawn on our iPad as a visual reference. For me, I'm just going to draw freehand onto the wall. I'm measuring out where my furniture is going to go to make sure that I know which bits of the mural will be behind the scenes and which bits will be exposed. When preparing your wall, you just want to remove any rough patches. I'm just using a sanding block, which is just sandpaper around a cork block, to just smooth out the wall. It's really important when doing this to wear a dust mask to make sure that you don't inhale any of the Polyfilla that you might have used. I'm looking at the main shapes of my design, and I've got this large circle on the left-hand side. I want to look at the gap between the circle of my design and the edge of the wall. Then with a drawing pin and a string, I'm going to attach a pencil to the other end of the string by just making a simple loop and tightening it. Then with the drawing pin in the middle of the circle, I'm just going to draw around, using it like a compass. This isn't exactly accurate. You won't get a perfect circle, but it'll give a loose enough circle that you can go over to neaten up. You can just redraw over the lines to make it a little bit neater. As you can see, it's pretty wobbly. To help transfer my design onto the wall, I'm going to draw these key leaf shapes as the cardboard template. Again, just freehanding them onto the template and cutting them out. But it just means that I can just use the shapes to repeat and there'll be some evenness to them. Keep checking your digital drawing as you are drawing onto the wall. Just check for positioning of things and rough locations. With your templates, you have the option to change the orientation and also to flip them around so that they're a reflection image of the shape that you've already used. On this, again, just create some different seams and dynamism in the design. For this template, I've trimmed it slightly. I made it a little bit smaller and taken off the pointed edge just to make it look a little bit different to the other leaves, but still have a similar proportion. There we have the sketch design. You should have the design pretty visible in pencil on your wall. Don't worry if it looks a bit rough around the edges at the moment, that will all be easily erased or covered in paint. You can use different objects to draw around. I'm using this old lamp shade to draw the scalloped edges of my cloud design. So just see what's around the house that you might be able to utilize. I've used the lamp shade to draw the rough shapes, but I actually want my curves to be more broad, so I'm going over them freehand. But it's a very useful guide that's just got me to that point. Let's start painting. To start with, you want to take one of your narrow brushes and go around the edges of your design. The first layer will not look as neat as when it's finished, so don't worry too much about really precise edges at this stage. Just get the edges down and we can fill in the shapes later. Once you've done the edges of your design, you can use the roller or you could use a thicker paint brush if you're working on a smaller area to fill in the middle. I'm also wiping down the pencil edges which I haven't used, which are still visible, just to keep it nice and neat. The pencil should come off the wall just with a cloth with a little bit of water in it. Again, I'm using a small brush detail to go around the edges of the shapes and in this section, because it's a bit smaller to fill it in as well. I'm using a more fine brush in this section to go around the fine detail. This is a brush I'd usually use with acrylic on canvas or paper, rather than a wall paintbrush. When you change colors and you're doing a section which is very close to each other like this leaf is, make sure that the previous color is pretty dry before you start doing that. Otherwise, you might get some bleed between the paint colors. Sometimes, with different paint types and different colors, you might need to do two or even three coats. So don't get disheartened if you can see the wall through it, just keep doing coats until it's the finish that you want. For my mural, I wanted to keep it really simple and just use three colors with a white background. But if you want, you can mix colors. I'm advised to keep them in separate pots and to mix a good quantity at the beginning of your painting. The more colors you use, the more complex your design will be and obviously, the longer it will take. Generally, keeping it simple works well. My mural design took me about three hours to complete, and is a great job to do in an afternoon.
7. Well Done and Thanks!: The final finishing touch is to put your furniture back in and to accessorize and dress the room your mural's in. This is one of my favorite stages of the whole process where you can really see how your mural brings your furniture and your room to life. I hope you've enjoyed this as much as I have, and I hope to see you in another class soon.