Transcripts
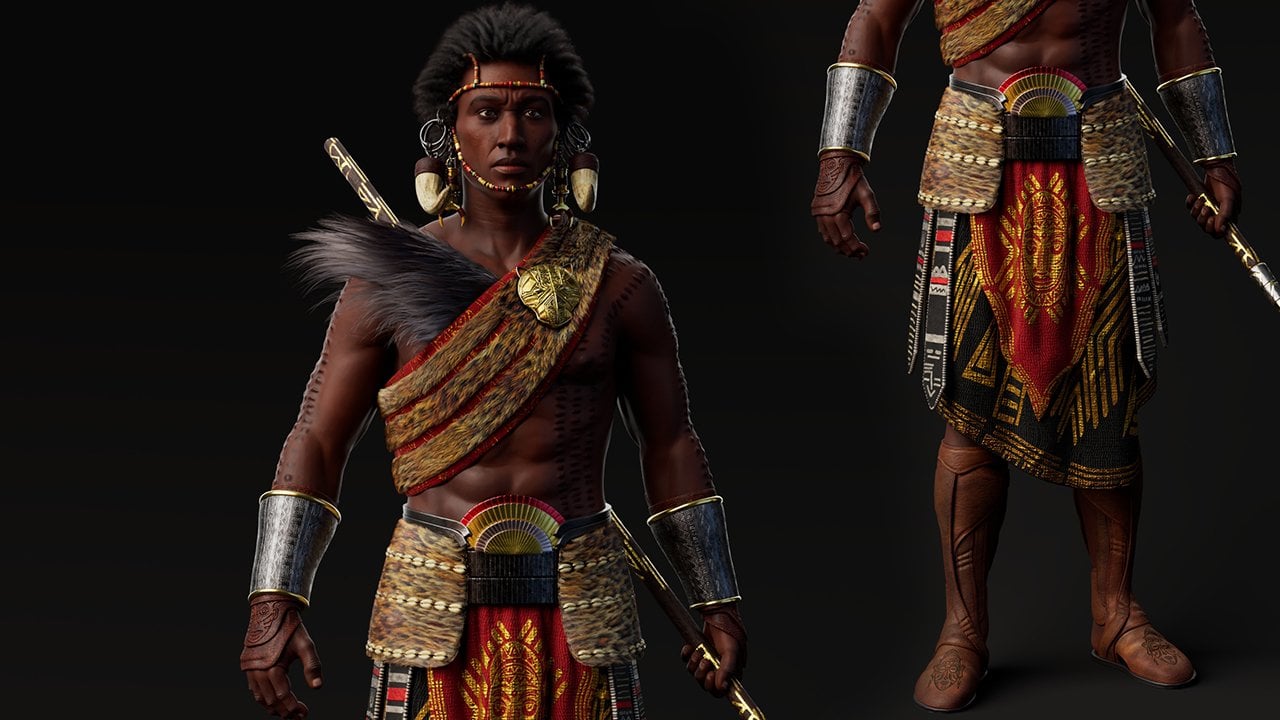
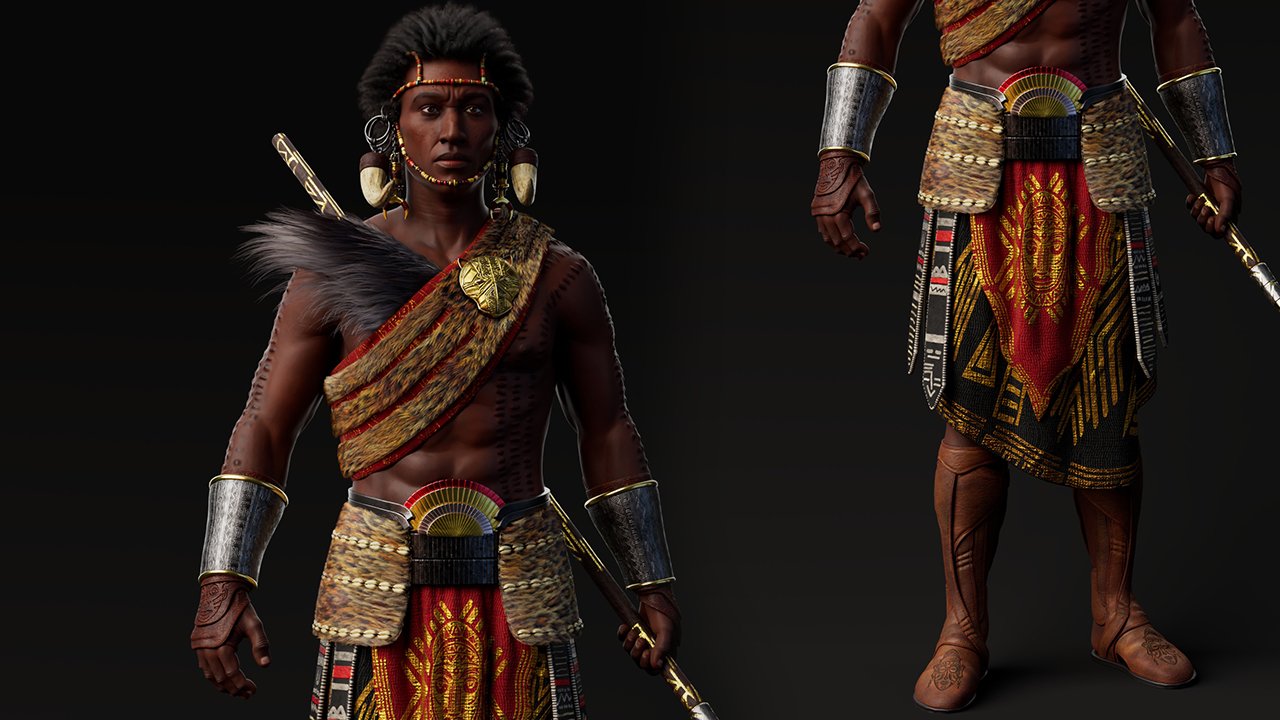
1. NEW GAME BOSS PROMO VID: Design a mystic game
boss character. My name is Kelechi Tango John. I'm a three D character and prop artist with over
six years of experience. In this class, you
will design and create a powerful mystic
boss game character built around the mystical
Talisman infused mo sets, utilizing industry
proving softwares like Maxson Zebrush,
SubtanPinter, Orthodex Mayer,
Marvelo designer, MrmosetTbg and final
rendering in Or Langen. This is more than
just an armor design. Each plate carries
ancient markings, embedded relics and
spiritual seals that define the boss' power, lure and visual identity. I will follow a
complete production ready A workflow used
in modern game studios, starting from to
the concert design. Will move through high
and low polymodeling, UV mapping, baking, texturing, and finally render
your character on real engine for a cinematic
and real time presentation. This project is
designed to straighten both your artistic
design thinking and your technical execution. This course is designed for
beginners to intermediate three D character artists or normal artists familiar
with basics of Zbrush, sbtanpinter, Mayer, Marvelous
designer, and MomosetTubg. Aspiring character
artists who want to learn a complete character
creation pipeline. Fred modelers looking to specialize in realistic
character arts. Anyone passionate about bringing digital characters to life.
Now, what will you learn? Scoped eye detail
armor in Zbrush, Build clean game ready
topology in Maya, B professional quality maps
in Zbrush and MomosetTbg, texture advanced materials in Adobe sub tan three D painter and render cinematic
shots in On engine. Create a AA quality portfolio
bos game character. By the end of this class, you will have a fully
realistic mystic talisman armor boss character
that feels ancient, powerful, and production ready. Not just a model, but a
complete portfolio center piece built using industry pipeline.
On let's get into it.
2. 01 Base Mesh Export: Hello, welcome, bad guys. So in this story, I'm going to be using
this reference as my main guide to actually read the entire thing
from scratch in TD. And there's no name
in there, actually. I wish there's a name for
the artist somewhere. I should definitely look for the name of the artist somewhere and then tell you guys around. But these references are
going to be working on, so I'm going to be creating
everything from scratch. So from the building up, scoring the entire detail, texturing, creating UVs, and then most likely n
inside of MomosetT bag. All right, so. That this
is like a main character, so let's get right to it.
I'm going to close this. I already have this loaded
do in my pure reference. Okay? So though, this character
looks more or less like a female character why because
if you look on the torso, you can see almost like a
shape of a breast in there. So giving a more feminine look. The feminine look is
not very obvious, but at least on the
on the breast region, kind of a bit more obvious too. I'm going to be using that as a reference guide, and also too. One of the features in here, I might not keep for example, the screw nail actually
going into eyes. I don't think I necessarily need necessarily
need to do that. As much as Ion to
follow the reference, I still want to kind of add some more realistic approach to it and not make it
look too so fantasy, like if I actually
used that word, the sense that this
needs to look a little bit more believable
in terms of reward approach. I'm not going to be adding
this scron inside here because she needs to
be looking through the helmets anyway. Okay? So as far as that grating, that's the lit I'm
going to exclude. And if we need to
add anything else, we can always add
that in between. But I think for the most part,
this should be that should be that should be pretty much everything we need
to add on it, okay? Yeah, the inside part of this
metal looks a bit empty. You might need to introduce some more detail across
that also as well. Okay, so that's fine. So I have some these references I would definitely use for this. So I'm going to be using
this male reference because it's kind of poky. Let me just so
load this control. I want to so load this. So it has that muscular shape which
you can introduce in here. The only difference in here is that you might need to introduce a little
bit of a slimmer, low out also to him around the belly region around
the belly region. So I'll just put the backpos because on this part kind of
slimmed out on these parts. If ause this can see it's kind of slimmed out
on these parts. This part a little bit slim out so you might just
kind of cut it out around off somewhere around
somewhere like fine. Then create one best
region for him. Okay? So that should be fine, but this is B mesh we're
going to be using, so so I'm going to copy
this new documents. I'm going to provide
a new file as well, this base mesh lone. So going to C. Let's
go to new documents. I have a new document in here, I'm going to be pasting
that in these documents. So it's off orbit
obviously we're going to just I'm going to pull
this way it needs to be. Let's just pull
this in the center. It's from the keyboard
to go to wire frame. And I'm going to use snap
to grid line, snap to grid. This is the snap
to grid feature. Just snap this to the center. I believe it's the center
part the center part. It pipe on the keyboard to go on wire frame wire to
go on shaded mode. Okay. I'm going to
give this a blink. Okay. Instead of giving
a blink material, I think we can see the
same matriz in there. I'm going to hip to bring out
the mode out of that too. I'm going to rename
this two. Let's use all caps for this cabs. Pase mesh. Okay. I'm going to delete this. Okay. So I'm going to give it a more darker
material shed. Let's go to attribute diton. Let's go to pull modern
as well. Battery pastry. Let's go to the this is
a blink material ready. Let's just Let's just name
this to Amor Amo talisman. That's the min um
I'm going to be giving it. Amo talisman. So yes, it should be fine. So I'm going to go
over to send it to dark in the material
a little bit small. This is a more darker shade. Let's just go in
naturally and just use more this start with gray. Okay. The darkness
a little bit small. I think somewhere around
there should be fine. I want to add eyeballs to it because this
on the reference, we don't really
have eyebow for it, so don't be any need to
actually add eyeballs to this. So no need to add
eyeballs to this. We can work with it as this. It's majorly just
meta piece across the entire ten so
Majorly just meta piece. Okay. Moving on. Let's see what we
can do in here. So I need to export this out this Biz mesh into
Zeb. Let's select it. Just Bism, but I need to
give you the same name. Let's copy the name in there
or maybe, maybe not yet. Not yet. Is going to be Bisma
because I'm just going to dynamiz this and then extract different parts out of this. So for now, let's just
leave it nuts, name nuts. Okay? Select it. I'm going to export
this out for selection. I've already created
a folder for this. So a folder has been
created for this already, so I'll need to go over to
that folder, Imo Talisman. So I'm going to create
a new folder here. This folder is going to be
Z zo carbs Zimput Okay. The inputs, open that up. Let's let's copy the
directory for it. Phase directory in here. Then this needs to be on Obj
so I need to go down to OBJ. Then, let's just name this
to Biz Mesh. Biz Mesh. Alright. I think we should
be pretty much fine. Okay. I think this we
can work within here. Yeah, this should be just fine. So yes, let's better
this out now. See we have a base
machine there. So now we need to
open up Zbrush. Let's open up ZBrush and
get a mode into ZBrush. Zbrush is loading up, just give this a little bit of time. Shouldn't take too long
to open up for us. Okay. All right, Zbrush. So usually, I like to start
with this default project. So that's double click
on the default projects. Default project is a good one. So there are no subdivision
level on this police fare. Is a police fares police
fare police fare. I'm just going to duplicate this police fare
so duplicate it, hide this at the bottom,
select this at the top. Then I'm going to just reimport what we need in
there. So let's do import. Let's go to our fat directory,
pase de five directory, and then we step that copitPs
mesh, to click on it. That is going to
apply itself in the to visualize this police spare. I can see how tiny our
police spare is down here. I'm going to scale it up. Let's just hit
around the keyboard, and then let's scale this up. We're going to scale
it up. And then that should be like it's
just going to be in there just for something just to have something in
there that we can actually reuse for
something else. So let's scale this out. Like, so for now, okay, I'll just put this up
some Around just fine. Pull this back or let's just
say it at the back for now. Just be at the back for now. Okay, let's turn on. Okay, perspective is turned
on already that's fine. So once we need to do
kind of set our camera. Let's set our camera for this. I believe it should be on draw. Let's donate five
millimeter lens. Since we scoped in port, we just need five millimeter
length should be just fine. That should be just fine.
And let me check my layout. I always like to use. Mostly
I use a default layout. I don't really customize
my interface like that, so I always prefer to work
with the default interface. So for each one should be able to follow
along without having any customized interface that might be confusing later on, so it should be just fine. Okay? So now that we have
this in here now. So in the next lesson, we're
going to go in and then start getting the general
proportions in there. Getting some good general
proportions in there, and then move on and
then begin to extract the portions we need to actually continue
up our detailing. So I'll see you guys in the
next test and bye for now.
3. 02 Breast Plate Blockout In Zbrush: Welcome back, guys. So
in previous lesson, we kind of set this up to begin the blocking out process
for this character in here. So let's get right to it. I'm just going to
pull this and I'm just doing this a
little bit more, right. So I'm going to be
starting with the torso. So let's start with the
torso first for it. Let me just get a
good view on this. So let me hide the
police fair phone, push this around here. So. Okay, that's fine. All right. Select the base mesh. I'm going to duplicate
the base mesh. Okay? I do this.
Let's work with this. So you need to kind of
grab the tos first. Let's grab the tos first. So I'm going to kind
of separate this out I have to bring
out a pool frame. So I'm going to grab the
part that I need for this. So I think we already
have UVs on here, so I'm going to use those UVs to create some poly
groups for it. So let's go over to poly groups. Let's do auto groups with UVs. Okay. So it gets closed, let's see where this ends. Now, the UVs actually
ends a very good place. Sine is in a good place. The neck also as well. So I'm going to grab this. Let me make sure Dub side
is also turned on so you go to display
turn on Dub sides. Okay. So I'm going to
invite the selection. Here, this is good, but you need a little bit more. Invert darts let's make
sure symmetry is turned on. Symmetry tour, the
symmetry is turned on. So I'm going to grab a
bit of the arm as well. So let's use the Mag lasso. I'm going to grab this as well. Control W, that is
separate pul group. Grab this Control
Shift click on that. Okay, invert this selection. So I'm basically trying to grab just the torso piece for now so I can actually
extract this piece. Okay? I think this should
be fine the way it is. Yeah, so this should be fine. Okay? So I'm going
to delete ding. Let's do delete ding for this. I think I might I might need a little bit
more invert this again. I need some part of
the neck as well. I need some part of the neck. Maybe we won grab everything
that's do with it. Let's just add the head to it. Let's add the head to
it. So invert this. Let's just do this for soap. Then delete Eden. Okay? Subdivide
subdivide a few times. It's already out $1 million
way too much for now. So I'm going to delete
den for now. Okay? So before I kind of dynamze
this, I dynamge this, I would like to I would like to grab or rather block
out the breast region. So let's use the
clay Buder brush. So I'm going to turn off dynamic so you can have a
bigger brush size. Semestron so play,
build or brush. Let's create something that
looks like a breast in here. Let's do in this
fashion for now. Okay. All right. Log this in. Then make sure we
smooth this out. Take down my smooth intensity. Let's smooth this down. Okay. I think I actually need the lower subdivision,
so I'm going to undo that. I'm actually need the
lower subdivision, so we can actually
go up and down and then move things
where we need to. So let me use the
move brush instead. So that makes better sense, so we can actually let's go to the lower subdivision level. Okay. Itinerary sums is a
little lot faster for us, so I mistakenly clicked on Control order shifts
to take a snapshot. So let me clear that
Control N to clear that. Okay, let's create
some boobs in there. Yeah, I think this
makes better sense. Okay. So I'm going to also
fix the torso too, pull this out some more, smooth this down at the top. Pm like soap. Yeah, the center part
needs to get out. Let's fill this part up smooth. Okay, maybe that
was way too much. Undo that. That
was way too much. We need the line in there, but we don't want
it to be too much. I'm going to reduce
the brush size for the clay builder brush. Just do something fins. One stroke should be
fine, smooth out. Alright. Look at this. Let's look at the shadowing used the move brush,
move this out. Okay, I think that
should be fine now. It's just easier just
to use move brush. That's where I kind of went
back, so I can actually use the move brush in here, right? So let's slim out the waist. So I'm still going to
use M Bros as well. Let me max out these parts. Load the max. I'll
smooth this out. Push this in some more. Okay? We still want to have
that arc shape in there. Need the arc shape in there, so but let's stretching it out just a little
bit, like so. I've noticed this part
actually these kind of shots. This part is short,
but that's fine. Because I'm going to
be using this piece and then moving it somewhere around somewhere begin up
somewhere around here. It's going to be a little
bit higher kind of, so go to create the I
won't say illusion, but create that
short measurement in here. So you're moving on. I think we're in a good
place, move this down. So it kind of gradual process
just to build this up. We don't be too concerned about making
it extremely perfect. We just need to build
something that actually works. We can also compare this
with other references too. So we kind of get a good idea what we're blocking in here. Let's see if I can
find all this. S can find Well, this is a good one also. Okay? Yeah, I think I get
the idea already. So for the back piece also, too, we're going to so some of the details and then introduce some clay
buildup also in the app. Like somewhere around the pp. Okay, build a flat
shape in here. Okay? Like so. Then smooth them down. Because we're going to be
extracting metabis out of this, so we might not
need to see some of those structural
muscles in there. All right. I think we
can work with this. Smooth this down some more. Okay. Let's go back to main
reference. Get in there. I think I also need
to kind of smooth out the collar bone. Yes, to smooth out the
collar bone, also in here. So I'm going to the inflate
use the clay be brush rudder, get some rounded shape
in here as well. The smooth that down. Okay? Fill this part up as well. So I'm basically
trying to fill up the regions where
now I'm going to be extracting shapes out from. So that's like a general
idea for this right now. Alright. Let's see. I think I think this
should be good. Let's look at this
from the side view and see if we have the
cored shape in there. Okay. Just trying to make sure the shaping is
in there correctly. Feel this up a little bit
more, soon this down. Okay. I'll pull
this out some more. All right. Maybe that's way too much. All right, that's fine. So I'm trying to make
it a little bit ticker. I think it gonna tick
foam around her, so I think it should
be fine for now. Let's see. I'm just trying to make sure I
have everything in place before
extracting this out. Okay. I think as, going to smooth
this out a little as well. Do that. Smooth
this out a little, put this down some more, okay? All right. I think we're in a good place. So I think we can
comfortably extra this now, so I can do I'm going
to do duplicates. I'm going to do a
duplicate of this. For these duplicates, I'm going to increase the
subdivision level, delete lower, and then do
a dyna match for this. I always want to have a
backup to go back to. So let's do dyna Mash for this, I want to make sure I'm
seeing this Mplecm in here. So I want Sorry. So I want my pole count
to be roughly around maybe now red
eighton hereabouts. I can't be shown until
we do this in here. So let's dyna Mash. 3 million or 3 minutes
is quite too much, so you need to readjust
the values in there. Let's use the value of 20 for the resolution
dyna mage this. 1.91 0.9 might still be a lot. Let's do 15. Maybe one less won't do ten. Let's do ten. Okay? Let's see. Dynamge this. So the value is always going
as low as ten as eight. Let's dyna maize this at eight. Let's see what we
have. 800 is fine. 800 is actually fine. Smooth this out. To increases
intensity, smooth this out. All right. Yeah, so you
can work with this. So now I think I can extract this can extract the shape
I need from this now. Yeah, so let's get an
extraction in here. So let's see how far
down this needs to go. I'm going to using
the Max lasso. Let's go from around here first. Let's do from this
front view first so. I'm going to grab this part out. We need a little bit small. There's so we take a bit
of an opening around the. There's something
pretty much like soap. Okay. There needs to be an interesting shipping in here as well. So I'm going to control anos just to create an
interesting shipping in here. All right. Okay. I
think this should work. I need something also in here. Trying to figure out how
much of this I need. Let's come down some more. I need a little bit for an interesting
shape to ds in yes. Maybe I would just need to use the pen to instead to
do some manual pencing. Let's do some na paints in here. So it gets more or less
like a rounded shape. Let's get more like
a rounded shape. So I'm going to
erase some of this. I need to get a rounded
shape in there. Okay? No. Wrong two. Okay. Here, I think something like, so I was need to work on this a little bit more,
reduce the bro size. Add a little bit more. Okay. Here, I think this
we can work with. So the part that is on MAX is where we're
going to extract from. So let's look for
the lower part now. Let's see what we can get in here maybe just in a straight
line should be fine. Come on. Let's go back
to the MAX last two. Trying to create more or less
like an interesting shape in Okay, maybe not. Let's do something
that comes this way. But it's still going
to be covered up. So let's do something again. Let's make this lower. Yeah, I think somewhere around
there should be fine. Somewhere around there
should be just fine. Okay, I'm going back to the
Let's go back to the MAX pen. Clean this up a little
bit small. Alright. Here, I think we can work with this. This
we can work with. Oh, come on. I think I
lost the other maxin. I don't want to lose the
other maxin so let's see. Let's do this again.
Back to the MAX lasso. So the more careful you
are in this process easier it is for you when
you kind of extra the shape, so you don't need to do
too much work on it again. So I'm just being
extremely careful in here just to make sure I don't need to do any
extra work in there. So I'm going to go to the MAX
pen I'm on the MAX pen now. So I'm going to do some
cleanup work in here. Oh, okay. Maybe
that's way too much. Okay. I think this
should be fine. So what we need
to do now to give this a different poly group. So Control W to give that a completely
different poly group. The meth is quite dense in here, so we can turn of the line,
you can turn off the line, so we can actually
see what we have in here or some issue
in here, undo that. Control W. Why is this not catching
the same undo that? You need to do some
fixing in here. I kind of fix some
things in here as well. So I'm going to erase
this in some more, okay? Erase this right. I should probably
sharpen this also. So I believe controls
then tap tap on the max edges and then tap a few times kind
of sharpen the edge. Control W to give this
a separate poly group. Why do I keep having this issue at the back here?
I don't know why. This one does not want
to grab with the others. Let's invite the MAX Control W. Here's better now.
Here's better now. So inverted the MAX
and then we did the shaping in there, right? So undo that. Okay. Yes, I'm going to delve this
like so let's see. I'm just kind of
checking again just to be sure everything's
working correctly. All right, so give
us a poly group. So now with this
now, we can just easily click to grab
the max int the max. Okay? Then we can do an extract. We can do an extract of this. If actually come in there
and I do zone extracts, let's go to extracts. We can either way, actually. We can just grab this
space out completely. I actually make better sense. But either way still
work actually. You can grab this
poly group or we can just do an extract in here. So either one should work. Either way should
work just fine. So I'm sure you want number actually which one will I use. So let me just show
you guys both methods. So let's start with
an extract phase. Let's start with an extract. So the thickness should
be let's extract this. Let's see how much
thickness that gives us. It's way too thick. Let
me do a quick save. I'm going to be saving
this very important. Let's make sure
we're saving this. Okay. So sickness for
this nice way too more or less reduce darts, extras. Is way too slim. Extracts. You can't really
see much of what is even going on
in there anymore. That gives a measure
of thickness. Okay? So we have
something like this now. Okay. Let's see how much thickness
you need for this. Maybe not too much.
Get in there again. Let me even reduce the
values a little bit more. Okay, Extracts. I'm looking for the right amount
of thickness in. Maybe this is way too slim. Extracts. I think this is a good number. Let's do a little bit more. Whoa, that's way too extreme. You have to figure out the
right amount of thickness. I think I'm going to go in
there and put some values in. Let's do one in front. Let's extra this again. Let's see. Extracts. Yes, it is perfect. Is the
perfect amount we need. So I'm going to click, Oh, we
don't want to smooth this. So take down this smuton down. We don't want any
smuten in there. Oh, I think this
naturally helps. I think this monton
naturally helps. This motonnaturally helps a little bit lesser
set it back to five. Okay, let's do accept. Okay? So clear this out. If
you sold this out now, this is the extra third piece. It also comes with
poly group in there. We don't need the poly
group, so we really need this front face. It's only front face
we need for this. So go back in there
and then let's go over to display
properties double sided. Okay, then we'll do delete ding. Let's do delete ding, go in, let's do deleted modified
topology delete ding. Okay? So this is pretty
much what we need. We're definitely going to make some modifications
in there. Now let's polish Let's
start polishing this. Let's polish this.
Let's polish this. Let's get something
good going on in there. So I'll go over to deformation. Let's do polish by group. Pole by a group a few times. The total number of polycunt
in there is quite high. Is it going to march that? Polie by groups a few times just to get something clean in there, remove brush and move this out. Then I can start making some minor adjustments in her by just using move brush and then move some things in place into bitmre
before marching. Okay? Something like
so should work. Push this down some more. So doing this symmetry
thunder, which is cool. So you have all the necessary
controls you need for this. All right. Let's see, I don't think I
need to move this any further. I think as far as this goes,
this should work just fine. I should be just fine. We can do a little bit of smooth
in here as well. Okay, the back, we can go in there and
do a little bit a little bit of smooth. Put this out a little
bit more creates a little bit of an
ango in the smooth. Okay. I think I'll need to make some adjustments in here as well. Alright. Put this out. In some more outs. Yeah, I think we're
in a good place, Yeah, I think it should be fine. Okay. So now we can actually
now Z remerge this, let's make a duplicate
of this and then you can Z remerge so duplicate. Let's duplicate this piece. Okay? Let's this two for now. Should still be visible.
All right. So Shift F. Let's do a duplicate. Let's do Zeroes zero march this. So I'll go over
to zero march and then turn on, keep groups. Take down smooth. Take down
smooth groups, detect edge. Don't of adaptive, I don't
really need adaptive for now. G down the adaptive
size. Fully count. Let's do Let's type
into India for now. Let's even zero that out. Actually, zero Transf can get the lowest possible
Polycount for this. So zero mash. So I'm going to all turn,
click on Zero Mash. So we still have symmetry
turned on for this, so it's going to zero merge
this with symmetry turned on, which is precisely what we want. Let me just give you a moments. Probably come back
when this is done. Okay? We have a complete
mess in here, do that. Don't do that I think
we need to start from a much higher value. Without any thickness in
here, no doubt, okay? I think we need start to
start from a higher value, so then we can
work our way down. So let's do 100 K for now
the total amounts are 300 K. Let's start with something higher
than walk our way down. Let's just as match
without having to down control click on Zim match let's see
what this gives us. Because actually, I
actually went to low last were having issues
in there. I went to low. So now we have
something around 100 k. So we can now do half. Let's go halfway. Merge this. Okay. Give us a little bit of
time to run through. Okay, go halfway again. So this is getting a
little bit cleaner. So we still have
some weird issues on the edge that we can easily fix with the polish by group. Polish by group a
little bit small. We can also do polish do
that that was a bit weird, polish by future. Okay. Because we need this edge
to kind of come out well, so let's continue this mach, go out phase and
rematch this again. N something quite low, maybe roughly around
ten or 5,000. Or maybe even lower
as a kiss maybe. Maybe even lower
as a kiss maybe. So we're getting something a little bit clean
on the edge now, which is precisely what we want. So you always want
to check the edge. I think that edge is also fine. We're getting there slowly All right, so let's go al again. Let's keep going al
and then so we get something quite decent enough
to work with al again. Be remember, we'll go to
biding sickness to this, we're going to biting
sickness to this, so I want to make sure it has the right amount that's not too dense but still
good enough to work with. So we start thinking, I
think we can still go lower. Definitely can see go lower. So let's go lower. Let's
go lower again. Okay? I think this is a
perfect amount for this. We can work with this no doubt. Yes, all the eses
looks really good. This we can
definitely work with. Okay. We can work
with this no doubt. Yes, this is low enough. This is quite low enough. So next we introduce
totickness Let's go out of solo no mood. So lot more. It doesn't need to be
completely body ok. Don't need to
completely or the skin. Just needs to have
the right amount. So I'm going to use we're going to be having
some gluten on its eat also, too, so I'm going to inflate
this a little bit more. Let's use the
deformation inflate. I don't really see anything
upping in here though. Okay, it's quite slow, we're having something in
inflate this a little bit more Inflate some more I because clothe is going
to be underneath this. Let's just raise some allowance for the clothes to
actually be in there. Let's look at this. I
think they should be fine. They should be just fine. So now we need to add
some thickness to this. So I'm going to go
over and then I'm going to do we can
re a few ways. We can do less with dynamic
subdiv dynamic subdivT down the sons. Let's add thickness to it. Getting close increase the
thickness a little bit more. It needs some more thickness,
that's way too much. I need a good amount
of thickness. Shape. Let's see what
we have in her It. A little bit more
shouldn't hurt. I think somewhere around,
this should be fine. Somewhere around, it
should be just fine. Okay. Yeah, I can work
with these segments. If, how many segment
do we have in there? Let's introduce two segments. If we apply, let's do smooth,
let's just do one smooth. Let's see how that looks smooth. Let's apply this. Subdivide, let's
see what we get. Yeah, not bad, not bad
at all, not bad at all. This will actually
work undo that. So you need to add some
edge loops to this. You need to add
this edge thickness to it can see this edge
thickness we have in here. We need to introduce that. But I think we can easily
do that in the next lesson. So we've already done
a lot of working here, so let's do that in next lesson. I'll see you guys in the
next lesson by for now.
4. 03 Top Breast Plate Blockout In Zbrush: Combo guys. So let's continue
from where we left off. So in the previous
lesson, we kind of extracted out the
breastplate piece. So going to carry on and
then continue working on it. But I would like to make some
adjustments to this though. With the move brush,
I would like to move this piece up
a little bit small. Most especially around there, get them in place a
little bit small. Okay? Most likely
cover this some more. Let's get some more covering
for the back. All right. Okay. Let's go for
the neck region. Let me see this properly. I think I need to wimp, get some pushing in here some more. I'd like to get this wrap around the neck, a
little bit more. So months or two for the back. Let's get this wrapped a little
bit more around the neck. All right, I think we
can work with this. Let's create a little bit
more rounded shape to it. Alright. Let's do a little bit more around here as well. Okay, that should be fine. All right. That's fine. So now we need to kind of
notice from the edge. This is the edging, the edge
is kind of pulling out. Kind of have this excluded
out a little bit more. So let's try and recreate
something similar to that. Okay. I'm thinking of a few
ways to do this, though. I think the most common
one will be just to get this edge extruded out. So I'm going to grab
this front parts. Let's see how it is. Okay. Now, I just figure out
how tick want this to be. So I think I'm just
to kind of create an edge loop across the
tsunami so low this out first. I'm going need to
create an edge loop. Let's see. So let's let's
do BZ M. What is this. Click Okay. B Z M. Yes. Okay. So we're still working with
this symmetry turned on. Symmetric turned on. So I'm
going to come symmetrton. I'm going to come closer. I think we can do this all
around it all at once. So let's let's go to the face. Let's do insert right? Nope. Want to insert. But not single poly group. Let's do Let's do
flat poly group. Let's just do poly group island. Let's do something like so. I think we might need a
little bit more so do that. Let's get a little bit
more quite close like so. I think this should
be just fine. Let me let's see if this is
the exact amounts we need. Okay, I think these
are amounts we need. I'm going to need to
delete some edge loop. So let's go to one of the edge. Let's do delete. Let's do delete,
delete, delete, delete. Edge loop complete. I'm going to delete this. Let me get close. Leave the edge. And it's running.
Let me leave that. That edge is fine where it is. Well, do that. We have
an issue in here. So let me ton of
symmetry for this. Wow. Let me see, let's go back in
and delete the entire edge, but it's not deleting
that edge for us. Let's do in sets. Can we do deletes, okay? O, should also hold up to
the dar edge, do that. Let's don a symmetry.
So go in leader edge. Should also affect
the opposite side. So it's precisely what I want. It's affecting the opposite
side as well. That's fine. Let's do this all around
here to the lead this edge. That's fine. So the edge on the neck collar should be just fine where it is. All right. I think
this should be fine. We don't have anyone
for the inward parts. Okay, that's fine. So now I'm going to I'm
going to extrude this out. Let's get this extruded out. So let's go to Extrude. Move this to the side. Let's extrude, extrude. Can we do QM instead? Poly loop poly group. Okay. Let's try
this on. All right. Shift F, let's see how much
of that we actually need. Just checking to see how much
of this we actually need. Maybe I made this way too much. But I think this should be roughly around the right amount. So let me subdivide this. Let's see. Let's subdivide this. We get something interesting in there. I think this
will actually work. This will work just
fine. Shift F. But we need to add some
poly groups in there. So just get this out as well. Let's do for the lower parts. I need a little bit more. Okay, pretty much like
so Shift F. Okay. I think I need a little
bit more do that Shift F. A little bit more. All right. Shift F. So now let's
go see Shift F again. Let's add some edge
loops to hold this. Or maybe we can do a
little bit of Bev. Let's figure out
which one works best. So let's do Bevo
first. Let's see. Let's do Bev Bevul complete. Let's do two roll instead. Okay. Let's do a swell. Alright, so let's not. Let's smooth this.
Let's see where we get. So I'm trying to
compare this to see if we have good
is Bevo on there. Okay, I think this
might just be fine. I think that might just be fine. I think the double rule
should be just fine. Double rule should be fine. Let's even try a single rule. Let's try a single rule in here. In a swell, let's moon
this less we get. Yeah, this is perfect. I think one rule should be
just best for it. I think one rule gives us
more better edge to it. You better edge,
you just one rule. So undo that. Let's undo that a few times. Let's undo this also
for the lower parts. I feel like I still need to
extrude this out some more. I feel like I need to
extrude this part out a little bit more so
let's grab them. Let's grab undo this. Let's do an auto Let's an auto
group in here auto group. Okay. So I just need the edge, just the edge I need. Okay. Stoned on for this. I just want to extrude this
edge a little bit more, so let me just undo that. I think we can grab Oh, we need to go to We're still
on Q March. I believe, yes. Nope. There's Holy
Group flat Island. Holy group. I think Poly
group island should be fine. Let's straw this out a
little bit more. Okay. So more should be fine. Something a little bit ticker, maybe a little bit more. A little bit more. Why don't we have this
working symmetrically. Why's not symmetrical. And Oh, this is not symmetrical. Okay. Let's see if we can
undo that, undo that. Let's do this again. Make sure
do polygraphs are visible. Let's do this again. Here's a symmetric
canal. Undo that. I'd like to get something
straight on instead. And way too much. I don't think the perfect I don't think the perfect
amount for this. I think it should be the
right amount for this. Yeah, I think it should be
the right amount for it. Let's test this out. Let's do
the Bevo now for the edge. So we're doing just one roll, one row for this, one
row in here as well. Can do one row in here as well. So let's test this out,
Control D, smooth. Yeah, I think it
should be just fine. This should work just fine. Okay, yeah, this would be fine. I think I will need
to extrude this out a little bit more also
on the lower part. Let's get this down some more. Add some extra head to it. Pv one rule, one ruler as well. Let's go to the neck region. Let's be one rule, one rule as well. Okay, that should be fine. Yeah, this should work
just fine, Shift. So if we should
subdivide this now, let's bring everything back out. If we should subdivide this, getting something more or less like so, it should be fine. Okay. This is like the method documents using
for the entire out scene. I think this should be fine. If F, let's go to lower
subdivision level. Let's go back to the move brush. Ton of dynamic, use
the brush size. And then let's adjust
this a little bit more. Trying to perfect the shaping
in a little bit more. Okay. Get close pull
this out some more. You stay out the
symmetry that's fine. Okay. Yeah, I think
when you write, please, when you write, please, doing this
correctly, All right. So the next piece we need
to grab now would be this piece for the should
I call it shoulder blade? No shoulder blade, actually, more like the color actually bo. That's the upmost region
of these breastplate. Grab need to grab
a piece out of it. The f part is that we can
actually use reuse this, but I think we have a copy
of this duplicating year. Still have this
duplicating year, so we can definitely use this. You need to introduce to move the neck at up a
little bit more. Oh, yes, so we can see Shi
Let me check transparency. Let's see where that is. So we can just do some
movements in here. Let's do some movement in there. And try and compensate
for it around there. Just try and get it roughly
around the same region where the new
modified version is. Maybe even up a little
bit more if you need to. Gap is still going
to be covered up, so there's ton of
transparency now. Let's get this in some
more use the bro size. Move this in closer to
the neck if you need to. All right, up a little bit more. Let's even get it out
a little bit more. Let's get this wrapping
around the neck some more. Why not? Because you're going to be
covering the entire outing. So I think somewhere around
there should be just fine. All right. So I'm
going to duplicate it. Make a duplicate out of
this. So low this out. Okay, the and is already roughly where it needs to be as well, so we need to let's do polish
by group, so deformation. Let's do polish by group. Let's get some cleaner
edges out of this. Alright. What's left now just
to extra the parts meat, but I think we need to kind
of fill up these parts. We need to fill this part up and smooth because we're having something that's kind
of flat in there, so we don't need too much
deformation in there, so something pretty much
like this smooth it out. Alright. The back is smoothed
out, that's fine. That work just fine for
what you need it for. Okay. So I think we can grab
what we need now. Can grab what you need. So
this is the piece we need. Just need to let's
use let put it aside. We just need I can do this few. I can even use the What's
that called again? Weekly brush move slice brush
rather. Use a slice brush. Let's just use a
slice brush instead. Well, we're going
to do some control. That's a little
difference in there. I'm going to do some
major controls over it. So let's just use this instead. So, we can just grab something around
nature of this. Let's see what that
code gives us. I think it's still
way better to just use. Let me undo that. It's still way better to just
use the maxing two instead. Let's start with the Mx lasso. Let's do it from the front. Let's see how much of
this we actually need. So I use to cement we turn on. It needs to be actually
quite close to the edge. So let's grab a little bit more. How far down do you
need this to be? Okay, I think this edge is fine. But the major issue is
just the back piece. I need to clean this
up a little bit more. So let's go over
to the marks pen. Produce the bros size, and then this let's make this
work. Let's make this work. So I'm going to start
cleaning things up a little bit more in here.
Here is perfect. I need more rounded
shape like soak. So the idea is to kind of get the more rounded
rounded shape in. So I can reduce
the blow size and then print some
more rounded shape. I think I need to clean, do some clean up in here to
get a rounded shape in. Alright. Is more
rounded shape now. Okay, this will work just fine. So now I can I can go in and then let's sharpen
the edge to control out. Sharpen the edge a
little bit small. Okay. Then I can grab let's give you a pully Then Control
Shift click on this. I don't need that anymore. So I'm going to do delete
as the deletes Eden. Modified topology deletes Eden. This is the entire
piece we need. So I'm going to duplicate
this piece now. Okay? Tn offs got a solo mode. We need to kind of get this out. So I need to let's
do an inflate. We need to leave this out
of where it is right now. So to do this in
more uniform way, the inflate actually works best for you to do this
in a more uniform way. Okay, let's do a bit more. Some more right. I think this should be fine. So now, the next thing
we need to do now would be to polish by group. Polish by less
tighten the edges. Polish by group a little
bit more all right. But definitely getting
something in here, which is precisely what we want. So the next thing we need
to do now would be would be to just let me adjust the
let's turn off symmetry. We got our Gizmo center this string this this
way, a little bit small. Okay? Son of symmetry, go to the move brush. Then let's pull this out. In some more compensate
for it here. Put this out. Okay,
that is fine. Alright. I feel like I need to push these ******* out
a little bit more. Think a little bit
more out some more. All right. That should be fine. But in here. So now we need to kind of start
zero matching this. So let's go. Let me save my five let save my five first.
Let's save this. Didn't take too long to
save, save that now. Let's solo this gets in the
then let's do geometry. I think I might need to
duplicate this again. Maybe not. I duplicate this again, so we don't need this
anymore. Let's delete this. Then we'll duplicate
this instead, hide that. Continue working on this.
Let's go to geometry. Go to geometry. Let's do the marshal
ton of adaptive, he group detects
a ton of smooth. Take down the adaptive. Let's increase this. Let's do something around 21 k because we go 80 k already. Then let's merge this,
let's see where we get. I think symmetry is
toned on for this, which is precisely what we want. Let's see, symmetry, symmetry
is toned on. So let's go. Before we go halfway, I would like to check the
edges for this very important. It's important to
check the edge. You can see some weird issues
around this edge already. So we need to fix those issues, we just need to go to
deformation polish by a group again to
tighten this edge. Okay? Then we can now
Zimrge this again. Z marge this again now. So let's go off with z march The reason I don't
like throwing off throwing on adaptive is because I want
my I want the sizing for each polygon kind of maintain almost the same size
for each piece, we actually maintain
the same size. So that's precisly what
I want. So so that once I subdivide this to
add more details, we should have even
spread out faces, equally spread out faces
across the entire mess. So I want to have one part
that's kind of stretching not start to add
details in there. I don't know if
that makes sense. I believe that makes
sense. So let's just keep matching this. But just follow longer and
then you should be fine. So the march half again. At okay, I think
we can go lower. We can definitely go lower. Can go lower, no doubt. Let's see. We can go on subdivision
level lower, but let's check the
edges to be sure. We're not having any weirdness
in the edge. All right. We're not having any
weirdness in this edge. So let's carry on and then
let's try to march this again. Then I merge this again, so I'll go over to Z
merge this router. Let's go off again. I think as far as this goes,
it should be just fine. Move this down. We
can do a tiny bit of polish polish by groups. Just to get more rounded. Just to get some more
rounded edge to it. Should be fine. Don't
need to go too long. If you decide to go too low,
you're just going to kind of create some issues for us
trying to move this down. So I think should be fine. Now, let's add some
sickness to it. Okay. So let's get
some sickness in. Let's bring everything back out. Let's get some
sickness out of this. I'm going to go to
dynamic sub div dynamic, take down the smoons. Let's increase sickness for it. Okay, let's get close. Let's think I need
to slow this out. Let's see the amount of
thickness we have hit F. This is probably the best we can at least
see the thickness in here. I need to move this
up. This will need to move up some more. Okay. I think somewhere around
there should be fine. Let's try and see if I can just make the thickness a
little bit more obvious, slightly a bit more obvious in. Alright. The back as well. But still is very much touching
the bottom machine there, so I want to kind of touch it so we can get good
interesting result out of it. You can also create variation
in the N two, get us fine. I think this thickness should be just fine for this, right? So segments we can do
to segment for now. If F, let's go in, let's see what we have two
segments should be fine. Apply this right. So the next thing
you need to add, we already have that
sickness around the edge. So this is perfect. We already have this
sickness around the edge. So we need to first
of all, delete the one we have in here, so
we can create a new one. So let's just do B BC I mean, skip this. Okay. So let's go over to inserts. I'm going to dot. I'm going to O and then delete
this edge loop. Delete this edge loop as well. Yeah, that's pretty much fine. So then we can now
go to the pace. We can do an insert. Let's just insert this day
New something taking off. Let's do this new
something eking off. I think somewhere around there
should be fine, I guess. Maybe we need a little bit more. So the idea is just to
find the right amount. Just to find the right
amount for this. I think we can nail this
somewhere around there. Yeah, this should
be fine. So now we need to extrude this out. So let's go to the Q Q
mesh.'s extra this out. Let's see how much of the
extra do we need in here. I think this should be fine. Something that I
know should be fine. Let's do the same around here as well. He that should be fine. Okay, we can work with this. So we need to bev
with the edge now. So we're still using
the same single rule. Single rule should be just fine. We are well, do
that getting close. But we are well come in a Bevul
come into the under part, Bevu also as well. Okay, so let's do a smoothing
Let's see what we get. Yeah, I think I can
work with this. I think I can work with this.
This should be just fine. Okay. I go down, delete the
higher subdivision level. Are. All right. Okay. Let me try something a little bit
interesting in here. Let me see if we get some
interesting results. I'll do let's go in
here and do that. Let's see if I can extrude this in instead, let's Extrude. Let's do group poly
loop poly group. Let's get this pushed
in a little bit more. Probably see if I can get an interesting
result out of this. If perhaps I can get an
interesting result out of this. Okay. Right? If we subdivide
this, let's see what we get. Okay. The only difference
in there is that we don't have sharp edges
in there to hold it. There's no sharp edges in there. It I'm trying I'm
trying to see if I can add something
a bit more interest, but at the same time, I
don't ruin the entire ship. Let's see. We still have the
lever, so actually stay experiment we stay
experiment in here, so we can always undo things if you feel like it's not working out correctly. So I'm going to undo that. I think let's do to group in
her auto group. All right. So I need to kind of do
an insert in here also. That's a bit weird. Bring
everything back out. Don't insert somewhere
around there. Okay. Somewhere around
there should be fine. Then I can do, can do
extruding here now. Let's do the extrude. Why is you grabbing
only one face? Let's grab the two Extrude. Is to grab these two faces. Let's do holy Here is a separate poly group again. Let's see. Let's see which
one actually work for this. Uh, poly group poly loop flats. Nope, still not working
the way I want it to. Extrude. Give me the
desired result, though. Okay, let's try this. Nope. Let's just do poly group instead, plyroupPly
group island. Here, this is one we need. Here, that's the one
we need. All right. I'm not sure how much
of that inset we need, let's do something a
little bit deeper. Okay? Let's see how we get. Then I'm going to add some
bevo in here. Less bevo. Less bevo undo that. Come on. Come on. Move this in. Undo that. Okay, yes, I'm using the wrong edge loop. Let's go to the edge
Bv. Edge Loop complete. Yeah, that's fine. Let's
put a bevulv in here. I'm not basically
experimenting here, though. Let's figure out what works. If it doesn't work, I'm
just going to do it. So there's no aminon doing
this, this doesn't work. Alright. So if we should subdivide this now, let's see what we get. I think we can keep this. I don't hurt, we can
definitely keep this. We can keep this. But maybe I'm going to add another extra edge loop in here. So let's insert
single edge loop. Single edge loop here, tighten this edge a little bit small. So tighten that edge. Let's do one around
here as well. All right. So let's
subdivide this Okay, I think we can work with this
a little bit of interest it just in case we are viewing
this from a slight angle. This way, you should
get an interesting result coming from this angle. So yeah, that should be fine. So delete ayer, we
can work with this. On the next lesson, let me
get everything back out. So in the next lesson, we'll move on to creating
this color piece. Like creating the collar piece, we move to creating
this metal hood. Okay? Then we can create this, then move down to creating
this mining piece. Alright so you guys the
next lesson bye for now.
5. 04 Top Breast Plate Slate Blockout In Zbrush: Come back, guys,
previously kind of try to tackle the upper
breast plates. Okay? So I'm going to move on from that and
then work on something else. I think for the most
part, everything is coming out quite well, except that I need
to this portion it I need to push this
down a little bit more. But to do that, I will need
to start with the one or the lower part and
then push that first. So let's get in there first, use the bros size. And push this in and pull this closer because
I'm not going to be creating an entire tunic for it. I'm not going to create only for what is going to be visible. So that is not going to be visible, I
can just ignore that. So anything that's not
going to be visible, I'm going to completely
ignore them. So let's just kind of push
this a little bit closer. Just a little allowance
there, right? Come here. Well, let's get this buried
in a little bit more, buried in some more. Okay. I think I think
this should work. I work just fine. Awesome. So let's go and
review the other piece. Here's the piece.
Let's make it visible. All right. And bend
this down as well. So we'll still have this sort
of loose subdivision level, so we can just quite easily bend this
where we need this to be without too much
struggles in there. So let's go to use the large brush size and then just push things roughly where we
believe they should be. That's a bit too
extreme. Closer closer. All right. Move this in. I just need to get this to be as neat as I possibly can get this to be move this closer. Look this from the
back, move this closer up a little bit small. Here, that should be should
be pretty much fine. Alright, let's move
to the next piece. So the next piece
next piece would be to just create
this color now. So before we come down, let's take a little bit of
time before we do this. Should we do this now? Should
we do this later let's see. Okay. So it's not really a big piece. So let's just do this now first. So I'm going to go over to
this and extra the shape out. So let's solo this out this way and make a
duplicate out of it. All right. Yes, I think that
duplicate should be, we have this. We have this. His duplicate should be fine. All right, so I can just let's try and get the ship a little
bit cleaner in there. I polis down some more. Okay. Then polish is
a little bit more. So let's go over to
polish polish by group. So the dot actually turned off. Cause I want it turned off
because if it's turned on, we won't see much of
the effects in there, so just turn the dot off so you can see more
stronger effects in there. All right, so that's fine. So now we need to just
grab the more or less like paint the shape we need
in there. I think, yes. Need to figure out how
the shape should be. I think we pull this out. I
think this is fine with it. We didn't put it
out with too much. I think that should
be just fine. Maybe we bring it out a
little bit small, alright? So obviously pull
this out as well. Let me put pull this
out a little bit more. So you can clearly
see the shape I'm cutting out of it.
A little bit small. All right. Sly so
should be fine. Put this out also as well.
All right, that's fine. A adjustment we need to make
in here, we can always do. So a ton on transparency, let's see how far out
this needs to be. We just the brows size
a little bit more. Extend this out to more. Okay, a little bit more
out a little bit more. Okay. This up some
more out some more. This way, that should be fine. Okay, ton of transparency. Ton transparency. Sand is going to paint in
the shape I need inear now. So let's let's do the Max lasso. Let's see how far
we can get this. Alright. Grab this down here. Let's see how much of
this we actually need. If we need this
to be this broad, I think this broad
should be fine. We just need to do some fixing around there,
and then we should be good. So I think I can
just use the Yes, I believe I can just use let's
see how far out this is. Okay, I think we can
play some of this out. Alright. I play some
of this out as well. Okay. Then I can just
use the max pen nun, the max out region I
want to paint for this. Let's just grab this. G bit points around there. Yeah, I think this
should be fine. So now let's sharpen
this some more. Alright Shift A, just give
this a separate poly group. Control ship click on this. Control Shift click again. We have one at the back as well. Let the max, Max this out, give it a separate poly group. Control shaped click on it. So let's delete the null. There's the delete ding. Yeah, I think that's
fine where it is. If I need to extend it
up a little bit small, we can always do
that if we need to. An turn up this transparency. All right. I also need to make
some adjustments to this by bringing it closer. So let's just first let's
get the ship in first. So let's go over to modified
topology, delete Eden. Okay? Let's polish this as well. So polish by group, polish by group, that's fine. All right. So now
we need to kind of bend the shape in where we
need to get this to be. For one, I'm going to
push this down some more put it down a little
bit closer this way. Okay. I pull these parts up. This part should be up. Increase the brush size
a little bit small. Up some more. Okay. I think this should be fine. I'm going to use the Max lasso. Is marks lasso brush. Alright, that should be fine. Invert the marks, blow
this out some more. Increase the brush size, I can push this
closer to the skin. Yeah, that should be fine.
Alright, invert the marks. Bring the undo
darts. Lay this out. Let me max this region like so. Did the mark, blow this out. Pinch this down some more. Okay. I'm just going to
add thickness to this, so it's going to kind
of pull out of darts. Cole just gets roughly
around the shape in. Okay. All right.
This should be fine. All right. Let the max. Okay. So now I'm going to do
the same to also in here, let's polish by group again.
Yeah, that should be fine. Then let's march this. I'm going to make a
duplicate of this and then Z march to duplicate. Let's Zmarge this and
get good topology out of it and crease some
thickness for it as well. Okay. So let's do Z march How many polygons
you have? We have four key polygons in here, so we can Come on. Okay. Ten k. Okay, that's fine. Let's
just let me undo that. I don't want that actually,
so kind of adaptive, keep grooves detects ton
down smooth. Zero mesh. Okay? Let's go out for it. But we also need to
let me solve this out. You also need to kind of check
the air to be sure there's no weirdness in there. Let Make sure there's no
weirdness on the edge. Very important to check. Okay. So I'm going to mark this edge, load the max, mark this edge as well. Let
me just do this once. Mark this edge, mark this edge, load this out in the max, and I'm going to do
polish by group again. I want this edge to
be a bit smoother, so polishing by
group, lay that out. Now, let's go back to
Zmsha then let's do again. T k. You can go lower. Here we have this at
one K resolution now. We can go lower. Let's go lower. Yeah, I think this is roughly where we need to get this to be. A do a little bit
of push in here. A little bit of push in here
should be fine. All right. This we can
definitely work with. Less our thickness
for it. This butler, I'm going to make quite
is going to be quite thick. Going to be quite thick. Let's push this point up a little bit sll
little bit more. Let's get sharp some
sharp edge in there. Es brows a little bit small. I'm not catching that hv
that's fine. That's fine. Okay, Zoom, let me kind of figure out how
this is looking. If I need to extend
this out a little bit more I think we need to extend
this a little bit more. Okay, ton of symmetry centers. I'm going to kind of it out and orient this roughly
around the same shape, extend this out a
little bit more. Yeah, that should
be somewhat fine. That should be somewhat fine. All right. So let's go in and
add some thickness to it. So dynamics of the dynamic, take down the smooth,
increase the thickness. So more thickness
you don't hurt. Let's see where we get. This might be
slightly too thick, so let's take it down some more. I think this is around
the perfect size for it. So we can just push
this down some more. Undo that. Turn on symmetry. Okay? Make sure
symmetry is don't on. Break this down a
little bit small. If this up some more, it down, down some more. Okay. I'm going to use them
standard brush rudder. Let me leave this up some
more up some more, okay. It's going to create some
shape in there, which is fine. Shouldn't you to have
a shape in there. Maybe just blend smooth that
down a little bit sare, take down the smooth intensity and smooth this down
a little bit small. Okay. I think this we
can work with in here. Okay. Also, too, we can do
the inverse by going to the shape behind it
and then move it down. Move it down instead
to compensate for it. Pull it down some more. Okay, down some more, maybe not so much. Select this. Okay. Produce the
bro size some more. Sin actually quite a lot of
manual adjustment just to get the shape right in there
where you need them to be. But that's fine. You still get good and interesting
result out of this. Okay. I see now the edge
kind of goes in. That's one thing we
definitely need to fix. So let's get the edge kind of in there up some more
pods up as well. Okay. I'm going to smooth this down, smooth the center up
and down some more. You need to make some
more corrections in here. Okay. Get closed. I have not applied this
thickness yet in there, so still have a measure
of control in there. Rotate this a little bit more. So most of the process
in here just to get in there and then bend the shape
to your desired results. Okay. Sandra is going to keep
pushing this in once I get the right shaping in
there, All right. Extend this out. I'm going to turn off the dynamics
of the for now. I need to polish this again. Let's grab these points. All right. Then let's go back
to the polish. Polish this. Come on. I think we need a
little bit more of this. Then let's polish. Awesome. Should be fine. Let's do tiny polish. Not as a bit much
polish by feature. Nope. I still want that
sharp edge, no doubt. Okay, that should be fine. Let's go back and introduce
the thickness again. I can introduce thickness again. So we're working in
a non destructive way smooth this down. Okay. So this off, smooth this down
around the smooth seeds. Get some smooth in there. Use the brows a little bit
small, smooth this down. Reintroduce the thickness again. Okay. Put this up. I think now for Mr., this
is looking quite good. Except I'll need to
shrink this parts closer. Shing this parts closer. I think I can just mark this
the mark blow this out some more.Tu shing this closer or
less like so should be fine. Okay? If if ton of this
tour of this again. Turn of the sickness and then do some slight
smoothing in there. Alright. Maybe increases
smooth intensity. Bring that back in. Okay. I think I would need
to turn this off. Pull this out, right? Mark these parts, mark
these parts. Okay. Let's let's do some slight blow. Blow is not quite intense. Let's grab a bit
more, a bit more. Load some more. And let's go and polgie a little bit more. Nope, that was a
bit too extreme. Mark mark this again.
Alright, that's fine. Alright, go back
and introduce this. I just want it to
be quite perfect. Not so I'm kind of doing
this over and over again. Just get something
really perfect in there. Yeah, I think we're good
now. Yeah, this is fine. It's fine. Okay, what Mason would ask me to
pull pull this down. No. I think I can just extend
this out this way. Roduce the bros size. My bro size was way too big. All right. Yes, we can
live with that, apply. Okay. Yeah, that's fine. So you need to add that
thickness to this also. So I think we can just use what is there already
to just do this. So we can do BM insets. Yes, let's save this also. Okay, saving this now, so let's done inset. We can do insets. Let's do flat Island, I believe, I solo this out. Okay. I was getting a
bit weird edge to this a bit of a weird edge. Let's see. Let's do Holy Group, Holy Group, poly Group. Holy Group should be somewhere
in Holy Group Island. Okay? I'm not sure I'm liking this weird additional edges
adding to this though. I don't think I like that. I
think I'm going to do this manually by adding No. I don't want to extrude. I'm not planning to extrude. I don't want to extrude this. Can I select this alone? Can Okay, so I'm not going to old out
and then add new common. Oh, I think I know everything needs to be B again for
it to actually work. What is going on. I think it wants me to
turn off symmetry. I think it wants me
to turn off symmetry. So I turn off symmetry now, so I'm just going to
grab all this edge. 'cause I don't have that
that's weird topology. I don't want any weird
topology in there. So I'm just going
to do this instead. It should be just fine. Okay. Wooden oats.
Don't do that. All right. Don't do that. Don't want a extra
edge or extra face. Okay. This is fine. Oh, great. We had extra so that we don't actually need so.
Let's fix that. Control Shift click
Iv or I need to go over to selection,
Beck selection. Inv selection. Click on this as well. They sell. Okay. I think I'll need to
change. Yes, that's fine. Just hold that and
then click on it. Old odds, click on
it, should be fine. But I want to make sure I'm not erasing something
else, though. Alright, I'm not
cleaning off anything I need a fear the back. So ignore those black
back ones for now. Okay. I think I'm looking at
one on the edge loop. I'm looking at the ones
at the edge loop just to be sure I don't have anyone
selected on the edge loop. Then we'll do something
like via the selection, then we'll do an auto group. Put the auto group
in a auto group. So something pretty much should have this separated
out now properly. Now if I should select this, I can just easily come on. Let me bring everything
back out first. Great. Bhasically what I'm trying to show you guys is this. So now I have just
separated out phase now. This is precisely what I want, so I need to extrude this out. Like what I'm doing for the er, so I'll go close to it. Extrude this out. All right. If let's see how much
depth we have in there. I think this depth
should be fine. We don't need to go to extreme. This depth should
be just fine, okay? We can definitely work with
this. Then we just Bvon. I don't think I
need to make this look too extreme except if I can except I can just do something like
extruding this edge also too, just to add another
extra edge to it. Undo that. Let me do this again, make it slightly longer. All right, Shift F. So we can do
something like this. Let's see how all
of this turns out. Let's compare. Maybe we might make it a
little bit longer. Let's make it a
little bit longer. Okay. Yeah, I think that's fine. So now I just want to
bevel some of the edges. So let's bevel the edge. So I'm going to do let's do some bevo so Bvul Alright. Single roll or two rolls.
Let's do single roll. Let's a single roll. Okay. Here well. All right. Let's do that. Let's do one as well. If it doesn't look good,
we just remove it. I think, it should be just fine. It should be just fine
for what we need it for. All right. So let's add
subdivision level to it. Okay. So obviously, losing some shape, so you need to
compensate for ts. Let's see No. Can we do it in here instead? I think we can do a little let's Shift Control D. Let's see. Is holding that edge just well. So let's do the same thing
now in here, so that edge. I need to do that because I need to do this symmetrically, so let's turn on symmetrically
on symmetry for this. Now we can do this. Great.
That is just great. It's not working with
symmetry turned on. It works without symmetry. Let's see if it's working
on the opposite side. Is he working on your working on the opposite
side, that's fine. Let's do this here as well. Here as well. Okay? If contradict, I hold the shape quite
well now, that's fine. Okay. So owes the shape quite
well in that region. We have something good enough
to work with in there now. Okay. Maybe I should add some little
bit of thickness in there. Just so it's a bit
more obvious to see. I'm not sure it's not ruining
our shape completely, so we can actually add dusk. Okay. Rotate it down this way, get some rotation down in, push it down some more. Let's see, nope. Now, it's kind of creating
some weirdness in there. Let's do this again. I need this to be quite perfect as much as we can
get this to be. All right. I think
they should be fine. They should be fine. Yeah, this we can
definitely work with. I need to go to the
lower subdivision level. Then use the move brush. Turn off dynamic, use the move brush and then
move something in place. Turn on symmetry for this
brush istill too big. Symmetry is turned
on coming around this region and then pull
this down some more. This is just where we
need to kind of adjust. Okay. All right.
Yeah, that's fine. That's fine. So less let
assume you can move on and then create this
region around here. So I see you guys in next
lesson. Bye for now.
6. 05 Chest Slate Lock In Zbrush: Welcome back, guys. So
in previous lesson, we kind of we worked
on and move this out. Alright, so we worked
on this piece, okay? So let's carry on. I think we still have a
system fittings here, though. But we come back to that. Thinks go create this. We need to create
this. So maybe we should do that just since it's like a major
piece in there, so we can let's just
create that instead. It's not going to be too much of an issue to create that
because we already have like we already have a base machine there you
can grab the ship out from. So let's go over to
let's go over to it, to make sure this is visible. I believe this is it in
there's shape in there. We can see we use this. So we can just solo this out. Maybe we should the
top one instead. Let's use this instead because
there's a lot of polygons. You can actually use kind
of cut out the shape. So I'm going to duplicate this. All right, so let's grab
the shape out of it. I'm going to be using
the Map Max pen. We still have this cemetn on. So I'm just going to paint the
shape I need Alright Okay. Yeah, something like
this should work. We just need to kind of pull this down a little bit small, but I think something around the nature of this should work. Let's pin the inward parts. Let's pin the inward
parts. All right. You need to make
some adjustment to extend this out, we
can always do that. We have a duplicates of this a duplicate
duplicating here. So shift He, Control W, do that. You need to kind of make sure
we have sharp edge on this. Control W, got the poly group, Control Shift click
Shift click. All right. So I'm going to pull this down. All right, this ship needs to come down somewhere
around here. Okay. Since make a lot of
adjustments in here actually, maybe we need a little bit more. Let's see. Yeah, this shape should be fine. If we need to make any other
corrections, we can do that. Let's just grab to it first. Let's do it deletes
ding delete ding, modified topology,
modified topology. Topology deletes ding,
deletes ding right. So I'm going to
subdivide this a little bit more, delete lower. Okay. Reason I'm doing this is because it's going to cut
out some shapes in here. So I'm going to use
the slice cove now. So I'll use a slice cove. I'm going to slice a shape
around here like so. Like some symmetry to
done. But that's fine. We we right to the
opposite side. Let me start by adding
some polish polish first. Let's do polish by group. Let's at least get some slightly
smoother edge in there. So our code will be a little
bit cleaner in here now. Okay. I'll do something
straight on in here. All right. So
Control shift click. Now less mirror this
to the opposite side. So I think we'll go to geometry, modified
topology, Mirror, and weld. Function Mirror weld. The hidden. Mirror weld. You see how they merge I
was still hidden in there, so it's working now. Alright, let's see. Let's see what else we can adjust in here. Here we've called the
shape, called the shape. I think for the most part,
this should be just fine. What we need to do now,
just to shrink this in. To symmetry, shrink this
in some way like so. Okay. All right. I think that should be fine. I'm going to duplicate of this, so I'm going to duplicate this. Let's make everything
visible again. I need to pull this out. This needs to come
out. Let's get this out because it's going to
be roughly around here. Oh, I think, let's spit it out. Let's spit it out. I think
I made it way too slim. So I'm going to stretch it
out a little bit small. A bit smart. Somewhere
around there should be fine. So let's get a rough shape
where it needs to be. I'd like to flatten
this out a bit more, flatten this out
some more, okay? Then I'm going to
rotate it this way. That's fine. Move this way. Yeah, I think we're getting
something, no doubt. I think it needs
to be I will need to stretch it out a
little bit small. But instead of stretching it
out way, I think I can grab. Let's use the max. Mark this region like so. No. Let's do a
smaller part of this, invert the mark, blow this out. I'm going to pull this
up a little bit more. That is fine. Okay, I'm
going to duplicate this. Let's duplicate this.
Alright, let's go in there. I'm going to I will need to
polish these top parts a bit small around this
region, actually. So not symmetry again. Okay? Invert the mark, invert the mark, blow this out. Okay. Let me grab this
as well, blow this out. I need to go to polish. Let's do polish by groups. So you won't see much
of the intensity in there because you need to still have a lot of
polygons in there, so let's just remerge
this quickly. Let's remerge can get
something lower to work with. Alright, so let's march this. I'm going to shrink this
down a little bit more, just a little, okay? Then I'll go over to geometry. Zero masher hep groups, detect edge ton of adaptive, bring this down,
increase this zero mash. Okay, let's give you some
moment to kind of load up. Then we see what that gives us, then we can work
from there on out. Okay, we have something
lower. Now let's see how much lower we have, okay? So let's begin to go halfway. Let's go half. Let's
go half again. So I'm going Afgan now
Let's polish this. I'm going to add some edges
before I polish this. Let me mark this out. Mark this out. Mark
this out like so. Then I'm going to do
a polished by group. Cause I want to eluminate a new weird edge we would
have in here. So let's do polish by group. A bit small, that is fine. Okay, now let's go
down even lower. Let's merge this even
lower. Oh, great. I'm having supposed
to have turned off this supposed to
have turned off. Let's do that. Lay this out. Take down the smooth, don't smooth in there. So let's go halfway. Marx this out. Mark this out. Ivar the max. I'm going
to extend them out a little bit more. It the max. And I'm going to also polish
Okay, select this portion. Invert the mark, blow this out. Poll this out a bit more. Okay, now let's go
back and then continue our zer mash Zero
mash halfway again, halfway again on
something quite low. Let's go off one more time. I think this is perfect to what you need it for.
This will work just fine. So now we just need to make some actual adjustments
in pull this out. Okay. Move this down some more. Alright. I'm going to
pull this out as well. Alright. This way
should be fine. This way should be fine as well. Put this out. Okay, I think
we're in a good place. I think we're in a good place. Let's add some
thickness to this. Let's bring everything
back on. Let's add some thickness to
this so dynamic. T down the smooth,
add some thickness. Well that's way too thick. Let's go down a little bit more. If, look at it from a distance because I always want
kind of check this from a distance to be sure if thickness is too much
or the right amount. I think it is the right amount. All right. So I'm going to apply this
on here so click apply. Now, that some few things
we need to do in here. So I need to extrude
the outer part. I need to extrude this part out. At the same time, let me sold this out so we can
see this properly. So I need to also grab
all of these edges. I need to grab all
of these edges because I need them
to be extruded out. Okay. So let's see Alright, let's do inset or we can just let's see what
we can do in here. Okay, so I'm going to do let's B we do have the ship extremely we do have
the ship extremely flat. No, we don't there's something
we can actually do in here, we can use the slice cove
and then slice edge here, but we don't have the
strep That was the issue. So I'm going to insert this. Okay? So I'm going to insert
something pretty moot like so. Okay. Yeah, something
pretty much like so. Then with the Q mesh
with the Q mesh, I'm going to extrude this out. This way. All right. I think we need a bit small,
so I'm going to undo that. I need to undo that.
Let's go back to insets. I think we need to make
this even smaller. I think something somewhere
around there should be fine. Maybe a little maybe
maybe a little bit small. Okay. I think somewhere
around there should be fine. Then we can now use the Q mesh. Extrude outward this way. Alright. This should be cool. I can also extrude
out this phase just to make it a
little bit higher. Extrude it out a little
bit a little bit higher. There's something pretty much
like so it should be good. Okay? I think this
should be fine. And then if I'm doing maybe
it's a bit too extreme. I'm just going to check to be sure if this is too extreme. I think it should be should
be around the right amount. That should be just about
the right amount for it. Okay. So now I need to kind
of grab hold out. Can I do a loop? I should
be able to do a loop. So let's see if we can grab
see if we can grab a loop. So poly loop. That's Poly loop flats. Okay. All right. Okay, I'm molding out, and I'm dragging this out this way. I think this value around
there should be just fine. If F, not sure I'm getting I'm not sure I'm getting the
desired result, though. Oh, I think I think, let's see. Let's bring this
back. Let's see. Undo that undo that. Let's do pull the
loop. Et's see. Try and create something a
bit more interesting in here. Let's see. Pregnant see if I need a little bit more, this
should be just fine. But I think I will need to kind of grab these two, actually. So let's grab I think
less than auto group. Auto Group and auto group. Okay? Yes. Yes, this is
what we need. Come on. I delete this. Let me
go over to insert hold, hold up, delete this loop? Come on. Okay, I'm on the
wrong one. B on the edge. Hold, delete this loop, then go back to Q mesh. Then we can net this out. Okay. Throw this out
a little bit more. I think that should be fine. Okay, I think I can do this now. Just a little B should be fine. Heap F, heaped F. Alright, I think we can live with this.
It should be fine. It should be just fine. Okay? So now, those
things kind of add some bev a few of these edges,
and then we should be good. Though we can try doing, if you go over to
Chris over to Chris, we can do Chris PG. Okay. Chris Pig. Let's do CrispG. So if you just subdivide
this now, divide this again. You should be getting
something like so. I think as far as this goes, I think this should
be just fine. We don't need to
do too much again. Already having good
edges around this. Want to get something cleaner, we can subdivide it a little bit more to get
something cleaner, but I think as far as this
goes, it should be fine. You should work just
fine. I work just fine. So let me undo all of that, delete higher. So
this should be fine. So just need to kind
of move this in place. So basically you just need
to move this in place. Zoom out. Let's
see where that is. I think we have this
fine where it is. We just need to move this down. B it is down a little bit more. I think this should do. But we need to extend
out some more. All right. Yeah, I think
this will work just fine. All right? I think
we are coming out. This is coming out quite well. You haven't added the
method details in here, but I think this is
coming out quite well. So next we need to work on be to move upward a
little bit more and then work on this collar piece to work on the color piece next. I'll see you guys in the
next lesson bye for now.
7. 06 Collar Plate Blockout In Zbrush: Okay, welcome back, guys. In the previous lesson, we
kind of worked on the lock. So we're going to continue on from where we left
off and then keep chipping in at this until we get the finished
result. So let's carry on. So let's kind of create
this cooler piece. This coll here, I would
like to create that. So let's get to work. Let's see what we
can do in there. So I'm going to use I
feel like I should use a fins that block that out
or just use the base mesh. We have this base mesh
we still have in here. I slow this out. Maybe I should also
use this instead. Then inflate it to
the shape we need. Let me clear this out.
I have you dynamh this? Okay, I think we
have this dyna mash? We don't have that dyna
mesh, but that's fine. So I'm going to grab the piece
I need out of solo mode. Let me off turn this off. Okay? So I think I
can duplicate that. Let me duplicate that instead. Okay, before I duplicate it, let me grab the portion
naturally need. Or that duplicate and then grab the portion naturally
need, so duplicates. Okay? So I only need you only need we
need this and this. Let just grab
mostly what I need. It. Okay, I need to change this to selection rec selection. Invert this. Okay, let's do an
auto grouping here. So go to group Poly group
poly group AutoGroupOnt shift click click as well. Let's go out of Solomo
Let's see what we have. Yeah, I think what we have
should be enough to kind of read the shape
we need for it. More or less, more or less. Or let's grab let's
grab a little bit more. Let's grab a little bit more. So I'll go over this way, shift. Let's max out something
around the nature of this. Alright. Maybe we can exclude can
exclude this region. In this should be fine. Shift, let's give it a
separate poly group. Okay, so now we can
delete den now. Let's delete Eden,
go over to geometry. Modified topology,
delete Eden. All right. I think this should
be fine. All right. So yes, we have the ship F. I think now we can actually
block out the shape we need. So I want to dyna match this. Let's go in first.
Let's see if we have enough resolution to act
least cope the shape we need. So using clear B D brush. Do that Cb a brush. Yeah, I think enough we have enough resolution to
block out what we need. Okay? Let's just block out
the shape we need for this. But while we're blocking
it out, we also need to we also need to
dynamize this as well. So let me get this out. Then do dyna match for it. Let's dyna match
this. So dynamshet. Let's dyna match this. Okay, need a little bit more, so let's increase the
values the value of 13. I sistin. Smooth this out, Dynamtg
this.This might just be fine. This might just be fine for
what's needed for. All right. We have this symmetry
torn down. That's fine. Precisely what we want. So I'm basically trying to lift up the portions we are
going to need for it. Compensate for it
around here as well. Alright. Just enough. Let's go out of isolates. Okay. Obviously,
it's way too much. We need to push that back
in, but that's fine. We just need to block
out the ship for it. I'm not entirely sure how
far back out it needs to go, but I think we make it
work one way or another. Okay. Let's just
blend this down. Zoom out. Let's see what we get. I think we can erase
some of these down here. We can erase. So I'm ding the earth now
just to dig that in. I'm going to smooth
this out as well. Soon them out, right? I see the base just to
pick something out of it. I think I think somewhere
around sms just about right. Let me chop this in a little
bit more. Smooth this down. Okay, hop this in some more. Soon this down. Okay. I think this should sit this
should sit just about right. Yeah, I think this should
sit just about right. Let me use the move
brush and then move this a little bit closer. Okay? So we have that
sloop transition down here, which is
also what we want. So this around there. Okay. Alright, so I think
as far as this goes, I think should be this
should be just about right. Yeah, this feels just
about right for it. I'm just checking this around
again just to be sure. Now for the center part, I'm going to create
something slightly more slightly more interesting. So let's get to it. So I'm going to let's see
what we can do in here. I think I no. I don't
need sold out yet. Let me use the Max
last to kind of grab the portion I need for it. Okay. So from this angle, I use the MAX lasso. All the way. Like, soap. Yes, I think this is
pretty much what we need. Just a bit of cleanup
should be good. All right, so let
me use the Max pen. So kind of do some manual
pen soap work in there. So I'm just going to
paint all the way. Okay. Now, the
distance is actually quite I need to push
this in some more. We need to push in some more. Okay. Let me clean this
part a little bit more. Okay? All right. I think I think somewhere
around there should be fine. You can always make adjustment to this later by pushing this, but I think this should be
around where it needs to be. Let's solo this out. Okay. So I'm going to sharpen this so Control
O and tap on it. Then Control W to give it
a separate poly group. Yes, I think this is
pretty much all we need. We can now duplicate this. Duplicate this this at the top. All right. I'm going to shift
click on this. I'm going to do a delete ding. So let's do delete ding, geometry, modified
topology, delete ding. Then let's polish this. Let's do let's turn up
these dots polish by group. Let's get something
a bit more rounded. You see something pretty
much like it seems fine. Okay, go back in a Let's let's turn on
back the Base mesh. So you can actually
see where that is. Okay. Yeah, I think we
can live with this. P need to move
this up some more. So let's use the move brush. Move this up a little bit more. Move this up some more. Okay. I think the brosze
is way too much. Could use the bros size. Okay. Move the center
part in some more. I think the spacing here
should be fine now. All right. This kind of rest on the
body a little bit more, so let's rest this
closer to the skin. Press this down some more. Even making it thought safe, it's completely fine if
it kind of digs in it's even fine because we're going to extract out merge this and then extract out
thickness from it. So it's completely fine if we have it touching the surface. Yeah, something pretty much
around there should be fine. So we still have that sloop. So let's go in and then
polish this again. Polish just a little bit small. Get some more
rounded shape to it. So now we can as remerge
this so shift F. Probably shining this
a little bit more. Okay. It's fine. Just before I merge this, let me do a quick save. Okay. Save this. All right. That's
fine. So I'll go over and then I'm going
to duplicate this again. Duplicate this and then go over to Let me check this out again to be sure
everything's working fine. Everything seems to be working
fine, so low this out. All right. So now
let's zero merge this. So you have a top count of 39
k. So you need to go lower. So let's go to
geometry, Zero mash. Turn off adaptive, keep group
detect takedown smooth, take down the adaptive size. Okay let's start with
focus, so zero merge this. So what needs to be
cemetary turn that's fine. We have a good topology
going across this. I'm going to check the
edge just to be sure I don't have any weird
edge around this. Okay? Oh, yeah, one more
thing. I think, before we do this actually
before we do this, I'm supposed to kind of create a separation in the middle. Suppose kind of separate
the middle out. So let's get some separation in. Let's make sure we're looking
at this move this this way. Let's just it from
the top instead, and kind of put a
separation in the middle. So let's just use the
max lasso instead. Or is in rectangular mark wreck. Let's mark something
in the middle. Marks out the middle points. Okay. Would you say poly group Control
Shift click. All right. Then I'll go over to still a little bit more work
to actually doing here. So let's get that
let's get that in. I'll go over this way. Let's kind of add a
cat in here as well. So let's do that. Let's do a coat in here as well. So I'll go over to Control Shift and then
let's use a slice cove. I'll go over to slice cove. Get this at an angle. Okay. So I'm just going
to do something. I'm supposed to do this from
the opposite direction. I supposed to do this from
this direction like so. Okay. Something like soap.
But that's fine. We're having some issues
in here, but that's fine. I think I need to go needs to
be down a little bit more. Move this down a
little bit more. Need a little bit more of
this. Let's go all the way. Should be fine. Let's see, I think I think we
need a bit more. Move this down. Move these down some more. Okay. Yeah, I think this
should be fine. So let's just do
mirror and weld. Modified topology, mirror weld. Geometry partially ding,
delete Eden mirror weld. Okay? Pretty much like so. So Control Shift click, yes, something like
so is what we need. This precisely what we need. I'm just trying to figure out if I have this too far apart. I don't want it to be
too far apart, though. I think I have them
two far parts. These two far parts. So I'm going to do this again. I don't want it to
be too far apart, so I'm going to do something a bit bit closer, quite
close, actually. So somewhere around here. There's a mirror weld. Okay, delete Eden mirror weld. All right. Control Shift, click, Condo Shift click. Let's do Autogroup
in here auto group. Bring everything back out. Control Shift click,
conto Shift click, Condo Shift click Invert. I need to go back to my selection
too, so reck selection. Int Control W the
same poly group. Yeah, this is pretty
much what I want. So this should be just fine. This should be just
fine. All right. So I'm going to
polish this again. Let's go over deformation,
polish this again. Let's get some
straighter edge out of nganPolish by group. That's the one we need. Okay. So I'm going to polish this
some more. That's just fine. Okay. So I need to kind of push
it a little bit closer. So I'm going to max out S
with symmetry turned on. Okay. Here's a gizmo.
Move this closer. I think so rotates when
you say it's a bit closer. All right, so let's
polish by group again. Okay, I think this
is close enough. This should be close enough
or what's needed for. If there's any
other adjustments, we can do it in here instead, so Move this closer, reduce the bros size, and then try and bring this
much closer, get up close. In this closer. You can turn up symmetry
for this even do. Let's see, somewhere
around there. Probably a little bit more. Let's grab a little
bit more. Okay. I'm just going to use the
move and move this closer. All right, clear
this out, then we can do mirror weld again. Mirror weld. Okay, delete Eden.
Mirror weld, okay? And it's way too
close, way too close. It's way too close. Okay. I think something like soap, delete a mirror weld. Let's go and polish this again. So I don't need this to be as neat as I possibly
can get this to be. That's fine now. So I
can duplicate this. I can duplicate this, add this. Then let's zer mash. Let's go over to
geometry Z mash. Z mash. I will still have
the same settings in school, so we can just zero mash this. I shouldn't take too long. We can get something clean
enough to work with. Okay, I'm getting
something cool. So let's go halfway. Now, make sure you
check the ads for any you will see one
weirdness in you already. You see, we get one
weirdness there already. So let's go and
then polish this, and then we would
zero mash again. Let's remerge this. Go over and then let's go halfway merge. So that should fix that
weirdness in there. Let's fixed its
that's been fixed. Awesome. So a two k.
Let's go halfway again. I think one k should
be just fine. So a symmetry bring this close. So now we have more
control over this now, which is more or less
precisely what I want. Okay. Let's do SM and Z mash. Same Z mash. So I do SIM and DHt zer mash, just to get a bit more
a better edge to it. So now this edge is better. Yeah, this is fine. This we can definitely
work within here. All right. So now we can
add thickness to it. We have made quite a lot
of modifications to it now just now to snow return
to our thickness. Let me pull more brain, pull this out a little two. I feel like it's buried into
your neck way too much. Let's just pull it out a little. Alright. Put out some more seem also
at the back of the neck. Yeah, something pretty mot
light, so it should be fine. Now, let's introduce some
thickness to this now, so I'm just going to go over and then introduce
some thickness to this. Okay. Yeah, I think
this should be fine. Yeah, that's fine. So let's
go on add subjckness to this dynamic of the
dynamic takedown soon. Then let's increase
the thickness for it. Let's say how much
thickness you need for it. You need to get a good
angle just to be sure. Let me solo this out. Yeah, I think this should be This should be maybe
slightly too much. Slightly too much. Let's
take it down a little too. I think this should
be the perfect amount of thickness you need for it. Okay. So I'm going to use
the move brush and then move this up some more. So I want the thickness to be
slightly obvious in there. Shouldn't be
completely buried in. You still want to
kind of see a glimpse of the thickness around there. So I'm just going to
lift this up slightly. I think the back parts gets
some good amount as well. Let's come to the side,
extend this out some more. So we're going to use
the symmety tundom which is fine,
precisely what we want. All right. I believe we should
be good in here. Okay, so now we need
to go in and then add the loop across this. He some thickness on the edge. Okay, so let's get to it. I think I might need to
move this a bit closer. Let's use the move topological
brush instead for it. So I'm going to use the
move topological brush. This one actually helps us
move actual edges in there. Get a bit more precision in. I just need to move
this closer this way. Shaping actually
looks interesting. Maybe we can actually
keep something like so. Just to add a bit bit
of an interest to it, just to add more interest to it. Maybe do something
similar also in here. Maybe not. Can we do
something similar in here? Let see how this is. Maybe
maybe that might just work. Maybe that might
just work. Okay. Yeah, I think that
should be fine. So I'm going to
isolate this piece. Onto ships click. Come on. Let me go smooth brush.
Something seems off. Come on, why can't I
just isolate this? I can't isolate this
anymore. Strange. That's quite strange. Okay. Oh, yeah, yeah, it
won't work because I've not applied this
yet. Completely forgot. I'm supposed to apply
this. Not applied it yet, so. My bad. So I'm going to
that's way too much. We just need two. So for
this should be fine, then I'm going to apply this. So now we can actually
isolate this now. Alright? Moving on to B ZM. I'm going to I'm even great. Can I get a loop out of this? Is it possible I get
a loop out of this? Huma poly loop poly group. Um, okay. I'm not sure I see something
happening in India, though. It's always tricky for me to actually do this.
I don't know why. It's always a very tricky
situation for me to actually get what I'm
looking for in here. It always wants to extrude something I don't I
don't want to extrude. Always wants to
exclude something. Am I doing this wrongly? I'm pressing something. I'm
not supposed to do this way. Anyways, let's see maybe
we can even use it. Let's see if we can
even use this fencing. Basically experimenting
here to see if I can actually use this. It's just going to create
something a bit weird in there which I don't
necessarily want. I think my CFS best is
still just to Come on, just to just do this manually. So I'll just do this
manually instead by those holding out and then giving
this a separate holy group. Okay, so wedding seen return, so we can just continue on. So it's going to be a little bit faster for us, that's fine. So then we'll go over
Here, also as well. Okay. Get up close. All right. Continue this on this way. All right. Almost there. Let's continue on this way, continues on that way also. Cool. Let's complete
this up. He that's fine. Precisely what I want. Okay, let's bring
everything back out. So I only need to kind
of do for the polygroup. So let's leave this up. Not entirely sure it's
affecting the opposite side. Don't necessarily need to
affect the back side, though. But it's not going to be
a major issue anyways. Let's just do this
in her. Come on. Why is not working in here? Me to always bring everything back out for
it to actually work. Okay. Yes, let's do
Let's do poly group. Yes. I think that
would be the one that will fix it for
us. Here perfect. That's what we
actually need. It's no longer affecting the backside. Okay? So let's see what we have. Is this thick enough? Yeah, I think this
should be high enough. So we can now add we can
add Let's add the Bvu now. So let's go to Bevu I'm actually using the
same value for the Bevo. Make sure we're on the edge. Bevo. Come on. Bevul. Okay? This is fine. Set this to two. Set this around
here also to two. This should also be at two. Maybe we can do
this also as well, do that. Do it again. To should be fine. Okay. I think I need to do also
around the edge just to hold this edge a little bit
more here as well. So that actually can hold
the edge a little bit more. You can do this here
as well, right? Let's subdivide this
let's see where we get. I think this we can work
with out of so low mod. Yeah, I think we
can work with this. The issue might have is that maybe we extrude
this way to mold, but I think we should be
fine. Should be fine. We just need to kind
of shring this in. Shrink this in ton of
symmetry center center this. Hing this in. That's
not going to work. I think we can also
use the move brush instead. Of dynamic. Let's use the move
brush instead to just move things down a
bit. Symmetry turn on. Okay. So I'm just going to
bury this down some more. Let's bury the thickness
down a little bit more, so it's not too high. So just to bury it in. Okay, so it shouldn't
feel too thick anymore. I should just be the right
amount of thickness. Let's be save also
for the neck region. So these parts are going to be actually covered
up or that's fine, let's just get something
in the end on the less. Get this in down some more. Use the brows size. Get this in. All right. I think this
should be the right amount. Yeah, so you should be fine. All right, Team can
work with this. So yes, we can work
with this moving on. In a shape we might, I
don't know if I need to. There's a shape in Is
not properly defined. But nonetheless, we can actually create
something in there. We can just block out something
in there that would still work. That's still find. We can still do something
in there that would work. So yeah, we'll do that
in the next lesson. I'll see you guys in the
next lesson bye for now.
8. 07 Collar Plate Mid Hinge Blockout In Zbrush: Me, guys. So in the
previous lesson, we kind of completed
this color piece. So we still have an a piece that's kind of close
to the color down, it's going to lock in. So for that, I'm going
to be using an IM, so I'm going to
delete I on this. I'm going to create
in an IMM for that. B it's going to be
just a cube and then would modify the cube, so let's get right to it, so BI and I'll go
to IMM primitive. The one I'm going to
use would be the cube. And I'm just going to
create something here. I'm going to how down shift. Kind make it a
little bit straight. So we have two in here
now, so that's fine. We need only one. So let's do splits
on MAX points, split on MAX points,
okay? That's fine. Let's go and select this. I let get enclosed. That's way too close.
That's way too close. Okay. Let's do auto group. Let's auto group.
So you can also grab the one on the
left hand side. Then we can dig the one on the right hand side.
So let's go over. Let's do delete ding. Geometry, modified topology,
delete ding all right. So I'm going to make a
duplicate out of this. Let's make it duplicates. I the duplicated piece. So this is basically
what we need. Is the front view,
this is the side view. So I'm going to string this
roughly around here for now. Okay. Yeah, that seems
pretty much fine. The next thing I'm going
to do is to kind of give separate pool groups
on the normals. Let's do group by
normals. This is the top. I only I only need let's move what we actually need so
we don't need this. We don't need this,
we don't need this. This is pretty much all we need. I'm going to do deleteen
delete ding again. All right. So I'm going to let's look
at this from this direction. I'm going to shing this a
little bit more this way. Let me move my gaze more undo the ton of symmetry,
move this this way. I'll shing this
roughly around here, extend this out a
little bit more. Let's bring everything back
out. Let's see what we have. I I can actually properly position this
way it needs to be. I think somewhere around
there should be just fine. Yeah, somewhere around
there would work perfectly. So extend this out
a little bit more, pull this up, okay? Yeah, somewhere around
there should be fine. So the next thing I'm
going to do would be let me turn off my gizmo getting close. I just need to move this
this way and do that. I think we can let me start
by moving this this way. Then move this this way into do this as
accurately as I can. Move undo that. Let's even use a
smaller bro size. Move this this way. Move
this this way. All right. Maybe somewhere around
there should be fine. Let's do the same thing
for the opposite side. All right. I think we are roughly around the same
place we used to be. Okay. Get up close. Move this back some more. All right. I think we can do. Let's see what else
you need to move in and move this in this way. Okay. I think I'll move
this here as well. Move this here as well. Okay. So if you should
subdivide this now, you can say add
mode that actually kind of shrink do that. So you need to actually add
some supporting edge for it. Let's add some more
supporting edge. So I'm going to not this B B. Now let's do inserts, add an edge loop in here, add edge loop in here. Okay. That's fine. All the thickness for
this around this side, I'll shing this down some more. So let's subdivide this,
let's see what we get. Yeah, that's fine. We're getting something pretty much
close to what we need. Okay? I'll go to
the top view. Okay. Let me make sure Double
side is turned on for it. Let go to display Double side. Double side is already
turned on for it. Okay. So basically,
what I want to do right now would be let
me get this week. I need to I think thing that I don't
really need all of this. This is the front side already, so I'm going to delete I'm going to delete portions
where I don't actually need, so let's go to the lower
subdivision level. I don't think I need Let's
just add busy again. BCM. Let's do BZM. I think I can just
do this in here. So B Z M. So I'm going to give this separate poly
group Control Shift click I'm not clicking
the wrong tin. Okay, I'm selecting select undo this selecting the wrongin I'm going to remove
this white region. So let's do something like
so okay invite selection, the deleteden I delete ding. Something's a bit
weird. Delete ding. Weird stretch when
I delete ding. But it's not going
to be a major issue, though we can always
move this back in place. It's not going to
be a major issue. Let me just move this
compensate for it. Okay? Move this down as
well, compensate for it. Okay. I'll move this in some more
in some more in some more, pretty much should be fine. Increase the sbution
level again. Do that, I think we need
to fix something here, fix this here as well, increase the subdivision level. I guess we just have to
fix this in here instead. But not really major issue, so it's not really a major issue to be
too concerned about. All right. I want to do the same
in here as well. Okay. That's fine. F. Let's go visualize
everything. Let's see what we
have close gently. I All right. I'll need to shing
this down some more. Okay, rotate this way. Yeah, I think, as
far as this goes, we're getting something
interesting enough to work with. Yes, it should be
buried in there. Yes, I think that is fine. So I'm going to
use the move brush to of dynamically
down the brush size. Move this up some more. Alright. I'm going to extend
this out some more Okay, out some more. Zoom out let's see what we have. I think somewhere around
there should be fine. Move Rush, move this
closer this way. All right. I need to move this
in. This needs to be properly buried down. Properly buried down this way
should be fine. All right. I'm seeing some regions
where I don't even need, but I can just move this down. Take down the browse size. I can just completely
bury this in. You can completely bury that in. Very much so because we're going to be adding
thickness to this, and I don't want
it to be visible. You can bury that in.
That should be fine. All right. This we
can work within here. Make some slight
adjustment to this as well around here, like so, okay. So now can add
thickness to this. So I'm not going to
come in. I think we can do this symmetry ton down. So let's just mirror this to the opposite side, delete ding. But okay, we have
subltion levels in there, so delete lower mirror and weld. So the lessmer' not intercepting
themselves in any way. We're seeing some interceptions in there I don't really want. I don't want
interceptions in here, so I'm going to move this out a little bit more mirror
weld and do that. Move this way a little
bit more mirror weld. Undo that. Move this
out, move this back. Mirror again. I think
this is perfect now. Yeah, this you can
work with right. So you can add thickness to this nos. Let's start
thickness to it. Let's start some
thickness to this. So a cantonal symmetry
for this as well. Symmetry now should
work just fine. I believe move this
in some more right. Okay. I'll go in, I need
to pull this up some more up some more. Like, so it should be fine. Zoom out a little bit more. She needs to make a lot
of adjustments in here, but I think as far as this goes, it's coming out quite well. Alright, now let's add
some thickness to this, so I'll go over to dynamics of the dynamic take down the
smooth. So taking down. I think it's probably
way too thick. So let's take down
the thickness. Okay. Move this dark
down, pay this back in. Alright. I think this should be. Oh, I see some issues somewhere. So this will need to move down. I know something was
slightly slightly off, so the edge you need to move the edge down some more this
edge you need to get down. Let's get this edge
down. Come in close. This edge you need to
move down some more. Come on, where's my selection. Move this down some more. Okay. Then we can
do some polish. Think a little bit more, let's kind of move a
little bit extreme on it. Okay. Let's polish
just a little bit. Let's give the same poly group. Control Would be the
same poly group. Then let's turn on the door so we don't have
these two extreme. Okay. That's pretty much fine. That should be just
fine the way it is. Let's go back and introduce back a sickness, bring
it with sickness. Push this back down. Okay. Maybe slightly too. Let's look at it from a distance because we're going to look
at it from a distance. I think the thickness
will be just fine. Thickness is just fine for this. Let's create some
gap in between. I mean, we need some
slight gap in between. That's fine. All right. Awesome. Okay. I think this we can work within a I think we can work
with this, no doubt. Okay. So now I'm going to apply, we need some 02 already
there, so apply this. So let's get in. Okay. I think any other detail I
might need to do might just be let's see if we
can make it work. So I'm going to BZ. Okay. So for this, I think we can do let's see. Let me start by adding this, no. Let's add an inset in here. Add one inset in
here. That's fine. Okay. I think I need to move this to the edge a little bit more. I need to move this closer to
the edge a little bit more. So more get this closer closer. Move the quite close. I think I pushed
this down in way too much. I don't want
to push that in. I just want to kind of
slide on the surface. Yeah, I think somewhere
around there should be fine. Maybe I went a little vb. Let's extend this out on the lower part
a little bit more. Okay. Yeah, that should be fine. Let's do group and
normal again. Let's see. Let's do con click on
this separate poly group. So you can kind of
get them separated because most are
in the same color, kind of, I don't want that
right? That seems fine. So I'm going to let's see. I think we can do this also in. Let's move this up some more. Up some more pop up a little bit more pop
here as well. Let's see. I think it's not
too much actually. Let me move this down. Okay. So let's get in there. Okay. But in what part, I feel like I
should ignore this, but let's just do something
in there, at the very least. Let's just do something in
that it doesn't feel ignored. Nope. Move this in. Here,
that seems fine. Okay. This we can
work within here. Okay, but we need a
lot of this actually. So let's just let's
let move this down. Hold out, hold out, and then continue this on. Continue this on this way. This way. All right, move this up along. Come on. Dango can be really weird and then quite difficult
to kind of get right. Come on. Let me let
me reduce my bro set. I think me bro set
may be the issue. Okay? Moving this along. Almost there. Go to
the inward parts. Undo that. Undo that. Gets enclosed. Okay.
Yeah, that's fine. Now we can actually extrude
thickness for this now. So with um I think Humor ready on polygroup
so that's fine. Let's get some thickness in let's see how much of
thickness we have in there. I think this should
be just about right. The next we need to do
is to bevel the edge. Let's just bevel the edge. So let's go over to bevul. Let's bevel this edge, two, two here, well, down here as well. Okay. Yeah, we can look
for the back why notes. No. Okay, that should
be pretty much it. Okay. I think we can work with this. Later on, we can come back to this and then inflate
this a little bit more. But as far as this goes,
you should be fine. So let's bring
everything back out. Let's see what we have. Okay? So I would like to acquire
two clothes on this tip. Can we just get Okay, yes, we can just move
the parts a bit more. Can we? Oh, some edges already welded. Some edges were
unfortunately welded. But it's still not a
deal breaker anyway, so I think this is fine. Let me solute this.
Let's see what it gets. Oh, there's a major
issue in there. There's actually a
major issue in there. Let's do the mirror
and weld again. Let's do a mirror weld again. Maybe we can extend this out
and try and fix that issue. I didn't even know
weirded this way. Okay. Move this back. There's a mirror wed, Let's. So geometry mirror weld. Now, it gets even worse. It gets even worse. I need to fix this. I don't think I want
to keep it a cities. I think we might need to go
back. Man to scroll back. We need to scroll
back quite well. We need to scroll back
just before we weirded. I think this should be fine. Yeah, somewhere around
there should be fine. So unfortunately, we seem to kind of do
repeat some of the process. Let's see. It was not in the right place. Trying to figure out
where totally went wrong. Okay? This was fine year. Not yet. Let's keep
scrubbing through and then figure out where
ttley went wrong. Okay. Okay. Bring everything back
out. Extend this. Okay. Okay? The issue was
actually from these bits. Let's scroll back a little
bit more. Stand this out? No, come on. Now,
we need to actually separate This where the
major issue started from. This is where we have
the major issue. So I'm going to bring
everything back out. I try and see if we can fix the issue we're having in here. I'll go back a little
bit more before I starting this white
paint arrow across this. I'm going to do let's do go over to geometric
auto grouping here. Okay? Yes. Okay. Yeah, this is the
shape in there, so I'm going to do delete den. Let's do delete ding. Okay? And I'm going to
move this back some more of symmetry for now move this back some
more back some more. I don't want any join in there. Outdoor script very cheap, so I'll just to kind of
withdrawal of this again. Let me just move this where
it needs to be first. Okay. So now we can add
the thickness again. So we're going to work
on only one side, so let's delete ding. Okay, so let's add
sickness first. Let's add the sickness in there. So dynamic. I think the word we had
before should be just fine. Word before should
be just fine, okay? And I can now go in and then be Z. I don't want any weird joining in there. I
don't want it at all. Okay. Okay, do that. Let's grab let's
apply these first. Let's just make this visible. Okay. Because I want this to be
accurate as I want it to be. There's any weirdness in
there. I don't allow that. Okay. So the journey is going to be
problematic later on I try to sculpt metal detail on there. All right. Okay. Okay. Move this down. Awesome. This should be just fine. Let me get close a little bit more. No, undo that. Move brush. Just move these points
down some more. Okay. Move this point down some more.
Alright that's fine. Bring everything back out.
Then I can add my thickness to this now, so B M. Let's add our sickness
in there now. Shift F. Let's see where we get. I think this should be
fine. I should work just fine. Let's go in. Then let's do some
bevo in there. Let's do some bevo, so BCM. Okay. So as well. Undo that as a bit odd. Okay. Here, as well. Here, I think
we should be fine now. But I should subdivide this. We're getting something more or less like so, which is fine. And I think we can before we mirror this to
the opposite side, I'd like to do some more
movements around here. Of dynamic, do some
movements in here. I don't want it to be too tight. Go to this shape, move this. Am I moving this correctly I
think I'm moving this wrong. Okay. Use the bro size
actually for this. Okay, back in here. We need to move this
down some more. Move this out. N to kind of get
this to be as neat as I can possibly
get this to be. Okay. Let me so this out. See if we can get close and move things out
a little bit more. Let's do this from the
back. Use the bros size. Okay, move this back down. Put some more gap in
there, bring it back out. Okay. Get close. Here's the gap we actually need. A Okay, so now we miror this
now to the opposite side. So let's do mirror well now. Okay, so we shouldn't getting
any weird joining indie. If we subdivide this, getting something
more or less like, which should be just
fine. All right. So that is fine. We can kind of move
this down some more. We need to undo that
turn on symmetry. Supposed to do that with
symmetry turned on. Okay? Let's look for another
angle, pull down. Okay, put this down some more. Yeah, that should be fine. That should be fine.
If you subdivide this. Yeah, that should be
pretty much fine, okay? The next lesson, we
can move to creating this hood or this kind
of metal hood on him. Can create the metal hood. That's fine. So I'll see you guys in next lesson.
Bye for now.
9. 08 Metal Hoodie Blockout In Zbrush: Comb guys. So in the
previous lesson, we kind of finalize
on the edge for this color for the color slate. So let's carry on. That's a few things we
need to kind of work on. So let's work on this
metal Hoodi now. Let's get the metal
Hoody in there where it needs to be, okay. So I'm going to use I remember
the sphere we had before, so we're going to use that,
but I feel like I should is just a little bit more. I feel like I should
just some more Okay. Let me even isolate this and actually modify the
shape a little bit more. So it makes better sense a
little bit more rounded. But it wasn't looking
rounded enough. Okay. So let's get
that rounded shape in there as much as
we possibly can. Okay. Well, that should be fine. All right, so let's
go to our sub too. Let's look for this fare the
fare should be down here. I'm going to
duplicate this fare. Okay? I'm going
to shoot this up. I'm going to go down
shift and shoot that up. Let's use this fair here, right? So those things get it in place. Let's get this in place. Also, we need to hide
the one at the top. The one we shot. Where is this? I thought we shot this one up. Okay. Yes, shut up now. Or is it. Okay. And to shoot this up.
Okay, this is down. Okay, shift Okay, up now. Yeah, that's find
out what I want. So I was going the wrong way. So now we have select
this now, right? So put this in here I'm
going to shing this down. So we just need to kind of
merge this kind of block this out and move this
along so we kind of get the shape based on this
so we have in here. So on the best brush, actually use for this would
be the move brush. So our best brush in here
will be the move brush. So let's start moving. Why is this stopping?
All the way. We're having this
gradual stop to it? I'm not sure why we are having
this gradual stop to it. That's a bit weird. That's
weird. Really weird. Let me close this let me close and open up
the file again. But not liking wise doing that. Okay, so save it unless
open it up again. Open up the file again, and
then we should be good. And our file size is not
that large, so that's fine. So I want to open
up the file again, and then I think she begins to work correctly now
now we do that. All right, so I'll close the software and
then look up again. I'm in ton of dynamic. I'm on the wrong
brush. Let's just say this to the
first, ayo again. Still not sure why this
is happening, though. Keeps stopping. Okay. Keep snapping in any way. Not sure why. Tally sure
why it keeps snapping. So there's no major
fix for this actually. The issue is just
because the process for Zbrush limits for each for the move brush, it's
just at its limits? Because our model is kind of bigger than the
brush as right now. That's the only reason why
it's no longer working. So it's a major issue, but I can't really
fix that because it's something that
comes with Zbrush. The major fix is
kind of chilling the entire model. Ishing
the entire model. And I don't want to
do that because I want to work with
reward scale in here, this is already on reword scale. It's already in reward scale, so I don't want to
mess with that, so I think I'm just going
to duplicate this again. Send this down. I'm
going to delete this. Okay? C just move this
infinitely unfortunately. So it's kind of creasing
more frustrating. It's more like a more
frustrating way to work, though. Let's just see what
we can do in here. Let's see if we can
make this work. So let's experiment and see
if we can make this work. Let's say I do duplicate
of this again. Bring this down. Sing
this quite small. Okay, Zoom into it. Frame into it. Okay.
And then I'll turn of this dynamic.
Turn of the dynamic. You can see the distance is a bit is slightly wider kind of. So if you keep shrinking this, stretching this even more, can see how we can stretch
this a little bit longer. Get longer. Let me turn up symmetry for now. You get a much longer
stretch to it. So it's just an issue
of scale linear. An issue of scale.
I don't want to scale scale it down
too small, so. Let's just see if we can there was an option to kind
of unify the entire model. I'm not sure that's
going to work, though, let's give it a try, make
it duplicate of this. Okay. Let's go down to
deformation and then Unify. Unify. Okay. Not sure I see any major
difference, though. Center this. I need to see the full body for this. Where is this buried in? Great grates. I'm going to go up again
and then select this again. The duplicates. Send it down. So your brush
is already too small. So let's see if this
actually works this time. Still have the same issue. Same issue still persists. Which I'm not
enjoying in any way. But it's kind of it's kind of frustrating to actually
work with though. Anyways, Let's get it in place. Sing this down. Okay. Move this out. Okay? They were getting
something in here now just to move this gently. Okay? I think we just need to
wrap this at the back. Get this wrapped at
the back quite well. Maybe all the way
there should be fine. Okay? Move this in
some more. Okay. Definitely getting something
in here, no doubt. So let's carry on
the same fashion. All right. Move this
out. Move this out. You can use the standard brush. We need to T off lazy mouse for this.
Turn off lazy mouse. Dig this in. Here subdivide the mesh a little
bit more maybe. Maybe we won't dynamieefore
we dynamise this. I don't dynamite yet. I need to get the entire
shape in first before I dynamishTo this down. Okay. Dems standard brush rather. Oh, no, that's way too intense,
take down the intensity. Dig this in a little bit. That's way too much,
take down the intensity. Okay. Dig this in some more.Tomch like so it should be
fine, smooth this down. Alright, go back to
the move brush. Okay. All right. I see
that I would need to bend this down some more. Nope. Use a standard brush, you use the brush size. Dig this in a little bit more. Maybe when you use the
Clay By door brush. Clayby door brush does a better job digging this
in, smooth this down. Okay. No, I don't want it
that's giving us an edge. I don't want that edge in
there. Giving us a weird edge. Okay? This down. Go to the more brush. Okay. Bring this closer. Okay. I go to the
clay brush now. Undo that. Dig this in instead. Okay? All right,
Smoove this down. This one is supposed to
be up a little bit more. So let's use the move
brush. Move this up. This way. Okay, I think it's supposed
to be where it is, but I just need to spread it out a little bit more
backwards some more. Yeah, pretty much like so. Do some smooth, clean some
things out some more. Okay, use the bros size. Smooth this down. I think I
might need to dynamite this. But we still have this
in the loop version, so I don't just dynamih yet. Alright? P closer closer to the skin, it should be directly on the
skin, directly on the skin. Okay. Soften this down. Need something that is
directly on the skin. We help some more. Okay, one thing I need
to do now would be use the standard brush, increase the brush size it
to intensity of the brush. Okay. That's the wrong placing
somewhere around the right? Getting something, log this in. Polish brush, flat in this. Flat in this some more. Let's get something
that is on the skin. Okay. Let's get something
quite close to the skin. Right. To the back here as well. Use the move brush.
Move this closer. Move this closer. I think we need to move this
quite more at the back. Quite more at the back
somewhere around the edge, fine, do some smooth. Smooth this out. What are of corrections to
do here to get this right? But I think we're
getting something. We're definitely
getting something. We just need to keep refining, refining this until we have something good
enough to work with. Okay? Well, want to
keep in mind the form. It's very important we
capture the essence of the form very much in there. Slotting this down. Okay? Plots in this some more Flats and darts. Just look at this from
a distance again. Figure out if you're
on the right track. Flats in this. Okay. Smooth. Yeah, just to get it as close
to the skin as possible. Alright. Get in there. Smooth the back as well. Okay. Stand this out. Look at this from a distance.
Let's see where we get. Okay. I will extend
this out some more. A list a bit small
should fine. Like so. Okay, open this part up. Actually let's dig it. Let's play that out. So clear this part
out be seen sm down. So what's going to
use it going to use the marks pen to kind
of get the shape we need? Let's look at it from the side. I'll move this fer need
to push back some more. Okay. All right. Then I'll mark this
region. Load the max. You need to move this
forward some more. Okay, lay this out,
smooth this down. Smooon down. Forward,
some more. Okay. I think we are definitely
getting something. We just need to work on
it a little bit more. I think at this point, ask to dynamge this now. I want to dynamige this now. So actually use the values. Let's use ten.
Let's dynamge this. We have this stone,
red, that's fine. Okay? All right. So now we can actually make some major corrections in here that we need,
smooth this down. All right. Reuse the move brush.
Move discloser. Move discloser. Move discloser. Okay. I think we have the basic
structure in there. Look at this from the side. Let's see what we can
adjust on the side. Move this up. Okay.
So down. So down. Check this again
from the side view. There's supposed to be a
better transition in here, so we don't have that
transition in here. Let's fix that. Let's
fix the transition in. Let's get that transition in. Okay. So this down. Right. Okay. Move this back in some more. It's not going to
be that clean yet. Is a little bit of refinement. But I think as far as this goes, I think we good place. Alright, so I think I can now
max out the region we need. So this time, I'm going
to use the I would use the Max pen already
on the mark pen. I'll start by reducing
the bros size, reduce the bros size Okay. Let's make the work a
little bit easier for us. I'll push this down some more and push this
down some more. Okay. Yeah, that should help. That should help. All right. Maybe we help ourselves
a little bit mobius in the dam standard brush and
then mark out the outline we need for this put mark out the region where we
need to draw our marks on. Light the region where we need to have our mark spinted in. Okay. Somewhere around the
edge would be fine. Okay. Do the same also
around the edge. Right. Don do that. Let's do something
a little bit cleaner. All right. So it gives us a good idea where we
need kind of max. So let's go in now
with the max in two. Stay through to the
edge as much as we can. Okay, stay through to the
edge as much as we can. All right. Undo that. That
wasn't net enough. Okay, that should be fine. That's moving up to this side. On do that. Supposed to be
painting the marks instead. Okay. Continue on. Keep pressing the wrong key. All right, that seems fine. Okay, so we can increase
the browse size now. Increase the bros size and
fill up in what parts. Okay. But we want to be
careful, though, we don't want to do it
and make it bleed out. We don't want this to bleed out, so we want to be a
little bit careful. On though that part was
already bleeding out. Okay. Coming close. All right. He also as well. I need to fill it up very well, so we don't have any
weird gaps in between. Don't want any weird gaps in
to fill it up completely. Include blows out a
little bit small. All right. Okay. Fill this up. Getting to the side, fill this up as well. So we want to be
extremely careful. I want to make sure you fill up the entire the entire inward
parts, the entire field. You need to fill
it up completely. You don't want any
gaps in between. Okay, so I'm going to duplicate. I'm going to duplicate
this duplicates. All right. Okay. So let's sharpen this. On Control O, sharpen the edge. If F Control W, give you
a separate poly group. I think we did a
neat job in there. As far as this goes,
it's a clean job. Control sheets click on it. Make sure that
side is turned on. Do side, all right. Let's see what we have
in here perfecto. So this is as good
as we can get it. Is for now. It's a lot of
modifications to doing here, though bo I think we're
on the right track. So definitely on the right
track. Yeah, so let's move on. So I'm going to, I think
we're on the right track. Apparently, there's any
other thing to do in there, but for now, there
isn't anything, so we can just go and do it deletes ding Modified
topology deletes Eden. Okay. The one thing we
can do is to try as much as possible to push
this closes out to the skin. Let's try and push this
close out to the skin. Little bit closer
won't hurt. Okay. Later on, we can modify, make the necessary
adjustment for this, but let's just get this
close enough to the skin. Okay. Put the air out. All right, and move this down. So more. Now, you don't
mess up the edge. Let's get close zebos size. Move this down, down, some more, smooth this down. Okay, now let's polish the edge. Let's polish the edge.
Let's isolate this. Let's get the edge polished. So I'll go over to deformation. One of the dots. Polish this. Get really clean
edge in there as much as we can. All right. It's kind of buried
in, but that's completely fine. That's
completely fine. This we will just later on pick some more
things in there, but I just need to
make sure the ship is coming out with needs two, which for the most part,
we're getting the shape well. Now, in here, I
can actually make some more corrections as I need. Make necessary connections
before zero mashing this. Especially moving. I think we can move
this Let's see. Move to the side a
little bit more, reduce the brows size. Move this down some more. Generally move this forward
a little bit more, okay? Alright. These
parts need to make some major shifts in here
by moving this in okay? Move these out, generally
move them back a little. Okay. This part anchor
the back some more. Alright. I think we can
definitely work with this. Move this in. Okay. Yeah, that should be fine. Should more or less fine, okay? Polish this again. Let's make
it duplicate out of this. Let me extend this
out some more. Okay. Okay, I think I need to pull
this out a little bit more. Okay. I think this
we can live with. Okay. Zoom out a
little bit more. Let's see what we get. I think this should be more
or less what we need. Pull this down some more. Okay. Awesome. So yeah. So now we can now duplicate this
and then zero march. So let's go in and de duplicate. So load this F. Let's get
some good zero Maher in here. Let's go to geometry,
zero masher heap groups, detect H, take down the smooth. So we have this at
100 k to begin with. Let's do something
somewhat around 60. Let's do 53rd or 45 there
about zero march this. Oh, supposed to
tone of something. Escape, ton of this
adaptive, dig it down. Okay, so merge this again. So we want even out
topology across this. For his face, the
sizing for his face to be more or less the same and not too spread out based on deformation
or curved origon. So I don't want to
Everything's kind of maintain that same square
shape around Okay. This is our first try. Let's check the edges. So just to be sure, go
back to the formation, polish this a little
bit more to kind of expose those weird edges.
We can't find any. Here, I think I see one up here. Yes, you can see them.
Let me get in close. Close. Okay. You can see the
weirdness in there. You can see this weird
shaping in there. So we don't want that at all. That's the way to kind of
polish these to eliminate them. So let's go off now. Let's go off. Just keep going off off off until we get something decent
enough to work with. Maybe something somewhere
around five K, I guess. Maybe somewhere around five k. I have something
extremely or weird here. And there's some kind of
weird pattern on top of this. I'm not entirely sure where this weird pattern
is coming from. It's a bit odd, like really odd. It's a very old
pattern to this off. Or maybe it's not major. Maybe just screen pixelating. Probably just screen pixlating. Let me I want to be sure. I don't want to make mistakes in here. I know you
guys can see this. Can see this weird
this weird pattern across the entire outne. I'm not entirely sure where
this is coming from, though. I don't have any
texture. Do you have weird textures in here,
textures, textures, textures? Texture There's no
texture in there. We don't have any
textures in here. Ton this off. If
I subdivide this. Can you guys actually see this? This is really weird.
It's a weird one. I'm not completely sure
where this is coming from. Let's change change material. It's still very much in
there for some reason. I'm not sure why
we're having this. Let me save this I'm supposed to be having
this weird issue in here. See you have this weird
shipping in there. I'm not liking this. It's most most definitely some
kind of bug or something. We'll find a solution to that
later on though Let's just finalize on Let's
finalize on this. Let's get this finalized
first, return to that. Definitely a weird
bug inside of Zebush. No doubt about that. So let's go back to geometry,
go halfway again. Half again. Check the edge. Okay. Tongs to go halfway. Okay. I think we can still
go out for Higin. One more should be fine. Yes, I think one more should
should be fine. Okay? The weird pi selected pattern
we're having in there, do not understand
why we have that in. Okay? So I'm going to save this. I'm going to save this
also as a sub too. B as a Z two, then
import it into into a completely different
different documents. Probably that should fix it. So I'm going to save save Okay, this is weird. Count that both. Okay, save us. Let's save us TL file. Let me name these two Talisman two save this. I't take too long to save. I'm gonna fix this weird
display issues we're having. So this is as to in here now. So this weird pattern
we are having here just puts me off completely. Does this change anything does not so I'm
going to close this. We want to see just say
yes and replace that. We're going to open a
completely new document. There's nothing inside,
completely new Zebra documents. Some of these issues
some of these issues are actually open and then you don't have major controls. So just to kind of close the software and then
open it up again and then hope that
actually fixes it. W is what I'm trying
to do right now. Okay, so you have a new
document opened up in here now. So let's let's load load two. Let's start from let's
start with this. Okay, let's subdivide this. Let's see if you have
that issue in here. I don't think I see
the issue in here. Okay? I don't think
the issue is in here. This one just a case of atmos subdivision level and then you have something
good enough to work with. Okay. Yes, yes. It's not a police
fair entirely, though. This is a bit weird. But I think we can bring in our mesh now and then
we should be good. So I'm going to
delete I on this. So let's load out two
to load two Z two. And I'm going to drag this out. O is in there already? Is in there already?
Let's get in close. Alright. For some reason, we still
have the same issue in India. I'm not entirely sure anymore. We'll probably go off
and then see what's actually causing this
weird shade in India. Okay, so I was gonna fix that later on and then
show you guys what I did. So I'll see you guys in
next lesson, bye for now.
10. 09 Metal Hoodie Refinement In Zbrush: Alright. Welcome back, guys. So we're still experiencing
the same issue, so issue does not
want to go away, though, there's a
solution for it. So if you notice in here now, let me get in close
to move this down. Select this, getting
close to it. If you notice now, it's
no longer in there. The reason why it's
no longer in this is because the issue is
from perspective view, so it's more or less like a corrupted fire from
the perspective view. So this fire actually corrupt
try different options. Try to close the software
on the software, save a to import into a
new into a new document. But nothing worked,
so image issue is coming from the perspective. So let's just keep the
perspective turned off. So we can just work on
this without having to be bogged out with the visual
error, z position nose. All right, so moving on. So
let's go to our reference. Okay. This is what we want
to work with in here. Okay, so let's get this
way we need it to be. All right. So I'm just
checking this to see. Let's see what we can do in
here. So let's back to this. So we're supposed to
kind of analyze on the hood, this metal hood. So let's add thickness
to the metal hood. The metal wood needs some
measure of thickness to it. So I'm going to select it. Some of the dynamic brush. Here, I need to go to move
brush. Move this out. Move this out a little bit. I think this part I need
to use the max lasso. Mouse this part out. It the max low. I come in close,
and then I'll try and move this
closer to the skin. Alright. Just try and get it quite
close. Close enough. All right. Bring this closer.
Okay, clear that out. Bring this closer. All right. Yeah, more or less like
so should be fine. I come in here as well. Move this closer. Okay. The bro size, scale this out. Now let's add thickness to this. So let's go over to dynamic
like we've been doing before. So dynamic sub div. Turn on dynamic sub div,
take down the smooth. Let's get some
measure of thickness in and make this quite thick, so a little bit thicker. Okay. Here, I think we
can live with this, put this out some more. Put a little gap in
there should work. A little gap in there
should be fine. All right. Let's visualize
this. Let's see where we get. I think this thickness
should be just fine. Though we still need to make
some corrections in there, maybe make it slightly thicker. Slightly thicker. Let's see. Maybe wait a little bit too. Let's call it from a distance because we're going to be visualizing this
from a distance. We want the right
amount of thickness. So let's say we're
assuming we're going to be rendering this from
this kind of view. So from this view, I
think it should be fine. Shift R to render this out, let's see, the
thickness is fine. I think that thickness
should be fine. All right? Shift F, ns. We need to scale out the edge. You need to scale out the
edge, let's isolate this. So we need to extrude
out the edge for this. Let's see if the edge is ready. We're having the right amount of thickness that we would need. I think it has the right amount of thickness we need for it. Maybe just a little correction, a little movement, and
then we should be good. All right. Yeah, that's a little movement
and we should be good. So I'm going to we need
to apply this first. So let's do two segments. Two segments should be fine. Just to add one edge
loop in the middle. Okay, so apply
this, select this. Let's come in here and
make some adjustments. All right. Checking this around. Yeah, we can do this. I'm going
to reduce the brush size. Causes cannot move. The vertice is a
little bit closer. Let's get this vertices a
little bit closer. All right. Closer. There's some more right. Move this closer.
Closer as well. Loser, I think that
should be fine. Yeah, that seems prettify. Pretty much fine. You ask me. We have gaps in here, so
let's just kind of try to average things in
a little bit more. Average this in. So once we sculpting
details in there, shouldn't the gap in there
shouldn't be too extreme. I think somewhere around
there should work just fine. Yeah, that should be fine. It shouldn't be too
much of an issue. Okay. Would slightly
closer as well. Just a little bit
more. All right. I think this should be fine. Just trying to average them out. Okay. So now we can confidently
select the edges now. Can confidently select the edge. I'm getting extrude in here, so let's do B ZM. Okay. Let's see. This actually goes around like a loop, so it should be fine. Let's see if we can just do this with one shot, if possible. So I'll go to SQ March already. Op Poly Group. Don't do that. Come on. It does not
want to work on sale, I bring everything out. Which you ask is kind of silly. Everything can make it. We can just do this even
though it's id. All right. Shift F, let's see. Let's see how much
thickness we have in there. I think it is the
right amount of This is the right amount of
thickness, should be fine. All right. Okay. I think
this should be just fine. I think we can make this a
little bit more interesting. We can dig this in as well. Can just buy this in here. Okay, Shift F, let's
see what we get. Yes, this should be interesting
enough to work with. That gives us
interesting results. So go back in there. So those things kind of
bevel with the edges now. Bevel the edges.
So let's do Bvul. So Bvul said that also in here. Though as in one,
so that's fine. That in the default Bvlleault
bevo should work just fine. You need to do the same in here, do the others way too extreme. Let's look for a good angle to it so we can do this properly. Okay? Like, so undo that. Something slight like so. All right. Okay, awesome, that
should be fine. So if you should
subdivide this now, should be getting something interesting enough to work with. So if I actually subdivide, t see how we get interesting
interesting look to it. Awesome. So this looks
interesting enough to work with. Okay, we can work with this. Checking this out from
all angles, that's fine. So if you notice also, we can see you can see some
plates across this, that we also need
to kind of get in. So, we can do that.
I can do that. So I'm going to go to
lower subdivision level. So five k is fine.
For a base mesh, for a base, this should be fine. Five k should be
just fine. Okay. I see the plate
coming across here. Let's see if we can do
this with the curve brush. Let's let the curve
brush for this.
11. 10 Face Mask Blockout In Zbrush: But, come back, guys. So
in the previous lesson, we kind of finalized on
the arc on the head Udi. Okay, so we're going to carry on and then I think
this time around, let's work on the head or
the meta mark instead. Think make better sense
to work on meta marks. So let's get some details
going on in there. So I'm going to let's see, let me go to the move brush. I think we still have this on the low we still have the
lowest ablution level for this. I'm going to duplicate this. Let's duplicate it. Duplicate. I'm going to send this down. Okay. That is fine. Then I'm going to isolate. I'll go to lower
subdivision level. Let's go to lower
subdivision level, delete higher, all right. Then let's do poly group. Let's do Auto group with UVs. So I'm going to grab just
this. This is all we need. And I'm going to do delete ding, modified topology, delete ding. All right. So we still need to make some
modifications to it as well. Kind of delete some parts too. Can we reconstruct this? No, we cannot reconstruct this. But that's fine. So I'm going
to go out of solo mode. I'm going to hide this
for now. All right. So I need to grab the region,
and it's going to mark out. So let's do transparency. So no transparency for this, and I'm going to
do the Mx last SO. Okay? I'm going to mark so
something around, like SO. Okay. Get in the symmetry Tundon
for asymmetry tundon Awesome. Okay, I'm going to
remove a few of these. Alright, so let's isolate this contro W to give that
the polygroup All right. So control sheet click on this. So we need to kind of clean
this up a little bit more. We need to do some
cleanup work in here. Alright, so let's do
some cleanup work. Let me solo this out again. Let's see what we have. Okay? Solo this. Let's do
some cleanup work. So I'm going to let's
grab a loop out of this. Can we get loop out
of this? Let's do BZ. Let's do a loop. Can I just out and delete? No, I can't do that control? Nope. Let's do hoop. All right. So dots and then actually change the
colour fase then you can tap out, change the color. I think this should be fine. Let's do the same thing in Okay. That's interesting. So
Control Shift click. Let's do auto group in here. So let's go over to geometry, no Bully groups auto group. All right. So select this. I'll do it deletes ding. I'm not trying to
get something to be cleaner in that's all. So let's do delete ding,
geometry delete ding. Let's come around here as well. Let's do something
cleaner around here. No. Okay, that seems fine. Okay, that seems fine.
I'm just clicking on it. Then it's deleting it. So go back in Auto group. All right. I think it is as
clean as we can get it to be. So control sheet. Click on this. Let's go and they'll do delete ding, delete
Eding Awesome. Okay. Then what part is fine. In what parts it's fine. For the eye, we need to
do the same for the eyes. Let's get in close
to the e. We need to delete need to delete
the loop for the eye. Let's come down. Let's see
if we can grab this loop. Goes complete. Let's
see, move this around. Yes, we have something
complete in here, I'm going to do
Control Shift click. Let's do delete Eden,
rotate this around. Okay. Let's do auto
group also as well. Auto group, PullyGroup
auto group. All right. Oh, I'm looking at this
from a weird angle. So let's look at
this from this way. Control Shift
click, delete Eden. Delete Eden. Awesome. So now we have the
max piece we need. Don't have transparency. Yeah, this part one actually envelopes every parts
we need. That's fine. So one thing we need
to do though would be to polish the edge. Let's get the edge polished. So I'm going to max these parts. Okay, invite the
max, blow it out. Then let's do a polish. Go back to the move brush. Let's polish this. So let's
go over to the formations. Polish, just to get
something straight in there. Get something straight enough. I think this should be
awesome. That's fine. Okay. So now we can start
working on the ship itself and getting
dam maxing in there. Let's get the shape
in. So I'm going to duplicate this just
to have a backup. So I'm going to duplicate
this, hide this. So we can actually
adjust this and move this si where we want and make the necessary
adjustments to it. Let me start by blocking out
the structural shape of it. So in this pler area, I need some understanding of the facial structure in here. But that's fine. We're not
doing too much, though. We don't need to block
out the shape we need. Take this intensity down. So I'm going to hoot and
dig in here some more. Okay. Let me create a structural
structured facing turn off. Let's turn off lazy mouth. I need this lazy mouth for this. Take down the intensity
a little bit small, reduce the bros size. Let's get that bone structure. Let's get that bone
structure in there. Okay. Get the bony structure in, dig in some more. All right. Those bony structures needs to be quite
visible in here. Very important to get
those bonus structures in. All right, read the
depths in here. The bonus structure should
be quite obvious to see, do that. Log this in. I'll smooth this detail out, take down this son's intensity, smooth this detail out, do that. Do that, smooth this
detail out. All right. I'll use the empty changes to them standard brush
them standard, I'll create depths in here. Creating more stronger
depth in here. Okay? Because not to make
this look like a max. You get that structure in there, create some depth
in here as well. Okay, smooth this down. Alright, I'll smooth
this down as well. I don't want to look
like kind of wood marked looking dude. But it's fine. I'll create undo that. We can create a dense
in there as well. Smooth that down. So
I'm kind of going to kind of experiment with it it a bit small just to get some good
result out of it. Smooth this down. Okay. I'll sharpen this. Sharpen
this a little bit more. All right. So I'm not increasing
the subution level yet. Once I increase the
sublution level, we should begin to get something interesting in here
physically brush, flatten this a little bit more. I want to make the
character look a little bit more scary. Smooth this down. Alright. Use the standard brush, create an angle in here, create an angle in here, okay? So it's the whiteness of the eye and the
whiteness of the mouth that makes it look
a bit more scary, so I'm going to do that also. Let's go to the move brush. I'm going to point
this down some more. Okay. We're going to introduce
some scary filling sets. Okay. Tight in this. Use the standard standard brush, hold out, and then create a
sharp line in the middle. Alright. Maybe that's
way too sharp. Something like so
should be fine. Okay, extend this out some more. We can pinch this in
a little bit more. Alright unless
widen up the mouth. So Okay, I think
I need to kind of sharpen this as well do that
use this dem standard brush, pull down out,
create a sharp line here that comes
down here this way. Create a dense in here, a more sharper dense. You can see it's
kind of getting a little bit more interesting now. Okay. Make this a bit obvious. Make the shape if bit more
obvious in here, right, smooth down, create a dense
in here, smooth that down. All of this will begin
to make better sense. So like, so Okay. You can create a dense
in here as well. That should be fine. All right. Let's open up the eye some more with a sharper
line in here. Pi a sharper line
in here as well. Dig dig this in. Okay. I so that parts going to cast
some more shadow depths. Smooth these down. Okay.
All right, that's fine. So let's widen the eye a little bit more, lower
part of the eye. So I'm going to say on the
marks last so max out. Load the marks. Let's
is a move brush. Move this down, open this
up a little bit more. Okay. Alright. Let's extend
this back some more. All right, getting a
little bit more scary, which is precisely what we want. So I'm going to open
the mouth up now. Let's open the mouth
up, so I'm going to still need to kind
of refine this though, but I think as far as this goes, we're getting something
interesting already. Okay? Create some more
sharper depth in here. Right? So yes, let's
go to the lips. So I'm going to use gizmo
sent out the Gizmo. I all right. Turn off symmetry
center the Gizmo, O down control, drag this out. If F, let's give it a separate
poly group, no do that. It's not neat enough yet. Go back to the Gizmo. Okay. Control W. If that's a separate
poly group, that's fine. So we can actually
go to our Gizmo, Control select to max that out. Invert the max, blow the max. Inverts with the move brush. Going to bring this down. Okay. I'm not going to go
as extreme as Oh, undo that undo that.
Don't know symmetry. So I'm not going
to go as extreme as what we have in here, though. So let's get this
down, pinch this down. Okay. Increase the broad size, come to increase the bro size. Move this down. Okay. Increase the bro size, get
this down, invert the max. Move this up. Okay. Then we can extend
it back some more. All right. Yeah, I think this
looks just fine. I don't want to go
to extreme minutes. All right. So I'm going to push the top part of
the lip down some more. Let's create some more
slimmer lip structured to him on the dam
standard brush, create a dent in the
sharp dents in there. Seem to know around
here. All right. Let's go out of so low mood. Fantastic. Can skin gets an interesting scary
results in here. Now, let's subdivide this.
We've not subdivided this yet, so that's kind of blocking
out the major forms. Then we subdivide subdivide
a little bit more. Okay. So now we can now make some more interesting
looking shape in there. We can do some more interesting
looking shape in now. So I can just go read
them standard brush. We're going to essentiate
to form some more, subdivide this some more. Okay? Yeah, that's fine. Then I'll begin to sharpen
some of the edges. Alright, create some more interesting looking
detail shaping there. I want this to be quite scary, so I'm introducing some
interesting shipping in. Small down some more. Okay? All right. So hard lines should work just fine,
just to push this. Some soft and hard
line should be fine. All right. Okay. So creates some
more interest to it. Come on. Just to get something a bit more interesting
looking in there. Awesome. I think we
can work with this. This should be just fine. Come to the lip, do
that hold out, do that. We use the bro size.
Come to the edge. Let's do this on
the edge. Alright. I think this should
be just fine. This we can work with no doubt. All right. Undo that. We need a bit more of an interesting shape into it. Okay? Awesome. I'll work. Let's smooth this down,
smooth this down, some more. Undo that. Smooth this down.
Fantastic. So this is just kind of
owning up the shape and then making it a little
bit more interesting. So this we can work with. Okay. Yeah, this is fine. This will work just fine. Maybe we can add something
in here, smooth down. Alright. Awesome. Awesome. That's fine. So now we can now kind of plate this metal piece on the
forehead. We can do that. Okay? I'm just going to duplicate
the mesh. Let's isolate this. I'm going to duplicate the mesh. All right. Let's see. Let's go to lower
subdivision level for it. Let's see if we can steal if we can just steal
that shape in there, I believe we can yes,
we definitely can. So give you the same poly group. Symmetry still turn on, so let's delete lower,
delete lower for this. Delete lower Geometry
deletes higher, all the subuon levels on top
let's grab what we need. Okay. Let's see if we can do let's see if we can do
this with the max lasso. Let's see if we can do
this with the max lasso. So I'm just going to be
very careful in here. Okay. Then go all the way like So Okay, ControWo. We have something, no doubt. But we need a little bit more. So basically what we
need now is to add to be M. I'm going to
add these suits. Okay? Fantastic. This is
pretty much all we need. That's pretty much all
we need to control shift in value selection, Control W D delete ding. Okay? All right, that should be fine. All right. So you need to
add some thickness to it. So let's add thickness, and then we can now do some
more work in there. All right. So let's do thickness in, so dynamic subdiv Alright, take down the smooth, add
some thickness to it. Let's do some more Shift F, let's bring everything back out. Let's see what we have. I think we might need a little bit
of extra thickness to it. Yeah, I think that should
be pretty much fine. Okay, two segments. Also that work, apply this on. The next thing we need
to do would be to I see. Yes, I'm going to do an inset. So insets poly groups this
inset Poly group island. So we're going to insert
only the poly group island. Why do we keep getting
this weird edge in here? I don't like that weird
edge at all at all. Just makes things feel
a little bit weird. Let's see if you cannot do
it and then delete it if you can. Let's delete it if you can. So I'll go over hold
out. Oh, we'll do that. Make sure we're on
inserts, hold out. I can't even I can't even
delete it. I can't delete it. So that's the reason
why I don't I don't even like adding it at all. Don't like adding it just weird. There is some extra edges
that I don't actually need, so I'm just going to do
something pretty much like this. This as well on
these parts, okay? Then I'm going to delete, delete this, add
on in the middle. Okay. I think that should be better way to
go. Okay, that's fine. So now I'm going to Control
Shift select this phase, and then begin to add
something like so. Oh, we can do it all at once. I think we can also
do it all at once. Let's bring everything
back out so we can do polyp polygroup. We can get this no Q mesh, poly poly group, okay? No. We are pretty much like so. Okay. Don't do that. Well, we're just going to figure out if you have on
the same height. I think it's pretty
much on the same. Yes, this is fine.
I work just fine. We don't need to do too much in. Then just to bevo the edge. Let's bev with the edge. So bevul bevel the edge. Awesome. Bving boots edge. All right, do the
same down here. Okay. Awesome. So we should
bring everything back out. That gonna bury this in some more, and then
we should be good. I just need to buy bury it in. So let's use the move brush. Ton of dynamic, and then
let's push this inward. Just make sure it's
not visible. Okay. I think we ultimately turned on for this, so it
should be good. Okay. Yeah, that should
be just fine. Fantastic. Let's see. I think this
should be more or less fine. Here, we can live with this. Except we want to push it
then create the shape, but I'm not going to put this
close to the eye, though. It's not going to be on the eye. It's not going to be on the eye. You can just bring
it should be under maybe that's under this
somewhere around here. I feel like that that
might be doing too much, but at the same
time, is it going to give us some cool
looking effects? Let's do it to
select this again. Duplicates duplicates
it, duplicates. Okay. Solo this out. Solo it. All right. So solo that out, and then I'm going to go over to take down to go to
lowest ob division level, deletes deletes higher for it. Okay? That's fine. Give you the same
polygroup. All right. Let's see what we
can do in here. Can we reconstruct this? No, we cannot. Let's see
where it's supposed to be. So we have symmetry turned on. So I'm gonna try as
much as possible, kind of grab this all at
once with the Max last. So let's see if
we can grab this. Try and trying to be
extremely careful in here. Okay. All the way here. Let's do all the way here. I Okay. Okay. Control W. Okay. Yeah, I think they
should work those fine. So let's do PZ, do that, add this to it, Control Shift, invert
the selection, Control W, delete ding. Let's do delete ding, modify
topology, delete ding. Okay. Awesome. So now that means kind of
get the shaping in, and then we should be
good to move brush. Crease the brush size. Okay. So the top part is
kind of slimmer. Top part is slim. Okay, we can. I think there's a
way to do this. We can mark. We can
mark this region. Mark this invite
mark, blow the mark. Not blow the marks yet
then we do polish, okay? Here, that makes sense.
Here, that makes sense. Okay, clear this out. Invite the marks rather. Then let's do polish by group. Okay? Awesome. That kind of immediately creates
the shape for us. We can still poligi a little bitmre to
shrink it some more. We need to. Without
doing too much. Let's turn the dots on. That's doing too much.
It's a bit too much. Let's do Nope. Polish by fritre Nope. Actually the porridge boy. It's kind of making it too much. So less inflates. Nope. Trying to be a bit careful in here. I
think it should be fine. I should be just fine.
I mean, come on. It doesn't need to be too slim. Don't of the dynamic. We use the brush size,
move brush. Okay. Don't do that. Why can't
I grab the entire piece? What is this? Another weirdness
happening in year now. And that weirdness happening in. Okay, the focal
length was weird. So move this in some more. Okay. I need to move this
down some more. Okay. I think that should
be pretty much fine. We need to bring you
down some more right. Now less articness to it. So let's go over to dynamic. Take down the smooth,
increase the thickness. Okay, I think this
thickness should be fine. Pull that up some more
or buy it in her. Okay, that should be fine. I
think that should be fine. So we can just add
two segments in. Okay, apply this on. B. I think for this one, I'm going to bevl
this quite well. Do this. Come on. What is this? Oh, I'm on wrong. So we need to be on Bevel. Bevel this quite
well, actually. Okay? Bevo this edge this way. Alright, let's subdivide this. Let's see what we get. No, I think the bevo was
a bit too much. Bevo was a bit much, so
we don't want too much. Because one can maintain some
kind of sharp edge to it. Let's maintain some
sharp edge to it. Okay. Okay, that should be fine. All right. Extend this out some more. Make it slightly thicker,
bring it back in. Move brush. Break
down the bre size. Okay gets closed. Then bring them down. All right. Busy brusse size, bring this up. So more. All right. I feel like I should
extend this out some more, spread it out some more. Okay. Extend this out
some more as well. All right. I think
that should be fine. That should be just fine. We don't need to go to
extreme in. Should be fine. Alright, so the next lesson, we can move on to
something else. So we should go in and then
let's turn this back on. So now I definitely need
to push this back in. I'll duplicate it actually
duplicate out of it. I'm duetting something
else. So delete it. Oh, come on, I'm
still duplicating it. So delete deletes. Okay. Going to go and select
the face itself. This one actually
wants to duplicate. So this one actually wants to duplicate or duplicate this. All right. We can push
we can push it back. As a gismoTosymmetry,
center this. All right. We can push the head back in All right. Go do that, do that. Let me just max the entire head actually invert the
max. Load the max. Okay. I'll move this in. So on symmetry and just buy
this in some more Okay. We solo this out, so we're getting something more
or less like saw. Let me smooth this out,
smooth out the neck. Okay. Yeah, awesome. We got something pretty much
like so. You should be fine. Alright. Yes, we can definitely
work with this. I'll see you guys
in next lesson. Bye for now. Week test render. Let's see. Awesome. So I'll see you guys in next
lesson. Bye for now.
12. 11 Crown Blockout In Zbrush: Welcome bar, guys.
So previous lesson, we kind of created this
arc around the head. And then off record, kind of plugged an eye
in just kind of get a good idea of how it look like if we have a
character behind him. Maybe would mark it out
completely, something like so. Okay, so also, I
noticed that in d two, I would actually need to log
this park out some more. Okay? So I need to go in
and then extend this in some more almost kind of
all the way to the end. Okay? Here, or so. So we have this
symmetry T Don out. It's fine. Precisely
what I want. Okay. I think I'm going to put out to something
in here like so. Let's see if that
actually that is fine. Here, that is fine.
We can keep it. Okay, let me just
redo this again. Okay? So it's creating this
kind of dotted lining between us and that's kind of
ton of the lazy mouse. Drag down the lazy mouse
that should actually fix it. It's not fixed. I think
it's kind of like an issue from my tablet also. But that's fine. No image. You should need
to smooth it out, smooth things out, and
then it should be good. Okay. Now, I think it's
fine the way it is. So the next piece I would
like to create would be more or less like this
crump piece on inside. So let's read that. Let's blog that in.
Okay? I'm thinking that she won't steal
the ship from this. I think we can actually
steal the ship from this or we can create
something from scratch and then modify it
to lower subdivision level. Probably. Let's just steal this already have the
ship actually in there. We can just steal
this and then reuse. So let's duplicate it. I'm going to duplicate it. Okay. Then I'm going
to move it back. It should be somewhere sitting. Maybe shouldn't be sitting
on top of it actually. I can actually have you
sitting on top of it. I mean, why not? Why not? We can have sitting
on it. Maybe just tilt it a little
bit back some more. Maybe back a little bits. Okay? All right. For fanla just let
it sit directly on it. Let's solo this. So all we need is
to grab this piece. I'm gonna delete Eden. Let's do delete ding. Geometry deletes ding. All right. Do you have symmetry turn
down for this, yes, we do. Figure out how much of this
we need to keep or remove. Let's do some around
there and do that. Do this with a bit
more precision. Who click. All right. I think we need to clear
out a little bit more. We need to remove
a little bit more. So I need to make
sure I'm doing this correctly or no, I think
it's in the right place. It's more or less
in the right place. Just need to erase maybe three
more and should be good. So let me go all the way here onto W again.
C click on that. Okay. I think this
is perfect where it is it should be just
fine where it is. Let's see. All right. So I'm going to
make a duplicate of this case just in case. I'm going to do I
do a delete now, so delete an All right, so I'm just going to
extrude this out. I want to get this extruded up. But before I extrude this up, I would like to simplify it a little bit more,
let's reconstruct. Can reconstruct? Why
can't this reconstruct? Like polygons in years quite
low. We have to reconstruct. I mean, come on,
why not? I there's no to go lower than
it is right now. Okay, for us, it shouldn't
be too much of an issue, I mean, I shouldn't be
too much of an issue. Let's extru this upward. So I'll go over to's
dynamic sub div. Are have a thickness there, so we need quite more. We need a whole lot more. Okay. So let's get this hire who need
a little bit more. So I need to pull you even more, but let me just kind
of average this and kind of see if this
in the right place. Yes, it's perfectly in the right place that
will work just fine. Okay. See. Yes, we can make
this work, so I'm going to double the
number for this. Let's do 55. It can go
larger higher than five. Okay. I can't go
higher than five. That's fine. We'll make it work. So let's just accept this first. Let's apply the Control Ship click on this invert
max, bring out a Gizmo. Turn up symmetry, center this. Okay, get this out this way. Okay. I think I'm
going to squash this down. All right. I need to kind of kind
of add some curve to it. Maybe we just start
with just one phase. And then let me enter this. No that's not looking great. That is not looking great. Let's just get the
shape we want. Let's just kind of get
the height we want first. Then every after that
you can come next. These enough. Let's say a little bit higher,
that should be fine. Okay, I'm going to squash this down get as straight
as I possibly can. Something pretty mot like, so should be fine.
Alright. Awesome. Okay. I think I can extend this out
as well, more or less so. Okay, I think this should
be just about rights. Okay. Then I'm going to
subdivide, I can subdivide this. Let's make it duplicate. Duplicate this. Then subdivide. Well, that's a bit weird. Clear the max, subdivide. That's looking a bit weird. So what we're going
to do instead we're going to add
loops in between. Let's add loops
in between. Okay. Let's see, Let me undo this. I need to undo this. Oh, let's go to the original instead do. Let's go to the original do. I still want to maintain
this curve shape. I need this clove
shape. So instead, extend it out some more. So the cove shape
has already given us most of the shaping we need. So the shaping we need
to extend this out. Say Heli bit more,
shouldn't hurt anybody. That should be fine. I All right. The only issue that is
not straight enough. Let me move this
again. The top part is not straight enough. Okay, we can't completely fix that until we
do something like, let me go and solo this out. So let's do group binormal. Let's do group binormal
to actually fix that. So I do group by normal group bynormalr Control
Shift click on this. Okay, how do you delete Eden? When the fact topology
deletes ding, then we can use this now gizmo heads in there and then straight
in it kind of flat. You can make this
completely flat now. So those flats in this, it's quite flat now,
precisely what we want. That we can subdivide
this as well. Spotting out. So maybe we
should do Bevo instead. Here's the Bevo instead. So I'll go over to
Bz, let's do inserts. Let's do insert instead.
Multiple inserts. Okay? We need a little bit more. Or in case we want to
have more control, let's say we want to have
more control over this, we need more control
over this, so we can actually bend this down. Let me just do one instead. Let's do one because I want
some control over this. Gets one roughly in the middle. Okay. I think this should
work just fine. So more brush now,
turn on symmetry, increase the brush size. So just to shrink this in I kind of compensate
for it quite well. If I move this way too much, you're going to get
unevenness around there. So make sure you compensate
for it quite well. Okay. I can move this down some more. So once I kind of add
more pots to this, I'm going to create some
interesting edge for us. Okay. So let's go and
add one more in here. You can add edge, one edge also as well. So B ZM. Let's add one edge. Add one age as well.
Okay? Awesome. So you can go back and move. Okay? Move this in some more. Move this in some more as well. All right. I think it's perfect now. We
have the shape we need. Okay, here's close,
compensate for this around. But we need to symmetry
ton down, so that's fine. So now we can now add
the sickness we need. Now the thickness in
me. Let's actually see what sickness will
be in here if you turn this on as fine we have thickness right
where we need it to be, so we can just move
this back in place. Okay? We would accept this, accept it, extend
it out even more. Move this back all
the way back to fine. So. So now, we need to kind of
extrude the shapes we need. Let's extrude the shapes
we need for this. So we have one crown
here, one, two, three, four, as one in the center,
so we can get this out. So we can do if we do 12, We do this to leave two gaps. Don't that to leave two garbs. I think that should
work. That should work. So let's just go it
be on the keyboard. Let's go to Zi modular. Hold OTs. Hot swell. We lift two gaps swell. Live two dots. Okay. Let's see. This needs to be absolutely as perfect
as we can get it to be. Okay. I'm not completely de yet. We have one. If we leave
two gaps in here now, delete to many this in here. So let me add an edge in here. Let me add somewhat
of an edge in here. Okay, delete this
edge on do that. I think this should work.
We can do this edge. Okay. Then we can just
I move this edge? That's a bit weird.
I see something a bit weird in there.
I don't want that. Okay. I think this should work
if I subdivide this. Let's kind of visualize. Want to visualize if we have
the shape in there we do. We have the shape in there,
but at the same time, I think I made it too thick. So let's just do
something like so. Extend it out some more. Okay. Awesome. All
right, let's go back in. So I'm going to do mesh. Not Polyloup don't want Polyoup. Let's do Polygp island. Come on. Something like so. Okay. I think mine is
way too broad, I think. I think mine is way way too big. I think mine might just
be way too big for this. So undo or undo do all of that. Maybe just two, two
should be fine. Maybe just these
two should be fine. Okay. Then we leave a mini gap. Let's do one, two, three. Let's leave three gaps. Okay? One, one, two, three. Okay. Let's see. We can do this in here. I think this should be fine. Let's see, do that
do in the middle. I think this should be fine. Now let's pull this out. All right. He's F. Obviously, we kind of
correct these bits. F is a little bit
wet on this edge. Let's see. So I'm going to use
the move brush. You see have symmetry
turn down for this. Not going to push this in. Move to the back,
push this in as well. He have this one in the middle. Push this in. Okay. Yeah,
you should just work. Okay? Bing this down some more, get this back in the middle. Alright. Let's create some
Bevo across this. Let's create some Bevo. So let's go over to Z Modular. Solo this out so you can
also visualize this alone. No, no, just before, not yet. I need to get I need to get this in. I need to get this in. So, let's let's see if we can do an inset without having that
weird iss we always have, you know, Inset holy group. Kind of ****** me off when I
get this weirdness in there. Weirdness is quite
annoying to deal with. Okay. Let's see. I think j have to do
this manually instead. Let's do insets with
an inset around here. Okay, like so, and I'll
begin to grab all of this. Okay. I need to do the same
for the backside also, too. I need to do the same
thing also around here. Okay. Well, that's fine. Yeah, so should be fine. The other thing you need to do now I don't need to pull this, I just want to push
this in instead. So, come on. Hu mesh. Hool group island. Come on. What is this? Don't do that ton of symmetry.
Why am I getting this? Ton of isolates. Okay. I think I need to change this up to flat flat, flat
island instead. Okay. That is a bit weird. Let's do extrude instead. Holy Group Island. Why do I keep having this
issue in here? It's almost like he's not
even respecting it at all. No respecting it at all. No
respect in your thoughts. A, we just let's just do
the opposites instead. Huma pool poly group. So definitely work, no doubt. So let's just do what work. Okay. All right. Yeah, I think this
should be fine. Yeah, I mean, why not? I
should work just fine. Okay. I'm not looking now these
crowns now to see if I need to do something in there as well
or just leave it as it is. Okay, I think let's try
and do something in there at the very
least. If we can. Okay. So let's let's see if we can do looking
for something poly group, poly group, poly group. Just to find something a little bit harder
polygroup island. Whoa. That seems like
a complete mess. Ah, Nope. That will not
work.Othing I don't want it to be I don't
want it to be too plain. Let's see. Okay. Trying to make it slightly
more interesting. So let's see behind poly group
in front and poly group. Now, it's not give me the
desired result I'm going for. Let me do inset instead. Let's insert this around here. Is this around here as well. Is this because I don't want
this to look too plain. Should also have some
interesting results to it. Okay. So undo that. Let's do
this symmetry turned on so you can get a
bit more cursy to it. Alright. Okay. Maybe just Bv. I think
Boo should just help. So let's just be with this. Just bear with this. Let's bevo the
necessary edges first. Don't do that wrong one. Okay, here closed. Bear
with this as well. Alright. Let's see what else we can do. Yes, it's better with
the backside, too. Okay. Yeah, that should be fine. Yes. As well. Okay. Yeah, as well. I think here also. He also. Okay. Let's merge this.
Let's see what I mean, let's add most oblivion.
Let's see what we get. Okay? Bring everything back out. Yeah, I think, as
far as this goes, I think it should
be fine for now. Way too thick to rotate, bring this down some more, a bit more actually. Alright. Now, the top part is
actually quite high. So let's use delete lower. Let's use tonagismo. Let's use the bend curve. No. Let's change orientation. Let's change the axis for this. Oh, no. It's the previous
art this was actually fine. We need to increase
the count for it, resolution count for it. But this center part needs
to be a little bit higher. Okay? Let's shrink it down also. No. Yeah there's some the screen parts in there
that I'm not really liking. I'm trying to avoid
using the move B because I think the move brush
might not do a good job. Let's just try using
move brush instead. Let's turn off the
dynamic and pull the center parts of Okay. That actually works.
That actually works. All right, but I need to kind
of bring it down some more. No, I don't want this anymore, so I can just
accept accept this. No, I don't want to squash down. I just pull down instead. I just buy this in some more. Okay? Bring this closer. Look at this from a distance, kind of get a good idea. Okay. Yeah, I think it
should work just fine. It should be just fine. And we did tell in India. I think we can block that dots instead by ourselves
with some sculpting so. I think as far as this goes,
it should be just fine. Okay? Right. Go down again. Yeah, this is fine.
This is fine. Just kind of trying
to get a good feel of it, subdivide some more. Let's get a good feel of this. Yeah, this is fine. This will work just fine.
So let's go down. Okay? Save our documents. So the next thing we need to
work on will be these wings. So Los may not look
extremely detailed yet. But those things in get
the general shape in. Let's not get the general
shape in Demica now, make it look a bit
more interesting. So we'll do that in the
next lesson five for now. I
13. 12 Crown Wing Blockout In Zbrush: Welcome, but guys. So
previous lesson kind of allies on the crown. So we still have a lot of
work to do in here, though, but the base blockout
in there should be just fine for
what we need it for. Okay? So let's carry on. So I'd like to make this wing, this wing on his head. So to do that, I'm thinking I'm going to kind
of paint out the shape for a plane and then extra that
out. So let's do that. So I'm going to go in and I'm
going to go over to Append. I'm going to append a plane third squares down
here quite small. Let's come down, select it, extend it out a little bit more. All right, getting close. P this here, maybe
let's leave this up a little bit more. All right. So I'm going to duplicate
it like we always do. I'm going to subdivide
the duplicates. Let's subdivide
these duplicates. Something quite should be fine. Up to 1 million should be fine. Then we do delete lower Shift F. So if you scar paint
in the let's see, we get something interesting and no that's fine,
precisly what we want. So I'll go in and
use the Max pen. So I'm going to
paint in the shape. Let me reduce the bros size. I'm going to reduce the
bros size even more. Right? I'm going to
paint pretty bros size. Alright. Something more or
less like soap. So basically trying to
create a wing shape in here, reduce the bro size
a little bit more. Increase intensity of my paints. Okay. Undo that, reduce the bros size. Let's do this from
around here instead. Kind of a mess right
now, but that's fine. We'll make it work. So I'm going to paint in, let's paint in word parts. Paint all in word parts. Alright. Since everything has to
do with inward parts. Okay. And I'm going to start
erasing a little bit of soap with a more
sharper ship in there. Okay. So I'm going to
reduce the bros size. Then I'm going to start pulling
out some wings in here. Right? Plot another
one. Lot another one. Another one in her.
Another one in here. Let's do one last one
around on the edge. Okay. Let's get some clothes and do some cleanup
job in there. Let me get a little bit sharper. Then some sharper edge in there. Okay. Move this aside. Put
some sharper edge. Alright. Yeah, I think, we need to do this a bit more
around here as well. Okay? Pretty bros size. So should be quite
long, kind of. Okay. Can these up some more. So I need to kind of
get down some more. Let's clean it up
some more. All right. It's not a completely neat do, but this will work just fine. So let's sharpen this,
sharpen this some more, control Let's do Shift F, Control W. Undo that, Control W. Give it a
separate poly group. Okay. Undo that. I need to fix
this up a little bit more. Okay. All right, sharpen this. Control W separate poli group, Control Shift click
Control Shift click again. Here is the shape
we actually need. It's roughly around 300
k, but that's fine. I'm going to modify
it as we need to. So let's start by
polishing this. Or let's start by
deleting ding first. So let's do delete ding. Delete ding. Okay. In. Then I'll go over to
information. Let's polige this. Pole this quite well. All right. I'm going to make some
modifications to this. Alright. Make some modifications to it. All right. Now, let's zero merge this. I'm going to make a
duplicate of this first. Let's make a duplicate so
duplicate this, hide this. Let's zero merge and then make
some modifications to it. So geometry, Z merger. Let's start with hundred K.
Keep groups, detect edge. I'm going to leave
this moon for now. So let's re merge this.
Give the a moment. Okay, we have something to
start with 98 K. All right. I'll go back and then
polish this again. Okay? All right. So let's go in and
then continue mashing this. Let's do half half now. So we keep going off and then
polishing it on the edge. Half again. All
right, half again. Okay, I won't do that. I'm losing that sharp edge. So I'm going to take down
the smooth now. Then Z mash. I don't want to lose
the sharp edge. Alright, Z mash again. All right, what do we have
20 k. Let's mash again. Okay. So I'm going to
go over to deformation, polish this a little bit more. Then let's go halfway
again, half again. All right, half again. Let's go out for more
time. All right. So we have something quite
low enough to work with. So we can actually sharpen
this a little bit more. All right, can sharpen this. Yeah, I think somewhere
around there should be fine. Okay. I'll bring this closer. All right. Tighten this some more. Okay. Then let's do same zero mash. Okay. Undo that zero mash again. Undo that old control
zero mash again. Undo that old Zero mash. Trying to avoid
having this in there, but anyways, is
there already so. Let's just do same zero mash or that's find that
fix the seats. Okay. On this off Zero mash. Okay. Let me increase this a
little bit more much. Get something a little bit
tire. Yeah, this is fine. I think we can work with
this. This we can work with. We kind of lost the edging
here, but that's fine. That's fine. It's not
going to be a major issue. I don't think it's gonna
be a major issue. Okay. Now, let's add some
thickness to this. Let's kind of see the
silhouette for it. Let's adjust the silhouette
a little bit more. Okay, if we should undo that. Let's add some
thickness to this. Oh, I think I need to fix
this region some more. Okay. Now, let's add
some thickness to this. Let's go to dynamic.
Take down moon, add some thickness to it. We need some more All right. I'm not entirely sure
how much more we need, but I think as far as this goes, it should be fine.
Increase that later on. So let's do two instead. Or, let's just do one for
the segment. Let's do two. So we have one across
this. That's fine. I'm going to let's get
this where it needs to be. But first, let me increase
the thickness a little bit more undo that. Supposed to undo that. Supposed to Let me
increase this all the way of face and apply
this before we can now scale it out some more, a little bit more p this
up, hing this down. Here this up. Let's rightly position this. Okay, Centers. Bring this down. Put this up. I can't really see that anymore. Let's get our crown visible. Let's make our crown visible. Alright, let's skill it
out some more. Okay. They rightly position this
way it needs to be now, so get this in. Move this skill it out
some more bullets in the. Yeah, so we need to make
some modifications to it, but I think as far
as this goes, we're getting something
interesting in there. Let's look at this from the
top view, move this forward. Alright. Let's see. I think we can make this work. Move this closer. Move this up some more closer. I think somewhere around
this should be just right. Maybe ski it out a little
bit more, push this back. Okay. Let's we can do some general
modifications to it now. There's one general
modification I can do would be to move this down. Try and create a little
bit of an arc in there. Okay. Move this in also as well. Create an arc in here as well. All right. Okay. All right. Move this up some more Okay. So now if you should
subdivide this, let's see what we get
when we subdivide this. Here, you that rounded
edge, which is what I want. The rounded edge
should be just fine. All right. Here, this we can
definitely work within her. Can definitely work with this. Maybe a little bit
modification should be fine. So you go to the lower
subdivision level. Move this in some more up
some more shown salts, make it a little
bit more obvious. I'll do the same for the
back piece also too. Okay? This I need to get down. So more down also. Alright. I think I went too much, so we need to
extend extend this, a some thickness
to it. All right. So I'm going to mirror
this to the opposite side. Let's mirror all
this too before we mirror to the opposite side, there's something
else you need to do. We have like two of this. So let's check the
geometry, delete are Okay. I'm going to hold down
Control, create another piece. All right. Go in. I'll rotate it this way. Okay. Rotate undo that, rotate some more,
move this back. Okay. I don't need to
be quite visible. Almost the same heights. I'm going to go in, rotate this some more, move this backwards some more. I think I can actually
buy this in here, extend this out.
Move this in here. Okay. Extend this out some
more in the max. Okay. Let's tend this out. I need to make a duplicate
of this also as well, so we can now duplicate
to fall back too. All right. Let's get in do this
center this rotates. Let's check this from
the top view. All right. I think we can make this work. Let's see clear the mark. I'm going to solo
this I'm going to. Let's use the Max lasso instead. Max las. I'll mark all of these bits. Okay. Bring it back out. Go to
our gizmo, go in depth. Move this out down. Okay. All right. Once I kind of perfect this
on this on one side, I can just flip this
on the opposite side. All right. Yeah, I think this
should be fine. Yeah, I guess this
should be fine. So some more. Okay. Trying to see I'm
just trying to find the best angle for
this, actually. Look for the best
angle for this. I think the best angle should
be somewhere around there. Okay, do that. Pull this out, let's leave it in there.
Let's bury it in there. Okay. What's kind of creating
a weird silhouette at the back and I
don't want that. So let's see if we
can bring this down. Okay? Like, so I want to have
gaping between here. I don't want that to
be quite too busy. So gaping there should be fine. All right. Gonna extend this
out to compensate for it. Okay. I kind of flatten it
out a little bit, flatten it down a little bit. Yeah, I think that
should be fine. Then we can mirror this
to the opposite side now. But it's quite large. You can see it's
almost down here, so I think we need
to make a little bit wider out some more
Bing this back in here. It kind of extends
down quite well. Use the move brush. Kind of get the ship ship ship
in I need for it. Okay. Let's move to the back piece. Not just this again. Alright. This. You just kind of get
the right position for it, and then
we should be good. Okay. Let me see if I can deflate
this a little bit more. Let me deflate this a little bit more so I'll
go to deformation. Okay. Let me try and
deflate it some more. This not too thick. Okay. I need to move this
a little bit more. Isolate. I think at this point, we can just give them a separate let's let's just give
a separate poly group. So it much easier to
actually select them. So let's do autogroup. Okay. Select this. I'll move this backwards
or more Backwards or more. Okay. Move this
backward some more. Yeah, this actually needs
a lot of refinement, but I think we're
on the right track. Lot of modifications,
I know there, but I think on the
right track for this. Let's clear this out. Now, let's miror this to the opposite side. So let's go to geometry. Geometry mirror weld. Okay, I think that's
fine where it is. Okay. So no symmetry for this. So you can do some
sculpted detail as well. All right. So this part needs to kind
of come down quite well. Okay? All right. The backside, we need to do the same for the
back side as well. Okay? Let's get in there. Move this up some
more. All right. That should be fine. So if we should subdivide this some more, we just need to make
the right amount of correction in here just to
get this to look right. Move this down, move this down. Move this down. Quite a lot of corrections to done in here. Okay. But we'll make it
work. Make it work? All right. I'm adding some
scopted details in there. Then we'll just fix any major issue you
might have in there. Okay? Fix that. Go to the back
side, fix this as well. Move this out. Okay. All right. Yeah, I think should be fine. Okay. Let me even do a
little bit of polish. Let's see what we
get on polish dis. Oh, that's way too extreme. No, that's not gonna work. I think the way it is
right now should be fine. Alright, so next lesson, let's move on to something else. Move on to something else. Smooth this down. I think less just remove
brush instead and move things in. All right. Here that's fine. That is fine. Most
likely next lesson, we can create this said piece. But as far as this goes, I
think this should be fine. Okay. You just need a little bit of refinement
and then we should be good. Let me just get a
good feel of this. I subdivide this quite well. Okay? I think this is where
some of the issue is. We can move this down. Okay? Just trying to get you right
amount of shipping in there. Here, I think this is fine. We can work with this. A little bit of refinement here,
probably that's fine. Alright, so I'll see you
guys in next lesson. Bye for now.
14. 13 Crown Priest Blockout In Zbrush: Okay, welcome back, guys.
So in the previous lesson, we kind of created
this wing shape. So we're going to move on
and increase something else. So the next thing I
would like to create would be let's see, I feel like I should increase this grown a little bit more. Maybe leave that up some more. Okay, pretty much less
so it should be fine. Get in close some more. Okay. I think somewhere roughly somewhere around
there should be fine. Push this down a little. Okay. So that kind of creates a base for this sculpt in there. So I'm going to be re
using my Bsemsh also. I mean, why not? We can
use our beige mash. So we can use, we have this Bsemsh already. We can definitely use
this and then just cover most of the shape let
me select it actually, and I'm going to duplicate it. Or maybe but I think I might need some let's see it first. So let's duplicate
it. So it's visible. Let's bring out our gizmo. Let me isolate it. Set our gizmo directly
on the head orient this. So I'll pull this up.
Okay, screw this down. One can see if the shape, we need most of this
we can cover up. Yes, we can definitely
work with this. So we have this five k
resolution for the polygons. So polygons should be fine. So I'm not going to shrink
this down this way. Okay? Let's if we move it up,
actually, let's move it up. Let's get this off screen a
little bit small like so. Then we can create
the shape we need. So we going to create
a two bond for him. So you can do this by in B. I. Let's go over to IMM primitive. So we're going to bring
in a police fair. So this polly fair should be directly on the
center of the head. Okay? So I'm holding down
shift to get this centered. All right. That should be fine. The next thing I'm going to do. Oh, shape is a bit deformed. That's a bit deformed. I don't want it to
be deformed, so let's drag this out again. Hold the shave just once, so we can not snap this directly on the
center of the head now, which is fine,
precisely what we want. So let's split this apart. So I'll go over to
the move brush. Let's go over to sub to
split split or marks points, then select the police fair. Okay? Make sure
symmetry is torn down. Center this old
and then sent out to MaxPoint or Max
Center rather. So move this up. Let's create a two
band ship for him. I would need to
turn off symmetry, center this, scale
out some more. Also, we only need
roughly half of this. So don't need the entire
team, t half of this, so let's get half
of this selected. So I can go somewhere
around there. Let's do a little bit more
around here Control W, get a separate poly
group, Control hit click. But I'm going to make a
duplicate of this first. So we can have a
backup to four back to put this down hide this. Then let's do delete Eden. So go over modify
topology, delete Ed. Let me get to enclose
on our reference. All right. Move
this up this way. I think we need to delete
the lower part or maybe not. Don't necessarily need
to do the lower part because one is
going to buy it in, or maybe just delete the
region we don't need. So just for the sake of optimizing this
a little bit more. So let's do. I think we need symmetry
turned down for this. Okay, grab this thing
called should be fine. CtWo. I think somewhere
around there should be fine. Control click
Delete it in again. All right. So back
to remove brush. Yes, you can just move the collabs down,
pay this back in. Okay, I think I met
Odletd with too much. I think updated with too
much on do that isolate. Don't do that again. Let's do I think all US should be fine. Come to W. This is
what turn into delete. So delete ding. Let's everything back out. All
right, that's fine. So we can subdivide
this a little bit more. As the one k polygon
should be fine. All right, pull this up. So let's just get a
blockout for the shape in I think this blockout somewhere around
there should be fine. Okay? Yeah, awesome. I think we can
definitely work with this, extend this out a
little bit more. Alright. Awesome. Smooth
this down. That is fine. Look at this from the side view, elevate this up some
more. Alright, perfect. That work just fine. So I can also duplicate this
and get this down. So I'm going to do a
duplicate of this. Yeah, I think you can
keep both of them in the same at the same sub
in the same sub, too. So let's go to gizmo, remove the symmetry
biting next on the keyboard, hold down control. Oh, I can't do this on seal. Let's delete lower. Let's make it
duplicate out of this. Okay? I think I'm
going to use this to kind of block out
the garments first. Let's use this to
block out the garment. So let's turn on symmetry, increase the bro size
a little bit more. Okay? Let's use this and kind of block out the garment first. So extend this out this week. Okay? De some more. De some more smooth
this down. All right. And pull this bar in. Just trying to simulate
something that looks like a garments in
there, should be fine. It doesn't need to be
extremely precise. We don't do too much
precision on it. I think something
around the nature of this should be just fine. Yeah, that's fine. Okay, let me give you a separate polygroup Control
W. Got a separate polygroup. All right. Shift F. Then I'll go over. Let me just think I'll need to kind of tweak the pace a little bit more. Then symmetry for this. Let's give him a slightly
different structure face. So it doesn't look too
identical in any way. But we can still keep the
major structures in there. It's fine. We can sti keep the
major structures in there. C I just introduce
some shaping to it. Okay. Take down the
smooth intensity, an smooth this down some more. So for now, we can just
leave this symmetrically. Let's create a dense in here. Okay? A it's kind
of close the lip. We need to close the lip. So let's do some
closing up of the lip. Go to gaze more,
extend this out. Let's give it a
separate poly group. Go back to gizmo control
select to max that out. Control tab on it to kind
of blow the edge out. Then we can use
the move brush and then move this upward
a little bit more. Inverting max, close the lip. All right. I think this
should be fine was. I'll introduce some more
ship into this as well, let's ton of symmetry,
get some blend in. Ton symmetry, bring this closer. So that's trying to incred some differences in the
facial structure in there. Just make it look slightly
more interesting. Let's create some necesarlabel
food in here as well. Create some denser dense, create some older looking
facial structure to him. Okay, this down. All right. So I don't need symmetrically for now.
That's completely fine. Okay. So now I can
turn off symmetry, introduce some more
shaping to it, create some structure
for the nose. Here, swell, here, swell, create some shaping in here. Just to break up the
shape some more. I'm not going for something
extremely realistic, though, but just enough to kind of break the silhouettes in there. Just enough to break
the silhouettes should be fine. Okay. Smooth that down. I think it should be roughly
fine with it. Don't need to do too much.
I use the more brush, move this in in some more right. I think that should
be good. Okay? Yeah, that should sit just fine. Don't need to do
too much. So I'm going to go over and select
this again and duplicate it. So let's go to
Gizmo, select this. Don't know symmetry
center this orient. Older no to center and
then to orient as well. Let me save my file. Let's save this file.
All right. Okay. So now, kind of use this kind
of create a scarf for him. So I'm going to hold down
Control drag this down. I want to create a
scarf piece for him. I need to adjust this or
undo that, undo that. Introduce symmetry turned on. Let's bring this
back and do okay. All right, so turn
on symmetry now. So with the move brush, I move this down this
way, get this up. Okay? Move this down more
I need to take down my brush size so you can get a bit more
precision in here. Alright. Move this out. Like so. Awesome. Let's smooth
down the edge. There's still a lot of block
block into doing here, but as far as this goes,
is coming out quite well. Smooth this down some more. Okay, let's look at
this from a distance so you can get a good
fell of the form. You can use the dam standout now to kind of do some blockout in ton of symmetry can do that. You just need something
basic in here for now. Just to get some
shaping in there. Okay, I use the standard brush, pret some more elevations
in here as well. Crit some elevations
in here as well. Alright. So let her come
back to it and then make the right
modifications to it. But for now, I just need
something like a Bz. Just the biz should
be fine for now. A good biz should
be just fine. Okay. We don't need to
do this inside of Marvelo design. I would
just take too much time. A rough blockout like this
should be fine. Okay. We've now added we have not added enough subdivision
level yet to hold this. Once you add more sub
subdivision to this, should be able to hold the
ship a little bit more. But for now, let's just get
some good blockout in there. Okay. I should be roughly
around there. I think I can use the dam
standard brush tunnel symmetry, create something down here, create something in
the middle as well. The awesome. This
should be just fine. Use the move brush again, kind of create something
that looks like a chest like chest in there. So more or less pulling
this out to move. I also simulates something that looks like this chest region. Head down the bros size, elevate this out some more. Okay. Do some slight
smooth in there. Alright. That should be just fine. Okay, that should
work just fine. I think we can actually bring all of this as one single piece. You get this as
one single piece. So we can measure
all of these down. Is three k in total. You can meagre all of this
down. I mean, why not? So I'm going to send all of
them down, hold down shifts, send all of them down, select the head, send
this down as well. Okay, so I have
them selected now. I'm going to select
the head. Put it sees selet the to bound first. I'm going to merge down. So let's merge down. Okay? So merge this down now. Is one single mesh now. Okay? So we can do let's do
some compression in here. Let's compress this
down some more, get some compression in here. So measure of compression
should be fine. Okay. Let me take down my bro size. Ton of symmetry for this. Symmetry ton off. All right. Okay, that should be fine. We have the major block cart in. We don't think most subdivision level to hold this very well. So I think I can
move this down now. So let's move this
down and put it where it needs to be make some
more adjustment to it. So I want to sharing this down. Okay. Get this in place. Pull it out some more. I think I'll need to max, I think I'll need to increase this size a little bit more. Okay? I think the to ban will need to use the
to ban some more. Less scale than this to ban. Okay. Yeah, something
pretty smart like so. All right, so I'm
going to shift. I need this and this marks marks this
out everything back out. So with the move brush, I'm going to extend
this out some more extend this out
some more. Okay. I think it's more or
less find where it is. I think one thing we
need to actually scale down will be the face. Let's scale down the face. Don't of symmetry center this. Let's scale down
the face some more. The face was actually
way too big. Okay. Let's see if the sizing
for this should be fine. I think the sizing for this nice Dana roughly where
it needs to be. All right. Let's clear this out, clear the marks, let's
push everything back in. Okay. I think that's add
it that way too much. Somewhere rough around the egg. Okay, scale this down. All right. You need to do some scale up work
in there, no doubt. Some scaling workers in order, so let's grab this max
invert the max. It the max. Okay. So no symmetry for
this. Not too much, though. Okay? Move this in here, scale this out some more or write I think the biggest issue in here now will
be the two band. I'll need to shrink these two
band some more and do that. Let me max out the
top region first. Let's go on auto group first. Think also give us a little more space cannot
separate them out. So let's separate down
control, select this. All right. I move this in place. Yes, I think, yes, this is fine. Bring this close up. Bring the top part up some more. Okay, bring this in some more. I think this should be fine. Invert the marks. Let me shrink the face a
little bit more. P should shrink the face a little bit more so it
doesn't look too big. Okay. Let's look at this
from a distance. Yes. I think as
far as this goes, it's kind of perfect
for a distance because we always
want to kind of check this from a
distance to be sure if it's in there where
it needs to be. I need to mention corrections
on the lower parts now. So we move brush and
move this in some more. Okay, smooth this down. Let's push this in some more
right, get them buried in. Perfect. I think this
will be just fine. Yeah, that should
work just fine. I don't think I need
anyone for the back. I don't think I need any
anyone for the back. I think the front part
should be just fine. All right, so that's
fine. So the next lesson, we can move on to
something else. You can just move
on to creating. Let's see what we can do. Move on to creating more or
less like the skate piece. We'll do the skirts piece
in the next lesson. I'll see you guys in the
next lesson. Bye for now.
15. 14 Metal Top Skirt Blockout In Zbrush: O Camber guys, on the previous
lesson we kind of worked on the priests for the crown. So we have done that already. So then the blockout. So we're still kind of mostly blockout across
the entire model. So we're going to continue
with the blockout. I need to create
got new shape now. So shape I need to
create now would be let's do let's create
this kind of kind of skirts, the first base, top base
of the skirt piece. Let's create the first base. Well, before we do that, I would like to slim out the way some more.
I'm going to select this. I'm going to do some No, I need to use the,
this is what I need. So I'll come in mark
out this region, like so, blow down the marks, invite the marks,
blow some more, and I need to kind
of shrink this. Let's turn off
symmetry center this. I'll need to She's not working. Okay, it's working now,
so don't you shing this a little bit in some more. Okay, yes, something pretty much like, so it should be fine. Extend this down some more. Awesome. Let this out. That is fine. Okay. Maybe undo that. D on symmetry, extend this out lead
should be fine, right? Awesome. Now, let's
create this set for him. So to create this
set, I think I need to I want to create
a cylinder for you. So a cylinder should be just
fine just to block this out. Yeah, so let's do that. So
I can do Let's do IIMM. Let's use a cylinder. So let's use this
cylinder instead. Come to the center point. Let's use something that does not have subdivision
level in there. It does not have sub go
back to the move brush. Let's look for
something that doesn't have subdivision level in there. I believe this priest doesn't have any subdivision level in. You have no subdivision
level in there that's fine, so we
can use this now. Let's come back in the BI. Okay? All right, get in the center and shift to get something
perfectly in the center. So atonal symmetry now is
perfectly in the center. Now, we need to
split this apart, so let's go to move. We do split on marks points, under split split
on marks points. All right? So let's
select this now. This is what we need
to work with in here. But there are a few corrections
you need to do in there. So first of all, I'll
go over to holy group, eso group and normal. Then I also need to kind
of get this down shift. Let's oring this 90 degrees. Okay, let's see where
it needs to be. I think somewhere roughly should be somewhere roughly
up here should be fine. And I'm going to scale
this out some more. Skirt out roughly
around the width for the skirt itself. Okay. Now let's get this
centered in here. Let's get this
from the top view. Let's see if you have
this privately centered. I think it's roughly around
there. That should be fine. Okay. This we can deal with. So now I'm going
to solo this out. I only I only need this
the rounded part of this. I don't need the top and bottom, so I'm going to do delete
ding, delete ding. I'm going to make a
duplicate of this just in case it duplicates,
I de duplicates. All right. So now we have too
many polygons in here, so we need to kind of simplify
this a little bit small. So we have greater
control over it. That's one way of
doing it. Another way of doing it would be to use the pin pve so we have
the right orientation. Let's add some more
resolution to this. I think three should
be fine. So we have one year, one
year and one year. All right. I think this should be fine. Just before we do this, before we do this, let
me accept this first. B here, I can accept this. Just before we do this, let's let's get the opening we
need in the center part. I'll need the opening
so I can just do symmetry tundwli
symmetry is turned on now. Let's get the center
opening for this. Get the opening in the center. Control W, all right. Control Shift click. It's going to affect the back part too. So let's do Control Shift
click, Control Shift click. I'm going to mark all of this, give it a separate poly group. Control shift click
Shift click. Okay. Let's bring everything back out. Let's see if the gap we having here is fine,
Th work just fine. The gap we have in here
will work just fine. A SAP needs to make
some modifications to it, but it should
work just fine. So I'm going to do
deleteden. All right? That's fine. So let's
go back to our Gizmo. To then curve. All right, so let's increase
the resolution. Let's get one.in the center. That is fine. Select undo that. Let me use my mouse since there, so I can be a bit more precise. Center dot is selected now. I will need to use this
scale this in this way. I'm sure you guys get
the idea already. Scale this in Okay. I think this should be fine. All right. I'll go
to the center part. I'm going to move
this up some more. I'll move this up a little
bit more like soap. Okay? And then select this. I'm going to scale this out a little bit small should be fine. So we get this
kind of arc shape. Move this up a little bit
small. Scale this out. Yes, perfect. I think this is a better This is a better
shaping for him. Okay, let's go back
to the center. Let's go back to
the center piece. Let's kill this in
some more All right. Okay. Yeah, that should be fine.
I'm going to accept this. Let's do accept for it. So I will accept this
so click on Accept. Okay. Definitely, we need to make some
modifications to it, but I think as far as this
goes, it should be fine. So I need to kind of get
this It's way too high, so I need to bring
this down some more. I also need to shrink it
down this way, up some more. Let's kind of get Eddie Stan
Vons to get a good idea. I think this should be I think it's roughly
where it needs to be. Yes, it's roughly
where it needs to be. Okay? Yes, we can definitely
work with this. So now you need to
use the move brush now and then move
something in place. So no symmetry for this. So you can use the move
brush and move this in. All right. In some more. Okay. You should be fine and do that. This should be fine where it is. F. All right. Can definitely work
with this. I solo this out. Let's
see what we have. All right. So we can get this
completely entirely perfect. But without going to work
with what we have and then create something
perfet out of this. So yeah, so now I think we
will need to at this point, we can add the necessary edge
looping we need for this. So I'm going to do
let's do B Z M skip. So I'm going to
do an inset here. Let's add one year. I think, let's add
one year. Okay. I'll add one year as well. Okay. I'll add one year. All right. That should be fine. Let's see. I'm trying
to see if I need Trying to see if I
need something here. Let me solo this out. So
I'm going to delete this. Let's add this here instead. I think I know every day, I'm going to kind
of push this out. I'm going to push that out,
so let me make it duplicate. So in case I messed in soap I
duplicate to fall back too. So let's use the move brush. So of this dynamic GitF Let's
use transparency instead. See if we can just grab
all of these bits. Okay, Ton of transparency. Let's scale undo
that invert the max, scale this undo that. Scale this out instead. It feels like it
feels like a mess, though, but make it work,
would make it work. Okay. You need to make some
modifications in here, no doubt. But I think this is
something I can definitely keep except make some cleanup, do some cleanup work
in here, no doubt. Bring this down some more. Okay. Scale this in all right. And I need to pinch
this back in place. I do the takedown the bros size. I need to pinch
this back in place. All right. I'll pinch these back in place. Okay. I need to make some adjustments
in here also as well. All right. That should be fine. Scale them in some more
actually quite small. Quite small should be fine. I'll pull this out. All right. Pull
this out some more. Okay? Yes, it should be fine. We can definitely
work with this. Yes, this we can definitely
work with. All right. So let's get this out. Awesome,
we can work with this. Let me smooth this
down at the back. Okay. So what now I'd
like to do would be to tighten the edge some more. So I need to add, most
likely bevul this. But just before we bevel it, let's create some so
busy with the Q mesh. Create some thickness for this. Okay? No, I think this mist needs
to be a little bit ticker, undo that. Let me delete this. I'll coming a bit closer
up a little bit more, up a little bit more
should be fine. Okay, I need this to be
quite sick. Should be fine. So we can now grab all of this. Okay. All right, that is fine. Go up. Move that.
Go all the way. All right. I'm kind of thinking
now I should do this Zoo. Maybe we should go
all the way up. I think we can go all
the way up. Let's see. Okay. I need to delete something actually because is
extended out way too much. Okay, I think I need
to delete something. I need to delete I will need
to delete this ring out. Let's see how we can
get that deleted. So I'm going to Let's grab all of this. Don't do that. Let me give this
same let me start by giving everything the
same polygraph first. Let me delete this
top part first, so it become a lot more
easier to grab what we need. Let me delete this
edge first because I don't really need
this edge anymore. I don't really need the edge. Come on. Okay. The control shift click. I'll do it deletes ding. Geometry deletes
ding. That's fine. Let's bring everything back out. Yes, I think this is, like, pretty much all we
need. All right. So the thickness is
going to be It up here, can get this thickness
up here instead, or can get thickness
here instead. Either way it should
be fine. But let's just do this thickness
here instead. Okay, so let's carry on. Okay. Go all the way down
down, continue this way. Alright. All right,
that is fine. I think we should be
able to just do all of this once. I think we can. At this point, I'm basically
kind of experimenting, so let's does not even visible. So let's just do
this s here instead. Okay. Go around this
around this, undo that. Okay, that is fine. Here, that is fine. Now, let's add thickness to this because
we need thickness for this. So let's go to dynamic sub div. Take down the smoon, add
some thickness to this. Heap F. Let's bring
everything back out. Let's see how much
thickness we need for this. I think something around
there should be fine. Let's do two of the segments. Apply this on. Okay.
Here that's fine. So now let's do BCM let's extrude, Soc mesh plyopPlygroup. Get some thickness in here. All right. I think this
might be overdoing it. I might be overdoing it. It's some kind of nature
of this should be fine. So, let's bevel the edge now. Let's get some good
edge beveling in there. So go to the edge. Make sure you bevel, I think, single row
should be fine. All right, like so
in here as well. Come here, do the
same sc around here. Do the same for the do that, the same for the inward parts. All right, SF, all right. Here, this is fine. So subdivide subdivide this you should be getting something
pretty much like so. Okay. This should be fine. I think the thickness for this
is actually way too much, so I'll need to undo that. Thickness is actually
way too much. Let's take this down
a notch, apply this. Okay. Then extend this out. Okay? Thickness is still way too much. On this side is way too much. Undo that. Take this
down some more. In the again, apply this
extend this out some more. Yeah, I think it is
the right amount now. I think this will
work just fine. This should be just fine now. If I subdivide this,
let's see what we get. I think it might actually leave
this without even needing to do too much
beveling on the edge. This might just work. Maybe maybe just one bevel
around here should be fine. Here. Do you have anything
working in there? Maybe something around
there should be fine. So subdivide yes, perfect. It will work just fine. We have the right amount of
thickness also in there. Alright. Maybe we need to
push this down. Undo that. Let's go over to move brush. Let's go back to the move brush. Take down the move size. Take down the move
size, some more. Okay. Let me mark so the
top region, blow the marks. I need to bring this
down some more. Actually closer closer
this way. This as well. Okay? I don't need to
do too much, though, because we're going to be having something
underneath this, so I think somewhere around
there should be fine, right? So that's fine. So
the next lesson, we'll just move on and
create something else. I'll see you guys in next
lesson, bye for now. Okay?
16. 15 Metal Torso Band Hinge Blockout In Zbrush: Welcome back, guys. So let's
carry on from left off. So let's see quite left off adjustment we
need to do in here. Okay? So let's carry on with it. So I'd like to make this
band across the waists. So I'm going to create the bond. So there are a few
things you need to do to actually create
that band in there. Let's start by
creating the ship in let's see if we can actually
use the clove brush now. Be able to use the
clove brush now. So let's see Okay. C strap. I think I always prefer
this curve flat snap. Yeah, this is the one. Okay. So let's see where we
need to put this in, right? So the measurement in year seems like she wish it slightly
off or something. This part kind of
comes down some more. So more or less like she has
kind of shot out to anyway. But we don't need to
completely follow that you don't have to. Let me pull this up, you know, let me leave this
down where it is actually. I will select this instead with the move brush and move
it down some more. Okay? All right. I think somewhere around
there should be fine. So we can use the brush now. So call flats. Take down the brush size. Let's get in a bit closer
in there on the reference. So it's something that
comes across this way. Let's move this all
the way up here. Okay. Undo that, select this instead. Okay, now that's way too big. Need to go over to, I believe, under strop. Okay? Pf function. Pf step. Let me increase
a little bit small. No, no. Make it smaller instead. Okay, that's way too small. Let's say this at
a value of one. Okay. Here's something like so. I will need to reduce the
bro size even more so you can use a bit more
precision. Yeah, awesome. Yes, I think we can definitely This we can definitely
work within here, and it's also a flat piece. I think the thickness also
too, should be just fine. So I'll go in to stroke. I'll do under core
function, deletes. Okay. So I'm going to do
split split on marks points, get in the F. Okay, I is what we need
is a flat surface, so it should work just fine
for what we need it for. Okay? P to add a
segment in the middle. Let's get a segment
roughly in the middle. But before that, let's duplicate this as well. I duplicate. B Z, undo that, undo that. Let's do inserts. Get this in the center.
Okay? With the move brush, I think with a move brush, I can move this increase the brush size a
little bit more. Let me just push
this out instead. Get this out instead. Okay, I think cemetary
tono, that's fine. So now we need to add
thickness to this. Let's get some thickness to it. But I need to add a BM BC I need to add an inset also around there
around this edge. Okay, so it's hold
the edge very well. Let's add some
thickness to this. So I'll go over to dynamic, take down the moons. Okay. I think by default,
we're getting some thickness in there because it's kind of tech
thickness that comes with this. I think this thickness should be just the right amount
we actually need. So I'm going to add segment two. Okay. Let me know. What did I just do? Okay, let's
go to solo, get in there. Right? It's very heavy
segments in the center part. Let's take this off. We're going to create
our own instead. So let's take that
off. Let's apply this. Then we'll add one
segment around here. So you should actually
go across this, which is fine,
precisely what we want. Okay. I think we're getting
something in here already. I think let's
subdivide this. Whoa. This edge is a bit weird. The edge around is a bit weird. Let's add one year.
Let's add one year. Here, well,
subdivide, let's see. Still having this weird
pinching under edge. Weird pinching under
edge which I don't want. But we just might just
be able to fix this. Okay. Let's let's go over
to this polish. You know, give me some
weirdness that I'm not liking at the moment. Weirdness that I'm
not really liking. Why do I keep exploding this solo gave me some
really weird edge. Okay. I'm just into
dicts, actually, so person do all of this. So there's a weirdness in here which I'm not liking at all. So we can try and see if
we can fix that by doing Let's idea we can actually try also to bevuli to see if we get something
in the Bvolis. Okay. Let me get in take
this down, apply this. Control secreting the
weirdness in there. Let's add the segments here. Or let's bevel with
the edge. Let's see. Let's say beveling this edge,
you do something in there. Pay with this edge as well,
pay with this as well. Subdivide. Okay,
that actually works. Alright that actually works to actually hold the edge properly. Okay, awesome. That
actually works. Except we need to I need to move this center parts
to the middle some more. I need to move this this way. Okay? Let's bring everything back out. You subdivide, you get
something like so. Turn of dynamic,
use the brush size. You move brush, move
this up some more. Okay. Now, this, I don't
think I will need to do too much working
here, though. But let me accept this first, let's do delete lower,
let's accept this. Okay. Alright. Okay. That
should be fine. See if I need to increase
the thickness a little bit more Let's see if we can get this slightly
thicker than it is right now. So we're going to use
the inflates instead. So let's do deformation. Inflates, put some thickness in. I think something like
that should be fine. Don't need to go to
extreme. Okay, fantastic. So now, there's see some other changes we
need to make to this What I think is in
the right spots. Yeah, this is actually
in the right spot. I'm going to move
this up some more. Let me grab this actually grab this around here over
the mags blow this out. Extend this up some more. Okay. Pull it out. Okay. At some more. All right. Yeah, we can definitely
live with this. You should be fine.
I'll select this. Bring this down a little. Okay. Move this in some
more, bring it closer. Okay. Yeah, that's fine. I think this we can work with. Now, let's reduce
shipping in there. So I'm just going to reuse the duplicates we
already had in there. So let's reuse the
shipping we have in there. Or we can even use
what is there already. So let me w duplicates.
Can I subdivide? Can I get this subdivided
down if I can? We'll go back to the
duplicates we have in there. Undo that. Let's select the duplicates. Okay. Pull it out. Let me get this up some more. Orientation seems rather odd. Okay. Let me rotate this
way, pull out this way. All right. Extend this
out some more. Okay. So now I just kind of select
bring this in some more. I do this correctly, this
is looking weird already. Here is looking weird already. Let's just do what we
need to do in here. So I would select this pun
should be where it is. I'm going to pull this out. Here we have one, I
think I can do two. So this two of this, okay? Let's see. So I'm going to grab this invert invert the max who up this way, L the max. Let's select the next two. I think we can do these two should be invert
the max those up. Okay. Somewhere around
there should be fine. All right. Put this up
some more clear that out. I think we can do this two. Invert the max.
Move this up. Okay. I think at this point,
I'll undo that first. We need to add under
coats in here. So let's do BZ. Come on. Come on. Oh, I'm Bo, so it's supposed
to be on insets. I supposed to be insets. Why are we not getting
inset in here? Fantastic. Oh, inset. Okay, I should work now. Yes. So somewhere around
here should be fine. Okay. Can I pull this out now? Yes, I can pull this
out comfortably. Okay. Pull this out some more. Let see what we have. Okay? Yeah, I think we can work
with this, play this out. So we have this
done symmetrically, something pretty much
like so shi fine. I need to make some
adjustment to this. I need to snap this down. This needs to come down.
Can I just mark the edge? Can I mark the edge? Let's see if we can
mark this edge. Inverts the max. Okay? Okay, up some more. We need to actually
have more gap in. We need to have more gap in. I think I just need to squatch the entire outin down some more, Squath this down some
more, pull it up. Okay. I'll max this region. Invert the max can
bring it down. Okay. I want to bring
it down some more. Okay, I think this
should be just fine. Okay. Let out a little bit more. I think we can do some
movements in here as well. Get down your brush size. Let's push these down,
get them closer. I might need to even
bevel that actually, so let's bevel with
these edges actually. Let's bevel them. By. Let's use BvulO let's create
a duplicate for it. Okay? By wood this way, get some kind of
flat edge in there. Okay. By wood this as well. Okay? By wood be wood should be fine. Okay? Yeah, I think this should work
just fine. The more brush. Tone of the dynamic Okay. I think this should
be fine. It is down. All right. Now, let's add some
thickness to it. So let's introduce some
thickness to it. So dynamic. Okay. Let's see where we get. I'll take this out. Is thickness is this thickness fine or
we need a little bit more? I think this should be
fine. So apply this. Let's go it from a distance. That should be fine, I guess. So let's be with the edge. So be with the edge. Okay. Yes, Spotter goes across
the entire out team, which is precisely what I want. So let's subdivide this.
Let's see what we have. Okay. I think we need to have
some supporting edge loops. Let's do some support No, not Belvo this time in sets. Do that getting close. Supporting edge
loops around here. Same for the top as well. Okay. Subdivide this now. I should hold shape a little bit more. Okay. The difference
in here that we of sharing this down.
Sharing this down. So I'm going to just work on one side and then mirror
to the opposite side. So let's do auto group. Okay. Deletes lower. So let's
go over to Auto Group. Control Shift click, control
shift click, deletes Eden. Modified topology, deletes Eden. Okay. I think they should
be more or less fine. So, then we can now
go in on one side, turn off symmetry,
go on one side. I'll try and arrange
this properly. Okay. So I'm going
to hold out and then range this a
little bit this way, so I can actually bring
this down some more. I think this way should be fine. Yeah, this way should be fine. Okay. So now we need
to make some movements in so I'm going to max out. I think we can mirror this now. So let's just do mirror weld. Grab this portion, grab
this portion as well. Invert the max flow. Let's bring this closer.
Bring this closer. I actually touch that surface, invert the max, bring
this closer quite well. I'm not sure I'm doing this
symtytn, but that's fine. I'll dose mirror and weld again. Okay. So clear the max
we run well again. So we should have this
fitted on the back side too. Okay. So I'm going to grab. I think we can let's merge these two together, and I'm
going to grab one. So I think this. So let's let's do meas down. So merge down. I'll make a duplicate of fits. Okay? Ton of symmetry center, ton of symmetry center, I'm going to rotate this way. I only need the one
at the back side. I only this one at
this size down here. I'm going to delete
this other side. We can just marg this out, give this a separate poly group, control control shaped click, then do delete Eden. Oder geometry, delete Eden. Then we should have
just this alone. I'm just going to move this
where it needs to be Okay. I think that actually
sits there properly. We can use the move brush
and then compensate for it by moving
it out some more. Okay? Moving it
out here as well. But it to also too.
Get this down. Perfect. I think this
should be just fine. Move this towards the
center some more. Okay? Now, it doesn't need to be completely
completely perfect. We need to move this closer. All right. Pull it out again. Okay, out this way, out this way out
this way. Fantastic. Okay. I think we
can work with this. Maybe a little correction
in here should be fine. Okay. So no symmetry. I'm
going to play the marks. I'm going to mark out of this. Invert the mark, blow this out, extend it out a little bit more just to make
it a little bit thicker in there a little bit wide shouldn't
alter anybody, okay? Okay. Invert this. All right. Think I'll do
the same for this as well. Let's do we can do
this in here instead. So I'm just going to max
out of this invert the max, load the max, extend it out
a little bit more as well. Okay. Yeah, I think
that should be fine. This on the back, we
can just do this just once by just trying to try and find set forth angle and then just extend it out a little
bit more, like so. Fine. Okay. Save this. Alright, so in the next lesson we'll just go in and then add debund across this easily
add the band across this. I'll do that in the next
lesson bye for now.
17. 16 Torso Strap Band Blockout In Zbrush: Hello, welcome back, guys. So in the previous
lesson, we kind of worked on creating this
metal waist band. So we're going to carry
on and then thread a metal piece across it. Okay? Let's do that. So I think should be fine.
I'm going to select this. I'm going to use a different
method for this actually. So slightly different
method for this. So I'm going to
duplicate this piece. The top su piece,
I'll duplicate that. Let's duplicate it all down
shift, send this down. You see why inhibit, so I'm going to control
shift select just this. This only piece I need. So
that's the poly group alone. Let's get the polygroup in. I'll go over to geometry, modified topology, delete Eden. Okay. Yes, that's fine.
Precisely what I want. I'm going to select
this at the back. I want to temporarily
hide that for now. But first, let me shoot this
down and hide this for now. Okay? Let's get this selected. So what I'm going to do
here is I'm going to slash a poly group in
between with a slice cove. Slash another down
one here as well. I think we would need okay. I think we need one more. Yes, you can slash another
down one in here as well. Okay? So let's get that in. So I'll go over to
the slice cove. Let's go over to slice curve. Okay. I can ton of
symmetry for this. So basically, something
on the middle part. So you want to
kind of aim at the middle o. I think we have
subdivision level in there. Okay. Let me increase
the subdivision level, delete lower, right? That should be fine. Let's
do this again. Okay? There's one. I'll do another
one around here as well. Okay? Then I'll do one more
roughly around here, right. So what we need to do now is to frame to frame the
polygrap for this. So let's go over to stroke. I believe under C
function, Okay. So I'm going to turn off border. I'm going to turn off this edge. So I'm going to leave
this arts fully group. So let's do frames. Okay? So this is what
we're going to be getting. So I'll go and eat B C. This
is the curve flat snap. So now, it depends on the bro size we need
to use for this. Bro size is important. So I want to increase
the bro size. This side should be roughly
there, probably let's. So select that. Let me tone on Transparency
won work for this. I solut this out and
I actually see okay, so looking at this
from the inward parts, Shape seems to be roughly probably roughly around
the size we need. Control Shift click Shift click. Control Shift click,
Control Shift click. Con do that, Control
Shift click. So I'm just trying to
eyeble the size and for it. Yeah, I think this
sizing should be fine. This sizing should be just fine. So I'm going to do delete den. Yes, we can do delete ding. Okay, or let's just do splits ding instead.
So splits ding. Alright, so I'm going to
go over to stroke again. I'm going to turn off
or delete the cove. Go and select this. I'll hide it for now. Don't
need that anymore. This is what we
need. Okay? So we have the right
shipping for this, which is cool,
precisely what we want. Then let's go and
turn on B it this? Yes, that's the
one. Okay? So I'm going to inflate all of
this now just to get it out or better still
just center this. Okay? Let's scale it out. Okay. So we still of select
them individually and then move them where
they need to be. All right. So I'm going to start
from the top this. I think I need to shing this
back down a little soon. I think somewhere around
there should be fine. Okay, let's go to the
next one, select this. No sense. Both of them are
having the same poly group. So let's give them
separate poly group. So poly group
autogroup that's fine. Go back to our gizmo,
select the center. It's even maxed. Let's
select this now. Okay? I think we can
sing this down a little. He that seems fine. Let's
go to the next one. Center this. I'll scale it up, bring this down a little,
move up some more. I need to make some
adjustment to it. I'm going to tunnel
symmetry for this, right? I just need to pull
it down some more. Look, use the move brush. Put this down some more. Yeah, that should
be pretty much it. And on the back
part, we can make some adjustment to this as well. So I can pull this up some more, invert this, pull
this up some more. That's probably a bit too
much. That's a bit too much. Move this up. Okay? All right. I think
that should be fine. Okay. Awesome. So now
we need to kind of do some separations in between.
We need to separate. We have one year, one, one, two. So we should have let's
bring back the poly group. Let's figure out where we
need to add that edge line. We can do I think we can do the first one should be
let's start from the center. It makes better sense to at
least start from the center. Then we can work
our way through. Okay? So I'm going to do I feel like I should do
something like so, slice in the center. Okay? Something pretty mode
like so should be fine. I mean, why not? So control
shift click Control Shift. Before we do that, let's
make a duplicate of it. In case anything
goes wrong, we can always fall back
to our duplicates. Then, I've already
hidden one already. So I'm going to go and select
this select this. Okay? I think affecting the
backside also, too. So I don't want the
backside to be affected. But let's just do it
again. Let's do it again. Then let's go solo mode. Ia the selection, I need to go back to my rectangular
selection. Electric via this. If all of this are
back a separate poly group, Control Shift click. Let me everything back out. Control Shift click,
click click also. Okay. Then we can do at
group again in here. Let me guess I mean, why not? So let's go back
and do Auto Group. All right. Then I'm going to
do delete Eden, delete Eden. Awesome. Okay. That
should be fine. All right. Let's bring
everything back out. Let's see. We still need the next part, we need to kind
of do a quote in. It should be let's look
at this from this angle. Okay. Yeah, I think we
can put we have this. I think we should get something
somewhere around here. Oh, I don't have the slice curve anymore,
so let's get that. Let's don't know
symmetry for this. Let's do this from the
opposite side instead. Let's do this from
this side instead. So I'm just trying to figure
out where it's supposed to be one, two, and two. Okay. So let's go into the slice
cove and we can do the gap. I think we can get
the gap in here. Okay. I mean, why not? Here as well. Now, the space in India might be inconsistent,
but that's fine. I'm going to make it work.
So let's solo this out. Okay? Control Shift click, Control Shift click Control
Shift click. All right. Let's go back to our
rectangular selection. Select, invert this. I'll select all of
this at the back. Ton of symmetry for this. Maxel of this out, control
W that separate polygroup. Select maxil of this as well. Control W, that
separate polygroup. Okay. Then I think we can
do miral weld for this. Let's do mirror weld. All right. Not yet. Let's see. Okay, we can do Mirror weld. Mirror weld actually figures
the other end's fine. Okay, so Control Shift
click. Oh, great. Now, we have the success people, let me select all of this again, ControlW Alright, Control Shift click
Control Shift click. All right. I think we can make this work. Let's see. Yeah, this should be
pretty much fine. So do deleted in mirror weld. Yeah, this will definitely work. Let need to make some more
modifications to this. For example, let's do Z M. Okay. Let's go to inserts, I'll I'll delete, delete this. Let's just clean it
up a little bit more. Okay. Let's get some
good cleanup in there. That should be fine. Okay, go out to isolates. I think we can turn on
symmetry here as well. Also we have this mirror
on the opposite side. Let's see if we can get some good functions in
here if we can. So let's do Extrude.
I'll go to the edge. Let's do extrude. So let's just do
mesh bolder instead. Okay. So if I extrude this I don't want to extrude
the entire border though. I have another idea
to do this though. I'm trying to see if I can
make this work with this. So let's do edge. We need to just extrude
the edge alone. No, this edge loop. I'm trying something different, see if I can make it work. So let's adjust the setting.
Need to adjust the setting. So if I go over to the edge now, I made this symmetry on
symmetry **** on for this. Let's turn off symmetry. Okay? So we go to the edge, make sure you are on
extrude edge and poly loop. Then ton of extend
surrounding faces, let's do regular
extrude instead. Then it should be on a free
angle. That should be fine. So let's go to the edge, extrude out this way. Maybe we need a little bit more. I need a little bit
more undo that. I think I've lost
my angle again. Let's go back to the angle. Okay. Is this direction. So it's important to
kind of get this in the direction where you want to extrude from because
I think it's free. So there's something
pretty much like. Okay. Then we go
here also, as well. Think all the way there
should be just fine. All the way there
should be just fine. We make corrections to it later
on, but just get that in. So let's come. Let's do the next let's do
for the next one. So extrude this out this way. Okay. Extrude this way. I think I think that
should be fine enough. Let's do this on
the opposite side. So I'm just going to
extrude up and do that. Extrude this way. Okay, that should
be fine as well. Yes, you need to make
corrections to that, but for now, that
should be fine. Let's go down and do
the same here also. Okay, extrude this out. Okay. It's in there, extrude in this direction. Extrude this out, then
extrude in this direction. Okay? That should be fine. Extrude out, nd that. Look at it from a
different angle, extrude this way and
extrude forward. Okay. Extrude out,
Extrude forward. Extrude out, Extrude forward. Yeah, I think that
should be pretty much fine. That should
be pretty much fine. So now if you actually
subdivide this, you should be getting something a bit too weird
for now undo that. So we need to add some
supporting edge loops for this. I think a preferable option is to bevo the O. I think
I've not done this yet. Let's do this also too. Okay? Get this out this way. He this out this way. Okay? That should be fine. Alright, so I need
to add some bevo to it and some additional
edge loops also. But before we do that,
I would like to use the move brush and move
points up a little bit more. Let's move these
points up. Okay? I don't want point this point
to actually be sharing, so just move them out of
the way or save my file. Save this. Okay, save
it. Here, that's fine. Move this down, down as well. Move this down, move this down, up, up as well. I can't seem to grab
the point very well. Got this from a different angle. Move this up as well. Right. Move this
in, up some more. Okay. Find a good angle
for this, pull this up. Up as well. Alright. So I don't want it to be shrink, so let's get in close
down here as well. Move this up, up as well. Okay. Alright. Just trying to make this as clean
as I possibly can. All right. So I'm going to bevo this now. I'm going to bevo
some of the edges. But let's make a duplicate
out of this also. So let's get a
duplicate out of this. All right. So B Z M. Let me start from this
start from down here. Okay. So let's do be vol. Let's do something like
so, something like so. So I'm going to subdivide this now. Let's see what I gets. Okay? Yeah, that's working, but we just need to
add some more edges to this. But it's working. So maybe we can just
extend this out actually, extend this out also this way. Subdivide Oh, I think I know
why it's shrinking that way. We don't have any
edge loop at the top, so we need to add some
edge loop at the top. Let's Let's do
multiple actually. So let's do multiple. Something like so here as well. Okay. All right. He also, you should hold
the hair properly now. So seems to be the weirdest
thing happening in here. We're having some
weird extra edges that we don't necessarily need. Not entirely sure what is
happening in here, though. This is like the
strangest thing. Conw to give that one
single polygraph. Okay. This is weird. We had something weird,
dear, weird as well. But this one seems to be
the weirdest one from the malls one down
here. Don't do that. Let me bevo this edge instead. But we have double
edge? Seems like we have double edging there. Seem to be getting double edge. I will undo all of this. We're having some really
weird edge in there. And I do not want undo that. Let's do one instead. Okay. Yeah, this This seems okay. The double edge we have
in there was a bit weird. Let me go out of solo mode. Okay? I think I will just have to do
this manually instead. I don't want any
weird edge in there. Subdivide this now, so it's kind of olden up
a little bit more. We need just some thickness in there, and then
we should be good. Okay, so add one in the
middle one year, one year. One in the middle, one
year, one year, as well. Mid Middle year, one year. Okay. Yeah, that's fine. Seems like we have an
extra engine in there. Okay, no extra gene in there. No extra gene in there.
So let's bev this now. Bevel. Let's d little bit more. Okay? Here, swell. Here. Here, swell, okay? Pavo this here as well. Okay. Pavo. I think we should
have one down here. Vv this. All right. Move to the opposite side. Bvul bevel as well. Undo that bevo this
Bvo this as well. Okay. Move this up. Right, Bevo as well. If it doesn't look
good, now those reverse the other
duplicates we have. So we subdivide this now. Okay, we're getting
something in there, no doubt, but we need to
add segments in here. Let' just bevo I think
bev should be just fine. Bevo pvulGs right amount
of spacing in there. Okay. I think we should be good. So if I had to smooth this now, I see more issue here. Okay. So don't do that. I need to add Pavo
in here as well. So wide that spacing in. Okay. So if we subdivide
this snow, All right. I think as far as this goes, I think we can work
with this. Okay. Let's add some thickness to it. I'll do that duplicates, then our thickness to it. So geometry, dynamic
subdi dynamic. Okay. Yeah. This might
just be too thick. Let's bring everything back out. Let's see. Go to the more brush. Okay. I'm I need to increase
the segment for this. Let's get in close. Solo gets in close. I think I put four in there. I think this should
be fine. So if I should apply this on subdivide. Should should most likely hold the shape a
little bit more. We have some weirdnesse
I'm not sure why, I think we can smooth that weirdness off it can
easily smooth it off. Shouldn't be a major issue. Okay. Control W for the entire outin. Let let me do, do that first. Let's do a tiny polish a tiny polishes expose any
weirdness we have in there. So this should kind of explode any weirdness we have in there. Get close, a little
bit of weirdness here. But all you know, I think this should still be fine.
So subdivide this. Maybe I'll just grab
all of this down here, invite the marks,
blow the mark some more, do some polish. Just to clean it clean
it up a little bit more. Yeah, that should be fine. I think we should be
fine. So yes, awesome. So the last we need to do in
there would be to add Okay, I think we need to scale
all of this out some more. Ton of symmetry, go in the scale it scale it out some
more. Okay, fantastic. I think that should
be fine. All right, so we can just squat just as
we have the rings in there. We need to add. And as far as this goes,
it should be fine. Okay, I need to make
some corrections at the back with a move brush. Pretty brush size,
ton of dynamic. Push these guys in some more. Okay? All right.
That should be fine. Okay, that should be fine. Need to add the change shape in there and name
should be good. Okay, so we'll do that in the
next lesson, bye for now. Okay. Move this down. I don't know symmetry
for this get close. Move go and select this instead. Symmetry should be turned
on symmetry is turned on, I'm going to move
this up some more. All right. That should be fine. All right. So I'll you guys in the
next lesson bye for now.
18. 17 Torso Band Chain Blockout In Zbrush: Welcomba guys. So in
the previous lesson, we kind of created this
bound piece around it. So this lesson,
let's continue on. So I would like to create
the chain piece we have in here. I kind of
checked around. I don't think I
have a particular chain piece similar to this, but we can use this. So let me show you
guys how I found it. So if I go back
over to light box, brush, then you go to
better tester brushes. Open that up. You should
find this in there, this inserts Omni chain. So as an interesting look to it. Okay. So let's draw this out. So I'm going to in
ton of dynamic, reduce the brows size this way. And let's draw something
in the middle. Okay. I think something
like so should be fine. I need to make
modifications to it. We don't need the entire outin. We don't need the
entire out of this. Let me go and tap again. It's a way too
bigger, obviously. So I'm going to bring
on dynamic again, increase the brow set
all the way to the end. Let's stop ton of
symmetry, let's tap do. That's a bit weird. All right. No got anything
interesting in here. I'm going to turn off dynamic. Okay. Let's get
in the tab, okay? Yeah, this seems decent enough. So I'm going to use this, then modify it to my desire. So let's carry on. So I'm going to let's make sure we delete
the stroke first. So I'll go into cough
function, I believe, delete. All right, so I'm
going to do splits, splits on marks points, right. I'm going to go
to my move brush. I'll select it. I'll
send this down. I'll make a duplicate of
it, hide the duplicates. Okay. So we can now modify the arranged this way
we want it to be. So I'm going to do auto group. Let's auto group in there first. So do auto group, auto group. Let's see. Holy group poly group, poly group, Auto Group.
All right. Awesome. So let's modify this ever we want. But we have
so many in there. So let's do I'm going to grab let me push this up first. Then push this up all the way. Then let's start
by grabbing three. I'll grab, I need to go out of this gizmo Control Shift click. Control Chip, click,
Control Shift click. Those three for now, invert the selection center
pull this down. Okay. Yeah, so it
should be fine. And I'm going to I
think at this point, we can we do delete
ding Larger splits. Let's do splits eating instead. Okay? So I'm going to
grab the top this. Let's grab this for now. Change the orientation.
Let me move this up first. Let's move this up
this way. Okay. I need to get this as straight
as I can get this to be. Come on. Straight in
this way. This way. Orient this like
so, move this back. Rotates this way. Okay.
I'll scale it out. Quite well, like so. Then we need to kind
of get it in here, bring this down some more. Okay. Let me go smooth to
this. Let's see if we add more
subdivisions to this. Adding more subdution to this, then we lose the sharp edge we have in there because I would like to keep a sharp edge. So I'm going to do
group boomals instead. Let's do group baomals
group by normal. Okay. Then we do Let's see. If you do crisp pets, if we do CrispG let's see
what that gives us. We do CrispG being here. Okay, for this Cris.
Let's do Crispy g. Okay. So if I should
subdivide this now. Subdivide some more. So it's more or less kind of holding the shape now anyway. It's more or less in
the shape do that. Okay. Or we can do this
manual instead of increased PG. 'cause
I'm liking the shape. I don't want to lose the
shape in wearing here, so I'm going to do that ons PG. So but I'm going to use B. I will still on bevo
let's do Bvl instead? I'll bevulT edge. Hey wood as well. Heywood as swell, 'cause I want to have some measure
of control over this. Bvuloo? I come in in a bevul as well. In a bevul as well. I didn't ever them I
just use just one of these pot bevood
Alright here as well. We need to do this also. Shouldn't neglect this. Maybe that's way too much. Yes, I think that
should be fine. It's affected the opposite
side too. That's fine. We v that also. So if we subdivide this, we should be getting
something like so. Yeah, we should work just fine. Self needs kind of introduce
some more edge in between. So let's introduce some more
edging between so insets. Let's do come in here inserts. No, it's supposed to be inserts. I supposed to be seen
inserts in SS inserts, multiple Okay. Come on. I think lasso should be fine. Do the same on the opposite do that I do the same
for the opposite side. That's a bit weird. He's applying this in
a very weird. Okay? That's weird. That's definitely weird.
So I think I might need to kind of mirror mirror
this to the opposite side. Let's get something mirror. So I'm going to do
let's come down here and I'll do autorou
auto grouping here. This is the only piece I need, so I'm going to do delete Eden, delete ding, modified
topology, delete Eden right. Mirror weld, okay. That's fine. So if we should
subdivide this now, you should hold up
the ship quite well. Is precisely what I
want and do that. So I want to be using this, so let me move Rush. I'm going to make a
duplicate of this. Let's duplicate this.
I duplicate for now. Send this out Orient, put this in some more, bring that back in this way. I need to make some modifications
to this ton of dynamic. I will turn up symmetry
for this also. I pull this out. All right. Yeah, I think that
should be fine. Let's go back in here, move this up some more. Like so should be fine. Then I'm going to duplicate it. Put this in here,
scale this down. Pretty much like so. Okay. Select this. Turn on
symmetry for this, and I'll bring this closer. Okay. Bring this closer as well. Select pull down control,
extend this down. Okay. I'll shrink it down. Okay. I think somewhere around
there should be just fine. I need to I also need to do
auto group also auto group. Auto grouping here,
just to have them separated out and I'll select this Let's scale it
down some more as well. All right. So now we
need to extend this out, od control, drag this out. I'll shrink it down quite well. Then od and ****
rotate it this way. Get this in there.
Okay? I'll shrink it down this way as well. Now let's position this
a little bit more. Okay. I'll sing this down
some more as well. Just to get them touching
the surface quite well. Extend this out some more. This way should be fine. Okay? Pull down control,
extend this down. Right. Extend this down this way. Let's see where we get. I'll rotate this aside. Move this up, bring
this down some more. Okay? That should be fine. Hold down control. Get
another one down here. Okay? Move this aside. Right. I'm going
to hold control, extend this down,
rotate it this way. Okay. Let's get it touching
into a little bit more, get close. Let's see. This way should
be fine. Awesome. Here, that's fine. That
will work just fine. So I'm going to pull this up. Okay. No, do that actually. Undo that actually.
Play this out. Let's auto group again. All right. I'm going to
select this instead, okay? Hold down control,
select this, move it up. Hold down control, get it up. I'm going to increase the
size a little bit more, increase the size some more, pull this out. Okay? Maybe that's out way
too more Shing this down some more,
put this this way. Get this up some more. Okay, should just be
touching it that way. Bring this down, all
right. That is fine. Okay. Yeah, that should be fine. Then I'm going to hold down
Control, get another one out. Hold down Shift, do that
let's send. Come on. Wrong piece up the direction. Hold out select,
holdout select, okay? On shift then
orient it this way. Okay. I'm going to extend it out
a little bit more this way. Okay. I'll rotate this way, bring this up some more. Should be touching it like
this way, that should be fine. All right. Let me move this down so we
can see this properly. Okay. I'm going to
clear this out. I think these two
should still be the same should still be
the same poly groups, so let's max them out. Shift F. Okay, I think we're
grabbing something also. So I'm going to let's
do auto group again. Okay. Yeah, that should be fine. So Control click,
Control Shift click, Control Shift
click, invert this, Max them out, bring
everything back out, invert the max. Go to our Gizmo. I feel like I should this
should make them even bigger. So I'm going to extend the
height a little bit more, bend this out this way. Okay. Put some bigger chains
in there, rotate this way. Alright. So I'm going to hold down control
and pull this up. Bring it closer. Move
this down this way. Let's bring it out some more. Alright, I think
that should be fine. We can do some slight
orientation as well. Okay. That should be fine.
Hold down control again. Extend this out. All right. Now, this one, I'm
going to push this way. Okay. Down here some more. All right. Awesome. Move this way. Do some rotation the opposite direction.
Okay, that's fine. All right. Let this out. Let's do Auto Group
again, auto group again. So I'm going to Oh, we
have something up here. We have something up here. I think we can use Oh, this one on the top, so that's fine. I
think we can use this. I mean, why not? We can
definitely use this, or we can just use
something else. I think we have
something else we can actually use from the IMM brush. Yeah, there should be some
tics from the IMM brush. So let me did this for now. Select this. Okay. So
I'll go to my IMM. I think there's
something somewhere I saw something
somewhere we can use. Let's see if I can find it. Let's start from in here. See if we can find it. It's not there. Let's try
in here not here either. Okay. Find that in here as well. Okay, I think I found it. So it can be one of these. Let's use this instead. Well, let's use this instead. So I'm just going to go in and then draw this out around here. How big is that supposed to be? Maybe I made it way too
big. But that's fine. We can always shrink it down. Shrink it down some more. Go back to the move
brush if f. Okay? How do move down this way. Alright. Let's see if that's that's looking
at it just to be sure. I think the shape the shaping in there, the shaping in there. Because I like to
make this kind of medieval kind of armor, so I don't know if
she shaping in here would make it look
believable or not. Mm, maybe not. So let's
go back into the row set. I think it should be in here. So let's move for Gizmo,
we can swap this. Alright? I think this is fine. I think this is definitely
a better one to use. Definitely a better one to use. Do we have supporting
edges for it? We have supporting edges
for it. That's fine. Perhaps a percentages
for it. Okay. Allow the save out.
Then I'm going to just extend one more in there. So let's let's do auto
group, auto group. So if we should
subdivide this first, let's say we subdivide can fold up the shape
a little bit more. It's holding up the
shape. That's fine. So let's do I think we
can do let's select this. I'll orient this
this way some more. I'll move this back in a
little bit more. Just like so. I'll go in here, move this up. All right. Go in here, move this closer orients
move this up some more. Then I think we can just
duplicate this now. Let me just get this
straighten out this way. Oh, yes, I think now we can grab
another pie so let's go out. Then do that. Put
control, get this out. Okay? I think we can rotate
this do that. Let's rotate. I think our setup is not
entirely accurate yet. Not entirely accurate yet. So to kind of make a little
bit of modification in here. We can just rotate it this way. How did this we get this down? Need something that
will actually work. But the orientation
for the last one is not entirely there,
not entirely there. So maybe I'm just
going to exclude that then select these three. It the selection, mark them out, and bring
everything back out, ind the max most likely scale the size
up a little bit more. Scale the size up a little
bit more, move this up. So we should get
it in there now. Okay. I think it's almost in just a little bit modification, and then we should be good. Okay. I think to make some
modifications to this, bring this out some more right. Orient it this way. I'm going to select this
now, move this way. Probably extend it
out some more dates. I think the big
issue is in here, so I'm going to extend
this out some more. Let's, undo that. I think we can
undo that as well. Let's grab this piece. Oh, come on. I'll do that. I'm just going to move
this forward some more to accommodate
it a little bit more. Down some more again, just to accommodate that shape. That's fine. I think something like this
should be just fine. This we can definitely work with. Let me do a quick sieve. All right. Yes, we can definitely
work with this. This should be just fine. I'll go in here again, I'll pull this
forward some more. All right. Okay.
I'll select this. Bring this forward some more. A little bit more. Okay. I think as far as this goes,
I think this should be fine. So we can now place a few
of them in here as well. So I'm going to
grab this instead. This get put the
orientation in here. Let me start by placing
one here. I do that first. Let me do on this side first, and I'm not going to mirror
it to the opposite side. So I'm going to do
split on marks points, split on marks points. Come back in here and then move this way
it's supposed to. Orients. Move this in in some more ooiens
control, get this up. Orient. Move this closer. Let's
get an angle to this. Move this in. Okay. We should be fine. Extend
it out some more, right, move this out,
pull down control, put the last one down there. Move this forward. Orient. Okay. Move this
back in some more. Oh, I think we need to
make some modifications in here move this forward a
little bit more forward. Forward, some more. Okay? I think so should be fine. Clear this out. Don't do that. Let me just push
this down some more. Let's mirror it to
the opposite side. So let's get this mirror
to the opposite side. So clear the mark mirror weld. Okay? Awesome. Yeah, I think it's
perfectly fine where it is. Yes, all good. All good. I need to kind of
merge them down. Merge this together with it. So let's do I think
this it is it? Yes, then no, that's not it. Yes, this is the
one to select this play any marks we have in there, then let's
do a merge down. So let's go over to
merge down. Okay? Awesome. So if we should
subdivide this now, should be having them holding up his edge quite well, do that. Okay. Awesome. So that's fine. So the next thing we need
to do would be Okay. Let's see. Then it's going to do blockout for the
entire out in first before adding any
other ship in there. I think the next one
we can work on would be I'm thinking of
these bigger skates, the bigger more skates instead. This bigger one. I
think that will make better trying to create
the bigger ships first. So let's create this
bigger one in there. Then the others we can now manually kind of
create them also, too. Or we can do we can
do this instead, see, which one make
better sense to do next. We'll figure that
out next, though, so I'll see you guys in the
next lesson, bye for now.
19. 18 long Metal Skirt Blockout In Zbrush: Open bar, guys. So in
the previous lesson, we kind of think we finalized
on this dorso band. Let's move on. Let's
create something else. I would like to create
this chain skirts. Should we call this
chain? Let's call it chain skirts, actually, so. To do that, I would like to make the entire body visible
with the legs so I can get a good view of the length of the leg and how
far down need to push this. Okay, so let's that's fine. Let's get right to it. I'm checking this now.
Noticing that I need to even push this up some
more so let's select it. Select like halfway, maybe not. Let's just turn of symmetry then center center this move this
up some more all the way. Come on. Getting close. Why does it keep snapping down? T of this pin it
us fine now. Okay? So I'm going to bring this up a little bit small so it should be
fine. Doesn't need to be. We don't need to overdo it. Okay. So that again. So noticing now
that for the bark, I think the bark bit too much, so we need to shing that down a bit small so let's
use the move brush. This is the move
brush move this Wait, let's see I want to make sure there are
no issues in here. Okay, just interception from
the order mese behind it. So just interception
from the mege behind it. So let's D merge behind
it for now, let's D this. Okay. All right. I'll move this in some more. Let's get this in.
Okay. No undo that. Let's make a duplicate
of it first. Let's make it duplicate. Then we can push
that duplicates in instead. That makes
better sense. All right. Perfect. So I'll come in here. I'll need to push this in
some more, use the bro size. Okay? Let's just push this
down some more. Okay? Here, symmetry is t for this Oh come on symmetry is t down for this. That's fine. Maybe out some more. Okay. I'll move this closer. Okay, let's get in here, put out select this
piece, move this down. Yeah, that should be fine. So I'm going to select this meta sket and
I'm going to make a duplicate of it. I'll
send it down first. Let's make a duplicate of
this, make a duplicate. So this duplicate, I'm going
to push down some more. But before we do that, let me solow this out first. I only need to grab
this in word part. Let's delete the rest. I'm going to delete the
rest, so I'm going to go over and do delete ding. That's fine. Okay. Let's go to Gizmo. I'm going to extend
this down some more. And some more close
white close to the fits. I think somewhere roughly, let's push this up some more. I think roughly a
should be fine. Alright, I think this
should be it. T is fine. Ti should work just fine. Checking just to be sure if there's no weirdness in there. Okay? There was some
weirdness in there, so. Let's push this up some more pretty mot
like so should be fine. All right, that should be fine. Okay. So the next thing
you need to do is to extend it out some
more. It's quite close. We need to extend the
a little bit more, so to do that, we use we can go over to gear icon for the
gizmo and use Ben Cove. So if we select this now, we can extend this
out some more, but we need to do some
more adjustment to it by. Let's add some more
segment to it. Let's add some more resolution. Then we can extend this
out some more All right? Let's see what we have.
I'll come in here. I'll shing this in some more. Not too much, though I think somewhere around
there should be fine. Somewhere around
there should be fine. I'll go over to this.
Bring that guy icon also to Ben Cove. Change the orientation for this. Extend it out some more. Okay. Go back to this, extend this out, scale this out. Let me reduce the
resolution first, so we get just two, and I can scale this out
a little bit more. Let's look at this
from a distance so we can see the
forms properly. But I just look at this from a distance and then get
a good fell of the foam. I think the fam here
should be just fine. Let's go and accept this accept
over this also to accept, go back into the ion skates. All right. I think we can definitely
make this work. So no symmetry for this
with a move brush. Rducing brush size. Let's just push this
back some more. Just a little bit
small, should be fine. Okay, somewhere around
there should be just fine. It's perfect. That
will work just fine. So now we need to add
some thickness to it. C do that I need to push the
inward part back some more. Okay. That's fine. We can definitely
work with this. Let me look at the inward parts. Here, I think I will need
to go to this again. I will need to move to the top. I need to scale this
out a little bit more. Not too much, just a
little should be fine. That's a bit too much. Oh, I
think that's way too much. Let's add some more
resolution to it. Okay? I think this is
where we need to adjust. Okay. That is fine.
Symmetry is turned on. Let's go to degrees
more, let's accept this. Let's accept this. The gear I can accept. I'm going to push symmetry
is still turned on for this apple juice
inside some more. Alright. I think
this should be fine. I don't need this to be quite as clean as we
can get it to be. Move this up. Okay? Now I can do polish. Let's do some polish for this. Let's do deformation, polished
fish polished by groups. Nah, I think we
need a sharp edge. We definitely need a sharp edge. So I'm going to
max out this edge. Let's max out the
edge. Slow this out. I'm going to max out
this edge as well. Then let's polish this. L polish, undo that. Lay this out. I think
this is clean enough now. I'll use my move brush. Undo that, get in close. Let's balance this up. I think as far as this goes, I think this should
be just fine. Yeah, we need to do some
movements in here, obviously, but I think this is
coming out quite well. So with the more brush, let's move this back in some more. Push this in some more. In some more. All right. Yeah, this should be fine. I'm
going to do a quick sieve. Let's save this. All right. So now we need to kind of add. Okay, let's see this
is wide enough. There's this gap in
your wide enough. I think we need to make
it a little bit wider. It needs to be a
little bit wider, so we can create a
new one in there. I think we'll create a
new one in there I mean why not so Bus. Let's done in sets. So let's just do single loop. Well, I think I think this
sickness should be enough. Just need to move
if it's in place. Just to move Rush instead. Yeah, I think this
should be fine. I think it's the right
amount, this should be fine. No let's add some edges to it, some segment edges to it. Or, yeah, some poly group
to it. So let's do that. So BZ. Let's solo this out. So Qmsh let's go over
to Q mesh, single. So I'm just going to go over
and around this x LO, right? I think this should be
fine. Then let's go up. Undo that doesn't
look accurate enough. Undo that again. On do that. Undo that, do this again. All
right. That should be fine. I don't think I should do for the top because it's
not going to be visible so why put something
in there, so no need. All right. I feel like I should move this
out a little bit more. Okay. Getting close. All right. I'm just trying to make something a little
bit cleaner in here. It's getting close. All right. That should be fine. I think this we can
work with in here. It's no less thickness to it. So let's see how much thickness do you
actually need for this? It's not extremely
thick, though. So let's go over to
geometry dynamic sub div. So you cannot memorize the
previous one day before, but we need to increase
it it's a third bit more. Okay. Maybe a little
bit small. Some more. Not too much, do I think
around there should be fine. Okay? So do Let's do two segments. Two segments should be fine. So apply this. So I'm
going to do an inset. Let's do an inset in here. We need to apply this apply
this set single loop. I want to hold this
edge quite well. So it doesn't get rounded up. I don't want to get rounded up, so let's hold the edge. I think we can do the
same up here as well. That should be fine. Then
with the humor selected, we can do poly loop poly group. I'm going to extend this out to more ipedF let's
see what we have. Okay. Let's bring everything back out. Let's see if this would work, I need to make some more
corrections with it. I think this should
work just fine. Although I think there is an
issue on the opposite side. I need to move this
out some more. Okay. So let's tend this out
some more again turf. All right. So if we subdivide this, should be getting something
like so, and do that. So let's be with the
necessary edges for it. Let's get some bev
necessary edge. So let's let's go over
to Bvul Bvul Alright. Come on. BvulO bevo edge. Getting close,
Bwoods edge as well. But I don't need to bevel
this egg because I've already created egg loops around them. I don't need to
bevel that again. So if we should
subdivide this now, should be getting something
sharp enough to work with. But this part is kind of
collapsing on itself, so I'll need to add a bevel in here to hold
that edge properly also, too. So if I should
subdivide this now, it should hold the egg properly. Alright? Yes, yes, this is fine. So this is coming
out quite well. Yeah, this worked just fine. All right, so next we
need to do next to create belts that go around it. So let's create belts
that go around it. So I'm going to duplicate this actually. I'm
gonna duplicate this. So let's duplicate
it, duplicate. Then let's slow this out. So we only need this piece. This is the only piece we need. All right? A Okay, we need, let's do delete
ding, delete ding. Modify topology, delete ding. So we have, I believe
this strap should be slow this out now. You want to put this way
is going to be visible. Any part is not
going to be visible, is not going to be visible.
We're going to ignore that. I still feel like
I need to shrink. I need to shrink this
up a little bit more. I think I need to shrink
this a little more. Okay, so it should
be fine. Okay. Then I need to push this inward. Let's push this inward
some more. Bury this in. Okay. By this in also
to the backside. All right. I think that should
be fine. I'll select this. I'll just push this in. And also, that should be fine. So we just need to be
where it needs to be. So if I do, we can do, one can be here,
one, two, three. We have one, two, three, four. So we have a total
of four in there. So we can also use a
slice cove to do this. I want to use a slice cove. Oh C and then just
use Slice Cove. Slice cove, slice
cove, slice cove. So do one here. Do another one. Do another one around the
C valves around there. Then we do one last one. Somewhere around
there should be fine. Let's visualize what we have. Okay. Seems like the one at the top is not
completely streets. It's not completely straights. A at the same time, we might not necessarily
need to have them completely straight. We don't need to. But I think something straight
should actually help. No, this spot alone is
not straight in any way. Let's see if you do Mirror weld. No, I don't do
mirror weld because we extracted this
from the older piece, so you need something
quite accurate. Something completely
street should be fine. Okay. I Yeah, so it should be fine. I think this should
be straight enough. So let's go over
to rope, stroke. Let's do frame Polly group. All right. Yeah,
this should be fine. Then I'll go over and
then I'll do let's do see flats 12 flat snap. That's way too big. So
take down your bro size. St too big. Pick down
the bro size some more. St too big. Pig down
the bro size some more. I think this should be roughly around the right
amount that we need. Okay, so let's delete the shrok and then go over
to split on max points. Okay? So you should
have them in here. This is what we
need. Let's bring everything back out.
I'm going to hide. Is that the one we're
supposed to hide? Yeah, definitely that's the one. So you get something pretty
much like sewing here. Okay. Yeah, this is fine.
This is fine. This will work just fine
for what needed for. Except now, we need to start
deleting some of the edges. Well, that is a bit strange. It feels like we have to this, I think we have to this song. We have to there. We
don't need this too, so I'll go over. Let's
duplicate this first. Let's duplicate of this. Okay. Then we do auto
group. Photo group. Because we have them on
top of themselves so we don't use multiple so let's
do the front parting. There's also another one
inside of it, though, but just in the front part,
and then should be good. Okay. So we can just do
delete ding now, Modify topology, delete ding. Alright, this is fine.
Let's do a quick sieve. Right. So the next lesson, we can guess we can just begin to add some separations in there if there are some
separations in there. Then we have a linda
them together, so we're going to separate it out to have
separations in there. Maybe we can even think we
can even do this in here. So let's see how
much time we have. I think we can do this
in here actually. So I'm going to do duplicate for this again
that duplicate, okay? So we can do let's see one, two. So do one, two, three, then we can have a gap in her. I think we can delete this. Cantonal symmetry for this. Can create the gap in her. So let's do BZ M, Q merge this, one, two, three, four,
one, Q merge this. Let's just do one, two, three, one, two, three, Okay. No do that. Let's do something
longer on this side, one, two, three, four. Okay. I would symmetrically. Anyways, let's just
do this continue. So one, two, three, four, five, two, one y. One, one, two, three, four, five, put one year. Undo that. Let's go
to the opposite side. One, two, three, four. Okay. Then one,
two, three, four. Or maybe we just leave. Yeah, let's do you need
to do one year on notes. Let's see. Okay. One, two, three. Let's
just do one here, swell. All right. I'm going to follow the same region where
they should be. So there should be here
swell, here swell. You need one should be one, two, three, four, one,
two, three, four. Okay, three, four, right. On this side, we have one, two, three, four,
five, one, two, three, four in here one, three, four, one,
two, three, four. Okay. One, two, three, four, five, one, two, three, four, five, one, two,
three, four, five. All right. I think that should
be pretty much in there. Alright, so we can
let's go to Move Brush, Control Shift click on
Control Shift click again. We need to invert the selection. So let's go to select Rec
invert the selection. Then we do it deletes ding. So geometry, modified
topology, delete ding. Perfect. So this will
work just fine, right? So we can work with
this.O the next lesson, we'll just go over and
then read the extra edge, read the extra edge it needs. And then we can
move on from there. Do you have a few ways of
doing this, though, I think. Okay. Yeah, that's fine.
So the next lesson, we're going to carry
on and then create thickness and then create something that's
supposed to be in here. So I'll see you guys in the
next lesson bye for now.
20. 19 long Metal Skirt Strap Blockout In Zbrush: *** Burgi. So in
previous lesson, we kind of created the
long skate and then created this banding
piece across it. So I'm going to carry on and
then create some thickness for it and then add
this ring in there. Alright so let's get to it. Though I feel like I'm going to use a slightly
different approach. I'm not going to create
the thickness in here, but I mean, rather
extrude the edge. I'm not going to do general
thickness across it and then move out along. So let's do that instead. But before doing that, I think we would need to
add some edge in between. So let's do Z M. So let's do inset,
multiple instead instead. So I think this should be fine. Here something across this week. Just to the edge a
little bit more, come on, what's going
on, getting there. Strange. Strange how that is
not even working. Turn off symmetry for this? Is working now. I don't need the symmetry
to be turned off. All right? Really, disadvantages
that we need to do it multiple times or twice. Okay? The issue with this is now, I'm seeing I'm seeing
double edges in here, which I don't really
want. No, no, no. I'm getting double
edges in there, which I don't want, so I need to undo all of that, actually. I don't need double
edges in there. I'm tally sure why it's giving
us double edges, though. I don't want double edges. Okay, multiple
specific elevation. Let me take this down. Specified reolution let me
take that down. Let's C. Increase that, let's see
where we get undo that. That's a bit weird. But a lot of weirdness appen here
which I don't really want. I I suggest way to add. I think there's a way
we can add divisions in her dynamic sub div Okay. Slow this out again. Not entirely sure what is
happening here at all. Play this out again. I don't want double edge here. Let's go over display
settings, display settings. Double side is turned on
a ready so that's fine. Let's do dynamic. Smooth
is not even working. Something is oddly wrong in
here, like, oddly wrong. Oh, no wonder. So I see
the issue now undo that. So delete den. Okay? Let's do this again. You know, undo that. It's
not working correctly. Let's do dynamic sub div. I still have this weird
double edge here, which I don't need.
Let's clear that out. Okay, if you should
add Smuns in there. The smun Now, do
that. Take that down. Okay. I'm checking the
thickness for this is the right amount
of thickness we need. Is obviously way
too thick, though. Obviously, way too
thick, so I'm going to shring this down some more. I think it should be the right amount of thickness we need. Okay. So S can do this in here. You see creating double edges in there and I don't want
double edges in there. So I think I'll use a
different approach instead. So let's first apply this. Then the approach I'm
going to use will be to do just one single segment
in the Bev that segment. So let's do that instead. So do we have let's don
a symmetry for this? I mean, come on, come on. Just giving us issues in here for some reason,
which I don't understand. I have already applied this. What is going on right now? Something is oddly wrong, oddly wrong with
this. Oddly wrong. Why can't I just add
my segments in here? Can't I not segments in here. Okay, finally, Okay. Seems like I have to do
it from the edge instead. So let me apply this again. Don't do that. I think my
thickness is too much. Okay? Pull this out. Sometime
just do something simple can be quite problematic to do. Undo that. I think I'm going to live
the stickness instead. I'm going to live the
stickness instead. Okay? Is it book from
the opposite side? I think it is let's just
take it down a little. This needs to be as clean
as we can get it to be. Here, that's fine.
Apply this on now. Okay, this is fine now. We can add this here.
Let me do that. Let me on try on the
multiplgin instead, I'll do it from
the edge instead. You know, still creating that double edge
which we don't need. This double edge. Let me smooth this, let's see. I'm still not liking the
edges creating for us. So let's just do
single edge instead. Okay? So single
edge across this. Single edge. Single
edge I swear. Come on. Okay. Just to do something
simple in here can be. There's a lot of weird
oddss happening in her. Really weird oddness
happening in year. So it's probably from
tony non symmetry. Probably from Tony non symmetry or looking at it from
a different angle. Maybe if you did it
from a different angle, it's going to work just
fine. Okay, we're moving on. Let's add this as
quickly as we can. I spend too much
time here already just trying to repeat
the same thing. Just kind of a
little bit annoying because of kind of
bugging also trying to do my notes now and then it needed to be on a particular angle
to do it properly. But I think it's
working just fine now. The good thing is
working just fine now. Okay? So I think I need to
hold the edges also too. Let's hold the edges also too. All right. So I don't want this
kind of flatten out flat out flatten out on me, to make sure to hold the
edge to hold this edge. I have no added
any new segments. Come on. To symmetry. Then add one here. See how symmetry of mess things up a little bit
more for us here, so I'm going to do and
delete what I don't need. Okay? Yeah, this should be fine. Alright. Hold this edge. There's this on the
top out also too. Hold this edge. All right. Do for the opposite side as well. All right. If this doesn't come out well, then we can just ignore
it and then remove them and then fix any issue
that might arise in there, but I think this
should be just fine. All right. So I've torn
off symmetry for it. So we can do this a little
bit faster in here. As fine as we as well. Okay. Here, well, here, also. Here, also. I think I
need to delete this. He symmetry is turned off. Okay. Yeah, it should be fine. So now if you
subdivide this now, you should be getting
something like so. Don't do that.
Subdivide, subdivide again. Okay. The edging here is not looking too good, but at the same time, it's really big it's
not really a big deal at the same time because we're going to see smooth some
of the edges out because we're going to be putting
a ring close to them. So shouldn't be too
much of an issue. Except, maybe we want to go
a little bit further and then do some Chris also, too. We can do Chris PG. If we subdivide this now, kind of hold the
sep up properly. I think this is
actually way better, so it should be fine. Do that. Let's do a quick
sieve. All right. So in the next lesson,
we're going to add the rings on the edges and then see how everything works together as
one single piece. I'll see you guys in next
lesson. Bye for now.
21. 20 Metal Skirt Strap Rings Blockout In Zbrush: Okay, welcome back, guys. So on the previous lesson, we kind of add a
thickness to this. So we're going to I think
if we smooth this now, we should be getting
what we need for meats. I think they should be fine. So we just need to add the rings in, and then
we should be good. So a subdivide ice
actually for this. Right, then I'll need to
push this in some more. So I'm going to
turn off dynamic. Then I'll go let's go to lower
subdivision level first. I'll push this in. Let's buy this into the edge some more. Okay. I need to symmetry turned
on. Okay, we're not. Okay? That's fine. I'll go to the opposite side and then push that in as well. Pull this out. So this
in and some more. I think I also need to the
metalsk I think I will need to add some subdivisions to it because it's not looking
too great for now. So let's subdivide this. Let's get something somewhat smooth in there at
the very least. Okay? So let's start on
the opposite side. Let's come here. Let's increase the subdivition level as well. So I think now we
can safely bring in or place the cylinders
in there. All right. So let's let me
select this instead. There's no sub dibution
level in there, so I'm going to do B I. I think we have something
that cylinders in there should be not there. I think I saw that cylinders
in there, this is the one. So we have ring in, so let's select this ring. I'm going to drag this in here. Let's select something
else, something lower. Something with lower topology
in there should be fine. Okay, I think that
should be fine. Let's split it and let's see how many polygons
we have in there. So split our max point,
select it quite low. So 192 polygons. So if we should
subdivide this yeah, I think this should
work just fine. We also need to inflate
this a little bit more. So I'm going to inflate. Okay. Yeah, I think that
should be fine. So I'm going to bury this in,
but not too much, though. I think let's get
it out some more. He's kind of maintaining
sharp edges around it. So I'm going to polish that out, scale out some more,
inflate some more. All right. So it's just a matter of placing it where
it needs to be now, so if I do somewhere around sending somewhere
around there should be fine. Okay? So you need to do to pull out this metal
band across it. So you can push the
metal band across the. Let me pull this
up here some more. Okay. Go down. Wood control. Okay, we have
subdivided this already, so I'm going to delete
lower, put this down. Let's first get the chip in
where it's supposed to be. B we start covering it up
with the other meta piece. Let me zoom this out. I'll pull this out of the
way, zoom this out. Okay. All right.
That should be fine. Pull this out. I think
this way should be fine. Move this out this
way, put this in. And put this up this way. Hold down control, make
a duplicate of this. Okay, move this out this way, get in close, rotate
out this way. Okay. Yeah, I think that
should be fine. All right. I'm going to hold down control, extend this out out some more
all the way should be fine. So just a matter of rotating and please putting this
way it needs to be. So bring this closer. Once we place the first
one, it's easy for us to just move it up and then arrange them
where it needs to be. So let's just do some more
arrangements in here. This way should be fine. Since somewhere around
there should be fine. Rotates this way, pull this up. So once you do one
side, the other side becomes a little bit more
easier to actually place in. So I'll just bring this closer around here, should be fine. Pull down control, pull this up. Okay. Rotate, bring
this in place. Put this out. All right. Pull down control,
pull this out. Let's rotate this way. I
put this out here rotates. I think this should
be fine where it is. Maybe just pull it out
a little bit small. It has a bit small let's
pay this back down in. Okay? So I think I can select all of these invert the max Center
pull this out this way. So it'll become a
whole lot faster to actually arrange
them now manually. Let's just get them roughly
where it needs to be. Okay? So, sir, then we can just do auto grouping there and then individually move
them where it needs to be. So I'll do to group auto group, hold down Control
sell like this. Okay. Just try to manually position it
where it needs to be. All right. I think roughly India
should be fine. Okay. Here, that's fine. Let's move
to the next. Get in close. We bring this closer
up some more. Here this roughly in
the center parts. Okay. I think around
there should be fine. Is this here as well. Okay. Move to get it a little bit closer to
where it needs to be. So let's bring this
closer closer this way. Can intersect a little
bit more. That is fine. Move to the next piece. So I'm going to rotate it this
way, move this in. I think around there
should be fine. They just been disclosed. I
think they should be fine. So I think let's start by mirroring this to
the opposite side. I think let's do
mirror and weld first. Then we can now individually adjust them where
they need to be, go to modified topology.
Mirror and weld. Something looks a bit off. So we just need to adjust
them when they need to be. I'm going to delete before
we start delete Net in, let's make sure we do auto
group PullyGroup auto group. So C click all of this. Then let's do delete ding, so do delete ding. So now we can
individually select them now and then move
them where it needs to be. So I'm just going
to adjust this, so it's already maxed already, so it's precisely what we want. Pull and control,
select the next one. Let's bring this closer. I think somewhere around
there should be fine. Okay, that's fine. So
let's move this in. Okay. I think that should
be fine. Let's rotate this. Okay, go to the next one. I think this final one, I think so should
be the final one. Let's just move this
closer this way. I think this should be
generally fine now. So it need to do is to
move the bands loser. I can't do this with symmetry on so it's not perfectly
symmetrical, so I can't do this with
symmetry turned on. So I need to manually push
them in where they need to be. I need some more
subdivision level, so. Let's get some more subdivision
level in the move brush. I would move. Let's move
this let's move this out. Hold. I think we can just use the
standard brush actually to just get this out. Let me undo this actually. Let's get it back
to the fourth chip. Then we can just use the
standard brush to pull it out, move this forward some more
back to the standard brush. Move this out. Uses the
faster way to go actually. So bring this forward.
Use the standard brush, elevate this out some more. Okay? There's still a lot of
corrections to do in here, though, but I think this
is coming out just well. Oh we did not adjust this
we're adjusting everything. So let's go back in here. Clear the max, go down
control and select this. Move this in place.
Let's get close. Move this in center
this as much as we can. Put it this way. Then bring it closer to the surface.
Let's go to the next one. Move it here. Okay, should be fine. Okay, this should
work just fine. I think the round there
should be just fine. So let's go to the next one. So this is going to be
properly where it needs to be. So you just don't do that, just a matter of
being patient and then gently moving them
where they need to be. Just now as you have them
where they need to be, we should be good. So I think this
will be final one. Move it closer. Who reent this? Who reient this. Who reent this this way. Okay, move this in closer. I think that should
be fine. Okay. So now we let's continue on. So
let's go back to this. So I would like to do
auto group in here. Let's auto group in here
so we can have them separated out so you can
select them individually. Auto Group. Select this so I
can now with the move brush, move in place, standard brush
elevate this out some more. Okay? And I'm going to smooth
also. I mean, why not? We can smooth as well. Okay? How can move to the next one. Use the move brush,
move this closer. Okay. Use the move brush also to
elevate it up some more. Standard brush. Get some
folding in, smooth this down. Back to the move brush,
move this closer. Okay. Smooth this down. Back to the standard brush, elevate this some more. Okay? I think I need to
read the same up here, too, so I'm going to
smooth this down. Smooth this down as
well. All right. So from a distance, it
should actually look as though it's actually
buried in there. All right. That's fine.
So go to the next one. Pull this out. Okay. Elevate this out some more. Okay. This out this way forward some more up some more. That should be fine.
Invert the max. Bring the closes this way. So we can use the
standard brush now to evate's kind of covered. Smooth the edge. Smooth
this edge some more. Okay. I think I also need
to ton off stroke. I need to tone off
stroke for this because that lazy
mouse turn this off. So once we pull this out, it's gonna she's going
to pull out without having to refine this
way too much. So yes. So the list we need to
adjust now be the intensity. Let's take down the standard brush intensity down some more. Move to the next one. I'm
going to use the move in place smooth do that,
smooth this down. Standard brush, I'm going to
elevate this out some more, do some blend smooth
also in there. Okay, so the front edge. All right, invert the max. So we need to actually do this across across the entire out in. Invert the max, invert the max. Okay. Standard brush now, I'm
going to elevate this out. Smooe this down.
Here, that's fine. This is fine. Let's use
the move brush also too. So this down. Yes, that's fine. So let's
just continue from down here. Since we are in here already, so let us continue in here. So max this out. You move brush, move
this out some more. Okay, then standout brush. I need to do a bit
more intensity. All right. Move brush. Don't do that standard brush. Okay? Invert the mark with
the brush. Move the out. Okay. Standard brush. Okay. Move this out as
well. Let's do some smooth. Smooth this down.
Smooth this down. Okay, let's move upwards. Select move brush, move it out. Okay. Moves out this way,
standard brush. This reacting that
should be fine. Let's do smooth for the edges. Invert the marks, move. Standard brush. Smooth down. Get this elevated a bit more, smooth down some more, move up. At this point, basically just repeating the same process
over and over again. So I'm not doing
anything complicated, just repeating the same process. Okay, smooth this down. I v the marks rather
move this out. Standard brush. Okay. Smooth down. So at this point, let's save the entire file. So we don't lose any details.
Let's save the entire file. So I'm going to do
one more role and then go off the record and then finish the remaining
parts of it. At this point, you
guys already get the general idea of
what I'm doing in here, so just to repeat the same
thing over and over again. All right. So move this out. Okay. Move this out as well. Standard brush.
Smooth. If the max. Standard brush. Smooth. Okay. Moving on. Bring out ages,
move, select this. Move this out. It the mark, move this out as well. Okay? Standard brush. It the mark, standard
brush. Smooth the edge. Invert, smooth the edge. Okay. That should be
fine. Let's move down. Be it makes better sense
now just doing this. Okay? So let's go down.
Let's do this next. I mean, do we have okay? Two more rules, and
then we should be done? Okay. Move this further out. Move this further out as well. Let's get this out this way. Invert the max, pull
this out as well. Let's move the edge
for both of them. That's fine. So let's move
move brush, move this further. Invert, move this further. Getting close. Zoom this
out some more inverts. Okay? Pull this out as well. And play the marks actually
smooth the middle parts. Okay. That should
fine let's come down. Select with the move brush. Move this out. Invite the marks, move this out as well. Okay? All right. Inverts, move this out. Here, that should be fine. Smooth the middle points.
Like so should be fine. Okay. Let's do this instead,
remove brush. I think we can kind
of do all of this in the same episode. So let's just get it
where it needs to be. All right. The standard brush now. Elevates inverts
elevates as well. Lays out, smooth
the center points. Okay? That should be fine. Let's move up the move brush. So I'm going to try to be a little bit faster in here now. Okay? Standard brush,
move this out. Pull this out as well. At some more clear this out. Okay? All right,
that should be fine. Pull this out. Inverts,
out again. Standard brush. Let's fill up these side first. Inverts, fill up this side also. Let the marks move the middle
points. Okay? That's fine. Okay. Let's move this up. Try and
move this as fast as we can. Invert the marks, pull this
out as well. Standard brush. Build this up. Okay, clear the marks. Let's soften out
the center points. Okay? Soon this down. So we can
just finalize this now. Let's go to the last rule. Select this with the move brush, move out this way. Move this out this way as well. Okay, fill up these bits. Inverts, fill up
this bit as well. Let the marks, soften the edge. Step to the boot edge. Select the next
one. Move this out, inverts, move this out as well. The standard brush.
Head this elevated. Head is elevated. Head this out. Let's smooth the middle points. Okay? Like, so should
be fine. All right. Put this out, inverts,
put this out. Inverts. Okay,
invert this as well. In this one, we need
to pull out some more. Here, smooth this down. Do that, standard brush. In this one just need
a little bit more. Smooth this down
some more inverts, smooth led this out, let's smooth the edge. Put this out some more,
smooth the edge some more. Okay? Sin the last one. Select move brush,
pull this out, inverts, put this out as
well. Standout brush. Let's fill this part up, inverts, fill this
part up as well, clear the marks, smooth the
midpoints. Smoothie as well. Okay, awesome, that should be fine. That will work just fine. Okay? So in the next lesson, we can create the inward strap. See the inward strap
that goes in there. I think we have duplicate
of this already, so we can use that duplicate. I'll see you guys in next
lesson by for now. I
22. 21 Metal Skirt Pokers Blockout In Zbrush: Hey, welcome, bad guys. So
in the previous lesson, we kind of added our rings, and then we kind of also sponsoned out the details that are supposed to be
holding the ring in place. So in this lesson, you need
to work on the inward parts, so I need to hide
let's body for now. You can just look at the
inward parts carefully. Then we also have duplicates. This is the reason why
we needed duplicates. Slow this out. This is one of the reasons why
we needed duplicates. So we still have this
duplicator as well. So I'm going to duplicate
this again. Okay? So this is the one
I'm going to use, so I'm going to let's even see where they
actually buried in. So let's turn on transparency. So one thing I need
to do first is to extend them out to more, so I'll select all
of these edges. Okay. Then let's extend
them out to more. Invert the max. Okay. Yeah, let's bring them
out a little bit more. Okay? Carry them back in. Yeah, I think should this
should be just fine. Maybe maybe maybe
I did some more. So let's push them
back in some more. Okay? Get them down a little bit more. Yeah, I think somewhere
around there should be fine. But we need to get
invert the max. Let me turn of symmetry, center this and pull it out. No that will be too much.
Let's clear this out. Move let's scale
them out generally. So it's little bit visible now. Was going to be adding
sickness to this, maybe we shouldn't
extend them do that, overextend them
out with too more, just barely out so
it should be fine. Then we can add some
sickness to it. So let's go over Okay. I think there are
some corrections adjustments we need
to make to this. First, let me start
by doing Mirror weld. Then I would add
additional segment to this Z Let's add
additional codes in. I think we need to do one, two, so one, two, do that. One, two, one, two. Mirror well again.
Okay, that's fine. Now let's add thickness to this. So dynamic. If F, let's see, the amount of
thickness we can get out of it. Okay. I think I'll need to
scale this out some more. Okay. Yeah, I should think they should sit well. Let's get in close. Let's see if it's actually
buried in some more. T is kind of buried in
some more, which is fine. Okay. So we can do let's take this do
that take this down. It's creating some weird edge in there that we don't need. So I'm going to apply
this. Let's apply this. Then under Chris,
before we go to Chris, let's do poly group. Let's do group by normal. Then we can now do Chris
PG for this as well. So Chris under geometry,
we should find Chris. So let's do Chris PG. So if we should
subdivide this now, they should hold up I should hold up the
shape quite well. I think my thickness
is way too much. I think thickness for this
might be bit too much. Let's get something
moderate in there. I think they should
be moderate enough. Then let's go back to
polygroupsroup anormal, and let's do isPG three pig. Okay. So if we
subdivide this now, it should be having
something more or less like, so if we go up and make
this visible again. So should be getting
something like this, we should work just fine,
what we need it for. Except we need to turn of
symmetry and we remove brush. Let's take down the
subdivision level in the ton of dynamic. Symmetries turn on, we can just quite easily move the backwards. So it's kind of touching
the long skirt piece. Makes better sense that way. Touch it a little bit
small, that should be fine. So I think this should be
fine for the inward parts. For the inside part, I think
this should work just fine. So look at the form for
this now, as you can see, we're kind of getting the
appropriate form for it. We have the appropriate
form for this, no doubt. So just continue in
the same fashion. To symmetry for this. Move this out a little bit more. Okay. All right. I think there
seems to be an issue here. We be T should come. Let me even go in here instead. Let's push this out instead. So that'll make better sense pushing this out instead, okay? Awesome. So you can see,
let's go this from the side. We have the proportions accurately in place
from the side. Front definitely on the
front also too to the back. Let's see the back is
also fine, too, okay? So you always want to keep
keep the forms in control, and then make it look at least quite close
to the reference. Even though you only
have a chico tha, which is actually fine
for the reference, but based on what we have here, I think we're actually
on the right track. We're definitely on
the right track. So I'm going to save this. Save this Okay. So next thing we need to
do now will be to start creating this books around it. So we can create these books
around it. I think we can. So I'm going to be using
a QQ mesh for this. So let's start by
creating a Q mesh. I'm going to use let's use
this again to create Qmsh. I think I move this up. Okay? So let's create Q mesh. I'm going to use BI Okay. I think we should have
something under a pint. Should have something pent. Okay, now that will just be a C. That will just be a con
without any sharp edge to it. So we need something
that actually has sharp edge to it, so be. We have anything in here
that looks pointed. No, we don't, so
let's use the QMH. So I'm going to start by arrange
something in the middle. Okay, let's do split
on Mark points. I want to sold do that
split on mark point again. I F out select this, okay, let's get in there. So we do group by
normal again for it. Auto group, group by normal. Binomal yes, something like so. Okay. So I'm going
to extend this out. Okay? I think this way
should be fine. Okay. I'm also going to do let's
go over let's don of smooth. Then let's subdivide. I'm going to do let's duplicate
of this, send this down. Hid this. Okay, go back to
geometry, delete lower. Let's divide this
again, delete lower. Okay, bs are 300 no
less no no smooth now, then I'll go over to gizmo, and then I'll do bend curve. So select the center points, scale this down and do d less. Take down the resolution. We have just two dots, 11 down. Then I'm going to
shrink this way. So you should be getting
something pretty much like so. Don't need to go to extreme, I think, something like
so should be fine. Okay. Yeah, that should be fine. I'm going to accept
this, so I accept. All right. I need to
delete the lower parts. So I don't I don't need
this in lower parts. Let me bring everything
back out first. Let me make a duplicate
of this first. Let's make a duplicate
of this. Hide this. Control Shlick Control
shehat click again. Let's do deletes deletes. Okay. Let's do the fact
topology delete in. Shift A right. So let's bring
everything back out. So now, it's just a matter of placing them where
they need to be now. I think I'm just going
to do a few parts and I'm sure you guys can
do the remaining part. So you guys will be able
to do the remaining part. So let's just bring this
down, bring this down here. Okay. Oh, yeah, there's
almost I in day to do. So let's do Chris PG as well. Chris, Chris, Chris,
Chris, Chris PG. Come on. Okay,
let's found it so. Ris PG. So now we should
do smooth in there. If we smooth this now, you can see I still holding
up the sharp edge, which is precisely what I want. So that's fine. So I'm
going to Orien Okay. Pen this as well.
Pulling down shifts. Bring this down. Bring
this down some more. Berry this in. Rotate, rotates. Okay, rotates this way as well. I think that should be sitting correctly where it needs to be. Yeah, I think that is fine. So we just need to bring
it down some more. Like, so it should be
fine. Okay, that's fine. Okay. Rotate this this way. Bring this out some more. Let's getting closer. I'm going to bring this manual in for the most part manually
for the most parts. Okay. So I'm going to
hold down control, put this in here. Get in there, see if I
need to pull this out. Let's put this out some more. Okay? Pull down control,
put this down again. So I'm going to be repeating
the same process across. Pull down control,
put this down again. Okay. Yeah, like
so should be fine. Lay this out. Then we can do auto group
in there, so auto group. If I need to adjust this, I can just want to
pull this up this way. I think something like
that should be fine. Okay. Let's see mo rotates, all of this this way. So more down control this out. Okay. Rotates this way. Pack some more rotates
this way. Pack some more. Let's put this in. So need to select them
individually and then adjust them properly
where you need to be. I think they should be fine, I guess, Autogroup again. I select this Okay. Let me just get them. Roughly touching the surface. Okay, that's fine. All
right. That is fine. Oh, not too good, so move it in some more. Yes, I think we have
the same go do that. I think we have roughly the
same issue in here also, too. Barry this in some more. Okay. So I'm doing this
manually just to get this Tin there should be fine. Doesn't need to be
absolutely perfect because chino forzmd
is like handmade. So it doesn't need to
be absolutely perfect. Imperfection also to also
make it look a lot more believable. Don't do that. Squashing the wrong
tin rotates this way. Okay, so I'm going to
extend this out across. So I'm going to put the
same process across Okay. Maybe we should do one more. I'm going to select all of this. It the max, hold down Control, hood this out out some
more, rotates this way, lets out some more
rotates this way. Trying to see if I can perfect the space we have
in between them. Bury them in. So you need to go individually and then adjust them. So auto group. Let me start from the top. Okay, push it out some more, buy it in a little bit more. Okay, select the next one. I think this one is
actually fine where it is, or is it as it is. I think this one is
fine where it is. Okay, select the next one
rotates who is inward. I think that should
be fine. So now we can mirror this to
the opposite side. So let's do mirror weld. Then I'll complete the
rest of it off screen. So you guys get
the idea already, so mirror weld, so you should
have something in here. We just need one more should be fine. I think we can
do this in here. I mean, why not. So I'm
just going to grab this, pull down control undo
that invert the max. Hold down Control. Come on, undo that clear this again. So I don't grab another
piece elsewhere, so I'm going to grab
this invert the max. Okay? Hold down Control, pull this out this
way, rotates this way. So you just need this
perfectly in the center. So I'll move this closer. Then I need to do
manual work in there. So let's go over to
Holy Groups Auto Group. Okay? Yes, I think we
can also finalize. I'm going to do
this off screen, so since already get the idea, so I'll see you guys in
next lesson. Bye for now.
23. 22 Waist Pendant In Zbrush: Come back, guys. So
in the last lesson, we kind of worked on
still kind of kind of finalize on the
long skired piece. So in this lesson, we're going to moving
on to something else. Let me subdivide the area
of subdivisions in there. There's already
subdivisions in there. I just wanted to check,
okay? That's fine. So in this lesson,
let's move on to creating What should
we call this? What should we call
this? Let me call it was pendant, waste
pendant piece. So to do that, I will need
to use a Humes for it. So I'm going to select
this Data's not avenue subdivision
level in there. Okay? Then I would be
I'm in primitive Hume. Let's do on the
center down shift. Shift of control t do that. No, it's not even
snapping correctly. Let me turn up
symmetry for this. Why is it not kind
of drawing out streets okay? Definitely not. He's not drawing out a
street as he wants it to. Okay, now it's working now, so down shifts French fruit
now, which is what we want. Okay? So I'm going to do
split on marks points. Let me go back to my Gizmo and kind of perfect
it a little bit more. You go back in here. Split on marks points. Let's go out of the move brush. I think we already we had
something in here before. Yes, we had something
in here before. So this would actually can
actually use this instance. Let's use this instance.
I'm going to duplicate. Wh send this down. Okay? Bring this down. Now for this, I can
still keep down. Let me just send this down
and hide that instead. Okay. So let's select this. This already has some
subdivision level in there already
so which is fine. Precisely what we need. So if we should go in,
we can do delete lower. Okay. So I'm going to isolate this
before I isolate this less, kind of get a clue
shaping for it. Something close to the
shape unit for it. So let me move this out some more sing this down
a little bit more. I think somewhere around
there should be fine. It's roughly around the
size we need for it. Maybe shing this in
a little bit more. Okay? If we need to extend this out, let me
extend this out. So be extended out.
Maybe not too much, maybe, like, so it
should be fine. Okay? So I think this
we can work with. I'm going to solo this. Let's start by shrinking
it down a little bit more. Let's get good thickness for it. I think this thickness
should be fine. Yeah, I think this
thickness should be just about right for it. Okay. Yeah, that's fine. Shift F. So now we need to make some movement or
adjustment for this. I'm going to delete some
of these side poly groups, less or edges, so edge loop. So let me go B ZM. Make sure we're on inserts. So I'll delete this, I'll
delete this as well. So I want to have some
more control over this, so I'm going to
delete this as well. Yeah. So just to have a
little bit basic to have more control over it. Okay. So the first one I I'm
going to split this in two. So let's go over to Bevul. I'm going to split this
apart this way I think somewhere roughly
something roughly around this nature
should be fine. Okay? That's fine.
Okay, so I'm going to QmshOdO and give this
to its own poly group. Okay. Then I'm going to
extrude this polygroup out. So with Qmsh selected, I'm going to extrude them out. All they should be fine. Hey, that seems that seems
just about right. Okay? I think this we can
work with except, we need to make some
modifications to it, but for the most part, I think this should be fine. All right. Moving on. So I'll need to I need
to bevo this edge. BvthEd actuals let's don
on symmetry for this. Okay. So I think I'll to add
a segment in the middle. So let's go to inserts. Let's add one in the middle. Okay. Something directly in
the middle should be fine. All right. Yeah, I think we can definitely
work with this. So I'm going to go over to I believe the move.
Let's do maxing first. Let's Let's mark this region. Invert the max. Move brush, move this down some
more. All right? Also get some more curve
looking surface in there. Okay. Clay that out. Let's see. For these sides, I would let's let's see what
we can do in here. I think I'll need to
add a difference. I need to bring extra
this out also as well. Okay. I need to
extrude that out. But just before we do, I think we need to extrude
out an entire edge loop. So let's go and extrude
an edge loop for this. Okay, I'm supposed to
bevl this also, too, so Let me bevol this, so I'll go over to Bvul. No, no, this is not the bevul we need. Maybe more or less so. Extending not. I don't want
this to extend out that way. Extending not weird way, so if audio subdivide the anton smooth, let's
just see where we get. Yes, yes, we're getting
roughly the shape we need. So just a few
modifications in there, but at least we're getting most of the shape we
actually need in there. A bit rounded. That's fine. Let me start by
extruding an edge loop. So let's go to Qm. Let's
do Poly loop Poly group. I'm going to extend
polyp poly group. Let's do poly loop. Et's
do poly loop instead. Extend this out. So how much of this do we need now? That's
the next question. Okay? So I'm checking this
out just to be sure. Okay, I should subdivide this getting something
more or less O. Maybe that's not
entirely what I need. Probably not entirely
what I need. Because this inward,
let me get in close. This inward part supposed to we have separate shipping
in here, okay? We can do Let me extra this out. Instead, I'm going to do
pool group instead. No. No, no, it's not going on
in. I need to delete this. So let's go tos
delete this for now. Then we can extend. Now I want to extend the
entire outin out. I need to extend the
entire outin out. So let's see. Let's see if we under extrude. We can do that
instead, so extrude. Okay. Extrude. Okay, let's see. Here's poly group
border instead. No. I need something that
would actually work. Let's see, let's look for something in here
that should work. I'm trying to, I think
the only way just to give this is just to kind
of fill this up first. Let's just fill this
up, don't do that. Let's fill this up with
the same polit group, so it becomes a lot
much easier for us. I can't really find
something that would work. Maybe I'm not looking
at this the wrong way. Okay, something like so, so
we can do pull ply group. Okay, yes, perfect.
This is what we want. Why is the back part
looking a bit old? Backpas looking a bit
old I see why now. So I need to undo this. There was an issue
on the back side, so No. No. Human single pully Come on. Come on. Son of symmetry
for this. I mean, come on. So I think I need to undo
this where we are the issue. I do this properly now. Yeah, it's pretty much this way. Let's come down here also. Make sure we're doing this
correctly without any issues. We see I have an issue in there. Maybe if we get
it flat this way, we should avoid any issues. Okay? Check this out
again around, come on. Come on. Basically tap in this one by one now just to
avoid any issues. So check this
around. Okay. Yes, I think this should be fine. Yeah, this should be
fine. So now we can extrude this out some more. Yeah, I think this
thickness should be thickness should
be just about right. Okay? Maybe let's do it
multiple times. Let's do the first one.
Let's do this first one. Okay. Then let's
repeat that. Come on. And let's repeat that again. Come on. Bit annoying
to work with. Okay. I mean, I just need to
do this se game, boy. Okay, I think I know why. So let's go over Polo poly
group again. Yes, better now. So XT thinks outweigh too much. We don't want
something too extreme. I think we should be able
to live with this Okay. So Control Shift click, invert the selection, give
you the same poly group, bring everything back out,
change the poly group color, have something a bit
more separated out. Okay? So I think I'm going
to extrude this inward now. We can extrude inward
if you need to. I think I like to make
the design my own, so I would go in and insert around some los around
there should be fine. Then we do PlyoPlyGroup. I going around. Do that.
Let's do this again. Come on. Extend this out
just a little bit more. Alright, I think something
so should be cool. Then I'm going to push
this in some more. Let's push this inward. On do that, let's do
flat flat poly group. So I'm going to push this
inward a little bit more. Make somewhere around
there should be fine. Okay? Here, we're
getting something now. The push this down so we can see this a
little bit properly. Okay. So I need to use this tonal symmetry for
this Atonal symmetry. I'm going to max this
region invert the max. I think I'm going to squash
this close out this way. So we have a little space on this head to extrude
something out also. Okay. That should be fine. Let this out. So I'm going
to make a duplicate of this. I'll duplicate this. So we
have a backup to work with. All right. So I'll go in. So on these bits, I
will need to yes, I think I can, let's
extrude something here. So I'm going to go in single
poly symmetry is done done. Let's do one here.
Okay, that is fine. Then I'm going to do
an inset for this. So let's do a small
inset for this, right? Then I'm going to
extrude this out. Let's go to Qmsh. Yeah, single ply should be fine. So I'm going to
extrude this outward. Let's see how high
hop this needs to be. Maybe somewhere roughly around there should be fine. I
think that should be fine. Okay? So, but I need to add a
segments across this now. So let's go over to inset. Study segments here. Okay? That should be fine. I'd
like to bear with this edge. But just before I
be with that edge. Let's add another
segment in here. Okay. And then let's do auto group on this.
Let's see what we get. We're already getting
something close to not close enough
to what we need. We just need to add
some more edge loops in a few places, and
then we should be good. But the general look is kind of coming together right now. Okay? So undo that. I should be able to bevo. Let's add one segment
here. All right. That should be good. Let's do some Bevo now. So let's go over to the
edge, bevo this region. We do something around
there should be fine. Bevo as well. Okay? So we
have that rounded look to it. I think we can more
or less do something bevel around there.
I mean, why not? Then we should
smooth this again, don't know smooth getting
something like this. Okay? Subdivide, some more.
Let's see what we get. Okay, Undo that undo. We need to redo one step. Okay? So now we start adding some extra edges to extra
bevel edges to some of this. So for one, I would do let's do Let's do it around
not there. No there. We can do the Bvround Let's
start with the inward parts. Let's do Bevier Bevo Bev swell Ar. I'll do slide beva swell, okay? I think we can do a little
biv as well, right? I think for the most part,
it's coming out well. I need to do any bevlin
here. No entirely sure. Let's see if I can let's extend this out so we
have enough edge to that, in case we are doing
some little in there, just to have everyone do
topology across this more less. Okay, I think this should
be just about right. But there's still a few
things we need to do. For one, I would like to Okay. Let me delete this.
No undo that. Let's go over to
SATs or delete this. Let's add it in here instead. Okay? Okay, let's
subdivide this. That is fine and do that. There's one more thing
we also need to do so I'll need to do an inset in here in this part and
then push this in. Let's see, I'll need to kind
of do Q mesh in the first. Let's Q merge this
front part like so. For the back side, I don't think I need to
do that for the backside. Just the front side
should be fine. I'm going to do I
need to go here? I think I need to do
here also as well. Okay, that's fine. So
let's do an inset in here. I'll do insets let's give you a moment to
kind of save out. Okay? Won't do that. Now, this incest is just it's a weird one. We
have a weird one. You don't know
what's cutting out, adding this extra
edge in there that we don't need. Can I delete it? Can I delete that? Okay. That was a bit weird
from Zbrush. All right.
24. 23 Waist Pendant Chain In Zbrush: Okay. Okay come, but guys. So in the previous
lesson, Zbrush was acting little sauce. So I start to save
out what yard, so I don't lose any
of these fires. So let's carry on. So remember, previously, we're trying to do an inset in here, and we're having some
really weird issues. So once you have it
on equal distance, you begin to get something
with this edge in here, which we don't want. So
I'm going to undo that. But if we have this on standard, it's going to work just fine. So you should see this is extraordinary kind of getting
an inset in here without any weirdness in this is what I'm trying
to avoid trying to avoid a new weirdness in there. So something pretty much
like, so it should be fine. So I'm going to
push it inward now. So let's push it inward so
we can do the Hu Humes, we can do flats and polygroup. So I push this in
looking a bit old. Let's use just Holy
group holy group, poly group, holy group. Holy group island instead. Let's use the extrude instead. I think the extrude should be
better one to actually use. Let's poly group island. Okay, much better we can
push this inward a bit more. See how far and I think
that should be fine enough. Subdivide this less gets going to add some edge loops around this and then
it should be fine. You use the Bevo
feature instead. Just use the wrong
one this again. I use the bevo instead
so Bvul Come on. Okay, so and what part also I think class fine. So if we should
subdivide this now, should be getting something
pretty much way and do that. I think I need to add
additional in here. That seems cool. My entire idea about something cool
in here, definitely. Okay. So we need one edge loop here, another edge loop here. I think we can bevel also, too. Able to bevvel around
this region slightly. Just to hold the ship a little
bit Okay. Won't do that. I think I'm going
to add an edge. Roughly edge should be fine. No, don't do that. I think
I I lost something in here. Supposed The bevil is gone. My bevile is gone. I need to
introduce that bevil again. Come on. Let's add the bev in again. Okay. Starts. We already have an
insert already, so we can do let's
subdivide this now. If we subdivide this again, I think this should work. I think it should
work just fine. So going do this a few times. I'm going to use the
Mobush now to make some close up adjustment for it. And I'm going to move up slightly this way. Move. No, do that. Move the entire
outin up some more. I think this will
definitely work. Subdivide this now. Yeah,
it will work just fine. I just fine for
what's needed for, maybe bend this down this way. A yes we can definitely undo that. Sin we are having edges down here that we don't
necessarily need. Let's see where that
is coming from. I'm going to delete delete
one of these edges. Most likely this
edge. I'm going to delete this edge to EZ. I'll delete this edge. Okay? Subdivide now should get something a little bit
rounded now to work with. Pretty much like fins. Let's bring everything back out. I'm doing this on the
opposite side all the wire of symmetry, let's this front. Let's get this front facing. I'm going to scale this down. Okay. I think we can hook this now we its to so let's just move this backwards more up in. Maybe when you use
something acid size first, let's get good size in
here. I think that's fine. I think let's scale
this down some more. For this chain piece, I will need to t it back in. Onto something bigger, maybe
we won just extend the shape out a little bit more so I want to make a duplicate of it. Let's go back to this chain. Chain precisely. Let's
do autogroup in there. Let's do auto group photo group. Poly group auto group. Okay, I'll go in
and select this. Come on. Go back to our Gizmo. Gizmo is visible O down control, select the last piece. A O down control,
extend this out more. Say out. Okay, way
should be fine. Let's move it out a bit more. Down some more
that's way too high. We can move this up. I think I say scale is way
too big, let's move this up. This way should be fine. Up some. I think around
there should be fine. We can just move the shape
itself down some more. Let's just move it
down. Let's get up close so we can see where to put this in I think somewhere around
there should be fine. Okay. I'll go back to this. I'll just rotate it a
little bit more so we can visibly see an angle to it. Something like that
should be fine. Okay? So we need to make
a duplicate out of this. So I'll just go down
control, extend this down. This way. Say upwards some more. He hold control,
extend this out. Rotates this way. Move this up some more. Let's say we scale it down a little bit more,
let's scale it down. Scale it down a little bit more. Hold on control,
extend this out again, rotate this get out this way. Maybe we going to
scale this down a little bit more like so. All right, go down contratend
this out, rotate this way. Yeah, I think this should
be in the right place now. So I'm going to move
this forward more. Okay. I won't see an issue
here that I need to go fix. So let's go back in
there to the move brush. Move rush. Extend this out some more. Extend this out some more. I'm going to select this now, I'm going to get to
duplicate out of this. Let's do photo group again. I will need this
finger gizmo control select this down control, extend this out this
way, rotate in here. I think I also need to shrink
this down here do that. That's not perfect yet, so let's get this completely
perfect first. He down this way, rotates, hold down shift, move this in. We can move this back in
more up some more this way. I think I can rotate it
this way, should be fine. Here I think that should
be fine. I'm going to play the marking
for it and I'm going to mark all
of these this way. Get the marks correctly. Invert the max
gizmo down control. Hold down control, extend enallysuw why it's
not working now. Supposed to down control and then get a duplicate
out of this. Let's give the same okay,
inverts poly group. Select this again, hold down Control on any duplicate
out of this now. Okay, that's fine.
I'm just going to do split split on MAX points. Let's do split on max points. So I'm going to select this now hold down control,
can I extend this out? Okay. Let the duplicate out
of it. Move this back in. I think roughly points. I'm going to rotate it
the opposite direction Spain lestrn properly positions proper position
where Sins properly positioned where it is
maybe get this way, I'm going to do do Auto group also on this. Let's do auto group. Auto group. I'll select this, move
this down this way. Rotates this way. Okay. Fishing
down a little bit small. Got it from a different
angle and try to get the heap where it needs to be maybe push
it back some more. Look somewhere at
the back just to get a little bit more
randomized variation to it. Can let out now. The awesome. We have this in here now, which is precisely what we want. We just need to continue on and then create some more rings down here and then
create our bellpiece. Do that in the next
lesson, bye for now.
25. 24 Waist Bells In Zbrush: Okay. Hello, comba guys. So in the previous lesson, we kind of worked
on these pendants. So we're going to carry on
and then create the bell. So let's do that now. So I'm going to
create the bell next. Let me kind of zoom out and get a good feel of the proportion
of these pendants. Think mine is slightly too big. So I'll go back in there,
select this again. Okay. I will scale
it down a bit more. Move this up. P scale it out some more All right. All right, so I'm going to
select esto group in here. Let's get closed. Cleary maximin we have
in the Odw control, select this rotate a bit
more move out this way. Let just save out and then going to make some
adjustments in here as well. Okay. Move this rotate this way, move this out. Zoom out. Move this forward. I think I'm going to grab
the entire out in actually, so this weird is a bit weird. Which piece is
this? Not entirely sure where that piece
is coming from, though. You solve this out. We have another weird one here. I'm going to do delete Eden. Let's do delete Eden, delete den that's fine. I'll grab all of this invert the max and I'll just move this forward
a little bit more. Think that should rest
well. Come back down here. Just push it down
a little bit more. Okay. Here, that
should be fine. Okay. That's fine. Now, let's create this bell,
to create the bell, I would use Let's Let
me duplicate this again and then go to
geometry delete Lower. So I'm going to create
a police fair BI Let's do police fair in police fair, police fair, police fair. Okay, police fair.
How drag this? No, that's not
probably symmetrical. That's a bit weird. I'm not getting street
police fair in there. Stange. I pull this out. Let's see. Was amazing
it's not straights. Is a bit weird. Quite weird. Okay, so this is what I'm
what I'm going to do. I'm going to draw one. I'm going to do split on mark points, split on marks points. Select this and I'll
go over to geometry. I'll do mesh from brush. Okay. H is that being buried down here so
let's kill it out. This one is actually
quite perfect. So this one we're
going to be using, use the move brush,
pull this out. Do we have this center center
now Orient center this. Okay. I'll pull this up forward. So we need to kind
of use it kind of create the bell piece. So I would need to so
we can do in here. So I feel like a cylinder would
have been feel a cylinder should be better
better bed for this. At the same time,
we can still make this work. Definitely make it. The reason I'm
using this because of sapaes all over this, words all over this one,
that's why I need to use this. So I'm going to grab
let's grab all of this. Control W. I'll make a
duplicate out of this. Let's duplicate this. Isolate right unless I think we can use
this y not click. I'm going to do delete ding, delete modified
topology, delete ding. Okay. I'm going to
max out this region. V the max written
do that as it off. Undo, undo bring
everything back out. Let's grab just the lower
parts. This is what I need. Control click Control Chi click, delete EdentroW L marks
this lower region. Id the marks. Come
on, inverted the max. Why is not working? Maybe
because we are poly groups that because it's
just way too low. Yes, it's fine. But I want squash this down, squash it down, squash
it down some more, get something
completely straight on. Let's get this roughly around
the length we need, okay? I think I can scale
this out a little bit. Oh, maybe let's leave it let's just cl it out set like so. Okay, lay this out. Then I'm going to add
some loops across this. Busy. Let's add
loops across this. Let's do inset. Let's do multiple inset instead. Come on. Multiple I mean,
yes, I'm doing the writing. I mean, pricing not working. Anyways, let's
just go to Bev and then Bevo what we have in here. I'm going to use
multiple Bev instead. So let's just do four rules. I think I needs to be extended
out a little bit more. I'm not getting the
desired results at all. L et's do two first.
Let's do two rows. Okay? Maybe something like so, then I'm going to not there. I to do an inset. Come on. Really. Let's do single instead. Let's do one year,
one year, one year. I would have preferred
something that's a little bit more evened out. So I'm going to delete this. I'm going to add one
year and one year, so you should have
something that's more or less like evened out. Okay, so I'm going
to turn over this M. That's for smooth. I'm going to divide this delete lower to a more
topology around this. The reason I'm doing
this is because if I can actually go over to my dis move and then let's
do the bend curve. You can actually bend this
now. So let's add more. Let's start by stealing
this in some more. Okay, that should be fine. Let's add some more radio and
some more resolution to it. Se like this bottom
one. Scale this out. Okay. Add some more. I'll put this down
a little bit more. Let's add some more
resolution to it. Okay. So I'm going to select let me take
down the resolute. We need one more resolution.
I'll select this. Scale this in some
more, select this. Scale this in some more as well. Maybe I scale it with too much. Don't do that. Let's
take down the scale. Scale this out a
little bit more. Okay. Add more segments, pull on
shift, bring this down. Okay. F, let's see what we have. I think as far as bells go, I think this should
be just about right. It should be just fine. I'm going to accept this. I'll go to my G icon,
click on Accept. This should be fine. So the last meaning you
just add thickness and then add a bell shape in there. Add a bell shape in
there should be good. So you can also use the same. We can use police police fare
we have in there already. Okay. Then, send in my notes. Okay? Yes we can work with that. So let's first make the
necessary thickness for this. So let me select this again. Duplicate. Sabo for this. Then let's add some
thickness to it. So I'll go over to
dynamic sub div, dynamic. He's moot off. Let's increase thickness for it. I think we need a whole
lot more thickness for it. Think thicker than what we
already having here now. Do that. Let's do Control
W for the entire outin. Okay. We need this to be quite thicker than this. I'm
going to undo all of this. I'm not going to get my doreticness in here
if I do this, so. Let's do BZMet' you extrude instead
all polygons Okay. I think this thickness should be just fine. I mean, why not? Then we can we can
bevo the edge. Well, maybe just
add one segment. Let's just bevel
the edge actually. So let's do bevel instead. So bevo this do that, let's make sure 11
single role for the bevil single
ro should be fine. Okay. Here as well. He
that should be fine. Is it I feel like it's
not thick enough, though. I feel like it's
not thick enough, so I'm going to undo undo that. Let's make it quite thicker
than it is right now. Then bevo the edge. Okay, bevo this edge
as well. Alright. Yeah, I think that should
be pretty much fine. If I'm going to scale this down. I'm select this. We can do we
can do this duplicate this. Okay. I'll scale this
down pretty much like so. Then I'll come to the top I
stay on the Z modular bus. I'd add something in here. I'm going to extrude
this common. Let's extrude just the
flat island extrude out. Okay. I'm going to use my mark into mag parts invert the max Cent
squash it down this way. Okay. So more, pull
it up, some more. Think about the way
should be fine. Get this out, bring this in. Okay? Yes, it actually needs to touch. So let's first get
the shipping india. I'm going to scale this down. Okay. The bell should be
something like so. So if we should
subdivide that now, we're getting something
smoothed out this way. Which is cool. We don't need
to do too much actually in there, so do that. Let's go to lower subdivision
level, select this. Invite the marks, pull
this all the way up. You kind of touch this
in the more or less. Squash it down. Okay. Yeah,
I think that should be fine. That should be fine.
I mean, why not? Wow the same poly group. Then I'm going to I'm
going to polish this. So let's go over and then
polish this to deformation. Let's polish this. No, no, I don't want to polish
the edge out completely. Let's do polish
by group instead. Polish by group, a little bit
weird. Let's solo this out. Let's see what we get. We need some edge
loops across this. So edge loops across this. So I'm going to do B ZM. It multiple. Can we just do this
in one common? Oh, that's subdivision
level in there, so let's go lower,
delete higher. Why can't I just add
multiple in here? I mean, common like a multiple, why can't I add
multiple in there? Start multiple edge loops. Here's this distributes. So extend this out this way. Okay? Don't do that, do that. Let's do just one. Single. Let's do. No, that won't work in there. But let's go to W. Let's
polish this. Let's see. Polish. I think this polish
should be fine. Yeah, it should be fine. It should be fine. Alright, so that holds up quite well now. That holds up quite well. That's fine. So I'm going to merge the two Let's
merge this together. Merge them together
as one single piece. So I'm going to use Got top too. Let's do send down select
this as well, send this down. Okay. Then let's merge the
two as one single piece. So let's go over to
merge, merge down. Okay. People should do that. Go to subdivision, turn
on the smooth, subdivide. Whoa, that's a bit weird. We're having this wedge, sharp edges across this.
I don't want that. Do not want that Okay. Let's see the issues
might be having in there. Let's do auto group first.
Let's do an auto group. Deformation auto group,
autoto auto group. Select this. Okay. Let's bring everything back out, subdivide into the
shift click on this. Let's go to the formation.
That's perfect. So that cannot clean everything out, precisely what we want. Okay. So if we should
subdivide this more now, she's getting something clean
enough now to work with. So that's fine.
Ectly what I want. So now we can I think we can scale this and bring this
where it needs to be. I'm going to scale this down. Move this forward up around
this way, should be fine. Maybe that's down way to more. Let me zoom out so you can get a good feel of
the scale for it. Skill it down some more. He up this way. That should be fine. So
now we kind of create the chain that goes around it. I'm going to use this instead. F isolates this one some tight edges around it. But let's see. Let's
use a tourist instead. Let's see if we can use a toast instead and then
create what we need. Okay, so I'm going to,
let's bring out a tours. I'm going to do an append.
Let's do a pen append append Pen let's do Torus. Now, where is it
Where's a Taurus So, down yes. I'm going to seal
this out some more. Okay. Hold shift rotates. Hold shift, rotates. Throw this out. Let's see
if we can reconstruct this. Can we reconstruct
this? Yes, we can also. Get closed. Reconstruct this again. I'm going to create
something that los little bit rounded. Something rounded. So let's
reconstruct again. One more. I think somewhere around
there should be fine, so I'm going to think, no. Let's max this first. Okay. Int the max. Right. Let this out. Let's do mirror weld. Delete mirror weld, okay? Something a little bit
off. See this out. Kind of properly sent anyway. Okay. I'm going to do
let's do group by normal. Control ships click on this. Hip on this Mg this out, invert the max.
Come on, undo that. Let this let do this again. This is all I need
inverting max. Okay, squash this down, then bring it out again. Okay. Subdivide this. Here's
perfect. Subdivide this now. Should be getting
the more or less like a chain ring shape in
there, which is what I want. Subdivide this one more. Okay? I think this should be
fine. Center, bring this down this way as well. Okay. Awesome. I think
we can work with this. I'm going to make a
duplicate out of this. I one at the top, bring
everything back out. Pull down control
deletes it in here, delete lower, so
pull down control, extend this out,
rotate this way. Pull this up. Lay this out, hold down
Control, bring one up. Get in the let's
see, up some more. Lay this out. Let's
shing this down. Okay. I've hidden this
already, so let's hide this. Bring this down. Let's do
one more down control, extend this out some
more, lay this out. Bring this down. Okay.
Still out some more. Let's kind of ran position
this around the bell the bell. Okay. So we can do all of this, though, so I need to delete I just need to delete
something in there. I need to delete a few. Let's get this where
it needs to be. Okay. Come closed. Move this in. I think we just need to delete a few of these. We
don't need so much. Let's get in close
first. I think I can let's put this in
here. I mean, why not? Let's put that in here instead. So it's going to get a
good idea of this scale. I think I will need to shrink this down a little bit more. Put this up again. Okay, here I think
should be just fine. No, I just need to delete a few of a few of these so we can just delete let's see where we can delete the let
turn that back on. Okay, so those delete Shift F, let's just delete do that
do auto group for this. Auto group, let's
delete this out. Okay, let's do delete ding, delete ding. That
should be fine. Ton of transparency,
select the bell itself, move this closer closer. I think that should be
fine there. Yeah, that should be just fine there. Okay. So now we need to make
duplicate of these bell. I'm going to do I need to
let higher, a duplicate. I'm going to do splits
on mark points, split on mark points, splits. Okay, so going do that. Let's go in move this up. This down. Okay. Get this
pretty much up here. Okay. Then we can
do mirror weld. So mirror weld, get one
on the opposite side. Then we can select this chain O down control, pull one out. We do split on max point
also t split on max points. Okay? I'm going to maintain
the scale onto that. I'm going to maintain this scale and maintain the
scale for this chain. Please, I mean, why not so? Let's maintain this scale. Move this closer this way. I think it should
be on the edge. Kind of holding on on the edge. Let's get close. Find a good angle
for this, this down. Okay. I think should be holding on on this edge, that edge
should be fine. All right, so let's
do transparency. A Control click Move this down. Click, Control click. Let's do delete Eden. Let's do Delete
Eden, the geometry, delete Eden. Okay? That's fine. I'm going to select
this now and then move this in here to of transparency. Ignore the opposite
side for now. We guys going to
mirro where that's not where don't place need
where it needs to be. Move this back
bodily to bit small. Okay? That should be fine. Let me download little bit more. Okay. Yeah, that should be fine. I mean, why not? Okay. This way, we do mirror weld. We select this
chain on this side. Okay. We do mirror
weld also too in here. Maybe this last one
last one down here, we can shring this
down just to make it look slightly
interesting, move it up. Okay. No, let's leave it down there. Let's move this up instead. Okay, that should be fine. Move this up a little bit more. Let's frame in the
let's get in close. Yeah, that's fine.
That should be fine. Okay. So I can just mirror
this to the opposite side now. Then we should have this
buried where it needs to be. Now, I see clearly now, this is not perfectly
in the center, so let's get this in
the center as well. Let's move this get this
rough in the center part. Yes, it's in the center
part now. Awesome. So now we have this in
offset up our bells. That should be fine where it is. Okay, so in next lesson, we'll just move on to something else. I'll see you guys in the
next lesson, buy for now. But I should take
a quick render, shift F. See some
interesting shadows happening in there already too. So I'll see you guys in
next lesson. Bye for now.
26. 25 Skirt In Marvelous Designer: Hey, welcome back, guys. So in the previous lesson, we think we finalized on the
bells for the Base mesh. So now, I'd like to
move on something else. I was thinking initially, I'm going to create
the skirt and then this floating call this
floating scarf or what? Okay, whatever it is, so I was thinking I'll
create them inside of Zebol, but I think it's going
to be a lot much easier to actually create them inside of Marvelous
Designer instead. So I'm going to bring
in my Bsemchin here, so I'll select the Base mesh. I'm going to export this. I think we already have an
export of this base mesh. So if we should go to
our file under Z Import, we should have, we have it in the area
of the base mesh in. So let's go back to
Marvelous Designer. Let's see, can I dose drag and drop this in here, W that work? Okay. No, it won't won't, it's actually it's actually we want to import this CN yes. So definitely want import
this is an avatar. Definitely. And then
this skill should be on CMDStudi that's fine. So click Okay. La okay? So it's in here now. So
we need to kind of change the material for the material we have in here is a bit cold. So let's change you let's
use a more lighter tone. Okay? Maybe not too light. Let's do think something somewhere around
there should be fine. Then let's add more
reflectivity to him. Let's make him
slightly reflective. I change the background
in here with sb that's not working in here. Anyways, we have something
here to work with, so let's create this set piece. So I conto a two d
view maybe shrink this piece or more
space in here. Like so should be fine. Alright, so let's
draw a cylinder. Let's draw a rectangle in here. So I'll draw a rectangle something bit too much
like so to begin with. I think this is
actually way too wide, but for starting points, I think this should be
roughly where it needs to be. So I just sits just
slightly higher, slightly longer than his nail. So you might need to shrink
this down a little bit more. Cancel this let's
go to di pattern. I'll select the
edge up some more. In the general
shape, I'm going to shing the general shape
down a little bit more. Okay. So more or around here. All right. I think
this should be fine. Then I'm going to
edit button again. I'll select this edge. I'll get close. Go down shift to
extend this Let's do point roughly around
3.5 on each side. So roughly around the same 3.5. Okay, that should be fine. I'm going to duplicate
this around. Let's make a
duplicate. Let's have a duplicate another
one at the back. I'm going to shrink this
again. A bit small. So let's do duplicates. How do duplicates
copy mirror pastes. Okay? Then we need to
move on to the back. I'll move to the back. But
I need to reverse this do that I didn't move
datacurately enough. Okay, so we need to
flip this horizontally. All right. I'll bring the
closes out to the skin. Okay. I think somewhere
around there should be fine. But and the next thing I'm going to do be to think I might need to create
a loop on the edge. Let's create a loop on the edge. So I'm going to create
a new rectangle. I keep saying cylinder, so let's create a rectangle instead. Since something like so. Let's make it slightly
higher than it is right now. Okay. And I'll mirror this copy. Let's do symmetry
pattern instead. I'll need to move
it to the back. I need to also mirror this. So let's mirror rather
flip flip horizontal. I'll select this. Okay,
it's symmetrical, so I can just extend one side. It's going to affect
the opposite side. I need to bring
this closer again. I think I need to
widen this some more. Okay. Then I'm going
to select this too. I'm going to use freeze. Let's stitch together. So
I'm going to do my stitching also in from the DDVstad. So let's do segment
two. I'll select this. Stitch this this
way. Select this. Stitch this this way. I think we can
still together now, so let's sew this together. There's see space and then
we sew that together. Stop the sewing. Okay. Then
I'm going to do this freeze. Let's freeze this too. So don't freeze let's
activate it instead. Whichever will actually work. Then to stitch also so
let's sew them together. Let's use the three D.
So from the three Dview instead. Aston segment so. So I'm going to
sew this in here. That should be fine.
To a great extent, it's a lot much easier just to sow from the three
dview instead. Okay. I think this
should be fine. All right. So there's
something else I like to do. I would like to do
sew outs as well. So I want to sew sew from
around here this edge. The move to the back from these points. I'm not totally sure why
it's not working, though. Let's see. No, this is not working
the way I want it to. So I might need to do it. I need to do it in here instead. So let's do it in here,
so I'll go to two. Let's do the free answer. Going to figure out
where the should be, I believe is, we, yeah. Then, H No undo that. Yeah, I need to do this
again. Now start from this. Let's start from in here, way. Yes, there should be fine. Let's see what we sewed in. You see, we sew the correct
place in, that's fine. Then I'm going to stitch here. I need to make sure there is roughly around the same edge. Here, as well. Yeah, I think that
should be fine. So we can eat space, but let's sew this together. Okay. Well now, it's
kind of way too tight. You can see clearly that
this is way too tight, so we need to free up
a little bit more. We can quite easily do that
by just slating these two and scaling them out.
Scale them out. I also scale these points. I let's see if we can
actually link them together. Can we link since a whole lot easier
if we can just link them together as one piece. There's no linking in here. There's no link in there let's
have to do this manually instead. Going to
do this manually. So I'm going to extend this. Let's do roughly
something close to five some spacing in between. Okay. I think I overextended
that let me do. Getting close. I move this out this way. So we need to do the same also
to for the opposite side. Extend this out for
a unit of five, roughly around five
doesn't need to be it might be 4.9 that's fine. Okay. I think that should be fine.
So let's sew this up again, at spacebar sew this up again. So it's going to run
around then try and create something good
enough for us to work with. Okay. I think we're in a good place, but the heap region, we need to extend
that out some more so we need to use the
curve brush instead. So let's do we do a det curve. Let's put this here extend out. So around the value of three, and the value of three
should be just fine. Round that should be fine. So increasing this round 32, you seem on the opposite side. Okay. That should be fine. So
let's simulate this again. I need to pull this
out some more. I think we are getting
what we actually want now. Put this out some more right? Since button actually
sits were now, but it's actually way too long, may need to pull
it up some more. So I think for the simulation, let's use, I don't want to use
fuzz let's just do normal. Let's stick with normal for now. Then the length of this
set is way too long, so we need to shing this down. So let's pull this up, Squeak. I'm kind of looking
at eyeballing it also too from the reference, just to be sure I'm doing
this in the right place. Because as much as one
desire also going to have can see some entirely
sure what this is, though, or the actual
portionistic name for it, but you need to have
that around the hem. Needs to be also around the hem. Okay. So I need to push this
up maybe up slightly. Slightly not too much, though. Similarly this again. Okay. Okay, that should be fine. I think this is fine
where it is now. Also, I don't need
much rinks in there, so I might not even need to increase the particle
distance for it. I think the default we have
here should be just fine. Just fine, but there's
no small thing I like to do in way. So let's go to the it cove and add a little cove
in here in the center point. Maybe just a little this
way should be fine. As well from the simulation. Yeah, I think it should
be fine. Work just fine. So this we can work with
So the next lesson, you can always go
in and then create this that comes down here. Shouldn't be too
much of a fannsh I think we can even do that here. I mean, why not? You
can just do that here. You can just create the shape. In here, let's figure out
how long this should be sasm something around this
nature like soap. Okay? Then we can select
it and move it up, move it up. Bring it closer. Okay. The stitch it
where it needs to be. We can just do different
part, I believe. So let's just do
segment, so instead. You can do segment,
so segment sewing. Segment way too broad. That's way too broad. I don't
want it to be that broad. Let's see if we can do it
in the three Dview instead. Let's do free and free
and sewing instead. So free and sing does not really work perfectly on the three D V, but
let's give it a try. Move this up. Now,
it's not even working. Not working the
way I want it to. I need to teach it to
the up part instead. I guess I will also have to
do this inside of my two dive instead do this first. Do this again. Okay? Thing called fine. Let's run a simulation for it. So I think I need to move it. I will need to move because it's not perfectly in the center, so
I need to move it. So let's edit so. Let's try and get this
roughly in the center. Okay. This needs to be
directly in the center. It's kind of floating
off. Floating off. Rotate it this way. Move this forward.
Simulate this again. Okay. So I'll be giving it
a different material instead. Let me stop
the simulation. Let me give it a
different material. I'm going to create
a new material in. So I'm going to use leather
material for it instead. End the colour as well. So for the presets, let's open up the
preset in here. Let's find leather. We're looking for
something that is leather in tarn alphabetically. If it's ran aphabetical, then we should have better I don't think it's
na alphabetically. Where is leather. I think I saw something
this should work. So I'll pull and drag this here from the simulation again. Let's pull it out. Okay. Still not potl in
the center, though. So I need to stop the
simulation and going into sew again and move it a bit more
from the simulation again. Okay. I think it should set
you well in here now. Okay. Let's stop the simulation. I'm going to Let's
freeze these two. Run the simulation again. I think it's better,
it's way better now. The length for this, let's see, trying to figure out the length
for this to be just fine. I need to shrink it down a
little bit more, I think. I think it should
be just fine here. Let's just shrink
it up some more. I'll select these two. Shrink
them up a little bit more. Let's make them
active, activate them. I'll freeze this instead
from the simulation. Okay. I think we are in
a good place now. Bring up a little bit more. Activate it. Here, I think this
should work out fine. So go to work with. I'm
going to save this. Then the next lesson,
the next lesson, we can just create the
topology needed for it. Let's just name
these two MD skates. The next lesson,
we can just create topology for this and
export this out and bring it into zebra. I'll see you guys in
next lesson bye for now.
27. 26 Skirt Retopology In Marvelous Designer: Okay, but, guys, so let's carry on from where we left off. So we're supposed to
do the topology next, but I feel like I need to make some adjustment
around there. This part feels a bit old, so I think it's the allowance we added in,
so I'm going to reduce that. Let's go to Edit Cove. So I'm going to push this. Oh, I think I'm adding
a new one. On do that. Do that. Edit Cove virtual
instead, I believe. Okay, let's sing
this down some more. He also as well. It simulates. Let's
see what we get. Okay? That's fine. I'll do the same also in here. Simulate this again. Yes, I think this is I
think this should be fine. Okay. Yeah, this would be fine. We can definitely
work with this. Just checking again just to be sure I have everything
correctly set up. I'm going to just extend
this up a little bit more. Okay, simulates. All right. I'm using normal
similarity is fine. I don't need to increase the
I don't need to increase the particle distance
because I don't want to have too much food and
wrinkles around it. I think this should
work just fine. So I'll go over. I
think we can check. It's already on quards, yes, but we need better
quards for this. Let's go to Monochrome surface. So now, how do we wrap or
how do we retopologize this? So I'll pull this
up here instead. Okay? That should be
fine where it is. I think we also have I think we have a UV editor
window also, too. So if you go to UV Editor, we have a UV editor
window in here. Is there a way to
pack this at once? Okay. So we can't really pack this, so we can just shrink more
or less like shrink this in. The shrink this in. It's not going to affect
to the pattern window, so it's not going
to affect that. I just want to kind of arrange this in a zero to one space. Okay. So there won't be much
difference though, because at going to
create new UVs bots show you guys it's actually in there in case you
want to adjust it. Now, let's go over
to let me save this. Let's go over to topology through topology two inside
of Marvelous Designer, go over here, click
on patch two. So I'll set the
divisions to ten. Let start with ten. Okay?
So how do we do this now? Go in and click four sides. So it works best for
squarish surfaces. Then click on creates. Okay? I but a one is symmetrical so once
you do on one side, is going to affect
the opposite side. All right, creates, do the
same here also as well. Okay? All the way up. Then go back to the
starting points. Click on Create. Okay. Let's do this here also. All right. Create awesome. So that's fine. So I'm going to next
thing I need to do be let's go over to I
believe edit topology, select, some to just click out and we do add all divisions. Yes, let's do add all divisions. So it's going to
kind of subdivide it and add more
divisions in there. So I think I might need a
little more I mean let's see. Let's see, I think one
more should be fine. Maybe. Let's check this again. Yeah, one more should be fine. So add all divisions again. Okay. Then right le let's move out some
more, right leak again. Let's remesh or duplicate. Then let's give this a moment
to kind of run through. So it's loading up down.
Let's just give it a moment. Shouldn't take too
long. Almost there. Almost there should
be as not as it does, it's going to kind of create
like an actual megh for it. I'm going to create an
actual mesh for it. If you go back to
transform pattern, we can just move this down. Let's move this down this way. So this is going to be
the reemerge version now. The reemerge version
is down yet, so we should go over,
go back to move. Let's select all of this at
the top and let's temporarily hide hide them,
hide the pattern. So what we have here now is
the retopologize version. So if you go over to
let's go over to mesh. This is like
retopologize version. Okay. Yeah, that's fine. Let's check this again. Yeah, this will work just fine. So the next we need
to do now would be to export them out. Let's
select all of this. File export selected, B
selected. So I'll go over. Let's create a new
folder for this. Let's do MD, open it up, create a new food MD exports. Okay. Open that up. Let's just
name these two skates. Yeah, that should be fine. They're spotting out now. So
next we need to do to open up to show some
settings to actually adjust show some
settings to adjust, so converted, thin,
unified UV coordinate. Don't need anybody textures
for it. Yeah, this is fine. Okay. This is fine. Click Okay. So next they're
spotting out the OBJ. A Okay, that's fine. We'll be exported. Let's go over to Maya.
Let's bring this in. Okay. I think I'm going
to, that's fine. So go to MD. I I need to
save this again, actually. Save this again. Okay? Open up MD. Let me save this into this
folder instead to save jets open it in a
put this in here. Just keep this little
bit organized. Alright, saving. Save this again. All right, go back in there to
save the indian now, which is what I want. I'm going to delete this. Okay. So back to Maya, open up the folder, D MD exports, scar
drag and drop this in. Yes, this always happens.
I don't know why. The offset is a little
bit of an offset to it. But it's not going to be
major. It's really a big deal. We can just push and
size this up properly. Okay. I think this should be
sitting's getting close. All right. Yeah, I should be sitting fine. So I'm going to give this
a different material. Let's do blank material. Okay. So we already have good
topology in there already. So it's a total of eight k, which will definitely be doubled when we create sickness for it. But as far as this goes,
I think they should be just fine where it is. So I'm going to S going to give this some sickness,
let's isolate this. Let's make it duplicate first. Okay, I think at this point, I can just safely close this. I don't need Marvelo design
anymore, at least for now. So let's temporarily
close that. All right. Okay. Awesome that is fine. This we can
definitely work with. Let's see what we get.
Yes, this is fine. I. This is fine. So I'm going
to add this duplicate. Let's work with the
original instead. Control one to isolate.
Let's criticness for it. I'm going to There's some weird issues in here
that we need to correct. Just move this. Let's go
over to modeling two kits. Let's do soface slide. Come on. A slide not working, let's just turn this off and then just move this
manually instead. All right. There are, like
a few of these around, so don't kind of check
and then fix them. Something like so. Just kind of create some
little issues in between bots. It's not really big
deal to actually fix, just to get them back in place. Though there are faster
ways of doing this. We can actually
quickly do this inside of Zbrush but since
we're in here, red let just fix them in here. Okay? That is fine. All right. Okay. All right, that should be fine. Yeah, I think that should
be pretty much fine. Let's check around
the skirt itself to see. Yeah, fantastic. I think this will
work just fine. I'm going to delete this, no. Let's make a duplicate
of this again. All right. I'll name this enters enter my duplicates creating
it with different names. So let's just rename
this properly sieve. And let's extrude,
so clic on Extrude. I'm going to do Locals
Extrude instead. Okay. Let's see how much
of this thickness we need. A little bit more. She didn't salt anybody. Okay, I'll go into
the attributed dital. I need to add some
divisions in there. Let's do two divisions. Let's do two divisions in there. Okay. I'm going to do auto Smoot. Here don't. Let's do autosmot in here.
Let's see what we get. Okay. All right. Here, this should be
just fine. It's one. Okay? So we need to add some supporting some clues supporting edges in here
just to shape some more. So I'll go over to
modeling two kids. We do more tie cuts. Let's adjust the
sheading for it. It's way too bright for now. Let's adjust the sheading. We can delete by type history. Taking is a little
bit more, okay? Selects she retic and
old more tie cuts. Hold on control, stick
close to the edge. Okay? So that should hold
up that edge quite well. Same here also. Okay. Yeah, that should
work just fine. We do this same also
around, do we have? I think we have something
on the edge already? Okay, I guess not, so let's add something close to the edge. Just to hold up the
sheep, a little more. So now if we should do
Auto smooth in here, biting three on the keyboard. You'll be getting something
pretty mode like so. Okay? So now we can
actually export to Zbrush. But now we have Zbrush closed, let's open up Zbrush
and then get this in. Oh, also, I need
to delete the UVs. A UVs we have in here, I need to delete
them. Or maybe not. I think this is
actually quite good, so we can we should be
able to split them. Because when we extrude it created another
extra UVs for us. So let's do layouts. Is n zero to one space first. Here, I think it's
actually perfect. We don't need to do
another UV in there, actually. This work just fine. Because if you kind
of test this out, we test this out by turning
on Checker pattern. You can see kind of
flows properly in there. Everything flows properly. So this is fine. I'm
going to keep this. So close. Lets export this
out into Zbrush to select. You can see we don't have too
much food rinks in there, which is fine,
precisely what I want. Okay. Yeah, this is fine. I work just fine. Se we need to move
this out some more. Okay. So let's go over to let's select this and then export this out
export selection. Export this to the
correct folder. Okay. So I'm exporting this
out to Talisman Z imports. Here is the folder, I need
to export it out to copy. Past the directory in there and just named it to sketsEpots. So now let's open up our Zbrush
file on the Zbrush file. Okay. So back to Zbrush. Let's import this in. So we're going to do an append. I'm going to append Capen anything actually.
So let's go down. Should be down select
what just append. Okay. Then let's replace that. Let's over to imports. Zimput skirts. So you see now we have this perfect perfectly
placed where it needs to be. But obviously we need to make some adjustment because
I think it's kind of covering some bits
that we need to adjust. Okay? Can see where we
obviously need to adjust, but for the most part,
kind of imported in quite well or imported in quite well. Let's see where we
need to adjust. Okay. Buried in
there. All right. I think it would make
better sense if we see just to find the right balance in
select this instead, use the move brush,
ton of dynamic. Let's adjust our workspace, move brush, take down
the browse size. Move this up some more. Okay, use the browse size, bury this back in Okay. I would select per this
a little bit more. Okay. Let's see. I think this might just
sit just fine we too. I see where we need to adjust. I might even need to bring this out a little bit,
a little bit more. This method might bring
forward a little bit more. Okay? So I'm going to select
start by selecting this. I'll push them
forward some more. Push them forward, some more. Let's make sure
symmetry is torn off. Come on. Ton of symmetry common. Keep selecting the
wrong. Now just look this cards from
a different angle. Fantastic. Move this
here. Turn off symmetry. Why does this keep snapping
Let's solo this out. Something is oddly wrong
in here. It's oddly wrong. Symmetry is ton off now. It's not snapping to the
center for some weird reason. I think I can move
this out some more. So we have quite a number of Oh, I see why I see why so I want to clear it kind of maxed out, so there was max and
in there as well, but it was not getting
to the center. Okay, so let's move this
forward a little bit more. Okay? Something pretty moot like stow. We need to do the same also in here move this
forward some more. Okay. I think I kind
of separate this out so let's separate this. So I'm going to do split ding, split ding, split ding. Select this down
shift, send this down, select this down shift, send this down as well. Okay. Let me select this now. Get this in the center, move
this forward, some more. Get to a close, move
this forward, some more. Okay. So why I'm doing that
is because I need to I don't want these
bells to be buried in, so it needs to be forward
a little bit more. So I'm going to merge down. Let's merge down so merge down. Okay, that is fine. I'm
going to select this. I'm going to move it forward. Okay. Put it this way. Back some more. All right. Okay. That should be fine.
I'll come in here. We still have this
separated out, so we need to get
them merged down. Let's merge this down
as well. Merge down. Okay? Select send this down. Select send this down. I believe there are no
subdivisions level in there. So we can actually merge them
down as well, merge down. Okay? These bells, send them down. I think we can merge
these two together. I mean, why not? Let's
merge them together. So we can have them as
well as a single unit. Then we can move it forward. Let's move it forward. So more. Okay. I think I need to adjust
this on the opposite side. Okay. So adjustments
need to be made. So I'm going to
zoom out some more. Let's grab let's grab
all of these bits. Just to be sure I'm not selecting
something else inverts. So I'm going to move this I say I'm selecting
something else. Let me use the max last. Okay. If I move this out
and I think you shouldn't be moving anything
weird now and there. Move this aside.
Okay. Let the max. Max last again, SMAx all of
these bits, invert the max. Move this to the edge. Okay. I think we actually need to move
this back some more. We need to move
this back some more actually. Clear this out. The entire scene, move it back a little bit more.
Like so it should be fine. Okay? So what I'm
going to do in here for this would be
the move brush. Tonal symmetry for this. I'm going to push this down. Down some more. Okay? So enough symmetry
now, move this. I don't want any
interceptions in there, so we can move this
closer that way. Okay. Let's see where we get in here. Let me get close. Okay. Yeah, I think that should be
fine. That should be fine. So in the next lesson, we just move on and
then start making some adjustments and
corrections to it. I'll see you guys
in next lesson. By for now. Okay, wait before
we go. Us one last thing. I think I need to push
this down this way. Yes, just to make this
edge a little bit visible. So since somewhere there
should be fine, that's fine. Alright.
28. 27 Drapery Seam Taping In Zbrush: Welcome back, guys. So I'm
taking a look at this, and I feel like I need to add
an extra edge in between. Feel that there's supposed
to be an extra edge in here. So let's see if we
can get that in. So I'm going to make a duplicate of this
long metal skirts. I'll make a duplicate of it. Okay? I'll slow this out. All right. Do you have
this perftly symmetrical? I'm not entirely sure, though, but I believe we should have
this perpetly symmetrical. So what I'm going to do
will be to go over to B Z M. Okay. Then Q Mesh. I'm going to come from up here. Like so. All right. Keep going. Undo that. Come on. All right. Let's do
one more in here. Why is this? Do we have subdivision
level in here? Oh, yeah, we do. We do so. I need to remove this
subdivision level, so I need to undo all of this. Undo D tire. Okay. Maybe I'm from
this strange well, let's get in common. I mean, common.
Fantastic. He's just refusing to have his own kind of take that ply grouping in there. I think I might have
made some mistakes in. So I think I would do
this with symmetry turned off instead I'm
having weird issues. Nice working. So keep in mind, if you're having weird
issues, probably symmetry turned on. Okay. Alright. Go around it. Since we already have bare Vl in here, so that
will work just fine. So the reason I'm doing
this is because I'm going to extrude this in instead. So I'm going to
push this inward. Okay. Move this up. Alright. Keep going up. Final piece. Okay,
that should be fine. So we need to
extrude this inward. So let's do we can
still use Qmsh. I mean, why not? Let's
do polyp polygroup. Find a good angle for this. That's a bit weird. I think we should use the
extrude instead. So it should be the same
poly loop poly group. All right. I think they might think
this should be fine shifted let's see how much
depth we have in there. Okay. I think this depth
should be fine. I think the depth we have
in there should be fine. So we don't need
to bevo the edge. So let's bevel the edge, bevel, find a good angle for it. Oh shifts shift F instead. So you can actually see
proper shading in there. So it's getting a little
bit confusing just to see the angle
properly in there. That doesn't seem to be working. Okay, Bvulo single so so Okay. Let's do the same
for the opposite, I think it should also
affect the opposite side. So if you subdivide
this now, come on. Yeah, I think I
think should work. It doesn't need to
be too extreme. Something light in
there should be fine. It does create some
good shadow in there. Get in close, let's see Okay, let's go to the lowest
subdivision level. Feel like I should I should
kind of bevo this edge, delete iron, feel I should bevo this edge to hold the
shape a little bit more. Okay, let's subdivide Yeah, that should hold up the
shape a little bit more. That should be fine. Let's
bring everything back out. All right. I mean,
it should be fine. We can work with this. So we have good proper edging
around this now. Okay, now. Let's go back to the fabric itself,
isolate, shift. So we're going to do let's
do polyroup auto group UV. All right. Fantastic. I think it will work pretty much just fine for what
you need it for. All right. So you can see some
weird edges in here. So we can just quite easily fix that with
polish by a group. So that should fix
that up nicely. Okay. Yeah, that's fine. So I just need to move some
things in and then we should be Let's do polish. Here, let's do group
by no mouse instead. Now, is going to create some
weirdness, so auto group. Auto group should be fine.
So control shift click. Max out, inverting max. I think let's subdivide
these ones first. Let's do one
subdivision in first. Okay. Mark this inverting mark, go to a move on a move
brush ton of dynamic. It the mark, ton of
symmetry for this. So the idea is just
to push this closer. Just bring this closer. Like, so Okay, I'll
leave this gap in here. D the same for the
opposite side. Bring this way closer. Okay. Move this I think I move
this way too much in. Okay? Like, so it
should be fine. Let the max. Let's
do in here swell. Just push this closer closer
swell, that should be fine. Okay? Mark marks this. I'll pull this up. So more. Up some more. Let's do the same
for the backside. Okay. Here, well, here well. All right. I think that should
be at least fine for now. It the max. I'll put this back in so we can see the
separation in between. Okay. All right. I think we can work with this. Let's bring everything back out. Okay. I feel like I should
inflate it some more. Just get some inflates in there. So I'm going to go over to
deformation, deformation, and I'm going to inflate this
this is not very obvious. Let's do a little bit
more. Okay, that's fine. So now, how do we create this typically
tapering at the edge? What do we call it so? I have a browse that I'm
actually going to use. So let's start by
duplicating this piece. Let's you play the skirts. Okay? Let'ss one at the top, go to the lower
subdivision level, deleierF Alright, so let's go back to the No
deformation polygroupGroup. UVs, Okay? Let's see how let's see
how we can make this work. So I'm going to be using
the inward ship instead. I'm going to need
the inward parts. See inward part I need
some more control ****. Click. Come on. Okay. I just need
the inward parts. This so invert this. Oh, need to make sure
D Start is turned on. Display D side. So this is pretty
much what I need. Yeah, it's pretty
much what I need. Okay. So now I'm going
to do delete ding. Let's do delete ding. Fact topology, delete
ding. All right. So I have a brush that I'm
actually going to use for this IMM brush and I'm going to wrap it
around this on the edge. So let's go over to Light box. Tacon brushes, KC
stylized brush. I think it should be
this one, KC IMM. So I have a few of these Okay. I think one of
these should work. Let's try this
instead, select it. Go over to stroke. Core function. Let's Come on. Let's do bolder
instead, frame mesh. Could the bro size a
little tap on the edge. Alright. Let's see. This actually flips
the opposite way. I actually flip the opposite
way in this direction. So for that I need to use a slightly different
approach instead. What is down way
too much. Do it. Let's use this instead. Now, let's just flip on
the opposite direction. Let's try this. So seems flipped in the
opposite direction. Okay. Just trying to figure
out which one work, but I think this one looks
way better, actually. This one looks way better. Yes. So I think I'm
going to be using this instead handle it in edges
that I don't necessarily need. Okay. So I do this. So I'm going to I don't
want it all over. I don't want it all over
the place, so I'm going to go over to there's the Let's do under stroke. Let's delete this for now, okay? I'll make a duplicate of this. Let's duplicate this.
Hide this duplicates. I'm going to delete this. Delete den. Okay. So I'm going to go
over now and then frame mesh bother
up in here again. Now, we don't need
the entire outing. So we're going to delete portions where we
don't actually need. I still make some
modifications to it also, too. Okay. Here, that should be fine. So I'm going to
let's do split ding, so split split on marks points. It's going to hide that. But that's fine. So let's go and delete the stroke. All right. Turn of isolates. Selects isolates. Let's do autogroup in here. There's auto group
in, so go over. Oh, if I do auto group, it's going to separate them
out way too much actually. But let's see let's
see if we can do. Let's see if we can use
something in there actually. So if we do auto group. Yeah, that's what I
was trying to avoid. What about we do merge
group is similar groups. Okay. Please don't crash. Okay, so it actually did a pretty good job
separating them out. So let me save this face. Just like we are way too many, so I did a pretty good job merging what is
necessary in there. Okay, so now I'm going to
Control Shift click on this, and I'm going to delete
what we don't need. So what we don't need for now
would be I mean, come on. Let's get this front facing. Let me use this instead. Okay. Marks this part out, Control W. Control Shift click,
deletes them. Oh, Condo deletes it in yes. Undo that, Control W to
get them. Oh, come on. Undo Okay. So now I have given them
a separate poly group, so control shifts click. Let's do delete
Eden get up close. Okay. Con trough. Let's
do this as well. This part is going to be
quite tricky, actually. It's going to be tricky parts. So let's just do it
systematically instead. So I'm going to go I'm
going to grab all of this. Okay, control W,
Control Shift click. All right, so I'm going to
do delete Eden as well. So this should helpetch should actually help simplify
things a little bit more. Okay? Trying to simplify
things as much as I can. But I think on these bits, I'll need to delete. Let's sort this out again. Let's see what we have. Okay. I don't need this. Let me grab this portion. Do the same for
the opposite side. Grab this portion. Okay? Deleted in again. Alright. Because I want to
make sure I'm like, something that's quite
neat in here actually. So I'm being extra careful. The bring everything back out. Let's see. Think C's t it
out a little bit small. Let's do transparency. I'm going to MAX these bits. Okay. CW. I'm not sure I'm seeing
what I'm getting in. CWA is better. Okay. Let's delete them. Control Shift click Delete Eden. All right. I think I can do Auto group any herhe
let's do deformation, holy group. Auto group. Control Shift click. So I can delete any
parts that I don't need. It's quite messy in
there, but that's fine. It's not going to be visible. It's not going to be
visible, Okay. All right. Let me do a quick C
for the file again. Because I don't want to do this by moving
them one by one. So it's gonna be a long process. Okay, so let's do
29. 28 Skirt Seam Taping In Zbrush: All right, so carrying on. I'm going to do
me similar groups again here so I can
adjust this now properly, so select let's select this part is actually gets merged in and I don't
really want that. It's kind of making
things slightly difficult to work with in there, but I think I have an idea
how it's going to fix that. So I'm going to use my max last. I'm going to max quite close
in the CtW Control click. Let's see if make
sure we didn't grab that part from
that. That's fine. I'll do delete ding,
delete ding, okay? Yeah, that's fine. So I can
say legacy and tio in now. Control W. Let me do that again. Con W. Let me make it slightly different color
actually, W. Come on. Why is not getting
different color in there? Anyways, this marks
this as well. Control W. Come on. Keep getting
the same color. Why am I getting the
same color Inverts? Why are we getting the same? What am I getting
the same color? I used to be a completely
different color. Here's better. Okay? Going to hide this for now. Can we get a different
color in here? Okay. Come on. Come on,
something wrong? Is something broken in here. Better. Is a separate coster
I'm doing this because site easier for me to
actually select them. Why do we keep getting okay? All right. This one is quite loose. Imagine this correctly, no
grabbing something else we are notes. All right. So now I separated out now. Let's go out of isolates. So now we can properly arrange this now where
they need to be. So yes, so I can sell Select this old
control, select this. We can turn of transparency, yes, we can turn
of transparency. Now, we need to make
the order cad visible. So let's make this ad visible. Let's side this for now,
don't need that anymore. Yes, this is the one we need. Common we no longer
training yet. Something is rather odd.
Yes, this is what we need. Okay. Here is the one we need.
Select this, get enclosed. So it's just a matter of pushing it where it needs to be now. So we just need to arrange this properly where
it needs to be. Since we have this
properly arranged, I think I'm going to
let me center this. I'm just going to duplicate
this around, actually. Move this in, rotate
in forward some more. Okay. I think this
should be fine. Maybe at this point just
duplicate this one across here. I think that would
make better sense. Let's just visualize this first. Let me see what we
are getting in there. I need to move this up
some more. I think so. Okay, I think that
should be fine. I think we can just
delete the rest. Let's delete the rest instead. Or, better still, let's just
do split on MAX points. Okay, split on mark points. We can hide this for now.
Let's go back to this. I'm just going to start holding control and duplicating
this across. Okay? So we want to create
some space in there. Okay. Center these three won
control, extend them out. Extend them out this way. Okay. Out some more play this
center, extend them out. All right. Yeah, I think that
should be fine. We need to make some
adjustments in here, no doubt. I F. So it's not going to
be a major issue to actually adjust this
way we need them to, so we can I think we can
easily select them now. So I'm going to, let's
max this three first. I think it's this
three that's moving off invert the max. Cents moves forward. Okay. So no transparency rotates this. Transparency. Rotates. Move this down, rotates. Move this back in. Okay.
Forward some more. All right. T of transparency. Let me rotate this just to be
sure when you right place. So use the move brush. I use the move brush and then move this back in some more. Move this back in. Okay. All right. Get in close. Let's see. Yeah, I think that
should be fine where it is. Yeah, that should work just
fine. That should be fine. So now we going to replicate
that across this also, too. Let's get that
replicated across. But I'm going to help
myself a little bit more, so I'm going to copy copy
this copy the sub two. I'll open a new canvas. But let's go to a new canvas. In here, I'll paste
that sub two in here. So paste go back in here, I would copy the skirts, copy the skirts, sub two. From in piece this skep
to in just so I have enough space to kind of move this along move this
around, actually, so. So I'm going to select this. Okay. I'll move this up. Move this in here. I also
need to go to these gates. Make sure Auto Come on. Control Shift click,
Control Shift click, I'll delete Delete ding on that. Delete ding delete lower, deletes ding all right. Select this. So the Agena start moving
them where they need to be. I think I might need to
do this piece by piece. I need to do this
piece by piece. And to do them piece by piece, we first of all need to give them separate ply
groups again to control W it's actually extra work
necessary work, actually. Want this to look
good, necessary work. Okay. I'm sure you guys get
the idea already just to move this along,
then tie out. This one is different
polygroup already. So I need to start moving them individually, put on control. Move it in where it needs
to be. Yeah, it's fine. We can get move this. Let's move all of this up
a little first, like so. Okay. Move it in. Inda should be fine. Get some space in
there. All right. Let's move to the next one. Move it in. Okay. Move
down some more next. Move this in. Okay, that should be fine. Create some space
in India as well. Always want to aspace in India, in case you want to get
them a separate poly group, we can easily do that. Move this in. Okay, that
should be fine. Next. Okay. Get some spacing in there. Move this aside, hop some more, get some spacing rotates, get some spacing
in there as well. Move this forward a bit more. Okay. Yeah, that should be fine. So now we need to do this
across the entire outing. I need to do this across. I what is this? Okay, star ship. Starship
from this sub to in here. Okay. So let's extend this
out, hold down control. Move this out.
Move this back in. Okay. So we need to do this
across the entire piece. Pull down control,
extend this out. So each time I extend this out, I need to make sure
I'm doing this as accurately as I need to because I'm going to be
having separate ply group, and then I need to also
add some space in there. So in case you want to
select max them out, you can just easily
max them out with. That's also very important. All right. That should be fine. Extend
another one also too. Okay. Now, just to find the
right angle to put this. So as we keep rotating
and moving this, the orientation will begin
to get a little off. So you want to be careful with that and then
stay just them and put them where they need to
be. Extend this out. Okay. Forward some more.
Open a little bit more Backwards some more. Okay. Move the out. All right. O some more. Back in some more. Okay. Pull down control,
extend this out. I'm sure at this point you
guys get the idea already. I'm sure you guys
gotten the idea just to duplicate this across. So this will give it more of an interesting shape into it. So its going to vary
the strands in there, but for the most part,
this coming just fine. Hold down control,
extend another one to the opposite side,
rotates this way. Buried it back in. Get this down some
more All right, good control external one out. So you want to kind of
make sure you kind of get consistency on the spacing
as much as you can. As much as you can get good
consistency on the spacing. Hop some more,
move this back in. Okay. Rotates. Move this back in some more. All right. Hold down
control, extend this out. Remember, always kind of
try as much as possible to maintain equal spacing in there. Okay. Here it is back in the center. All right. Extend a new one out. So in this part
where start getting cove might be a it bit tricky, but just try as
much as possible to maintain that consistency,
and then you should be good. So each one I pull out, I'll try and be as accurate
as I possibly can for it. Okay. Hold down control,
extend another one out. This one I can put in a
bring this down rotates. Okay, get it closer. All right. That should be fine. Hold
down control. Move this out. Move this out a bit
more, pack some more. Okay. Alk this from
a different angle. Alright, I think pretty
much there should be 24 out to rotate this Okay. I think we can live with
this move this up some more. Move this down. Okay, hold down control, extend
another one out. Okay. Allow to save out two, and then we can
continue move this in here I'll rotate this
way, move this forward. Here, that should
be fine. Hold down control, get another one out. So that's the most perfect one we've done so far down control. Move this back in, please. Okay. Here I have a little
bit of distance to go, or I think we're
doing just fine. Okay. Get another one out. So
we have a region where it kind of kind of have
a curvature in there. So that should be fined control. All right, wet this down. Let's get some variation
in the rotation as well. Extend this out. Okay. Move this in here. Get this back, paired in. Hold down control, get
another copy of this. This here rotates. Bring this forward.
Pay this back in. That should be fine.
Hold down control, get another extension out. So I don't want to
repeat this again. That's why I'm trying
to be as accurate as I can possibly be. Here, that should be fine. Hold down control,
extend this out. You just need one more
actually in there. One more should be just fine. Okay. Move this way, up some more, rotate back in. Okay, let's get some more outs. All right. Get some more spacing in. Parry this back in some
more. That should be fine. Okay? I'm thinking of let's do from this direction
instead, clear this out. Let's do it from this
direction instead now. Extend this out. Okay. I think we would have better moving this in instead from
this direction. Okay. That's fine. Move this in some more down, pull down control,
extend this out. Ming this forward. Back down some more, up a little bit more. Okay. Pull down control,
extend this out. Move this this way. Get this berrit in up some more. Use a move brush, move this in. Okay, that should be fine. Control, extend another
one out this way, rotate this way, bury
this in some more. Okay, I think that should
perfect where it is do control. I think we can just
get this this way. Okay, put it forward. Use the move brush,
get in close. Move this in. Perfect. So we have this note. This
is what we need. So I'm going to now
grab all of them. So basically just
going to copy it. Copy this sub to copy it. Go back to this and
then paste it in here. So let's select this
and let's paste. Fantastic. So now
we can now merge these two we can merge
these two together. So let's just do merge
down. Merge down. Awesome. So you get something
pretty much like so. So we kind of add some
variations to them, which I will show you how to do. It's not going to
be a big issue. So to add variations
in the let's start by slling them out,
the quick sieve. Okay? So to kind of get some variations in the
strands in there, we can just quite easily
just be modified topology, increase the bros size. Then we can just kind of create variations
in here on the tip. So this is just all
I'm going to do. So break some extend some, put some in just to get
separated variation in there. So it doesn't look everything
doesn't look the same. So pretty something this way. So that's how I kind
of break them up. So just randomly scatter the randomly scattered them,
and then we should be good. Well, we want to be
careful, though we don't want to overdo it. Just enough should be fine. Just enough to create
some interesting variation in there
should be fine. Okay. So I'm just breaking this up. You want to be careful,
though. All right. You can get to move on
slightly extended out. Okay. All right. All right. So at least I will kind of randomize them at least
to a good extent, a good extent of randomization, just so it doesn't
look too symmetrical. So I will do for
the back also too. Let's not neglect
that. All right, so let's get them back in place. Awesome. So we should be
fine if we do shifts out. Let's do some renders in here. So we get something quite
interesting in there. Okay, which is what
we want. Okay. So moving on the next
we need to do be to create this piece that
is actually on the surface. So we'll do that in
next lesson by for now.
30. 29 Skirt Back Emblem In Zbrush: Cucumber, guys, so let's
carry in for left off. In the previous lesson, we kind of added this like the
sim taping, what's it called? Tape tapestry around
the hem, okay. So moving on from
that, I will need to kind of create this
emblem instead of it. So the emblem looks more less like kind of lead
up is going around it. So we need to create that. I'm going to start with
the inward part first. So I have this on
another canvas, so we have this on
a separate canvas. I think we need to duplicate copy this again actually.
Let's copy it again. Let's pace it in here, okay? And I think I can delete this. I don't need to say
anymore, so delete. Okay, delete as well. Right, so this is all we need. So we can duplicate. So let's do ShitFo Delete lower. Control ships click. Let's do splits ding
instead. So splits ding. Okay, so I'm going to
side this for now. Let's work with just
this alone. All right. So there's something we
also need to do in here. So that would be to go over and let's do poly group
photo group with UVs. We only need the front piece. That's all we need. Because the front piece
should be just fine. So I'm going to control
Ship click on this. Let's make sure Double seride
is done on double side. I'll make a duplicate of this. Then let's do delete ding, delete ding, all right. I think this fine. Basically, we need to
draw on one side and then most likely mirror
to the opposite side. Yes. Take there's nothing else. Okay, that's fine. So I'm going to subdivide
this a few times. Let's do one more.
Let's delete lower. Right? So I'm just going
to draw on one side and then mirror to the opposite side because it's not
perfectly symmetrical. All right. Let's do that. So I'm going to
use the bro size. Boss or more, go over to I
can use the last two both. I'm not entirely sure if
the last two is going to give me something neat
enough to work with. No I don't have much
control over this song. Let's use the I think let's
use the Max pen instead. But at the same time,
let's start with this. Let's start with something
halfway like so. Then I'll begin to chop off the regions
where we don't need. So down control. Can use the MAX last
saw. All right. So I can't really entirely
see the ship in India, but I'm going to use this as my main reference for the ship. So I'm going to use as my
main reference for the ship. Okay. It's not completely sharp, but I think this should work at least
for starting points. Okay. I'm going to use
the circle instead. P space bar and move this out. Okay. Hold down ds. Undo that Noding that correctly. Space about move the same place. Let's move this up some more. Bring this down, hold down space by move this here.
Hold down odds. Subtrat ship out of this. Right? So draw something bigger again. Smoove something a
little bit bigger, bring this closer, put that out. Okay. I think as far as this goes,
this should definitely work. We need to extend it, you can also always extend
it if you need to. I think we need something white bigger than what
we have right now. So let's go back to let's
make it a little bit wider. S to be a little bit wider, so. At least we know what
we're supposed to do. So just to repeat that. Let's do a bit more let's grab some more
region out of this. Okay. Now I can use
the max last saw. I can use the max last saw. But think we can do that's supposed to be get something straight. We're getting something more
or less like social pine. You can go back and then use the circle and begin
to draw the chip in. Get a smaller one first. The more wider piece. Okay. Maybe that's
actually way too wide. I let's do something
smaller in here. I just need this to be
as clean as possible. Okay. Bigger one now. Okay, yes, perfect. T will work just fine. So I'm
going to out and sharpen. Let's sharpen the edge
a little bit more. Okay, I think we can this
we can work with no doubt. Maybe we will paint some more. Let's create some and Okay. Something like so. It's no needs, but we're
going to make it neat. Maybe let's try and make it a little bit neater than
what we have in there. All right. So no, repeat that pull down
control and sharpen this. Okay? So I'm going to duplicate this
shape again one more time. But before we do Control W to get that a
separate poly group. Let's come in and
then duplicate this. Okay. You click to delete Eden. Delete Edin Mirror weld. Then let's sharpen the edge. Let's do polish by group. Tighten this edge some more. Think I will need to
use my slice cove and then do something
sharp on the edge. Let's do something
sharp on the edge. So let's do slice cove. So this head needs to
be quite sharp. Okay. No, I don't want it to go all
over the place, so wrong. Okay. There's grabbing portions we
don't need, but that's fine. We're just going to do that. Let's do auto group in here. Okay. So move that parts. Okay. Then let's delete
it in the mirror, delete it in the mirror
weld. All right. So if we go back to deformation and then we do polish
by group again, to sharpen things up a little
bit more, that's fine. All right. So now we need to
retopologize this. Let's go over and
duplicate this again. Let's remerg Z remar
ton of adaptive. We have to to 180. So let's start with
something around 50. Keep group, detect,
take down smooth, take down the adaptive size. Turn on symmetry. So we have this
symmetric on both end. Then let's z remerge this. Let me just give you
a moment just to run through and then give us
some interesting results. I'm not supposed to name TnovKbd that Control W give everything the same polygroup
Because use Kib groups going to give that region different polygroups
and I don't want that. You're going to use
that polygroup and then rematch that and
I don't want that. So let's do this again. Don't take too long. Almost done then. Keep going lower and lower until we get something good
enough to work with. So I'm supposed to cut
this parts off. Undo that. Let's cut the parts
off. Con shift. Pickets undo that,
undo that, undo that. Let's do this from
this angle instead. Okay. Do we have this cut out where we do to
shift click, delete Eden. Then we need to do
polish again. All right. Back in Z mash, Z mash, this. You always want to
kind of check around just to be sure everything's
working correctly. Very important. It's important
we do that's almost done. Okay, then we can keep going
off Wymtch this again. Until we get something
low enough to work with, go halfway again. Okay, 19 k, go halfway again. I think I'm going for
something roughly around maybe one k. Okay? I think this should
be more or less fine. Let's do one more. Yeah, I think this
is distinct enough. Yes, this is disent enough. So you can actually
punch out the edges now if we need to so we can punch out this edge,
make this head sharper. Make this edge sharper as well. Okay? I think this will work just
fine. So now let's give it some measure of thickness. So let's make the order. This get itself visible so
you can see through it. Pretty much like so then
we go over to geometry, dynamic sub div, tonton,
take down the smooth. Saving out. So actually
save this also too as well. Let me save my document as well. Okay. Almost done saving. So now let's add some
thickness to this. Let's see how much thickness
we actually need for this. Think I'm going overboard
with this already. So I'm going to gizmow
move this out some more. Move this in. Oh, let's
do out some more. I think somewhere roughly
around there should be fine. Maybe a little a
little bit more. Okay, increase the
thickness some more. Move this in. Okay. That should be fine. Let's see if we add segments in the more segments you
actually need in her. Let's do one for now, so we have two in between. Let's see. I'm looking at the layout
in here just to get a good idea what I
need to do in here. I think this should
be fine. So let's apply this apply that. Okay. So I'm going to
solo this for now. And I'm going to
extend the edge out a little bit more so PZ. So let's do extrude
poly Lupolygroup. That should be fine. Okay,
yes, polyply Come on. Here's something like sg. Okay. How would this work? I have a better idea. So let's do this quite wider. Then bring this closer. Here something pretty much like, so then I'm going to get
push this in word instead. So push this in. Let's do flat island. Come on. Ton of symmetry.
Let's see symmetry. Hope, we don't have any
issues around this okay, we don't is fine.
Turn off symmetry. We can push this form on. Let's do poly poly group. Flat flats, Poly group, yes, that's one I need. Come on. Why are we having
these issues in here. Ignoring some Pat
and then working on SP, which is a bit weird. It's not what I want. Not entirely sure why
wouldn't doing that. Let's do island. Come on. Okay, I have
another idea, Control shift. Let's do auto group in
here, AutoGroup auto group. This is double sided I turned
on for this. Yes, it is. Yes, it's fine. So
let's do it again. No, this time around
we're supposed to use flats poly group. A what is going on right now? It's supposed to be working, but for some reason,
it's not working. Let's use Q mas instead. Q machine instead.
Let's do flat island. Something is just awfully wrong. Something is just awfully
wrong in here, honestly. This is not grabbing
it completely. Symmetry symmetry is
obviously turned off. Symmetry is obviously
turned off. What if we do insets? If we do an inset
in here, you know? Let's do plat poly group. See, same weirdness
happening in here. Same weirdness. I just strange. Absolutely strange
if you ask me. Anyways, there are
other ways to do this. I'm going to go, let's see if we can do Control Shift click. I was trying to avoid using
this technique though, because sometimes it
doesn't really give clean result, but should be Edge loop. This edge loop, I believe should be edge loop. Okay? Yeah, this is
precisely what we want. Edge loop. Less we try this
again. Still not working. So Control Shift
click, Max this out, bring everything back
out, invert the max, bring a gizmo, and
push this down. I was trying to avoid
not using this but seems we just have to
maybe pull it up instead. So we have three
layers in there. Let's get in close. Let's see. Let's see if that
actually makes sense. Yeah, that makes sense. I actually makes sense. Okay. So if we should
bring everything back out, we should be getting
something pretty mode like so we should
work just fine, except we just need
to ton of dynamic, we need to make some
adjustments in here. So tunnel symmetry. Let's see. Okay, on this side is okay. So on this side is not too okay, so we need
to pull it out. Let's get this out some more. Oh. So now just basically trying to fine
tune this and get something. Co that tunnel symmetry
for this actually. So we can do this
move this pm push. That's a bit odd. To symmetry,
pull this out again. Okay? Down it two. This down lite two down
elite two Elite two as well. Yeah, I think, as
far as this goes, I think this should
be just fine. Should work just fine. There's anything we
need to do in here. We can just go in
and correct that. So now let's add some edges around this to actually
hold it tightly. So B. I'm just going
to bevel the edge. Let's do two undo that. On this edge as well, here well undo that gets up close. That's rather odd. Find a good ana again for
this symmetry turned off. The symmetry turned off. This looking a bit strange. I'm looking for a
good angle to do, let's do this. Let's
do it here first. Trying to get a good angle in the bos finding it a
little bit difficult. Let me reduce the brow size. Using your bro size should actually help us grab that edge. Here, we have grab done
that for the edge now. Okay, so those edges that
need to be sharpened. I don't want to lose
this edge when I smooth, so I will need to
weave this edge. Okay. I need to bevo
this edge as well. Do that, get up close. Bevo this as well. Bevo this year also
the same year. Okay? I feel like we should
do the same year as well. Let's do something here
as well. I mean, why not? Okay? I think that should
be just fine. So if we should
subdivide this now, we should definitely hold up
the head a whole lot more. That's fine. I should
work just fine. All right. I work just fine. So we can send this to
the soar documents. So we are canvas. So let's copy this, go to the main Canvas. Let's do pastes. Okay. Here we see some corrections
that needs to be made. That's fine. We can always fix this. Select only make adjustments on necessary regions, actually. Right correction of
the necessary regions. We're going to select this Okay. Let me moves more up. Then rotate this out some more just to create a
little more space in the don't have any
interceptions, especially when moving
this paler out. Okay. I'll use the move brush. Let's use the move
brush ton of dynamic, and then move this click
max out, invert the max. Take down the brush size, and move this up just a little moved it out
a little as well. But remember, we're still going to have
something in there, so we don't move it too much. Don't move it so
much, very important. So I need to kind of copy the entire hoket
again and move it to the other documents and paste in here again because I've kind of done a
little update on it. I've done update on it. That's fine. Let me
do a quick sieve. Okay. Then we're going to
extract this out so we can work with just this
front drapery alone. The country she click. Okay. Keep touching in
there. That's fine. I think we need to go back and make corrections here also. Tn of symmetry. Con do that, select max, invert the max pull
this out on the side. Okay. Let's do the same
for the other side. The other side seems fine. Okay. Let this out, copy it again, go to
the opposite side. Let's delete this.
Pass the new one in. Okay. Control click. Think hide this. Then let's do delete ding. Okay, we have Subption
level here, delete lower. Then let's do modified
topology, delete ding. This is what we're going
to need to kind of extract out this new
shape in there, okay? So I'll see you guys in the
next lesson bye for now.
31. 30 Skirt Drapery Emblem In Zbrush: Combat guys. So let's carry
on from where we left off. So let's see, we
kind of finalize on this back and bland piece for
the skirts. Fabric skirt. So we're going to do
the same thing now. So in here, let's create
a shape out of this. So I'm going to subdivide
a bit more, delete lower. Okay. War is fine. So at this point now
we need to create the shaping in there. So
let's get right to it. So I'm going to, let's use the rectangle first.
Rectangle face. Turn on symmetry as well.
Symmetry is done on. So I'm going to get
something looking. It's close quite
close to the edge. It's quite close to the edge. There's something around the e. It's not perfly symmetrical,
though, but that's fine. We just need to make sure it
looks good on one half on this half, especially Okay. Something pretty mot
like, so should be fine. So I'll only be
working on one half, or I need to something else I need to do I need
to do Auto group with UVs. So auto group with UV. Okay. And I'm going to duplicate it. All right. Control, Shift click. I'll turn on double sided then and then I'll
also do delete ding. So let's do delete
ding. That's fine. Okay, so working on this
side piece for now. So I'm going to use
the start here. So let's use the maxing
perfect circle instead. So you should be
getting one that is roughly up all the way here. Oh, go do that. Space about to move this. Oh, that out, separate that out. Okay. I think I may have
done way too much. I don't want something
that's way too much. Alright that's fine. Okay. How do around these bits. All right. We also
have another one roughly around here
as well. Okay. Yes, we're getting something interesting in here, no doubt. Then I need to put
this down here. I need to have a
sharp cut down here. I think I will use
the Let's first give this one poly group controlW,
give it a poly group. Okay. I feel like I should think now I should
add one more in here. Let's do one more in here. All the way here actually. Okay, that should be fine. Yeah, I think that
should work just fine for what you need it for. Control W to get a
separate poly group. Okay. And I'm going
to use a slice cove. So let's bring out
the slice curve. The slice cove is very selected. Slice something
around the this way, C Condo that Control shift. Click. That's a bit strange. When did we get When did we get this in the Okay. Let's do play any
maxing in there. Go in and do auto group with you that Auto group
should be fine. Okay, through select this. No, let me just undo
do undo all of this. Clear the max in that
is there, better now. Then do this slice cove again. Okay. Yeah, something
around there should be fine. Control shift. Click. I'm going to make a
duplicate of this again. Let's delete it in mirror weld. Con do that. But also have no manner of
weirdness in there. Delete it in again. Mirror weld. Don't do that. That's
a bit strange. Getting some
strangeness in there, which not entirely setting where we are getting
that strangeness in. I'm supposed to be able to
just mirror and weld this. Yes, it's working now. Okay? Oh, yes, it's working
because we had, yes, we still had torn this off, so it was actually working. Okay. I think we can work with this. I'm just going to bring in
our Gizmo in ton of symmetry, bring this in a little bit more. Okay? Yeah, this should be fine. I do that. No, we don't need
that maxing anymore. Let's do the normal. Let's
just do max last two instead. I would select Let me
select these bits. Symmetry actually for it. Okay. Blow this out. Okay. Grab portion, blow
this out some more. Okay. I will extend
this down some more, shrink it in a little bit more. It feels rather old. It feels rather old. Soto going to mug the slower parts instead. Load the marks. Okay? Turn off symmetry
center this this way, squash it down some
more. All right. Then I'm going to
max this region. Ton off symmetry
for this actually. Load the max. Move
this up Come on. Load the max move
this up a little. Okay. Alright, I think we
can work with this. This we can
definitely work with. It feels like this party
should be quite slimmer. I need to make it look a lot slimmer than
it is right now. Let's get back in. Squash it down some more. Look okay. I'll select tonal symmetry, selects all of this down here. Let's go up a little more. Low this shin this in some more. Okay. I think we can adjust this also. I looking a bit
weird in here now, so I need to fix this. Okay. So now we can duplicate this. Then we can use the polish. Let's use the deformation polish by group, tone of the dots. Okay. I think this should
be fine at 85, so now we can zer march this. Let's go over to Z Maher. Get some zero mage
going on in there. Sweating this out some more. Okay. All right. That is fine. So I'm going to turn off adaptive keep groups, detect, take this
down. Let's do. So at 85 k, active polycuns 85 k. Let's
do something around 37 is. Take down the adaptive size. Make sure asymmetry is t on, Shift F. Let's remerch this. That gives a moment, so it
shouldn't take too long to get some clean
topology around it. Okay, we have something
to start with. So I'm going to polish again. Just to clean some edge up so we don't have any
weirdness on the edge. Okay. I feel like I need to, maybe we can just leave it actually. We can just leave it
can still be in there, so let's do under Zi mash again. So this time around,
we go halfway Zi mash. Okay, we keep going half way, the matching this halfway. Okay. Let's do one more. I think we can we go? Can we go lower? Just one more? Yes, we can. So now I'm going to make
some modifications to this. Take down my bro size. Okay. Spitting this
up some more right. Okay. That is a bit odd, so I'm just going to stretch this down. All right. P this up. Yeah, this we need
to also straighten. Let's get something
straight in here as well. Okay. Something straighten
off so should be fine. Let's kind of get something
that flows close to it. Alright. I think
this should be fine. Okay. Now the next thing I'd like to do will be to
create some thickness for it. Let's get some thickness
going on in there. So let me just do a quick sieve. Quick sieve. But All right. So what we need to
do is of check. Let's check. Let's don't
go out of solo mode. Let's check, and now we can see definitely that's
down way too much. So that we need to also fix. So we can just max this region, invite the max, blow some
more. I bring this up. Okay. Pop some more. That
should be fine. I'm going to come
into the middle point and then smooth this out. Get some smooth
going on in there. I'm also going to be smoothing
now the center points. Et's smooth that down.
Okay? That is fine. So let's go back to geometry dynamic sub
div, turn that on. Okay? No, undo that.
Take down the smooth. We don't want smooth for now, but we definitely need some
thickness going on in. Okay, let's go out of solo
mode. Let's see what we have. This out some more. So now we need to make some
adjustment on the other side. So let's use the move
Bushtno symmetry and then move it out. It's gonna buy down
way too much there. Move it out. Okay. Out some more. Out some more. Same on the opposite side. Okay. I think this will
work just fine. So let's add one
segment in there, so we're going to make
it a value of two. Okay? That is fine.
You click on Apply. Okay. I'll move this out some more out some more
around there also. Maybe thickness with
it for itself might even be probably too much. Feel slightly way too much. You see, exactly way too much
so we need to undo that. Take down the
thickness some more. Set the value to two. Okay. Yeah, I think this
thicknes should be fine. So let's apply this on. So let's do BZ. When it's going to
flaing off our mesh, so we need to bring this
back closer to the mesh. Closer to the mesh. Okay. This should be more or
less fine where it is. Move this up and out some more. Okay. Yeah, that's fine. I'll smooth the center
up up down, some more. Okay. So now let's PZ.
I solo this out. So we need to extrude extrude
poly loop poly group out. So we're pretty much
going to kind of repeat the same thing we did
for the other side. For the first piece, we kind of created polo poly group
out also as well in here. Okay. Then we're going to do yes. Let's see. So let's see if it
actually work in here. So let's do insets, flat flat poly group. Okay, finally, it's
worked in here instead. Okay. We're having
some issues here, so I'm gonna sure you
get that to fix that. So you just need to
turn off where is that. Let's standard instead. So standard should be
the one you should use. Okay. Get this in. Okay, so it won't be having that weird additional
costs that was fantastic. We still having the
same issue in here. That is just great.
That is just great. I guess we also have to use the other method used,
which is edge loop. I think we also have
to use Edge loop. Let's just edge loop. Control shifts move broad
control shift click. Give it a separate poly
group, Control shifts, click. Let's go over to edge
loop, edge loop like so. Okay. Yeah, bring everything back out. Click, Max, invert the max, use the move brush. Center the move brush,
push this down. Maybe not too much though I think somewhere around
there should be just fine. Somewhere around
there should be fine. The next we need to
do now will be to add extra edge loop or bevo around the edge
to hold it completely. Okay? I think also, too, I
would like to move this. Let me see if I can
actually extrude this out if the extrude
would actually work BZ. Let's use Q mach instead. Is there just poly group alone? Poly group island.
Extrude this out. Okay, fantastic.
That actually works. Let's go out of solo mode. Let's see everything
we have in here. Yes, it actually work just fine. Okay, so let's bev with
some of the edges. Let's bevel the edges. So let's go over to an edge. We have Bev indie already. So you should be
fine also in here. Also in getting closes. Undo that. I do not
feel rights. Okay? That should be fine. Pa pa as well. Get enclosed, pvlPvl as well. All right. Let
should go around it. Then you gonna fold
these corner edges. Let's hold the corner edges. Some drinks with cement
ton of, that's fine. It's gonna affect the
opposite side as well. Okay. That's fine. Okay. Okay, I'm not supposed
to do in year, so I'm going to undo that. This is the region I'm
supposed to do it on. Okay, then here as well. Okay. Then around here as well. Okay, in here or a
little bit much. Just a little should
be fine. Come on. Let's get in close. Come on. Take down the bros size. Okay, that should be fine. Get in close. Okay, that
should be fine as well. I need to do one for
the middle points to hold this some more. Okay. Do the same also around here. Okay. Yeah, that should work. You need one here as well. Okay. Yeah, I think we are good. I believe we are good in here. So if we should subdivide
this, subdivide some more, he's holding up the
edge quite well, except we need to Let's
go to the more brush. You need to turn on symmetry
and then just moot this out. Okay? I think as far as these goes, I think they should be just
fine for what's needed for. Okay. So take down the
subdivision level. We move topology. I need to just
move get in close. I think we also have to
use the polygroup instead. So let's use the
polygroup instead. Move this up some more. Move this down, up
some more. Okay. Yeah, that should be fine.
So now let's copy this. Delete. So let's
copy this sub too, copy it and paste
it on the original. Let's just come and
paste this in here. Okay. Yeah, I think this
should work just fine. Should work just fine. I think we have some extra
food spacing in that we can just adjust to turn up
symmetry with a move brush. Move this down. Okay. Move this down. Get in close. Move this down as
well. Move this down. Select this. Bar
this down some more. Select this, push this down. Select this, bury
this down. Okay. Zoom out. So it's just
a matter of just trying to get it to be where
it needs to be. Pardo. Let me select
just this alone. Parade is down. Okay. So con now, pushes down some more and
check this around, okay? Para is down. Okay. Check this around just to be sure everything's
working correctly. Yes, I think we have
this setup correctly. This on the back side, I
think I'll turn on symmetry, I'll extend it out some more. So a lot more visible in there. Just move this in.
Okay? That's fine. Awesome. Here's this we can
definitely work with. Okay, so yes, we're definitely
on the right track. Okay. Let's see. Yeah, so the next thing
we need to do now would be build the metal fits. Do the metal fits instead. Let's see what we have. There will be some
extra spacing in here. Maybe extra spacing here, we can kind of put some kind of fabric some fabric be in there. Then I see Alright. We have some interesting
shaping in there. It's fine. It's not as well
done with this fied, then we can move up and then create the call it
sleeveless piece in here. Then create the shoulder piece, create the glove piece as well. Okay. Yes, yes, yes, we can do that. Yeah, I think, yes, we think
we're on the right track. So I'll see you guys in the
next lesson. Bye for now.
32. 31 Top Ankle Guard In Zbrush: Welcome back guys.
So previous lesson, we kind of worked on the
leather piece of blend that comes with the drapery in front. So moving on from that, we need to work on
something else. We need to work on let's see, we need to work on the fit. Let's create something
for the fit. So I would like to copy because it was easier
just to do this in a different canvas and
then bring it back in because we have enough space
in there to kind of work. Okay, so let's let's
do that. Okay. So maybe for this, I would need to shoot F. Does the auto group
with you in Okay. I'm going to hide this. Okay. Keep that hidden. Then I think this is the image that the arm cut off, select it. I we can isolate this. This is buried in. I wouldn't need the
head to be visible, so I'm going to hide this. Okay. Yeah, so you should
have something cleaner in here just to see the option peeking
through it. So this is fine. Alright, so I'm going to
select Poppy the soap too. Popy let's go to
the order Canvas. Apiece this in here. Hide. Maybe just leave it
but just paste it in past. I can temporarily
hide this, hide this. When we see hide this as well. Okay. So now let's begin
to work on it. So let's do how do you
duplicate of it again. Let's do another
duplicate of this, select Save my file All right. Allow this sip out.
We should be good. Yeah, this is fine. So shift. So we just need to cut
off the parts we need. So I'm going to use
the slice cove, slice cove to start by slicing
out the portion we need. So I'll go all the way up. How high can we go, I think, somewhere roughly around
these bits, okay slice there. Is it not slice
accurately enough. Okay, something quite
straightforward in there. Okay, so the lower parts. I think somewhere around this region should be fine.
I'm going to grab this. Okay, we need to invite
this, so I need to go and select my select rec. Okay? Yeah, this is a bit we
need a star shape in there. I like to hide that
don't need that visible. Okay. Yeah, this should be fine. Let's make sure Dub side is
don't on D on double side. Okay. Let's start
by polishing this. Polish is just going to
clear things way too much. So let's use the Okay. Let's use this instead, polish by group. Let's inflate. Inflate some more. Let's try to inflate
balloon instead. Let's make the other
body this. Go down. Let's make this visible. Post need to work on one parts. Then coming right to
the opposite side, needs to be visible
lest on its own. I need to kind of
extend this out. Extend this out
forward also too, needs to be quite bigger
than what we have in here and a whole lot more whole lot more like
a cylinder kind of. So let's get a good
cylindrical shape out of this. Okay? Using the move
browser to a ton of symmetry, move this out. Okay. So let's
polish this again, so I'll go over to
the deformation. I think my polishing
intensity is w high, but that's fine. Let's in flats. Okay. I think we have
something good now. I believe we do. All right. Move this forward
a little bit more. Okay. We do polish by features, let's see, nothing
happens in there, if we do relax. Oh, come on. Oh, yeah, it's supposed
to do delete ding. So let's do delete ding, go in and then let's
do delete ding. Modify topology, delete ding. All right, so this
is the mesh we need. Okay. Check this move this out. Deformation, let's do relax. Okay. Polish again. Though checking need
just to be sure it's looking correctly, I think. I think as far as this goes, I think this should be just
fine for what's needed for. Let me move this
forward the lead to bring this in, son this down. Okay, I think as far as this goes, this will be pretty fine. I should work just fine
for what's needed for. So now we need to make a
duplicate out of this. So let's duplicate this. We have under piso? Go there because I was seeing
another piece up yet, so let's delete that. Do delete ding. Geometry delete ding, okay? We still have issues in there,
so let's solo this out. I supposed to be able
to ton of symmetry. Supposed to be able
to center this. The control Shift
click on this again, delete Eden one more time. Yeah, so now we don't
have any extra piece anywhere else aside from this. Let's go out of solo mode. All right. Okay. Polish polish this again. So let's do deformation
polish by group. So turn on the dots.
Okay, polish this clean. Let's get some clean
edge in there. That is fine. Now
let's zero merge this. Geometry Zima, geometry zero
masher ton of adaptive, keep groups, det,
take down the smooth. Ta down adaptive size. Let's go all the
way down zero mesh. Okay? Okay, we have the duplicate
mirror to the opposite side. That's fine. But let's just
work with one instead. Let's just work
with one instead. Turn off symmetry. Control W, Control Shift
click, delete Eden. Okay. So we have it as
low as 120 polygons. So that'll give us
a better option to actually move this
properly we want it to Okay. I'm going to turn
on double sided. Okay, I's polish. Okay. Put this out a little two. Yeah, this should be fine. So the next thing I'd
like to do be to add. Let's add thickness. Okay, before we add
thickness around this, use the browse size,
scale this out some more. Okay. Now, let's do Let's do dynamic sub div Okay. Let's add thickness to
this, take down the smooth, add some thickness to it. Increase the thickness
all the way out. Since probably weigh
too much, take it down. Heat E. I think this thickness seems
just about right for it. Okay? So let's add. I think we can do three in here. Let's do two. Th should be fine. Okay? So if you should
apply this on now, if we subdivide this, you should hold up the
He properly this way. Okay. Here, this should be fine. I should be just fine. So I'm going to delete
lower isolate and I'm going to do group group
by normal in here. So should have good
edges around this. Okay. This would be just fine. So yes, so now we have quite an interesting piece
in here to work with. So with this now,
we can actually extract every other
piece we need for it. So let's do that so we can extract you can see a ring in your earring
supposed to be in front here. Okay? Herring is
supposed to be in front. If, let me see. I think I might need
to shrink this in some more extend
undo that extend, do that coming close. Extend this out way this down. Okay. Yeah, this is fine. As far as this goes, I think
this will work just fine. Then we can do, I work. So I'm going to make
a duplicate of this. So let's duplicate
of this duplicates. Control Shift click, get it out. This is pretty much
all we need for now. Okay, so now we just
need to extract out this loops around it, we need to extract
loop around it, Let's do delete
ding first on this. So delete ding
geometry, delete ding. Delete ding that's fine. So where's the first
one supposed to be? I'm guessing the
first one is free on. So the first one should
be, can we use these two? So Bus. Or maybe not Busim. Let's do let's eating again. I can I can use the mark
last for this, I believe. Okay. So we need these two, so let's go and grab
another extra pie. Control W. If you're getting something
like this, awesome. Okay, let's move up. Let's do something
up here as well. So we have let's do
one, two, three, four. Okay. Then we'll grab so we need one, two, then we'll go
all the way up here. Control W again. Here, so we need one more. So we can do one, one, two, three, four, one,
two, three, four. Okay. Now I think I need to undo this. Let's do one, two, three. Okay. Then we grab these two up
and grab this to add to it, Control W. That's fine. Then we can do, one, two, three, as well. So we can come up here, grab one, two, three. All the way, should be fine. Control W as well. He undo that. Think we need to do some
cleanup at the back. That was not accurate
enough. Let me clear that. Okay. Con trow. Ah Okay, remove this Control W. That's fine. We can also
make it still make it also B. Add this. So let me to do Nic Control
Shift click on this. Control Shift click
again. All right. Let's do auto group
in here. Auto Group. Yeah, this should be fine. Wrapped around
accurately enough. Okay. So let's do delete ding, delete ding. All right. F now we need to delete the I think we should be
able to delete these two. So I'm going to hold
out the ZM hold out. That's where I need
to place this. Okay? Come on. Okay. So O in here as well. Okay, here also too. Here, that is fine. So I'm going to make a
duplicate of this, so let's duplicate this. Just to have a backup, Control Shift click
Control Shift click again. We do delete ding. Delete ding, that is fine. Okay. Yeah, this is where
it needs to be. So now we can add
thickness to it. So let's go to dynamic
sub div. So non dynamic. I'm taking up the previous
thickness we had before. The segment, let's
do two instead, take down the thickness, increase the thickness
a little bit more. I think somewhere around
there should be fine. Okay. Awesome. This
will work just fine. This we can work with, no doubt. So let's apply this on. Then I'm going to go
back to the previous. Let's go back to the
previous canvas. I need to steal, I need to steal one of these. So let's steal one of these solo I think I can quite
easily just see this. So I'm going to copy
in past this in here. Go out of solo mode, then do delete ding, modified topology,
delete heading. All right. Let's go back
to the order Canvas. Let's bring everything back out, go back in here, these
more center this. So just a matter
of bringing them and placing it where
it needs to be. That's what we're
going to do next, placing them where
it needs to be. S the scale way too much. Take down the scale,
pull this out, F. Okay, we just need to rotate
properly, pop some more. Okay. Get this in here. Pull this out some more.
Yeah, that should be fine. That should be fine where it is. Then I'm going to hold down
Control, make it duplicate. Put it down. Okay. All right. Hold on control,
extend this down. Let me give it a moment
to actually see vouch. Should be almost done. Yes, that's fine.
So move this down. A little interception
should be just fine. Maybe a bit too
much on this side. Put this out some more. He should be Air that should
sit just fine in there. Okay. I think I need to
move this this way. Alright, that should be fine.
So let's go back in here. Let's go in here first. Subdivide, gets a
cleaner mesh in there. Okay. For this,
I'm going to turn of smooth for now, divide one. Okay. Let's see two deletes lower. Then we can turn on
smooth, subdivide this. Okay, it feels rather odd. Wehing weird edges in there. So don't do that. Let's just do normal smooth first.
Yes, this is fine. It should be fine. I'm trying to see if I
need sharp edges in there, so I think I need
sharp edges in there. So let's bevel these edges. So BZ bevel these edges. Bevel this way, PvolPvls well. I pretty much should be fine. Pvol PevulPvl as well. Bevo this, Bevo, Bevo as well. This one is not
looking neat enough. It's not looking neat enough. PevoPv this way. No. Okay. Here's perfect. All right. I think I can
bevo this edge also too. Get up loose. Because I still want to
kind of keep this edge. I still want to keep
that sharp edge. Okay. All right. Okay,
that should be fine. Let's go up the same
for the top parts. Okay. Yeah, that should
hold up quite nicely. So if we should
subdivide this now, we're getting something
pretty motor like, so we should work just fine. Use the more brush. Let's do auto group in here,
so auto group. Heap F with more brush, ton of dynamic. Control select this. Move this out. Take need to do this a bit more. Move this out first,
then move this out next. Okay. Move this out. Move this out. Get this out. Get this out. That
should be fine. Invert the marks and
let's begin to extrude Paradise gets something
that covers up these bits. So we need some more
resolution for this. Undo that. Undo that.
Clear the marks. Let's subdivide. Some more so we have more
resolution to work with. Let's learn the move brush. Put the move brush,
move this out. Sway moves out the sway. With the standard brush, kind of gets Oh, I think I need to turn off
stroke for this lazy mouse, ton of this lazy mouse for it. So yeah, this is
much better now. Do some smoothing in there. So for this, we
actually need more subdivision level to
actually hold it. I think we need to
subdivide this some more Okay, that's rather old. Let me use the clay
brush instead. No, no. I think we would need to use the more brush and then
move this out some more. Move it out some more. Okay? That should help. Okay. Move this out
some more as well.
33. 32 Top Edge Ankle Guard In Zbrush: Also to help things a
little bit more, I think, I'm going to select this ring and then shrink them. Let's see. Shrink shrink the
thickness down some more. Shrink the thickness
down some more. So let's go over to deformation. Deformation, inflate,
shrink it down some more. Yeah, that should
be fine. Undo that wrong, smooth this down. Okay? Who's the move brush. Move
this in. Smooth this down. Okay. I can use the standard brush now and just get what
I need in there. Smooth the edge,
smooth the edge. I think I went overboard in. Smooth this down. I musically
build a brush instead. Smoo this down. Okay. Smooth this down. Standard brush this portion seem
smooth edge down. Smooth edge down
some more pulls out. Okay. I think they should
work. We just need to make some more
modifications to it. When we mark this region
out, invite the mouse, blow this out to the move brush, do some movement
in here like so. Okay, smooth. Same also around here. Smooth this down. Okay.
That should be fine. Do the same around here. Load this down. Put the lower
sublution level smooth, increase the sublution level. Move this back. So
more, move this up. Okay. Mark this region, inverting max, load
marks, smooth this down. Put this back this way, okay? All right, should that
should work just fine. Okay, so let's go to lower subdivision level
actually for it. Let's go on subltion
level higher. Then we can mirror it
to the opposite side. So delete higher, delete
lower mirror weld. Select this. Okay? Delete a mirror weld. Okay. Go to the rings. Mirror weld as well. Okay. So stay have one more
thing you need to do. Still have this to do. Still have this to do in there. So let's just get in there. I think we can do this in we just need to select
the shape we need. Yes, we can do
that. So I'm going to do a duplicate of this. Let's duplicates. All right. Solo this out. Control ship click,
delete hidden. Okay. Who writes? I think I need to also
do something here to come back to that.
We'll come back to that. But for now, have you
done deletes delete Eden. Let's do auto group. Auto group. Let's work
on just one piece, and then we're going to move
right to the opposite side to delete Eden. That's fine. Here is the front facing region. Okay, so let's grab
what we need to be Z. I think we can do like so grab this download the way here. Okay. Come on, undo that this way. Then go all the way down. Let's fill up the inward parts. All right. So we have one here. To to grab this also. Okay. Then we go around
this. That is fine. Around here, let's go
around here as well. Okay. Awesome. This is what we need. So I'm
going to duplicate this. Come on I grab this piece. Do delete ding,
geometry, delete ding. Okay. Let's make this visible. This is visible instead is the one we see as
when we have mirrored. Okay, so if we should
subdivide this now, we're getting something that
looks pretty much like so. But we need to let's
do some smoothing in. So let's do some smooth. Let's do I think we might
need one more undo, undo. I think we need one more. Shift click Delete Eden. Okay, so now if we should polish this polish this less to of these dots.
Let's polish this. No, it's not giving us
the desired results. No, not getting the
desired results in there. If I use the move brush, move this down. Come on. Down this way down this
way down this way. No, not that way. Move this forward, forward. Okay. Maybe not. I think we can
just need to hold this edge. I think we need to start
by adding sickness to it first weable
to hold our head. Let's just start by
adding sickness. So let's go to geometry, dynamic, turn it on. So go out of five slates. It's way too thick. Okay. I think something around
there should be fine. Let's sea and All right. I think this we can
work with in here. Let's Let's do two instead. Okay, just one should
be fine for now. Let's just do one
in the apply this. Okay. Then I'm going to
be with this edge. B with this edge like so. Bevel this edge like so. Okay? If we should
subdivide this null, yes, so we're getting pretty
mod the shape we need now. But we need to make some
modifications to it. Above this edge. Okay. Pay this edge as well. Alright. Pay this edge as well. Okay, we're just going to compensate for some
of these edges, though, but for now I
think this should be fine. Let's get this spread out. Okay? So I'm going to come on. Get up close. Yeah, so I feel a few things
we need to do in here. Maybe I should have done
this before I want to start doing Bevo in and around it. So let me undo all of this. Let's undo the Bevo wet first. This kind of gets ex
through the edge. So let's do Hulu. Come on. Can I select the fish in here. Trying to make sure, come on, undo that. Undo that. That's This is a bit weird. Directly cons something odd. Oh, I remember now, I'm supposed to apply this, so I said, Well, that's why
we're having this issue. So apply this first.
Then me poly poly group. Undo that wrong place. Well, this is rather old. It's all db. It's kind of giving us quite an interesting
result out of it. You have an interesting
result coming out of this. Come on. Let's define a
good angle for it. Okay? But I don't want that actually. I do not want that.
Let's just do poly loop. Why is it grabbing
the front parts? Why is it grabbing
the front parts? Don't want to grab the
front parts in any way. I'm going to select this give
this separate poly group. Then try this again. Working
now. He's working now. Okay? I don't want that. I I I need to grab these
two faces actually. So let's see if we can
do inserts, delete this. Yes, way bit, yes,
this is what I want. Okay. Allow this save out. But it seems that num. I need to extrude bit, Let me get some more
out of this first. Let's do a little bit
more, extend this out. Okay. Then I will just need to extrude this
loop out like so. Yeah. So this is pretty much what what I'm
actually going for. So now we cannot bevo the edge. So let's bevo the edge now. Bevul so let's start
by beveling this edge. Okay? Bear with
this edge as well. B with this edge. Okay. Let's bev with the
edge thickness for it. By with this edge,
pay with this edge. By with this edge as well. Alright, I think as
far as this goes, I think this should
be just fine. You should, Okay, we need
to be Bay with this edge. By with this edge as well. Pay with the back edge, too. Okay, that should be fine. Let's bring everything back out. Getting something more
or less like soap. Oh, I see, it's
more issue in here. So let's see, I think we
should be able to rotate it. We should be able
to rotate this way. Yes, then just move some things in place,
and we should be good. So I want to move brush
now. Ton of dynamic. All right. I need
to pull it out. Pull this out out this way, move up, move this
out. All right. Let's duplicate this just in
case duplicate all right. I'll grab these bits, inverts, blow the marks, I'll
move this down. Now that's looking a bit old. Let's grab these bits. This way, So it seems like a system adjustment
we need to do for one. I need to come in. Let's go
over to Auto Group for this. Pull down control, select this. Move it up. A little bit more
somewhere around there. Okay? Select this. Select move this up as well. Okay? Like, select this. I think with the move brochure, I should be able to
I don't move this down I don't break this actually because
I kind of like the sharp edges I'm
getting for it. So let's do these bits,
low inverting mark. We'll just keep pushing
these down slowly. It blow the mark, pushing this down slowly. Okay? Mark this out, invert the max. Move this down some more. I remove brush, I undo that. Okay, so we need to compensate
for it around here. Compensate for it here also. All right. Yes, fantastic. I think
this will work just fine. Should be just fine. We need to just make some adjustments in and around here as well. Okay. Move this out. Move this out on the side. Okay, here, that should be fine. Move this in. Okay. So now
we can mirror and weld. Let's do mirror
weld. Mirror weld. Move this up a little bit more. Move this out, move brush
and then compensate for it. Move it out. Part down. Okay. Is this symmetrical?
I don't think so. So we start doing mirror
weld on both sides so mirror weld select this play the max mirror
weld. Select this. If we should subdivide Okay. Subdivide, subdivide, so we can get something cleaner in
there, so this will work. So I'm not basically
subdividing just to check if it work just fine. Move this aside. Move this in some more. Okay. All right, that's fine. So let's do mirror weld. Fantastic. So this will work just fine for what
we need it for. Alright, so now I
think we can now mirror this copy and
piece on the other side. So let's start copying
them piece by piece. So let's do copy coming pastes. Okay, go to the other side. Copy Past. Select. Have you copied
the ring? I'm not copied the ring
yet. Copy the ring. Past. The copy the
main main piece in here. Before we do that. I think I would need to do C on. I think I feel like I
should actually extrudes. So most will be ZM.
Do you have any yet. Nothing is in there,
so that's fine. Nope. Extend this out some more. Okay. Do we have this symmetry to? Let's do this with
symmetry tone on. Okay? A little bit more. Alright, perv. Pervul Ship F. If we subdivide this, I think something like
that should be fine. So let's copy it now. Wait, let me undo this.
I want to have a backup. I need to have a backup just in case in case I don't
like it later on. So let's duplicate this
entire sin duplicate. So we always need
backup just in case. Undo that. Insert, delete
this. Create a new one. But this one let's get
some more space in. Okay. Like so. Undo that. S to bevul Undo that. Okay. If we subdivide this,
let's see what we get, if you subdivide this, here,
I think this would be fine. So let's copy this now. Copy pastes. Fantastic. So let's
subdivide it. So now we get shaping in there. So the next lesson,
we're going to carry on and then continue
with the footing. So we'll do that in next
lesson, bye for now.
34. 33 Metal Footwear In Zbrush: Cucumber, guys. So on
the previous lesson, we kind of ****** on
the on the foot mesh, but not it now. I feel I kind of
made it way too big. Way too big. I would
like to get something a little bit closer to the skin. Something pretty much
tighter instead. So since we made it
on the other canvas, it was a cool idea, so we can work on it on
this canvas instead. So I would like to push it closer to the skin
a whole lot more. Okay? So let's fix that. So I need to kind of merge a few things together to fix it. So let's start by putting
them in a folder. So I'm going to create let me select Okay That's
when I selected, I'll create a folder. You just name is meta uncle Gard Okay. I think this should
be fine. Then I'm going to put them
in that folder. Drag this in, select this, drag in, bring the folder down. Okay, so for each
one inside of it, I'm going to let's see if
we have Okay, that's fine. So basically, what I'm
going to do is to make sure they're all on their
lowest subdivision level. Let's make sure they're on
the lowest subdivision level. So this is on the lowest
subdivision level. Okay. Let's check this. This also on the lowest
subdivision level. Okay. Let's check this as well. Lowest subdivision level. I'm going to do a duplicate
to go to the gear icon, click on Merge folder. Okay. So everything that inside that folder is going to be
merged into one single piece. Bit too much like so.
Except the ring is fine. I don't want the ring to
be in that folder for now. Then what I'm going
to do be too good. You know, I don't want
to explode this yet. So shift eggs to explode. So what I need to do be to
bring them closer to the mesh. Okay. Let me start by going
to gizmo select this. This up some more or maybe not leave it
where it is actually. Let's move this up instead. Okay. Around there
should be fine. There the max. Then
still on the move brush. So the more brush now, too symmetry for this. I can quite easily move this. Let me hide these rings for now. W the brush size. So the idea is to bring
it quite close to the quite close to the skin. The the brushe size here. Okay. I need to be quite closer. All right. Let's go
to the backside. Let's turn on transparency. I think with
transparency, we can see clearly where we
need to push closer. Okay. Yes, this makes sense. I'm also going to extend
it down some more. Okay. Let's put this closer. Okay. But it needs to be quite
fitted in on the leg. Needs something quite fitted. All right. I'll use the max
last so I'm going to max it, the mouse blow. Move it up a little
bit more. All right. Yeah, I think this at
the back should be fine. I mean, why not? That will give it a little
bit of interest. Okay. Let's turn of transparency. Use the brows size,
bring it closer. Closer Okay. Here, I think they
should be tight enough. I think as far as this goes, I think they should
be tight enough. Let's go to the front. Okay. Okay. Out a little. This is pretty fine. Let's turn this back on. I'm going to duplicate it. Okay? So now we can move it
where it needs to be. So let's start with this
order Control, select it. He Okay. To set back some more. I think there should be fine. Let's go to the next one. Move in. Pop some more. Tates, rotates, in. Down should be fine. Let's go to the last piece. Rotates this out
some more rotates. Yeah, awesome. That
should be fine. I need to go in and then adjust adjust them the
way. It needs to be. Back some more. Okay,
move this back down. Alright. I need to compensate
for it around here. Okay? Some slight smooth. Smooth also in here. Okay. Okay, that should be fine. Let go to the next one. Okay? This, I'm going to mirror
and weld mirror weld, right? Select this Okay. Barry this in some more. Soon this down,
bring this forward. This out. Okay. Let me use the clay
brush, elevate some more. Back to the move brush. Okay. Yeah, that should be fine was. Move to the next one.
Smooth this out first. Right. Smooth this out. Okay. Push it back in. Out. Yeah, I think this is fine. So the entire team we have
a totally count of 14 K. F, let's see where we get in here. Okay. I believe this should definitely
work. Definitely work. But let's do auto grouping here, I'm going to do let's
go to fully group, let's do auto group. All right. So I'm going
to select all of this. A ton of symmetry,
select all of this. Who is a single
polygroup control ships click do delete ding. Okay? The next thing I'm
going to do would be to control select
this, two split ding. Control ship select
this, two split ding. All right. Awesome. So
this will work just fine. So now we have then separated
out, properly issued. A pods down here. So now we can now mirror
into the opposite side. So let's do Mirror
now, Mirror weld. Mirror weld, mirror weld. Mirror Mirror weld. Okay. Awesome. So let's
do a quick see for this. All right, so I think we are done with these bits,
so now we can move on. We can go back to the
original documents. This in here, I'm
just going to delete. Select the deletes. Select the deletes. Okay, delete this as well, and come back in
here, we can out. We can then copy and paste. So copy stops. I think we need one more copy
this no not tap and past. Right? Awesome. So now
we have something a bit closer to the skin now
that we can work with. Alright. Awesome. So
now let's go back. Let's go back to
these documents. Let's create the Let's create the front piece.
Let's create this piece. This is what we need
to create next. We should be able to get
this as one single piece. But if not separate piece. All right, so a few
things we can do in here. I think to kind of move
things a lot faster. I think I'm just going to
use a police spare instead. So let's create a police fare that should
be work for this. I'm going to over B I to pull this fair,
track that in here. How do split ser this
split or marks points, select it, get good
orientation to it. Okay. So at this point,
now needs to start moving and squashing this
to the desired results. Okay. Just keep moving. Move this ina where
it needs to be. Okay. Is lots more faster way
to actually do things in air how far out they
should they should be. So we need to kind
of get these ships to defeat very important. Okay, smooth this
down, subdivide it. Okay move this out. Let's turn on transparency. Let's see how this is
wrapped around it. In some more right. Move this in. T of transparency. Move this up. All right. That should be fine. Smoothing things out
a little bit more. I'll need to lift. Let's use this clay brush, put some more depth in
front. Smooth this down. Okay. Back to the move
brush. All right. I think this should be pretty much fine for what
I need it for. Move this back some more. Move these back some more. I'm going to duplicate this. Let's make it duplicate out
of this. Subdivide again. Now I'm going to go to
geometry, delete lower. I'm going to use a slice curve. I'm going to use a slice
curve and then slice the shape we need out of this. Move this aside. Slice cove. Okay. Move this way. Let's see what we get. Is this clean enough? Nope, it's not looking clean enough. With the move brush,
I'll move this back in some more here also. Con do that, move this up. Double click on the Oats. No. One click on the Os, one click on the out again, one click on the out again. It's working well on one side, but on the other side, it's
not working that well. So let's do this from
this view instead. A Los weird on this side.
We don't want that. Okay. Yeah, I think, yes, I
think this should work. Select this. Okay, delete den. Let's go back to let's make sure double
side it is dont on. Display double side.
Build this again. All right. So I'm going to slice
also to the under parts. Yeah, we need to do
that way because you need to use that
kind of generates a so lack of this.
Generate is so for this. I'm going to select
max invite the max, squash this down, squash down, kinda get something
flat in there. Then we can use this to
create a soul for it. Move this up some more. Okay. All right, so clear this out. Then we can go and then
do polish by group. Become polish by
group elite too. You can see how we're getting
something in here now. You need to make more
modifications to it. Move this forward some more. Yeah, I think, as
far as this goes, we're getting something
good enough to work with. Probably just move this
forward a bit more. Okay. Bring it down. Do some more down some more
quite closer to the skin. Okay. All right. Yeah, I think this should
be just fine where it sees. Put down some more here. Let's do this fix this
also on the side here. Okay. Just in the good amount of
precision to get this right. So this down, up. Okay. That should be
fine where it is. I think at this point,
we can Z rems, I guess. No, so let's select this. I want to get that
out of the mix. So let's do split ding. All right. So this is
going to be a source. So I'm going to select
selected already. Shift F S selected already. Okay. So I'm going to max out this region. Invite the max. Move this back. Move
this back this way. No, that's a bit old. Yeah, it should be fine. So we're going to use this
kind of create the soul. Is going to be the soul. Well, obviously, I think
I still need to make some modifications to it, but we're getting
something usable in here, that's just the main idea. Get something
pretty much usable. Okay? So now we can use
the move brush now to knock this back in place. Okay. I see here now, I need
to move it closer. Move it closer closer. Okay. So on this side, you see
there's always something to still adjust to get
it quite close. Select the saw, squash it flat. Okay, do that clay the
max, square sheet flats. All right. Then I'm going to polish sheets. Let's do some polishing
here deformation. Polish by a group, one of the dots,
polish by a group. Okay. So now let's turn on transparency and we can keep adjusting
it to bits. Oh just this okay. It's more like so. All right. Yeah, I think, as
far as this goes, I think this should
work just fine. Enough transparency. Move this help some more. Okay. Now, I think
we move this down. Okay. Yeah, that should be
fine. So now I'm going to duplicate this down. I'm going to duplicate this
so you can do Z remer for it. So let's do it
duplicate duplicate it. I one. Let's work
with this instead. Then we'll do ZI mash. Let's do Z remash for this. Geometry Z masher
group detect edge, take the smooth down. Zero mesh. Okay. Then we'll keep
going halfway, half half. Let's do one more half. Okay. I think this is as
close as we can get it to be. This is good topology across it. So sent topology
across should be fine. All right, so now we need to extrude out this
portion from it. I will extrude this portion out. So let's first figure out
where it needs to be. Or we won out thickness. Let's add thickness
to this first. Less ad thickness to it. So I'm going to make a duplicate again. The retopologize version. Let's make it duplicate.
Geometry, dynamics of the take down the smooth,
increase its thickness. Okay. I there's slight thickness. That's with two ticking.
This should be just fine. What we have here should
be just fine. Okay. Let's do two. That
should be fine. Here, this work just fine. Click on Apply. Control
Shift click on this. So I'm going to add let me get
everything back out first. I'm going to figure out
where this edge should be. I'm guessing somewhere
around here. So I'm going to be Z M
let's do let's solo this. Let's do polish by
feature. Don't do that. I don't want to affect the edge. I don't want to affect the edge, so let's polish this
a little bit more. Okay? Just to get cleaner
edge flow, get cleaner flow. So I think we can
add an inset here. So let's do an inset so we
pretty much around here. Control shift onus
with Q selected. Oh, yeah, I think we can also do plyopEtend this out, say Okay. Pol ope turn this out
this way, as well. If F, bring everything back out. They are perfect.
I work just fine. So we just need now
to pay with the edge. Like so here as well. Okay? So if we subdivide
this, let's see what we have. Okay. Working just fine. We also need to play with
this edge undo that. Hey with this edge as well. Okay. I need to put under edge
loop to hold this edge. For now, let's just add edge. Okay. Yeah, that should be fine. So let's go under
inserts or inserts. So this should hold
this edge properly now. This goes across the entire
outin. That should be fine. Okay, so if we should
subdivide this now, you can see how it
holding up the edge quite well. All right. I think as far as this goes, I think should be fine. Should work just fine. Okay. I think we move
select this Okay, take down the size of the brush. I think this actually sees
quite well where it is. I think this sees quite
well where it is. Just extend this out some more. Alright. Hip. Then I'm going
to duplicate this. Let's do a duplicate for this. So it's up to pqates I'm also going to save
this. I save this. So we're rushing to zero
merge this and then increase thickness for it,
and then we should be good. So I don't met it
duplicate of it, so let's zero mere. So solo this. Then geometry, Z merger of adaptive
takedown smooth. Let's start with five K. Then we begin to go half way
through, halfway through. One more. Yeah, I think
this should be fine. Bring everything back out. Okay, so now we need to add some dynamic
thickness for it. So take down the smooth,
increase its thickness. Let's do some more. Okay. Yeah, I think at this point, we also need to push it out at least a little
bit a little more. Down some more. Okay. I think I think something
around there should be fine. All right. I think we
can work with this. I'm going to do two segments
in. Maybe we three. Let's do three
segments. Apply this. If we subdivide this now, we'll be getting something
that looks somewhat like so, which is not bad. This we can
definitely work with, move this forward some more. Okay. Or maybe we should get it out. Let's get it out instead. Let's get it out instead. I should extend out
a little bit more. Select this, prey this down. Select this, push it in, in. Okay. Let's select
the sow instead. Put the saw outward. Okay. No. Let's see what we have
on the opposite side. I to push this in. Okay? It's one to do. Let's
extend this out instead. Okay. Pull that up. All right. Awesome. So this
will work just fine. Okay. So I'm going to mirror
this to the opposite sides. Let's delete higher
fat topology, Mirror weld, select, no. Mirror. Take this down, delete higher mirror weld. Awesome. So in the next lesson, we go and create a shape that's supposed to
be for the Bpiece. I'll see you guys
in next lesson. Bye for now.
35. 34 Metal Footwear And Leather Pant In Zbrush: A Comber guys, so let's continue
from where we left off. So we're still working on
the metal footwear, okay? So there are a few
things I would like to create in a one. You can see a back piece. Then also, I can't really
see anything inside of this, but I'm pretty sure that
we can create some kind of layer leader that goes all the way all the way up even up to
the knee region, so we can have the skirt
kind of covering it up. So it feels like kind of
kind of lead up and sort of. So we don't create extra
topology or mesh where we don't actually need then
to be rendered out from our camera view. So with that in mind, let's create this back piece. So to do that, I think
I can select this yeah, we can definitely
still with this. So we can do Let's do
duplicates, duplicates. Okay. Yeah, that is fine.
We need to duplicate. So solo this out. Control. We can do Okay. Let's grab this edge. This is the edge we need.
You need to this edge alone. All right? Then I'm going to I don't
need the entire edge though. We just need something
to work with. So I'm going to start by doing delete ding first.
Let's do delete ding. Delete ding. That's how much of
this we actually need. So I'm going to use
the Maxso Control W. Okay, let's see how far
this is supposed to go. Okay. I see that needs to be somewhere around
there, but that's fine. Control Shift click again,
Control Shift click. Delete Eden. Okay. Yeah, this is fine,
so you don't need to make another adjustment
in here as well. So needs to be, I
think we need to be as far as, should be fine. So I'm going to grab
rotate this this way. I'll grab all of this,
Control W. Okay? I'll grab all of this. Do the lemon for a better angle so we don't grab
what's behind us. Control W, Control Shift click. Okay, perfect. Let's do it ding. The next thing I'm
going to do be to center this and scale it out. Okay, screen is a bit off. A bit wet also, too,
but that's fine. I think a more preferable
way to do this would be let's just grab. Yes, we can just grab
the top part instead. Find a good angle for it. Okay. Pull this up. That's fine. Any
issues we having the fix that later on.
Let's just grab this up. Okay. I think somewhere, let's see where we need to get this
to be move this this way. Okay, how far up out,
we're going to get this. I think far up here should be, I think around there
should be just fine. Let the marks, move this up. Okay? Let's isolates I'm
going to mark this bits. Okay. Then I'll go
over to a deformation. Turn on the dots
polished by a group. He's a bit old. Looking a bit old.
Let's do relax. Black is not even
working for this polish. No, definitely not.
Polish by features. Now polish scripts edge. No, looking a bit weird as well. I think a more preferable
option would be to we should be able
to delete this edge. So BZMull delete that
edge completely. Okay? Yeah, I think we're
in a good place. So we can now introduce
a few ss we need. We'll introduce what we need. Let's introduce one year, one at the edge,
one in the middle, one year, one year, all right. That should be fine. So
it's just a matter of kind of pushing and pulling and adjusting them to
our desired results. Okay. Bring this down some more. Bray this in in a swell. Okay. Yeah, so now we see that we is going to get this edge down. We need to get this edge down. I think we can just
easily fix that by doing. We really just move it down. You can just easily move
it down down this way, on the opposite side, down this way as well. Okay? I think we can
do polish by group. Polish by group,
polish by group. Okay. Like so, like so as well. Okay, put this out. S, this is fine. So
now we can let's do dynamic sub div and
add some thickness to it. Dynamic sub div, dynamic. Take down. Okay,
it's already taking up the previous thickness for
everybody's way too thick. So let's shrink this down
some more. Slow this out. Okay. Down so much should be fine. Cause I's going to extrude
out the edges for it. So shift F, let's push this
back in back in this way. Okay. Awesome. I think for the back also,
we need to get this closer. But remember, we're
still going to be adding still going to
be adding some kind of layout lead out
call sockings to him. Not sure which butler words
we actually use for it. But let's just bring it
closer enough first. Okay, I think that
should be fine there. All right, so Shift F again. So I'm going to apply this. So we need to extrude this edge. Get some edge extruded, get in. Let's control click on
this, solo this out. I'll bring this closer. Let's bring this
somewhat closer. Okay. I should be fine. Compensate
for it around there as well. Do the same for
the opposite side. Okay? All right, compensate
for it around here. All right, that is fine. Awesome. I think we can definitely work with this so
I'm going to do let's do BZ go around this way. Okay. All right. Right here also two. Okay. Almost done. Fantastic. So let's bring
everything back out. So we need to extrude this out. So I think we should be
on a Q polyp poly group. Extrude this out. This way, ship F. Let's see
how thick this is. I think the thickness
for this should be fine. Then let's go to the
edge BvulPy this edge. By this edge. Okay. Undo that this edge as well. I think that should
be pretty much fine. Shaped F. If you should
subdivide this now, you should be getting something less more or less like so. Okay, so undo that. Then let's use move brush and
move things back in place. Okay, most likely moving
this closer maybe not. Let's get it out instead. That should create a little
bit of interest to it. You get some more
interest to it this way. Okay? Out some more
down some more. Okay? All right. I think
this should be fine. Yeah, it should be
pretty much fine, so if we should subdivide this, getting something that
holds up on that edge, put to a lower subdivision
level, bring this closer. Okay. I think pretty much around
there should be fine. So let's delete.
Let's do Mirror weld. Okay, fantastic. So
now just kind of grab the lado piece we need
from the body itself. So I'm going to select the body. I'll make a duplicate out of it. Let's the duplicate
Let's duplicates. Okay. Hi this. I F. All right. I think we can actually can actually use this topology
that's already in there. It's going to grab what
we need. Yes, definitely. So. Let's do one side and the mirror to
the opposite side. So I'll go all the way. Let's do for mopi
instead so B Z M. No. No. Come on. Why can't
we just get come on. Here's something
pretty sim like so. Okay. We'll do that in the I
come down here as well. Let's go all the way, no. Let's go all the way, yeah. Come on. Okay.
Something like so. Then go back to remove brush, Control Shift click.
Control Shift click. Okay, invert go and
use the select. Invert this. Okay, then
we'll do Auto Group. There's Auto Group,
auto group, auto group. All right. Control Shift
click Control Shift click. Awesome. So this is
pretty much all we need. Make sure D salt is turned
on, turn on the side. Then we'll do delete
ding, delete ding. Let's bring everything back out. So at this point, we have
the 13 Ki is quite a lot. It's quite a lot. Can
we reconstruct this? We can't reconstruct this. Okay. But I think is quite probably
way too much, actually, so I'm going to let's see
if we can remsh this. Let's do some remsh. So I'll go over let's
first clean this up, so I'm going to let's do polish. As polish up most of the
details we have in there. Polish up most of the details. Also, too, I think I need to
delete what we have here. So B, let's get another loop. Okay, that was fast. I think we get
another loop boss. Let me just delete
this, that'll be fine. Auto Group again. Control Shift click on this to delete
Eden, delete ding. Can we reconstruct this now? We still cannot reconstruct
this? Anyway, that's fine. Let's Let's kind of get
something low out of this. So I'm going to let's
turn this body back on. Oh, okay, we have Okay,
yes, this is fine. We have without one K. But it needs to be slightly
lower than this. Let's get it slightly lower. Let's get something even lower than what we
have right now. I hope really hope
this would work. This reconstruct, but
it's not working. So let's do a duplicate for it. Let's duplicated Let's look
with what is down here. Okay. Let's go over and then
let's zero mash this. So zer mesh, take this down, down this own, take
down the smooth. Let's go lower zer mash. Okay, undo that. Turn off symmetry. Let's
use a value of two. Let's start with 20 mash. Least at two k now. So let's go half again. Yeah, 500 500 is
fine. 500 is fine. At this point now we need
to create thickness for it. Let's create some
thickness for it. Okay, so I'll go over
and then dynamic sub d dynamic down Dion, add some thickness to it. Let's see if the
sickness would work. Yeah, I mean, why not?
Sickness will definitely work. So let's do one segment, so we do two. All right. So smooth, is going to have kind of rounded edges
to it. So apply. Okay, this should be fine. So at this point, we need to move things in place, and then
we should be good. So let's just move ins in place. Okay. So at this point, I
think we definitely need kind of add some
more subdivisions to it. But as far as this goes, I think we're getting
good result out of this. So let's subdivide this hip F. Subdivide one more. Then let's accurately
push this in. Okay. I think I think I'll need to go let's go back to
lower subdivision level. Delete. Let's do
mirror weld first. Mirror weld. Okay. Then we can
subdivide. All right. Okay. P this in. At this out some more down in. Okay. Move up. Let's see. Select this. Let's go on so Abtribton level higher so we get something
at more rounded. Back to selecting this. Move
this out out out as well. Okay. Oh, come on. I've not done
this symmetrically before. Symmetry was done,
though. Can we do mirror weld while
we still have? Okay, mesh cannot be applied. Let's go to lower
subdivision level. Delete higher mirror weld. Don't know symmetry now. Now we can subdivide this. Okay. Put this out out here as well. Get up close, push this in. Okay. All right. Move this undo that gets
up close. Move this out. Okay? Yeah, I think they should, okay, something to fix in
here, get up close. All right. Okay, I think
it should be fine. If we make some of
the skirts visible, let's make the skirt visible. Okay. I think this should
be the front down. I think I just need to
pull this up some more. I'll need to pull
it up some more. Okay? Blow this out. Center, pull it up some more. W a more brush,
compensate for it. No, that would look rather old. That would look rather old. So let's go to the
lower subdution level. Let's use on the lower
subdution levels No. I think we just better this
just use the move brush. Let's just use the move brush
and pull it up slightly. Okay. Alright Okay, I think
that should be fine. So I'm going to save my file. So you just to add some kind of fold and leather
wrinkle details in there just to make it feel
a lot more like leather. So I can just do this with
Let's do standard brush first. Take tone of the lazy mousk, take down the intensity. Okay. So just to come on, put some wrinkle interesting
wrinkle detail in. Okay? This is just to get
something basic in there. So of symmetry now. Just get some basic
wrinkle details in there. We'll eventually go back
in and then modify. But for now let's just
get something basic in. Okay. We don't have enough resolution
to hold this for now, but let's just do some
major lock ins in. Okay? Just to make it feel add some feeling of fabric or
leather material in there, changes to Dame standard. Okay? Yeah, planting
pretty much like so. Cool down here as well, repeat the same thing. Standard brush, freeze
intense to a little bit more. Okay. Let's do
something this way. Okay. Mook to the opposite side. Don't do that. I use this damn standard brush now, create some indentation. Okay. I think as far as this goes, I think this should
be just fine. Alright. Okay. So for distance,
it looks good. So just something more or
less like so should be fine. Alright so let's mirror it let's copy it to
the opposite side. So copy. Just send this down. Copy. Go to our main folder. Min mesh, paste this in here. Paste, okay? That should be fine.
Move this out. Pull back in here. I'll
copy the next one. Let's copy this. I think I can just merge
this with the soul. I mean, why not? Let's merge this with the soul Let's merge everything
together, actually. So select the soul. Send it down, pull down
ship, send this down. These are the back.
Use the move brush. Move some movements in here. Okay. Turn this off.
Let's do it again. I think symmetry
should be turned on. Okay, no, no, no, mesh
is supposed to be torn off for this because we sculpting this
slightly differently. So that should be fine. So I'll send this down. So let's do meas down
for all of this. Making sure there are no
subdivision level in there. I'm just checking to be sure if there's any subdivision level in there. If there's none. So let's do mewn
mess down, messedwn, copy in your pastes Okay. Fantastic. So we'll get
something in here now. That should work just fine
for what we need it for. Okay? So I'll see you guys in the next
lesson bye for now.
36. 35 Chest Nails In Zbrush: Okay, welcome but guys. So in the previous lesson,
we kind of finalized on the two and the letter piece
that comes with seats. So I think, enough
where it needs to be. That is fine. There
will ne to work on. So let's go up to move up. Let's start working on. Let me start by creating this
news in there first. So I'll create this news
where they need to be Okay. And then we can now work on the garment that's supposed to be inside and then
the rest of the piece. Okay, so let's move on. We
have a lot of work to do. Put this aside.
Okay, that is Eden. I think we need the head piece. This is the max. I
think this is the. This needs to be visible. Selected let's see what
we have from that. Okay. So I think I'm
actually going to sculpting some features for
the head as well. Okay. Then we'll be and do
what's necessary in there. Let's see, take this down. Okay. So I think
this is going to be the last thing I'm going to do sculpting features for the head. So I'll do that last, but let's just go back, turn
everything back on. Okay. Let's continue what
we need to do for it. So here are nails, so I
would do I think I need to adjust this a little bit
more fees a bit too good. So with the move brush,
scale this out some more. Right. I think that
should be fine. Put some more
interest to it. Okay. So now for the nails, let's
create a cylinder first. We have topology in here. Let's look for something that
has now topology in there. Topology here as well. We know topology in this piece. So we can use that to
create a cylinder so B. I don't think we have I'm not entirely sure if we have just
nails in here somewhere. I don't think we have nails in. A Okay, so we're just going to create nail out of
this. All right. So let's insert cylinder. I'll create one here like so. I'll do split on max points, split on mark points. Okay, let's solo this out. Get us the wrong
one, scroll down. This is the one we need.
Orient center this. If, let's see what
we get out of this. All right. I'm guessing the better
option to actually use would be a police fair instead. So let's do police first let's do duplicate
of this first. Then do police fast BI. Let's do police first, select the police fair, go down to geometry
Merge from Brush. It's nice somewhere else. Let's figure out where
that is. Scale it out. Okay. I mean, come on.
Is it that small? Oh, it's kind of
off screen selects. Okay. I need to hide this for now. Razor mesh itself. Can't
even find Razor mesh. I mean she's off somewhere else. Find a mesh. Okay,
our mesh is in here, then we have this
fall down here. Move it up, up. Okay, I think we scaled
it way too much. And it's not it's no
longer in front anymore. I just weird. So I'm not
going to use this anymore. I'm just going to make me
move things way too much. I don't want to
do that. And it's just completely off
where it needs to be. Completely off. Select it again. Something seems rather old. Something is rather old. I don't want to
use that anymore. It's kind of creating
a mess in here. Okay? Is it a bona select? It's kind of create
some weirdness in. It's a bit weird. Come on. Something is odd. Keep snapping off orbits. I think I'm going to
use this instead. Let's use this instead. So
I'm going to duplicates. Plate this down ship
send this down. All right. So I'm going to do something
slightly different. Control W, solo this out. Sink it down because
it's in the center. What I'm going to do I'm going
to select these top parts, Control W, select
these lower parts. Control W as well. Okay? This is fine. So what I'm going to do would
be to go over let's select. Let's select this. Marx int
the max, squash it down. Okay. Let the mark, select this. Mark int the max, undo that, inte the max. Do that squash it down this way, kind of flatten it, move
it up, scale it out. Awesome. So this is
precisely what I want. He something pretty much should be just fine for
what you need it for. But there are a few
things we need to do. So let's clear the max. Let's do deformation
polish by group. It us a bit odd. So I'm going to go BZ
under the inserts, delete this polish by group. Okay. Yeah, alternatively, we can
also do this select this do delete ding, delete ding, then we flatten this center flatting this quite
well, completely flat. Stay in there, then we'll
do dynamics of the dynamic, add some thickness to
it, crease it sickness. You have something at least more perfect in shape instead. Alright. Yeah, this
will work just fine, so I'm going to do two apply. So on the top part now, this
is what I'm going to do. I'm going to Control
Shift click. I'm going to select all of this. Like so, or maybe, or maybe not the entire outing. Maybe we just need
just this alone. Alright, so let's
move this aside. There's Let's see there a
circle of spherical is. Let's select this.
There's the flat island. No. Okay. Now, it's not give me
what I'm looking for. I think a more
preferable way to go about this is to select it, invert invert the max. This one actually always works most of the
time, just Polish. So it's going to
kind of fise that. So precisely what I want. Then I can also
extrude this out, so let's do umse. Let's do flat island, poly group island instead. Extrude this out. Okay. I think doesn't need to be smaller
than this right now. Let's check this out. I
think it might need to be slightly smaller than this. Okay. Let's do that. Instead, let's do
insets instead. Polygroup islands insets
and set this this way. I think that size
should be fine. Clear the mark, let this
again Polish by group, okay. Undo that. H mesh. Extend this out. Okay,
extend this out even more. Okay. Let the max. I think I can do less max
this via the max. Do that. Move this down so grates. That's going to mess
in soap in there. I don't need to mess
in soap in there, so let's just do another
extrude like so. So this should be pretty
much long enough. So let's do Bev now. I'll go over o no,
go to the edge. Bevul let's start by doing some be wool in here
instead. Undo that. Let's do like sew. Let's do like sew. Okay, let's like sew again. Like, sew, undo that. Sway, sway. Undo that. I should be fine. Let's do one instead. Okay. So another one here. That's way too much. I think this should be pretty much
fine for what we need it for. Th should work just fine. Okay? But I don't need
inward part anymore. But before we duplicate that, let's do let's Bevo do some
more Bevo in here also. Most definitely Bevo
around here, too. Let's make a duplicate of this. So let's bring
everything back out. Let's make it duplicate
to duplicate this. I, right. I'm thinking I should select
this invert the mouse, get the center, move
this up some more. A little bit more
should be fine. Okay. Let this out. If we should subdivide this now, if you're getting
something pretty much like so, it's fine. But now we don't need
this in here anymore. So let's do delete ding. Geometry, modified
topology, delete ding. Okay. So I'll string this down. Pull this up. So let's
do for the left side, then we can do mirror
it to the right side. So shing this some more. Bring it where it needs
to be out this way. Okay. It's too big, Shing this
down a little bit more. Here, I think this sizing
should be just fine. Push this in here. Let's see. Let's see the sizing. Scale
out a little bit more, okay? I think this should be fine. Bring it closer
around these bits. Pop some more,
pull down control, get something out, duplicate
extended out, rotates. Move it this way.
Rotates this way. Put this down this way up. Okay. Put Cold control. Make it down a
duplicate of this. Move this around here. Think around this
portion should be fine. By this in some more. Pull down control, gets
one more extended out. Sway. Rotates bury
this down some more. Okay. Let's see what we get. Clear this out.
Let's do auto group. Auto group. Select this, move out some more. Bry this down some more. Shifts F. Pull down control,
come in, select this, pull this out, rotate this
way, bring this forward. Okay. Yeah, I think that
should be fine. I think let's bury
down some more. Okay. I think I need to select
this rotate this way. Alright. That should be fine. I guess, select this, move this forward. So more up. Trying to get good
spacing in the Okay. Pull this down some more. I
think that should be fine. Let's go over and do
geometry mirror weld. Yeah, fantastic. I think
this will work just fine. Obviously, you
might need to make some more corrections
in the bots. I think for the most part,
this should be just fine. Yeah, this should
work just fine. Feels like we need
one more in here. So I'm going to select
this Control W, select it again,
select this again. Make it duplicated control. Make a duplicates
here. Move this out. I'm going to move
this back some more also. Let's just do mirror. Clear this out.
Let's do Auto Group. Select undo that
control, select this. Move this backward. By this back in, backwards, so more, come in here. Okay. Rotate it this
way. All right. Select this, move this back. So more. All right. I think this should
work. Don't do that. Protea it's this way. We so it's kind of facing
a little bit more. All right, create
the max mirror weld. Okay. Yeah, thank you. I
think I work just fine. So yeah, moving on. So in the next
lesson, we can just move on to something else. I think in this lesson, we
can just move on to creating the garment inside of him. So we can do that in next
lesson. Bye for now.
37. 36 Fabric Vest In Zbrush: Welcome back, guys. So
in previous lesson, we think we kind of finalize
on the footwear, okay? So in this lesson, I'm
going to move on and then create we have a sphere. I'm going to maybe going center this roughly
in the center. Okay, and I'll shoot this
down and then hide it. All right. So without some
weirdness in there, this butler spell was
actually quite problematic. So I'm going to even delete it. Okay. That's fine. Moving on. So this lesson now,
I'd like to create the what shall we call
it Tunic inside of him? Wha is it called Tunic? What is this even called? Anyway, something similar to something more similar
to this kind of. But I'm not going to be kind of creating the extra geometry
that we don't actually need. But that'll just be unnecessary. So we're going to create
what we actually need. So I'm not going to drop out just this portion out and then create sleeves, so
that should be fine. Alright? That will make better
sense. Let's do that. Before we do that,
I would like to move this in a bit more. Letter of symmetry
with the move brush. The move brush already selected, increase the brush
size t of dynamic. Okay. Let's go back to
our main reference. Get it up close. Let's look
at this from an angle. So I'll be moving this
portion in some more. Yeah, I think somewhere around
there should be just fine. Alright, no less,
I'm going to grab this body piece, select this. But this is what I actually
need to actually read the fabric in there or the
tunic clothing in there. So yes, let's do that. So I would I think we
can isolate this. First, let's make
a duplicate of it, so I'm going to
make it duplicate. Okay? Then I'm going
to isolate it. So it's kind of grabbing
most of what we will need. Can keep this round
neck in. We need to. Alright. Let's see how we
can make this work. If F, is the lowest
subdivision level? Yes, the lowest
subdivision level? Maybe just for the sake of getting I'm looking
at the topology. I just to be sure the topology is right for what's needed for. I think for the most part, this topology should
actually work. I mean, why not? All right, so I'm going to grab. I want to do this in a
more systematic way. So we have something quite
clean and neat around this. So I'm going to
come in a I'll do PZMOQmh let's do poly group. Okay. So do something like so. Yeah, pretty much around
there. Should be fine. We don't need excessive
mesh on top of this. So I think around there
should be just fine. Just have something that kind of encloses this
place also, too. Let's bring everything back out. Let's see. We do transparency. Let's see where that's portion. So around there is also fine. Yes, we can also work with that. T of transparency, solo mode. All right, so
Control Shift click. Then we'll do Auto Group. Fully group auto group. All right, bring
everything back out. This is the only
portion we need. Oh, I think we still need to do some more corrections in here. Let's start by doing delete
ding geometry delete ding. Then how far out do you
want these leaves to go? I'm still going
to kind of create a glove also too for him. If I look for let's find
some kind of glove piece. This is more or less like
a glove piece also too. To create a glove
piece. So we can also make duplicate of this kind of blockout some kind of
glove piece out of it. You can see under
glove piece in here. All right. So keep that in
mind, keeping that in mind. Kind of covers
everything. All right. So, I'm going to make a
duplicate of this again. Let's say this at the top. And I'll come in I think you are working with symmetry
Tundon for this. So this is perfect symmetry. All right, so I think as far
as this leave should go, let's see I think we can stop we can stop our
sleeve around there. So let's make note here. Let's look for a
good angle for this. Something more or
less like soap. The control shift click. And Okay. Then let's do Auto Group. So Auto Group. Control Ships click. All right. We do delete Eden. So let's turn on
double sided also for this double sided spillu side. You can see we have this
weird edge around it. So we need to delete
that also to as well. Okay. Let's do the same for this edge. So I'm basically just
adding sickness in there. But we I'm going to
need the sickness, we just need to we just need to have
separate poly groups in there essentially. So like saw the
control shift click. It's not grabbing it, so I think might need to do the opposite direction instead. Let's look for another
way to actually do this. Okay, that's fine. I
actually deleted it. Okay, that is fine. Let's do delete ding again just to be sure. Delete ding okay. That's deleted.
Control Shift click. Control Shift click again. It's den, right that's fine. This is going to be
for, like, a vest. Let's just call it vest instead. So smooth the hell lot more,
but this is fine for now. Let's go in and then block out also to the glove
we need for it. Because we need some
good gloves also on it. So let's see our gloves can be as far out as
here instead. No. Do that coming close. No. No. So I'm selecting it and then tapping holes who have
something a bit flat in there. Around there should be fine. So Control Shift
Control Shift, click. There's Auto Group. Auto Group. Control Shift click again. Screen is going to be
a base for the glove. So let's do display
settings double sided, delete ding, delete
ding, that's fine. So I'm going to shoot it down, so don't shoot it down. You know, that's the wrong
one. This is the one we need. I'll shoot this down as well. Okay, so I'm going
to isolate now, let's start smoothing things out. Let's smooth things out. So to do that, I think the
faster way to smooth things out would be polish. Let's go to the formation
and then just polish this. The polishing is kind of
shrinking this lower pad down. I don't want to shrink
lower pad down so let's just do polish by glue. Is an extreme polish by group. Let's turn on the dot
again and let's just put this and smooth out any
detail we have in there. I think this should
be fine for now. All right. So now we need to start making
some modifications to this as necessary
modifications to it. Let's figure out where it is
again, I in the right place. Okay. Make it visible,
turn on transparency. So I'm going to do inflates
to bring it out of the skin some more so let's
inflate this some more. Alright, so you
can see how we're getting something
interesting already. I think, yeah, somewhere around there
should be just fine. I guess we can live
with this because what's it going to be
dent sickness to it? Something around the nature
of this should be fine. So go in and then remove brush. Ton of dynamic, use
the brush size. So some smoothing out. Now, let's see if we can
actually zimrge this. Let's see if you
get some topology around this if you zomrge this. So I'm going to make
a duplicate of this. I'll duplicate this hide this. Let's do zer remser geometries, zero masher ton of adaptive. Civ group detects edge, right? Yeah, let's do five key
instead to zero mash. So 5k5k distance kind
of giving us nine k. But that's fine.
Let me undo this. We have clean topology in here, so we want to kind of
maintain that also, too. So what I'm going to do be let's mark this
region like so. Give it a separate poly group. So this poly group is
going to help with kind of creating edge loops around it is precisely what we want. So I'm going to z mash again. No, that's weird. It's kind of. It's not working as accurately
as I would want it to. So I'm going to M No. All right. Okay. Control
she would click. Control she click. Let's do Auto Group. All right. Okay, Control W to give the
same poly group, that's fine. Then let's remash again. This one's going to
flow that same flow. Yes, we're getting better. There's more or less
better flowing here now. So let's go halfway to
remash done this adaptive. Though I'm not
entirely sure if it's actually affecting
it because I've already turned it off in here. But let's remash again. Yeah, I think this is
should be way better. Let's do same and remash again. Let's get something
cleaner down here. I think what we had before was way better. I think
this is way better. All right. So this is cleaner, this is a more cleaner
mesh to work with. Ton of symmetry. I'm
ton of solo mode. So we just need to use
the more brush now to just move things in
where it needs to be. So we're still working with symmetry turn on, which is fine. So just make some corrections
here or there, right? So we have a lower mesh topology or Polycouncl want to
articness to this. We're not going to
work in something too high to optimize things
a little bit more. Yeah, I think this is awesome. This is fine where it is. So now we need to artiness. So I'm going to make
a duplicate of this. Let's make it duplicate. So
I'm going to duplicate this. Let me do a quick
save for my file. It is important to
at least save at intervals so you don't lose your progress So I don't want
to lose any progress in it. That's why I needed to
save this to save up now. We need to add some
sickness to it. Do some thickness. Let's do. Okay. So we're still going to ditch this still going to ditch this. Let's just give you the
same ply group across. So later when we do UVs, we have something better and
let's do Control W. Just in adult poly group just
to define how we want our edge flow to
actually go around this mesh. She's fine now. So
let's carry on. So to of ton of solo mode. And let's do thickness for this. So let's do dynamic
subdiv geometry. Dynamic sub div takedown smooth, add some thickness to it. It's obviously way too thick. Let's get a good value in. I think this value
should be roughly fine. Then we add one segment to it. Was it going to test in
south just to be sure though just in between. So we can have some smoothed
bevood edge across it. So we apply this and
then we subdivide Yeah, I think should work just fine. I work just fine
for what we need it for. I worked just fine. So I want to go out
of solo mode now. Then we have start 15 k, which is roughly fine. Doesn't need to
be extremely low. I think at this point now,
we cannot begin to add some rinkul and food
details in there. Okay? Kersey, I'm just going to check the back just to
be sure, Kersey. Is not pulling out. I need
to push this back in. More or less, select
this, pull this out. To compensate for it. I think we have the estimate
return and that's fine. Let this again. Now, let's use actual reference for putting some food rink details in there. So there are a few
examples in here, but let's use this one has a bit more interesting
ranol detail across it. Let's see if we can
find something else also interesting rank details. Okay, good interesting
details in here as well. Yeah, I think we can just use. Let's use this for the left arm or for the right arm
right arm sleeves, then this the left hand sleeve. So let's do that. I'm going to solo this
out. Let's solo this out. So we need some
more subdivisions. Let's subdivide some more. Okay? I think around
there should be fine. Los going to block
out a good base. Good based fine. So let's go to a lower
subdivision level now. Okay? We can start with working with symmetry in here so we can use
the standard brush. Let's get some rin coded
food and do that food cold. I think we need to increase
subdivision level for this. Density is way too much. Take down the
intensity. All right? So just basically getting this blockout in there out
let's see what we have. Is we're getting something
interesting in there already. Okay? So I'm just trying to
break the uniformity of this first gets closed. We use the bros size. So this down. All right. So this down, put out, dig in. I can see how I kind of getting. I kind of blocking the
compressions first. So I was working with
symmetry for now? Was it going to break symmetry
eventually, but for now, I'll just continue with doing
this symmetrically for now. Increase the intensity
a little bit more. On do that as way too much. All right. Come up here. Smooth this down.
Freeze the brush size. Take down the smooth intensity
so we can soften out the edge. All right. This lemon looks too symmetrical
though, but that's fine. Put dig in here some more. Do some smooth. So now I
can turn off symmetry. Symmetry turned off
now, we can actually work asymmetrically in there. It's kind of get some
more interesting ring in. Part looks a bit
good. So this down. This down. Okay. I do that. Trying to get
some more depth in there, but not too aggressive that way. That way, should be
fine. All right? Do that do this again.
Swoon this down. Get this ship looking in there to go to the opposite
side, sw this down. Okay. On doo that, get close. So this down. So this down around
here as well. So if you do this often enough, you kind of get a good idea
of what to actually do. So what I'm actually doing
in here, so should be fine. Okay? That should be
interesting enough. Smooth this down that intense, get close, add some
smaller ones in there. All right, getting the
smoothies down as well. Okay, now let's
go to the itself. Let's create some elevations. I'm basically just using
the standard brush for now just to get
some blocking in. Just some base blocking
in there should be fine. Then eventually we're
going to go in and then on the higher
subdivision level and then do some more
smaller folded wrinkles in there with the
dam standard brush. So for now, so at least, I think you're on
the right track. So I'm going to reduce
the Let's go up, soften it out some more. So I'm just going to creating
the major blockout in. Okay. Smooth this down. Any blobs in the blend smooth that
down should be good. Smooth this down.
This part should be this part around there
should be quite smooth. Don't want too much
wrinkle in there actually. So the major wrinkle
and compression should be around this front side. Go that. Okay. Pull
down out, dig in. Around there also too. So the idea is to create some
Y and V shapes in there, put dig in, dig in. So basically creating
some Y and Z shapes. So I'm going to
create some Z ship around Blind smooth this down. Let's do some Z ship in here. More or less like so. You're going to go in and
then work on them some more but for now just
get them at least slightly visible in We
also want to be careful, we don't want to
overdo it so you don't create some
weirdness in this. Let's do them standard
brushing and try to accentuate some of the detail in by creating some more depth
in and across them. Smooth that down,
to kind of create some sharp lines also too
as well. Then smooth. Okay. You can see from a distance now we're getting something interesting
enough to work with. Smooth this down, get something softer around there, right? Some more depth. So this
down elevates, of this down. You can see now on
the front side now, we get interesting full
wrinkle detail in, which is precisely what we want. Then you can create some more
depth also in here as well. Okay. So you can create some
more variation in here, more or less like
soup. All right. So I'm going to use this
standard brush now to elevate a few of this
just a little bit more, right, put some
more depth in here. All right. I think as far as this
going on this side, I think it should be
fine on this side. Maybe some slight elevation just to break up the
surface some more. But I'm actually going to
soften them out as well. So let's just soften them out. Just create some additional
surface detail to it. Okay? The more or less
like, so it should be fine. Okay, let's come up here, create some interest also, too. I didn't really spend
much time in here, so let's do some
detailing in here. Okay. That's a bit too high
and a bit weird. Let's just get close something smaller brush size,
and then we should be good. Then blend smooth
that down as well. We need them standard
brushing to create some interesting looking
depth. All right. So back to the Sun
standard brush. Let's use the oppose
the Oder reference. Okay, let's use this instead. So basically see Z
and Y shape in there. Okay. We can use
this kind of block, do some basic standard
blockout, right? So we get something
interesting in there already. Do those as a bit weird. Smooth this down with
some Y shape in as well. Do that as a bit
weird. Then smooth. All right. This part means more
stronger elevations. Let's elevate some portions
a little bit more. Just make it stand out. He
pretty much like so fine. Till a lot more adjustment
to be done in let's get in. Okay. 13 days way too much.
Let's get in closes. Do that. All right.
That looks a bit odd. Elevated some more,
something like sushi pine. So let's kind of do some continuation in
here on the side. Okay. Here, also, too on this side, a bit were less smooth
that out getting close. Put some y and z ships in there. Okay?
38. 37 Fabric Glove In Zbrush: Come back, guys. So previous
less kind of created the Bz mesh for our vest and then we start
adding some sculpting details. So I just going to carry on and then continue modifying
the sculpted detail. Wh what I'm doing
here. I'm still modifying our sculpted
details some more. Okay. To this down. I don't go too extreme
and then create too many full details
or rankle detail in. So you just need just enough
to actually sell this out as being actual fabric. So that's the entire
idea for this. To do some smooth in
here smooth as well. You need some more depth
in here, no doubt. You know, undo
that, get up lose. Okay. On the edge. I don't do that. I I old. Once you feel like it
is looking a bit old, you just need to go in
there and then fix it. I think as far as this
goodies should be fine. So we need to kind of introduce
them standard brush now let's introduce some more
depth in where next week. Okay. Yeah, this would
actually help sell out food and wrinkle
detail a lot more. All right. Do that I looking a bit told. Okay. Smooth down,
smooth this down. All right. Do that, create some more indentation
in here. Also tighten it up. All right. Like so should be
fine, smooth this down. Smooth the edge. So on the edge. Now, this from a distance.
I think this should work. The backside doesn't
look too great. So let's do some fix in there. Smooth this down. Won't do that. So this down, smooth this down. Okay. Put some extra
edging around the egg. Do the same for the
opposite side as well. Lets go close. Okay, I think as far as this
goes, this should be fine. So this down, smooth this down. Okay. Smooth this down. Just trying to create some more interest
to it. So this down. All right. So look at
it from a distance. Now the idea is look at it from a distance and have a feel of it if it's looking good or not. Smooth some things out. Here, I think this should
more or less work. Some smooth gets in here also, too, just trying to blend all the details down together
as one single piece. I feel a lot natural in there. You can create some
sharp edge just to create some interest to
it and blend smoother down. So you just, like,
slightly faint in there, but still very much in there. I need to create this at
an interesting angle. Okay. All right. More
or less like so. Then smooth that down, just
to create some kind of faded wrinkles in there
or full details in. You should help
sell out the mesh a little bit smartly
from a distance. Smooth this down,
smooth this down, smooth down. Okay. That's fine. So if you bring
everything back out now, you should be getting
something more or less like this to work. Just fine. Awesome. So this is how kind of created full details in that looks believable. We can do some fixing in here. Okay, this down. So if you go to a higher
sublvion level now, let's just go to
higher subltion level, you can see how our details kind of comes through
quite nicely also. Need to use the standard
brush just to put some more shadow
depth in between. Since you w the shadow depth in some more on some
of these regions. Okay. Going to fix this
with more brush. Move this out. Let's look at the opposite side. Move undo that come in
close. Move this out. All right, so if you
kind of do small render, just see shadows in
there. It's fine. So with the standard
brush also too in here, you need to kind of
create some more depth. You need some more shadow depth. So we can only do that
by creating some using the standard brush to create some sharper depths in
a few of these parts. So just make it a little
bit more obvious to see. Okay. You should help sell out
the work a little bit more do that gets up
close, soo that down. So this down. So this down. I can do that. This down. All right. I think we can definitely
live with this. This we can live
with my distance looks quite good. So
that's the general idea. Look at it from a distance to be sure everything
looking just right. Okay, I think I'm going
to leave these scites. Let's move on to something else. All right. I'm going to them sieve
this also a quick sieve. So at this point, the
next we need to work on will be on the glove glove, let's work on the glove
are duplicate for it. So what was going to
use that duplicate that duplicate turn dangerous. Get what we need out of it. Okay? So it's more or less like a suede material, which is fine. So I'm going to using this
as my main reference. So let's go in, and then I
think we add should be this. Yes, that's the one. I'm going
to make a duplicate of it. Make a duplicate, solo this out. Do we have symmetry
to on your display, the obst distur that is fine, Shift F. So let's start
by going to deformation, polish this some more, then inflate yes,
this would be fine. Inflate this. Let's visualize
this in, let's inflate. Some more. Let's get a good feel if
that is fine where it is. Okay. Yeah, I need to make some modifications
in there, no doubt. Let's do transparency. Let's see how far out this is. All right. Yes, we
can work with this. I'm going to do some
fill up in there. I don't want to
use move brush and then symmetry turned on. Let's make sure
symmetry is turned on, asymmetry is turned on. We can slow this out. I'm gonna move this out. O this week. I'm going
to leave this burrit in. It's gonna be fine
burridun I think. Let just move this
out quite well. Okay? Let's polish. Polish also a little bit small. Yeah, this should be fine. I think we need to make
some separations in here, so let's go to argues more, and then all those mags
spat out. It the marks. Let's get some spacing in here. Do that. Smooth. To get that
separated out. All right. That should be fine. F. I think the topology, we have polycun five K polyton. I think we need to get something slightly lower than
what is in there already. So let's go over to geometry. I'm going to start by
duplicating this again. Then under geometry,
Z masa zero mas Zero masher we do ton of adaptive
keep group detectors, take this down, take this
down some more zer mash. Okay, three k, let's go halfway. Okay, 1.8, 1.8 k. I think 1.8 k should
be fine, more or less. Let's see if we have
good flow around this. Yes, we do. That's fine. I think we can work with this.
Okay. Now, let's add some. Okay. I think I need to move this I think I need to inflate
this a little bit more. Okay. That should be
perfect where it is. Then we can use the
move brush now and then just make some move corrections around the egg. Okay. I think at this point
now, we can add sickness. I'll buy this in some more. Maybe let me shrink it
in a little bit more, shrink it in some more. So the thickness is going to me to be what we elevate it out. So let's go to geometry, dynamic sub div, dynamic, take down the smooth,
increase thickness. That's way too thick, take
down the thickness some more. I think that's the
way too tick though. Here, this should
be roughly fine. Let's do two for the segments, go out of solo mode. Okay, apply this on, subdivide subdivide one more. Let's subdivide one more. Let's go to the lower
sublution level. Move some things in,
select this, move it out. All right. I think
that should be fine. Buried in. All right. So we can solo this out now. The next thing would be to add kind of add a wrinkle detail. Who wants ablution level higher. Let's look at the details
we have in there and then use that get some put
that wrinkle detail in there. Can use this standard
brush ladder. Okay, Take down your brush
size and begin to add some wrinkle detail in
the smooth this down. I think the first smetered
it was a bit old. Okay. Go on sublbton level higher. So this down. So this down. Just trying to get some
good base blockout in. Some news you symmetry turned
on, he's fine for now. Okay. I do that. All right. Get some depth in
elevations also to so this down,
use the blow size. All right. Do that. So I'm used to
symmetry tundonF now later, I'm going to brick symmetry. Way wrinkle detail should
be ready noctil should be. You need some indention
in there as well just to separate it out. All right. Then we can add some
full wrinkles in there. Undo that. I'm going
to slim out the edge. Bread little bit of
interest also too to it. Right. Create some depth also in here. Then let's start introducing some food and wrinkle
detail in there. We got these points out of
symmetry now. This out. It's not looking great for now, because we need to start doing some more additional work in there by smoothing
things down. I'm going to start
smoothing things down. So we just need some I just needed like a base
to start with. Then we can now start
working individually on it. I Okay. So add details in there zoom out to see
what we have this down. Symmetric td off for
this so that's fine. Let's look for another
reference that should help. Right? Move this up this way. Smooth down some more.
Soo down some more. Let's go on subduction. More subdivision for this,
let's subdivide a bit more. All right. So this down, smooth
this down some more, then go to the lower
subdivision level. I use this them
standard brush now. I begin to do some more
interesting detail in there. That should make this feel
a lot more interesting. Because what's going to
make it feel like it's kind of it's not completely tight. So we don't want something
completely tight in there. So we're going to make it look like this is some measure
of allowance in there. Don't do that. Now, at the same time,
I don't do too much. Just not cell
dementia acid being, glob acid being something
that is not that tight. Look at this from a distance, put a higher
subdivision level with a standard brush with some more higher
elevations to this. Undo that. Smooth that down. So indention in here, smooth this down as well. Okay. Smooth this down. This part is quite neglected, so we need to add
some details to this, especially where the
knock is supposed to be. Okay. Then we do some smoons. Then let's add some food and
ran Cotail in there as well. Use the bro size. Use the Boss some more. Okay. Trying to get
interesting details in. Some of this down. I
was looking a bit old. What I need to do here will
be to fill this part up. Some of this down. Alright, them standard. Okay, let's go back to
standard brush first. Some elevations in here. Do that. Okay. That's a bit too
much. So this down. Us the brush size.
Get some compression that goes in here this week. Okay, so this down. Same standard brush. Right. So this down standard brush, elevates, elevates some
more. Stats bit too much. Okay. I think we need to so this down. Same standard brush.
So on the edge. All right. Let's go to the
next one. Go to the next one. Start making the same
modifications in here. Let's start with
the standard brush. Smooth this down. Smooth
this down some more. Let's get that elevation
for the noc within there. Okay. Not there. I think around
there here as well. Okay. Same for this
piece. So these down. So them down. So more. Doesn't need to be least blobby. We just need to have a good idea of something
being in there. Okay? Get enclosed, pre some
indentation in here. Let's do, we've done something
there already. Okay. Smooth this down. I need to use them
standard brush. It, that's a bit. Let's do something like
soap. Smooth this down. Back to standard brush. Any way to blow the ins. Let's get the smooth. Smooth also, too, go to lower subdion level actually
get some smooth in here. Okay? Like to get something in. So this down. Basically creating
that why shipping in the Put some depth in here. All right, cret some
why shaping in. Condo that zebra size. Smooth this down. Okay. Smooth down. Smooth
down some more. Smooth this down. Is this
damp standard brush. W some more depth around here. Okay? Come on. Alright. Et's create some indention in. All right. The opposite
side also too as well. Okay. T this down. Okay. So this down. I think we need that
indentition in here. So this down. So this
down. So this down. I think as far as
the front side goes, I think that the
palm should be fine. I need to make some
modifications in here, smooth this down. Okay. My save out. Okay. Moving on.
Smooth this down. This is a bit old, so I need to feel this parts up as well. Then do a smooth. Okay. That should be fine. See if we can use it just to put some more fold wrinkle detail in Moon them down. Okay. With the standard brush now, I can go and elevate them up. I think this is not
completely necessary though. Let's just do smooth
down, smooth this down. Okay. Smooth these down, so get
something smooth to work with. The standard brush. Okay, let's bring Ein back
out. Let's see what we get. I don't need to go to extreme. I see definitely
now that we need to I need to shing this back in. I mean, we can do let's do solo. I think we can do
Let's do deformation. So that's creating some
weirdness in that we don't want. Already, we have some
weirdness in here already. So let's not do that. Let's not do that. Let's
try inflate balloon. Nope, it's not
working correctly. Let's go to the lower
subdivision level and move things closer to the skin. Okay. I'm not going to manually
move things in place. I don't want it to be that Tick. All right. Let's same
for the opposite side. Get in there. So
steep poking out. Get up close. All
right, move this in. Move this in. That's
bit too much. Use the move brush,
move this up, pay them in some more
in some more, right? In some more. Let's increase the
subbtion level. Let's see where we
get. Let's even look at our main reference. Let's see if on the right track. You're fallly on
the right track, this part is going
to be covered up. So the main part we're going to actually let me
smooth this down. The main part we're actually
going to be seeing would be just the inward parts. That's basically what you're
going to be seeing even more. Okay, so this will work. I'll see you guys
in next lesson, can create the I think we can create this 10 million here, let's create the
ten Millirenext. I'll see you guys in
next lesson by for now, save my file. And
39. 38 Chain Mill MircoPoly In Zbrush: Okay, welcome but guys. So on previous slicing, we
kind of worked on the gloves. So we're going to carry on and then work
on something else. Let me stand this out some more. Okay. Just making slight
movement in there. All right? That should be fine. Okay. Let me go in here put out, elevate some more, this down. Okay. So the next thing
I'd like to do would be is to get a mesh for
this chain mill in here. Let's kind of create a
chain mill in there. All right. That's fine. So I'm going to go
over to a sub two. Let's see what we can use. I think we can use this, no doubt, let's make a
duplicate for it again. Let's do this again. All right. I'm going to let's
work with this. Let's give everything undo that. Let's give everything the
same poly group control W. Most of what we need is just symmetry is
turned on here, that's fine. I'm going to grab these
portions in here. But I think we need to zero merge this again with
a higher poly count. Let's grab what we
need first, I think. Let's grab what we
need. B Z M. Let's just do I think all the est
everything back on. Let's see. Transparency. We can do let's see think all the way down
here should be fine. Okay. Somewhere around this way. No. No. No. I need to
delete it actually. Why can't I just delete
this? I just grab. Come on. I Control shifts, click. Control Shift click. Something seems
oddly wrong here. Undo a few times,
Control W again. Come on. Okay,
Control Shift click. Why do we keep having
this weirdness in there? I think I have no
choice but to just do this manually instead so. Let's just use the Max lasso. Okay. Control W. Control
ships click click. Let's do delete ding. Delete ding, modified
topology, delete Eden. Okay. I'm going to max this portion, Control W, Control Shift
click again, delete Eden. Okay. So I'm going to
subdivide this one. Be fine that let's make
a duplicate of this. Let's do duplicates. Okay. Then I'll subdivide
these ones, delete lower. All right? Then I'm going to go over
to dynamic Subdiv Okay. Okay. So now go over to
dynamic sub div. I'll turn on dynamic sub Dave, take down the smooth,
then turn on micropol. Okay, then let's let's
use a chain mill in here. I think there was one chain
mill in here somewhere. Okay. Nits, this is the one
chain mill, chain link. I don't talk that too much. Then let's try
let's try this one. Okay. So I'm going to
check this around. Just to be sure we have
this working correctly. Okay. So at the same time, too, we don't want an entire surface because
if you notice in here, we still have a gap around here, so we need to make sure
we have that too as well. Okay, so I'm going to turn
this off for now, Okay. So I'm going to go back
to can we reduce this? Can we reconstruct? Yes,
we can reconstruct. Okay, so let's make
everything visible again. So I will need to
scale this out. So let's use inflates. Let's go to inflate, inflate, let's do inflates. So I want to kind of get
this out of the mesh. Okay. I think this point should be
let's do a little bit more. A little bit more like so. Then I'm going to buy
and move things in. Make some adjustments
in a ton of symmetry. Move this out. Move out as well. O out as well. Okay. Move this in down out, get close, move this
down, this out. So these are important steps
because news can get this to look as accurate
as we want it to be. So we need to move and make
some adjustments in here. Okay? All right. Move this out. All right. Move to the back side, do
the same thing also in here. Let me select this instead and do some
movement, move this back in. Okay. I think this
should work. All right. We can work with
this, select this. I think I also need to
make under duplicate, I need to adjust
something in here. Okay. All right,
that should be fine. Okay, so now I'm
going to go over to let me duplicate this again. Let's make it duplicate.
I always like to make a duplicate to have
backups to fall back too. All right. I'll low this out. So we need to grab the
portions now we don't need. Let me do something
more or less like so. Let me see how far this should
be maybe all the way here. See, bring everything back out. Yeah, I think that
should be fine. I'll do the seems on
the opposite side. Okay. Let me grab this
portion as well. Control W. Give that a separate poly group. Then you need to make it a
lot more neater at the back. Grab this Okay. I'll grab all of this. Control W. Undo that. Grab this way. Control W, undo that. Let's see again. I need to kind of make sure this
is as neat as it can be. Control W Alexo. Click that out. Okay. Now, this is not as neat
as we want it to be, though, but would make it work. Just the necessary
cleanup in there. Let's bring everything back out. Are you not looking as
neat as it should be? Let me max this part out, Control W, and I'll
do this again. No, I used to be quite visible, so I'll do something, like, se I'll be as
careful as I can be. Okay, Control W. Okay, so we get something
somewhat neater in there. Maybe not entirely there, but
that will work just fine. We can also keep
this select this as well. I'll clean this up. Control W, clean this up. I think we can work
with something like so let's move it back, grab Grab this portion. Wow, click. Let's see what we
have. I think this is more or less fine
for what's needed for. Okay. Invert the selection. Control W, bring everything back out.
Let's see where we get. Okay. I'll select this. I think we need to
make some adjustments in here as well. Yes we do that. So I'm going to let me find
a good angle for this. I think this angle
should be fine. I need all of this
around around this. Let me do this again.
Okay, Control W. Do that. Let me clay any maxing
we have down here, Control W. Anyways, let's
just select this in max. Here, Control W. Here, like so. Control Shift
click, Control Shift click. Invite the selection, control W. Shift click,
Control Shift click. Yes, I think this
should be fine. Control W. Yes. I mean, this some issues in here. Yeah, we need to fix we need
to fix this Control Shift. So I'm going to max
this portion control W. Control, Shift click,
Control Shift click Control W. All right. I need to be quite neat. That's what I'm
doing it this way. Yeah, I think this is fine now, so I'm going to
duplicate this again. Hide, Control, Shift, click, Control Shift click,
invert the selection. Then let's do delete ding. Delete ding. Geometry
Modified topology, delete ding. All right. Yeah, that's fine. So now
we can subdivide Okay, delete lower, bring
everything back out. I'll pull this out. Put this out out some more. Get up close. Pull
this up, some more. I think we need to pull
this out as well. Okay. I'll select this. I'll
push this in some more. This kind of grabbing
where I don't want grab, so I need to be quite careful in there,
select this carefully. All right. Okay? Like, precision in
here, very important. Trying to be as precise as
you can get this to be. Alright, so select this
again. So, awesome. Yeah, I think this should I think I'll move
this Hopson more. Okay. Awesome. So now let's
go over to dynamic subdiv. Let's turn on micro. So we're using this chain mill. Get up close. Here they are quite small. So let me turn this off. Let's say we reconstruct this and then we
try this on again. Okay? Let's see. Yeah, I think this is
way too big, actually. Too big looks a bit weird. So if we should include
the subdivision level, we get something that
makes a whole lot sense, better sense in there. Okay, so we can
also change this. Let's try this, that
looks rather odd. Let's try this Okay.
So we have the option. So actually pick
which one we want. This one feels like
I should keep it. But let's see, we still have other options
in here we can explore. Can explore some other
option. I mean, why not? Let's try chain twist. No, I think so far
this chain link Yeah, I think I might just
keep this instead. So moving this around, is a bit slower with this. But if we use it moves a lot
slightly faster than before. But I'm going to be sticking
with chain link instead. So I will click on.
So we have skill. Can adjust the scale
if you need to. But we need to be quite careful
with the numbers though. Let's see if we
should do a line. Multiple subdivision
index, let's delete lower. We do a line. Okay? This is for the align. If we undo that. Which
one do I think is better? I'm trying to figure out
which one is better actually. So me personally, I
think I prefer this because it's not completely
and absolutely aligned. But if we align this now, we're getting something that
looks perfectly aligned. Which is not bad, actually. It's not bad, actually. We can actually can actually
work with this, but we see some issues
around this portion here. So the pattern kind of changed
a little bit around here. So I think the align version
feels a lot more realistic. So I'm going to
keep this instead. So I'm going to apply
this on so click on Apply Okay. So have we
applied? Oh, whoa. So we have this at 1.4 million. I think that is way
too much, honestly. I think that's way too much, probably more than what we need. That's why things are
a little slow in her. A more than what we need. So undo that. Reconstruct this. So that want something
that is way too much. Oh, my dogs have to
manually delete a few. Okay. I think so far this sub this
one works best actually. But the Polycount for
us is just crazy. It's way way too
much, way too much. We might even might even
need to delete a few tins. So let me turn this off. So I'm going to actually delete delete a few of this. We don't need
the entire outing. So just to create something
that is not as dense. Delete. Let's see what
we can delete in here. Okay. Let's just see. I
think I'll do right. These parts. Now let's start deleting,
let's start deleting so B M want this to be
where we want it to be. Any additional portions to this, you can have to delete them out. Okay. Don't do that. Let's turn
on symmetry for this. Okay, that's weird. It's some really weird shaping which I
don't actually need, so I think I'm just going
to do this instead. I think it's great
in that because we have so low mode turned on. So long mode on just making create some weirdness in there. A do that. It's becoming quite difficult
just to grab what we need. Let me do this
instead. Control W. Okay. Grab all of this. Control W, select that. And it's going to
erase a lot more, a lot more because we
don't need everything. We need to kind of keep what we need so the polycon
can actually go down. So let's go over to modify
topology, delete Eden. Okay, let's ton of solo. Let's see. Okay, I need
to delete a bit more. I think this let's delete this. This goes across. Yeah, this one goes across here. Okay. I'm going to use
the Max last one instead. Okay, Control W, Ct
click. That's fine. Even if it's rough
in her, that's still fine because that's going to without grabbing what we need,
delete it in again. Okay. Let's subdivide this. Let's go to dynamics,
subdiv dynamic. Okay. All right. So the rest, we can just manually
move drag them in. So we should apply this
now still quite much. One point A, roughly 1
million polygons in there, which is still quite
dense. Do that. Let's try this one. We apply this let's
actually quite less. We have less polygons in there. Ton of transparency. I think this I can
actually live with. The I can definitely live with. The rest was just too dense. Let's see if there's something even lower we can even find. Let's say there's something
even lower chain link. Okay, to apply this on. We're looking for
something quite low, not too high at the same time. All right, starts 700. Okay. Is also fine. Right? Let's look
for something else. This one looks like there's
more wider shape in there, so let's even experiment
with some wider shapes in. We have some skills. Okay.
Let's try this scale. Let's try this von cable. Let's see. Right? Interesting. There's some interesting
we've going on in there. But let's try the scales. Okay. Let's delete lower. Let's
see where we get to line. Nope. Skills. I think I may have found the one that that might work
just best for this. If we do align, do the align. I think this being aligned
makes better sense. If we apply this on, let's see, we have this at 500
k. 500 k, undo that. Go back in the selects
two scales we select. Okay, this was the
scale we selected. Let's try scale three instead. So we have quite a
lot of options just to play within here.
Let's see this. Okay. Still offsets. Okay. I think as far as this goes, I think the scales
we had India before, I believe this one seems to be a better one,
so if we shall align this. Okay. So we don't have any
space in India, though. There's not so much
space in India. But I think this should
just work, so I won't do. Let's turn this off. Let's make sure we duplicate
this one more time. So we have a good backup
to return back to. And then we're going to
try the two options. I figure which one works
best. Let's start with this. Okay? Have we aligned?
Did we align this? So I turned off the fits. Let's turn on this bit again. I think fit is way
better. He no. Align appl this on. So it is roughly around 500, let's say 600 k, which
is a good enough. It's not too bad. So in here if I should go
to the formation, let's say, I shrink
them down some more. So you shrinking
the entire thin. Just make it touch the skin. You already clothing
surface some more. Okay, this is one option. I'll save this. Let's save this. So this is definitely
one option. The second option we can try because we still
have the backup in here. So if I just select this, let's side this for now,
let's use this. I'm going to duplicate
this as well. So let's try another option. I mean, why not? Since we can
adjust them as we please. We have this vortex.
Let's try this on. Nope. Nope. Elastic no. Okay. This one definitely
looks interesting. We do a line. Okay. This actually looks interesting. I don't think it's
good. It's going to cost too much at the same time. Do we have gaps in between? Let me see if I can adjust this scale. So the
scale is at one. If you do 1.3, let's
see what we get. Let's say we reduce the
vials, use the value of 0.5. Let's see. Is the
way tighter now. Let's k value two. Okay. I think the scale value
of two is way too high. Maybe 1.5. Okay. So if we apply this on Okay. This is even way
lower. Average at 224. Let's say 230 k,
they're about to. We also have something
even lower to work with. So I'm going to rename this
so we know what it is. Chain Mil. All right. I'll shoot, before I shoot down, shoot it down. Let's
select the next one. Let's side this. This one
is at least your scales. So I'll name this to scale Mal. Okay. So I'll shoot this down. Alright, then we have this
shoot this down as well. So now we have two options
kind of fall back to. So we have this. Let me
hide this on this scale. Then this is the chain meal. I think I'm going to
keep this instead. So if we kind of run through
some rendering here, I should have something
interesting, like so. Here is kind of
precisely what I want. Then I can make
adjustment to it. Take this down. Okay. I'll turn up symmetry. I'll push this in some more. Okay. Move this up. Make sure it's visible. Chain. All right. I think it is where
it needs to be. Awesome. So the next lesson, we'll just move on
to something else. I'll see you guys
in the next lesson. Let me select this. Don't
do that, select this. Just move things in some more. I mean, why not? When we can just it's going
to fill up some gaps. All right. Okay. All right, so I'll see you guys in next
lesson. Bye for now.
40. 39 Arm Belt Strap In Zbrush: Look, me about, guys,
in previous lesson, we kind of worked
on this chain mill. So we're going to carry on and then continue from
where we left off. So I can see some kind of kind of strap piece
that goes in here. So I would like to
get that locked in. Let's do that. So I'm going to use I think we can
use one of not this. Part has good topology in
there that we can just steal. Yes, that's good topology, we can steal and use it
for what we need it for. Alright, so I think it should be somewhere around
here. Let's do that. I'm going to make a
duplicate of this. Okay. So let's do it
on the left hand side, and we'll mirror it to
the right hand side. But five before I do
that, let's do the Okay. So I need it a little
bit wider kind of. So I'm going to go to insert. I'm going to hold out and it a subdivision
level in there, let's delete that lit higher. Can we reconstruct this again we cannot so dots deletes this. Okay. I'm going to create a
new one roughly around here, so just going to use
that kind of gets the lines you need for it,
so this should be fine. This work just fine for
what I need it for. So I'm just going to add a
new holy group across this. Okay. Let's see how it's supposed
to be because I'm not supposed to go
entirely around it. So we can do one more. One more around there as well. I think this should be fine.
Around there should be fine. Okay? Or should it be down? Should be down a
little bit more. Let's go out of solo mode,
let's see where that is. I think it should
be down some more. So we need to undo all of this. Should be down a
little bit more. So somewhere, let's get a good angle where
it needs to be. Okay. I think around there
should be fine. So I'm going to delete this. 01 somewhere around
here should be fine. Okay, we cancel this out now. Okay? All right. Something like so. How do. Let's get you such a
good camera angle. Okay. One more should be fine there. All right. Control shifts, click on Control shifts, click. Control Shift click. Invite selection, ControW,
bring everything back out. Alright, so I have a
butler belt strap. So I'm going to try
that belt strap. Let's see where we get.
So live under brushes. So belt, IMM, open
that up, open that up. Let's see which one we can use. Let's start with the default.
So I'm going to go over. I'm just trying to see
if this come out well. If not, we'll just use
something completely different. Okay. But to make it
work, we also need to Let's just try to first. Let's see. It's gonna lose it up, it's
gonna work properly. Let's just try this one
without losing it up. So I'm going to go over to
co function, I believe. There's the poly group. The bro size is important now. Tap in there. Okay, I think this
will work just fine. So I'm going to undo
that. So we need to close up the O
completely. So be Z. Okay, I think I need to
remove ten stroke function. We have close this up. It again. Let's go
to the MM brush. Let's go over to stroke, remesh. All right, so something
pretty much like so, but I'm going to increase the bra size
a little a bit more. This is a bigger browse size. Hip let's see what we get. Okay. Let's bring
everything back out. Let's see. Here, I think
this size is actually fine. So I'm going to let's see we have something smooth enough to work
with. That's fine. So I'm going to
go over to Shrok. I got this mesh from Bd kings, so it's actually free IMM mesh. Plead this. Let's do
split on marks points. Split points. Okay. This is the
bid piece we need. So only let's see where we
actually need this to be. So we need one of these.
This is the one we need. So I'm going to duplicate this, the duplicates, solo this
F. Let's grab the portions. Let's exclude the
portions we don't need. So I'm going to do delete ding. Modified topology, geometry, modified topology, delete ding. All right. But now
we need to make some modifications and
adjustment to this. I'm going to isolate this
first to begin with. Okay, or we can just do grow
Binomals and then Cris Pig. So grow by normal. Then let's do CPG geometry. Chris. Cris PG. Before we do Chris PG, let's like to make this quite thicker
than it is right now. Now, let's do auto group first. I'm trying to see which
one I need to do first because depending on the
one I do first, it meant, actually break or grin what
we already have in here. So you need to be quite careful. Now, if I inflate this, we're going to lose this
sharp edge we having here. So I guess we don't have
to do Cris Pig first. Let's do group norms
and Chris PG first. Mat Chris PG Okay. Let's see. Let me increase this
with a bit more PG. Okay? I think that's
roughly fine where it is. If we should subdivide this, I can see how we
absorb the shape a lot more precisely
what we want, but now we need to kind of
add some thickness to this. I'm going to do to group. That's the auto
group. I'll go over to fully Group Auto Group. Control Shift click on this. This is the only
piece I need to kind of Let's mark the mark. I need to kind of grit
make it a bit bit thicker. It seems quite flat in
there. And zoom out. We don't need this anymore. So we need to hide the darts. Let's go back in here. Okay. See likes push this
down, but that's fine. So let's inflate. Deformation inflates.
Yeah it's perfect. So it's working just
fine. So inflate is working just
fine. Clear the max. Okay, let's go over
to subdivision level. Divi subdivide this again. We're getting some sim
or less like this, but we need to make some
corrections in here. So let's max this out again. I'll just use the move brush
and move this in here. Take down the brush size. Let's make the hole quite wider than it is right now. All right. Okay. This should
work just fine. All right, so the little need
to do nice to shrink it in. So I'm going to don't do that. Maybe we should also use
the mauve brush instead. Polishing this in first like so. Don't do that. I needed to
move the maxing in there. Okay, a little so
it should be fine. Let's go to lower
subdivision level. With a more brush
now, ton of dynamic. Okay, we need to mirror this
so let's delete higher. Let's do mirror weld. Okay, before we do miror weld, let's move this in place first. Let's move this in place. Okay. Pay this in some more Okay. I'm getting something nice. Okay. This portion,
we need to get out. Let's find a good angle for it. Okay. Move this up. So more. All right. I think this seats well now. All right. I feel like I should make
it we expand this here, it's going to mess things up not too much. Tax
so should be fine. Move this back in place. Alright. So one thing
I'd like to do be two this part is always wide, so I would like to push
it down some more. Okay, so I'm going
to slow this out. I'm going to go through shifts. I'm going to let me use
the Max Lasso instead. Max lasso. I max this region. Load the max, invert the max. Then I'm just going to
bend this over this way. So more. Okay. Maybe
that's way too much. Load this some more. Guess
get ages more in place. Like so. Around there
should be fine. Okay. Let's bring
everything back out. So we just need to
select this now. Let me select the opposite
max out, invert the max. Okay, parry this in again. This way, perfect
work just fine. Okay. Rotate it this way. Extend it out some more. Not so more should be fine. At the mark, bring this
down and some more. Okay. Also, I think this
will work just fine. Yeah, it's perfect. So now we can mirror this to the
opposite side now. Let's miror this to
the opposite side. So I'll go over to
Modified topology. Mirror weld. Okay, symmetry is
turned off. Perfect. That's what we want. So now we need to make some
adjustments in here. Okay. So move this closer. Move this up. Move
this up as well. Oops more hops to more. Okay. Yeah, I think this
should be fine. Okay, in here. Bring the
close out the surface. Okay. All right. So what I want
to be quite tight in there. Perfect. This will
work just fine. So I've finalized on
that, which is cool. Thinking there should be fine. All right. Yeah, this
will work just fine. Okay, so next we need to
do be the shoulder guard. Let's create the
shoulder guard next. I'll do that in the next
lesson. Bye for now.
41. 40 Shoulder Guard In Zbrush: Hey, welcome back, guys.
So in the previous lesson, we kind of created
this birthpiece. So in this lesson,
I would like to create the shoulder guard, so I'm going to put it this way. So there are a few
ways to do this. I can start with I'm kind
of feel like starting with starting with a spare and then block out the ship from this fare and
then cut out this sphere. So let's do that instead. So I'm going too. We're still on the
belt, so that's fine. There's no subvition
level in there, so I'm going to go
over on the edge like so let's use the IMM. Use the police fare instead. So I'm going to drag out something around
there, like so, okay? That's fine. I'm going to
do split on marks points. Let's go over to split
on marks points. Okay. Move brush. I like this. So we need to kind of remove some portions that we
don't necessarily need. Okay? Like, for example, I'm going to I
think I'm going to grab more or less like let's
say around here, Control W. Okay. I don't need that this, so I'm going to make
it duplicates like we always do Control
Ships click. Then we can do
delete ding in here, geometry delete ding. All right. Center this, scale
it out some more. So going to ski it out to roughly around the size we need. Move this this way,
rotate this way. Then most likely to
squash it down some more. Okay. So with this now you can actually kind of
block out the shape quite easily and
way faster, too. Okay. I'm going to
move this down here. Okay. Move this up some more, squash it down some
more. All right. I think our team of delete
this edge also, too. We definitely need
to delete that edge. So now we can
actually just block out the shade
directly with this, and then we should be good. So I'm going to make a
duplicate of this again. Let's duplicate, hide this. Slow this out. Okay. But before I delete, let's see, so I'm going
to just do busy MZ. I'll do an inset roughly, let's see, roughly around here. Then I'm going to and then just create this
head go around this. Okay. Because we won't
need this anymore. So Control Ships click. Let's do delete ding. Delete ding, delete
ding, all right. So now let's kind
of get the ship. Let me just move this this
way. Okay, straight on. Then let's kind of get the
shaping we need for it. I want to use the move brush
ton of dynamic. All right. So you can see how this part is quite elevated up
a little bit more. So let's elevate this
up some more Sway. This side is kind
of flattened out. So I'm going to move this down, move this down as well. Alright. More or less like this. Okay. I'm going to extend this out some more out some more. I'm going to try and be as accurate as I possibly can with this flats in this portion. Let's get something
flat in here as well. Okay. So I'm trying to
get the shaping in there. I'll pull this down some more. So more push this in. Get something flat
in here, as well. But not completely flat though. I think somewhere around
there should be fine. Alright. Move this up some more. I think the shaping for
this should be just fine. You should be able to
use this shaping Okay. Yeah, this should
be fine. This work just fine for what
you need it for. So we're going to do less
ar thickness for it first. Make another duplicate for
it, like we always do. Then go over to geometry
dynamic subdiv. Dynamic subdivt on less
increase thickness for it. So more thickness
that's way too much. Let's say how much techs
we have around this. I think this should be fine.
In what inner thickness should be just fine. Then I'll do segments three. I think this segment should
hold up quite nicely. Okay, then another
thing we need to do let's apply this
and then we're going to I'll need two Okay, so I need to add M. We
need to extrude this edge. So let's go over
to pm polygroup. Okay. That's gets B sickness first. I think I'll need
a little bit more. I think more or less
so should be fine. Okay. Let's bring everything
back out. Shift F. All right. Yes, I think this is
getting the shape we need, but just a few
modifications also to it. Let's C. Shift F. Poly loop poly group again. Let's do no get close. That's a bit weird. Putting
some weirdness in there. Let's just do poly loop. Let's see what it gets. Putting some awfully weird shaping in there
that I don't need. Can I just solo this? No, it's not giving it's not
give me the shaping I need. I need to do some extra
workings in there. But maybe not. Can
always fix this. So let me do an inset here. Let's do inset here first. Let's try this again. It's working better now
with the inset in there. Let's do roughly
under inserting year. Let's see where we get. Let's see if this will
work or not, do that. On do that again. Let me add my insets roughly
around there, let's do this. I'm not trying to
create a little bit more interest to it. Okay. So I'm going to
ship click on this. Or let's let's do poly
group group by nomuse. Okay? Control Shift
click on this. Control Shift click. Max bring everything back out, invert the max Ar. I'll pull this out some more. I'll rotate this down. Let's get the rotation this way. Hop some more, get some
more rotation this way. Maybe that might
be way too much. Might be way too
much. Okay, let's try something unless you use Chris PG unless you
actually get out of this. If this would work or not.
So I'm going over to rispGo. Let's do CrispG let's subdivide. Let's
see what we get. Let's see if this would actually work if we
have this in there. I think this might just work. I might just work. I need to make a bit more
modification to it. For the most part, I think
this will work just fine. I can also make it a little
bit more interesting by doing something in there.
Let's do one more. We can extrude this in. But before we do,
let's do bevel. I'm going to bevel
this undo that. Okay. Then I'm going
to extrude this in extrude this in some more. Okay. You create some more
interest to it. Undo that. Let's do a bit more. All right. Then I can add some
bev linear now. So let's undo that. Undo that. Let's be edge. Come
on, undo that. Let me reduce my
brows size some more. Okay. Come on. Solo this out. Get in get close in there. Okay. Command that's way too much. Get in this angle, do that. Undo that. Here, like so. This gen bit problematic
gonna fix. But that's fine. Let's do an inset. We'll do an insert. I insert rather keep using the wrong word. Let's do insert. Yeah, just to hold
up that edge it lot more. Do one in the middle. Okay. I think we need going to
delete a few of these though. So do delete, delete. Okay? Add one in the middle. Add one around here as well. All right. Add one here, add one in the
middle, middle also too. Let's get something
good going on in there. All right, that should
be fine. Let's go out of solo mode. Then just a matter of
scaling, you know, I think the scale
circular scale scale this down a little bit more. Put it where it
should be. I'm going to extend this out this way. Okay? And it seems kind of make
some modifications to it. Kind of wrap this
around it a bit more. Let's just get the angle for it. Let's do Okay, I think we
need to subdivide some more. Let's subdiv Let
me duplicate this and subdivide
duplicate, subdivide. Okay. Yeah, that should be fine. All right, so I'm
going to delete lower. Let's do bend curve. Let's do three. Move this up this
way. Get a curve. All right. Front seem pretty much like so. I'll change the Come on. Let's accept this past, accept, go back
in the pin curve. Then we'll do let's
change the angle for it. I think this angle,
not this angle. Let's here this angle,
so should be fine. I'm going to select this bend this in some more bend
this in here too. There's phase to extreme,
but that's fine. Come on. Let's accept
this also too. Go back in there. Se read
bend this in some more. Select bend this in some more. Let's do accept, and
I'll pull it out. Okay. T at this stage, extend it out to more. So just a matter of
kind of pushing, pulling, and then adjusting
it once it looks good. Okay. I think let's use
the move brush. Now anything you want
to do now, you can use the move brush to
actually do that. Okay, with a move brush. Move this in some more. Okay. More like so. All right, so I'm going to mirror this to the
opposite side. The tonal symmetry,
mirror weld. All right. So now we can move
this even more. That looks a bit weird.
Mirror weld again. Going to do this with
good precision in there. Okay. Like, so right loser. More or less like
touching this chain meal. Okay? Compensate for it around here. I need to rotate rotate this way some
more, bring it forward. Okay. We had one issue. I didn't
miror it to the opposite side. So let's do something. Let's I wasn't
working with symmetry tundon so let's do mirror. Okay. Mirror and
then mirror weld. Perfect. The mootonal
symmetry now. Okay. Let's create some more or less sharp
angle around here, sharp angle around here. Sharp angle here, here, as well. Okay. I think it a little bit of an extension bring this closer. Okay. Se some modifications to
be done in here as well. Alright. Okay. Yeah, this is fine.
Should work just fine. Should work just fine. Sink a little push down here. Yeah, should be fine. Trying to close that
part up some more. Get closed. Okay. From up here, move this way. I think, as far as this
goes, it should be fine. Alright, so keep this. So I see you guys in next. Let's move on and create the next piece down
here. So bye for now.
42. 41 Top Hand Guard In Zbrush: Come back, guys. So in
the previous lesson, we kind of created
this shoulder guard, but I feel like I still need to make some
correations in there because parts go bulging
out way too much. So I feel I need to
shrink that some more. So I'm going to control shift, click on it via the max. Okay? I think we can do we
can do Polish by group. Let's see, hope it's
not ruining anything. I think it's running
something in there. So better still I'm
going to do I'm going to just squash it down. Okay. No squashing down because it has an inward thickness for it. How do we go about fixing this? Let me clear the marks. I think I'm going to
manually just push push. I'm kind of smoothing it down. Let's do push instead. I think gradual push
would make better sense. Okay, the bro size. All right. Let's look the overall
form for it now. I think it fez a
whole lot condo that, fez a whole lot better now. So yeah, yeah, it
should be fine. So now, this lesson
is supposed to be about condo that got a little
bit of weirdness in here. I need to push this down
looking a bit weird. Okay. With a more brush, move
this up a bit more. All right. Okay. Go marks this region, invite the mark
blows out some more. Okay. All right. This closer. Yeah, I think that
should be fine. So now let's move on to creating the metal parts for the
lower part of the arm. Yeah. So let's go over. We can still use Is it
this? That's not the one. Yeah, this one, I'm
going to duplicate this. I'll shoot this down. Okay. Yeah, this should be fine. Let's solo this out. P F. So I want to do it on this
opposite side instead. Do it and then we camera
it to the other side. So let's see how far out
this is supposed to go. Okay, I think we need here
roughly where it is right now. Alright. Let's see where else
we need to move this up. Let's see. I think
as far as somewhere around the nature of around
this portion should be fine. Okay? I know where it is now, so I'm going to clear
this, do this again. All right. Con through W's completely in its indi though, make it work. So Control Shift click on that. Okay, I'm going to I'm
going to max this region, ControlW, bring
everything back out, Control Shift, click on this. Yeah, I think, as far as this
goes, this is what we need. Okay? Yes, it's perfect
perfect where it is. The one we need to do be to do deleted Let me
duplicate this first. Hide. Let's do delete ding,
geometry, delete ding. Then I'm going to
shrink this down. I'll shrink this
down. So go over. Let's go over. Let's
do polish by group. We just get something
tighter in there, more or less like so it
should be fine. Okay. I'm going to isolate it. I'm going to max this region
like so. Invert the max. I'm going to inflate some more. No, no, undo that. Invert this. Let's give it a Let's
use move brush instead. So our move Griz more instead. Okay. Undo that. Play the marks. Let's just do something like so. Yes, this is what we need. I
think if I inflate this now, yes, perfect is what I needed. Let's get this slightly
inflated this way. Alright, something
like so should fine. I'm going to Okay. Invert the max, polish again
some more. Let this out. Can just push this down a little a little a
little like so. All right, F. So we need to hold this edge.
I need to hold this edge. So I'm going to do B D M. I would like to's
subdivision level, you need to do delete ding. Dimetr delete ding, delete Pevlo should be fine. Something should that
should be fine. All right. So now the next introduce to arctic ness to Control W. Now, less arctic ness to this. So I'll go over a
let's do dynamic div. Okay? I think we should I feel like I pulled this down some more. Okay, so let's use
the move brush. Let's turn this off for
now the move brush. Okay. I pull this down. I pull
this down also around here. I'll pull this in. Okay? Down some more down some more. Okay, I think that
should be fine. Slow this out, dynamic,
increase the thickness. This might be way too thick. This might just be there.
This is the right amount. Maybe a little bit of
thickness should help. I should work just fine. Then we add one segment in between. Let's just do one. Okay. Here's something like so. We move Rush, I'll move
this not closer though, extend it out because something is supposed to be
buried in there. Going to bury under
meshing let's extend, get some space in there. Okay. Yeah, it should be fine. Apply this on. We
can move this up, move this out, making minor
corrections here and there. Okay. Then I islect this P Z M. I'll bevo this out some more because I want
to extrude them inward, Extrude them inward, some more. Okay? I think we can
do Chris PG now. So let's go over increase
the bevo width. Chris Pig. All right. I think let's let me
undo this crisp first. Come on, undo that. Let
me bevo this as well. Extrude inward two. Okay, Cre pg. Now if you should
subdivide this, you should hold up the
shape a little bit more. Okay. So it's holding up
the ship a bit more, which is coop precisely
what we want. Alright. Fantastic. So next
thing you need to do no. I think I need to
move this out some more use the brows size. Okay. Move this out. Move this out as well. Move this out here out
here as well. Okay? Select this, move this out. Okay. Fantastic. So this
will work just fine. So we still have some shape
into doing here also, too. So do that next. Okay. Let's create this shape
that's supposed to be in here. So I'll go over. I'll do Let's do Okay. Let's come back in here
bring everything back out. I don't sold. Let's do Shift F. Okay, I think we can solo this
now know where it is. This where the edge stops we
need Let's do one more edge. We grab one more edge. Basically just four
edges should be fine. So I'm just going to do
something like sew Okay. Control W. Yeah, this is
precisely what we need. I'm going to delete
some regions now, so Control Shift click. I'm going to select all
of this around here. Control W as well. Hi darts. This is pretty much all we need. So I'm going to duplicate
the mesh again. Okay? And I'm going to do delete ding, delete ding, Modified
topology, delete ding. This way a bit kind of
gets something quite low. So this kind of crashed. So good thing we
kind of created or saved out a backup for
us, so that's fine. So before I delete it in, I'm supposed to do
delete higher first. So that's where the
issue came from. Okay, if I go out of isolates, let me also save
this file again and replace it with the main file and also kind of create copies. Once you make good progress, great copies for
it's very important. Let me get this shape
out that I need. Okay, I think I might need to delete extra from
this also, too. I need to delete extra, so I'm going to grab
input this here. Let's do marka Okay. I think I'm going
to grab this as well through Control
Control Shift click. Let's do that Delete
Eden again, delete Eden. Okay, I think somewhere
around there should be fine. Somewhere around
there should be fine. Don't need to go to extreme. All right. So I'm going to max these parts. Okay, let's go to our gizmo. Roughly center
squash in this way. Okay. Play the max. Here this should be fine. Need to make some
modifications to it as well, so I'll go over to the move
brush. Ton of dynamic. Move this up. Move the stop, go to
the opposite side, move the top as well. Okay. Something pretty mode,
like so should be fine. Here also too as
well, move this down. Okay. Yeah, like so should be
fine. I mean, why not? Then let's add some
thickness to it. So let's go over to
Let's subdivide. Shrinking the mesh. I don't want to kind
of shrink the mesh, so we need to add some
more polycn to it. So B Z, I'll do insert here, one year as well,
one year as well. Then we subdivide this nice hold up the shape, delete lower. Okay. So now let's add
some thickness for this. Dynamic has some
thickness to it. I think damage might be
way too thick. Okay. I think this should be
fine. Let's do one segment. The one should be fine. Apply this one. Let's do Bvul. Okay. That should be fine. So don't do that. So with
Q I shall go in Q pullou. Come on. Let's find a
good angle for this. Push this down.
Alright, so do polish by crit edge rather, Bing
everything back out. Okay. Oh, no, no, no, add the wrong
idea, wrong idea. I forgot to kind of look at
what we have already in here. No, we don't need Okay. Apply this again. The shaping is actually
quite different. So I'm supposed to
just extrude, no. Let's dose this edge. Now let's strude this out. So this is going to
be the first first thickness on the edge, no. First thickness on the edge, first edge thickness,
then we don't order one for the second edge thickness. Okay. So it should
be fine. Okay. Maybe that's way too much. Let's do. Let's do it again. I need a bit more. All
right. This is fine. Let's do another one.
Okay, it should be fine. So then we need to do this edge. Something more or less like so. **** F. Yes, it is
precisely what we want. Maybe just for the sake of
adding another one in there, let's just do something
that don't do that. Come on. I don't
want to snapping. I don't want this
to snap. Let's see. Don't do that. Let's
do extrude instead. Polyloop. Let's go and fix this. Let's do geometry
group by nor mouse. Okay. I should be able to
extrude this poly loop now with E. Okay,
pretty much like so. Shift F. Okay. Do that. Let's see. There is a really major
difference in there. Let's go group PG. I haven't done that, so
let's go and do Chris PG. I say, I look like with
Chris PG turned on. Okay. Then if I should
subdivide this a bit more. Yeah, awesome to work just fine. Take down the subdivision level. Let's use the move brush and do some move directions in here. For one who moved this out, that's bit too much, out
slightly like so, she'd be fine. Out like so also, too. Okay. I think I made a mistake in kind of bid more than words.
Way too much actually. But that's fine. Make it work. We just need to extend
it out some more. Get some extensions in there. Put this out. Okay. Put this out on the lower side. Extend this out some
more and buy it closer. Getting close, prey
this in some more. Okay. Like so should
be fine. All right. We can also center
this rotates this way. If we need to, I
think we need to. Okay. Put this out in some more. Yeah, I think this will
just about to work. Fix this. All right. I think this should be fine. Put this out some more. Okay. Here now let's delete. I'm going to do mirror weld. So go over to
deformation mirror, tangiometry, topology,
mirror weld Okay. Measure symmetry is
turned off for this now. So we can move things individually properly
where they need to be. Break these down some more. Okay. Right. Come in here to the opposite side. Freeze the bro size,
move things closer. Okay. Move this out. Move this out. Rotate.
Move to the opposite side. Get closer, move
this down some more. Move this up. Barry this down. Barry this down.
Okay. Here, that should be fine. Okay. Move this up, in some more. I think we should be good
here that should be fine. Let's see. I think that
should be fine. Do that. I'm not supposed to
smooth that aggressively. Let's move brush instead. Okay. Awesome. So that's fine. So next lesson just move on and then continue on the
rest of the parts. So I'll see you guys in the
next lesson bye for now. Oh, I see I've not even mirrored this
to the opposite side. Select go down. Okay. Delete lower, delete higher. Let's go over deformation,
mirror mirror weld. Symmetry don't offer this
as well. That's fine. The opposite side, right
hand side is fine. So the left hand side might need to adjust a little bit more. Okay. I'll move this down
some more this way. Select, move this
up, up some more. Okay. Move this down. Okay. I move this in some more. Move this in some
more. All right. Down some more. Down some more, maybe not to more, select this. Move this up instead. Okay. All right. So just a matter of pushing pushing
things in as needed. And then you should
be good. Okay. Yeah, I think this should
sit quite well in now. Select this. Move
these up some more. Okay. Move this down. Move. Trying to make the necessary
adjustments in as needed. Okay, that should be fine. I'll see you guys in next
lesson, bye for now.
43. 42 Hand Cover Guard In Zbrush: Welcome back, guys. So
let's continue on on this. Quite a lot of correctations
to doing here, but good to make it work. So I would need to go
down to the next piece. At this point, I think the
next piece to create would be this larger piece. So let's get this
larger piece in. I think we can use. Let's use this again.
Duplicate of its. Okay. I ate. I think I need to use one of those dias, let's
use this instead. Personal as no,
that's not the one. That's not the one. I think
we should have one down here. I think you should have one. Here, this is the
one I needed to use, so I'm going to duplicate this. Okay? This one gives me a good idea where the shapes
are kind of residing, so I know which region
are supposed to put out. So let's get a good view on this to know where we
need to kind of extract. Okay, so we have this
ending starting from here, so need, like, let's say, two more, so one, two. So I'm going to grab all the way let me bring this up again. W max out these parts. Control W, it's grabbing
more than what we need. I need to do some do this first. Grabbing more than what
we need, we need to fix that. W again. I should isolate this Otis, we don't need all of
these around like W. Okay. Is going to be a bit multi
financial today with a Let's just do PZMa mark this region. Okay. This as well.
A should be fine. That should be fine.
And I'm going to do delete ding geometry
delete Eden. Order is fine. Helping everything back out. So we need to kind of remove regions where we
don't actually need. I need to do this
quite carefully. Okay. Let's see this
from this region. I will do Okay, I think I can do from here. That is trying to mark them out, making
those regions out. Let's do this as well. Let's sold this out. So I'm
going to go down all the way. Go down all the way
around here as well. Okay? So I'm going to make
it duplicate of this. Let's make it
duplicate. This backup to use control shift. Click on this. Let's
do Auto Group. Bring everything
back out. So this is pretty much all we need. There's even already having most of the sheep
partly it for it. I just need to make
some modifications and then kind of extrude out. So I'm going to do delete
Eden, delete Eden. Okay. Let's bring everything back out. Let's go to our Gizmo, center it around
where it needs to be. Then I need to pull it out. Okay, pulling out the wrong way. So let's find a good angle
for it, it this way. Space some more and
pull it out this way. Or maybe not. Let's get a
bit more currency to it. Let's just we still have something's divisible that we don't need. Turn this off. Okay? Since let's do
deformation inf I think you to just maintain the
original position but just make it stick
out a little bit more. Okay, so we can just use
this kind of bring this out where it needs to be. Let's see how much
of this we need. I think this is roughly
fine where it is. We just need to make a
few more adjustment to it now. Ton of dynamic. Pull this out. Okay. Put this out as well, a little. That should be fine. Let's
get the right shaping for it. Okay? So I'm going to
use the move brush. Move this outward. Okay. I think that should be
roughly fine where it is. Maybe I did too much back
in some more. Alright. We can see how this palon actually has kind of
rounded edge to it. Most especially on the top part. We would need to fix that. Let's let's push
this in some more. Okay. Push this in to get
that hove ship in. Okay. How do you see on the
opposite side as well? Okay. So more so this down. Get up close. Okay. So
now I'm going to mark so. Let's go to low mode. I'm going to mark
so the lower parts. Load the marks,
invert the marks, then let's do polish by group. That's going to round
up the top parts. Is precisely what we want. I also need to pull this up. Let's make sure we get this
as accurately as we can. Maintain the rounded
consistency around it. Okay, out of solo
mode. He that's fine. We're going to push
in that's fine. Play the max, inflate
this out some more. Okay, use the move brush. Pull this out. Okay, let's go in some more I think I need to fix
this a little bit more. I'm going to mark
this lower up pa down again, load the marks. I ton of group and I polish. Oh, that's a bit too aggressive. That's slightly way too
aggressive also, too. We're getting roughly
the shape we need now. Let's go out of solo mode. Up this out. Okay? Maybe not too much.
I still want to kind of get this buried
in a little smooth. Use the move brush,
move this out as well. I think that should be fine. Okay. We need to get
that cove back in. Let's get the cove back in. Right. Push this down some more. All right. Closer as well. I just need this to be as neat as I can
get it to be down. Down some more. All right. Move brush, put it down, gets up close, down. I think let's look at
it from a distance. I think for the most part, I think this should
be just right. Okay. At this point, just to
move this well you know, just to get the heaping
you need for it. Smooth this edge down
some more. Okay. I think at this point, we
can add sickness to it now. The only issue we might
have around this would be the edging around it, edging around it, which we
see need to kind of fix. But let's see if we can
fix that by doing some, I don't need to domgic again because really are good
topology around this. We just need to
kind of fix some of the edging around it, and
then it should be good. Okay, so let's carry on. I'm going to artiness to this. Let's do duplicate for it. Let's thickness so dynamic. Let's smooth this down
some more don't do that. Ascent doesn't feel right. Let me max out edges instead. Let's max edges. Okay. So this part I want
to kind of smooth out. Let's go back to deformation. Polish this some more
low polish this little. Just to get something
clean in the exo. Then let's add dynamic
sub day applies. Let's add thickness to it. Some more thickness
should be fine. A bit more. Let's see site. I'm not trying to get the feel of thickness in ebbs is fine, or maybe it's way too much. Feels slightly way too much. So let's get something more
or less like sushi fine. Okay. Then I'm going
to I don't want any. I don't think I need any
segments in there for now. So let's apply this on. So low this. Let's see
what we get. This is fine. So B Z M. I'm going to extrude the
edge, extrude poly loop. Okay, extend this out. How far out do you want this extended? That's
the big question. Let's do some more. Okay, I think this
should be fine, I guess. All right. And I'm
going to extrude this out out this way. So. So pretty much
pretty much like so. I go to bevel out the edge. Let me solo this
out. I'm going to do there's the autogroupGroup, by normals so the bevo selected, let's make sure bevul I'll
bevo this edge this way. Bev this edge this way as
well. Maybe you don't do that. Let's delete this
center in sets. Put all that. Put Bevo
now. Don't do that. Bevo this edge this way. Be this edge this way as well. Okay. And I'm going
to bevo this as well. Alright, let's go back in. This polo actually wraps
around it quite well. Fine maybe the height
for it is way too much. We have too much height for it. We can just we sing
this down instead. Okay. Yeah, I think we should be fine. So if we should subdivide this, we're getting something
more or less like, so we should work just
fine what you need it for. So you can still use the
move brush if you need to to pull and push in
some more as needed. For example, I'm going to
push this down some more. Now, the other thing to figure out is how high you want
this to be the top part, I think, not too high. Let's get this down some more. Okay. I'll go back and select this This I need to
push in some more. Okay. I'm gonna do that. Extend this out, right? As far as this goes, I think this should be just fine ways. I'm going to save this now. Okay. Then the next lesson, we can just move on and create
the next piece in front. Tread this piece
also you still have like one, two, three, four. At least one here, we don't need to do
just one and then we can also duplicate them forward, and then we should be good. So I'll see you guys in the
next lesson. Bye for now.
44. 43 Hand Egde Cover Guard In Zbrush: Right. Welcome back, guys on the previous lesson V kind
of finalized on this. Still working on this
Amor. All right. So I feel like there's
something I need to do also in the inks I can see anhtes information around
here and edging around here. Let's see if you can do that
C with the polygons in your, we cannot do this when we are
adding scopted details in. So I delete I'll
duplicate this, okay? Then let's isolate it. So basically, I'm
going to do busy. I'm going to do an inset.
Do an inset in here. So let's go inset. Let's do Holy group Poly
Group Island, I believe. Okay. Yeah, this will definitely work, but we're having
some weird issues. You can see this
pots in between. We don't want that,
so to remove that, all we need to do
is to go back in there and set it to standard. Once you do that, you should have this working correctly now. Let's get an edge
somewhere around there. Okay. So I'm going
to do Control shift. Click on this, select
it via the Max. All right. I'll pull
this up. Shift edge. Let's see. Sink now we get
some good edge in India now. But we need to hold
our edge properly now. So to do that, we need
to go over and then do Bev so Bvl let's bevel the edge. So let's beb with this edge. With something more or less
like so. So clear the mark. If we should subdivide this now, we should get kind of
good proper edging around it, which
is kind of fine. You can definitely use this. If you subdivide even more, the edge becomes even a
little bit more obvious. So that's fine. So do that go to the lower
subdivision level. Okay. Yeah, that should
be fine. So moving on so let's create
the next piece. The next piece is supposed to be Let's do this one inside. Let's go back here. Let's find
the mesh for it. Is this? No, no, that. Okay, this is the one I'm
going to duplicate. So this is give us a
clear idea where we're supposed to what we're
supposed to extract out. Let's bring everything back out. I we man duplicate for it. That's fine. But it's going to be buried downward
instead, roughly around here. So let's see what we can keep. I think I'm going to use
this invert the selection. Yeah, before we carry on, let me send this down
also too before carry on. I'll go back here. We need to mirror this to
the opposite side. So let's go over to
geometry, deformation. Let's do mirror modified
topology Mirror weld. Ar perfect. That
works just fine. All right, so moving
on. Go back down. Let's let this solo this out. So this is basically
what we need, but obviously need to make
some adjustments to it. For one, I need to delete I need to delete a few of these
around these parts. So I'm going to lay this out. Let's do Mx last. Does it from around
here instead. I'll grab these bits. Con trow, select darts. I'm going to do delete ding. Geometry modify
topology delete ding. Okay. Okay. So zebra kind of crashed because we had subdivision
levels in there. So let's delete. Let me start by going all
the way of first. Let's do Let me
select, this instead. Any sabibution level we have
in there, let's delete sets, so we don't have the same issue repeating
itself later on. Let's scroll down to the end, select this geometry,
delete higher. All right. S this
to Mark's last two. All right. We need to move
this where it needs to be now, so go out of isolates. I'll pull this down. Let's roughly get this
where it needs to be. So just a matter of
pulling and pushing and then arranging this
way we need to be. Put it this way down
some more around here. No. Rights. So I need to shrink this down to metre think this might take
a longer time to do, though. I think we should actually grab the piece from this,
make it a lot easier, but at the same time, since we already
have this it's fine, we can just carry on and
try and make it work. So I'm going to
shrink this down. Let's do polish. I still want to maintain
that sharp edge. Use this polish. Going to
shrink everything down. Way too much. Et's just do
manual scaling in here. Okay? I think at this point, I
think we can safely use the move brush and then move
this out the way we want. Maybe we can subdivide it also, too, so we are going to do that. Oh, I need to
delete ding for it. Modify topology,
delete ding, okay? Then subdivide. Let's get at least
good enough shipping in there as we can. Smooth this down.
Smooth this down. Okay. So just to do some
manual work in here, just to get it to sit right
where it needs to be. Okay, use the brush
size, this part up. Sin using the move brush. You don't need to do
need to kind of get this use the move brush and then push this in
as much as we need to. All right. I think we're getting something good enough now. Okay. I need to come in close. Here this at the better angle. Okay, move this down. This needs to be
buried in actually, move this up some more up
some more up some more. Okay? Elevate this up some more. All right. Here I will
definitely get in there, but we need to make some
adjustment also, too. Like pushing this portion down some more O B it's down. Going to pick some of the
issues might have in there. We just gets shipping in. Maybe we can have this
curve that seems nice. Do the same thing too
on the opposite side. Okay, not too much, though.
Around there should be fine. All right. Bring this down. Let's check the ship
we have in here. I think on this side, we need to pull this down some more. Okay. I think as far as this goes, this
should work just fine. Let's check it from
the side. Let's see. I think they should be
fine. Let's isolate it and compensate for the shaping where we need to
have them moved correctly. Okay. So I'm going to max these parts. Then I'm going to
blow just once. Then I'll go back
to deformation. Just trying to get
something cleaner in there. Okay? I still want to maintain the sharp
edge we have here, so I'm still going to
mark this part also, too. Okay. So it's kind of
taking up do that. It's taking up the let
me get the mark do that. Is of taking up the separations we having down the polygroups. Let's give you the
same clear the mass, give you the same polygroup. Mark this edge again. Okay? All right invert the mark, polish this some more. Let's get something
cleaner in there. Okay, invite the max, let's do something small
around there as well. That part is not neglected. Okay, go out of solo mode. Get in there with
the move brush, move this out a little. Here, I think that should
be fine with it is. That should be fine
with it is. Okay. Let's move this down some more. Because we're going to be
adding thickness in there. I would want the
thickness to kind of begin to interceept
in a weird way. That should be fine. All right. So now we can a
thickness to this let's slow this out, get up close. So dynamic sub div dynamic sub div Add thickness in there. Add some more thickness. Okay. I think a Bz, it should be fine. As Bz should work just fine. I'll push it down some
more down some more. Okay, like, so here,
that should be fine. We're still going to add
additional thickness in. Let me put this down here. Let's look at this
from a distance, Let's add a little
bit more thickness. Way too thick. I think somewhere around
there should be fine. Then I'm going to
apply this on Okay. Then I need to kind
of extrude the edge. So B Z L extrude the edge. So me poly loop. You can get this similar
edge also to around there. So let's extend this out. Think a little bit
more and do that. I think some around
there should be fine. Okay. Then I'm going to
extrude this also too. A little bit more like
so should be fine. Then let's do bevo. Let's sold this. Let's use the Bevo feature now. So bevo, BvulUd that. Okay, Bevo now. All right. I think I will need to
delete this edging. Insert delete that.
Go to the edge, select perfol Produce as well. Produce as well. At a little be in here. Come on. All right. Maybe a
little bit more. Like so should be fine. Okay. So if we should
subdivide this now, should get something
rounded this way. We should work just
fine. I'll do that. So let's add extra edging to it, so I'll do Control Shift click. Okay, that should be fine. Check in. So let's do Qsh Qmsh, let's do fly group island. Okay. Come on. Let's go out to folates. Let's make sure
we're on standard. No, no, I was in the wrong ten, so we're supposed
to be on insets, supposed to be on
insets standard, okay? I think it should work now.
So let's so this again. No. Let's do poly group island. All right. Control Shift. Click Max out and the max. Let's scale this out. Instead, let's use the move. Let's use the move
Gizmo instead. Let's use this instead. That's creating some
weirdness in there. Okay I'll square this down. I'll scale this out. It's not creating
the shaping we need. The shipping we need is
not completely there. Let's center this again, see if we can get this to work. Okay. Squared this down. All right. I think this
will work just fine now. This will work
just fine. We just needed an extra edging for it. Then let's bev with the edge. So go back to Let's
bevo this common. Doesn't want to bevel this
edge, this rounded edge. Okay, here's beveling now. So something like
so should be fine. Now, we should subdivide
this, subdivide this. You can see how we get good
edging also too in there, which is fine,
precisely what I want. Do the bevo do that.
So let's carry on. It's perfect. That
will work just fine. We can just push
this down so much. Let's go back to the move brush. Okay. Bring this
closer closer closer. Okay. That should be fine. So let's create the next piece. I think the next piece,
we can just quite easily extract it out of this. So I'm going to duplicate it. Let's duplicate. All right. Slow this out.
Ship F. All right.
45. 44 Back Hand Cover Guard In Zbrush: So we come back, guys. So carrying on from
where we left off, so I made duplicate of this, so I'm just going to
grab the parts we need, so I need just this. Let's see if we have any subdivision level
in there there's known. I'm going to do delete den I'm
going to reconstruct this, get something lower to work
with. Let's go back in here. I'm going to do inflate inflate Okay, so Zbrush kind of crashed again while I tried
to inflate this. So I'm going to go back
to we reconstructed this. I'll go back to the higher
version, delete lower. Okay. Then I'm going to inflate
from here instead first. So let's do inflate.
Inflate some more. I keep inflating
the sons gums out. So, you know, it comes
out and then it's kind of buried in between here. So that's like general
idea for this. Let's keep inflating. I think there should
be fine because as it going to hear sickness,
around there should be fine. I think now I can safely guess I should be able
to safely do that. Maybe we should
leave it like so. We're just going to cut
out the portions we need. I see reconstruct this. Let's reconstruct this
can work a bit faster. Okay, so we remove brush.
Select the move brush. This will need to kind of
get what we need first. I think we don't need
this from this region. So be ZM, mas selected. Okay. I think around there. Okay, on this part two, let's see how far we
need to have this. Okay. So I think around there. All right. So let's delete
higher Control Shep click. That's the autorouphto group. Let's make a duplicate of this. Bring everything back
out, select this. Let's see if the shape is there. I think the shape
is roughly there. Let's go to geometry,
delete Eden. So now we can use the move
brush now to actually move the piece in place
a little bit more. So we can just do some
movements in there some more. Okay. Think around
there should be fine. Use the bros size, extend
this out some more, compensate for it
around here as well, compensate for it around here. If we want to compensate for it, so we have good edge
flow around it. Okay. Check this on the
side. Let's see. Okay, I think this
should be fine. So let's subdivide
the lit lower. Alright. Oh, do that. Do that. We need
to pull it down. This we need to get down some more needs to
be down some more. All right. I think
around should be fine. Okay. Around J also too
should be just fine. So I'm going to subdivide now, delete lower, and let's
do some polish for it. So let's go to deformation. Polish by a group, polish
some more, polish again. Put this back up. Okay, polish a little r. Put this up, up some more. Okay. This one is kind of spread out. Okay. Polish a little. All right. That's fine. Okay. Just making some minor adjustment and
corrections in there. Let's solo this out now. Compensate for it around here. Okay. Go out of solo mode,
let's see this again. I think at this point now we can add the thickness we need. Let's add the thickness. Let me just check this again
once more to be sure. Okay. Polish. All
right. That's fine. So low this let's
add thickness in. I think I'll need
to move this point up out some more out
some a little bit more. A the Okay. That's fine. So dynamic. Dynamics of the dynamic. Taking up some good thickness also to in there which is fine. Yeah, I think, this will.
This will work just fine. If, let's see. All right. I'll use
the move brush again. I'll move this in in
some more then out. In some more outlet that's fine. I need to be as accurate
as I needed to be. So apply this on. So B. So I just need to extrude
the edge, solo this out. Hm, poly loop. I get this out. Here that should be fine.
Undo that. Get this out. Here, I think this
should be fine. C do that, maybe a
little bit more. A little more, should
be fine. All right. Then we'll do inserts or
rather insert or delete this. Then let's bev with the edge. Basically, we're
putting the same process we did for the others. Pay edge this way,
this way as well. Here also too as well. Okay, then we do
the inward parts. That's way too much. Okay,
that should be fine. Then let's do inset now. So inset standard no,
Holy Group Island. I think somewhere around
there should be fine. Go to the Gizmo center this. Okay. Yes, I'm supposed
to isolate, Max, invite the mass, go back
to Gizmo, pull this out. I F, let's see. I think somewhere around
there should be fine. Maybe out a little bit more. Lady Maxine. Let's
go on a Bvl around. No. Come on. Why can't we have Bevel
around this edge? Come on. It's not line, this is the angle we
needed to add the bev in. I think that should be fine. We just subdivide this should hold up the edge a
little bit more. Okay, do the subdivision
level with a move brush, let's move some things back in. Get this burried down. Get this buried down as well. Select, put this down. Okay, awesome, that
should be fine. So now we just need to kind of duplicate this a few more times. So I'll go over to control, hold down Control,
pull this down. I will shrink it down
a little bit more. By it in here. Okay. Helps me to make some corrections
in here, no doubt. Let's use the more brush, move this down some more. Okay? That's bit too much. I'll invert the max, actually pull this
up a little bit higher to compensate for the others that
will be under it. Up some more up some more. Up some more so invert the
max and let's get this up. Yes, perfect. Perfect there. Then we just need
to move this down. Move this down. Okay? As need to kind of shrink it this way. Move this up. Okay. You can pull it in some
more down control, get round duplicates,
Shing this down. Get this in, get close. Orient this, squash
this down some more. Okay. Hing this size down. Move this in. All right, I think scale
this down a little bit. Cutting weight the size is fine. We just need to
rotate it this way. Let's check what we have. I'll use the move brush, breath this in some more. Let's see what we have here
that is fine, clear max. Okay? So we need to mirror
this to the opposite side. So let's go over to
deformation Mirror geometry, modify topology, Mirror weld. W do that, let's select this
do the same thing also too. So deformation mirror Okay. Can do that. Let me make sure I'm doing
this correctly, though. The any subltion level
in there that is known. Clear any maxing
we have in there. Mirror, all right,
geometry mirror weld. Okay, perfect. Awesome. So this
will work just fine. We have this properly positioned position
where it needs to be. I will select this. I need to pull this up some more up some more
out a bit more. All right. Perfect. So we should go in now
and then subdivide, if we select this, let's just do some quick render. Let's see. We do some quick
render at an angle like so. Okay. Sit. I do a quick render, let's see. Okay? I think this is fine. To work just fine for
what we need it for. I think this butler piece, I will need to I think I will need to just
rotate this slightly. Need to rotate this
slightly, like so. Yeah, that's fine. Let's
do undo Mirror now. I need to delete what is
on the opposite side. Trow, delete Eden. Let's go back deformation, mirror geometry, mirror weld. Perfect. All right. Yeah, I think we're
getting something cool, which we can definitely keep. I think symmetry is done on
for this, I believe, yes. Extend this extend this. All right. Fantastic. So I think on the S are
definitely on the right track. Then before we start creating these accessories, this scepter. And then what about this call it human shield from
Suma metal shield. We need to start adding up
all these boots in there. So we need to get some boats in. It's important we have
those boats in all of these boats in here as well. That'll make better sense to
have some boats in there. So as far as this
goes, I think we're getting something quite good. Yes, at least for the
proportions for the proportions, most of the proportions
are actually in place. So just something to
kind of keep in mind, making sure all the proportions
are accurately in place. I feel like I need to make
some adjustments here too. Okay. Let me slow this out. I feel like I should make
some indentations in here. Okay. So I'm going to
separate them out. Let's make a duplicate
of this first. Let's get a duplicate of it. So send it down. Make it duplicate,
the duplicates. All right. I need to make an
inset in the middle. We have quite a number of polygons in here in
and around this, so that we need to fix. Let me let's use the
rectangular las too. So this part but we need
to be quite careful. Okay, Control W. I think we
got it absolutely perfectly. Yes. Yes, that's fine. Precisely what I want. So what I need to do now to go to BZ. Then I'm going to first delete the subdivision level,
so delete higher. All right, so I need to
push this in so I'll do Let's do little inset first. Let's do a little
inset first. Like so. Then we can use the QmshPlyop now poly loop poly
group instead. PlyoopPoly group. Come on. Okay, I need to delete
what's in the middle. So let's go to insert. Let's deleted or
delete this edge. Yeah, I should be
able to do this now. Okay. Just to add a bitt
bit of interest to it to create some more
interest to the shape. All right. I think I'm going to come on. It's not going to
work because we need an extra edge in there. You need extra
edge to hold this. So let's do insets. Add one. No, better still, let's do bevo instead,
let's do bevl. Okay. Bv as well. Alright. Still not perfectly
extruding its. No, it's not perfectly
extruding it, but that's fine. Let's just bevo this edge. By this edge as well. Bev this edge. By
with this edge. Okay, so if we should
subdivide this now, we're going something like this, but it's not looking
that good yet, cause I want something
quite quite sharp edge. So to the bevel, let's
do two rows instead. So on that extra edge, you actually hold it quite well. Okay? All right. So if you subdivide this now, it's holding up the edge quite tightly now, which
is what I want. But I will add some a
little bit more interest to it, so that's fine. Okay? That should be fine. Okay, that should
work just fine, just to give it a little
bit more interest to it. Okay? Subdivide some more Alright I think the only
thing we need to do in here will be to move these portions out
a little bit more, make them quite
thicker in shape. Just extend them out some more. Okay. Here's two. Two different parts. All right. So if we should subdivide
this quite nicely now. I'll see you guys in
next lesson bye for now.
46. 45 Bolts Guard In Zbrush: Okay, come but guys. So
in the previous lesson, we kind of finalized on
the lower hand hammer. All of this down here,
so finalized on that. In this next thing, we need to, we definitely need to do
some more work in here. Oh, I think I need to do some
more work on this actually. So the bonds we have
this bond in there. I need to get that elevated
a little bit more just to create some
compression in there. So I'll use the standard brush. I'm just going to create some elevations in there.
Use the brush size. All right. Let make
sure symmetry is turned off for this symmetry
is turned off. So just going to create some
tight compressions in there. Let me use this dam
standard brush instead. Okay. That's a bit too
aggressive smooth it down. Okay. So that should create some measure
of depth in there. All right. So that should give us a
more believable result. Okay. That's a bit too weird. Physically trying to create some more depth
around that region. Okay? So that part feels a bit more tighter
sort of All right, use the bro side some more. Move to the back side. Tha that compression
piece in there as well. All right, get that white shape. Okay. That should be fine. Put to the back also to do
the same thing in here. Needs to feel like some
measure of tension in there. All right. Tight in this in. Also kind
of creating some kind of Y shape food compressions
in there as well. Yeah, something pretty mot
less so should be fine. That should work. Okay? All right, awesome. That
should do. Let's see. Okay. This is them standard brush. All right. Yeah, that should be fine.
Okay, so at this point, the next thing you
need to do is to create next thing to do is to create boats
in between them. So I know the kind of boats
we need to create in. So I'm going to select this news because there's no
subivison level in there. I'll go over to Is on that draws on that draw
where we see embed. I think it should
be under brushes. Let's find depth. So I'll push this
down some more. But before I do
that, let me first select the pro set I need to use B I want to use
the IMM model kits. So I want to use one
of these flat as in, so I'm going to use
some flat as in. Let's use this. I'll turn on symmetry. Let's create what
we have in here. Let me start from around here. So I need to also
do embed also, too. So let's go over to embed. Brush, embed, push
this down a little. Then I'll create something
like so in there. Yeah, something pretty much
like so should be fine. I'll go up here also too and
do the same and do that. No. Do that feel right. Okay. Maybe not. Let's do
it here instead. Con do that come
down here some more. Okay. Let's do don't do that. I think these two
should be fine here. I think I should put
this closer around here. Is slightly bigger. All right. Yeah, I think there
should be fine. Icy the max. Isolate this. I just need to mix this both Control W same poly
gal control shift click. Then eso splits dingplt split, split split ding, all right. Yeah, that should
be fine. So now this not selected now
we need to move up. You need to create some
piece around here. Symmetry turned on. Symmetry turned on, that's fine. Do that. Going to
create this for the metal hoodie. So let's go. Alright. There should be a way to kind of get this to be the same size. We're not getting the same
size for some reason. Maybe because symmetry is too. But that's fine. We're going to use our eyes kind of gets roughly the same size
and across this. Don't do that. Let's see. The next one
should be around here. Let's make it slightly
bigger than it was. Okay. All right. The next one should
be around these bits. On do that, let's get
this out some more. All right, that should be fine roughly around the
same size and for it. So moving on. I think it needs to also go
across this way. Okay. I think that's way too close. Let's go around here. All right. Here, as well. I think we need a little
bit more spacing. Okay? Alright, do one
more around here. That's way too close, actually. I think there should be fine. Okay. Where else do you need the same sizing of
boots in there. For this one, I'm going to use something a bit more
rounded instead. So let's move to
something rounded. Let's use this instead. I'll do it in here. All right. So that should be embedded in. That is fine. Moving on. Let's see where else
you need to have this embed going to
do for the shoulders. Let's just do for the shoulders
now. I mean, why not? This one is supposed
to be a bit bulgy, but let's see if we can
actually use this instead. I think we can actually
use because there's a nice edge rim around it
that will make better sense. Except I need to make it a little bit bigger
than it is right now. Okay? Let's get in there. Or I think I need to make this
embedded in some more. I need to get this
embedded in some more. Okay? Let's see the other ones we have this one. I
think this is floating. So we need to undo
that and draw it again because the other
one we did before was kind of kind of floating
on the surface. I don't want that it does
embedded way too much. She does sits on the surface. S embedded way too much. Up some more. Okay. Let's get enclosed. I think I need to
push it up some more, a little bit more. Okay. Yes, since fine above, we just go to move
this up some more, that should be fine, I
guess. Let's come in here. You need to si subdivide
this subdivide one more. It's't work because there are subdivision levels in there. Let's undo that. Oh, no, you're supposed to have that you're supposed
to have that. So let's subdivide
this actually. Then go back and select Come on. Go to the move, select this. I'd be again, let's select this. Let be on the same branch that's find precisely
what we want. Checking this now see if
maybe this would work or if we eat to our
gizmo either W E or R. We can instantly
change to this yeah, I think this would be
the one we need to use. This should be the
one we need to use. So I'm just going
to undo that again. Let's use this instead. Or do we have
something a bit more interesting that we can use? We have this also,
we have the two. Okay? So let's go back to the brush and bed,
we get down a lit. Let's try this Let's
try this on first. Oh, come on, come on, come on. Go out of Gizmo. Go out of Gizmo.
Let's get that back. Let's go back in the Is
not set, set this again. All right. Now, let's draw this in here. Yeah, I think this
makes better sense. Okay. Let's switch it
up. Let's use this. Trying to see if
this would work just fine or I need to make
adjustment to it. Okay, I think that
should be just fine. That should be just
fine where it is. Let's draw it out again. Missing the wrong
one, I think so. Alright, I think that
sizing should be fine. Trying to figure out whether
I need to make this bulge out a little bit more.
It's fine where it is. So let's go back to the brush. Move this up a little. Let's get in there, let's see. Let's do transparency. Okay? Now we can get
a good sense now for how much we need to
have this embedded. Let's leave this up
a little bit more. Go out of transparency, draw this out.
Transparency, get close. I think this is this should
be just fine with it is. I should be fine with it. So we have the right amount of
embed in here that we need. So I just need to draw
something bigger. Okay, D one year as well. Okay. Do one year undo this. Let's get this
close to the edge. Okay. All right. I'll do one. Don't do that. Let's do
something close down here. Then swell. Okay. I'll do that. I'll do one. He swell. Okay, then we'll do one
year. I mean, why not? Let's do one around here. Okay, I think, as far as
this goes, that should work. Yes, I think we can
work with this. Can definitely work with this. But kind of give
maybe I should put one more year for six of
having something in there. No, that is a bit off. That is slightly off. Yeah, I think that
should be fine. That should work just fine. Moving on. Yeah, we can also repeat the
same thing around here. So since we're still
on the same brooch, we can't just repeat the
same thing down here. So let's do one around
here around here. Okay, one year well. Okay. Do one in the
center. One year swell. Okay, I'll do a smaller
one here, here also. Let's get one up here
around there as well. Here, that should be fine. We can definitely
live with this. So the same thing
also, so you need to kind of do around here. So what needs is
symmetric ton on, which is fine, precisely
what we need to do. All right. I think this one we need to embed this down
a little bit more. Let's get this embedded down
a bit more around here. So we have one,
two, three, four. So let's start with
the first one. This one needs to be
embedded quite well. One, two, three. We can also get variations
in the variation of size in there if we need to four. Okay. All right, I think proportions and size is slightly
way too off. Okay. One decides to be at
least close enough before we start breaking it
up a little bit more. All right, that should be fine. Let's move on to the next side. So I'm just going to follow
the same condo that. Okay. Oh, that's
like two. All right. Yeah, I think the sizing should
be fine there. Moving on. N one here around, here well. Okay, then roughly around here. Okay. So that's going to
carry on in the same fashion. I think it's a
symmetric ton down, so that would help us
move things a lot faster. Okay. All right. Moving this on. Okay. All right. Let me
allow this sieve. I think we just just one
more in the middle point. Center point, I can just turn off symmetry and
then just do that. C turn off symmetry now. Just get this in the center. Okay. Here, that should be
pretty much fine. You see, you can see I'll get an interesting result out of
this now I just doing this. Okay. Yes, I think we need I'm going
to do something different. Let's use this instead
for this edge. That will make better
sense for that edge. Also, too, we need to
do this down here. We need to do it in here, too. Tonal symmetry. Let's get one here. I think that might
be way too big. Way too big. Around
there should be fine. Okay. Like actually do the same
thing around the boots. As far as far as this
goes on the reference, we don't have anything
in the boots. We can still check realistic
references just to be sure. So while we're doing that,
let me just do a quick sieve. So I'm going to check references
in here just to be sure. It's AI reference,
so I'm not going to pay I'm not going to pay
too much attention to that. I'm looking for something a
bit more realistic approach. Okay? They have on the edges. It's also AI bots. Okay? This is a good one. So we have some
around the edges, some smaller ones
around the edges. I think for this one, I
think we can just do them inside of are quite small, so we can easily do that
instead of Subtanpnter instead. That make better sense doing
that in Subtanpnter instead, instead of doing
it in here Okay. I should be fine. All right. Yes, that should be fine. So
that's Painter agreed on. Let's get back in here. So I'm going to use
the same fasteners on this lower edge. Use them on this lower
edge so we can do I'll just do them
systematically in here instead. But I'll make better
sense do that in there. So it'll feel like it's kind of the boat holding its edge, edge here with the
edge inside also too. That makes better
sense. Okay. Now, we can be a little bit more
free handed in there. I think this one needs
to come down some more. This part Lauer needs to
come down a little bit more. So let's do auto group. Auto group, be fully group
auto group, auto group again. So this part Laon marks
this out invert the max. Go to Gizmo. Okay, center the gizmo. Turn off symmetry,
center the gizmo. Pull it down this way. Okay, that makes better sense. Let the max. Let's do this next. Max this out invert the max. Center get this
down here, like so. Just to get something a
little bit more accurate in. Okay. Center this as well. Put up some more. Okay. Center this also too. Trying to get something a
bit more accurate in there. Alright. Let's go back. Come on. I can't go back. Let's
go back to this. Let's go back to the IMM brush, then we can throw that in there. We can do a few
more also to around the edges. I mean, why not? Okay. So this will help sell
the mesh a little bit more, making it feel a
lot more realistic. Alright, give it a lot
more realism to it. I'm just going to pull
that roughly where we have the pokers in there. It's awesome. Okay? That should be fine. All right. To see how we can moving
things a lot faster in here because we are using the reference references made by human beings,
it's not actually a. That's why I think
functionality actually plays a big part on this
is what we need. So let's see where
else you need to add some boots and
fasteners in there. Okay, so we see on this fits. So we need to do that
on the fit as well. I think for a while, I'll do. Let's get one in here. That's way too big. Let's get something like so here or two. Also two. Okay. Yeah, as well. Undo that. Yeah, well, also, then
one more around her. Awesome. So that makes at
least that makes better sense. So we go down. We need one here. Okay? No, it's not supposed to be actually
in there supposed to be roughly around
roughly around, okay, roughly around
the edging for it. So putting it around the
edging makes way better sense. Makes way better sense. He also Okay. Check the sizing just to be sure we're getting
good sizing in there. Don't do that. Again,
that's way too big. That's way too big.
That should be fine. That's way too big. All right. So I think edging
around there should be fine. Let's now do one in the center. On do that, get good
proper sizing in there. Yeah, that should
be fine. All right. I'll do one year, as well. Okay. I'll do one year, something smaller,
something smaller, as well. Okay. That should be fine. I'm going to fast in
this edge also two. Let's do one year. Should be up a little bit more.
He should be fine. He also two. Okay, then we have one year. Here also, too. Alright? I think
that should be fine. We don't need to go too
aggressive in there. We can do something here, create another space,
do something here. So I'm being quite careful. I don't want to overstate this. Just enough to sell the ship as being realistic
should be enough. Okay. Let's do arlast one year. All right. Then we'll
do one year as well. Okay, that makes sense. That makes sense.
Alright. Moving on. Okay. Here, we need. I think I think we can just
do that inside of septanspent instead for this. But I think I definitely
need one year here as well. Okay. Let's do one
year here also. Okay. Make sure we get the
same size in between. All right. One definitely in
here, here, as well. On the opposite side,
here, here, well. Okay. Fantastic. Let's just
do here. Let's just do here. I mean, let's just get
something in there. Because this is what
is going to sell this character has
been realistic, and we want to make sure
it's realistic enough. Don't do that. That should be fine. All right. Don't do
that do you again. Alright I think they should
hold this up quite nicely. Okay. I feel like I
should probably get something around here also, too. Symmetry should be
turned on for this, I mean, symmetry
is not turned on. We have symmetry
in here already. Okay? Yeah, it's actually
working in there, so Alright So for this, I want to keep wider
spacing in between them. All the way to be back. I don't want this
to be too obvious. I think ton of symmetry. Let's do one year. All right. I think you made a se unit. This parts supposed
to be closer. It's supposed to be closer.
So let's lay the max. I'm going to max this
thermal symmetry. Let's max this v the max, bring out the gizmo and bring
them forward some more. Bing them forward, parade
it down some more. Yeah, I think around
there should be fine. Okay, lady marks. Alright, so I'll see you guys in the next lesson. By for now.
47. 41 Top Hand Guard In Zbrush: Come back, guys. So in
the previous lesson we kind of created this
shoulder guard, but I feel like I still need to make some
correations in there because parts go bulging
out way too much. So I feel I need to
shrink that some more. So I'm going to control shifts, click on it via the max. Okay? I think we can do we
can do Polish by group. Let's see, hope it's
not ruining anything. I think it's running
something in there. So better still I'm
going to do I'm going to just squash it down. Okay. No squashing down because it has an inward thickness for it. How do we go about fixing this? Let me clear the marks. I think I'm going to
manually just push push. I'm kind of smoothing it down. Let's do push instead. I think gradual push
would make better sense. Okay, the bro size. All right. Let's look the overall
form for it now. I think it fez a
whole lot condo that, fez a whole lot better now. So yeah, yeah, it
should be fine. So now, this lesson is
supposed to be about, we have condo that got a little
bit of weirdness in here. I need to push this down
looking a bit weird. Okay. With the more brush,
move this up a bit more. All right. Okay. Go mark this region. It the mark blow
this out some more. Okay. All right. This closer. Yeah, I think that
should be fine. So now let's move on to creating the meta part for the
lower part of the arm. Yeah. So let's go over. We can still use is this?
That's not the one. Yeah, this one, I'm
going to duplicate this. I'll shoot this down. Okay. Yeah, this should be fine. Let's solo this out. P F. So I want to do it on this
opposite side instead. Do it and then we came
to the other side. So let's see how far out
this is supposed to go. Okay, I think we need here
roughly where it is right now. Alright, let's see where else
we need to move this up. Let's see. I think
as far as somewhere around the nature of around
this portion should be fine. Okay? I know where it is now, so I'm going to clear
this, do this again. All right. Con through W's completely in its ind though, make it work. So Control Shift click on that. Okay, I'm going to I'm
going to max this region, ControlW, bring
everything back out, Control Shift click on this. Yeah, I think, as far as this
goes, this is what we need. Okay? Yes, it's perfect
perfect where it is. The one we need to do be to do deleted Let me
duplicate this first. Hide. Let's do delete ding,
geometry, delete ding. Then I'm going to
shrink this down. I'll shrink this
down. So go over. Let's go over. Let's
do polish by group. We just get something
tighter in there, more or less like so it
should be fine. Okay. I'm going to isolate it. I'm going to max this region
like so. Invert the max. I'm going to in
inflate some more. No, no, undo that. Invert this. Let's give it a Let's
use move brush instead. So our move Griz more instead. Okay. Undo that. Play the mark. Let's just do something like so. Yes, this is what we need. I
think if I inflate this now, yes, perfect is what I needed. Let's get this slightly
inflated this way. Alright, something
like so should fine. I'm going too. It the max, polish again some more. Let this out. Can just
push this down a little. A little a little like so. All right, F. So we need to hold this edge.
I need to hold this edge. So I'm going to do M. I would like to's
subdivision level, you need to do delete ding. Dimetr delete ding, delete Pevlo should be fine. Something should that
should be fine. All right. So now the next we introduce the arctic ness to Control W. Now, less arctic ness to this. So I'll go over a
let's do dynamic div. Okay? I think we should I feel like I pulled this down some more. Okay, so let's use
the move brush. Let's turn this off for
now the move brush. Okay. I pull this down. I pull
this down also around here. I'll pull this in. Okay? Down some more down some more. Okay, I think that
should be fine. Slow this out, dynamic,
increase the thickness. This might be way too thick. This might just be there.
This is the right amount. Maybe a little bit of
thickness should help. I should work just fine. Then we add one segment in between. Let's just do one. Okay. Here's something like so. We move Rush, I'll move
this not closer though, extend it out because something is supposed to be
buried in there. Going to bury under
meshing let's extend, get some space in there. Okay. Yeah, it should be fine. Apply this on. We
can move this up, move this out, making minor
corrections here and there. Okay. Then I islect this P Z M. I'll bevo this out some more because I want
to extrude them inward, Extrude them inward, some more. Okay? I think we can
do Chris Pig now. So let's go over increase
the bevo width. Chris Pig. All right. I think let's let me
undo this crisp first. Come on, undo that. Let
me bevo this as well. Extrude inward two. Okay, Cre pg. Now if you should
subdivide this, you should hold up the
shape a little bit more. Okay. So it's holding up
the ship a bit more, which is coop precisely
what we want. Alright. Fantastic. So next
thing you need to do no. I think I need to
move this out some more use the brows size. Okay. Move this out. Move this out as well. Move this out here out
here as well. Okay? Select this, move this out. Okay. Fantastic. So this
will work just fine. So we still have some shape
into doing here also, too. So do that next. Okay. Let's create this shape
that's supposed to be in here. So I'll go over. I'll do Let's do Okay. Let's come back in here
bring everything back out. I don't sold. Let's do Shift F. Okay, I think we can slow this
now know where it is. This where the edge
stops. So we need. Let's do one more edge. We grab one more edge. Basically just four
edges should be fine. So I'm just going to do
something like sew Okay. Control W. Yeah, this is
precisely what we need. I'm going to delete
some regions now, so Control Shift click. I'm going to select all
of this around here. Control W as well. Hi dt. This is pretty much all we need. So I'm going to duplicate
the mesh again. Okay? And I'm going to do delete ding, delete ding, Modified
topology, delete ding. This way a bit kind of
gets something quite low. So this kind of crashed. So good thing we
kind of created or saved out the backup
for us, so that's fine. So before I delete it in, I'm supposed to do
delete higher first. So that's where the
issue came from. Okay, if I go out of isolates, let me also save
this file again and replace it with the main file and also kind of create copies. Once you make good progress, great copies for
it's very important. Let me get this ship
out that I need. Okay, I think I might need to delete extra from
this also, too. I need to delete extra, so I'm going to grab
input this here. Let's do marka Okay. I think I'm going
to grab this as well through Control
Control Shift click. Let's do that Delete
Eden again, delete Eden. Okay, I think somewhere
around there should be fine. Somewhere around
there should be fine. Don't need to go to extreme. All right. So I'm going to max these parts. Okay, let's go to our gizmo. Roughly center
squash in this way. Okay. Play the max. Here this should be fine. Need to make some
modifications to it as well, so I'll go over to the move
brush. Ton of dynamic. Move this up. Move the stop, go to
the opposite side, move the top as well. Okay. Something pretty mode,
like so should be fine. Here also too as
well, move this down. Okay. Yeah, like so should be fine. I mean, why not? Then let's
add some thickness to it. So let's go over to Let's
subdivide shrinking the mesh. I don't want to kind
of shrink the mesh, so we need to add some
more polycn to it. So B Z, I'll do insert here, one year as well,
one year as well. Then we subdivide this nice hold up the shape, delete lower. Okay. So now let's add
some thickness for this. Dynamic has some
thickness to it. I think damage might be
way too thick. Okay. I think this should be
fine. Let's do one segment. The one should be fine. Apply this one. Let's do Bvul. Okay. That should be fine. So don't do that. So
with Q I shall go in Q pullou. Come on. Let's find a good angle
for this. Push this down. Alright, so do polish by crit edge rather, bring
everything back out. Okay. Oh, no, no, no, add the
wrong idea, wrong idea. I forgot to kind of look at
what we have already in here. No, we don't need Okay,
apply this again. The shaping is actually
quite different. So I'm supposed to
just extrude, no. Let's dose this edge. Now let's strude this out. So this is going to
be the first first thickness on the edge, no. First thickness on the edge, first edge thickness,
then we don't or that one for the second edge thickness. Okay. So it should
be fine. Okay. Maybe that's way too much. Let's do. Let's do it again. I need a bit more. All
right. This is fine. Let's do another one.
Okay, it should be fine. So then we need to do this edge. Something more or less like so. **** F. Yes, it is
precisely what we want. Maybe just for the sake of
adding another one in there, let's just do something
that don't do that. Come on. I don't
want to snapping. I don't want this
to snap. Let's see. Don't do that. Let's
do extrude instead. Polyloop. Let's go and fix this. Let's do geometry
group by normal. Okay. I should be able to
extrude this poly loop now with E. Okay,
pretty much like so. Shift F. Okay. Do that. Let's see. There is a really major
difference in there. Let's go group PG. I haven't done that, so
let's go and do Chris PG. I say, I look like with
Chris PG turned on. Okay. Then if I should
subdivide this a bit more. Yeah, awesome to work just fine. Take down the subdivision level. Let's use the move brush and do some move directions in here. For one who moved this out, that's bit too much, out
slightly like so, she'd be fine. Out like so also, too. Okay. I think I made a mistake in kind of bid more than words.
Way too much actually. But that's fine. Make it work. We just need to extend
it out some more. Get some extensions in there. Put this out. Okay. Put this out on the lower side. Extend this out some
more and buy it closer. Getting close, prey
this in some more. Okay. Like so should
be fine. All right. We can also center
this rotates this way. If we need to, I
think we need to. Okay. Put this out in some more. Here, I think this will
just about to work. Fix this. All right. I think this should be fine. Put this out some more. Okay. Here now let's delete. I'm going to do mirror weld. So go over to
deformation mirror, tangiometry, M phy
topology, Mirror weld. Okay. Measure symmetry is
turned off for this now. So we can move things individually properly
where they need to be. Break these down some more. Okay. Right. Come in here to the opposite side. Freeze the bro size,
move things closer. Okay. Move this out. Move this out. Rotate.
Move to the opposite side. Get closer, move
this down some more. Move this up. Barry this down. Barry this down.
Okay. Here, that should be fine. Okay. Move this up, in some more. I think we should be good
here that should be fine. Let's see. I think that
should be fine. Do that. I'm not supposed to
smooth that aggressively. Let's move brush instead. Okay. Awesome. So that's fine. So next lesson just move on and then continue on the
rest of the parts. So I'll see you guys in the
next lesson bye for now. Oh, I see I've not even mirrored this
to the opposite side. Select go down. Okay. Delete lower, delete higher. Let's go over deformation,
mirror mirror weld. Symmetry don't offer this
as well, that's fine. The opposite side, right
hand side is fine. So the left hand side might need to adjust a little bit more. Okay. I'll move this down
some more this way. Select, move this
up, up some more. Okay. Move this down. Okay. I move this in some more. Move this in some more. All right. Down some more. Down some more, maybe not
to more, select this. Move this up instead. Okay. All right. So just a matter of pushing pushing
things in as needed. And then you should
be good. Okay. Yeah, I think this should
sit quite well in now. Select this. Move
these up some more. Okay. Move this down. Move. Trying to make the necessary
adjustments in as needed. Okay, that should be fine. I'll see you guys in next
lesson, bye for now.
48. 46 Scepter Tail Mesh In Zbrush: Welcome,ba guys, in
previous lesson, you kind of added the
boats and kind of fasting most of the call
boats, actually, so in there. So that's fine. So
in this lesson, I would like to get get
this rod or skept in there. So what I'm going to do next. So let's get right to it. So I'll go over to let's go over to the older
mesh in here instead. So I'd like to do this instead. Mark the body visible. Alright. So basically, what
we're going to do is to create it in the center
and the middle point, so course we can do
this so we can get the symmetrical features in
there as close as possible. So the first thing you
need to drop in would be our cylinder in there. So think we can do a pen
cylinder it's down there. It's quite small. So let's go
all the way down and select it and scale it out. Okay. Let's get good sizing for it. Very important. I think the size we have for
this should be fine. You just need to scale it. I think this scale
size should be fine. Something like that
should be fine. Okay. So I'll bring
it to the front. Alright, I think
we should be fine. Let me take this down
a little bit more. Okay? Shrink it
down a little bit. Don't do that. Shrink it
down a little bit more. Okay, scale it out. All right, scale it
out a little here, this should be
fine. This is fine. So instead of isolating it, let's just go over to this. Let's say this body for now, let's work with just this alone, shift F. Let's say
the policon for this. The total policon
for this is 48483. That's fine. We can
definitely work with that. Okay. That we can work with. Yeah, so that's fine. So the next thing you
need to do would be to let me max out the top parts. Okay? Play this max. Come on. Okay, better still
just do ply group, group and nomuse control shift. And before we do that,
let's Bevo this edge. I don't need this inward parts. I'm going to Bevo the edge.
Let's bevo this edge. So BZ Bevul so let's
get this bevo in here. Okay, let's go to
the under parts. Do the same also too. Get up lose Bevo this as well. All right. So we're going
to do control shaped click. Just make sure that sitted on. All right. Come in here also too. Country shift click. Then we do delete ding. Let me first make a
duplicate of this. Then let's do delete ding. Geometry delete
ding, that is fine. Okay. So the first
part first portion I'm going to work on would be let's start from
the top parts. Let's start working
from in here first. I think that makes better sense to start
working from here first. Okay, so let's figure out how, how far this is supposed to be. I will say we can steal, we can definitely steal this. So what I'm going to
do be to duplicate this isolate them out. Okay. And I'm going
to max this part, Control W. So this is
pretty much what I need. Okay, so click on this. I'm going to do delete ding. Delete ding, modified topology, modified geometry, delete ding, let's bring everything back out. So I think this is pretty
much what we need. Let's get in close. Okay,
let me zoom out also, too to see if I have it
right where it needs to be. Here, I think, as
far as that goes, that's right where
it needs to be. All right. So there are some features it's gonna
get in, so let's do that. You can see, right. That's fine. We'll make it work. Okay, so let's start
by doing an extrude. But before we do an extrude,
let's do inset here. I'd like to create where
this edge is supposed to be. So let's do that. I'll do let's see where I
need to place this. PZ. I'll do inserts. Let's figure out where
that needs to be. We can do it somewhere
around there. Yeah, somewhere around
there should be fine. Yeah, that should be fine. Fine. Okay. So I'll do the same one
or two for the top parts. Let's get one roughly roughly around around
there should be fine. Okay? Then I need
to bevo this edge. Let's do Bvul I'm going
to do let's do four rows. Let's do four rows
instead. Okay. So we have something
in here now. Let me sold this out for now. So I can see the spacing
in between these, so I'd like to compensate for that space and also
to come on around. So we need to do insets. So inset let's do multiple. Okay. I think, so should be fine. Like, so should be fine as well. Okay? But I need to add
one year undo that. I think just one should be fine. We can't do one
because we are still, let's do single instead. One year, one year, one year, one year as well. So that should kind of more
or less average things out. Okay. I'm going to delete this. I do. Let's do one
year, here as well. Okay? One the middle,
one in the middle. Okay. Awesome. I think I'm
need to go down here as well. Let's do one year as well. Let me go up a little bit more around there
should be fine. Okay. Let's give you the same
polygroup so Control W, get that same polygroup. All right. I'm going to max
these stop parts. Control W. Separate
poly group two, Control W. All right. So now let's carry on. Okay, so now we need to add thickness to
the entire outin. Let's get some
thickness going in, so let's do edge loop. No edge loop dynamics
of the tono dynamic. Take down the smooth. Let's get some
thickness in there. Maybe this is that's
exactly where we take a little bit more. Okay. Yeah, I think somewhere
around the nature of this should be fine for
now. All right. So moving on, I'm
going to apply this on Apply F. Let's solo this out. Okay. So now at
this point, also, we also need to do
group binomals. Let me select this first. Let's do group binomals in here. Here, that's fine.
Precisely what I want. Same here also two
or maybe notes. Let's see. Do we actually need
that? Do we actually need? No, we don't, so
that should be fine. Alright, so now let's go
down. Let's go down here. I would do let's see there's still a lot of work we need to
do actually done. Let's see if we can simplify it by reconstructing, fantastic. We can reconstruct this.
Let's reconstruct one more. No, that will be going
too far to delete higher. No, undo that. Reconstructing
can mess things up for us with little bit of mess. So undo that. The reason why I'm doing that because we don't have any supporting edge
around this part, so let's add some
supporting edge around her so let's do one, two, just to hold our head. So when we kind of
reconstruct it, we don't lose what
is there already. Okay, so if we
construct this now, we should hold the shape. It's not in shape
completely yet. We need some more Let's do
an edge here, reconstruct. It's no longer reconstructing. So I'm gonna keep what we have in here anyway, that's fine. That's fine. If you construct,
it's going to work now. So I'm gonna leave that for now. So let's do BZ M. I'm
going to extrude this out. Hm. Hume will do Okay. Let's do I think we can let's see if
we go to reconstruct. Okay. Yeah, I think, this will. This will work just
fine. I work just fine. Do that again. Make
a duplicate of it. Then reconstructs. Okay, something like,
so it should be fine. So the first thing
I'm going to do be two Control Shift click. Yes, control. Let's do group by
no mouse again, group by no mouse. Okay. So we need to kind
of extrude this out. Poly oop poly group,
how we extrude. Okay, we ablution
level in there. Let's delete that,
delete higher. Save my file. Okay, I think
we can extrude this out now. Polyp Polyopolygroup. Okay. I think we need a little
bit more. Come on. Let's do some more. Okay? No. All right. Something
more or less like so. Let's see how far out this is. Just to be sure how
far we have it. Okay. I think this should
be fine. So I'm going to bevo this edge. I'm going to do that. Let's do just single roll. Something more or less like so. I'm going to extrude this
inward a little bit more. Okay. I think that
should be fine. So this lower part, I need
to let's do auto group in here auto group. I
need to extrude. No, I need to let
me delete this. Let's go to inset. Delete this to extrude
this edge down some more. Let's down some more, a little bit more
should be fine. Okay. Don't do that Is not
extruded out properly. Let me just Auto group again, select this. Go to our Gizmo. Centered gets up loose. I'll pull this down this way. Just something more or less
like so should be fine. Lay the max. Okay.
So the next thing you need to do now is
to bev with this edge. I need to bev with this edge. So let's go to Bvul. Let's start the bev
this edge first. Then we'll bevel this
also to alongside. Alright. I would
Bvulewll the inner edge. Bevo bevo as well. S quite well, actually. Same also, too, Bo also too. All right? That should be fine. You kind of tackle
one aspect of it. I think some other
aspect also too, you also need to
tackle for this. And that would be
on the body itself. So let's see, Let's get this
front face in, like so Okay. So let's move this up. So let's work on
the top part now. Okay, so I'm going to do let's let's add an edge
here in the middle points. I'm going to be with this edge. Let's bear with this edge. So be vol bevel this like so. Okay. Then let's do Q
holopUdo that, do that. Undo that. Here,
pretty much like so. Okay. Here two. Hold on, rather,
pretty much like so. Then we need to bevo the edge. Bodi edge as well. Bavood edge as well. Bevo edge as well. Bodi okay? Bevo Bevo right.
That should be fine. I think at this point,
we need to bear with this also, too, slightly. Alright. That's fine.
Okay, moving on. Let's see some stuff
we need to do in here. So let's get that in. Let's make sure this is
front facing also too. So what I'm going to do
here would be to let's grab let's see grab Okay. Let's see how far
out to need to go. I think pretty much
like this Control W. So this is perfect. But we need to kind of get
this probably a little higher. Needs to be a little bit
higher. So we undo that. No, let's apply that face. Okay. So what I need to it's on the wrong place.
It's on the wrong place. Let's get this perfectly
font face in this way. Then I'm going to
add let's do inset here close to the top parts
down here as well, okay? So let's turn on
symmetry for this, it'll make our life
a whole lot easier. We can do something like
ControW think I need to go up a little bit higher to be a little
bit thiger than this. Okay? ContW Yes, perfect. So affect the opposite side
too, precisely what I want. I'm going to do the same
thing here also, too. To do the same here as well. Okay. All right, sing this down. Come on. Let's allow this save out, and then we should we would
get what we need now. Control W. Control W.
In affecting anything? Control W. Control Shift click. Okay. I don't see anything I don't see much
happening in here, though. I don't see much
happening in there. Okay, I think you should make things a
whole lot easier now. Okay. Move this down. Control W. Okay. Here, this will work, but we
need to grab this alongside. So grab this. Okay, selecting something else and
do this again. No. Hoods. Okay, here, this is fine.
Precisely what we need. Control Shift click,
Control Shift click, Control Shift click. Control Shift click. Come on. This is what I need. Come on. Okay. Let me max do that. Let me max this portion
all the way down. Control W. Yes, perfect now. So this is pretty
much what I need. So what I'm going to do now
be to extrude them inward. So I'm gonna get some
intrusion inside. So let's do pre
ply group island. Okay. No, that's way too much. Somewhere around
there should be fine. Okay. I'll push, before we do that, let's get it duplicates.
Very important. Let's get it duplicates again. I'm always going to always do duplicates just in
case things go AYR, we still have backups for this. Okay. All right. Here, that should be fine. The next one we need
to do would be this. All right. Tally affected one's parts. You need to have this also
affecting the opposite side. This needs to go in also too. All right. Okay. I'm going to extrude this
portion out some more. Okay. So I think at this
point, to make things a whole lot
easier for us, we can do I think Chris SPG should be
more or less he writes. What Chris Pig will be for this to get a little bit might
get a little bit confused. Let's just do this manually instead. Okay, is there already? Let's just do Bv, Bvul pretty much to bev
this. That's a bit odd. Rather odd. That's quite old. Let's just do insert instead. G one year, gets one year. Okay. I believe that did go around
not entirely. G one year. Okay, her well. I think we need one year also rotate this. Let's set one year. Yeah, well. I think we
have one year already. So at this point, we need to okay, I need to put one at the top, do that, do that. Definitely one year,
one year, as well. Okay? Do the same
thing also in here. Okay. Let's put one in the
middle or place one here, just trying to kind of even
out the parts around this. Okay. That should be fine. So that's when we kind of
smooth this out should get good topology around
where we need it to be. Okay. All right. So let's move this now. Let's subdivide. Something feels oddly wrong. Something feels oddly wrong. Okay, ton of symmetry. All right. Subdivide. Why is it not subdividing? My mesh for some reason
is not subdividing. Do you have anything hidden? Subdivided now. I think
we have something hidden. Okay, we see an issue down here. So that we need to fix. So let's insert multiple. Multiple, multiple is tod on, so why am I just
getting just one? To out of isolates. Turn off symmetry.
Keep getting just one in there. T of symmetry. You just keep showing me just
putting just one in there. We need a little bit
more to hold out well. But just add one for now. Okay. Now, can we bevul what we
already have in here now? So let's do Bv. We can do two. Two. To as well in here. To are well in here also. Okay, bring everything back out. Subdivide it holds up
the edge quite well now. So having the edge been
held up quite well now. Perfect. So this
will work just fine. Okay. Can do that. Let me max out this
portion invert the max. I'd like to scale this out
some more, pull it down. Okay. Subdivide
subdivide some more, get something quite
clean in there. Okay? I think this
will work just fine. This should be just
fine. All right. So I think we can just put
the crown to this now. So let's just put a
set a crown for this. Okay, we can just I. I
think we have one here. Should have one here. Okay. We can use, we can use this. We can't get it in the center, so let's just draw
it out here first. All right. Undo that. Let's try and get this
ppt in the center. Here it is roughly
in the center. Okay? This not
perfectly accurate yet. Okay, that should be fine. Okay. Here's something like so. So I'm going to do let's
do turn off transparency. Let's do geometry. Group by nomuse Control
Shift click, Max out. Okay. Undo that. Oh, I'm supposed to undo that. Split on Mark point first. Split on Mark point first, split on Mark
points, select this. Then we can do group
by nomuse now, group by no Mu. Bring out a gizmo. Pull this out. Okay. Pull this out. Shing this down. I think it's awfully wrong. Do we need an extra edge here? Let me blow this out once. Okay. Play this,
put this back down. Okay. Like so. Pull this out. I think we
need to pull it out way more. Okay, more or less like so. Push this down, squash
this, put this down. Okay, down some more. All right. Let the max. I'm going to max the stop parts
now, low this out. Put this out some more white
more, squash this down. Heat F. Okay. I think I need to
grab this pull this up. Squash it down. Okay. I think we can do Bvul in B Z. Use the bevo this way. All right. I'm not sure I'm getting the
exact shape I want though. Intily the shape I want. Please subdivide this Okay. Well we can still make it
work, though. I mean, why not? We can still make it
work. Not entirely there yet, but we
can make it work. I'm going to do inflates,
deformation inflates. Yes. Yes, what I'm
going is what I need. Okay. Then we can pull it
up a bit higher. Okay? Play the max. Perfect. This will
work just fine. Then I'll do delete lower. Okay. So again, miss
something on the top. Yeah, a few of this
we can just use. I think we can use
this why notes. Let's draw it in the center. Okay. Center get this properly
centered, this up. Properly center it. All right. Yeah,
that should be fine. So yeah, we'll complete
the first piece. So team's gonna pull
some of this in there, but at least as
far as it's good, we're getting something
interesting to work with. So I'll see you guys in
next lesson, bye for now.
49. 47 Scepter Tip Mesh In Zbrush: Bok ab guys, so let's carry
on from where we left off. The final piece kind
of add to this will be the cones in here. So I think we can
quite easily do that with the penned three the cone. Okay? It's down
all the way here, so we need to kind of start
by skiing that up first. I think I think around
this side should be fine. Let's get it forward,
get in there. Okay? I'm going to we don't need
the lower part though. So I'll go over. Let's
go over to poly groups. Let's do group by normals, Control shift
click, shift click. So no double sided. All right. And I'll go to geometry, modified topology, delete Eden. All right. That's
fine. That's fine. So the polygon is quite
load there. That's fine. But one used to
be quite rounded. So it feels like this
is quite rounded. So how do we achieve that? Basically, we go
over to deformation. Then let's just polish this. Polishing this is kind
of shrinking in also. So we need to maybe extend
it out a little bit more. Okay? I think this should be fine. Let's polish a it
bit more as well. Let's mark the lower
part, blow the marks. Polish. Okay. Yeah, I think this
should actually work. Cushing this down
some more right. Let's do polish by group. No, that's messing things up. Kind of having this
messed up at the top, also, too, another one that's. So polish by future
polish again. All right, I think this
should be more or less fine. So I'm going to make
a duplicate of this. So let's do duplicates. Okay, select this, move it up. Let's place it where
it needs to be. Okay. Sing this down. Old shift, snap this this way. Move this in this frame
into it, bring this down. Okay, pull it out. Okay, it seems quite small, so I think we need to
extend it out some more. Okay. I also think it needs to be
bigger than it is right now. So let's shing this out. All right around there
should be more or less fine. Okay, Shing this down some more. Let's see where we get. Okay. I think we
can live with this. I'll bring this down here. Hold down control,
extend this out. Hold down control,
extend out here as well. Clear everything
out, move this up. Okay. I think we need one more. Well, I think I didn't
evenly spread this out. Let's try and get this
evenly spread out. So I'll Let's do Auto group. Fully group, Auto group. Select this center this here. Okay and control,
bring this down. Let's get the spacing
properly in there. That's fine. Clear
out, bring this down. Okay? Let's see, I'm going to
also polish this again. Let's see what we get
when we polish this. Okay. Let's do that one step. Put this down some more. All right. So I'm going to
make a duplicate of this. So center this,
hold down Control. Move this out, get
this back in place. Okay, I'll go to the top parts. I'm going to hold out, move this center, and
I'll rotate this way. Rotate this way, get this centered here
that should be fine. A little bit more. Okay, here, that should be fine. Hold down control
again, move this out. Get this back in the center. Okay. Rotate this
this way. Okay. Trying to get this centered
as much as possible. All right, that should be fine. O down control getting
closer down control again. Get a copy out of this. Sent back again. Rotates. Alright. Here,
this should be fine. Okay, we can definitely
work with this. This we can work with no doubt. Okay. So I think I'll need to merge all of
this as one single piece, so we can probably scale it out. Maybe let's leave with fries
for now. Let's go down. Let's go down to
the lower parts. So let's work on this. So there are a few
things to do in here. Let's start working on it. So I'm going to
select this poll. Let's get in the zoom in. For this pita I
need to kind of cut out Let's see two pieces to cut out to cut out
something for this. So let's make a
duplicate of this. So let's make it duplicate, duplicate this, send this down. Z let's get up close. Okay. Trying to figure out where
it's supposed to be. I think it should be let's
see somewhere around here. So let's do inserts. Okay, you think just
one should be fine. Alright. Let's make sure
we don't have double. Let's just do single instead. I'll add another one down roughly around here
should be fine. All right. Then I'll do
another one here or too. I'll just do one roughly. So should be quite wider, so we can do something
around there, right. So let's kind of extract
what we need now. So I'll go to the Max Control W. Control W A two. Okay. Perfect. So this is
precisely what we need. So I'm going to Control Shift. Just slow this out. Bring everything back out.
This is what I need. Come on. T to do is the opposite specle. It's selecting elsewhere. We need to get them
out. So let's see, I need to remember I
reduce the brows size. B size quite low already. Okay? Going to select this. So I'm going to do split
heading to begin with. I'll come down here.
Control Shift click. Come on. This is all I need actually invert
the max. Control ****. Click. Yes. Split ding. I'll bring this down here. Let's bring everything
back out to Let me select this. Okay, it seems to be
an issue somewhere. Oh, yes, this is a
portion we need. So I'm going to delete
Eden, delete Eden. Okay, bring this down. So what we need these two. I'm going to merge them
together as one single piece. So let's merge down. He's more. Okay, something feels off. Oh, we still have
round a piece up here that we don't need. I'm going to mag this Control W, Control Shift, click on that, Control Shift click again. D delete ding,
geometry delete ding. So now we can get this now. So let's bring this back out. So the first thing I'm
going to do is to shrew this out, strew them out. So let's isolate first. You mesh all polygons Okay. Let's just do this
for knowledge, just do one for knowledge, just do group holy group island. Sure this out first. Okay. Maybe I went a little overboard. Probably not. I'm going
to keep that as it is. Then I need to bevel
the edges also, too, so make sure you on bevel. Here single roll should be fine. Okay? No that's way too
much. He dislike so. Let's get up close. All right. Tax. Tax as well. All right. That should be fine. So we also need edge
loops in between. So need edge loop in between. Let's do inserts.
Let's do multiple. Okay? That should be fine. All right. That should
be fine. That should hold up quite nicely. Let's come down to the next one. Okay. So Qm, B group island,
extend this out. All right, XO should be
fine. Let's see what we get. The that work does fine. Let's also do let's add the
segments in there first. All right. Then let's
go to the edge. BvulvEedge Pay with
this edge also too. Pay with this edge. Pay with this edge.
Fantastic dw just fine. Okay, so next we need
to know what to add. You can see a cylinder
piece in there, we have a cylinder
piece in there that was more like like a more
or less like a fair. So the best option to actually
use for this would be the Let me go all the
way to the top instead, is to use the police fare. Come on. So's police
fair for this. So I'm going to select
this at the top. Police fair. The police fair will
work just fine for it. So the center, more or less
like that should be fine. Let's go back to the move. Let's split this apart. So split, split on marks
points, select it. It's in the center
already is down. Let's get this all the way down. Okay. I'll scale it out. Log this in here. Okay. Well, now, we need to
make some modifications to it. Slow this out. It's not even
perfectly centered, so let's get this perfectly
centered this way. Alright. Okay, I should work. One thing we need to do also
will be to select this. I'm going to max this inverting
mouse, go to a gizmo, I put this up more continue
some more spacing in there, because this needs to kind
of be extended out this way. Like so. I think something more or less
like so should be fine. Then let's subdivide
this. All right. So I'm going to do delete Okay, before we shrink,
let's make a duplicate out of this because we
still need this again. I think again to create
this piece we have in here. Let's make a duplicate of it. Okay. Then I'm going to let's
go back to this instead, hide this, let's
use this instead. All right. I'll go to
geometry, delete lower. Then I'm going to
use my Giz more. Let's go over to
geometry bend curve. So let's add one more
resolution to it. Okay. Let's shing
this in this way. Then shing this pull this out. Select this. Get the
more legs this way, select this, pull this up. Let me put this up.
Let me go down shift, so you can get it
at a straight line. Move this up in a straight line. Select this also too. Move this down. I
think maybe even more. Scale it out as well. I'll select this invert the max I'll pull this down in here, scale this out a bit more. Okay. Yeah, that should be fine. Let's get back in here. Go back to Let's accept
this first. Okay? All right, should should work. Sec needs to make
some modifications to it with the move brush, increase the brush size. So no symmetry for this. Let's move this in.
Move this in some more. Move this in some more. Okay? Yes, it should be fine. We can get some interesting
shape in India, actually. More or less like
sk. Put this in. All right, that should
work those fines. Let's go back to
the front. So now we need to go to file
this pot in there. Was plan is a pointed one, so we need to go in and then steal the pointed shape
from the other canvas. But before I do that, let
me save this as well. Let's sieve. Save this,
make sure we save. So I'm going to steal
steal this and then place that in and then it should be more or less
good for this part. Then we can move on
to the top parts. The top part, we need
to make this also, too. So that's fine. Already have some single enough to work with. So keep working on it bit by bit until we get the desired results. So
I'll go back in here. I need to just steal one of these you just need
to steal one of this. So let's just do copy. Let's just copy the soup too. Come back in here. Pase that
soup to in here. All right. Then I'm going to
do let's go down Deltire Let's steal something. I think we can let's
steal one from the back. This one looks a bit
more straight on. So let's do delete hiding. I'm allowed to save out. So this one is not
completely straight. Let's see if we can't get it. Now we can't get it straight. So we also have to manually try as much as possible
to get it straight. Is a bit strange at this moment. Let just get it as
straight as we can. Okay. Let's see. We also have some
shaping in there, too, but that's fine. We'll make it work. So shaping should be more or less in this direction like so. Yeah, something more or
less like this should work. Yes, that's fine. Let
me solo this out. So I'm going to
extrude out the edge. We need an extruded
edge. So let's do that. I'll go over to PZ. No. Let's do inserts. No. You have thickness there would
have thickness in there, so Come on, I don't
need multiple. Just need one. Just
one should be fine. Let me move this way. Okay? Let's insert single. There's something around
there should be fine. Then we need to extrude the edge loop or is
called poly loop. Let's extrude poly loop. Before that, make it
duplicates like we always do. Send it down, hide this. No. I want to hide this instead. Okay? No. No, come on. It's always a ticking process just to get the edge you need. Extrude this out this way. It's fantastic. So you can see how we get any shape
in in here now. The next thing to
do will be just to add to add edge loops
by beveling this. So you can always do
a quick bevel and then we should be good. We can also do Cris Pig. That will still work. Let's
do Bevo instead. All right. B in. Well, the bebo in is a
bit old, so I won't do that. Let's strike Cris Pig.
Let's see what we get. Chris Pig, Chris,
increase. Okay. Why do we have this upline
that's a bit weird. PPG. Smooth this out now. We
add my topology to this, we get something sharp,
but it's way too sharp. Honestly, it's way
too sharp for me. I feel like I should
add pebbles in here and get to close. The bevo here looks a bit weird, but let's see if we if we
can at least make it work. No, no, no, it's not working. Or do you have
symmetry tone though? Is it because we have
symmetry tone on? So I'm going out of solo mood. Let's see if there's anything actually wrong with
what we are doing. Okay, let me turn
this off. This is one we're working with.
So send this down. Okay? Let's do this again. Still weird. Still quite weird. So let's just insert instead. I think this will
make better sense. Let's just add edge loops here. Okay, then we'll go back to
Bevo again. Slow this out. Gets up close. Come on. Bv Bvul Alright.
That should be fine. I can bevo this edge also, too. You gonna create
another extra edge in there, it should be fine. Something like so
should be fine, okay? So we should now we are
losing this sharp edge. But that's fine. We just
need to bev here as well. Bevul Okay. Bevul Move to the
opposite side, bevel. Okay, that should be fine.
So if we subdivide this now. Fantastic. See how we
have this being detached. We have a weird detached edge in there which we don't need. So we need to undo
all of this actually and figure out what's
actually wrong with this. For the most part,
I don't really see anything really weird
with this, though, but it's given some weird deeps in there
that we don't need. Okay. I'm going to do this again just to kind of figure out what's
exactly wrong with it. Okay. All right, so if we should go through the we add subdivisions to this. Okay? This is fine now. I think the issue might
be from this bevel. The issue might just, Ts is
definitely from the bevel. I think our safest bet in
here would be so far, CrespG. Let's subdivide this. Let's see. Okay, it's holds
up the edge do ds. Let's do CrispG. CrespG
subdivide this now. CrespG actually work to actually hold the
edge quite well. So I think that should be fine. Yeah, that should be fine. Yeah, we can work with ds. I mean, why not? Here,
we can work with this. Let's just gonna get it
where it needs to be now. So I'll use the move brush. Let's make a duplicate of this. Move this where it needs to be. Okay. Move this down. String this down. Okay.
Oriente this way. All right move scale
this down a bit more. Let me scale this
down some more. Bring this in place. Okay. Now, some things are not
accurately in place, which we might need to adjust. Let's see if we can get some
proper adjustments in there. Let's do this. Let's do polish, let's do
group by normal first. Let's see what we get.
Okay. That should be fine. Then we will do deformation
polish by group. Also get something
quite clean in there. All right. Then Control
Shift click on this. Okay, Max this, bring
everything back out. I'm going to do something
quite longer in there. Okay. Actually wait
too long, though. Now I'm going to kind of
straighten it out some more, put this back in here. Okay, that should be fine. Yeah, we can work with this. So at this point, it's just a matter of
proper placements. Let's move this in some more. Move this out. I
think at this point, we need to use the move brush
to kind of move things in. I need to get I need to grab this marks them out,
invert the max. Move this out some more. Okay, out some more, a little bit more
should be fine. Alright, we're getting
something now invert the max. We move brush, move
this no that looks odd. Okay. Yes, I think, something like this should work. I'll go back and select this. Let's move this out some more. Go back in here. I'll use the
move brush, move this down. Okay. Move this out some more. Just trying to get this
as accurately as I can. A giving an interesting result, which is cool that we can
actually keep all too. All right, let's see
what we get. Fantastic. Maybe a little we need to
do just to tilt this up a little Yeah, that's fine. That's fine. So the
next you need to do now will be to duplicate
this to the opposite side. So hold down control,
get this out. Hold down shift rotate this way, Barry this back
in, pull this out. Okay, I'll route it
upward a little bit more. Let's make sure it's in place. Alright. S like there not
in the same place, but let's move this up a little. Okay, center this,
get the duplicates, get this back in place,
rotates this way. Let's get the rotation at
least a bit more accurate. All right. That should be fine. I'm
going to max this region, invert the max, low this out, extend it out some more Extend this out some more to the
same year also, too. This extend this out some more. Let this do this
for year also too. Load this. Okay, get this out. Do the same also too. At this point, I'm not too
precise about getting it. All of them exact accurate
size or length for it. A little variation in
there also two can actually make it look
a lot more believable. So this would be fine. Okay,
so in the next lesson, move on to the lower parts. I'll see you guys in
next lesson by for now.
50. 48 Scepter Tip Crown In Zbrush: Come back, guys. So moving on from
where we left off. So we're still kind of
working on the tip of this. So seem to get some Okay. Okay, that's fine. That's fine. Just the inward
parts inward part. So we're still going to even make some
corrections on that. Let me solo this out. Feels like we have another
extra piece in there. Yeah, we don't need
this to be visible, so I'm going to hide that. Let's hide that that visible. Okay. Okay. Hi dots. Okay, yeah, that's fine now. That's fine. Alright,
so moving on. So we need to kind of create
this shaping in there. So to do that, I think we need the police fair we
created before. Let's select make it
visible duplicate. Hide one of the duplicates, send this down, bring
this down here. And I'm going to scale it out. More or less I'm going to
scale it out to the size we need for it. So I think something around the nature of
this should be fine. So I'm just going
to get a good feel of it just to be sure. Yeah, I think, this
should be fine. So I'm going to
actually slow this out. Then I'm going to sub sub divided so I can just
grab the piece from this. We see. So let's use grab because
it's much easier. It's work with the lower
subdivision level actually. It's much easier to do that. So let me duplicate
this one more. Then I'm going to
grab what I need. So basically what I need
will be to go to BZ unless I selecting
physically the shape, but it might take a little
bit of time to actually try to fine tune and
get this to look right. But we'll make it work so. Let me start by
doing this first. I think all the way here
should be fine here also, too. Okay. I think maybe year also two. Then I'll go because we
have this edge here. We have this edge here so we
can do we can do, as well. Grab this also, too. Let's see. Okay. Yeah,
this should be fine. Let's see if we need
a little bit smart. I think we might need
a little bit more. I'm going to grab this as well. Okay? Let's see, do the same
on the opposite side. Okay. I'll do one year. Let's see. This should be
fine. Worked just fine. So we can do go through
ship click on this. Okay. So I'm going to
was I need to make sure symmetry if I
turn on symmetry, are we going to get
this perfectly? I might need to I might also need to kind of
mirror and weld this too. But I think as far as good,
it should be fine for now. So let's go on do
delete ding geometry, delete ding, delete ding. Mirror weld. So that should
clean things up a bit more. So the next thing now
we need to do net start pushing and pulling
things in place. I think there might be
one issue we might have. Well, let's just see. Let
undo the tnalsymmetry. Okay? Move this in place. Move this in. Move
this in. Okay? I think this might
make things a little bit harder to work
with because we don't have something in here.
This might just make sense. Though it's going
to work, though, but you might need to do
some pushing and pulling. But the benefit to
this is that we have this low pulley. So
it's quite long. So we don't need to
kind of zeromrge this. We just need to kind of move since we have the
desired results. Okay. So I'll just keep pushing
and adjusting just to get the right shipping
in there as well. Let's see the shipping we have. Move this in some more. All right. Move
this in some more. I think I think this
should be fine. Move this in, in some more, move this in. Okay. Let's compensate for
some of the edges, so we get even topology across
this as much as we can. All right. I think this should work. Yeah,
this should work. Okay, so let's do some slight
polish to this as well. So let's polish this. So I'll go over to
deformation, polish by future. Okay. So during that nanosis we need
to push this in some more. This we need to
get in quite more. Okay. Push this in some more. Okay. T at this point, I mean to do them just to get
cleaner edge around here. So let's duplicate this. So we research 45. So let's go over to geometry. But let's get at least
the shaping in the fits. Okay. Move this in some more, getting in some more
okay. Zero merger. Turn off adaptive, keep group, detect edge, take
down the smooth. Let's go all the way
down zero merge this. Okay, let's turn off
detextdge zero merge. Let's go off. Okay, half again. Yes, we're getting yes,
we're way better now. Half war more, half one
more, half one more. Okay, can go lower than
this. But that's fine. We get good clean
topology around this now. So this will work just fine. Making it work a
whole lot easier for us to kind of get
it to look right. Do that the more brush, move this in some more, okay? Awesome. I think we can this
we can work with. I'll spread this down some
more. Okay, fantastic. So now that we have this in, I'm going to duplicate it. Let's duplicate. Okay, then I'll go over. Let's add some thickness to it. Let's get some thickness
going on in here. So geometry, dynamic
subdiv Okay. I already gotten some
thickness in here already. I'm going to increase
the thickness some more. I think something more or
less like so should be fine. No, maybe not. Because I need
some edging around this. I need some edging around this, so this might not work. Because of the way this
shape is shaping needul be Z. I want to extrude out the edge to
extrude edge lo Okay. Just something more or less
like so should be fine. Here, something like
that should be fine. Then we can now add
thickness to it now. I'll take down the thickness. I don't want it
extremely way too thick. Think some around there
should be fine. So apply Okay. So I'm going
to do QsgPolloop. I'm going to extrude this out. Okay. Yeah, more something like so, maybe a little bit
more little bit more. Okay, that should be fine. I can see an issue here now. The thickness we
had in the in word parties actually way too much. So let's go back and then shing this down
some more, apply. Then if we should
extrude this out now, should have the right amount of thickness in there, so
we can actually push. Then I'm going to push
this in extrude that in. So you should get something
more or less like so. Then we need to do some be vol. Can do some Bevo or we
can just do Crispy G. Cris PG should PG. No, Let's do bevel instead. Let's do bevel instead so. Let's do Bvuldo
that, gets up close. B edge, Bv edge. Yeah, a swell. Well inward. Okay, I think that
should work just fine. Whoa. Whoa. I did not see this at all. Undo all of that,
that we need to. Okay. Okay, it was the screw that
kind of caused that issue. So undo that. Let's go out of solo mode. We do solo mode. Turn off symmetry. It's actually a good thing
to actually kind of check around your mode just to be sure this is
working correctly. Undo that also too. So once we need to reduce that, we need to fix we need to fix the edge loop
across this also too. Let's get that fixed.
So let's insert. Let's do an inset in here. Flex this out don't work. So we need to kind of get
this across very important. So we have any
weirdness in there. Okay. Undo that actually. So on symmetry just to make
things a whole lot faster. Okay. So just to make sure
we get this right. What you actually kind of checked around you
just to be sure. That's why you want to always check always check around your model to be sure you're
doing this correctly. If not, you're going to
get something weird. Come on. I need to undo that. Okay, let me isolate this out. Let's isolate. Isolate this. So we can do this without any
mistakes in there. Okay. So you basically need to be patient with the process
and always check around to be sure everything is working
accurately as it should. All right, perfect. So we can bring
everything back out now. Yes, that's clean. Then we can extrude this common. All right. Fantastic. So you should actually go around so you
can see it going around now. Then we can extru this in. All right. Whoa. You still have
weirdness in there. Still have weirdness in. Okay. I don't want this to go around, so let me hide this for
now. Let's do this again. Nope. Let's think I'm
missing something. Poly loop poly group, I think that should
be the one is perfect. This is what we need. Precisely what we need. Now we have this
working correctly now. Okay. So I'm going to delete this, instead
of deleting it, let's just pervulnd that pervul. Split this apart a little. Go back to Q mesh,
polyoPolyGroup. I'm going to polyoupPoly group, push this in. Yes, perfect. This is what we need.
Precisely what we need. Okay? Now we can bear
with the edge now. So we can quite easily
bear with the edges. Okay. That's fine. Okay. Undo
that, get up close. All right. That's
fine. That is fine. That is fine. Zoom
out, zoom back in. So this should hold
the ship quite well now. I believe so. Shift F, if we should
subdivide this now, we should be getting
something more or less like so precisely what
we need, do that. Of isolates. So this
should be down obviously. So let's get this down. Okay. That should be fine. Let's make a duplicate of it. Get that duplicate back in. Okay. I'll go to the top. Ton of symmetry transcends
centers this way, rotate this out this way. Okay. I think more or less
like so should be fine. Play the x. I'm going to
rotate this this way. Okay, 90 degrees should be
perfect for this. All right. Yes, this will definitely work. So the next thing we need
to kind of create now will be this what we need
to create next. But I think as far as this goes, I think this should be
just fine where it is. Okay? If we feel need to kind
of shrink it down, we can. Maybe we should
shrink this down some more, put this in again. Okay, that should fine. Okay, that's fine. Moving
on. Let do a quick save. All right, so the next
piece for the next piece, I think I'm going to use a plane and just
work on the plane, get the shaping in there,
and then bring it back in. That's pretty much what
we're going to do. Or we can just steal
the shaping from this. We can definitely steal the ship from this and then
modify it however we want. Because we already
have something good in here. So let's
duplicate this. I'm going to duplicate
this duplicate. Okay. Isolate Control shift. Click. Okay. Let me rotate this 90 degrees. So we have this kind of
perfectly centered anyway. Alright, so let's
do photo group. Holy group auto
group, Auto group. Control Shift click on this. Then we can do delete ding, geometry on fatpology
delete ding. All right. So basically what we
need is let me use the mark last so
ton on symmetry. Does this. We can
select it manually, so it's a lot much easier. And we can use the
symmetry tone down too. Let's just do roll well
just to be extremely sure. Okay, that should be fine. So I'm going to do let's do PCM ***** undo that. Okay. Grab this her two. Alright, Control Shift click. Control Shift
click, delete Eden. Okay. Then I'm going to
start some movement and adjustments in move these out. Move this out.
Okay? Move this in, in some more these out. Go down here, pull this out because it's way too
thin on the lower end. Okay. Let's let's kind of get
the ship in in here first. Once you get the ship in here, then we can now make the others fit
properly as we should. Okay. All right. Okay. All right. Okay, that should be fine. Okay, let me put this in some more so we get out
rounded shape in there. But I think I'm going to I feel like I actually
split this into two. But let's do the M. I do that. Let's get inserts, a one. Okay, that should be fine. With the move brush, we can
now move this accordingly. Okay. Now, if you're
noticing here on the side, you can see how this pass
kind of tilts forward. So let's kind of replicate that tilt forward
that we see in there. Let's replicate
that. Let's do that. So to do that, I'm going to use, I'm just going to max this
this way, invert the max. Let's see if we can get it
in the rotate this way, this way, this way,
bring this down. Yes, we have something, no doubt. Okay, clear this out. Then we can start making some adjustments and
corrections to it. I will also push
these bits down. Okay? This edge also
to push it down. Move this forward. Hold as well. Okay? So you can see here
on the side now we get that shape in. We need
to do a bit more. Let me see if C
max is in the max, rotate, move this up
forward some more. Okay? So to hold this
edge a little bit more, we might need to add
some more segments. So if you add more
segment to this now, act hold up the shape some more. We can also do this. Pull this out. Okay. So
more children's hot. All right. That's fine.
I'm going to delete lower, then I'm going to go
over to deformation. Let's do polish by features. Perfecto. So now we get something
interesting to work with. Okay? So I'll need to extend I'll need to squash
this down a little like so, then extend it out also too. Let's extend this out. Okay, this here. Let's see the length for it. I think we need a
little bit more. Or maybe this instead, we shrink down some more, pull it back in, select
this ton of symmetry. Here, the center. This center, I'm not sure it's centered. Ton of symmetry
center this, okay? Then we kind of get
good visuals on this. I'll rotate this way,
bring it closer. Put this down, figure out
the length for it again. Extend this out, bring
this down some more. Okay. I think as far as this goes, the length for this now
should be just fine. Pull this out this way, pull this up. Yeah,
this is fine. I feel like I need to extend some more some more
extension should be fine. So should be fine. So I'm going to make a
duplicate of this now. So let's get to duplicate, duplicate this, hide one at the top. Let's
work with this. Okay. So now, next thing to
do would be let's solo this. Let's get some thickness
in the geometry, dynamics of the thermodynamic. Okay, we have some base
thickness. We should work. It'd be fine, I guess. No, let's do a little bit more. Okay, a bit more. Okay? Maybe way too much though. We too much down the lit,
that should be fine. Apply this on. Okay, so be busy. I'm going to extrude
this suplepolygroup. Come on. P Loolygroup. Come on. Why is it not working? I supposed to work. Okay,
that's a bit strange. Let's go back to the edge. Let's just do Polly Loop. Let's see. Fantastic.
It's still not working. Something feels oddly wrong. Okay? Why do we keep having
the same edge around this? So I'm going to do something so. Let me do group by normal, group by normal,
group by normal. Okay? Okay. Yeah, I think you should
help this work properly now. So let's say through the edge. Here it's perfect.
It's working now. So this issue was the
only group in front. Let me do that again. Let's see this come on. Let's see this from
this angle instead. I think we might need a need
a little bit more. Okay. I still feel like I
need a little bit more. All right. I think
this should be fine. Strew Let's strew this
out now and do that, get a good angle on it. Come on. Okay. Yes. Shift F. Let's see. D should be fine. So I'm
going to bevel this edge. So let's be with the edge. More or less like
so should be fine. Then let's extrude
this in permon. Like so something more or
less o should be fine. Then let's bear with the edges. So let's go and bev
with this edge. But with this edge. By undo that. But this edge. Okay? Where would this edge. A inward part doesn't
need any bevo. But the inward parts,
where we swell. Okay. I think as far as this
goes, it should be fine. So just a matter
of placements now. I think I might need to
make a little adjustment in a bend curve. This part I need to
shrink it in some more. Okay? Bend this down some more. Okay. I think let's do down
a little bit more. I think that should be fine. Let's accept this accept. Okay. Now now we can kind of mirror, duplicate whatever
what's doing here. Oh, I think I need
to pain curve again. Let's pull this out. Okay,
that should be fine. Accept. See, let's get this
in the center now. I get the gismo in the center,
place it in the center. All right. Pull down control, get an extension out, put it back, rough in
the center, rotates. Rotate some more. Okay, I see an issue in here. I see an issue in here
that we might need to fix. So undo that, undo that, undo, undo that as well. I came up preferable option would be to get this
in the center first. Let's make a duplicate
of it, duplicates. Okay. First, I need to do
this kind of position on this around here. Let's get the shipping
in there first. This is what we
need to do first. So let's get the
shipping in paint curve. Okay, Let's see. Let's start by moving this out. Move this out as well. Move this up. Okay.
Something like so. Move this this way.
I'll select this, shing this down some more. Okay? I just needs
to touch like so. Go back in here. Okay. Accept these
first. All right. I'll select this,
pull this down. Okay, like so. Then I think it to be safe now, it's safe now to actually
go back in a in curve. Let's increase the segments. I'll move this in some more. Move this in some more this way. Okay? All right. I think we can work
Oh, fantastic. Fantastic. We have this face
in the opposite direction. You can see you have this face
in the opposite direction. So I think we need to go back. It's always been on the
opposite direction. I thought I was doing it
in the correct direction, but I've been on the
opposite all the while. So need to go back quite a bit. I've been on the opposite
direction on along.
51. 49 Scepter Crown Parts In Zbrush: Okay, comb guys on
the previous lesson, we kind of created
this space boots. I realize I've been doing this
in the opposite direction, so I would need to fix this. It's not going to be a major
issue fixing it, though, we need to do is to duplicate this and just repeat a
few steps, so isolate. So I'm going to grab this and this edge invert the selection. I'll do delete ding. In fact topology, delete ding, and I'm going to do let's do control Control
Shift click on this. I'm going to do
Auto Group in here. Auto Group. So Control Shift click, Control shift, click
again, invert this. So this is basically all I need. Then I'm going to
do delete Eden. So we need to repeat
the thickness again, so let's repeat the thickness. They it's going to memorize the previous
sickness, which is cool. I'm going to leave that
as it is. Then I apply. Then I'm going to need
to extrude out again. So B Z don't do that. We need to extra this out. Let's make sure we're doing this correctly on the
right direction. Come on. Okay. Well, let's
make it a little bit tier. A little bit tire,
so should be fine. Okay. So I'm going to use the
bevul split this in two. Okay. By this in. All right. So now we can bevo this
now, Bevo Pavo pavo. Pavo, PvoPvoTG some Bevo in here as well. Alright, perfect. So now we can now quite easily
move this in place. So let me center this. Let's do bend curve. Let's reduce the bend
curve resolution. Okay, get this in
here. All right. No, undo that actually. Let's
leave with the way it is. Why? Because we need
to kind of rotate this back in the middle.
It back to the middle. Hold center this again, to actually rotate this
into one of these. I remember correctly, I need to get this
into one of these. So based on where it is in here, we can now make correct
adjustments to it. So let's do bend curve now. I move this out some more. Okay. Let's get up loose. Okay. All right. Maybe in some more, select this, pull this down. Okay, fantastic. Back in
here, accept this first. Go back in there. Et's add one more resolution
in get this bent in. All right. Get this
up, some more. I just need this to be as accurately as we
can get it to be. Okay? Would use the resolution
these down some more. I think Oh maybe not. Maybe not. Don't need to
get it down way too much. Let's see what we
have in here Okay. Move this up some more. Okay, I think we can
accept this now. Accept. So perf work just fine. So let's go back set
degrees more in here. Rotate a little bit more. Okay, O down control,
gets one out. The duplicate out. Rotate
this way, 90 degrees. Hold down control,
get another one out, get it back in the center, rotate 90 degrees again. I don't think I'm doing it.
I don't think it's okay. All right. Okay. I feel like I need to shrink. I need to shing this
down some more. Is quite wide, so let me shing this down
a little bit more. Okay, pull down control, get one out back in in position. Okay, rotate this
now 90 degrees. Yes. We need some
spacing in between. So spacing in between
should be fine. Okay? Yeah, I think
that should be fine. Get another one out. Get it back in
position 90 degrees. Put down control,
get another one out, put it back in position. Okay, old and shift rotate
this 90 degrees again. Play the max. Let's just
rotate it this way. Okay. Yeah, I think this should
be more or less fine. Okay. I come back in her. I would
go to the Gizmo been curve, select this, scale it. Let me add some
segments in actually. Scale this part out some more let's do some more
segments. Scale this out. So more. Scale this out some more. Just get some space
in India actually. Let's accept this. Accept. Okay, fantastic.
Tho work just fine. We select this now
and we subdivide, see how it holds the shape quite nicely, which
is what we want. This also too, if you subdivide, holds up the shape
quite well also too. You need to do need to kind of put kind of big rock in there. You need to have a big
rock in the middle. Okay, let's just do that
gets a big rock in. Let's select this. Okay undo that. Let's get this at the top. Let's get some kind
of rock in there. So be let's see if we can get some interesting
looking rock ship in. PI. We have this ter
sphere. We have this. As we have this o sphere. Let's select this
exosphere instead. To symmetry. Okay. And I'm going to
basically drag this down. Let's mark split on mark points, split on Mark points. Undo that's select it, get it down. Get in there. Okay, it's not in the center. Let's get this in the
center. Bread this in. Scale it out so more Okay, we can deform
the shape as well. This way. Let's do some more
this way. Let me solo this. Let's see. I think I went
overboard, this out. For the shaping
we still going to depend depend on a few things, so let me skill it
out, pull this up. Let's see where it's buried in. So this her out. I'm going to use been curve
produce the polycunt. I'll shing this down this way. He should look something
more or less like so. I'll accept this. Okay, let's get close, hell it out some
more, buil this in. And let's see where we
are at this, that's fine. So something I'm also
going to do I'll come over to geometry. Kind of like the shaping
we have in there, so I'm going to
turn off a smooth. I'll subdivide this. Okay. Then I'll delete let me make a duplicator
of this first. Okay. Hi just send it down. Then I'm going to
do deletes lower. Then I'm going to
turn on smooth now and divide this Okay. I think at this point,
we might not need we might not need to
smooth this in any way. Cause we lose we lose those
sharp edges we have in there, and we need those sharp edge. Very important. Need
those sharp edge. Okay. So dots let's go over
to e'srou Let's turn this dot on group normal Na Let's increase the max
angle group by normal, NA I'm trying to see if I can get all of the
sharp edges bevoed out. That's a general idea to get
those sharp edge bevod out. So let me do 45. Okay, let's see if we can
go over to geometry, prePG. Do you have any thing
here that might work? Is there any options
kind of Chris edge. Let me save this. We can obviously leave this
as it is, though. I like to sharpen most
of the edges in there. Or another option we can
use is to z mash and then the Z march to
actually keep those edges. Well, let's see, Chris. There's no Cris edge. Let's see. Let's do Chris, do you have
anything going on in here? No, we do not. So that's not going to work.
Not going to work. We can do Let's see if
we can actually do B. Okay, I think we can do this. Cantonalsymmetry
for this actually. So these sharp edges, we can add some pieces on it just to hold the
edge a little bit more. Basically just
experiment in here, though, just to see what works. Figure out what
works in here. Okay. Let's see if this would
even do anything in here. Okay? Let's see going to bevo
most of the edges in here. Bevo this as well. Okay. In here as well. Okay. Let's not forget this portion. Okay. I think we have one. Let's do one here as well. Okay. Let's subdivide this. Subdivide some more. Yeah, I think this actually
gives interesting results. You just need to kind of
smooth some of the edges out so we can do polish. Let's do polish by group. That's gonna create even some
weirdness in there as well. Well, I think, as far as
it's good, should work. General polish. General
polish is way too strong. Let's do polish by features. No. No the right amount of
pol Polish scripts edge, no. One of these dots, polish. This actually gives us
an interesting results. If you should know, pull it by future. If you subdivide this again, let's subdivide
this a few times. Okay? This going to create
some interesting looking shape to it. Then I'll turn off symmetry. I'll use this smooth brush. So some of this a
little bit more. Okay? Yeah, yeah, this is actually will actually
work just fine. I think it's interesting.
It's kind of create some emirc kind of
stone structure to it. Alright, so it's
buried in here now. Should be getting some
stone structure in here, which you can give
some jade material or something. That's fine. So let me do a quick save. So in the next
let's just kind of move on to something else. There's a shape in here. There's a shape in
here. I think we can also create that shape in we can create that ship, in that ship cost shouldn't be too much
of an issue, I believe. So we just need to grab this and go to a lower
subdivision level. I'm going to duplicate it. Yeah, we can duplicate. So let's go make duplicate
of this isolates. I think all I need
to do one and then, I'm just going to mirror
this so the opposite sides. Oh, interesting.
Let's do geometry. Do we have a duplicate
just to be sure. Yes, we have a duplicating here. Modified topology, deletes
Eden. All right? Fantastic. Can we delete Ayer Can we also
reconstruct? We can, too? Fantastic. So you need
one? Who you need one? And then we should be good. Let's figure out how
far how that should be. Okay, let's just use one. So let's do the Po group. I only need this.
I'll do deletes ding geometry deletes ding. Okay. Let's see how far
out that should be. Maybe I'll use it all
the way instead BZ. Symmetry work on this? No. It's not perfectly
symmetrical. Actually works. Come on. All right. Perfect. So Control Shift
click Delete Eden. I'm going to turn off symmetry. Start by pushing
this out some more. Okay. And I'm going
to add another one across here, inserts Inserts. Okay, deletes Okay.
Let's go higher. Well, deletes higher actually. Let me give this a moment
to kind of save out. Okay, I've done
deleting already. Here add one segment in here. Let's see. Okay? No, actually. Let me I'm
going to cut this instead, to have something straighter. Let's use a slice cove. I cuts a line here. Perfect. I'm going to
be with this line. Let's be with this line. Okay. This way, go to the
move brush now. So now symmetry, shing this in. Okay. We can do this. All right. Crushing this in. All right. I'll extend this out
some more. Okay. Extend these sides out instead. All right. Bring
everything back out. We're getting something around
here. That should be fine. Okay? Yeah, I think when
you write place, a little bit more adjustment
and then we should be good. Let's start by subi No, we can't subdivide yet. We can't subdivide yet. Because we need to
hold this edge. So let's add thickness first. So you're going to memorize thickness that was there before, but that was way too thick. I think something like, so you might need to
push this out actually. So let's get gizmo centered. Then I think pull out this way, rotates out some more. Okay. Put this in down some more
down some more. All right. So now you can see where we
need to actually fix now. I need to pull this
up up up up this way. Okay. So I'm going to apply this the subdivide is going
to shrink it also, too. Let's add necessary
loops for it. Let's do group by normal. I need to pull this out. Okay. So let's do group by
normal group by normal. Okay? Then we can do CrispiG
Let's do Crispy g. No, let's just do manual
rising in here. I mean, why not? So let's
just do BvulPZM Come on. Bevo ton of symmetry. Okay? No, I don't want
it Bevo that way. I don't want Bevo
that way, like so. Okay. Then like so. Alright, Bevo in here as well. V in here. Then Bv. Okay. Bevul also too, spread
this out some more. Okay, that should hold up the head a little bit a bit more. So if you subdivide now, that should hold up
the head some more. Fantastic, so. Yes, this should be more or less
fine where it is. Wimve I'll move
this out some more. Come on. Alright I'll use the move brush, move this in some more, get some more accuracy to it. And I will need to bury
this down some more. Let's get this bury
down some more. Break this down, kind of touch
the soft with some more. Okay. All right. I think
we're in a good place. So now, basically, I just
need to delete lower and then rotate this to
the opposite sides. So center, bring this here. Okay. O down control,
get a copy of it. Here the copy back in, rotates. Okay. Yeah, I see here also, you need to make adjustments to it. But that's fine. So I'm going to push it up some more do that. Let's pull it up out some more. Yeah,
that should be fine. Okay, hold down Control. Bring it round that piece. Here this back in. Rotates Seems like we need to make quite a lot
of correction in here. Con do that. Rotates out. Okay. That should be fine. Use the
move brush, get up close. Move this up, put this down. Rotates this way some more. Okay? Let's see.
That should be fine. One more, and it should be
good. Old than control. Get the copy out of it. Push the copy back in. Rotates. Okay, rotates out. Gets in there. All right. Look at it from this angle, I think, up some more. All right, that should be fine. Play that out. Now the next
thing to do will be to add already guessed it
like a boat in there, so I, it should be in
here, we not there. I, that's the one,
that's the one. Let's find it again. Should be almost there.
Okay? We can use this position it in there. Okay? I think I need to
make it embed it in some more so
let's just brush, embed it down some more. Okay? Undo that. All right move to the next side. Okay. Last parts. All right, clay the marks. Awesome. So we're kind of as far as this goes,
I think we're done. Far as this goes, we're done. Okay. I think I went in
there to do something here. Okay. I'll mark the center parts. Get our gizmo in there. Then kind of shing this in here, like so. Alright, Lady mark. Yeah, something like
that should be fine. Okay. Awesome. So
we're done with this. So I'll see you guys
in the next lesson where we move on to. Yes, where we move
on to creating this. So see you guys in the
next lesson bye for now.
52. 50 Casket Base Mesh In Zbrush: Okay, but guys. So in
the previous lesson, we kind of worked on the
rod or the scepter rather. So I'm going to import
it now to our main file. But first, we need to
kind of get all of this. Let's get all of
this in a folder. It's kind of faster ways kind of imports with folder in there. So let's do that instead. You know, this is what we
need. I'll send this down. I'll put it in a folder. I'm going to rename
this folder to Scepter. Okay. Then all the mesh we need, I'm going to put
them in that folder. Most especially the
visible meshes, send this down. Put
it in the folder. I think this as well, send this down, put it in the folder. I think as well, send this
down, put it in a folder. I also send down in the folder. Yes, I think we need
this also, too. Send this down in the folder. Okay, send this down, put it in the folder. All. Okay, yes, then the rod itself, send this down, put
it in the folder. Put this in here, okay? Do we need this? No,
we don't need that. I think we're fine. So let me select Oh, we need this also too,
put this in the folder. Open the folder
up, drag this in. Let's select something
completely different. Hide the folder. We can see that everything
inside our folder. Select the folder. Then
go over to Zip login. Then go over to Sub to master, you should see copy folder. Copy folder. Let's go in here and let's
paste the folder in, go to Same Z plug in again. Piece folder. Let's make sure I piece new folder
the bottom parts. Let make sure bottom
part is selected. Bottom sub to selected
and then piece folder. So to go through and then
paste that in there. Okay, perfect, so we have
this place in here now, which is precisely what we need. But I'll need to
move it to the side. So let's move this let's move
this scepter to the side. I'll go in. I'll
do transform sets. Center orients Orient. Come on. Don't up symmetry. Just move this to the side. Feels like we have something
selected somewhere. Anyways, let's move this. Let's move it this way. All right. That should be fine. Turn this off. Let's make sure we don't
have any issues in there. Okay. We move this correctly,
no issues in there. All right. Okay,
that should be fine. Now in this lesson, let's
work on the next piece. Let's work on this.
So I'm going to do it in a new canvas instead. So it's around the height of where the chest region
is supposed to be. Maybe probably a
little bit higher, maybe all the way actually. So I'm going to do that
in another canvas. Okay? Maybe we'll
get the heights. We can actually can we
do this here instead? No, let's do on a
separate canvas. Okay? Just need to kind of get a good sizing for where they're
supposed to be. So I'm going to create
a let's do an append append a pen plain plane, okay. Let's make sure
select that plane, extend it out this
way, move it forward. Let's figure out where the ground level
is supposed to be. So ground level
should be somewhere around ground level,
somewhere around there. Okay? But I want
to matter though, so it's need to kind
of scale and do that. Scale this out properly. No do that, actually. Let's move our Gizmo
to the bottom and out. Move the gizmre to the bottom. So if I scale this out, now I can scale it up this way. You got a high length of this. Okay. I think somewhere around
there should be fine. Then the size or the bit for it. I think this we should
be more or less fine. They kind of tips at the end. So let's extend it out a little. Then we dip it at the end. I think something like
so should be fine. Yes. Let's dip at the end, so I'll go to the
Gizmo bend cove. I'll select the lower half. Then I'll just scale
it down some more. Okay? This should be fine,
maybe a little bit more. Okay? No, probably nothing.
This size should be fine. This size should be
pretty much fine. Maybe we can scale this
out a bit more, okay? Yeah, this should be fine. So we have roughly around
the heights we need now, so I need to copy to
the other document, and we have this also
too symmetrical. So that is fine. Symmetrical, that's fine. I'm going to copy
this copy this sub too from in here and
I'll paste this in here. So let's do et me
add this for now. Okay, no piste soup in here. It's kind of buried inside. We have this inside. So I need this to be out, so I'll send it out of the group. Hide this again. Okay, so this is pretty
much all we need MD quick sieve what's it going to do proper clean
up all of our files, though, when we are kind of done with getting the base mesh, we want to clean up the file and then the reduce or delete any soap that we
don't actually need. Okay, so for now,
let's just carry on. Let me put this here. Kind of get up close
a little bit more. Okay. This is all we
need. That is fine. So first thing I'm going
to do is to reduce the fully count for this. Pul count for this
is way too wide. So let's go over to geometry. Let's make a duplicate of it
first. Make it duplicates. Okay, we duplicate. So let's go to geometry. Reconstructs reconstructs. Let's do one more. Okay. This should be more or less fine, let's
delete higher. No, let me go on
solution level higher. Now, let's go low
because we need this to be quietly enough, so we can actually easily
manipl theever we want. Okay. So this should be fine. Alright, so I will need to add a little bit of
thickness to this, 'cause you know some
thickness you kind of start with. Quite important. I can't just extrude, I like to extrude this edge out, but I can't strew this edge outout having some
polygroups in there. So let's go dynamic, turn on dynamic, take
down the smooth. Let's go over and add
some thickness to it. Something actually quite thick. Moving all the way to
the end should be fine. Like a system supporting
edge loops in there, do I? Let's see. Let's apply this. We subdivide, they're actually supporting
edge loops in there. There are supporting
edge loops in there. I need to try and delete them. You don't need supporting edge
loops as far as this goes. Okay? Yeah, we can easily
fix that by doing. Let me actually undo
this thickness. Let's do the thickness first. I will do BCM I'll do inserts or polygons. I'll get something
small on the edge like. Then control shift click. And I'm going to do delete ding. Delete ding, something
that doesn't have any edge loops on it, so we can now go back
and that sickness, maybe scale this out. Let me it for now. Let's let out a little bit
more say scale out this way. Okay, that should be fine.
Okay. So dynamic increase the thickness, click Apply. So now if we subdivide, it's going to shrink this way, which is what I want for now. So let's extend the
thickness out some more. Okay. Roughly around the
thickness we should have for it. I think this tick that's
a little bit more. This should be, let
me take it back. This should be fine
for now at least. All right. So let's carry on. Let's carry on with
this. I'm going to extrude out the edge. So let's do extrude poly loop poly loop poly
group instead. Okay? Like, so it should be fine. Use I need something
like an inset in there. So let's see how far
out we need this. Okay. Let's do two instead. Let's start with
something small. Then we'll add
another one to it. Okay. Yeah, pretty much,
let's should be fine. All right, so I'm going
to go to the top now. Q mesh. Let's add
segments in there, or add a polygroup in there. We need this. But before that, you can just on the
edge loop in here. So let's do inserts and do
that a edge loop around here. Okay. Then I'm going to
do something like so. Then we need to extreme on, we need to extrude this out. Let's go over to extrude. I probably skew mesh anyone who still work Extrude
documents should be fine. Let's do flat Bly group. Okay, so I'm trying to kind
of ship this head in there. That's a general idea. It's
kind of ship that head in. All right. I think the first
one should be fine. Let me add something in here
extra this out also too. I think with this now we
can do proper shaping in. Be able to shape
this now properly. So I'm going to
mark this region, bring out our gizmo, put this in, bring this down. Okay. Play the marks. I need to max these bits. So of symmetries. Come on. Centering
somewhere else. Invert the max, get
this up. All right. So now we need to add some
supporting edge loops. Need some supporting edge loops around here around
here actually. So insert set one here. Okay. Set one here as well. They need to reshape
this a little bit more. If you subdivide this,
let's see what we have. I will have something actually makes sense when
we subdivide it, to make some adjustment
and corrections to it. So let's see, I'm going to turn on
symmetry again I max this region va the max. Let's get something TAF
is a lot more rounded. Okay? I'll add one here. I don't want something
that's kind of fling the deformation of the ships. I'm going to use my
slice cove instead. Let's slice cove to do this. I'll add one directly
where we need it to be. Okay? More or less like,
so should be fine. Then I'm going to max this
region, invert the max. Okay? All right. Do I need? Yes, so we extend this
out like to instead. Okay. Yeah, that should be fine. I think I'm going to
select these bits via the max I probably down some more down this way
should be fine. In some more. Okay. So basically, just trying
to get the shaping in. Then we also need to
kind of bevel this or we can I think
we can do something can select this let's see
if this get this down. Here, this will work just to get something rounded in there. Okay, lay this out. Then I'll need to
select this as well. Get something that should kind of create some kind
of roundedness to it. Okay. Yeah, this should be fine. So if you should you kind
of bevel this edge now, should get something
interesting, bear with the edge. But before I do that, I would like to get an extrude So this BT won't matter that much
because we're going to have something it's going
to be a head in there. I'm going to have something
c on it on the side. So carry on. But I would like to get need
to do something in here. You can see this edge in here. We have an extra lens in, so I will need to create that. So to do that, I can just Let's a slice curve.
I mean, why not? Let's get this I
feel it should be. How far out can we get this? Let's do all do here. Undo that. Undo that. Let's go from the
opposite direction instead. Let's do it from the
opposite direction. Okay? Let's see, I think it
might be way too high. I think that's way too high. Let's go down some more
around here should be fine. Yeah, that should be fine. Okay. So what I need to do now would be to extrude
this part out. Okay. So I'm going to let me select, let me give this
a different Lou. Come on. Come on. Kind of acting because
we have symmetry on Leamington symmetry for
now, tonal symmetry again. I'll do this carefully. Okay? I think we also need this. All right. Let's make sure we don't have
any issues around the back. Let me see if I need to
go all the way in. Okay? Let me allow this save out. Alright, I think we might might need to
adjust this a bit small. Why I just carry on first. Armo thickness we need do that. All right. I think I will need to make
some adjustments to this. This is the more brush,
increase the brush size. I will need to extend
this out some more. Okay. Yes, I think
this should be fine. Okay. I think we really need
to do it all the way here. Maybe we should put
this back slightly. I don't think we need to go
all the way up that much. Maybe at best, we do. Yes, this part is going
to be covered up, so this part's going
to be covered up, so we don't need to
go all the way in. We can do something separating
here if we need to. Maybe we should
actually do that. So let's do I need. I'm going to select this. Let's do double sided. Okay. Let's Can we get this out? Okay. I'll do group by no mouse poly group
group by no mouse. Not yet. I need this
and I need this. Let's change this to
select R to invert this. Let's do group by normus. This why I'm doing
that because I need this piece outlet it out. And I'm going to do an inset. For this inset, let's
do flat and poly group. No. Let's make sure on standard Holy
group island instead. Okay, put something like so, should be fine. Oh, great. Kind of lost what
we have in here. No, I don't want to lose I
don't want to lose this. I don't want to lose this. Let's just do flat island. Okay. I think they should
they should No, I'm losing some of the details
I need to be in there. Can we do this without actually
affecting something else? Fantastic. Still
affecting something else? Okay. I think I'm going to
delete this loop first. Let me delete this loop
oro delete this loop. Do this again. Okay. Here, we can live
with this. We just need to kind of re
select them again. We need to select
them again. Okay. So we are fine. We just
need to select them again. Okay. I'll select this edge. All of this edge. Right. So we're going to pretty
much extrude them out. I'm going to make a
duplicate of this. Let's make it duplicate just
to be on the safe side. Undo that poly oop polygroup
mese poloopolygroup. Okay. Extrude out, F. All right. Interesting. We're getting
something cool in here. Okay. Let's see. So we know definitely now that we need
to push this out some more. These bits I push out some more. So I just need to go in and add something a new polygroup
in there as well. Okay. Then do another
extrude Extrude this out. All right. Let me
make sure this out. I'll tap out, just to give it a separate coloring around it. Yeah, this coloring
should be fine. I'm still holding
it to cue this out. Okay? That should be fine. I we need to do now
would be to adjust the kind of structure for it. I need to adjust the structure. So I'm going to select
max invert the max. Go to our gizmo. Okay. I need to select specific
regions actually for it. I need to select specific region because
this will not work. Let me select this first, and I'm going to the
front this is the front. So I'm going to go to my max into I select all these bits. Let's do a little bit
more all these bits. Invite the max. Go to
our Gizmo, pull it out. I think I need to get
some smooth in there, and select this, bring everything back invite
the max, blow blow again. Come on. I think I'm
pulling something out now. Oh Mark these parts. Do this again formon. Else something else is
being selected somewhere. Okay. I max this invert the max. Let me use the move brush
instead since we're not getting this properly with
the mole Perfect. Se my brush size. Okay. Let's check the
reference. Again, we just need a little bit
elevation in here. Okay. Then we can push
this edge back some more. All right. Okay. Perfect. That should work just fine. I'll come to the middle points, extend this out as
well. That is fine. So yeah, this we can
definitely work with. So now just kind of add the
necessary edge loops for it. Let's add some
necessary edge loops. Also, so I'll do something going to do something
on this loop. Let me start by deleting
what is in the center BZ M O Come on edge. Insert, delete this. Okay? So I'm going to do let
me do I need this edge back. I need to be Berblt instead. Bevult this way. Okay, I think that
should be fine. Then I'm going to
extrude this inward. Extrude or getting a
few mess in there. I don't want that. So
let's do the opposite. Let's pull it loop instead. I'll at getting some
issues in there. Let's extend this out instead, extend this out do that. Come on. Extend this
out quite well. Extend this out a little. Okay. But unionize that inward part is way too deep. So I'm
going to undo that. In what part is way too deep. So instead, we're
going to bear with this just little instead. Then we can do extrude,
some more extrude, a little Yes, I think we can
definitely work with this. It should be just fine.
So now we don't need to bevo the edges now and
we should be good. So those sharp edges now kind
of add that bit too much, add some bevo in there. Pervis well, PvoPvoPevo pv, as well. Okay. We'll come down here. I think let's see. I think for these bits, we need to move
something out here. This part looks a bit weird. Get some good shipping for it. Alright, so let's Oh, I also need to I will also
need to bend this down, bend this down as well. So you get proper
shipping in the to be Z should undo that. I should add an insert in here. Just one should be fine. Let's do one for now. I'll add one year swell. Okay? Yeah, I swell, one
year, one year swell. Okay. We're definitely
getting something. Okay. Do we have bevel
on the back side? I believe we do. Yes, we do. Okay, we need some
bevo inward parts. So Bv needs some bevos here here also too to
hold that head properly. I think I'll need a
bevo ear as well. Okay? Bevo do that as a bit old. Let's see if we can do
this properly instead. Okay, there should be fine. Okay, ship F. So now, if you kind of
subdivide this now, should get something interesting
enough to work with. So let's subdivide. I should hold up the
shape properly now. Yes. So we get the roundedness we are looking
for maybe way too round, probably way too round. I need to bevel this edge a bit more to hold it to subdivide. We are now getting
something way better now. Let's see, we have an
issue around here. Let's fix this final issue
we have around here. Okay. I think for the most part, those adding few
extra edge loops should fix any issue
might have in here. Okay. If you subdivide this now. Okay, I see. That's not where
the issue is coming from. The issue is coming from
around here. Don't do that. Let's use the BvuFuture BevulG close. No, not there. This is from around.
Definitely from around. We subdivide this now. Okay? If E can do that, I think a preferable
option would be adding E loops instead. Let's let's do extra
a loop around here. Quite close,
actually. Not there. Like, so I'll do one as well. Let's do one year subdivide that should hold it up a
little bit more awesome. So now we need to do the same delete are to do the same all around
here compensate for it. Okay. Do one here, or so. Yeah, fantastic. That
will work just fine. So if you subdivide, we get good shape in there. Okay, yeah, that's fine. You can see how we
get something clean, kind of taking up
the ship we need it for. So that's fine. I'll see you guys in next
lesson will carry on and then radio ships that are
supposed to be in there. I'll see you guys next
sting bye for now.
53. 51 Casket Body Mesh In Zbrush: Okay, Ocen Bar, guys. So I think next step would be to add a human character in there, and that
makes better sense. But I'd like to add
something that does not have topology that
is quite high. Because I feel like
this one we have in here is quite high. Also, too, I think we need to actually to scale this down. So let's scale this down. Actually way too high. Let's see the previous
one that was there before previous one that was there before it
was quite smaller. So let's get some resizing. Okay. We just need to
shrink it generally down, down some more. Okay. Yeah, pretty mot like
so should be fine. Yes, that should be just fine. All right, so I need to bring the human
character in here. So let me save this again. Like I was saying
before, I think this character might
be way too dense. Probably way too dense. I need to kind of
get it a bit lower. So if I select it lowest
lowest for is 32 k. 32 k. So that's the fish the
kind of structure, muscular structure we
actually need for it, though. I think maybe I should use this. So can we even reconstruct this? We cannot? I need
something low actually. So if I go to my light box, let's see what we have in here. If I should select this. We'd like to save
this project, yes. So it's going to open up
a new project for us. So I want to kind of
compare the topology here, the amount of polygons
we have in there actually to see which
one is quite low. So let's go all the way down. Okay, we have this at 15 k. The lay at 15 k,
which is actually fine. I think we can use this instead this is
actually quite lower. 15 is quite a really good
number, something quite low. Here, that's fine.
So I'm going to export this out. I'll delete. Let's say spot this out. We're going to use this instead. Get an export, so
go over and then we do Let's do we're going to
export this out as a ZTLFle. As BJ instead. So I'll go to preferences. Important exports.
Turn all group, turn on Smooth normal. I'm going to export this out. There's the imports Mil what
should we all this now? Let's just name this
to casketes mail. Let's name this to caskets. Mail, save this out. Then let's go and open
up our file again. There's a file. Let me delete this and make
a duplicate of it. Okay. Open this up. You want to save no. All right,
so we're back in. Go out of solo mode, and then I'm going to hide this body for now, select this. Now, let's in pots. I'll go over to Let's
append the ship first. Get a ship first appends fair. L that's fair Ips
casket mill Okay. It's kind of bigger than
normal, though. That's fine. We're going to scale it
down to the size we need, and then we should be good. So let's scale this scale down. Scale this down. I think I
went overboard for the scale. Okay? Bring this forward
up down some more. Let's just kind of roughly get where the sizing should be. Yeah, I think this
size should be fine. Because let's just see we
cannot put this in here. You can see this
size and should. Let me get this down some more. I can see this size and should actually match a little
bit more. That's fine. Let's make a duplicate of this. It duplicates, then
we start shaping it. It's gonna be where
it needs to be. Well, a few things
I like to do first. First, I would like to
slow this out. And fix. Looks quite slim too slim, read the fingernails
invert these blows out. Symmetry turned on. Symmetry is not turned
on. Let's mesial symmetry is turned on for
this to on symmetry, say this here, I'll do
let's use the max last. Okay. I'll mark all of this. Blow the mark, blow the mark. Okay, I'll go to
deformation inflates We need some swim to
inflate some more. Alright. That should work just
fine for what you need it for. Play the max. Okay, that is fine. I don't think I need to extend the arm anymore than what
we already have in here. Since the size of the arm
itself should be fine. Maybe we can just use the move brush and then
move this up some more. Okay. Down here some more,
that should be fine. Okay. Then I can
use the move brush just to make some
adjustment to him. Okay. Kind of add some bit more
muscular structure to him. Just a little should be fine. Smooth this down. Take
down the smooth intensity. Smooth this down. Okay. Use
the dad dam standard brush, create some structure to him. Okay. Just to get some muscular
looking structure to it. So I'm just doing a
loos subdivision level. We find a loos
subdivision level. Okay. Get some shape in here as well. All right. Okay. So I already know the structures that are
supposed to be in the dust. I'm just gonna blocking them in. Blocking the structure that's
supposed to be in there. All right. Okay. Okay. The back part is not going to be visible at the very least, let's just get some good
structures in there. Alright. Extend this part out. Okay. Just need
something in there. All right. So this part is
not going to be visible, though, but let's get
something in there. I don't do that. It might feel like I'm not
really doing anything, but I'm actually doing
something in there. Let's get some herb
shaping in.To this down. Okay? So I'm going
to reshape this now. I'm going to reshape this
get some good structure in. I pose, pose this. This down. Okay. It should be fine. So this down. So
now at this point, we need to pose this,
so I'm going to make a duplicate of this again. Let's get a duplicate. So I'm going to roughly pose this to what we can
find see in here. So to do that, Max Larso is going to be our
best friend in here. Also City will be
our best friend. Move brush into this closer. Okay? All right, awesome. Same standard, create
some dentition in here, smoothes down. Play brush, fill the spot up, some more, smoothes down, fill it up, smoothes down. You know, I think
I went overboard. I think I'm gonna
keep this, like so. Just fill the p up. Okay. Indentation in here. Fantastic. So now
let's use the max last so see the haps
should come down. So mark this part like so. Blow the mark inverts,
flow the max, use the gizmw, position
the gizmw around the. All right. Then move
this down this way. Move this down this way. Okay. So more this way. Maybe there's a bit too
much tend this out. I use the smooth brush, smooth this Istead
using the smooth brush. Let's move brush instead. But let's make sure we let's make sure we have polygroups in
there all two groups. There's no polygroups in there, so I'm going to do ControWG
a separate poly group. That should help
since a lot better. Thanks, you need to
go back in there. We can easily go
back in there and make the necessary
adjustments as needed. Okay. Yeah, that should be fine. So we need to make this
feel a lot more believable. I'm going to max this region. Invert, blow the max. I'll pull this down here. Let's get this this way. Use this, bring this
down some more, rotate this way in some
more which don't do that. I need to fix this
region some more. Bring this out. I
pushing this in. I don't want to
kind of completely mess up the topology in there. The forms in there. I don't want to mess that up completely. So inverts blow this
out some more inverts. Rotate, get this in here, move this in some
more out some more. Okay? Let's see some more
bring this down. Okay? That should be fine.
Clear the marks. Select this, mark
this region inverts. On do that inverts. No. Come on, I didn't
do that correctly. Select this, mark these bits. Invert the max, blow this
out, bring at gizmo. I'll just push this in a
little bit more this way. Then in fix any weird deformation
we have in there here. I use the clay brush. I'll
just fill this part up. Full this part up,
smooth this down. Okay? That should be fine. Maybe it it way too much. You need to compensate
for it around move brush. Compensate to it around,
smooth this down. Okay? Move this in some more
smooth this down. All right. That is fine. So we do the same thing
too for the legs. Let's max this pump out. So Mark last so I'll go in. We need this control
W's poly group. Okay. No, maybe not there. I need to do this properly. Let's do around these bits. Okay. I'll use the Max pen now and remove this portion on
the front part this way. Okay? Let's give this
a separate polygroup. On do that I'll give you a
separate poly group now. Let this out. I think we didn't
do that correctly. We need to exclude these bits. So clean the inward part out. Okay. Make sure this part is
max Control W. Yeah, I think this should be fine. All right, blow the max. Pasarizmo, get this
center down here. Move this around here,
bring this closer. Maybe not too close. I'm going to smooth
the middle points, get some separations in there. Okay? Yeah, like so should be I think we need a little bit more
to push it even closer. Seems quite closer, actually. I think somewhere around
there should be fine. Okay. But it seems like we need to
shrink the hips a bit more. Let's give him a more
slender structure to him. Blow the marks. Let's give
him more slim body structure. Go to the legs, blow this out. Give him more slender
body structure. Okay. Maybe not too broad shoulders. I need to move this
up actually a little. Smooth this down. I think need to shrink the
general mass of the arm, low this down, let's slim out. Let's slim out the arm
a little bit more. More slightly slimmer structure. Okay. Get up close, do this with
a bit more carefulness, start breaking the foam. Okay. Something
like should fine. I think I still need to
work on this a little bit more around especially low. Let me get this around here. I'm going to rotate,
bring it forward. Bring this forward. Okay. That should be fine. I think
that makes better sense. We need to fix issues in here. I think I did it in the wrong
place, but that's fine. We can gonna fix
the shape in here. Alright. Okay. Pop this out a little bit more out
a little bit more. Okay. Smooth this part
down. I think we did a pretty good job
as far as this goes. So you go out of isolates. You can see how we kind of get this at least for the most part, in where it needs to be. Okay. Yeah, I think it should be fine. The only issue now
I'm seeing is we are, I think you can just
fix that quite easily. Load the max. You can just
move this back up here, center, move this back in, then move this back down. But I want to faced
with an issue where even though we get
this to the back, this things to come out further, so I is going to be quite
careful with this actually. If not, is going to kind of
ignore this to an extent. But let's see how we can
make it work. All right. So I'll select this. I'm going to mark this region this way. Bring everything
back out, invert the mass, blow this out. I'm going to position this roughly around here
and get this out. This way, I think
this will work. Alright, that should
work just fine. We get good shape in there. Let's see. This back
here, move out. Okay. Once sept is
not really following. Naturally, the contract is going to look something
somewhat like so then extended out this way, a little, at least from this
side from this ricotta view, but on the front view, the
angle is completely different. So that's when it needs to
find a good balance for this. We just find a good
balance for it. I think a more preferable
angle would be undo that. A more preferable angle would
be what we did initially. Something like so. It's
a more preferable angle. Maybe just spread it
out a little this way. Okay, for me personally, it is a more preferable lango. Okay, I think we can
extend this out a little per this in some more. I think we're kind of
getting there now. But we can just reference
is just anatomically, some things are quite off. So the best we can get
this to be would be let's see the best we
can get this to be will be something
more or less like so. Okay, clear this out, and then I'm going to make a
duplicate of this. By structure is a bit
flattened down, so we can do. Let's go make a
duplicate of this, okay? So we can always have
backup to fall back too. So if we should center ton of
symmetry, center this way, then we kind of I'll do I think there's something
else I need to do in here. I need to grab this. I'll allow this save out. I need to max the waste region. Okay? Something like
so, I'll blow this out. Go to our gizmo
set deGizmo here, and I need to move him
back some more this way. Okay? Maybe back some
more, a little bit more. So now the general structure now looks flattened the
flatten from the side. Life is kind of flattened. So clearly maxing we
have in the center this. Then squash the general
shape down some more. Okay. Ignore the art for now because I won't
be using the difference. We're going to be using
the maxing we created for the other portion of the
ear to work for this. Okay. I put out some more. The only issue now we have this is where the
shoulder is supposed to be. So this is our shaping india, we need to kind of
compensate for it by selecting this portion. Let me clear this
out on a symmetry, select this portion,
load the mark some more, inverte the marks, move this up this way to compensate for
where the shoulder should be. Or maybe not. Maybe we should
do it for our mesh instead. Scale it down some more, okay? B down this way. Scale it out a little bit more. I think the previous
size is actually fine. We just need to fix
this region here. So let's let me
select this again. Common symmetry is
supposed to be stated on. Okay. Let me make a duplicate of this. I will squash this
down this way, then pull it up this way, squash down a little bit more. Flow the mark some
more, squash this down. Okay. With the move brush,
I'm going to move this in some more yes, we can just do some
slight fix in here. Okay. Load this down. Then also can do some fixing in here as
well, sing this down. Bring this down. Okay? Not too much though. I think somewhere around
there should be fine. All right. Yes, I think should as far as this goes, this
should work just fine. Go back to the body. I'm going to increase the
thickness a little bit more. Okay. All right. Because for one, we can't push
this back all the way down here without it intercepting
with the body itself. So as far as this goes, I'm
going to leave it like so. Should be just fine this way. Okay? T on symmetry. Let's look at the fits. And the fit is not
properly defined. Fit is not properly
defined in any way. So I think I'm going to
kind of do a cut out. I will eventually do a cut out. Is down, I'm going to do a
cut out for the fit region. So what you going to be seeing just the ankllonj anqullon. So maybe we should
do that even now. Extending these down all the way so see just only the ankle, then this other part is
going to be cut out. Already have a duplicator fit, so we can even cut
that out now, too. So transparency Okay. I think to do this in a
bit more precise way, we need an edge loop. It seem to make an
edge loop in there. So I'll come close. Let's use P Z M. Okay. Something like that
should be fine. Then we can do control
Shift click Okay. I'm going to hide these two. I'm going to do Auto
Group in here now, Auto Group, bring
everything back out, so we don't need these bits. Alright, so we're going to do delete ding, geometry,
delete ding. Okay, out of transparency. That's fantastic.
It should be fine. Okay. Yeah, so we're going to continue on
to the next lesson. Now so you guys the next
lesson. Bye for now.
54. 52 Casket Torso Mesh In Zbrush: Cucumber, guys. So in
the previous lesson, we kind of worked on
this casket piece, and then we worked on
the base mesh as well. So let's carry on. But I kind of
notice something in here. Is on the back side. This shape is not looking great, so let's kind of fix that. So I'm just going to
try as much as possible to kind of straighten it out to more just to get something quite sweet in
here at the very least. Also smooth it out to get
something good enough. I'll just this again. Okay. I'll do the same
thing here as well. M out by smoothing, do some smooth in there. Okay. Continuous the symmetry turn on. Yeah, that should be
more or less fine. Okay? Probably need to kind
of add another one in there, but I think I'm just going to
do that with a slice cove. If you get more accuracy
with the slice cove, Oh, it's work because we have subdivision windows.
Let's delete tire. Okay? So we have something straight in there. That should be fine. Right? So now we need to kind of get
this piece out of it. So I think a more preferable
way to do that would be to extrude what we
already have in there, and then we can quite
easily work with it. So let's see where we can
extrude or we can just draw out get a cube
in the actual in Non. But I think it'll
be much easier if you grab a piece out of this. I'm going to duplicate it. I'm going to duplicate,
isolate isolate again. Let's figure out
where that should be. So I'm going to use
PZM use the Qmsh. I go to figure out how far
out it is supposed to be. How far out it is
supposed to be. Okay, it goes all the way to the goes all the
way around there. So I'm going to come on. I'm going to select everything
that's without Region. All right. I'll
come around here. Students make a lot of
corrections in there, but let's just get this
shaping we need in there. Give them a separate
Polly group. All right. Yeah, I think somewhere
around there should be fine. Okay, so moving on. I'm going to do Control Shift click and I'm going to
do deletedinGeometry, modified topology,
delete All right. I'm going to see let's see how far this
is supposed to be. I just fine where it is, though. Let's isolate it instead, and let's work on the
shaping of it a bit more. Let's work on ship a bit more. So I'm going to do Polish
deformation polish by group. If I don't lose the lower edge, I'm going to mark this out
and do polish by group. Okay. The topology we have in here
is not the best actually, so we need to kind of
work on the topology a little bit more just to get something decent
enough to work with. So I'll clear this
out. If you do relax, flag doesn't do much. No. Definitely not. So let's just do a
duplicate of this. So I'm going to duplicate
this as a back up and then I'm going
to zer merge this. We have a total
full count of 81. So prod active key
skip detect edge, take down the smooth, go all the way down,
zero merge this. Now we're getting something
interesting to work with. Let's go off. Okay, here,
this is perfect now. This is as slow as we
can get it to be fine. This we can work with
I go out of isolation. Oh, yes, we need to make some adjustments to it, no doubt, especially on this
edge just to get the edge in position with
what was there before. So let's move it out this way. Move out this way. We need to the symmetry turn on. So I'm going to do mirror.
Mirror weld should work. Let's go over to modified
topology mirror weld. Now Mirror weld
is giving us some weird in the middle.
I don't want that so. Let's just do instead
move one step further. Then turn on symmetry. Let me get an angle. I should probably also
hide this biz mesh. I'm going to select it
let's hide this for now. This is what we are
working with out Okay. Actually, we need to kind
of extend it out some more up some more. All right. So now at this point now, we need to kind of extrude this. I just kind of extrude this. But before we do,
I like to squash this down a bit
more just kind of flat flatting it's a bit
more for no shrinking, just want to be safe
for not shrinking. This is the g we need
to use actually. So to of symmetry, center
orient squash this, make it completely flat. Okay. I think this should
work. Then the next we need to do
would be I think I need to compensate
for not symmetry, I need to compensate
for the edge in here. Okay? That should be fine.
Compensate for it around here as well. Alright. So let's add
some thickness to it. So I'll go over to let's
go over to geometry, dynamic sub dive,
thermodynamic sub div. So by default, it cannot take up a thickness
because we kind of extracted it out from a
previous pis das thickness. But the thickness
should be extended more than the way it is
right now, but for now, let's apply this and
then we're going to move this in some more Okay. Let me select this.
Let's divide this because we used to be at
this rounded nature first. So we cannot properly get the We can properly shape
this as we need to. So I'm going to select this now. I solo this for now. Keep using the term for Maya used to isolate for
years it's called solo. What I want to do next
to max this in the max. Okay. Go to Gizmo,
pull this out. Okay. Now, the idea is to figure out how far out you
need to push this. But to figure out how far
we need to push this, we also need to I think I will need to rotate this in this way a
little bit more. But looking at this now, I feel like I'm excluding
this out way too much. Let me undo this. I think
somewhere around here she's supposed to be fine. So in that sense, we need to kind of
flatten this some more. Flatten this
character some more. So let's go over to Let's
duplicate this one more time. Okay. So the move selected, I'll need to move. This a major move in here. Let me select this.
Let me hide this one. Let me send this down first
and hide it. Go back in here. Let's get this flatten
down some more. Okay. Select. Let me let me select
this instead. Max inverting max,
blow this down. Blow. Let's flatten
it some more. Because it needs to be
flattened down some more. Okay? Pull it back some more. All right. Okay. Yes, I think we're
getting do that. I think we're getting
something in here now. Okay. All right. Okay. So let's go
to the arms now. Use the bro size. All right. The rot we can use to
kind of shrink this, so we can use deformation, inflate towards a
negative value. Negative value again,
a little bit small. Okay. Right, I think this should
be more or less fine, right? I think I can undo that. Let's invert this law. For the back parts, I can push this
back in some more. All right. Okay. Here this back. All right, so what do kind
make this kind of work. So the shapes were
adding in here, shouldn't kind of fight
with what we had before. Flemington this back on, so I can go back in
here. I can do this. I feel like it's way too big. T make some corrections
in there though. So let's just get the length
in there at the very least. I can rotate this way now. Actually don't do that
move this back in this way as far out here. So the mid points now
I'm going to bring out. So symmetries don't on. I'll go to mesh again, pry this in some more. Okay. Select this. I can start pulling and pushing this out
to compensate for it. Alright. And make this work. Perhaps the mess we
also need to fix. Let's see what happens
if I actually polish this polish this
polishing the lower edge, and we need that lower edge. So if I do polish by group, that was going to mess
things up also too. I think the best option is just manually fix things in here. And when we smooth to get
this properly in place. More smooth by adding more subdivision level
to it, actually. Okay? Like, so right. Feels like maybe this is
way too, is way too high. Way too long, actually. So let me clear the marks, go up here, squash
it down some more. I think pretty much somewhere around
there should be fine. Somewhere around
there should be fine. Okay. I'll push. The backside
needs to come out some more center
this bullets out. Yes, it needs to kind of
come out a little bit more like snow. All right. So I'm going to do
polish by Let's see. I need this lower part to
have a different poly group. So I'll go over to polygroup. Let's do group by no mouse. Okay? Yes, this will work just fine. So now if we should do
deformation polish by group, we should have
something that kind of sharpens out this way. Let's turn on you do so we don't have something that is
way too aggressive. Okay? All right, so I think I'll
put this up right? Test on transparency. We need to get this down. Do I have Let me clear any marks and
I have in there first. Okay. The polish this again. All right. If I come down here and select let's select this lower piece. So of symmetry center. Let's flatten this
out some more. The the maxing. I think
at this point now we need some more subution level to actually hold this properly. Okay. Making sure symmetry
is turned on. So no symmetry for
this. Extend this out. So now I'm going to let's give you the same
polygroup first. And let's add
segments in between M insert multiple that should hold up that shap. That's like so Alright. So I'm going to add segments. Yes, I mean, why not?
We can add the segments here. Don't do that. Changes to single. I need to hold this edge. Or better just bevo instead. But for bevo make a
duplicate of this. With five bev I would like to get this piece
extracted out of this extruded out of
this without having to create it completely
new merge for it. But first, let's subdivide
this. Let's see what we have. Let's see what we
get out of this. Just to be sure we're on
the right track, do that. So of this, I'm going to
extend out some more. Here we subdivide this now. Okay. I'm getting
something no doubt. I just want to be sure if
we're on the right track, if I'm doing this correctly, use the move brush,
move this up some more. Okay. Select this, maybe pull
this down some more. All right. Come back here, extend
this out some more. Okay. Salmon plcanzoxm with 800. Let's see take
this back to fort. She is like the base
subdivision level. And et check this out again to be sure everything's
working correctly. I pull spot out some more. As you going to have something
cover up these bits. Just want to be sure if
we're on the right track. Okay. Yeah, that's fine. I
think at this point now we can make a
duplicate of this. Make a duplicate. Then I can
extrude what I need now. So we have another extra piece that's supposed to
be extruded out. So now let's get
that extruded out. So it's pretty much like a loop. Let me use the move brush, move this in place. So it's pretty like
an extruded loop. I think this loop we're having here should be fine this
loop you have across this. It's actually a nice place
to kind of add that extrude, so PZ, Soc Poly loop poly group. No. Come on. Why is it not? Okay, I think I know why I need to I would need to kind of give them the same Same poly group, that makes it a lot much easier. Okay. Yeah, that should
be fine. Come on. Alright, that's fine. So now
we can extrude this out now. Extrude this rat out yet. Oh, I see the issue now. All right, that should be fine. Check this around
just to be sure. We want to extrude. The idea now is how far
out we want this to be extruded? Let's see. I think She around the nature
of this should be fine. Then we go back in
the I can do that. I need to extrude this in. So I think I will need to start by adding
an insert in here first. Okay. Then bevel this inserts. I think you need to bit more. I need to push
this up some more. It's not extend more
than some butlar angle. Let's see. Okay. Let's add that again. Let's add that again. Something like so. Then
let's do Bvul again. But this time for the beb
let's use two rules. Come on. Let's do four rows. It's not extending more than
what we needed to extend. I think at this point, I might just need to
add insert precisely where I want it to be. Okay. There's something around
the nature of this. I'm going to delete
this in the middle. So the general idea now would be to do poly loop. Let's
see if this would work. Yeah, I think that work
without any major issue. Yeah, it actually
works, so that's fine. Precisely what we want. So now we need to kind of start
beveling some of the edges now. So let's bevel with this edge. Let's go bevel. Let me start by bebling this
edge. B with this edge. I'll do do that single rule to beve with this slightly more. Don't do that. Getting close. Okay, don't have
symmetry for this, probably symmetry is
causing an issue. Like so. Like so, well, I here well,
come on that needs. Like so. So now if you
kind of subdivide this, if we should subdivide this now, should be getting something. I think I'm losing
a lot of the edge. I'm going to undo that. I'm
losing a lot of the edge. I'm losing too much of
the edge, actually, so I'm not going to
make it that strong. I still want to keep some
good edging in there. Getting close. Maybe
just it come on. Keep snapping
something quite large. Okay. Don't do that. All right. I don't know that
that kind of round itself out way too much. Maybe undo that. Yeah
that size should be fine. Undo that. Come on. All right. Subdivide this Yeah, I think
we can live with this. This we can
definitely live with. Here, we're getting
something in, still some more work to be done, but we have something
in here now. That should work just fine. But we need to let's go
to lower sollton level. We need to push
this push this in some more center this ton off symmetry.Ge
this back in here, then squash this in some more. Okay. I think this should be fine.
Yeah, that should be fine. All right. So I'll
see you guys in the next let's see we we
cannot move on and work on something
else. Bye for now.
55. 53 Casket Hood Mesh In Zbrush: Come about, guys, in
the previous lesson, we created this space. Looking at it, I
feel like I need to. This part is way too thin. Is way too thin. I think we need to get an additional
height to it. His last year, we can do that. So I'm going to busy. I'm going to start by
deleting an edge group. Inserts. I'll delete
that edge loop. Okay. Let's see I'll delete
this edge loop as well. Okay. Get close, let this edge
loop, delete this edge loop. So you can have this back to
most where it was before. Okay. Then I would extrude let me delete this
edge loop as well. And I'm going to extra Come on. I think we need that
edge loop back in there. Come on. Let's see if we
are missing something. Let's do no attraction
first. Let's see. All right. Subdivide this. Okay. Here,
I think this should work. I think there's something a
lot more thicker in there. Here that should work. We should be able to do the same thing
too for the lower parts. So let's start by
deleting undo that. Getting at a good angle. For this lower part,
you're supposed to just do is supposed to kind of get something just one single poly grouping
here on lower part. So let's do Control click. I'm going to do Auto group. You should have this
completely separate piece. Is what I want. Go to gizmo, extend this down some more. Okay, I think that should
be fine. Play the max. I'm not trying to fix
any fewer thickness would have in there so I think this should
work just fine. Then we can go and
bear wood again. Can just bear wood
slide to Okay. Here, also, too, you
can just be you a little two to hold our hedge. So if you should
subdivide it now, you get something a little
bit ticker to work with. It's perfect. I work just
fine. Okay, so moving on. So the next thing I'd
like to do be to steal the marks we have from
the other canvas. Let's bring it in there. Won't be needing this anymore. I can just quite easily
I just hide it for now. Then what I need is let's see. I think we can steal this. It's quite high now. We have a lot going on in there. So I'm going to steal this. Let me make it duplicate first. I'm going to duplicate
this and shoot this down. Okay. Delete. Let's solo this delete higher. Copy the soap to come in a paste it's in your past somewhere offs fine. That's fine. Let's
go back in here. I need to sell this as well. I need to stew this. Okay. So let's stew that. I'm going to do let's copy
that come in your pastes. Go back in here. I need
to stew this as well. So I'm going to copy and
paste that in here as well. Okay? But just before I move it to replace
it needs to be, I need to make some
adjustments to this. Let's go to lower subton
level, delete higher. I only need one of this. I only need one, so
I'm going to turn of symmetry Control W, Control Shift
click, delete Eden. All right. I'm going to, let's see, I think for the most
part, buried in. So let's first get
this in the center. This needs to be in the center. Also, we need to kind of
need to kind of enlarge this let me stand tight first. Let's see if we can expand this. As we can a bit more. Let me get this
off in the center. Okay. I'll get this rotated
this way, this way out. Now we need to make some
modifications to it. So I think at this point, I
can just use the move brush. Move brush should be fine. Make necessary adjustments
in here, get enclosed. Okay? All right. Get enclosed, pull this down. Need to make the
proper adjustments in here, and then
we should be good. Let's find a good angle for it. So we can make the adjustments
a bit more accurate. Let me so solo this out. So you can see some
discrepancies in here already. Let's fix any
discrepancies in there. Rev we can do Polish group this out. Okay. If ev So this can see
some slight issue. I'm going to select low polish putting some weirdness in there. Let's do all of this again. I'll select this, select select, give the same poly group. Play any marks in India,
now we can polish this. We have something
better now, right? So while we're here, we can still make some
adjustments in here. All right. This top part is going to be
buried in, no doubt. So it's going to be
buried inside the shape. But it's not perfectly
in the center yet, so I think I need to
move move this this way. Let me move this
way instead. Okay. I think at this point, we can just let's get
this quite accurate. So delete Eden solo this. Let's start by doing polish. No, that's a bit too extreme. Let me mix that
region into polish. It the max. Right? Let's get something
straight in here first. Okay. Then we can quite easily just ship
it the way we want. But I think it comes
down further down. All right. I'll bury this down some more because we're going to
be adding sickness for it. Now let's get some
sickness going in there. So deleting, show
dynamic sub div. All right. I think we can work with this. Take this down, apply
with the move Rush, move this up, move this. That should be fine where it is. Maybe select this instead. S return on Berry this down
some more Alr.G select this. All right. I think I would like to
extrude the edge out so Z extrude this out. Okay. I think I can do
extrude this out. All right. Squash the entire
shape down some more. Or maybe not. Move brush and
just force pull them down. Okay? I need to do this
quite accurately. Alright, can get in close now, compensate for it
around this region. Okay. All right. That should be pretty much fine. Alright, I think
that should work. Maybe just sing
this down a little. Okay. Awesome. So
now we're going into the shape now
and then we can make some more
modifications to it. Let me change this
to the dm standard. Rush Okay, use the
standard brush. Let's make some slight
differences in here. Okay? Do that that doesn't seem right. That doesn't seem right either. Maybe what we can actually do is the changing of the
expression, maybe. Can change the
expression slightly. You move brush, prep
something wider, Bnd it down. Okay, you stop, it's down. Let's get some shaping
in here as well. Don't do that. Just to
get more or less like a scary shaping in
there. Here also, too. I'll pull it up. Yes, just kind of creates
a more scarier look to it. All right. That should be fine. So we have this at 22 k. So I want to put these 29 in a group and then position it
where it needs to be. Let's get them in a group. First, I will need to merge these two as
one single piece. Let's measure these two
down so do merge down. Okay? I'll put this in a folder. Let's just do default
folder that should be fine. Log this in, and we
can do transpose sets. The next thing
would be to kind of position it where
it needs to be. Ton of symmetry. Are we
still moving this Spar? So let's just get this position where I feel like
it needs to be. Take down the scale, pay this in more in
some more actually. Maybe not more
because we're still going to have a piece
covering that two parts. I'm going to scale
this down some more. Think as far as this goes, think somewhere around the edge. Fine. Let's go out of
it. I'll select this. I need to hide I need
to hide all of this. So I'm going to go
all the way down. Make a duplicator of it again. You know, I'm always
making duplicates. So B, we can do insets. Let's do insets around, you know, like a
loop, fully loop. Okay. Control Shift, click on this. Then we'll do Auto
Group, Auto Group. Control Shift click,
out of isolates. Alright. I think we actually have
something nice in here. Let's see, I feel like I should go back to
the folder and then pull this up some
more transpose sets. Whereas I gizmo Come on. Do we necessarily need kind
of position ton of symmetry? Come on. Oh, I need to
select something inside. That's where the main issue is. Hope I don't move
something completely off. So center tunnel symmetry,
center this Okay. Bring this down. Send this out. I think we are rilling off
some more. Come on. Get back in the center. Let's see. Oh, I see the issue now.
Let's orient this. Okay. Maybe up a
little this way. Okay. I think they should work. Yeah, they should work just
fine for what's needed for. The other bits is going to
be covering its pilots. Okay. Yeah, I think we
can work with this. Yeah, this should be
fine where it is. Okay? Yeah, that's fine. Okay. Let's see where we get. Maybe we can make the
head slightly longer. Let's create some length to it. Right. Okay, so next let's
see what is going to create the covering
we have around it. Yes, I mean, yes,
that should work. Or even steal? Can we steal what
we have in here? They look quite similar. I
think we can steal this. So let's steal this instead
on those copy in here past. I need to get it
out of the group. This is all the way up here. Now, the back is
kind of flat so. The only thing you
need to do would be to delete some regions out. So let's just get this
down where it needs to be. Yeah, this would
make better sense. Obviously, you need to do some scaling and
adjustments in there. Et's see, we get it in here. Bring this in. Bring
this some more. Okay. Obviously, we need to kind of do some pushing and pulling and adjustment just to get
this to look right. Okay. Let's see if we can
actually do this in here. The piece we need is just
this do deletes heading. Geometry, delete heading. Can we reconstruct this cannot? We need something
quite lower than what we already
have in here now. So let's reconstruct. The symmetry is on for it. The match Okay. How we don't have proper
edge loops in here. We have this march this again. No proper edge loop. Let's do two. Can go, or more. Now we're losing that
shape in the bodies. This is actually quite low. I think this is low enough
for us to work with. So I need to delete delete Before we
delete that actually, let just kind of force
the shape in some more. Let's force the shape where
it needs to be first. Okay. No, no, do that, don't do that. All right. I think I need to do
this systematically, so I do this correctly. Okay. Let me extend what needs
to be extended out first. Ideally, I should max
out those marks in her low Clear this out. Let's do something
smaller around here. Blow this out. Be it is down here. All right. So this down. Move this
down. Invert the max. Get closer. Okay. B is down here, right? So you have more
accuracy this way. The mark, smoothes down, out. Okay. There the max in right down at the back. Bosons kind of delete
something out of this though. Let me just kind
of get this quite close to where we need it
to be smooth this down. We use the H polish
brush instead. Okay. Polish down. So get
something flat in there. Okay. Something pretty much like so. All right. The move brush, move this out. All right. Getting
something now. Let's use the standard brush. Pull out, dig in a dent in here, smooth that down,
use the move brush, move it out some more. Okay. I'm going to extend
this out some more. All right. Move up. Put this down. Okay. So smooth. Ship F. All right, so now I'm
going to duplicate it. Let's make a duplicate of this. So basically, I just think
of delete an edge loop. I think the edge loop
we can delete would be this M Okay. More or less like right so control shift click, control shift click. We do poly group auto group
auto group. All right. Control Shift click on this. We do delete ding. Information, geometry,
topology, delete ding, help me get everything back out. So next thing you need
to do now would be to let me max out these bits. Inverts. Don't do that. Invert the max. Don't do that. It gonna get this
straightened out. I think a much easier
way to do that would be just to do polish. Let's polish this. Better, can we reconstruct? Now we cannot reconstruct. Okay? So let's do deformation. Polish polish, polish,
some more. Okay? But that seems slightly
a bit excessive. I just kind of get let me
see if I can actually be able to max these bits. Okay? It the max. Okay. Here's something pretty much
like this is what I need. Squash this down this
way. Invert the max. Polish, polish, polish, polish. Polish some more. Invert
the max. Don't do that. So I can do PCM. Inserts, I'm going
to delete this, and I'm going to create
a new one in there. Something around
there should be fine. With the move brush, we
can compensate for it. Polish by group. Okay, do that. Let me hold this edge. Polish by group. All right. Okay. Perfect. Now, I have
something in here now. I have something in there. I can also x this some
more invert the max. I'm going to shrink this closer, shrink this closer to the
skin or rather to this mesh. I think I went too.
I was supposed to just do something more
or less like this. Okay? I think as far as this
goes, this should be fine. I think I did it way too much. For us, that should
be fine, I guess. C went overboard,
extend this out. Okay? So now we can now rather
add some thickness to it, so I'm going to make
a duplicate of this. Let's add dynamic sub div. Okay. Arctic do you
want this to be? We have a good base
thickness for it already. Okay. I think I won't do this. I need to make some
adjustments in here. I'm just specially pulling
this apart a little bit more and pulling it back in some more cause I'm going to be getting an extona
extrusion in there. That should be fine.
Apply this again. Let's get disclosure. Okay. Take down any segments
we have in there. Okay. Get this down some more, compensate for it around here. All right. Move this in. All right. Okay, that should be fine. Okay. Apply this on. So B Z undo that. I need to extra undo that. HumulpPully group. Come on, what's going on? Come on. That's a bit strange. Oh, I'm on the wrong, I'm on the wrong this
all the while, so. Let's get this extruded, not that way, extruded
out this way. I think we need a little
bit more do that. Alright. Let's see what we get. I think a little bit
more should be fine. Come on. Alright, so we need to make some adjustments to it
later now, actually, so to remove brush, we just need to compensate
for it by pulling it out. Okay. In some mode should be fine. All right. Something
pretty mode like so. The reason why we're
doing this is because we need I think I also need
to do additional inset. So B ZM inset standardly group poly
group island instead. Maybe a little bit
small this way. Okay. Yeah, that should be fine.
So I need to extra this out. Mesh Pollo poly group. Okay. She I think it needs
a little bit more. Let's do inset again. Quite more actually. Okay. So what I'm going
to do will be to go to insert and insert rather,
out, delete this. We have this as one
single piece now so now we can extrude this out, Q meg Let's extrude
this out. Come on. PollyopPoly group. We're having some weird
issues around here, though. Oh. Oh. This is from so we need to be
actually quite careful here, so let's do in set again. Let's set again, but we need to quite careful on that angle. Even though we doing need to be a little bit careful
on that angle, so we don't break
things in there. Delete this delete this. Should be quite cleaner now. So if we should do the extrude in here now, should be good. Okay. Maybe do a little
bit more inserts. All right. Delete this. Okay. Now let's go to Humesh. Polyp poly group, you should
have something better now. Alright. I Okay. I think
this should work. Another thing I like
to do in here would be to create an inset inside. So, delete this. Well, maybe let's
delete it for now. Let's add a new one. Then we use the Bv Bvul
bevo this way. All right. Put the Qm selected, extrude this in, all right. That should work just fine. Don't do that. Let's do inserts. Add a loop here, use
the Bvolod this way. Here, move this in
some more All right, you're getting
something more or less like so, that makes
better sense. Okay? I think to kind
of clean this so, you can just do Cris PG. Chris PG should be fine
to hold up the edge. So if you subdivide this now, should get something
more or less like so. I work absolutely just fine. So let's go to lower
subdivision level. We don't need to use
the move brush now to move things around
a little bit more, and then we should be good. Okay? Get close. Bring the close. Closer. All right. Fantastic
that work just fine. Alright? I should be just fine. Maybe pull this down some more. Okay. Alright. So I see you guys in next
lesson, bye for now.
56. 54 Casket Bands Mesh In Zbrush: Welcome back, guys. So
in your previous lesson, we still working on
this caskete piece. Let me call it casket piece, so there are a few things you need to make
corrections you need to make in and then
model parts to this. But as far as this goes, we're getting something quite interesting in here, no doubt. Okay. So let's carry on. So I'm going to select this Baze mesh. Twist Okay. So I'm going to do delete ding. Let's do delete ding for
any piece we don't need because if we bring this out
you have the heading there. So let's do delete ding. All right. That is fine. Okay. Also, another thing I'd like
to bring our degrees more. So symmetry, pull down control. Pull down control. Thread out. Okay. Tally sure why this is
not working, though. Anyways, let's do emton
of symmetry for now, probably is not
working because of symmetry or we need to use the already on maxmin
is working now, this is what I actually wanted. Hemingon know symmetry for this seems like it doesn't
work with symmetry on. Doesn't seem to work with
symmetry returned on. Okay. Anyways. Let's see. Do we have V there? I don't think we have
Vs in there though. But no worries, we
would make it work. So now let's go back in
here because I'm going to try to actually smooth this part in and
kind of separate the M again into
separate poly group. So I think a first way to
do that would be to do B. Let's look for something
that goes around there. Undo that. I think inset
should be fully look. Okay. I think somewhere around
there like so undo that. Set needs to be turned
on for this can do that. Since say standard don't want extra weird edging
in there, like so. Then Control Shift click,
invert this rater. It goes around, then
we do Auto Group. That's perfect. This is
precisely what we want. Hi this do I need to do this
for the legs to be sure? I don't think I need to.
I don't think I need to. Let's just give you the
same poly groups fine. Then we'll go in and delete any extra edge we have in there. Let's clean this
up. Okay. So you go over to edge inserts. I'm just going to
delete this edge, this edge as well, and
then we should be good. Right as properly separated out. I feel like we should do the
same to two for the leg. Okay. See, Ah, no, leg should be fine. We don't need to do
much in there, so bring everything
back out. Fine now. Let's make this visible. Right? Okay. I think we're going to be cutting now the portions
we need from this piece, so it makes things a whole
lot easier, no doubt. So let's go to create
the bands now. What we need to do next
to create the bands. So let's isolate this again. Thinking of even creating's I would need Okay, I need a duplicate of this. I need to duplicate.
So let's make it duplicate duplicates, right? So we're going to
create this bond here. Then we create this bond. This one is kind of separated not separated out, actually. No single bonds not kind
of joining themselves, so to kind of create
something different in there. You can just kind
of steal this place in place that in
there as well, right? There isn't much detail for
this front piece though. Isn't much detail, so
let's just carry on. Let's carry on. I think this one goes all the
way down here, okay? Right? You just kind of fill up the We just try to fill up
the gaps in between them. Because on the reference
on the front view, some details were not added. But on this recorda view, we have more like some
details added in there. So just to find the find
the right balance bit and then All right, so let's carry on and then
get the detailing in there. It doesn't go around all
the way to the back. We have an extended
portion in there. I just trying to figure out
a better way to do this. Okay. Figure out the
right move for it. I think it's fine.
We can do this now. I think we can also bring in a cylinder and then get
a cylinder in there. That should also work. Let's do unapened we can scot
out the shape here. Let's use a cylinder instead. Cylinder instead.
So I'm going to do unopened appended cylinder. Okay. Cylinder should be
somewhere down there. I'll select it. Seal this out. Bring this forward. Seal
this out some more. Right. Still out a small. I'm going to make a
duplicate of this. High the top, let's
work with this. Move this up. Definitely, we need to delete some of this out. We don't need everything though. But let me first get it
roughly where we Okay. Looking at this for the best
possible way to do this without having to make too much adjustments
or corrections to it. So as much as I need this,
I'm going to hide this, I think more preferable way to get the shape in there with less difficulty is to extract
the ship out of this piece. I think that's most best
option right now to do so I'm going to duplicate
it, send this down. So just trying to figure
out the faster way to do it without having
to make too much adjustments and corrections in. I think this one actually
fits what we need it for. Okay? Because we can just quite easily grab
what you need for it. Then it also has low
topology across it also too, that kind of make it a lot more easier for us to work with. Okay? So let's figure out
where it needs to be. It needs to be around around
where we're supposed to be. So we need this edge. Okay. So I'm going to do let's do something
different in here. So Udi the highest
subdivision level for it. Tres on insets. Okay. All right. Undo the
insets. Let me max. I max these bits. Control W. He that's fine. I'm going to do Control Shift. Click on this Control click. This is pretty much all we need for the writes
adjustment to fine. Okay. So first things first, let's adjust the lower parts. Come on. Okay without
have any subdivision, let's add a loop
code in between. A a loop code like so. Then I'm going to mark
these lower parts. Okay? So of symmetry center
this to delete ding. Okay? Trying to get something
straight in there, invert the max
straight also too. Setting this out down. Okay. Let this out. I think we have something more or less straight
off for us to work with. D has the right engine for it, so we start forcing any
new shape to create. That has the right engine, so we need to kind of
delete something. We don't need the
entire outinth. So I'm going to make
a duplicate of this I Let's duplicate
this piece. Okay. I would delete that edge. Let's add let's add
another new edge in there and Citron straighten it out a little I
think this is fine. Doesn't need to straighten
out completely. Okay. Now, let's figure out
let's do no symmetry first. So no symmetry for this. Okay. Next we need to figure out where we need this edge to be consider
this edge in here. Figure out where we want that. We can't use it
from the top view, so we need to use it from
the side view instead. So I'm going to max. The I think we find C W. He is grabbing this
piece that we also need. So let me get in there. Okay. We do Auto Group. That's the auto group. So
poly group auto group. Let's go back in
here. So we need this and we need this
in vale selection. Let's go out of isolate.
Let's see what we have. This is pretty much all we need. Okay, a step, we need
to delete one more, do this edge. Well that's fine. We going to do
delete ding first. Then ps. Control click,
Control Shift click. Affect the opposite
side, delete ding. Let's check this out again. Here, this is fine
where it is now. We have this where
it needs to be. The thing we need to do
now will be to pull pull these parts out just
to pull it out. So we need to kind
of figure out the right place to use
and pull it out. Let's do that. Okay. So it should be I'm just
trying to see. We're going to ignore the part, so it's going to
be around there. So let's do transparency. We can use our mask last to now. Let's figure out where
we need to get out. Okay, I think this
portion stodut. Let's make another
duplicator of this about to do some drastic
adjustment to this, so let's have a backup
for it. All right. Don't have transparency
move this come on. Okay, not entirely there.
Need a little bit more. A little bit small. Let's grab this part
also as well inverts. Move this out. That's perfect. So we need some extra
groups to this. Mtonosymmetry, center. We obviously need some
extra poly groups can offer the edge
a little bit more. I think as far as this goes, this should work just
fine. Square this down. Okay, this we can
definitely work with. I'm just kind of checking
just to be sure. Okay. We need to move this
in Tunnel symmetry and mark the parts and int the marks move
this in some more. Okay. So I think
this should be fine. We just need to add
some more segments to fold this properly so. Let's add some extra
edge loops to this. Okay? The somewhere around
there should be fine. Add one ear as well. Add one ear as well. I to be a little bit
precise with this. Okay. Now we definitely need
more subdivisions to this. Okay? So I would let's
add add one, well. Okay. So if you go and subdivide don't need to
say entirely, though. But let's see let's subdivide this subdivide so we have
more holygons to work with. Then we can make the necessary movement and
adjustments in there. So with the move brush, those things you can perfect it on
one side on the first piece, and it becomes a lot more
easier for the other piece. Okay. So you can see how we're getting a bit more
precision in here now. The symmetries don't undo that. That was not fret enough. I'm sure you guys get the idea, now that's why I just kind of changed my mind and then use something that'll make the work a whole lot easier for us. Okay? Move this folder out some more because something is
going to be buried in front. Okay? I think also to the lens
should be just fine. Let's see I think, we might need to scale it out. I need to skill
it out some more. So that shouldn't be
too much of an issue. Undo that center. Went perfectly scaled out. When this killing
should be fine. I'll pull this up some more. That should be fine. Okay? So you need to go
back into the mesh itself. Blow this out. You
need to push this in. Okay? Invert the max out. Okay. Not too much though. I don't
want to ruin the shape. I don't want to completely
ruin the shape, so let's just do bigger
movements instead. Alright. I'll select this move
this in some more. We also need to move
it out this way out some more out some
more on the side. I think I didn't turn
on symmetric for this. Fini mirror weld, cool
undo, let's undo. Let's go one step further. Turn on symmetry now and then just make
the correction in. That's bio much. This
out, go in here, inverting max with
this in some more from back here, extend this out. Okay, come to the
side, get this out. So now we need to
kind of get the shape in it's a bit rounded on that parts. Bit rounded. So let's get something Round. Actually, we can make
this rounded by just doing basically by
just doing the polish, let's get a ship in the first. Okay? So let's polish this now. So polish by group. Do that actually. Let's just
polish just this edge alone. This is just the edge you need
to polish, blow this out. So we're working symmetrically
in here as well. So if we do polish by
group, one of these dots. Okay, that should give us good rounded
polish edge in there. Can pull this out some more
out a little bit. Okay. That should be fine. So now we do need to kind of get
some sickness out for it. Get some thickness,
and we should be good. So let's delete lower
dynamic chonodynamic. So she get some thickness in there because you cannot copy it out from a previous mesh. But thickness in there
is way too much. Okay? I see. Okay. I'm trying to figure
out if this thickness should be fine or only
a little bit more. Okay. We have seating parts in there that we
don't want visible. There are some parts
in there that's not visible. This is something else. Here's something
else, so. Okay, on the right track, no doubt. Go back in here. Maybe just a little bit more
ten should be fine. A little bit more like,
so it should be fine. I'll apply this on
solo this Okay. Undo that actually. Undo that. So on
this off for now, you need to give everything
one single polygroup and apply it again. Apply. Okay, that's fine now. So B Z M. I'll need to
extrude poly oop poly group, extrude this undo that. Not inset. Q mesh. Q mesh pull pool group, okay? Alright. Okay. That is fine. Extrude it out. Okay. That should
be fine as well. I serve. Yeah, that should
work just fine. So we need to do some Bevo now. So you guys get the idea
ready to do some Bevo now. This edge. Come on. To symmetry, with this edge Pavle edge swell. Let's come down. Okay. That you went
round, which is fine. Let's go out of
isolates now It's just too big or
too too long pass, so let's shrink it
down some more I Okay. Let's get good
proper size for it. Yeah, I think, as far as this
goes, it should be fine. So now, it makes the
work a lot easier. So we have this shaping. Oh, I think I need to fix this This I need to
fix remove brush. Let me select this
first to undo that. Let's we do Okay. So on symmetry. All right. G two corrections
here and there. Okay. Select the base mesh. I'm going to just
pull this out some more pull this out
some more All right. Okay, that should be fine. Then we can select this. We can quite easily make
a duplicate for it. This one sows the abdomen,
of symmetry for this. Let's get the orientation
right all down control. All right. More or less like so. Then we need to make
some adjustment to it. All right. Let me start by shrinking
it down some more. Okay. Then we need to make
necessary adjustments to kind of make
this fit properly. So with the move brush,
turn on symmetry, increase the brush
size quite well. Then starts pulling it out. Increase the brush size. Okay. Is the more Okay. I should be fine. Okay. Yeah, that should
work just fine, except we need to kind
of compensate for it here. All right. We need more than one more
down here, and should be good. Okay, so let's go down. Let's get another copy of this. Pull down control, pull down. Okay. More or less
almost where the nill. This is where the
Nillin of a bit weird. Preference is not completely
accurate anthemically, but don't worries, no
worries, make it work. We can do the last should be, let's say we can do it
around here instead. Okay. You should be
fine where it is. So you just need to
squash it down like two. Okay. Then do the necessary
adjustments down this way. All right. Move this out. Move out this way. Move this out this
way out this way. Then start pushing this down. This down as well. Take
down your brow size. So we just need to be quite precise in here just to
get it to look right. I'm going to subdivide
this though, but on the lowest possible subdivision
level we have right now, let's try and get some
accuracy in there. Okay? All right,
that should be fine. Out. That should be fine. Maybe we won't pull
this down a little. Then we need to fix
this bit a little as well. That is fine. Look at it from a
different angle. All right. Let's make another
duplicate of this. I think we can finalize
this around here instead. Squage this in. Turn some more. So this one, we need to
move drastically down. Just put this in down some more. Okay. Move this in, please. You we corrections,
you should be there. Do that as a bit odd. Is down this out out this way out this way. All right. Get in close, pull this out, push this in. Se quite a lot of
discrepancies in here, so maybe at this point, I can turn off symmetry and work on this other half
a bit more accurately. All right. Out on top of this. Okay, undo that. We use the bros size. Okay. Come on. Almost there. Almost there. All right. Check for the
opposite side. Okay. Once we add more additional
subdivision level to this, it's going to kind of round smooth all of this
out some more. Okay. But I think around
there should be fine. All right, so if we should
subdivide this now, you get something way cleaner. All right? Maybe it's
more accurate, fantastic. All right, so that's
fine. So next lesson, we'll move on to something else. I'll see you guys in
next lesson bye for now.
57. 55 Casket Hand Cuffs Mesh In Zbrush: A Cuba guys, previous
lesson we kind of created these pans around it. So going to move on now. I think I would need to create let's create this
center coding strap. Let's create that instead. Okay? So I'm going to I think
it would be much easier to just use a plane and then reshape that plan
wherever we want, okay? Okay, so let's do that. So I'll go over C. Okay. So basically need a plane. So let's append Append plane. Okay. Go down and select it. Okay. Sell it out. Bring this forward.
Sell this out. Okay. Pull it up. Just kind of get this roughly
where it needs to be. Okay. Bing this down some more. All right. So ship. So we need to
kind of reconstruct this. Let's get something
low out of this to reconstruct reconstruct
delete tire. Squash this down. Let's get this roughly around
this size it should be. I think this size should
this size should be fine. Okay. So the next we need to do now will
be to subdivide this. But I think we also have
extra edging around it. So extra should get closed. There's like extra
edging around it, which I don't want any
extra edging around it, so I'm going to do BZ
outdoor and insets. The inset should
be all polygons. Okay. Undo that. Let's do poly
group island instead. All right, Control Shift click. I feel like I still see that
extra gen india though. I still see the extra agent, so I'm going to undo
that. Let me subdivide. Let's see if the extra
agent is still there. Maybe just my pinaty on me. Okay? Here the street on again. Let's just work on
it and let's see if we're going to have the
extra edge in there. So let's subdivide do that
with an extra edge in here. So let's do starts starts getting close
to an edge here. Undo that to a year. Okay. Subdivide, delete lower. The reason why I'm
doing this is because I I need something in between so we can actually
deform the c we want. Okay? I think I need to split just add one year as well. Can't do that here swell. Here. Yeah. Okay. All right. Here, that should
be more or less fine. Okay? So I'm going to use the, we can't do this from
this side because we need some we need some thickness for to be able to see
it from this side. Is double sided turned on. Okay? Push this in some more. All right. So let's add some thickness in so you can see
it from the side. So I'm going to do let's
do duplicate first. Duplicate, go over to geometric
dynamic sub dino dynamic, take down the sons,
increase thickness. Way to tick though. Take it down a little. If I think something
like so should be fine. Then apply. Okay, then we go to our gizmo. Let's do the bent curve. Now that we can see it
accurately in here, so to kind of help us
push things in some more. Okay. I'm going to move this in here. Maybe not completely in there, though, not completely in. Barely touching le Okay. Then we need to increase
the resolution for it. Then we can do some extra work in there to get
this to look right. Okay. We need one here, no doubt. Let's Let's get them in
where they should be first. This is for the parts that
are quite visible in here. Okay. Undo that It's not straight on. Something that is that'll
be straight from an angle. Okay. Move this in some more. All right. Let's do this move this in
some more right. Let's see if this is
straight, straight. This is what we need to adjust. Okay. All right. I think as far as this goes, we're getting something
good enough in there a little modification
we should be good in there. Okay. Yeah, I think this
should be fine. Any correction we
need to make in, we can do it manually instead. So let's accept this. So accept that is fine. Okay. So moving on, I need to make
some adjustments in here. So I'll turn on
symmetry for this, I use the move brush. Use the move brush and make
the necessary adjustments. Okay. So actually, I needed I need to get some
shaping in here. Okay. Here as well. You need to move
this up a little. Then get the ship down here, pull it up some more. Okay. Just need to get an interesting
shaping out of this. All right. Break
this down some more. Pull this out some more. T should be fine. Okay. Extend this out some more. Okay. Extend this out some more. Break this down. Okay. Now we do if we do
polish crease edge, that should work just
fine, but I think I'll need to add
straticness to the edge. So let's start by shrinking
it in a little bit more. Paxil should be fine. P. So we need to
extrude the edge, so Qs poly loop poly
group, extend this out. Okay. Maybe a little
bit more. Alright. It's quite wide, so I'm
going to sink it in some more IF, let's see where we get. I think it's a little
still a little bit small. Let's go back and then
shrink it down a bit more. Okay. Maybe a little bit
more right go back in. Then we can extrude
this out again. Strew the edge out again. I think that's a
bit too extreme. Maybe she shoulk this
in some more Alright. Let's see where we
get. Can do that. I need to swing
this in some more. Okay. Extrude this out. Yes, I think this
should be perfect now. I should work just fine. Okay. Let's extrude out
this edge. All right. Don't do that. Let's
do that again. Okay. This we can work with. Let's get a good
visual in there. So at this point,
we just need to use the move brush and
move things back in some more Okay. All right. Maybe not. Let's do the opposite instead. Let's push this out instead. Put this out instead. Now, this we need to buy in and even cut out
some parts of it. Let's just get the
corrections in the first. All right. Okay. So back in the P. So you don't
need to bevel this. But let's first smooth. Yeah, I knew there were some
edges in there already, so that's why I wanted to
smooth just to be sure. There are some edge loops
there already, which is fine. Ls cannot do anything
else egging in there. Edge loop should
hold up quite well. I'll make a duplicate of this. Make a duplicate. Let's see which portion
we need to cut out. Okay. I think we
need to do that. Let's go over to slice cove. I'll slice shape
roughly around there. Control sheep click, control
click, control she click. Then we'll just do delete ding. Geometry, modified topology,
delete in slice COV again. I'll just add on all
the way to the end. So that's when I
smooth this out, it's not going to
shrink down way too much so we subdivide, it's not going to shrink
down way too much, undo that subdivision level. It trying to kind of keep
things a bit more optimized. All right, that should be fine. That should work just fine. Okay, I think at this point now, we can create the chain. He can create the
chain on his leg. Let me subdivide this. Let me use the move
brush and move things in place here as well
the lower parts. Okay. Yeah, I think that
should work fine. Okay, so let's create the
in on his leg ristruer. Remember we had
cylinders there before. Let's use the cylinder
as we already have. So I'll turn on this
cylinder again, select it, bring this down, down some more, get it in position to kind of increase
the length a bit more. I think this should be
fine where it is how do duplicate again, isolates. Let's do group by normal, holy group, holy group,
group by normus. Control shift lick. Make sure W serte is done on. Go in the delete ding, reconstruct
reconstruct one more. Can you construct
again? So delete higher I think this is
the lowest we can go. Okay? I think we need to
shing this down a little. All right. So it's just a matter of placing
it where it needs to be. Let's make one more
duplicates. Okay? This in where it's
supposed to be. So at this point,
it's just a matter of adjusting it until
you kind of fits. Shrink it down. Out. If, let's see, I
think it should come down some more dates. Not too much rotation, I think around there
should be fine. All right. You need to get this
properly in place, move the top some more. Yeah, I think that
should be fine. So now let's add some
thickness to it. Let's get some good
thickness going on in there. So let's go over dynamic. Dynamics they then on dynamic. Take down this smooth, get
some thickness in there. Okay. Let's see where we get. Maybe way too thick, take it down a little. Yeah, this should be fine.
Apply this on, right? To subdivide this, to get in something more or less
like so. Undo that. I'm not going to add a little Bevin B's a little bi heres well. Undo that. Let's do this again. We
have a different colors in there. Subdivide this. This will work just fine. Okay. I'd like to add some
thickness in between. So bevo this. More like adding a
lining between them. Okay, here. He well. Okay, Hush. Humes pulloPlygroup.
That's fine. Let's pull this in.
Let's pull this in. Back to our bevo Bv
Come on on, do that. We want small bevo rise it. A little bevo should be fine. Okay. Go up. Let me allow this sieve out. But shouldn't take too long sieved. Let me save this also too. All right. Let's bev edge Bvulge Bv edge as well here also. Okay, I think as far as this
goes, it should be fine. Okay. This we can work with
this we can work with. So we mirror weld. He's mirror weld,
mirror weld, all right. Okay. Maybe just make it ether wider. We roll well. All right. That's fine. Now, the chain piece. I need
some chain piece in there. We can just steal what we had
before from the order from the order mesh on the canvas, so we have this, we can steal this
salmon, why not? Et's copy. Let's copy. Copy. Come in here, let's do pasts. Okay, it's behind us. Bring it to the front. We only need one side. So let's let's grab this and I need to change this to select crack inverts to do
delete ding, delete ding. Now for this, I
only need one side, so Control W, CT
delete Eden as well. All right. So this is
the only thing we need. We need to start scaling. Let's start by scaling it out. That's probably way too much. Let's do a little bit more, rotate. Put it here. Here the scale is
a bit too much. All right. So just a matter of getting
it where it needs to be. We need to rotate
this way. Okay. We're still going to kind
of adjust the liking. Right. Let's do something like so. Solo this out. Okay. I'll put this here. I'll rotate this down this way. So it's just a matter of moving it where it needs
to be, and we should be good. Okay. Move this
forward some more. So I'm going to start selecting
them individually and then making some
adjustments to it. Okay, put it this way. Who down. All right. Put the next one. Wo down. Put it this way. All right, select the next one. Put it this way. I think I'll rotate this way. All right. I'm doing the manual
work in there. Then move out. I'm going to do Mirror weld. Fantastic. So why did I bring
this out this out right? So we have some now, so I'm just going to
there's auto group. Auto Group, auto group. Holy group Auto Group
Auto Group, fantastic. All right. So I can
let me get close, hold down Control, select
these bits, hold down Control. At get the copy out, rotates. I think my rotation might
be too off for now. Let's get it centered. Okay. Rotate this way. Perfect. Rout it
this way. Alright. Pull on control, get
another copy out. All right. Rotate down this way. All right. I need to
rotate it this way. I think I need to
go back in here, auto group again, going
through select this. Bring this fd up
those are this way. Sad get in the center, this way. This part might be
a little tricky. Let's put this back in. All right, get this down. Maybe scale it out a
little just to put it a bit more accommodating
space in there. All right. Let's see where
we get, move this up. Okay. Rotate this way. Move this in here,
pull this down. All right. Okay. Clay the maxing in there. But now we need something. We need something in here. Let's see if we can use some IMM brush in
here that might help. Let's try this there's something in here
that should help. No. I think we should should at least
have something in here. Nothing as well. Let's try this. We should have something in
there, we have something. We can one of this. Let's use this instead. Okay. So let's go and then I'm
going to drag gets closed. I'll drag it on the
surface of this. All right. That should be fine. Perfect that I'll sit
perfectly fine in there. Let's go to our move brush. If let's do split
on marks points, split on marks points. Okay, get in here. So we just need to work on these bits and then
should fit in properly. All right. I think rotate this some more so it sits
properly in there. Okay, that should be fine. So the next thing you need
to do is to mirror and weld. Let's do mir mirror weld. Now select this. It's
just a matter of rotating it rotating it till
we have it locked in. Okay. That seems rather odd. Probably scale it out
a little bit more. Okay. Rotate some more. Get this at another angle. Okay? Or do we have this
rotated somewhere? Let's just carry on
first. Let's see. Move this up this way. Okay. Not entirely there a little bit more forward.
Bring this closer. I think at this point, we
can use the move brush. We can even go in here instead, rotate this some more. D some more, create little
bit of gap in there, so it fits quite well in. Alright, I think
that should be fine. Okay. So I'll need to steal
This I'll need to steal. I'll do splits on Mark points. Let's do splits on marks points. Okay. So basically,
what I'm going to do will be select this piece. Let's come in here first.
Let's select this first. Move to the other
side, select this. Then do another split
on Mark points. I'll select this. I'll
completely delete it. Delete. Okay. Zoom out. I'm going
to select I this, and then we do mirror weld. Fantastic. So that
will work just fine. So all we need to do now is to merge them together
as one single piece. Let's merge these two
down. I'll come in here. I'll do merge down. All right. Then I'm
going to select this. Let's make sure nothing
news is selected. Do that. Rot it this way. Let's
get a good angle to it. B it's this way,
rotate this way. Alright, that should be fine. Okay, that should work
just fine. Awesome. All right, so in
the next lesson, just move on and
increase something else. I'll so you guys in next
lesson bye for now. Put some weirdness in your
Then to fill this part up. Then smooth. Yeah, that's fine. Alright? So take you guys
the next lesson bye for now.
58. 56 Casket Bolts Mesh In Zbrush: Okay. Welcome back, guys, on the previous lesson, we
kind of worked on the chain. Okay? So let's carry on. Let's see what else we
can work with in here. Okay? I think this should
should work for the most part. I'm just checking. You can see from
the reference kind of quite narrowed down. But I don't think I want to
make that narrowed down. I don't think I need to
maybe narrow down a little but not as slim
as we right here. And to do that, we need to take into account a few
things just to make that work. Okay. Look at this. I'm
going to select this. Let's make it
duplicate out of it, and let's narrow it down. Let's say I want to kind of drink it down a
little bit more, we can just use the
let's use bend. Hit the subdivision level
in the delete tire. Let's go to the bend curve. Okay, that's a bit d.
It's not in the center, so we need to turn off symmetry and center
this as much as we can, then go back in there. We have this in the center now. So let's do two do that. Bring this down a little. Okay? Yeah, I think around just fine. But we can do this even better
but let's go accept this. We can let me select this. Let's get it alongside. So I'm going to send this down. I'll select this, send this down as well.
I'll select this. Let's go over to
geometry, deleire. Let's make a copy of it, duplicate select this also to see if there's any subdivision level
in there there's no. So what I'm going
to do is that I'm going to merge them
as one single piece. Let's do merge down. Okay. That should be fine. Then we
can go in your paint curve. Then I can select this again. We can shing this down. Okay. So it was before cushing
this down some more. Okay. At this point, it's
just a matter of making some additional
adjustment to it. Well, let's visualize
the main body also too. So we get a general feel
of the entire out scene. Yeah, I think that makes sense. I think that should be fine. Let's accept this. I need to make some
adjustment to it. So let's do auto
group auto group. All right, so I'm going to
separate this out again. No, instead, let's do
this and let's do split. I'll stop to split split ding. Okay. I'm going to start from this piece with the move
brush, turn on symmetry. Select the move brush. Move this out out swelling here. Move the south. Move the
south. Move the south. Okay. All right. Turn of symmetric bodies. It closed, let's tend this out. You need to make sure everything is as clean as it needs to be. I'll select this remove brush, ton of symmetric bodies. Put this out. Out. All right. Move down to asymmetry. Use the bros size,
extend this out. Move this out. Okay. All right. I think
that should be fine. Here, that should be fine. So let's see what else we
can work with in here. For the most part,
everything is in place. So now we can start
adding the boat to this. Let's necessary boats to it. So I'm going to start adding
the boat from in here. Select this tonal symmetry. All right. Prez brush size.
Pro in some more. In some more. Okay. Just get something
quite tighter in there. All right. Okay, that's fine. Is there any subdivision
level in there? Okay, is, let's come in here, no subdivision level in here. Then we can start
adding the boats in. So B I select this. Let's find it. Okay. So it's one of the
we can use any of this. Let's use this instead. Symmetry done done, no doubt. So Let's see, you can
see one from the top. So let's go in at the top. Pull one here. Let's see if
it's no the surface proper. It's not ren the surface.
You need to go to brush. Depp P you dip down some more. All right. I believe that should be sitting
in properly now. That should be sitting
in there properly. It's getting close. Let's see. Okay.
Yeah, that sits well. That sits well. Moving on. Need a few more around this. So you can do a
smaller one here. Let's get closed. Okay. Trying to see how much do that. Don't do that small
one in there. Okay. Trying to figure out
if I need this to be quite flat on the
surface or not. I need this buried in even more. Getting that should be
fine. I shouldn't be buried down with too much. All right. You need one year as well. Try and make sure
you cannot get in the same size and
for it. One year. All right. That should fine. Moving on. Let's see. I think for this, I can
use something else. Let's use this instead. And then make sure it's
buried in some more. Okay. Here, that
should be fine. Okay. That should work just fine. Then we go back into
this gets in here. All right. He one in here. Okay. He one L gets one here. But that roof seem rather odd. And I think that should be fine. So I just get it more or
less closer this way. So it's kind of
feel like kind of first in towards this
piece at the back. So that should make better
sense. And do that. Let's increase the
size a bit more. Okay? Then we can go to the
back piece and do that. We need, we just need one year. Okay? Let's see. I think we need one here
as well. All right. Do that, increase
the size a bit more. Okay, that should be fine. That will work
just fine. I think it makes sense if we have somebody back. I
need to hide this. Let me go back a Let's side this Okay. Throw down. This is a mesh we need to be on, select this mesh, right? Okay. Just checking just to make sure everything's working correctly. Of in one. You need to make sure it's kind
of buried in again. Down some more. Okay. Fine. You're as well. Okay. Let's get
one in the center. That's way too big. Roughly get it around the same
size as the others, maybe slightly
bigger. That's fine. Get one here. Down a bit here. Don't do that. Try get similar size. All right. Get closed on here. Here, swell. Here, swell. That's
on his way too big. Do that gets the edge. Okay. Do the last one here. One here as well. All right. Okay? So now to the front piece, you need one here, for sure, something
quite big actually. Okay, Let's get one here. Using roughly the same size,
gets one in the mid year. Just get one in the mid
year as well to one year. Okay, passing one year as well. Okay. Do we need one here, let's let's get something
in there regardless. Okay? We need some smaller ones. Don't do that getting close. Up some more. Okay, now let's go to the sides. We have both in here. Do that's quite big. Something quite big, as big
as that should be fine. Okay. All right. That should. No, that
is not sitting well. Let's get up close. Okay. I think that shop's
setting well now. Where else? Do we need this? Yes, we
need one for the forehead. We need one for sure.
That's way too big. Yeah, pretty much less
so should be fine. That should account for everything we need
to have in there. Right? So now, I think the
next thing will be adding, you can see one around. Yeah, I think what we
have here should be fine. To have here should
be just fine. Okay. Moving on. Okay? Yes, we need to add nails. Okay. This nails, you need
to introduce the nails now, so let's clear the max. Select the body. Do you have any subdision no
subdivision level in there, let's subdivide a bit more. Okay. Just to have something
more or less in there. Let change it to
the standard brush. The standard. Me
the cats in here. Okay. Something's rather
odd. Slow this out. Okay. Take down the smooth
intensity, smooth this down. Alright. Work just fine. This down. Okay. That should be fine. All right. So I'm just adding
necessary breakup in there. Okay. All right. Just to accentuate some of
the forms some more. Okay. So this down. Okay. Same standard brush. Yeah, that should be fine. So now for the news, let
me see this out first. Okay. So for the news, let's go steal this again. There's still some
news. I mean, why not? Poppy the soup to
come back in here, paste the soup in. So basically, we just need one. Just need one in
a good position, and then we come right
to the opposite side. Let me give you a
moment to kind of save. The nails are not
all over the place, so we just need to kind of place them where it needs to be,
and then we should be good. Okay. So I'll do Control
Shift. Click on this. I'll do delete
Eden. Delete Eden. All right. I'll just move it down
where it needs to be. So we have one
directly on the Ni Po. Let's get this forward. Okay. See this down. All right. Serf it's this way Sway. All right. It's this way. Let's see. Now it's
just to figure out how much do you
need them to be out. Okay. Let's see. I think
they need to be quite slightly bigger and
a little bit obvious. All right? Let's see what we have probably
pull it out a little two. Okay. Make this work. So
hold down Control. Hold down control. Make
under copy around here. Okay. Sat this way. Okay. Let's see, push this
back in some more. Hold down control, make
an under copy of this. Take it this way. Bring this in. All right. Stop. I think it should be
more or less around. So let's it this way. Say, this way. Space some more. All right. I think that should be more. Okay, let's get this
down some more. Okay. Let's see, push this
back in some more. Alright. Let's see
I think we go down. Go down control, run down here. Move this way. Okay. At Okay. Let's see if we get
it out some more. All right. Front facing some more down where should be fine. Okay. One directly on the kneel. Get it closer. Bits out this way. Front face in some more tilted a little. By this in some more. All right. Pull down control
again, pull this down. Okay. Is in some mores. All right. I think we should let's see if there's one more I think
we should be fine here. Okay? All right. So if
we do shift out, we have something like so. Okay. I think the lit I need
to adjust would be less grab two invert the max. I think I might need
to pull this up some more around closer around here. Down a little, that
should be fine. Okay, that's fine. So
next we need to do will be to put them in a folder. Let's get all of
this in a folder. We can put this in this
folder or just rename this folder to caskets. Let's use our caps in here. Caskets pkts. Okay? So everything that
needs to be visible, we just put them in
there, pad put this in. I put this in. Let me first send this down. I send this down
all the way down, should be fine.
Then I'll hide it. Select, down shift,
send this down. Select down shift,
send this down. Okay? Hold down shift,
send this down. This needs to be on the same. Supposed to have the same. Okay. I also of separates
out the boat Okay, let's do split
hiding. All right. So this and this is supposed
to be on the same sub too. So let's make sure that no
sublution level in the first, then we can merge them as one single piece to
merge down. All right. Okay, select this,
send this down. Is there anything
else sending down? All right, so let's start
putting them inside the folder. So drag in, put in
in in in as well. So if you should go and
select something else, you should have that
completely hidden. Okay? Oh, yes, Skip we
forgot to add this also. So send this down, select this, send this down, put it in the folder, select
something else, then oh this also inclusive I'll put these drugs in All right. So this is the entire outing. I believe you select
something else, hide it. Everything is eating. Awesome. So we just need to
kind of copy this folder now. So let's go over to Zip login. Sub to master copy folder. Come in a Zip login
piece folder. Let's allow this run through. Perfect is in there now. So I just need to kind of
place this on the side. So let's place this on the side. So let me send this
down all the way down. Can I send this folder down? Yes, I can I did I? Yes, we did to
transpose sets. Okay. Go back in the ton of one
ton of symmetry center. Okay, Transpose
close this again, transpose sets this around here. Side. All right, fantastic. As far as this goes, we have
all of what we need now. Let's say we do a quick render. Let me transpose this again. Need to pull this up
slightly this way. Okay. So if we do kept out transpose set a let's make
sure we select something. Move this up, L. Let's do a
quick render in her shift. So at this point, we're done
with the major blowout. The major blockout
is kind of done, so I think this is
actually a good piece. So in the next lesson,
we'll just move on and then do something else. Most likely, arrange all of
our files, create a new file, arrange all of the files,
and begin to work on the I poly surface
detailing in there. So I'll see you guys in the
next lesson, bye for now. A
59. 57 Bolts Topology Optimization In Zbrush: Cucumber, guys. So in
the previous lesson, we kind of stat up. So in this lesson, I would like to start organizing things. But before I do, there's something we need
to kind of fix. Let me close down, some to fix them. What we need to
fix is this boat. The boats we have on the edges, we need to get that
fixed why because it has an extra edge that we
don't necessarily need. So let's see if we can go into them isolate,
that's quite a lot. That's quite a lot, actually. So the idea is that
we have to shift. We have this extra flat faces that we
don't necessarily need, so we're just going
to take up more take up two more space that
we don't need to give it. So let's fix that. So I'm going to
start remiting too. Start remiting just to keep things organized
as well as we go. Get in the body more both. All right. So I'll
send this down. Let me shoot this down.
Okay? This particular one, I think I'm going
to shoot this up. Okay? Let's go down to this. I'll make a
duplicate, hide that. Then I want to do
group binomals. That's basically
what we need to do group binormals
and then we'll fix any extra agent
we have in there. From those kind of checking, I think it also comes with extra edging between the doors. So group by normal
going to make the work. Easier, but you need to kind of manually
go in and begin to tap tap on each on each polygon, on each poly group rather. So we can do one side
and then mirror to the opposite side and then fix any other issue might have. Let's just start in here. These things we symmetry turn on symmetry Let's
turn on symmetry. Let's group by normal. Is going to do this
symmetrically, did. Cently shove let's find
out control shift click. Okay, do that. Do this from the indo parts. That is not symmetrical. It's not symmetrical in any way. We have some of these data actually we have smartly
directly in the center. There's going to
be a long process, but let's just get it
done piece by piece. Take down your
browse size, right? It's going to take a
little bit of time, but we just need
to get it right. Don't do that. Let me
bring everything back out. The symmetry is turned on. So it's not doing this
symmetrically, unfortunately. Alright. Okay. Okay. Move side, select. Alright, I'm going
to do delete ing. Each time I each time
I move a few steps. I'm going to do
deleting just to keep things walking a
bit faster back. Okay. All right. Let's see what we can
do from this view. Let's just work with
this view for now, see what we can clean
up from this back view. Okay. I think this will make work a little completely easier though, but a little easier. Okay. Let's visualize
this get a broader view. Okay. Alright get in here,
do this as well. Let's do delete ding. Let's zoom out. Let's see
if something were missing. Okay. On this side I two. Here swell. Here
swell. Here, swell. Okay. Come down here. Here
swell, here swell. Just move to the opposite side. Here, here here so. Okay? It's quite a lot, but that's fine to delete ding. Okay, I would like to finalize on this top region
first before moving down. Let's come to the front view. Let's see what we missed
on the front view. Okay? I selected selected as well. Okay. Select, taking this carefully to be sure I'm doing
this correctly. Right? We can do here let's move to the other side. Here, take this around. Let's see what we may have
missed on these parts. Okay. I think, as far as the tops go, I think we kind of did a
pretty good job. Hidden. Alright? Hearing close,
cross check again. Check this around. I
think I missed one. This is why I need to kind of check this around
just to be sure. Okay. It's thin. All right. I think we can now
carefully go down. Come down. Let's start
from the front view. Okay. So lower parts. The feet, we can come back to that. Let's just do the mid let's
do the mid part first. Let's first tack on the side, then we work on the arm. Okay. Well can just go spinning this around gently and select what
needs to be selected. Okay. Oh, I think I'm
already strolling off Grilling off into the am. But that's fine. Okay.
Let's come in here. Right. Heats in at an angle. Okay. That should be fine. Since
I can see some of this, I'll just go in and
then fix what we can. Okay. Yes, I think I can come in here now and do some
selections in there. I wish it was more faster way
to for now, let's just can Okay. Seeing the angle of view. All right. Ts to delete dentin
check this arm properly. The arm both properly. See one ed. Didn't
get that part. Okay. Checking this around feels like floating
planets which look cool. All right, so we didn't
target these parts. All right. Yes, I think
that should be fine. Okay. Fantastic. So delete
in. All right. So this This is
for the left arm. Yes. We have this
for the left arm. I think since we
have for left arm, I think I can just quite easily. Mirror it to the opposite side. But let's start by maxing
everything in there. Ib its one single polygrap. Okay. Marks all of this in her with a separate poly group. So I marks all of this again. Trying to see if I can
work a bit faster in here. Okay. Is mark now. I'm going to do split
on marks points, split on marks points. Okay, then I'm going
to do mirror weld, but it's going to
be an issue though, because kind of do
some fixing in there, but they just do mirror weld. I'll move things a lot
faster for us Mirror weld. So you can see doing that
now, something became hidden. I messier became hidden. So we need to pull it out. So let's do Transparency. Let's do autorouphuto group F. Go to Gizmo
Control click on it, and we just need to pull
it out out that way. I think that should
be pretty much it. Everything maintains
its original position. I I see something down here. That position is where
it needs to be getting close back and do that. Okay. Just need to get
it back in there. All right. Select this as well. Let's get it out first,
then position it there. I think this should make
the working a lot easier. All right. I think everything
should be fine. Okay. That is fine. I'm going
to do a quick sieve. Okay. I kind of
tackle the top parts, so I've tackled the arm
be coming down now. Moving downwards
to the next thing around the waist region. Tackle that around
the waist region, so I can do I was just going
to form in the eye slates. I think we did a
pretty good job for selecting this for working
around the toso parts. I'm not sure there's any bits we need correct in there I
think that should be fine. Okay? Yeah, so next we need
to do let's move to B. B completely like so. Contribute click, click again. Let's think we can quite
easily just do this. Okay. All right. Here as well. I think we can go to the I think
this one to the fit. Let me be sure. Okay,
it comes around. Okay, I think we need
to go around this now. Alright. Okay. Move this along. All right, I think we completed that. Yes, we have that
should be fine. Cross check again
just to be sure. Okay. Geometry deletes din. All right. So now for the bits, I think we need to separate
them, don't do that. We need to separate them out. I need to separate them
out, but before we do, let's just get what
we need in the first. Let's just eat nuts,
and why not? Why not? Let's just mark last marks last symmetry symmetry to on I'll just mark
all these bits. Then we'll do split
on mark points, split on mark points, right? Turn of symmetry mark any maxing we have in
the selectal of this. Give it one single
polygroup conduct click. We do delete seeding. Symmetry delete seeding. So just focus on
just one part only. Then we can mirror on
the opposite side. Okay. Let's go around this. All right. I'm sure you guys get the idea
because we're going to do this for every
single boat we have. So I'm going going
to do for this part, and then you guys can finish
up the rest of the part that this sia wouldn't
be able to contain. Tackling this from this angle. Let's angle, change the angle
bits and clean this up. Okay. I think I may have missed a few. Let's cross check again just
to be sure delete it in. I think we did a
pretty good job. We obviously need to
cross check again. This out mirror weld. Do that do that. Turn off symmetry. Okay, I need to turn off local
symmetry for this. Turn off local symmetry
mirror weld. That's fine. I should work now. Okay. I think we have that tattooed
that should be just fine. Take a quick sieve again. Okay. Save out, and
then I think we can go to the let's do the skeptitg. The casket let's see
how much time we have. Then see if we can actually
do that also, too. We almost done saving. Alright. Fantastic, so I
don't think we have too much boats going on
in here. He asked me. I think this is the
only boat we have in Okay. It's kind of buried in. I think we can just
isolate it. So low mode. Let's go over to groupomal Alright Select just be doing something wrong though. Okay. I think we are done
in the selection. We kind of ber it in,
actually bury it in. Let's do AutoGroup in here. Okay? Let's solute this
as well. All right. In the selection. Then we do delete den. Delete eden. That
should be fine. All right. That should be fine. Let's move on to next. So the next will
be these cascades. All right, so let's
just is plate. Sure you guys get the idea. We're going to pretty much
repeat the same thing. So I'll do this off
recording instead. Let's just go in and then just
do polyp by normal, right? So I'll see you guys
in next for now.
60. 58 Subtools Optimization In Zbrush: We work on about guys. So in the previous lesson,
we kind of worked on the boats and then
kind of created or rather deleted the extra flat face edges
would not be needed, so just to have things
a bit more optimized. Since we have done that now, kind of organize
things a whole lot more our entire sub to
in is a complete mess. So we want something that
is properly organized as much as possible.
Let's get right to it. So basically, what
I'm going to do be to separate them into folders folder into folders
with several parts in there. We're going to have
the head folder parts. We have the tos, then
we have the end. Then we have around the waists. Yes, then we have around the, you can call these skates,
long skirts, okay? Then we have the foot. I think we already
have a folder for this skepalready. Yes, we do. And we already have a folder
too for the casket, as well. And that'll be fine. Now to
add them in separate folders. We can now begin to merge the necessary meshes
together, optimize them, give them a proper
naming convention, and then we will do
detail sculpting on them. Just get a little bit
more organized and then delete every other
mesh we don't need. So we can kind of optimize the File properly
for i resolution, poly sculpting in there
and detailing also too. So let's get right
to it enough to. So what I'm going
to do is to come down here, let's go down. Okay. So this kept out. I'll put this here. Can I send all of this down? Yes, I can send the folder down. Yes, you can send
the folder down. That is fine. A ships send
this folder down as well. Alright, that is fine. So anyone that is actually in the folder
I'm going to hide those, so it doesn't disturb our view. Okay? Yes, that's fine. So we have the bots. So I think why we are
kind of arranging this, you can also name some
things also, too. If we shoot but let me just
name this to body boats. Body boats. All right. I'll shoot this down. Okay. This one is a foot boats. Alright, then she'll
send these down. Probably won't put them
in the own folder maybe. Let's see okay. This is boats I'll shoot this down. Alright, I think
it's obsafe to kind of not put them in the folder yet because the hand both supposed to be in
his own separate folder. W that the body boats is kind
of standing out completely. That's fine. I think
we can put that in the toso folder. That
should work just fine. Alright so Alright. I think we, we can do. Let's create the folder foldt least let's have some
objects in the folder first. Let's do for the
first one we can do. This is the body boats
we can do tos parts. All right, so we have something
in there now already. If you close that.
Is for the foods, we can name these two
pretty new food food parts. All right. Then with the new folder. No, this gret folder. Let's name these two parts. All right, so at least we
have the folders in here now. Then let me move this along. This particular one is
what is visible right now. So I'm going to put
that in a folder. Let's send this down first. Put this in the
head parts, folder. Okay then mesh we
need to send down. I was going to send it down or put it in the
correct folder so add parts. Let's hide, select this, send this down, put this
in the same folder. All right. Minimize, extend this
out, put this this way. Let's kind of adjust our layout. Okay, so everything that's do with the head is going
to be in the folder, which makes sense.
Send this down. I'll also send this down. We can start also
merging some few things together just top spit
things up a little bit more. I think that go to
take extra times. Let's just set them
in folder face. I think one before and other. A lot of makes sense,
one before another. Send this down, bring
this new folder. Turn this down,
put the sn folder. Okay, these as well. So I pretty much
doing the same thing. So mean marks, put
the sn folder. Okay. We can also get
this in the same folder. I mean, why not? Put this in there I think as
far as the head goes, I think that should
be just fine. That work just fine. I'm thinking maybe I should
put this I should put the boats for the head mesh. I think can put that
in the same food. I think that will
make better sense. I'll make better
sense just to keep them pretty much organized. So I'm going to
select it, isolate. Figure out where they're
supposed to be. Play that. Let's use the maxl instead. All right, Mark this region. Then we'll just do splits,
mark points. Okay. Then we go in and
then select it, send it out of the group. I mean, why is no sending
out of the group? We it. Okay, this is it. I think we need to open
the folder, select it, and then now we can send it out, so it needs to be selected. Then I drag and put this in the head folder.
That should be fine. So I should go away
now, that's fine. The next thing
will be the torso. So let's go to the
nails, send this down. So this is going to be
inside the torso folder. Send this down, put it in
the torso folder as well. Okay. Send this down, torso folder. Let's hide your torso
folder as well. Okay. Et's move, select this, send this down,
bring that in there. Okay. We are seeing meshes that
we don't need, that's fine. We need to focus on what we need and get them into the
correct folder as needed. Okay. So while you focusing
on what we need? This is part of the clothl too. So send this down,
bring this in. Send this down, bring that in. Bring that in. I think for the toe, so
we can grab can grab some more can grab some more mesh. Okay? Let's see
what we have here. I think the rest of this, we can just put that in
the waist folder instead. Yes. So, this should be just fine. I think we can select this is gonna be
for the arm folder. So let's send this
down. The arm folder. I think I'm going to drag this
down. Let's put this down. Drop that in there, hide it. Select this, send this
down, bring that in there. Let's open up the folder so we can properly see
what we're doing. Send that in there. So pret
more repetition in there. Pretty much repeating the
same thing we're doing, just to keep more organized, it's important we have them
organized properly All right. Do we need, we
definitely need those. Put that in there. Let's go come in
here, pull this in. All right. Anything else to
do with the arm? I think we're done with everything else to
do with the arm. So let's close that folder. Let's see what we have. Okay, we need a folder for the waist a new
folder for the waist. So let's create a new folder, let's name these
two waste parts. Okay? For this waste parts, I think, what do we have in? Oh, no, we're not supposed
to have this in we're supposed to have this in
the arm parts instead. And to send this down, put this in the arm parts. Oh, something is off. Now, the folder is
deleted, that's fine. We can just select something
else and then send this down and create a new
folder we are selected. So let's just type in wasps. Alright, so we have that now. Then let's start putting the corred mesh
into that folder. So it makes sense to actually organize
your fights properly. So you know certainly
where they are, so you can work on
them individually. Then this Oh, that's
really needful. Let's eye that, so
we can actually see what we need to select next. So I'm just ordering
down shifts and then selecting this move down. You can see press
shift to move to last. That's pretty much
what I'm doing. Okay. Move to the next one. Bring that in there. I think that also includes the skirts and this
emblem mesh as well. All of this needs to
go in there as well. The save out. Shouldn't take too long because my file
is not that big, right? So bring this in there. Because I'm kind of tempted
go to merge meshes together, but I shouldn't be
tempted for now. Let's just get what needs to be in the folder in the
folder that it needs to be. Because for begin to merge them that's going to
make the process a whole lot longer. I
wouldn't want that. That kind of defeat the purpose of arranging things properly. So we have everything
that needs to be in the waste folder in there now. So the last thing will be for the foods. Let me
drag this down. So need something for the foods. So the rest of this
is going to be for the foot folder instead. All of these sit quite
nicely in the foot folder. Right hide that as well. Okay. All right. That's in there head
that's in there as well. Okay. Come down. Put this in. Fantastic. You can see how we pretty
much Oh, one is missing. This part lm is supposed
to be for the torso. So let's make sure we have this placed in the torso instead. So torso torso parts. All right. Let's see if we have okay. Now we have everything
properly arranged, set up the way it should
be, which is awesome. Right? So if we go down, everything
we need now is actually placed in the proper folder. What Nani to do just
to let me save this. So I'm going to kind of create
a new or rather save out a new file. It's
a different name. I'm just going to
name this to name out something maybe
main instead, since we have this
organized in here. So just to have a file backup in case
anything goes wrong. Hopefully, nothing
goes wrong in here, so I'm just going to put main Amo teisman
I will save this. So this is the five we're
going to be working with now. This is the five we're
going to be working with, is our main file now. So we can actually delete every unnecessary stuff that
we don't need right here. Because everything we need
now is already placed in the accurate folder.
So anything else. Oh, I think we need,
like a backup file? Let's be sure. Let's
turn everything back on. Okay? Let's be sure everything
we need actually in place. Here's everything we need
nice in place. That's fine. I'm going to keep this, but the rest everything
from up here, I'm going to delete. So let's actually
go all the way up. Anything we don't need.
All of these miscellans. We're just going to
completely delete them. Starting from this,
let me send I think, let me send this down. The other things we need
that are actually visible, I can just send
them down instead. Because once I start
hitting delete, I don't want to keep
eating dit until we erase everything
that we don't need. Okay, so all of this up here. We don't necessarily
need them anymore. Since we already have a
backup you need any of those, we can always bring that
up from the backup, but for now, I'm just going
to be hitting the lit. Okay? So let's make sure
we're visualizing this. This is going to help optimize
our file a whole lot more. Because I necessary mesh that is there, we're
going to delete that. So we're going to reduce our file size because needs
our file size reduced. So when we're adding
the coopted details, it's actually going to
help without making this file too slow to work with. Okay, now careful now.
Almost at the end. Right? Take it can leave dart, but I'm going to copy
it and send this into a different into a different
soup to sele copy darts. Put this in a different canvas. Just paste this in here instead. But now we still kind
of delete delete this I think we need to
delete all of this also, too, because we don't
need that name anymore. So let's start deleting them because we already
have a backup file. So all of this is not going
to be necessary anymore. Okay. It's just to optimize
our file quite well. Okay, that's fine. If we go back to
our original file. So I think there might be different when we
save this out now. We save this out. We
have this now 229 MB. So if we should replace that. You should have a
little reduction in file size, I believe. Let's just go back
and open it up again. Awesome. You can see how our file size reduce
dramatically. So from 229 MB to 46 MB, which is what we want
because we're going to be increasing subluption
levels later. And then we need to kind of
optimize this a lot more. So I'll do a quick sieve again. I'm not sure you guys, we
used to kind of optimize your file before starting the
scope the details in there. So in the next lesson model, we're going to go into each
fold and then begin to merge meshes that needs to be
merged as one single piece, right, so you guys in the
next lesson buy for now.
61. 59 Scepter Subtools Prepping In Zbrush: Welcome back, guys. So I
know from where we left off. So I need to kind
of arrange this now or rather kind of merge
down the meshes we need. Okay? So this I'm going to
put them in Micelano's fold. Okay, Miss. So they're just going to be in the Miscellanos folder instead, 'cause you don't want them
visible at the moment or kind of out of place videos are actually
in proper folders. Okay, so let's start from the let's see where
we can start from. Let's just start
hierarchically in here, so let's start from the skeptal. I'm going to hide all of this. Okay. Let's get
into the skeptal. So let's see which messes
we can merge down together. Also, we'll also be checking the topology on them just to be sure every
topology is okay. There are any sulution
level in there, we're going to delete that. This, for example, I think
we have for the most part, we have good topology
around this. Let me just check
the reference again. Let's see if there's something
else we can do in there. Okay. Crown on top. I don't think we need
so much detail in here. I think this will work just
fine for what's needed for. But let's get in. Let's see. Now we see a phase that we're not
supposed to have down here, which you can also delete. So let's grow by normal. Okay? Solo these out. Yeah, do we need the Bs also, I don't think we need the base because we have
discovered up here. So I'm going to let's
bring everything back out. Control ship click
on Oh, do that. Let's do group by normal. Oh, I lost that. I don't want
to lose that in any way. Let's do Control
**** click on this. Okay? Let's do Auto
group in here. Auto Group. No, no,
I missed something. Don't do that. Let's do
it this way instead. Mark this ControW
invite selection. Then I'm going to
do delete Edin. All right. Control Ship click on this. Let's do Auto Group in here. Select this again. Delete ding. All right. Eso Auto group. Okay, that should be fine. This we can definitely
work with no doubts. I think we need an olden
edge around here, so be ZM. Okay. I think I delete may need
to delete a few of this. It's a bit weird here. Topology in here is a bit old. Let me add one sheep
here, one sheep here. It's kind of merging down. Let me see maybe dies from
the Chris P's under Chris. On Crease PG without fix eating on Chris without
fxenacy nothing. We might not need
to fix this if we subdivide it if it's gonna
give us good results. Let's tra subdivision
level to it. Let's see, I don't think we
have any major issue there. But at the same time, not really liking what
I see in there. You might just be able to
live with this though. So I subdivide we have more subductions
down here, which is fine. If I do delete lower for now, ZM, see if I can actually
delete non work, do that. We'll leave it for now.
We'll leave it for now. Let's come down to
the next piece. This I need to kind of check
properly and not order necessary head loops on this just to keep the
shape a bit more. Okay. So the idea is to check. So we have a total
of two resolution in there it seems fine
for the most part. But I'm going to add more
subdivision level across BZ. So I'm going to add in between, keeping in mind that we're
going to subdivide and then do some sculpted
details in there. So we need good resolution in there to hold the
shape quite well. I think so far this
should be fine. She works fine. So
go out to isolates. No, I need to kind of
separate these two. Reason I'm sparting
them is because this potlar crown
now at the top, is going to be
completely separate. I'm not going to be sculpting
so detail in there. I can do that instead
of Stan spina instead. So I don't want to kind of be there while I kind of
merge these two together. So we'll just do
split aging instead. Right? That is it. This is this. So I'm
going to send this down. But this time around,
I'm not holding down. I'm not holding
down shape because I want to kind of send
this all the way down. So around here should be fine. This part line has
good topology. This also has good
topology if we subdivide. Now, let's subdivide this, let's confirm a few
things to be sure if you have good topology in and around it to hold
the shape quite well. Okay, I think this should
hold up quite nicely. So I'm going to come in here and I'm going to
merge these two down. All right. Fantastic.
So moving on. Okay, let's select this. Let's see if it does,
how in between there which is fine. Let's
subdivide this. Let's make sure they're not
pulling out in any way. So far, they're in place. All right. Awesome, that
will work just fine. I think we can keep
those as they are. Maybe not. It has
good topology across it as well, which is also fine. So if you ask me, I say, can I should merge
these three also, too. Together, let's merge
them together. Let's see. Let's see where it is. Put this down here. Okay, I think we can do
measure down forests. Let's do measure down. Okay, fantastic. You can have this as one separate
piece on its own. Now this is a separate piece. If you subdivide
this sugar we should have enough subdivision level to hold the shape quite so well. So how can we know
until we test that out? We need to test that
out, but before we do, let's kind of finalize
on what we need to merge in this septa for now, then we can subdivide them and figure out if it's
going to work or not. Okay. For the rod, let's see. Let's getting close. I need to select
this getting close. That's a bit weird. Select this. Let's check this
subivison level in there. There's none that is fine. I think we can get this I keep getting this
pull effect in there. Not any weird pulling
effect in there, though. Alright, so what should
we measure and we can do. Let's see what we
can do in here. Okay, select this let's
see topology in there. Yes, we need to compensate
for the topology around here. New some more edges
across this so busy. I'll do one. Yeah,
swell, sell. Okay? Yeah, yeah, so should should hold the
ship a whole lot more. Now, for the inward parts, I don't think we need so much. Let's just do one
year, one year. One. Okay, that's fine. So we need to do this across
the measure, also, too. It's important we do this because sculpting
surface detail in there, and its shape needs to
hold itself quite well for sub divisions or surface
detail sculpting in there. Okay. We're not going to be seeing this
in what pass so we don't need to put too much where it's not going
to be visible. All right. Let's move
on to something else. Okay. That should be fine. You can just do in here. Okay. All right. Move
to the next one. So these are just quite
necessary edge loops. I would hold this shape
a whole lot more. We're also going to test, I think we're done
with everything. Here, not yet. As going to test this subdivision level are there just to be sure
everything's looking correctly. Okay. Alright. So let's test this out. Let's see if the ship
holds up quite well. So a new weird issue
in and around. I think so far, it's odes itself quite nicely,
which is fine. Okay. Here's an awesome
subbton level in the one K. If you go all the way down, let's keep it up. So this out. Let's
see what we get. Now we have this let
me take it down. Delete higher for now. We're going to delete portions that we don't necessarily need. So far, I think we won't be
needing all of this so here. I need to make sure I'm doing
this doing this correctly. No, that is not looking correct enough. Okay. All right, we just
need to pull this up in some more. That's fine. Let's do the same
for the underpar. Okay. Oh, I think we might need to leave the
one in the lower parts. I think we need the
one in lower parts, but the one on the top who
do delete ding in there. Modified topology deletes ding then we need to push
it up some more. So I'm just going to
I'm just going to mix up some more, low the max. Move this in some more
squash undo that. Undo that. Squash
it in a little. Lo should be fine. Probably use the move brush a bit more. Pay it in some more Okay. Yeah, fantastic.
That should be fine. We can definitely
work with those. So now we need to merge
these three together, so let's come down in
here I'll send this down. Okay? Send this down. This one is already down.
Select this. Send down. Now, we need to kind of make
sure the topology we have in there are quite close enough. So once we subdivide once we get something quite
good to work with. I might not necessarily need
to do too much in here but. At the same time, let's go
good topology across them. I think this is fine. I'm
just going to do merge down. Okay. Fantastic.
That work just fine. So let's move. Let's
move down. Okay. Thinking, I think we I
need to isolate this. Did I exclude the Let
me kind of confirm. Okay, excluded. Excluded. Okay. Yeah, that's fine. I think
we're in a good place. Now, where do we merge this to? That's
your next question. I mean, we can merge this
with this. I mean, why not? We can do that shouldn't be too much of an issue, I believe. So topology in Jezreel
is quite good. Well, I'm going to exclude I'm going to exclude the
boats we have in there. Let's do split ding. Geometry to split ding. Now, let's check if we have any subdivision level in there. I don't think we have any subdivision level
in there so far. Okay, no subdution level in, but we need to send it down. Okay. Then we'll
do a merge down. All right, that should be fine. We'll keep this boot
separate for now. Yes, I kind of save
this also, too. Let me give you some moment to actually save and
I'll save mine. Okay. We're good. I think we can let's see if there's any sub
dibtion level in there. We have subdivision level in. If we go lower, let's
see what we have. That's quite low.
We select this. The radio the lowest
lowest around eight k. Let's delete
higher, select this. Let's go higher.
I mean, why not? I need to merge
these two together. It makes sense to have them merged together
as one single piece. So, let's instead of
having a duplicate, I don't think we need
to duplicate anymore. Let's just don't need to make
it and duplicate actually. So let's delete lower and merge what needs
to be merged down. Okay. Were merging
these two together. So let's just do merge down. Okay? That is fine.
So we have the road, we have this, we have this. We have the both separated out. Then we have our Emirate Stone. This is already in a good place. I don't need to
subdivide this anymore. But what I can actually do is
to merge it with the boats. Since we don't need to
subdivide way too much, we get good details out of it. Let's just merge
it with the bolts. So first of all, let me go in there and see resin subdivision level in the we have
subdivision level in. I'm going to do delete. Let's just go on
solution level higher, three K, delete
lower, delete higher. Then I'll just merge
it down with bots. Okay, that should
work just fine. So yeah, that kind of
analyses for these three. I think these three
should work just fine. Maybe while we're here, we can also start naming things. Then that makes better sense. Since once we have group
then we can just name. Let me just name these two. Emerald Stone. Okay. Gets close. I can name this to Stone cage. Stone cage. Okay. Oh, we have this cap. I'll just name this to cap. Rod cap Okay. Then this is the rod itself. I mean, yeah, we
can put the rod. We can put the rod and the cap
together. I mean, why not? I think that also makes better
sense. So let's do that. So Rod cap and rod would merge those
two as one single piece. Okay, then it should just be
called rod. Okay, fantastic. Alright zod head. Okay. That should be fine. Let's go down here. We
can name this cage hold. Rather stone, cage, stone hold. Okay, that should be fine. So that makes better sense. So properly name we've made and also named this also,
too, so that should help. So we're just going
to save this file. Then next lesson,
we'll just carry on and keep optimizing and
then renaming in there. So I'll see you guys in the
next lesson, bye for now.
62. 60 Casket Subtools Prepping In Zbrush: Ob guys. So in the
previous lesson we worked on arranging the rather
organizing sub to. So we started with the sub
two for the skeptal so we're going to move onto
something else. So I'm going to hide the septal. Let's turn on the turn
on the casket instead. Okay? Now, I might be
wondering why this is still visible because we need to kind of select something in here. Let's go into that folder. Okay. So let's get right to it. I'm going to open it up and let's see which mesh
we can combine. All right? We can do Ooh. So feels rather odd. There's not enough
resolution holding it. We need to crank that
up to be our base. Can see is also Is it
still buried in the let's see I think we
might need to make some adjustment to it just to make sure it's in there
to select the move brush. Symmetry workers will
look out symmetric. Okay? That's rather
strange. Move brush. Yeah, much better now. So I just need to push this in. Like, so it should be fine.
I think that's way too much. Reduce the brush size. Okay. Seems like it's
already in there. So we don't need to do too
much. Cannot pull it out. Okay. Just making necessary corrections
where they need to be. Yeah, I think that
should be fine. Okay, we have the
tk. I'm going to do delete lower instead
for this, so delete lower. Right? I think I will do delete
lower for this before we do. Before we do delete lower. I would like to kind of
check in the first and see if we need to add extra edge loops
across some of these. I need to add extra
edge loop around this. Let me do delete higher first. Extra edge loop around this B. Okay? No, that needs to be in there. We need that. Let's just add extra edge
loops across this. Ton of symmetry. Okay. I think this
should be fine. This we can work
with. All right, so we can subdivide,
delete lower. That should be fine. Okay. Et's get this straightened out. So now what should
we mesh together. Up next question, okay? I need to push this back
down tonal symmetry. Okay. I don't want anything
penetrating out, so I think that should be fine. You're, awesome. All right. So obviously, we need to merge. Let's see what we have
in here actually. Let's see what we have in there. We take this down, delete are, select this already merge as one single piece
that is fine. Okay. I think we can. Now, these screws and this, I can merge them together
with this as well. So let's get that to work. It's the one actually
all the way down, so I'll need to pull it up. It's all the way down,
so let me drag this up. All the way here should be fine. Select this, pull this
all the way up. Okay? I think we can get
those two together. Let's see the total number
of polycns we have. So this is at one
k. This is a two k. I think we can
this alongside. So let me pull that up as well. Let's make sure there are
no subdivision level in the Check any sulution
level in the delete area. An sulution level in here. Okay, there's none.
Okay, that's fine. We can now merge can
merge this down. So let's do merge down. Okay, merge down
again. That's fine. All right. So, I'm just going to
name these two caskets. Let's use all caps for this. Caskets, helmets. Yeah, that's fine. So
that is a total of CK. And the topology across the
mating should work just fine. Even though we
subdivide, that's fine. So let me temporarily hide that. Okay. Yeah, that should
be fine. Moving on. I think this nails
should be where it is. So I'm just going to name
these two nails or cascades. News. Yeah, that's fine. Dads
casket marks, I think, I can leave that with
right, so caskets, Max caskets Mark Hi dos. I think this butler one, I'm going to leave this duets. What should we name this ***? Let's just do casket
body instead. Casket body. Hi that move down. For this, this is
like all the boats. I think we can leave all
the boats the way there. Okay, we have a total of five K. But we need to kind of
separate them out anyway. So in case you want to
add details in there, we can quite easily
add those details. We should we separate
this out from? Okay, let's do. Let's do all the clay. Let's do all the here. Then we can separate this Let me marks this at the top. Okay. I'll have to make sure we're
doing this correctly done. So I need to kind of
check to make sure. So we're going to do
split on marks points. Let's split or
split marks points. Okay? So if you slow that out, So all of this down
here, which is fine. Let's get in the we
have this at the top. Move this up. Okay,
you are separated now, so I think the are the
ones are lower ones. We can name these
two both lower. But let's put caskets
at the beginning, so we know what it is. Hi that, move down. Name these two
caskets, both Top. Okay, hide that as well. This is just the body, so we
can leave this at the body. This should be fine as the body. And I'm not I don't think there are UVs
on it, but that's fine. I couldn't create
UVs left around, but let's just see car skates. Let's just do car skates. Cascades, male body. All right. That's fine. High darts. I think it's palonk seats. It can be where it is right now. We don't need to actually
change change darts. Thinkin we have good topology
that hold it's quite well. Okay, not really. You need
to kind of add some more. You need to add some
more edge loops. Especially around here. You need to merge loops around
there because we cannot stretch that out way
too much actually. But let's do auto group first. Auto group. Let's start with this. Is there any subution level in there, there's none, that's fine.
Let's start with this. BZ ton of symmetry. So I'm just going to add extra
E loops around these bits. Et's this out. Okay. It's getting closer so we don't make any
mistakes in there. All right. Yeah, swell, swell in here. Okay. I think this should
be fair enough. Let me delete this
add one around here. Bring the others back
out. Let's go in here. I think we're going to
start adding from here. Okay. I think that's a bit. No, no, we can add
that in there. You should be fine. Okay. Just basically checking just to be sure on the right track. There's quite a lot going
on in here, though. Which is fine because needs can hold the shape quite
well around here. Because of the deformation
we have there. So that should be fine. Just looking at this path if
I need to do one in there, but I think we need
no need for that. Let's move on to the next piece. Okay. Let's add necessary edge loops. Okay. I think this
part should be fine. I do that. Okay. We're also going to smooth
this out just to be sure there are no
weirdness in there. Sometimes when working
with Z modular, you can get some weird issues. Come on. This is something like this
I was kind of referring to. Going to see some
weirdness happening in Okay. Along. Yeah, I think that
should be fine. I think that should
be pretty much it. I see an issue around the e. Okay. Let's do one egg here as well. Okay. Definitely need one egg. Let's just check. Okay, that's bare wood
properly, that should be fine. Okay. So now let's kind of test things out to be sure the mesh
is not broken in any way. So I don't want subdivision
level just to see. I think so far we are good. Okay. So let's go back in there. We have the chain. Okay, we still have this
additional chain that we're not taken account
of, but that's fine. Okay. So let's rename this
Let's name these two caskets. Let's name these
two plates hold. All right. That's fine. Let's move on to the next one. Okay? This is the chain. Okay, we kind of
merge these two down. Let's see if I need to
add anything in there. Okay, I think let's
subdivide this. Let's see, do that. I think I need to delete this extra edge
we have in there. I don't think we need
those. So let's do Poly group, et Zoo
group, but no mouse. Okay. Let's make sure
Dub sated is turned on. Give you a moment to save. Then let's go to
the opposite side. All right. I think this
should be just fine. Okay. We do delete ding. Delete ding, BZ. Let's turn on symmetry. Perhaps this should work
with symmetry turned on. Okay. Yes, well, All right. So I just need to ask a
bit more divisions to this to hold the
ship quite well. Especially when we try adding subdivision
details in there. So we need something
to hold the ship. Alright, I want to
believe we have this grades did not apply it saves symmetrically
on the opposite side. Fantastic. Oh, symmetry
wasn't turned on. That's fine. Let's get in there and then repeat
the same process. Come on. I need to delete this. I Okay. Let's do a swell. Okay. We can do one in here. In here swell. I think
we should be good. We should be good. All right. I think I need one on this side. Okay, that should be fine. Then we can merge it down. Select this, just do merge down. Is there any sublution
level in here just to be sure it
is known fantastic. Merge down. That's fine. We can just name
these two cascade chain. All right. Yeah, it shouldn't be difficult use them
to cascades cough. But we need one more
subdivision level. Let's cram this up one more subdivision level, delete lower. Calskates coughs. Basket, coughs. Alright, that should
work just fine. Se, we're pretty much
done with this as well. Let's do a quick sieve. So the next thing we're going to be dealing
with is going to be the head parts. So let's let me hide this. Let's select something in there. Alright, so I'll see you
guys in next lesson, we go in and then set this
up properly. Bye for now.
63. 61 Torso Subtools Prepping In Zbrush: Okay, welcome back, guys. So in the previous
lesson, we kind of worked on the casketes fder. So let's carry on now and
then work on the head parts. So let's get right to it. So I already selected something. Let me start with
this. Solo this out. Let's see if we have enough
topology to hold it. Okay, one let's see took a I think this should. He needs a few more around this. Let's do delete a Z M. So we need one here, swell. That should hold
up quite nicely. One the center well. Okay, we definitely need
one here, here as well. Here. Okay. We need one here. That should hold
up that edge quite well in case we're
adding details in there. I think for the most part,
it should work just fine. Then I'm just going to do, let's say, group but
no mouse instead. Just get something
needs in there. I think we should be fine. It should be fine. So now what
should we merge the sets? Let's bring everything back out. I can merge it with his do have subdivision
level in there. The sublsion level we have
in there is two kids, so that's fine.
Let's delete lower. Select this. We have this roughly almost
around Suki also, too. That should be fine. So
let's find where they are. So this is pull this
all the way up. This is for the
boats. Let's just start by naming these
two head boats. Hops for this. Boats Okay. So this and this we can
merge as one single piece. So let's do merge down. This also, too, we can
get that in there. I'll just put it all the way up. This also delete lower. I can pull this up here. This also. Let's pull it up here. Then we can do merge down. I think one more,
yes. Here's one more. All right, fantastic. So all of this is going to
be one single piece. I think this should
work just fine. We have enough Oh, not entirely enough yet. We still need to need to
add a few in here. Busy. Okay. Why is not working. Why? Okay, it's working
now. That's fine. That is what we
need in the I think this weekend he will need one in a in a common. Great. Okay, that's fine. Okay, that should
work. We need to make sure we have enough
edge loophole in it. We need to hold this
edge also to as well. Yeah, as well. Okay. That's some weirdness. That's some weirdness. Oh, of this tone
of that symmetric. That's the issue we're
having previously, so. Okay. Yea, we should be fine now. Go to the opposite side. That should hold the
edges quite well. Let's just check around to be sure everything
is in order. We need one year,
one year, as well. Okay. We need one year, or so. Okay. It's important to
have this scene there before we started adding sculpted details in Okay. Fantastic. Yeah, I think as far as this goes,
it should be fine. Just trying to even out
the edge loop spacing for it face in there.
So that's fine. Moving on. I'm
going to hide this, hide this, move down. I think this should
be fine where it is. Let's rename this. Okay, we need to
rename this Ed crown. Okay. Select this Ewing. This we can definitely
work with, I hide that. In here, let's see
what can we add Okay, yes, we can add this,
this and this together. Let's see if there's any
subdivision level in there. There's none that is fine. Edge loops, perfect. Okay. Maybe we can just add. Okay, we already have that
Boo, that's fine. That's fine. Let's come down here. I think we have this working
correctly as well. Let's check this. 14
kin let's go lower. Let's go one sub dilution level higher. Three k is quite much. Five, four KKK roughly
similar to the other. So delete higher delete
lower, delete higher instead. Alright, that should be fine. So we just need to get them. Let me move this up. The
face marks are cities. But there's no subution
level in there, I believe, no sublution level
in here as well, so we can just do
merge down mesh down. Mase down, mess down. Oh, yeah, that we can do lists. That would work just fine. So we can do a max Okay. Then this will be head,
hoodie, head hood. It just dem head. Should we call the helmets or
just deem it hood instead. So we name as head Hoody. That's fine. This would
be crown ornaments. I just name the crown priests. Okay. Let's put in front. All right. Fantastic, so. That would work just fine. We have properly named them. Properly named, merge down the necessary added necessary
edge loops also, too. We can hide out. Let's
move down to the next one.To there's quite a lot happening in here.
Happening in here. Okay. Yes, let's make it
work. So, let's go in. Let's see what we can merge
together as one single piece. I feel like I should merge.
Let me select this first. Okay. We can probably
leave this way is seven K total fulcun
seven k, that's fine. Okay? I think this news
also too should be on its own separate Subtool then we can merge this
and this together. That's fine. Yeah,
let's do that first. So is there any
subdivision level in? Okay, now sub divition
level in? That's fine. Let's find it.
Could sit in here? I pull this all the way up. What is this? Okay, this piece
at the back that's fine. W. We'll come back to that. Let's select this. I think it does all the necessary
edge loop it needs. Let's let's get in
there, let's visualize. Yes, it does all the edge
loop you need in there. Two k, let's delete higher. Find where that
okay, pull this up. Select this. Do we have subdivision
level in there? There's no, total of
two k, that's fine. Pull this up. Then we
can merge it down, merge down, merge down. Fantastic, that's fine. Okay. That would work just fine. So we need to actually
name this so we can name this torso color. Tso color. That is fine. We hide that. Okay? This we need to merge it
down with this piece. And this piece as well. Let me put this up. Select the belt, put
it up as well. Okay? For this belt, let's see if we have enough topology to hold it. I think we do I'll do
delete lower instead. I think we have enough to
hold this. Select this. Let's see if we have enough
to hold this as well. I think if you ask me, I think
we should, spacing here. Need to kind of add a
few more down here. By By M. I'm trying to see if it's
completely necessary, though. We're going to be
folding or rather merging quite a number
of piece together. Okay, let's just
add. Let's add it. Let's add it where
it needs to be. Okay. Et's add this so so we don't
have any issue later on. Okay, that should be fine. Let's move to the other piece. Is there any subduction level in there there's none, that's fine. So just to repeat the same son, add edge loops across this. Okay. I All right. This would hold the
shape quite well. So when we had or try to use
any metallic surface alpha. No metallic metal
surface alpha in there. It's going to hold. It's
going to kind of work properly without having to crank this subdivision
level way too high. That's like general
idea for doing this. Okay. Let's add one here. Okay. I think we should be fine. Bring everything back
out. So this is the belt. We can now merge this down, merge down, merge down. Fantastic. So that should
hold the shape quite well. We can name it to torso belts. Let's name the two torso belts. Alright. Yes. That we can definitely
work with hide the darts. Body we can leave this. Let's just body boats. Let's name it to torso. Boats should be
fine. Hide darts. What should we name these arts? And bring everything
back out we need. I think I'm missing
the chain mill. He chain mill is in there. I will select this. Let me pull do some adjustments to it. Scroll down, make this visible so we can just see
what's going on in there. Wood is down. Let's even go to a lower subivision
level for hits who is down. Okay, that should be fine. All right. Okay,
let's turn this off. So let's go back in here. What should we name this as? Let's do Tsu okay,
Tso chess plates. Tso Chess plates. Okay, hide that. Do you have subdivision
level in there? Yeah, I think for the most part, I think this should
be just fine. That should be fine. That so this is going to
be a torso vest. I'll just name these to
tos vests Torso vests. All right, that should be fine. Let's hire that's
moving on. Okay? This is for the
chain torso chain. So, so chain chains, that should be fine.
Obviously, to nails. So nails. Alright.
That should be fine. So I think we've
kind of completed everything that's
do for the toes so We have this properly
named as it should be. Okay. This we can work with e, let's go down to the paths. All right. So that's what we want to work on
in the next lesson. I'll see you guys in the
next lesson, bye for now.
64. 62 Arm Subtools Prepping In Zbrush: Well, come back, guys.
So in previous lesson, we kind of worked
on the torso parts. So I'm going to carry on and
then work on the arm parts. So let's get into it. Let's see what we can
merge together, see this. You have some subdion
leaves in there. Let's go with lower one. I think should be fine. Let's see. Okay, I think we need to go on subdivision
level higher. 14 I think 14 should
hold up quite nicely. This piece is going
to be visible. So let's do delete
lower, delete higher. It's like a big
piece that's going to be visible on our front scum. So we need to have good topology in there
that is visible. Okay? This is fine. So let's start renaming. They think I'm gonna
leave these cities. I'm going to leave these cities. So let me pull this
up all the way. Which piece is this? Okay? I'll just rename this to shoulder Let's use
our caps for this. Shoulder pads. Okay. I'll hide that move down. Okay let's just
move down instead. Let's just follow the
hierarchy in there. It's a subdivision
level in here. There's none. Let's visualize. Let's see where we get. So
we have a two K resolution. Two K resolution
seems fine. Okay? So we're going to
merge it with this. Do we have subdivision level
in there? Okay? We don't. So I'm going to pull this
all the way up here. Let's check this as well. I think we are good
topology going across this. Is there any subdivision
level in there. It is non fantastic. Pull this up as well. Okay? I think we
can get this and this in the same merge
ds one single two. One single sub two. So let's
just merge down. Merge down. Alright that's fine. So I'm
going to rename these two. And Okay, and back. Okay, let's do hand side parts. All right. Move
along with the belt. Okay, let's limit
this to elbow belts. Elbow belts. That
should be fine. Do have any subdivision
level in there. If we don't think default will be just fine
for all cities. That should be fine.
Default will be just fine. So chain mail already
has its own name. Let's just name this all
cap chain Mil chain mail. Let's just do chain mail
or arm chain mail instead. All right. Move down. Okay, this particular one, I think we need
something higher for it. We need a higher
subdivision level for it. So let's subdivide this. I'll do delete lower. Okay, I think, I think it's merge this with
the other parts. I don't think we
measure that yet. So let's go all the way up. Unside parts. Let's
merge this down. Wait, wait a minutes. Oh, I think that's
an extra pieces like an extra piece
we don't need. An extra piece we don't
need, so I'm just going to pull this up.
I'm going to hide that. Okay. Here's an extra piece that I forgot to kind of delete, so moving on, I'll select
this, select this. I think for this, this is folky resolution. If we subdivide this, we have this Ty resolution. Let's see. Is already shrink down.
Let's subdivide this. But first, let's pull it up. Okay, is where it
needs to be already. So let's actually
subdivide this. So I'm going to subdivide
trying to check if I need to. Let's just subdivide.
Then let's delete lower. Delete lower. Then
we can merge down. Merge down. All right.
We name these two. What should we name this s and back parts. Okay. That should be fine. This
is the booth that is fine. Then this is the ann glove. Let's just name
this two A glove. Okay, that should
work just fine. All right. I'll
do a quick sieve. I think everything is coming
together quite nicely. So we can hide this too. Hide this as well. I think we should
delete this don't actually need it anymore.
Let's just delete. Okay. I think we have
everything we need now. Alright. I think I might need to make
some adjustments to this. Let's make sure. Let's just make some little
adjustment to it. So we're going to do Auto Group. Okay. Symmetry turn on. Turn
off local symmetry, okay? Max is being everything back out invading max invading max. Okay, it feels like you
just on this part alone, so let's turn off symmetry. We just need to push
this up a little. Okay, that should be fine. Let's make the
chain mill visible. Let's make sure there are no interceptions at
interceptions in there. So I think we should get this back to the
way it was before. But I think if I leave this way, it is going to give
me an issue so. Maybe I should select this
instead and pull this in instead bury that in instead.
That makes better sense. Okay. I'm just going to check this
around just to be sure. P down. Okay, I think everything
should be just fine. All right. I think I need to make the shed visible, just to see also. Let's make the vest visible. Okay. Hi, the chain
meal. Yeah, I figured. So let's buy this back in. Make sure it's
buried in properly. Okay. Bury this in as well. Remember, we don't have any actual body inside of the mesh inside
of this arm also. We can just kind of
push this in just to make it look a
lot more cleaner. Okay. That should be fine. Bar this down. Put
this down. Okay. I want to make sure we make sure everything
is quite neat. Needs to be quite neat. All right. We should be good. Turn it off, tone it off. Jump back in here. Okay. Yes, I think we're good. Yes, we're good. So I'm going to
hide all of this. Let's go down to
the waste parts. Make it visible. What a lot going on in here?
Let me save my file. Okay. Let's see what we can merge together and then
move this along. That one is fine. This change
will be fine with it is. Maybe we can add it with
this maybe or maybe not. Let's live with the ties. Okay. This let's see any sublution
level in the five K, delete lower, that's fine. So let's name these two.
What should we name this? Just checking just to be sure, see what's happening in there S going to make a lot of corrections in there,
but that's fine. As long everything
comes out the way it should This skits. Okay. All right. Yes, we want to spots.
So let's carry on. So this I'm just I feel like I actually kind of
merge this down with this Blevi weight
so let me just name these two top waists top chain. All right. Hide dots. Name these two waists. Wits top edge. All right. That should be fine. I see some things in here
now that I need to adjust, select it can just quite
easily push them in. Turn on symmetry for this. We can push it in,
it shouldn't be too much of an issue if
we push this in. Okay. Just to keep things quite neat and organized,
that should be fine. So there's already the set. We're going to leave this
as it is or pull this up. So this we name this
as waist long cage. Subdivision level in the dares. So we're going to Yes, yes, we can go up delete. Let me check first, see if you want to add an
extra edge anywhere. No, this is fine.
So delete lower. Okay. We hide it. Hide this as well. Let's move to the next piece. This I definitely need to merge
with the one at the back. But let's see if there's
any subdivision level in there, there is none. Three k, 15 k. Okay. Mm. Let's move slower. Yes, this is fine now. Delete are. Let's merge
these two together. Okay, and also
abbreviation level in here as well. That is fine. So let's merge down. We're just going
to name the two. Skirt Emblem. Let's do skirt emblem. Okay, that should be
fine. I would hide those. Okay. All right. I think this and this needs to kind of be
in the same place. These two needs
to mesh together. But it already has something
going on for it already, so I think we might just
figure out a way to make. Okay, this is already,
this one a mesh already. So let's just do skets. Let's name skirts. Embroidery Might be
spelling that's wrong. That's fine. This longer
I know what it is. Okay. This, I think, and
this we can put in the same ess, why not? We can put in the same category, the same or kind of
merge them together. That will work just fine.
Or maybe with this instead. No, this butler un
stand out separately. So I'm going to pull it
all the way up here. So if I select this
and these two, we can do a meg down. But this I'm going to
subdivide one more first. Let's sub's already
subdivided one. Let's do delete lower. Let's see if it's
the shape Okay. Yeah, I think you should hold that should hold those fine. Let's see in between, that should be fine as well. Okay, that should be fine.
65. 63 Foot Subtools Prepping In Zbrush: Welcome bad guys, kind of have some issue with my
recording software. Now that I'm looking at this, see trying to figure out if
I need to merge these two, if it's gonna be an
issue for me or not. Okay? Because these rings
are quite lots in there. White a lot of rings in there. Let's just keep Let's
keep it separate. Let's keep it separate.
I make better sense. So let's just name these two as waste in a C. Okay. I'll hide that. Name
these two waists. Let's just do wastes, rings. Okay. Hi darts, move down. The reason why I'm
leaving it this way is because I
want to kind of get the best resolution
when we start texture. I don't want to kind of
shed so I don't want to text density in general to be quite small when we
kind of even wrap them. So the quality needs
to be quite high. So keeping them separate seems
like a better way to go. Alright, moving on, I'll
name these two wastes out H high darts. I think this we can measure one. So it's going to be waste bells. Okay? High dos. Okay, there should
be waste cones. We cones. All right. High darts. We already named this. So this
name should be give this? Waist. Let me just
rename this to wastes Let's Middle plates. Let's do mid plates. Alright? That should
be just fine. High dose. Alright. Fantastic. So we can go to the food now. This is like, last one.
Let's make our food visible. Okay. These two, we need to merge. But we want to increase
the subltion level first. But let's start it what is
the food bowl that's fine, let's say that's This I think we can just merge this with the rings.
That would be fine. But let's see if there's any sublution level
in there first. And no subuton level
in there, that's fine. Let's find the
rings. Put this up. Is there any subdivision
level for the rings. None that is fine, merge down. We name these two foods. Bootstrap. Okay. Move to this. Do you have any subdivision
level in there there's none. For this part line, I
think we might need to have some subdivision or some cuts in some
parts, very important. So I would B Can we use the symmetry tone on? Okay, that's fine.
Symmetry tone on. I'll do one year,
I'll do one year. I do one year. Okay,
I'll add another one here at the back. Okay. If we subdivide this do that, I think we need one
more in we need two in. Let's add an extra loop that should hold the
shape quite well, subdivide Okay? I think this should be fine.
I'll use the move brush. Move this out a bit more. Okay. Move this out some more. All right. We subdivide, should hold that
shape quite well. So I'm going to,
let's do delete low. You have affecting the
opposite side, yes, it is to delete lower. It's going to be a base shape. Okay, select this. I think we can just leave these cities and then
just join them up. So let's just measure
down. Okay. That is fine. Yeah, this will work just fine. I'll hide that. Let's name these two foods Foot Guard. Just name these two
foot guard instead. Okay. Move down. This particular one, I think I think we have
a good place already. Put these two footwear. Okay? Or is it supposed?
Okay, the inward parts. Um, let's name the foods
foods shorts pants Okay, that should be fine. So pretty much kind of done
pretty much with everything. Yeah, I done with everything. So the next we need to do
is just to export them out into May and then see if you have any back facing issues in there and then fix that up
and bring them back in. But so far, I think we
should think we are good, and we should be getting ready for surface
detailing in there. So I'll see you guys in the
next lesson, bye for now.
66. 64 Subtools Proof Checks In Maya: Hello, welcome back, guys. In the previous lesson, we
kind of organized and then merged down the
necessary meshes. So in this lesson, we're
going to export out all the mesh all the
Base mesh into Maya, just to see if there's
no issues especially having meshes with your back facing is
kind of obvious to see, so we won't be able
to see that inside of Z brush until we
export that out to a third party three
software like Maya. Let's get to it.
It's quite a lot of export to do, but it's fine. So let me start with this. Let's make everything visible. All right. So selecting the emerald stone. So I'm going to export this out. So I'm going to create
a new folder named that Zeport All right. Oh, there's something
I need to check. Under preferences, important
export, under exports. Don't know of group, don't know smooth normal, that's fine. So now we can export this now. Okay, the exports, and we
have kind of named them, so we shouldn't have any issues because we gave
them proper name. So Stone cage export that out. All right. Road. Exports road head. Export that out. So it
shouldn't take us too long to actually export
everything out since we're just kind of repeating the same thing over and over again. So we're done with the skeptal. Let's go down to the caskets. Okay. I think we have something
that's visible. Let's just make
everything visible. Okay. Make this visible as well. Alright, let's start with
the first one exports. Okay. The face marks, I
think we need to be on a lower subdivision
level to export this out. The lowest okay, that's like the base,
actually, so that's fine. Okay. Quite a lot of
mesh. But it is fine. Okay? Export this as well.
Caskets, boots. Because this is where
we need to actually proof check just to
be sure everything is working correctly
before starting the sculpted details
inside of Zbrush. If not, it's going
to be thrown into an issue where you
have backface mesh, and then your details have been sculpted in that backface, and then it's kind of flip them. It becomes a whole lot of
issue to actually resolve, so we don't want that. So we just want to cross check and proof check to be sure everything
is working correctly. So we're done with the casket, let's move down to
something else. Okay? This is the head mesh. Head boots. Okay. That's fine. Ed Marx. I think this one has
abduption level in there, so let's just go
all the way down to the base, export the base. Okay, Ed Woody. S this down a crown. Okay. Just to be sure. Okay, I
expected that just to be sure. Collapse. Open this up. Make everything visible. Okay. Go the way up. Subution level in there there's non pots. That's a bit strange. Why is there spots now to the
name? Here's working now? Okay, I selected
something else previous. I think I selected the input. That's why it was
not showing name. I'll click on Allow just to be sure everything's on
low subdution level. No wrong option. The verse should be
on the lowest swell. I think this verse is
actually quite too low. Let's use a one
stop dution level higher. That make better sense. All right. Let's put this out. Throw down. That last
one for that folder. Who loves this. Height. Let's go
to the next one. Make everything visible in her. Okay. It has the first one. Exports. That should be fine. Quite
a lot of parts in here. Gonna create a lot of pieces
in here, so that's fine. We all necessary chain meal. Chain meal is quite high. That's what I want a little bit of time to actually export out. Okay. That'll be
the highest for now because I mean, it's quite high. Export that out as well. And boat glove Is but long run. This subdivision level we
are in is good enough? Let's use 15. Let's
export out 15 instead, 15 k instead, which is a
subdivision level too. Okay. Go lower export the
higher one instead. Okay. We have two more folders. Make everything visible. Okay. Oh, I see an issue in here. I see an issue in here
that we need to fix. We need to fix this Okay. Barry this back down. Back down. Okay. I think they should work. All right. Yeah,
that should work. We're still making
all of this visible. All right. So let's go back up and
then start exporting this. Okay. Next one, skates exports wrong one. Now that is rather old. Oh, yes, no wonder. It
was in wrong folder, so let's make sure when
you correct folder now. Make sure when you
correct folder. Put this cat again. Exports. Make sure
you correct folder. Alright. That's fine. Exports. Okay. Move this down. But I actually have a good feeling that all
of this that we did, we shouldn't be having any
weird back facing in there. I want to believe, please I have like, Okay? This is way too low. Let's
go on subltion level higher. I have, like, a strong
feeling that maybe roughly this feels way too low. Now, let's export at 15 instead. Okay? Like I was saying, I have a strong feeling
that as up to 80% that we won't be having
any back facing in here. Okay. This is the only food that has quite a whole lot
of mesh in there. Let's just make sure
we get them out. Okay. Alright. I think that's the last one for that foold Hi that
gets in there. Not so much happening in here. Okay. Hk should be fine for that. Okay, exports. Exports. Almost done. Okay. Yeah, that should be fine. Yeah, I think we're
in a good place. So, we're done
exporting this out, so let's do a quick sieve. Okay, then we'll go and then
go to Maya in new documents. Let's just drag and
drop them in here. I should first start
by saving this. Let me save these documents. Let's save it in here. Okay. I'm just going to
rename it as main. Let's put main in front. Okay, I'll save
this. That is fine. Then let's drag and drop all of what I've
exported in here. It comes with
materials also, too. I'm going to be a
lot of so let's just um Is there what do
sequential selection? No, not too many selection
options in here. Anyways, let's just select everything that is OBJ in here. Anything that is OBJ is
going to be selected. All right. OBJ selection only. Se a lot more to select. Almost there. I would just like to cross check to be sure everything
that is OBJ selected. It's quite a lot of
machine here, though. So far, we are good, so that's
going to drag and drop. It's going to come with
some weird name in there, but that's not my major
concern right now. My major concern just to get all of this
to get loaded in. Then we can actually
check if there's any weird back facing
issues in there. Okay? All right. We need to kind of scrutinize and go through the entire outing and properly check Okay. I think for the most part, we get at least from
what I'm seeing, I'm seeing everything's
working correctly. This is working correctly. There's no back facing
in here just to give this lamb this lamb has
been applied in here. Okay, standard surface. Existing material,
standard surface. So the backface
initia I was talking about is using black. Maybe you see a pot louse cedar. On top of one of these
Sundays completely black. But so far, there's
an issue in year. We have a weirdness in there that we are not
supposed to have. So we try to actually fix that. But so far so far, I think we are getting
something quite good in her. Don't see any black
weirdness in so far. Okay. All right. Fantastic. Checking this quite
meticulously. Okay. Here to close. This part is
something you can't avoid. You just need to check. It's extremely
important to check. Hey, I think we're fine. I
think we're fine in here. Let's come into this other side. Okay. All right. Okay. Yeah, I need to push
this in, that's fine. Something we can do
inside of Zbrush. Alright, fantastic.
So the only thing I'm going to be
fixing is this piece. So waste long cage. Let's send this
all the way down. I'll make a duplicate of it. Isolate. And let's fix
this issue we having here. Use we're supposed to
get the straight line. All these extra lines. We don't actually
need them. So I'm going to do edge mode
top click on this edge. Okay. So, click click Control deletes. All right. Then I will
need to go to Vertex, select select these vert. I'll go to transform
surface slide. I'll just move this this way. I'll do the same here as well. Okay. Select select,
select this as well. Squash this down. Okay, I
actually more or less fine. Let's go to the next side. Okay. That is fine. Okay, C through the leads. Vertex select these arts. Get them center. Okay. Select the tree. Squash them down this way. No, down this way. Extend this out. All right. Let's see if you have
anyone on the other side. Let's check in and around. This is the only one
I'm going to kind of replace with what we
have inside of Zbrush. Okay? So I'm going
to export this out and replace what
was there before. Let's copy the five parts. Copy play the five parts in. Should be on OBJ OBJ exports. So the name is West Long cage. W West Long cage. That's the one replace. Okay. I'm going to hide this. All right. I'm going to rename this
to waist long edge. Okay. Yeah, that should be fine. Let's bring everything back out. Then I will need to also check. Let's check this. See if there's any
weirdness in there. So far, no weirdness in. All right. Take this as well. Okay. We're good. All right. So far so good. Yeah, that's fine. Then
let's go back to Zbrush. And then I think it should
be on these waste parts. I'll select this,
then replace it. Replace. Let's just
duplicate it first. Hide one, and let's
replace this. Do you have any subdivision
level in the I believe nodes. So let's do imports,
and let's replace it. Zports W waste cage
long or Wist long cage. Okay, you can see how
we can of fix that now. So let's isolate, get in the just basically I just need
to do some smooth work in, and then we should be good. Just a little smooth
work in the All right. That should be just fine. Okay, fantastic. So we're
just working with this alone. So I think I'm going to
send this out of the group. Hold shift shoot this down drag and drop
that into Miscellanos. I think we have one up in
here to send this down. Drop that into Miscellanos. Okay? Fantastic. Go out of solo mode. I think we are gold in in here. All right. Okay. So in the next lesson, we're going to go
in proper and then start working on adding the
necessary details in there. So I'll see you guys in the
next lesson, bye for now.
67. 65 Stone Cage Surface Detailing In Zbrush: O Cuba, guys. So in
the previous lesson, we kind of proof checked the
entire mesh inside of Maya, and then it came out
well, and then we made the necessary modification
to the waist lung cage. So do right now, we're
going to start by getting into proper detail in
in. So let's do that. So we're also starting
hierarchically also to in from the skeletal, then work our way down. So selecting the emeralds stone. Okay. Let's solo that
out, get in there. Okay? So we need
to kind of crank the subdivision a
little bit more. Okay? All right, something though I'm not going to do I don't want to do too much in here, though. I think what we have in here should work pretty much just
fine for what's needed for. So I think I will just
leave this as it is. The only thing I might need
to do be to maybe drag some details for the
boat we have in here. So let's subdivide
one more, I guess. Then let's alpha kind of
get some detail in there. Okay? Let's do, before we do that, let's do let's go back. Let's do some trim dynamic in. Okay, let's go to lower
subdivision level. Let's do Auto Group. Most especially, I'm going
to do it kind of group this group ControW give
them separate poly group. This will be the last one.
Okay, then we're just going to islet them, select. I think he does everything
then inverted selection. Then let's go to the
highest subdivision level. Okay, so the twin dynamic brush, I'm just going to
kind of get clothes and more or less just
beat this into place. To create some additional
surfacing detail in there. I think we might also need to even subdivide this one more. Okay, that should be fine. I don't need to go too extreme. Don't need to go
too extreme on it. It is the one we just did. Okay. So just randomly
tap around this, and then we should be fine. Move to the next one. Okay. This is just going to help sell the ship a little bit more. I think it is the
last one. Okay. Yeah, this should be fine. Let's bring everything back out. I think so far we have I think pretty much
good detailing in there. We don't necessarily need
to go extreme on that. We can just leave that as it is. There's another that
we need to do just add that instead of
septanspena instead. But as far as that goes,
that should be fine. Okay. Let's go down to the
lower subdivision level. Go to the next shape. On this, we need to do quite
a lot of working here. So let's start by
doing auto group, poly group auto group. Okay? So we're going to move this as fast
as we possibly can. So let's subdivide, maybe even
get this. Okay, 3 million. Let's see what 3 million
actually gives us. Okay? So trim dynamic. Okay. Let's start with this. Okay. So increase the bra size. So I'm just going to let me increase intensity
a bit more. No, brush size is way too big. So I just need to kind
of beat this in place, do that as a bit old. That was a bit too aggressive. So I'm pretty much
adding just broken up metallic surface look in here. Maybe when the edge polish
should do a better job. Yeah, I think I prefer the
ge polish brush instead. On do that as a bit too strong. Okay. So this is just going to create some randomized look to it. I also need to bring
out the reference just so I'm sure we're doing
the writing our shows. That's the metapiece that's
the metapie we can carry on. So creating this
beating up metal look should give it a more
believable vibe to it. That's too strong,
but we can keep that. Okay. Stepping around this. Let's not neglet the back parts. Reduce the bros
size a bit small. Okay. All right. We might eventually need to kind of
subdivide this more more, but for now, at least
for this detail, we're getting definitely
getting what we want. Alright. Just going to randomly create some interesting
breakups around here. Okay. So you just need to kind of randomize
your hand movement. That's basically it. We're not doing anything too complicated. So just trying to
create some breakup in the Okay. All right. We'll just go around this
break up the detail. So we're going to doing
this on various parts. But I think so far, we're
getting something interesting. Okay. All right. I think this for
now should be fine. We can move on to
a different piece, bring everything back out. Let's move to this piece. Let's first read this bits
and up look in there. All right. Maybe increase the
intensity some more. Okay. Reduce the browse
size. All right. Reduce the brow size some more. Put some smaller ones in the Alright, this should work. Okay. So, reduce the brush
size. Let's go to the edge. Shop the edge a bit more
with the brush size. Okay. We can move to the
back side now and just add some beat
up look to it. Okay. I think this we can work with. Move to the next one. We
have like two more to go. Okay. We use the brush size. All right. Bet that in. Okay, but we don't want
to go too aggressive on. That's where I'm kind
of going light handed. Okay. All right. I've kept this inside
a different layer, but putting it inside
a different layer, that's going to increase
the five size drastically, for now, I don't really
want that because we have a lot of parts
going on in here. I don't think I want to
put that much pressure on my arm since I'm also kind
of recording in here, but if you want to put this in the layer, that's
completely fine. That's actually a
smart way to go, put most of this
detail in the layer. So you can always go back and make adjustments
as you didn't fit. But for now, just to go easy on my ram, I'm
not going to do that. Okay. That should be fine. Alright, that should be fine. Move on. Let's do for
this final piece. Then go inside of it, bro side some more. Make sure that beating up look
is quite obvious in there. Okay? I think we're doing a pretty
good job in here so far. Alright, due the bro. Okay, let's do
bigger ones first, then we reduce the bro size
and then do smaller ones in. I think that should better sell, give a realistic look to it. Alright, that is
fine. All right. Get in some details
for this sofas edge. Okay. Move to the back side with
some breakup in here as well. Okay. This is like the kind of first pass we're
doing over this. Okay, so now we can go
inward now you can see how we get good interesting
detailing in there. So let's go in now. I think we only have like
three of these, I think. Okay. Yeah, that should be fine. Then we go to the edge
and break that up. So more Okay. There's a good number of work
to do in here, but I think. So far, we're getting at least good realistic
result out of this. Let's go to the back side. Increase the bro size. Start with bigger, larger ones. Then we break them up
with smaller ones. Use the bro size. Let's break them up with smaller ones now. Okay. Alright. Try to see make sure there are no weird interceptions
in the Okay, there seems to be an
issue around here. So that's out. Son's out. I think
because it wasn't there, those are bigger brussels, probably why. But that's fine. Okay. Just to break that
up keep it small. Okay, basically
just two in there. So that's fine. Increase
the bro size some more. Put some interesting
breakup in here and there. Okay. That is fine. We use
the browse size. Let's go to the edge. Get some breakup
detail for the edge. Okay. All right. Trans kind of add
some speed to it, so we can move this
a bit quickly. That's a bit too intense. Crazy brush size. Okay. Just get some beat
up look to this. All right. Yeah, that shouldn't be fine. So let's bring
everything back out. So now we need to kind of need to crank up the
subdivision level one more. Let's divide one more. Okay, so go over
to surface noise. Surface noise, surface noise. Where is that? Surface here does it. Noise. Let's frame this in. We'll go over to noise plugin. Let's select Dance Click
aka getting closer. Can't you really see
anything going on in here? I close. Now we see something now. Okay. I need something Brig increase intensity a bit
more priority skill. Okay. Now, this is
obviously way too intense, so take down the intensity
or the strengths. You'll get a good look at it. I need to make some
adjustment to it. Okay. Here, something like so. All right. Actually This is
actually a good base. Let's adjust this
graph some more, see if we can get something
interesting out of it. Okay, can increase
the scale. All right. Just trying to find
a good value for it. You click Okay. So we have this here now. So let's not apply this ner.
Let's see where we get. Okay. So I'm going to click on Apply. Let's give you a moment to
kind of apply on the mesh. Yeah, I think. Yeah, I
think this would work. Okay. Yeah, that should
work. Then we go in. I'm going to change this to let's change this noise plugin. Let's use the peeling
noise instead. Peeling noise. Click Okay. This is what's
gonna give us that grainy metal look to it. So let's make some
adjustment to it. Some should be
actually quite sight. Okay. All right. So I'm
going to reset this. Okay. We'll get that grainy
look off this so click. Yeah, I think we
can work with this. I'll click Okay. Okay? Let's check this quite well. Let's apply this one,
let's see what we get. Has it been applied?
Okay, has been applied. So that surface detail in the I think from a good distance, it
should be just fine. Okay? Si We can work with this. Just basically checking
just to be sure. Okay, that's fine. Now, let's do some
additional working there. We can do I haven't tried this before, though
but let's see. Let's see where we get the
slash brush, slash two brush. Let's look for the slashes. Come on. To slash two. Let's come into the edge, increase the bro size. Okay, that's actually
quite interesting. Can see how we get
this chip to look in the But that's a bit
too strong if you do. All right. Yeah, so we have good interesting
results in there, but let me just take
down the intensity. Increase the bros size. Now it's a bit too
aggressive. Okay. I'm just going to
create some break up, look in on some of this edge. Smooth that down. I think another brochure I
can actually use that would. Actually, probably do
a better job would be this is actually giving
us good effect, though, but I think what I'm actually going for
is not precisely this, but we still get something interesting
enough to work with. Okay. That will definitely break things up some
more, no doubt. All right. We can
leave this as it is. Under brush you can use
will be let me go back. I think the trim brush
Trim smooth border, double click conduct set this let's use let's
use this instead. When we come to the edge, we can actually break
the edge a bit more. Rating is kind of chip
chip off look to it. I think is a much
better one to use. We use the bro size, can create some chipping
off look to this. That's a bit too extreme. Getting close. I
think this broil gives a more preferable
effect to it. Man it looks quite chipped off. But at the same time, I don't
want to go too extreme. Just enough to kind of give
us that chipped up look. No, no, no, that's too extreme. Though, in combination with this kind of gives us
an interesting result, though, which is
actually quite cool, quitting indens with
the slash two and then using this him
Smooth boarder to kind of create another
additional chipped off look on that it
information it has given us with the
slash two brush. I think this should be fine. Okay, let's move on
to another piece. I think I'm just
going to straight off just use this instead. Okay. All right. Here and there,
that should help. Okay. So we get the general idea, just to create some chip to look Get close. All right. I think as far as this goes, it should be more or less fine. Can do for the back as well. Now for the scratches,
you can just quite easily do scratches instead
of subtonspaina instead. Okay, this should be
fine. Move to the next. Okay. All right. Quitting chip off
look on the edge. Okay. That's fine. This kind of works way better than putting cracks
and chips on the edge. I'm going to maintain adding
this on the edge instead. Maybe even oats. It's gonna create an additional pulling out also in there, if necessary, actually,
but not so much. Okay. Alright. That should work just fine. Okay. Interesting chip
top L we are getting. Let's move to this. Just enough to sell this
off as being metal. Okay, but we don't want
to do too much down and then ruin the mesh itself, so we still want to be quite careful in the Okay. Let's go from the
side back side. Okay. That's
creating quite a lot of interesting
chipping off look, which is precisely what we need. Okay. Fantastic. Maybe a little
down here as well. Alright. Okay. Little missing just scratch his butt, we can
do that inside of. So Tan spina instead. So let's carry on with this creating some chipped off look. But we don't want to
make it to extreme, just enough to create
an interesting result. Okay. Let's create some also
two in these front parts. All right. That should be fine. Move to the next one. Okay. That's fine. That dense is fine. All right. Okay. All right. Yeah, I think this
should be fine. Okay. Fantastic. So this
should be pretty much fine. Okay. Interesting. So
each butler one is having like roughly 1.1 million polygons in there,
which is still fine. Okay, that's fine. So moving on. We can move on to
something else. I'll see you guys in
next lesson by for now. I
68. 66 Rod Surface Detailing In Zbrush: Okay. Welcome back, guys. So let's kind of carry on
from where we left off. So this time around,
let's work on the road. So I'm going to solo
this out, get up close. So we're going to subdivide
this a few times. Okay. Let's do one more. Okay. I think at this point, what's
kind of taking up most of the sub div is the
shape at the top. Maybe I'm going to go all
the way down. Do that. Let's don't do that to the base. I think I need to add some additional edge loops to
hold this edge a bit more. I'm also going to kind
of separate them. So let's do let's do
auto group first. Okay. Are we getting this
to be the same color? Let's get some
different color, okay. I'm going to do
split ding for now. Okay. Then let's add some
additional L loops across this to be the M. Let's
just bevel this instead. Okay. Let's go and do the
same for the bottom. And Okay. I also kind of like to subdivide kind of add
extra codes to this. How far can I pull this? Better still let's just
add Let's do inserts? Let's just add
loops across this. That should help a lot also too to try and get it roughly
around the center points. Okay. Okay. I think this should
help a little. So I'm going to
subdivide this now. Subdivide up to 1
million, let's see. Okay. I think I still do
you still have that? You know, remember we
had some weird issues on the surfacing when
we turn on okay, still there turn on
perspective view. Ton of perspective view instead. We should be able to see
this cleaner now, like so. Okay? So let's go to
the He polish brush. Okay. Ton of dynamic. So just going to
kind of break this. Let me reduce the
intensity a bit more. Going to go over this. We have going to be quite a lot of work
actually, but that's fine. Let's do systematically
let's start from the top. Okay. See the brass a bit more. Let's just go around
this nature like so. Also do one side, you can just rotate and then do
the opposite side. So that's pretty much going to repeat the same thing across. Okay? We can do a few stronger
ones if we can. Alright. Moving down. Not entirely sure if I'm moving close
to the bottom yet, but let's carry on. Okay, I think we
are quite close. Okay. So I'm going to rotate this way. Then we'll move upwards. Alright. I think I'm making
good progress in here. Is like this part already
has the detailing in there. Can just do additional
breakup in there if we can. Mode rotates. All right. Okay. All right. Okay, coming along quite nicely. One more last region. Okay, for me, distance is
actually looking quite good. Is precisely what we need. Okay. And Alright. I want to believe
we're almost done. Yes, we are fantastic. So. Next thing to do is just to add some
surface noise to this. Let's go over to Over to surface noise. It's kind of get in closer. Okay, noise blog. Let's even see this
checker pattern. Let's see what we get from
this checker pattern. Okay, this checkup
pattern actually has something quite interesting
going on in there. Actually, something that's
kind of close enough to more or less like some
noise texturing in there. Let me see what happens when
I play with these bits. Okay. Interesting. You can see pushing this in kind of
courses kind of create some interesting dense ship
in there. Wh is also cool. Well, let's start with
this. The strength is way too strong. I think something somewhat around there should
be fine. Click, okay. Get up close. We might need to
increase the Okay. I think this skill
should be fine. Then let's apply this on.
Let's see what we get. Getting to apply it on, is not really holding
the shape quite well, so we need to
subdivide one more. Okay. I'll take down the
smooth, apply it to mesh. It seems like we need actually way more way more polycon to actually hold
this surface detail. And that is just going to be a bit
too extreme if you cannot add this
in here actually. Let's just keep a small smooth. Let's increase intensity,
a bit more apply. It's won't hold.
It's won't hold. A it won't hold as much
as I would like it too because it's requesting for it's requesting for
more subdivision level. And that's going to be
just way too extreme. Why? Because it's going
to be way too extreme, why because we can
quite easily add this same detail in subtanspina. So I'm going to
skip this instead. But most likely try and convert this to some
kind of dent instead. Let's see if you
convert this to dents, if we get at least
something in there that might stick to apply the mesh. Let's see. I think for the most
part, this pale one should actually work.
This one will stay. The rest of the
details we cannot inside of Subtispina instead. So I'm going to go
all the way down. Let's go to the lower
sublton level. Okay. I'll do a quick sieve. Because we still have a lot of I still
have a lot of mesh, and I'm kind of trying
to go easy on my um because I'm not sure
it's going to kind of take all the details
all the way to the a, so I'm just going
to skip some and then add that instead of the
texturing process instead, which actually makes
good sense, actually. So let's move on. This we're just going
to leave that for now. Let's move to the next piece. Okay? Right? Now, this is going to take quite a lot
of polygons, actually. So let's get to
cranking this up. Now looking at this also, too, I feel like I can remove this and add it
to the other one, add it to this smaller
piece in here. Let's exclude this. So split it in. Okay. I'm just going
to mesen merge down. Then we leave that as it is. Let's come down in here. So we have this as 12 k, so let's subdivide maybe
before we do that, let's just work in this
arrangement in here. So let's detail for this first. Maybe something around nine. We have this weird
sharp edge in here. I do not want that,
so I'm going to undo. Okay. That's quite a
really sharp edge. Edge, extremely sharp BZ M I would like to delete deleting one kind of delete the entire scene for some weird reason. This kind of give me some
strange vibe in there. You know what? I
have another idea. So let's do this. Then I'm going to do
polish fantastic. This would hold the
shape quite well. Okay? This we can
definitely work with. So we can keep subdividing Okay. What you can just do here
is to use the He polish and then just put some irregularities on
the surfacing detail in there just to break up
the shape some more. Okay. Any other detail, we can add that inside of
subtans painter instead. Much isn't so much to do here, just to break up the
surface in here. No, no, I don't want to go to
extreme, so let's do that. Getting quite close. Let's polish this as well. Let's get some
soft border to it. Okay? I think we can work with
that this we can work with no surface breakup. That's fine. Let's go to the
lower subdivision level. Then we can move down
to the next piece now. Let's move down to the
next piece, right? There's quite a lot of
work to do in here. So let's get in there. Subdivide Would this valley be good enough avoid
most of the details? Not entirely sure
yet, but find out. Let's start adding the H
polish breakup detail. Let's start from this angle. Grizz the bro size a bit more. Okay. Tackle tops first. All right. Okay. I don't want
to go too extreme, though, so I think
that should be fine. Let's do front view. Let's use this
view as our guide. Okay. Let's go to lowest
subdivision level. Let's do Auto group, so it makes it a lot easier to kind of select what we need. Let's start with
this piece. Okay. So let's just create
the breakup in there we have this lower part. So let's just break
this up also too. Reduce the bro size. Put the brow size a bit more. Right. Okay. Right. So we're not doing anything
too complicated in here. Basically just repeating
the same process over and over and over again. I think that should
be good enough. Okay. Right. Back to the front view. Just go to the side. I think we need to
do on these edges. Okay. All right. Crazy blow
size a bit more. Let's start adding
some breakup in here, crizyblo size a bit more. All right. Let's come in here. Break up also too. Let's just break up
this edge some more. Okay. Oh Yeah, I think this is
coming out quite nicely. Okay, I think we have
gone around this fine. Invert the selection,
gets in here. So starting from the
front view also too. This one shouldn't be too
much of an issue because pretty much you're
just repeating the same thing over
and over again. So I'm tackling the
front part first. Okay, move down. Okay. Give us a moment to save. I think we're making really
good progress in here so far. Okay. Let's move to
the side. Right? It makes better sense. Kind of giving me a
more human like touch where we kind of do this
without symmetry turned on. I think I'm looking this from
the wrong angle this way. Okay. Breaking this up like
so should be fine. Move up. Okay. This this way, crush the
center part a bit more. Right? I'm sure, at this
point, you guys already get a general idea. Okay. Move this to the side. Okay. Spot is rather odd. I think we have duplicated
messing for some reason, which I did not take notice of. We definitely need to
fix those. Fix that. Let's keep Heated mesh, taking up unnecessary polygons. Okay, we can do delete ding. Modified topology, delete ding. It's kind of loading n,
let us give you a moments. Yeah, I believe we're done. So that should kind of take down the poly count down a
little bit more for us, which is fine,
precisely what we want. Okay. Let's carry on. So good thing you at least
saw the issue in there, and then we're fixing
it. So let's carry on. Okay. Then we're looking at it now. I think most of the
green metal take with. We can just save a
lot of ram space while optimizing
and then just do that in the texturing
process instead. Then this beating up look and then chopped up
look on the edge, we can't be like the
thing we do in here. I think that's a more
favorable way to go because the green
look of the metal, do that inside of Subtanspinter, we have actually greater
control over it, like way greater
control over it. And then since we are going to be exporting that four K map, going to get very
good itail in India, will some close up
camera renders in there, which we might not
necessarily do, but at least from a distance
or a little bit close up, it's gonna give us
good result, actually. I would say what save us a
lot of ram space also, too. Okay. Even same also
too dents also dents. Okay. I think we are pretty,
we're moving up. Alright. Should work just fine. Okay. Move this along. I think
it should be the last one. Should be the last piece. Okay. That should be it. And just to add a
cheap edge look to it. I think we have the trim
smooth brush in here. Let's go back in here.
Let's create it. Let's see if it to stick. I think for this one, we might might just kind of subdivide
this just one more time. Just one more time.
So we can get a little bit more crack
or chip to look in here. Okay. There's not going to be
everywhere, though, obviously. We just need to
kind of create it in a few places, and
we should be good. Okay. I think that
should be fine. So it makes better sense just to add it on this edge instead. But we want to be careful
though you don't want to kind of press or push
it way too much. Intense less the
intensity down some more. So it's not that strong. Pati there enough to
kind of fold the ship. Okay. Alright, that
should be fine. So just to add some
chipped to look to it. Let's get down, add
the same also, too. Okay. Let's take a look. Move this up, a one here. Let's take a look at the entire out and let's get
a good feel of it. All right. Get up close. Move this down. You need a few more around here. Get up close here as well. Okay. I think this is
looking cheap enough. Okay. This we can
definitely work with. We can see for this part, we just need to do on a few of the tips, and
then we should be good. Yeah, I don't even really make much
difference, but anyways, let's get some let's get some breakup in the Okay. Not the entire thing though. I think we can
leave these cities. I think it should be
fine. Yeah, awesome. So let's go to the lower
subdivision level. So we're done with that piece. So the next piece we're going to be working on will be this. We'll do that in
the next lesson. I'll see you guys in
next lesson bye for now.
69. 67 Stone Cage Surface Detailing In Zbrush: Oh, come back, guys. So in
previous lesson you kind of worked on the road head. Oh, I need to
actually rename this. So let's rename this to Rod cap. Okay. Get back in there. Right? Yeah, that
should be fine. So this is the next piece
we need to work on. So let's check the
topology we have in here. That should fine. The other part I feel we need a bit
more would be on this. But at the same time. I think having
something close enough, you still work without
any major issue. I think we have a necessary topology in here
which we should delete. I don't think I need a lot of
this in here, so Busy Okay. Alright, let's let's bring
everything back out. Okay, I think we need
to brow it a bit more. Okay? Okay. Lets see. Let's see if there is going to be any major issue in there. I see a small issue, but that's not going to be major problem. We can just pull that down. So let's go do delete ding. I'm pretty much
trying to optimize in here, so delete ding. Then we select this
with a move brush. If you turn on symmetry, if you do local symmetry
without help, here's it fell. So you can push this
down some more. Okay. Yeah, pretty much
that should be fine. So basically just trying to optimize some more
so I don't I want necess three polygons
that we don't actually need. That's fine. So let's do auto group
for this. Auto group. Okay? Yeah, I think
this should be fine. It should be just fine,
so let's subdivide. So I'm going to kind of
subdivide something up to maybe five, 10
million thereabouts. Okay, we have six. Let's see. I think this six should actually hold the details you're going to be adding in fine enough. Okay? I want now I like to do be to Let's go lower.
Let's go lower. Select these three
invert the selection. Okay, go to a higher
subdivision level for them and then do a polish. Bring back some soft
edge in the Okay. I think this should be
fine. Bring everything back out. Looking way too sharp. We need some kind of
soft edging around it. It what we have in here should be pretty much just fine
for what's needed for. All right, so age polish
just starts with these bits. Symmetry is done on for
this, no, it's fine. Let's Let's work
symmetrically in here. That would most definitely
speed things up a lot more. Okay. C turn off symmetry now for a bits and then just
go over and then do some more breakup in
there. All right. That should be fine.
Inv ditelection. Ton off symmetry.
Use the bros size. Okay, yes, we can do this
quite a lot faster now. Ton of symmetry and
then just go in, over them manually and then try and do some more
breakup around them. Okay, fantastic doubt
work just fine. Moving on, ton on symmetry. Now, which part is this
going to be affecting? Oh, okay, I see now. Awesome. This we can work with. Okay, get up close. Okay. Increasing intensity a bit more. All right. Okay. Do some break up here and there. So what needs the symmetry
toned down, which is cool. The highlighting there
is way too strong. I can't really see what
I'm doing better angle. Maybe use the mat
cups not good enough. Okay? Okay. Let me even get up loose, increase the bro size. I think should should
it should work. Okay. The other part is almost
like a complete mess. I think symmetry was not
really the best idea. So let's just kind of
smooth the details out. No that grace. I'm
kind of wondering why one side was not getting
more of the details, so we see why now. At the same time, still looking good, we
can still keep this. Okay? So symmetry turned off, I think we're just going to
kind of stick with doing this without you know symmetry. Symmetric on off. Reduce the bros size. Et's go around this. Okay. All right. Okay. Awesome. Okay, I've to these two. Let's do this fine piece. Okay. What's going to kind
of make this shiny bit more is adding those cheap
up edges to it. That really sell the
ship a lot more. Right? Okay. Let's move down to
the next shape. So this is I think we can
turn on symmetry for this. Okay. In ton of symmetry, we can go asymmetrical in here, break this up some more. In work part is not
going to be visible, so I don't need to do
anything in there. Okay. Do some breakup in as well. Find a good camera
and go for this. Yeah yeah, that should be pretty much fine. Moving on. Next piece. Okay. Let's get to close.
Let's see if there's something actually really
happening in there. Okay. Something is definitely
happening in there. Let's move to the next piece. The the bros size. Okay. I think chipping off edges would be w to kind of sell the
ship a whole lot more. But let's just keep get some beat up looking there doless. Okay. Have you done these bits? I think we have I don't
think I have done these bits. Get up close. Alright. Let's see. I think
we have touched up the parts well enough. Then we can now start
adding the chip off look to it to trim less
star from the top. Okay. That's fine. So we're going to the higher
subdivision level to do this. I was going to be a
bit more precise. Make sure we add
those cracks in. Okay. Let's go to lower solution
level so we can just select them individually
and then work on them. S that will make things
a bit more faster. Okay. Move this around. Get a little bit of distance. Okay. That should be fine. Let's
move this to the top. Yeah, I think as
far as this goes, this should be pretty
more just fine. Okay. This will definitely help. Let's find another piece. Oh, I see this we
need to pull up. Move this up, bring
everything back out. To mate buy this in Okay. Yeah, that's fine. Hide. These three, let's
just work on this now. Go back, increase the
subdivision level. Get close ton of symmetry. Yeah, definitely get some really interesting
sheep in here. Though this pot on, this sp
has quite a lot of edge, but that's fine. That's fine. If we did a really
good job in year, it's going to kind of
really shine through. Shine through in our
kind of texturing. So let's do the best
we can to get good. Add chop chop detail in
there as much as we can. So it might take a
little bit of time but. If we do it right, we get
cool, interesting results in. Alright. Okay. Right. Okay, I think that pretty much
looks chopped off enough. Move on to the next piece. Is a really good
angle to just get some good luck in
op detail in there. Okay. Let's move up some more. I think we are doing
a pretty good job in. Okay. That should be fine. Move on to the next piece. Okay. All right. Okay. Yeah, that should
be fine. Do not to want to go to extreme. Okay. Let's finalize. Let's get to loose. Okay, that we can work with, I think we have one final piece. Increase the brush
size some more. Okay. Okay. You should definitely create some cool looking
effects in texturing. Okay. I think we should be good. Just for that piece. Yeah, I can see it looks kind of
cheap, though, which is fine. Exactly what we're
going for. Next piece. Right. Get so close, get some
smaller one as well. Okay. That should be fine.
Let's see we can do in the inward parts. On the under part as well. That should be fine.
Move this along. That should be pretty
much fine. Next ****. I think we can tackle this in one go. Get close. Okay. And my does take a little bit of time, but it's necessary we get
some detail also in there. All right. Let's move to the next piece. All right. Okay. Et's see if we can do
this a bit faster. We want to do this first, I
want to be careful, though, because we want to
do this with some proper common sense in mind. Okay. Let us fine. Get up close. Alright. Move to the under parts. Okay. Move to the under side. Okay. The bro size a bit more. Okay. Let's move to the next. All right. Yeah, it is coming
out quite well. Okay. Okay. That should be pretty much fine. Just take a look at
it from a distance. You can see some interesting
chopped up edges to it. Okay. Maybe introduce a little
bit more here and there. Okay. Maybe do some
breakup on to. This one was not looking like we have some good detailing
on the surface, so I'm just going to kind of tap around with this a bit more. Alright. Let's take
a look at this. I think we get interesting
results from this. Going to introduce some more
breakup in here as well. Okay. Yeah. Awesome.
Awesome. This is fine. All right. So I think as far as
this entire septa goes, I think we're kind of done
with the entire out sine. So if we go out of isolates. Okay, I see where we need to kind of make some adjustments. The need to make some
adjustments here or there. So let's just go to a
lower sublison level. The move rush starts moving
things up some more. Okay. Here's another
additional necessary corrections we need to make. Okay. Do this here as well. Fantastic. All right. Awesome. Okay. Taking this around
just to be sure. Okay. Yeah, awesome. I'll see you guys in the
next lesson by for now.
70. 68 Casket Helmet Surface Detailing In Zbrush: Hey, welcome ba, guys. So previously, we kind of finalized on the receptor
folder so sitelin. So now I'm moving
on to the cascades. So first piece in there
is what we have in here. So let's get right into hits. So I'm going to start by doing
like auto group in there. So let's go poly group, auto group. Okay, fantastic. That's fine. So we're going to subdivide this roughly
around maybe 10 million. Okay, so subdividing. Let's do one more 6 million. Let's see if 6 million is
actually a good amount. 6 million should
be a good amount. I mean, why not? Okay, so I'm going to go over
to the He polish. I'm going to start let's
start with the smaller piece. Let's work on dty for
the smaller piece first. Okay. I'm tally sure why maybe use a smaller
brush or something. I really see the details
quite strong in there. Okay. At the very least, let's
just get something in there. Maybe a smaller brush
size should do the trick. Okay. Just go around and then break
up the surface some more, get some beating up look to it. Alright. Okay. Is on top the surface. Right? That should be fine. I think we need to work on the front part,
the inner part. I don't think we need any detail in there for the under parts. It's not going to be visible. Let's go to the next piece. Reduce the brow size. I think
for this actually work, we need a smaller brow size, so we can actually get
some biting up look to it. Maybe we won't go on
subdivision level, you know, Pro subdivision level. Okay. Move across. Get up close. Right. I think that should
be fine, then we can go on the surface edge, increase the sublon level. Okay. Was going to add some
surface detail in there as well. Move to the other side. A I think this should be fine. Moving on. Let's get
details also on this edge. We don't want to neglet
that edge as well. Okay? Awesome. Move this aside. I doesn't feel that obvious, but let's get
something in there. It's important to get
something in there even though it might not be
extremely obvious. Okay. Yeah, that should
be fine. It will definitely look
slightly different from what we had before. Even though the difference
might not be extremely much, but at least still giving us some surface breakup is
still useful for us. Okay. Yes, break up like this should
fine. Let's do this piece. Use the bros size a
bit more for this. Spot lemon has quite a lot of aging around it,
but make it work. Okay? For this, you can actually see
the detail quite well. Alright. Going to go across, keep extending the
detail around this. Hey, that looks interesting, but maybe I went
way too extreme. Maybe light, like
so should be fine. Okay. All right. Okay, I think that's
fine. I don't know if I should do
for the what part. Then is not gonna be visible. Okay, let's just get
something at least in there. Okay. Get up close. All right. Yeah, I think so far so
good that should be fine. Fantastic. Now for the edge, I think I'm going to take down the intensity
reduce the bro size and go over it. Okay. Might not be quite
intense in the boys fine. It's a cheap tog
look that's going to kind of sell this
out quite well. But if we move out
of this little let's see where we get Okay. Right. Okay. Awesome. Okay. Dustin is going to
break up the surface. So the surface doesn't
look too clean. That's pretty much what
we are doing here, break up the surface
so the surface doesn't feel too clean. Okay? We can't ignore
the inward path also, too, so let's get
something in there. Okay? Going to give it an extra layer of surface detailing in there. Okay. Christin. The part that's gonna take
most of the time is when we start adding chips of edges. That's the bid that's going
to take quite a lot of time. But we have quite long
edges across this. I think we have gotten
to the starting points. Fantastic. Okay. Yes, we
get interesting results in This we can live with. Just checking this
also too on the sides. Okay. Let's do it slightly and let's at least,
this is fine. Right next piece.
Let's badge this in. All right. Getting good results already,
which is what we need. Okay. All right. Let's break up the
back part as well. Of flat surface, you
don't actually see detail white swell on
like pins surfaces. Getting close. Let's get some break up detail
also too on this. Okay, we just bros
size a bit more. Okay?'s going around this. Get those detail around. Okay. Yes, this interesting result
we're getting so far. Fantastic, so let's move there. Oh, we need some detail
also on the lower parts. Definitely need some
detail in there. Okay. We don't want to neglect. Most of the parts in here, we need to get at least some
level of detailing in there. Fine. Get up close. Wedce the browse
size a bit more. Maybe we should start with
the inward part first. Wedce the browse size
a bit more as well. All right. Fine. Get the surface
break up because I don't want the entire thing
to look just too smooth. So we need some surface
breakup in there. Getting a bit close. So we'll have a more
unique results when we kind of break up any
smooth surface in there. Because it's like a meta piece. It's not like a piece
made by refined tools. So she kind of get some
bitten up look to it. Also, to keep in mind that
that has been used over time, so there should be some
kind of beat up look to it. Okay. That's fine. We'll go
to the lower edge. Part some smashed up
bits in look to it. Okay. I think we're doing
pretty good job in here. Okay. Move this along. I see. But I don't go to create a new wobbly look on yet too much, though, because things kind of maintain some
measure of sharpness. It doesn't look like
kind of stylized mesh. Okay. This we can
definitely work with. Let's bring everything back out. There there for me
from close of view, we see some of the details
speaking out quite well. So nice to introduce the
cheap edge look to it now. So let's go let's
start with this. Weduce the bros size. I'm not going to do I'm not
going to do too much in here. Just enough to kind of get good looking ship in there
or chopped up edge in there. Okay. Okay? Let's do for the lower back
edge also too, if you can. All right. Let's see if this is good enough or we need
to add a bit more. Okay. Yeah, I think that should
be fine for the most part. Let's move to the next piece. A move down. Move down. Move this along. Be you need to create some
detail here as well. A Okay. Set up the top part, but let's just conclude on
these lower parts. Okay. Okay, that should be fine. Let's move to the top part now. So I'm just going
to put it where it's going to be a bit more of us to see. Long. Yeah, I think this is fine. Now that is looking a bit old. Get lose. Yeah,
something like so. Still have quite
a long way to go, but I think we're making
good progress in so far. Let's bring everything back out. Let's see what we get. Yeah, we need some more obvious
breakup in here. Okay. Here as well. Okay. Capture detail in here as well. That's fine. Let's
move to this piece. This one is quite trekythough. So I'm going to be a little
bit careful in here. Get up lose. No, we're not getting good
results from that edge. Thinking maybe I should pv up kind of polygi
a little bit more. This mess up Okay. Let's go to lower
subdivision level. Polygy add some more can increase the
subdivision level now. Yes. I think this
is way better now. Okay. Awesome. So just carry
on and keep getting some chopped edge look to this. We have a long length length
for this is quite long, so we need to go around a lot. I think so far, we're getting something good
enough to work with. Okay. Keep getting some good
edging details to this. On do that, get up close. Now we have a good way to add details on the edge after
adding that polish. Okay. Are the chopped edges. All right. So coming up now, Okay. My tables we won't crank up
the subdivision level later on, before we bake. So we get more
interesting or clean now surface edge
to it for baking. But for now, I think we're
actually in a good place. Let's carry on. Let's see how we kind of salt
in the edge now to kind of add the necessary
details we need. Okay. Hop this edge. No, this edge actually goes across
the entire out sin. So let's make sure we get interesting edge suits right? Okay? Let's get a good proper
good to it so we can get the detail in properly. Okay. So this is just going to help make a character look and kind of feel a lot
more realistic. Okay. I was a bit old.
Let's see if we can keep this. I think
we can keep it. Or maybe not because I don't
have issues when we try to make details
on those regions. I'm also keeping in
mind baking process. Okay. Move along. Find a good angle for this. Move this get up close. Okay. You know, we need to
kind of go around this. That's why trying to be a bit more meticulous while
I'm going around this. All right. Almost there. You should upsell the
mesh a bit more, okay. Can see you get some good
interesting chop off look on the edge. Is fine. Okay. I think this should work.
Maybe the last part would be on this inward edge. Okay? Yes, that would pretty much
help this lot lot more. Okay? Because it shouldn't
be this smooth. So breaking it up is going to
be a huge advantage for us. So I'm trying to put a
bit more peas to it. Okay, interesting. Get to a close. Right. So pretty much trying to
avoid anything that looks too clean because usage, it needs to appear like
something that has been used for quite
a long while, which I've kind of
repeated countlessly. So it's important we kind
of chop off the edge. Okay. Right. So something that you
want to kind of come out to needs your precious time. Kind of spend time actually
making this look good. Okay. Are we there yet? Okay, now let's take a
good look at it now. You can see from Miss
Ang, we can see where we are good interesting
edging sweets. Quite interesting edging sweets. She's fine, so let's move on. So let's bring
everything back out. Now, we have one final piece. So let's isolate get good
edging for this as well. Okay. Is but long, we actually
deformed it maybe way too much. But that's fine. Let's create some
interesting edge into it. So I'm just tapping
just chop of the edge. Rod the brush size. Okay. All right. Come to the lower side. Move this around. Okay. Move this along. Okay. Chop the edge some more. Here, we can't just
negle the lower parts. We need to add some interesting
chopped up look sweets. Okay. Almost done. Find a good angle for it. Okay. Let's at around
this edge also too. Come to the front that is
going to be more visible. I yeah, I think you
should be fine. So bring everything
back out now. Yes, we get interesting
chipped off looking results. Gets closed up. So
aggressive ones in here. Okay, so this is fine. So the next lesson, we're going to move on to something else. I'll see you guys
in next lesson. Bye for now. There's
some rendering, let's get a good feel
of it, that's fine. So I'll see you guys
in next lesson, bye for now. A
71. 69 Casket Nails Surface Detailing In Zbrush: Come back, guys. So carrying
on from where we left off. Okay? So I'll go back to
we're working on cascades. Hold down now. Let's
go to the next is. Select news Okay. Total number of polygons
for nails that two k. Most three almost three
polygons, but that's fine. Let's see what we
can do in here. I'll go in. I'll subdivide
this a few more. I think 2 million should
be roughly there. I'll go to the lower
subdivision level. I'll do auto group, right? We don't know symmetry
for this local symmetry is not going to do much. Okay? Not going to work so. We have to do this piece by piece because it's paler mesh is not on the center of
this entire canvas. But that's fine.
Let's just carry on. Let's start with this. Go to the S oblivion level
for this single piece. Okay. So H polish, Okay. I'm just going to fit
this up a few times. So launch didn't take too
much time because basically just repeating the
same sen around this. Alright. Okay. I'm going to do for
the road as well. Pre pro size a bit more so
we can do this a bit faster. Okay. One of the things
we can do to make it feel more realistic is to go to the move brush and then reduce the subdivision
level and create some paint in a way
in a few of these. It doesn't look
completely accurate. There's something
pretty much like pin. Bring everything back
out. Not sure which one. This is the one we
did, so let's move to the next one, right? So the same thing. Age polish. Okay. Just fits around the edges. Right? That's fine. Let's keep moving this
around it in place. Alright. That should be fine. Move brush. We've used the subdivision
level a little bit. All right? That's fine. Let's get back straight on. Maybe we can just select
these two instead. Let's do them in twos instead. There's subdivision
level h polish. For the chip top, we're going to come back to that and do it. First, let's just get this
beat up look around it. Okay. All right. That should work. So the bros size a bit more. And fit is in place. Okay. Awesome. Go to the lower subdivision
level with more brush. All right. That should be
fine. Move to the next one. He polish. We the subdivision level. All right. Okay. Put the business up as well. Zeb size a bit more. All right. They're awesome. Then reduce the fully counts and then
let's get some bend to this. Alright, that should be fine. Let's make sure we're looking
at this from the front. Okay. Let's move to the
next piece inverts. He polish, let's go to the
highest subdivision level. Is this in place. Good to your underpass. That's good to your road. Right. Move down. Let's get some distance to it so you can actually properly see this at a wider range. Okay, that's fine. We use
the subdivision level. Use the move brush. Get some movements in
there. That should be fine. Move to the next piece, increase the subdivision level. Age polish. That is fine. All right. I be at this point,
I'm not really doing anything not doing anything superficial that you probably
might not understand. So I'm basically just repeating the same thing over and
over and over again. Right? That's fine. Okay. Aw. That should work just fine. Rod use the subdivision level. More brush, move this
around the bits. Alright, I think that's fine. Let's get this front face in again. Bring
everything back out. So we still have not so much
anymore, which is fine. So let's go to the
next two piece. Increase the subdivision
level, h polish. Fit this a bit more. Okay. Here this broken up
a bit more, right? Okay. Go around the first. Increase the brush size. Then we start bashing this in. Okay. Fantastic that work just fine. You use the resolution
with the move brush. All right. Fantastic that work just fine. Let's move to the next piece. Pretty subson level
gets in there. I might get a little bit tricky
just to get in the bones. It makes it quite easier
just to stop on top of it. Okay. All right. I'll go a bit light handed on the edge so I
don't want to kind of ruin the bear wood edge
we have in there already. Alright. Awesome. Okay. All right. Fantastic. Yeah, that should
work just fine. Oh, yeah, yeah,
we need to reduce the use the resolution and then try and
move this in place. Yeah, that should be fine. We don't need to go to extreme. Okay. Last two. Get in the age polish. We need to increase
the resolution. All right. Okay. Does she fine? Okay. Move up, get it done as well. Yeah, I think that's
pretty much sets it. Would you use the resolution
with the move brush. Okay, we can live with this. All right. Move to the next piece. H polish, increase resolution. Go in and then just
bit sits in place. Okay. All right. That should be fine. Okay. That should be fine. Move this around. Okay. Yeah, that's fine. Use resolution, move brush. Here I live data cities. Let's go to Oh, we're done with the
other one already. I think the final piece. Get to close, put
division level. Let's begin to get some bitten
up panel look in there. Okay. Does she fine I'm allowed to see votes. Okay. Fine. Let's get in
there. Move this along. Okay. All right. Move this down. Okay. Yeah, that should be fine. Oh, yeah, we need to
reduce the polygon counts. Okay. Like so should be fine. Get into the opposite side,
increase the polycunt. Bit this in some more. Alright. Okay. That's fine. All right. Okay. Yeah, that should work. Let's barge the road
parts in some more. Okay. Move this up. I think we're in a good place. Reduce the resolution,
move brush. Okay, that should be fine. Let's increase the
subltion level. Let's see if we can use
the Jim Smooth border now. Let's see if we
don't have enough resolution to actually do this. I think need to crank
this up later on, though, but I think
this will be fine. At the same time, I don't
want to do this way too much. Use the bros size. I
think for the most part, what we have in here we just
fine for what's needed for. Okay. All right. Let's go
to the next one. Try not to go to extreme on its. Okay. I'm using a smaller brow size, so it's not too strong
in there. Okay. Move up. Get to close. I think that should be fine. Okay. What's the next slide. Hey, should that should work. Let's go underneath. As if you're going to see
underneath this anyways, but let's just get
detail in there. That should be fine. Move up. Okay. Right. Let's go down it. Let's
get some detail in there. Okay. Move to the next side. Let's start with
something. Then we should be able to swim in there. All of this is going to add interesting surface detail when we start doing
textures in there. That's why we think that
kind of add something in. Okay. I have quite a number
of them to go. Right. Let's see if we can get a bit of that detail you
under needs this as well. Okay. We can move in this fashion. And Okay. Move to the top side. Get up close. Okay. Move to the next piece. Gets up close. Maybe not too much in there. All right. Move to this piece. I've done this already. Let's see. Move this way. Okay. Let's get in here. A All right. Get some chip off look in there. Put your other edge. Hear the same detail
in India as well. Okay. This should be the next piece. Right. Let's go underneath this. That should be fine. I think Opia should
be the next one. Keto loose. Okay. That should work just fine. Yeah, fantastic. I think that
should be pretty much it. Okay. So I'll do a quick save. So I'll see you guys
in next lesson. We'll work on next piece.
72. 70 Casket Nails Surface Detailing In Zbrush: Cumber, guys. So previously we kind
of worked on the news. Let's move on to
another piece, right? The max I don't think I need to do much
on the marks, though. But we can also add some
chip to look to it. Let's kind of subdivide, get something in the
for the most part, I'm just going to
try and accentuate the symmetry working
in a local symmetry. Local symmetry is working. So just to accentuate some of these sharp lines, and
we should be good. Okay. Right a Okay. I wasn't looking
straight enough. Okay. That should work. In do that. Right. Oh Okay. That's fine. I'll smooth this down. So it should be kind
of solved in there. We do the subdivision level, use the standard brush, with some depth in here. Elevate it up some more
soften it down some more. I think I need to take
this down do that. We use the intensity of the
brush to use the brush size. Okay. S down. So down. Okay. Same standard brush. A undo that. Let's go on subdivision
level higher. Okay. Soften this down
some more ton of symmetry. Then we can use the smooth trim border and then kind of
chip off some edge. Undo that. Let's go to
higher subdivision level. Let's create some chipped
off edges here and there. Okay. That's creating some chipped
off edges here and there. Okay. Yeah, I think this should
be fine for the most part. Let's go to the cascade body, select this, go to the lower subdivision
level, casket body. Okay. I need to subdivide 2.2 million should be really good number
for this, I believe. A Okay. Here, this should work. So
let's use the H polition then. I think we can use the
symmetry turndown for now. Then we'll break
symmetry later on. Let's just use it to get that beat up look in on the surface. The most of this part is
not going to be visible because we have the body in the let's just at ville just kind of
fit things up around. Okay. All right. Move up. Do the same on the edge. Try not to go too extreme in something just to add in
there should be fine. Is it up? I don't want to do too
much on this edge. I don't want to ruin
that edge, though. Let's go to the
back. Get up close. Okay. I'm just going to kind of tone
of symmetry and then work asymmetrically in
there just to make it not look too identical
or too symmetrical. I'll turn off symmetry now. Break this up a bit more. Alright. Let's go in here now. Break up any symmetrical
look in there. Okay. And should help break up
that uniformity in there. I need to do for one side? The other side should
look different automatically because I'm
not going to be touching it. I need something in
here just a little. Okay. I need some breakup
here as well. All right. Let's get this
properly positioned. Let's see, we kind of work
a little on this edge. Okay. Not too much, though.
I don't want to ruin the lwod edge we have in there, but just enough to just make
it look not smooth enough. Alright, I think I think
this should be fine. So we can introduce
the chip edge now. Okay. So I'm going to do
this asymmetrically because I don't want it to
feel the same on both side. Okay. I'm just going to go
one edge at a time. Okay. Yeah, I think you're doing a really pretty
good job in here. This chipped off look actually gives it a
bit more realism. That's why I needed
to kind of add it. All right. So this will definitely add
some more livability to it. Okay. You'll need a few
more in here also, too. Keto close. Okay. Right. Opposite side. I think this fine app getting
close, don't do that. Let's get something
in here as well. Okay. Trying to get it
around this edge. This edge should be on the
floor most of the time, so let's get something
quite chopped off in there. Okay? Don't do front and back as well. Okay. Pre some chopped up
look in here as well. Okay. I think this is the measures
being more realistic now. A right. Some extreme ones
here and there. Help. Okay, fantastic. I think for the most part, this should be just about right. Okay. What do we have for the boats? I'm not going to do
anything in here. I'm not going to
give data as it is, both lower, boat
stop, scroll down. What do we have next this body? I think we can do this. Because
we still have some time. So let's do this instead but
let me go back in here and then reduce that to
lower subton level. Then get back in here. What do we still have?
We have the chains? I don't think I would do
too much for the chains. Maybe do something though. To see, we have the chains, then we have the coughs,
definitely look for the cuhs. So for this body,
body shouldn't be too much of an issue except we
need to do something in there. I need to turn
this on, you know, turn it off, T this Oh, okay, I can't have to at
the same time. That's fine. So is the body that
I selected now. I need to move I need to move this condo that's. Turn on symmetry. I think
local symmetry is to one. That's fine. Okay, pretty much, that's all I need to do. So the body selected, I'm just going to go solo mode. Subdivide this 2 million
around there should be fine. Autonosymmetry, then H polish. Okay. Let's look at the reference. Let's see if there, we're fine. We're good in there?
We're good in there. So let's put this back in. So H polish, So basically just
trying to increase the blow size a bit more. I think that's a
bit too extreme. Something's oddly wrong in here. Local symmetry is supposed to be working. Why is
it not working? Local symmetry
seems to be giving me a bit of an issue in here. A bit odd. Let's
just turn it off. Let's turn it off so we can
do what we need to do in it's going to take us extra time to just go over this boys fine. I think we can be as
fast as we need to. So just a surface
breakup in there. Okay. Just to make things
a whole lot faster. So trying to add this
beating up metal look to it. Okay. I'm thinking of respecting
the foam because I don't completely ring the
foam while adding this. So still very much
respecting the forms. Okay. I feel like I should
probably inflate the finger nails a bit more because it
looks way too thin. Yes, let's do that. Mark la Invert, go to lower
subdivision level low. Need to inflate this a bit more. A a little bit more. All right, clear that out. Go to die subdivision level now. Continue on with
what we are doing. It's quite unfortunate that we can't use symmetry in here. So it just going to take us a bit more time so just kind of get this built up look
across the entire mesh, and that's pretty much
all we're going to do. I don't think we need
to add any chipping of this in here. Just this alone should
actually go a long way. Okay. Is it bit too strong? I'm trying to move as
fast as I can just to add this fitting up look to it. Okay. Go around on this side. Okay. Here, I think that
should pretty much there. Let's move to this side. I should work just fine. I look as much you're
supposed to work on this. No entirely sure why it's
not working, though. Okay. Right. Move down. Let's work
on the lower parts. Okay. Okay. Moving this along. So you have quite a lot of
parts to kind of add this some but together
piece by piece. Okay. Almost done with this. Okay. I think we have, this should
be more or less there. Okay, let's go to the toe. So it's like a complete piece. That's fine. Walk on front
and then move to the back. Okay. So front side fell before
we went to the back side. Okay. Use the broad size
a little bit more. Okay. This working just fine. Okay. Almost there. So the
other side of leg. It's quite a lot of work to
do, though, but that's fine. Okay. Now this now get good results. Still working on
your front parts? So long. Go to the
other side of the leg. Okay. All right. Can move to the back now. So does move from the
bottom all the way up. That should be fine. Go to the opposite side. Okay. So very much
respecting your form. Okay. All right. Moving this along, almost done. Move up. Okay. Bring everything back
out. Let's see where we get. Okay. I think as far as this goes, it should work just fine. Okay? That looks
bittn up enough. Alright. Fantastic.
So let's move on. So move on continue the
next lesson by for now. H.
73. 71 Casket Plate Holds Surface Detailing In Zbrush: How come about, guys. So see carrying on and
working on this piece. I would need to kind of work
on the boots a little bit, just a little bit fine. So let's isolate it. You know, let's leave it
the way it is actually. Then subdivide
subdivide a few times. So basically, I just need to kind of break this
because it's like a major bigger piece
that we need to kind of break up a bit more. Okay? There's some sporty
mode like so. None of this symmetry
we have in there. Let's get to loose. Definitely also need to kind
of increase this a bit more. But I think at least for
this, this should be fine. Okay. Okay. Then I can use
the move brush and then bend to form a bit more. Okay. Yeah, that's fine. Then let's move on to
I need to check this, this one is a bit out of place. Push it back in. I know we
modified the entire space, so we need to make sure it's still buried
in as it should be. Okay. Yeah, that should be fine. Okay. So let's move
on to something else. Let's go back to our sub too. Let's see which
piece is the next. So I've done the casket body, basketske bottopo. Go down. I've done the body. Okay, this is the next piece to work on. Let's solo this. So we need to kind of crack the sub vision level
for this quite well. So we have this 3
million polygons, which should be good
enough to work with. Already have some
cool informations in there for madnesra loops,
which will work just fine. Let's get in each polish brush. Okay. Let's start
with this piece. Let's get some bit
up look in there. I'm going to leave
this edge for now. Let's just try and get some
bit look in the center part. Okay. Alright. I might not need to go
to extreme on this. Just beat the surface to more. All right. I think
I'm going to do everything before moving
on to the next piece. Maybe gentle touches around it. Like, quite very
gentle touches around. I try not to be too
extreme with it. Okay. All right, then we can use the trim smooth border to just chip up chip
off front of the edge. So more. Okay. Reduce
the brush size. Think poker chip, let me adjust a little
bit more like so. Okay. Just break this apart. So more. Okay. That should be fine. Move this along. Okay. Move down. All right. Maybe should do the
lower part first, then move up to the top parts. That will make better sense. Okay. Let's move. Let's work
on the under parts. So more. Alright.
Go to the underpas, do some breakup
in there as well. Okay. That should be fine. Break the spas. All right. Yeah, I think that
should be fine. Yes, I think something like
so should be just fine. We don't need to go to
crazy or too extreme on it. Okay, so I'll move
to the next piece. Let's do this instead. How many of these
do we want have? Okay, we have one,
two, three, okay? So let's start with
the He polish. Okay. Here to close. Right. I should work. Move this aside to
the opposite side. Just give it those
beaten up look, which we have been doing
repeatedly so far. Okay. Then I think we can just go directly to adding
some chip off edge. I'll start from the
top, then move to the bottom edge,
use the bros size. Okay. I us the broad size a bit small. Just make some region
looks a bit chipped off. Add some milit on
the lower parts. Okay. We definitely of cram
this up when we want to do some baking for it. But for now, I think we
should be just fine. All right. Okay. Okay. So around there. That should be
fine. Get up close. We're just working on
the lower edge now, just trying to get some
breakup detail here and there. Okay. Let's get
our angles right. Okay. Awesome. Continue on with this. Get up clothes. Can crack this lower
part also too. We can crack this edge instead. Okay. Yeah, that should be fine.
Let's move to the next piece. Wrong to supposed be on the
edge polish brush instead. Right. Let's move to the opposite side. Get this pop look in as well. Okay. Now, let's start
chipping over the edge. Okay. From the Oda paths. Okay. That should be fine. So that should also
work just fine. So you want kind of vary
the chipped off edge. I can do some at the top. So at the bottom. You
won't get to lose. Make sure we get some
smaller ones in as well. Okay. All right. Okay. Yeah, that should be fine. I think that should
work just fine. Let's get underneath this also. Okay. Let's get some interesting
aggressive ones around here. I think it's last
one at least for this horizontal looking shape. So each polish Break this in some more. At some variation in. Okay. Okay. Do it fine. Okay. Let's do some right. Get the detail in
the here as well. Okay. This way, get some on the lower increase
the broad side so more, get some on the lower
edge. Move this along. Okay. All right. Notice that I'm a bit
more aggressive on these bits instead,
which is fine. You can just do some more
aggressive region just to make it sell this a bit more. Okay. Alright. So I'm not trying
to make it look like something kind of hit it, and then we have those
chipped off edge to it. That's a general idea for it. Okay. Move this along. Okay. All right. Get this
underneath as well. Get some muddy top. Move this along, get some
underneath here as well. We can move out a bit more. So since I was in
dynamic bro size, so once you get a little
distance for miss, the br size becomes
a lot bigger. I gonna create some
deeper details in there. Alright. Okay. Alright, that should be fine. Okay, this is fine. Let's move to the
longer shape now. Let me do a quick sieve. It is a more longer piece so I'm managing to spend a
little bit of time in here. Maybe not even do
too much, actually. But it seems like we don't
have enough resolution to actually hold the shape. Not enough resolution
to hold the shape. So let's bring
everything back out. Let's subdivide one more. So that should definitely
give some more resolutions, some of the chipped off edge. So you should have more resolution in
here now to work with. Edge polish. Okay, so now we can fit this in Could the bro size, use the bro size a bit more. It seems like nothing
is happening, but we actually have
something going on in there. Okay. Fine. Okay. We can also do the same
for some of these edges. We actually feels like it's way too sharpness
is way too strong, so we need to kind
of soften the edge. Let's soften the edge. So let's go on soft
division level lower and just do polish. So this would help soften the edge a little bit
more for us to work with. Okay? That is fine. So I mistakenly changed this. Come on. Mistaally change that. Let's
just use the H polish. H polish, H polish. Pool is already selected. I selected. Increase subdivision level. Let's just go directly into
using this theme already. Okay, let's just start from the bottom, then
walk our way up. Okay. Gets proper angle to
this detailing in here. Let's focus on one side for now. Then move to the opposite side. Okay. I need to be directly
on the edge. Okay. This is on the edge as well. Okay. Increase the brow
size a bit more. It's gonna be at least a bit
more precise on the edge. Move up some more, create
some more gaps in between. Oh, I think council think
I kind of move somewhere. I think I may have I think I may have made
a mistake somewhere. I think I went to this Undo. I need to I need to fix this. I need to go to my quick
save and the last save, let's open up this last sieve. I mistakenly went to hit
one of this history, and I went back way too much.
Went back way too much. I need to fix that. So
I'm kind of opening up the last saved mesh in
here the last saved one. I think that actually sucks. Now I have to go back and to go back and pretty much
start all the details again. Well, that's fine.
As long as we can get back to this level. So let me just save this and replace what
was there before. This So we need to
kind of do this again. So each polish. We need to start from
the inward part again. Let me just do this
as quickly as I can. We also need we also
need to polish this. Let's go to the lower
subdivision level, polish this. Okay. Go back to the
higher subdivision level. I'll pitch this up again. Okay. Okay, that's fine. Okay. They're awesome. So I'll try and bi a little bit
more Kiev not to hit on any of this undo history. Crazy blow size. So I'm using a bigger
bro size now for this. So we get more precision to it. Okay. All right. Bet undo that looks a bit old. Okay. Here, that should
work. Undo that. Undo that. Get up close, not get this at the edge. Okay. Let me do in here too. Okay. Put it to the side. Okay, I think we are
doing this quite well. Move up some more. Okay. That should be fine. Okay. Yeah, that should be fine.
Move to the opposite side. Okay. Move this down. So in this part,
I'm trying to add some more precision to it, so get something
quite nice in there. All right. Okay. Move this along down here. Okay. Put it some more
gaps in between. Pun that in some more All right. Hey, that should be
fine. Opposite side. We can just move this cop also to ignore a large
portion, create one ear. Okay. You should work just fine. Move this up here as well. Okay, I think as far as this
goes, it should be fine. Let's bring everything back out. We can definitely
work with this. Okay, so I'm going to save this. So in next lesson, we just
move to a different piece, the chain piece, then
we have the curves, and then it should be
done the caskets holder. So I'll see you guys in
next lesson by for now.
74. 72 Casket Chains Surface Detailing In Zbrush: Comb, guys, previously
kind of worked on this cascade plate.
So let's move on. Let's work on the chains, then work on the curves. Then we can move
to something else. So I'm going to isolate it. Let's come back, let's reduce
the subdivision level down. Okay? This one, I think we can. Okay, let's subdivide. I think 1 million
polygraon should be fine. Okay? I ops letter is active
prescriptive. Click to use. Okay. How do I want to change this? H polish, H polish, can I just force this
to be on H Polish? I can't think I don't need to study this,
but that's fine. Let's just work with
what we have in a So just to kind of
touch this up a bit more to make it feel more
like bitsing up metal piece. Okay. I think we can also work
with this individual. Oh, we have symmetry turned on? Let me turn off local symmetry. Let's see if the normal symmetry would work. Now
it's not working. Let me get everything back
out with the subvision level. I'd like to make sure
symmetry is turned off, in case I don't have
any weird issues. I'm going to do holy
group portal group. Okay. So on the same age polish brush. So just going to
make it a bit more metal with some
beat up look to it. Okay. Introduce for the inward
part also too as well. Let's move to the next piece. Get up close. All right. Okay. Break these apart. Okay. At us fine. A us fine. Let's move to the next piece. Okay. Okay. That should be fine. Okay. That should be fine. Move this aside. Okay. Next one. So I'm pretty much
just repeating the same process
over and over again. Okay. Move this along. All right. Okay. Let's move this to the next one. Okay. A Yeah, I think we're making good
progress here already. Alright. Okay. Okay, I think that's fine.
Let's move to the next one. Not too many to
go, so we're good. Okay. Okay. That's fine. Yeah, that's fine. Okay. That's fine. I think we're moving
this along quite nicely. So let's just carry on with it. Sometimes part might just
feel like a boring process because we're just doing the same thing over
and over again. So it's just a process
that is highly necessary. Very necessary process. I think we have
three more to go. Okay. All right. All right. That's fine. Okay. Yeah, that's fine. Two more. I think I need to work
on one aspect first, so before I move on to the other aspet just to be
sure I cover the entire thing. Okay? Right? Et's go inside. Okay, let's skip this part. Let's get tail in here as well. Okay. So I'm trying not to
be too aggressive on it, so I don't lose don't lose the entire shape
completely, so I should be fine. Alright. That's fine. Okay. That's fine. Okay. That should be fine. He us fine. Move this around. Okay. Okay. He us fine. Let's work
on this bit also too. Okay. I should also work. I think we didn't do that much for
the piece on the other end. So we need to do that. Also, I need to polish
this a bit more. Let's get soft rounded
edge across this. Okay? Because looking
way too sharp. All right. So now we can work in there now, get some cool details in there. Okay. Like so. Alright. Okay, that should be fine. So I don't really change now. So the next thing to work
on will be for the cuffs, handcuffs, so I think
that's bit too extreme. Alright, so to work on
your four cuffs next. I'll see you guys in
next lesson bye for now.
75. 73 Casket Cuffs Surface Detailing In Zbrush: Combo guys. So in
the previous lesson, we worked on creating some
metal edits for the chains. So let's move over to the cups. For this don't woymmersymmetry, going to work local symmetry. Asymmetry seems to be kind
of weird at this point. I can't even see anything
happening here at all. Okay. Okay, ton this off. Can we get it applied?
It won't work. So that's fine. So
let's subdivide. Let's subdivide a few times. Okay. Let's go to lower
subdivision level. Then we do auto group. Let's start with this. Okay. Each policy
is still selected. Use the brows size a bit small, so can move a lot
faster in here. Let's includes Okay. So I need a smaller brush
size just to get some detailing in some bit up
detailing across around this. It's important to have
detail in here as well. Okay? Same here as well. All right, that should be fine. Remember, we still have the
other part to do. Let's just conclude
on one piece, then we'll move on
to the next piece. I think as far as this
goes, it should be fine. So now we can now put some cheap tough edge
look shaping in here. Okay. That should work. Right? That's be fine. Let's
go to the lower parts. I think we might even need
to subdivide one more. So let's subdivide one more. Okay. So that's not the piece
we're working on. We're working on this piece. All right. I think we are working
on this instead. Okay? I think this is fine.
We can make this work. Okay. Let's work on your
next piece. Isolates. All right. He polish. Okay. I think that should be fine. Let's move down. Out. Come on. Move up, getting close. All right. Get up close. Proceeds. Okay. Let's create some
chopped of edge. All right. I think I may have
clicked on something. Okay. Use the bro size a bit small. Let's go to the other end. Right. Let's not neglect in what parts. At the very least, let's
just get something in there. Okay. Let's just do some
cracks in here as well. Okay. This just help sell
the design a bit more. Okay. You can do something
somewhat similar also in here. Okay. Just get in the bit close up. I think we can work with this. Okay. Let's see what we get. Et's just try something no. Let's go to the sub
two. Let's do all I. Basically just going to increase the subdivision level
for everything. So we can just get a good
idea on what we have in here. Okay. So this is like everything to go down the higher sub
diviution level. It feels like
something is missing here. Something feels missing. Something feels
missing on these bits. Let's do all. Did I mistakenly delete a mesh or something is
hidden somewhere? Okay. Okay, I think this is
it. Yes, this is it. Alright, I think we are good. I think we are good,
so let's carry on. Move on to the next piece.
76. 74 Head Crown Surface Detailing In Zbrush: Welcome back guys. So
the previous lesson, we kind of analyze on the
caskets, pull up parts. So I'm going to move
on now and then work on the head parts. So let's get right into it. So we have Ed boots. For the Ed boots, I'm just going to leave
that where it is. Let's move to the next piece. So we have the Ed crown. For the head crown, I don't
think I need to do so much in there though but at very least let's get
something in there. So I'm going to solo this out. Okay, it comes with all
this mesh, which is fine. So let's do auto group. Let's get auto group
in there. Photo group. I'm pretty much looking at this, and I feel like I should put this on it
completely separate. I on it completely separate
sub two on your own. I think that would
make better since. These two can be a
separate sub too, so let's grab them. I'm going to do
splitzEding. Split heading. Okay. I'll move this up. Let's start with this. We can also work symmetrically
with this. It's also fine. So let's
crank the subdivision level. Okay, so 5 million should
be just about there. I need to enclose this
software and open it again and then set
this H polse up. Well, maybe not since
we're here already, so let me just continue on. We already have everything
we need up here, so we can just move on. Solo this. So let me tone off symmetry. Let's just this reduce
the sub dution level. Build this up a bit more. Okay, that should be
fine. Turn off symmetry. Get up close. Let's just get some interesting
looking shape in here. Reduce the brows size, ton of symmetry and then get some variation on one side and leave
the opposite side. Tonal symmetry. Okay. Ton off symmetry, break
up the opposite side. All right. Tonal symmetry. Okay. So I'm doing this now
with cemetery turned on just to move
things a bit faster. Okay. Use the bro size. This under part is not going to be visible, but let's just get
something in there. Okay. Get something in here
as well. Get up loose. Okay. I think we're in a good
place, it should work. So we're still working with
this with symmetry turned on. All right. I'll turn off symmetry now and then just break
this up a bit more. Turn off symmetry again. Ton off symmetry,
break these apart. Turn on symmetry. Okay. Don't know symmetry. Break this separately.
That is fine. All right. Don't
know symmetry. Okay. Let's get some detail in here. Ton of symmetry, work on this gets in this
detail in here as well. I think for the most
part, I think all of this should be just fine. Alright. So the
last you need to do now is to add the edging to it. I think I don't want to
do too much also in here. Like for the edging,
maybe you just you on some parts and then
we should be good. Okay. And let's go to the top. All right. That should be fine. Don't do some detail here. All right. Don't do that. Okay. That should work. Okay. Don't do that. All right. This should be fine. All right. I don't want
to go too extreme. I think this should
be just fine. Okay. Reck select invert
let's get in here now. He polish. So ton of symmetry just
to work a bit faster in. Ton of symmetry, let's go
and break this a bit more. Phono symmetry. So we can work a bit faster since we are working
symmetrically in here. That'll make the process a
whole lot faster for us. Pono symmetry now. Okay. Then let's use the
edge or trim smooth border. I'll go of chop off
some of the edges. All right. That should be fine. It gets a longer one
around here as well. Okay. Okay. Move to the side. Get that detailing
in there as well. All right. Okay. Awesome. I think we can live with this. Let's do on this
side a bit small. All right. I think as far as this goes, this should be more
or less just fine. Okay. Alright. Let's go to lower
subdivision level. Let's move to the next piece. Let's move to this piece. Okay, next piece.
That's a quick sieve. So let's subdivide more 5 million should be
right about there. Let's start with these two. Ctonosymmetry, gets
on H polish in Turn of symmetry. Oh,
I'm using the wrong too. I'm using the wrong brush. I'm using the wrong brush. Smooth this down.
Smooth this down. Supposed to be using
the He polish brush. Too symmetry. A Okay. Increase intensity a bit
more. Turn off symmetry. All right. I think
this should be fine. Then we can use
the He polish now. Alright trim border instead. Symmetry ton of, that's fine. Okay. I undo that. Break this this way. All right. Move to the next side. Undo that, get up close. Okay, do that. All right. A Yeah, that's fine. Okay. I think we are done with that. Let's move to the next piece. I think it holds the
detail quite well. All the details quite well. Let's move to this piece. Run on symmetry for this. Let's start with the polish. H polish, that's the right
one we're supposed to use. So let's start doing some
beat up work in there. I think what do to symmetry turn down for now,
which is fine. Ton of symmetry, let's
just differentiates the opposite side,
it should be good. Okay, ton of symmetry. We need to kind of break
this apart also too. Okay. Then turn off symmetry. Do some little breakup in there. We should be fine. Turn
on symmetry again. Get up close. Turn off symmetry. All right. Okay,
that should be fine. I think we can turn
on symmetry and then get some reco
variation in here as well. Can do for the
backside also too. Turn off symmetry. I don't think I need
to do so much for the inward part because it's
not going to be visible. Okay. So now let's add some chopped off edge loop to
it, Trim smooth border. Symmetry is torn off
precisely what we need. Let's increase the
subdivision level so we can get as much
detail as possible. Do that. Okay. That should be fine. All right. Come to the edge. Move to the back side. We can get some nice detailing
also too on this edge. I want to be careful
here, though, you don't want to do
it too much, so then you lose the entire edge. So I'm just going to be a
bit careful in get up close. So I'm doing this
symmetry turned off now. Okay. Alright. Getting the same condo darts same thing
on the other side. I'm kind of being more precise on the edge now. That's fine. I should work just fine.
I should work just fine. Doesn't need to be too extreme. Okay, I think the final
piece would be this. Let's use the edge polish. We turn on symmetry
for this first. Okay, symmetry is torn on now. Et's go and then just do some
break up here and there. Okay. To symmetry let's work on the other side as a
separate individual piece. Okay. I'm just going to
do some breakup around the edge to
asymmetry for this. Also the backside, kind of get some breakups
in ton of symmetry. Okay. Ton symmetry for this. Get some surfacing also
on the inward parts. Even though it's not
going to be visible, let's at least get
something in there. Then let's introduce
the thin smooth border, kind of make some edge
look chopped off. All right. Let me give
you a moment to save. Let me also save this manually. Okay. Awesome. All right, so see you chop in
some of these edges, give it more of an
interesting look to it. Okay. I can do on doing
what part also, too. I mean, why not? Get a good angle so it's. Okay. All right. Get interesting
result out of this. Get up close. Don't do that. That's
not looking right. Get some details in
here here as well. Okay. I mean, we need to get good detailing across this.
As a general idea. Okay? This under on the
edge also, too. Okay. Pre some larger ones that goes across in there get
some smaller ones. Okay. This difference of fits. Okay, we get good details
going around this. Except for this edge, do that. Let's get in close. All right. Okay. Let's see if we need
to add a few more, but I think so far we have something good
enough to work with. Okay. Interesting. A few more All right. Fantastic. So this
should be fine. So if we bring
everything back out now, take a closer look. We get good interesting
results in. Okay. I think we're already getting good
detailing across this. We should work just fine. Let me add one here. Here as well, pas is
going to be more visible. Okay. All right. Okay. Move this aside. Move this get a good angle. Okay. Right, not to go
too crazy on it. I think it should be fine.
I think we can hide. Anyone we have done, we
can just hide those. The next one to work on
will be on these wings. So I'll see you guys in the
next lesson bye for now.
77. 75 Head Wings Surface Detailing In Zbrush: Come about, guys. So moving on. Let's work on the next piece. Okay. I think I would
like to let's see. Let's work on this.
Let's work on this. There's not the
next thing in mind, but let's just get some let's get some of the details in before
moving on to something else. Okay. So I'm using the
dam standard brush. Just going to accentuate
some of these folds. Okay? Something pretty mod like, so she be she'd be pretty
much fine where it is. Okay. Don't need to
go too extreme on what we have in here. I think
this will be just fine. Okay. Just trying to
create an illusion of some kind of tube in here. All right? Okay. Just holding out some
more depths in there. Okay. Yeah, I think that
should be fine. It's another separation in here, we can do one down
here here as well. Okay? Yeah, I think we
can live with this. So now let's move on
to the next piece. Let's do this one is going
to be quite a bit of work. But we'll make it work. So let's just capture
the essence of this wing shape in there we can this cement return on as well. Okay? Let's start
with these two. Alright. So let me
everything back out. Let's subdivide subdivide
subdivide one more, okay? All right. So the same them standard brush. Let's begin to capture
the shipping in there. Okay. We have this weird dots in, so let's try and eliminate dots. Okay, better. Now, this knife, let's get edge. Let's get good proper
edge in there first. Take down the intensity. Okay. Something like so. I'll let go to lower subdivision
level, smooth this down. Okay, it is fine.
But the back would into any wing shape
for the back. So I think a more preferable way to go would be to
use the mark spin. Okay. Could you broach
size a bit small? All right Okay. I like, so cutting down
this way too wide, let's do something
like, maybe we can get the wide one
there and do that. Okay. I'll clean this off. Put the new one this way. Alright this line
is a bit thicker. A Okay? Get something all
the way in here. Don't do that act
looking neat enough. No. I cannot get it to be as neat as
I can get it to be. Don't do that. So g is high enough. Okay. I think you need a bit more. All right. So I'm doing on DIS
subdivision level instead so we can get
thinner edge to it. Alright. Okay. So I'm just trying to
make this quite cleaner. You get something interesting
enough to work with, so I'm going to invert the max. Let's get something cleaner. Don't do that. Don't do that. Alright. So let's blow this a few times. Then let's use the
inflat balloon. I think I may have pushed
this way too much. Yeah, I feel good. So
let's use the inflates and go in walls instead. Okay. But we need to do some
more work on top of it. If you clear the mark,
let's see what we have. Can do that invert the marks. I think the inner line should be quite slim
but that's fine. Let's go to lower
subdivision level. Okay. We can use the
inflate brush, I believe. EIN. Okay. I'll go to the higher
subdivision level. I think that's way too strong. Avis is going to work on notes. I think I need to reduce
the brows size and be a bit more precise where
I need this to be. Okay. I think for the more
preferable option to actually let me
clear this out. Let's see what we
have. Feverable option is to use the pinch brush, PPI. So with the pinch brush, we can tighten things up. Let me increase the
brush size a bit more, see if we can drag Okay. You need to use the move brush, fix this a bit more. Go back to the paint brush. Let me clear the mark in there. Undo that. Close. Okay. All right. Learning something
that'll be too precise. Think something pretty much
around there should be fine. Then back to the inflect brush. I'll just inflect
the inward parts. Okay. I think around around the
nature of this should be fine. Okay. Like so. Doesn't need to be
extremely accurate, I think, it should be
pretty much there. Okay. Inflate plate the
edge a bit more. Give you some inflated looking
edge to it let's go to lower subdivision level so we can do this a bit
more precision. Okay. Alright the backside, we will just use them
standard brush again. Okay. Then smooth it down. Go to lower subdivision level and smooth it down a bit more. That's a bit too extreme. Take down this smooth intensity. Okay. Then I'm going to use
the H polish brush and just get some
prick up in here. Okay. Tn of symmetry. I think I'm just going to
kind of duplicate this and then reuse
for the back side. Put some separations in here. Okay. Pinch brush. Okay. I'm just trying to
tight in if you loose ends. Okay. Get in there. All right. We bring everything back out. I think it to make
better sense to just duplicate
this for the back. We still have one at
the back as well. You can just delete it and then use what we
have for the back. So let's do delete ding. Let's go to lower
subution level first. Let's duplicate this duplicates hide one of the lower
parts to one to the top. Then let's do delete ding. Geometry delete ding. Let's give you some moments
to actually delete. Okay, it has deleted Eden. Clay just delete what down. Here, we can just
delete what is down here and get a good look at
the way it's supposed to be. Here, we can delete this. Okay, then duplicate this. I. Symmetry turned down, yes. I move this this way,
rotate this way. Okay. Let's see where we get.
We need to turn back on this round so we know where
to place this forward. Okay. Do that phrases out
some more proceeds. Okay. Put it this way. Okay. At fantastic. This
will work just fine. These two we can definitely keep Let's see if we
should be able to combine, we should be able
to combine should be able to combine these two. Able to combine these two
as one seeing good piece. Let's first go to the
subdivision level for it. Allow the save out. I think I need to do something
in here them standard. T is getting close. Symmetry symmetry needs to be toned off or this
asymmetry is torn off. Something's oddly wrong. Okay. All right. I think
that should be fine. Okay. Increase this also
to di subdivision level. Now, let me save this. You should be able to
merge measures and then still keep the subdivision
level that is in there. That is what I want
to try right now. So zip plugin sub to master
merge visible sub to no. Is a mess down. Or if you just use normal regular
mesh down, will keep? Will it keep? Let's
just do mess down. Look okay? I'm trying to see if
it's going to keep our subdivision levels or it's going to complete
that delete them. But we see we see. Let's go in and check. Okay, fantastic. I totally kept it. Fantastic. That's fine. They are awesome.
Alright. So now we can move on to
the next piece, which is just meaning
two, which is this and this all of them are
actually one, that's fine. That is fine. That
will definitely work. Okay. So we'll do those
in the next lesson. I'll see you guys in the
next lesson, bye for now.
78. 76 Head Hoodie Surface Detailing In Zbrush: Comb guys. So in
previous lesson, we kind of worked on the wings. So let's move on
to the next piece. I think this is next piece
is the last piece you're supposed to work on in
there on the eight parts. Here's on the eight
parts, folder. So let's isolate it. Then let's do polish but. Let's do auto group
first. Auto group. Okay. Yeah, this would be fine. Then we subdivide this and
put this all the way up. So subdivide Let's do one more. I think in a good place, this should actually work. Let's start from
the smaller piece. Okay, let's start
with a smaller piece. We can turn off symmetry
for this as well. So H polish. Let's get some bit up, look in there. Okay. Turn off symmetry and do some individual
breakup in there as well. Tn on symmetry. Get
some breakup in. Okay. A All right. Th should work just fine. Because we're not going
to be seeing both ends at the same time
when we render it, so we can just work
symmetrically in there. What will actually
break up the surface quite too well is the surface detailing or surface texturing
inside of Subt spinter. So Oton of symmetry now just do some light
work here and there. Okay, so let's get some
of this edge chipped off. Let's start from the
outer edge instead. All right. Like, so you don't need to do too
much on the inward part because it's not really
going to be visible. But at the very least, let's
just get something in there. Okay? All right. Give me some detail
here as well. Okay? All right. Let's get close
to these borders. We need a few more
also in there. Right? Okay, so we can work on
the opposite side now. Okay. Increasing the subdivision
lay a few more times. So we get kind of sharper
details in there. I do that. Increase the
bros size a bit more. Get some stronger
looking breakup in. All right. Getting close. All right. Move this up a bit more,
get these chips in. Okay. Yeah, I think as far as that
goes, that should be fine. Okay, let's move
to the next shape. Let's work on this next, increase the
subdivision level out. Tn on symmetry. Let's
use the H polish. Get some bits in look in. Alright. Okay. Looking good. Ton off symmetry, work
asymmetrically in here, reduce the bro gets closer
instead since we're using the dynamic size brush dynamic. If I'm getting that correctly, dynamic for the brros
size or redraw size. All right. Fantastic. Tontonsymmetry for this. Okay. All right. That should be fine. Get in there. Ton of symmetry. Oh, ton on symmetry again. Let's do for the top.
Okay. Ton of symmetry. Break this up, ton
on symmetry again. Okay. Move this along.
Ton of symmetry. I All right. So let's introduce
some agent suits. Actually, I bring everything
back out because I want to all add this way it's
going to be visible. So let's all add this way. It's going to be quite visible. Okay. Gotten close. Rotates. Getting close. Right? Then we can isolate it now. Were you know in map that region where it's
going to be visible then. The other part, we can
just go free and on it. Okay. Okay. Yeah, well. Gets
in detail, yeah. The inward part needs to have some breakup
detail also, too. Okay. I Okay, I think for the most part, this should be just fine
for what's needed for. Okay. Let's go to this piece now. Turn on symmetry,
use the H polish. Just start smashing
some details in there. So this butler, we need to
spend a lot more time on this because the most part of
this is going to be visible, so let's make sure
we get it right. Don't do that. I don't want to smash that edge in too much. Okay, ton of symmetry. And do some breaking up in here so it doesn't
look too symmetrical. Okay. Alright. I think we can
just go right into glton so chopped off edge
for it. So ton of symmetry. Okay. Oh, symmetry is on
ton of symmetry. I think I got knocked off from the view.
Let's get in there. Okay. Get in close. Let's start to the lower
edge, then we move up. Okay. Go to the opposite side. I'm being as careful
as I need to be because I don't want to
ruin what we already have. Just like we've been doing
before, we don't want to completely ruin the
edges we already have, so go gentle in there. Okay. We just need enough
to actually sell the Shah as being
realistic. That's all. Okay. Move this down some more. All right. Okay. Just do a little around these bits around
the inward bits. Not too much that part is
actually already quite thin. I think you're doing a pretty
good job in there already. So let's continue on. So now let's work on
the inward parts. But inward parts, I need
to be quite careful india. I won't use a smaller bro size. The smaller bro size in India. Okay. All right. Something small should be fine. Okay. All right. Okay. All right, let's go to the top. Okay. All right. Yeah, I think this
should be fine. Let's bring everything back out. I think we have this
way it needs to be. Yes. Let's do something on
the borders of this. It doesn't feel like we
kind of neglected it. All right. So this is fine. So in the next lesson,
we're going to move on let's bring
everything back out, move on to another piece. Okay, move on to another folder. To folder. I'll see you guys in the next
lesson by for now. A quick sieve. Okay. And
79. 77 Torso Collar And Belt Surface Detailing In Zbrush: Alright. Welcome back, guys. So let's carry on from
where we left off. I've already worked
on the parts, so now moving on to
the torso parts. Let's elet the color. So let's get to close. Okay. So this is like the base. Then we're going to do poly
group auto group, right? Let's subdivide it to a
few million polygons. Let's do one more. I think
this should be just fine. So how can you symmetry
turned on for this. So let's go to lower subdivision
levels to low this out. Pre subdivision level, H polish. Here's the bros
size, tono dynamic. All right? Let's go on subdivision
even lower. Okay. So for now, I'll do the symmetry to on just to spit things up. Right? Let's move to the back side. Okay. I think we need bling material on so we can actually
see this properly. So tour of symmetry now. Let's just break up on parts. Okay. That should
be fine. So those going to re some of these
edges a little bit more. Just create some interest. All right. Okay, that should
work just fine. I'll increase the
subdivision level. Do that issue we
have at the back. Oh Okay. So let's use the trim smooth
border. Use the bros size. Let's come in here
first. Let's get this chopped off a bit more. So pretty much repeating what we've been doing all the while. So we're doing this for
each part of the mesh. Okay. That should be fine. Okay? That should be fine. Let's go underneath. Create some breakups here
and there also on the edge. Alright. Okay. That should be fine. All right. To do some on the top edge also to let me reduce
the bros size. Okay. You should walk
around the. That's fine. Okay. That should be fine. Okay. That's fine. So let's bring
everything back out. Let's move to the next piece. Let's do this piece, ton
of symmetry, each polish. Free bro size a bit. Did this up, ton of symmetry. Let's go and break
this even more. Okay. Let's do the same also
too on this edge. I All right. I think we're on
the right track, so we're just going to continue in this same fashion just to break some of these
surfaces up a bit more. Okay. We're going to give it a bit of an
interesting look to it, which is what we're
actually going for in here. Okay? Alton of symmetry. You also on this edge. All right. Ton of symmetry, do some individual
breakups in there. Okay. Then let's use the
thin smooth border. All right. You should create some
interesting look to it. All right. Let's tackle
some moot on the back side. All right. That should be fine. Okay. Keep this edge off. Okay. Go around there too. Do that, get up lose. Okay, let's go and even increase the subdivision level so we
can get more precision to it. Okay. That should be fine. That crack also too
should be fine. As dental meta that also helps with creating some additional
detailing that would look good when we actually do some texture inside
of it instead of substance pena, right? Alright. That should fine. Okay. All right. Let's move to the next piece. Quite a lot going
on here in here. So let's start with symmetry. Recoding what parts? T of symmetry in. Okay. Rduce the brows size
quite well and go over. I think I might need to
polish this a bit more. Let's go to lower
solution level. Let's polish this, get some
smooth bordered edge to it. Okay. Something like
so should be fine. Okay? So let's carry on. Let's use the trim smooth
border and break up the edge. Okay. Okay. Can do some aggressive chipping
of also in a few parts. Can go around also too. Okay. Well, I want to kind
of be careful, though. I don't want to kind of
ruin the shape completely. Let's do this with some sense
to it, use the brush size. Create some tighter
ones here and there. Okay. All right. Here, two. Okay. Could be fine? Here, two. Let's
see what we get. Okay. There's no leg dates.
It's somewhat backside. It's not gonna be
that obvious to see, but let's just put something in there. I think they
should be fine. Okay. Okay, it is fine. Let's
bring everything back out. So we're kind of done
working on this. Let's go to the lower
subdivision level. Let's move on to something else. Should save this. Okay. So next piece. Also belt Ke toot 16. I think this should be fine. Okay. Then let's start by doing
Auto Group in there. All right. Let's check out a reference. That is also a metapiece. That is definitely a metapiece. Okay. Yeah, I think we can be fine. It's also a metap so let's get
in there. Let's subdivide. If I on symmetry, symmetry. Symmetry, kind of kind of do
something at least a good extent, so let's subdivide. Okay. Subdivision should be
roughly where I need to be H polish. Okay. So I'm just trying to
make some bit up look to it. Is a bit extreme. Extreme, ton of symmetry, ton of symmetry gets up close. Okay. Turn off symmetry. Let's do the
opposite. This seems to be pushing in quite well. Way too motctual, so going to be slightly
careful around there. Canton of symmetry now. Let's move to the one
or on the other side. Can isolate it. Okay. Yeah, this should be fine.
Let's just carry on. Incre the subdivision level. He back size pushed in way too much ton of
symmetry. All right. Let's go into communion
and then break this. Let's get some individualistic
breakup in there. It doesn't feel too symmetrical. Let's go to the next piece. Can ton of symmetry
to start with. Okay. Alright. All right. Tn of symmetry, let's go
work on this manually. Without symmetry involved,
break up these parts. Do that a bit too much. Okay. Let's go to
the lower piece. Turn on symmetry. With symmetry, we can actually do
this a lot faster. Okay. Of symmetry. All right. I think a
Mammoson soft in this edge. Here, it seems somewhat too
sharp. Somewhat too sharp. So we need to soften it.
So let's grab three. Okay. Then let's just do
some polish in there. Let's go to lower
subdivision level. Do we have anything
working in there? Okay. Seem to have no doubt. We call it extra edge or
what? Or do we have in there? Let's go to the lower
subdivision level? G to figure out what that is. Okay. Don't do that. Let's say let's everything back
out, select just this. Polish this. Don't do that.
Polish this way too much. Go on sublution level higher. Okay. Here, that should
instantly fix that, right? That's cool. Okay. So think it's going to polish
a few more pits like this. Let's go on sublution
level higher. Increase the sublution
level again. I'm just going to go in manually and just try to break
this up a bit more. We should should be just fine. Let's also work on this. Pretty much the same
thing, biting this in. Well some interesting
but up look in there. All right. So we're going to do that
for the others also, too. Okay. Let's go in here. Break this even more. Alright. Okay. All right. You should be just fine. Let's go to the inward parts. Okay. Let me give you a
moment to actually do call a quick sieve. It didn't take too long,
and then we carry on. Okay, that should be fine. I think we have the one at
the back. Here to close. Alright. Okay. That should be fine. Okay. Just creating sort of
breakups on the surface. All right. That should be fine. Let's
work on the one at the back. Okay. Right? We don't need to do
too much in here, just like sushi fine. All right. Let's go to the ice the ice
ebration level already. And let's use the
Tim Smooth border and begin to create some
chipped off look on the edge. Okay. So take a little bit of
time because we're doing this for each individual piece. So it might take a little bit of time just to get
it to look right. Most especially on
the longer shape, so we need to go around those longer shape
and then create some cheap break off look in. Okay. Fine. Fine. Let's move on
to the next piece. All right. Okay. I pack also two. Okay. Well, that should be
pretty much fine. Let's move to the next piece. Get up close. All right. This we can work with. Alright. Okay. That should be fine. Right? This part is not going
to visible doublets. At the very least add
something in there. Okay. Let's move to the next piece. So when it's gonna
put it was going to be visible on the camera view. So that is pretty
much what I'm doing. I think that's a bit too
extreme. That should be fine. Alright. Let's move up. All right. That should be fine. Move up. Okay. Does work just fine. Okay. So trying to make sure this is feels a bit random and
not like something done or created with too
much carefulness to it. I feel like chipped off
edges that happens randomly. And not just at one
particular point in time. So that's the idea I'm
trying to create in here. Okay. That should be fine. Move to the next one. So try slightly to be a bit extreme to get interesting
breakups in there. Okay. That's fine. Okay. Now from a little distance now you can see some
interesting chipped off edge, which is precisely
what we're going for. Let's go to the next piece. Okay, go do that. Now, this one will just go around put some chopped
off edges to it. Some aggressive one, some
light ones go across this. Okay. Let's move to the
top. All right? Look, eventually we might need to increase the
subdivision level. But I think for now,
we should be good. While we starting baking
might need to double the resolution increase
subdivision level for it. All right. I think this
should work just fine. Move to the next one. Undo that. Let's create some obvious
one in here as well. Ax You go out of solo
mode, work just fine. Okay. Next piece, to close, use the brows as a bit more. Okay. Et's do the under
part first or move. Does it bit cold. It
all loose, right. Okay. That should be
fine. Can do that. Okay. So you want to do it it a bit obvious to actually see
that general idea for it. So now I'm kind of coming to
the front part a bit more. Okay. That's a bit
cold, create a new one. All right. Write
an interesting one down here here as well. Let's move to top. All right. That should be fine. It close. Alright. Okay. That is fine. Move this along. Okay. This get pretty
long around here. This should be fine. Okay. Now we can do on this. I think for this, I'm not
going to go to extreme, just something here and
there should be fine. Okay. All right Let's do
for the inward parts. Okay. Some chipped of edge. Okay. Let's do for
the opposite side. All right. So I'm not trying to be
go too crazy on this. Just enough to make the
chef feel interesting. Tussle Okay. All right. As you work gets in there around there as well. Okay. That's fine. Okay. That's fine. Okay, I think we have
done that already. So those go to the back piece. All right. Yeah, at this point, most of the details
are just repetitive, pretty much in the same
brush over and over again. So it shouldn't be too much of an issue to
actually follow along. Okay. Okay. That fine. Okay. Move to the back piece. All right. Okay so
close, break in there. Okay. That's fine. Okay. Okay. Yeah, I think for the most part, this should be just fine. Let's get close. Let's
see what we have. I think for the
most part, we get interesting result out
of this. That's fine. So next lesson, we're just going to move on to the next piece. So I'll see you guys in the
next lesson by for now. I
80. 78 Torso Chest Surface Detailing In Zbrush: Talk about guys. So previously, we kind of worked on
the I think we should even hide what we
have worked on those. So let's work on
the torso boats. Tossa boats won't be
too much work actually. I just need Let sallow this out. But we need to work on these boats on the waist parts and then on the shoulder strap. So at least I'm good to
working on so I'm going to subdivide Let's do one more. The thing I'm going
to do just use H polish brush and
then just go over. I think you can stare on
symmetry also for this. So we can work symmetrically. Just going to come
over and then just do some minor breakup working
there and the good. So That's pretty much all going to it. Bro size a bit s. Alright. Next should be
fine. Break up here. So I'm just going to
do this as quickly as I can. It's fine. It's fine if it's symmetric
because when we textures are texts are going to prec up the symmetrical
look to it. So for now, we can just
leave this symmetrical. Okay. Then now let's get
this pricing this way. Symmetry symmetry is
also working for this. We can do also symmetrically. Get in there, right? Just to move this along
quickly as quickly as we can. And this is symmetric car, it's going to make the
work a lot easier, so you can just go in and then put some surface
breakup in around it. Okay. That's fine. All right. Just a pative process
which would make a huge difference
across the entire mesh. I think I missed these bits across Okay. Okay. As well, right? I think we are pretty
much almost done. Having quite deep, that's fine. We can keep that.
Definitely keep that. Probably at this
point to of symmetry. Okay? We can decide to now go into a few of
them and then just break them up some more it
doesn't feel completely too symmetric on both need to right? Something pretty much like fine. L so should fine. You can go
to a lower subution level. We can move to the
next piece, right? So I'm going to subdivide
this some more. Let's make sure you are going
to lower subution level. Then we're going to subdivide this So subdividing this
now, Control D, subdivide. Okay, H polish, turn this
cemetary ton on as well. Just get some bit up sweets. That should help
sell the measures being put some aging
sets. All right. Okay, that should be fine. All right, something like so. So you need to
symmetrically also, too, so just to make this move things a lot faster
in and around. All right. Okay. I turn up symmetry now. Then we can go individually and then break
some parts up some more some interesting
breakup bits. Right. Okay. We're pretty like so should
be just about fine for it. Right? I can break up this also too. Do some interesting shaping
and break up to it. Okay. It should also help the mash
who lots more. That's fine. So do create some
chipped off edge loop. So we're going to use
James Smooth brush, James Smooth border brush. So I'm going to
chop off some edge. Alright. That should be just fine. Okay. I'm on around here as well. I won't do too much in here because the border is
not that thick enough, so just going to just bare
minimum in there ship fine. By minimum just fine. Coming here with more breakup around the neck
region. All right? Here, as well. Some more break. We definitely need
some breakup in there. So let's go to other edge. Okay? So what are the
breakup where is going to be slightly visible? Like general idea where
is going to be visible. Okay. Put some interesting one
on the edge. All right. Let's go underneath this. For this, let's
start by breaking Al's getting close,
break up this edge. Okay. So so in here awell move this along. I create some smaller ones,
also some bigger ones. I'm kind of using the tone
of the dynamic brush. So we have some
control over this. Let's go underneath now, right? This way, put some chopped
off look to it here as well. I can go a bit extreme in here, so it feels like something kind of eating to it.
That should be fine. Well, okay. Here, that seems fine.
I worked just fine. Okay? So the next lesson, I'm just going to move
on to okay divest. I don't think we need to
do so much for the vest. Let's go to lower
subdivision level for this. For the vest, I think. I've done most of the working
there already, so I think I'm just
going to leave that. Most of what we need has
been pretty much added in. We subdivide for more maybe just do a little works
with the standard brush. Just going to create a bit
more depth in a few of this. But most of what we need
has been blocked in. So I think we should be
pretty much in, right? Okay. I think this
should be fine. Okay, so let me turn this off, turn this off, turn
this off as well. It's gonna be the ins and the
nails for the next lesson. I'll see you guys
in next lesson. Bye for now. Maybe the way
this is kind of structured, I might not even do
anything in here actually. Maybe just create some chipped off look and that'll be all. I'll work just fine for it. So do that in next lesson. Bye for now. And
81. 79 Torso Chain Nails Surface Detailing In Zbrush: Talk about guys. So let's carry on from where we left off. So let's work on the chains. So I won't be doing too much in going let's extend this
out first so Shiff. We have them separate. It's fine. Separate poly
groups, so let's subdivide. Okay. Yeah, I think they should
work. Subdivide a bit more. Okay. So I'm just going to use the chip off
chipped off edge for it. So let me move this
to the side B. Okay. That was a bit too
extreme. I'm not sure that was going to work properly
on this edge, though. Okay, let me slow this out. I'm going to polish
this a bit more. So polish is definitely
needed some polish, okay? I think for this, we can
just use the edge polish. You do some bit up
look around bit up surfacing around it. And
then we should be good. All right. Okay, fine. Here's something more
or less like so. Okay. Here is something more
or less like sushi fine. Let's go to the next piece. So for this, I'm missing
the edge points. Let's just see what
that gives us. Okay. I think it's better to just
use this let's see this trim. Smooth border, yeah
this bog just fine. So I'm just going to break up some of the edges a bit more. I'm only going to breaking up the edges that's
going to be visible. That's more or less around here. Okay? You should move on quite fast. Since we're just let's
just do the back also too, so it doesn't feel
neglected in any way. Okay. All right. Okay. Here's something like so. There quite a lot of this. So you might need
to do quite a lot of work in and around this. Okay. All right. Okay. So fine. Okay. Let's go to
the next piece. Just to give it a bit
of an interest to it. That's pretty much what
we're trying to do, create a bit more
interest to it. All right. Fine. All right. Move this aside. Okay. Move to the next
one. It's important we have this detail
across this just to make it feel a lot more interesting and also add
some measure of age into it. Okay. Here as well, here so. Come on top, right? Here, so. That should be fine. Okay. That's fine. Okay. That should be fine. Let's
move to the next one. This is the next
piece, get in there. Let's get some surface
breakup detail in. All right. Sahul fine, well. Chop this in. Okay. All right.
That should be fine. Okay, this in here, well. Okay. Move to the backside,
create some breakup, chipped off edge detail in. All right. I think that should
be good enough. Looking at this now, a
little bit close up. You can see some breakup in here and there which is
precisely what we need. Okay. That sh a fine here as well. Okay? It's a long Okay. He so close. That's fine. All right. Move to the next piece. I think if done off symmetry, we can do this symmetrically, but at the same time, don't look too I don't look too
great if you do that. Turn off symmetry. Plug this in. All right. He also two. Okay.
That should be fine. Go underneath, put some
variation in here two. Move to the back side. Let's
not neglect the backside, everyone is not going to be that visible just get
something in there. Okay. All right. Move down. I think this
I'll just do on y. Okay. Okay. I think we can just
do this directly on. All right. And yeah, I think we're making good progress in this around
move to the back side. Okay. Create some
breakup in here as well. Okay? That fine. Move to the next piece. Okay. Move this I think we can
keep that. We can keep that. Right. That's fine. Okay. Oh good in there as well. Okay. Yeah, that's fine. Yeah, that should
work just fine. Let's move on to
the opposite side. Okay. So it pretty much
repeating the same son on various edges just to get some interesting
chopped off look to it. So at some point, feel like
a kind of boring process, but it's a necessary
boring process you need just to get something
interesting out of it. Right? Okay. Okay that's fine. Mono top parts. Let's just get the back
detailing in Okay. All right. You should be fine here as well. Okay. Touch it fine, here two. Move this along, get
something in here. Here's two. Let's do something close
to the edge instead. Should fine back side. Okay. Yeah, this we can
definitely fit. That is fine. I think we can move
to the opposite side now and then just try
and finalize this. This is a bit strange. We have a missing piece. It's a missing piece in here. That should be fine. Not
an intentional mist, not an intentional symbol. I think that actually
helps also to just get something that looks maybe something
that's completely odd from the mix, and
that will be just fine. Okay. That was a bit too much. Okay. Do it fine. Let's move to the back.
Does it here as well. Put something here as well. Let's move up the next piece. Move this around a year or two. All right. Detail in a year as well. Move to the backside. Okay. All right. Move. I need to be fine one. Okay. That's fine. Go to the back. Right. Yeah, I think this
should be just fine. Then let's move up. Let's move and then
work on this nails. Go back and take down the resolution subdivision
in there to go over to nails subdivides probably
symmetrical, Let's see. I probably symmetrical, that
will definitely help pilots. Let's subdivide them a bit more. Okay. So we start with
the He polish brush. I bet this in place a few times. Okay. So it's going to be
symmetrical on both sides, but detection is going to
break up the uniformity of it. So we should help pio lots. Okay. All right. This should be just fine. Come in and then let's
barge this in some more. It doesn't feel like
anything's happening there, but at least we're
getting something in. All right. Do it fine and let's
go in the leg of it and break up some more Okay. Have you done? Should be marrying in here now. Stump some breakup
in on the top of it. Okay, around there as well, then let's go legs. Okay. But it's
fine here as well. Okay? Yeah, that should be fine. Okay. Awesome. Let's
move to the next piece. Let's start with the legs. Okay. That should be fine.
Go to the surface, get some break cup
surface in India. I think I'm going to even
subdivide even more. One more should be fine. Alright, I think we
should be fine now. Is there any piece we didn't
do? Okay, that's fine. So now we can at this point, we can tone of symmetry. Ton of symmetry. So
ton of symmetry. Let's use our trim smooth
border, get up close. All right. So I'm just trying to break
this three so mooch up to edge t All right. That should be fine. I need to make
sure I'm moving in the right direction across this. Okay. All right. Next. I've done that already,
I need to moving this other direction instead. Okay. That's fine. Here as well. Okay. That is fine. Move
to the next one. I think we're doing just
fine. We're doing just fine. I think we're doing this as accurately enough as we need to. Stings kind of break the heaping of it a little bit more though
with the more brush. But I think for now we are doing just I think we are doing
just fine, for the most part. Okay. Move to the next one. All right. Read some one or two on
your underpas so you get a bit more interesting
result out of it. Move to the next. Oh, this one seemed like I've not even done nothing in there. This one feels like I've
not done nothing in here. Let's just get the cup in. I think I lost it. Lost it. Okay, found it. Found it. Okay. Feels like maybe our symmetry didn't work entirely
for everything. We're kind of work
in symmetrically kind of read these
extra details. Some of them feels like it
did not get that detail. Some of them feel like
didn't get that detail. See on these parts, the detail was not
properly translated in, so I need to kind
of go in there and then reinstate that
into the mesh. That's fine. Extra work
though, but that's fine. I Okay. Here as well. Okay. That should be fine. Go to the top as
well, smash this in. All right. Getting here also to get some smashed up beaten up look to it. Okay. Get this surface
detail in there. Rights. Okay, this one also too. All right. Getting the let's grits surface surface
breakup in. All right. I think we're in
a good place now. I think we have done a
good job to do that, so we just continue
to chipping off look. Okay. So let's go in. Okay. He up loose. You should be fine. All right. Move the next piece. Let's make sure
we do this right. All right, go
underneath. Get this in. Okay. That in that should
be pretty much just fine. Move to the next piece. So let's close. All right. Yeah, well. Okay. That should be just fine. So Okay. E here. Okay. That's fine. Can get some
one a bit a bit extreme. Are we done with this Siton I'm going to go
to lower subdivision level. Then with the move brush, I'll begin to kind of create some oddness in
between a few of these. Okay. Just make it look a
bit more interesting. Like, they've been smashed
in and bet in a few times. Okay. Alright. Yeah, I think we're
in a good place. Can get some of this also too
looking a bit slightly odd. Okay. Yeah, that's fine. I should work pretty
more just fine. Okay? So I'll see you guys in the next lesson where we
move on to the next folder. I should be the arm
part so By for now.
82. 80 Shoulder Parts Surface Detailing In Zbrush: Come back, guys,
so let's carry on. So I'm going to move from
this to the arm parts. Okay, I think I need
everything to be visible in there quite a lot of
work to do in here. Let's bring back a reference. Let's just thinking of metaps mostly metap going to carry on with the method
we've been using since. So put up parts. Let's get in there we can work on this
symmetry turned on. Metric can be
turned on for this. Okay. So let's subdivide, 3 million should be roughly around the I think
this should be fine. So each polish ton of dynamic. Okay. Let's get in there and begin
to wash some shapes in Tn of symmetry. Closed right? A good. Okay. Yeah, that's fine. Let's move to the other side, get up close. Pash in some of the edges so that part doesn't feel like we didn't do any work in there. So let's get something in. Right. Close let me see.
I think I might need to polish this a bit more. Let's go in and then
drag the polish to. Under deformations, let's see. Let's go to a slower
subdivision level. Okay, polish this again just to have some be wood edge to it. So now we can comfortably
start adding the, this Trim smooth border. I think you're okay
with this symmetry turned on, that's fine. Let's start from this angle and begin to break things
up with the bro size. Okay. We're just going to undo, undo that. Getting close. You want to be a bit more
careful detail on the edge. Crank up our subdivision level. You can see some weird
issue around those parts. Let's increase
subdivision level again. Okay. This is the parts
we're working on. Right? Since we don't have enough
edge for the parts, probably would have enough
edge for these parts. Seems to have seems to have
a lot of edge holding it, so let's just carry on. I need to just subdivide it
one more time, probably. Let's subdivide
this one more time. Okay? That should hold that should hold the
edge a lot more. Right? I feels a little bit
extreme but that's fine. Undo that. He us fine. Let's go to the underpasPt some breakups in there as well. Get in close, reduce
the brush size. All right. That's fine. Same here as well. Don't do that getting close. Let's move to the
opposite, the other piece. You would start
from the top parts, use the brush size a
bit more n gets in a bit closed that
last step, right? Maybe I won't go
to extreme in here just enough to create
something interesting. Move up. Okay. How do we undo that. We just fine. All right. Let's create something
along these parts. Something deeper like fine. Deep as well. That's a Okay. He's in loser loser. So smaller. That's a bit too much. Let's
just find it this way. Alright, I think it
should work just fine. You have most of what
we need India already. I think this should be fine. Okay. So I'll go to the lowest
subdivision level for it. Let's move to the next heap. Okay. Here, this is all
metal also too. I think for this, we're
going to be doing this symmetrically quite as
for the beaten up look, then we'll break it up later. Let's just subdivide. Let's subdivide
for more 8 million should be roughly there. Let's go to the lower
subdivision level. We already have auto
grouping the soluti fine. Let's start with two, go to the higher subution level. He polish Pal symmetry. Getting close let's begin to
bush some shape in there. Okay. Sushi fine. All right. Almost there. Okay. Then I can turn up symmetry
and then just create something ties in looking pretty much the same
as the other side. So just to go over just one part and then break it up pretty
much like sushi fine. It seems like some of these parts didn't
get surface detail. So let's go in and then create some breakup
in there as well. But a lot of you didn't even get the breakup detail we added. Quite strange, so they're
not perfectly symmetrical, but you still okay anyway. I kind of okay anyway. So let's just do the manual work and
then just break it up. Okay, that's fine. I like to
bring everything back out. I like to break up the
edge individually, so it's not much easier for me. So let's go over to the
thin smooth border brush. Yeah, I think this butler
will need smooth also, too. Let's go on subdivision
level lower. Let's polish Polish. Come on. We don't poli the mode
too much, though. Just enough just to create some highlight on the edge,
and we should be fine. Okay. It's just a matter of
breaking the edge now. Use the bros size. Find
a good angle for this. Right. Move this along. Okay, let's
do for the inward parts. Nope, it's not going to
be completely visible, but at the very least, let's
just get something in there. Okay, let's go stop. I'm not entirely sure most of this is going
to be visible, though. Let's get some interesting
detail in there. All right. Okay. I do that, move this side. Okay. Let's go to
the inward part now. Right? We don't neglect in
what pas there to add little India as well,
so that should be fine. Let's move to the order. I'm not even sure which
Amados did I think. Should I think this
is the end we did. Okay that's definitely it. Let's go to the next one. Okay. Let me start by polishing
these edges a bit more. Okay. Maybe a little bit more again. All right. Okay, let's start
adding damaged edge. Okay. So That should fine. But we still want to
be careful, though. You don't want to ruin the
topology in the window you adding this edge detail. Anything that looks a bit off or weird, you can
just undo that. Okay. That should be just fine. Let's go to the inward parts. R inward part is
not going to be. Let's get something in there. Alright, let's go to the top. Okay. That should be just fine. No, no, that's a
bit too extreme. That's a bit too
extreme, so gets closer. All right. Okay. That's fine. Let's go
from the top around. Okay. It's on the inside. It's not gonna be visible,
let's just do something in. Okay, that should be fine. Okay. Let's do the let's
do these bits. Let's do this bit instead. Not entirely sure
if it's going to be perfectly
symmetrical, though. Let's start with the He polish. I just break inward
parts Soface bit small. T of symmetry, let's look
at the opposite side. They can do the best job.
Since we're in here now, let's just get undo that. I don't go too
close to the edge. Let's just beat
this up some more. Yeah, that should be
fine. Should definitely polish the edge a
bit more as well. Okay. Then begin to
chop some edges off. All right. We need to get this
at a better angle. Okay. That's fine. Shape is not as
big as the other ones, too. We should cover quite a lot
of areas quite quickly. Say for the fact
that it does inward parts to inward edge, have some inward edge that
I need to take care of. Okay. Smooth along. Same here, let's get something in there. Right? No, that one looks a bit cold. Cold. Yeah, much better. I think this one might
take a little while because it goes across
the entire out scene. Okay. So we need some
details here as well. Yeah, this will take more
time than I anticipated. I'll try not to go too extreme. Just enough to give
us realistic results. Okay, it should be
pretty much fine. Let's move to the opposite side. Okay. So around this fine. Right. Undo that. That's a bit wrong. Undo that. I wasn't
looking right. Okay. This one I'm going
to make quite long. Get blows, increase the lose size and do that. That isn't
looking right. Okay. It's fine. Use the process getting close. I think we just need to go this last loop across the
mesh, and we should be good. Okay. That should be just right. All right. I think
we can definitely this clean Liking let's
break that apart a bit more. Alright, that's fine. Let's
bring everything back out. Now we just need to finalize
on this lower piece. Sono symmetry, H polish. Okay. Since might not need too much, we just need to do
on the edge and wish you would Okay. All right. Do we have this perfectly on the opposite
side? Let's to symmetry. Let's just break the detail
on this part some more. All right. That should be fine. Then let's let's trim
some of these edges. I think the best part to
tm would be edges like so. Okay. We can just break this apart, and we should be all good. All right. Yeah, it should be fine. Let's
go to the opposite side. Okay. Gets closed. That should be just fine for
what's needed for. Okay. Yeah, this should be
just about right. All of this should
be just about right. So in the next lesson,
move on to the next piece. I'll see you guys
in the next lesson. Bye for now. This
our universities. Is our universities,
next piece to work on. Then we have the boat,
then we have this. I'll see you guys in next
lesson, bye for now.
83. 81 Gloves Parts Surface Detailing In Zbrush: Right, come back,
guys, so this is a nice piece we're
supposed to work on. But low I'm not going to do too much wear and seeing here. I would like to clean
keep this as clean as as clean as possible, though, just to keep a region where the air of rest without
too much cling across it. So let's get to it. So I'm going to subdivide. Let's go to lower
subdivision level. Let's do fly group,
let's auto group. Okay. Should fine. Then let's go
to the subdivision level, subdivide, subdivide,
subdivide one more. Okay. All right. That should be fine. I think we need to let's go to lower
subdivision level now. Select, grab this, grab
this invert the selection. Symmetry should be on. Let's go to higher
subdivision level. Okay. Go on subution
level lower. Each polish let's get enclosed. Let's begin to break
this up as well. There's still some other things we
need to do on top of this. But for now, let's just let's just let's just kind of create some
surface on top of it. Okay. I think this should
be just fine. So of symmetry, let's go to the opposite side and break
this part a little two. Okay. Then let's begin to
break some edging to it. Like I said, I won't
go to extreme. Just a little to here
and they should fine. I don't want to be
too aggressive. Okay. All right, I should be fine. Let's go to the other side. Okay. Let's just hit some
break up here and there. Right? Tradition feel like something that just recently been replaced without not too much damage in there. I think
they should be fine. We can work with. I think we can turn
on symmetry also. I think I need to
something in here. Symmetry the opposite side. But maxi max with lower
subdivision level. The more selected. I'm just going to push
this down the same for the opposite side. Down as well. Okay. Then we can start breaking this further adding
surface detail to it. He polish. I think we
come turn symmetric this. Let's increase the subuon level. I'm just going to some bits. So symmetry is also ton on, so that's going to help us move get things
done a lot quicker. All right. T of symmetry getting close. So feel slightly too
extreme, but that's fine. Can keep it. Unless we need
to edging here and there. And Okay. Just here and fine. This one. Fine. Let's move to the next piece. There should be
for the selection. Come on. Okay. Yes. So
asymmetry H polish. Get up close. Is like we're not doing anything but something's
actually happening in there. Okay. Is of symmetry, let's
take the opposite side. Right. Okay. Headship fine. Add some chopped off edge sets. Like I said, not too extreme, just faintly in there. Really too extreme
ones here and there, but for the most part,
I go to keep it clean. I neglected the opposite
side, so let's get in there. Okay. Fine? Is final photon is
tonosymmetry, H polish. I'm increasing the subdivision
level one step higher. So of symmetry. Let's work
on the opposite side. All right. Let's create the
chips of to this. Use the bros size. Okay. That's fine. Move to the next piece. Right. If we do some we can add a bit
more aggressiveness to it. Okay. So you pretty much fine. I'm going to go to lower
subdivision level and then let me save my file. I shouldn't too long to save. So in the next lesson, we're
just going to move on. I think we can do it
here. I mean, why not? It's just the boats. We can just say minus surface
details on the boats. So let's boat I believe we can do this
symmetry return on. Let's just subdivide it times. And Okay. H polish. This is the only
shape breaking apart. Move up. More or less fine. Move up again. Next one. I think we add one for the shoulder parts so we
need to get up there. I thought there was some
for the shoulder parts or maybe it is not
included in her. It doesn't seem to be
included in her of symmetry, let's break this
up individually. Okay. It's not
included in this bag. I think it should be
on the on the top. Included in, I believe in there. I believe we have
already worked on them, so I believe, we worked on
them as well, so that's fine. I'm going to turn this off. Let's get back in here. I think all is well in there. I her, I think that
should be just fine, too. I would both, let's
turn all of this off. Let's just move to the gloves. Aria bit is for these gloves. So the it now need to add to
add the same line across it. I'll do this symmetry to off. Symmetry return off. Let me
subdivide subdivide one more. Okay. Go to the lower
subdivision level. Let's do auto group for this. Right. Let's get in here, increase the subdivision
level, get closed. I'm going to use my SIM brush. I believe I have some
SIM brushes in here, I can use B SIM. Let's find something
that makes sense. Let's see, this one seemed like a good one.
So we click on that. Take down the dark shade, the bright shading
down a bit more. Let's draw something
else. Let's see what we get. Here, this will
definitely work. I'm going to increase
the process a bit more. I do that. Fine
proper good with. Okay. This needs to go across some parts might prove a
bit difficult get right, but try as much as possible
get something in there. Like most likely in
between the fingers. This I'm just going to get this download via Okay. A good angle in here. Okay. Move to the other side,
find a good angle. All right. S this way. We're going to do this also on
the opposite side. Right? Nice angle in here. Okay. So continues all the way down. Angle for this. Let's continue this round. Okay. Fantastic. I think
that should be just fine. Maybe for the front of it, we can do something that
comes across this way. Okay, I think that
should be just fine. Let's go to the der arm order glove instead. Down here. Okay. Right? I, I think I need
to do this again. This again. You know, we're working
with dynamic brush, so we need to do this with
more similar brush size. Don't do that. We come from
this direction instead. All right. Fine. That's in this direction. Connect. Down wrong direction. Wrong direction as
well. We're supposed to be bottom bottom up. So from the bottom,
move upwards instead. I think that's the
right way to go. Give you a moment to actually save start from the bottom
and then work our way up. A Something like so. Now this is in the
opposie direction, so this will move from top down. Depending on the angle
you're viewing this from this one should be from bottom all the way up. Same here as well. Okay. That should be fine. No opposite direction. Let's come from this angle All right. All right. I think
that should be fine. Maybe also to 44 of it, we can do something
around, let's see. Well, that's Bs is way too big I can do that something around
the nature of this. The same also too on
the opposite side. Getting close. I do that. He should be fine. There, that's pretty much it. Let's go to lower
subdivision level. So I think we're done with
this entire set also. Done with these sets. But I think there
might be something might need to do but I think for now for now, we're
done with the sets. So let me turn
everything back on. What I was actually thinking is. I think we need to do that. Bit like an edge around this where this put actually sits in. We'll do that next
lesson, buy for now. Save this file. And
85. 83 Short Waist Cage Surface Detailing In Zbrush: We come about, guys, let's
carry from left off. So completed, we've
completed the parts. I'm moving on to
the base parts now. So I would like to start
with this bigger ship. Is kind of the next one down. Let me just pop it up. Okay? So I'm going to isolate. Let on the arm parts. Let me make sure we have this on the lowest
subdivision level. Okay? Yeah, that's fine. Actually, let's do do all low. Let's do all low. So we get it on the
lower subdivision level, so it's easier for us to
kind of optimize some more. So you're selecting
this piece now. So I'm going to
subdivide this Okay. I think roughly around 5
million should be fine. Let's go on subdiviution
level lower. Let's use H polish. I'll turn on symmetry for this to move things a
bit faster in here. Okay. So I'm just going
to beat the mesh. So more just make it
feel a lot more like a metal piece, right? So what it needs is
symmetry turned on. So need to kind of break
symmetry eventually. But just to move
things a lot faster. So we need a symmetry
to be turned on. All right. Yeah, that should be fine. I'll of symmetry now. And I'll just work
on just one part. The other part should
automatically feel different because I'm working
on just these parts. All right. That should be fine. Interesting. We didn't
seem to have this applied. So since it's not entirely
pap symmetrical, that's fine. So let's just get in there
and break this up some more. Okay. Okay, that's fine. All right. Okay. Let me add something similar
also on these edges just to make it feel a lot more
like a metal pis go around. Okay. I think we're almost done to create some
interest to it as well. Okay? We can do something similar
around these parts. Okay. Yeah, like so should be fine. Okay. So now let's create some chipped edge to it
to trim smooth butter. Alright. So for this, we can just
go slightly crazy on it. All right. A person is a bit old, so I'm going to undo that. I'm going to do this on
the edge itself, like so. Okay. More like so. But some
deeper ones also too. Do that. Bring this down. Okay. Get in close. N a few
more in on this edge. So I'm using a
smaller brush size, so I'm doing this close up because I'm using the brush
with dynamic turned off. All right. Let's continue
on with the edge. Oh right? That's a bit odd.
Undo that. Undo that. Undo that. You don't be
careful on the edge, though. Okay. That is fine. Fine, as well. Move this along. That should be almost fine. We just go and then
show up this edge. Something like this
should be fine. Okay. Chop this edge. Okay. So move up some more. Chop this down like so. Okay? That should be pretty much fine. Okay. Let's get in. Okay. So these bits will need to
be closer, getting close. Like, so, that should be
just fine. Move this along. Get close. Alright That
should be also fine. You can move to the top sets. We can chop this edge as well. Undo that this is a bit odd. You should be fine. Right. Okay, smaller ones around. Okay. Yeah, I think, as
far as this goes, this should be more
or less there. It's not to go too extreme. Okay. That is fine. Okay. Getting close. All right. So go out of isolates. Then we just need to use this
standard brush and begin to kind of let me select this increase the
so abolition level some more. Don't do that. This is the one we need to This
measure need to be on. Okay. There's quite a lot
of this around there, so we'll be spending quite some time getting
this to look right. It's quite a lot of them. Okay. I'll just go in this
fashion like this. Move this aside. Next one. So I'll just go in, I don't know, horizontal
role piece by piece. Makes better just going like so. Right. Almost done with one rule. Okay. All right. Move the setting brought this out unintentionally.
Let me remove this. All right. That should fine. Let's move down. Let me see if I can just do
this with one swoop instead. We can go all the way
down, let's go all the way down. Let's go all the way down. So we don't have to
turn this around again. So I'm doing this
vertically instead. Otates Okay. That should be fine.
Right move up. Move this to the other side, get a good camera and go to it. All right. That should be fine. Like, so should be just fine. If you feel like it's
not working for us, we can always smooth it out. But I think for now,
we should be good. Okay. All right. Okay. That should be fine. Okay. Move this aside. Get a
good and good sweets. Right. Sweet move down. Okay. Next piece. So, it doesn't need
to be perfect. I do need to get something around it and it should be good. All right. That should be fine. This aside. We're pretty much
almost done with this. Maybe you should
have, roughly 16 more to go more or less. Okay. I'm going to Zoom on just
to get a good feel of it. I think this should
be just fine. Okay. That's fine. Move down. Okay. That is fine. Okay. Move this aside. Okay. I think this should be the
final piece of this puzzle. Yeah, that should be fine. Yeah, that seems a
bit too much fine. Maybe for the sake
of adding dents, we can this bro doesn't
feel doesn't feel, I think we can do
some scratches. Not gets in let me
subdivide it one more. Subdivide one more. No only getting the best
scratches in her, though. So I won't do that.
I think let's just leave the scratches for
sock splinter instead. Okay. So this is the next
piece to work on. For this, I'm just going to
reduce the subdivision level. I think for the
boats, we are pretty much are pretty much
done for the boats. So we can quite
easily hide it now. Everything that needs
to be done with the boats we have done already, so high dust gets in here. I'll high this. Let's
move to the next piece. We can slow this,
then subdivide Okay. I don't want to go
to extreme here. I'm just pretty much
going to be adding the let's subdivide one more. So just the trim and just trim some of
the borders for this. Just to make it look a
little bit more unique. All right. I won't go too extreme here
and there should be fine. Okay. Like so. So I'll do I going to just repeat the same thing
over the entire mesh. All right. No. Just to make it feel a little bit more
unique like the others. Okay. Okay, that should be fine. Move to this piece. So I'm just going to put
this on the vis part where it's going to
be quite visible. Okay. So fine. All right. It's just ways to kind of
add more interest to it. So it doesn't feel too basic or too smooth
too flat anyway. Okay. Fine. Okay. All good. Right. Okay. Around here. Okay. All right. So out. Yeah, that should
be fine. Let's move to the next opposite side. Good on this edge as well. Let's get some should
be pretty much there. All right. Gets close. Okay. That is fine as well. Okay. M in here this edge. Get something here as well. Okay. Okay, I think this
should be fine. I think we can definitely
work with this. Alright, so the next lesson, we'll just move on
to the next mesh. I'll see you guys in
next lesson bye for now. This get for the most part, we can just pretty
much live as it is. I don't think I need to
go too extreme in there. Maybe just a little.
Standard brush. So a symmetry. Okay. All right. That should be fine. Okay. So most of this part is
not going to be visible, but let's just add something
in there at the very least just to add a
little interest to it, get some slight interest to it. Alright, that's fine. Okay. I'll move this up here. Now, this one is going
to be full leader, is going to be adding
leader to that and then working on most details is going to be inside
of Subtanpinter. So let's leave that as it is. So next one to work with this. We'll do that in the
next lesson by for now.
86. 84 Long Waist Cage Surface Detailing In Zbrush: Talking about guys. So let's
move on to the next piece. Previous less worked on
the short skirt sage, so the longer one, so let's get right to it. So I want to start by
subdividing this a few times. Okay? 7 million seems to
be right about there. So let's don't know symmetry. Let's see if we can do
this symmetrically. Even though it doesn't
work perfectly symmetrically, that's the fine. As long we get something good enough to work
with, that's fine. So just make any other necessary recups we
need to do in there. Okay. So I'm basically repeating
the same process, bashing in some heating
up sweets, right? So move up. Good thing is kind of working
symmetrically anyway. Maybe not perfectly symmetrical, but at least this would help us make it
work a whole lot faster. Turn of symmetry now. Then go break some of this
up a bit more getting close, get close to the edge. Okay. So should be fine. Move to the opposite side, some parts were
not properly done, so I was going to
go in and then fix those up. Get in close. Alright. Okay, this should be just fine. I think at this point, we can add the chip tough edge to it. Okay. That's a really
strong one, that's fine. That should work. The round
doesn't look quite right. Okay. Should be fine. So being
careful here, though. I don't want to mess up
the inward dents we have. So being a bit
sareful around this. Okay? Here, we can keep that. That should be
fine. Get in here, get some breakup here and there. Okay. Move that as a bit odd. Okay. Pretty much fine. All right. This one should be quite longer. That should be
fine. Okay. We need a few also to in
the inward parts. Can get some aggressive ones in there as well.
That should be fine. Don't do that that
didn't feel rights. Don't do that as well.
Still doesn't feel right. Okay, that should be just fine. Okay. All good around on the edge. That fine, getting close. I think we can definitely
work with this. Come on. All right. Move to the top. We can page this in as well. Right? I think as
far as this goes, it should be more or less see an issue in here
and just move that down. Then we can take down
the subdivision level. Let's move to the next
piece the wist inner arc. So inward parts? I don't think I
need to do too much in here but let's
just subdivide. Let's get something
around 1 million. So the only thing
we need to work on would be this in what parts. And we turn on symmetry. Okay, we can use the
symmetry turned on, I believe, that should help
split things up a bit more. I also need to kind
of polish this. So let's polish the edge. Let's get some softer
edge going on around it. Okay. Go to the lower
subdivision level. Polish is a bit more. He should be let's do
a little bit more. Ca should be more or less there. Crank up the subdivision
level, h polish. We can use the symmetrically
that's completely fine. So are you going to
do it where it's going to be slightly visible. It's not going to be
entirely visible, at least, let's just
do something there. All right. Okay. I think to make it a
lot easier for me, yes, we can just select one. So we don't have the orders
in my view blocking my view. So that's so should be fine. Okay, move to the next one. Symmetry is also turned
on, which is fine. Alright. That should be fine.
Move to the next one. I think this should be
like last one, I believe. Okay. So fine. Okay. So now we can add the
chip off look to it. Let's see if it's going
to actually hold. Okay, that actually
held quite well. So I'm just going
to kind of create some interesting looking shape to it ton of symmetry also, too. Okay. And so should be fine. All right. Okay. Something
around the nature of this should hold
up quite nicely. Okay. Like so. All right. Bring
everything back out. This is this would work
with Zemo just fine. Okay. Yeah, I think we're good. So let's see what is
next on the list. Rings. I think these rings, I'll just leave
those as they are. Any correction
modification to done, I think we can just let
me slow this out first. Let's actually see.
We subdivide Okay. Just checking. Maybe we can do probably a little walking about like to keep
them quite clean in any way. Let's just subdivide
and just use the H polish brush and then just tap around a few of them. Can we turn on symmetry on this? We can just tunnel
symmetry on this. Just going to randomly just tap on a few of them
just to ton of symmetry also, too, just to get some
irregularities to it. Just to get some
regularities on them. Okay. I think something around
like so should be fine. Don't need to go too extreme. All right. Okay, I think this
should work just fine. We'll leave that as it is. So let's move to the next one. Okay. I think for this, I need
to delete delete this. Let's leave it at 15 k, so let's delete lower. So we can work with
this subdivide, subdivide, one more subdivision. Can we work with
symmetry on for this? I think to a good extent we can. So with H polish, I also need to kind of
smooth this down so let's go to lower subdution
level. Let's polish this. Okay. Yeah, I pretty
much like sushi be fine. Let's add some beat
up look to them. Okay. All right. Not entirely sure if this is perfectly
symmetric at all. So let's just carry on. Ton of symmetry. All right. Yeah, yeah, it's not
perfectly symmetric. It's creating some weirdness, so we're going to
do this if symmetry turned off. Let's move down. Okay. Get some beat up
look through it. That should help with it's a little bit of detailing
on the surface. All right. That should be fine. Okay. All right. I will take a little
while, that's fine. Just to get good servicing
detail around it. Okay. Move on to the next one. Okay. I should be just fine.
Move this along. Okay. All right. Okay. Yeah, that should be
fine. Move this along. I think we have two more rules to go, and then we
should be good. Oh, just one, one. Okay. Fine? Does she fine as well? Right? Okay. All right. This should work just well. Sink to more. Doesn't need to be
extremely detailed, though. Just something like so it should be pretty much just fine for it. Okay. The process of at least at least is kind of
interesting to work with. The borers process, most boring process
of the entire stage is heavy and wrapping. So it's just that asp is going
to be very, very repetive. Let's kind of create some
chopped off edge to it now. Not entirely sure. It's
going to hold quite well. So let's see, okay. So, that's fine. So let's create some chopped
off edge here and there. Okay? That should be fine. We can do some extreme
ones also, too, if needed. Okay. Move this along. So I'm just trying to do
this quickly as I can. Okay. It's fine. Use a bit old. Correct that. Okay. Good. There's quite a lot of this we need to do
across the entire mesh. Remember, we have like
we call it colons. Water actually three more rules. Let me call it three more rules. This is like an end part, so we can chop this edge
some more. All right. Awesome. So I think we need to chop some
of this edge also too. Pret a bit more interest to
it. All right, gets in there. Good. That is fine. Okay. All right. This should be pretty much
there. Move this along. S. Like I said, also, too, like we always do get some
extreme ones in there as well. Okay. Move this along. Okay. Get some extreme
chopped up e to it. Alright. Move this we have to more rows All right. We can do this here as well. Okay. Chop of the edge. All right, move this
to the next rule. Chop of this edge. This feel a bit too extreme. Co mess mesh. Mess up our mesh in any way. All right. Okay. I think, as far as this goes, I think we're on
the right track. To extreme ones,
less extreme ones, and then we move along. Okay? Get this extreme right? Get some smaller ones on
these parts, getting close. I'll not make this too obvious. Slide breakup in there. Okay. Like, so it
should be fine. Move this up to the last roll. IT let me do a quick
sieve also too. Alright. Okay. Move it along, get some
extreme ones in here also. Okay. Get one here. Okay. Let me allow the save out,
right? Don't save in. So let's move this along. Get this broken up. Okay, chop this in maybe all
the way to the end actually. Then we do something on the opposite direction all
the way down the edge, find the lit around the, the chop this off some
more off some more. Okay? We can do
something light here. And on the part put
something a bit extreme. Okay. I think as
far as this goes, that's pretty much there. Okay, this should be fine. I'll go to lower
subdivision level. Let's see what is next. Okay. This is the next. I don't think we need
to do too much in here. So let's start by subdividing. Let's get this to
a few millions. 10 million should be
there. So each polish. I'm just going to bid this in
Can I solo this yes I can? Okay. Pretty much just beat this up, and
we should be good. That's pretty much it we're
gonna be doing in there. Then add some chopped off
edge, and then that's all. Okay. Alright. Oh, I think we need to get something in the
inward path too. Let's create something that
is quite close to the edge. Okay. Something that's just going to be visible on the edge. Okay. Pretty so Alright something like this should be fine. Okay? So let's move
to the next shape. Comitonalsymmetry for this. I think we can see a good extents should help make things a whole
lot faster in here. All right. Okay. So I think I can
brick symmetry now. Let's work on this
asymmetrically. It's a little difference
from the other one. It just seems to kind of make this part look a bit
board. But that's fine. We can keep that. Any auditing here would actually make
it feel a lot more unique. Okay. Move this aside. In what part, you need to break up some more? Okay. Th should also work just fine. I right, move to
the opposite side. He's getting close. Alright. Lots needs to be
close to the edge, and then we should be good.
All right, fantastic. So we can now chop off some
of the edges for this. Extreme ones and
slightly extreme ones, and then we should be
pretty much there. So on this down. I think we need to do some
bashing work in here. Okay? This one, I'm going to
make them quite obvious. All right. It's closes, smaller bro size. All right. That should
be roughly there. Bring everything
back out. Let's do some work in here as well. This is the list I'm going to
be doing in here, at least. Just to get good on uniform shaping in there,
and then we should be fine. Okay. Right? Yeah, I think this
should be fine. So there should feel
slightly different also too. So what's left this? So I can do this on just
this angle like so. Change the angle. I think this will make the
work a lot faster. Okay. Change the angle again. Right? This makes the process a lot faster hang
the angle again. Okay. Let's use this angle
to start with from these parts on the
Mcentle chain. Okay. W this up. All right. Okay. We can do this
from this angle now. Yeah, this make the
work a lot faster, so it's going to be
shown on most of the visible parts
in our camera view, which is precisely what we want. Okay. Back also, too. I think we are doing just fine. Last one. Let's start
with the back go. Come to the side. Okay. Let's do somewhat
three quarter view. Front view. Okay. Yeah, I think this
should be just fine. We have good detailing
across this, so the next lesson, we're just going to move
on to the waste cones. So I'll see you guys in
next lesson by for now.
87. 85 Long Waist Cones Surface Detailing In Zbrush: Welcome bad guys. So let's carry on from where we left off. So we've worked on this
long skirt worked on this. So just remaining this. Then we move to some
others also to in here. Okay. So it cons. So I'm gonna leave this. Just want to is left. So let's solo this out. Okay. All right. So let's
start by subdividing it. Cleani max and we have in the subdivide,
subdivide, subdivide. So I'm looking at the
active points in here. I think roughly around 9
million should be fine. So trim smooth border. Okay. I think we can go out of Okay. Let's make sure I
see in solo mode. Okay? Could the bros size
getting close. This doesn't seem like it's
enough to even hold the ship. Okay, I think we
need to polish this. Let's go on subvition
level lower. Let's polish the edge some more. Increase the sub
dilution level now, reduce the bros size. Yes, it will work now. I'm just going to add some chip of edge
to a few of these. Undo that. You want to avoid having any
weirdness in there, so you need to be completely
on the center of the edge. Not right. You're like, so, right. Undo that. Okay, that should work. Okay. Let's move on to the next piece. I need to increase the
brush size a bit more. Okay. Rotates. This is pretty much what
we're going to be around it. Okay. That's fine. That's fine. So it's pretty much repetition
across the entire ten. Okay, move down next one. C do that. We can do a few
extreme ones also, too. Alright. That is fine. Move this along. Okay. I think this will be the last
one for this vertical rule. Okay. Create some extreme also too. All right. Let's move to another
vertical rule. Do that looking a
bit cold. Okay. Right. Okay, that should
be fine as well. Here's something
long around here. That completely breaks the ship. Alright. That is fine. Hey, that should work.
Let's move to the next one. Okay. I can produce interesting
edge into it, and that is precisely
what we need. Putting down is a bit odd. Because I don't kind of get
something too slim because peking that is going
to create an issue for us because the mesh are kind
of intersecting in there, and then crytinom out
of that is going to be is not going to be as
clean as you need it to be, so that's why we need to get
clean transition in there. Right. Okay? Here, that should work. Here, we're moving
down. Getting close. Right? Rotates. Oh, that doesn't seem right. Can't see the edge is
too slim in there, so let's spread that a bit more. Okay. That is fine. Don't do that. That is not looking right. Don't do that again. Getting a bit close the center. Yeah, that's fine. Okay. Getting close. That should be just fine. Move down to the last
one under vertical roll. Okay. Don't do that do
that, gets in close. Okay. That is fine. Okay. Move this to
side. Gets in close. All right. Con do that. Okay. Undo that, undo that. I think I got knocked
off pack in year. Yeah, that's the
one. Since there's an angle we have not done yet. Let's get so close,
smash this in. That is fine. Okay. Let's move
to another vertical roll. Getting close. Let's start
doing something in there. All right. Now, this polish
and then we have this stage edge kind of else quite well to kind of catch good
highlights in there. That's a bit odd.
Undo that, undo that. Smoo that down if you need. Okay. Get a distance
in, rotates. All right. That should be fine. Con do that. The first one we did was fine, but
second one was not there. Okay? Put some
deep edge in here. That should be fine. Let's
move to the next one. Okay. Here's in the tine that is fine. All right. We can leave a few that
is not too extreme. Just something, no, that
doesn't feel right. Getting the smooth
down, do some more. Okay. That should work now. Alright, that should be fine. We don't need to go too crazy
on it. Move this along. Do something around there
that feels extreme. The idea of doing this bien
is just to make it feel more natural and more or less
more organic, anyway. If it does use
procedural texture, it's just going to give some
procedural look to it that any human touch to it that kind of feels
a lot more realistic. Because most of the
chipping off should happen kind of randomly, not at the same time,
so there should be variation in the
chipping off also, too. Let's move this down.
Okay. I'll also keep some really
smooth ones also. I don't feel like everything
is chipped off completely. So I'll go a bit light
handed on a few of them. Is, for example, we
can go light handed. Okay. It doesn't feel like there's too much
happening there. Okay? So you still have many vertical
road, you have to go. We have one, two, three, four. Okay. So let's get in
there. Get up close. Okay. That is fine. All right that is fine. Okay. Get this in, so do something
extreme around these parts. Extremely too. Awesome. Go to the next one. Get up close. I think I've noted.
Okay, this is it. Okay. Move up. So a bit or less slender
down. All right. Go extreme here, here as well. Okay. Move to the next one. This one I'll keep fairly clean. Not too much should
be happening in here. Okay. Move this along. I think
there's some hardness in here. We need to clean out. All right. Clean this out as
well. Move this aside. Okay. Polish this as well. I think that should
be fine. Let's move on to another rule. Okay. Yeah, we're doing just fine. Yeah, that should work. Okay. Move this aside. All right. Okay. All right. That should be fine. Go do that. That doesn't look right. Okay. I think that
should be just fine. Get in there do some
extreme extreme ones in your Alright Okay, I'll go a bit light handed
on these other halves. Not too strong. Light
handed should be fine. Alright. It's in the That's a bit odd. Don't do that. Okay? I'll I'll be quite soft handed on this. Okay. Yeah, that should be fine. All right. Okay. Yeah, that should work. That should work. I'll go a
little bit crazy on this one. Okay. So if you want to
kind of make sure your model comes out great, for this officing stage of this, you need to just be quite
patient with the process. It can make you
feel like, Oh, man, this is moving way too slow, and you want to spit
things but's chill. T chill and get it
right because you want to kind of get this to look as good as
you possibly can. That general idea so
you can get noticed. So take your time to actually work on the
details quite well. He last two. Okay. Get in close. All right. So I'm going a bit slightly
extreme here slightly. Okay. That should be fine.
Heating the blends down. Move to the next one. Okay. Move this down. All right. Okay. You should be fine. I'm getting a bit close so I can reduce a bit more
accuracy to it. All right. Gets in the Okay. That's fine. Okay. Yeah, that should work. Kind of been slight
handed on this. Okay, we can keep that as it is. Maybe go slightly
extreme in here. Okay. Make this apt extreme. So I'm going a bit
strong handed on this I want to go out those
interesting jag edge to it. Let's get up loose. Yeah, that should be
fine. Last vertical role. Okay. Alright. That should be just right. Okay. Awesome. Move this move to
the next piece. I'll go mid ended on this. Some extreme ones and then
some light ones in between. Okay. Like so should be fine. Oh, this one is a bit odd. Don't do that. Don't
do that again. I think I'm looking at
this from the wrong angle. Okay, there's pretty much
like so now should be fine. A All right. For this p one, I think I can just do something a bit uniform across the edges. Like so. Get in close, undo that. Undo that. Do that
again, get in close. I think Mango was just wrong. Okay. All right. We can keep the let
to the final piece. We can just do something
slightly aggressive in here. Slightly aggressive
should be just fine. Okay. That should be fine. And all right, so if we take
a good look at this now, let's bring everything back out. We'll be getting something
quite interesting to look at. Okay. Yeah, this should
pretty much there. So let's go to the lower
subdivision level, and then let's move on to the
final piece in this folder. Okay. Getting close,
isolates Let's subdivide. I think 2 million should
be just about there. I'm not going to do
too much in here. I still want to keep this more or less the
way it is anyway. Without too much
breakups in there. Blade just kind of beat the back end this back is
not going to be visible. The blades get some
detail in there. Same also to in front. Not too extreme, just
something slightly in there. Okay. We can just chip
off some of the edges. Maybe, okay. I'm going to be a
little bit careful. I don't completely
ring the mesh. Okay? Something around the
nature of this should be just about rights. Not too extreme.
Just be in there, give it a little bit of
stuffy detail into it. Okay. I think, like, so it
should be just fine. Okay. Getting close. All right. Yeah, I think this
should be fine. I don't need to go
to extreme in here. Maybe okay. All right. Yeah, this we can work with. Let's bring everything back out. So the next thing we're
going to be working on is to move to
the next folder. So moving to the next
folder next folder, let me hide this, open this up. I think this should be the
last is the last folder. Okay, pretty much everything in here, and then
we should be done. And then we should
move on to the UV and wrapping process. I'll see you guys in next
lesson, bye for now.
88. 86 Foot Parts Surface Detailing In Zbrush: Welcome back, guys. So in
the last foold in this fold, are we're going to get in and then start
working on each one. So we have the food boats. It those I'm going
to leave usties, then we have the food strap. Okay, this we need to work
on. So let's get in there. So it also comes with the rings
around it, which is fine. So let's just divide I think 3 million should
be just about there. Okay. So let's just use the H polish and then
undo that bit in place. I think we can turn on
symmetry also, too. Okay. Let's get some bit up look. Since we're working
symmetrically also, too, that's going to actually help speed up the process
by a whole lot. Right? Okay. I'm not entirely sure if this
is perfectly symmetrical. We'll find out though,
find out soon enough. Let's Let's see the
other worked on this, let's see the other parts. Roughly symmetric. Let's turn
off symmetry now and then work on this sep this
individual piece. Just to break any weird symmetry patterns
we find in there. All right. Okay, that should be
fine. Tonu symmetry, let's go to the next one. Okay. Oh, we should definitely be
doing this also too in here. Get this looking slightly
different as well. Okay? Ton up symmetry gets
this written up also too. Sh doesn't require
too much work. Let's just tackle
it all at once. Okay. That should be fine. Right. On a symmetry again. Get these bits up getting close. Right. Okay. That is fine. Ton of symmetry. Let's just make this part look completely different
from the other one. Okay. Oh, sees not even
affect this site, so we can make it
feel quite different. Okay. Yeah, that is fine.
Ton of symmetry. Maybe ton of symmetry, actually, let's just do
something different. Work on this individually. Right. Move to the other side. Get in close. Okay. So you're trying
to get something unique each on each ring. It's like general idea,
so that should be fine. So no symmetry move down. Symmetry turned on, I
believe it is. Yes, it is. Alright. Fits this up. Okay. Pretty much, so it
should be fine. Ton of symmetry. Move
to the opposite side. Let's make this different
from the opposite side. Alright. Let's go to the rings. All right. All right, so should
be just fine. Okay. Do something a bit
extreme in here as well. Move to the other ring. Okay. Get some differentiation
on the detailing in there. All right, so we can
chip off the edge now. Okay. Increase the brows size. Maybe we want to isolate
instead. Isolate this. Okay. Like so it should be just fine. You should create
some interesting looking detail into it. Alright, let's do
the under part too. Do some slightly extreme. Okay. Alright, I think
that should be fine. Let's move to the opposite side. Start with something
quite aggressive. So we need to do this on
this fatibo edge. All right. Get in the more or less, so should be fine?
Go underneath this. Okay? Like, so should be fine. All right. You should work. Let's
move on to the next. I Okay. Awesome. That should be fine.
Go to the top, create something that kind
of connects in a way. Okay. I think we can live with this. Okay. Next, undo that. We have not done this
opposite side yet. I'll keep this one fairly the same with not too much of this crack in there
or chip enough in there. Maybe just slightly in
on the edges alone. Okay? Maybe do something
here here as well. Okay, that should work. Move to this piece. A Okay. Do something aggressive
on these bits. All right. Continue on. Okay. Get this different
angle and then as well. Okay, move to the opposite side. I Okay. That should be fine. Me in her. Do something a
bit extreme on these parts. Extreme there as well. Extreme extreme year and then just leave the rest as it is,
bring everything back out. I think this will
be fine. So let's go to the lower
subdivision level. Let's move to the next piece. This one is obviously
metal, so subdivide. Let's do one more subdivision. Okay. Let's start with this
getting the bits up. So no symmetry. So this should help speed the
process by whole lots. All right. Get in a bit more. Okay. It's important to get this
bit up look in there. What make it look
like it's handmade. So I don't of symmetry now. Look to the other parts, try to smash things in a bit more to break up that symmetrical look we
have on both sides. All right. In value selection, let's go to this piece
ton of symmetry for this. No ton of symmetry, actually. I want to quite careful in here. I don't want to spoil
the edge we have in there already. Okay. All right. Okay. Let's move to
the opposite side. Okay. Get this pushed up as well. Move this around. Okay. It should be pretty
much just fine. Let's bring everything
back out. No, undo that. Let's create cheap off look in here first before bringing
the other parts out. So the cheap off look
would be mostly on some of these edges. Like so. Okay. All right. Can do a
few in also, too. All right. That should be fine. I don't want to be careful. I don't want to completely
run this clean edge we have. Okay? We can go slightly extreme on some of these edges, though. Okay, that should be fine. You can do something slightly
extreme on these bits. All right. Okay. That's fine getting close to something kind
of extreme here. Okay. Chop that up some more. That should be
more or less fine. Here, we can keep this ascites. Okay. Let's invert this. So our chip top edge is going
to be around this instead. Alright. Here, this should
be more or less fine. Move to the other side. I don't want to do
too extreme in here. Okay, here, I think,
more or less fine. Bring everything back out.
I should be just fine. So let's go to lower
subdivision level. So we have the footwear,
and then we have this. Let's see the footwear. I think the footwear won't
do too much in there, but let's just get good
subdivision level in. Okay? Aun on symmetry for this. So let's beat this
up a little bit. So we want to be careful.
We don't bet this up and then we lose all the
foam we have in there. We still want to
maintain the fam. All the forms in there, we
need to still keep that. So you might want to go a little bit light
handed in there. Just be a little bit
light handed. Okay. Yeah, like, so fine. Okay. Move to the back piece
as well. All right. I'll turn up symmetry now. And I'll just go in separately so it doesn't
feel to the same. Some irregularities here
and there should also help. Alright. Okay, we can introduce the
cheap enough edge now. So, like you guess, it's
going to be on the edges, so can do something
extreme in here. Like so. Okay. I think that should be fine. I'm going to do something
slide on the edge. Okay? On this edge, you can
chip that in some more. Okay? Do that
doesn't feel right. Rotates Yeah, that
should be fine. Also, to create some
breakup in there. Okay, that should be fine. Like I said, I'm not
going too extreme. I don't want to do
too extreme in there. Okay. Stronger one in here. Do something stronger
around these parts. Okay. Something strong
in here as well, something strong in here. All right, slights
break up in here. Okay. Break up in here as well. Okay. Yeah, also, maybe a little
bit extreme on these parts. Okay. Yeah, I think we are there. Maybe something slightly
extreme in here. Okay. Yeah, that should
be pretty much there. Yeah, yeah, this is
pretty much fine. Then the lax, let's go back here and then reduce
the subdivision level. But this part. I don't think I need to do too much, though. Allow to save. I don't think I need to do
too much for this. It is going to be
like a leather piece, so let's subdivide a few more. Standard brush. Slow them out. So not much not too
much foods in there, it's going to be like
leather. Not too much foods. Just a few compressions
here and there. Tous the brush size. Okay. I think for the most part, this should be roughly there. Right? Okay. I think we can work with this. It's going to be like
a full leather piece. All right, that's
gonna set it for the entire surface
detail for this. So the next lesson
is going to be about exporting
this out and then creating vis and then bringing
them back in and then baking the necessary
maps for them. Let me do a quick
sieve. So I'll see you guys in the next
lesson by for now. I'll probably do render for
DI resolution, probably. Anyways, bye for now.
89. 87 Prepping for Uv Unwrapping In Maya: Okay comb, guys.
So in this lesson, let's now start
exporting all of this into Maya and then get some
UVs going on in there. So let's start from the
first folder in there. Let's the the folder. Okay. So on the scepter. All right. So let's solo this let's see
what we have in here. Okay. I think for k should
be fine. All right. I think for this particular one, we can just do UVs directly
inside of Zbrush instead. So I'm going to do auto group. Fully group auto group. All right. The plugin. Giving Master ton of symmetry. Let's do poly
group, then unwrap. I think that should
be just fine. So let's spot this out. Okay. So under the exports, I'm going to create
a new folder. I'm going to name
this folder to Let's detailed I details exports. All right, open that
up. I'll save that. Before we do the cave, we need to check something
Other preference is important exports. Exports, ton of group,
ton on smooth normal. Let's export this out again. Just replace that. That's fine. Moving on. Let's go
to the next ship. I think 12 k is the
base, which is fine. We can work with this.
Right. Export this out. So we already have
them properly named, so it's going to make the work
a whole lot easier for us. Broad, I think, Subution
level one should be fine. Just export this out. Okay. But it's fine. Move
to the next one. Okay. Moving on. Road. Probably I have disconnected
something else, but let's just
export this as is. We're going to merge
that later on. So let's just spot
this out first. We're going to export all
the objects we have in here first and then later on work on what we need to
merge together. All right? Bees, I think the bes should be
just fine. All right? So the final rendering is
going to be in Oil engine. So I'm trying to kind
of learning the ropes about Olngine so that I can actually render this
out inside of it. That is going to be
an interesting one. None. Export this out. I shouldn't take us too long to actually export all
of what we need out. So done with this folder,
let's move to the next folder. Okay? Like, so I think
CISC is just fine. Export? Okay. Nails. I think for this particular one, we might just be able to use maybe we should use
it manually instead, so you get something quite
need to vise out of this. Took a resolution, fully
count for it is fine. So save this casket max. Five k is also fine. This one is actually going to be quite
straightforward to work with. But you want wrap so let's
spot that out as well. Casket body, Adke should be fine as the base
spot this out. Okay. That should be fine. Move to the next.
Casket boats exports. All right. That is fine. These are the next ones. Export as well. First get me body
lowest also exports. Okay. This is the lowest
also. Export it out. Right casket chain exports wtsds down. Caskets, cogs exports. That is fine. Let's move to
the next folder head parts. Ed boats, is this supposed to
be visible? I believe, yes. Export this out. Okay.
Go to the next one. Right that is fine. Head
crown exports. Okay. I think for this
one, we'll go on subduction level higher
exports. That is fine. We have the head marks. Export this as well. Yeah, this is fine is exports. Alright. Head crown priest. Let's put this two. Okay, I think we're
done with that. Let's move on to the next one. Let's get that framed in view. Export. Right? I'm just going to render this at the highest possible quality. That's why I'm not minding
too much about the plcuns. Something basic as they
should be just fine. I'm not trying to optimize
it for actual game. That's why I'm kind of
leaving the plcuntw there. So I will export this also, too. Right. Both I need to go to the lower
subdivision level for this. Let me do all low. Again, just to make sure everything's on the
lower subdution level. Export this out. That is fine. Next. Okay. Exports. Spot this out as well. I think for this one, I'll go
on subriution level higher. Let's go on subription
level higher for this. The chains Export this as well. Okay. I think this
will be the last one. So on this fold, I export this also too. Okay. Yeah, I think that should be there's
everything in there. Hi that. Let's go to the next
parts, and piece, make the visible, the
legs, export this out. Okay, this as well. Fine. Okay. Elbow parts. Elbow belts rather. So this is should fine as well. Exports. Okay. Chain. I
think for this one, I think we need to
do the UVs inside. We need to do the
UVs in here instead. Let's see if we can get
UVs in the poly group on wrap I think this might take this might
just take a while. This might take a while,
but I think once it's done, we should get something
good enough to work with. I'm just give you a moment
to just do his thing. Okay, so that is done. Expose that now.
Right? Moving on. Well, we're pretty much just repeating the same
thing over and over again, just putting out
the model so we can get UVs on there and then put them back in and rather big
out necessary maps for it. For the glove, I'm going
to also the wire it. Okay. That seems set it for the parts. Let's twist right? I think five K for you
should be just about right. Well. I think fine I think
on the wrong that let's get right folder in the you should be fine exports. Down next one, fine exports. Make sure you expo the
cor folder as well. Okay. You always want to
make sure you are exporting them to
the correct folder. Next one put out down. It's quite a number
of them in here. So let's just come this along quickly. We're
doing just fine. So far, we don't
have any issues. So far, everything's just fine. Fully continues like this also too for the baking process, it can be quite a
pain sometimes. I would like to do the
unwrapping in here instead, let's just auto Group group. And I'll save my
document also too. So as long as is don't
saving then I'm just going to do the von wrap
in here instead. I don't start doing
the piece by piece. I can just quite easily
just do it automatically with the UV master
inside of brush. I mean, why not? I'll just make the process a
whole lot faster. Just get in the poly groups. Wrap Okay. Wise, let's just
give us a moment toting come back when it's done. Okay, that's done. Well, that took a
while. All right. So I think I can
safely export this now the exports,
details, the exports. Right, or done, moving on. Okay. Next one. I two k should be fine. Spot this or maybe let's go. Let's crank this
up just one step. Thank you, might seem
a little bit too much. Let's just leave it
at two k for now. Except maybe probably otherwise if we need to crank that to
I think it should be fine. Okay. So I think we're
done with that set. Let's go to the last set. Right? This is for the boat. Okay. Let's spot
this out as well. This also well. Let's move down. I think we cram this up,
k should be just fine. Export also too. Let me do a quick
save for the file. The next step will be
just to import them into our Maya file and then see how we can
move on from there. Next step will obviously
be creating UVs for them. Give you some moment
to actually save out. Here, that's fine. Then this is a Maya
file main amortisa. So let's go into the actual
fod that we exported them in. And then I think I'm just going to drag
everything and drop in here. Let's see drag and drop. This might take probably a little while to
get all of them in. So probably come back,
recognized file type. Confirm. I think we
need to kind of do this because it's probably
from the MTL file. So I'm just going to
keep clicking this. It shouldn't be too much of
an issue because I don't take too much time starting to
select all the OBJ file. I think I should be fine
just clicking confirm. Okay. The annoying part is
just the weird naming that comes with Zbrush fully mesh three D. So probably need to kind of
clean that up later on. Okay. I think we're
pretty much done. So we have this brought
in successfully. Oh, I see something we
need to fix in here. So let's just go back in and then try and
get that sorted out. So it should be the waste parts. This is visible. I don't
know, tone of solo mode, yes. I need to go in and select this. So I'm just going to pretty much just use the move brush and then just move them in place or
rather move them out of place. Move brush, I'm just going
to this back do that. I need to select
just this alone. Okay. So I need to be quite
careful in here, though. All right. Moving on. I think we missed the parts. Move that back in. I think we just need to do
the same also on this side. Let's get in a bit closer and then just feed some
more space for it. Let's spot this out.
Let's see what it gets. Do that first. I think I need
to pull this out some more. Let's export this. Just going to replace
what was there before. Sports, detailed exports.
Then we just replace. Get back in here. We
can delete what is there and then find the skates get skates. Did I spot that
stonbos spot again. Let me make sure I spotted
this out correctly. Yes. Right? He has formed it too.
Let's go back in. And then I'll just drag
and drop this into a sin. Yeah, it should be fine now. That should be fine. Okay, let's make sure we give you the other same material
like the others. What material is it actually
let's lamb Lambert. Okay. Is the standard su Yes, so everything
imported correctly. So far, I don't see
any major issue. So we should be good. Then in the next lesson,
we're going to start in anarchical format and then try to unfold each and
every single one of these. These are the ones who have
done in Zbrush already. So let me save this file. So I'll see you guys in the
next lesson by for now.
90. 88 Import Head In Maya: Okay, welcome back, guys. So let's carry on from
where we left off. We're supposed to start
creating the UVs for it. But before we kind of
start creating UVs, I would like to kind of
get an head mesh in here. So I have one in here, so something I did before. I think it will work
just fine for it. So I have this I have this
head mesh I can just use. Well, I might not be
using the eyebrow though. I'm just going to
use just the head alone should be just fine. Okay, so I'm going
to use that instead. So needs of make some
adjustments to it, but I think it should
work just fine. So I'm just going to
drag and drop this in going to select it, drop it in a A to come with
some model accessories, too. We don't need the accessories.
Let me find that. Let me start by putting
all of this in a group. Name this to Armor Talisman. Just use all caps for it. Talisman T Pose. We're going to be posing this. Let's just give you
the proper name. I'll hide it for now. I don't need this. I'm going to delete all of what I
don't necessarily need. Okay. I think this is
pretty much all we need. Let's set a camera. Let's use something that's do with focal lens with some kind of portray
view in any way. Let's do 80 millimeter
in there right. Let's bring this back out. Okay. It's not properly
in where it needs to be, so I need to kind of
move it in place. Let's move this forward. So we need to do quite a
number of corrections in here. Move this up, try to match
this with the eye some more. Okay. So we need kind of make some corrections just to
properly fit this in. Okay. I will not be skiing the head, but I will need to kind of push a few of these around some also. What I'm going to do would be
to select this head itself, and I'm going to
export that out. Yes, I'm going to
export that out. So let's see what we can
actually properly adjust so we can what we can adjust
would be the mark itself. You can just pull it out
around here as well. Okay? So that should really help
make this stand out some more. Okay, so we'll do that.
So I'm going to export just the head alone sports. I need to export this
in the correct folder. So I'll do Z import,
copy this Okay. I paste this in here. Then should be on
OBG OBGOBGEpots. He mesh, rights Okay, that should that should
see to those fine ways. Then let's go back
to our Zbrush file. So I'm on the head part, so I'm gonna leave
this at the head part. I'm just going to do an append. Let's do an append.
Appendice fare, seems like that fair is
kind of buried down here. So let's drag that into
the head parts folder. So I'm just going to
drop this all way up, select it, and I'll do imports. Okay, the imports head mesh, that is a bit strange. That's quite strange. I can't even find the ad
mess just imported in. How did I export out the mark? I think I exported
out the urngin. Yeah, I definitely exported out urngin so export selection. Yes. Okay, so let's
confirm to be sure we exported out the wrong
ten. Yes, we did. So this is wrong,
I spread it out the max again. I'm not
supposed to do that. So let's exput the imports
in the correct one. Yeah, perfect. So
all I need to do now is just to make necessary necessary adjustments to it. So the adjustment
is going to be on this mesh instead on
the mark instead. So I'm just going to
use my move brush and then don't know symmetry. Okay, something like
ton on symmetry. And then I'm just going
to pull this out. Say ton of symmetry. Go to the other side,
get this out. Okay. I would move to a symmetry, I would move this up some more. You can see some more
of the leaps in there. Okay. I see. Here there should be
fine where it is. Need to make some adjustments
in and around here. To symmetry, pull this out. Ton symmetry, get
this out this way. Ar get close. Pull this out some
more. All right. I think somewhere
around there should be, I need to get this
out a bit more. All right. Yeah, I think, as far as this goes, I think
we are in the right spots. This we can
definitely work with. Okay. So now we need to do next to
export out the Edmark again. Export a new version for this. So I'll go to preferences,
important exports. Smooth normal exports. So let's export it to the
fold that needs to be Z export detailed
exports, Ed marks. We're going to replace
what is there. Okay. Come back in here, select select this HP, send it out of the group, hide d. Let's bring in the new one. Z exports, detail
Z exports, Ed MAX. He mark found it drag
and drop in her. Okay. This is a new one. Everything is brought in
correctly as it should. Still some adjustments
to be made. See if you number of
adjustments to be made. To confirm this again. Okay, it's not entirely
visible there, but it's definitely
visible around here. So Let's see. Let's see what we can adjust. Okay. Let me isolate this. Let me see what is
actually in the rights. That fine. I think we might
even just leave it as it is. Okay, fine. I want to be entirely sure if if this is working
correctly as it should. Maybe what we can do is to Yes, we can just do the
sculpting in here instead. So if you go over to
our sculpting brush, this is the pool brush. Let's see. Brush is a bit weird. It's a bit weird brush. But I don't mess support
you already have in there. I'm going to pretty much
leave this as it is. Okay. Here, that's fine. We can
settle for this as it is. So now we can definitely move
on to even wrapping now. I'm just going to
save this file. I'm also going to
save my Zbrush file. And then in the next lesson, let me get this into the group. Let's get into the group. So in your next lesson, start even wrapping process properly. I'll see you guys in the
next lesson by for now.
91. 89 UV Unwrapping Waist Cage Accessories In Maya: Oh, come about, guys. So
in the previous lesson, we kind of added a
new heading to this. Okay, well, there's a few things I would like to do also, too. I go to a perspective cam I believe is near clip
plain Is this to one. Actually, let me those black artifacts in there,
so we're good. Then let's go to the Iraq the doctor or for the
head mesh we have, we already have UVs onda, we have complete UVs onda, so we shouldn't have
any issues in there. But for the h, this is where we need to start creating all
the necessary UV is in. Okay? So we're going to follow
this hierarchy in here. And while going to
start naming things as well or naming things
properly instead. Okay? So let's go to our
UV Editing, UV Editing. Open the UV editor
and transform, create and saw unfold, right? Come on. Why are we What am I
getting this? Yeah, better. Okay. Then let's isolate this, Okay, we have UVs based
UVs that comes with seats. I think this should
be just fine. We don't need to do I don't even need to do anything in here actually. This is just fine. Let's just apply checker
pattern in here just to see. Yeah, that work
just fine. Alright. So let's bring
everything back out, Control one, move
to the next one. Okay, are you visini for
some reason, casket boat. Okay. So let's do camera biz. These are just boots so
it's going to be quite easy to unfold since we've already kind of cut
out the inward parts. So I'm just going to unfold. All right, then we'll
just do layout. And that should be
pretty more done. All right. Okay? That should be
pretty much done. Let's go out of isolates. A Okay. So anyone who have done, let's just hide them so we
know we're done with those. We have another booths
Fi souleds Okay. Let's do camera biz on fold. Lo Almost done. Fantastic. That should be fine. Two out of five sults. Hide those. Let's
move to the next one. I Okay. Okay, let me turn this off. All right, so let's start
by doing camera based. Unless find a good spot, you kind of put a UVsme. So I'm going to add my UVCM
somewhere around here. Actually kind of completely
split the aps. I'll do cuts. Move this aside. Okay. Select these two unfold orients. The part I'm more concerned
about is around this region. But let's see. Let's select
these two. Let's do layouts. I think I might
need to kind of get this straits in a
bit more like so. Let's turn on hear part. Let's see where we get. I
think for the most part, this is actually
looking quite good. Okay, so that should be
fine. Do a quick save. Okay. Hid those. Let's move
on to the next one. Okay, this shreds are
from the chain mill. So I'm just going to skip that. I also need to kind of adjust
the name in here also. Fantastic. Now we have a really
weird name ind. Great just great. I need to fix delete this. Yeah, I need to fix
this. I need to go to where is that found again. Your name space editor. I think this is from
this basket body. Okay. Deletes meshed roots lose
that should be fine now. Make this visible. Name
these two caskets. Caskets, body. Okay. Now, we can adjust this
without any issues now. Okay, that is fine. We're done with this. We're
done with this as well. Let's move to the next one. All right. I don't if it's on here, I don't know if it's
on here that's good. Okay, so let's get let's
get this UVon wrapped. So let's do camera Bs. Okay. Let's find a good angle
for this A U sim, I do. Yeah, as well. I'll do, so. Okay. Round here. Okay, I'll do cats. Let's move to the next side. All right. Here also two. Move
this up. Grab here. I'll do coats. Come to the opposite side. Let's do here, here, also. Let's do here. Getting close to her here
also around here, move down. Here, also. Let's take
these parts here also. Let's do coats. Select
all of these unfold. I think this should this
should work just fine. Orients. I like to get all
of this facing vertically. So rotates, selects,
layout heck a pattern. Let's see. I think for the most part, this
should work just fine. Okay. Yeah, this is good. I don't need to go to extreme
on this work just fine? Delete that weird Zbrush
naming that comes with it. Great. We have another
weird naming also, too, that's kind of messing
things up again for us. Fantastic. We need to go back in
there and then fix this. I think we might be dealing
with this for a while. So what's it called buten best that way stop. This is the one. Okay, should that should do it. Hi, that's. Let's move
on to the next one. The IV is not the best, so we need to recreate new
ones, so camera based. So far, creating the V is
not really a major issue. So let's get into the edge edge mode to
use this edge instead. I think this edge goes
across the entire measure. I believe it did. Then I do it cuts
selects unfold. Okay. I'll do orients let's
rotate this way, select those two, get them
properly layed out this way. Alright. You should be fine. Bring everything back out. I just hope we don't have any weird naming
issue in a fantastic. We have another weird
naming issue in there also, too. That is just great. I think I'm just going
to leave this window on let's find it. Should kind of come with
a marker in there, okay? Okay, I'm just going to
minimize this down here. Okay. Let me move this. I
can't move darts. Anyways. Moving on. High darts. Okay. Let's see if there's a way
we can use automatic Vs. If you do now, automatic
Vs is a complete mess. That is a complete mess. I think what we have in N
is actually quite good. It is actually quite good. What we have in
ENa is quite good. Only that we're
going to completely ignore the is kind of
V so we texturing, we're going to use Tripena
mapping for de texturing. I think maybe we should just Let's just create
should we create our own let of this nanadag Let's see. If I select a lot of this and I don't fold, let's
see what we get. Yeah, I think this is
more proper option, but I think we might
need to do this again because some of these kind of caught outside and we don't
want it to be outside. Okay. So let's create
new ones for them. All right. I'll do select this loop. Select this loop, move down. Ho down ship select this loop. Select that loop,
go down. All right. Fine. Let's go to the next rule. The next rolling here. We can just continue on
around the fine. Move down. Okay? The idea is kind
of ide sim eline that's where to do this again. Let's go to the next rule. We can do at. Let's do
coat first so we can save the progress we
have done on this. Then move down, work on this. So like I said, the
even wrapping process, like I said before,
kind of boring process. So it's a boring process, but also very necessary. Necessary, but boring process. Get that in. But I think we're moving quite
fast, so we're good. We're moving quite fast. Okay, also too as well. So you can just kind of repeat
the same thing I'm doing. I'm just basically doing the same thing over
and over again. Nothing too fancy. I think on the last roll, Okay. Move this down. All right. A fine. Okay. This be the last piece. Let's do cuts, select
all of the UVs d unfold. We do orients. I would like to
keep them vertical. Let's keep this vertical. Okay. Select the entire out
scene, let's do layout. So just wanting to keep
in mind you my kind of layout settings I think it's important kind of
show you guys that. My layout settings on fold, parking resolution four k.
Then texture size, folk, as well, pixels for the padding unit and
the shell pad in 20, tile pad in ten, and then you should
be pretty much good. So I don't want to
kind of feel like embody something else
that you're not aware of. So that is just the
basic setting I use. No. Let's go out of isolates. Hopefully it doesn't create
that weird fantastic. I think we're gonna be
facing this for a while. So I just have to keep doing this Down delete. Okay. Probably just pull this up here. Let's just live up there. Just live up there
should be fine. Okay. Moving on to
the next piece. Okay. I don't know if it's on there, I know if it's camera based, it should don't take
too long to do. So we just need to do
something on the edge. Pretty much like so. Let's go down
instead, let's just follow it in that fashion. Okay. Like so should be fine.
Move down to the next one. Okay. That is fine. Nope, wrong one.
Here's the right one. So kind of directly on the edge. I need to get in
closer on this and do this properly like sushi fine. Okay, here well. Here, I think that
sets it for that rule. Let's go to. Let's
just do court first. Let's move to the next rule. Okay? Tex should be fine. All right. That should be fine. Moving on. Like that should be fine. Move down. Let's make sure selecting everything
that needs to be selected. Okay. All right,
that should work. Okay. We do cuts. We still have a few more to go. P process, so I'm not doing
anything fantastic in here. I believe that should be d one. Okay. All right. That is fine. Okay. Move this down. All right. Okay. Put the cords. Move to the next one. All right. Okay. Oh, that's fine. Undo that. Okay. That is fine. Okay. Do you coats? Oh, I think I
am one move this to the end. Now, do you coats.
Yeah, that's fine. Okay. That that's fine. Okay. Ducts. Move this to the end. All right. Okay. Cuts, I think on
the last rule now. Okay. That should be there. Get in there. Fantastic. Almost done. Okay. That is fine. I see that last one,
so those codes. I think I think it's
the menu one I keep. I keep losing that
view for the last one. So let's just quickly
get it selected. I think I accidentally
did something else, so do that. Let's do it again. Okay. Pots. So now we can go and select all of
these, don't fold. For these particular ones, I think I'm going to leave them, should be kind of laying flats like horizontal fashions and that's with
kind of engineer. So that make better sense. I'll do layouts, get them laid out and
probably set them up, get the orientation rights. Almost done. Okay. So I'll select select Okay. I think that should
be everything. Rent, select everything. Let's get accurately
as it needs to be. Okay. Almost done. Alright, that should be fine. Yeah, I think we are
pretty much good in here. Let's do UV check
pattern. Let's see. I think we are pretty
much fine in here. Okay. Objects mode. Let's hope we don't have weird
naming in here. Fantastic. Fantastic. Maybe what we should do is try doing delete by
type history in there. Then let's see if I should
fix. Still not fixing it. Great. Deletes merge with roots, okay? That is fine. So the next lesson I was going to carry on and
then keep working on it. I'll see you guys in the
next lesson bye for now.
92. 90 UV Unwrapping Long Cage Accessories In Maya: O comb, guys. So in
the previous lesson, we kind of started
the ven wrapping, so we are going to continue
on. Let's hide this. Move to the next
piece, solo this out. Let me see if I should
delete this first. Maybe that should
okay. That works. I think the idea
would be to delete the weird name in the first before doing any v and wrapping. Let's start by doing
camera Bz Okay. Let's find a good
spot to layer UV SM. I think we can just
do one at the back. I think somewhere around
there. Does it go around? Yeah, that goes around. Fantastic. Okay,
then I think I'm going to do it's not that deep. It's not that deep, so I
think we should be just fine. So let's do cuts.
Let's do unfold. Orient plots. Let's get the treating
out a bit more. Treating out a bit more as
well, select those again. Check a pattern. Let's
see what we get. Okay. Let's see. I think for the most
part, we should be good. But most part, we should be
just good in here. All right. Go to isolates, high darts. Deletes the naming in there. But maybe she just go in and delete all this weird
naming in there first, it feels like an extra piece
that is just extra step that just feels a little too annoying to kind of just do
after or before, just to avoid any
weird naming issues. So let's do that now. Okay. Fine. Okay. Well, almost. Most seldom
moost done, not almost done. See quite a number of them too. I I'm sure there are
faster ways of doing this. If you need a faster way,
please do let me know. Let's try and get Okay, I think I didn't do
that correctly enough. I'll save my file. Okay? Leads. Okay. That is fine. Just a few more, and we should be good in here. All right. I think we should
have, get a good guess maybe ten more of these to
go. So let's do a counts. One, two, three, four, five, six, seven, eight, I think nine. Okay, you're quite
more than ten. So I think a round
number of 15, I guess. Just to get this weird
naming out of the website on it starts fixing
the name again. Okay, so let's save this. Alright, so that weird name is off was it going to
kind of work on it again because we're
going to create a pose. So I was going to come
back and then create a pose and export
them out again. So maybe we doing this again. Let me save this once more, then let's isolate
gets in there. Let me select the mesh
itself. Camera base. So the perfect place to have
this sim line will be doing something across that goes
across the entire mesh. Something like so how do cuts. This one is actually
quite easier to kind of f food Orient fantastic, and then we should be good. Okay. I hide this. Let's move
to the next piece. It's for the inward part. This should don't take
too long to get in. So let's just select the edges. Okay? Move to the opposite
side, select the edge. Alright, opposite side,
select this edge. Okay. Like so. Where do we need to be? Yeah, that should be fine. Bots fantastic. I should have undo that. We needed to start with this. Let's see if we still
have this edge selected, I lost them lost
them. That's fine. I think I'm going to
figure out a different way of wrapping this monitor. So let's like so. Yeah, like so should be fine. So if we do a cuts, select this, we do unfold, you get something like so. I think it's better. Let's just continue
on in that fashion. Okay. Cats. So that should be fine. To coats Undo that. Let's do cuts. I'll select
all of this fold, orients. I would like to lay
this horizontally and then does give anodizing. Yeah, it should be
fine. Just fine. Alright, that should
be fine. Okay. I'll hide that, move
to the next one. Okay. I would like to try
something on you. Let's see if that's
what actually works. Let's do camera biz. If we do unfold now, We get something
completely flat, let's test this out. Let's see if this would work. F is a little bit old. It's likely let's do a
test for one of this. If I do let's say
I do something. So let's find where that is. And we'll do cuts. Trying to figure out something that'll give me cleaner results. Yeah, I think this
one more similar. More closer to the shape. Feels more closer to the shape. So I'm going to just
continue on in this manner. Okay. So you need to be
directly on the edge. Alright. Let's move to the other side. So the idea is to kind of hide where they seem supposed to be. Yeah, I think you should give us a much better result
when we bake. Okay. That is fine. Okay. I put him on just repeating
the same thing, so. This should be fine. Okay. The idea is to hide the same. So I think we are
doing just fine, hiding the same outdo cuts. Okay. That should be fine. All right. That's fine. Okay. That's fine. I think you said I will work just fine for
what I need it for. Move this along. Here, I think that's
in the right place. Also on your right place.
This is like the final one. So for this butler
one, I'm going to hide it on the back side instead. Right. Okay, pots. Then select the entire
out and we do unfold. Okay, then I'll do
orient the out. For this one, like
extra work just to get the position a
little bit cleaner. So this one we need
to do quite a lot of manual work just to get seats feel quite clean in
terms of their orientation. Okay? Okay. No, there's not
entirely necessary, but I just want to
get them quite clean. I need something to be
a little bit cleaner. So we can kind of optimize
the piece quite well. Okay. All right. That should be fine. The two. Yeah, this
should be fine. Yes, well, Okay. That is fine. I think
I missed one piece. All right, select all of this. Let's do the up again. That should quite organize
since Ib Alright. Fantastic. So I think
we should be just fine. Okay. The bells, bells are front
view the front view. Select everything camera based. Yeah, don't worry this one
this is not a complicated one. So what we just do
is find a good edge. Okay? So find a good edge
there as well. Then we'll just do cuts. I think we can I've been separated out already,
so that should be fine. Then let's do, let's see for this shape I think for this, I don't need to care
too much actually. I can just do directly in the middle and then
we should be good. I pots. Okay. Now for this, we need kind of
a little bit of extra here. All right. Yeah. Basically
trying to hide it. I'm basically trying to
hide my sem also, too. All right. I think this one is
buried in a pots. So I'm trying to hide this.
That's the backside now, trying to hide my seem edge. All right. I think we're on
the right track. That should be fine.
That should be fine. Okay. All right. I need to get in the cuts get my in the. Okay. All right, so close. Get in there. All
right. The cuts. Okay, fantastic.
So I'm just going to select everything do on food. Okay, I think for these bells, I need to do a little
more work in there. I need to do a little more work, most especially for the
combo side, actually. But the extrasm I'm going to recruit is going to
be on the back side. So I'll select this way. Okay. I need to make sure I
follow line properly. Okay, I think you can quite
easily, that is fine. How do you cuts. I'll do yeah. Okay, and it should be
somewhere around here. So let's do all here. We cuts to close this. That is fine because
we are kind of hiding this at the back side,
so it should be good. One here. Here. That's fine the corresponding
I think should be this, that should be it.
The cuts right. Select all of this again unfold. Green take too long, so make adjustments to them. So for this, just gonna
get this vertical instead. So be vertical instead. Okay. This as well also
to get the particle. Seems well. Okay. Yeah it's perfect. I'm set
everything now and then. Okay. Fantastic. So this
should be more or less there. Let's see what we get. This is fine. The front view, you don't see the
same line that much. Is precisely the general
idea for this. All right. I'll hide darts. Okay? Diverse wouldn't be
too much of an issue. So here a few things we can do. Let's start by
placing a seam here. Placing another
seam here as well. Okay. Yeah. Yeah. And then we
can do cuts Okay. I think we might
need to might need to do another think
that won't work. Oh. Let's start unfolding this. Okay, yes, yes. I think I
know what I missed now. Just to see if this goes around. Yes, that around quite
nicely. Same here as well. There fantastic, so, this
is pretty much what was missing to cots Unfold. Okay. I think we need to do a little
bit more work also too. I see. It's gonna be like
an actual vessel. Cats and seem should be
nailed in correctly, I think. Damon actually goes
around way too much. Let's see if we can
do one around here. Here are sell pots, seleg food. Perfecto. So this should be
just about what we need. Let's do oriented. Okay. Select this. So the most part that's
going to revisible is this. So we might need to think we might need to stick
something together. Let's rotate this this way. Rotate it this way. Select all of this again. I think this will
also still work. I might also just work. I might need to stitch
these parts a little. Let's select this edge all the way down here and
I'll do stitch together. Okay. I like this edge. How
do we stitch together? Our food Yes, this
might look rather odd, but I think it will
work just fine. Orients. Because it's going to allow
let me move this this way. Tied fabric to kind of
be aligned properly. I think we can stitch
this also, too. Stitch together. If it doesn't work correctly, then I'm going to do it.
That's completely fine. But I strongly
believe this should work just fine on fold. Select these two, please.
Let's check this. So, this is pretty much
what I'm looking for. You can see how tiling
just goes across properly. So you should be
fine I'll save this. Okay. Let's save this. I think one I may have mistook it gonna be covered up most
of the time, so no issue. So yeah, yes, let's hide
this to the next one news. So we can do that
in the next lesson, so I'll see you guys in next
lesson by for now. Okay.
93. 91 UV Unwrapping Torso Accessories In Maya: Ob, guys, let's carry on
for where we left off. I work on the nails. That's the next piece
for us to work on. I'm going to start
by let me go over to transform food
arrangement and layout. Let's start with camera
based. Isolate this. Think when a good place.
What we're going to do in here is create a seam underneath this.
I'm going to select this. Then I will move this back, select all the way
up. All the cats. This is precisely how
I'm going to make the UV seams across this. Right, selecting a go way down. I believe that's the one cuts. Next piece. Okay. So the idea is also to add sim edge coats I think already around
the back side now. Okay. I think I can
do it here instead. Okay. Front work just
fine around the ear. The cat good way down. Cats think on this side, I'll need to hide that coat
at the back coat as well. Okay. We can keep this on this edge. It's not going to be directly
visible on our camera view. Is the general idea for this. Yeah, I think I've done
the c. I think it should be here's last piece. Okay. The cuts the entire piece. Less unfold this first. I think I folded this correctly. Then we do layouts give
it to run through. Giving it to orient. To the orientation,
I'd like to get them vertical rotate this way, select this rotator as well. Select all these
layout All right. I think that should
be just about right. Just kind of see apply Oh, there's a major issue around
here stretching around here. So we can also check
this in just to show. We can see some stretching way too red, too much
red around here, so we need to tighten
that up a little more. Like try to fix that. So much
desire to fix that would be to add just to add extra edge. I think I can quite
easily do it in here, so Yes, I think spacing, I think around there
should be fine. Okay. Actually, I cannot relieve any stretching we have in there. Okay. Everything selected,
I'll do cats. Select all of these unfold. Unfold one more time.
Orient stretching also look in correctly. Let's go in and then test this. We get something way better now. I eliminated most of the
redness, so this is fine. I should work just
fine. Save this. Hide that move in next piece. Let's start by
doing camera this. Let's get in this edge. Get this edge as well. We also need to get let's see, I think we need to get Let's
see. Let's do it cut first. Next piece. I think for this particular one, I can just do something
around the coats. That should just be
pretty much fine for it. Same here as well. Let's find a good edge
around the coats. Like the entire
out let's on food Orient Let's just
check if we have any, I think some stretching around here, we can
easily fix that. For this, we still have
some measure of redness in. Let's just get some
cinder coats across it, so just relieve that
tension. Whole lot more. I'm going to do a coats here. And fold, that should relieve
the tension quite well. At this point it feels
rather old. It feels. I think I'm not going
to leave this as it is. Let's go back to do it because
I think this is just fine. Shouldn't be too
much of an issue. So where we have an issue is
around this piece in front, so quite easily fixed out, we just need to add Let's
do it here instead. Add the coats here. And
if we fold just fine. So that should free
up the tension. Different up tension,
yes, spin up retention, a whole lot more so I'm going to select this get proper
orientation around there. Okay, select the entire
thin. Let's do layer. Okay. Okay, we still have a bit some tension in
and around there, another way kind of fix this
tension would be to add a cuts around from here, old way old way to the back ext here also all the way to the back. Okay. They will do coats I think the cost is way too much. That's way too much.
But at the same time, it's not really going
to be a major issue. Let me unfold this
Unfold this also too. Let's check this again. Just checking to see
if there's any strong tension in and around there. I see. Male tension
is just around here. I think we can just
do some slight codes. So slide codes should be good enough to relieve
any tension in there. Also, too, I would
like pace mode, isolate it slid this piece so I cannot work on it properly. Since can relieve
some tension in this. There's et's cats. Ideally, mom
supposed to put that first Let's do cats. I'll repeat the same
on the opposite side. I rest up on the opposite side, okay? Am I doing this right? Okay, how do you cut? How would unfold this? Just a cat in there that
should relieve the tension. A lot more unfold this. Let's go and then
check. So you can see how that kind of ease down the tension so I think
this should be just fine. Okay. We can hide this now. Next piece, isolates, right? For this we just need
to kind of go in, get in on the edge. Gets in on this edge as well. Heating on the edge. Same also on the opposite side. I'm trying to
figure out where to add need one code
that goes across it. Maybe we can add it at the back. I think a better option
would be on the side. Let's add it on
the sides instead. So Okay. I would like so. Come on. Supposed kind of bad I'm supposed to get
something be in there. So lost all of that. So let's just kind of quickly
do that again. Okay? Side. Don't take too
long because we already nobody's lay this on. Yeah, and then move
to the opposite side. Yeah, as well as the
courts food. Okay. Not entirely sure if I need
one around here, though. Let's just kind of orient this. I'd like to get this this way, select out. There
shouldn't be too. There shouldn't be
much tension in there. I think this should be roughly
around it. Let's just add. I'm going to do trapina
mapping in there, so let's let's just do some
separations in around here. As well be cut. Don't do that think should be this and this. Let this to unfold, right? So we'll get the proper
shaping in India, but now we need to kind of
an the orientation for it. So let's rotate this way. This way, select all of them. Let's right. Such a point. Okay. I think it's all good.
Move to the next piece. To chains. This one seems like it's a mess. So let's do camera biz. Pretty much just going to use the same method we
used earlier on. So I go to the back,
start with this in here. This one might take
a little way photo. Okay. The code So swell the cuts. Then we'll do another
one that runs. It's not supposed to run
across the entire mesh though, it should be from
year would be fine. We cut right. Then let's a as well. I hide our same line. Trying to pretty much hide
where it seems supposed to be. D here. I did it here. We can the same here. Hi that here. We can do it here. Hide it here. Fine. Let's through on
this center roll. Okay. How do cuts. The last
pretty more the longest. Let's just go to
the opposite side. Let's do two. Okay. I think that should be fine. The cuts on the opposite side. At its fine fine. The cuts. Like the entire piece,
let's do unfold Orient, I would like to get this fic
in in the same direction. The vertical. All right. We check this in at. This is pretty much fine. Doesn't need to be
extremely good, it should be fine
for what needed for. Be quick sieve. Okay. B side, this move
to the next one. We have a number
quite a number to go. This book shouldn't
be too much fans should do camera based. Select all of these, unfold, then layout then so in there. Still have like
one, three, five, six, seven, eight, nine, ten. Pretty much 102030 its plus
around figure pistols. Also I'm sure you guys get the idea of how to
kind of do this not seeing too complicated. Since I'm kind of
showing you guys how to kind of get it done, I state this front. Is going to be the last
piece for this lesson. So camera based. Okay. So like I said
before, the idea is to hide where it seems to be. So I'm going to hide it
roughly around this edge. This one is going to be quite
easy out kind of on food. Edge. No, I think
that's the wrong edge. Supposed to put it where not
going to put that visible. I believe around there
should be going around it. You need to be sure
it's going around. Yeah, I think that's fine.
Make sure it goes around. Yes, it does. Okay, it
goes around as well. I think we have the right angle to it now so we can
just select it. This went around also too. Here that went
around here as well. Okay. To do cots. Then let's get into the
rest of this piece. I think we can find one
that goes around, too. This one can go around. Let's confirm
those, that's fine. This would be
directly on the back. So like so. So pretty much trying to hide where
the seam is supposed to be. Here as well. So I
should go around this. Here does all the coats. Then we have the final
one at the back. Okay that's fine. Cats I'll select the entire piece, and then we can do on fold. Okay. Orients longer one
should be horizontal. Only what is vertical
should be vertical. And so far, I think we
have that arrangement in here the entire out sin
I'm going to lay out I think there are a few
ones we need to lay flats. Let's figure out where they are. I'm going to lay this horizontal I think we can just quite easily
select them in her Okay. This ones this two supposed
to be arranged vertically. So let's get them aside, and let's give them up
vertical treatments. Okay. Then everything here should have that horizontal treatments. Okay. Let the entire out
in again. Let's do layout. Let's see if there's any
tension in and around it. I think for the most
part, it should be fine. So we're going to move on to the next lesson and then work
on the rest of the piece. So I will see you guys in the
next lesson. Bye for now. And
94. 92 UV Unwrapping Rod Base Accessories In Maya: Welcome back, guys.
We'll come to last section of we're
working on the UVs. So let's move on to the next
piece. This is the next is. I think this is for the Okay. Here the UVs in there
should be fine. Probably just some
orientation in there too. Come back to that. So
let's just isolate this. Okay. Let's start with
camera biz. Okay. So generally let's kind of hide where the
same line should be. So I think a good
list hiding it. I'm thinking of hiding it directly somewhere around there. Somewhere around there
should work just fine. So let's hide it in here. Okay. That should be fine. Right? Here as well. Here also. We have this inner piece. Let's get in there. I think for this do we
can add this here also. Let's do as well, right, then we'll do
cots the entire out. Let's do fold. Okay. Let's do orients. Let and then starts getting
proper orientation in there, so this way orientation should be kind of
pratical instead, right? That she fine? Okay. Take the entire outin check if you have any
stretching in there. I think we're seeing mostly I think this white
should be fine. No completely white,
though, get some red there, but it's kind of faint, so it's not that strong, so it should be fine. So that should be just fine. Let's hide this. Let's
move to the next piece. Okay. I let a quick sieve. Then let's do camera
biz. All right. Et's start from this ring in here start from
this inward ring. Front, I'm going to hide
put one across that. I'll do one year as well. Okay? Let's get in. Let's put one year here also. Right? For this, let's use
let's see where that is. You can do that. Let's use
the one just below it. Here, that should be fine. This this here also. The only thing that's
going to be remaining would be this shape. So we can do the general idea is going to fied
where that should be. Let's first do cots let's
see where we can hide. I think we can hide one
here, go do it to the end. Here we as well. Okay, that should
be fine. We do cat. Like the entire
piece has to unfold. Orient cannot see which one we can actually set horizontally and then
vertically. This is fine. This is a bit odd. That's rather odd. Now, this one might be an issue important. Importing back to Zbrush. I might be an issue
importing back to Zbrush. And see Curry see some broken up mesh in there that is not
looking too good. But at the same time, at the same time, we can
get away with that by just baking it inside of
Marmoset Toolbag. But this geometry is
not looking too great. So let's try and fix the issue that
we're having in there. And it's just a vertex issue some detached tess in there that's why we
are having this issue. So let's isolate this. What I'm going to do is
to go over to thesis, select the entire arts. These are odd. Vertex, the entire arts. Let's go to merge vertices. Let's go to option. Do that. I need to
select them again. Okay. I think I should temporarily
hide that for now. Spread the entire vats. Go to the option.
Okay, let's do mage. I strange. That is quite strange. I think I might need to
kind of separate this out. If let's hit smooth on them,
let's see where we get. Okay. Let's say the loop. Loop is not even going across, so it's definitely
an issue there. So I need to kind of separate
these apart completely, let's separate them apart, so I'm going to separate you can see how they are
disjointed separate them out. I'll do combine.
Then let's isolate. Then let's select diverts. Okay. I think I need to kind of reduce the amount we have in there. So let's do 0.01, apply. Okay. So if you should smooth
this now, perfect now. This is actually working now. It's working just fine now. Because if I smooth this, we are getting good results now. So we need to kind of
measure this back Select, select select this
wood and control, select this and we combine so the name in
the stone cage hold. Probably copy that name. Combine Gilbertypt Soon good. Yeah, that's fine. So I'm
going to move this back up. Go back to our UVs And then deletes U visas issues. Delete those. Since we're also in here,
I'm going to select this gets an
orientation for them. Sets. That's fine. So we need to redo this again. So if it's smooth
cannot select them, then I'm going to do camera biz. Let me move this out of the way. So Importing this back into Zbrush is going to be an issue, so we're going to be an
external software set to back. So this is one issue, I think I should kind of
put an indicator there. Let me put an indicator there. Let's that's call mesh ish. Okay. I think that should be
a good indicator for that. Here is the front, so
let's do the UVs again. Let me start let's start
with one. Let's see. On food. Fantastic. We still
have that weird issue in there for some reason. Phase like this might not
be going away anytime soon. You need this combined
as one single piece. Sometimes girls encounter issues like this, even though
you do everything right. Usually points or vertice
is not in the right place. Let's do the touch
the touch components. That it? No. Extra pass. Et's start with one. Let the entire vats into the option versus 0.03 instead. Apply delete this I need to be sure if I'm not
sure this has worked yet. I think I need to
kind of combine this. Let's start by
combining this again. The main issue is
from around here. So let's do I think I don't need to
kind of select the tios, and also need to kind of
select just this region alone. Then apply. So wrap this working correctly. Now if we do this again, try to wrap this again and then we get the
same is that means the mesh is kind of what we
call it completely broken. Okay? So I'll pretty much need to
do the same for the others. Let's isolate them. Combine them first. Fine. Combine. Fine, right? Just delete any UVs
we have in there. Okay. So Vertex mode, select
all of these vats in your Let's just do a math since we have a
threshold of 0.3 already. I Okay. I believe it should
be the next one. Let's just select most of
the regions that we need. All right. I'll save this. All right, so let's go back out, select those three again. Or ether select the entire four. Let's start by doing
UVs camera based. And I have this kind of crazy same issue that
means it's not going to work. So let me do it
CT in here first. I do cuts. When I select. Let's do the way
here. Okay, let's go. Let's do let's also
do way here as well. Then we'll do CTs oh. Select double click
on this as well. Let's let the UV shell. Let's move the UV
shell out of the way. Let's unfold this. I think the mesh itself
is completely broken, so I don't think there's much I can do to actually fix this
mesh is completely broken. Set me back, delete
this entire ring. At the same time, I do
not want to do that. So I think is going to
pretty much use it as it is. We're going to uses. Let's just gets an edge across. The issue that we can't
import this back to Maya Zebra without having
any importation issue, something about topology has been changed, blah, blah, blah. So I'm just going to
pick this externally. And we should be good. So let me select the entire
piece on food. Okay. H. I'll select all of this. Bien. There's a lot. I think I'm missing fold
again's unfold again. I think there's something
I'm missing Prien. Okay, let's get them
combined with the others. Combine by type history, select this also combine Okay. I'll save this. The tire outs in the right?
I'm going to hide this. Let's move to the next piece. This already has
something in here. But I think one of the major issues
I might be having in here is the orientation. I'd like to get the orientation. This majorly everything
facing vertically. I'm going to select all of this. I'll start by doing
orient. Okay. And I'll do layouts.
95. 93 UV Unwrapping Rod Head Accessories In Maya: Come about, guys. So in
the previous lesson, kind of, you almost kind of
wanted to start this piece, so let's get right into it. But I would like to change
your orientation to be something vertical
instead of horizontal, but it's kind of mixed in here, so I don't really want that. So how do we go
about fixing that? I'm going to select
all the entire shell, and I'm going to
do stack similar. So basically, whichever
UVs is kind of horizontal. It's going to kind of
pack them together. And whichever one is
kind of vertical, is also going to try as much as possible to kind of
pack them together. And then we can now go in
between them and then begin to get similar vertical
orientation among them, and then unpack that or
yes, rather, rather, we just lay them out also on a zero to one space.
So it's almost done. Yeah, something
pretty much like so. So I'm going to
select all of this. Let's do Orient. Okay. I'll select all of this in here. I'll do orient as well. Okay. Oriens get them at least facing
in on specific direction. I think we can pretty much do that for the entire in orients. All right. Perfect.
So let's select this. Select. Little of this in here. So I'm just letting
know the ones facing the kind of lay down horizontally because I like to make them face
vertically instead. Okay? Yeah, well. All right. Okay. So I molding shift
just to get them aligned to select them
rather. Select of this. All of this as well. Okay, then we do let's
rotate this 90 degrees. Okay, so we are pretty much
most of them kind of facing on on a vertical kind of
laid out in vertical axis. Then we can do layout for this. We're going to be styling a fabrics a fabric
pattern in there, so we want most of
them to be facing the same facing in
spacul vertical axis. Let me go when it's done. So I think something pretty much like sous should be fine. Now this, for example, not entirely sure what's Oh, we just needed to
do that orients. Let's find space for this. I'm man to unpack
this again, though. So we have this. Let's see if there are a
few others in here as well. All right. Okay. So unfold right Orient. They need to pack this
again. Let's do layouts. I to kind of get this out for the next thing we're
about to work on. Let me say this here. So we
have this set up properly. So let's do UV tile
or U checker pattern. Let's see. So this is kind of tiling
properly. This is fine. Go out of this. I'll
do a quick sieve. All right. Set this here. That is fine. I'll hide that. Okay, so this now is going to be this piece and
this piece also, too. So let's isolate them. My isolation is now actually in a Let's control one to
isolate select camera Bz. UVs, let's move this aside. Alright. Okay, so this is what
we're going to do. I would go in double
click on this edge. I need to get this edge across. I think we stopped somewhere. Okay. That is fine. I need to make sure I'm selecting this on
the right angle. No, that's the wrong one. Okay. Oh, I think that's
just the one we needed to select to select this. I think this goes
across the entire mesh. Yeah, it does. Okay. Yeah, that should
be fine. I'll do another one around her or so. Let's see what we
get. Okay, I'll do cuts, move these out. Seems like one of you didn't go across the entire out scene. I'll double click
on this isolates. I can't figure out if
it kind of went across. So let's do food. Okay. What a lot of weirdness
happening in here. Let's clean this up, pots. No food. Well, there's quite a lot
of weirdness in here. That does not seem to
be working fine enough. So I'm going to undo
that a few times. Okay. Let's start with
the center piece. I need to redo instead. You know, can select the edge. We can just quickly
select the edge. That's not the edge that goes
around. It should be this. I'll do cuts. Since the cat does not go
across the entire outing, or I don't cut yet. Cuts. Okay. Like so. Alright. Select
this. Select this. You should just be gonna
unfold this street up, so let's unfold this. Yeah, I think this is way
better on food this as well. Now, just some broken
piece in here, some fools. This may also be an issue
baking this, but that's fine. When it's an exn baker, kind of we can't kind of get this to put
back into Zbrush. So let's change the
orientation for it. Okay. Let's move to
the other piece. So the idea is pretty
much the same Okay. Let's find something
that goes across. Let's do from around here. This one should go across. Okay. Then we'll do cuts let this to unfold Orient this way, select the entire piece. Lots. I think so far, this
should be fine. Okay, this should be just fine. Bring everything
back outside this. Show up parts.
Let's get in there. Alright. Let's isolate Camera Bz. The idea for these two is
to hide where UVsin is. So let's do one around here. And here as well. Con do that. Let's
get in some more. Okay. Get in here. Do that. Let's do
this edge instead. Get into that 90 degree angle
and then grab this as well. Pots on food. Orient lay this I need
to rotate this way. Let's see what we get. Yeah, I think the parts need
to free this a bit more. I too reddish. It
to be too reddish. So maybe we should we can lay let's lay our
coat somewhere else. So I'll select this op. I'll do stitch together. Okay. Then instead, I'll
put my coats here instead. Cuts selects orients on food on food. Let's
see what we get. Yeah, I think this is kind
of quite manageable now. Let's just repeat the same
on the opposite side. Okay. Edge more double click, stitch together.
Then codes here. All right. Select the
entire scene unfold. OriensRslt and then
we can array them. Select this. Let's
get this direction. Okay. That should be fine. Stay the entire piece. Lay out again. Okay. Yeah, this should be
pretty much there. I'll hide this. Let's
move to the next piece. Okay. Let's isolate. There's quite a lot going
on in here, make it work. So I need to hide where my
sim line is supposed to be. So let's start
with camera based. I'll double click on
this isolate this alone. I would do a cut around here. A Let's get in here as
well with the cuts. Select it, put it to
the side on fold. Orient. I think as
far as this goes, this should be just fine. For the most part, this
should be just fine. Now for this, let
me select them. Okay. Control one, Control
one again two isolates. So the idea for this will
be to hide our same line. I think if we sell, okay, yes, we can do something
of this nature. Okay. We can just do in here as well. Et's get some clothes. Okay? Sus well. Alright. Okay. Let's go in on this side. Gen Danguo. Here, that's fine.
Okay. That is fine. Here, as well. No. Let me get better
and go to this. All right. Okay. Alright, I'll do cuts. Is there another piece left? I think we've kind of done the entire outing, so I
think this should be fine. So let's select the entirety
of this and then we do on food orient. So let's get proper
orientation in here. Let's do stack similar. I'm just going to do
something like so. I think we just have to
pretty much do this manually. All right. Should be fine. You as well. Okay. Okay, we have to there, so
let's select those two. Okay. Yeah, that should be
fine. Here also too. All right. Here, we have to the Alright, so I select the tios and Julias. Done, so check a
pattern. Let's see. Let's bring the other one
out also too as well. Alright, it should be just fine. Save this scene. Okay. Hide. Whoa, now, this is quite
a lot happening in here. Let's do camera Bs. They're pretty much empty, so I'm just going
to unfold this out. All right. How hide Object
mode, hide dos Rod. Okay, this is the front.
We just need to kind of create a coats at the back. The coats here. Oh, we already have. We already have that already in here. This is a weird. Let's get in close and
let's do camera bis Like, so the cuts selects fold. This one shouldn't
be too difficult. You're pretty much
the same d one. So let's lay this out
properly like that. That should be fine. Okay. You're awesome. I'll hide this let's go to the next piece. This is for the
wings, camera biz. For this particular one, I think a preferable
place to just put this cut would be
around this edge. So this will actually should. Okay, we definitely need
something that goes across. Most of this doesn't really
go across that well. But I think this one in the
middle should go across. Okay? Let's see, it's
definitely meta pie. We can still get a
cross in there since I'm going to be buying
triplanar mapping for it. Let's see if we can get something that
goes across in a loop. No, this one the loop in here
is not looking that great. What about this not good enough. I think it's just this one
that goes across perfectly, so we can just use this instead. So this kind of split this in
the middle, which is fine. And those do cuts. Okay, hopefully we don't have any weird shaping in
there. Let's do unfold. Alright, let's stack similar. Stack similar for this because
most of them are actually let's do orients layouts. So we need to kind of
get the positioning of this somewhat similar to somewhat similar to what we have in our viewpo
similar angle like so. Okay. Like so. I like this. All right. Something as close to our main
shape as possible. Okay. Would you. Yeah, I think we are
pretty much there. He, for the most part, this
should be pretty much fine. Alright. Yeah, I've been
looking at this now. I think we can still make this slightly better in any way. But you just figure out, Okay, so let's make this quite better and try to hide our
same as much as we can. So this is what I'm going to do. I'm going to select
here selected. Okay? I'll go all the way. Double click. No, I want
to go on top instead. I want to go on top instead. So let's do this again, select. Okay, in this direction, it should come on. It's not gonna follow the
direction I need to follow. So let's do this. Let's start
from this angle instead. Okay, so have to kind
of do this this way. Okay. Then I'll do stitch together. So let's use this as
our first tests fold. Alright. Let's do orients the orientation
is not properly sets. Let's do this manually instead. Yeah, we can just get this way instead. Yeah,
this will work just fine. So we are pretty much
hiding our same lines now. So this will work just fine. So let's find find this all the way all the way down here. Stitch together. Okay, let's just
ignoral that for now. Let's move to something else. Here. Here, as well. Okay. All the way down here. Alright, let's stitch
together. That should be fine. Yeah, I think we'll
have one more. Okay? That should be fine. She
not get the idea now. So if I go all the
way down here, I should kind of respect that direction. Shish together. I'll select these
three I'll do unfold. But Okay. We do orient Orient orient. I think we just have to
manually orient this as well. Let's get this facing
down this way. I think a more neater way to
kind of go about doing this. All right. So that will completely hide the seam on the top. Is fine. W you have put the
seam down here. It's not going to be
that much visible. Okay? Now we have another issue
to actually deal with. Definitely another
issue to deal with. We might need to cut
this up in here as well. That's why it's important
to kind of check this on to see
distortions in there. So we cannot go in and
then actually fix them. So we have that to quite handy. So pretty much what I'm going
to do is to select let's do from here all the way Okay. Then we'll do outdoor cuts. So let's see how
that helps unfold. Okay. I definitely freed up
some tension in there. Say for the parting,
it's quite intense, but I think we can make it work. Shouldn't be too much of an
issue we can make it work. So I'm going to
keep these cities. So let's just do the
same for the others. Okay. Oh, I think we can quite
clearly see it here. All cats can select this all here Select this all the A do cuts. UVel select the
entire UVSal of food. Okay. Then I'll just layout again. Yeah, I think we
can work with this. I'll save this again. Okay, I'll hide this. Let's move to something else. Okay, so this might take maybe
not so much time though. I think we can just quickly
do this quickly do this. All right. So our
Sim edge should be Let's Let's start
by doing camera based. Okay, camera based. Let's find a good angle,
kind of lay this in. Let's do it around here,
that should go across. Just a single let's do
something around here. Check if this goes across. That goes across, that's fine. Okay. For this, we can do
it can select this loop. All right, that should go
across also too. Let's see. Oh, no, that one is wrong place. It's supposed to be inward. Okay? You select Oh,
let's just do cuts. Okay. Then we'll do food Orient. Okay. So let's see where this
is, the inward parts. The the outward parts. Let's get this this
way. This way. I understand what to
do kind of manually. So let's do so. Like so as well.
Okay. All right. So I'm gonna be slightly
tricky but let's just do something more or
less of this nature. Okay. Select the entire piece. Y Okay, let's check this. Let's see what we have. So remember, we have an
arrow going in here, so we can I think we can try and see if I can kind of create a crack in there. Just go to relieve this
redness tension in there. I think we can pretty much. Let's do that instead. Edge mode, select it. Let's find where it is. Let's start for.
Oh, okay, yes, yes. We can just go all the
way. We can do a cuts. It's not going to
be that visible. Et's do a bit more. Let's see how far
that out this is. Okay? See buried in the
les cats select on food. Rotate this way. Check this out. Okay. Still some
tension in there. I'll do all parts
in here of food. So that should completely
fix that issue. Alright, rotate this way. Let the entire out
in, let's do layout. Okay. I think this
should be fine. Yeah, this will work just fine. So the next lesson,
we're going to move on to the next piece. Se quite a number of
piece to go in here. So I'll see you guys in the
next lesson by for now.
96. 94 UV Unwrapping Hand Plates Accessories In Maya: Right O comber guys. So let's
continue on from left off. So there's still
a few number go. But I think we're almost there. Maybe two or three more sections of storis on this and then
we should be good. So yeah. So yes, this is
the why do we have just one single piece That's
not one single piece, so we have this Okay? I think this okay, that's fine. Right. Let's do camera based. Okay. Isolate control
one to isolate. Okay. So where do we stamp
in the UVs for this? I have an idea. Let's do I think we can set let's
set one on the side. So I'm going to select this to the opposite side.
Pb click on this. Then let's do a pot. Okay. Let's move
to the next piece. This one shouldn't be
too much of an issue. Just find something
that goes across. So how do you cut. Then select the entire
outing and then do unfold. Okay. Ends. Yeah, I think this
should work just fine. So let's do layout and let's see how this is laid
out on our screen. I think for the most
part, this should be, you have quite a number
of redness in here. Another way we can
actually go about it too. Another way to go
about this can do. Let me just thoughts. Two stitch together. Okay? Then let's add the
look at the back side. So this is the front. Let's add the look at the pots. Select fold. Foods rather odd because the textile density is
no longer the same. Textile density is
no longer accurate. So when I don't want that I want the textile density to be
as accurate as possible, so let's just do in
the middle instead. I shouldn't be too
much of an issue to kind of do this
in the middle. Let's do cuts in the middle. Let it to unfold. So you kind of, like, pretty
much the same size now. Extra density for both of them now is pretty
much the same size. So I'll select them too. Okay. I think let's check
the UV distortion. I think it's more or less fine. I'll work with this, right? So let's move on to the
next piece. I'll save this. Okay. Then we'll go out of
isolates, hide this. Next piece, solo camera based. Same method actually for this find the loop that goes
across the entire piece. Okay. Here as well. He also here also ducts food Orient. Yeah. I think I'd like
to get this particle. I'd like to make sure
all of this kind of orange vertical instead. So let's select these three. Okay. Let's orient this way, select let's do layout. Right? Check for distortions. I
think for the most part, this should be more or less
there except for around. I'm just going to
be cut from select this we should be fine? No. Let's do that
again. Pick out. Select this. Here something
pretty much like so. Move to the opposite side. How do we here should
be fine cats on food. Okay. Dayot. Here, that should
be roughly fine. Cut of isolates, hide this
move to the next piece. Okay. So shouldn't be too
much of an issue. We can just do camera
based and unfold. Is going to flatten
out the entire piece. Orient. So I like to
properly orient this again. Let's get it this way. Get this this way. Move this aside. Get this way. On fold. Let the entire out layout. All right. Save this. Okay. That is fine. Next piece. This is for the boats. Let's do camera based unfold. Usually like the most
one do and get in place. Alright. That should be fine. Hide those. You have that separately on defense
groups, that's fine. Let's move to the next piece. Isolate camera based. This shouldn't be too
much of an issue. We can just find that angle. Yeah, that should be fine. Okay. This I do. Yeah, I think that should be
pretty much fine. Okay. Because it's in
word piece, right. Let's do for this side as well. Okay. All right. Cots take the entire
piece unfold. Okay. I figured this one
might be an issue. So let's see where we can I
think we can bury that piece. Let's do it inward. Let's do it in a need
another across it. Does this look? Go to the opposite side also. Lots Unfold Orient layout. I only close the orientation. So I think I think this should be let's see where this is actually
select this edge loop. I need to select
rotate them this way. Okay. The rest can be in an
horizontal fashion. Let's get the rest horizontal. Or food. Let's select the entire
piece. Let's do layout. Okay. That should be fine. Let's see. Not too much
distortion so far. So this will work just
fine. Okay. I think this should be just
fine. Hide this. Let's move to the next piece. Plates. Yeah, this one
might be slightly ticky because I don't think I doubt if we have very
clean loops across this. We might still need to
make some adjustment also. Okay? Let's just do camera based. We just pretty much need to find something that goes
across the entire thing. Direction for that is not here. Here, as well, not
completely there. Yeah, it kind of merge this so it won't be as accurate
as we need it to be, but let's just let's do a
loop pot in the center first. Cut in a first? Okay. See this spaton doesn't
really go around properly. And Okay. Maybe we can do this.
Let's do one year. Let's do one year as well. How do cuts. Let's see what
we are if I don't fold. Okay. I think that should work. Let's kind of pretty much
the same for the other love. Okay. Then here also. No, that one doesn't go
across, don't do that. I think that should
be fine. We cut also. Select on food. Okay. Let's select the tie
out and then let's do Orient. Let's check V distortion, quite a lot of distortion
in here, but that's fine. We have something now so we can begin to work our way across it. Interesting. But
interesting enough almost have this across. Selects selects select as well. Selects do coats. Okay. Same here also too.
Select all of this. Okay, outdoor coats. It's fine. Selects all this At the codes. Let's go the way here. So goes around
this less selects. Select this way. Codes. For food. Orients Orientation
is not the best, so we need to kind
of manually do the orientation. This way. Okay. Say. Okay. I All right, so sled and tie out and let's fold one more time and layouts. Okay. I'll save this file. Let's go out of
isolates. Hide this. This can do camera fold Layout Almost done. More come back. Here is fine. High dose. The next piece. This one should be
quite straightforward. So let's start
with camera based. So let's. Okay. Yeah. Well, do that do that. Let's do here instead. Opposite side. We just repeat the same
thing on the same edge. Okay. They'll do cats. The entire piece don't fold. Let's do orients. It's really vertically
directed to be horizontal. So pretty much rotates
this way that way. This need to rotate this way. Okay. All right. Slide
the entire piece. As. Right. So the next one
is actually the foot here. I think this should
be, that's fine. Go out of isolates. Then we need to hide this and then move
to the next piece, select Control H to hide darts. Let's isolate this camera based. Let's start with the SL Okay. And then move on to
this inward piece. Okay, let's do COTS. For this, we find something that goes around the entire model. I think this one should go
across the entire model. Here two pots, select
on food. Green. Yes, this we can think I'm
going to get this this way. That's this way as well. So particle, this should be
horizontal, right? Okay. Select the entire piece. Let's do lay Yeah, I think
this should be fine. We check this out,
it's pretty much fine. Let's go out of oulds that. Let's just finalize
with the boots instead on fold layouts. We're just going to
move on to space. Four, six, seven,
eight, nine, 11, 12, meshes, and then we should done and then we can start
hiking process. But I think we're making
significant progress. So I'll see you guys in the
next lesson, bye for now. A
97. 95 UV Unwrapping Foot Plate AccessoriesIn Maya: Come back, guys. So let's carry
on for where we left off. We're done with this
boat let's hide darts. Let's move to the next piece. He let's isolate. I'm going to do camera based. Okay. But lemon is going to be kind of similar to we've been doing the others, is to find a good
edge around this. Something that goes across. The round goes across but
not in the right place. So let's do this instead. Okay, that should be fine. Okay. Now for this, we need to hide. Yes, we can hide. Let's do coat here here as well. I'm just going to kind of repeat the same thing across
the entire mesh. Let's do here so go down. Okay, around here, here also. I think we need to, let's cancel this wireframe. Slide this edge. Okay, let's do cuts. Let's go to the other side
and repeat the same thing. Okay. L should be fine. Grab this as well. Right. Okay. Here
should be fine. I think we're down
to the final piece. Let's get a good camera
and go in there so we can select it properly here. Here as well. It from the keyboard.
Let's go in. Okay, five, the cuts. The entire piece.
Let's do unfold. Orient, stack similar. Okay. Let's do before we do layout. I like to kind of
select these rings. Okay. I'll move
them out this way. Okay. Select rotates, rotates
this way as well. Rotate this way,
this way, this way. Like so should be horizontal, but this should be
arranged vertically. I'll select the entire piece. Is a moment you can lay out and then we should be good and we can
move next piece. All right, that should be fine. A high dose, go out of isolates. Isolate this. Let's start by doing camera based. Okay. Selet a loop. Set another loop in here. Then the same, I
think we can pull the same around here,
like sushi fine. Here also let the loop in here. Loop in here as
well. Don't do that. Let's use this loop instead. Then we'll do it cuts
unfold Ori ends. Then we align this properly. Let's do this way. Okay. Then let's do layout again. Yeah, that
should be fine. I'll save this. Yeah, I think this should be
pretty much fine. Let me try and get the
rotation a bit straight on. All right. So let's go out to isolate. Let's move to the next piece. Hide do camera pase. Let the loop in here. Loop in here as well. Loop across. Let's do the
same for the other side. Okay. Records. Now, for this piece, we can do I think
we can kind of get this loop as well. Here as well. He gets in. Okay, boots, select on food Orient no less
properly arranged this. I would just rotate
this way this way. Like so. For this, let's get this more in horizontal or rather
horizontal way. Okay. That should be fine. Let's do layout again. All right. That should be fine. Okay. I think that should be pretty
much fine the way it is. Hide dose, move to
the next piece. Have we done this red? Okay, I think Zbrush did
this for us so we can just select this and then
do orients and layout. That should be fine. Hide dose. Alt camera based. I think for this, let's just do. Let's just do this. So okay this should work, I do cats do the same for
the for the other piece. Okay. Go all the way to the head of this here as well. We do CTs. For other part we kind of supposed to kind of
a cut also to be in a In here as well. So seems buried in,
but we can't find it. Okay. Around there should be fine. W we cut do the
same on this piece. Okay. So should be fine. All right. Get closed here also. This is any parts we're missing, we can just do that as well. We have captured that part. Captured that part,
too so let's do codes. Let's go to the bookle itself. I think let's just do something that goes across this way. Sell well. So you find the end
of the end of it. Around should be fine. We need just do across like SOPon actually goes across the entire in SO who
needs to do here as well. Here also. It's kind of tricky, but I
think we can make it work. Okay. Let's do a cuts. Let's get in on
the opposite side and repeat the same thing. Okay. This this edge as well. Okay. I need to get Let's get this edge. Let's do it cut. So now we need to kind of do this
unfold this first. Then any region we need to
kind of get in and then fix, we can just easily
quite easily do that. So let's we can isolate a few parts and then
do so that as well. Okay. Let's look for what isn't working and
then we fix that. This isn't working that well. So I need to select the edge. I'm not sure if it's this edge, that should be the
one then we do cuts. Get those out on food, on food. There seems to be another edge. Cats. Seems to be another edge
on the opposite side, too. Cats. I would want cuts all the way here
as well. Cat that. On food. I think I need to rework this as well as the
coat in the mid cuts. On food. Still need some
more cuts in here. Cats. Cut as well. On food. This seems to be getting worse. Et's select it. Let's isolate. Let's see where that is. Oh, this is it. So I can find the right
angles to kind of lay coats in here edge mode. Yeah, we need to coat here. We need coat here as well. Food. Bots or food. I don't really matter though the coating is not that neat, but shouldn't be a major issue since
we're always going to use rep liner mapping
just to map that across. CO food or food. Cats. Don't seem like it's there yet. Please do the coats
here instead. Fold. This piece. Is this on this region, so we need to do
some coats in here. Here as well, coats. Cats here as well. The entire piece,
let's do on food. Select select pots food. I think we can live with this. Tho should be fine. Now, shouldn't be shouldn't be too difficult to get right. Let's do camera
based, solo this. I think that went across the entire ten, so
that should be fine. In across the entire tin. So that was going to do cots. That should go around as
well. That should go around. Okay. All right, that
should be everything, so do coats on food Orient leave Anyone displaced as vertical
in vertical. Okay. Let's select two shell. Okay, rotate this way. This should be this way layout again. All right,
that should be fine. Cut of isolates, hide dose. Next one is the nails,
but this news is going to take a while. The nails should take a while. So let's move on to something
a bit faster in here. Camera based fold out. Let's of tackle the more
simpler ones in here instead. Hide dose. Okay. Elites, camera biz. Find a good angle for this. We can do this. Should go
across the entire piece. Let's look for another
angle to this. You go across the entire piece, we can do cots. Let here as well. I should also go around. Coots So seems like a
slightly tricky one. Let's put out the best. I believe I can select Okay, let me just select it here. Let's move this out
of the way first. Then I'll select an edge. Fine whether each
edge is double click. Here something that
goes across this way. Then we'll do a cuts. Okay, select the entire piece. Let's do Unfold first. So let me just have this round and I'm going to unfold
and layout again. So unfold. Here,
there's the backside. Okay, it should be fine. Just need to get proper
orientation on this orients. Let's figure out where
some of the Okay. We can get this
horizontal instead. Base Okay, that should be fine. Get this this way. This way as well. Okay, it should be let's
see this way as well. Select entirein and then let's do layout Okay, almost done. That
should be fine. All right. Here, I think this
should be fine. Hid do. Let's do the cough instead. Oh, this is the ed mark, so let's just do camera
based unfold layouts, and then we should be good. Hide that. Let's do the chains. No, let's do this
instead, cos instead. Camera based. I would do here as well. Let's do for the opposite side. Yeah, here as well. Cuts, select unfold Orient. I think the orientation should be something somewhat like so. Yeah, this should be fine. I do. So in the next lesson, I'm going to finalize on
the rest of this piece. We have one, two, three, three more piece to go. So we'll do that in the
next lesson, bye for now.
98. 96 UV Unwrapping Casket Accessories In Maya: Welcome baa, guys, so let's carry on from where we left off. Need to be on my UV workspace. Okay. Then I'm going
to open this up. I don't think we need the align, so I would definitely
need a range. Okay? I would like to
isolate this as well. Alright, let's start
with camera based. So the general idea
is to hide sem line. So I think I'll go
to the back side. How are sem lines at
the Okay. Edge mode. We loop around there. Okay. Let's do
this loop instead. Select the edge
all the way here. Okay, that should be fine. Move to the opposite side. Pretty much repeat
the same thing. I think is all the way, here. Okay? We do a cuts. Okay. I would like to unfold
this two at the top. Let me see if we get something
good enough to work with. Okay. I'll select down all
of these down here, move this to the
side orient layouts. So I want to check if
there's any distortions if there are strong
distortions in the Okay yes. There's going to be
distortions around there. So if we should check that to some slight distortions
around there. So I would definitely need to
do a loop selection there. Loop selection here as well, and do cuts on fold. Yeah. I think that should
reduce any tension we are. That definitely reduce
any tension we in there. I'm going to use the
same format just to kind of unwrap
the rest of this. Okay? So the process is
physically the same. All right. Move to the next one. Okay. All the way here. Get the loop around
there, as well. Let's come to the next piece. Yeah, that should be the one. Okay, move to the
opposite side. Okay. And that's fine.
Let's do a cuts. Then we move down. A few more to go and then
we should be done. Since we pretty much
know what to do, we can we can just kind of skip this process
if you don't want to kind of watch me as I kind of go through the
others and then finish up. That's it completely fine cause I'm pretty much doing
the same thing. I think four more piece to go. Okay. Move to the next side. Yeah. Yeah, as well. Okay. Yeah, that's fine. Okay. Yeah, that should be fine. You as well. Okay. You're well, all the Is the coats Yeah, that
should be fine. So select the entire
piece on food Orient. Select the entire piece, let's do stack similar. Sometimes stack
similar doesn't work. Let's do stack shells. Okay. I'll select this
all of this in here. Let's go to transform Orient, select the entire piece. We can do layers. Okay. Yeah, that's done.
For some reason, some of them did not
respect what we did before. So I would need to select
all of them again. Let's do stack similar. Okay? Stack shells. Yeah, I should respect this. Let's do a bit more
selection in there. Okay? L should work just fine. Okay, yeah, perfect.
That will be just fine. We can hide this. Let's do the chains first
before we do the body. So let's isolate this as well. We do camera biz. So this is the front, so
let's move to the back. So pretty much want
to wide our seam, where is not going
to be that visible. Let's start with this piece. I'm going to edge mode. I think we can
pretty much just go an entire loop across
this like stone. Let's do on the
opposite side as well. Okay. Do cuts. So they are just going
to hide out same line. So I think we can
hide this here, here. Move to the opposite side. Next one, rather,
here, here, well. Okay, let's hide in here. Okay, here well, the same here. Down here should be fine. We can have the same
year here as well. Okay? We can hide the
same here, here as well. I believe we should
be almost done. We can hide the same
here and in here. This we can hide sim I think we can pretty
much hide it in here. Here as well. I'll do cuts. Okay, two more to go. Okay. Let's do one
year around here. Let's do one in here do cuts. He that's pretty much it, and then just on food. We do orients Stack stimular I don't know why
stack simular is not working, though, let's just
do stack shells. Select pretty much all of this around here,
rotates 90 degrees. Select the entire
piece, do layout. Okay, that should this pretty much set up
properly, like so. Okay. We are pretty much done with
that. Do a quick sieve. Okay. I'll hide this. Let's just
finalize with this piece. Center this, see if you can select the entire
outin then make sure everything is in their
accurate center. Okay? So let's work with this. Okay. Let me make everything
visible first. I want to be sure, Okay, yes, yes, a good place. Do that, select. Let's do SIs let it. And then let's do camera based. There's quite a
lot going on here, but would make it work. So first thing, I'd like
to do would be to kind of get an edge loop that goes
across the arm. So here, Well, I'm pretty much
just in courts for now. Trying to get loops
that goes across. You see why bit make the
process a lot easier. Okay? Yeah, well. Okay, that a la goes across the entire, that should be fine. Okay. That should be fine. All right. Okay. So for this, we need one loop that goes all
the way all the way. Okay. Like so it should be fine. Okay, we need something
also in here. So let's do coats
first. Let's do coats. Then we can quite
easily separate them. Oh, seems like the separation
is not complete yet. It's not complete yet. Some parts are not completely
selected in there. So I'm going to use a
slightly different approach. I'm going to select this loop. Let's figure out what
is going on in there or we can just stitch
that back together, stitch together, and let's
find a different region. So let's do this region instead. That one still goes across like a loop. We don't want that. I think this should be
it Okay, we do coats. Still can separate
this out. No worries. Let's do that to
what we had before. Let's bring back what we
had before these codes. So we do let's go to the back. Let's kind of separate
them out first. So I'll do another double click on this to get a
loop. I'll do a coat there. Okay, spread this out. Okay. So something should
become easier from here on out. All right. So I'll need to come
do I need to select. Let's say I select this edge. I'll come in here, find that edge and double
click on that edge. See if we can get a look that goes across the entire out in. I'll do cuts. I'll do the
same for the other side. That part is kind of eating, so you can't really
sit there because I've no folded yet, so. Now, let's select the two. Let me select this tooth
first and then move it aside. Lead this on food. Okay. So now we can
now quite easily figure out what is
actually wrong in there. Okay, I would select
pull this aside. And unless kind of
clean this so properly, I will just select these edges, this edge all the cuts. Okay, I would unfold this. Select this unfold this as well. Okay. O fold. I'll do the same
around here as well. I'm not looking for super
clean or supernice UVs. Something like so should be
good enough to work with. On food. On fold. Okay. Okay. So we need to kind of stitch this center
part together. This we need to stitch together. So I'll select Let me go as far as I can see,
double clicking here. Stitch together. Select fold. Let's orient this
properly, at least. Okay. We can still completely close
this gap, stitch together. Select on fold. Okay? Yeah, I think let's
check for distortions. See some tension around the air. I think we can quite
easily ease that tension by by just doing a cuts. Let me just select
an edge first. Okay? So we click the COTS. Kind of find something close to that also it's
on the opposite side. The cuts on food. They should ease some
tensions in there. Tensions have been eased up now. Okay. The legs are obviously fine, so I need to just orient them orient them this way.
Now, let's go in here. Okay, I think I
would like to put my same year fine arts pots. Okay. Same year also, too. Maybe park a little bit more. Fine records. So I made a loop across
the entire outing, so we can now quite easily
select the two of food. Okay? That should
work just fine. Okay? Maybe put these down instead. Let's get them properly arranged
at least to some extent. So now to this, let's see if we can find a loop that goes across
the entire piece. If we can even find
something like that, select this edge, find
the edge, double click. Now that edge doesn't seem
to go around the entire tin. Okay, so we need
to do quite a lot of manual working here actually. Let's see this edge. That edge doesn't go
across also as well. So that's fine. We're just going to find a way to get
a cut across this. That should be fine
there. Oh, this kind of went somewhere else. So I need to select this. I'll double click on this. Double click in here as well. Okay. That should be fine. That's fine elopia as well. Elopia are not
completely that nice, so we might just need to find a way to kind
of make it work. Okay. Yeah, we can
just continue in this fashion, so Okay. All right. Okay. That should be fine.
Who do you coats. Okay? This should
at least give us something good enough
to work with on food. Okay. Then we just
need to go in and then start doing some
more coats in there. Cats. Cort as well. Cat as well on food. Okay, yeah, yeah, this work. I should work just fine. Making sure there are no okay, this should
work just fine. So you just need to
go to the other mnan then kind of repeat the same process into the select this loop
you having here. Don't do that
doesn't seem right. Okay? Let's go to the edge. Okay. I need to check if I'm
missing something in there, but I think we should be fine. Okay. All right. God. I think we need to do something
for the tom also too. Let's do C. Okay. I think pretty much do
that that's wrong one. Okay. I think we can collapse this all the way there.
There's the cuts. Selects fold. Okay. So now we just need to
start adding, I think, no. We need to do something
around here Condo that. I think Manuel
selection in here. Okay. I'll do cuts. Okay. I'll do undercuts. I'll do unfold. Addison doesn't seem to be
as good as the other one. But it should still work. Let's see if I'm missing
something in here. Okay. So seems to be too
close to themselves. Or maybe Josie won't go all the way and then just put
the cats in here. Okay. Yeah, I think
should more or less work. It just find a way to just
stitch stitch something here. Stitch together on food. Okay. Orient, rotate this. I'll select the entire
outinPs do layout. Okay. Some of the orientation
is not precisely there. Okay. Se like this again.
Let's. Let's check if there's any strong
distortions in there. For the most part,
I think they should be pretty just fine. Okay. Save this file. Yeah, I think this
should be just fine. I think I'm going to bring
everything back out, so I need to kind of label those the meshes that kind of have issues on
their UVs label them. So if I'm baking, I know some of them have issues. I can just arrange that
or give them a separate. Let's give them a
label that kind of separates them from the
others because those ones are going to be having
issues when we try to when we try to do
baking inside of Zbrush. So I'm trying to
identify those ones. Okay. I'm pretty much looking
for the ones that have broken pieces around. Okay. I think this one
has some broken piece. Let's go out of isolates. Yeah, this one definitely
add some broken piece. So yes, I see some
issues in here. So I'm going to label this. What should we put? Let's just put is Okay, let me just put fix at the end. Let's put fix at the end. So that will label it as
something that there's issues or maybe put T in
front so topology fix. Let's put C in front. Okay, TFT fix. That should be fine.
Let's carry on. Let's figure out find
another's issue in there. Now this one doesn't
look perfectly arranged. Orient, let's get
that looking nets. Okay. Moving on. All of this seems fine. Okay. Okay, I've already seen one. I think there should
be more than one. I believe there should
be more than one. Is this another one? Is definitely another
one. Or is it? Okay, no, no, it's
not. No. But I think we need better
orientation in here. Okay. I don't think this
one has any issue. Okay. Yeah, This is fine. I think I was one
that kind of broke them into piece like so. So that should be fine. Okay, let's move
to the next one. Zoom out, and then
let's be sure. Okay. That should be fine. Fine, as well. Okay,
seems like we only had one piece with the issue. Let me just cross
check again. Okay. That's the one last
cross check just show. Okay? All right. And we've named that already. Okay. And figure out,
okay, is this piece. Okay? Yeah, I think I think
we're gold in in. We should be golden in. So far, I think that's, like, the only piece with the issues. Okay. Yeah, I think we're fine. Yeah, that's the only one. So that's the only one. No, not. We're not going to, we have stonehd where
is this supposed? Okay. Let's see, we have this recipe already.
Alright, that's fine. So that's the only measure
that's going to have an issue, when we try to import
it back to zebra. I was going to build
that externally instead of Monsey to bag. So I'll see you guys
in the next lesson, bye for now. A
99. 97 Export Mesh For Baking: Balcomb, guys, so let's start
exporting out our mesh into a different folder and then get them back into Zbrush and then
start the baking process. So let's get right to it. I'll start with the first
one in which is the skirt. I'm going to be spotting
this out as an OBJ. I need to find the
folder for it. A Z imports. I'll create a new folder. This this folder is going to be all caps in here, UV meshes. Okay. So we're
going to be getting all models into this folder
to appease this in here. This is skirts. Let's
type in skates Exports. Right. Next one. I was going to kind of
copy the name in here. Let's copy the name in there. A spot selection. It's not
even taking up the name. So we also have to
manually type this in caskets, both top. Okay. I think I should also
hide anyone I've done. So I know kind of
know where we're at. So caskets put lower. I'll just use this and
put lower at the end. Here, that's fine. High
dose, basket body. Okay, little everything else and then just put body in
there for the name. Alright, chain Mill.
I think for this, we make any adjustment
to the UVs for this? Let's kind of confirm. Okay, I think we kind of arrange them in a
way, I believe. So let's export those. Okay. Um, Mal. Yeah, that should be fine. Hide dose. Okay. This is the waste we stop Gin. All right. We stop Kg. That is fine as well.
Add those waste ring, kind pickup piece in here, just get all of this exported. We have the waste out arc waste out arc waste mead plates. Waste meat plates. Okay. Then we have the wait long cage. All right. West in a c. Okay, that is fine. Waste cones. That is fine as well. Waist bells. Okay. We have the torso vests. Vests, not belts, vests. Tso nails. Okay. You have the Tsu color. All right. Tsu chest blitz. I think I spelled that wrong. Tsu blitz Tsu chins. Then we have the Tsu boots. Tsu boots. All right. Then Tsu belts. So belts. Stone cage. Okay. Oh, this is a longer
one shirts embroidery. Spotsksks skirts. He embro skirt and blemTFix skirts and bm fix. Okay, that should be fine. Then we have the shoulder pads. Shoulder pads. Okay. Rod head. Rod head. Okay, I think for
this road head. Okay. Let's see. Road cup. Okay. I think I would
like to get these two. You say zero to one space
so let's do layouts. The difference that I kind of shrink this down way too much. And ideally, I don't want that, so maybe we can just
leave them separately, so we kind of get quite a lot of detail from them when we
actually render them. So I think I'm pretty much going to leave them as they are. Okay. Let's spot this out. Because I'm not going to get the highest possible
quality for this. We already have
something already on the highest possible
quality for this. Okay. Head cup. Rod cup instead. Rod cup. Okay. Hi dos. Rod. Okay. Then we have the
head wings wings. Okay. Then we have the head Udi. Head di. Right. We have the head crown. Head crown. Why do we have to why do
we have to add crowns? I think the name in Ia
is a bit slightly wrong. Yeah, something we need to kind of adjust the sets in innie. We have to add crown supposed to have something
slightly different. Oh, head crown. Maybe I should name this
to head crown top. Okay. Head crown lower. Okay, maybe something
like this should be fine. Oh, sequins confirm that though, just to be sure instead of Zbrush crown top. Okay. Ed crown crown a a crown priests. Ed crown priests, add boots. Boots. Okay. That is fine. Do you have side parts Ed side parts. Okay. Then we have the Earn
glove. Let me confirm. Check again, if there's
any overlapping in her I do not want any overlapping, basically. I don't want any
overlapping in here. So I need to just rework
the UVs a little bit more. Let's see. I'll do coats in here. So let's do coats. Select fold. Yeah, that will definitely work. So that kind of space
things out a little for us. So let's pretty much do
the same for the others. Okay. That should be fine. Put this on spread out
already. Spread out already. Okay, let's do cots. Select the entire aren
again. Let's do a food. Okay. Let's do layouts. Okay, I think we have most of this spread out a
little bit more now, so I think this is going to be a better one to actually use. Okay, so let's spot
this out and love. Then we have the boat. And boots. Okay.
That should be fine. Go to the next one
and back parts and parts. All right. By this. So we have
the food swear now. Exports, food Yeah. Then go to the next one,
foot strap. All right. Almost on food med puns food puns foot guard. All right. Then we have the foot boots. Foot boots. Emerald Stone Emard Stone. Then we have the elbow belts. Elbow belts. Caskets plt hold. Caskets plt hold. Okay. Casket News. No. Cascades What? No, this. Case sports selection,
cascade News. All right. Then cascades Max. Cascades Max. Then we have the
cascade Mil body. Caskets mil body rights and casket helmets. Casket helmets casket coughs. Okay. Hi dos casket chins Okay. HidosH max. All right, I think that should be
pretty much everything. Save this file. So the next
thing to do would be to start importing them into Zero and then baking up
normal maps for them.
100. 98 Baking Maps In Zbrush: A Cuba guys. So in this lesson, let's start picking up the
necessary map needed for this. So I'm going to start with before I
start with the IS food, I remember we kind of a an
issue with naming for this. So let's go in. So name this to Ed Crum top. Ed Crum top. Come on. All right. So this is the head crown lower. Okay. That should be fine. So
kind of bag this out let's start with the same
hierarchy in here. Okay so let's select
the emirate stone. Okay. So load this out. Okay, so we have this at four K. I believe in Maya also too, it should be four K. But no, I Maya is not
accurately arranged. So we might just need to
actually go in there. And select it. Okay, Emirates tone. So we have this at four
k. Fast this is at four k. So that is roughly
where it needs to be. So we can just go in and then
bring this in. So imports. Yeah, just before also import, we need to make sure it's
going to be a long process. We need to make sure we
delete any UVs on the first. So delete UVs. Very important to
delete UVs first. The imports. Okay, so it's emerald. So let's do E Emerald Stone. That's name. Okay. Imported in successfully
successfully, that's fine. Means to be cut foci
resolution normal map, so create normal map. Please then I'll do Clone
map texture flip V exports. I think we need to
let's go back one step. The exports with a
new folder in here. Let's name this to Z maps. The maps would be fine. So this will be the
ERA tone, okay? Oh, I think I need to
save this as PNG instead. I need this to be saved as PNG. So let's do PNG instead. Okay? That is fine. Saved out now. So let's
go in and then check. Okay. The maps, you shouldn't see
too much happening in there, but let you see some detailing. I don't know if you guys
can actually see this cause some details in
there, so that's fine. Close this. Let's move
to the next piece. So I can temporarily hide
that so stone cage Okay. So let's confirm again
the plicon for it, 12, so 12 k as well. That's fine. So let's go and then check if
there's any UVs on there. So this is pretty much the entire process
just to get something, just to kind of big this out. So no UVs in there, that's fine. So let's go and input this in. Okay, so we are going
to go back a few step. Okay. Stone cage. That is name Stone cage. He's the one click conducts. We have a successful inputs. Successful inputs in
four k resolution, norm map, grit normal map. Okay. If this is slight movement, you kind of calculate
and then give us a map. Is there now. Lone texture, flip
V exports. Okay? W to go back. I think it would make better
sense if you just put a texture file year
instead. The imports. So let's just put a texture
file in here instead Z map. I'm going to bring the
other ones in here instead. So that's fine. So just make it easier for me to kind of navigate and
then get what I want. So I'm going to put this
put Import imports. The map this in here. Okay? Fantastic. So moving on. I'll temporarily hide
this for the road. Okay. So let's see if there's
any UVs on there. So, UV is on there, so delete 310 UVs
we have on there. Then let's do in pots. Okay? Road, is just
the road alone. Okay. I think we actually spotted them out on the accurate subdbution level, so Martin needs kind
of actually check the polycon so. I
believe we did that. So, okay. Yeah, this is fine. So let's do UV map. Let's spot this out
for resolution. No mamp with the mamap
In the clone map, texture, flip V exports. Okay. Put this in here
that should be fine. Next piece. Roll cup Okay. Imports. Rod cap.
That is the one. I needed to confirm if
there's any UVs on there. Let's delete UV says to four k and import
this back in again. I just needed to be sure. Okay, Rod cup. Okay. Normal map.
Great normal map. So normal maps, just
keep it tangent, smooth UV, smooth normal,
then you should be good. So Clone texture, lip V exports. Okay. Here this in here. Next piece. Okay, rod head. Okay, let's clear this out.
Contra clear that out. So subdivision level am I on
for this? I need to confirm. So let's go back in here. Something seems odd here. A piece is definitely missing. There's a piece missing I feel like it's a piece
missing in here. There's definitely a
piece missing in there. Okay. We definitely have
a missing piece. Okay. Oh, yeah, this one
also had issues. I figured there was
one more issues that I did not kind
of take into account. So I'm going to move. I need to move come on. I need to move this in to the
other one just close to it. Fix, okay? Yeah, that is fine. Okay. Yeah, this is
fine. Save this again. So for this, I'm not going
to do the baking inside of Zbrush because there are
issues that comes with it. But let's go back up here and let's confirm with solution, we exported this out, so select it. It's around thank you. Okay, thank you, also,
thank you, resolution. Thank you. Polygonso.
That's fine. So let's go over to UV map. Delete any vies we have on the side to fork
your resolution. Then imports. So
this is rod head. Okay? Rod head. Okay, that seemed to
import correctly. So normal map creates
normal map for this. Me staking a little
too wide, okay, in the now clone texture,
flip the exports. Okay, fantastic. That work just fine. Okay,
I'm going to skip this. I would skip this for
now because we do that outside, somos bag instead. This is the Okay, yes. Okay, that's like the last
one in there, actually. So I'll skip this for now. Let's go over to the next set. Lose this this for now,
go to the next set. Okay. Here this frame into view. Feel like something is missing. Feel like I have
something missing. A Okay, this is for the
cask it is for the casket. I figured I was thinking this was from
this for the casket, so good we're good. Okay, so we have this at
CSKect selected CK total. Let's see what we have in here. Is it also CSC? Yes, it is. Let's go down to the UV, delete UVs we are in S
fork a resolution inputs. So it's called casket helmet. So that you see on the
keyboard, caskets, helmets. Here that's the one. Select that's
Imported incorrectly. Normal map, creates normal map. Okay. Fantastic. So this
should work just fine. So clone texture, flip, exports, Za, get this in here. Okay, that is just
fine. All right. In the hide dis Cascade News. Okay, let's do UV map, delete any UVs we have
in the sets to fork a resolution. Then imports. So this is called Cascade News. You should be able to find
it around the casket nails. That's the one. Select those, it's ready a foc resolution. Create norm map. Learn nom map. PV exports. Okay, with a map. Okay, save this. I think I need to kind of
save the file again. Since we've made some
corrections genius, let's save the file. Okay, that is fine. That is fine. Let's move to
the next piece, Cascades max. I believe this one should be right where we need it
to be especially on the polygon count and
where we exported it out from polygon counts, we exported this out from. I believe they
should be the same. Delete UVs fork a resolution, imports to cascade Marx. Casket maps should be. Yeah, that's the one. Okay. Awesome. Normal map. Great normal map.
For the most part, it's mostly normal map
we're going to Media. I don't think we
necessarily need displacement map for most
of the details from this. So let's do flip V exports. Okay, the maps. Okay. Save. That is fine. Move on
to the next piece. Casket body. Okay. Let's see if there's
any map that deletes. So is to fork a resolution. Se I'm deleting what
was there before, because if you bring
in a new one, it might just interfere with
what was there before, and then you just have issues trying to make good
maps in there. Your mouse come out it's a bit weird with some weird
stretching also in there. So casket body. Okay. It's kind of
careful process, so you just want to
take your time and then make sure you're
doing it right. So that's why I'm not
actually in an AT levy. I'd also hope there's
not any major issue in because sometimes it might have some issues that
I need to kind of fix, but we need to kind of fix
put all of them out first and then see check them one by one later on
to see if there's something wrong and then go
back and then fix those. But I believe for
the most part, the way we kind of set this up. So if you're fooling
this step by step, the way we set this up, you shouldn't have
too much or too many or no issues
out there, actually. I believe so
strongly believe so. So let's just carry
on delete UV. There's the four K resolution. So this is called caskets both lower soiputs so cascades both lower, cascades
boots lower. That's the one. Normal map. Map cannot be quite the
subdivision level is active. Okay. Something
seems oddly wrong. Oh, yeah. Oh, yeah,
this one does not. We don't have subdivision
level in here. So we need to divide a
few times just to get something Clean UVsagsO more. Okay, let's go to
the lowest. Okay. Let's delete UVs in
the import this again. So cascade both lower,
cascade both lower. Okay. Then now we can pick I give you a moment
kind of save out. So now we should be able to kind of make something
out of this now, so normal map, create or might not even need to even create
a normal map for this, but let's just regardless, I just create a normal map. Okay. Owetexture flip
v exports. Okay. Yeah, that should be fine. Moving on, this
casket boot stop. Okay. So let's inputs. Oh, let's check for
the UV map lets. Okay. Inputs. It's called
cascade boots top. Cascades boot top. There is one. Awesome. So fk resolution
normal map. Great normal map. Let your V I think I missed one step. You need to just export here. Okay? In a save. Okay? So I'm going to run this for
the next 30 minutes then. Any other one we've not done, I think you guys will be able to handle the rest yourselves. So let's just run through. I do go to the next one. Is the body. I believe we exported this out
correctly as well. You know, UVs on the imports. So it's the cascade male body. Cascade male body. Okay. Okay, resolution. Normal map, great noma map. Okay. Clone, texture,
plebe exports. All right. Awesome. Next, caskets, plates hold, delete any vis we have in the imports, caskets
plates hold. Seems like we have a lot
of caskets meshes in here, so caskets down your
casket plates d. Okay. Forky resolution. Wet nom map. Let's give it a moment
to kind of do its thing. Okay, clone, normal,
texture, pl vi, exports. Okay, fantastic. Basket chain. Okay. Make sure there
are no UVs on there. I think there should
be something there. So let's delete. Okay,
Imports, casket, chains. Okay. Cascades chains, that
is the one. All right. That is to foc a resolution. Normal map all right,
creates normal map. I shouldn't take too long. One texture, Flav exports. Save this in here. Okay,
fantastic. We're good. Next piece, casket coughs. Okay, there should be on here, I believe, deletes
sets to four k. Imports, casket cuffs. Should be this right. Normal mat nom up. Okay, Clone normal
texture, lev expotso. In a save. All right. I think that's the
last one in that sets. That's pretty much the
last one in the sets. Okay, move to the next sets. Open up the folder. No, I don't think we
already have the head already, so head both. Okay? I think we need to
subdivide this. To subdivide That's
getting close. Let's see if this is, I think this is pretty
much good enough. Let's go to the
lower subuton level, delete any UVs we
have in there, okay? This is the A both to imports this is boots, head head boots, that's the one. Okay, fork resolution,
great noumer map, Clonumal mapVEpots Save. Okay. Crop. Okay. Check if we delete any map we have in the
is to fork a resolution. Imports Okay, still the same under
the same C, so crown. I mean, this is called
okay, head Crown. So you need to head out
to H. Head crown top. That's the one. Read out for key resolution
to create them map. Okay. Loan map,
texture V exports. Okay, Map. That is fine. All done in there. I need to start hiding this so
I know where mats. Okay, next one. So let's delete UV. Status to foc a resolution. Okay, Imports Let's go to. So this is head crown lower. Ed crown lower. That's the one.
Fantastic. So now let's go and then just make
normal ma, create normal map. Okay, that is fine. Blow normal ma. Take your pv exports. Okay. Save this out. Okay, that is fine. Moving on. Ed wings. Let's see, I know if it's
on there is perfect inputs. So this is a CK. Let's confirm if it's CSC also too as well. No, it's not a CSCI. So we have this one
subdivision level higher. So cancel this ases confirm. So we're going to import
this now with the correct. Is there any max in there, okay? Inputs, so Ed wings. Wings. That's the one. Okay, for resolution, normal
map. Great normal map. Okay. Yeah, that should
be pretty much there. Okay, loan map. Texture, flip normal Exports. Okay, that is fine. Okay, I think 2 minutes more, and then the rest, we can
just do offline instead. Okay? That should be EVs in here, so you need to kind of
delete those deletes. So this is the E max in ports. Max. That's the
one FokiRsolution. Num map with numer map, clone map, Texture PV
moves down exports. Export this to the
folder we needed to be. Okay. I think you also exported this
out at the cort level two. Okay, that's fine.
FokiRsolution. Imports called head hoodie. Head hoodie. Oh, I think I exported
something wrong. I think I spelled
something wrong, so I want to fix
that head hoodie. Head hoodie, head hoodie. That's the one.
Okay, do it normal. It Taking slight bit of
time to do that but. Okay, we have it now
one v exports. Okay? Yeah, that's fine. So I need
to confirm some sensor. I think the marks, I'll select those
export this out again just to be
sure I have this. I figured I'd not export
that out initially. I went to select
the export in here. I is wrong. So that's fine. So let's do this. Okay. I also need to make some slight correction
in here, but for now, the litten UVs we have
in the sides to fork a normal map, pots. Okay. This is the eight crown. Eight crown priests. Okay. Did normal. Okay lonmaltexture, flip V. Okay. Exports. Okay, so now the correction I
need to do in here would be to pull the auto groups
auto groups again. I'll select this marks inviting
mark with the move brush. I just need to push this back
down, pretty much like so. Then export this out. Okay, add crown priests and then just replace
what is here. Okay. Then come back in here. I'm going to shift B,
send it out of the group, hide that Import the new one, delete this is not
supposed to be in here. Okay? Eight crown Priest, eight crown. Greece that's the one
dragon drops in here. Oh, no. Too many mesh. I need to delete
those. My export setting needs to be set in here, which I failed to do. So exports. Okay, that should be fine. Okay, replace that. Now we should get it
working correctly now. Head cron priests
go in there again, should be able to find it now. Okay, this is in there now. Delete this extra weird naming, drag it into the group. Okay. Save this. Okay. Let's see. Okay, that's
the last one in that set. I'm sure you guys get
the idea already. So I'm just going to
go through and then do the rest of this and
come back when I'm done. I'll see you guys in the
next lesson, bye for now.
101. 99 Baking Maps In Marmoset Toolbag: Okay Cuba, guys. So
let's kind of make the other meshes that we
are kind of UV issues. So to do that, we need to put a high subdivision
level for it. So I'm just going to
let's go over I think is the skirt emblem and
then so let's go over to Wit So skirt
emblem is one of it. I need to make sure that little UK there's no is in there. We need to go to the highest
subdivision level for it. Due to higher subution level, let's get all of this
looking quite clean. Let's get clean edges to this something smooth
enough to work with. I think should be
should be just fine. So I'm going to export
this out exports. So I'll go over to Z exports. I'll name this to high exports.
There is an exporting. Then I'll go over let's go over to this keptal
I believe is this one. Here, this is the one. So let's go to the highest
subdivision level. Let's make sure there
are no UVs in there. So the litten UVs
we have in there, put the subdivision
level for it, 6 million. And let's export
this out as well. So remember, on the
export setting, we have this as smooth
normal so that's fine. We turned off group also too. So ten cage, high. Okay. Let's just give you a moment
to kind of go run through. I'll come back
when this is done. It's done exporting.
So let's go in here. We need to almost say too bad. We need to bring in the let's bring in the
meshes in there. So if I should go over
here, let's start. Let's be low poll instead. So what's that called? I strong Let's see. Let's go back to Maya and then figure out
the name for it. Let me just not let me not kind of doing
guesswork in there, so stone age old. So stone, I did not
export that out yet, so let's export it
outport selection. Stone Age old. Okay. You should have it in here now if you just close this search. Open it up again, type in stone. Stone cage that's the one
drag and drop this in here. Also, the skirts emblem. Skirts Emblem fix, drag
that in as well. All right. Okay, that's fine. Let's import the Oli
versions of this now. So under exports. You just type in Hi. Find them in the self
I select these two, drag and drop them in here. Let me just give them
a moment to load up. Okay, so I've then
successfully imported in. Okay, close, this close. So let's start the
baking process. So if I should click
on new BC projects, let's start with the
stone cage hold. This is the low
version put this here. Then the I version
pull here as well. I'll just name this stone. Okay, I'll create
another big group. This is the I put low
put this in here. Okay? That is fine. Let's start
with let's start with this. So let's open that up. So the eye is kind of heading
for now, so that's fine. So let's go to the Big project. Let me name these two skates. Okay? So now here for
the setup in here, we need to bake normal maps. I'm going to put these two
sustain samples a sustained. Let's bake a four k resolution
baking normal map alone. Okay? Padding padding, padding moderate soften
increased out all the way. Then let's pick a folder for it. Et's speak this ford.
Let's do this at PNG. This is for the skirts. Okay. That is fine. Yeah, so I think we can just bake this, and
then we should be good. So let's click on bake.
This one shouldn't think. But it doesn't take
that long to bake. Then we can just review this
as as it's done baking. So it's done beakin so
let's preview this. So this is like the
preview now on this, which is more or less fine. For the most part, it's fine. So if you go into our folder, you should be able to
find it in a just type in skirts in a skirt normal. It's supposed to
be skirt emblem, so I can just rename this
to sket emblem Okay. That should be fine. If we can do something
in here if we can, maybe we won't bring
the cage closer. Seems slightly five so let's say we bring the cage closer. Okay, we cage closer and then do another bike Let's
bake this again. Okay. Review this. Not so much
happening in here, though. Let me deletes and it's
preview again, okay? Not so much happening,
but we should be good. Should be good in here. Let me move this. Let's get back in there skirts. Okay. This is a new
one with those bits. So much not too much
happening in there. So maybe we should I'll just
put the emblem in front. I'll just put two. Okay. So I know definitely. That's the second one we did. So let's close this
and go to the stone. So this is the next one we
need to kind of work on. So we were seeing some
preview in there. We're not supposed to have
this preview in there, so I think I can just something weird seems to be
happening in here if I should hide aside this seem some really weird
art offact in here. Okay. Let's him to fix this issue. Let's apply the new
material to it. Let him to fix the issue. I think we can move on. Here is the low, and
this is the high. So let's hide the low. Let's review the mesh. The mesh has all the
details in the spine. Okay. I'll go back to the low, make the low visible. Then the cage. I need to bring
the cage slightly closer. Slightly closer to the mesh. Here, let's choose
an output for this. So let's supposed to
be named a stone cage, hold, stone, cage, hold. All right. Now let's go to the
baking group itself, and then let's set
samples to stein, increase the softn,
moderate resolution four k. That should be fine. And then let's run the bake So you can pretty much see how
easy it is just to make. Oh, it's done because let's preview this. Let's
see what we get. These are low pollen. Now having the details of the high pollus
precisely what we want. And so far, I don't see any major issue in
or around here. So we should be
pretty much good. If you come in here and I just put in stone S
type in S in here, we should find it's down here, so stone cage old. So that's the one we need, and everything seems to be working
pretty much just fine. So let's do a sieve
for this sin. Okay. Let's do stone
skirts. So bag. All right, so that's pretty much that should
be pretty much it. So we're done with all our
picks for everything we need. So the next step
will be to start the texturing process inside
of Substance Painter. So I'll see you guys in the
next lesson five for now.
102. 100 Prepping Model For Substance Painter: We combat guys. So now
let's kind of prepare this to get into
Substance Painter. So let's get right to it. So pretty much, we're going to kind of select all
of this and then give them different materials, so we can have them
as textual sets instead of Substance Painter. So I'm going to select the skirts. The
first one in there. Okay, you can click,
then let's give it. We have existing materials
already, but that's fine. We need to give it
a new material. So favorite, let's do Lambert. Okay. So I'll take down the diffuse. Diffuse is always so high. I don't know why not
made it too high. So let's give it red. Okay, red should
be fine for now. Then we need to change
the name. Very important. It's important to give
it the same name. So skirts. Let's do the skirts
map for mats instead. Okay, then I'm going to hide
that, move to the next one. Give it a different
favorite lambert as well. No, that's the wrong one.
Supposed to give it Lambat. I always prefer to use lambert
because I've been using lambat for a long while
to kind of get this out, and then I don't have
any issues with it, so why change that method when
this will work just fine? Okay. So the name needs
to be correct as well. So I think we can
copy the name here. Can we copy the name? Let's paste in here did? Let's do mats. Okay. M to the next one. Lamberts. Take down the diffuse, give it a different color. Okay. Copy the name in here. Put mouth at the end. Might not even need
to put math at the end if you don't
even want so and so. Either way, we still
work just fine. Numbers. Okay, take
down the diffuse. Copy this. Okay. Let's do favorite material, Lambert. Copy this. Take
down the diffuse. Let's use this instead. Okay, hide dose. Okay. Rising material Lamberts. Copy. Paste this in here,
take down the diffuse. Okay. That should
be fine. Hide dose. Next one. Alright. Select that again. Copy. Place that in there. Maybe you should just
leave it white like so. Okay, moving on.
103. 101 Prepping Model For Substance Painter: But guys, kind of run into an issue with my
recording software, so Let's kind of stopped
the recording midway. And then let's just carry on. So we stopped at the rings. So let's create Lambat for that. Okay? I don't kind of
skip most of these steps. Even though this is kind
of repetitive step, they just might be
something that I just need to maybe adjust or fix. So that's why I don't
kind of skip this step. But for you guys who are
actually watching it, you might just let me leave
it at this glow for now. You might just need
to kind of maybe speed up the tutorial instead until you get to the point where maybe I
might change something in. So that's just pretty
much the reason why I'm kind of recording
the entire process. So you can just stick around, maybe grab something it where
you kind of wash through. Or if you're doing
this yourself, you can just practice along too. Okay. Let's use the
yellow but let's use the brighter version for it. Okay? I does. So I'm going to try and
pick up the past instead. So you can do this
quite Second this quite quickly and save time. Okay. So usually the form platform is mostly doing these rights. Form platform is mostly the texturing aspects
like the part, texturing and then look development aspects, like
the form part for me. So I've been kind of learning kind of learning
on real engine lately. So I have a strong feeling that I'm going to be rendering
this inside of on real engine instead so just to kind of show you
guys how to pretty much bringing your models
into Unreal Engine, so exciting times ahead. So I've always been using Arno, for the most part,
kind of the Manders, which kind of gets good results, but I would like to try
real Time rendering and kind of expand my portfolio
to real time rendering. So most of my renders moving on, should be on real Engine, so we can actually explore
the software it well. Okay. Do we have any Lamberts? Okay. Copy the names that's in here. Hi dos. I think we should be
able to do this within the 30 minutes within
30 minutes time frame. Most of these kind of come. Let's lead type history in there for instance there
has some history in there. Okay. This is the bright one. Copy this rights for the bells. Lamberts can pretty much
leave this at the whites. Okay. Yeah, that should be
fine. From this point, we start using the darker shade for this more darker shade. Let's copy the name. Use a darker sheet, sort of. Hi dos. Okay. Copy the name. All right. You can use the red but a more darker
version of the red. Okay, Lamberts. That should be fine.
I'll copy this. Alright, use the yellow, a more darker version
of the yellow. Next piece. Okay, Lamberts select it again so you can copy
the name for it. Okay, that is fine. Yeah, I think it's the green, more darker version
of that green. Okay, next piece. Copy paste that's in the
last time we did was green, so let's use this
darker tone of darts. Hide those. Okay, Lamberts. Let's copy the name. Paste that's in there so
more darker tone of this. Okay. Lambert, select it again
so we can copy the name. Place that in there. So you should be using
this darker thon. Hi dos, move to the next one. Lambert. Select it again so we
can copy the name. Okay. Now for this is a
different sheet. Okay, this time around, the
star is in different sheet. Okay, Lamberts. Let's copy the name. Base that's in
there. Use yellow, slightly different shade. Okay. Next one. Lamberts. Copy the name. Okay. That is fine. This is the green
different shade, slightly different shade. Okay. Did we do that correctly? Yes, we did. I dose. Okay. Copy this past this in here. Okay. He is fine. Hide this. Okay. Lamberts. Yeah, that's fine. P with the name. Okay. Let's use a different shade. Like should be fine. High dose. That is fine. Save. Moving on. Okay, Lambert, select it again. Copy the name, paste
that's in here. Okay. Maybe use a
different shed. Hide those give this
different material, copy, paste that's in there. Give it a different shed. Yeah, there are quite a lot
of objects going on in here. Quite a lot of objects going
on in here, but that's fine. They are all necessary objects
that needs to be in here. Maybe go back to the red
and push this down here. Okay? Lambert. Select it again. Copy this. Pies this in here,
use the yellow, get it turn around here. Just to be sure.
Okay, that's fine. Lambert's. Okay. Copy the name. Yeah, that is fine.
Here's the green. Okay. Hi, that's. Moving on. Okay. I think for the most part, I don't think I'm
going to be making. Do we have are we supposed to have some
kind of high in here? I believe we should be having some atleast one of the things I was kind
of talking about. I believe we should have
some kind of high in here. Yeah, we definitely need to
have some high in there, so I can just steal I can steal this basically
and use I duplicate it. I pull it up, shrink it down. Okay. Pull it in. Okay. I need to go to face mode, select this and just try
to properly match it. Like so. Okay. Click
out, click it again. Move these two forward. Yeah, something like so. I also going to put them in the same zero to one space so. Let's go over to UV Editing. So it's just the high, we're just going to kind of
arrange somewhere, I believe. Okay, let's select everything
that do with the high, just the high loon.
Okay, this is it. I'll select this,
shrink it down, pull it out of the mix. For now, I'll select these two. Now select the eyes now or now just pull it in here.
So we can grab. So I need to get the textile
resolution from this, so I'll go I think about
transform, I believe. Click on Gets select all
the three, click on sets. So I think they
should be fine there. So I need to select. Let's go back to
modeling standard. Okay, I haven't named this yet, so let's copy this past in a I'll select these two. I'll select just
the loon for now, I'm not going to give
its existing material. Let's give it head
crown priests. Yes. Yes, that should be
fine. So that should be fine. So I'm going to just give this a slightly
different polo toon. Okay? I think we need to
bring it closer. Let's just put it this
here should be fine. Here that's fine.
Hide those as well. Moving on. Almost
done. Save my file. Okay. Let's Lambert copy pace this here. Okay. Yeah, that's fine. Okay. Moving on to the next piece. Samba, select it again. Okay. Yeah, I think, this is fine. Basically checking
around if there's any issues in the
bots, it's fine. Less you don't, like, se dose. Okay. Lamberts. That
should be fine. Let's put the name in there. Okay. Us somewhere around here. Save my sin. Hide those. Next piece. Okay. Lamberts. A Yeah, we're going in there, so let's copy this as
well. Best it's in there. All right. Change the colour tone. This was put here instead. Now, I think I used the wrong. It's not supposed to be blink. Not supposed to it's like a
blink material, I believe. No supposed to use a blink. Set to Lambert again. Okay. Copy that name pic in the Okay. Well, at this point, we
can even use colour, so we can just reuse this since we already have
a pallets in there now, you can just reuse those. Okay. Copy paste right. Here is the pellet
we have in there. Okay. Lamberts. Copy the name. Okay. Testing the pellets
in the next one. Okay. Lamberts. Okay. Yeah, I think that should
be fine. High dos. Okay. I just wanted to be sure there are
no issues in here, so so far no issues. Okay. Lamberts. Copy pastes. Then give it a different pill think this one should be fine. Okay. Here, that's fine. Copy this paste it in here. Change colo tone, I believe
is this Tidsmo almost done. Lamberts. Copy this as well. Place that in there.
Okay. Okay, yes, yes, let's give it
repeat its name. Let's go to the end.
Let's start with the end. Feel like at this
point, I'm kind of losing track of the
colo pill that I'm using. So start at the end instead. Copied name. Yeah, I know this is
like a boring process, but still necessary. Boring but necessary process. Okay. I think at the end of
this I'm I'm going to start using the default
colors instead, Lambat copy in the let's just start using
the default instead. Center pivoNs Lambert, copy pace that's in there. Okay. That should be looking. Yeah, that's fine. We Oh. I didn't copy your name
properly, so, like so. Let's just stick with the
brighter tons for now. I Okay, Lamberts copy the name. Phase that in. This is the
next brighter tone, high dose. Here it's enclosed,
center pv one. Lamberts. Okay, passe this in. I think the name something
feels odd, delete this. Okay. All right. Almost there. Almost there. Okay. Best going to stick with it. I think we have used this
registering. Let's use this. Okay. All right. I think I can just leave
this at the whites. We have like five
more to go. Okay. We can use this. Okay. Sent up votes. Copy the name. Let's start using
this at the end. Okay. So another boring part is going to be setting up the materials, setting up the material. But we should be at
least by that time, we should have we should
kind of enjoy your process, so let's see, grab name. Okay. We can do this. All right. Select its copy pastes. To give it a different colour. A lot of colo tone in here now. Let's use these shades
of gray instead. Okay. Now for the head behind it,
I don't think I I don't think I want to do
something special in there. Okay? Because they already
have their own material. They have their own materials, which I'm going to be
importing in later on. I don't think I'm going to
import them into Subtanpnter. If I select this as
a name, move up, this has a name,
this has a name, this has a name,
this has a name, so I'm not going to
leave that as it is. And I would also hide maybe I don't think
I feel like I don't need to bring this
into Substance Painter. But at the same
time, I want to so maybe we should select only what we need to bring into
Septimspina instead. Before we do that,
let's select all of this, make this visible. So we can see all of
what we have done. You can see in label them
with different colors, even in different material IDs, anyway, I should use that word. And I'm going to
select all of this. Then I'm going to
select the head. I'll select the outer eye. Those those two should be fine. Pretty much need just those two. Okay? Then we can now export
them out as an FBX file. So let's export selection. Let's get them in
the correct folder. Copy the folder parts. Okay, fantastic. So Okay. FBX exports. Okay, that should be fine. Yes, so I'm just
going to name this to Armor Am I spelling out
correctly, Amo Talisman. Okay, let's export this out. Exporting out. Let's
done exporting. We should have it
in year. So 44 MB, which is decent decent amount. Okay? We directly just
below 30 minutes. So that's fine. So the next
lesson I was going to open up So tan spina and
then import that in. I'll see you guys in
next lesson by for now.
104. 102 Importing Maps To Substance Painter: Okay, come, but, guys. So yeah, let's get our mod anyway. So I've already gone
around and then gotten some reference that
we're going to be using for the
texturing process, okay? Because I feel I needed
references that actually help make our model look quite interesting
when texturing, so that aside, okay? That aside, so let's
move on. Okay. There are also some
references I need to bring that probably
be later though. All right. So let's
get our model in here. Okay. So yeah, I just
wanted to show you guys I think something similar to the environment
we'll be working with. So something let me just open
this up right here instead. Okay. Just like a general idea. Let me just kind of show
you guys a general idea of what our environment
would look like. So we're going to kind of
for our final rendering, I would like to our pretty might like to use an
environment similar to this, a similar environment
to something like so. Okay. So if I kind of doing the rain rain inside of inside of ranging will be trying to replicate this
similar landscape, and then try to get similar
lighting also, too. So that's pretty much what
we're going to be doing. When we kind of do
our final rendering, just kind of show you guys an example of what I'm
kind of referring to. So yeah, that out of the way. So kind of fire so let's
get down to texturing. So I'll go to Fire New. Then I'll click on select. Let's find a model. Okay, so LBXi selected. So we also need to bring in
some maps to import big maps. OpenGL is fine,
two k resolution. Document. Let's do two
k is fine for now. So let's add biked maps. So a big map, I believe you are in here. So all of the maps we
need Okay, you need this. So let me just select
the entire outing. Then I need to deselect. We have these two skirts emblem. So I'll find skate emblem. The second one and those
going to skirts Emblem. Here is the one
and those going to deselect that don't need that. Let's see if there's any
other one, we name that two. Okay, that should be fine.
Everything should be fine. I'll open this up. Okay, I'll also add another one for the skin for the head mode
that we already have. So I'll need to
find where that is. I think doctor Khan,
that is the one. LP text shows. So we need the base color, we need the normal map, we
need the roughness map. Then for the outer eye. So we need to find
for the outer eye. So we need the
outer eye for this. So the outer eye normal outer
eye base color opacity, probably, let's just leave
it select that, okay. I think that is pretty okay, eye roughness also too. I think that's pretty
much all we need. I'm also going to be
providing this file, too, so I click on open. Okay. So I think that should be
pretty much everything now. Click Okay. Let's give this a moment to
offload into our scene. All right. Fantastic. So we have it
brought in successfully, which is rectly we want. And we don't really have
any issues because we did we did a really good job just setting
everything up in Maya, baking the necessary
maps we need. So you can now see the
beauty of this right in here with some lights
in there. Go in. You can see this also as well. Everything came in correctly. So if you just kind of do, let's say we add some
shadows in here, you should kind of
pretty much appreciate the work even more, okay? So everything came
in quite nicely. Everything came in quite nicely. No error issues. Okay, but I'm not going
to using panorama. I would like to
use the studio to marco instead have
kind of flat lighting. So to properly better
oppose kind of texture models properly with some kind of neutral
lighting in there. Right? Awesome. What I like to do is to adjust
the camera angle, so field of view. Let's do MMM. Let's do 50. Let's do 50 millimeter lens. Okay, here, that should
be roughly there. Then I'm just going to
turn up the shadows. The next thing to
do is to save this. Save, make sure we save this. Let's Let's Let's do
POS, so we get the name. Is that dots at the end
and put P in front. Okay. I'll save this
saving down here now. So we have quite a lot of maps, lot of models in here, so we need to assign each one to their respective normal maps, so we can atleast
see the normals in there properly. Okay? So stick in the white to
kind of save come back when this is done. Done saving. So kind of apply the normal
mouse piece by piece. Okay, so let's say the
first one arm chain. I don't think we can
really frame in here, so can't necessarily
frame in here. Or let's isolate it.
Let's see where we get. Okay, so let's go into
our maps, select normal. So name is A chin Mill. So we have chin milleni.
Let's select that. Let's see if you have any
major difference in there. So far, no major difference, so this should should be just
fine. To work just fine. Okay? Alright. Let's show all. Let's say that. Let's
move to the next one. Okay. There's our caskets. It's only framing into
the or the entire mesh. Let's see if there's
any setting in here that allows us to frame just into selected mesh only. Don't see any in here. Anyways, let's move on. So let's bring in the map for this. I really need to know
the name for it. This caskets body. Casket body caskets body, this is the one, select it. Okay, you can see it brings in the sculpted details
in there now. So far so good, all the details seems
to be in there. Okay, I think we should
be good in India. Don't see any major issues
so far, we should be fine. Inter may do this. Okay. I think I
selecting the wrong one. But that's fine. Let's
go to the next one. Doesn't frame into it except maybe I might
clicking something. Okay. Anyways, moving
on getting close. We're pretty much going to
import this for everything. So caskets, boots. I think I need to extend this
so I see the name properly. So caskets boots lower. Caskets boots lower. Okay. I don't really see any major
difference in there so far. That should be should
be fine the way it is. If I pull out this,
bring it back. My on the right one.
Casket both lower. I need to be sure if
I'm on the right one, caskets both lower that's
the run. Okay, next one. Okay. Have the casket both stop. Casket both stop. All right. I think we have those in. I think I also need to kind
of maybe roughly check. So far so good, everything seems to be coming
out just fine. Okay. Move to the next one. Cascade chains get in close. So it's important you're
actually going to check just to be sure everything's
working correctly. So cascade chains Oh, I think I hit hit
something else, I need to go back,
return to painting mood. Okay? So select normal
cascades chains. Good gonna arrange
alphabetically cascade chains. Okay, we have them
imported incorrectly. Casket cuves. Casket cuve should
be the next one. Okay, so far so good
correctly as well. Close that casket helmets. Get in the casket helmets. It should be this because it's going to arrange alphabetically. All right. Fantastic. We
have that in here as well. Okay. All good. Okay. This we can work
with Casket' body. So casket body, this should
be the one casket male body. That is fine. Caskets mark Okay. Caskets Mark Alright yes, this is fine. Casket news. So probably just Okay, let's just put name
put caskets there. And then you should have
everything that has to do with that casket,
mass casket news. Okay. Where are those
came in correctly? Cascades hold. Caskets. Plate hold. Here, that's the one.
Okay. Yeah, fine. Alright, this should
work just fine. Okay. Let's move to the next
one, doctor K. Yeah, this one shouldn't be
too much of an issue. We just do the ERK is
a normal map for that. You should see all the
details now in there. Fine. Elbow belts. Should be this Let's such
elbow belts, elbow. That should be the
one. Okay, for eds, quite a number of them to go. Emerald Stone. Okay. Emerald Stone.
That should be the one. I only see much happening
in here, though. I only see much
happening in there. That's fine. Except maybe it's flips. Maybe we didn't flip
this so Emerald stone. I would like to find out to be sure if I actually
filled out correctly. These are kind of
issues like you might want to check
if it's actually an issue Emerald stone. Okay. This is down, so we need to
confirm that from in here, you're editing, select
the Emerald Stone. That's not the one. Okay, yeah, this right place on
the right place, so we can move on. Just need this kind of
cross check to be sure. Food boats. So those
type in foods, food boats that one
is in food guard. Okay. Food guard that
should be the one. Okay? Put meat pants. Put meat pants, that's the one. Okay, food strap. Since you kind of put
your name in there, it's going to be quite easier to just kind of select them. Okay? Put where Put where. Okay, fantastic. And
back parts. Okay? Nba parts. So I think you guys get the general
idea for this back parts. So I'm just going
to type in in here. So back parts will be
the first thing here. Okay. Sets that's fine. So you guys can go through
and then we'll go through and then apply all of those normal maps, the
necessary channels. Okay, so I'll see you guys in
the next lesson by for now.
105. 103 Baking Maps To Substance Painter: So welcome back, guys.
So let's get right into the texturing process.
But first, we need to. So I've gone around and then applied all the normal maps
needed for everything. So I did that off screen, which I've already kind
of explained the process. It's now less big, so I'm
going to scroll down. Okay, just before I
scroll down there are some settings we need to
kind of set up also, too. I believe let's
let's find those. So reflection maybe
it's not there. Okay, I found it. So
specular quality, let's increase that to high. Let's make sure we get the get good specular setup in here. Okay? Also, I think we have
set our camera already. I believe we have we've
set that already. So now let's go and then Okay. So let's go to big Maps. So it's going to open up a
different workspace for us. So this is where we kind of some other additional
settings in here. So I would like to do
here is to default, I would like to
Btk in resolution. Okay? Yes, I would also
like to tone off normal. I don't use to bake
normal for us because we already have imported
our custom normals. So what we need to do is
to do apply selection to all texture sets. Okay? So if we should come
in here now down here, you can see the
normal is toned off, which is kind of
precisely what we want. That we need to do is
to go over to HID. Want this to be by mesh
ID. Very important. This would also apply
to meshes, too. You can see selecting
older textual sets. We have this apply to
textual sets, which is fine, and that's to adjust to go to CvrtualGenerate from normal map. Want to generate our covate from normal map, very important. It's going to use details
from a normal map to create cavity or
rather cortual for us. Covirtual maxing for us is fine. And that would also apply
to other meshes, too. One last thing is to go to embient eclusion self occlusion. I always put it to Off
Oly s mesh name rather. Why, because I don't
have kind of weird visible embient
seclusion around here. So around in between where
two meshes kind of mit. So this should be
pretty more just fine. Yes, this is fine. So that should also apply to the others, which is precisely what we need. So now we'll go down to go down. Okay, it's already the already. So I need to do click on
big selected textures. So everything here is
going to big that. So let's click on Big
selected textures. So this might be y so we'll
come back when this is done. Okay, so we're kind of done with the baking process. Okay. Most of these kind
of bits correctly, so I'm just basically checking. For the most parts
for most parts, peaks came out well. Except for some weird
issues around there. This one is just from the
ambient seclusion map, so it shouldn't be too
much of an issue actually. Okay. Shouldn't be
too much of an issue. Check the rest of this. Okay? Yeah, I think we should be
going in here, click on. I'm going to click on
return to painting mode. Alright. Then I'm going to save my file. H.
106. 104 Old Grunge Silver Metal Substance Painter: Okay, so now let's get right
into the texturing process. So I'm going to going to
control O and then click. I'm going to right click on these brastplt or Tso
chess plates instead. So I'm going to isolate this, so let's start with this first. So already have a reference
we can definitely use so this is reference
we're going to use. Let me find that. Okay? It's pretty much
what I reference is too, but it is for the ground
you have on this. I'm going to be
starting with this, let's put this up here for now. Okay, shrink this a bit more. Okay, that's fine. Then let's go to layers. I'm going to delete
what we have here. Feel like I should bring in put the new few
layer and then bring in squash this down. And bring in the
normal map again. So let's turn on
the normal channel. I'm just going to
type in tosso plates. Let's just put splits. I think you should
bring that out for us. Okay. So tossochest plates, just to kind of accentuate the normal
map detail there again. Making it a bit more obvious
to see. Okay, that's fine. So I'm just going to
name this to normal. All right. So now let's find the material that's relac
this grunge texture in here. It's going to be on the
eight channel instead. So I'm going to let's go
towards the positive value. I'm going to create a black max, and I'm going to add
a few layer in there. Let's find a material that's
kind of closest to it. So I'm going to type in grunge. Going to move the
plates in there. Okay. So, if you think I'm not
spelling this correctly, it's supposed to be Gs. Why do I keep typing the wrong? Okay, it's just not
complete, that's why. Just not complete,
yes. All right. So I need to find something
closest to what we have. We have in our reference. Kind of good options in here. So let's find something quite
close. This is one example. Okay. This one looks quite good, but obviously way too intense, so let's go and then take down the intensity of
this. All right. So probably getting something interesting enough to work with. And I'm going to do
triplina mapping in here. You know, that's the
wrong place to put tramplina mapping
tramplinar mapping should be in here instead, yes. So triplanar mapping. So anyway, we have si line
going to kind of ignore that and then just get something that goes
around the entire mesh. Also, I need to set this to fork a resolution
so we can kind of properly see the quality of
that map affecting this mesh. So right off the bat, we already have something quite
interesting to work with. So I'm going to increase the intensity a little
bit more. Okay. Now do I need to
kind of tile this? Let's see if we don't necessarily need to kind
of tile this though. But let's do some tieing. Let's see what we get
when we tile this. S get even more better
looking results. Okay? Also, if we go towards
a negative value, let's say we go towards
towards a negative, we get something like so, which is also quite nice. I think I might just skip this. Okay? Yeah, for the most part, this
would come out just fine. Okay. So I'm going
to kind of establish the Bs height information
first before moving on. I want to establish this first. So I'll kind of see
some dnsing here. I'd like to introduce
another dnsing here. Let's do Grunge. Okay. D Alright I'm going to duplicate this or
hide this for now. So for this here, I need to change this to
something else. Let's do ground spots. I'd like to introduce
some spots in there. I kind of eats into
the mesh itself. Let's look for I think this
one is a bit distorted. I think this should
be a good one. Okay. This looking
quite interesting. So we also have this
triplanar mapping. So let me do one. We do one, and I think we
need a little bit more. Okay, like so should be fine. Well, we need to kind of max out this is affecting
the entire mesh. I don't want it all
over the place. Maybe we want maybe want
it all over the place. So let's turn this on. Let's
compare. Yeah, I think. This will be just fine. But I would like to also I like to blow it just a
little bit more and also get some some more
dense steps to it. And then I'll do art filter. Let's do blow filter. Okay? Let's see. Maybe with too much. Maybe like so. Let's bring
the other one back out. Let's see what we
get. Okay, this is by itself already looking quite interesting
to work with. Alright. Okay. Keep
interesting enough. See if we have some
depth shadows in there, I think we should
introduce a little bit of black colour tone in here. Let's see, let's
do something dark. Then I'll take down the opacity of it for
the colour itself. Maybe that's bit too much. I want to get those
black tints in there. So we have some
extra detail of kind of tap shadowing
in there, anyway. Alright. This is
working just fine. I'll do it quick sieve. Okay,
that is fine. So moving on. Yeah, there to kind of establish
something here for now. Okay? We seem to add
some scratches also, too in the batting for now. For now, I think we are
in a good place for now. Okay? So we should look
at other references too. I'm not star adding any
metal property to this yet, but at least we see some of
the details in here now. Okay. So this will
definitely help also, too. Yes this is fine. It's fine. All right, so moving on. So I'd like to introduce you look at the
mirror reference, you can see this feels more
like a sil val or metal. It's a metapieovius. So let's look for a meta
piece we can bring in there to sell and measure
a little bit more. Okay? So I would we might still
come back to this though, but let's just add
a metal material. So let's go to smart material
and type in metal in there. Okay? So let's find a metal material that would look
good enough for it. We have this silver.
Silver looks good. We have this steel. Then we have the steel rough. Then we have this tell ruined. I think this tell ruined
should be a good one. The legs drag and drop
this in here, right. I'll give you some
Immense kind of load up and then we'll see
what we have and see what we can kind of
adjust in here as well. You are awesome.
So we're getting quite interesting looking
result out of this already. So hadoscrb through. Alright. Yes, this is looking
quite interesting. Need to do a lot more work in here, but for the most part, I think we're getting quite interesting looking
results in already. Okay? So now I like to
be to hide this for now, I go in here or introduce
the color and metal rough. So let's hide this for now. Let's increase the
metallic property for it. Okay, Roughness, Okay. Do I need to hide, okay, need to do something like so. Let's see the amount of
roughness we want in there. Maybe something
around there like so. Then this tone, I think I use something a little bit
darker so roughness, make it slightly rough. Like so. Let's turn this
on. Let's see what we get. Let's see if we can find any
major difference in there. No significant
difference in there. So maybe, let's say we drag
this on top and let's see. Okay. Now, that's a bit extreme. Okay, that's getting
close. Let's see. So there's something I
kind of notice in here. We can't really see the
let me turn this on. We can't really see the
details of what we did in here in these two when
we have this on top. So we need to kind of find
a way to actually fix that. The way to fix that should
be dragging this on top. Let's get this on top. Okay. Then also to think the height information
might be too strong. Okay? They get something
like so going. I also like to add metallic
property to it as well. Let's give it some metallic
property roughness as well. Okay. Maybe not completely rough. Maybe it somewhere around
there should be fine. Okay. Check the surfacing
for this a bit more. We obviously need some
more roughness in there, some more breaker for
the roughness in there, but we'll get to that in a bit. Now for this, I'm going
to drag this on top. That will give us some
crazy grunge in there, which is way too intense, but would adapt to that
kind of make this better. Let me just add some
more roughness to it. So I'm going to go to the just go to the
information we have in here. And then Let's dow this down. Okay. So also one thing that's very important is
you always want to kind of check your model
at a distance just to get a good idea how it looks like
from a distance, if you have your
right balance for it. I think for the most part, I think, all we kind
of get includes, you kind of see more of the
grunge and pre cops in here, which is giving us more of
an interesting result to it. I actually is precisely
what we're going for. Then looking at this
from a distance, feels like feels like the right amount of
balance in there. So, that's fine. So moving on. So if you go back to
our original reference, let me see this again. Okay. So let's kind of check
out the reference again. So yes, we're kind of
roughly in a good place. So one thing I'd
like to add would be Let's look for actual I think this one
feels a bit more sgy. So let's look for more
something close to real world. And let's kind of compare and
see what we have in there. So you also see a lot of
discolorations in here. This one is quite
a age quite well. We don't want to go
this extreme though. We still want to
get some shine in there. It's another one. Okay? So one thing we are
kind of missing is roast. In missing some dark roast and then some light roast and then some deep
scratches in there as well. So I'm going to duplicate. Let's let me kind
of rename this. I think this one has dents.
Let's name the two dents. Tens. All right. Then I'm going to
duplicate this. So for this one, I need
scratches to be on here. So let's go and find
some scratches. Let's find scratches. Seems to be spelling this wrong. Okay. Yes. So let's I'll find large
randomized scratches, though. Okay. So fed doesn't feel. Let's find something that resonates more with
what we are going for. Okay. You know, this one
looks interesting. But it comes with some
additional detail. I just want something
that's kind of like this, on black and white sheets. Scratch generator. Okay, let's
go for scratch generator. Let's see what that gives us. I'm going to hide
everything else. And this is obviously
all over the place. So let's use a
value of one. Okay. Let's take down the balance. I think that the balance
even more. Okay. I think we need to extend this one is gonna take a longer time to
kind of adjust correctly. So let's use this instead. Just this will work just fine. So I will need to take I need to make this
a bit more shiny. Okay, roughness, a bit more
shiny scratches in there. Then let's make some
adjustments on the piling. Okay. Okay, adjust the
balance as well. We don't want this
all over the place. Okay. Let's see scratch, w that's way too much. Find a good balance. So let's
turn these orders back on. Do you have any colour okay? You don't have any
colour in there. Okay, I think as far as
this goes, this should sit. This should sit quite nicely
in here for just this okay? All right. I think this is fine. This is fine. Moving on. So what, what we're going to replicate across
the entire mesh? That's where I'm gonna get
this to look just right. So it's important to get
this to look just right. Okay, so I think we can
start intro using roast. Let's look at our
main reference. So let's start intro using
some layers of roasting here. So I think I would
just go in here and typing let's type in roasts. Mm Roast roasts. Let's see a reference. Mm. I don't want to. I already have something close to what we have in here already. So I think let's go over
to materials instead. So on the materials,
we have me tau roasts. Okay, West creates
our own roast, too. You know what? Let's start with a more
salto kind of roast. Cretin did this by ourselves. So let's start a most
sat kind of roast. I'm going to choose. Let's do let's find. Let me just colo
pick this instead. A most salted kind of roast kind of uses this way like so. SoTn on roughness for this. Make this quite rough. Okay. Then I'm going to add
a black mark in there, and let's use the Smart max. So typing roast roast
is already in there, so let's let's see what
we can do in here. Let's do edge roast, drag and drop this in there. So it's going to start
giving us something in here. Okay? So yeah, this is
this we can work with. Yeah, this we can work
with as starts in base. So let's go in
there and then make some adjustment to it generally. Can we randomize, increase
the balance for this, let's see where this
is affecting. Okay. All right. If we take this down, you think roughly around
there should be fine. Let's go down to the
next Max editor. Let's see what we have.
Definitely notes. Let's go back up. Let's see. Okay? I just need more faded
more faded amounts in there. So I'm being quite
careful in here. Okay. So I'm going to go in and then I'll just take this down. Say we need a bit more faint. Faint kind of value in there. Yeah, this is a good one. It's a good one. This
will definitely work. A faint value just to create some kind of imbalance in there. Okay, that should be fine. So let's look at
another reference. Okay? So we have another
set of colors for this. So I'll duplicate this. Let's do duplicate for it. Okay? Then I'll change the color. Let's use more yellowish
slightly yellowish tone to it. Okay. Then we need to obviously change the way this is
affecting our model. So let's start by randomizing. I think I might need to push this towards a more
yellowish tone. Okay? All right. And then we make some
adjustment to this. Okay. Let's see. I need to randomize
this randomize. Come down yet to next one. Can I randomize this as well? There's no randomized
value for this. That is fine. Increase
this a bit more. Okay. Now, let's take it down. Okay? So add another
layer of roast in here, but I think it's ti too intense. Another layer of roasts. Okay? I think I would let's introduce some discoloration
in here as well, add some metallic
property to it. Then let's go and increase
this let's see what we get. All right. Obviously, we too much, so we need to take it down, and I need to Okay. Let's this off and
on. Let's see. We have some shine in there. I think I'll need to
bring this down instead. Okay. It's kind of hiding our
shine. Let's increase this. Let's see. Go through this with a light and
then see what we have. Okay. Yeah, yeah, I think
this should be just fine. Fine. Alright, so I still want to make sure we get some sharp highlights
in regions. And some sharp
highlights in here. If you look at this, also
get that sharp highlights from some reflection in there. So we should also work just
fine. Okay? Moving on. Let's see what else we
are probably missing. So now we can bring in that
more aggressive roast now. So I think I need to label this. Let's do yellow, yellow, shine. Name this to yellow shine. Okay, let's name this
lights roasts Lights. Lights Roasts. Okay. Fantastic. I think they should
be just fine. Then now we can go in
and then let's use Okay. I do I think I'm trying
to see No No darts. Okay. Yeah, we can also kind of
paint some of these off. So it's we can paint this now I need to add a
pincer paint layer. I can paint paint
off some of this. Okay? Yeah so should be's paint some of
this off as well. I. Okay, I think we're getting
good results already in here. This loose kind of
battered and used. Awesome. So moving on. Let's go in and add
our roast material, so it should be
under material rust. So I'm just going to drag
and drop this in here. Let's put this just
above the shine first. Let's see what we get.
I think I did that. I didn't do that correctly. I didn't do that
correctly, so I'm just going to drag
and drop this on top. Okay, now this feels
all over the place. So don't want this to
be all over the place. I mean, obviously it shouldn't
be all over the place. So let's see what we
can do Smart max. Okay? Surface.
Let's try this on. The surface roasts. So it's loading up. Let's give this little moment to load up. This is a bit weird. Oh, no, no. Not there. Add the black mark first and drag and drop
this into that max. Okay. I would say I'm not really
digging what we have in here. This rot itself kind of
covering the entire outting, so we don't want that.
We don't want that. Let's make some adjustments in. Okay, we want it on some part, but we definitely don't
want it all over the place. Okay? Let's see on the keyboard. Let's see the mark
itself for it. Okay, you contrast. I need to get sharp
contrast in there actually. So it's amiga on the
keyboard, let's see. IT our contrast might
be slightly too much. Let's adjust that a little,
increase the balance. Okay. We definitely don't
want this all over the place. So let's see texture one. That just increase the
amounts, but let's see. Take this down. It's
looking a bit weird. Kind of creating a weird
undertone for this. I Okay. Let me select this instead. I put in this whitishness. I don't know why we have this whitishness
in there, though. I'm not supposed to
get this whitish looking thing in there. So let's go back to x and then still make
some adjustment to this. Okay? Should be able to
randomize this I mean. Should be open curvature. Okay. I want to have the option to
be able to randomize this, but you're not really getting
that option in there, so here is what I'm going to do. I'm going to increase this, and I'm going to go
over another few layer. And I'm going to drive this
few layer with a grunge map. Let's do grunge. Okay, let's find something. You know, L let's
find something. Let's find something a bit more aggressive, maybe
something like so. Then I'm going to do multiply. So this should kind of help us kind of max things
out a little bit more. And we don't want any It
information in there. Is there any It information? We need to, we have a little
bit of It information. Okay, so let's go back in there. Let's see. All right. We don't want this
all over the place. Just looking at our reference, I mean reference, actually. We can see some of
those in there, but I don't want too much Okay, I think we can
actually sell this. Okay? This should be just
about fine, right. There's one last
thing I like to do. Let's see if that helps
a lot or maybe not so. I have this oil texture. I have this oil texture. I think that smart material, you have this oil texture. So I'm just going to drag
and drop this on top. Let's see if this gives a more interesting result to it or it completely ruins it. So it looks something
somewhat like this, then I will just
do have overlay. Maybe overlay seems way
too much extra screen. Then pretty much just This is just looking
like it's going to kind of kill the entire then. And it comes with
way too much way too much roughness to it. Okay. Let's find a good spot
for this, actually. Might not necessarily
need this at the end, but I'm just trying to add
some interest to textures, trying to add some
interest to it. It doesn't seem to be doing anything super
interesting in there. It doesn't seem to
be doing anything super interesting
in there so far. Let me take it
down down all the. Let's see. Okay. Maybe it wouldn't
completely take off the roughness in there. Do you do anything
interesting, probably notes. I don't see anything
interesting in here, so I'm basically just
experimenting just to see if I get something at least
interesting in there, but for the most part,
I don't think so. I think this should
work. Pretty much does fine for what
we need it for. Let's see, based on
all our references, let's see if there's
something else we can add. Maybe there's something
else we can add. But we get good highlights
in here already. Okay. These highlights
I want to keep. Alright, so this should be fine. So I'll see you guys in the
next lesson bye for now.
107. 105 Old Grunge Bronze Metal Substance Painter: Welcome ba, guys, so let's
continue on on this project. I think we've kind of
created the base for this. So the only thing I feel might need to
probably adjust would be the grunge intensity that's
if we actually need to. But at the same time, I would still like to
kind of keep it. Maybe feel definitely
feels too strong. So let's go back to where they
are and then adjust them. Let me kind of pull ups this. The dent I think the
dens is a bit too deep. So let's kind of take
that down a bit more. Okay? Like, so it
should be fine. Alright, turn this
off and on. Right? I think the ros also comes with its own its own
heights information. So let's go in there
and then height range. Let's take down
the height range. Okay. Maybe just lit in there. Not something that
strong should be on it. All right. Yeah, that
should be fine. Okay. Then go to the Grunge ts. This one show definitely
phase two intense. So let's go to our channel. Let's go to Heights and
then let's take down the generalis detail in there. You zero this out,
this is what we have. Okay. Let's compare this again. I think we need to
do this. We need to do this inside of it instead. Okay. This is a bit strange. This is rather strange. I'm not supposed
to be having this. Why am I having this? I
just need to remove it, so I just need to
remove that like so. That's not supposed
to be in there. Okay. This is for the scratches,
I need to rename this. To scratches in there. All right, that's fine. I
want to go back in here. It's already quite slow, so I think, let's see. It's low, but still feels
like maybe too intense. Still feels very,
very much intense, so let's see what
we can do in here to produce that ton this off. It's really quite
low on its own. It seems like the odor sink
is from where is that steel. Let's go into it. Let's find where I
think this should be. Let's see bumps as well. Okay? So we need to reduce the
it information for this. Let's take it down a
little bit and move up, bring back our grunge. A ground still is very intense. And it's most likely
coming from the roughness. I think somewhere like so. So just a matter of going back and forth and
then trying to and then try to figure out
the right balance for it because I'm going
to be duplicating this across the entire mesh. So I need to kind of figure
out a good balance for it. Okay. Look at this
from a distance. Because we're pretty much
going to be looking at this, more or less from a
distance like so. So we need to actually make sure at least we get good
details in there. Then on close up, we have good growing detail
across this also as well. For the most part, this should mostly most likely just be fine. Okay. Let's move up a bit. Let's see. Here, we need
the highlights. Okay? Now, this I need to take down. Like so you can see, I think I think from I think the issue we're having in
here is the rough net itself. Everything looks a
good balance now. So the rust rather these roasts, I'll go in there You
need to sit in there. Then this one on top. I think we need to kind of
break this up even more. I'm going to add
another few layer. On this few layer, I'm
going to use the clouds. This is the cloud. I would let's use Cloud three let's
say this is to multiply. Okay. So it's going
to kind of let me D this lower one for now. Okay, I think that
should be fine. Let's just go into the
clouds just a bit more. Okay. Yeah, I think this will work. This
will work just fine. You just not make it sure
across the entire mesh. So, yes, I think this is a
good place. It's perfect. It works just fine. So now we
need to convert all of this nine to a smart material
that we can just reuse. Also to outn this back on. I adds a little bit of
something in there, so I'm going to take
it down a bit small. Adds a little bit of something. As a little bit of this
coloration in there. Okay. Let's do triplanar
mapping in there instead. Without this. Let's say we
go and increase this again. Okay. All right. Let's do a bit more tiling
in there. All right? Let's see if we do UV
projection, let's see. Maybe do some rotation like so. All right, then blend this down. Okay. Now we get an
int of interest to it. There's a little bit
of interest to it. I go off and on. You can see there's
a little bit of interest to our texture itself. So I'll just most likely
leave it on. All right. Moving on. So I'm going to put all of
this now into a group. I will group this so
they're all in a group now. Let's collapse this group. I'm going to rename this
group to Heirs Grunge or rather old Old Grunge metal. Old grunge. Metal. Alright, that should be
fine. I'll save this. So this way I'm doing
this is because I can actually use this
on other meshes. Okay? So I'll need
to convert this into a smart materials clear
concrete smart material. So we have it down here now. You cannot create
a preview for us. So we have that in here now. You can see how
interesting it looks. So now we need to go back in here let's look at
our main reference. So now we need to figure out this particular material
we just created now, which other mesh or mode actually needs
the same material, so This long cage actually
needs the same material. Even our road also needs
the same material. This body also need
the same material. Okay? The mouth also
need the same material. So we're going to be even
the color also, too, so we're going to be duplicating it across that across them. So let's look for the I
believe it should be torso. Let's go to torso torso color. Turn on the torso color. Okay, go to the torso color. Open it up, delete this. So just need to kind of
import that in there. So I'm just going to drag and
drop the material on there. But, see, we still
have this kind of bronze splitted
material also in there. So we need to kind of create the bronze version of it, too. Okay. All right. But we need to make at least quite some
more adjustments and modifications to it. Okay? So here, let's get in there. I would add ahite max. I'll go to this
selection polygon fill. So it's on black already. Let's use mesh fill instead. I will exclude Anyways, let's exclude let's eat X again and select
this alone for now. Alright. So moving on. So it feels feels quite rough. I'd like to introduce some
more shininess to it. Let's create bringing some
more shininess to it. Now if you take out this grunge, can see how you have a bit
more interest to mesh. Okay? So let's say I take this
down we hid it completely, we get slight interest to it, but now they are a little bit of discrepancies in between them. So I would like to go in there and I would let's go to the bar let's go to
the ground concrete. Okay. Let's take it down
a little bit more. So this is that we can
kind of add more variation to the materials in here and make it feel
more interesting. Okay. And another
interesting thing to this is that we can get variations
of this as we please. We can get something rough. We can get something not
as damaged or we like so. So we still have
that option, too. So moving on, just
need to kind of find kind of a good balance for this because the idea for this is that we're
going to be looking at this from a distance. So since we're looking
at this from a distance, let's make sure the filling from a distance actually
looks good also as well. That's why I'm kind
of getting my light across this just to get a good feel of it
from a distance. We see that shine with some discolorations
in there as well, which would work just fine
for what we need it for. So it's important kind of look at it from a distance
just to be sure. I think we can set you for this. We have good shine across this. Now we need to kind of
duplicate this and then create this bronze looking
material out of it. Okay. So I'm going to
just duplicate this. All right. I need
to save my file. All right, so I'm going to
hide this lower one for now. So let's go in. So generally, you just go over to the steel damaged and then begin to change the base material in there to something more bronze splitted. Let's use the shiny.
Let's try this. Okay? So any any silver machine here, what I was going to adjust that to something a bit
more good plated instead. Maybe even hide all
of this for now. Okay, coming here as well. Change the tone. Okay. All right. Go down again. I think this one comes
with let's hide this also. Here, we need to ton of this
oil oil oil texture for now. Let's go to the core of the material and
then make sure this is looking more silver. I mean, more bronze
Same Band seclusion detailing is actually
quite nice, too. So let's go down. Let's see, yes. So we get
the material in here now. So this is what was kind of obstructing or seeing most
of the details in there. So let's get in there.
Turn it back on. And then let's use,
it's using more lighter sheade more or less
like darker sheade. So let's find more darker
shade of this color, like maybe something
maybe something around here, like so. Move out a little bit distance. Let's see where we
get. We turn this off. Okay, I would like to introduce some more let me duplicate
this material first. I'd like to introduce some
more metallic property to it. Okay. That's interesting. So
I'm getting a bit more of an interesting result
to this now. All right. I'm just trying to
figure out if I need to make this brighter
than it is right now, but I don't think so.
So let's carry on. Let's back the other materials, so let's turn on this oil. Okay. Yeah, this one, we need to adjust
a little bit more. So let's go to the
blow, blow this out. So that will actually
kind of blow out the edges way more. Let's do a little bit more. Okay, the orientation for this, I might need to just change
the orientation for this, let's adjust the
orientation for it. Okay. Yeah, fantastic. This is looking I'm giving it a
bit more interest to it, so I think we need to take down the visibility shouldn't
be so visible in there. I think something fits faint
like, so it should be fine. So let's bring back our
dense grunge heights. Our grange heights seems
to be quite aggressive in our group in the again. Okay. Like so. Okay. This also need to actually
kind of change to more, let's try this brighter tone. Okay. Pre see if I can bring
more shine to it. Okay. Let's get in there. I think the previous amount
should be just fine. Then again, go and check this
from a distance. Let's see. Okay. I feel like I'm just
kind of brighten up the Biz bronze material. But let me make a
duplicate of this first. Let's push this towards
a more brighter tone. Okay, so it does a bit too much. Let's see I think something somewhere around
here should be fine. Take this at a distance. Move a light through it just to see what we're getting in there. Okay. Yeah, that should sit. That should sit just
fine. All right. Let's introduce back our roast. Okay? Our roast is also complementing it,
which is also cool. Okay. I think we have
this edging here, which we're not
supposed to have. So let's see what is where
that is coming from. Okay. Let's see
edge damage pumps. Okay, that's from
the edge light. So we need to kind
of change this. We need to use a
more brighter shade. Okay. Who towards a more
brighter shade. All right. Would this work lighting this a bit more Lighting
this a bit more. A bit more. Okay, perfect. Yeah, this should be
roughly what we need. All right, so just
gonna rename these two. Let's put bronze. Okay. I will delete the number
we have in there, and I'm going to save this
as a new smart material. Okay. So that is fine. So now we just need to apply
it where it needs to be. So to do that, I would just we already
have a max in here. I'll add a black mark
on this and then I'll go over to Mesh
field, select these two. Eat X on the keyboard, select this, then
turn this back on. Okay? And then we
should be good. Alright, I think the
dance we have in there is way too strong. Let's go to dance. Yes, this dance is
way too strong. Let's get in there get in there. Tau this even more. Okay? And I don't want it
to be darts agresib in the so let's just
do something like so. Putting it of complete let's
turn it off completely. I don't think we
would need those. Okay? All right. I think this we can
definitely work with. Run this through again. Okay. Yeah, so now we can just keep kind of copying and pasting this on
the others also, too. Alright. So let's just kind of work
on the head head parts. So I'll go and then I'll just Look at this from
M distance again. Let's see what we
get from M distance. We get that interesting
shine on it. Okay. It's fine. All right. Okay. This work just fine. So let's go over to let's go
over to the head helmets. I'll copy this bronze. I'll copy this bronze. Okay. Let's go over to head. Let's turn on the head
crown, head lower, head priest, head hoodie, head marks as well. Head wings. Okay. Fantastic. So let's start with the let's start
with the head wings. So it's going to be having
the bronze material, so let's space that in there. There's a black mark. Let's
move the mark in there. Okay. All right. Good. Yeah, this is actually
perfect, actually. This will work just
fine. We don't necessarily need to do any detail in there
work just fine. Okay. I'll go over
to the head hoodie, select the head hoodie. Okay. Place the same
material in there. I also need to remove the marks. Alright, you can see how
beautiful this actually looks. It's all the we kind of took our time to kind of add
the right detail in there. So right of the bolt, we get something looking
quite cool in this. Except for the
scratches, though, scratches seems a bit dd. We have dd scratches in there, so let's go into the scratches. And then let's adjust the randomization of that or add the tiling for it rather. So Okay. Fantastic. Alright,
can see we get that interesting interesting
looking shine to it. Which is what we're
actually going for. Okay. But for the, for
the wings itself, for the head wings, we can
go over to the heard wings. The eye texture I brought
in for the wings, I would like to make it a
little bit more obvious. So we're just going to
increase this, slightly. You can see I some
discolorations in there, so let's go into it. Maybe tau this save
little bit more. Orientation, chain orientation. Okay, offsets are
just the offsets. Yeah, something
like almost there. Almost there. Okay. Okay. Yeah, something like so. Let me try the rotation again. Okay. Yeah, I think I like this even better. I
like this even better. So we turned that off, and
now we get something like sobrec of the texture even more. Okay. So moving on, moving on. So let's go to the crown. Let's go to the crown. Yes. So this crown, I will need to do some
adjustments in there by reducing some of the intensity in there. Okay. Yes. But
before we do that, let's just apply material
for this priest, so I'm going to use the Let's use the Let's use the metal. I don't use more metal instead I don't use
more metal for this. So let's see let's use
something that's a bit more There's a little
bit more shine to it. Legos default for this default
for this should be fine. We do make some
adjustments to it. So crown priests. I don't want to work
on this yet because there's still some things
that I need to do in there. So let's delete this Legos
drag and drop this in there et's give you a moments. Okay. Yeah, I think this
should looks fine. Looks fine. Except
we go in and then takes the edge damaged? These dates. Let's see roughness. Yes, let's just take out
the roughness for now. Let's make it feel a little
bit more shiny in there. Okay? That should be fine. Okay. I'll paste this in
here. I selected this. I think this one comes
with the crown as well. Comes with
the crown as well. So let's remove the marks. So this one we need to make adjustments and then
corrections in there. Okay. No, I was actually
trying to select this. This one comes with Let's
space this in there. Let's space the
previously copied. Let's do remove marks. Let's see what that is. I think the okay that actually
comes with the Okay, yes. Yes. Yes. That's the one. But the colours need
to be different. Needs to have some
different colours in there. This one is supposed to be
a bit the metal version. So let's go and then copy this go into this mesh
and copy the metal, the silver metal, then
come back in here. Okay. Let's add a black max in. Let's do white max
instead. White max. Okay, now the selects do the selects click
on them instead. But this one is supposed to
have the good or the bronze. So let's paste in the
new metal version we copied and let's
see what we get. Okay. So for this one, I think I'll need to
kind of take the roasts. Just roast is fine. Roast
roast is actually fine. Maybe just, you know, make it dart
visible, so paint o. Then let's take off
these grunge ides. Let's take off the grange ides. Or you know, we need that. We need that grange is.
We need the grunge ides. I need that also. Yeah, I'll just hide this oil
texture painting in this oil texture in there. So this should be fine. Okay? I'll add a black marks to it. Then I'll just go
and then select eat eggs to go to the
whites, select them. Yeah, that should be fine.
So in the next lesson, we're going to go
in and then make some adjustment
to this crown and add some pattern in here. Okay? So I'll do that in the
next lesson. Bye for now.
108. 106 Crow Metal Substance Painter: We come about, guys. So
going through this again, I kind of testing shadows and reflection and then
testing a new Asia. So I'm using the studio white, which is down here. So when I turned on the shadow. I kind of notice
something in there that is not looking
quite appealing. From a distance, we
can't really see that shine. It looks
way too rough. It's a little bit of shine, but the roughness is
just all over the place. So I went back to I'm back
at this torso plates. So I kind of notice what
was kind of give me the issue is this light roll. So if I should turn this off, you can see how it looks
a bit more or a lot more appealing with some shine to it. You can see the difference. And then we need that
shine because we want our light kind of roll
off on those shines. So it's important to get
that shine in there. So don't need back on. This is where dish is.
This marks down here. So if I should select
it and I go down to the balance and I take the
balance down completely, we can turn this off and on, now you can see
completely hides that. Let's say we introduce
just a little, and then we still get
a good shine in there. So that's pretty mod
what I'm going to do. So let me increase
this. Let's see. Let's see if there's any major difference in there as well. Okay. So yeah. Yes, yes, we get
back that shine. So I'm going to repeat
that I'll go back in here. I'll go in here as well. For the metal piece, I'll
go in there and then just go in and then adjust it. I'll just adjust
the balance. Okay. Is that Am I even
on the right one? Yes, I am. Just wanted to be sure
I'm in the right place. Oh, that's the wrong one. But that's fine. We still need to adjust
that, too for that. Okay? Alright, so I need to do
this in here instead. So it's supposed to be
in on this light roast. Go in there and take
down the balance, so we get some moshino it. Okay. I'll do this here as well. This is the metal
here that's the one. Take down the balance. Okay. You get a bit more shine to it. Now, this one is not supposed
to be that aggressive in this let's take it down
a notch, that's fine. Bring this back up early
too. Yeah, that's fine. Alright. So if we should go
back and then use the studio TmacoT studio
TmacoTn of the shadows for now. You can see we get
more shine to it, which is, which is what we want. Okay. All right. Yeah, fantastic. So
we're moving on. So I'll go I would
need to copy this. Apply this on the face max. Blood this on the face marks. So one other interesting
to to kind of keep account of is remember we
have a normal in here. So this normal is going
to normal is going to apply the textual set normal in here by
default automatically, which is actually a good thing it's going to do that again. Okay? So now, yeah, this one looks way too strong. Face mark looks way too strong, so we need to make
some adjustment to it. So yeah, let's go
in and then figure out where the adjustment
is meant to be. I believe, I need to turn
this on that needs to be on. Okay. Then we would need to go in, I believe it's under, let's see. Let's see. Okay. Okay. I like
that in there. That should be fine as well. Okay. The dance, I think the dance might be lesser
just the dense randomization. Okay, let's go in.
Let's randomize this. Yes, this is fine. I don't want it to be that
strong on the face. All right. So let's go to the steel ruined. We need to make
some adjustments. Definitely need to make
some adjustments in here. Let's see what we
get. This is fine. Gei lights. I think I need the edge
highlights, edge damage. We need that as well. I think the dates, we just
need to di the dates for now. Roughness. Let's see. I'm not really liking
what we have in here, I'm trying to figure
out where that is. So we can so we can adjust that. Okay. Now, where is that? Okay, it's from the roast. Okay. So I need to kind of randomize let's go in and then
randomize this. Let's increase this a bit
more to reduce it actually. I need to just move this
trying to figure out where that is sitting
and get that removed. Okay. Is the UKs found it. So we need to go in
and then adjust this. I don't want too much
of it on the face. Okay? That should be fine. You use bag the grunge ds. Okay. P to see if I still need to
have this in here or not. Yeah, definitely need
to have this on here. Alright, that should be fine. Need to get in there and then figure out what
was wrong with it. I think we should
be good in in year. Okay, so now back to the crown. You need to make some
adjustment on the crown. So I would like to
even solo it out. Okay? We need to introduce
some shine to this. Maybe not that's Yeah, we need to shine
and the oil texture is a bit too aggressive. Bits too aggressive in there, so So I definitely need it, but not as much as we
have in there for now. Let's make some
adjustments in Okay. So that's the one. This de
occlusion was a bit strong. Let me take it down a bit more. All right. Then the
scratch is also too. I would like to randomize this. Let's even tile this
a little bit more, pretty much like
so should be fine. Okay. There's some adjustments this some adjustments to be made. Okay, were there already. Here, that should be
fine. Let's find. Okay. Now, this major
debts in the center, I'm trying to trying
to remove those. I don't want it
to be too strong. So I'm trying to
figure, Oh, okay, This is already. So
I'll take that out. That should be fine. These dates. Look at it from a distance,
let's see where we get. Yeah, I think for the most
part, this should be fine. Let's go over to let's see
what we have in there, not much happening in there. Okay. Alright. So what we need to
do now will be to create can see this pattern we have in there. So we
need to create that. So to do that, I
will need to go down to the normal RRS
normal just above that, I create a new fi
layer above that. You only need the IT
information for it. Put it towards a negative. I'll add a black max in there. Then I'm going to
use the Part two. So we need to use
paint along parts. Okay. Then I need this
to be symmetrical. Where's our symmetry line. I need to show okay. I want to find the
center of this. I think we should be
roughly in the center. Move this a little this way, okay? Yeah, that should be fine. So I'm going to kind of
draw out a shape now. Okay? Think like so. Find the center points
or roughly around here. This was working
symmetrically, I believe. Not getting this to
work the way it should. Seems like we need to close this So maybe I'm
missing something. Increase the hardness. Let me drag this all the way up. I'll just put this on top. Okay. Change the
colour to red tone. No, it's kind of filling
the entire mesh. It's not supposed to
fill the entire mesh. Because I'm going to
start this again, I think I must have
missed something, so let's create a
new fill layer. Okay. I'll give it a colour. Close this. Come
on. What is this? No, no, no, no. Okay, that's where
it's meant to be. All right. So I'm going
to add a black max. Okay. I'll take down
the browse size. Let's use something like so. Then put in symmetrically, so I'll just go in, got
the reference a bit more. I'll do double click in
here pretty sharp line. Okay. So I'm going to
go over to the setup. I will reduce the browse size. I need to go to my
material itself. Let's add it
information to this. So now, it's working
just fine now. But I still need to kind
of reduce the browse size. Let's reduce the bros
size a bit more. Okay. So more fine. I need to adjust these points, pull it down some more, okay? Yes, it's working just fine now. So I'll just bring it down here. Okay. Then I'll go back
to my paint brush. And I'm going to add
a filter to this. I'm going to add a
blow filter to this. So I might need to, I think this might be
digging in instead. So let's push it in instead. Put to a blow filter. Blow this a little bit like so. Okay, so it gets pretty
much something like so. If we also invert this, let's see, do the opposites. I'm trying to figure out
which which one works best if you should
have it out or in, but I think I'm going
for the one with in. In seems a lot better. Okay. But I think I would like
to use the bevoul instead. I think the bevo should give a better results from this off. Increase the distance for this. Okay. I'll still
keep the blow. Okay. Let's do an good. No, good is not looking good. Round. Okay. And I'll go in and then adjust this
shouldn't be that strong. The blow, take out the
it's supposed to be the smooth so let's take
down the smooth once something is a bit
sharp in there. Okay. Something like so, it should be just fine. Okay. I'll move the collar. I don't need the collar
for this anymore. All right. Let's
make it visible. I don't I don't need
to do for the back. I think those here
should be just fine. Okay. Slate it again. So let's
paint over it so I think over on the
edge highlights. I'll just go in there.
I'll add a paint layer. Okay. Reduce the bros size. Okay. Now, just add, I think I need to
change my brush. Let's use a different
set of brush. I'll go to brushes
di fetters brushes. Come on. Brushes. Close this. Let's use the deaths brush. Let's use this one and
reduce its size quite well. Then I would turn of the symmetry use the
brush size a bit more. So just one kind of
paint on the edge. Just to introduce a bit
more where that edge with. Okay. Alright. Same here swell
around here swell, all the way down here also. Here, this should be fine.
Okay. Like so. All right. You don't want that
place to feel empty. Okay. Let's go back in. Let's close. I'll do for
the inward part as well. All right. Yeah, I think this should
work. All right. This we can
definitely work with. So it is fine. So just move on next lesson, we will try move
on and then just continue working on the textures anding the textures
and reuse them. Okay? So I'll see you guys in the next
lesson. Bye for now.
109. 107 Torso Bronze Metal Substance Painter: Welcome ba, guys, so let's
carry off where we left off. I kind of done most of the
hard parts just to start duplicating most
of the materials across other parts of the mesh. So I would let's do I think
we're done with the head. Okay. Let's move down to
the torso region. Let's move on to torso region. Let's find the torso. So we have the torso belts. Okay, then we have
these boats. All right. Of these boats are
going to be, I believe. Some of the materials are going
to be slightly different. So we need to keep
account of that. All right. So moving on, let's turn on the too
chains, So nails. I'll leave the verse for now. No, let's turn on the devise. I think I have a material
for that as well. Okay. So now let's
start duplicating. So for the should up pads, I think we shoulder
pads as well, shoulder part on
the shoulder part. Okay, moving on. So let's start with
the torso nails. So for the torso nails, I'm going to be using the
material from the head. So I'm going to use the
material from the head. I'll copy this. I'll
go to the nails. Okay, and I'll just paste
this in there. All right. I will remove the maxing we have in there because
it's just nails, we're going to be
seen in there, so let's apply directly to it. Alright? Perfect. We don't need to really need to do
too much in there. It looks fine already. Okay. So I'm also
going to be using that also too for the boats. Well, we're going to be using
two material for the boat. So let's start with
the first one. Okay. It has a max. It
has a max in there. So let's do black max. Then let's go in. I'm going to select this working at all. It's working, give
you a moments. Okay? So I think I should undo that and do this with
symmetry turn on. Let's do this symmetry turn on. Okay? Move to the back, select this as well. Pretty mot like so. Then
for this boat in here, we're going to be using the
one from the crown itself. Let's go to the
crown. Let's grab this bronze from the crown. I think I need to put
this name two parts. Let's use our caps
for the parts. Okay. Pat line. All
right. That's fine. So what we need to copy this. Let's go back in the boat. Okay, I'll just pace this should supposed to
pase this underneath this, so every other not in
silent, drag this out first. Let's drag that out. Then
pull this down instead. So yeah, pretty much something like the other ones
are supposed to be the bronze material. Okay, we have here, this is looking quite decent. Let's go in, let's
see if we should turn on let's on turn
on these deaths. Let's see what we get
turn on the deaths. Okay, it's giving
us some interesting looking shape to it, or texture to it, which is fine. Let's try the death
also as well. Don't see too much
happening in there, but I think we should be fine. Move this up. Yes. Yes, I think this should be
fine the way it is. Alright. Okay. Some ground japening in there. A few of them, actually,
which is fine. Well, I'm not sure
I'm liking this. I think that is from the Let's go down here
from the ambience. I believe from the
dart ambience. So let's remove that.
Let's leave it inside. Let's just reduce how
much of it we see. This is the one
reduce, so let's, this is what we need
to reduce. Okay? That is fine. All right. Here, this should be fine. Just go and check this
again just to be sure. Okay. Awesome. So now for the
shoulder pads shoulder pads, I'm going to be using,
let's do the chain first. Let's do the chain.
For the chain, I'm going to be using the
same one. So let's copy this. Let's go to this chain. Phase that's in there, give
you a moment to load up. Alright. This should work just
fine for the chain. Showed pads, I'll
go and copy this. This is when I need to copy, I'm going to copy the Udi
bronze metal, copy it. And I'm going to use it
for this and this also. Let's start with
the showed up pads. And then place that in there. So the materials that
you guys don't have, I'm going to I'm going to
provide those provide those. So this is looking interesting
s for the fact that this ambient death is kind
of not looking great. So let's go in there
let's go into the max itself and then take
it down, right? So should be looking
quite interesting now. So I think I'll
do the same also, too, for this Body. So go in there. Open it. We take it down. Let's
see what it gets. Yeah, that should be fine. Alright, you get some good
shine in there as well. Okay. Move this
along, select this. Place the same
material in there. So we already kind
of blocked out the material textures
just to apply it and then make any necessary
modification we see fit for it. So this one needs to introduce a bit more shine to it as well. I take this out.
Yes. That brings in something quite interesting. So I'm going to
leave it as it is. Alright? Moving
on. Yes, I think, Okay, the vests, let's do the vest. So I'm
going to the vest. So I have a red fabric
I'm going to use. So I'll go to Smart Materials, I'll type in as Ks, I believe is the bandanna, is the bandanna one.
So I'll drag this in. I need to make
modifications to it. This looks quite
all over the place. So yes, it would make some
good modifications to it. So pattern, take out
the pattern for now. Let's see tears. We need to reduce the amount of
tears we have in there. Let's see if you to this. Okay. Without this in here,
no, that's not the one. Let's find this. Okay. There's no tiling in here
for virtual, let's see. Okay, that's where
we're going to adjust it so let's we
don't want too much. Just a little here and
there should be fine. Then make some
modifications to it. We still have that
styling in there. Still have some of this pattern. The base base fabric we
need more red to it, so let's introduce a
brighter demic loses first. I think on that for
red that's fine. So we need to introduce
some more redness to it. See if we can pick that color. It is a bit more red.
Stone is too dark. Try to avoid fighting with OKs. Take that down. Trying to avoid fighting with
the texture itself. Fabric color variation. Okay. We need some more red. Pull this up was red. Okay. Slowly gets in there. No, I need some more red. All right. Need some more red to this. I no, this red needs
to be quite strong. We need a more strong.
Red thn for this. Let's see. Let me hide this for now. Let's use Let's use
some default in here. I think mine is
just going to make things look slightly
complicated. Let's see, we drag and
drop this in here. I need a more
stronger type of red, but this material looks
like it's going to work, but I need more
stronger red sets. Discoloration take
of discoloration. Okay, we need this p.
You need that also too. Yeah, I don't think I don't
need this pattern in there. Okay. Need more stronger red tone. Maybe because it kind of
this is kind of painting, so it's I'm not getting
that strong red in there. Okay. Yeah, this is a
more stronger set of red. It is a more
stronger set of red. So I'll introduce this let's do let's get into
the material itself. Take it down a bit more. I think this ton of
red should be fine. The pattern now we need
to go to fix the pattern. No, no, this tiling
pattern in think need. That would also work. Let's find the pattern. Here there's a pattern in there. So if you go into it, I'd like to to this even
more, let's go 50. Okay. All right. So if you bring
in some shadows in here, I think the shadow
should actually help. Some shadows like so. I think I also need to slightly darken let's see discoloration. Not that off. Edge, darkening let's go to
this edge darkening less, see where we can
adjust in there. And just getting close. Let's see. I don't see much
happening in here, though. I don't really see too
much happening in there. So I think what we have
now should be fine. Okay. I think what I can
actually do be to create a new fill layer. Use this kind of more
darker reddish tone. Okay. Then I'm going to
use no not multiply. Let's try overlay. I think leave this
out normal and then just kind of use this to dark in the material
a little bit more. Okay. Yeah, I think
for the most part, I think this should work. Now, this slightly too much. Let's take down the Okay, we can just play with this. This is fine. I think the default material actually
works fine for this. So this is fine. I
worked just fine. So now we need to go over to
anaton on the chain Mill. So chain meal Okay,
I'm chain Mill. I would use the
texture from the head. And it's kind of making
my piece a bit slow, so that's If the mesh
is actually quite high, so it's kind of slowing
things down a little bit. So let's go in there, delete
what we have paste this in. Then remove marks. Let's get it applied, and then let's see what
we can adjust in there. Okay. We already have two
interesting results already. But I think I'll need to
let's go to these roasts. I need to kind of duck in bring some more
dark shed to it. Not seeing so much of
that apline in there. Most of these are notes applying strongly on the
mesh, which is fine. We'll find a way
to make it work. N a bit more. Here, precisely what I needed. I just need it to kind of
darken the tint a bit more. Let me give you a
moment to save out. Right? So it has
more depth to it, is making it look even more
interesting right now, so I'm just going to
keep it as it is. I don't need to kind
of push this too much. Sin as it is, like, so should be roughly just
fine for what's needed for. One thing I'd like to do, also, too, is to the rod. Let's make the rod visible. Let's make all the elements
of the rod visible. So the rod itself,
I'm going to using the same metal material. So since already copied that, I'm just going to
paste that in there. Okay. Remove the mark, right? Okay. Yeah, yeah. This will work just fine. This will work just fine for
what's needed for. Fine. Okay. Now for the cups, I'm going to use I'm going to I'm going
to use the materials from the let's use materials
from the wings itself. Let's try the wing material. I prefer the material
from the crown, but let's try the wing material. Copy those come in here. Okay, phase that in. Let me give you a moment to load up let's see what we have. Okay, now that is just
practically way too rough. That's practically
way too. We might need something slightly
shiny in there. So I think a preferable
option was to use this crown to use the crown. Good material or bronze
material instead. But this one doesn't we don't see too
much shine in there, so we need to shine. We need to shine. It's important we get
that shine in there. So pretty much delete
this phase that in. Okay, way better, way better. So I'll see we get
a bit more shine. Sweet come in here also too. The cup use the same material. I'll use the same material
also too for the rest of this. Yeah, we get actually
good shine in there, so that's fine. Move down. I think we need to turn
on the stone cage. I believe stone cage and then what is the name
of the other one? Stone cage old Fix. Here's, those two. Okay. Put the same material in there. So you have the benefit or the advantage reapplying
the materials. So long you kind of did. As long they did a really
good job in there, just getting the
materials to look right, then you can just repeat. And then since they
are different, UVs go come out
unique on each one. So that's why we have something
looking unique in here. To go in there as well and
then piece the same material. So we have good consistency across the materials in
there. All right. Fantastic. So that is looking quite nice. See how generally all of
this is looking quite nice. Is coming together quite nicely. Okay. So we're getting quite good looking interesting
results in here. Okay. We can let's see what else. Okay, let's turn
on this cage waste cage on the waste cage. So look for the
waste waste waste. Yes, I think this
is no, not this. What is that called again, Waste top cage, this is the one. So for this butler
one, I'm going to be using I'm going to be using
the materials from this. This is the material
I'm going to use Udi. I'll copy that. All right, go in here, pace this in here. As the past. So it's going to create a unique material in there as well. Because that's pretty much
what we're going for. Getting some good looking, unique materials in there. Fantastic. Alright. So
let me do a quick save. So in the next lesson, we're
just going to continue on and then keep working on it. So I'll see you guys
in the next lesson. Bye for now.
110. 108 Casket Metal Substance Painter: Okay. Welcome back, guys, so let's carry on from
where we left off. Okay, so moving down, let's move to the torso and do some more work
on the torso region. Okay. What lots going on in the last things
we're going to work on would be piece this
scared piece in there, so that pretty much be the
last thing we would work on. Oh maybe not. We already
have the blockout in there, so we can just work with the
blockout. So let's carry on. Let's carry on. So
if I go over and then let's bring out the
I'm going to find them. I've not kind of made the
noom map for this yet. It's still some more work to do. So let's go to Long West, okay? I also need to kind of tone
of the shadows for now. Okay. So I'll turn on the ist bells, on inner wrist slits,
string as well. Westins also. Okay. Here, I think pretty
much all the snow let's start playing the
materials in there. Let's see. Okay, let's copy
this for the chains. Let's grab this for the chains. Select that copy it. Okay. Come in here, paste it in. Paste
that in there. But I think you also need to
kind of hide some of this. So I'm going to hide
call hide this. Just to make it a
bit lightweight. I'll hide this also. Yeah, so it can kind of
move a lot quicker in here. All right. Select this also too. Now for this, which
one should we apply? Let's apply the same
thing also in there. Okay, let's see what we get. Yeah, for the most
part, this should be fine. Should be fine. Then for the bells, let's use
this instead for the bells. So use the cop it. Paste that in there.
I rather go to the texture sets and then
piece that in there as well. Let's see what that gives us. And then we'll make
modification if necessary. We actually have a really
good shine in there. We have a good shine. I was
hoping to get a good shine, and then so far, we have
a good shine in there. So the watch pretty
much does fine. Okay. So I'm going to
use the same, so 24. I'm going to grab this. Okay. Place that in there as
well, this inner arc. Okay. Here, that is fine here as well. Okay. Here that in there. Right, that should
apply on there as well. Right looking nice. Let's do the same for the rings. For the rings, I
think for the rings, we can use let's use I think I'm going to use the chains I
use the chains instead. Selecting the wrong one
is the right one now. I would like the rings
to be a bit more shiny. So select that. Pase that in there. Right. So that will give us a bit more shiny rings, which is fine. For this cones, I think, let's do the get's long skates. For the long skirt,
let's do this cones. For these cones, I'm
going to use this piece. So I'm going back in there
and then I'm going to copy it copy come into the cones. Okay, phase that in there. All right. Let's
see where we get. Yeah, we need to make
some adjustment to it, especially the edges. You have quite
strong edge in here, so I'd like to modify that, so it should be
under the eilights. Yeah, that highlight,
I need to reduce that. Okay. So go in there. I need to reduce
that a bit more. I don't need to be too strong. I think something like
so should be fine. All right. So moving on, I'll grab, we definitely need
this for the breast to cheese chess plate. So to so, chess plates. To chess plate, this
one. I'll go in there. I would grab this copy it. I don't know if I
kind of separated this edge out. I can't
really remember. So if I didn't then we also
have to manually paint in paint the detail in there. Because the edge the edges
kind of have good plate to it. Oh, goodness. I'm
using the wrong one. Is the wrong one, yeah, for the phones supposed to
be more silver instead. Supposed to be getting silver
plate in there instead. So I'm going to just go
into it. I'll go into it. I will delete this. Okay.
Then paste this new one, we just copy it. All right. Then we'll go to the
same highlights. I need to take out one that's
not supposed to be there. So I high ds think what
we have here should be just fine. Should be fine. So let's go back in. Let's copy this selected
tendency copy it. Okay, get back in here. Okay. Now paste it in there. Drag it out of that group, all put it on top. All right. So I'll add
the black marks to it. I'm not entirely
sure. Let me check my roots by two review. Oh, I did not cut it out. I did not cut it out, so I was supposed to kind of
cut out the edge for it. Supposed to get a
coat around it. But I completely forgot, supposed to the coats
in there buttly forgot. So that need us to If I start
doing that now down us to begin to bake and then
go back and forth, I think I can just
paint it in here, so shouldn't be too
much of an issue. I mean, be too much of an issue painting
it in here, right? I mean, should not be Let's see. As biking it wouldn't be too
much of an issue as well. Okay, I think I have an idea. Because to paint
this is going to be actually a lot of work
painting this all over, is going to be a lot
of work, so I will do this, save this. So let me close this for now. So what I'm going to
do would be to open up my then just do a
coats around the edge. Unfold I won't unfold it I
just simply do a coat then that should kind of separate
things out for us in the Okay, so we're back in here. So physically, all I needed to do was to
let's say isolate this. I'll go to edge mode. I will just find
let's find an edge. I can't really see
this properly, so I need to let's get
a more darker shade. So you can properly
see it in sine. Okay. It's already kind of coat out at the back
yes, which is fine. But we just need a coat that goes I don't think that is
in the right place yet. Mit a bit more space. Okay? The Sea I need to grab this way. Okay. I is supposed to
be roughly around here. But if you do that,
you can see how it goes down here. We
don't really want that. Don't want that, so a C. I'm going to deselect
it around here. So most of this top part is
not going to be visible, but I would like to
get something that is at least somewhat
needs. Okay. So around there.
I would deselect. We can go all the
way down and then deselect I'm mooning down
control to the select. Okay. All right. It also goes all the way down, so we need to go all
the way here as well. Yes, we need to go all
the way up actually. Select. Okay. Select. Then I'll go in this way. All right. Okay. Let's see what we get. I've
not done the coats yet. So let's do the coats now, so I'll go over cot
and so I'll do coats. I just want to check
something in here. It's not fully cuts
not fully cut yet. It's not fully cut yet. There's something missing. Okay. I need to kind of
confirm this here also. Shells. Okay, we
have a coats here. Cat goes across? Oh, yes, I see. I see it now. I see
where the issue is. So I'm supposed to close
this out with coats. The coat as well. I believe we should be able to, we have it now separated. So I want on food. That's where the trick
is. So I want on food. This is already in place. I'm coats and I want on fold. Okay? Then I'm just going to
bring everything back out. I'll save this file. So I just pretty much need
to report this again. So I'll select everything. No, not everything,
not everything. Remember, I would
select everything here. Then I'll go in. I need to deselect the
Iris and miniscus. Okay? Yes, that's
pretty much it. And I'll do pots. Let's go to a folder. Let's copy with five parts. Copy it with five parts. Alright, then over, I'm just
going to put two in front. Button has an FBX,
which is fine. So if this moment
is done exporting, so what we need to
do now would be, I need to save this, and
I'll close it and then I'll open up my Substance file and then report
that back in again. Let's open that up.
Right? So leave alone. Everything is visible in here, so we don't want the entire
thing to be visible, so we need to let's
report the edited mesh. So project configuration
select Okay. So select that click okay. So pretty much everything we just need to give this a
little bit of time to just run through and then bring in the modified UVs with
everything else. So this might take
a little while. So I'm going to come
back when this is done. I think it's imported
correctly now, so I'm going to just
isolate this set alone. Not the long cage. So was long cage, so I'm going to isolate it. I believe at this point, I can just do black max Do
I can just do fully fill, then UV chunk fill and enamoleshd doesn't
seem to be working. Should work. Maybe I
should come a bit close. That's rather strange. Let's see. Let me
undo this again. I'll remove the max, pull this down, add the
max in here, select this. Doesn't seem to be working. Let's go into a 2d3d view. Okay. If this doesn't work,
then I think we have no other option
but just on food, it kind of get shift to it, and then we have to pick this
again instead of Zbrush. So let me just give
this one more try. Let's do a black marks. Okay. U V, I think, ton of ton of this symmetry. Then I will just select this. It doesn't seem to work. We'll
have to kind of bag that. We have to kind of
spread them out and bag them again.
I won't do that now. So since we're in her already, let's let's just continue on and then come back
to that in a bit. Come back to this
in a bit. So I'm just going to hide
all of this for now. Okay? I I don't want everything
to be visible, so let's do it all. I need. Let's go to
the casket instead. Casket body. Casket.
Athingle do with casket, let's just turn on. Turn those on for
now. All right. Then I'll go over
to the Ed boat, turn on both, Ed
crowns d as well. Okay. Then also a s, too color be because I need to kind of
select Oh, interesting. Interesting. I missed
missed one part, so I need to have
I would need to have a C Torso boats. Okay. Yes. So I want to go
into the torso boats to copy the good material from it and apply it to
these Udi boats. Okay. Copy that. Right? If you can visible if you
want, that's completely fine. I'm trying to optimize
what I'm recording, so I kind of work a
bit faster in here. I don't too much
weight on my arm. I need to remove this marks. No, wrong one, wrong one,
definitely the wrong one. Selected the wrong one. Let's go back in there. This is the one we meant to
copy so copy that. Go back in here, paste this in, and then we should be good. Okay. Feels slightly different. Definitely feels
slightly different. For me to go in and then
make some adjustment to it. Let's go over to stay ruined. I need them to be shiny. Except maybe I'm missing
something in here. Okay. Here, I think we can make this
work. That should be fine. But make a lot of sense
if they are quite shiny. So let's see what we can's
what we're missing in there. And then fix it. Okay. I think I'll go in here
and then I'm going to increase this a bit more. Is that a bit smaller
let's go I believe cvture. Maybe not cvtureEto Nothing seems to be giving
me that desired results. Let's see. I think we can actually
lives not bad actually. This we can probably work with. So moving on. I think I can use the same
thing also in here. I'll delete this
that's in there. But I don't want it
all over the place, so I'm going to add
a black x in mesh. Will you need it for this? All right, so I'm
going to I think I can just copy the
same tone also too. Use the same to also in here. Pass that in for
this hold. Okay. I'll do the same for the
chains or pass the same two for the chains or save
two for the curves too. Right. Let's go to course. Use
the same thing as well. Okay. Then for this back piece, I think we can use
this hoodie instead. It bronze from the hoodie for it for pets I'll select. Is that in there. All right. That's fine. So the next lesson, we're going to
continue on and then keep applying the necessary
textures to this. I'll see you guys in next
lesson, bye for now.
111. 109 Waist Metal Substance Painter: Cucumber, guys. So before
we continue the texturing, I would like to fix that
issue with the long edge, long cage, this long cage. So I don't remember we
frey kind of cut that out, so we need to fold
and then rebake and then get that back
into buttons painter, so I'm going to select this can open the ne
and layout, con fold. Okay? But at the same time, this will work actually, work. I will just layout. Okay. But it's not taking
up more resolution, so I won't do that maybe
what I can actually do. Let's get in the Let's see
what we can do in here. Se like this and
then just shrink it in a lit to, like, so. Okay. So we select this and then
let's go to transform and let's click on
get texel density. That's like 2.1,
select these gets. That's roughly around
205, which is still okay. So this will work just fine. So now we need to export
this out and then big. So we export this out
again, sport selection. Let's find where we
exported them too. The imports UV meshes, Zin copy. Place this in, change it to OBJ. So the name is called
Think west long gauge. That's the one. Replace that. Go back to Zbrush, select this. It's
already selected. So we have seven k also, too. Polygon count seven k, so we can also import this
back in and then bike. Let's start by deleting
what was there before, delete UV Imports W in the Service long
cage that's the one. Book resolution map. Let's create a
nenmer map for this. W one, texture, V exports. So it's supposed to
export this in here. So PNG, how do put two in front. Okay, that's pretty much
it. Don't save this. I'll click, yes. Right? So I need to go back to Maya, I'll save this scene. Okay. Save this,
and then we need to just do the export again, FBX. So I would just go
select entire piece. Select it down here as well. I would select Iris
and miniscus, right? I export this out.
Sport selection. I think I went, I need
to set this to VX. I put three instead. Okay, let's give you a
moment to export out. I don't take too long.
Save this again. All right. Then we need to open up to open up our
subtansPna file. Pi is getting rather large. Let me delete this. So
let's open this up. Okay, so back to
Substance Painter, I will need to update this. So I'll go to Edits Project
configuration, selects. Okay. So select three. Open that up, click Okay. So we need to give you
a moment to kind of go through and then
reload everything. Then we import in our new baked normal map
and then B inputs again. Then we'll be able to just sell and apply to where we
actually needed to be. So let me just
give you a moment. Okay, so that's kind
of loaded it up. So we need to go and then
find the waste cage. Base long cage,
select that isolated. Okay. So now, if we go over
to let's check this out. You can see how
it's separated now, but we need to bring
in the baked map, the newly baked map. So Z imports Z map. Should be among the
first one here, so two ways long. So I'll bring this in here
and apply this as a texture. I put that as a texture, okay? That is fine. So we go over to the texture set settings,
and we need to replace this. So drag and drop this in there. Alright. Then we go
to big mesh maps. Because we need to
bake this again. Okay, yeah, it's just the visibility that is that
is just slowed out right now. We still need to kind of make sure cause the other ones
are kind of selected, so we still need to
make sure this is selected because we're
baking for holds. So I would just you can
just solo this out here. So I will just need to
Let's Can I solo this? Let's see. I haven't
tried this yet though, so let's do focus Is
not doing anything. Is not, so I would
need to manually just turn all of this off. Quite a lot going on in here. So this is the only one we
need so turn the rest off. Okay. Good you can just click one and then scroll up and then
it turns off the others. Make things a lot faster. Okay. So now, it's just
one that I selected now. So that's the only
one we're baking. This setting still
remains the same. Yes. Same Overture. Generate from normal
map that is fine. Everything remains the same, so. Let's just click to this
big waste long page. All right. So this
shouldn't take too long. So it's done, so
let's return back. Three D only. So yes, we pretty much have
everything in there now. Yes, we do. So I can
go back to the layers. I can now select what
needs to be selected. Okay. All right. Oh, okay, you can see it
kind of automatically does the selection because we
already have selection in there, which is cool. So we have this now properly
the way we need it to be. From what I can see, we have way too much way too much
grunge detail in there, so I need to go in and then
make some adjustments. Yeah, this one is way
too strong in there. Okay. Let's use Let's go in there. Okay. We don't want to completely
cover the entire mesh. We also go to It information. Take down the t a
little bit more. It feels somewhat strong. Okay, that's fine. I think
the main the main let's see. Okay. Let's get in here. Let's check the height damage. Bumps. Yeah, I'll turn
off bump for this. That occlusion, let's leave
that seclusion. Okay. Edge damage you live out on. Okay, let's see where we get. All right. Yeah, I think we can
definitely work with this. Okay. Yeah, we also get
good shine around it. So, we might it's actually
a good idea, too. Having the inside being good. Seems like a good idea also. That kind of makes
sense in any way. So we can actually leave
that. Okay? Moving on. All right. So let's go over to the casket. We're still working
on the caskets. Let's go to the casket and
then make the necessary. Let's do something like so. I'll find caskets. Everything that's
do with the casket, I will just turn it on. All right. So let's carry on. So let's see from
the reference, Okay. All right. I I will
select these boots. But we need to kind of copy. I'm going to copy some of these details. The
textual details. So let's go I think to the head crown head crown head crown. Yes, head crown top. I'll copy this copy. Okay. Let's go to the boots. Was the right. Then we need to specify which
one is going to be gold and which one is going to be bronze and which one is going
to be the metal. So for the metal, we can copy
the one from the Ed max. Copy the one from the Ed mark. So let's find Edmark
Ed marks, go in there. I'll copy the metal
from there. Okay. Come back in here. A that in. Pull it out of the group. Okay. So let's go and then figure
out how to make this work. Okay. This is the metal, so I'll go into it. Let's do mesh selection. So this one should be metal, Yes, that should be metal. Everything that
needs to be metal, will just give them
some metal piece to it. I'm also checking to see how it is. It's
looking quite nice. Okay, let's see,
which other metal. What do we need in here? I think that's that's
kind of pretty much it. That's kind of roughly
pretty much it. Okay. Let me also isolate
it isolate it let's see. Okay. It's not even really grabbing the entire outing,
but that's fine. Alright, let's check
the back. Okay. So we need to get all
of this actually in age to be the metal. Okay. Yes. Yeah, like,
so should be fine. To the selects. There
should be gold. Okay. Yeah, I think I
think we're good. I think we're good.
So I'm going to copy the bronze again. Let's go over to this. This one should be entirely it should be entirely gold.
So let's start in there. All right. All good in there. Check this again
just to be sure. So for this news, I'm just going to copy the news. I'll copy the news from this. For this, let's copy the news. So we have the let's
go to the head. Is the head or is it ths? Okay. I have been nice. We have some kind of searching here just to search out what we need. What do we name it? Okay. Torso call her torso
News. Go to Torso News. Okay. And I will just copy this and I'll come
in here to the news. Then we'll just
paste that in there. And then we should
be good. All right. I think we're pretty
much almost done. So, for the rest of this, we're going to use this. Let's see, we can use the cage. So we can just go
to the torso color. Set the torso color. Let's
grab the metal from there. Let's grab the metal
from this torso color. Okay, copy that. Let's come to the body first. Okay, up there. We should begin to get a interesting looking
result already. Except for the bronze, the
bronze tints in there might be slightly probably
slightly too much. So I would just get a blend
in there so not that strong, but still kind of
roughly in there. Okay. I think this
should work just fine. Alright. Okay. Oh All right, so I'm going
to use the metal for this. Before we do that,
before we do that. Let's apply the
same thing on here. Let's apply the
same thing on here, so I selected this
selected? Okay. Going to delete this. Oh,
no undo that undo that. Okay. So I'm just going to paste Okay. I'm going to add a okay, no, not add a black
Medo drags down here. Yes. That should
be pretty much it. Okay. This we can work with, and I'll go in and select
these boats in here. Okay? And I'm going to copy the metal. I'll go to the face max. I'll pretty much just
space that in there. Okay, and I'll move the max. All right should work
pretty much just fine. Run our light through this, see if we get that
interesting shine. Yeah, we do. Okay. This should work just fine.
I'll do a quick sieve. All right. So moving on.
So I'd like to kind of texture the elbow belt. Let's hide all of this for
now, we're done with that. Let's texture this elbow belt. Get in there. I think I'm just going to use my own most likely use my
own materials for this. So let's go to material some leather materials
I created myself. So let's just do leather. Find some of my own GC leather. Here, this would be a good one. I've got to ask for
the stove for soul. I'm just going to drag
and drop this in here. Okay. And for the color itself, I think the darker more
darker tones should be fine. So let me delete this. Let's use the darker one
I met. The darker shade. All right. Then we can just
use metal for this. So let's just type in metal. No sure I'm typing
that correctly. Okay, let's just use this
silver armor instead. So I'll pull this up.
I'll add a black mark. I'll add a black mark
to this as well. Okay. So let's do mesh fill. Select. Let's do this
symmetrically also, too. Select this, right? Should just affect
the opposite side. Oh, it's not affecting
the opposite side. So turn that off. Select this again,
select this, right? For the letter, we
just select this. Yeah, that's pretty much
that's pretty much it. All right. That should be fine. Then for the skirts, we do this skirt, let's go to the torso
vests, torso vests, copy the fabric in
there, copy the fabric. Don't need this anymore.
This one we need, copy it. And let's go to the skirts. Turn that on pretty much we use the same
material in here. That's rather old. Let's find where the edge is. Okay, that's the one
that's a bit strange. Yeah, we need these bots. Shouldn't be the way
it is right now. Let's soft on it, right? The damage, I think we
had some damage in there. The fabric damage. Let's get C smot
of this happening. That's not the one.
That's not the one. Did I delete those? Okay. Trans if I deleted those. Okay, no, no, they
were they were from the d, they were from my own. Yes. I think I bring that back, so I can just do panda case. Let's do fabrifst. PandanT one. Drugs in here. All I need is just the damage. It's just the tears. So I'm just going to drag and
drop this in here. Okay. I would hide
this. All right. I just need to modify this. It's more darker shade. Okay. Go in there. Randomize this randomize this
again, Maya not so much. But the cover you're
setting let's go into the cover
you're setting. Okay? There may be something around the nature of this
should be fine. I'll also kind of
copy this tier, and I'll go to the torso
vest, make it visible. We also have this threading in here. I'm going
to turn that off. Okay, I will apply
tears in there. I shouldn't be this aggressive. I go to the curvature. Take down the curvature. I think something
around the nature of this should be just fine. Okay? Alex should be fine. We turn that off. All right, so this is fine.
I'll do a quick save. So next lesson, we're
going to move on and then work on the other
parts of the mesh. It probably won't
work on this itself. I think this one
shouldn't be an issue. You can also do
that now since we can just copy and then piece
that's pretty much it. So let's just copy this. Put into this copy.
Okay, copy the bronze. Which name did we give that? You'd be and something. Yes, and we have both and
back parts, and side parts. Okay. Idea, I think this
is pretty much everything. So let's go in to them and then just paste what needs to
be pasted in there. I think I need just
one, past it twice. Right, go to the next piece. Paste pretty much the same
thing in India as well. Then select the boats. Paste same thing India as well. Okay. They're awesome. It should work fine. Okay, so I'll do a quick save, and then I'll see you guys in the next lesson bye for now.
112. 110 Skirt Emblem In Substance Painter: Okay come back, guys.
So let's carry on. So I think for the most part, this is like what
is kind of left. So let's move on. So I'm going to work
on the gloves now. There's some work
for the gloves. I'm going to be using some
leather piece for this. So I'm just going
to type in leather. So I'm going to use my own
leather, this leather in here. Then I might just change the
color to a more darker tone. Okay. You can see how
kind of damage it is. So created this just to create it for other
project actually, but it will work
just fine for this. So I just need to
kind of tuck in the almost light
brown tone in there. So I think that should be okay. This is eating her.
That's the one. I take that off. We already have something that's already
looking quite interesting. Maybe instead we can just
lighten it a bit more like so. Okay. Let's see this is kind of
tone I'm kind of going for. This leather writes, I'm going to use a more
darker tone for it. Just to use a more dark tone. Okay. Tone this off
for now, right? I think we're already
getting something quite interesting
enough to work with. Put in a dark in this
a bit more. All right. This here, I need to kind of change the collatn completely. Let me tilt these to
a more don't like so, but maybe slightly darker, like so should be fine. Yeah, something like this should be just fine
work just fine. I don't need to do
extra work in here. I think this is I I need to just come in here and then let's increase
the balance for this. Reduce the balance actually. Just a little randomize this. It's not too strong.
Alright, that's fine. I'm going to copy it. I'm going to use this
in here as well. I use it here. Okay. Yes. But I think for this one, this one needs to be almost, you can see quite
black in there. So we need to use are more darker tone for it.
Let's good down here. We was a more darker tone. I think I kind of like
how this is looking. This should should be fine, but we need to kind of
separate this edge. This edge needs to have
a good tint to it. More like a bronze tint to it. So let's look for
let's type in bronze. So we have this bronze in here. I'm going to put
this at the top. Okay. I'm going to add a black max. I believe I kind of
separated that out. So if a mesh for UV
chunk instead, do that. Next to the selects. Come on. Yes, we need to make
some adjustment to it. Cloton for this is too bright. Then we kind of we
also need to kind of take down the metallic
property for it. So let's take down the metal
bit more down some more. Okay. Meta property also let's
take it down some more. Maybe just an int. Okay? Let's bring back slightly
the metal tint to it. Alright, I'll tuck
in this a bit more. Small darker tone,
slightly darker. All right. You can see we have one of the
surface breakup here, which actually looks
quite interesting, so. So this we can definitely keep. Then I need to go over to the three d view or
the two devieRather. I need to get let
me push this aside. Alright, I need to
get a shape in here. You can see we have quite a number of
shapes in there, actually. You can see a pattern in there that we would even
need to kind of painting. But before we do that, let's
get this ship in there. Let's go over to Alphas. Let's see if we find something. Let's we'll find something similar to what we have in here. If you don't, then
we going to go to Photoshop and then
just create them. It wouldn't be too much of an issue to actually
create that. If you have something
close to it, we have this. Maybe you can even
use something else. This Butler one looks
interesting to work with. It's an interesting
shape to work with. Okay. Let's keep
moving. Let's see. I think this one
makes better sense. This crest makes
better sense in there. I think we should use that instead of what we have in here. So to do that, I'm
just going to go down. I'm going to create a few layer. A few layer, I'm going to use a more dark
out to for this. Okay, add some information to it towards the
negative instead. I'm going to add a black mark. All right. At the
black marks and then I'll add a
few layer to this. And I'm just going to
drag this in there. Then on a three D view, right around the two Dview, we need to make some adjustments first
here, repeating none. So how shift control. Need to bring this
all the way here. Okay. Opus some more extend out a bit more. Maybe we can even make
this more interesting. We can create another
new field layer or duplicate what we
have in duplicate it and those drag and
drop this in there. But we would use sub trats I think we
need the opposite of that inverse sub trats Okay. It's not looking that great yet. Let's do difference. Okay. We have something interesting, but let's see, we can
make this work, no doubt. I feel like maybe
it's not there yet. Okay. Almost no. Scale it out a bit more.
That's bit too much. Let's add the paint
layer in the pints. I'm going to can I erase
this? Bring this down. Not seeing much happening
in there, though. No I think we can leave this. Probably just leave
this. Let's see. Let's try something else.
I'm going to duplicate this. Let's drag this in there. Change this to screen exclusion. No, definitely not. Definitely not. I think Difference
feels like a good one, but I think I'm going to
stick with this instead. Okay? Can I put this
down here? Yes, I can? I also going to add
a filter to this. Let's do Bevo instead. Okay, do some smooth in there. Now, this feels a lot
more interesting. Okay. Maybe maybe pebble is a bit
too intense. Getting close. Let's actually get a good
closer look on this. Okay. I think this should
more or less fine, so, we would need to need to add
if I'm doing this correctly, though, let's add
an anchor points. So delete that first. Let's
Let's name these two logo. I also need to kind of
get the duplicate of this because I I might need to have one
around here as well. Okay, so let's
duplicate of it. Okay. Then, can I move this? No, I don't think
I can move that. I need to I need to
kind of manually move. I select I can select both of them and they
move at the same time, so I will just have to do something like sew
all the way down here, I'll move this in place. Okay. Delete anything I don't need. I'll select this to a
put them in a group. I want to use them
as ankle points. Hopefully I remember how to do that sometimes
kind of eludes me. I forget how to do
that. So let's see. I'm going to add an
ankle points in here. I'll go into the leather
brights, open that up, open the max. I'll go down. Let's find, we added them as normal Is information in there so ankle
point, let's select it. Let's go over to, I believe,
where is that again? Yeah, micro detail. Turn on the I information. It's not working in there, so let me just figure this
out and come back. So found a way to
kind of make it work. It's not give me the
complete desired result, but still good
enough to work with. So let me close. I'm going to select
everything inside this group. I'm going to give you a
moment to kind of save out. Alright so I kind of pull all
of this out all the way up. Okay, and I'll go into
the leather boots. I will copy this Polm this out and then drag a copy
out of that mix, right? Like so. Then I would need
to say this logo two, this logo one, I do
logo one in here. P Logo one, I'll go to the max. I'll drop an ankle
point in there. Then I'll go to the
MGMAx, open that up. I will do I'll go close that, go to the microds, select the ankle points. Okay, and I'll scroll up to micro details.
That's returned on. Okay, if I turn these
clouds off now, should be able to see some
of the details in there now. You can see how it's kind of getting something in here
now is all over the place, so I don't want to be
all over the place. Let's see how we
can adjust in here. Okay. So I'm pretty
much going to use I like to use a different. So I'm going to close this
maybe keep this for now. So I'm going to use something. Let's type in maybe roast, a soft edge dami Let's see. Log that in there. That means I would need to bring this down. I would need to go over to
anchor point India again. Go to micro details, through. Okay. Then we can make
adjustments to this. Right? I think I'll prefer something I see that's
way too strong. You can turn on the cloud, go into the cloud, make
it slightly visible. So I'm going to
duplicate this copy. Can I get its effects. Okay. So then I'll go to the logo too. I'm going to add an come
points in this one at the top, I will just go in and then
change this change this to the local or the logo
mark too. That should. Let me turn move up. Was the micro detail. Cert on true Ton this off. Okay. I see. So I need to set this to
I believe screen, right. So you can actually see what
is kind of underneath it. But spot law at the back is
just all over the place. I don't want it to be
quite all over the place. The bottom one was working. But the one at the top doesn't seem to be working that well. So I'm going to close that. I'll hide this for now. I'm going to duplicate
the entire thingen then go in there I will just change this from one
to the two so go max two. Set to through. But it doesn't
seem to be working the way I hoped it should. So I'm going to put this
inside another group, add a black marks to it.
I turn this back on. And then I'm going to kind of paint where
I need it to be. So I think my paint
brush already. So let's just use the brushes in a let's type in this brush. Okay. I'm just going
to thinks I have no option but just manually painting where it needs to be. Use the bros size. Do some manual
painting on the edge. The t information
also too might need to adjust that a bit more. Alright. So I would need to adjust the height
information for this. Let's just do general heights and tn this down in a slightly. Okay. Yeah, that should
be fine. I'll turn this back on as well. I'll put this in a group. Let me name this logo edge 02. Put this in a group as well. Name this logo edge 01. Or are the black marks in there. Alright. I'm just going in
and then paints, no. I'll just going in
and then paints. That's wrong I'm supposed
to be in here instead. Just go and just repaint
where I need this to be. So we have kind of greater
control over this. Okay. I'll go in and
add a paint layer. I can kind of paint
inside of it some more. Okay, yeah, I think this should work just fine. I
should work just fine. Doesn't need to be too strong, I think, so it should be fine. Okay. Then we have
another shape in there. We have an edge in there. You can see can see an
inward shape in there. So we can actually use a
fill and then fill that up. Okay, so let's create
a few layer in here. Let's use red for now. I'll add the black marks. I'll add a pint layer. Then I'm going to
use the Part two. I'm going to use the
feel part two instead. Maybe. Let's Let's use the edge. Let's do the edge.
Instead, let's do paint a long edge instead. Okay? So I think we need symmetry
to be turned on for this. I think we do this
manually because we might not get this
perfectly in here. Let's see if we
turn on symmetry, I think this will work. So we would just need to
kind of draw out the shape. On paint a train at all? Oh, it needs to be done
on the three D view. Well, that's going
to be an issue. I definitely going
to be an issue. But anyways, we make it work, so I need to reduce
the bros size. Take down the bros size. Hardness of the brush, make this quite hard. Okay. You need to
reduce the bros size. A here. Can do that. Double click. Kind of
like a tri ky one. Double click.
Double click. Okay. So it's applying on both side. So all I need to do is to reduce the bros size a bit more. I think something around
there should be fine. Then I'll go in I'm going to use a more darker shade. All right. Turn on the t information. Get some It in there. I'm going to also add a
filter pvul filter for this. Right. It's I's really looking
quite interesting. Extend that out a bit more. Add some soft slightly
soft edge sweets. Yeah, I think this
will sit just fine. So I'm going to, yes, I'm still in Lady paints. Yes. Brush is still selected. We can just temporarily
hide the color. You know, we, we can just paint can just
paint. That's fine. So we can double click click. Hey click instead. Click. Okay. Well, that sucks. It's not completely perfect
on the opposite side, so I'm going to
turn off symmetry. And then let's just do
this manually instead. Do that's of match this
as closely as I can. Do that. Okay. So All the should be fine. All right, click out. Okay, I'll need one more
also too in the center. Let's see what we get. Think we have good
shipping in there so far. Okay. I'll need to create a new paint layer so I can have a different
bros size for this. So paint layer, go back in there take down
the bros size a bit. I almost feels like it
don't matter that much because we have a
bevel in there. But that's fine. That's fine. W we like so. Can do that. Trying to be as precise
as I can get this to be. Okay? Let's see. We also have the
options go in and then make adjustments
as we see fits. We can definitely
do those, do that. Okay. Let's for turn of this bevel, we have something like so. Let's go to the bevul again. That's a bit too strong. Soften it a little bit more. Let's go to the it formation. We go the opposite to
the direction, okay? Opposite direction
seems to be just fine. I think this should
be just fine. Okay, that we need to do I
need to copy this again. Do I? No, copy. Let's copy this instead. Let's hold that drag
this all the way up. I'm going to go in there. I would do es name
these two edges. Part edges, since they
should make better sense. Part edges. That's fine. I'm going to close
close this as well. Then I'm going to add
an ankle point in here. Let's add an ankle
point in there. Get in here, change this ankle point to
the newly created one. I still don't like
how it's kind of, I think I need to
what I need to do. Let's see if I take this down. It's affecting the
entire outing actually. Okay, anyway, that's fine. I think I know what
I'm going to do. So why we have this, so I would just put
I would pull that, let's go in here and
then get some more. Then I'll put this in a group. I'll rename these
two edges parts. Okay? All right, that's fine. Then I'm going to add the
black mouse to this. Then we can just manually
paint in the detail. Something like so, can
manually paint this in as we see fits. Alright. With this, we have
greater control over where it needs
to be painted on. I think I may have
knocked this off balance. All right, get back in there. Okay. Paints that back in. Okay. Yeah, this
feels a lot better. We have the control
to paint where we on the engines will appear. Okay. Almost done. All right. I think this
should be in a good place. Yeah, I think that pretty
much kind of set it. I think we wait wait
this is a bit too wide. Wait for that seems
a bit too wide. Let's see. W and select it, we should be able to
reduce that bits. Select it also, should be
able to reduce that a bit. Set data as well. Reduce those. Yeah, this seems much neter
now. So this is fine. It worked just fine.
It's work just fine. So I can still copy I can
just copy the same letter. Where it. Scroll down here this letter, can just copy this and
I'll paste this on here. Just past piss that on there. Alright, uns you get something looking quite nice, it's fine. Okay? B quick save. So I'll see you guys in the
next lesson will carry on and then work on the rest of
the mesh. So buy for now.
113. 111 Footwear In Substance Painter: Oh Cuba, guys, so
let's carry on. So I would like to work on on
this embroidery down here, so I can just go back in here and just copy
the material from it. So I think the good the
bronze are more copy that. I can just come in
and paste it in here. Paste that in here. So that should move the marks should kind of
apply to the entire tin. Okay? Can also introduce some
more metallicness to it. I think it's from this instead, but not too much metal, though. I think maybe something
more or less like so. Okay, I think we
can work with this. Let's see what else we can do. Yes, let's go back
to the skirts. Skirt, skirts. So we need to add some
good plating for diskets. On this edge, you need to
add some good plating, we should be able to
let me isolate them. Isolate this mesh
itself, delete this. Don't need that anymore. Apply
the bronze on top of that. We would do et's
add a black max. Can I add a paint layer to this? Let's see if we can add a paint and then use because we have, like, you can see
this strip in there, kind of go strip on that. So I'm trying to recreate that. Let me also temporarily
hide this tier for now. Let's see if we should be
able to draw that in there. I of this symmetry because it's not going
to be symmetrical. Let's see interesting, we actually have the shape
in there, so that's fine. Okay. When I go all the way, I don't think I can
go all the way. Let me double click.
Also, increase the size. Okay, get back in there. This is going to be
for this first edge. Probably went all
the way down here. Okay. I can go all
the way as well. Then go up, do that. That's not looking
quite there yet. This should be fine. This should be fine. Okay. All right. Undo that need something that
goes straight line. Okay. I think also we can just
do something like so. And just create the next
one directly like so. Undo that getting close. So just kind of knew
this all at once. Okay. Yeah, like so. All right. I think all the should be fine. I click out. We get something looking pretty
much like which looks cool. We can Let's see, we can add a bluff filter, maybe Take down the
blow intensity. So we get kind of soft
edge around parts. Okay, I'll go back in there. Or rather, let's create
another pint layer. Okay. Go back to the paths. I think this one we
can just do one. Let's do two also. This one might be kind of tricky though. Okay. Do that double click instead, then we can just keep clicking. Okay. So our lights. Undo that around
there should be fine. Okay. Just trying to get this as
precise as I possibly can. Move our lights. Okay. Almost almost at the end. Undo that I was
looking a bit dd. A gets in there. Okay, I think this should
be fine. Let's click out. All right, so we would I think we need one more
going across this. So let's do another one. Now, we can just continue
on from this actually. So, let me just
create a new one, so. We don't have any
confliction in there. Okay. All right am I doing
this correctly. I believe so. Continue on. Let's
try to get this as accurately as I possibly
can rotate our lights, so that's not
looking quite nice. Kind of cut cuts off if
you don't do it properly. Okay. Undo that. I can say cuts off, so we need to be a
bit closer in there. Yeah, CC mistake made here
also, too, but that's fine. That mistake can still make
things look good also. Okay. Almost there.
Move the lights. Get in the Let's go all the way, should be fine. Look out. Alright, so that is looking quite looking quite interesting. So if we should bring not everything back out, definitely. We can bring up what
was there before. We get in something
looking like so, which is actually
interesting also, too. Need to bring this
down. Okay? All right, this is fine. So let's move on. Let's move on to the fits. I would need to copy Let's p the metal and then
okay, yes, let's go in. Let's go in here. So bring
up the UD for the head. Then let's go over
to I need to copy The chess plates. You know, no, let's do co lines. Let's copy this. So
let's select this. Go to the torso
color. Let's copy. Oh, we actually have to ind. So let's just copy. One I think one is for
the boats. Let's see. Okay, you can just
copy this too. Okay. We can just copy these two. So let's copy them. Okay. Yes, we can go down. Let's select this. Let's
figure out what that is. Okay. Yes, we can paste those two in here and then specify where we need
to be applied to. So the metal ground is already applied to something
already, which is fine. So let's go to this
max, mesh fill. So it should be this in here. No, so let's mesh
fill this instead. Okay. I had the black marks here also. Then let's apply
to this here also. Go back here, select this. That should be fine. I would go in and copy the bronze
also, copy the bronze. Come in, select this, and then just paste
the bronze in there. Remove the marks. Okay, then we should have this
directly applied. All right. Same with
also to the boots. Let's just sat in
the Remove the mark. Okay. Move our
light through this. We can see that's fine. Alright. Put the footwear, place
that in there as well. Okay, remove the mark Okay. There, fantastic. So this let me give you a moment
to kind of sieve. All right. I would also pretty much copy because I it's
already copied, so there's something
else I'm missing. Think covered those feel like I need to bring
back more shine for this for this metal, I need to bring a
bit more shine. So let's see what we can adjust to bring
in more shine to it. Scroll down. Let's
go to this seal. Oh, this is the wrong one. This is the wrong one. Let's
go to the metal in here. Okay. Yeah, we need the depths. We need the highlights. Yeah, I think turning of
the dirt actually helps. Hey dirt needs to be in there. Feel like something
is missing in here. I need more shine
needs more shine. So I'm adding a bit more
reflectivity to it. A bit more shine to it as well. Okay. Let me just run my
light through it. Again, I think that
should be fine. So let's go now to this. What we got to be
finalizing on will be this I haven't found I
think I found something, but we're also going to
come back to this in a bit, so let's go here and
then paste the metal. Okay? And then let's do
apply to everything first, and then I'm going to
X and select this. Okay? So I'm going to
use a JD material. There's a JD material in here. So if I type in JD, all those pull this down. Okay. Then we'll just go into it. Let's see what we
can adjust in there. Let's start by putting
this changes into a complete red red material. Okay. For these clouds,
go to the colour. Okay. This light red. For
the colour itself, I think I'm going to use
a more dark dark shade. Okay. This I need to change. All right. Let's see what else we
can adjust in there. Let's use a more
darker tone for this. Okay. I think it's just lacking
that lacking that shine. Maybe a little bit of an
opacity shed to it also. Dark spot we can keep. But it needs a bit more shine. And some metallic
property to it also. Okay? All right. Yeah, for me, this tans is
looking quite nice now. Okay. So I'm going to add
a co virtual material. So this one is going to
be add some roughness, make it quite shiny. Metallic property, make it
quite metallic in a way. Okay. Yeah, something like so. This I'm going to
add a black max. I'm going to add a generator. I'm going to add should be like, let's do covrtu Okay. You increase the balance, we have this all over the place. Okay. Let's blow this out some more so it gets an interesting
metallic shine to it. We go back to base
colour, take this down. Okay. No. Base color. Let's see. Yeah,
that should be fine. Maya also introduce some
emissive property to it, too. So I will go in and
then add a new channel. I'm going to add emissive
channel to this. Emissive. Okay. I'll
duplicate this. All right. I'm going
to turn off metallic, turn on emissive. Okay. Like so. I'll go to the curvature. I would need to take
down the take this down. Balance, like so. Okay. Let's push this
to the more bright out. I think the red should be fine. But it's way too visible now. Let's see, we push this up. Alright. Let's say
we take it down. I don't work because you think
is supposed to take down the general missiveness
of this, okay? I feel like I should even
blow it out some more. But not too much, though. Not too much. Okay, maybe something
around the nature of this should be on some blur. Okay. All right. Let's go to a base color. Take down the base color
a little bit more. All right. Get up close, what do we have? Okay. Yeah, I think they should work. Let me bring this down instead. Any major difference if you do. Not so much. Alright. Let's make it more
interesting add a few layer and add a grunge. Let's add a grunge
material to it. Let's say I apply
these grange to it. Yeah, this is looking
way more interesting. And let's do multiply
instead. No, no, multiply. Let's do screen
instead. No. Let's do linear d, no. Difference. Difference seems like
an interesting one. Okay. Let's try exclusion. Let's try this. No Ovalle linear bone. Differences seems like a
more preferable option. Okay? Yes, this is looking cool. So there's a bit
more interest to it. Maybe adding some
transparency to it might kind of make it
look a lot more interesting. But to do that, you need to come back in here and then change to the Alpha blending. Change it to Alpha blending. Okay. Then to the channel, we're going to add
another channel called Opacity channel. Add a past channel to this. Okay, so I'm going to just maybe just duplicate
let's duplicate this instead, introduce your pasty channel. Okay. All right. We can turn off
emissive I think we need dims. Emissive actually lose cool. We put these to
whites. Let's see. Okay, I'm missing something. I'm supposed to turn this off. So that's giving you some
interesting look to it. Making it quite interesting
if we bring in metallic. Okay. And right. Yes, yes, yes. I work. This would work. This feels
a lot more interesting now. Now, if we duplicate this
and then shrink that in should get good
interesting shaping in there, you can see how we have
this edge reflectivity on it because of the
surface detail we have. Okay, so this will
work just fine. I'll do a quick sieve. So just a minimum last
thing to actually fix. Let's show all let's
see what we have. We just need to put
something in here, and then we should be
we should be good. Okay. For the most part,
everything seems to be working just fine. All right, so I would need
to let me just go over to this head and then just
apply a material to that. So isolate already have
the materials we need, so we're just going
to apply that o. Let's just put dock can. The material should appear,
so that's for the color, roughness that's
for the roughness. Okay. Then let's find the eye. Let's the outer eye. It's not selected,
just select it. Okay. Then add the
in the roughness. Base color. Let's
type in in there. Okay, roughness, flood
the roughness as well. Okay. Let's bring everything back out again. Let's see what we have. Okay? Some weird issue here because
everything is now visible, so I need to go and select this isolate it because we need to kind of I can actually
add a dragon in there if I need to but I think I would. So just tack that in the
next lesson instead. So I'll just find you normal or map you can bring in there. So I'll see you guys in
next lesson, bye for now.
114. 112 Pirest Chrest In Substance Painter: Okay, welcome, bad guys. So let's carry on
where we left off. I have an depth map
I can actually use. I think I need to rename this. So Trist depth I was kind of experimenting
with a few options, though, but I think
this one work best. Let me drag and
drop this in here. I'll bring this in as
Let's do Alpha instead. I booth. Okay. So I'm going to's but a few layer, can I input this in here? It's not going to work as
accurately as I needed to, so I would do that. I would need to create a few layer with
information in there. Now add the black mark. I'll add a few. Then I can drag and
drop that in there. Okay. Let's go back here. Let's
turn off the color. Need the t information.
All right. So I'll go over to my two D and three D
view, go in there. We go to the fiel turn off repetive and then
set this to none. Then just kind of get
this roughly where I need it to be Okay. Yeah, I might need to still
do some cleanup in there. Need to do some
cleanup in there, but I think this should
work just fine. So futile let's do
bevul as a bit strong. Feel too strong. Ah. I'm good. Maybe. No, this
is not going to work. Seems like it almost
worked for a moment there, but I think a preferable
one should be bevel. I mean, blow instead. So let's do not blow
a bit too much. Let's do just a slight blow. Okay. All right, so I need to do some cleanup work also in there. At the same time, I need
to make this metallic. Okay. Well, it
looks slightly odd. We just need to do some
cleanup and then do some more work in there and
then we should be good. I can duplicate this a few
times to make it more intense. But before we do that, we kind of do some cleanup on the edge. So I'm going to add
the paint layer. Then I need to use the default. I don't need to use
any alpha in there. Let me move that. Let's use the default brush. I type in the fault. Let's go do it to
the starting points. The basic art should be fine. We use the Broize
X on the keyboard, and then let's kind
of clean this up. So more. Don't do that. We
use the bro size. Et's do this India instead. Okay. Should be fine. All right. I would duplicate, duplicate this one more. Then I think I can actually
adjust this slightly. Also, so here we get some interesting
looking depth in there. Probably change the color
of this a little bit more. Maybe even add let's
see if this would work if I do like let's say
add a few layer to this this probably might not. Hess, I think we can what we need to do is
to actually turn this off. We need this for the eights, then of the ton of
this roughness. You need this for
the eight for now. We just need heights.
So this also, too, we just need it for
the heights information. I'll do this one more time. Let's do the opposite direction. Now let's keep it fully like so. I need to go three DV lane. Then I'm just going
to duplicate this. So this part is I'm going
to turn off the eights. We only need the color
metallic and roughness. All right. Maybe maybe for you, maybe just roughness only. Roughness and metallic
property instead. Okay. Here, we need some
definitely some colors in there. Some colors in there. Make this quite rough. Okay. Then I'm going to
add a black max. Going to add a few layer. Then this few layer
should be controlled. It's kind of all over
the place, though. Yeah, no fix that I need it. I just need to add a
grunge material in here. Let's use the BW instead. BW spots. Okay?
Something like so. I'll put all of this in a group. This also let me put
this in a group. Okay. And I'm going to
add a black max, and I'm going to add a fill. Then I will type in priests. I believe I have a cut out. Yes. I have a cut out in there. So I would need to copy the settings in
here and paste on there. So should be able to
do that go all the way down here. The fill. W copy this setting copy. Come in a piece that's in you need to kind
of set this to non as well to back copy the next
copy the next settens. We should be able
to just copy this. I mean, you should be able to
just copy this copy effect. So spin it longer time. You can just copy this and
then past paste effect, paste effects, paste
effects. Yeah, fantastic. So, I mean, instead of just
doing it the other way, which seems a bit a bit off. But we need to kind
of change this, so we need to change this and use this instead,
perfect, perfect. This is precisely what
we are going for. We can also copy
the paint effect. So let's copy this paint effects and paste that past
effect, paste effects. Yeah. Excel that cleans
that up also, too. Alright, so this will be
just fine. Can go back in a Don't rough it off too much, so maybe back here
should be fine. Alright, so this will give you an interesting looking result to it as well. Okay. If I go and copy these
scratches on this map, let's copy those get into the group and then
paste that in that group. I think that should also
introduce some scratches to it. Yes, it did. We just need to adjust
that some more. You can see the
scratches in here now. Precisely what we want. Same with the item from
this grunge height if we do a bit more,
not too chutal. We don't need to be ten in tens, a little should be fine. Okay. Add more
reflectivity to it. Add more reflectivity,
let me make this like so. Alright, so should be
this should be fine. D D't go to crazy on it. Okay, I think there's
something else. We can copy this as well. Copy. You need to copy
the oil texture now. Copy the roast also, too. Copy those, get in here, paste this also, drag this
on top, turn on the roast. The roast values a bit too much, so we need to go to the clouds. Dak this down. Okay. Go in her tone of
the paint layer, t see, increase the balance. We don't want s. Maybe just ss make it feel
like it's kind of eroded and make it quite
rough also, as well. Okay? Yeah, yeah. Fantastic will work just fine for
what you need for. I'll do a quick save. Okay. Okay, so we have this
all settled now. I'm going to turn
everything back on. Let's make everything visible. Awesome. Awesome. All right, so let's introduce shadows
in the so if the shadows, you can see how interesting
all of this looks. Okay, so I would need to let's
try all the lighting here. Let's try all the light set top. This is the studio umbrella. Okay? Thi is looking fine. Let's
try glazed, glaze patio. It also looks good
India, as well. If environments also looks good. Atla don't know what that
is, though, but let's see. Okay, also have interesting
looking lighting result also in the Hunton forests. Okay. But you do not want to be chased by something like
this in the forest though, so this dark, gloomy look also looks
interesting on the model. So I'm just kind of testing out different light setup just to get a good feel
of the material. And then far so far, we have something quite
interesting in there, which is precisely what I want to get something
interesting. Like a boring light,
though, horse garage. Okay. So it works out
well on only light setup. So which is good. Let's see. Try this
panorama. Okay. Panorama looks good too. I think there's one. Is this? Well, let's test that one. Okay. Here, this mandarin and this is the one
we're looking for. Okay, that looks
interesting as well. Let's start trying some studio. It's an interesting
one, too. Ah. Wait for a futuristic model to look
good, but not for this. Let's try this studio all three, those three lights setup. Casting some interesting
shadows to this. Okay. Yeah, I think for the most
part, this should be fine. Studio whites is just going to blow everything out on that. So I want something that
has more shadow to it. This is looking
interesting also, too. But I think so far
this one looks good, and then this studio tomaco Studio tomaco also looks good. So let's get some nice looking
shadow depth in there. Like, so then we'll just do a render and
let's see what we have. So I'm just going
to click on Ira. I'm sure you guys are
familiar with IRE, so it shouldn't be
too much of an issue. So I'm just going to do a render for more personal viewing. We can do some render
with IR also, too. So I'll see you guys in the
next lesson bye for now.
115. 113 Posing Arn In Zbrush: Okay, come back, guys.
So in this lesson, we need to kind of pose
a kind of character. Like pose to kind of
make sure it's kind of grabbing the rod and
position this also, too. Okay, so let's get right to it. So what I'm going to do would be to duplicate this main talisman. So I'm going to duplicate that. I'll drag a copy. The reason why I'm doing this is
because I want to kind of have a separate file where I actually
pose the character. Okay? Since I have a separate file for that, so
I'm going to rename that. So if anything goes wrong, I still have something
to kind of fall back to. All right, so this is the file, so I'm going to rename this. Okay. I'll just put pose
postmotalisman, that is fine. Then I'm going to
open up the file. Okay, so we are in. So what we need to do is to pretty much make what
needs to be post visible. So let's do that. Let me make all of
this visible first. But majorly what you
need to make this visible is let's see, let me make everything
visible first. Then we're just going to
generally turn everything off. Anything that wouldn't be
visible we're just going to turn off that fu for it. It's easier for me
to kind of make better planning if I
have everything visible. Is there a tool to just
make everything visible? I mean, Okay. Just make all visible. There should be
sub to master. No. Show sub to Okay. Awesome. So yeah,
that was the first. We never knew we had
something in there, okay? That was way faster. Okay, so basically what we
need to be visible is just majorly this
arm and the toso. Alright, then you roll
head not so much. Maybe just this part
so let's begin to hide let's hide folders
that we don't want visible. For example, tone
of the miscellanos, ton of these footps these parts, we can completely turn that off. Okay. These boats, where
are they laid out. No, no, we need The boat
needs to be visible. We need them visible. Okay. Yeah, this
is pretty much it. This is pretty much all
we need to be visible. The head, I want to turn off
the head parts. All right. This is all we need visible. All right. Okay. So now, how do we kind of I need to change this
arrangement, okay? So now how do we pose this? We need to go over to zip login. Then transpose now in here, I'm going to I'm not
going to turn on layer Y because button that, it makes sense turn
that on though button down to is just
going to increase my five size way too much, and I'm trying to
optimize this so I can kind of record and
do what I need to do. But if you PC you can
actually handle it, creating layers for each
pose you make in here, you can pretty
much just do that. Okay, can just turn it on. A new layer will be created at the top subdivision level for each sub to before
depose is transferred. I pretty much don't wonder
how that's going to skyrocket the five size of this
my Z brush project. So I'm going to ignore that. I will ignore this also too. So if a T pose is selected, press this button to save to dig or create low res merge for working with
transpose, right? So let's click in there and let's get a meas
that we can actually pose. But let's give this a moment. All right. You can see how only
what is Okay, thank you. You can see how only what was visible is kind of transferred, which is kind of
precisely what we want. Okay. One other thing. Okay, yes. This is fine. Shift F. You can see how everything has
its own poly group. But one thing I would
like to do would be to select is two max, let me do this this way. Mark all of Mark all of this. Come on. Let me use
Mark's last one instead. Max lasso. I'm going
to max, this piece. I'll give it let
me do this again, Control W. Let's give it
one single polygroup. I'll do the same here also, actually put 19 on a casket, so I'm just going
to max all of this. All right. ControW give you
the same poly group as well. So it's just me trying to pretty much organize
all of this. All right. I think I'll need to also Ananal symmetry for
this symmetry would work. Need to max out give all of
this a separate poly group. I'm getting close just to be sure I'm not selecting
something else. This select anything
I did in here, Control W, I need a bit
more work in here as well. You need to mad and Control, Mark all these parts. Control W. Okay, temporarily hide those. Oh, I see an issue in here, so see an issue in there. I this I need to fix. I need to max all the Max also. I need to turn off symmetry
for this to off symmetry. Mark this again. So it's
important to kind of check just to be sure you're not selecting something else. Okay. Well hide this. Let's see if we have
this working correctly. You can see you can see one parts kind
of ignored at the back. I was ignored at the back. We need to add this also to it. Okay, going through
W. All right. It's important to have this looking quite neat fai this now. No, no. Okay, yes, we can
select all of this now, give this a separate poly group. Okay, we need to make sure
W sided is turned on to. I'm pretty much just trying to get them into
separate poly groups. So once I'm kind of
maxing the posing here, we're going to be doing
quite a lot of maxing, so I don't want that maxing kind of mess things up for me. So we need to have things separated as
necessary as we can. Okay, that is fine. That work just fine.
Separate piece as well. Separate piece as
well. Fantastic. All right. Okay. That is fine. Okay. All right. Okay, that's fine. So now I
would like to kind of pose, I would like to pose
this arm first. Let's get these
umposed. Alright. So it's kind of tricky here, because we have quite a lot of a lot of meshes
going on in here. So what I'm going to do would
be to hide this as well. The symmetry is
already turned off. Okay? I'm going to do a max
in here, blow this mark. Okay? So what I need to do
is kind of rotate this arm. So I have this back paths
kind of facing us in any way. So let's go to our Gizmo. That let's go to our Gizmo, bringing the Gizmo in here. All right. Let's get this in here, kind of make sure it's directly in the mesh holding
not to kind of arrange this, set the oritation properly. And I'm going to
rotate it this way. Just a little not
too much, though. You want to be qui want to
be quite careful with it. Do not want to overdo it. I'm going to select these parts or mark that part
out rather, okay? I'll blow the max again
I move this down. I would rotate this a little,
just a little like so. Okay. I'll clear the max. We're getting there. All right. I'm going to hide that. All right. Let's see. Okay. I'm going to max spots? Okay. Now, this part
gets quite tricky. So this is what I'm going
to do I would let's see. Because the only part I kind of mark so is, let me
show you guys here. This portion, I need
to mark out and then plow and then rotate again. But if I do that,
it's going to mess up this ship we having here. So at this point, I need to be quite careful. It's important. I'm quite careful
with this so yeah, so I'm going to grab
this and this also. Okay. Let's see. I'm going to invert
the selection. Clear this marks select
invert the selection. Seeing. Let me go. Let's see. Is the maxed out? Let me bring everything back out.
Let me do this again. Rub that, grab this. Grab this. Okay, I would grab this undo that. It the selection, Max
this. Int the max. I'll grab this and this. Okay. Inverted selection,
right, perfect. Okay. Let's see what is maxed out. I need to confirm
something in here. So what I needed to make sure of is let's CKS, we have it. We have max in there already. So I would invert the max. I'll blow this out some more. I'll set this down here. This way. I'm sure the faster
ways of doing this by rigging the
entire outing boots. I don't know how to rig, so this is just going to be the, I'm just going to go
about doing this. So I'm going to
rotate some more. Alright. I don't want to go too
extreme, do I think this at this point should be just about. Okay. Let's C PID should be fine. Play the max, bring
everything back out. Okay. So just few
issues to actually fix. This chain me will need to
kind of get it back in place. So I'm going to use
the more brush. Going to get that back in. O get this buried back in. All right. Okay, gets close. All right. Let's see. I think this should be fine. Select this, bring
it down some more. Okay. I'll select
this. Bring it down. So more pretty much around
there should be fine. Okay. Clear that out. I need to select this
Let's enter the votes, bring it forward this way. So I can get an idea
where I need to place the arm, place the rudder. Okay? I need a little bit distance. Let's extend this out this way. All right. Is blocking our vis
let's just put this to the side so we can
visualize this a bit more. Okay, so I'm going to
grab those these as well. Okay, basically, let's do
the opposites instead. So let me hide
hide this Oh crap. Oh crap. We have
this somewhere else. That is quite old. This is quite old. At this wanting kind of keep in mind of when
you're doing this. You might just let's find let's find where we kind
of moved out out of place. Okay? All right. So we add these two
selected as a major issue. So I'm going to symmetry
is actually turned off, so I'm going to have
to max this out. No worries. I'll click okay. Good thing we can still go back and fix any issue
we have in here. Okay. I invite the selection. I'm going to I'm going to even grab this as
well, grab this as well. Invite the selection.
I'll mark this part out. I think we need to let's see, I'll move those instead. Let's see what we get from this. Okay? Already have this issue
here, but that's fine. So we can just go in
and rotate this again. I think at this point, I'm
going to be checking both and regularly just to be sure
I'm not moving something. So I see I'm moving
something else already. I dos a Okay. That is fine. Let's see, maybe a
little bit more. Okay. Bit more. All right. That should be fine. Let's bring everything back out. Then we need to make
that correction again. I Prey this back down. Pre back down again. Clay. Move this down. Clay this gets in here. Bre down. Don't do that.
Okay, that's fine. All right. Okay,
that should be fine. So now I'm going to hide
this Let me do a quick save. Let's do a quick
save and move on. Okay, so let's carry on. I believe at this point,
we are doing just fine. So I'm going to hide. I need to hide this
as well. Okay. I also need to hide
this this as well. I think I need to I need to get this boat
separate actually. This boat needs to be separate because I'm going to move something now
that might affect it. I don't want it to
give me issues. Okay. So let's let aside this as well, okay. This also also this Alright. I think I believe in a good spots I believe
I need a good spot. So what I'm going to do
now would be to I need to grab I need to grab these parts. Okay, I'll have this
also, too. All right. I'll blow this inverts. Blow, blow some more. I'll need to move this all the way up here to the shoulder. So I'm pretty much trying to move the shoulder
at this points. That's a bit called. S
this in here some more Ar. Okay. Yeah, that should be that
should be fine, I guess. I'm going to grab
all these parts, load this out quite well,
very well, actually. I'll put this in here. I need to hide I need
to hide this for now. Okay, Lord, come on. Hold down control, blow
this out some more. I'll set this down here. No. I think I'm doing
something wrong in here. Wrong place. Think I blowed
out out way too much. Let's grab it again. The reason I'm kind
of blowing it out is because of this chain mill. Invert the mark, low
so should be fine. Okay? Con do that. Let me select these parts. Okay? Invert the
max, blow some more. Make sure I don't
have the other parts selected, very important. Okay. This is kind of issues like
this I was trying to avoid. Let me move this this way. Okay. So issues might be in here. You can see how we have that
weird stretching in there, which I don't necessarily want. Also, too, I'll need
to mark this part out, blow just once,
probably, move this up. Up some more. Yeah, I'm sure issues
is going to be on here, so I felt issue is going
to be on this chain mill. I'm kind of extending the ends. I'm not supposed to extend
the underway, actually. Okay. The issue is just the chain
because if I do, let's say, I isolate this
chain mill inverts, we can now blow in here. So we need to blow this
out, like quite well. So we have smooth out
transition around it. This is just where the
major issue is going to be. Okay. Who the selection because we need to kind of
lift that up also. Making sure I don't have
any weirdness in there. Okay, I think that's
the right angle to actually elevate move that up. But the main problem
is our chain mill. A chain mill is still the
major issue we having here. Okay, know what? Let's
exclude it completely. Exclude it completely
for now. Okay. A bit to bit extreme. Let's see. Let's way too extreme. Let's check the post to again. All right. Let's see. Okay. I'm going to add blow
this out some more. No. Reset this, put this in here. No, no there yet. No. No. Getting some weirdness in here, which I don't really like. Yeah, yeah, I think this is
the angle, actually we need. Alright. Bring everything back out. So pretty much all we need
to do now is to reshape. Okay, I need to go
back. I still need to do a little bit more
work in here, actually. Okay. I'll move this down here. You need to undo that inte Max. Undo that ind Max. Come on. Oh, I need to max
all these parts out. Okay. Make sure I'm doing
this correctly. Come on. What am
I have an issue? So let me do this again. Let me max this again. All right. Invite the max, blow this out. All right. And bring everything back out.
116. 114 Posing Right Arm In Zbrush: Welcome back, guys. So let's continue with the
posing for this. I would need to grab this. This also This as well. Okay, via the selection. I need to kind of get this
chain u to be in place. So I'll go to gizmo. Okay. I need to It's quite a lot of
correction I need to do for the chain though. So marks this Okay. Now, this part, this is
where the major issue is. So let's see if we can I just It's going
to be a tricky one. I can just move
this drastically. It's going to give me issues, so I need to kind of do
this piece by piece. So let me select it again. Via the selection. Something else is
being selected, grew just this alone. Okay. Invert the selection.
Let's see what we have. Okay. I'm going to select this kind of selecting
what I actually need. I need you know what? Let's do this instead. Let's give this part a
separate poly group. All right, that is
fine, this will work. So I'm going to select this now. Okay. Invert Selection. Perfect.
This is what I need. Let's go back to the Gizmo. I'm just going to hold
control and select it. In something doesn't feel right. Hold control, click on
this. Does it work now? Yeah, it's fine now. Let's see how we
can make this work. Let me start by,
let's put this here. I'll move this
back to begin with first let's see if we can use the move brush to
force this imposition. Okay, I think we probably have a better
option with the move brush. Okay? Maxing this at this point, we get some weirdness when
we do some when we do maxing in I think we can just let me show
you what I mean, I I do like let's say I select just this alone and
I max this part out, for example, I try to blow. I don't get that smooth
transition in there. Maybe let's try something else. If you go to a gizmo and I do is not really putting
control and doing that, it's not working that perfectly. It's not working perfectly,
as I would like it too. Let's bring everything back out. Let's grab all of this. In, grab this also
Invadiselection. Okay? All right, I should blow this out
quite well, actually. Come on. What is this? Yes, I use the move brush now. What happens in here. You can see we have
this weirdness in here, so it's going to be difficult to just max and then just move. Yeah, it's going to
be a difficult one. So that's why I'm kind
of using the move brush instead to just do this. I think we have better
luck with the move brush. Well, you just need some
measure of carefulness in here. Okay. Let's see how much
of this we can just Oh, that feels odd. That feels odd. It'll be cool if you can
just get this don't do that. I need to be extremely, extremely careful
with the movements. Okay. Let's see. Okay this out. Okay. Maybe I'll just come
back when I'm done. Just kind of push push
this in as much as I can. Yeah, there's also another
option we can try. I just remember now we have another option we
can actually try. So we can select it already. We can let's go into it. And Okay, I can
use the bend cove. Mesh is partially den. This one works if the mesh is
partially den, it is a bit. Now, this might be an issue. Why? Because, let's see,
I'm supposed to have, like if I do bend cove, mesh is partially den. I don't know if
this is going to I don't know if this is going
to ruin things though, but let's give it a try
if I kind of split this. I do not know if this is
going to be an issue. I think a more preferable
option would be to do this would be to do it. Let me make it duplicate of. Let me show you guys pretty
more what I'm trying to do, but if I duplicate this, this is the original. Let
me hide this for now. It's pretty more what
I'm trying to do. If I do splits split hidden, then I would have then
I would have just this. Okay. So this is pretty
much what I'm trying to do. If I should go in a bent cove. We have something like so. I can just quite easily move it this way.
You get the idea. So something like so. Like, I have some control
over how I move this. Okay? I can also increase
the resolution for it, so I can get a bit
more control over it. So this will make the work at
least a little bit easier, but it's not working the way I would want it to
on the actual mesh I need you to kind of work on. But this kind of gives me more kind of greater
control in any way. I kind of get things
to sit properly, then I can just use the move brush and then
compensate for regions around it. That's the disadvantage
this actually. We can't do this why all
of this is a single mesh. We can't do that well.
This is a single mesh. So just to kind of give you guys an idea of
what's going through my mind. So I will have to delete those. I think at this point, the only favorable option is to the favorable option is just to I won't be needing
all of this anymore, just to delete what
we're not going to need. But I'm going to do
that later on when we have kind of
transferred our polls. So unfortunately, we will have to we just have to do
this this way instead. Okay. So I'll pretty much just have to forcefully move this in place. Let me just get this in place. I'll just push what I
need to kind of get in and then pretty
much delay the rest. Okay. Because what's not going to be visible, we don't
actually need them, so most likely I would
most likely delete them. Let's just get something that sits roughly where
it needs to be. Okay. All right. Move these parts out. Need that's in,
get a bit closer. Okay. Let's see. All right, that should be fine. Okay. Alright, I can't delete it here because we can delete it when we have transferred
transferred all the detail. Okay. I think this should
sit just fine. Let's bring everything back out. That should sit just fine. Okay. That should be fine. So pretty much what
I need to do now. I think this pot ama will
need to scale it in place. My, do I have something el
selected? Don't do that. Hold down control, select this. I think I need to put
my gizmo down here. I'll scale it down a bit small. Let's get this sitting
on the resting on there. Okay. Alright. I'll move this back around here. I strongly believe
I need to go back to I need to go back into, let's hide this this as well. This also two. This also two. I'll need to go in here, I'll grab this portion. Invite the max,
low this a little. I think we need to grab
Okay this is fine. Okay? I need to elevate. Let's get this max
this out as well. Okay. Let's get this around here. No, should be here. Now, just a matter of finding
the angle to know like so. Undo that. This is where
it's supposed to be. All right, leave
this up some more. I need to fix this
a little bit more. Okay. Just in the arm to be a little bitd up
a little bit more. I think somewhere around
there should be fine. Let's get in here. Move this around here. We can put this down here
again and scale it up. Alright, move this
forward. Okay. Let's find the right place
to put this forward. Let's push this forward
a little bit more. I think at this point
you might need to scale it up a tiny bit more. Maybe that's way too much. Okay. This seems to be
sitting here correctly. I need to rotate this,
bring it forward. Let's see. Okay. That is nice. Let's check our arm properly. Okay. Invert the max. I think at this point now
we can use the move brush. I think I cannot remove
that move brush. Let's go to move brush. Move Brush. Okay. At this point, we need
to select come on. Gizmo select this. Then let's see move this
down rez the bros size. I'll just kind of
move this down. So it kind of
roughly touches it. Okay. Move this down. Move this down. Oh, great. Oh, we have fingers
in there, so. We have fingers in
there. We're not even supposed to need this
anymore in there, though. But it's fine. It's fine. Maybe even there's to
bring everything back out. I never knew there were
fingers in there actually. H. So let's figure out which fingers which
finger we have here. So let's do auto group
Autorou auto group, poly group auto group. Okay. Use a gizmo, grab these bits,
bring everything back out. Move the snow. Interesting. It's actually quite interesting. So there are actually
fingers in there. Lay this out again. I can't really see
any fingers in there, but once I do my marks
in there, I see fingers, it's finger popping
out over the marks, which is oddly strange. Okay. I kind of max. I think the best option
would be to max it this way. Let's max it this way, bring everything back out
invade the mark, blow this out. Then I will just
use the bro size and then just try and get something pretty much done
yet, touching this way. Okay? I okay. Select this. I'm going to grab
all of this also. Bring everything back out.
Invdi max, blow this. Okay. I'll need to kind of pull
this down it touches. Like so. Then we can just compensate or
just pushing this down. All right. That
should be fine. Okay. So we have something looking interesting, like,
so touching it. Perfect. So that
should work just fine. So next part you need to
work on is this order. I need to save my
file, save my file. If you have any issues
in okay, that's fine. I'll save this I
117. 115 Posing Left Arm In Zbrush: We combo dies. So the next thing going to pose would be this age, so it can actually hold the rod. So I'll get in there. So I'm not going to roughly
just pose this first. Okay? So I'm going to using my
own an example to kind of get how it's supposed
to be posed in. Also, to help me out, I'm going to do
something like this, grab all of this, give it
a separate poly group, grab all of this in here. Give it a separate poly group. Okay. Let me grab
this a bit more. Con do that separate poly group. Okay, I those two to swell. You want to be quite
careful, though. Separate poly group. Do that. Maybe a preferable option
would be to use the Gizmo and do no, a bit small. Yeah, that should be
fine. Don't do that. Don't do that. You
need a bit more. Separate polygroup. All right. Separate polygroup in there so let's bring
everything back out. So now we need to grab this. That is strange. Strange. Why am I getting this? That is rather strange. Okay. I think I need
to undo all of that. Grab this invert this again. I'm supposed to be
getting auto group again, I'm supposed to be getting
all of this all at once. Not sure why we're going to getting some weirdness in there. But I grab this holy group. Okay, it's working now. Okay. Holy group. I think at this point,
I would also have to do it Holy group. Holy group. Holy
group. All right. Yes, it's working fine now. Invite the selection. Okay,
yes, we can make it work now. Okay. So the word is going
to be coming in here. Okay, so the rod
will be coming in here is going to be
slanted this way. So the farthest
point of our finger should be up inward a bit more. So let's begin to do
some maxing in here. I guess a little bit trek in here, but we'll make it work. Get some orientation in here. Maybe we'll know
the way up here. Okay. We can move this down here. No, that's a bit extreme. Clay that's something
around here, invite max, pod here Pod here. Feels a bit old. You see, we have issues also in there. I think at this point,
I would just have to manually mark that
invert the max. Okay. I would also undo that, undo that blow the blow
is way too intense. I think at this point, I think a more favorable option
is the move brush. We more favorable option is
the move brush at this point. Okay. All right. That should be fine. We've had the marks. Come on. Hope I didn't break
anything in there. I just wanted to be
sure. Move out the max, put, put this in here. Move this up. Move this up. I'll use the move brush now. Take down your brush size. Move this in place. All right. Let's move to the next one. All right. This way, Mark these
bits via the max. Let's get this centered. All right, this is a
bit stretched too much, let's get this closer. I'll use the more brush now. Okay. Like so should be fine. Mark these parts,
invert the max. Rotates this way. Feels rather old in there. This way, move it up. All right. I'll use
the Move brush now. Let's blow this a little
smooth this down. Okay. Yeah, something like so. Int the mark. Let's
mark this out. Actually, let's
mark all this part like so, invert the max. Get this in here, get some good rotation in
here, put this around here. I would rotate this. I think I missed the spots. Okay. Undo that, move this way. Okay, undo that. Blow. Here, I think my blow intends this way too much so let's is the move brush. Play this again. All those
blow the small parts, invite the marks, blow some
more. Yes it's better now. Okay. Put this down. Okay. Low this around
here invert the max. Put this down here,
rotate it this way, rotate it this way. All right. Do some smoothing in there. Smoothing in here as well
to relieve some tension. Okay. Then I'm going to
max out all this region, so invite the max flow. Get this way. Make sure you're in
the right place. I think I get it
down here somewhere. Move this forward,
up some more. Okay? Play the marks. I need to
grab all this portion, invite the marks, low. Move this back up. I think I squash the
end with too much. I need to invite the mark. I need to compensate
for these parts. Okay? Invert the max
rotates it this way. Compensates. All right. Play the max, bring
everything back out. Okay. Rotate it this way, some more. Okay, let marks all
these parts invert the marks blow, root undo that, move this up, rotate this way, rotate this way, some more, move it up, rotate this way. Let's look at how this is. Okay. I'm going to mark these bits. Get in there we bend
this in some more. Okay. Clear the marks, bring everything back out.
Let's see what we have. Okay. We need to make some
adjustments in here, no doubt. Do that. Max everything. Okay. It the max. Let's just push this in. I also need to kind of
get this inward part, some of it out some
more out some more. Okay? Now, there's some
weirdness in here, which I'm not sure of, so
let's smooth that down. Check again for any
weirdness anywhere. I'll leave this
up, up some more, up some more, up some more. But these are kind of
gloves that should have some measure of
thickness in there. Okay? All right. Then I'm going to select the
rod unless move it in place. Set the orientation
rotates it a bit more. Yes, you can see how this
would sit perfectly in there, rotate it this way. Up some more. Okay. Down this way. Down this way. Okay. I think I can move
it forward now. Like, so I think it's looking as good now.
Move it forward. No, that's not
looking great yet. Okay. Okay. We rotate this way. Let's see where we
get and do that. I think I think
we're good this way. Yeah, this should be
pretty much fine. I'll do a quick sieve.
Alright, I think we're fine. I think at this
point, we candles transfer candles transfer this. So transfer tips to soap to. So let's hit that less
what you do is thin. Okay. Fantastic. So we have
something good in here now. We have our fine apples, so we can just go back in
and make some as visible. So we can make the head visible. We can make this visible. Okay. Making it visible just to kind of
check if there are no issues around
this in any way. Okay, so far so good. All right. Fantastic. So I'll save
I'll save one more time. So the next lesson
is just going to be about exporting only
what is necessary, only what was posed. Yeah, so what are you going
to exporting what was posed? Back to Maya and add that
to what was not posed. At least, that makes
sense. So we don't need to export
everything out again. Alright? So I think
for the most part, we're going to export out there going to export
out the caskets. We're going to export
out the skeptleEport out most of everything
that's do with the mine, and then
we should be good. So we'll do that in the
next lesson, bye for now.
118. 116 Exporting Pose In Zbrush: Okay, so let's spot out the Let's spot out the
posed version of this mesh. Okay. So I would need to my only fear is that
when I export this out, I just we don't have any
disturbance on the youth is just my only major concern. Now for this, I don't think
I'm going to export this out. I can just shrink or reduce and replace what we have inside of my incorrect position, right? So also I'll do something similar to for the roads
the minimal position. So what I'm going
to export would be let's see let's
start with let's start with I'll go into the toes
aside everything else. I'll leave the arm
parts as well. Okay? So let's go
into the torso. I think I would leave let's
torso call live that. I'll leave this.
I'll leave this. No, I think I need to
export out the boats. Yes, I need to export these boats up because we
can have adjusted them yet. Let's go over to preferences. Important export export
tunnel group, tunnel normal. Okay, so I'm going
to export this out. I'm going to export them
into a separate order. I'm going to be exporting
them into Z exports. I'll create a new folder. I'll name this
pose Pose exports. All right. Save thats. I'll select the chain mill the armps Export that out as well. I think I might just have to do this every same time which. Let's export this
out. All right, that is fine. Export
that as well. Yes, we don't have to do
this every single time then. Okay. So I'll export the vests. Okay. That is fine. I will export also the belts. I'm only exporting out what is necessary to be exported out. Okay? This as well. So this is the and boat. I need to export
that out as well. Okay. This also need to export. All right. The park side also. Okay. The gloves, definitely. All right. I believe that should
be everything. We want now like to export
also to be the road. Let's export something,
at least just the road. He skeptal I'll go
in there just this road alone just to get a good idea where I'm
supposed to place it. So export this out also. Okay. Yeah, that's fine. I think one more thing will
be the casket. Let's I just need to kind of
select just this part alone. So I'm going to use that
kind of size everything up. So it's just going to be like
a reference kind of size the other parts into into it. All right, I think that
should be pretty much it. I think as far as this goes, I think this should
be just about rights. Minimize that. That's good. So Imre file. Okay. I think I'm going to
I might just make it duplicate of this Okay. I'm going to rename
this supposed as well. All right. I'm going
to open this up. See, we're back in here now, so I'm going to leave this open also because I need to actually check if my UVs are
completely fine, too. So yeah, I'm going
to select this. I'm going to do a
duplicate. All right. I'm going to hide this original. I'm going to go to
the duplicates. Okay. And I'm going
to delete parts of what we are going
to be replacing. So I'm going to delete
this. I'll delete this. I would delete this as well. That's when we kind
of import them in, they would just kind of
sit where they need to be. Okay. So pretty
much all of that. Then let's go back now to where we kind of
exported them too. And then we'll drag and
drop all of them in. So if I should go to post. All right. So I'm going
to select the OBJ. We need just the OBJ for this. And I'm just drag and drop
this into our same file. So they should kind of import directly where they need to be. Okay. Alright. Awesome. So
they're actually in place, I think I did not
export out one. Okay, I need to go back and
export out the chest leads. Okay? Let's export
that out, as well. Good to where you have
before the in here now, so I'm just going to
export this in there. Okay. Then it should be those dragon db
this in. All right. Fantastic. So we have a pose. We have pretty much all of this. So let's kind of
check the UVs to be sure there are no issues
with the UVs great. Fantastic. Fantastic. So this was the issue I needed
to kind of keep in mind. This one is fine. This is fine. This is fine. All good. This is fine. Fantastic.
Another issue here. Okay. This is fine. Pretty much anyone
that has issues, I think we need to
just highlight them. This is one of the
major issue that comes with zero sometimes
when you export. So there's one issue in there. This is fine. This fine. Okay. Issue on here. I want to try and see if we
can transfer the UVs from the good one to this
bad one in here. So I'm putting issue in
front. This is fine. This is fine. Fine fine as well. Let's leave this extra
naming in there. Okay. Astra weird naming. I'm just going to delete those. No worries. We'll find a way to
actually fix them. So if transferring
the UVs doesn't work, then we will just
have to sieve out the smart material
we apply to them on the TPOs version
and create new UVs, pick the new UVs, normal map instead
of Zbrush again and then just directly apply the material, and then
we should be fine. But it would make
better sense if we can use what we have
already texturing instead of Substance Painter. So the next thing you
need to do is to kind of to position
this way properly. So I'm going to select everything that
has to do with caskets. Everything that has
to do with casket, I need to select all of
them and put it in a group. Then put this in a group. Name these two
casketes. All right. So pretty much all we need
to do is to just position it position it where
it needs to be. So I'm just go over
to my top view, and I'll just use this to kind of get it in the same position. And this is one of
the reasons why I did not want to
export everything out because I figured there
might be issues like this. And the issues are quite kind of kind of annoying
when you export and then your UVs
gets messed up. Who's this. Okay. So I'll need to bring my Gizmo down all the way down here. Okay. Scale two. Let's scale this to
the spot where it needs to be. Okay. I need to scale this
down a little bit more. Let me come close in here. I need to push it
back some more. I'll rotate this. Let's find the right spot for this. I'll move it slightly this way. Okay. So I just need
to kind of scale it down a little bit
more even too much. Let's see what we have in here. I think scale it down
a little bit more. All right. Et's see if I move it this way. Backward some more bit too much. Yeah, I think this
should be fine. I should be fine around there. Then I'll just temporarily hide the holder one I side that. All right. That's fine. Then we going to do the
same for the rod as well. I will need to
select all of this. Put it in a group. Name
this group to rod. Scepter rudder.
Okay. That is fine. Then it's just a matter of kind of putting it in a position
where it needs to be. Okay. So let us do
just that. All right. I think we'll get this
properly from this angle. So I'm going to let's
center pivot on this. I would rotate, pretty much
rotate until we kind of get it perfectly matched on
this angle, like so. Just a little's like so. Let's find another
angle in here. Let's get it in here, then rotates. Okay? Let's try and get the rotation as accurately as
we possibly can. All right. So just a matter of finding
where it needs to sit now. So I'm going to select the one we brought it brought in. I'm
going to hide those. Then let's find where this needs to sit actually
move it up slightly. Don't do that. I Okay. Now put it this way. I'm just trying to kind of
get this as closely as I can. I think we just have to kind
of do trade off, actually. Okay. Almost there. Yeah, I think it should be fine. Around there should be just
fine. I'll do a quick sieve. Okay. Here, that is fine. The Di issue now is
try figuring out where transferring the UVs
now from the Wars issues. Let me select this Let
me select the two. Now just bring it down here. Okay? Two issues, let me just put them
close to themselves. Okay. That should be fine. Alright, so I'm going
to go in there. Let's delete these UVs. Before I do that,
let me make sure I can make a duplicate of them, so let's duplicate them. Let me duplicate and
put them in a group. Okay. Delete UVs. Delete this UVs as well. All right. So I'm
going to go grab, I need to put all
of this back in. Let me grab all of
this and put this in the folder in this
folder or group instead. India should be fine. I'll temporarily hide
those with hold on. What is this? This fn is practically
outside zero to one space. No entirely sure why that is. Let's figure out where that is. Okay, so it's not going
to be a major issue because it's not actually
visible in our scin. But it's quite easy
to kind of fix. We just need to
select all of them, position it back
in and then just reapply the material again
in Substance Painter. We still up kind of big
that and Z brochure. I kind of show you guys
the process already, so I'll fix that off screen. Yeah, most likely fix
that up off screen. So that aside, I need to object
mode again, select Okay. Go out of isolates. I'm pretty much trying to
visualize what we need to fix. So I'll go in here. I need to find the vest. Let me make this visible. I'll select this. I'll select this as well. So here, these two, and it's
going to transfer the UVs, so I'm going to make
duplicates out of them. I would drag that
out of the group, I place them outside here. I'm going to hide this now. So we need to transfer the UVs. Let's transfer the UVs. So hopefully this works. If it doesn't then
I'm always gonna find another way to
kind of make it work. Alright, so let's go
over to Paris in her. I want to transfer the UVs. So what I'm going to do would be let's see how let's
start with glove. Okay. So what transferring
do is from this to this. So I'll go to I
believe not mesh. Yes, you can mesh transfer
attributes, open up the setup. That's getting let's
see vertex position. Okay, everything
remains the same. World. Hes for UV transfer. Okay. Yeah, everything seems
to be just fine. Now click on Transfer. Let's give this a
moment. Let's see if that actually works. Okay, so now let's check this. Yeah, it doesn't seem to work. My gonna try this off screen on the figure out why and
then show you guys. I'll see you guys in next
lesson. Bye for now.
119. 117 Uv Transfer In Maya: Hey, welcome, bad guys. So after kind of running
some test on this, piggled I just needed to adjust the setting and
then that would work. Sometimes it works when you
kind of use this setting of setting it to leaving
it out world. But in this case, I just needed to set this at component and then
that actually works. So be noticing here now, we have UVsone but
I new vison here. So if I will select this, select this, select this. Then tex position Vctors
normal, that's fine. Instead of world, I'm going
to set this to components, then we click on Apply. Let's give this a
moment to do with ten. Okay, I think it's done. So if you select this
now you can see how UVs were successfully
transferred. All right. So I'm pretty much going to
do the same also in here, so I'm going to select
this and select this. So same setting also
too, I click on Apply. Let's give this a moment.
I think it's done. You can see how that
kind of transfer the UVs correctly also too. I think I might need to delete this set and take
another screenshots, this one is not
working correctly. Okay? So I'll need to take
another screenshot and replace this while I'm here. So let's do that. I'll just
take a new screenshots. Okay. Now I'll
just replace this. Maybe I'll just put this down
here and paste it in here. So it's just going to be
an option to actually try. Most likely put this
down here and pull this up. All right. And for the selection for
the selection arrangements, let's let's use the
and glove instead. Move this to the side. All right. And I'll just do another screenshot
also in here. Okay. I'll copy this. We'll say these two together, pull this down. Phase this here. Maybe if you do
this side by side instead side by side,
we make better sense. All right. That should be fine.
I'll close this. So I would need to I don't
need this and this anymore, so I'm just going to hide those. Okay, I will make this feasible. Okay, I will select these two. I'll need to drag and drop
them back into the group. Why is it taking
this? That's fine. So now we don't need
to actually redo the UVs anymore, so
this would work. This would work pretty
much just fine. But the UVs now has been
successfully transferred. No, that's strange.
That is strange. That is just completely strange. Let me undo that. I'm not entirely sure why I have
that weirdness in there. If I should hide this, is there a copy in there
that I'm not aware of? Oh, yeah, there's copying I'm not aware of so I
need to delete that. Yeah, I need to
delete this also too. So now we just
need to Fantastic. Another weirdness, another
weirdness happening in year. I can't completely see
my UVs anymore in year. Let's bring this back. That is just great. Another
weird pero issue in here. I'm just going to
completely delete this. I'll need to do this again. Unfortunately, I need
to do this again. I'm going to hide
this, make it visible. Let this to do
duplicates. All right. I'll bring those duplicates
out of the group. In here, I'll hide this
I'll make this visible. Is already transferred
there. What man of weirdness is this?
Man of weirdness? Is this? Alright, so I'm going to do this
by type history. Let's see, that should fix any weirdness we are
having india for now. I'll select this to I hid dose. Okay. I'll make this visible. Okay. Select is there,
select is there. I'll do Shift P to bring
this out of the group. I'll delete that group. Okay? Is there now. I'll
do this one by one. I'll drag and drop
this in one by one. Okay, that in the drag
and drop these two. All right, that is in there. Okay? Let's confirm again, is in the fantastic. So we're good now.
Save this, right? So now the next thing we're going to do would be to select the entire piece and export as a posed version.
Select all of this. I don't need to I need to mark. I need to let's let all of
this first. Then go in here. I'll select the Okay, we actually need all of this
actually need all of this. So love this selected now, I'm just going to export
this as an FBX file. Oh, wait, we need to, we need to apply the apply the material that's
supposed to be on the so existing material needs
to be torso chest splits. This should be vests. To vests. This should be is this supposed to be? Let's find T foods I
believe that's the one. Yeah, that should
be its Chin meal. Okay. Chain meal. It's supposed to
be arm chain meal. Why can't I find this in here? Just too many materials around. Let's see. It is actually arranged
alphabetically, so that material is
way up is way up. So let's ignore that for now. I'm going to find out
later on show that part. Okay, this is the boots and boots they should be and Side parts. Then should be
the should be back parts. The belt also too. I don't think we can find I don't think we can see
the belt in here because alphabetically kind of
starts from F. We need to go way higher to actually see what's supposed
to be in there. That's fine. So let's do glove. Hand glove. Okay. I need to make some adjustments
in selects this phase. Pull that up. Put that up as
well. I'll do a quick sieve. So for the rest of the mesh now, I need to kind of
apply the material, so I will need to go to
iPashade and then apply it so I can start with the
Have I apply this already, I believe I have app, I'm
supposed to apply this. So let's go over to Windows
rendering epa shade. I'll put some more
space in here. Yeah, come on. Okay. So this is supposed
to be arm chain meal. So let's do assign
material to selection. Here, that's fine.
Then for the belts, I think I gave this a name. So let's see if we
let's type in belt. Oh, yeah, elbow belt. So here, I named
that elbow belt. So this is the one here. I remember when I
named it elbow belt. Come on. So elbow belt, select it.Pla material to
selection, that is fine. So yeah pretty much everything everything is pretty much in place now. I'll
do a quick sieve. Then I'm going to export
all of these out. Select the entire piece and
let's do export selection. So this is going to be deposed. Let's go into let's grab the folder path
directory, copy that. Pause this in here. All right. That should be fine. Then I'm just going
to put pose in front. Let's do a caps instead. Pose. Okay, export this out.
120. 118 Texture Export In Unreal Engine: B, guys. So let's move on. So we have done our pose and I've gotten the
pose ready inside of Maya. So I'm going to export
out the textures. We're going to need to kind of do our renders inside
of on Real Engine five. So let's get to it. Let's go to file.
Let's pot textures. Okay. So I come in here. So I need to specify where I
need to export this out too. I would export this out
to my amortaismfolder. So I'm going to name
the two P textures. P textures. Okay. Select that open out for select. So I'm going to be exporting
out four k resolution. Okay, I'm not going
to be exporting out the head we brought into it. So I'm going to find those. So turn this off. I'll look for outer eye
also too. Turn that off. Yeah, that should be fine.
All right. So moving on. So I need to export
the I need to find the Unreal Engine
exports templates. Okay. So you have the
Unreal Engine pat. I think there should
be something like Unreal Engine for somewhere. Is the Unreal Engine
for Somewhere? Oh, they probably remove that
on this version I'm using. So let's just run
through. Let's see. Okay, let's open it up. I would like to
check the template. So I'll go to boo
templates. Let's see. Unreal Engine parts. Okay, so we have let's
see what we have in here. Okay, so the occlusion
roughness and metallic should be on the
l occlusion map, G, for the roughness map, then B for the metallic. Okay? That seems fine. We have the color
map, eight, bits, eight bit as well,
normal map eight bits. Okay? We have emissive. We don't really have any emissive material
going on in here, so we're not going to get
emissive out of this. So let's go B, selected that is fine. Fork a resolution
that is also fine. So I'll go in and check, okay. Yeah, it's pretty much
pretty much all we need. Go back to global settings, and then we are just
going to export this out. Okay. So I think for the
doctor can Ed, we need that also, too, because it's going to give us the same similar file,
which is what we need. For the eyes, we might just
find a difference, like, maybe maybe probably an eye from the maybe defaults or template from Metahuman
or something. So we figured that out later. So I'll turn this on because I need all
these maps in here, then I'm going to go back in
and then export this app. Okay? So that is basically it, so I'm going to come
back when this is done, and then we're going
to prepare a SIM file, at least for before we do proper environment
and then place our character in
that environment. So I'll see you guys in
next lesson for now.
121. 119 Prepping For Unreal Engine: O combat guys. So
let's carry on. So I would like
to kind of create let me see my reference in here. So let me expand this a little bit more for
you guys to actually see. So I'm going to create
like a backdrop, something similar to this. So we have a backdrop
in here just to experiment with some kind
of studio lighting in there. Then when we are done,
we're going to try as much to kind of create a more similar
environment like this and then get our
character in there. Alright, so let's carry on. So I'm going to
scratch this down. So basically, we're
going to have two scenes a studio light setup and then an environment
light setup also, too, in a engine. So let us get to it. So to create this backdrop, I would need to go
to the top view. Okay. And I'm going to do let me zoom out some
more pretty much like. I will do, let's do
interactive creation. I'm creating a cube. So the cube should be more or less starting
somewhere around there. All the should be
pretty much just fine. Okay. Well, sus kind of set the
heights for this deep heights. Let's do Okay. Let's type in 3,000. Okay. I didn't do this properly, so I need to do this again. I kind of skip skip to one step. And I'm going to do this
with a bit more accuracy to it. So a cube. Okay. Like so. Drag the ids. Okay. So we have
something like so. Let's do from the top view. I would kind of center
this roughly around here. Let's do wireframe mode. Bring this forward a
little bit more, okay? Yeah, something like
that should be fine. I'll go to the side view. Phase mode, select these faces. I'm not sure the side view the side view this
right ones use. Let's see. Let's see the gua character is facing
Ks. I'll select all of this. I'll do delete. Select the delete as well. Select this delete
as well. Okay. So you can see our camera is
not viewing this properly, so I need to go to my
perspective or a camera, go to attributes, and then
I believe should be this. Let's add another one
here. Okay, that's fine. All right. Okay. All right, so I'm going to go to face mode, select this face. I want to reverse the
normal to reverse normal. All right. I will
go to edge mode. I will select this edge. Okay. And I'm going to
do a bevo for this edge. So let's do a Bvul Alright
get this down like so. Okay, add more
segments in there, get something smooth
around that spots. Should we get something smooth
like so on those spots. Okay. And let's
make sure this is sitting properly on the ground so center pivotes or
E D on the keyboard. Go to the side view. Let's get epivotes
roughly around here. Okay. Move it forward
around here, E D again. Let's get close. Okay. I'm just going to
bring this down some more. Okay. Let's see. Let's go to our front view. Let's
see where we get. So now, there are a few things you might need to adjust in here now is to
select the casket. Let's go to the casket. I believe I grouped that. Okay, I'm going to
go to our side view. I'll scale this down. Okay. I'll move this up. I pretty much want this
to kind of sits on the surface a bit more.
Let's see where we get. Okay. If I look down, I bring
this down, kind of touch. All right. Let's scale this up some more. All right. I believe that should
be touching as well. Let's get in there maybe
that is a bit too much. Scale to again. Scale this
down down a little bit more. Let's get in the Let's see. I think I did that
do just one step. Scale this down again. Okay, let's see what we have. Yeah, perfect. I
will work just fine, so I'll do a quick save again. Okay? So, yes, we pretty much have the backdrop now to
kind of work with. All right. Okay. We have this touching
that is also fine. Okay, so I'm going to
select this backdrop. Now I'm going to it by type t. I'm going to name
this to backdrop. Let's give it a blink material. Let's name this to drop. This is all caps for this. Okay. I'm going to export
this out as a separate file. So I'm exporting this out. Let's use FBX instead. Copy these five parts. Place the five parts in there. So this is going
to be back drop. All right. That is
fine. Big sieve. So now let's open
up on real Engine. And to select Creed Engine. I'm going to click
on new projects. And I think there should be
a blank screen song here. So I'll go over to the film
video and live events. Select that song to use this
blank document in here. Okay. Then I am going to
specify a folder for this. Okay? So let me just create a new folder actually for this. I'm going to name this
to Armor Talis man. Okay, I'm going to
select the folder. Then I'm going to
name the project also to one that's called Talisman. A clic concrete. So this might take quite
a long time to actually calculate and then
open up our sin. So I'm going to come back
when this is done preparing all the shaders
for our SIN file. So I'll see you guys later.
122. 120 Model Set Up In Unreal Engine: Welcome back, guys. So
now we are in a scene. So on the engine is
properly opened now. Okay? So there's a few things
I always like to change when I open up a new
version of foreign engine. So I believe it should be not sure which one it is
right now. Probably this. Okay. Let's see. Yeah, now it feels
more like I'm using. So now I feels more like
I'm using Maya now. So I'm using Maya
navigation tool Zine. So once you go to the set in Xiniir and then
you turn this on, you should be able to use
Maya navigation tools. By the way I'm using
Unreal Engine. I believe on Real Engine
5.7 yeah Baging 5.7. Okay? So 5.7. All right. So now we need to control L to bring out our
content browser in here. So I'm going to create I'm going to create I would like
to create a new folder. And this folder is going to be let's name these
two textures. Textures. Okay. I'll
create another folder. I'm going to name this
folder to static meshes. I need to remove the
spacing we have in between. Okay, that's fine. What else do we need? Okay, so I'm going to open
up the textures. So I'll like to go in
and then bring in, I think we can just
do imports in here. So let's do imports. I want
to import my texture files. So SP textures, open that up. Okay, select the entire out
scene. I'll click Open. So let's get all of the textures
we need imported, okay? That is fine. Alright, so you can see how the texture is kind of
imported correctly. So far so good. That's fine. So let's go over to starti mesh. Okay, I think I would like to create one more
folder for materials. So let's create one more
folder for materials. Okay. Now, where did I create? I think I created it in the wrong place, so I'm going to delete that. It should be created
in just outside the inside of the
content folder instead. Alright, so under the
static mash folder, I'm going to bring
in the our meshes. So let's go in. Let's start with the backdrop. I believe I exported
out the backdrop, so FBX, I'm going to drag
and drop this in here. Okay? So you source
name for assets. Alright. Let's see. I think everything looks good. Import taxi mesh. All right. Okay. Yeah, I think we should we
should be just good. Import texture, the tech number
map texture, flip numero? Okay, okay, okay. All right, so clconimports. Okay, so I'm going to drag
and drop this in our sin. Am I doing something? I think
I'm doing something wrong. Okay, yeah, I drag
the wrong one, so I need to undo, okay? I'm just drag the static mesh
instead of the material. So let's static mesh. Drag and drop the
static mesh in here. Okay. And I'm just going to
pull this out some more. Like, so it should be just let's leave it at
default, actually. Let's leave it at
defaults. Okay? So I'm going to select this. I think I'm going to
push this down instead. Is one I'm going to push down. All right. That should be fine. So control space, I'm
going to select this. I'm going to paste this
in instead. I pasting. Can I drag and drop this
in the material slots? Yeah, move here.
Yeah, that's fine. So I only need my
tactic mesh to be in the tartic mesh fold
or anything material should be in the
materials folder instead. All right, that
should be fine. Okay? Moving on. If I am going to the fold, I'm
going to the material first. Let's see what we
have in the Okay. Yeah, just a simple
basic material. Nothing special
happening in here. Okay. So I'm going to collapse this. Then let's bring in. Let's bring in the posed
version of our mesh. Post. So this is
the posed version. I'm just going to drag and drop this Let's go to static mesh. I'm going to drag and
drop this in here. Okay, so we have a menu here. We have import tactic meshes. That's what we want. I
don't want to combine them, so I'm going to
leave it as it is. Okay. There are no
animations in there, so even if it is
torn down is not going to be an issue because there's no
animation in there. Import materials, yes, you
need to import materials. I believe the material should come with its own
specific names. So that makes the whole
lot easier to just import the textures in
and then work on them. So moving on, so I'm just
going to click Imports, okay? All right. So let's give this a
moment to do this thing. So you can see now it's
important also, too, with the right naming
convention in there, so it's make it a lot
easier to actually texture or rather apply the texts to them because once you apply the texts to them, it's going to apply directly
on the mesh itself. Let me just give you a
moment to do the run the importation and I
come when this is done. So we have the mesh now
successfully imported. Okay? So that means kind of
arrange them again. I'd like to make sure I kind of specify where
they need to be. So materials. Come on. I'm out control now and I'm selecting
the materials. Let me see this, get some more space in here. Keep selecting all
the materials. Okay. Material. All these are material
instances, which is fine. A material setup is not
going to be complicated, so try and make it as
straightforward as possible. Okay? Okay, a few more to go, I know we can obviously
use filters in here, but let me just organize
them in folders instead. For me, there should
be more near so I can just move through
folders instead. So I'm just going to drag and drop this in the material slots. Click move here. Okay. That is done. Let's see. This is all Okay?
Yes, this is fine. I will just bring this down. Okay. Let's see. Let me hide this for now. Let's hide this for now. Let's see what happens
if I believe I should be able to select all
of these at once. Okay. Let me get
some space in here. Bring this out, then
those drag and drop this in sin is perfect. So it should be aligned properly just the way
it is inside of Maya, which is precisely what I want. So we have this properly set up. So if we should go over
and then do Control L, so this should be Basically, just to check, check the
light set top in here just to see everything's
working just fine. Okay. Yeah, that's fine. Let's set our lights backward
a bit more. A is fine. So the next thing to do would
be I think at this point, I can delete this. Okay? So next to this to kind
of set up our own lights. But let me kind of organize
thing in here as well. Let's get this
properly organized. So we don't need this
backdrop anymore. So I'm going to select all of these players that
I should ignore that. Okay. Then find the
players that remove that. I'm going to create
a folder for them. So I'm going to name
this to armor maman. Okay. That should be fine. Alright, so with this now, we can just do
something like so. All our lights are also in here. So if I should hide hide all of those side all
of this for now. Okay. Yeah, that is fine.
That will work just fine. Then I think what we're going to do is
that the next lesson, we'll just move right into
the lightning process. So I will see you guys in the
next lesson. Bye for now. Oh, let me save this file. Okay. Bye for now.
123. 121 Model Fix And Master Material Set up In Unreal Engine: Walking by, guys. So kind
of run into an issue where after saving my file
and closing on real engine, opening on L engine again, I could not find
my file anymore. And then when I imported
that back into our sin, kind of getting some weird
normals that were not smoothed out because when
out of sporting out of Maya, you want to make sure your export setting is set this way. But you scroll down,
smooth group should be on. Smooth me should also be on, and that should be pretty much it at least for the
BX, as far as I know. But important thing to let me just show you guys
again looking in here, you can see how this is
kind of smoothed out. There are no weird edging
or normal edging in here in any way that would
need me to kind of smooth the edges again. So everything looks fine here. And the same thing I
imported back into imported into on real engine, but I'm having issues, so and I was going to
import this again. So on the static mash, I'm going to use let me
use imports instead. Let me use imports instead. So I'll go over to my pos. Okay? This is it. Let me
start with the backdrop. Let's start with
the backdrop. Okay? So we have this option in here. Let me just type in normal. Okay. Recompute normal. I think I'll turn these two off. This two needs to be off. I think that's that's
where the issue is. I'm going to turn that off. So I'm importing this
into Oil engines, not going to recompute my normals and then create
some edging in there. So I'll click on imports. Okay? So now this
backdrop material, I'm just going to drag and move these two materials move
here, that is fine. I still architectures where they need to be, so that's fine. So I'm going to leave the
textures the way they are. Okay. Then I'm going to
do Import again. I'll need to go over
and then set, Is, let's select the
post, open this up. Okay. This might take a little while, so I'll come back
when this is done. Okay, so we're back
in yes. I'm just going to type in normal again. Compute should be turned off. Te normal. The one is
from the textures. I'm just going to ignore
that. So this is just the one I need to turn off and
I'll click on Imports. So it's going to import
take a while to import, and it's also going to import the texts or the material that we actually
assigned to them. That also has the proper naming for it also, too.
So that's fine. Let me just give
you some moment to import and I'll come
back when this is done. Alright, so that
came in quite well. I'm just going to
kind of do a test. I'm going to import
something just to test this out just to be sure what do we having here. Okay. I'm having this also weird issue where I can't even zoom into it. It's kind of strange. Select click F to
kind of get in there. All right, so you can see
this came in quite well. Here, all of this
comes in quite well. Though not where I would
like it to be, though. So I'm just going to select
all of them and then delete because I need to
bring them in properly. I just want to check if
you're going to have any weird normal issues in
there and then so far I would have any weird
normal issue in there. So now I'm just going to
copy all of this like we did before into
the material folder. So I'm just going to
do this off screen done this before already,
so I'll just do this again. All right, so I've
done that already. I've moved that into
the materials folder. Okay. So now let's select all of this and then get
this into a scene. So this down some more. Okay, drag and drop this
around here should be fine. Okay. Awesome. So, come
on, not this again. So it's kind of pigs
that I don't let any of this mesh and then hit F to kind of frame
into that mesh. Okay? Yeah, I think so far. I don't have any weird normal issue anymore, which is fine. I'm going to save this. I want to make sure I'm
saving this properly, so save all or save
current level. Okay, so I need to put
all of this in a group. All of this needs to be in
a group or in a folder. So I'm using you correct
terms for Unreal Engine. Let's put this in
a folder. So I'm just going to name
this to Am Talisman. We're not supposed to
be spacing in there. Always forget that. We're not supposed to have
spacing in there. So underscore, 'cause I'm used
to Maya just putting space and then it
automatically creates an underscore for me.
Okay, well, that's fine. So I was thinking just before
I do the lighting in here, let's just kind of
get all our materials blogged in correctly
where they need to be. I think that makes that
makes better sense. Okay. So yes, let's do that. Let's do that real quick. It's not going to be quick, though, but it
will take a while. So let's just get right into it. So I'll go over to the materials and start with the
backdrop material. Yeah, one mot to do
to do one motin. Let me save this again. Under plugin under our plugin, soit preferences, I believe. I need to turn on retracing. Then on that logging, I
also need to turn on AGI. So let's turn on retracing here. I think I'm not in the
right, but I think it should be under plugins, I believe. Okay, so I was in
the wrong place. Yes, it's supposed to be
under project setting. So open up project setting. Let's turn this on retrace. Okay, so I'll retrace
shadows. I'll turn that on. Right? I'll close this. Then go back under plugins HDRI. Okay, my Asia backdrop
is already turned on. That's fine. All right. So just want to make
sure everything that's needed is written on
I'll save this again. Okay, so let's start
with the backdrop. Let's start with the
material for the backdrop, so I would let's go over
it on the materials. Let's type in the search bar
let's type in, back drop. Okay, this is the one. I'll double click on that. There really a material
instance that is fine. So I need to go to
the material itself. You can see it
doesn't come with a default material that is completely empty
for us to work with because if I should
open this up now, I should open up the
parent material, we have practical
nodes everywhere, and want go to create this
from scratch, basically. So I'm not going to use this. I'm going to close
this completely. Then we might just have to create our own
material from scratch. So I'm going to
create a new folder. I go to what contents. I'll create a new folder, create a new folder in here
and I'm going to name this to U E on that score Mats Okay. Alright, that's fine. So I'm
going to open that score. Okay, so I'm going to
right click option, click. I'll create a new material. So this material is going
to be for the backdrop. So like a master material
for the backdrop. So, so back drop Under sce. That should be fine.
This should be fine. So I'm going to open this up. Okay, let me put this aside. All right. So I need to log
some into the base color. I'm just going to
three on the keyboard. So I'm trying to create a
constant three vector node. Okay. So I'm actually clicking on the left mouse
click and then it's in three. Okay? So this is going to create a constant three d vector node or you can do I delete this. I believe you can
write yes right click, and then you should
type in the constant Three vector. Okay. So
I'm just going to plug the RGB to the base color. All right. That should be fine. I think I'd like to convert this option. Click. I'd like to convert
this to parameter as well. I'm going to name the two.
Let me just do Abdo instead. All right, that is fine. So the color for this, I'm going to use let me
double click on this. I'm just going to use
more or less like a dark shaded color for this. Okay. Then I need to plug something to
the roughness channel. So I can just plug in a
constant to roughness channel, so I'm option, click and
then type in constants. Okay. I think I can convert
this also to a parameter. Let me just name
this to roughness. All right. So I'm just
going to plug this directly to our roughness lots. I select this now. You can see how shiny how shiny our
material looks right now. So I don't want this
to be too shiny, so I think I can just create
a more role shade for this. Okay? That should be fine.
Then I can save this. I'll save this. All right, then I'm
going to close this. I have a material in here, then I'm going to
select this backdrop, and I'll click on selected
asset from content Browser. Okay. Having this weird Condo that Why'm having this
weird grid I mean, you just pull drag
and drop this in here instead. It's rather odd. So I was actually
kind of calculating, so it's done calculating
and then it's there now, so I will need to darken
the shed a little bit more. Let's get in there. Let's see something quite rough. And then dark in this even more. I'm going to get more or like a blue stints in there as well. Okay. I'll click Okay. I'll save this. Alright,
I'll close this, something pretty much like this. I'm going for something
a bit darker. So something that looks
that gives us more of this look to it because we're going to be using customized
light in setup in here. So I don't want the backdrop
to be that obvious. So Julie powder is going
to be getting some light is just this flow close to
where our character is. So that's what I'm pretty
much trying to recreate. So let me minimize this again. Save this level
again, that is fine. So I'm going to move on to so let's move to something else. Let's do you know,
Let's select this. Then I think at this point, I won't be needing any of these materials anymore
because I mean, I'm not going to be using
them anymore anymore. So I think what I'm just going to leave them
for visualization purposes. Just for visualization
purposes, that should be fine. So go back to UE mats going
to create another material. Oh, yeah, let's just do let's just think I was just going to, let's create another
new material. So with that I'm going to be duplicating that as a
material instance instead. So for this, this is
the torso chess plate. So Merce torso chess sce, chess underscoePlts. So I'm only going to do
this for a few of the mesh, then the rest you guys
can do yourself because the method or you process is
just pretty much the same. So we have this. I'm going to double clicks. Let's get in there. All right, so let's bring
in our text shows in here. I like to minimize
let's minimize this. Oh, we also have content browser
in here. That's awesome. So let me just extend
this up so more, I'll go to textos. Then I will type in there should be the
only he splits in there. So this is it. So I would select these three. I'll drag and drop this in here. Let me put this
out. Say this here. Come on. This should
be down here, and this should be
here here as well. Okay. Yeah, I think this should
be pretty much just fine. So I'm going to block the GB
channel to the base column. So it's kind of calculating and then we should get
something in there. All right. So now, for this, we have let's see
where we get in here. Okay. But before we move on, something we do we need
to do for, I believe. Let's check this
material. First of all, doubly con material. Okay, SRGB is tn
off, which is fine. Now, I'm not seven,
so let's go back into UE con bring this
back out again. Oh, kind of lost or
detectors I brought in. Yeah, because I've not
actually plugged them into any channel yet, so that's fine. Let me go back in
double click on this. What I needed to do was to
make sure SRGB is torn off, very important because we're kind of looking at this
through the channels. So if let me hide
all of this first. So on the G, we have
our roughness map. On the Bach channel, we have ton this off On
the Bach channel, we have a metallic metallic
MM shader or texture. Then this we have the ambient
seclusion on the R channel, so keeping that in mind, we need to make sure
this is turned off. Just make all of
this visible again. And I'll save this. All
right. That's fine. So I can collapse this now. Then trough space about to bring our content
drawer back out, and I'll drag and draw
this back in here again. Let me just make sure
I do this properly. Okay. Yeah, this is fine. So I'm going to I'm not doing too much adjustment for the
at least for the color. So I'm just going to drag and drop this into
the base color. Okay, I think I'll need a
bit more space in here. Okay? I might need to
adjust the I need to adjust the intensity of roughness and metallic
channel though. So what I'm going to do
is to create option. Click. Let's create a multiply
multiply node in here. So I'll plug, let
me say this all the way here first. Okay. Then I'm going to plug
this B channel to A. Then for the green
channel to the A. Then for the B, I'm going to create I think
it should be one. A constant note also in here. I'm going to plug
this to B, all right. Then I'm going to plug this to the roughness channel
that is fine. Don't take a while
kind of updates, and then we should get
something in there. Okay? So I'll pretty much do the same for the metallic
channel also. So I can select this to Control
D. Okay, pull this down. Put this down here, I plug
the metallic channel in here. Okay. Then drag and plug this into the metallic
that should be fine. All right. Then for the normal map, let me then extend
this out this way. Okay. Also do a quick
sieve. All right. So I'm going to let's
create another nodin here. So let's do the flat in normal. Flatin normal, that's
the one. All right. So I'm going to copy
this constant also too. So let's do Control D for that. Pull this out here. Okay? Then I would do let's plug
this AlgeB to the normal, then plug this in here. Then I would plug this
to the as normal inner. Let's get this down. Plug
this into the normal slots. Okay, so I will select this now. Let's set the value
to one. Set this one. Wason kind of set all
of the constants in, let's set them to one. Set them to values of one, also two, set it
to a value of one. Okay. I'll save this. Let's apply this to a character. Let's see what we get out of it. So let me just minimize this. Let's close this actually. Let's go to the UE materials. Select selected. You have we selected already. Select this and
then log this in. Okay, I think I kind of
made a mistake here, so you can see it's
not working properly, that's because I just
went in and then tried to confirm again what
was actually wrong. I'm plugging the wrong channel. I'm plugging this into
the wrong channel. So this is not the normal map. This is the This is the Al GB channel for the roughness
metallic channel in here, so I'm pug plugging this
on the wrong channel, so I need to fix that. So I'm just going to
I think this goes into I just need to disconnect this
need to disconnect it. So I'm going to delete this
and then input them in again. Did that completely wrong. So that's our tissues are
now applied correctly. So this is a normal inner.
Let's bring the normal. And then just log this in here. We should have something that should be more realistic now. Is already set to one. Let's make sure.
Stop click on that. Let's make sure, this
is done off already. Close this. I'll use no. Let's get back in there. Okay? Oh, yes, I did not I
did not save that. So let me close this Let me start with the correct
way of plugging this ins. This is for the roughness, so that should go into
the print channel. So log this in here. Then this is for the metallic, Uplog this in here. Okay. How do we save Yeah, so now we have something
that actually works. So forgive me for that. That was just an error on my parts. So let's do a run through again, so let's run through. So CD value is now logged
in correctly at issue. So the green channel is the roughness logged into
the multiplying node. Okay? Blue channel is the metaly so logged into
the correct node as well. So the last node, you need to log in now will be
the normal map. So let's get the normal map in. So let's go in and bring in the texture for the normal
map, bring this in here. So just block the algae B to
the normal plot in there and then save this Okay, so let me minimize this. So we should be getting
the details in here now. So Al's not yes at the moment, I'll need to kind of find a
good angle for our lights. Okay. We can also
kind of crank some of the details up a
little bit more if you feel like it's not
completely there yet. So I like to minimize this. We can I think I'll
need to adjust let's get all of this looking more or less like a parameter. So I'm going to select
this. Convert to parameter. Convert to parameter as well. Convert to parameter. Okay, I think I've
done that already. Yeah, also. To parameter. Convert to parameter as well. And I need to rename this. Se this to no. Let
this said this to OR Meet said this to BDO. Okay. So I would
need to let's see. Can we get a bigger
view of this? Let's see. Now, let me gi. In
case someone kind of use the same model
in our preview, what we can do is to go over to our content
browser under Static Mesh. Let me create some
more space in here. Let me save this as well. Okay. Then I'm just going to
search for the chests. Chess plates. Make
sure it's selected. Then come in here
and just click this. So it's going to bring in in
really see this properly. We have better videos in
here because an as in here. We have an Asia in here. Lose. Okay, get better
lights in here. We can come to this parameter for then we can crank this up. Let's say s something let
me give you a moment kind of you can see how extreme now to be strong
value of two instead. Better with you in
way better, instead. I'm going to keep
going to save this. Yeah, that should be just fine. Next lesson will be as
a main material and then this material and then
just applying into this load. I'll see you index lesson,
124. 122 Master Material And Material Instance Set up In Unreal Engine: Okay, yeah, so this is going
to be really quick Tutorial. Kind of figure out why my sin
was not saving previously. So I needed to go to file. Then do save current levels. So I'm going to
create a new folder. Create, be able to create
a new folder in here. So a new folder. I'm going to rename this folder to levels. Okay, I'll open up that folder and I'm going
to save this as mine. Stay save this as studio
studio, underscore. Lighting underscore level. Okay? That should be
fine. So I'll save this. I'm pretty certain now
that if I go to my levels, let's go over and then save
this let me close this out. Okay? So we'll be able to see now our studio lights in level. Yeah, one other thing
to keep in mind is that's very important also too. If I go back to UE materials. So we have this as
a master material now, a master material. So I should probably name
rename this to master instead. So can I change the name? I should be able to
change the name? Yeah, but before we
change the name, actually, before we
change the name, there's something I need to something we needed
to do in here. And that would be prey
giving this a name. So this parameter here, we need to give that
a name as well. So we need to rename
this to normal. Let's just name it to normal
intensity, normal intensity. This is what is going to
control the intensity of our normal map. So
that should be fine. Let's go to the next one. This is for metallic
to select this. So name this to metallic. Metallic intensity. Okay. Yeah, that should be fine. I mold is also up. This should be roughness
as the rough intensity, so I'll change this to
roughness intensity. All right. Then I'll
save this Okay. Awesome. The reason
why about doing this is because let me see. Let me just close this out. He would like to
apply changes, yes. Okay? The reason about this is because if we go back
to our content drawer, if I should duplicate this material as a
material instance. So if I should do create
material instance in here, I can save this also too. I we need to rename this router, so let's let's do regio
changes to master material. Sony engine kind
of crashed on me. So I think since I'm here, I'm just going to
make a duplicate. Before I make a duplicate,
let's let's just rename this. Let's rename this to
master Master underscore. Please don't crash again. Great. Okay, so
I'm just going to duplicate this as at
material instance instead. So I'm just going
to name this two L. So this is going to be ML. Okay. Underscore let's do underscore mats. All right. So if we should double
click on this now, let's check out the material. You should notice now that we have under these global
scalar parameters, we have the metallic intensity, normal intensity,
roughness intensity. Also have the albedo. So if you turn this on, we can now quite easily
just replace this. So if you go to a textures
or texturing in here, we can quite easily
replace this with any of the texture that needs
to be replaced with, and then we can just apply that directly on the model itself. So just give you guys an idea why I needed
to kind of create a parameter for it and then convert every textures
into parameters also, too. So we can quite easily just
chain them wherever we want. Okay? So we also have
master material in. And that's going to rename this. Let's see if it will allow
us to rename this now. Hopefully, this doesn't crash. Let me save this again. Do we have recent Okay, we have that day we have
this here so that's fine. Okay. We should
some kind of names. I don't know maybe it's renaming that is kind of
the issue in here, so let me name this to master score Mt. All right,
that is fine. So this would be a master
material, that makes sense. So basically what we need to do now is to select this again, go to our content
drawer, select this. Rename this. Let's do
let's rename Okay, let's make it duplicate first. Okay? So I have a master, and then we have the
duplicating here, so I can just do let's
rename these two. To To underscoe plates. All right, that's
fine. So basically, this is what we're
going to be duplicating across the entire across the entire mode and then kind of renaming them and placing them where
they need to be. Select now. I'll go
over here and I'll just selected from Asset
content browser. Okay. So it's going to be that
material instance now. So it's kind of starting here, so I'll save this then
right that's being. So that's quite duplicate. What we're going to
do so how you guys in the next lesson. A
125. 123 Texture SRGB Bug Issues In Unreal Engine: So we come back, guys. So
in the previous lesson, we kind of faced quite
a lot of issues. So after making
research and then trying to figure out
what the actual problem might be because we're
doing everything right, but the issue we're having was, let me open this up,
open up the textures. Let's say, search for let's say I open this
up instead. Okay? So the major issue we're
having is from the SRGB, trying to turn it off,
right now, I set to force. So that's the major
issues from A to under issue was trying
to turn all of this off. You see, we're still
facing the same issue. Normally, we should be able to kind of turn everything off. We're not supposed to be seeing this blue anym cyclic cont. So issues around those
parts because it's more or less like it's definitely
a bug because naturally, we're supposed to have
all of this torn off. So the major problem was that
we did everything right, but there was kind of bugs. Since this is 5.7 is not
a fully stable version. So previous versions use or probably some of you might be using maybe lower version, maybe 5.0 or 5.1 and then
using the same setup we used before by creating
an instance and then plugging the materials
in the right slot. Should work precisely for you
without any major issues. But if you're having
the same issue as me, so I kind of found out a way to kind of get around that bug. So what we're going
to be doing would be to make a copy of
this master material, and then everything's going
to be master materials, and then we're just
going to be replacing the textures inside of
the master material. So let's do that. So I'm going to let's
use select this, for example, I'll go in here. Then I'm going to drag and
move this all the way copy. So let's do copy here. So I'm going to change this to torso colors. I'm
going to change the name. Let's rename this to too. Let's do torso color. So this method is going
to work just fine because I kind of tested it out and then it's
working just fine. But if it's working when you
use the material instance, and it still works just
fine, so that will be cool. So you can just
continue on with that. But if any of you are kind
of having the same issue where you're unable to get
it to work just like I am. This is a way to kind
of get around it, M, that's for master color. So I'm going to it's already selected and
selected also as well. So I'm going to go down and
then select to apply it. Then let's go in there. Let's go into the
master material. So basically, all
we need to do is just to replace the
channels in here. So I think I'm going
to pull this up. Okay. Also, what
might help would be making sure we are
using the same model also. So if I go to Static
Mesh and type in, just putting color in here, select it, then we can
select it here also as well. So we can get better
preview in here to see what we are
getting. All right. So with that in here, I'm going to go over
to the Albi doo. I'm going to select the Abu doo. So if you scroll down your
on the detail spanel, you have the bid in here. Okay? So I'm going to go
to our textures. Okay, it's already
selected in here, so I will select the Albi doo, come back in here,
then place that in. You can see it has been
placed in her correctly. You can see it's
placed incorrectly. So we'll go to the
next one, so the ORM. Okay? This is this
texture in here. By default, the SRGB is
written off by default. So I'll select it.
Let's get in here, send it over. Okay? It's taking this times kind of preparing shaders down here. So as long as you don't
preparing shaders down here, should we should see it in. Okay. So I'm going to go now to the normal or select the normal. And I'm just going to select this and send it over
in there as well. All right. So now we
can make corrections to this ever where we
see fits. Okay. So I'm going to go let me start by applying changes to original material to
use this real world. That's will apply let's
save this also too. Then we can make the necessary corrections that
need to be made in the so save as well. All right. So while
we are in here, I think I'll go over to
the roughness material. The constant, I think I'm
going to change this up. If I increase this
up a bit more. So more should be getting something that looks
pretty much like so. Wood should be just fine
for what needed for. Okay. Let's say we
crank up the value. So more, let's see what we get when we crank up this
value some more. Oh, I have an idea. Let's
crank this value up. So let me use the value of 20. Let's see what that gives us. That is not bad, but I think let's go to an
even lower value to 0.6. It's way too shiny. So I'm going to go into the
material itself. So I want to just visualize the I want to visualize just the I can't
visualize this alone, so this is another issue. I can't just visualize
the green channel alone because I was
pretty much trying to adjust these values in here to see if they will
actually do something. Okay, let's reset
that. That a little. Does that really do anything? Let's do a value of two. Let's see. Okay. If you go to a much lower
value, let's do 0.3. Let's see what that gives us. If we should save this, let's
go back in here, let's see. You can see how that is actually affecting material in here. All right. So go back
to the roughness. Let's say if we should
crank this up to one. Let's even use a lower
number, let's see. It just way too shiny. Let's put it at the value of 20. Let's see Ste feels
way too shiny, though. I'll go back and set this
back to the default. Okay, Save this out. I think I think we
can work with this. The value of 20 I think
this should be fine more. Let's go over to the metallic. Let's see what happens
when we put in 20 or so. That's a bit too extreme. That's 0.5. Okay. All right. Let's compare this to one. I think we should be fine.
Let's just do 0.8 instead. Okay, so I'll save this. Then let's go over.
Let's see what we get. Okay, we're getting
sharp highlights in the first you do Control L. Okay. Okay, so I've
actually applied this now to the color piece, it doesn't feel completely
DIS, at least for me. So it might just be an issue
with a light set up in here. So I'm just going to
kind of create like a basic like three
point light setup in here kind of figure out how the materials react to that studio light
setup because I'm kind of liking the material we have
in here for the chest plates, which looks good with some
metal variations in there. It kind of gives ipssion
But this on the other hand, this whole in here doesn't
give that impression. Probably might need to go back to ToptwnsPina to
actually fix that. But at the same time,
I tested this out inside of Marmoset Toolbag and I kind of get good results. At least, it looks a little
bit more like metal. Any, I'm not entirely
sure why On Engine is giving us this plasticky
looking shaping year. So that's fully a
different approach. I'm going to completely hide. Let me delete this. I
was kind of testing out, so I'm going to do this again, so I'm going to delete this. So I'm going to
hide this for now. Let's go into this Bloss
icon and add here, let's add here, let's
do a wreck lights. You can see down here. I'm
going to pull this up. Okay. I'll bring this
forward. Up some more. Alright. So I'm
going to scale this, actually, let me pull
this up way more actually out this way. Okay, so let's see
the light radius. I think the fault
should be fine. Okay, so I'm going to increase the intensity
of our lights. Let's just increase intensity of our light a little bit more so we can see something
going on in there. Okay, I'll pull this
up, move this forward. This way, I'm going to rotate it facing this direction. Okay. I'm going to make a
duplicate of this light so Control D, make a duplicate. I'm going to set this back to the way it was,
move the opposite. You need to rotate it this way. Like so I see. I don't want to
look too blown out. So when you see that meta
looking material in it, I mean, something
is definitely off. And after steak shells, my mom said to bag, and
they come just fine. Let's blow the
shadow in in there. Don't want strong shadows. Let's do the sauce with so I can blow the
shadows in some more. I'm going to create
under new lights. I'm going to create a
point light instead. Just set to the box. I'm going to put this forward. So this is just going to be like a light just to fill up
empty spaces in there. I'll do a quick sieve.
Okay. The sauce radios, let's pull this out this way.
Yeah, that should be fine. Let's soft in the in
shallow that comes with it, using the sauce sauce radios. All right. Okay. The first
light you created, I think we can take down
the brightness for it. Let's just take it down
a little bit more so it's not too
aggressively bright. Same with two on the other side. Okay? So I'm going to use
temperature for this as well. Let's introduce a
more let's introduce a more cold tone to it. Then for the first light, let's use the same temperature. Let's introduce a more
warmer light tone to it. All right. This is looking good. The only issue, the only
problem we're having here is the material is not
looking that great. It's not looking that great. The chess material is
looking quite fine. So what we're going
to do here is too? The main issue is
from the materials were actually applying to it. That's where the major
issue is coming from. So let's bring this back out. So this material
feels really weird. I only working as accurately
as I would want it to. That's just the
sad part in there. So like we discussed before, it's definitely a bug. So I think what I
might just do would be to let's just look for
another shape instead. Let's select this. What I'll just to do the
smallest like the ard way, just to create new material. I won't be copying I'll creating new master material
for everything. So head, di, head hoodie, right. So I'm going to directly apply
this apply this on there. Then I would go into it
material. All right. Then let's bring
extras in there. So let's just type in Woody. I'll select three materials. I'll drag and drop this in here. We cal going to kind of create everything from scratch again. Let me put this down
here. All right. This I'm just going to plug. Yes, you can just blog
directly in there. That should be fine.
Okay, put this aside. For this, I'm going to
create a multiply node, so multiply. Here, I'm going to
create a constant. I think I can just left mouse click and at
one, pretty constant. So I'm going to start with
the roughness channel. Plug this in here. Log this in here as well. Okay. I'll select these
two, duplicate them. Let's go over to the
metallic channel, plug the metallic
channel in here. It is for the roughness, I'll plug the roughness
in log this to metallic. Okay. Maybe you can just get under constant also
too for the specular. Probably that should help
so control D as well. So there's a constant for
the specular. Log that in. Okay. I'll just say this to one. Set these values to one. There is also to one. All right. So you need now to
use the Let's use the flat flatting normal. Okay. Let this constant
out duplicate that. Bring this down, plug this to flatness plug the LGB in here. Let's connect this
to the normal slots. Okay, I'll save this It's
already applied to the mess. It's already applied to mesh. So let's see what that
will actually give us. Okay. So if I should close this. Let's come
in there. You see? Still looking a bit weird. Looks quite plasticky. Getting a really plastic
looking shape in here so I'm going to go
in top click on this. We're supposed to be able to
turn this off but something just So we still have
the issue in here. It's a bit weird. Let's see if any of these simple bridles actually won't fix anything. Still not working.
I'll close this. Let's set this back
from texture group. Save this as it is. Let's go into our
material itself. Let's see if I zero
out this specular. Save this let's see what we get. I would also need
to kind of create some more intensity
for the normal map. I need to create some
more intensity for the normal map, select
the normal map. I'll do two instead,
save this apply. Still doesn't still doesn't look still doesn't look great. Still feels pretty
much like plastic. I'm not getting that realistic looking realistic looking
metallic metallic fields, it feels very, very
much like plastic. My best guess is the
issue is still from this from this shed in a Let me see. See if this
actually changes anything. Still not getting that
result I'm going for. The fact that I'm unable to check this is where
the major problem is. This is where the major
problem is because the metallic chain is
not making it look metallic at all in
any. Is a bit old. Is rather old. Here's
what I'm going to do. I'm going to kind of separate
it out completely and then put it as a separate
itself and let's see. Let's see if that actually
helps in any way. So I'm going to close this. I'm going to open up
that texture instead. Okay, guys, like I said before, I was going to kind
of separate them out. Knife. If you look at this now, it looks way better. Now, the colors
in here, come on. Now the colors in her kind of correctly represented, like, accurately represented in hero, if you notice feels more like metal than what we
had here before. Let me show you guys
how I kind of fix this. Let me go back to Photoshop. So kind of separates out the separate them out into separate individual
PNG textures. So if I should add
these two now. So this is the original
texture in here, if you go to your channels, make sure you guys
pretty much what I did. Because thing as
important as that, like I said before,
when I face an issue, it's always important
for me to kind of troubleshoot and then
figure out what was wrong and then explain
to you guys what actually went wrong because I noticed that most tutorials
don't really do that. They cut out the part
where they made mistakes, and then things were not
really working out and then just go right to where they actually fixed it
without actually explaining what went
wrong and how to fix it. So I always like to make sure
I do the opposite of that. Follow the normal procedure. If I face issues in there, show you guys the
same issue I face, and then show you guys how I find a way to kind
of make it work, more or less like
troubleshooting the issue. So now, the way it's going
to fix this would be, let's say, let's say, the green channel
is our roughness and the blue channels
are metallics. What I did was to double
click on this control, A, select the entire
outin, go to layers, create a new with
a new layer, hid, then Control V to paste that
metallic channel in there. Then I kind of saved
it out separately. So I save it out
separately as a PNG. So I save it as a PNG. So if I should show you guys, let's go a type in wood in ESC, I've already saved
them out already. I saved out the metallic channel and then the roughness
channel also, too. Then what I did next was
to let me go in here. What I did next was
to import them in. So this is what
you have in a Udi metal Udi roughness, you get. So I went back to the shade
to the master material again. Went back to the
master material. Okay, so I went back
to master material. I double click on that. So I just basically deleted
what was there before the ORM material and
then just brought in the separate material itself and then just plug them
the green channel. You can use any of these
either the L green or blue i because these are
black and white material, so you can use either of them, either of the RGB. As long as you're not
using the RGB in here, long you're using
them separately, that should work just fine. But before I kind
of brought them in, it also encounter another issue. Why? Because if I go back to
my textures and I type in Hoody typing hood in here. If I double click on it now. Okay? Now, I can quite easily
does turn this off and on. So yes, once I did that, it's going to pop up an issue
in here an error in here. So pretty much, there's
no way to actually kind of at least as far as I know,
to kind of resolve this. Even though you go in and then replace that let me
select this for now. Even though you go in and
then replace that texture, it's still not going to work, so I encounter this
issue also, too. So the way to actually
fix this would be to delete it
first, delete it. Then before you drag and
drop it in a editor in here, what you need to do is on your content browser
to click on it first. Initially, it should come in as an SRGB as SRGB turned on. By default, it's going
to come in like this. So before you input
it into your editor, just make sure you
turn this off. Then you save. Then I'm
going to close this. Then go about my
content browser. Then I'm going to drag and
drop this in here again. So by default, as I
drag this in here now, by going into it again,
just to show you guys. It's already turned off. So I I won't need to do
anything else again. So all I need to pretty
much do right now is to already have
the multiplier. So to the other C, I drag R
channel instead to the A. Okay. And then the value is already set to one
already. So that is fine. I save this all right, so it's going to work
correctly now as it should. It's going to work
correctly as it should. So we're going to use a different example
to kind of fix this. So pretty much what we're going to do at the
end is to export, C. CI is working correctly now. All the materials, all the metallic material is now working
accurately as it should. Okay? So if I go back in the let's go to
the same material. This is the hoodie. Okay?
Let's go back in here. If I should go to the metallic, this is the metallic shader. Let's go to the values in here, the constant, and then
let's say I crank this up. Let's just say, for example, I crank this up
all the way to 20, for example, and I save this. Okay? Let me give you a moment to actually save
out. Alright, save now. So as you close this up, you can see there isn't
much difference in here because we already have that cool metallic
look in there already. So this is working
fine as it should. So let's go to the same method
for the rest of the parts. So you can see a major
difference in here. Before this was looking kind of a bit more like a plastic, just like this color is looking
a bit more like plastic. But now after inputting
them separately and then making sure the GB channel
is working properly, we get properly represented
shaders in here now, so now, what we're going
to do is to go back to Saptanspina and then
expot everything out as. We're going to spot
everything out as a separate individual textures. I think that will
make better sense, and then we can now
import them in properly. So I'm going to make this. I'm going to convert this into Let's go back in there. Let's
get them into parameters. So I think you get them to parameters and then we use
material instance for them, it's going to supposed
to work properly. Since the method is to turn off the SRGB before bringing it
into the material editor. So let's go in. I think we can I do multiple? Can I do multiple for this? Let's see if can see
can do multiple? Let's do convert to parameters. Yes, perfect. So this is going to
be a normal select this to be the normal texture. Okay. Then I need to convert this to parameter
to convert to parameter, name dismal intensity. Okay. Then one very important
one very important skill you should have is to figure out when something is
not working right. Because I know for a certain the metallic property not looking metallic surface was not looking right because face
felt more like plastic. So you need to kind of
have a good keen eye for observing. Let me say this back
to one because it doesn't really do anything.
It doesn't do much. So you need to have a keen eye for knowing when something
doesn't feel right. Metallic intensity. So now, at least now we know
what the major problem is, and then we know how to fix it, so that is a plus for us. Okay. This is the roughness. Roughness ext that was really an annoying,
annoying bug, though. That was an annoying bug, but good thing we were
able to fix it. Good thing we found everywhere around it, roughness intensity. Okay. So change to Albi do Albi do texture. All right, so it should be
fine. Yeah, we should work. We should be just fine. Everything is where
it needs to be. Okay, I'm going to save this. So we have this now
converted to parameters. So if you make a
materialists out of this, we should be able to now plug in various textures properly after turning of the SL GB in there. So, this works fine now. So I'm going to close this. I'm going to save
my file. All right. Then what we need to do now is to go back to Substance
Painter and then export all of them back out as separate individual textures. So let's do that. I'm also going to delete. I'm also going to delete texturing that we
don't need anymore. I'm going to delete those,
especially the ORM. I think it should be most
especially the ORM textures. So we can just come here
and then just type in. Let's do occlusion. Occlusion. No, it's not
sharing that up in any way. Okay, so this might take a
while to actually delete. But that is fine. You need to select
textures in here. Let's see, we should be able to. Okay, I'm not spelling
that correctly. All right. So this is pretty much all the occlusion
materials in here. So we don't need them anymore
because they're kind of problematic inside
of on real engines, so I'm just going
to go in and then grab grab all of that. Okay. Okay, Save for the
one for the breastplate, though, for the chest plates. On find that It's gonna be a difficult one
to actually find out. Anyways, let's just delete. At least now we know how to resolve the issue
we're having in here. Yeah, I'm just going to
do force deletes. Okay. All right, so we have all of those now deleted,
which is fine. So this is what
we're going to keep. This is pretty much
what we're going to keep because everything
works correctly just now. So I'll see you guys back where
I go back to Satan Spina, and then we export them out as individual
materials instead. I see. Okay. Let
me turn this off. All right. So we're going to use a main master material for the next lecturing
for the other part. So I'll see you game save this. I'll see you guys
in the next lesson. Bye for now.
126. 124 Reexporting Textures In Substance Painter: Ok Ba guys, so we need to kind of reexpre this out
again properly, okay? So what now I like to do is
to go into the torso color and then isolate it. Then add some more shine to
it because it feels like it is introduced more metallic some more metallic
shine to it, actually. So let's go down here instead. I'd like to introduce
some more shine. Okay. Let me make this a
bit more feasible. Alright. That should be fine. Okay. Maybe any who can
just take this down. Go down. Let's see. Highlights. Make the eye lights
a bit more sharper. So this is more or less like a back and
forth thing on see, we kind of get something
looking good enough. This base, let's see our Bz
bringing some motu into it. Okay, we see more shine now. That hides most of the shine. So let's reduce this and then
to have more shine to it. All right. Same also too with the deaths. I need to get more
shine to it as well. Yeah, I think this should
work. I'll do a quick sieve. We might need to do we
need to do the same nose, too for the lower bronze parts. But I think so far, we should be I think we're
on the right track. So I'll just go into it. Okay. Let's see this shine. Crease the shine some more. Okay. Maybe even tone of that.
Turn this metal roast off. Let's go down in
here highlights. Add some more
highlights to this. Okay, then these deaths to take it down some more to introduce some more shine,
that should be fine. Okay. Let's bring everything
back out. Let's see. Alright. I I think another place that need some more
attention will be the shoulder shoulder
shoulder pads. Okay, let's get in there. This will take down. Because I need to have
more shine on this. Maybe hide this completely. Okay, this need to take
Let's get in there. It doesn't really
do much like that. But if we turn this off, let's see actually
does something, so let's bring some
shine back to it. Okay. Just before we
export this out again. Alright let's see which other other parts need to
introduce some more shine. Here, I need to introduce some more shine in here as well. At least now we
already know where to actually adjust to bring
back more shine to it. So in here, I'm just
going to open this up. Okay, bring that down and
actually bring some more shine, perhaps some more highlights
in there that is fine. Okay. I'll do the
same here also. I think let's go back to this. Let's go back to
the store so piece. I think I feel like I still need to do
something in there. Let's go back to it. Okay, I think, let's
do take this down. That should be more shine. Okay, open this up. It's it's not even
visible that much. Let's see. That should be fine. For this, edge damage. Need some metallic
property to this. Let's add some metallic
property to it. Okay. That should be fine. I think I might
need to even one of these oil bead also
to turn that off. I think at this point, we might even need to just
report everything back in again or a spot of
detectors back out, so I think we're on the right track I
coming here as well. Because we need to
kind of make sure the materials look right. So while we up light inside of Stan spinter
we can still go back and make some necessary
corrections as needed to take this down. Get some more shine in there. Okay, we have some more
shine that is fine. So we already know where to actually adjust to
bring back more shine. So that's why we're just
getting in there and then adding that shine in. Okay, let's go to these wings. We turn this off. Let's see what we get. Here, we get more shine in
there, no doubts. Take this down. Okay? Because I noticed that
the metallic sheading or rendering instead of lnging
doesn't look that appealing. So we just need to kind of
get some more shine in there, so to make it a little
bit more appealing. And that is why we are
kind of doing this. Okay? Maybe this is not the one. Okay. Let's find where we
have the eye lights. Let's find where we
have the eye lights. And then make the
eyelights more visible. Okay. Yeah, this is a bit more
shining now. This is fine. Okay. I'll come in here. Let's add
some shine to that, as well. Okay. We pretty much know what to add. Okay, this spot lon already has some good measure of
shining there already. Yeah, we have some good
measure of shining here, so I might just leave this Let's Let's say we just
turn this ten it off. Let's reduce this
drastically, okay? That should be fine. Very quick sieve. So moving on. Let's go down here and do the
same also in there. You need to add some more
shine to this because it needs at least some
additional shine. So what do you know
where to adjust. So just to go in there
and then just do that. Okay? I should add more
shine to our material, which is let's do this as well. Let's get in there. Okay. Just go in and
then take this one. Now let's see what we get. Okay. Oh, that is more or
less the wrong please. I think that is the wrong one. Okay. Yeah, this is the one
we're supposed to be in. This is for the pens, I think,
yeah that should be fine. So you to go in here
for the roasts, take out the roasts. Add some more introduce
some more shine to it. I think this is where
you're not there. Okay. That's damage. Let's add some more shine
to these highlights. Okay. Let's add some a bit more shine to it. That
should be fine. Let's get in here on
the back of the arm. I think this is the
bronze as well, so let's get into it. Make some more in there as well. Okay. Moving on. Okay. Let's
go to this chain meal. Select the chain meal. N some more shine
for this chain meal. So I think Okay, let's go in and then
just take this down. You should introduce
some more shine to it. I hide this even
working AS is working. Okay, we completely hide
this, let's see where we get. Not much difference, though. Why hide this. Okay. He highlights, I think I'm going to scale
this up some more. All right. Roughness dates. Let's see no much difference
happening in there. Okay, that should be
fine. Let's move down. Let's select this.
Let's get in there, we need to kind of introduce a bit more shine to it, as well. Let's see. Let me isolate it,
actually. Let's see. Okay. This is the grunge. Come on. I need some
more shine here as well. Let's see what that gives us. Okay. Let's get
in here, as well. Introduce a bit more shine. I think the fit itself is really looking.
It's quite shiny. It's shiny enough for us
sum to Let's get in here. Okay. Let's get in the Okay, this one already
looks shiny enough, so we leave data as it is. Leave data as it is. Now, for this cage, I think we need a bit
more work on this cage. On the cascades, body udder, so I would do less isolate it. All right. Now, the det we have in
there, I think I might need to at least
reduce that some more. I think we have dirt
that is way too strong. Et's take down these deaths. These deaths, I'm going
to slightly reduce. Shouldn't be too
aggressive in there. Yeah, I think it should
more or less work. It's a shadow shadow in there that adding some extra depth
for us, which is fine. Okay. Let's go to these helmets. I think that should be kind
of rounding up get in there. Okay. This is for the bronze.
This is already turned off, so I think we should have
enough shine in there already. Let's go to the next one. Let's go in there,
adjust the values, get some more shine going on in. Okay, I think this one shouldn't be too aggressive in there
so let's tur this down. Alright, that should be fine. Let's bring everything
back out. Let's see. I'll come in here. I'm going to isolate it so we can at least see what we are working on. That one is already
torn off as well. Yeah, I think this one should
be fine the way it is. Okay. All right. I think you should be fine.
I'll do a quick save. So at this point,
ma need to just delete I think it's safe to just delete
what we have in here. Okay. So I'll pretty much I pretty much just delete
the entire ten actually. I'll just delete
the entire team. You can start afresh inside of On engine and then plugging them into
the correct channel. So I would most likely just Okay, I'm going
to leave these two. I think these two already
have a slot already, so I'm going to select that. So yes, for the Hoody I
think that is for the Hoody, so how more Hodie. I'm need to find that. Okay, it's not an issue
because it's very imported into the contents
inside of energy, so I can just delete gentiin they're just going
on delete entien. So delete because we need
to export this out again. So let's go back in here
and then exports textures. So I'm going to
completely ditch this. Is there a way to
reset reset. Okay? So let's select
that folder again. He this folder in
here, select folder. So I'm not going
to use the default exports channel for this. So I think spot out
four k resolution. Okay. Let's pot fitting. This we're not really
spotting out any item. We don't any item map,
we're just spotting out the Abudu roughness
and the normal. So I think PNG should
be perfect for this. We're not spotting out
any its information. Okay. Let's see. So if I should go in We should be able to do this enable
ride for all items. Okay, yes, yes. So we only need the color,
metallic roughness. We don't need this number. We don't need this.
We don't need AO. Let's see if we can
transfer this to the other. So let's do enable
override for all items. Is that working at all? No, it not work? Okay? No it's not going to work. It's not going to work.
It's not going to work. So let's see generiot settings. Let's see if we can
do this in here. Enable it's not going to
work in here as well. I was looking for
include texture. Do this work. So it's not going to work. So my kind of do this piece
by piece for the entire team, which is like a whole
lot of work, though. It's a lot of work. But anyways, it's just cessry work
that we need to do. I was thinking I can just use the necessary output for it. Let's see. Which but are we
using right now? Okay. So let's just do manual instead. So I'm going to turn
off hollow metal turn this off, turn this off. Turn this off as well. So this is pretty
much all we need. Okay, base color
metallic roughness. Okay. So I'm going to pretty
much do this for the others. So I'm going to come back
when I'm done with this. Then once I'm done, I'm
not going to exports. I'm sure you guys get
the idea already, so you can just turn them off individually and then you
exports should be good. All right. I'll see you guys
in next lesson. Bye for now.
127. 125 Applying Textures In Unreal Engine: Welcome back guys. I went to my textures fall down the I
kind of deleted everything. So I would more or less pretty much like to start
from the beginning. So I'm going to import all
of them again in here. So let's just import
the textures in here to select everything. Okay? I would like us to
get a fresh start to this so we can just blog them incorrectly
as it should be. Let me give you an so actually
import all of this in. And we still have we still pretty much
have our set opine, which is also fine, we're still going to kind of
speak later on, okay? So yes. Alright, so we have them
imported in here now, so everything has been
ported correctly. Hopefully, this
time you won't have any weird issues in here. Let's go back to you E mats. Then for the I think
I'm going to delete this the fs delete Okay. This also, too, I think I'm
going to delete this as well. Pause the leads. Okay. Then
let's go into the Ed Udi. I'll double click on that. So basically need to
report the textures again. Yes, yes, very important. Before we import the textures, there's something we need to do. We need to come
type in roughness. Okay? I'm going to all
the textures only. I believe I can
select everything. Option click. Yes. Let's see. I believe so be
textual sets actions. Is a particular asset action. Uh Let's do this again, Asset action Okay. Asset actions, edit selection in property metrics
that's the one. Yes, so for all
of our roughness, we need to turn off
the SRG before this. This will take a while. Then we can just do this automatically. Try to select and scroll down, but it's not doing that soon. I would need to turn
this off piece by piece, because it's just going
to kind of mess up the physically going to mess up black and white
texture we have in there. We don't want that we
don't want that issue. So I need to turn this off
for every single thing. A need to do this for the
metallic texture also. So I think I'm just
going to do this off screen and then come
back when I'm done. Can I select multiple
and do this t work? No it's not working. If I select multiple
can I do let's see Now, that doesn't work
either, so I have to do this piece by piece. I'll
come back when I'm done. Okay, so I think that should
be it click on saving. A save pretty much do
the same thing also for the metallic channel. So I'm going to close this. Put up outline content
drawer, put metal metallic. So textures already turned down, so it's really going to show
us for the texts alone. So let's pretty much do
the same in here as well. Okay? Asset action, this
selection in property matrix, and then we pretty much go
do the same here as well. Okay, I think we're done
to save this. All right. I'm going to close this. So we have this now all set up. Let me close this. I'll go to UE material son of this texture. Okay, so for the head odie, let's get close to
the head Hoodi. So we just pretty much need to apply the textures in there. So this is the budo. Let's go to textures, type in Hoody in here. Yeah, it's going to be
four texture. That's fine. So Abdo select the bu
doo, send this in. Okay. Let's go to the
roughness channel. Select the roughness,
send that in as well. Selet the metallic
gets in the send that in sele the normal
send that in as well. Okay, then I would save
this material. All right. Then I'll close
this. Should have that applied in there now. I need to select
the hoodie again. Let me get close. Okay, now it feels
more like some kind of metal material and now looking a bit too
weird, like plastic. So we should let me save this. Yeah, that's fine.
So we can go to the UE materials now,
then close this. Let me see if I need to increase the normal intensity for it. Yeah, I feel like I'll need to increase the intensity for it. So let's get in there. So let's select this. Ready at two. Let's use a value of 2.7. Okay. Save this. Let's see what we are. It's a bit maintens
No that's fine. All right, so I'm
going to clear this. Then let's make a material
instance from this. So I'm going to create
a material instance. I'm going to rename
these two MLO cape. Let's do To underscore
color. Okay. Yeah, so that's fine. So if I should double
click on that now. You should have some
parameters in here now we can work with so I'm
going to turn everything on. Let's turn this on as well. Okay, let's go to
our text shows. Hopefully this works
correctly now. Yeah, before we do I
think we need to I would need to save Okay,
let's just plug in. Let's just plug in the
materials in the Faso. Let's just type in color. All right, so the log the Abdo
in the metallic metallic, log the metallic in normal plog the normal in roughness, log
the roughness in. I'll save this lose this. Let's apply it now to what
needs to be needs to be here. Let's go into the
material instance, the material
instance, select it, and then let's send
it in there Yeah, now, it feels more like metal. It feels like metal also, but intensity is way too much, so I need to adjust the
intensity some more, so intensity is way too much. Let's set this back
to let's do 1.7. Okay. Let's sieve.
Save this again. Now we get something that feels a whole lot more realistic. Not what we have in before that looks a
bit more like plastic. So this one feels a
whole lot better now. All right. I'll save this. Okay. Let's go to our content
drawer, close this. I'm going to duplicate this d again as a
material instance. I'm going to name this
to ML underscore breast Breast plates. Okay, I'm just applying it
to the bigger ships first. So let's select this. Let's send it over in there, and then we open it up and then we'll apply what
needs to be in there. So let's go to textures. So just breast plates. It needs to be on. Can we just drag this in before
t I think we can. Okay. Then metallic
metallic loads, normal loads,
roughness save this. The normal intensity, I
think I'll say this to two. Save this again. Let's close this up. Let's see what we get. Do we have the supply? That send this doesn't
seem to be in there yet. Those okay, breast plates,
double click on that. Okay, I'm not changed
the color yet, so I need to change the color. So let's go back in
here, type in chest. Diab doo, I did not
change diabetes. Let's make sure we plug the
correct albedo in there. Chess, play chess,
play chess, plate. Okay. That should
be fine. Save this. Save this again. Close. Fantastic. So see how all of this is working correctly
the way it should. It's precisely what we
need, how we save this. So I'm pretty much
going to repeat the same step for the
other part of the mesh. So yes, we can carry this on. Let's do Let me try. Let's do this in here instead. So show that pad. So let me close this. I'll make a duplicate
of this as well. Material instance.
I've been doing. Okay, let's just put ML there. All right on that score. We can use MI instead? MI will just feel like there's no M I think MI is better for minium
you just use ML instead, but it's still the same
material instance. So let's do show that so I
need to delete shoulder pads. Okay? So I need to get this
applied on the region, okay? Then let's go into it. You can see how it
becomes easier now just applying the textis
when we're kind of struggling to kind of get it right because of the bug instead of on arranging for
the ESL GB channel. So this one works
way better now. So shoulder pads, or I need
to turn all of this on. Let's make sure
this is turned on. I said this to two.
Two should be fine. Then let's just drag and drop the materials in
where they should be. Okay. We need to turn off the SRGB for the normal map because by default only engine turn
turns that off for us, that's what we didn't
do for the normal map. Okay? Fantastic. Se, it looks
way like meta material now. I really gives a
metamaterial impression, which is precisely
what we're going for. All right? So let's do
for this head wing. I'm just trying to do this
for what is visible in here, then I'll do the
main one off screen. I'm sure you guys get
the idea already now. So let's go back to
EUE material clauses. I think you can
duplicate this down, create a material instance
once we duplicate. Now it's not creating a material instance for us
when we duplicate, so let's delete that. I'm going to just do create
material instance instead. So ML underscore
underscore wings. All right. Open that up. Make sure we turn all
of these back on. Okay, save the entire file, open this up, go to a texture. Let's just type
in wings in here, then drag and drop. Drag and drop drag
and drop as well. Drag and drop in here. I'll say this to two. Maybe even 2.2. Let's do 2.2 instead,
Save All right. I've not even applied it on
there yet, so select it. Apply. Okay. I think I need to increase
the let me get in there. I need to increase
the intensity of the normal map a little
bit more. Let's do three. Save this. Close this. Here, I think, that
feels fine now. That will work just fine. I'll get the metallic look
to it, which is fine. Okay, so I'm just going to
go off screen and then do the rest and then I'll
come back when I'm done. I'll see you guys in the
next lesson by for now.
128. 126 Adding Advanced Parameters To Master Materials In Unreal Engine: Welcome back, guys. So I haven't kind of applied
all the materials yet. I figured we can make material
a bit more interesting and then have kind of
greater control over it, by doing some additional
work to kind of make it look look and kind of
feel more interesting. So here's what I'm going to do. I'm going to I opened
up the master material. This is like the
master material. I think I need to actually
rename this also to to master Come on. I'll just type in
master in there. Let's use a car. Okay. Yeah, that's the one.
So I figured we can add some saturation and
then some contrast to the contrast to the roughness
and the metallic channels. To do that, I'm going to
open the master material. Okay? No, is that
is an instance. Okay, this is the master
material in here. All right? So I'll double
click on that. Okay. So what you're going to do
here is to start by adding some a node that control
this saturation of this. So to do that, I'm just going to go
to an empty space. For now, I'll right click in there and I'll type
in the saturation. Yeah, I know it's kind of the node is
kind of the opposite, so but that's fine. Then I'm going to duplicate
this scalar node. Yeah, let's even rename, let's convert this to
a parameter and then rename this to specular. Okay? All right. That should be specular
intensity. So let's do. Can we go back in? Okay, we can just name
this in here instead. Specular intensity. All right, that should be fine. So in here, I'm
just going to let click and hit one to bring
out another constant. And then I'm going to drag
this constant into fraction. Okay. And I'm going to control and remove this, lay that out, then drag this into the
first slot in there, and then I'm going to drag
this into a base color. Okay? So if you notice Near now, if you have this at
the value of one, a value of one turns material
into a gray scale material, as you can see here, we
have a gray scale material. But if it's a zero, we don't have any saturation
contribution in there. But let's say we go to a value
of let's say minus eight, for example, minus 859. You can see how it
makes our model architectures quite saturated. So I'm going to set
this back to zero. Okay. Then I'm going to
convert this into a parameter. Then I'm going to name
this to saturation. All right. That should be fine. I would save this. Okay? That should that
should work for now. So I'm not going
to leave there, so we have a parameter to actually tweak in case we want to make
our colors more saturated. So the next we need
to do is to work on the This is a metallic texture. I want to add a contrast
to our metallic texture. So to do that, let me
put this down here. So to do that, I think, yes, I'll do this in here. We have some space
in here to do that. So I'm going to hold down Control and disconnect
this. All right? Then I'm going to create a
linear interpolation node, so I would right
clicking a dos type in linear You should have
the linear interpolates. Yeah, found it down under utilities linear
interpolatee. All right. So what I need to do in here would be to set
this here for now, and I'm going to
plug it directly to the metallic channel. All right, that is fine. So let me set this aside here. I'm going to plug
this multiply now. This multiplies for the
metallic intensity. So I'm going to plug
this to A slot for now. The mix kind of creates
the contrast nodes. Create constrt constrats I keep saying that wrongly,
contrasts, is it? Contrast, rather,
man, English is hard. So I'm going to
right click in here. I'm going to type
in. So there's no, there's actually a
contrast node there. It's called cheap, I
believe cheap contrast. But let's use the
Power node instead. This is the power node instead. So go in there. Was is going to create a
new constant for this, so I would click and eat
one on the keyboard. Then I'm going to convert
this into a parameter. This is going to be let's
name these two contrast. Okay. Even that not to
pronounce it properly, at least, I should
know how to spell it. So that's it in there. I'm going to plug the default
value into the exposure. The exposure or exponential, what's it called? Okay,
constant exponents. Okay. Then I'm
going to drag from the arb channel up log
to the base. Okay. Then I'm going to
plug this base to the B slots. All right. So now we have just
see this A and B, like two slots where you can
plug something in there. So we have a metallic
intensity node, plug into the first lot, and then we have the contrast node plug into the second slot. Then this is directly plugged
into the metallic channel. So with this null,
let's say we do, let's say we go into
the contrast right now. And then for the metallic, we type in a value of, let's say we go to a
value of nine Okay. And then we save
this. All right. Just for experimentation
purposes, in case you want kind of teak
some things in there for each material instance and
pull this out like so. Do we see much
happening in here, if you go in and then we let's set the bold
values back to default. I believe zero should be the
default. If you save this. We don't really see any
major change in there. I think we might
actually see this properly would be when we add to the when we add this to the
roughness channel instead, I think that's where
we're going to see more of it pop out a little bit more. Well, let's let's try doing
I plug this correctly? Plug rightly let's put
this as a value of ten. I don't see any major
difference in there though. Let's do a value of minus nine. Don't really see any
major difference in there either. That's fine. We're going to copy, so we're just going
to kind of duplicate the same duplicate the same ten and then
bring it down here. So what we need to
duplicate would be these three, particularly. So So I'm going to sell
it already selected, I'm going to duplicate it. I'll drag this. Let's do around should be
fine. All right. So I'm just going to
plug this arrow channel again to the Bs. Okay? Then O down control, remove this, then
drag this to slot A. Then I'm going to
drag this all the way to the roughness
roughness channel. Yeah, something like this, I believe this one should
actually work properly now. So if we should go in here, I'm going to I need to also
kind of rename this to contrast roughness to know precisely what is
actually adjusting. All right. I don't think
I spelled out correctly. Okay, that should be fine.
So you should work now. I should do a value of
nine, I was working now. So if I do a value of nine, you can see how shiny this
looks I let me pull this out. I've not yet applied it, so
if I actually can apply, we should have something that looks way more
reflective in there. Let me give you a moment
to actually save out. Yeah, I can see now it
looks way more reflective, maybe actually way
too reflective. So we can always adjust the
values however we want. So I'm going to, let's say,
I'm using a value of two. Can see how it
changes drastically. I now adds some more
roughness to this. Is a lot more oily. We can also kind of go
to a negative value. Let's do minus nine. Extreme, so you can see
how nonreflective this is. Let's say we do a
value of minus two. Okay. Let's say let's
say this back to zero. Let me say this back to zero. Okay? No, zero is kind
of less reflective. The actual value that's
supposed to be there should be one to bring back the
default roughness in there. Then we can move between
let's say we do 0.8. We can reduce the reflectivity
in there as we see fits. Okay. So I think
that actually helps. That actually helps to reduce or tune down
the reflectivity. And if you need to
kind of tune that up, we can do that also. But now, it's affecting
the entire image because this is a
master material. So I'm going to set this to let me set this back
to the fourth of one. So let me save this also, too. So we have controls over the material instance to adjust them for the material
instance instead. So I'll save this again. I'll close this. All right. Let's
say I want to bring more reflectivity to this color, where is it color
color piece in here, so I'm just going
to drag this week. So we see more global
scalar parameters now available for
us to actually use. Oh, I think I need to
rename this contrast. I need to rename that
contrast for the metallic. Let's go back to the
master material. Rename that and put this aside. We name this contrast to
metallic, so we know what it is. Metallic Okay. Fantastic. So I'll
save this again. I'll pull this this way. Let's pull this way. Let's get some more
space in here. Alright, so if I find, let me save this again. So if I find the I think
it should be the color. To color that's the one. If I go in the Canton
on the parameters now, saturation also to
speculartnsity, as well. So let's put this to the side. So I'm going to focus
on this color now because this is like a material instance for the color piece. So the contrast
for the roughness, let's say we set this
at a value of nine, you can see how we make
this a bit more shiny. But I don't want it
to be that extreme, so maybe we do dial this
to a value of five. Let's see. Let's see
how shiny that looks. Let's do a value of four. Okay, let's say this to one. I think let's do
a value of three. I think a value of three
should be a good one. Yes, so you can kind of see we kind of catch more
highlights in there now. Getting a bit more highlights
in there, fantastic. So that work just fine. We can also we feel like kind of if we want to
kind of introduce some more. So let's have that
control over this, though, so let me save this. So we pretty much have
control over this. So pecular intensity. Let's do nine in here. Let's see if that does anything. Pecular intensity, that
might actually help as well. Metallic contrast, I don't really see much happening
in here, though. Let's crank up the
vs use the value of 20 les 30, let's see. Okay? Now, that feels
a bit too extreme. So let's fine. Let's
go half of this. Let's do half. Okay. Feels like halfway is now really doing it. Let's keep taking this down. I'll save this. Let me
say this back to one. Trying to find a good value that will work just fine for it. Let's say we go even lower. Let's do minus five. Okay, it's kind of getting
a little bit better. Come on. It's kind of getting
a little bit better now. I think a minus, yes, a negative value
actually helps this. Negative value
actually helps this. Yeah, it's looking a
bit more better now, kind of blending well
with the others. So let's do negative ten. Let's go a bit extreme. I think that'll be too
much. That'll bit too much, actually. Let me see this. I think I'm just going to stick with what we have in here now. I think what we
have in here should be pretty much just fine. Okay, if you come in here to the metallic intensity,
let's do ten. Don't really see much of anything happening
india, though. I don't see much of anything
happening in there. So let me say it back to,
that's the wrong one. Let's back to more I
need more of the no. I think I mistakenly
adjusted that. So let's set this to 1.8
for the normal intensity. Let's go to the saturation. Let's see. Okay. If you add
more saturation to this, that's a bit too extreme, it's more value should help
lift this up some more. So yeah, that's fine. So I'm
going to leave these cities. I'll do a quick
save's save our sin. Alright, so now
the major idea is that we have control
over this now, at least, we have more control
over the entire piece, so I'm just going to go off now, and then we still have some time maybe in
the next 5 minutes, continue to apply
continue to apply the textures to the
other materials. Okay? So I think
at this point now, we can follow the
hierarchy in here. So I'll go in there I would do a master material. This
is the master material. Let's make a duplicate for this. Yeah, material
understands rather. Then this is going to be
let's just name this to chain meals call Mal. All right. Fantastic. So I would get selected
already in here, and I would just apply
that as in here, I'll just apply that to
the material in here. Okay, click out. So it's another material
that has been applied to it. So we need to go into
the material itself. Let's double click
on the material and then drag the
textures in there. So I go to texture
folder, chain, mil. Set it to texture alone. We have the base colour,
so we need to kind of turn all of these on. Can they just be permanently on? Is that what kind of make
them permanently on? If you guys have any
idea to make this permanently on after
duplicating, that'll be cool. But anyways, carry on. So base color or
drag the base color. Metallic drag this
to the metallic, normal drag these to
the normal slots. Okay? Roughness drag this
to the roughness lots. I'll save this. All right. Let's pull this out. Let's click out. Let's
see what we have. Okay. I think we might need to do some
extra working here. For example, I would need
some more shine to this, so that's why we have
the contrast now. So if I should go to the
value of ten, save this. Let's make our material
a bit more shiny. G to close. Let's see. The normal intensity, let's
say it is back to one. Okay. All right, so let's do what
else can we adjust in here the metallic this value. Let's say this to
ten. Let's see. Alright, let's do a
negative value instead. Yes, to get more shine to this. I don't go too extreme
on it, though, but I think this should be
roughly there. Saturation Get a bit more saturation india. I don't really seem much
happening in India, though. Not much happening in India. Set it back to zero. Oh, yes. Oh, I think that was specular. That was for the specular
mistake, my bad. So let's do let's add more
saturation to this. All right. Maybe around there
should be fine. Don't need to go to extreme. Still kind of
adjust it later on, but see from an angle like this, we can see more of the
reflectivity properly. We don't have any Asia
right now seen yet, so that's why we
can't really see some good reflectivity
around our scene, but at least something
like so should be just fine. I'll save this. Close this out. Let's carry on. So I'm going to fs hierarchy, so that should be fine. So casket body. I'll go back in UE
materials, close this. Don't be textures. Let's do this master material
again. Create an instance. Should be caskete body. Casket body. Okay,
that should be fine. Selected already. Let's
directly apply it in there. Then we need to go into
the material itself. Turn all of these back on. Okay. All right.
That should be fine. Let's go over to the textures, caskets, body. Okay. Yeah, so this is a new one kind of let me make sure
tissues is selected. So this is the new one. I'm
going to drag them in here. Okay. Metallic channel. We have the normal channel. We have the roughness channel. We have them plugged in now. Normal intensity, I think I might just leave
this way it is. So we need to kind of check save and then we'll
check this out. Let's see where we get. We don't really
have good lighting in that region, though. We don't have proper
lighting in that region, so Let's see. But let's just see with what we have let just
create another one. Let's find our lights. Let's find these lights. I'm going to put
this in your folder. I'm going to name the
studio studio lights. Okay, so I'm going to
duplicate this point light. I will duplicate
the point lights. I need to bring it forward and bring this too much. Let's get up close. So I pretty much just need
this to kind of eliminate the casket a bit more
so maybe I'll just put it in front instead,
in front of it instead. I need to kind of take
down the intensity. Let me glue this for now. I need to take down
the intensity. I don't need to be that intense. Barely in there, like so, and move this forward some more. Okay. So you can see how that's kind of catching some
highlights in here, which is precisely what we want. You can see we see
how it kind of illuminate this region
some more, so that's fine. This we can definitely use. Can we turn off the
shadows for this? Should be able to turn off
shadows for this light. I really need this to
kind of illuminate. I don't want to kind
of cast any shadow in her contact shadow
cast in intensity. Can found it. So I'll turn that I don't
want to cast any shadow. This light also, I
don't want to cast any this point light also the first point light it
shouldn't cast any shadow. Let's see any
difference in Okay, I think it needs to cast in here. We need some
shadow in there. This let's see, let's lights cast some
shadow, that's fine. So that's why we have
from control over this now. So yeah,
that should be fine. So now we can go close to it. I think what we have here
is pretty much just fine. We don't need to go
to extreme on it. That should be just fine. Okay, that should be just fine. I'm sure you guys you guys
get the idea already, so it's just a matter of continuing same format
and then keep working on it. So I'll see you
guys next lessons. I'll go off screen and then
just apply all the materials. So this might take a while.
So but I'll just get it done. I'll see you guys in next
lesson. Bye for now.
129. 126 Adding Advanced Parameters To Master Materials In Unreal Engine: Welcome back, guys. So I haven't kind of applied
all the materials yet. I figured we can make material
a bit more interesting and then have kind of
greater control over it, by doing some additional
work to kind of make it look look and kind of
feel more interesting. So here's what I'm going to do. I'm going to I opened
up the master material. This is like the
master material. I think I need to actually
rename this also to to master Come on. I'll just type in
master in there. Let's use a car. Okay. Yeah, that's the one.
So I figured we can add some saturation and
then some contrast to the contrast to the roughness
and the metallic channels. To do that, I'm going to
open the master material. Okay? No, is that
is an instance. Okay, this is the master
material in here. All right? So I'll double
click on that. Okay. So what you're going to do
here is to start by adding some a node that control
this saturation of this. So to do that, I'm just going to go
to an empty space. For now, I'll right click in there and I'll type
in the saturation. Yeah, I know it's kind of the node is
kind of the opposite, so but that's fine. Then I'm going to duplicate
this scalar node. Yeah, let's even rename, let's convert this to
a parameter and then rename this to specular. Okay? All right. That should be specular
intensity. So let's do. Can we go back in? Okay, we can just name
this in here instead. Specular intensity. All right, that should be fine. So in here, I'm
just going to let click and hit one to bring
out another constant. And then I'm going to drag
this constant into fraction. Okay. And I'm going to control and remove this, lay that out, then drag this into the
first slot in there, and then I'm going to drag
this into a base color. Okay? So if you notice Near now, if you have this at
the value of one, a value of one turns material
into a gray scale material, as you can see here, we
have a gray scale material. But if it's a zero, we don't have any saturation
contribution in there. But let's say we go to a value
of let's say minus eight, for example, minus 859. You can see how it
makes our model architectures quite saturated. So I'm going to set
this back to zero. Okay. Then I'm going to
convert this into a parameter. Then I'm going to name
this to saturation. All right. That should be fine. I would save this. Okay? That should that
should work for now. So I'm not going
to leave there, so we have a parameter to actually tweak in case we want to make
our colors more saturated. So the next we need
to do is to work on the This is a metallic texture. I want to add a contrast
to our metallic texture. So to do that, let me
put this down here. So to do that, I think, yes, I'll do this in here. We have some space
in here to do that. So I'm going to hold down Control and disconnect
this. All right? Then I'm going to create a
linear interpolation node, so I would right
clicking a dos type in linear You should have
the linear interpolates. Yeah, found it down under utilities linear
interpolatee. All right. So what I need to do in here would be to set
this here for now, and I'm going to
plug it directly to the metallic channel. All right, that is fine. So let me set this aside here. I'm going to plug
this multiply now. This multiplies for the
metallic intensity. So I'm going to plug
this to A slot for now. The mix kind of creates
the contrast nodes. Create constrt constrats I keep saying that wrongly,
contrasts, is it? Contrast, rather,
man, English is hard. So I'm going to
right click in here. I'm going to type
in. So there's no, there's actually a
contrast node there. It's called cheap, I
believe cheap contrast. But let's use the
Power node instead. This is the power node instead. So go in there. Was is going to create a
new constant for this, so I would click and eat
one on the keyboard. Then I'm going to convert
this into a parameter. This is going to be let's
name these two contrast. Okay. Even that not to
pronounce it properly, at least, I should
know how to spell it. So that's it in there. I'm going to plug the default
value into the exposure. The exposure or exponential, what's it called? Okay,
constant exponents. Okay. Then I'm
going to drag from the arb channel up log
to the base. Okay. Then I'm going to
plug this base to the B slots. All right. So now we have just
see this A and B, like two slots where you can
plug something in there. So we have a metallic
intensity node, plug into the first lot, and then we have the contrast node plug into the second slot. Then this is directly plugged
into the metallic channel. So with this null,
let's say we do, let's say we go into
the contrast right now. And then for the metallic, we type in a value of, let's say we go to a
value of nine Okay. And then we save
this. All right. Just for experimentation
purposes, in case you want kind of teak
some things in there for each material instance and
pull this out like so. Do we see much
happening in here, if you go in and then we let's set the bold
values back to default. I believe zero should be the
default. If you save this. We don't really see any
major change in there. I think we might
actually see this properly would be when we add to the when we add this to the
roughness channel instead, I think that's where
we're going to see more of it pop out a little bit more. Well, let's let's try doing
I plug this correctly? Plug rightly let's put
this as a value of ten. I don't see any major
difference in there though. Let's do a value of minus nine. Don't really see any
major difference in there either. That's fine. We're going to copy, so we're just going
to kind of duplicate the same duplicate the same ten and then
bring it down here. So what we need to
duplicate would be these three, particularly. So So I'm going to sell
it already selected, I'm going to duplicate it. I'll drag this. Let's do around should be
fine. All right. So I'm just going to
plug this arrow channel again to the Bs. Okay? Then O down control, remove this, then
drag this to slot A. Then I'm going to
drag this all the way to the roughness
roughness channel. Yeah, something like this, I believe this one should
actually work properly now. So if we should go in here, I'm going to I need to also
kind of rename this to contrast roughness to know precisely what is
actually adjusting. All right. I don't think
I spelled out correctly. Okay, that should be fine.
So you should work now. I should do a value of
nine, I was working now. So if I do a value of nine, you can see how shiny this
looks I let me pull this out. I've not yet applied it, so
if I actually can apply, we should have something that looks way more
reflective in there. Let me give you a moment
to actually save out. Yeah, I can see now it
looks way more reflective, maybe actually way
too reflective. So we can always adjust the
values however we want. So I'm going to, let's say,
I'm using a value of two. Can see how it
changes drastically. I now adds some more
roughness to this. Is a lot more oily. We can also kind of go
to a negative value. Let's do minus nine. Extreme, so you can see
how nonreflective this is. Let's say we do a
value of minus two. Okay. Let's say let's
say this back to zero. Let me say this back to zero. Okay? No, zero is kind
of less reflective. The actual value that's
supposed to be there should be one to bring back the
default roughness in there. Then we can move between
let's say we do 0.8. We can reduce the reflectivity
in there as we see fits. Okay. So I think
that actually helps. That actually helps to reduce or tune down
the reflectivity. And if you need to
kind of tune that up, we can do that also. But now, it's affecting
the entire image because this is a
master material. So I'm going to set this to let me set this back
to the fourth of one. So let me save this also, too. So we have controls over the material instance to adjust them for the material
instance instead. So I'll save this again. I'll close this. All right. Let's
say I want to bring more reflectivity to this color, where is it color
color piece in here, so I'm just going
to drag this week. So we see more global
scalar parameters now available for
us to actually use. Oh, I think I need to
rename this contrast. I need to rename that
contrast for the metallic. Let's go back to the
master material. Rename that and put this aside. We name this contrast to
metallic, so we know what it is. Metallic Okay. Fantastic. So I'll
save this again. I'll pull this this way. Let's pull this way. Let's get some more
space in here. Alright, so if I find, let me save this again. So if I find the I think
it should be the color. To color that's the one. If I go in the Canton
on the parameters now, saturation also to
speculartnsity, as well. So let's put this to the side. So I'm going to focus
on this color now because this is like a material instance for the color piece. So the contrast
for the roughness, let's say we set this
at a value of nine, you can see how we make
this a bit more shiny. But I don't want it
to be that extreme, so maybe we do dial this
to a value of five. Let's see. Let's see
how shiny that looks. Let's do a value of four. Okay, let's say this to one. I think let's do
a value of three. I think a value of three
should be a good one. Yes, so you can kind of see we kind of catch more
highlights in there now. Getting a bit more highlights
in there, fantastic. So that work just fine. We can also we feel like kind of if we want to
kind of introduce some more. So let's have that
control over this, though, so let me save this. So we pretty much have
control over this. So pecular intensity. Let's do nine in here. Let's see if that does anything. Pecular intensity, that
might actually help as well. Metallic contrast, I don't really see much happening
in here, though. Let's crank up the
vs use the value of 20 les 30, let's see. Okay? Now, that feels
a bit too extreme. So let's fine. Let's
go half of this. Let's do half. Okay. Feels like halfway is now really doing it. Let's keep taking this down. I'll save this. Let me
say this back to one. Trying to find a good value that will work just fine for it. Let's say we go even lower. Let's do minus five. Okay, it's kind of getting
a little bit better. Come on. It's kind of getting
a little bit better now. I think a minus, yes, a negative value
actually helps this. Negative value
actually helps this. Yeah, it's looking a
bit more better now, kind of blending well
with the others. So let's do negative ten. Let's go a bit extreme. I think that'll be too
much. That'll bit too much, actually. Let me see this. I think I'm just going to stick with what we have in here now. I think what we
have in here should be pretty much just fine. Okay, if you come in here to the metallic intensity,
let's do ten. Don't really see much of anything happening
india, though. I don't see much of anything
happening in there. So let me say it back to,
that's the wrong one. Let's back to more I
need more of the no. I think I mistakenly
adjusted that. So let's set this to 1.8
for the normal intensity. Let's go to the saturation. Let's see. Okay. If you add
more saturation to this, that's a bit too extreme, it's more value should help
lift this up some more. So yeah, that's fine. So I'm
going to leave these cities. I'll do a quick
save's save our sin. Alright, so now
the major idea is that we have control
over this now, at least, we have more control
over the entire piece, so I'm just going to go off now, and then we still have some time maybe in
the next 5 minutes, continue to apply
continue to apply the textures to the
other materials. Okay? So I think
at this point now, we can follow the
hierarchy in here. So I'll go in there I would do a master material. This
is the master material. Let's make a duplicate for this. Yeah, material
understands rather. Then this is going to be
let's just name this to chain meals call Mal. All right. Fantastic. So I would get selected
already in here, and I would just apply
that as in here, I'll just apply that to
the material in here. Okay, click out. So it's another material
that has been applied to it. So we need to go into
the material itself. Let's double click
on the material and then drag the
textures in there. So I go to texture
folder, chain, mil. Set it to texture alone. We have the base colour,
so we need to kind of turn all of these on. Can they just be permanently on? Is that what kind of make
them permanently on? If you guys have any
idea to make this permanently on after
duplicating, that'll be cool. But anyways, carry on. So base color or
drag the base color. Metallic drag this
to the metallic, normal drag these to
the normal slots. Okay? Roughness drag this
to the roughness lots. I'll save this. All right. Let's pull this out. Let's click out. Let's
see what we have. Okay. I think we might need to do some
extra working here. For example, I would need
some more shine to this, so that's why we have
the contrast now. So if I should go to the
value of ten, save this. Let's make our material
a bit more shiny. G to close. Let's see. The normal intensity, let's
say it is back to one. Okay. All right, so let's do what
else can we adjust in here the metallic this value. Let's say this to
ten. Let's see. Alright, let's do a
negative value instead. Yes, to get more shine to this. I don't go too extreme
on it, though, but I think this should be
roughly there. Saturation Get a bit more saturation india. I don't really seem much
happening in India, though. Not much happening in India. Set it back to zero. Oh, yes. Oh, I think that was specular. That was for the specular
mistake, my bad. So let's do let's add more
saturation to this. All right. Maybe around there
should be fine. Don't need to go to extreme. Still kind of
adjust it later on, but see from an angle like this, we can see more of the
reflectivity properly. We don't have any Asia
right now seen yet, so that's why we
can't really see some good reflectivity
around our scene, but at least something
like so should be just fine. I'll save this. Close this out. Let's carry on. So I'm going to fs hierarchy, so that should be fine. So casket body. I'll go back in UE
materials, close this. Don't be textures. Let's do this master material
again. Create an instance. Should be caskete body. Casket body. Okay,
that should be fine. Selected already. Let's
directly apply it in there. Then we need to go into
the material itself. Turn all of these back on. Okay. All right.
That should be fine. Let's go over to the textures, caskets, body. Okay. Yeah, so this is a new one kind of let me make sure
tissues is selected. So this is the new one. I'm
going to drag them in here. Okay. Metallic channel. We have the normal channel. We have the roughness channel. We have them plugged in now. Normal intensity, I think I might just leave
this way it is. So we need to kind of check save and then we'll
check this out. Let's see where we get. We don't really
have good lighting in that region, though. We don't have proper
lighting in that region, so Let's see. But let's just see with what we have let just
create another one. Let's find our lights. Let's find these lights. I'm going to put
this in your folder. I'm going to name the
studio studio lights. Okay, so I'm going to
duplicate this point light. I will duplicate
the point lights. I need to bring it forward and bring this too much. Let's get up close. So I pretty much just need
this to kind of eliminate the casket a bit more
so maybe I'll just put it in front instead,
in front of it instead. I need to kind of take
down the intensity. Let me glue this for now. I need to take down
the intensity. I don't need to be that intense. Barely in there, like so, and move this forward some more. Okay. So you can see how that's kind of catching some
highlights in here, which is precisely what we want. You can see we see
how it kind of illuminate this region
some more, so that's fine. This we can definitely use. Can we turn off the
shadows for this? Should be able to turn off
shadows for this light. I really need this to
kind of illuminate. I don't want to kind
of cast any shadow in her contact shadow
cast in intensity. Can found it. So I'll turn that I don't
want to cast any shadow. This light also, I
don't want to cast any this point light also the first point light it
shouldn't cast any shadow. Let's see any
difference in Okay, I think it needs to cast in here. We need some
shadow in there. This let's see, let's lights cast some
shadow, that's fine. So that's why we have
from control over this now. So yeah,
that should be fine. So now we can go close to it. I think what we have here
is pretty much just fine. We don't need to go
to extreme on it. That should be just fine. Okay, that should be just fine. I'm sure you guys you guys
get the idea already, so it's just a matter of continuing same format
and then keep working on it. So I'll see you
guys next lessons. I'll go off screen and then
just apply all the materials. So this might take a while.
So but I'll just get it done. I'll see you guys in next
lesson. Bye for now.
130. 127 Look Development In Unreal Engine: Okay, welcome back. So I kind of went in and then
I apply to the materials, but except for this
glowing material in here. Okay, so I've not done that yet. So also, let's see what else were missing
in here. Okay, yes, yes. Then I went to let me show you guys everything I
adjusted in here. Okay, so I made the exponential
light fog visible again. The skylight is
also visible, okay? It's not doing so much, though. I mean, the atmosphere
rather is visible. Then we have the skylights too, not doing much as well. But what actually adjusted
was the directional light. So I kind of tune these down, cans the values tuned down. Then I kind of angled
the light also. Can see where the
light kind of angled. So kind of angle the light
roughly around here. So if I should go back in
there and I move this, you can see how the
shadows are moving. I don't want this highlight
at the back of my backdrop, so I just kind of see this
somewhere around here. Okay, that should be fine. Then another act I
actually did was to go back to the
my point lights. I also kind of reduce
the intensity for them, just to get something
that's not too bright. Okay? So if we turn
the point light too, you can see how we get more
stronger shadows in there. Actually, we have more
interesting shadows in there. But if we turn it
back on, you can see how it brightens
the entire scene. We can also kind
of tune it down. To get some interesting
shadow in there. I also like kind of duplicate it and then set
this at the back. I would like to set this
at the back as well. So let's duplicate these lights. So this light will
just be more or less like a back light, do that. A back light illuminating
the back of our model. I'm just going to
bring this close, increase the light intensity, getting closer.
Bring this closer. It's a bit too bright
when it comes closer, so we're going to tune it
down a little bit more. So more like so.
I'll pull it up. So all you want to kind of hit the shoulders a little bit more, add some more brightness
to the shoulders. And I kind of like
the light that's in there since we was
in the temperature. I think it was in we was
in temperature for that. It's just a plain just a
plain light, so that's fine. Okay. So we get some interesting
light shadowing in here. All right, I'm not now there
the post process volume yet, so I don't go to add that yet. So yes, one, one other issue I kind of encountered
for the fabric garment. Let me open this up
for the material. Let me show you guys
what I did in there. And also some otherings I
did in a few places, too. So if you open up the texture, when let me close this
and pull this down here. Okay. Let me extend this. Let's create some
more space in here. All right. Interesting. So on the SRGB, so SRGB, I kind of
turned this off. Why? Because if I turn it on. I kind of grease my material. My material was not
looking quite realistic, so see how dark it is, so kind of turned that off. Then I also played with the also play with
the brightness, kind of tune down the
brightness to effect to make it look a bit
more interesting. So let me save this I'll
do the same tune also too for the fabric down here. Do the same for this
fabric also too. I go in the I also
turned off the RGB, turned off HR GB, and also adjusted the brightness a little bit more. Cancer 0.5. Let me close this.
Now, okay for this, I just crank to the normal map. Basically, it just crank to the normal map to make it a bit more obvious to see,
let me drag it out. Okay, so you see here now, so if I turn down
the normal intense, let's I say this to
the fault of one, can see I guess flat in there, so kind of increase that. I was in a value of six,
but we can use seven also to bring that
detail back out. I'll save this. Close this. And that thing I also
did was to adjust the brightness for
some of the material. So I select the face marks. I go into the
texture map itself. Open the texture map. Scroll down the brightness tune down the brightness to 0.4. Let me show you guys why I did that because you pull this out. Okay. Scroll down to where
we see the brightness. Let me get a distance to this. If I say this back to the
default value of one, you can see how
bright that looks. So I just vent in there and then soon this down
to the value of 0.4. Get more contrasting new
down even more, maybe 0.3. This kind of compie let's give you a moment
kind of compile because 0.3 was
maybe some too dark. I think we actually keep this, like, so yeah, this is fine. So. So that was just what I was kind of doing back and
forth. Pretty much that. Okay. So another
thing I did was to, another thing we need to do
now is to create a material for this glowing piece in here, this emeralds glowing
piece in here. So I will need to create a master material for that,
a new master material. But let me go into
the original first. I would like to grab Okay, I would like to
grab all of this. Let's see if I can
actually copy them, so I'm going to copy it. Okay, I'll close this. I'm going to create a
new master material to create material. So I'm going to name
this to Emerald. Am I spelled that
correctly. Emerald Stone. Let's remove the
spacing in there. Okay. I'll open
up that material. Can we paste what we copied in a fantastic weaken?
That is nice. I put this all the way here, so I'm just going to plug yes, I'm just going to plug
this to base color. Okay. That should be fine. Then this for the specular, plug this into the
specular. All right. Metallic, uplog this to
the metallic channel. Why not plug into the specular? Come on, get in there, okay? All right. I'll plug this
into roughness. All right. Then this should go
into nor mouse lots. I'll save this. All right. Then we
also need to kind of bring in it's
called emeralds, let's go to the texture,
type in emerald. I think this should be it. I need to bring in the
emissive material. I'm not sure. Do you need
the pasity for this? Let's see. Let's drop the emissive material
in here first. So it is a color map, so that's going to plug RGB to the color channel.
Oh, yes, Ss. Let us create a let's create multiplier node in here. Do you have
a multiply? Yes. We have a multiplier
node in here. I'm going to copy this CtV. I put this in front. Okay. What would you say algBho
AlgeB should go into the a lot and then we plug
this into emissive color. All right. A, that should be fine. We can also increase intensity, I need to kind of rename this. This should be emissive
Let me see intensity. I'll leave that as it is. Let's select this again. Okay. Let's see what
we have in here. I don't think I need to create an opacity channel for this. I don't think I would need to. Maybe we can turn
on double sided. Probably we turn
on double sided. Let's see. Which what
did you create in there? Okay. But we might not even
need we might not even need the opacity channel for it.
Might not even need it. But if we turn on marks, we should be able to see the
opacity marks in there now, and we should be able to
plug that material in. So let's see if we can create
a bit more space in here. Let's create some space in here. Let's create Let
me mix some space. Okay. Select this food. Come on. Let that out. Pull this out some more, select all of this, pull
this out some more. Okay? I'm going to kind
of save this. All right. So I would also I also
need to do something. I need to kind of visualize
the material itself in here. So let's go into
the static meshes, select it, and then let's
make sure it's visible in here so we can actually see
what we're working with. So it's not yet
applied in there, so we need to let
me pull this down. Okay, UE material is selected. Let's make sure it's applied in there should be able
to see it in here now. So let's get this bigger again. Let's get in close. Okay. Then we need to plog o
pasitive marks in there. So we would go to our textures. I believe this is it, so I'm going to drag
and drop this in here. It's a black and white texture, so we should be able to just
log the R channel in there. Let's see, it's
kind of loading up. Let's give you a
moment to kind of calculator and then load up. Okay. Let's see. Let's play with the intensity
of the emissive material. We should be able to adjust
the intensity for that. We crank this up some
more concealed glues. Okay. Here, that's fine. Then we'll save this. I'm going to create a material
instance out of this. I'll create a material
instance to be able to adjust the values properly. So I'm saving this now
let's see what we get. All right. Let me just save this
again. Save quickly now. So I'll close this.
Bring this back out. Okay. Let this out. Say it's already glued
in India already. It's glow in India already. So I do, let's go back in here. I would do Let's make a
material instance out of this. Okay? I think I'm going to
rename the original material. I'm going to put
master in front. Come on. I put master in front. Okay. I'll select the
material instance. So the material instance is what is going to
be applied to it. So let me select it in there. I selected now. The material
instance should be applied. So I'll go into the
material instance. Come on. This is the master
material. Am I doing, I'm selecting ongon
keep selecting ngton so this is
Material instance. I'm supposed to send
the material instance inside there now,
so that's fine. I'll save a document, click out, select it again. Let's get in there. Okay. So I'm going to let's
get close out to it. Let's see what we can
make out of this. Et's turn all of this on. Okay? Oh, yeah, we did not convert your pasity channel
to Let me see this. We did not convert your parity
channel to a parameter, so we need to go back
to the master material and convert it into a parameter. Same with the same with
the emissive material, so convert into a parameter, emissive I Okay. Yes. Here, also, let's convert
this into a parameter. Let's convert to
parameter as well. Should be opacity. All right. That should be fine. I'll save this. Then you should
automatically update on. Should automatically update
on the instance now. Yeah, we have it in the opacity. Let's get in close. Okay, you don't have the
opacity now, should be get. Is this even working?
Seems rather odd. This is supposed to update. There's no updates
in as you should. Select it again. I'll send it over. Let's click out. Let's
go into it again. Get close. He's not really giving
us the precise preview that we actually need
in there, though. For this intense just
said this back to one. I'll save this. Let me close this out, select it and then pop it out. Okay, the opacity is kind of does not give me
that desired result, so I might need to go in there. If I turn that off, let's make this smaller. This is comm is way
too small. Okay. I don't really see a
major difference in here. I don't see any
major difference in here. Let's go into it. Oh, yeah, I'm supposed to, I'm supposed to turn this off, yes. This is supposed
to be turned off. See the issue I was having that's supposed
to be turned off. I'll save this. Supposed to get an
update in here. Why are we not getting
the updates in here? That is rather strange. I think it's beginning Okay, yes, it has been disabled in years. No longer
applied in there. For some reason it's no
longer applied in there. I believe it is still I think it's still trying
to kind of update. Oh, okay, there's some error in there now, so that's
fine. That's fine. That's fine. That's fine. You can fix that. Can fix that. All we need to do is
to let's delete it. Then we need to
bring it in again. So I'm just going
to drag that in again and then just convert
this into a parameter. Because I remember we faced
that issue also, too, so we just need to remove it
and then bring it back in. Log this back into
the opacity max. I'll save should we should be getting something
in here knife note. I'm just going to figure out what is actually wrong with it. Might just be the
same issue as before. Okay, so it has been updated. Yeah, it's working properly now, so I'll save this one more time. Close this CSC is
working properly now. And having that weird
issue we're having before. So we're still on the instance. Let's go to the instance
material instance. And then I think for the, I need to make it a
bit more reflexive. Let's make this a
bit more reflective. If I should turn this off now, I don't see any
major difference. I'm not seeing any major
difference in here though. I don't see any
major difference in No major difference
in here as well. No intense. That we to wash. Metallic property. Not napping in there. Let's just make this a bit more shiny, so add a bit more
shininess to it. I'll save this. Let's go into the
opatie texture itself. Let's see what we
can do in here. Let's say I said this 0.2. Okay, let's see the
result that gives us. Oh, that completely
hides our mesh. Okay, let's do a value
of brightness of two. Okay. I don't see any major
difference in there, though. I want to go to see that mode because we're going to add
the glue effect to it, so it's not going
to make any major, major difference in there, so
I can just save this again. Okay? So let's send
this back into its original position. Alright. Just a matter of
adding glow to it. So what I'm going
to do next would be let's add a post
process volume to it. I'll save my documents. So I'll go to DplusSign. I believe under volume,
post process volume. I'll add that in there
and I'm going to search for Obound.
So turn it on. So it's going to affect
our entire screen. Then making sure I
select CST selected. Let's go to exposure. Let's type in exposure
and to its own. Changes to Let's
do manual instead. I think all the exposure, basic should be fine.
Let's scroll down. I think we need
more space in here. There's a lot you can
do in here, though, but let's just still of
art a camera in here also. So let's see what
we can do here. Let's type in Bloom, I believe. So turn that on. Convoltion I don't see much I don't see much of that
happening in here, though, does it need natural camera for us
to actually see this? Or am I missing
something in here? Okay, for the sake of just
following the steps properly, I'm going to, let's
see exposure. Do you have Whoa,
that's extreme. Let's say it's about to
default. It's about to default. No standard. Oh, that's for the bloom. Yeah, the bloom bloom
is actually working. Actually working
actually working. So maybe what I need to
adjust is the exposure. Let's adjust the exposure. Little this is way too much. That's way too much as well. I think I'm just going to
take this down some more. Okay, around there
should be fine. So let's add let's
add in a camera. So I'll go into cinematic
scene came actor Okay. Then we want our
camera to be looking at this through our main
through our perspective view. So I'm going to go
in there, I believe. Okay. Yeah, I think move
camera to object. No, that's the wrong one. That's the wrong one. Yes, that's the right one. So we can go into we can go into a camera
view in here also too. Let's go into a camera view. Let's set this up. So we're still going to
go back and then texture the skin in the face in there. But for now, let's just
set something up in here. Okay? So, so Okay. So I think depth of field. I think Cton on this Let
me mix some space in here. A particular. This
is the right one. I need to clear
what was in here, so we go over to let's see Let's set a camera. Let's set a camera in here first. Which one should we use? Let's try this get in close. Let's do 50 for the
focal length. Okay. Then I need to zit camera focus. Which one? Which one are
we supposed to? Let's see. Yeah, yes, under focal, yes, under focus settings. On a focus seting I'm going to change this from
manual to tracking. Yes, then opening up
the tracking settings. I pick let's pick deface. Okay, so it's going to blow out anything that's at
the back of this, which is precisely what we want. So if you kind of do
debugging for this, we do our debugging. Debug actually working in here. We curtly see it because oh, yes, finally, finally, so. So this is pretty much where the blow kind of find the line. So yes, something like. So I think it's kind
of fine where it is. Yeah, I think it's fine
where to select turn it off. I was looking at this through our camera lens, though. Okay? So if you go back
to post processing, try to kind of set this up
before doing the final. So go back to post processing. Let's do's post processing. Let let me make some
more space in here. Here, post processing. Let me close this group, close this as well. Close this. Yeah, chromatic aberration. I think we can lessen
a little bit of that. Can't properly see how much
of this I'm adding, though. But let's do a value of
this should be fine. Let's add some grain
to it as well. Thin grain. We just need just a
tiny amount to be fine. Not too much, though,
something like that should be fine. Okay? Then let's adjust the mid tone. Under colour grading.
You have contras, et ton of control, let's
ton on grammar gain. Okay. Saturation as well.
Let's open this up. Cin is, why are we not seen something in
here? Okay, as now? So we have the option to kind of adjust the mid
tone however we want. Make it a little bit
more interesting. Or the contrast, we
can go in there. We can also adjust
the value in here, drag this all the way you can see how we get more contrast in, can see how we get
less contrast. So let's just do a little bit of an amount in there
should be fine. Okay. Now, the lights in here, I think I might need to make
this a bit more intense. That's blown out.
That's too much. I think we need to find
a good balance for it. I think so around
there should be fine. Let's go back to
post process volume, type in mid tone. And let's continue on with
what we have in under grammar, let's but just considerin of
brightening the entire up. We don't want that don't
want too much of that. Okay. I think we're in a good place.
I'm going to save this. So the next thing we
need to work on would be see don't see enough
glowing here, though. Okay, let's just do
the bloom again. Let's see if we can crank
this up a bit more. Let's do the
convolution instead. I really seen any
strong major difference in here though. We
try the standard. Definitely get something
from the standard. Convolution again,
intensity, let's see. I think the best option
is just to do this inside of Photoshop instead. But anyways, we get something
interesting now, okay? So I'm going to E G on
the keyboard to add everything else we get
something like so. So in the next lesson, I
was going to go in and then try and work on the
face skin texture. We now we have something
good enough to work with if I should o. But just zooming
it back into much. We don't want that. Come on, we're having this
issue again, so select one of these and
then just frame into it. Oh, I see we need to also
still work on the blow. So let's go to our camera. Let's let me close
this out. Okay, focus. Let's do manual instead. Why is the buggy Why is the
buggy not working in here? A Okay. Back out here, like so. Yeah, I think I remember.
I think I know why. Okay. It's not clear. I think on the settings in here, it's actually set to high. Set to high. Yes. Everything
actually set quite properly. Probably get more resolution
when we render this out. But anyway, we get this in here. So in the next lesson,
we're going to go in and then work on
this in text show. I'll see you guys in next
lesson. Bye for now.
131. 128 Metahuman Eye In Maya: Okay, we come by, guys. So I want to carry on with this. Yeah, I'm sure you're
kind of surprised why we are back in
Maya, but that's fine. I want to explain why
we are back in Maya. The reason why we're
back in Maya is because I would like to use the meta human high
for our character. So just to kind of
speed up the process. So I would need to go back
in here and then let's make this would
minuses isolate that. So it going to bring in
a new eye into our mesh, and another eye is going
to be a meta human eo. I already created a meta human we can actually use using here. So I'm going to
show you guys how to extract the eye out of this. So if you go over
to the wire frame, you can see we have
an eyeball in here. Have an eyeball
here so we need to steal that eyeball
to actually use. And the way to do that
would be to go into it. So I think we can use
the right eye and then we can duplicate
that across. And then in orange, we're going to use the
meta human Sader for it, the eye shader for it, and
then just copy that over since we're going to be using the
eye from a meta human mesh which so the UV is in there. This is one of the
major reasons why we're using it because
it tells UV is in there that is specific to the meta human eyeder or master material or
material instance. Yeah, that aside, so I'm
going to select a D already, so I'm going to do Control. I'm going to provide the I for you guys to
actually use too. So I'm just kind of showing
you guys the process. So Control D, make a duplicate Shift P to send
that out of the group. Okay. Then I'm going to just just select it center.
Now, I can't move it out. I can't move this out. Why? Because let me go
back to shaded. I can't move this out
because it's kind of locked. It's locked. The
parameters are locked. So go to your channel
box and lay ditto. I'm going to select
all of this option, click in Who unlock selected. Alright. So now I should be able to
quite fly move this out now. Okay? So let me undo that. I'll pretty more just
let's just export this out Apot selection. I think I'm going to export
it to's put this in here. Okay, so I'm going to
export this in here. Let me create the folder so
I know where it actually is. Let's just let's name this
folder to meta human I. Let's use our caps for this. Meta human I. All right, so I'll get in there. I'm going to just
copy the five parts. I paste that in there. Okay. Then, yes, can I spot
this out as FBX. Let's do meta human I, right? Yeah, that should
be fine. So let's go back into this project. And here I would okay, do we have let me make everything
invisible again, okay? I'm going to rename this
let's name this to pose. All right. I'll temporarily
hide those for now. Okay. Then I'm going to
hide this as well. I'll hide the Iris as well. Alright. Then I'm going
to bring the e in here. So let's drag and drop Lesa
can drop our I model in here, so we have it in here now. Let's figure out where that is. It's all the way down here, so we just need to
get it in place. Let's figure out whether
I is fire frame as well. So I'm not going to
pull this in here. Okay. Like so. Pull it forward some more, from our perspective,
you need to figure out where properly where
it needs to sit. Okay. Now, if we're getting this,
we just need to go to our camera perspective camera, and then we can just
adjust this vals, put set this to five
near clip to five. Okay. I think I can pull this
forward a bit more. Yeah, it's actually
covering it quite properly. Yeah, I think this
should work just fine. I should work just fine. This scale, I think is fine. You can always adjust
the parameters properly inside of Oil engine. So I'm not going to mirror
this to the opposite side. I'm just going to make
another duplicate of it. So let's let's just duplicate this and pull this, like so. I see. Yeah, we need to would need to, okay. I just need to get this
properly where it needs to be. So at this point, I'm pretty
much going to kind of eyeball this, per see. I'll need to kind of rotate
this a bit more this way. No, that's a bit too much.
This way should be fine. Put this in some more. Per see I'm thinking maybe I should even scale
this out a little bit more. I hide I need to also
hide this minuscule so we can properly kind of get
proper shaping in there. Let's see. Just a matter of
getting these two seats. Okay, I just needed to
move this way. All right. Here, we need to kind of
scale this some more. Let's see. Let's
scale these two. I'll put this in a group. I can scale them as
one single piece. Scale out some more. Sellt them as individual piece. Come in close. Let's
see where we get. Okay. Here, this should
be This should be fine. Well, let's see. I think
this should be fine. I'm going to select
select the group itself and then
push them back in, like, so just a little bits. Let's see what we have. I think
this should be just fine. Okay. Yeah, I think we can obviously work with this.
I'll do a quick save. Now, all I need to do now
is just to export this out, export these out
and then bring them into real engine and then fix
them where they need to be. So export selection. Let's paste them back in. So I'm just going to use name
this to new meta I Alright. That should be fine. Okay. Here that work just fine. So another another thing I'm supposed to
mention would be, where is this case in here. So I'm using the Meta human
project file from fabs. So you just search for
Meta human and then you should find the project file. Were you would have
let me go back. Go back a bit more. Meta human. Where in the contents, you should have you should
have meta human in there. You have the adder common
toro sshpnu adder. Then under in the
face, yes, no, not. Yes, here's the
face. Open this up. So yes, in the face, we're
going to use this material. So you see we have metal
or material instance, which is the MI, then
I refractive instance, right eye, and then
we have the left eye. So we're going to be using the right eye because if the right eye we
kind of copy it. So if I should go back
to the other document, will you copy the right eye? So that's the one we're
going to be using. So now and then we're going to just use the same
material in there. So while we are here, I think I can just copy this material. I'm going to copy this
material, so I'll copy this. Let's go to let me
create a new folder. Let's open this up. I need to find my own real engine folder
also to far project, so it should be in here. So whatever you save this into, so I can just open this up
and go to the contents. So that content, I'm
going to go to materials. This is where we have
all our materials. So I'm going to paste the e material in here or maybe let's
create a new folder. A new folder named this to meta human eye. I open that up. I'll paste the material in here, I think, I believe or you
should be able to load this up. Aside that also, too, we need to go in less paste Oh, okay, I need to come on. So yes, into the meta human I. I'll copy the new meta I. I'll copy those. I'll just copy it
and I'll go in. Let's go into, this is
the folder in here. I'm going to paste this in here. All right. So once we kind
of open up on engine, it's going to load
up this and then I'm going to just drag and drop
it where it needs to be. Okay, so I would so I'm
going to open up in engine, so I'll see you guys in the
next lesson. Bye for now.
132. 128 Metahuman Eye Placement In Unreal Engine: Okay. Welcome back, guys, so
let's open up a engine file. So let me open it up, and I'm going to come back
when this is done. Okay, so you're noticing
here now seeing that chen source content
file has been detected. Would you like to import
or click on imports. Okay. So I believe this is
the 14 pipeline. All right. Let's just go
through this. Okay. I think I would like
to import them as a Let's do let's see
what we get in import materials.
Yeah, that's fine. Import textures, tone that off. Yeah, we need to turn on smooth. Let's normal in here, typing normal in here. So we compute normal.
Let's turn that off. Don't want to compute normal. We want to kind of preserve the normal that comes with it. So, yes, that should be
should be just fine. I'm going to click on Imports. Okay. So let's open
our content drawer. I believe where we put
this under under material. We have the static mesh. I think I should have
named this properly. We should have named this properly. Let's
rename this in here. So let's rename this. What should we rename
this to I right? No. On that score in the Let's say this let's rename
this to I left. Maybe we should have
imported them as a combined mesh
instead. Let's see. But it shouldn't be too
much of an issue, though. Con always reset put
this way it needs to be. So it shouldn't be too much
of an issue regardless. So, that's fine. Let's do let's see. This material, is
going to be in there? I can't really see
it in, though. Am I missing something? Okay, I think I know
what the issue is. We need a little bit more just to get this
to work correctly. Most especially the textures and the master material as well, so we'll circle back to that. Let's just place the eye
where it needs to be first. Okay. Yeah, this is
looking good. All right. So we just go to place our
eye in where it needs to be. So we need to hide a few things. We need to select
and hide this marks. Okay. Also to let's see where
is that setting in here. It in a note here. So I want to just my
perspective view in camera go under click on this
icon down here drop down, and then let's change
this field of you to let's do 50 instead. That will give us
better viewing angle on a perspective view. This is way better, so. Now I'm going to go
in and then hide select this outer
eye, I'll hide out. I'll also hide this minus I
also hide the high risk too. Okay? So let's select these two, then drag and drop them
into our sin Okay. Let's find where they are. They're both offset in really weird way.
They're both offsetted. I'm going to delete this
or is this as well, out for Okay, I need to
delete this as well. I think I might need to go
back in and export them out again because they both
come with some ODs in this. I need to kind of open those ODs and then
just one LOD in here. So what is the issue right now? So little by type history again. Little by type history, Okay, I would
duplicate this group. How duplicate this group. Hi ds. I'm going to combine, how to combine Why do we have? That's a bit weird. Can't we just combine these
two Combine. Oh, my bad. I clicked on the wrong thing, so supposed to use
combine instead, so I'm going to use this
is combine instead. So yes, that's the right one, so that's it bit type three. I'm going to rename this
two Meta I All right. Export this out again and just replace what
was there before. New meta, I'm just
going to replace that. Yes. I'm going to delete these
two. Don't need them anymore. Yes. I'm just going to drag
and drop those new I in here. Okay, new meta I. This is the one here.
I'm just going to drag and drop this into our sin. Let me drag and
drop this in here. Okay, let's type in normal. I'll turn this off. Does
it come with textures? He's just import this in, so that's in now, drag and put this in here. Let's find where they are. Oh, the way up we
all the way up here. So let's option click on it. Let's go over to P votes
Center selection. Come on. I need to be on the modeling
to actually make this work. So let's go over to
selection modeling. Don't know why Nengin takes extra step just to get
this input in right. Anyways, go to transform. Click on Edit P vote and
click on Center, okay? And then you should be good. So Condos that should be fine. I believe we can go to selection now and then we should come on. Et's do this again. So I
did P votes Center. Okay? Where is this again? Right, click on this
again and go to form. Then I should be able to move
now where it needs to be. Come on. Here, come this
now. So let's get this. To of placing it where it needs to be. Okay. Et me off screen instead. Here, I think it is
where it needs to be now. Let me click out. Here's where it needs to be.
Let's go back to selection. Okay. So now we have a Pivot now where it
also needs to be. So if I should, not that I think it needs
to be Let me click out. We pretty much have that
right around there. Okay. Go to a content drawer. I believe this is
the eye shader. We can just go in and then pick the color a
little bit more. I would no, not here. Not here. Here. Let's double click
on the mesh itself. We don't have any material
applied to it yet. We don't have any significant
material applied to it yet. Tell the default that
actually came with it. Yeah, default that actually
came with Ts is this. So let's do let's see
what we have in here. Now, this is not supposed
to be a parent material. This is just de funk
material that came with it. So I'm going to I need
to create a default. We can just use those previous
material instance we have. So we can just apply materials. Let's go over to UEs I can just make a duplicate
of this master material. Let's do material instance. Let's just do I basic. I basic. Then let's make sure it's
applied to the I itself, or let's apply this in there. Then just go into it and
then just click t just to. Yeah, I think I
think working with the default should be
just fine for now, but let me just leave this RCA please more like a
police order kind of. Let's leave this RC police order circle back to that for later. So go back to that for later. What I need to do is to
apply a skin seld skin shed, like a subsurface shed.
This is the head itself. So we need to apply
something in there. So for this, we need
to kind of create, I think we can duplicate
the master material, then create something out of it. So I'll go over to
let me open this up. According to our
master material, let's make a I'm not make any material instance
so I'm just going to drag and pull this here. We do copy here instead. Now, where is our copy? Let's find that copy. Yeah, it is down here. So
I'm going to name this. Let's rename this name. Let's name this to skin. Okay. Open that up. Let's make sure. Let's also
make sure it's actually applied applied to it. So let's apply this in there. Go into the skin. All right. We also need to do a material
instance instead for it. So let's make sure we go
over to Let's sell Select. Is selected already
shading model. We want to use subsurface. Let's subsurface profile. Okay. Don't really have
any profile in here. Let's just create a
new one for ourself. Let's just put this
in the UE material. New subsurface profile. I'll just save this in here. Okay. Yeah, that should
be fine. All right. So for the opacity channel, we need something for
the opacity channel, so I'm going to eat S
to create a parameter. Let's just name this
to SSS intensity. All right. I'm just going to plug this
into the opacity override. I'll save this texture. Okay. Then I need to
create an instance for the texture so we
can actually bring in the correct materials in
there. Okay, that's fine. So I'm going to close this. I'll make this a
material instance I let's do great
material instance. That should be fine. Select it. Then let's make sure it
is applied in there. Then let's go to the
material instance itself. Then let's go to textures. How does type in C. Okay, I need to turn it on. Turn this on here as well. Okay. Then let's apply. Let's bring in the material
that needs to be in there. So let's drag this in there. Not sure why it's
still taking up. Okay. Updating now. Roughness plug this
roughness channel. I'll save this. Okay.
133. 129 Skin Shading In Unreal Engine: Okay, so carry on. Checking. This feels rather odd. This one feels rather odd. I think I'm just going to use I think I might think should
I didn't bring that in. So yeah, I think we
circle back to this or we can just use ZE textures. We can just use just use the same press texture
in there, select it. Yeah, that should be fine. Yes, that should be fine. Okay. So now, back
to the head itself. So I kind of applied
a material in there, but we need some subsurface going on in there and also
the material looks a bit old. So let's make the necessary
corrections in there. I'm going to open
this up. I think I can let's do let me
close this for now. He's selected. Is selected. So I'll go to Static mesh. Let's type in pan. I would select it. The reason why I'm doing this is
because once I go in here, I can see better preview. I'm just going to
select it in here. I can see bet review of
the texture itself. Okay. So maybe I can even
darken it also too. Why? Because in our
view pots in here, it looks way too bright. Let me go into the
texture itself and then reduce the brightness. I'm I'm going there. I'm going to type in brightness. Let's take down the
brightness for it. Let's see where we get. Yeah, something like
this looks way better. I'm going to see how
close this for now. So let's go back
into the texts into the parameters for this
material instance. Let's getting close. Like so. Then I'm going to
turn on the SSS intensity. Remember, we turn on
the SSS intensity for scar parameter
for the operty. So let's try value of one. Let's say, Oh, wow, that is too much SSS. So I'm going to put
seductive value of 0.2. That is even too much. Let's try 0.01. Okay. Is looking
slightly better. I feel slightly better. Maybe do 0.08 instead. Okay. You do 0.00 0.8 rather, can see is way too much.
I don't want that much. I'm trying to find a
value for this 0.1. 0.1 seems a good one. Let's just this again. No, that's way too much.
Let's put two at the end. Let's put one at the end. It doesn't seem to
do much actually. I think 0.1 should be fine. Then if you go over to material, see over on the subas
profile in there, we can go into it and we can make some more
corrections in here as well. We have some default
roughness, O, and let's suggest this. Let's see if this makes
any major difference. So if I don't see any
major difference in there, let me go back. Let me save this as well. Okay. What do you need? I increase this. Let's
reset this back to default. I think so if I kind of
like what we have in here, we can go over to
let's turn this on. Let's turn all of
this on actually. Okay, specular intensity
without, this will do something. Let's find a good
value for this. Let's make him slightly sweaty but not too
sweaty at the same time. So let's find a
distance in here. This is the first time
that we actually have this secular tensity
actually working in here. So I think we have I think
this looks decent enough. We don't need to go to extreme. Maybe the intensity for
this SSS, let's do 0.2. 0.2 seems way too much. I think 0.1. Let's do
0.15 still too much. 0.11. I think anything that has any number at the
end is not doing so much. Let's set it to two. Let's go to let's go back to
the profile itself. Let's adjust this. Okay. I think, and I believe
I can actually see this looks at least this
looks slightly better. Now this is way too extreme. Let's find a good
value for this. Let's do a value of 0.2. Now, zero point is not
giving me desired results. 0.2, 0.2. Basically kind of eyeballing this just to figure out
what actually works. I think this, this might
just work just fine. Here, this should be
fine. It should be fine. So I'll save this. Okay. And then the specular
for this is fine. I get kind of catching good
highlights in here as well. Let me see if I can adjust
the contrast roughness. Let's see what that gives us. It makes the skin
even way more oily. Makes the skin more oily
and we don't want that. So go even lower amount
to get this rough. Let's find a good
amount for this, not too oily, not too rough with good
specular highlights. Yeah, this is perfect. This work just fine. So I'll save this. It just a matter of
kind of eyeballing it until you get something
decent enough to work with. And I think they should
be roughly there. Basically, just checking
the highlight around here. I think I can tune down this
secular down a third more. Like, so we get good
eye lights in here now. Yeah, that's fine.
I'll save this. I'll close this, save this
as well, I'll close this. Yeah, this can work
for our skin texture. It should be just fine
for our skin texture. Let's passing. Awesome. So the next we need
to work on would be the eye. So you should add in this
I need to ding the shade as.The material instance alone is going to come
with what is needed. Didn't work out
work out that way. Okay. Do we have? Yeah, yes. I didn't really did not
really work out that way. So I need to kind of bring probably the entire
content in here, so it should kind of load up and then I believe I not tried
this tries before, though. I believe you kind
of take up all the textures needed for it. So for this, I think
it's too bright, way too bright, so I will
need to adjust that. So all I need to do is just to adjust the
brightness for it. So I'll go into the texture go to the texture and
adjust the brightness. Let's use the value of 0.5. Okay, now that seems okay. I think this way better.
So let's close close this. Then we need to bring
back the head marks, yes. We need to still
need to work on. So the head mark going
to hide this for now. So I'll save this again. So next we need to the
work on the I next. I'll see you guys next
lesson, buy for now.
134. 130 Enhancing Lights In Unreal Engine: Welcome back guys.
So I think for the studio lighting
and for the materials, there are a few things
you need to do. You need to kind of
work on the eye. So we're unable to kind
of import or migrate the meta human eye in here. So kind of checked online, made some research and I figured
out that the only way to kind of get your meta human
eye working in your skin on your level is to either download it
from the fabs market or the other way
I figured out is to create a meta human
project, just a basic method. I also is a preset
in the preset body. So that's going to compile and then create all
the textures we need, and then we're going to
use the material instance, and that should definitely work. Besides that, you might notice some gittering on this region. I don't know if you guys
can notice it, though. So to fix that, I will just go to post processing in here. My post processing,
I'll type in lumen. Okay, so I'm going to be
using this set s in here. So we have the Let's see Lumen global's turn on now we can't use retracing
here because I'm using a GTX. I'm using a GTX
graphics card in here, so retracing might not work
as accurately as it should. So cache for heating,
re heat lights. This metal gives the best
GI reflection performance, best quality with
limited will be limited by our surface cache
represents given sin, okay? Let's say we select that. Let's see if that actually
improves light in any way. I don't really see
any major difference in Yd, but let me
just leave it on. So I'm going to turn on the
lumen sin lighting quality. I'll set this to let's
say this to two. Okay. And I would also
set the final gada, I'll set that to
two as well. Okay. Then under the advanced tab, the advanced tab, I believe final gada
lighting update speed. Final gada lighting update
speed, that should be the one, sets this to 0.5 Okay, I think that should actually help our seeing a
whole lot better. Yeah, the itering kind
of stopped a lit, so I don't know if you
guys can see that, but just plug set this up,
and then it should be fine. Okay? I'm going to save my documents or EG to hide
any highlights in there. I think we should be
fine at this point. Okay, another thing I
would like to do would be to let me go in. I'll select. Yeah, yeah, I remember now. I wanted to kind of get
some good ei light at the back of our mesh. I want to get some good
highlight in there. So I'm going to
select this light, and I would like to crank
up the intensity for it. So let's come on this angle. If we crank up the intensity,
let's see what we get. Yeah, and I'm not casting
a shadow with it. I don't want any weird
shadow happening in there, so I'm not casting
any shadow with it, but we need some more, it's just all over the place. So I'm going to, let's see,
the Attinuation radius. I will adjust that. So I pretty much
really want it to kind of be hitting
the back to be like, it's going to be like
rim lights on the model. Let's find a good angle for it. Let's I don't increase the attenuation radius that's the wrong one too much though, because I don't want to kind
of bounce off this floor. So I'm going to get it
this way. I pull it back. I just want this
to kind of catch good highlights in at the
back just like a rim light. Okay? A little bit for a
little bit more. All right. We should be catching should be catching some
highlights in there. All right. So I'm
going to keep this. I would also try using a
rectangular light also in there. I'll duplicate the
rectangular light and get that at
the back as well. So hide let me select
this hide this for now. I'll just go in and then
create a rec light. Okay? Let's see which direction
is kind of shining on. So let's go to the back and
then get a closer look at it. Yeah, this gives better, this is way better, actually. This gives better eyelight. That's why I wanted to
kind of try this on. Now, what we have in here, I think it should
be the lens flare. Under the post processing. Let's see who's processing. Should be some lens
play happening in here. We take this down, yes, that
should fix that awesome. So now I can see
how we kind of get quite interesting looking
highlights at the back. So it gives a more natural more natural and
interesting look to it. So we have good
highlights in there, and then the bloom is also
helping it quite a lot. So thinking of this
thinking of this nighting, what you can actually do is to put an ad rectangular lights in front in here just to make this some more
preferable highlights. Okay, so at this point, I'm a playing with our light just to figure out
what would work. And this so far is definitely
going to work for me. The one now I like to do, though would be let me close this. Make sure the light
is selected again. Let me play this out. So I don't want this I want it to cast
shadows? Let's see. Let's see. Let's turn off
the shadows for this. Okay. Let's see. I think I actually
want this to cast shadow, but I want that
shadow to be soft. So make the shadow soft
with going to use what. No create some
softened out shadows. So sauce bits should soften up those shadows for us.
All right, fantastic. So This kind of feel
light we have in here, these field lights,
we turn that off, we get something like so. Let's turn it off for now. So at this point, I'm
just pretty much trying to trying to improve our light. I think I'll keep
this point light too. Then I'm going to
create and Let's create an nodule rectangular
lights rec lights. So this one should
should be in front. I'm going to rotate this
because this one gives us this rectangular light
gives us the undo that. This rectangular light gives us the best metallic highlights
we actually need in our sin. Okay? So I'm going to
pull this back some more. I'll rotate it this way. Let's see let's see what
we're getting in there. It makes most of our shiny
objects quite shiny, which actually gives
a good look to it, creating some sharper
eyelight in there as well, making our renders look
way more interesting. It's way too shiny,
actually, but that's fine. I think we can actually
soften the dark shine by introducing back
our point lights. The point light, kind of
enable the Nib los kind of gets some soft out
edge to this shininess. So you see. Let's see this again.
Let's compare. I'm just trying to find the
right angle for this, though. If I ski this, okay, that won't do that
won't do too much. I would need to let's say we
bring this down some more. Okay? I think what we actually need
is some more brightness. I'm going to use a value of ten. Let's see. Bring some more
brightness to our scene Okay, now we get some
more brightness in here. But we're losing some
details in here. This we need some more
details in there as well. So I'll go back and then I think I need to
select these two. Let's bring them into
our studio lights. Okay. Because there's more
or less like end no end no end to figuring out
which butler light works best. So we're just going to keep adjusting and then
tweaking this to figure out which set of
lighting works best for this. That's not supposed
to be in there. Let's just put it inside side the folder itself.
Yeah, that's fine. But now we're getting quite sharp eyelight, which is cool, boys making a mold feel a bit more or less like
painted kind of. Which gives a good
interesting look, actually. We have an interesting
look to this. So let's go back and then let's
see which one was eating. Let's turn on the
first point light. You can see how turning
on this first point light now kind of soften out those sharp highlights kind of introduces some more
brightness to our scene. You can see giving it a more interesting we have a more
interesting look to it. Yeah, this makes it more. This makes everything
way more interesting. You can see good interesting
lights into this. Yes. Awesome. We have some good
rim light as well. Let's EG on a keyboard
to D those other lights. Okay, we are good. We are good sorting out shadows. We also have good interesting
highlights to this. Maybe the highlighting
is way too much. Let's find out where or
rather what we can adjust. You know, this is the one. You can see the
difference in there. You can see how this
makes it feel a bit more. Gives that kind of
gothic feeling to it, and it kind of sorting out
those sharp highlights. We up here is way too bright, so let's figure out
what we can adjust. Okay. Yeah, this is nice. Yeah, this is the rim light. Rim light seems fine. Yeah, so I think we go
into the red light and we can kind of reduce
the intensity of it. So let's reduce the
value of eight. Okay. Click out. Bring this back on. I need a good value that kind of
balances everything out. Let's say this to five. Let's get close. Let's go in let's say
said this to seven. That kind of lifts
everything up some more. But it's kind of catching
too much I light up here. So I think what I'm going to
do would be to hit you on the keyboard and then move it move it forward
a little bit more. Okay. Let's see what we have
in attenuation radius. Let me shrink my attenuation
radio a little bit more. Okay, let's get close. Let's see, off and on, off and on. Okay? I need to move this
down some more. It's not affecting. I
think the major thing is our attination radio.
Let's bring that down. If we bring this closer, yes. Yes. Now we have more control. I'll pull this down. I
don't want it to affect. I think I need to reduce
the atinuation radio some more bring it closer. Et's see where we get. I want that eyelight. I want this eyelight but I don't
want it to be too strong. I don't want it to be
too strong over here. That's pretty much what
I'm trying to visibly control in here rotates. Let's increase the
brightnesses said this to ten. So at this point, let me just I think I'm
not going to go off and then find a
good angle for it and then come back and
then show you guys. Okay, so I find a
good setup for this. So for the rec lights, the intensities are seven, then atmation radius at 3:10. Then I figure what was
actually wrong with the lights with having
my light way too bright at the top is my
rectangular lights 03. You see how you make
nviting too bright. So I'll go in there and then pretty much reduce
the brightness for it. So let's do a value of four. Let's do a value of two. Oh, that's the wrong one.
I mean the wrong one. So let's say this back to seven. Let the wrong light. So this is the light
we needed to adjust. So I'll say these two, three. Okay, the actinuation radios, I'll take it down a bit. I don't want too much.
Alright. I think I think this feels
properly lit now. Also, I'm kind of
looking at the eye, and I feel like I think we
can actually keep this eye. I think we can actually
keep this eye. It looks weird, though, but it gives it an interesting does
an interesting look to it. It's an interesting look to it. Maybe maybe we can actually use a more gold
material in there, more goldish tins material
in there should be fine. We don't necessarily need to
get actual eyes in there. Not necessarily. We need
to make this character look a little bit
mystical in a way. Okay. Yeah, maybe what I can actually
do is to go into the eye. Let's go into the eye and I select this minuscus in here, I'm going to hide those. I see another eye behind that, so I'm going to
hide that as well. Okay? Yeah, maybe we can just
make it gold colored. We can make it gold colo. So I think we can quite
easily do that by bringing in our starter contents into
this into our project. So I'm not going to copy that. I'm copying our starter
content into this project. So I'll go over to my directory. I believe I have let's
see, I believe let me. I believe I have
starter contents in here I can just
copy one of those. You have one in here. Okay, I found one, so I'm
going to just copy this. I'll do copy. Okay. Then I would go
over to contents, and I'll just paste this
in here, at our contents. We go into a content drawer, we have a starter contents, then in materials,
we should have, I want to kind of try, we
have glass also in here. I want to kind of try
try a few things. We also have metal, gold. Let's see. Okay. All right. Platform, basic floor. Okay, so let's try a
few things in here. I would go over to
I think where me select select this
is the new I. Yeah, I need to get this new
I into this folder. Why it's not popping
into that folder. Let me collapse this. Let me drag this into
this folder. Okay. Move to root. Ah, okay already assigned
to the root already. Anyway, that's fine. I'm
going to let's go in here. Let's start with let's start with this create some
master materials. I'm going to create
an instance for this. So let's create
material instance. Okay, and I'm just going
to drag and drop this. Let me drag and drop
this into meta human I. Let's move here. Okay. This is it in. So I'm going
to apply this to the eye. So let's apply this. Oh, it comes with the
checker pattern in there. Let's see if we can adjust this. Or is it coming I think
it's compiling the shader. It's kind of
compiling the shader, so let me see if this. Should be compiling the shader. I just want to basic
material in there. Okay, yeah, good. Now, can we change the colour
hope this won't make things too
complicated for us? Can we just quickly
change the color in here? Ah, this is just going to
create a Okay, yeah, we can. We can actually, so
we can actually. So not too much happening
in here actually. But we should be able to change can't we just change
the color in here? I found it family, family, so I was kind of looking looking at it
from the wrong place. So you're in here. So I don't
need to turn on the colour. I want to make this somewhat
of a dark material. Then roughness. I want to make
this quite kind of shiny. Okay, I'll save this. Let's see what we have. IG
on the keyboard. Let's see if that gives us
any interesting look to it. Okay. Let's see. I'm trying
to see if I can get something
interesting out of it. That's one aspect
to actually try. Let's try using gold material. Let's try using a
good material for it. So back to the starter
content materials. We have the good
master material. I'm going to create
a material instance. Okay. I'm going to drag that material instance
into the metahuman eye. Let's do movie instead. Let's get into the folder, select it, select the eye. Let's apply that on the
let's see where we get. Let's see. He's kind of
preparing the shaders. Let me give this a moment,
go to prepare the shaders. Okay, we get something
interesting. But I'd like to make this way kind of saturate a
little bit more so. Let's go into it, select it. Kind of give it a similar
colour to what we have in here. So we can go in the
double click on it. All right. Let's see. There's no actual
adjustments in here. I can't find any major
adjustments in here so far. So let me just open
the master material. They don't look like they were actually converted
to parameters. Yes, I figured we're not
converted to parameters, so we might need
to come in here. I'll need to pull this down, so I'll close this so we can
actually eyeball it in here. Then I'll go into the common. Oh, there's a texture in there. There's actually a
texture in there. Greats. So I'm going to
open up the texture. Then I just need to type
in brightness in here. Et's take down the brightness. That's probably with too
much. Let's save this. Let's see what that
gives. Oh, oh, we already have this
updates in in here. So, yes, that's fine. So yes, we have something
pretty mode like, so we should we should
more or less work. Yeah, this should
more or less work. Don't need to go to
extreme. So this is good news to feel a
little bit mystical. So yeah, awesome. This feels like it's in
your rights, please. Okay. Yeah, I'll save
this come back here. I think I will just
connect close. I shouldn't affect anything. I mean, received the
texture already, so yeah, that's fine. So yeah, moving on. Let's see. Looking at this now
I feel like maybe I should brighten this
up a little bit more. I think on that region,
we have a studio light in the Let's see which
0.3 to that off. Okay, let's see, let's find the light that's actually
in the select this. Okay, that seems fine. Okay. Yeah, I think this is the one. I'm just going to
bring this down some more kind of some in here. Yeah, that should be fine. EG
again so why do those icon. Okay, fantastic. So if you go into a sin cam, you'll be getting
something that looks way more interesting, like so. Alright. Here, this
is looking nice. I'll do a quick save. Here,
this will definitely work. We can definitely
work with this. Let's hide all of this. Okay? Now, let's do, I'll kind of set this back to
I'll set this to my camera. Now, let's do, like
a quick render of this, like a screenshot. So I'll go over too forgot to. This particular this particular one, I need to go in there. I think I would like to
do something in there. I like to crank up the emissive, Let's say we do like 100
let's see what that gives us. So let me put this around here. I don't see any major
difference in there, though. I just let just say this to ten. I don't see any
major difference. So let me close this. So I'll go to my calm Snic
cams already such in here. Let's kind of get this
properly angled again. Okay. I just do front face
naturally. Okay, this is fine. Then I'll go over to
selected already, so we are using
the 16 90 thus No, I think this is DSLR. That's fine. So I'll
go down to crop. On this crop, I will
set it to 1.33. Say I kind of cut
out these parts. So that is fine. Bring this down here.
And then let's do some high resolution
screenshots. I think I will just let me let me double
the amount for this. Let's do two. Okay,
now click on capture. So, we already have
something in there. Yes, so find out
where you need to find that would be Id here, let me just go back so I can show you guys where to find out. So you go to your folder, then saved screenshots,
Windows editor. So this is the new
one we just created. Okay. So I'm going
to open this up. Fantastic. So you
can see how we have something quite nice in here. Though we might need
to actually crank up the resolution even more to
get something quite clean. So from a distance,
it looks good, but we want something
that looks way cleaner, but this is not the one going to kind of render this outdoor. I would like to rend
out a video later on. But this screenshot is not
as clean as I want it to be, so you can actually crank
that up if you want to. It's going to get more
cleaner result out of it. But I think I'll
prefer to just do the sequencer I think in
the next lesson naturally. So just make a simple, simple video shot out of this. So I'll see you guys in
next lesson by for now.
135. 131 Sequencer And Rendering In Unreal Engine: So we comb, guys, so
this lesson I'm going to dabble into using the sequencer. So now we need to go
to our content drawer. Okay. Content drawer,
I would I would create let's let's create a new folder and contents, create
a new folder. Plus I can fold a new folder. I'm going to name these two sequence sequence sequencer. I'm going to open that up. Okay. So I'm going to add a new sequencer in here
where is not there. Yeah, this is the one. So add new level sequence. Open new sequence. This is
going to be a studio sequence. It'll be a studio sequence. Let's put studio to the
underscore sequence. I'm saving this inside
the sequencer folder. All right. So this would
open up our sequencer. Then, yes, that is fine. Then the next thing I'm going to do is what I'm basically
trying to do in this tutorial is to create a table at table for the character and
then for our light. So now, to do that, let's start from
bringing our camera in doing a basic should we call it Zoom out,
Zoom out animation. Then after that,
we're going to do the turntable. So
let's get in there. So I'll need to find my
camera. So find the camera. This is our sinicame actor. I'll drag and drop
this into a sequencer. All right, so I'll hold down
Control. Hold down control. I can squash this down a little. Let's see. 30 frames per
second should be fine. Let me create some
more space in here. Okay? Yeah, that should be fine. If I move a slider
in, there's nothing. There's nothing happening
in here for now. Okay, so we need to set this. Let me move this pack in here. I need to set this frame rate to I think 25 frames
should be just fine. 25 frame should be 25. He, let's use this.
25 frames per second should be fine. Okay. Then I think I'm
going to set this. I need to figure out
how many I think I want this to be like you see, let's let's get this
around 1 minute. Let's get our frames around
1 minute. Let's see. So for around minute 1 minute
of, 1 minute time frame. I think it would be 25 times 60. So 25 frames make one seconds, and then we have
multiply that by 60, so that'll be 1,500 mo. So 1,500. So for extend this can see how much of 1 minute
we have in here now. Think I can just pull this maybe somewhere around maybe
somewhere around here, per se. Okay. Extend this
as well. All right. So I'm going to make a
simple camera movements. I'll go over to the transform, open up the transform. I think we need a bit
more space in here. Okay? Ocation. Let's see, okay. Let me undo that. Try and find try and find the center of
my screen, like so. Alright, I think
what we need to be, what we need to be
animating is this. Let me just get this
somewhere around here. Et's get this in frame like so. All right, so I'm going to pull starting point should
be roughly around here. Maybe we do this all the way, should be maybe all the way
halfway should be fine. Yeah, halfway around
there should be fine. Okay. So I'm going
to add a que frame. I'll pull this all the way I
think somewhere around here. Then I'll just get
this out this way. Okay. Something like so. Let me just get this
position this way. So if we should let's start. Let's find a good
angle for this. Then put this up a little bit small. Put this up some more. Now, I want to just
make this clear. I'm not a photography
or videography expert, so I might making some irritating or non professional
camera movement to this. So, forgive me for that. You guys forgive me for.
I think this should work. It's getting close. Yeah, I think should be
they should be just fine. Okay. Yeah, so this
will work just fine. So next night I like
to do now would be to animate the let me close this. Is to kind of do a turn
table for a character. There's a character time table. Let me close kind of close this, minimize this way, minimize, so as well. Okay, that's fine. So we have that timeline
here now, so that's fine. So we can, yes, that is fine. So from there, I'm going
to let's close this. Let's open up our studio lights. So I'm going to create, just
an actor create an actor. I would move this actor into the let me get this
down some more. I'll move this actor
into studio lights. Okay? That is fine. Yeah, that will work just fine. Then I'm going to select all of our lights and make that a
child of this actor, too. Alright? I think I'll
Let's do that's a bit. Did I just let's
get back in there. Whoa, what just
happened right now? I think I messed things
up a bit too much. I think I might need to undo this Okay, here, that's fine. Let me just make sure we have
this way it needs to be. Here, that is fine.
Okay, no funny business. I'll drag that in there again. Okay? So I'll select this. I accidentally kind of double clicked on it, so I'm
not supposed to do that. So what I need to do now is to drag let me create some more. Can I create some
more space in here? To drag this actor
in here. Okay. Then what I need to do would be to animate the rotation
of our lights. That's pretty much what
I need to do in here. So to do that, I'll
select the actor. I need to animate the rotation. So I would click click on the key frame.
Let me move this. Let me move this this way, click on the key frame
for the rotation axis. Now, we see a transform in here. I'm going to open
up that transform. So open up the rotation. Let's get some more
space in here. Let's see what is
actually in there, okay? I believe that
should be the yarn. Yes. It's the y we're actually
animating, so undo that. So now that we have
that in there, so I'm going to add a keyframe. We already have a
keyframe in there. We have a keyframe in
there. I'll pull this out. Let's see, all the
way up with like so. Then I'll add the key frame. Oh, undo that. I
missed the step. I missed the step. Move
this all the way here. Let's now get some
rotation for our lights. I'm going to say this back
to the way it was. Okay. Something like so. So now we have a keyframe in there now. All right. You can see how we
have interesting light movements in here. So that's one aspect. So we need to kind of repeat
the same process and then do that for our entire model also. So I'll need to go
over to the mtaisma. This backdrop, I need to kind of send this
out of the group. Don't do that. This
needs to be out of the group because
let me pull this. Can I pull this down? I think we just have to
keep pulling this. Oh, no, no, no, I think I I have a better option for this, I have a better option for this. So what I'm going to do would be to just create a new folder. I'll just name this to backdrop. Okay. And I'll pull this
need to pull this out. It needs to be out. Come on. Let me just put this first
into this backdrop folder. Yeah, I think we can make
it work in here actually. So I'm going to
create another actor, I create another actor. So this actor I would get
let me put it in here first. Then into the folder.
I mean, come on. Why am I getting
this? Why why are we having this? This
is the actor we need. Move this in here.
Yeah, fantastic. It works now. So same we also did for a previous
one. I'm going to go in. I would select all of this. I just pretty much need to
drag and make them a child of this cannot touch, attach the gene with
movable mobility. That's fine that Am I
missing something in here. Let me figure out what is
actually wrong with this. Set this to movable. Okay,
let's try doing this again. Put this in here. Yeah,
I should work now. So let me select all of this. It wasn't static, so we just
need to set that to movable. Let's see will set
everything to movable. Let's do movable for
the entire outin. I believe we should don't
have any issues now. Yes, we have that in there. So if you hide this,
everything goes off. Now, which is this? Oh, yeah. We need to get this into Okay, needs to be set to
movable as well. So set this to movable. I need to bring this out
of set this in here. Okay? No, that's
the wrong one. Yes. Yeah, that's the right
one. So yeah, that's fine. So now we have a singo
let me rename this two. Let's name these two. Um, Let me name this to
all underscore Armor. All right. That should be fine. I think I would like to
rename this also too. Hopefully, hopefully,
this doesn't mess things up if I do. Let's hope it doesn't
or underscore lights. Okay. Let's be sure. Yeah, fantastic. We're good. Also, I think, we're good in. So yeah, moving on, I'm going to go over
now to the actor. So let me get some space
in here screwed up. So I'll need to drag this
actor into the sequencer. Let's make sure we
kind of drag and drop this into a sequence here. Okay, that's fine. So we need
to work on the rotation. So I'm going to add a
key frame in there. So we should have the transform
now transform rotation. What we need to
adjust is the Yo. So I'm going to
move this all the way maybe somewhere
here like so, and I'm going to now, yes, the issue here now is we need to kind of center
pivot on this properly. The Pivot is not
where it needs to be. That is another issue
to kind of adjust. So to do that, I think we faced the same issue previously. So let's go into the modeling. Go to the transform. I think I might need to
bring everything out again before I kind
of set this properly. So let me let me go
to this offscreen. This off let me just show you guys actually
let me show you guys, since it's not going to be a
major issue to actually fix. So what I did was to all the bet all the objects now or static meshes are now
inside this backdrop. And now I char of this backdrop. So for now, now I will
select this again. I still on the modeling too. You can't actually see
the Edit P vote now. We can't do that. But if you select it now
we can actually adjust this I put this where
it needs to be. So I'll go to er views in
here, find where it is. You can see it's not
properly in the center. So let's get this
roughly in the center. It's going to be a
t k one in here. Let's get this properly
centered as much as we can. Okay? All right. I think this should be fine.
That should work just fine. I'll select let me select
all of our meshes again, and then just move
them in there Alright. Then let's go out of let's
go back to selection, select these viewports,
maximize it, select it again. If we rotate this
do that rotation. I think something might
be a little bit off. Let me pull Can I pull this
completely out of the group? Let's see rotate this now. We are way better. I think
the major issue we're having kind of rooted to
this Amo talismufolder. So that's why we're
having this issue. So pulling this
completely out of it actually fix the issue.
So now let's continue on. So I'm going to bring that
into the sequencer again. Then we pretty much just
do what we need to do. So I'm going to let's pull
this all the way All right. Then I would go and add a keyframe for the
rotation. Fantastic. And I would go to the transform, open up the rotation, extend
this all the way, like so. I think somewhere around
there should be fine. Then we can rotate our mesh. I think this 60 should be the right value around
there should be fine. And then we have this
properly where it should be. So if you should go all the
way now to the beginning, I'll do a quick save for this. Okay? I think we want it no loop
in Loop playback range. I think we want looping on this. So let's it play Yeah, okay. Yes. Yeah, I think
this should work fine. Then we have our
lights go around this. You can see other
bluish and kind of temperature lights we added
in this kind of making this look way more interesting. Okay. Fantastic.
Yeah, fantastic. This will work just
fine. I work just fine. Let me stop pull this back. So I'll save this again. So the next thing is
to figure out, now, how do we render this
into an image sequence? I'll need to go,
I believe the Z, open up this option. Turn on show set
in before render. Okay, we want to render
out our current sequence. It is what we want
to render. I want to render out our
current sequence. On the SN camera also
too that's fine. Let's go back in the Okay. Now, yes, if I click on, let me see if everything
selected correctly. Output directory. Let's see. Okay. Is the output
directory, that's fine. Say movie renders that is fine. Okay, I'm going to
click on it now. I's going to bring out
this setting for us. We should be able to try to The butler setting
I'm looking for her, output resolution, open this up. Use the resolution
we rendering out, which is fine. I
think this is fine. Shouldn't be too
much of an issue. Should. This should
work just fine. Alright? Let's see. I think everything should
be fine in here as well. I think we are good. I
think if you go in here, we should be able
to kind of adjust this also too if we need to. Because right now it's
kind of ranging out as image sequence,
which is still fine. Yeah, I think it's still fine. We can have that as an image
sequence and then compare that compare it
inside of Photoshop. So I think this should
be fine. Let me close. Let me close this. Yeah, I
think this should be fine. If you do h26, we can also render out as a video input also
too if we need to, we just need to kind
of swap this for this. I think I prefer to render out as an image sequence for now. Yeah, I think image sequence
will better for now. So let's see maybe
we can we get? Can we have two options in here? Is it possible for us
to have two options? Let's say plug this in here. Okay, we can't have two options. We can only we can
just only have one. But if you save this
let's see what we get, let's save this let's
see what we get. I'm pretty much just
experimenting in here, so it should render
out as a video, but I think I'm just
going to I think for now, I prefer the image sequence. So let's go back in here and then connect this back
directly, directly directly. I'm going to leave
this node here for now, so I'm going to close this. So yeah, I think we're
good. Yeah, we're good. So let's hit render in here. And then I think let's just give this moment
to kind of warm up and then do this thing and then we'll come back when
this is done and then do a final need to do some maybe some little
adjustment inside of probably some tal adjustment
inside of Photoshop. But what I like to do inside
Photoshop is to bring in the unreal engine
logo into that and I kind of compare the
sequence into a video format. So I'll see you guys in the
next lesson bye for now.
136. 132 Post Processing Rendering In Photoshop: Welcome back, guys. So
it's done rendering out, so I would need to find
where it rendered out too. So yes, under the
in under saved. We should have, should
be in a movie renders. 670 MB, that's fine. So, I need to go into Photoshop now and
then input this in. Also, I need to get the
real NG PNG logo as well. So I can bring
that in. But let's start by opening
Photoshop first. Let's open Photoshop. So it's going to be a different way to
actually import this in. We're going to import this as an image sequence, close this. Okay. Why that is opening, I'll just go to the
Internet and then grab grab the Unreal Engine. What is this weight
for this program? Okay, I think what is
slowing my piece down is I still have a real
engine turned on here, so let me go to perspective.
I'll save this. Then I'm going to
let's go in and save save current level again. Another save, I need
to kind of click in here. Okay, save. Okay, I'll close this. So we can work a
bit faster in here. I'm kind of using a low
dPC so it's a two gigram. Not really high en
PC, that's worse, and I need to kind
of optimize just to get things running a
bit faster in here. Okay, so let's go over to believe supposed to be input somewhere or
open image sequence. Turn on image sequence for this. Select an image first.
So let's go and grab the Pi
directory, copy this. Come on. Come on. I think I also have
to go in the movie renders, select one image sequence. Yes, I believe selecting
one should be. Oh, man. I at forgotten,
so let's do open. No, we this out at 25 frans
per second, so it's okay. Did I do this correctly? I think I did this all wrong.
I think I did it all wrong. So timeline. Play. Oh, I think At I
did this correctly. So I did this correctly. So in sequence, Why do I have this cutout
screen here though? Cantly sure have
this coutu screen. We might need to do
something to that. Let's do Control T. Perhaps
convert into smart objects. Let's see, am I missing
something in here? Do that. I think I might need to
do some cropping in here. So let's do some
cropping in here. I'm going to crop this this way. Crop it this way as well. Yeah, that should be fine.
Enter, then play this again. Okay. I shot really slow time to kind of do what
it needs to do. Okay, yeah, I think that's fine. So I need to kind of place
my logo around here. So let's just go in and
then grab the C BNG logo. So I'll just drop
this in our sin. Okay, put this up. Here, can I even see
this even working? I need to extend stay
this old way, yes. We need to give this a white
material right come on. I'm kind of too I've gotten
to use Torin engine. I'm kind of calling this
material right now, so Ecolo Basically Eco too
much dim in rain engine. To much dim inorin engine. So let's do maybe maybe use
a gradient or something. I think that should be
fine. Maybe it's too white. Let's get something
more like so. Adjust the size for this. I'll just snap this around somewhere around
here should be fine. Okay. Way too much.
Let's snap this down. All right. Should probably
make the Ole engine slightly bigger than
it is right now. Okay, so it should be fine. I was thinking maybe I
shouldn't put this around here. Maybe, let's see, I think I'll need to scale
this up a bit more. Okay. A yeah, I think that should be fine. That should be fine. We have good quality from this
close up, that is fine. So the other to this
is that with this now, we can actually get
different renders, different angle
render from this. I believe we can also do
save this into a JPEG. Here, we can save
this into a JPEG. We have a different angle
to kind of save out, kind of put on our portfolio. So that's the form part of this. So now that we're
done with this, I would go over to I will go over to let's save this
out as a video format. So produce this render video. I pretty much use any software
of your choice, though. Oh, yeah, I think I need
to do something else. I need to do something to add
some vignettes into this. Let's get some
vignettes in here. Be able to add vignette in here. So if I should go
over to Filter, do I still even remember
where the vignettin is? Uh, I think it'd be
under Lens Correction. Custom. Yeah, I found it so. I'm just going to can really see this vignette
actually working in here though. Think Io. Okay. Do you see anything
happening in here? I feel like I might
just have to do this. Okay, we have some on the edge. I think I might just have to
do this manually, though. So I'm going to
create a new layer. I'm going to create
a new layer up here. I'll feel this layer with black. So X Okay. Pull this all the
way up here instead. Yeah, the layer is
supposed to be up. So I'm going to pull this here, let's slide all the
way I'll pull this up. You have the top layer around
there, should be fine. Let's get some more spacing
here, that should be fine. So now go to my brush, increase the browse size, like a massive brush in here. Then I'm going to add a
add layer marks to this. Say foreground or foreground
color should be black. And now just tap in there, like so and do that. You need to increase our
browse size a bit small. Do that increase the brows
size some more taping again. Okay, we should we get some
good vignetting in here now. But my still take it down. Feels a bit too extreme. Also, I don't want the vignetting to be
affecting my logo. I'm going to pull this
all the way up here. Then I will just use your opacity channel to
kind of take this down. Let's find let's find a
good spots where we have light on the floor
so we can actually see more of the
difference in there. Okay. All right. Turn this off and on. We can see something
pretty much like so. If you go all the way to the
starting point, let's see. Yeah, I think it should be fine. Should be fine. I'll
save this file. Let me save this
file under saved. Let's do Let's just do sequence in there.
I'll save this. All right. I think now we can just export this out as a video. So let's do render video. So the default quality
is actually fine. We need to kind of
select where we need to save these to the wrong folder. Okay. Put it saved. All right. I think it should
be down here around there. It's outside food
that should be fine. I would rename this to arm Amoltamn Bad. Okay. Yeah, this should be fine. Yeah, this should be
fine. I mean, why not? Unless let's make sure, okay, five rings per
second art is fine, high quality that is
fine. Leslie can render. So you're just going to
Destin and then render out. So let's allow Dustin and then we'll come
back when this is done. Okay, so we're done
rendering out our video. So let's see Here's
the video in here. So let's kind of play this.
Let's see what we get. There's no sound to
this obvious list. There's no sound, so this is just a render rendered out video we kind of compared
inside of Photoshop. Okay. Then we'll have the lights
go across this. Interesting. All right. Then we'll have a sound table. Okay. Yeah, and then
that's pretty much it. Alright, so thank you
guys for watching. I will see you guys in
the next one bye for now.
 Kelechi John, 3D CHARACTER ARTIST