Transcripts
1. Intro: [MUSIC] Hey, I'm Maja Faber. I'm a surface pattern
designer who have created more than thousand patterns for my Spoonflower shop so far. I've made all of these
patterns in Procreate, and most of them are
included in collections. Creating collections
for Spoonflower is not only a good way of painting
many patterns at a time and by that keeping your
shop up to date and more often visible in
the search result of new designs of Spoonflower. But it's also a great
way to get more sales as a customer tends
to buy more from you if you can offer
matching designs. In this class, I will teach
you my process of creating a full pattern collection from idea and inspiration
to sketching, drawing your patterns and
finalizing your files. You will learn what to
think about when you create a pattern collection
specifically for Spoonflower. We will talk about how
to name your designs, different colorways, and how many patterns you
should include in a collection. I will take you through my full process of uploading
my designs in Spoonflower, including all of the details
like tags, file names, and finally how to
order samples so that you can make your designs
for sale in your shop. This class is made for you
who wants to learn how to create a full pattern
collection in Procreate. You probably have an interest in selling your designs
on Spoonflower, but it's not a must
to take this class. The actual process of creating a pattern collection
in Procreate is pretty much the same for me, even if I created for a different purpose than
to sell it on Spoonflower. This is an intermediate class. You need to have some
basic knowledge of drawing and creating patterns
in Procreate to be able to follow along. If you never made a pattern
in Procreate previously, I recommend to watch my
other classes about creating different types of patterns in Procreate before you
watch this class. You can find all of these classes on my profile
page here on Skillshare. Before we dive in and
start with the class, I also want to mention
that I've included three free downloadable
Procreate brushes in this class. These are from me and my
husband's brand Faber company, and you can find all
of our brush sets on my website,
majafaber.com/shop. With all of this said
let's get started with creating our
pattern collections.
2. Downloads: I've included three free premium Procreate brushes that you can download when you
watch this class. They are from me
and my husband's brand favorite company and are free for you to use for both
personal and commercial use. The Procreate brushes included
are the smooth filler from our drying brush set and the grain stamp 2 from
our grain brush set. I've also included
a brand new brush that I call thick and texture, that when this class is created, the only way you can download this brush is through
watching this class. If you enjoy using
these brushes, you can purchase the
full brush sets, dry ink and grain, and a bunch of other
awesome brushes on my website,
majafaber.com/shop. To download the free
procreate brushes, tap the downloadable PDF under the ''Project and
Resources'' tab here in class and you tap the link in the PDF or go to the URL
that you see on screen now. You will be directed
to a site where you need to type in your
name and email address, which will add you
to my email list. Tap to unlock and
that will take you to a folder where you can
download the file. To download the file
directly to Procreate, tap the file so that it will be added to your downloads
in your browser. I'm using Safari
here on my iPad. Then tap the file in
the download section and it will be instantly
added to Procreate.
3. Class Project: Your project in this
class is to create a pattern collection that you
can upload to Spoonflower. I will teach all of the details that you need
to know in class and you can choose yourself how large collection
you want to create. In this class, I will create a collection of six
original patterns, which I will make several
different color variations of. You are welcome to draw
along with me in class, and create the same patterns
as me for learning purposes. But remember, that
these patterns are my original designs with my copyright that I already sell on for
example, Spoonflower. You are not allowed to
share these patterns in any way and say that
it's your designs, that will be an infringement
on my copyright. If you want to share about
your process in this class on social media and are
copying my designs, it always has to be very clear that they
are created by me. With that said, I'm super
excited to see what you create. Please do share your
projects in class, and if you share it on
for example, Instagram, feel free to tag me
with Maja Faber.
4. Why Create Collections: Let's start with talking about the fundamentals of a
pattern collection. We will dive into the why first, why you would want to
create collections. Creating pattern
collections is a way of creating patterns that
match well together. There are many parts to why you would like to
create collections. The two main reasons
as I see it, is that number 1, you are more likely to make more money meaning that
the customer are more likely to buy more designs from you if they can see an
obvious match for a design. This can be a licensing
client or for example, a Spoonflower customer, which is what we focus
on in this class. It can be a smart idea
business-wise to be able to sell or license
more of your patterns. Reason number 2 is that when you as a designer
create one pattern, you have your idea and your inspiration for that
pattern made up already. Maybe you spent three
weeks, three days, three hours, or three minutes
to come up with this idea. It really doesn't matter. What matters is that when we have one idea it's easier for our creative brains
to figure out more ideas just by the
flow of creativity. At least this is how
my brain works and I'm sure that many
creatives recognize this. This all means that it
might be easier to come up with more ideas that
matches your first pattern, then come up with a
completely new idea which all ends off to save time and
creative brain capacity. By creating a whole pattern
collection at once, it probably means that you
can create patterns more efficiently if this is
what you want to do. I, myself, is a fast creator. I really enjoy a fast
speed in my creativity. Now, I don't mean that
you have to create in high-speed or even
being efficient. In a world where
everything goes quickly, you might want to have a slower
creative process than for example me and that's of
course completely fine. You do you. However, as this class is
aimed to creating collections for selling
on Spoonflower, I believe that being able to create patterns
efficiently will make it more likely to sell
more designs on Spoonflower if this
is what you want. It's not just on Spoonflower
that it works like this. It's the same for all
print-on-demand sites. If you upload patterns frequently and the more
designs you have in your shop, the more likely it
is that you will find success on print-on-demand shops especially when you build a new shop and you don't
have regular customers yet. But in the long run, when you do have
regular customers, they will probably still want to see new designs for
you once in a while. So, being efficient
and being able to create more patterns
in less time is a good way of being
able to succeed selling designs on Spoonflower.
5. What to Include: A pattern collection is a number of patterns
that work well together. How do you make the patterns
match well together? Well, a common way is
to create a collection around a theme and with
a limited color pattern, that way, your patterns
will match in color and in the theme and
style of your designs. Typically, a pattern
collection includes one or two more busy patterns
known as hero prints, a few coordinating patterns
such as secondary prints, which are a bit calmer
than the hero print, but more busy than the
last type of pattern, the blender, which
is the simplest one. This is the standard way of thinking about
pattern collections. But I will say, however, to not stare yourself blind on the descriptions of the
different patterns. If you are a person who creates more simple designs like me, then your hero pattern doesn't
need to be super busy, and if you are a person who
creates more complex designs, your blender prints doesn't need to be super
calm and simple. In my experience, what type of patterns you
should include in a collection and how
much you need to follow the general guidelines
about creating collections, depends on the end purpose
for your collection. If you create collections for licensing clients, then yes, they are more likely
to be used to you as a designer creating a
certain type of collection. But if you create
collections for your own products
or, for example, for your own print-on-demand
shop like Spoonflower, you can decide yourself
what to include. I would, however, always think about
the end customer and their wants and needs. How many patterns should
a collection include? Well, I know that
different people have different
opinions about this. I myself feel that there are no rules that fit all the time, and what I mean with that is
that how many patterns to include in a collection
for me depends once again, on the end purpose. As I see it, a pattern
collection can include anything from three
to 50 patterns, or maybe even more. A standard way of
thinking when it comes to collections for
licensing clients is that a collection
normally includes six to 15 patterns or
something like that. Why do I say that
a collection can include three to 50 patterns? Well, as I mentioned previously, it all depends on
the end purpose. If you, for example,
create a collection for a licensing client
that will print your designs as a
fabric collection, there are certain rules
or guidelines to follow. If you create a collection to be printed on your own products, you can decide
completely yourself, how small or large collection
you want to create. If you, as we are
doing in this class, are creating a pattern
collection to be sold on Spoonflower,
you can, of course, create any type of
collection you want as well as it's your own
print-on-demand shop. But as I mentioned, it's important to always
have the end customer in mind when you are trying
to sell your designs, so you need to think about what a typical Spoonflower
customer wants to buy. A few things that I recommend when it comes
to creating collections for Spoonflower if
you want to succeed selling your designs are this, make sure that your collection have a well-balanced
color palette, which makes the patterns
match well together, create many color
variations of your designs, as you don't know which
color the customer prefer. Remember, that you are not your customer and everyone
have different preferences. To make it easier and cheaper
to prove your designs include maximum 42 patterns
in your collection. I'll talk more about this in the lesson about
proofing your designs. But keep this as a
general guideline. You can, of course, choose to listen to this or not, but you will understand
why 42 patterns is a good amount when we talk more about this later on in class. Make sure that your colors
have enough contrast to each other which you will see when you proof your designs. This might be tricky in
the beginning if you never have printed your designs
and products previously. In that case, don't
let this stop you, create the full collection,
proof your designs, and then you will learn
with experience once you have seen your designs
printed a few times. The last tip is to have in mind that Spoonflower customers often have a certain motif
in mind when they want to buy fabric or wallpaper. As a customer on
print-on-demand sites with tens of thousands of
designs to choose from, you will search
for what you want. To create patterns
and collections with specific themes may be very successful when it comes
to the search results. Now, that we have been
talking a bit more about the why and how
to create collections, let's dive into the practical
parts of this class.
6. Inspiration: A great start to build a pattern collection is
to gather inspiration. The inspiration can of
course come from anywhere. I think as creatives we are constantly gathering
inspiration wherever we are. Sometimes we already know
what we want to draw, we have already gathered inspiration from our
lives in general. The many times we need to actively search for inspiration. For me at least when I create a full pattern collection it's good to have gathered a bunch of inspiration and create
a mood board so that I know in which direction I
want to go with my designs. When I create designs one-by-one without creating a
full collection it can work fine just to create
whatever comes to mind not having gathered a
bunch of inspiration pre-hand. But when creating a
full pattern collection that includes a bunch
of patterns that are supposed to be matching is typically easier to
have a clear path to follow and to have gathered inspiration before we start
to create the first pattern. My favorite way of gathering inspiration except
being out and about and constantly gathering
inspiration just by living my life in general is to
have a look at Pinterest. From Pinterest, I gather
a bunch of images, I save them in a board and when I've
spent time searching for inspiration I have a look at my board and see if I can see a certain theme with more themes and/or colors that I like that I want
to move forward with. Before you start to gather inspiration it can help
to have a theme in mind. That way it will be easier
to stay on track with your collection and make
it look and feel cohesive. Your theme can be anything really safari
animals, city life, dogs or pets, it can be birthdays, summer, nature, cars or anything. In this class I will create my collection around
a spring theme, spring flowers when the
first warm sunshine arrives. Feel free to draw
characters instead or animals or have a winter
theme and draw a snow man. I choose flowers as it's a common thing
that many are used to drawing which will make it
easier to follow along in class if you want to choose
the same theme as me. Spend time in Pinterest
and gather inspiration. You can pause this class
and take half an hour or an hour and gather inspirational images
that you want to use. You can of course spend as much time as you
want in this phase but for me personally I
don't like to get stuck here in this
part of the process. I rather go back and find more
inspiration for something specific later on if I
feel that I need it.
7. Moodboard: When you have gathered a
bunch of inspiration images, it's time to narrow it down. Have a look at your
Pinterest board and see which images
you like the most. Both when it comes to
motifs and colors. Try to think about that you want to create a cohesive collection. So choose images
that you feel are matching at least a little bit. When you've chosen an image, tap on the image and tap the three little dots and
tap "Download Image". This will save your image
to your camera roll. Do this with images
that you like the most. Let's say that you can
choose 5-10 images. What we will do is to
create a mood board and procreate with these images. You can, of course, just use the mood board that you
create on Pinterest and do a split screen in Procreate
or take a screenshot of the whole Pinterest board
and add that to Procreate. But I like to have
the actual images one-by-one on my canvas to be able to move them around and create an inspirational
mood board. Now it's finally time
to head into Procreate. I will create just any
size of canvas really. For this mood board, I will go for a
screen size but I don't want to take the
top selection here, the screen size, P3 because that is in P3 color profile and that will make the colors
look a bit wrong. If I want to do a screen size, I will just remember 2732 times 2048 and
create a new canvas. Two-seven-three-two, and it already says
2048 and the DPI 300, maximum layers is 115 and
the color profile, is SRGB. Hit "Create" and here I have a canvas that is screen size. The next thing that
I will do is to tap the Actions panel
Add, insert a photo, and I will start to
add the photos that I want to have in my mood board. Let's just zoom out a bit. The placement really
doesn't matter. Now just start to
add them one by one. Let's see how it looks. Maybe that would be a
little bit too large. We just decrease the size a bit so I will fit
something over here. Maybe that floral one,
something like that. This one might look
good over here. We will create a mood board
here with the images and this is just the very start of the process of creating
our collection. Your mood board doesn't
need to be tidy at all. It's completely up to you how you want your
mood board to look. When you're finished
with your mood board, save it as a JPEG in
the Actions panel. Share JPEG and I will tap "Save Image" to save
it to my camera roll.
8. Color Palette: The very first thing that I tried to decide on
when it comes to actual creating part of making a pattern collection
is the color palettes. Now we all work differently, and if you want to
think about colors after you have made sketches of the motifs
for your patterns, then you do that but for me, colors are a huge part
of the collection. Color sets the mood and it helps me to move forward with
planning the whole collection. I always start with
my mood board. From the mood board, I will create a
first color palette. This palette might change during the process as we
draw our full collection. When you see how the colors interact with each
other in the patterns, and if the colors are right for the mood that you want to
set for the collection, and that's just how
a created process works in general,
at least for me. We move back and forth
and then back again, make changes, try things out and finally figure
out how we want it. What I do is to use the
mood board as inspiration, to draw a few blobs with colors. I will create a new layer
in the layers panel, and with the free brush,
thick in texture. I will draw a few blobs that are inspired by the mood board. I start with choosing more colors than I
think that I need. Just trying out how different
colors would work together. Take your time here and
from your mood board, choose some colors to build your first large color palette that we later on
can narrow down. What I will do is to save this first color palette so
that we always have it if we want to use more
colors later on in the process when we have
narrowed down our colors. Let's just save all of these. I created a new palette, tapping that plus sign
in the color panel, and then I tap and
hold on the color to select it and I tap on one of
the swatches in my palette. When you're happy with
your larger color palette and have saved it as a palette in
your color panel, we can head over
to the next lesson where we will start
with sketching.
9. Sketching: Finally, we will start to
draw something in this class. The first stage of creating a collection is to
sketch up your ideas. Sometimes when I create a slued collection,
it comes intuitive. I can sketch up the idea for
one pattern and I create that pattern and then a collection unfolds
from that pattern. When that happens, it's
awesome but you can't trust that you will be in that creative flow
all of the time, at least I'm not. The only way for me to start the collection is to
sketch up the ideas for the full collection
before I even start to actually draw
one single pattern. How you sketch is
completely up to you. Sometimes I use the 6B pencil to sketch up some ideas
for patterns in black and white first but often I go for
colors to start with as it makes me get a better feel for the color palette and the
general mood of the collection. You should sketch in a
way that you prefer, of course, but I will do it all in color here in this class. The first thing that I
usually do is to try out my color palette
but first of all, let's create a new Canvas
with the same size, screen size RGB or
whatever size you want. The Canvas size at this
point when it comes to sketching up our patterns,
really doesn't matter. Let's start with trying
out our color palettes. I've tried to narrow down
my larger color palette, which is this one to a
pallet with fewer colors. I don't have a
specific amount of colors that I use for
every collection that I create but let's
say that I usually start with somewhere around
six or seven colors. One great way of doing this is to quickly sketch up
a stripes pattern. Usually I create a
square over here, just draw a quick square
and fill that in with a cream white to not get that super sharp
white contrast with my colors because usually if I have a white background
in my patterns, it's more of a
cream white color. Here is my little square
and what I do is to create a new layer where
I draw a few stripes. I do this really quickly and
intuitive just like this, draw a few stripes on
the same layer for convenience with some of the colors that I feel that I
wanted to try out together. To not be overwhelmed
and use too many colors, let's just use six
or seven colors here to help us narrow down
our color palette. If you feel that a color
doesn't make a good match, you can just tap and drag the color to fill that
stripe with a new color. It doesn't matter here if the
feel is perfect and what I mean with that is if you use a texture brush
like me here, and you tap and drag, doesn't feel all the texture,
don't worry about it. This is just a sketch and
we don't want to spend time here trying to
make it look perfect. Spend some time here, and try to narrow down your
color palette a little bit. This will make it easier to move forward sketching
up our patterns. Now, I feel that these colors
work really good together, so my color palette is
starting to take its form. But even if I like this
color palette now, I might change it later on. Often I changed bits
and pieces of it, I might remove a color
or add a color or a few. But for me it's much
easier to start a collection if I have a
color scheme to start with. The very first thing that I will do when I start to sketch up my actual patterns is to add my mood board as
a reference image. Tap the actions panel
Canvas, reference image, import image, and import your saved mood board that you have saved
to your camera roll. You can make this smaller
or larger however you wish. I will keep mine
pretty small over here so that you can see
my Canvas clearly. The very first thing that
I will do is to draw some rough squares that I
will do pattern sketches in. I start to color these squares with colors from my palette. Don't worry, you can always
change this later on, I do this to get a good idea of how my
color palette will work. Not only on motifs but also as background color match
together as a collection. For this pattern collection, I will create six patterns
that I'll later on, will create several
color variations of. But I will make room for a few more patterns as
I might want to try out different ideas
next to each other before I narrow it
down to six patterns. Let's just create eight
squares here as a start. What I have in
mind when creating these background boxes
for my patterns, is to not make all of the patterns with cream-white
background and not make all of the patterns
with blue background or whatever color but
to make it varied. I like white backgrounds and lighter backgrounds
from many of my colors. Many times the hero pattern in my collection might
be on cream-white, then I might add one or
a few more patterns with cream-white but to balance
out the collection. I also want to have patterns with other colors
of the background. There's no rule here of how
many patterns you should have in different colors
and things like that. For me, it has come
with experience. The more pattern
collections I have created, the easier it has
become to create a balanced collection
when it comes to colors. Now, it's time to start
to sketch up my patterns. I have a look at
my moodboard for ideas of motifs to
start to sketch with. My recommendation is to always start with what
comes easy to you, and that is to avoid
overwhelm because creating a pattern collection
can feel like a huge task. To make sure that you
follow the process from start to finish and
create a full collection, my recommendation is to always do what comes easiest
to you first. That way it's easier to get into a flow instead of
making yourself to, for example, create
the hero pattern, if you don't have any ideas
for the hero pattern yet, but you have just decided that you will create the
hero pattern first, and then it will
be harder to move forward with the
rest of collection. For me, it's often the simplest patterns
that comes easiest. What I know is that I want
to have a pattern with suns inspired by this pattern, and here are some suns, and just the mood in
general of this moodboard. I will just make that moodboard
a little bit smaller, so that you can see
what I'm doing here. I will start to sketch suns
for one of the patterns, so each of the motifs
for the patterns, I will create a new layer. I create a new layer, and
start to sketch some suns. Remember that this is the first stage of
the drawing process, so keep your ideas free here, and don't get stuck. I think that I want the suns
on a colored background, and that the motifs
will be cream white. Let's quickly try that out. That looks good to me, so this could be a
blender print or maybe even a secondary print, if I would use more colors. But as I mentioned
previously in class, I recommend that you
don't get stuck here trying to decide which
print is secondary, which is blender, and which is hero when you create pattern collections
for Spoonflower. Instead, think of
the end customer that are making, for example, baby clothes or dog
bandanas or whatever end customer you can think of for your style and your designs. How would they like to
match different pieces of for example baby clothes
together print wise? I can't mention
enough to think about the end customer when you create patterns for Spoonflower, instead of thinking
of how you should create a collection
based on certain rules. I generally do the sketching
part pretty quickly. I just want a starting
at point here. I know that I probably will change my mind
along the process. I'm making the full collection, so I don't get stuck
here thinking that it has to be perfect at this stage. Moving on, I know
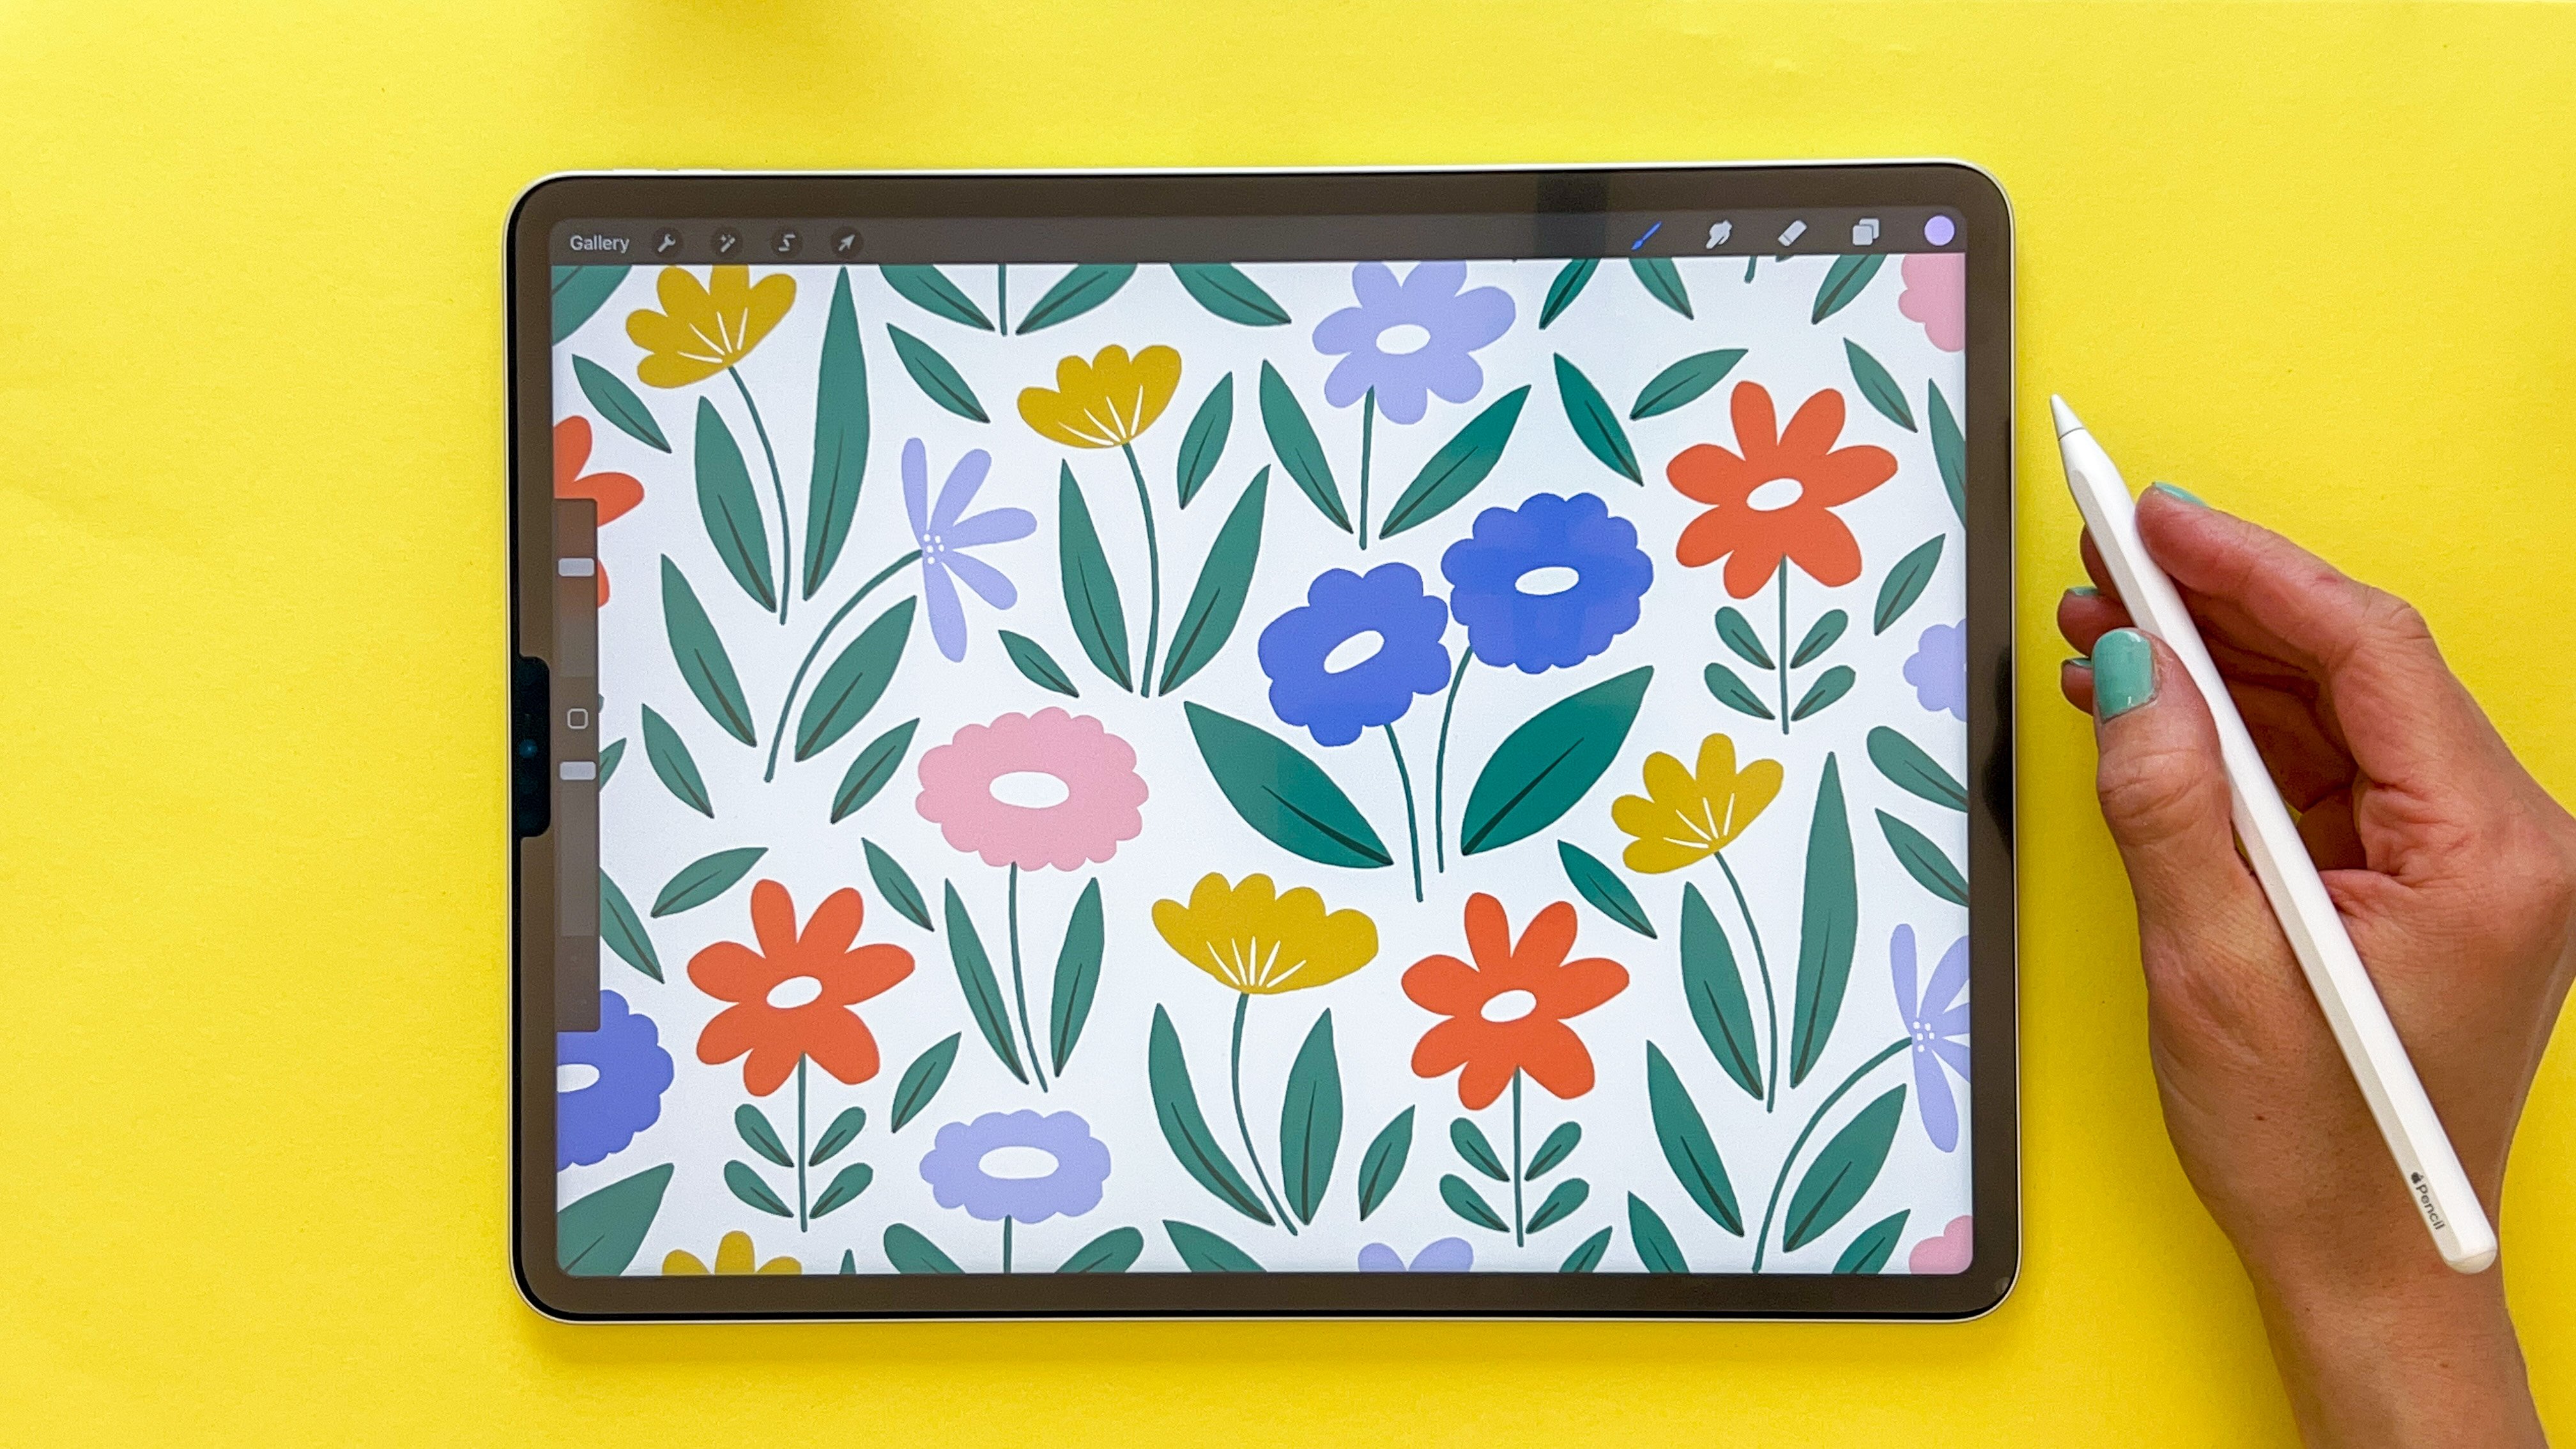
that I want to make some floral pattern
in this collection, so I sketch up some flowers
for one of the patterns. I think that I want this one on a cream
white background, and I know that I want this
collection to be loose, so I'm thinking of
the style that I want using the moodboard as
inspiration as I sketch. I also make sure to
save the colors from the stripes pattern where we tried out to narrow
down our color palette. So, I save those colors on
the end row in my palette, so that I can use them
in these sketches. I'm currently surrounded by
palm trees living in Myoka. So, I want to add a pattern with palm trees
to the collection as well. I'll draw a lot of palm trees, fruits, and cactaceae, as you might have noticed
in my latest classes, highly influenced by my
surroundings here in my Myoka. Maybe I want to add
an ice cream pattern, so let's try that out. Let's try a two color
wavy stripes pattern inspired by the
waves in the ocean. I think that that
looks really good. The thin stripes will probably look really
good in this collection, that will probably be filled on blobby and bold
shapes otherwise. Let's try out some
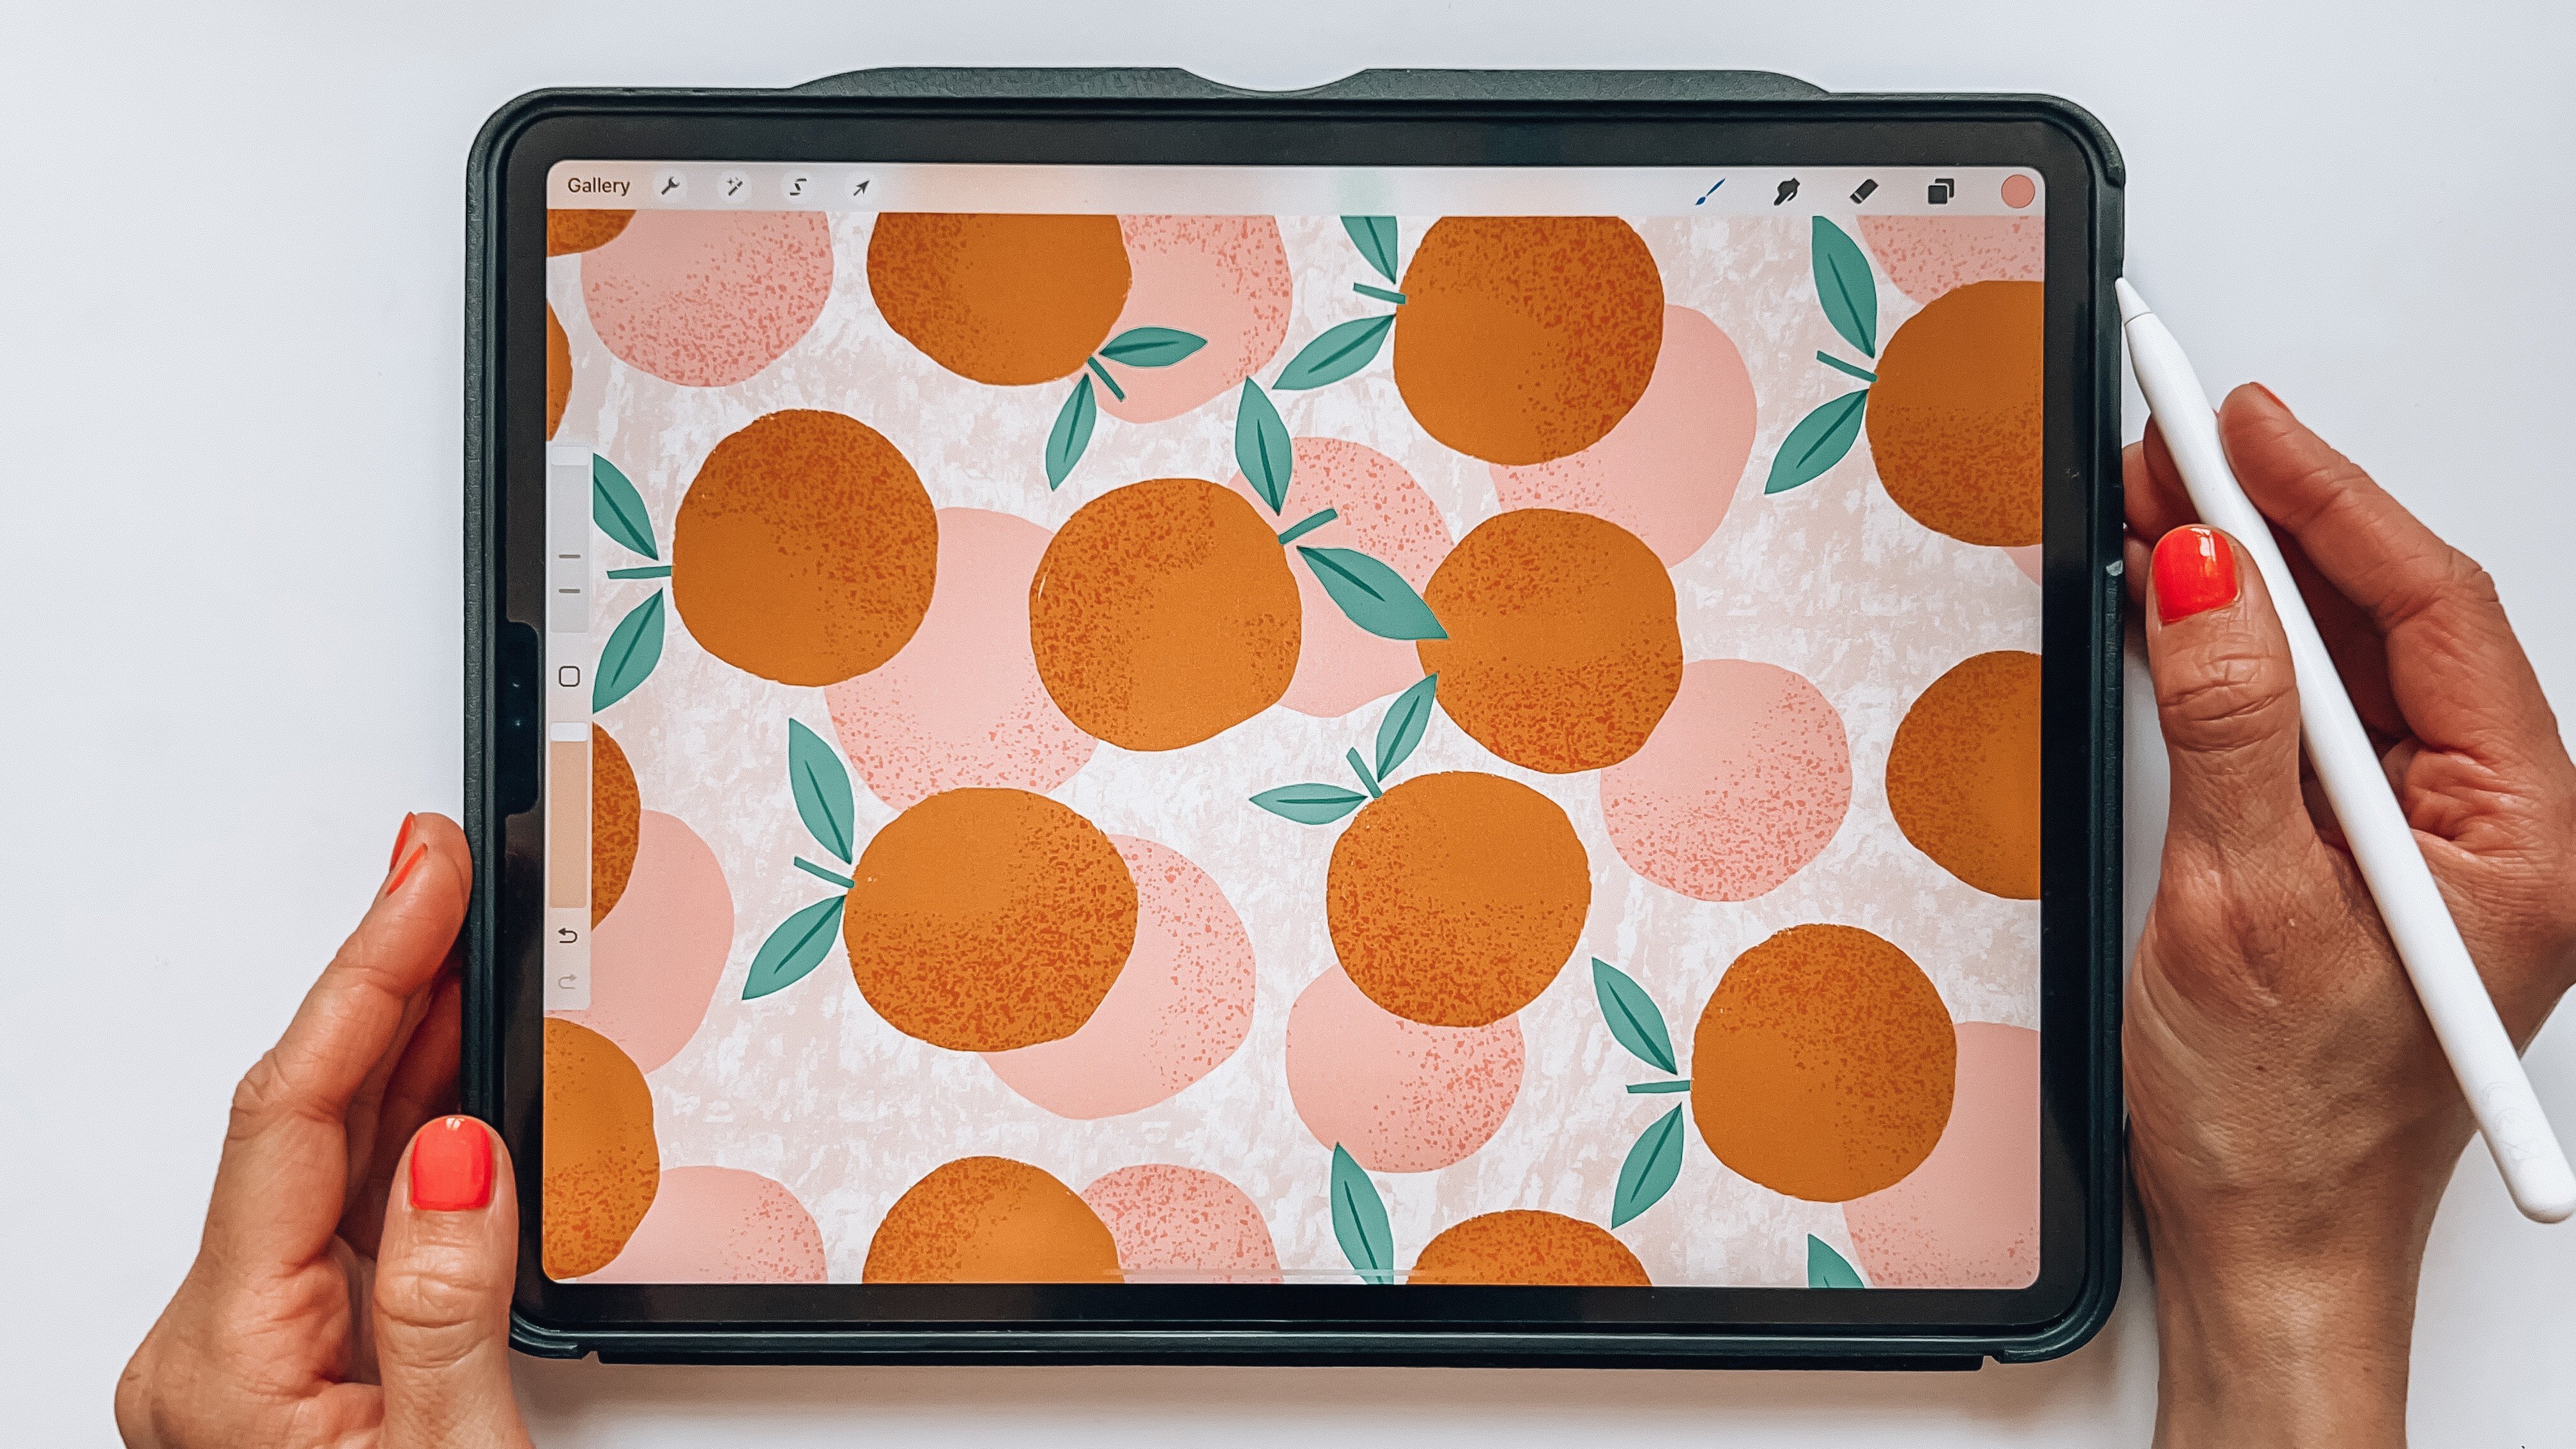
citrus pattern as well, maybe oranges or lemons. I have drawn quite a
few lemon patterns, and I've actually
included lemons in a few pattern collections
lately on Spoonflower. Maybe that might not make it to the final collection,
but let's see. Now I want to create
some simple patterns so let's do a stripes
pattern into colors, simple but a very effective
match to the other patterns. Let's add a simple
dots pattern as well. On this one, I will try to add a few
more colors on the dots, so that it balances out the other simple patterns
in the collection. Here, we have our
finished rough sketch with a bunch of
different patterns. When you are finished
with your sketch, save it as a JPEG to
your camera roll, so that we can use it
later on the class. Go to the actions panel, save as a JPEG, and to your camera roll.
10. Canvas Size: When it comes to which
canvas size you should use in Procreate when creating
patterns for Spoonflower, I really recommend
to have a look at Spoonflower's own guide
about sizing your design. I will link to this guide in the description
of this class. You can read everything here, there's a bunch of
information and I think that this guide explains it
better than I ever could. With that said, I
can share which canvas sizes I normally use. Generally I use
one of two sizes, 3,600 pixels square, with
300 DPI in Procreate, worth 7,200 pixels, which is the double of 3,600 pixels
and in 300 DPI as well. I always create automated
patterns in square ties. You don't have to do that. You can create any
type of tile you wish but I've always created mine in squares mainly to
keep it simple. Why do I create patterns
with two different sizes? Well, I always want to
create my patterns in as large size as possible but Procreate
has a layer limit. When I type in 7,200 pixels, I get a layer limit of
eight when I have 300 DPI. When I know that I don't need to use more layers than this, I create patterns that
are 7,200 pixels. But if I know that I need
more layers in my patterns, I go for 3,600 pixels and that will bring me a
maximum layers of 47. These are just my standard
sizes that I use. Maybe it makes no sense
for someone else, but for me it's easier to just
have two standard sizes to choose from whenever I create
patterns for Spoonflower, instead of needing
to think about what canvas size I will
use for each pattern. My normal size to
keep my workflow flexible is definitely
3,600 pixels. If I however, want to make a pattern specifically
for wallpaper design, I will prefer to use
7,200 pixel canvas. That makes it possible to get a larger scale of the repeated
tile for the wallpaper, which I think often look good. Spoonflower recommends
at least 150 DPI, so you could create a
canvas with that too. But I always create
all of my artwork in 300 DPI if I would like to use this design for
something else in the future, that I need it to be 300 DPI. Because then I don't need
to redraw the pattern, I already have it
in high resolution. I won't go down the
road to try to explain DPI to you in technical terms. I just don't think that I can explain that in a logical way. But in general terms, it's a matter of resolution. The higher your DPI is, the high-resolution
your image has. Spoonflower has another guide on image resolution and DPI. You can learn more
about this here. With that said, I will create the patterns in this
class with different canvas sizes depending on how many layers I expect to use. But I will make sure that
all of the patterns are at 300 DPI and have a
RGB color profile.
11. Creating a Template: Before we start to create
action patterns in this class, I want to mention that I already have other
classes where I teach how to create
different types of patterns in Procreate. For example, I have a
beginner's friendly class, which is called create
an editable pattern in Procreate with
color variations. I have another
class about how to create stripes and
lines patterns, and the third class about how to create half-drop
patterns in Procreate. If you watched my other classes, you might recognize the
method that we will use in this class
as it's similar to method number three from my class, about
half-drop patterns. I won't go through the
action pattern making process in Procreate
thoroughly in this class, I will focus more about the
collection in itself and why I create the patterns
that I do in this collection. However, I will create the
patterns here in class, but I will speed up the
process and not share the technical parts of creating each pattern
in this class, as I were to teach this in my other appropriate
pattern classes. However, with the first
pattern that I create, I will show you quickly how I create the action pattern tile. But for all of the
rest of the patterns, I will move through that
part really quickly. I think that this class is following information as it is, and it will probably
be easier for you to follow along
if I don't go in as detailed as in
my other classes about the technical parts of creating
patterns in Procreate. If you think that I moved
through the parts about creating the action pattern
too quickly in this class, check out my other classes about creating
patterns in Procreate. You find them all on my profile
page here on Skillshare. With that said, let's start to create the
action patterns. Where do we start? Well, personally, I like to start with
coordinating patterns, one of the simple
ones that I have a clear idea of what
I want to create. Maybe this is the
hero pattern for you, then by all means, go ahead and create
the hero pattern, which for me it would
be this floral pattern. But for me at least
it takes the edge of the overwhelming
feeling that can arrive when you're supposed to create the full
pattern collection, to start with a simple pattern
that comes easy to me. Especially the pattern that I already have a clear idea of. It's easier to not
lose the flow of my creativity and my process of creating the
whole collection, if I start with a pattern
that comes easiest to me. I hope that all makes sense. In this collection, I have a clear idea
of this Sun pattern, so that is the one that
I will start with. I head back to my gallery
and I create a new canvas. For this pattern, I know that I don't need to use many layers as I only want
to make it two colors, and I usually create my pattern files so that each
color has a separate layer. For this pattern, I will
go for a large canvas, 7,200 pixels in
width and in height. Now, if you have a different
type of iPad than me and you can't use
this large size, then by all means, you can go down in size. I know that for this, I don't need to use
that many layers, I think that around 6-8 layers is good to be able to work with, but I don't need more than that. Go as large as you can on your iPad if you want to
create a large pattern tile. As I mentioned in the
lesson about canvas size, I often go as large as possible when it
comes to canvas size. Make sure that your canvas
is in RGB and hit "Create." To save time, when I create my other
patterns in this collection, I will start with
creating a template file. What I mean with that is that
I will save actions which will make it able for me to quickly create a
pattern of this Canvas. This is my new method to quickly create patterns in
Procreate and I teach this method in
my other class about creating a half-drop
repeats in Procreate, but here we will do the same method but
for full-drop instead. If you think that this part
is moving too quickly, you can head back to my
other class about creating half-drops in Procreate to
learn the details more fully. There are a few
different techniques that you can create patterns in Procreate and I think
that you should use the one that makes
more sense to you. Lately, this method
is the one that makes most sense to me and it's the quickest for me
to make patterns. What I do is that I have a layer and I fill
it with a color, it doesn't matter which color, you just fill it with a color. I make sure that I have snapping
turned on and magnetics. If you want to make sure that you are exactly
in the right position, you can also turn on
your drawing guide and increase the size of
your grid to maximum. Sometimes I feel that I need it when the snapping isn't that perfect and sometimes
this not being seems to work better and then I don't need
a drawing guide. What we will do is to
use the Transform tool, tap and drag to create a
box at the top left corner. Make sure that you have
3,000 width and height, and tap the Transform
tool again. Then you tap your
Layers panel and either you can tap your
"Layer", tap "Select", or you can tap with two
fingers on the layer, which will select that layer. Make sure that you don't have Color Fill selected
here so that you will get the actual
selection of your square. When you have
selected the square, hit "Save and Load", and the little plus
sign in Selections. Then you tap your box, drag it over to another
part of your canvas, it doesn't matter in
which order you do this, you just use another part, so the top right part for me, I make sure that it snaps in
the exact right position. Then I tap the layer
with two fingers, Save and Load and the little plus sign to save
that selection, as selection number two. I tap and drag my square
to the bottom left corner, tap that Selection tool again. If you somehow
would have a lot of space outside of your
square in this layer, it means that your square
isn't perfectly filled. Somehow that happens, for me, it feels like a bug, I don't know why that happens. But to make sure
that your square is filling only this position, the bottom left corner, you could also
create a new square. In that case, fill your layer, tap and drag to fill in a new square in the
bottom left corner. But for me usually it works by moving the squares to
the different positions. Tap with two fingers and hold on the layer to
create the selection, and save it as
selection number three. Select your square with
the Transform tool, tap and drag to the
bottom right corner. Tap with two fingers
on the layer, Save and Load, and
selection number four. Tap the Transform tool, and here we have our
pattern template. This template you can just
name as pattern templates. Sometimes I just write
pattern template 7,200 pixels really quickly, just to quickly see in my gallery view that
this is the template. You could also of
course rename it to pattern template 7,200 pixels. Now, when we will continue
to create our first pattern, you will understand why we
saved all of those squares as selections that will create
an action in Procreate.
12. Create the First Pattern: Moving on before we
create our first pattern, I will stack all of
the canvases that are included in this collection in one stack to keep
everything in order. We have our 7,200
pattern template. I will select that
one duplicated so that I make a copy and then I can use this pattern
template later on. Tap that template and I will just clear
that layer and I also don't want to join
guides to be in the way when I draw my motifs, so I turn off the Drawing Guide. The very first thing that I
do is to turn on reference, Load Actions panel, Canvas, and reference, and import
the image of my sketch. This is giving me a direction
for what I want to draw. The first pattern that
I want to focus on, is this sun pattern. I always start my patterns with the background box
and I think that these colors look good. So I will use the orange color, tap, and drag to create
a background box. From now on, we will try out
the colors when we create the patterns and that is how I decide on the
final color palette. The first thing that I do
when I draw my motifs, is even if I have this
really simple type of motif, I always sketch up my
motifs with the 6B pencil. I know that we all are
different and you don't need to sketch up
your motifs pre-hand. But my creativity and
my process gets a bit of flow if I create a
quick sketch first. So let's draw a few suns. Here, I cannot try out the
placement of the suns. I don't want them to
be perfectly balanced, I want them to look a little bit wonky and a little
bit irregular. So even when I sketch, I can move around
the motifs then just get a feel for how I
want the pattern to look. When I've created
my sketch layer, I will bring down the opacity on that layer and create a new layer on top
of it where I can draw the actual motifs in color. I will use the cream, whites, and thick and texture brush, which you can download
for free in this class, I will just try out the size
and start to draw the suns. I want the suns to
be kind of wonky looking and sometimes
you need to draw a few motifs until I get the
hang of what type of look I'm after and sometimes I need to redraw a
few of the motifs, so that is what I'm doing along the way when I
create this pattern. I created many
patterns in Procreate. I've got to use to the
placement of the motifs and how to place them it takes to create the balanced pattern. Don't worry if you
don't succeed on the first try with practice comes not perfection because I don't want to say perfection. It's not healthy to
aim for perfection. But at least you will get more experience the more you create patterns
in Procreate. I promise you that if you stick to it and create
pattern after pattern, you will get into
it and we'll find a process that works
great for you. After I've drawn all of the motifs and are happy
with how they look, it's time to create
the actual repeats. Remember that when you
create the pattern, you make sure that no
motifs are falling off the edges of your pattern tile in this stage of the process. Now, it's time to
create our pattern. The first thing that I do
is to delete the sketch in the layers panel and
then you can choose here if you want to
group your layers. I will swipe right to select both layers
and create a group. With the group selected, we can go in and create our actions for the
repeated pattern. If you do, however, have any issues with selecting all of the
patterns in the group, you can just swipe
through right on each separate layer to
select both layers, and then we can start with
our pattern-making actions. When you have
selected both layers, tap the selections tool save
and load and selection one, then the transform tool, flip horizontal
and flip vertical. Selections tool again, and we will do the same with selection number two flip
vertical and flip horizontal. Once again, Save and
Load, Selection three, and with the transform tool, flip horizontal
and flip vertical. The same thing where
selection number 4 transform to flip vertical
and flip horizontal. Now, if you have a
pattern where the motifs have a very specific
up and down direction, you will see that your
pattern is turnaround here, and you could just turn your Canvas around
by usually what I do is tap the Transform
tool and rotate 45 degrees four times. Okay, great. So now all we
need to do is to fill in the empty space
with more motifs. I will draw more suns, and I will try to
place them in a way that I feel is a good
balance for this pattern. As you can see, when we
have made these actions, we have created a repeated tile. What is falling off the
edges to the right is coming in the edge on the left and the same
with the top and bottom. That's exactly what will
happen in any type of food drop pattern in any method
that you created with. So moving on, I will
fill in the empty space and draw more suns and
I will make sure to place them in a
way that I feel is balanced and good
for this pattern. When I feel that I'm
finished with a pattern, I swipe down with three fingers and tap Copy all, and tap Paste. This will give me a layer
with a flattened image. You could also
share your image as a JPEG to your camera roll
and add it as a photo. Whatever way you prefer here. Now that you have your image, we will select it
with the transform to make sure that we
have snapping and magnetics turned on and
drag it down to half of its size so that it's perfectly fitted to one-quarter
of the canvas. We do this to try
out our repeats and see if we're happy with the pattern tile and
how it's repeated, or if we want to
make some changes. Let's place one of
the tiles on the top left then duplicate the layer and drag it to the top right, make sure that you
snap them to each other and then place them in
the exact right position. Duplicate again and drag
to the third square and duplicate again and drag
to the fourth square. Here we have our finished
pattern tile repeated. This way, we can see how
our tile looks when it's repeated and we can see if you want to make some
changes to the pattern. I can now see that I want the orange to be a bit
more warm and soft. So I change the background
color to a new orange. If you want to make some
changes to the motifs here, where they are placed, or how they look, the first thing to
try out is to change the motifs that are free and not falling off
the edges here. That's the quickest way
to change that balance of your pattern if you just want to change where your
motifs are placed. If you want to change what teams that are falling off the edges, you need to make the
actions once again to free up the motifs that
are falling off the edges in the
original pattern tile. Because you can never change
something that are falling off the edge without
breaking the tile. So if you want to change this, you go back and make sure
that you have all layers selected and then choose
the selections again. Selection 1, flip vertical flip
horizontal, selection 2, flip vertical, flip horizontal, and the same with
selection 3 and 4. Then you hit 45
degrees four times to flip the pattern once again. When I've done this
and I can make changes to the rest
of the motifs. As I mentioned previously, this is how detailed
I will go in this class about making
the actual repeat. If you want to learn
more about this, watch my other classes about creating patterns in Procreate for a more detailed
explanation of the process. Now, I'm happy with this
pattern and it's time to move on to create the other
patterns in the collection.
13. Hero Pattern: Let's move on to create
the hero pattern. Let me just mention first
that it doesn't matter at all in which order
you create the patterns. Do it in order to make
the most sense for you. I also wanted to
mention once again that from now on in this class, I won't go through the details of the
pattern-making process, meaning that technical parts are creating the actual repeats. You can learn that in
my quick explanation in the previous lesson or by watching my other
classes here on Skillshare about creating
patterns in Procreate. In this class, we will
continue to move on and create different types of patterns than the full drop that I explained
in the previous lesson. You can watch the
full explanation and instructions
of how to create, for example, half
drop patterns and striped patterns in Procreate in my other classes
here on Skillshare. With that said, let's move on
to create the hero pattern. For the hero pattern, I will
do a 3,600 pixels Canvas. I recommend that if you usually create the same
sizes of patterns, you can easily
create templates for all sorts of different patterns. For example, half
drop patterns and full drop patterns with
different sizes in Procreate. But moving on in this class, I will just create the patterns as I go and don't use templates. With that said, let's move on
to create the hero pattern. For the hero pattern, I will do a 3,600 pixels Canvas as I might need
to use more layers here. I will go for a floral
pattern as the hero pattern. I will bring in my reference
photo of the sketch. I don't know yet
how many colors I want to use in the hero pattern, maybe just four or five as this is the
look and feel that I want to create for
this collection. But that is something that unfolds when I start
to create the pattern. I have a look at my sketch in the reference window and
I also can have a look at my mood board here to see if I get any ideas for the flowers
that I wanted to draw. Many times I actually
draw flowers just from my imagination as I tend to go for a really simple
floral shape. Having a mood board to fall background is a
good thing anyway, to make sure that I'm on the right track when it
comes to the direction of the pattern collection
and the mood that I want to create with my patterns. I will draw some rough
flowers like this, trying out different
colors and shapes. I try out different shapes
to fill the in-betweens, the empty space
between the flowers. I typically tend to create
more dense-looking patterns. That's just the
part of my style. Here I'm starting to
find a look that I like. The colors are starting
to settle as well. I try out the colors as I go in this
pattern-making process. As these flowers are pretty
big and few and simple, I will create a half
drop of this pattern, which I teach you in my class, three ways to create a half
drop pattern in Procreate. If you don't follow along
with the half-drop technique, watch that class to
be able to follow along in this process. The technique is the same
as the full drop that we created in the other
lesson in this class. But how to create the squares
and rectangles to make the actions is a bit different. Watch that class to
understand the process if you don't know how
to do this already. When I've created
actual repeats, I create some more flowers
to fill in the empty space, and some more leaves. This is typically how I go
on and create patterns in Procreate compared to,
for example, Illustrator. The difference for
me is that when I create patterns in
Adobe Illustrator, on the desktop
version I'm talking about is that I typically filled in the empty space with motifs that I already created. But when I create
patterns in Procreate, I draw new motifs to fill in the empty space
and the patterns. For me, this is a fun
and intuitive part of the pattern-making
process and it makes the pattern look a bit
more flowing and alive. When I feel that I'm finished. I will try out the repeat just as we did in the last lesson. Paste in a flattened
image and place the types next to each other to see
how the pattern is repeated. If I want to make changes, I go back and make changes. I might want to change colors, so I might want to
change the placement of the motifs or how
they are drawn. Now I'm happy with this pattern, and for me, this hero
pattern is finished.
14. Coordinating Patterns: Moving on to create the other coordinating
patterns in the collection, the secondary and
the blender prints, let's create a
palm tree pattern. I'm not sure how many
layers I need here, so I will do it 3,600
pixels Canvas size. I'm guessing that I want to
make a half-drop pattern, so I might as well duplicate my hero pattern
file where I have my half drop actions and remove the motifs from my
hero pattern to create a completely new pattern
of this file and use it as a template for
half drop patterns. As I teach in my other classes about creating
patterns in Procreate, I always make sure to keep my colors separated in layers, that way I can easily
change the colors and make different colorways
of each pattern later on. I start with drawing the
brown stems on one layer and then the green parts of the palm trees on one
layer and of course, I have my background
books which I always start with when
I create the patterns. For this pattern, I will try to add some texture
and see how that looks just to make the palm trees a little
bit more interesting. If you watched my
class about how to create half drop
patterns in Procreate, this is the same technique
that we add texture in that class and
during this process, I figured out that what
I guessed about creating this pattern as a half
drop is a good choice. It's a great way of
creating more interest in a pattern with just
a few simple motifs. I'm trying the pattern out and I'm happy with
how this looks. For many of the patterns I use the brush thick and
texture but for the palm trees I use
a smooth filler and I add a little bit of texture
with the green stamp too. Moving on with the
rest of the patterns I will go through them even more quickly and share more about my thoughts with the
different patterns then the actual
method of creating them or which brush
I draw them with. Next step is the waves pattern, this one is supposed to be
the ocean in a abstract away. The inspiration comes
from the ocean anyway. This is one of the
simplest blender prints, I want the lines to be
thin here to balance out the thickness and the boldness of the other
motifs in the collection. Basically, I create
the stripes pattern in the edges but I'll make sure that it's wavy along
the pattern tile. As I mentioned
previously in class, I will mention it once again, to learn how to create all
stripes patterns in Procreate, I have a full class
just about this. You can check out my class, how to create stripes
and nice patterns in Procreate if you want to
learn this through me. Moving on, I tried to use
different background colors in the collection and
not only create patterns with
cream-white backgrounds, which for me somehow
are the easiest to create and what comes
naturally for me when I draw. As I have the bold flowers and the palms with
cream-white background, I will try to create the
other four patterns in the collection with other
colors of the background. Moving on, I'm creating a more simple wonky
stripes pattern with also only two colors
but bolder types of stripes. About the color choice, I tend to create the full collection of
the patterns first and then I create several color
variations of the patterns. At this starting point when I create the original
six patterns, it really doesn't matter if
the colors are perfectly matching in the collection
of these six patterns. We will create many
different color variations of each pattern and for me, it's the customer
that gets to decide which colorways of the patterns that they want to
match together. Let's move on to the very last pattern and I will create a dots pattern here. For me dots and stripes are
fun patterns to create, it goes quickly and I
think that they never go out of style and will
always be popular. For this dots pattern, I will use a few more
colors than just two. Let's go for four colors here. If you want to name the patterns after
the different types, hero, secondary, and blender, I would say that
in this collection the flowers are on
the hero, the dots, and palm trees are
the secondary, and the waves, stripes, and suns are blender. But as I mentioned previously, I'm not too fussy about
naming my patterns hero, secondary and blender when
I create first time flower. I tend to think more about
the collection as a unit and how the different
patterns would match together on different
textile products. For me, as I aim towards
the kids in the market, I think about all baby products when I create my
collection and how the customer could
match for example a baby body with the
bowtie or tights. Great. Now we have created
all of our original patterns, let's move forward and create a few color variations
of each pattern.
15. Colorways: As I mentioned earlier in class, it's a good idea to offer
several colorways of each design when you
sell on Spoonflower. You are not your customer and just because you don't like
yellow on, for example, clothes for your baby, doesn't mean that the
customer don't like yellow for the clothes
on their baby? Yes, of course, you
should stay with colors, that is your style, but within your style, I would recommend to offer several colorways
of each pattern. Maybe you don't want to
create another colorways for a very complex pattern
and that's fine, of course, create
what suits you. But in general, if you can also work more
colorways than one, you have a better chance
to sell your designs. I will show you really quickly in the first
pattern that we will change the colors of how I changed the colors
of the pattern. But if you feel that
it's moving too quickly, check out my class, create an editable
pattern in Procreate with collaborations for a more
detailed explanation. Let's take this sun pattern. I will select that one and duplicate it to make a
copy of the pattern. Then I will tap into the
next file, the copy. Here I will just tap the
background layer and tap and drag a new field color to create another colorway here. Let's go for the
green, for example. If I would like to change
the color of the suns, I would swipe to the
right on the layer with the suns with two fingers to create an alpha
lock on that layer. Then I will select a color. Let's go for the darker green. Tap the layer and
tap "Fill Layer". Now we have a completely different colorway
of this pattern. I will however, keep
the sun's cream white here and only change
the background color. Undo that, and here we have changed the background
color to green. When you have finished
recoloring the pattern tap "Gallery" to head
back to your stack. In this class, I will
create 42 designs out of these six
original pattern piles, and that is because
I want to create a large collection with many different colors
to choose from. But I wanted to keep it at
a maximum of 42 patterns, and that is how many
you can use to prove your designs in the most
affordable way on Spoonflower. I will talk more about this
and explain it more in detail in the lesson about
proofing your designs. But moving on, I have in mind to create 42 patterns
in this collection. A guideline that
I have set up for myself is to create at the most eight colorways
of each pattern. This is simply because at
this moment you can upload a maximum of eight designs on Spoonflower at the same time. So to simplify my
process and keep everything neat and organized when I upload the patterns, this is what I do. This is, however, of course
not what you need to do, but for me this makes sense. With that said, I
will create copies of the sun pattern here until
I have eight of those. Then I will go in and change the background
color of each. I make sure that I like
the matching look here, that you can match different
sun patterns together. Maybe you want to match
all of them or maybe in groups of a few that match
really well together. This is a matter of
preference and also experience when it comes to matching the patterns
in your collection. When you have created as
many collections as I have, you learn your way of
working and with experience, find your way of matching
colorways as well. When it comes to choosing more colorways to add
to your collection, when you feel that
your first collection, as I felt here
with six patterns, didn't have enough
colors to make it interesting as a
collection of 42 patterns, I go back to my
original sketch and my original color mood board and see which colors I can add. Then I adjust them a bit to make them match and eventually, I will end up with
a good balance. Sometimes I create all of
the 42 patterns first and the colors that I think
they will look good in and then I go back and change
some of the patterns. These colors look good. Let's move on to the
other blender prints. Here I want to have the
same colors as my suns. For me, this is an easy way of making the blender print
match well together. I use the same colors on many of them to be able to match. For example, the sun and the
waves or these trucks in the waves in a very simple way. Fast-forward a little bit
and I have created eight of each pattern of the
blender prints and they have the same colors. I think that these looks great, so now we will move on
with the palm trees. The first thing that we will
do is to make a copy of the pattern and
tap into the copy. I know by looking at
this pattern that I don't want another
background color of it. It will not work with the mood of the pattern
and the motifs, the way they are drawn. Maybe this doesn't make
sense for anyone else, but this is how I see this pattern with the
cream white background. As I had six original
patterns in this collection, if I multiply six with eight, which is the maximum
amount of colorways that I wanted to make of each
pattern, that is 48. I want to create a
maximum of 42 patterns. For this pattern,
I might as well create only three colorways, as I think that it
will be hard to create more colorways and still keep
the mood of the pattern. I will create one
pink version and one beige brown version as well. I think that, that looks good. Then moving on to
the floral pattern, the hero pattern
in the collection. Here I know as well
that I want to keep the background cream white. So I changed the
colors of the flowers, the dots and the leaves. I want to keep the leaves in a light color to not
compete with the flowers, which are the stars
of this pattern. But I can change the
hue of the leaves a little bit differently
depending on if I want the warm beige
or cold beige color to match the
colors of the flowers. Actually here, when it
comes to the flowers, I just try things out based
on my color mood board. Also I might try out colors in other color palettes
that I created previously. I add a few colors that I
think match well together, as well as with other
colors of the palette. I want to keep the colors calm mostly more towards
pastel than bright. But yeah, I might also
want to add one or two popping bright-colored
floral patterns here, to try that out. With the flowers, I'm
actually just having fun and seeing which color combination
I like for this pattern. I know that I need to add more colors to create
more versions of this pattern and as I try out the colors
in this pattern, I see that there are many combination that look
really good in this pattern. I want most of the
flower patterns to match as an overall
pattern collection. But I'm also trying
out this popping yellow and blue and
the red and pink to see which are the patterns my customers on Spoonflower
likes the most. That's one thing that I really
enjoy with Spoonflower. You can try things out easily and if you find that
something doesn't work, you can go in another direction for the next
collection you create. Moving forward, the last
pattern is the dots pattern. With this, I will use
the new colors from the flower pattern and create
matching dots patterns. I also want the dots
patterns to match well with other patterns in
the collection, of course. But I won't mind to create
the pattern here and there in my collection that can add a bit more popping effects like this blue dots
pattern, for example. That was a speed-up
process of how I create colorways for
the different patterns. Here we have all
other 42 patterns finished in this collection.
16. Name and Save Your Files: One part of the process to upload patterns to
Spoonflower that I've found a way of making more efficient is to
name your patterns. You can do this on Spoonflower when you
upload the patterns, naming them one by one but
that, for me at least, took a lot of time and
I'm an impatient person. So I've come up with a
way to save more time. We start with naming the
patterns in Procreate. This is not only good to keep everything
organized in Procreate, but also a great
technique to save time uploading to Spoonflower. I tap the name of a pattern, write the name and I
write the colorway. Then I select all of the
parts to the text except the colorway and tap the
little copy symbol over here. Tap "Enter" to save the
name on that pattern, and then I tap the next
pattern with the same motifs. Tap the little paste
symbol over here, and I write the colorway, tap "Enter" and continue like this for all of your patterns until you have named them all. For Spoonflower, it's
more important to name your patterns of
what the motifs are, then, for example,
some dreaming title. This has to do with
search result. It's more likely that
someone will see your patterns in a
search if you include, for example, dog in the
name of the pattern. If it's a pattern with
dogs than if you name the pattern your own
dog's name or something completely different than what's included in the actual pattern. Continue like this until
you have named all of your patterns
and then what we will do is to save
the files as JPEGs to a folder on your iPad and
this is the important part, not saving them on
your camera roll. If you save them to
your camera roll, you will lose the file names. I created a folder
on my iPad that's named Spoonflower and this is just a working folder where I place the patterns that I
will upload to Spoonflower. This is not a folder where
I backup and save my files, in the long run, it's
just a folder where I save the files on its
way to Spoonflower.
17. Upload to Spoonflower: We have reached the
end of this process. We will start to upload our
patterns to Spoonflower. I won't show you how to create your account on Spoonflower
and all of that. In this class, we will
focus on the actual upload. Tap Upload Designs
and here you can see that you can upload a
maximum of eight files. Let's start to upload our collection eight
patterns at a time. As I've created a maximum of eight colorways of each pattern, it will be easy for me here to keep track of which
I've uploaded. I will add them
pattern by pattern. If you have created 42 patterns, this process will
take quite some time. Now, to be able to show you my whole process of
uploading designs, I've actually already
uploaded these and proofed my designs
and made them for sale. I needed to do this
so that I could create this class and show you the full process with
my proofed designs. The patterns that
I'll show you here as an example to upload
patterns in class are actually the six
original patterns that I've already made
for sale in my shop. But now I made them private again so that I
can show you how I work with patterns in my design library to
be able to sell them. When you uploaded your designs, it might look a
little bit different as you probably haven't
proofed your designs yet, and might not yet be able to make them for sale, for example. With that said, we
will move on to our design library when
you've uploaded your designs. I usually first go
to the list view, especially when I've
uploaded a bunch of designs at the same
time as we've done here. Here I start with
adding a few details. The first thing is
the description. I upload so many designs, so I don't take time and write a specific description
for each pattern. I do believe though that it
can be a good thing to do for the search results and
also if you want to say something special
about every design. If you want to do this, you definitely should, and maybe not follow
my lead on this. But what I write in description though is a short
information that you are allowed to reset products created with my designs
purchased here. I select the checkbox for
each of the patterns, and I copy my description from another pattern and
paste the same in here. Then I tap Updates. Now I've changed the description for all of these patterns. Then I write in tags for
each of the patterns. Tags are a must to have a chance to be viewed in
the search result. I'm writing keywords here
that describes the pattern. Usually, I write kids and baby, my own name and sometimes I add minimalists or something like that that describes the style. Colors are also good keywords and also, for example, scale. If I've uploaded several
colorways of the same pattern, I tap in the checkbox and hit Edit tags and write in the same tags for
all of those patterns. Maybe I will just add a few more tags for each
pattern like which color it is. But here I tap the tag books separately as these
patterns aren't the same. Great. Now I will
tap this auto view. Here I will tap each
of the patterns with two fingers to add them
each to a new tab. That way I can work with many
patterns at the same time. I tap one of the tabs and
here I have my pattern. As you can see, the file name has automatically
been imported here, which means that I don't need to write or change the name. This saves me a bunch of time. The first thing I do to get a good feel of the scale
of the pattern is to tap Wallpaper view here and the little box
that says Room. This way I can imagine
the scale on fabric as well as I can see how it
will look on wallpaper. You can tap on all
products to get a look at the original scale of your patterns on both
wallpaper and textiles. But for me, it's quicker to have a look here on the
Wallpaper view first. Then I might tap on all products if I wanted to check details
on the textile products. For the half-drop patterns, I need to tap in half-drop
and for the full-drop, you just keep it at basic. The next thing we need to
do is to choose the size. Sometimes you might want to have a few different sizes
of your designs. Let's say that you want one
to look good as bedding, one as baby clothes, and one as a tea towel
or pillow cover. In that case, you
don't need to change the size of your files
before you upload. Just make sure that you upload the largest file
size that you would like to have and then you hit smaller here under design size, then you can save different
sizes in different files. I will only have one size
here of each pattern. I think that it's great to
have different sizes of each design and I do that
sometimes in some collections. But for this class, I won't upload more than
one of each pattern. When I think that the
wallpaper is a good size, I tap Save and while
it saves I can move on to another tab with
another design to save time. Here I have a look
at the wallpaper again and decide the size. Hit Save, and move
on to another tab. When I've saved the wallpaper
size on all of the tabs, I move onto fabric. Here, I try things out. Some patterns will do better as large prints and some
as a smaller scale. Usually when it comes to fabric, I need to see the size on the products to make
the final decision. I try out a size and
tap View All Products. Sometimes you need to
wait a bit and refresh the tab a few times until
it changes or saved. Now we look at the
products and I can see if it's a good
size for this pattern. What I see here is that I
might want to make it smaller, so I go back and change
the size a bit more. When I'm happy, I hit Save. Then I do this for all of
the other tabs as well. Why I choose different
sizes are based on experience and also by thinking
about the end customer. Once again, what might
this design be used for? What scale should
it be in that case? Should this design be offered in a few different sizes or is
it enough with just one size? Many times I try out the design before making the effort
of adding more sizes. You never know which design
that will be most popular. Sometimes you'll be surprised and it's not at all
the design that you thought would be most popular that becomes
your main seller. I usually wait a
bit when I created a collection to see if
the designs sell well. If they sell, I add more scales. This is all I do in this view. Actually, I think
that the list view is more efficient to work
with when it comes to everything else than sizing your designs and choosing
basic or half-drop repeat. We're back in the List View and here we can add a
new collection. Tap Add Collection,
name your collection. I typically don't write a
description here either. Again, I believe that it's
probably great to do so, but I just don't feel that
I have the time for it. I make sure that I don't
have this checkbox tapped in so that the collection
is private for now. Then I can tap the checkbox for all of
the designs that I want to add to the new collection and I tap up here and just
tap the Collections.
18. Proof Your Designs: It's time to proof your designs before you can go ahead
and make them for sale. First things first tap collections and find
your new collection. There's a shortcut option here in the middle
that will take you directly to what we want
to do to prove our designs. Fill a yard, or it can tap into your collection and
then tap "Fill a Yard". Now, how you can come to the
fill a yard option might change when Spoonflower do updates on their
site, you never know. But what we want to find here
is the fill a yard thing. It doesn't matter where you
find it or how you find it. I tap this and that will take
me to some more options. If you created a
smaller collection than me, you can of course, fill your yard with less designs or with two collections
or three collections, or fill a yard with
only two swatches. But I will use this one, one yard up to 42 designs. Tap that one and
choose your fabric, I usually go for the petal
signature cotton here, and then tap "Design
Your Project". Now it's time to design our yard filled with
our pattern swatches. Place your patterns
as you wish here. You place a design
by tapping it and then tapping "Books" over here. To make it pretty,
I usually want to spread out my designs
and not place the same pattern next to each
other but that's just me, you don't need to do that, but the full yard will give me a great look at
overall collection then without needing to cut out all of the swatches
with a scissor. Typically I tap the patterns in order here and spread
them out like this. This will take some
time, as you can see. Let's just speed it up a bit. When you are finished like this, you tap "Add to Cart"
and order your sample. That's all there is to it. Fast-forward in time a bit, and this is what you get but of course with your own
designs printed on it. When you got your proof, you can have a look at all of the designs in your
collection and see if you're happy with all
of the colors and the scales of the
patterns and all of that. If you would like to change
something with your patterns, the scale is just to change
like we did it before and hit "Save" but if you need to upload a
completely new file, let's say that you want
to change some colors, you tap "Upload Revision"
and "Upload a New File" and that's all there
is to it to proof your design and then
make it ready for sale.
19. Make for Sale: Now we have reached
the very end of creating a pattern
collection for Spoonflower. We have proofed our designs, got our samples home,
checked them out. We are happy with them and now we are ready to
make them for sale. What I usually do is to do
this from the list view as I mainly upload
collections so I have a bunch of patterns that I
want to make for sale at once. Go to your design
library again and the list queue and tap
the check boxes for the patterns that you
want to make for sale and then you tap,
''Make For Sale''. Just like that, your designs are available for the
public to purchase. Now we can have a look
in our shops to see how they all look
published on your page. That's the last little
piece that you needed to do to make your collection
for sale on Spoonflower.
20. Final Thoughts: That's it. We're finished with the class. We have created a full pattern
collection in Procreate. I have uploaded
mine to Spoonflower and maybe you are on
your way to do so. This is a process that I
personally do all of the time. What I teach you
and share here in class is my way of working with pattern collections in Procreate and uploading
them to Spoonflower. I hope you enjoyed to learn
my process and that you found this class useful as you build your own shop
on Spoonflower. Thank you so much for watching. If you liked this class, hit the "Follow" button
by my name to make sure that you don't miss
out on my future classes. You can also tap my name to go to my profile page
here on Skillshare, where you can find all my
classes available to watch. If you want to have a look at my premium Procreate brushes, available to buy and use in your artwork, go to
majafaber.com/shop. If you use any of our
favorite company brushes, feel free to tag me on
Instagram with maja_faber. If you have any
questions at all, please ask them on the discussions
page here in class and feel free to leave
a review to let me know if you
enjoyed this class. I would love to
hear your thoughts. Make sure you share
your project in class. If you post it on Instagram, feel free to tag me
with maja_faber. Thanks again for watching.
 Maja Faber, Surface Pattern Designer