Transcripts
1. Intro: [MUSIC] Hey there.
I'm Maja Faber. I'm a surface pattern
designer who have created more than 1,000 patterns
in Procreate so far. I love to explore new ways of creating
interesting patterns. In this class, I will teach
you my newest discovery, how to create symmetric
patterns in Procreate. At a first glance,
symmetrical patterns can make you believe that they are very complicated to create, but in this class, I will show you my techniques that will make it all feel super
fun, easy, and exciting. After watching this class, you will be able to
create all kinds of symmetric patterns in Procreate like you
use for all purposes. We will explore how to
use the symmetry tool to create three different
symmetric patterns. I will show you how to set up
your files so that you can recolor your patterns to as many color
variations as you wish. We will go through how to create a pattern template that can use for all source of
patterns in the future. To take this class,
you need to have some basic understanding
of how to use Procreate. You don't however need any experience in creating
patterns in Procreate as I will go through all that
you need to know to create a symmetric pattern from sketch to finished pattern
tile in this class. Before we start, I just
want to mention that I've included a bunch of
freebies in this class. Who doesn't love freebies? There's two free
premium Procreate brushes from me and my
husband's brand paper company. I want free Procreate
color pallets. You can use the same
brushes and colors as me if you wish for a smooth
learning experience. If you like our brushes, you can find all of our full
brush sets available to buy on my website,
majafaber.com/shop. I've also included
two free guideline templates that we will use to make our patterns well-balanced. More about that
later on in class. With all of this said, let's dive into class and start to create our
symmetric patterns.
2. Class Project: In this class, we will create three different
symmetrical patterns. How many patterns
you want to share as the class project is
completely up to you. You're also free to share your entire project if you wish, from inspirational images to sketches and the
final pattern tile. Process images are
super fun to see. I'm very excited to
see what you create. Please do share
your projects under the Project and
Resources tab here in class to learn how to export your file from Procreate so you can
share it in class. Watch the lesson
called export artwork.
3. Downloads: I've included two premium
Procreate brushes, two guideline templates, and one Procreate color
palette that you can download for free when
you watch this class. All of these resources
are free for you to use for both personal
and commercial use. The Procreate brushes
included are perfect pencil, and thick and texture. Both of these brushes are from our new texture brush set
from us at Faber company. If you enjoy using
these brushes, you can buy the
full brush sets and more on my website,
majafaber.com/shop. To download the freebies, tap the downloadable PDF under the projects and resources
tab here in class, or go through URL that
you see on screen now. You will be directed to
a site where you need to type in your name
and email address, which will add you
to my email list. Tap to unlock, and that will take you to a Dropbox folder where you
can download the files. You can of course,
unsubscribe from my email list at any time in the future if you don't want
to receive news from me. To download the brush
set file and the color palette file
directly to Procreate, tap the "file" and
tap "Download", and then we will do that
with the other file as well, tap the file and tap "Download". This will add your files to downloads in your
browse up here. I'm using Safari
here on my iPad, so if you use another browser, it might look a little
bit different for you. If you don't find
them in your browser, you can always find them in the downloads folder
on your iPad. In my Safari browser, I tap the files in
the download section, which will instantly
open up Procreate, and add them to the app. I do that with
both of the files, and then I head back to Safari to fetch the
guideline templates. To download these files, tap the files, tap "Download" with
both of the files, and you can find them in the downloads folder
on your iPad.
4. Finding Inspiration: Okay, the very first
thing that we will do in this class is to find inspiration for our
symmetric patterns. I've found that a great source
of inspiration are tiles. You can find tiles in real life, in your home or out and
about in your town. Or you can find
other inspiration for symmetrical patterns. But for me, tiles is a great
source of inspiration. I have a board on
Pinterest where I've saved a bunch of amazing
images of tiles. You can use this board as I've linked within the
description of this class. Or you can, of course, search for your own
inspiration on Pinterest with tiles or with other
types of symmetric patterns. I think the tiles are
an amazing inspiration. Sometimes I feel though, that the feeling
that you get from tiles, the rustic feeling, is hard to translate digitally, so some patterns that you see on tiles might not look
as good digitally. But it also depends
on the purpose of your pattern and your
personal preferences. Try things out and experiment
with symmetric patterns and see what you find works good
when you draw it digitally. We will use this Pinterest
board as inspiration in class. You can, if you want to, tap an image that you like, tap download image to
your camera roll and then you can use that image as a
reference image in Procreate. But I want to be inspired
from several images at once. I will use Pinterest as a
split-screen in Procreate. I will tap up here in Procreate and tap the
little split-screen symbol. Then I can tap Pinterest. That will bring Pinterest
as my split-screen app. I always want my inspiration to be here on the left
and drawing on the right, but you can choose
whichever side you want. Then I have my
inspiration over here. When you find some
inspirational images, let's head over to
the next lesson, where we will start with
a pattern templates.
5. Pattern Template: Let's start this class with
creating a pattern template. I will just remove the split
screen with Pinterest, drag that one to
left to remove it. Tap "Gallery" and
here we will create a new Canvas where we will
create a pattern template. Let's start with
creating a Canvas. Tap the plus sign, and I will use a Canvas that
is 3,600 pixels square. You can use any size
of Canvas you wish. This is my standard size
when I create patterns that I will share online on
print automatic platforms, for example and it also
brings me a bunch of layers. That's good to have some
layers to work with. I always make sure that
I have 300 DPI for high resolution and that the color profile
is set to sRGB. The top one over here is
the one that I usually use. The dimensions 3,600 pixels
in width and heights, and then I tap "Create". What we will do now, is to create the pattern
template, as I call it, which is a set of actions
that will make it easier and quicker for us to create the actual
pattern tile later on. If you have watched my other
classes here on Skillshare, you have seen different
methods of creating patterns. I share a few different
techniques and you can use the technique that
you like using the most. This one that we will
use here today is the technique that I use
the most at the moment. If you want to use that one, follow along and create
this pattern template. If you want to use
another technique or method that I've shown you in a previous pattern
making class, you can skip this
lesson and move on to the sketching part. Pattern templates
are really good because we can use them
over and over again. They will improve our
workflow and make it more efficient when we create
patterns in Procreate. In this class, we will
create full drop patterns. I will create one type
of pattern template. Let's start with doing that. The first thing that
we will do to create a pattern template is to turn on our drawing guide
and edit drawing guide, and drag up the grid
size to maximum, which will bring you four
equal sized squares on your Canvas with a guide
line in the center. Tap "Done", and this
will make it easier to get the right snapping, which is the next step
that I will show you now. Tap the color
palettes and I will use a dark color just because it's better
contrast on the video. But you can use
any type of color. The color really
doesn't matter here. Then I grab that
color and tap and fill to fill the whole layer. Now I have a layer
with a square. Then I tap the transform
tool and here I want to make sure that I have magnetics
and snapping turned on, and then I zoom out a bit so
you can see what I'm doing, and I tap in one of
the corner nodes and drag my square down
to the center. If you want to, you can
also tap one time on the corner node and write in
the dimensions over here. We have a 3,600 pixels square, so you can make
sure that you have the little chain symbol set here so that it will keep the proportions and make it a square when you type
in a new dimension, and then I type in 1,800 pixels, and that will bring me a
perfect square of 1,800 pixels. That's also a great
way of decreasing the size of your
square to the half, which will feel a
quarter of your Canvas. Tap the transform
tool again to place your square and then, we tap the layer in the layers
panel with two fingers. Tap and hold to
select that layer. If that doesn't work for you, you can tap the layer
and tap "Select". It's exactly the same thing. When you have
selected the square, tap "Save & Load" in the selections tool that
pops up automatically. Save and load and in selections, tap the little plus sign to
save selection Number 1. What we will do now is to
create four perfect squares that are aligned to the
edges of your Canvas, and we will save each
of them as selections. When we have this square
we tap the transform tool, tap and drag the
square to the left so that it fills the left
quarter of the Canvas, and you make sure that it's perfectly aligned to the edges. You do that by
tapping and dragging and when you see these
yellow guidelines, it should be perfectly centered. If you don't trust the
yellow guidelines, you can zoom in to see
that it's perfectly centered to the
drawing guides here. Make sure that you don't
look at the colored object over here because that's just
a visual flaw in Procreate. That's not where the
real object is placed. You should always watch
the dashed line over here. It is perfectly centered and then I tap the
transform tool. Nowadays, I usually trust the yellow guidelines,
and the snapping, and the magnetics, so I
don't zoom in that often, but sometimes it does get wrong. You can always zoom in
if you want to make sure that it's
perfectly aligned. When you have placed your
square to the top left corner, tap with two fingers
on the layer, or tap the layer
and tap "Select", as I showed you previously, tap "Save & Load" and the plus sign to save
selection Number 2. Tap the transform tool, drag it down your square so that it fills the
bottom left corner. Make sure that the
yellow guidelines are showing so that you have placed your square perfect
to the bottom left corner. Tap the transform tool again, tap the layers panel, tap and hold with two fingers
to select that layer, save and load
selections Number 3. Tap the transform tool, tap and drag to the
bottom right corner, make sure that you have the
yellow guide lines showing, then tap the transform tool, tap the layers panel, tap the layer with
two fingers to select that layer,
save and load. Oops, where did it go?
Let's do it again. Tap with two fingers in the layers panel on that
layer to select it, selections, save and load, tap the plus sign
and selections, and you has selection Number 4. Now we have created our pattern template
and we can actually clear this layer
and if you want to, I do this sometimes, you can just write
pattern template so that you know that
we will use this file as a pattern template and
we will just duplicate that file whenever we
want to create a pattern. A full drop pattern
in this specific size , 3,600 pixels square. This is how we create
a pattern template, and in the lessons when we
create the actual pattern, I will show you just how to
use this template to make your workflow more smooth when you create
patterns in Procreate.
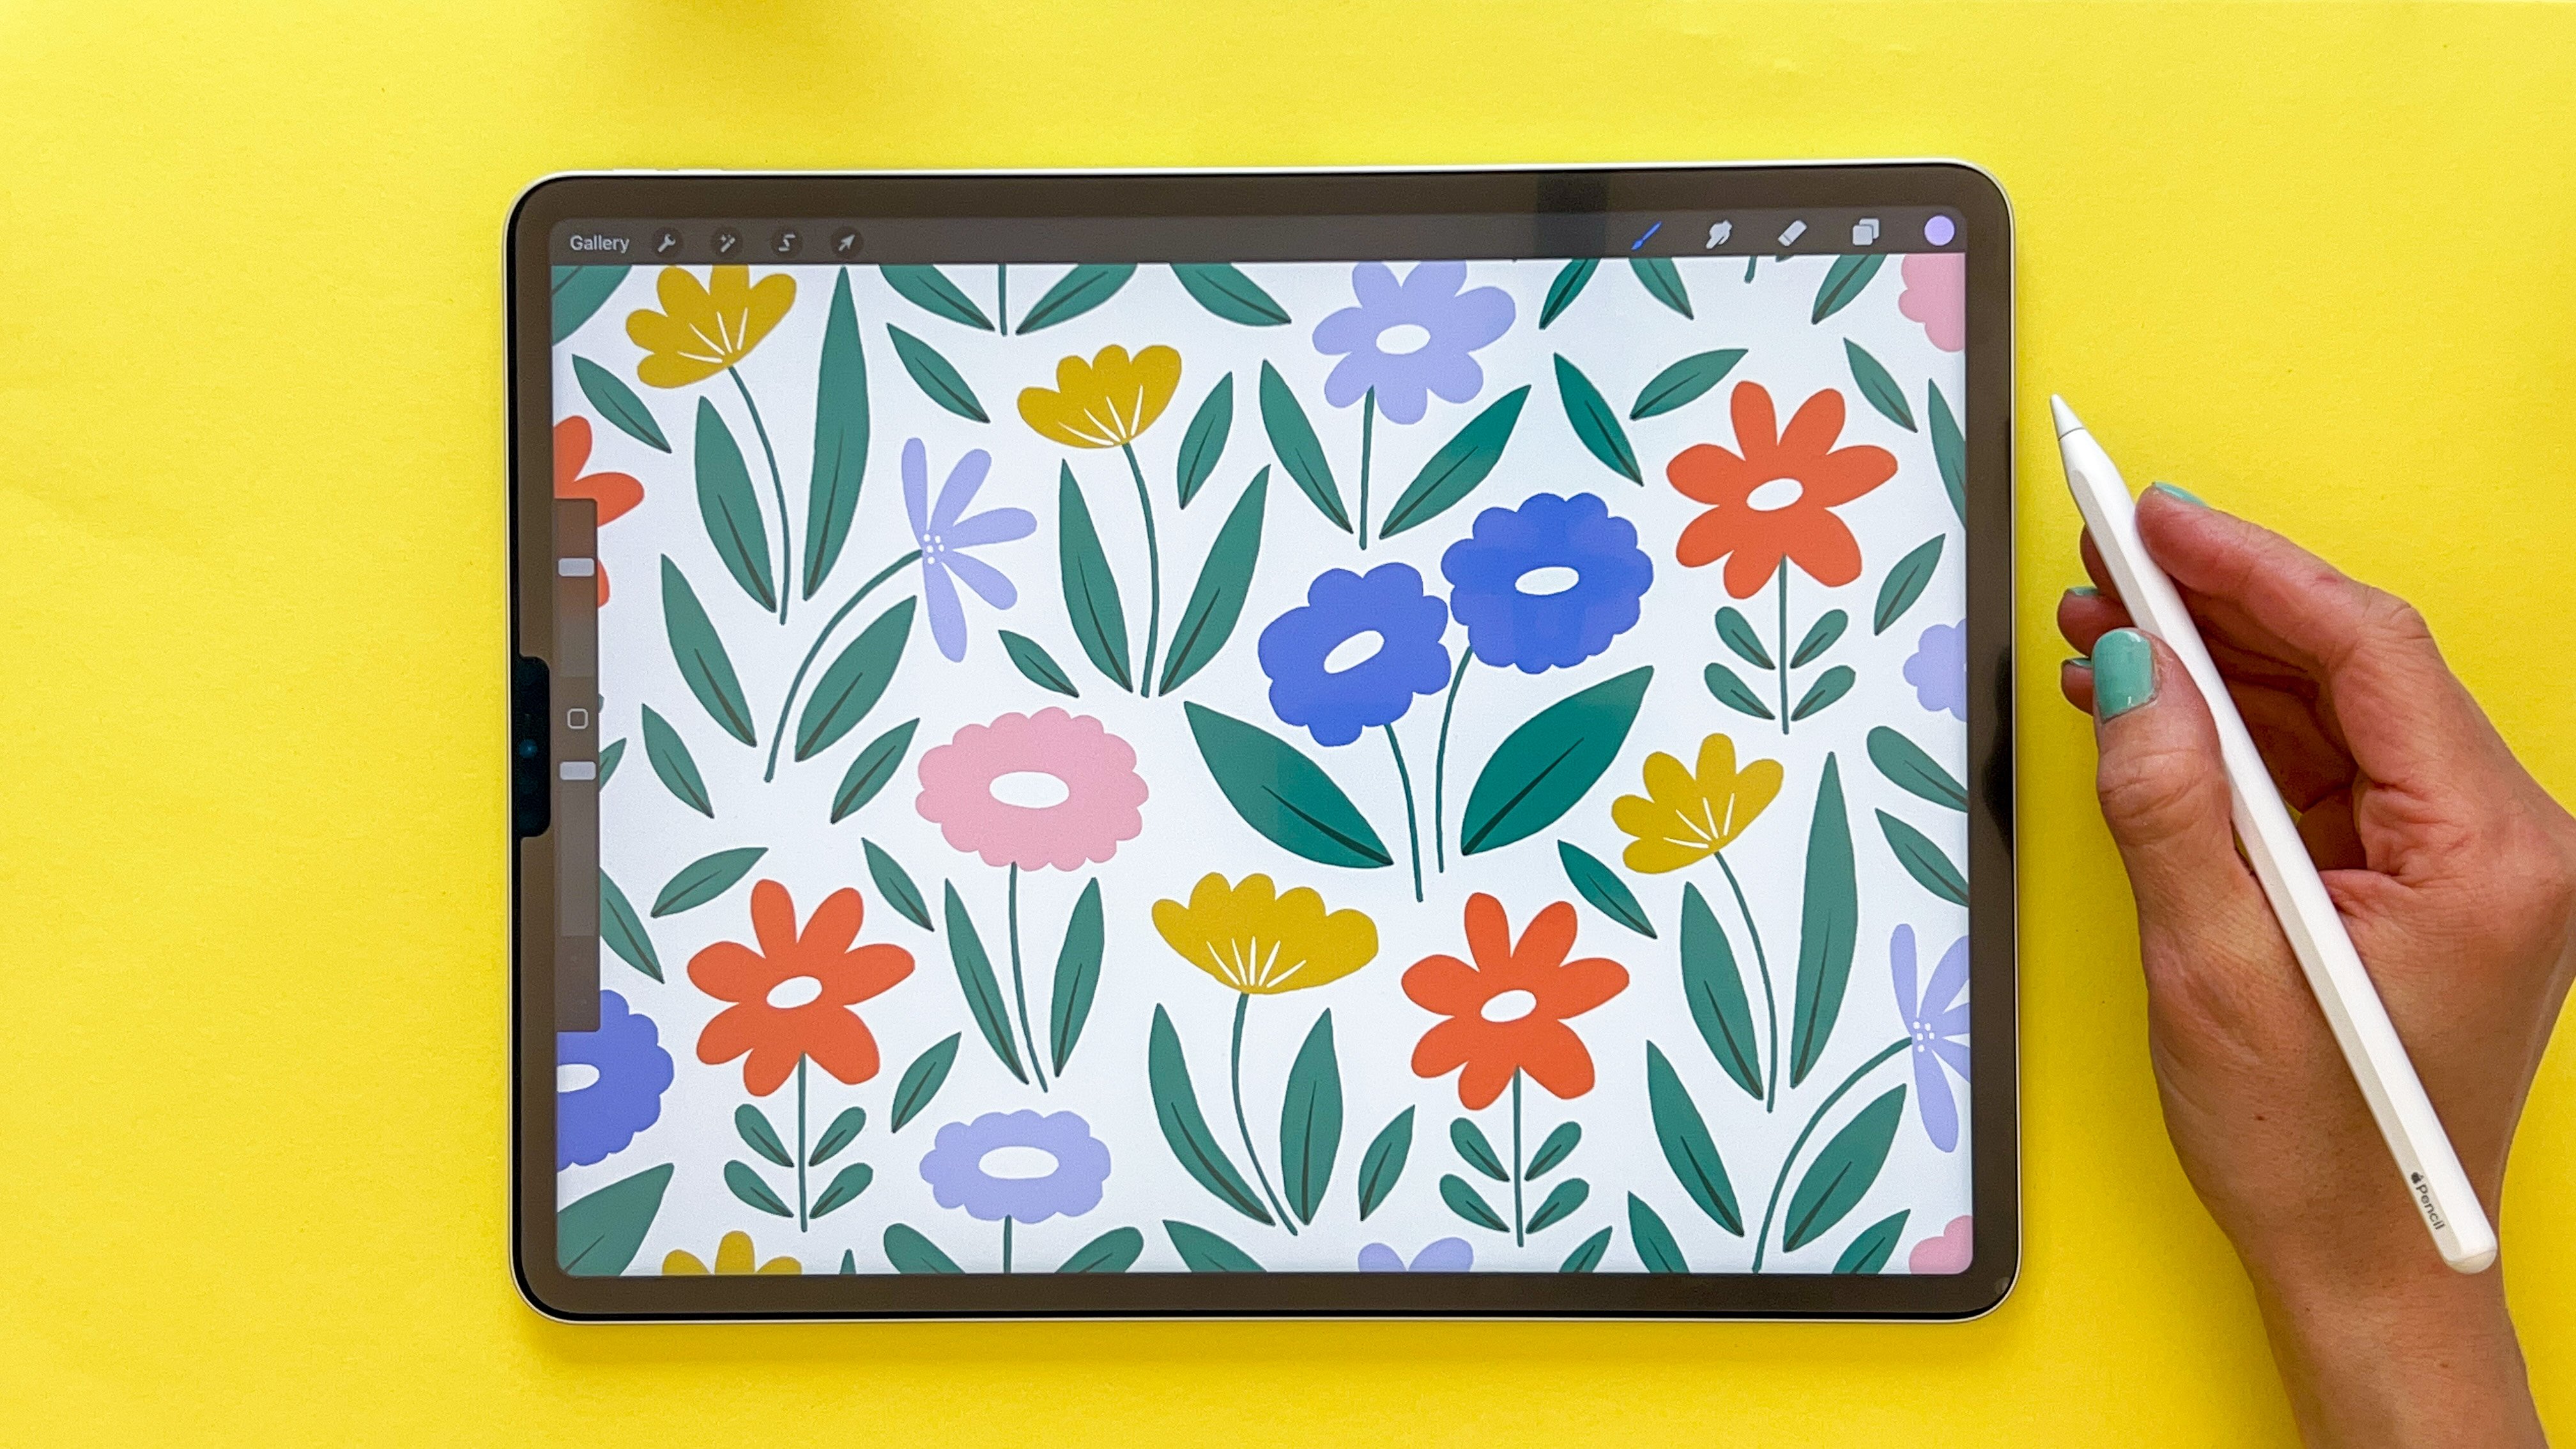
6. Sketching Geo Pattern - Part 1: Let's start with sketching
our first pattern. I have divided this class into the three
different patterns, so we will start with the
sketching our pattern Number 1. Then we will create the final color version
of pattern Number 1, and then we will continue with the sketching
of pattern Number 2. So let's start by duplicating
our pattern template. I will select the pattern
template and tap Duplicate, and then I will tap little
cross sign to deselect, and tap and drag to drag
those ones inside of a stack. So I accidentally dragged
another thing in there, so I will just grab that and take it out
again on my stack. But now we have two pattern
template files in my stack. One, I will make sure
to always duplicate and keep that as the
original pattern template, and then I will tap into the new one to create
a pattern in this one. The first thing that I will
do is to swipe to the right on the first layer
to clear that layer. So the first thing that
we will do is to turn on the symmetry tool because
that is what we will use in this class to create
our symmetric patterns. So tap the Actions
panel, Canvas. Your drawing guides
are turned on, and then we tap
Edit Drawing Guide. The normal 2D Grid is the one that we
use where we want to have the guidelines on our Canvas to get
good measurements, but now we will use
the symmetry tool. You can drag up the opacity and the
thickness of the line, I usually don't mind that. But what I usually do when I create these
types of patterns is to drag the drawing guides to the pink or red part of
the spectrum over here, because that will make it
show easier when we put on our images with the
drawing guides on top. In the symmetry tool, you can tap Options. We have the vertical symmetry, which means that what you
draw on one part over here will be reflected on the other part of
the Canvas over here. The horizontal is the same, what you draw at the top will
be reflected at the bottom. The quadrants, what you draw in one square will be reflected in the other three
squares of your Canvas. We have the radial one which
means that what you draw in this little section
will be reflected to all of the other small
sections of your Canvas. In this class, I won't use
the vertical and horizontal. You can experiment
with those yourself, but I will use the
more advanced ones, the quadrant and the radial. We will start with the
quadrant in this lesson, and we will make
sure that we don't have rotational
symmetry turned on, so make sure that
it's turned off, and that assisted drawing is turned on, and then we tap Done. As you can see, we
have four squares, and I will just demonstrate
how that works. In your layers panel
on your layer, you can see that a
system is turned on. You can tap the layer
and turn off assisted, and then you just have a
regular Canvas you can draw on, nothing is reflected. But when we turn on
the Drawing Assist, what you draw on one square will be reflected on the
three other squares. So that is how the
symmetry tool works, and you can draw all types of fun things with
the symmetry tool, but in this class, we will focus on
symmetric patterns. So let's get started with the actual sketch of
our first pattern. This is the most simple pattern that we will create
in the class. It will be a
one-colored version of a geometric symmetric pattern. So the first thing that
we'll do here is to swipe right and
clear this layer. Then, as you can see, that the guidelines of this
symmetric tool are here, which means that we can't add the 2D guidelines to the Canvas. When we create geometric shapes or maybe other shapes in
symmetrical patterns, it's easier if you can see where you place your
objects on the Canvas, so that you can
get a pattern that is balanced in a good way. Let me show you what I mean. I will tap to add a new layer, I will drag that layer
beneath my first layer. Then I will tap Access panel, Add, Insert a File. You fetch your guidelines small or guidelines large that you can download
in this class. I will tap Guidelines Small, then tap the transform
tool to place it, and then I will add a new
layer on top of that, insert a file and
guidelines large. You can use just one of
these if you want to, but I will show you a
little trick that I like to use to make it easier
visually to see. So I tap the first
Guidelines Small and I drag down the opacity
of it so that it's not that much
opacity at all. In this class, so that you can
see it on screen, I will keep it at maybe 35 percent or
something like that, but you can drag down
the opacity even more so that you aren't disturbed by the guidelines
when you create. Then I tap the
Guidelines Large and I will drag down that
opacity as well. I don't want to
drag it down more than the small guidelines
because I want that to be a little bit
darker so that I have a larger square and then four
smaller squares in-between. So maybe 4-5 percent or
something like that. Next thing that I will do is
to swipe to the right and both of those layers and
group them together, and I can rename
those two guides, so I know where I
have my guidelines. Now it's time to start to
sketch for our pattern. I will tap the assisted layer, that's empty layer that I
will start to sketch in. I make sure that I
have black as a color, and then I use the
perfect pencil, you can download for
free in this class, and I will add Pinterest
as a split-screen. So I tap little split-screen
at the top of Procreate, I tap and drag my Pinterest
window to the left, and here I have my
Pinterest board. I want to create some type
of geometric patterns. So these tiles are great
inspiration, for example. Also, these are really cool, and those ones, and there was also some type
of blue tiles over here. This one is really cool as well. So let's just start with
some inspirational images and play around with
some geometric shapes. You probably can't
see it on screen now, but as I have made the
symmetrical tool guidelines pink, I can see where those are. So even if you can't see that
on screen in this video, you probably can see it on
your own iPad in Procreate. So let's start by
drawing some shapes. I actually want to start
with dragging down the opacity a bit more
of the guidelines, because I felt that
those were a little bit disturbing when
there were so sharp. So on this is the layer. With the perfect pencil, I will start to add some shapes. I think that I want to add
some type of diamond shape. There are a few different
ways that you can draw your shapes when you use
the quadrant symmetry tool. You can draw one shape
per quadrant like this. But for this pattern, I think that I don't
want that look. You can experiment and see what look you want for your pattern. But I will erase those shapes and will try to add my
shapes like this instead. This is my center point, and if you feel
that it's hard to see where the points are that you want to start and
end to draw your shapes on, you can add some dots where
your shapes can meet up. So here is the center of
one of my squares and, no here it is [LAUGHTER], and here is the
center of the Canvas, and I will add a little
dot over here as well. If you want to, you can
draw straight lines, tap and hold, and when you tap with your fingers you will get
these straight lines. I don't want to do that. I want to have my patterns
a little bit more organic, not perfectly geometrics, so I will just draw. But you can do however
you want to of course. So I will start to
draw a diamond shape, but I think that I
want it a little bit more inflated like this one, maybe not that much, but a little bit, so I will make it
something like this. So that looks pretty
okay for a sketch. Then I think that I
want some oval shape, maybe something like that. But I probably want
them to meet up, so I will make my
diamond shape a little bit larger at the top. Then I can just erase
the parts that I don't want to have in my sketch so that
I don't get confused.
7. Sketching Geo Pattern - Part 2: Here we have some simple
geometric shapes that actually are turned into pretty cool pattern,
I would say. Now I want to draw, just by my imaginations, I will swipe to the right on the split-screen on Pinterest. It's also easier
for you to see in this class if I don't have
that app all the time, and I think that I want to add some dots. Just a
little note here. If you have watched
my other classes, you have probably
hear me say that you never should draw
anything out of the edge. It's the same rule here, but at the same time as what you draw here
are reflected here, so we are still making
a perfect pattern tile. We're just not sure
how this shape looks when it's repeated, where we're drawing like this. That is why we will try
it out in a minute, but just continue with me
and draw and I will show you in a minute why we can draw
at the edge at this point. Next, I will just want
to add some oval shapes. I think it's easier
to add some dots. I know where I want to
draw other oval shapes and I probably want to do
it at a center point here. Let's just count
1,2,3,4,5,6,7,8,9, so at 4.5, 1,2,3,4, somewhere
around here is the center and then I
will just draw a dot, so something like that. Now it's time to make the actual repeat
and see how our oval shapes over here repeated and I also might want to
add some more shapes. It's time to use our
pattern template. I will turn off the visibility
of the guides and I will add a layer and drag that layer
beneath our sketch layer. I will fill that layer
with a white color. This is to be able to
make the pattern action that we created in this pattern templates
earlier in class. I will swipe to the right on both layers and
group them together. Select the group and then we will use the
selections tool. Tap "save and load",
selection number one. You have one selection selected [LAUGHTER] and then
tap the transform tool, flip vertical, and
flip horizontal. It doesn't matter if you flip
horizontal first and then vertical or vertical
and then horizontal. If you find that you can
select the whole group, you can always swipe to
the right and both layers, and then you have both of
those layers selected as well. That works perfectly fine also. Then tap the "save
and load" again. Selection tool, that
transform tool, flip vertical and
flip horizontal. Then the selection tool
again, "save and load", selection 3, transform tool, flip vertical, and
flip horizontal. Then selection tool again, and selection number 4, transform tool, flip
horizontal and vertical. Now we have made actual
repeat of the pattern and going back to this sketch
layer with a black color, I can finish the pattern
and see if all of the shapes are looking
as I want them to look. These shapes might
be a little bit more oval than I
wanted and then I can just adjust them so that they are a little bit more round if that is the
look that I want. I can erase the parts of the sketch that I
don't want to use anymore for the final piece
so that I don't get confused. Now I can add some more of
this if I want to as well. If you want to continue to draw here with your drawing guys, you need to turn off the
background layer that we used to create the actual repeat and then turn on
the guides group. Tap the layer with the sketch and with the perfect pencil, I will continue to
draw some objects. I think that I want
to add dots in all of these objects over here. Turn off your drawing guides and have a look at your pattern. This looks pretty good
to me and for me, this sketch is finished. In the next lesson, we
will continue to create the final color version
of this pattern.
8. Create Geo Pattern: To continue with this pattern, we will move on to
the sketch layer and drag down the
opacity a bit so we can draw on top
of that layer. Then I will add a new layer
on top of that group. If you want to be organized, you can name your layer or group to sketch and then tap to
add a new layer on top. We still want to have our symmetry drawing
guide turned on. If you want to you can also have your guidelines turned on, or you can just draw by
freehand from your sketch. I will have the drawing
guides turned on for this example and then we will start to draw
on the new layer. I will choose a color, and in the color palettes that
is included in this class, there are some
earthy soft colors, which I feel is good when
you have busier patterns, but you can of course, use
brighter colors if you wish, or whatever type of
colors you wish. But if you want to
follow along with me, let's just use the green
color in the color palettes. Then I will use the thick
and texture brush for this. The thick and texture
brush has become my go-to brush for a lot of things
that I draw in Procreate. I hope that you enjoy too. I've included in this
Skillshare class and a few other classes
and it is from my texture brush sets from
me and my husband's brand, favorite company, which has become my favorite
brush set as well. The newest brush set is always
the favorite one for me. With the thick and
texture brush and on a new layer make sure that you have Drawing
Assist turned on. I almost forgot about that and then we will start
to draw our shapes. Let's start with
these oval shapes. It seems like I have something
not working over here. Oh, there. It worked, great. On that layer, let's start
to draw this oval shapes. I will just add some marks
so that I can better see where I want my shape to start and end and then
I will start to draw. I will tap and drag to fill the color and I
can just zoom in. If you feel that
there are some space between the outline
and your field shape, it's because the brush is
textured and normally I just go in and fill in those texture
pieces a little bit, but also, I don't mind if I have a little bit of
texture on my shapes. I don't need them to
be perfectly flat. If you want them to
be perfectly flat, also in the edges, you probably should
use another brush and not this thick and
texture brush. There I had my first shape and actually I think that
I want to tap and drag to move the color layer beneath my sketch so that I can see
my sketch shining through. With this layer selected, I will draw everything
that I want to have in the same color. My plan is that these diamond shapes will be green and the dots in
those will be white. This part will be white and
the dots here will be green. What I do here is that I draw everything that
is fully visible here because if I
draw over here, I'm not sure how that shape
looks when it's repeated. I will just stay to the
parts that are completely visible on this pattern
at the moment and then we will do
the repeat and we can add the other parts. I can see this dot clearly
and I will add that one. That's all for now
with the green. Then I will add a new layer, make sure that that layer is
Drawing Assist turned on and then I will use the cream whites and I will add the dots on the oval shapes. Here we go. It's reflected on the other side of my Canvas. That looks pretty cool. I always make sure that I draw the different colors on
separate layers so that I can re-color in a simple way further on in the process
if I want to do so. Moving on, we will put these
two layers in a group. Select those, put
them in a group, you can rename them to
pattern for example, or whatever you want to
name it and then we will select that group and we will do the actions where we
create the repeat. Tap the selections to save
and load selection number 1. Oops, I didn't have
a background layer. You always need a
background layer. You have the whole
squared as a selection. I will tap and drag a cream white background and I will put that
one in the group. Now I will select
the group again. Before we do the actions again, we need to select both
the pattern layer and the sketch
layer so that we do the actions on both
of those layers and then selection to save and
load selection number 1, transform 2, flip
horizontal, flip vertical, selection number 2 transform
2, flip horizontal, flip vertical, selection
number 3, flip horizontal, flip vertical and
selection number 4, flip horizontal, flip vertical. Now we have the shapes that were on the edges in the center. We can continue to
draw on those ones. In the pattern layer, I will select my green layer and the thick texture brush
and I will draw these shapes. If you want to use
your guidelines, you need to turn off the background layer so you
can see your guidelines shine through there and then we will continue to draw these shapes, make sure that they meet up
in a nice way in the edge, because that is how the
pattern will be repeated. The next one, you can of course be as
detailed as you wish here, creating a really straight
geometric pattern or be a little bit more
imperfect like me. For the purpose of this class, I'm not being too fussy
about my lines and that they should be completely
perfect.. Moving on, the other part that I want
green are those dots, so I will just use my green
color and draw a dot over here and that will be reflected
at the bottom as well. Turn off the sketch layer
so we can see our pattern, and I think that these dots should be a little bit more round,
so something like that. Then I can turn off
the guideline layer, turn on the sketch layer, and I can see that I have those two dots that I
want to add in white. I choose the cream white layer. Thick and texture and
here I will just draw these dots on free hand from the sketch, something like that. Then I can turn on the
background box again, turn off the sketch layer and here I can see my
finished pattern. Now you can have a look at
your pattern and see if you want to make some changes. I, for example, I can see a little thing over here
that I want to fix. You can do the changes
that you want to at this stage and then we will move on to try out the pattern. To try out the pattern, I will make sure that the
layers that I want to flatten, which is the pattern group, all of these are the
visibility turned on and then I swipe down with
three fingers tap Copy all, swipe down with three
fingers again and tap Paste. That will bring me
a flattened image of the whole pattern
in a new layer. With the transform tool, I tap and drag until
I reach 1,800 pixels, make a pattern tile that
is half of the size, and then I make a
duplicate of that layer, tap and drag to place it beneath and make a
duplicate again, tap and drag to place it on top and then tap and drag with the new copy to place one of those pattern tiles in each of the four
squares of my Canvas. You can turn off the drawing
guide because that might be in the way when you see
how your pattern is repeated. Here, you can see that
you have four images that are showing how your pattern is repeated when you place the pattern tiles
next to each other. If you zoom out, which I think is a
good little trick to see how your pattern
would be repeated if you are not looking at it
very closely, it looks good. Then we can zoom
in and see if we find any flaws or something
that we want to change. For me this looks
really, really good. If you would want to make
some changes you need to go back in the process and create the pattern
tile once again, just as we did when we
draw the repeat and you just move back
and forth until you find a pattern that
looks good to you. This pattern is finished. Let's move on to
the next pattern.
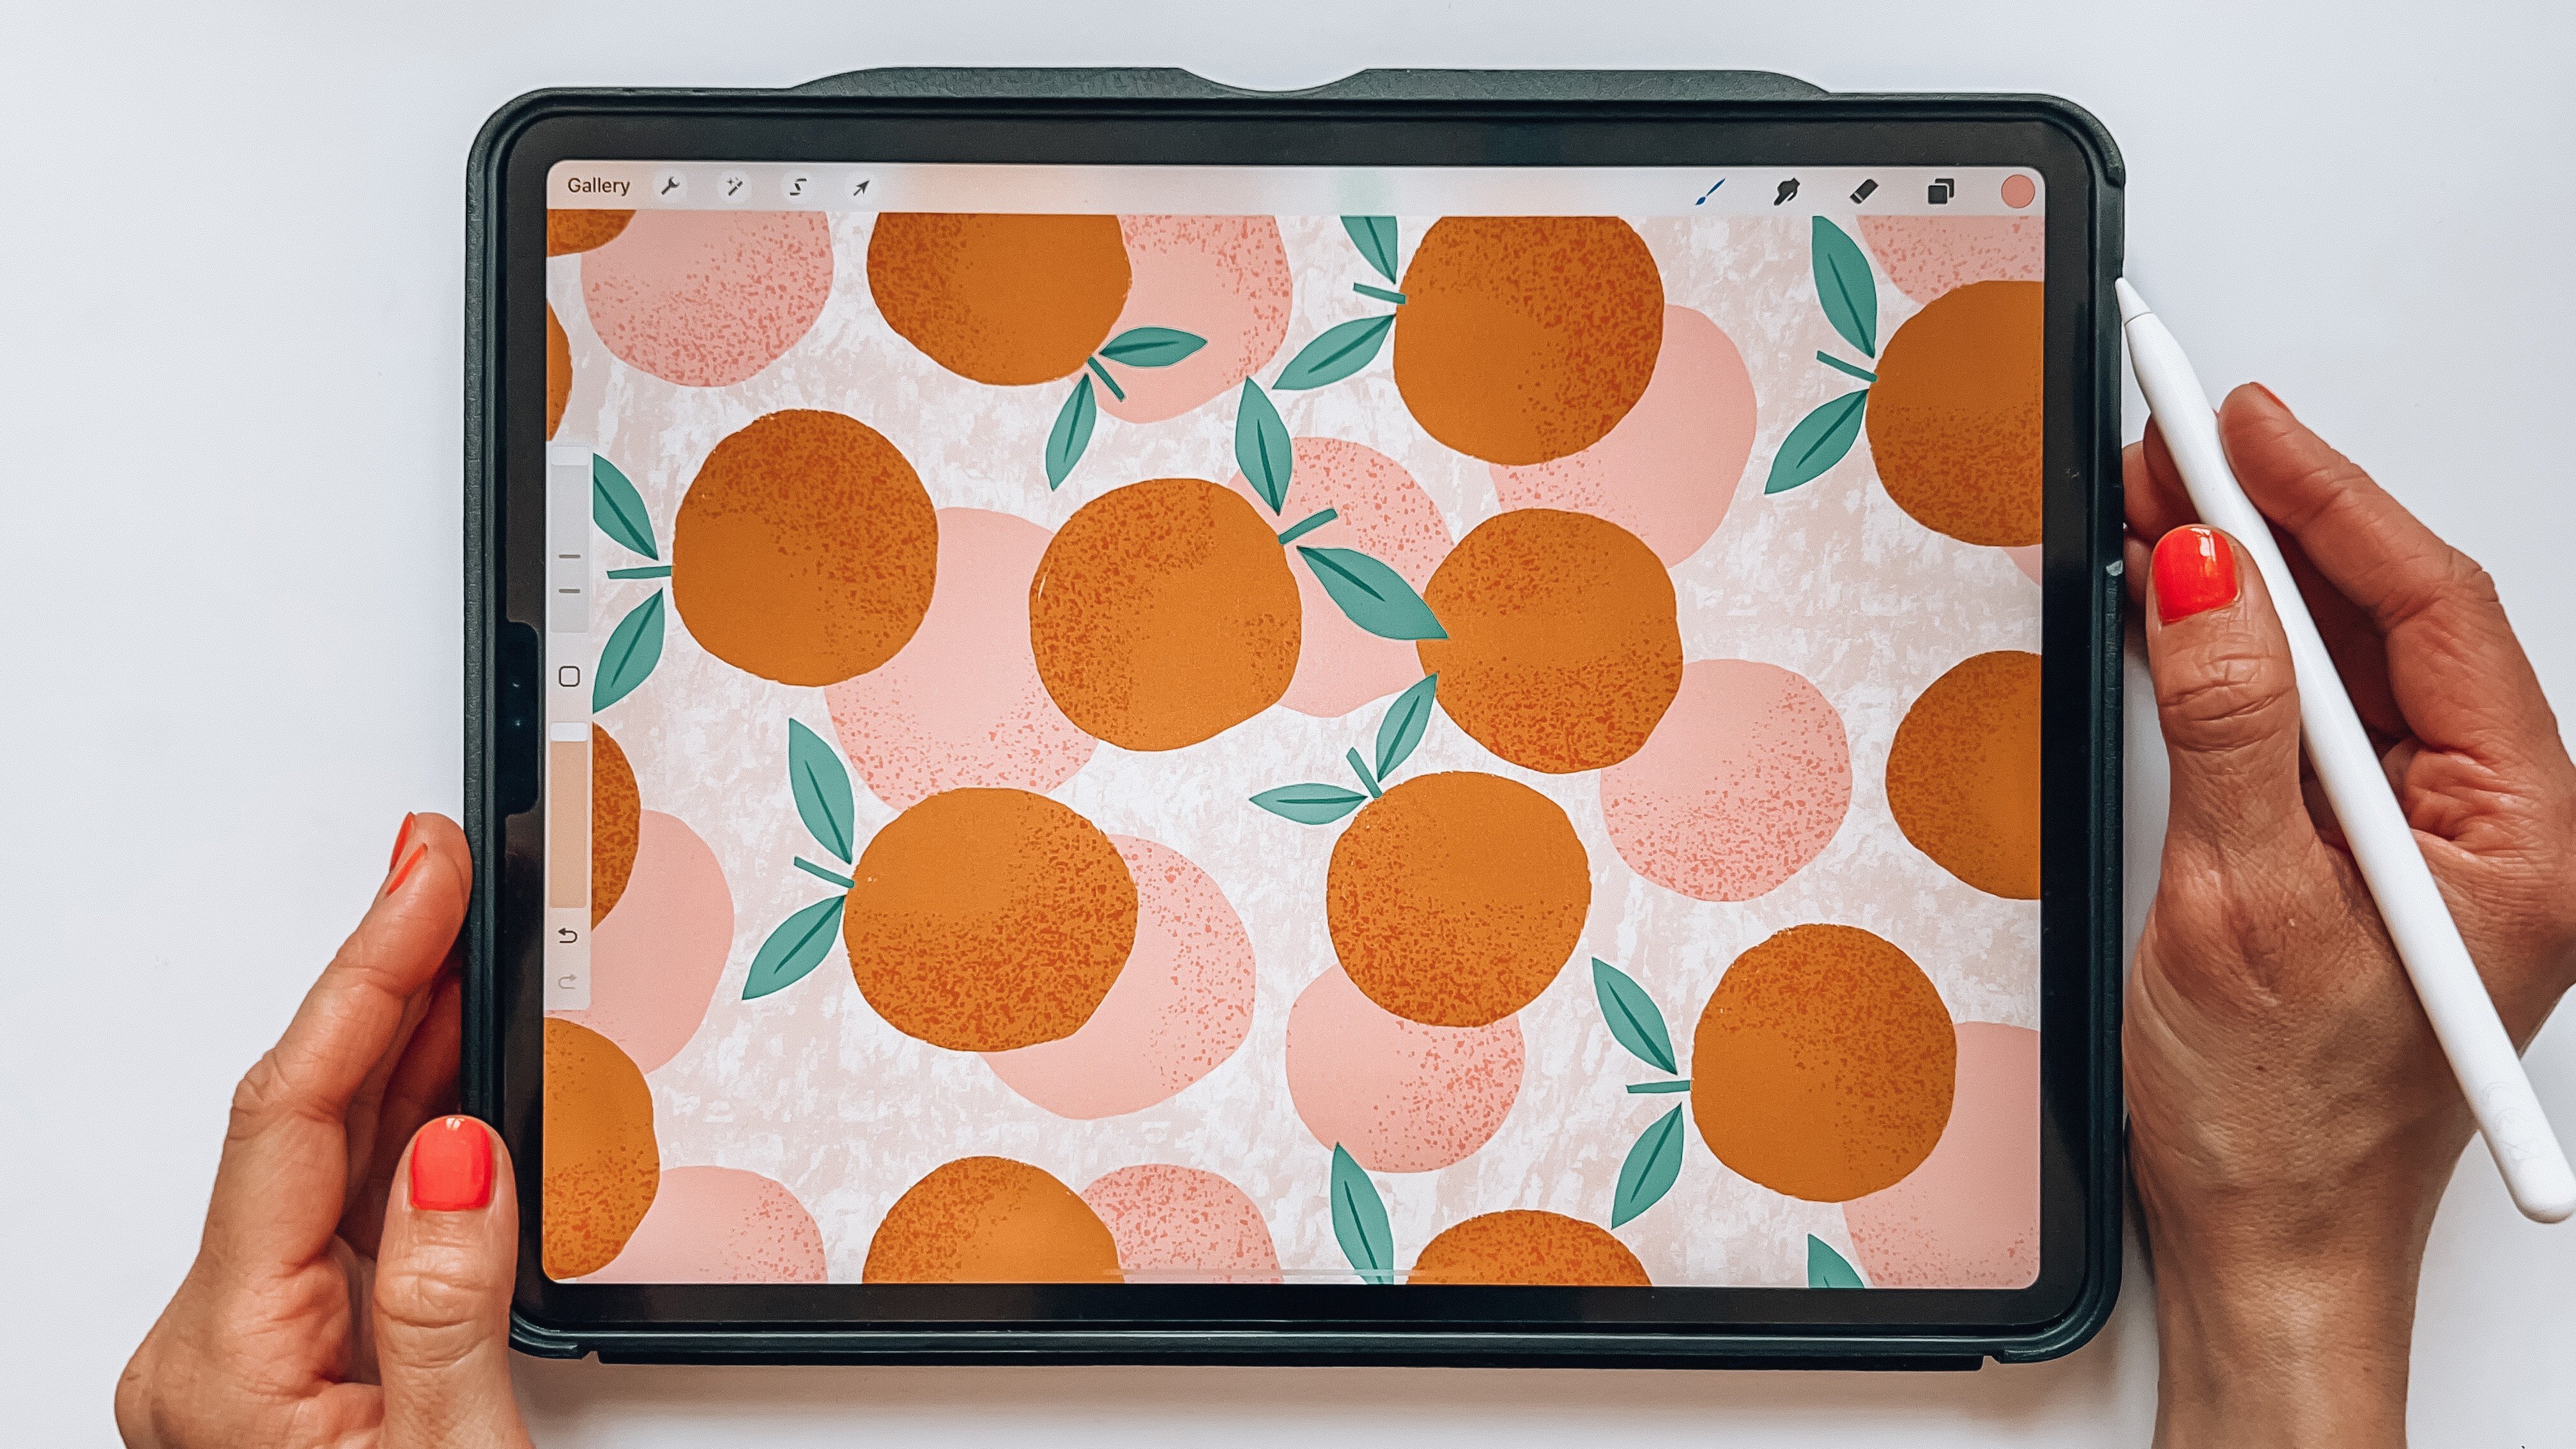
9. Sketching Tiles Pattern: Let's move on to create
the next pattern. Actually, I've just realized
that I didn't place the guidelines in the
original pattern template, so let's create a new
pattern template. Because we placed the guidelines in our pattern over here, we will create a new
pattern template with the guidelines
so we don't need to redo placing the
guidelines in every pattern. Tap into one of the
copies and I will delete all of the layers
that aren't guides, delete and turn on the guides, and then I can just
write the template here so I know that this is
the new pattern template. Here we have the new
one and then I can just delete the old pattern template. We have our template,
I select it, duplicate it, and then we start to create a new
pattern in this one. I will delete that layer and add a new layer where we
can draw our pattern. For this one, let's fetch some inspiration
from Pinterest. I want my inspiration
on the left and I think that I want to create something that is inspired
by this type of shape , like this one. Let's see what we have. I have one image in mind if
I can find it, this one. So this will be my inspiration. If I don't want to have the
Pinterest window like this, I can always download the image and I can't see
the three little dots. I will just increase the window and there we
have the three little dots, and I can download the
image to my camera roll. Now I can use this as a reference image instead
of having the split-screen. I will head back to Procreate. Under the Actions panel, I will turn on
reference, tap "Image", "Import Image" that I
saved to my camera roll. Now I have it as a small
image over here and it's easier for you to see the whole screen where
we draw our pattern. For this pattern,
we will also use the quadrant symmetry
drawing guides. Tap Drawing Guide and under
Symmetry, tap "Quadrant". I will still have mine in
a pink color over here, and then I tap "Done". Same as before, makes
sure you don't have rotational symmetry turned on and that assisted
drawing is turned on, and then tap "Okay". Now it says assisted in this layer and we can start
to sketch our pattern. With a black color again, I will with the perfect
pencil start to sketch. For this pattern, I will use a different method. Here I will draw one shape
using the symmetry here, to draw just one
shape in the center, and then we will repeat that shape and color it
in a different color. Almost like here that you have one shape over here and
one shape over here. This is green and this
is cream-whitish. So I want to use that
type of symmetry. Let's just make the
reference image a little bit smaller and then
we will start to draw. Now it's time to
start sketching, I know that this is
my center point, I can just mark that one up. And then I can choose how far
out I want my shape to go. These shapes meet at the
edges of the pattern tile. If we zoom in all
the way over here, I think that I want to make
mine a little bit smaller. So let's meet the shape
up over here somewhere, and then we can just
start to experiment and see how we want
our shape to look. Let's for example make one of
the oval shapes over here. Maybe I want the same
shape over here, and then something that goes up, maybe just a little bit out, a little bit here, and then maybe I wanted to meet up in some
shape over here. I don't really like
how that looks, I will just delete that part. I think I want to drag down
that part a little bit more. Now we have that shape, let's move on and draw
something in the middle. We can do some type
of flower thing in the middle, maybe like that, maybe something like that and
then we could do some dots maybe over there and over here. I'm just drawing some shapes with inspiration
from this one but I don't want it to look
exactly the same. It looks a little bit
the same at the moment but let's move on and
see what we can do. Then I might want to add
something that looks like a little flower. So inspiration with
that tulip shape over there and we could
do the same over here, maybe that one should
be a little bit longer. I will just delete that one
and draw a new one over here. That looks pretty good,
it looks a little bit similar but
at the same time, it's not an exact copy. As this is for
learning purposes, I don't mind that it's
a little bit similar. Then I will just tap the
little cross to remove the reference image
and here we can start to create a
pattern out of this. What I want to do now is to just repeat this shape but I want it with another color so it will look almost like a half-drop
pattern when it's finished. Let me show you what I mean. The first thing that we will
do is to add a new layer, tap and drag to place that layer beneath the first
layer with a white color. I'll use this cream right now, we tap and drag to fill
that layer with a color. Then we group these two layers together and this is our sketch. If we want to name it Sketch, we can do so, and then we will duplicate that sketch layer and uncheck little checkbox
with the visibility. We save one sketch
layer over here, we can actually drag it above the group so that it
won't be in the way. We can turn off the guidelines, we select our group and now
we will make the repeat, so tap the selection tool, tap save and load
Selection Number 1, transform to flip vertical, flip horizontal,
selections tool again, Selection Number
2, flip vertical, flip horizontal, save and load. Selection Number 3, flip vertical, flip
horizontal, save and load. Selection Number 4, flip
article and flip horizontal. Now we have flipped
everything to the outsides of
the pattern tile. We have repeated that shape in the edges and now we have a
blank space in the middle. To fill this space with
the exact same shape, just turn on the visibility of your second sketch layer
which you saved previously. Then we can drag that in the
sketch group so that we have all the layers with the
sketch together in one group. We can even merge these two layers together
because we don't need them separate so swipe the layers together to create one
layer with the sketch. That is a really
good way to create these types of patterns so this is the sketch
for a pattern. When we create the colored
version in the next lesson, I will show you just why I
created the pattern this way.
10. Create Tiles Pattern: So now it's time to
create this pattern. The first thing that
we will do is to turn down the opacity of
the sketch layer. Tap that layer, tap the little N symbol and bring down the opacity so that we can draw the colored shapes above or beneath the sketch layer depending on how
you like to work. I will create a layer above the background layer and
beneath the sketch layer, where I will draw
my colored shapes. If you want to, you can
turn on the guidelines. In that case, you turn
off the background layer, so that you can see
the guidelines. Or you can just
draw by freehand, turn on the background
layer and make it a little bit more organic and in perfect. For this one, I won't mind having the guidelines turned on, so I will have those
turned off and I will draw on top of
the background layer. On my new layer, I
make sure that I have Drawing Assist turned on, and then I will
select the color. For this one let's
go for a pink color. With thick and texture brush, I start to draw my shape. So you can zoom in a
bit if you want to, and then start to
draw your shape, I will fill in this
whole shape with one color and then the details on top of it with other colors. Tap to fill. If you turn off
the sketch layer, you can see how it looks. That looks pretty good, a little bit shaky
on some places, and also you have that
little line between where your outline of the
thick and texture brush, and fill color meets. You can always fill in that. That looks pretty good to me. Let's turn on the sketch layer again and continue
to draw the details. I want to have a pretty
simple pattern here, so most of the details, I think I will keep in the background color,
the cream white. But let's add a new layer
on top of the pink layer, and I will use the cream white color the same as
the background. With thick and texture, I will fill in the shapes. Let's start with the
ones in the middle. We can zoom in. Oops. We need to have
Drawing Assist turned on. It says Assisted on the layer and make sure that
you're on the new layer. I always keep my colors
separated in layers, as I mentioned before, which makes it easier to recolor this pattern later on
if we want to do that. Then I draw in the
shapes like that, I think that I will keep
these flowers white as well. Fill them in, and those flowers, fill that one in. Let's turn off the sketch
layer to see how it looks. I think it looks pretty good. I want it to look a
little bit rough, so I like that imperfect look. Great. Now, I will turn on the sketch
layer and I think that I will add another color
for the brown dots, so with a new layer, tap the layer, Drawing Assist, and then I will use the
dark brown color in the color palette with a thick and texture brush and I will add this little dots. Turn off the sketch layer and this is how my object looks. I think it looks pretty cool. Let's move on to
our next object, the one that is
repeated on the edges. Let's turn on the sketch layer
again because we want to make the repeat with
both the sketch and the color objects. I will just keep everything in this sketch group for now, and then we can move out the colored objects outside
of this group later on. Now, it's time to create
the other object, the one that is
repeated on the edges, and I want to have
that in another color. What we will do is to swipe to the right on the layers
with a color object, and I'll group those inside
of this sketch group, so we have that group over here. Then I will select that group, swipe to right to duplicate it. Now, we have two
copies of that object. One of those groups, I will just drag outside
of the sketch group. Now, I have one object over here that I don't want
to repeat with our actions. Then I want to repeat
everything that is inside of the sketch group, the sketch and object,
and the background. Moving on, I select
the sketch group or you can select all of the layers by swiping to
the right on the layers. It doesn't matter. Some people have problem
when they select the groups, so this is a great alternative. Tap the selection to save
and load selection number 1, tap the Transform tool, flip vertical, flip horizontal. Selection 2, save and
load selection number 2, flip vertical, flip horizontal. The same thing with
Selection 3 and Selection 4. Great. Now, we have our objects at the edges and we have a sketch for
object in the center. If we want the object
in the center to be exactly the same as the
object on the edges, we have saved a copy over here, so we can just turn on the
visibility of that one, place that one, and then we
can recolor that object. I will do that. But if you
want to draw a new object, if you don't want all this
to be exactly the same, you can do it over here. But to keep it simple, I will place my objects, that is an exact
copy of that one. Then I will turn off the
visibility of the sketch. I will drag up the group with
the other object over here. Now, we have all of these
objects separated in colors. These ones on the sides, we will keep that one pink. The one in the middle, I will just re-color the shape, so I will swipe
to the right with two fingers to create the
Alpha lock on that layer. Then I will choose a color. I'll go for the
lighter brown color in the color palette, and then I'll tap that
layer and tap Fill Layer. I will keep the dots
dark brown and I'll just change the color of the
background of that object. Yeah. This looks really good. Let's turn off the drawing
guide to see how it looks. At this point, it
looks really good. Now, I want to try to
repeat this pattern. The background is over
here in the sketch layer, so it doesn't really matter
but you can drag it up so that you have
the color objects and the background over here, and you can even group these
together if you want to have your colored
objects in one group. But I will just keep
mine over here. Turn off the sketch layer and make sure that I have all of the layers that I want to create an image of select that, swipe down with three
fingers copy all, swipe down with three
fingers, and paste. That will place my image on top of the layer
that was selected, so I will tap and drag, to drag it on top of all layers, and then I will
tap on the image. I usually drag but you
can also tap one of the nodes and make sure that you have
deleted chain symbol. Tap them so that it's
blue and right in 1,800 pixels which is half of
the size of our compass. To not make it confusing, I will turn off the visibility of the original pattern tile, and I will duplicate image, tap, and drag, make sure you have snapping
and magnetics turned on in the transform tool so that it snaps in the right position. The right position is
exactly in the edge, and then you tap
the Transform tool. Swipe to the right to
duplicate, drag it down, make sure that it snaps
in the right position, and then once again, duplicate the layer and drag
it to the right position. Now, we have four
pattern tiles that is repeated and we can see
how our pattern looks. For me, this is a
really cool pattern. I'm really happy with this one. You can twist it around, you can have in any
direction you want. It looks really good. Great. So now, we have
created our second pattern.
11. Sketching Floral Pattern - Part 1: It's time to create
our third pattern. We will start with the sketch, and now we have our
template ready here. I will just select the template, duplicate it, and
head into the copy. Delete the layer where
it says template and then I will add
a new layer on top. I will choose black as the
color and the perfect pencil, so that I'm ready to
sketch on new layer. Let's go ahead to Pinterest. I want to split
screen this time. I will just go straight into Pinterest and
save the image to my camera roll so
that I can use it as a reference just like
in the previous lesson. For this one I want to go
with the radial symmetry. Something like this
would be really cool. We can save that one
to the camera roll, so tap to download the image. This one is also really cool, so download that one. Some flowers would
look nice I think. This one is also amazing. Let's save that one. With those images downloaded, you can use any inspiration
imagery ways, of course. I will tap the actions
panel in Procreate, reference, image, import image. Let's see which one
to choose first, let's go for this one
and see if we can do something fun inspired
by this image. I will make it really small so that you can see as much of my canvas as possible
here. Something like that. Then I will go into
the drawing guide, turn on drawing guide and actions panel edit
drawing guide. Make sure you had
the symmetry tool, turn on options and here we
will change it to radial. We don't want
rotational symmetry, but we want assisted
drawing turned on, and then I tap done. Now we have a different type of symmetry thing going on here, which means that what I draw
in one of these sections, this is one section, so it's 1, 2, 3, 4, 5, 6, 7, 8, eight eight sections. What's pretty cool
is that you can get some really nice
flower shapes and other cool geometric
shapes that are repeated across your
cameras like this. The radial symmetry tool is a really fun tool
to play around with, so take some time to
experiment with it. You can make some really
nice stuff with this tool. Moving on, I will just delete that layer
and add a new layer, tap the layer and tap
drawing assist and here I will start to
sketch my actual pattern. This is my center
point of my canvas. It would be cool to have some maybe sun inspired flower,
something like this. This looks really nice, but I don't want to make an
exact copy of it, of course. But we can start to add
round shape in the middle. I like that look. Here something cool happened
like a flower in the middle. This is, for me, all about experimentation
is really fun to just play around and see what you can do with this tool and what type of interesting
shapes you can come up with. Then I might want to
draw some leaves. Let's try out some
smaller leaves like this. That looks really nice, maybe a little bit
longer over there. Then we can add
something more here. Maybe some dots or leaf
or something going out. Where did my flower go? It disappeared. How strange? I'm drawing that one again
and then we will continue. We can just look at the
composition over here. Something that goes out
like that might be cool. Maybe some flower
shape or leaf shape. Or you could do, they have some heart shape
that also looks pretty cool. Something like this. That will be pretty nice. Let's continue with that. It looks nice and here we can have maybe
the other direction. Like a flower girl there. Then I will continue
to experiment and see what interesting
shapes I can find here. When I draw these ones, I instantly see that I like the blobby shapes or
whatever we call it, the thicker shapes of these flower leaves or
shapes outside here, but I don't like these
really pointy shapes, so I will just delete that part. Then I can continue
and see if I can find something
interesting over here. I don't really like that center. Maybe that looks better, but I don't like that flower in the centers, maybe
something like that. Now, I think that this
looks much better. Then I will continue. Let's add something more. I don't want to add
too much because I still want to keep it simple, but we can add a few
more details over here, that looks pretty nice. Then maybe this flower shape can move into leaf like that. Maybe should be a
little bit better, angle of that one. That looks really nice. I really, really like this, how it's turning out. I think I will keep
it simple like this, and I will decide later on if
I want to add some details, I think it depends on the
color choice that I use here. Maybe I want to
add some details, like that will probably be cool. Or maybe I want
to keep it really simple with the shapes solid. But this looks nice like
this at the moment. It's fun to experiment, so it's hard to stop sometimes, you just want to add
more and more details when you use the symmetry tool. But I think that I'm quite
happy like this for now. Now, I will turn off the reference image and I will
create a pattern of this. We will add a new layer, drag it beneath the
layer with the sketch. I will use a green white
background for this one as well. I might change that later on, but for now let's
just use the green white as it looks
good on screen. We have a background layer,
we have the sketch layer, and I can also duplicate the sketch layer if I would like to use that one later on. I don't think that I will use it in this pattern,
but let's see. Swipe right on both of those sketch layers,
group them together. We can rename the
group to sketch. Now we have the sketch group, the guideline groups that I will turn off the visibility on, and then we will repeat
the sketch group. With the sketch group selected, taps lectures to save and
load selection number 1, flip vertical, flip horizontal. Selection number 2, flip vertical, flip horizontal. Selection number 3, flip vertical, flip horizontal. Selection number 4, flip vertical, flip horizontal. It's just exactly
the same technique with the pattern template as we did in the
previous lessons. That is why I'm moving through that part a little bit more quick as we repeat that
part in every pattern. If we turn on our layer
with the flowers, you can see that it is like reaching each other
here, the flowers, but that's okay because
I don't want to use that in this pattern anyway. I want to draw
something new here. I will turn off that
but it's always good to have that
original sketch. I can actually drag that
original sketch down below, and then I have the
sketch layer over here. If you want the
guidelines turned on, you can turn off the background. That might be pretty
nice when you draw the other parts of the
sketch here in the center. Turn off the background, make sure you're on
the sketch layer, and then with the black color
and the perfect pencil, I will start to draw some new floor shapes
here in the center.
12. Sketching Floral Pattern - Part 2: If you want to, you can
get inspiration from your flowers that you had
in the original sketch. In that case, you can just drag down the opacity of
that sketch layer. On your sketch layer, with the sketch
repeated on the center, you can use this as
inspiration if you want to. For example, draw
a similar size of another flower in
the center here or whatever look
that you're after. I will draw another flower, I think maybe with a smaller
center and longer leaves, let's try that out. Will that look good together? I don't know, maybe not. Let's go for a rounder
shape something like that, that might look good together. I will drag down the opacity of that sketch layer more so
that it won't be in the way, and then I will continue
to draw the rest of the shapes to fill this space out that is
in the center here. I'm not really sure what
I want to create here, but I will start to add
maybe the same type of leafy things so that it looks
a little bit symmetric, and then let's try to get, oops, I don't know what happened with the
leaf, let's draw it again. Something like that, and then maybe we
will try to draw some branch that goes out
like this with the leaf, feels like I'm drawing
much thicker things here on this part
of the pattern. Maybe that doesn't matter, or maybe it matters
to the whole pattern. I don't really know yet, but we will try it out
and see if we like it. We can draw some, maybe just a little
dotty thing over there that ties those
two parts together. Or maybe we want to get some leaf that goes out
of that I don't know. Or maybe a flower that
meets up the other flower. You can really experiment here, that's the fun part
of this process, drawing with the symmetry tool. Okay, that looks nice, and then I might
want to add one of those shapes that I had
over here in the patterns. So maybe something like that, and then moving on over there. I have no idea how
this pattern will look, it's completely
spontaneous, and the first time I'm
creating it is now when I film the class so it will be really
interesting to see. I said from the start that
I wanted to keep it simple, but this is turning out
to not be that simple. So let's see how it will look. If I turn off the sketch
of the centerpiece, I can see that it looks a
little bit square here now. So maybe I want to do
something about that, and it can help to just add a few things that
tie it together. Maybe we can try to add one of those floral shapes
here as well. I think that these
things are a little bit disturbing to me in the patterns so I will just remove those, and now it looks better. You can just choose
if you want to, try to add something more, maybe if it goes out some
thinner branches over there, it looks better, that
might look better. Then we have some
empty spots over here, and we're going to
fill with some dots. Okay, so let's try to make this a pattern and we
will see how it goes, and how it looks when it is a finished repeated
pattern with color. So let's move on to
the next lesson.
13. Create Floral Pattern - Part 1: Now, we have our sketch and it's time to create the finished
pattern out of this. It will be really interesting
to see how this goes. I will lower the opacity of the sketch layer to quite a lot. I hope that you still
see this on screen. Then I will add a new layer, just like we did in
the previous lessons. I will have the background
layer turned off, so that I still can see
my drawing guidelines. Then I will draw
on my new layer. I will turn on the
Drawing Assist. For this one, let's try to use several colors and see
how that will look. It might look a little bit
crazy as it's so many objects. We will start with
many colors and see if we want to reduce
the colors later on. Let's use the brown
color on a layer that is assisted underneath
the Sketch layer. I think that for this pattern, I will actually use the
pencil in drawing the shapes, so that it will get a
little bit texturized. Let's try that out. That way I get a little
bit of texture and a little bit of
see-through look, which can make it look
more organic I can feel. Something like that. Then, I don t know which shapes I want to have in the brown color yet, so I will add a new
layer for the pink. I think that I want
to make the flower, drag that layer beneath
the brown layer, tap the layer tap
Drawing Assist. Then I will start to draw the floral shapes
with the pink color. That looks pretty good. I don't need to have
the Sketch layer turned on all the time. I can turn that off when I fill in the shapes if I want to. Maybe I can have this
really sketched look. That looks pretty cool, like a textured-sketched look. I will try that out. Then turn on the
sketch layer again. I have that one
brown, that one pink. Which other colors do I
even have in my palette? I have a medium brown, a blue, and a green. I don't think that I
will use all of those. Maybe I will stick
to these colors. I probably will try to
leave out the blue for now. I will just go a
little bit crazy with the colors and try things out. On the brown layer, I will draw these
stems, like that. Then moving out here. Maybe that will look cool. I don't really know yet. Then I want to try to use the medium brown or the
more lighter brown on a new layer Drawing Assist. The lighter brown and
maybe I want to use that for the leaves or the flower, let's use it for the leaves and below the
darker brown color, so that I can draw
that in like this. How does that even look? Turn off the sketch layer, it looks a little bit uneven. Let's try that again. I'm not really happy
with how it looks. Without the Sketch layer, I will just draw a leave
here that I think looks good and use these short strokes to fill it in. Maybe something like that. I'm not sure if the stem
should go above the leaf here. Maybe I just want to
keep it like this. I think that instantly
looks better. I will just fill in
a little bit here. That looks great. Great. Turn on the sketch layer and now I will continue to draw something. Let's go for a pink flower with this one and then fill it in. I'm doing this pretty
spontaneously and also quickly for
you in this class, you can be as detailed
as you want of course. Turn off the sketch layer
and that looks pretty nice. Let's continue to turn
on the Sketch layer. I will just try to
draw something in the green color to
see if I like it. I will add a layer, turn on the drawing assist
on that layer and try out how the green color works together with
the other colors. Let's just draw this leaf
with the green color. Something like that. Turn off the sketch layer. That might work and then I will continue and
draw the other objects. I will draw all of
the objects that are free from the
edges right now, so it includes all of these objects and
the ones that goes out of the edges I will do the repeat before
I draw those ones. Now, we'll try to separate
the colors and spread them evenly throughout
the Canvas, throughout the pattern tile when I draw the
different objects. Let's move on and draw. This leaf can be green as well. I think they we'll drag
that one a little bit further down than it
was on the sketch. Something like that probably
will look good to make it balanced. Maybe
something like that. Then that one is green. What else can be green? Maybe these little
dots can be green. Now, these ones can be green. Basely what I do is just to choose different objects
with different colors, so there's no place in
the pattern where there is a lot of pink color
and a lot of green color. But that's a matter
of preference, but it's also a matter of
balance in the pattern.
14. Create Floral Pattern - Part 2: Moving on, maybe we want to
do this one darker brown, that might be interesting. I see a little
green thing there. On the green layer, I will
erase that little dot. Make sure that I'm on the
dark brown layer and then, draw this little floral
shape over here. Something like that. Then,
let's see maybe the stems over here should be
dark brown as well, and then we can have
another color on that one. I'm not very sure of these things that
goes on around here. Let's turn off the sketch layer. I'm not sure how that will look, so I think that I will
see when the pattern is repeated if I want to
add these little parts. For now, let's just drawing this and I think that I
want to keep that. I think that I want to draw
that in that pink color, and then turn off
the sketch layer. This looks like an
interesting pattern, I see that I have a little
bit of pink over here. Let's just erase that, and let's make the pattern
tile and see how it looks. With all of the layers in
the sketch group selected, I will make the pattern tile. Tap selection, tap save, and loads selection number
one, flip vertical, flip horizontal, save and
load selection number two, flip vertical flip horizontal. Selection number three, same with selection number four. I will turn off the
background layer, turn on the guides
again so that I can see a little bit more how
the pattern is balanced. If I turn off the sketch layer, if I turn off the
guide lines layer, I can see how the pattern looks. Now will start with
everything except this little shape here because I don't know how that will look, so I will start with this one. Maybe I want to
switch that around, so maybe I would do a pink center of that one
and a brownish flower. Then, I need to have the pink center above
the brown color so then, I need to create a new
layer so that I can draw the flower shapes
beneath the pink shape, if [LAUGHTER] that makes sense. Let's move on and draw this pink center of the
flower on a new layer, I tap drawing assist
and then I will fill in that shape, great. On the dark brown layer, I will draw these floral
shapes over here, fill them in, and turn off the visibility of the sketch layer to
see how that looks. I'm thinking it
looks pretty good, but I'm not very happy
with the pink shapes, so I will just delete that
one and on the brown layer, I will also just make it a
space here in the center, where I can draw the
round pink shape, and on the pink layer, I will try to draw that again. If you feel that you don't get the right texture when you have the symmetry tool turned on and you draw the
texture like this with, for example, the perfect pencil, you can always turn
off the drawing assist on that layer
when you fill it in. Let's create a shape like this, and then we can turn off the, drawing assist to fill in the shape so that it
looks better filled in. It really depends on the
look that you're after, but I think for me,
that looks better. Now, turn on the sketch layer, and we will draw some
leaves over here. Let's use the medium
brown to draw these leaves like that, and then that shape could
probably be dark brown, let's try that out. Turn off the sketch layer. Then, we need something
pink here in the middle, I can see, so we need
something there. I might want to create something else than those shapes
that I drew on the sketch. Let's try the shapes that
I've drawn the sketch, and we can see how it works. Then, I will turn on the drawing assist on
the top pink layer, and then fill in
these leafy shapes. On the brown layer, I will
just erase the parts that are underneath the pink flower. Turn off the sketch layer
and see how it looks. I think it looks
good to turn off the guide line layer it's
something empty over here. Maybe I can fill it in with
dots let's try that out. That would probably be, let's try out green dots maybe as we have
green dots over here. I will do a little dot, no, that didn't look good, little dot over here. No, that didn't look good
either maybe some line. no. Let's try out another color, pink and maybe I will just
draw a leafy shape here. Let's see how that looks, that looks a little bit crazy. Let's try a pink dot
and that looks better. This might be a good pattern, I'm really not sure yet, it looks a little
bit crazy to me, but we will try it out as a
pattern and see how it works. With all of the layers that is colored and the
background layer selected, I will swipe those to
the right and group them and this is
the pattern group, drag that to the top. Now, we'll just
rename it to pattern. Now, I will drag down with
three fingers, copy on, drag down with three
fingers again and paste, and that we'll tap and drag
until I reach 1800 pixels. Make sure I have magnetics
and snapping turned on. Swipe to the right to
duplicate the image, make sure that it
snaps to the edges. I will duplicate the image
so that I have four copies, just like we did in
previous lessons, and place them next
to each other to see how the pattern is repeated. I will turn off
the drawing guide because that is a
little bit in a way. This actually became a
pretty cool pattern, I'm actually happy with it. It looks nice. It's more complicated than the patterns that
I usually create, but at the same time
there's simple shapes, and it's a nice repeat. It really reminds me of
tiles and wallpaper. For these types of patterns, you can keep them
colorful like this, which will make them more
pithy or you can make them, for example, into colors, and that is what I will show
you in the next lesson, where we will recolor this pattern and make it
a two colored pattern.
15. Recoloring: We will recolor this pattern
and make it two colors. But first I will make
a copy so that I have one color version and then I want to create another
version that is two colors. Tap into one of the copies and the first
thing that I will do is just to delete these images
that are the repeated tile. Here, I won't mind to keep the sketch layer or the guides. I will just delete those so that we only
have the pattern. Now, I want to recolor
all of these layers. The first thing that I
want to do is to add another background color
because my idea is to have a colored background and white objects or
cream white objects. I will just recolor
the background and let's use the blue color
that we haven't used yet. Tap and drag to add the blue
color in the background, and that cuts a
little bit crazy. We need to recolor all of
these objects in the layers. The best way that I've found to recolor objects
that are textured. I've shown this previously in sketch classes and YouTube
tutorials on how to recolor objects in Procreate is to use Alpha lock
and fill layer. For me, that is the
technique that works the best when I have these
textured objects. Some other techniques won't color all the way to the edge, of a textured edge for example. This is the way that I will
recolor in this class. To do that, tap and drag with two fingers on the layer
to turn on the Alpha lock. You can also tap the layer and turn on the Alpha
lock like that. With the Alpha
lock on the layer, I will select the cream white
color in the color palette. Tap the layer and
tap "Fill Layer". If I zoom in now, I can see that all other
pieces of this object, all of the texture
is colored to white. Already that looks pretty cool. Let's move along and do the
same with all of the layers. Tap and drag with two fingers to the right to
turn on Alpha lock, tap "Fill Layer", now we'll do it with
all of the layers. This looks really cool I think. Now, I want to try to
repeat this patterns, I will tap and drag
with three fingers, tap copy all, and then drag down with three
fingers again, tap, paste. Drag down the size of your pattern tiles to
half of its size when it says 1,800 pixels and you have the snapping
and magnet is turned on, just like we did
previously in class. The yellow guidelines
are shown you know that you're in
the right position. Tap to transform
tool to place it. Duplicate that layer. Tap the transform
tool and drag it to one other quarter
of your canvas. Duplicate it again. Feel the third quarter, and duplicate it again and
feel the fourth quarter. Make sure you place it exactly
in the right position. This is the finished pattern
tile when it's too colored. I think that that
looks really cool. I like the color version
as well, but for example, products like wallpaper
or home decor, I think that this would
look really cool. That is how you recolor a pattern that you
create in Procreate.
16. Thank You: That's all for this class. We have created three different
symmetrical patterns, and you'll learn how to
re-color the patterns, so you can use it in many
different collaborations. Thank you so much for watching. If you liked this class, hit the "Follow" button
by my name to make sure that you don't miss
out on my future classes. You can also tap
my name to go to my profile page
here on Skillshare, where you find all my
classes available to watch. If you want to have a
look at all of my premium procreate brushes available to buy and use in your artwork, go to majafaber.com/shop and if you use any of our brushes, feel free to tag me on
Instagram with maja_faber. I also want to mention my
Patreon page where you can get a more personal
learning experience for me and connect with me further. I share a bunch of
resources every month, including a monthly
tutorial, a podcast, a monthly color palette, and color mood board, and the drawing process videos, and much, much more. I even offer a Q&A tier
where you can ask me anything anytime you want
in my chat at discord. Check out my Patreon page
if you want to learn more from me,
patreon.com/majafaber. If you have any questions
at all about this class, ask them in the
discussions page, and feel free to leave a review to let me know if
you enjoyed this class. I would love to
hear your thoughts. Make sure you share your
project here in class. If you post it on Instagram, feel free to tag me
with maja_ faber. Thanks again for watching.
 Maja Faber, Surface Pattern Designer