Transcripts
1. Introduction: Hello, my name is Benji and I'm very excited to work with you in this course to build your own journal for productivity. I really want this journal to be able to creatively inspire you in order to go off to your goals and really track your habits and your progress. I also use my journal for gratefulness and mindfulness and I go in and put a journal entry in every day about the things that I enjoyed that day and just the things that I'm appreciative for. For me, this journal is really important because I'd have Excel sheets everywhere. I'd have posters on the wall I'd have a little journal that I wrote in with a pen and paper. But it really was messy and everything was everywhere and I really wanted to consolidate this into one simple ritual that I do every night that helps track my goals, helps me keep myself mindful, and it helps keep me on the trajectory that I want to be on. This is going to be a really fun course because not only are we going to design the aesthetic and what goes on the inside, we'll also going to be talking about your mindsets and the rituals that you need to have in order to stay committed to your journal and really enjoy the process. I created this journal for myself a little over three months ago now, and it's really being probably the most impactful thing I've done in a few years. I'm really excited to share this experience with you and see what you can get out of it. Let's jump in together.
2. Your Project: Awesome. We're going to go on a journey together in this course, and build up your own habit and productivity journal for your own creative inspiration that's going to fit your needs perfectly. We're going to go through and choose the aesthetic together and build it up from the ground, so that it looks exactly how you want it to look. We're then going to dive into the elements and the modules and exactly what is inside your journal, because we want to personalize to you and your life in exactly what you need it for. We're going to go through step by step and build that together until the end, you're going to have the perfect journal for productivity, mindfulness, and your habits.
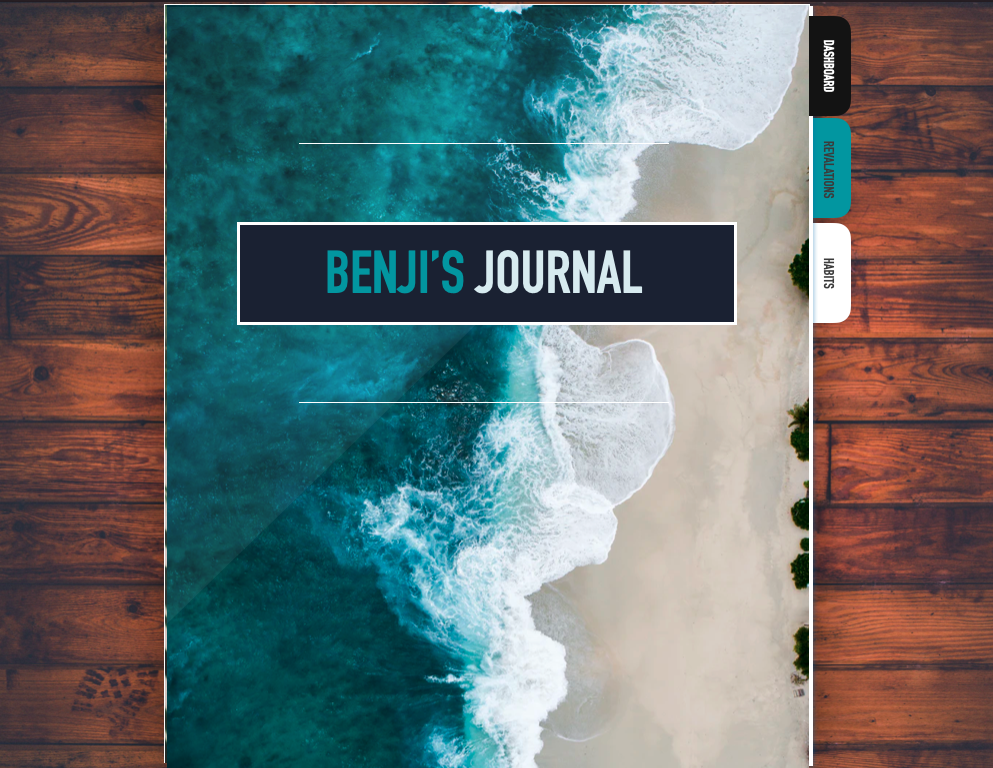
3. Cover and Aesthetics: Awesome. The first thing that we have to do together is actually give our journal a name. I called my journal the Journal of Growth, because it serves to track my habits, to track my goals. It's broken down from goals to habits. It's also there for my mindfulness and for my meditations and for my gratefulness. It really is pulling me to where I want to go in life. That's why I call it a Journal Growth. But you need to choose a name for your journal for whatever purpose that it serves for you. The second thing you need to do to customize your journal is to design the aesthetic. What does it actually look like? Now it can look like anything you want. That's the beautiful thing about these digital journals. You can have any amount of pictures, you can do your own drawings, you can have any color you want. I really advise that you take the time to choose what inspires you. Because I worked on this journal way too long forward. It looks like because I really needed to like what I saw and really needed to resonate with it in order for me to be motivated to keep opening it at nighttime and doing my journal. The best way to get inspiration is definitely to go to Pinterest, to Google what other people are doing with their journal, to see other templates and others templates for sale on Etsy. We don't need to buy those because we're going to show you exactly how to make it even better. But go and see what they're doing over there and get those ideas and bring it back to your journal for you to innovate on and improve for yourself. You can also scroll down the page here and look at other people's projects, who have been posting to the course, and get inspiration from them. Also make sure you repay that favor and make sure you post what your journal looks like when you'll finish the class. The three things you need is a name for your journal, you need a front cover for our journal, and you need a color palette that you're going to use and really resonate with. For me, I went with this starry background with the clouds, because that really is like looking up to the heavens, looking out to the skies. It's very much moving forward. I chose a darker color palette, the black and the grays, with a little bit of yellow in the accents, mostly because I actually journal at nighttime and I don't want the white light in my face, and I actually enjoy journaling in white and yellow pen. It really stands out and pops out from that background. But I'm going to let you choose your colors. I'm going to let you choose your photo. I'm going to let you choose your title. Make sure you download the course files. Then I'm going to jump onto the computer and show you how you can substitute your own colors, your own image, and your own title into your journal. Awesome. Now that you've downloaded the template, come over to the front cover, pop it open, and you can see this is the basis of the front of your journal. Now the first thing to change is the name. Very easy to come in here and change it to whatever you want. You can call it Whatever You Wanty. You can put in your name here, you can put in whatever it is that you decided to call it. I'm going to stick with Growth Journal because that's what I chose. Now, the next thing we're going to do is, you can see I've a little reflection on this. If we want to just move this to the side, we can access that file that is the front of our journal here. What we're going to do is we're going to need to replace this with something. The best way to replace this, if you've done a little researching, you may have found that image already. You can come over to Unsplash, type in something like a palm, if you wanted a palm. Obviously type in whatever it is that you want there, and scroll until you find something that would fit your journal well. You could see something like this. This one here is actually really nice as well. It doesn't have to be in the shape of your journal, you can crop it inside of Keynote. We're going to download here for free. It's just going to pop up, down there. We're going to go back to our Journal of Growth. I can move him to my second screen. I can drag it in on top here. It is inserting. What we're going to do is we're just going to finagle until it's in the right spot. Delete that old one. We're going to push this on the arrange key over here. Backwards, until it's in the right place. This is the arrangement, so the depth of it, is behind or in front of the title? Then we want to spin it around. We're going to come over here to the Rotate, and we're going to make sure we rotate it till it's the way we want it, which is that way like that. We're just going to plug him in. Remember you can have your journal actually be any width that you want it to be. I'm going to pop him down there. For something that is the wrong shape, what you can do it is, you can right-click on it, click on the "Edit Mask" button. Pull it down on wherever it is too big. I'm going to guess it's about there, just hit the "Enter key", and then stretch it out until it's in the right spot. You can see it was almost right, a little bit off. I'm just going to Edit Mask again. We're going to pull him back up to the top there. Just like that. There we go. We have our front cover in place and you can go ahead and you can change any of these boxes or any of the designs on top of it. You can get your own font in here, whatever font you want. Obviously, you're going to have to resize it. The next thing you can do is you can actually change its background as well. I like this cool little wood mahogany table behind it. But you can go in and you can put whatever it is that you want behind that as well. Then of course, the last thing that you've done is you've chosen your color palette. These little tabs over here which I'll show you exactly how to link up and make sure they're all working. But what we want to do is we want to make sure that they're right color for you. You can simply click on that box until it gets highlighted. Come over to Style over here and choose whatever it is the color that you chose for your color palette, and come and pop that in there. Once you've done that, you've got the front cover and the aesthetic of your journal finalized. We're going to rename these. We can come back and do all that at the end. But right now, we've got our aesthetic done. Now we're going to jump into our habits and our goals and what is actually inside of it.
4. Dashboards & Overviews: Awesome. So now you've got your aesthetic, now you know that you love your journal and it's going to be inspiring for you to come in and open up and journal inside of. We have to do the inside, we have to create it together. We want to do this in a very specific way because we need it to actually serve you. We need it to serve your goals and make sure that you're keeping on top of your habits, your mindfulness, your gratefulness. Whatever it is that you want to keep on top of, this is your best friend for doing that. You can see inside the template that you can download, I've broken the journal down into two parts. One of them are going to be the overviews. For me I like to see the yearly overview and the monthly overviews of what's going on in my life and I check my habits there. Then the next part which we're not going to be doing right now is going to be building up the day-to-day ritual. But for now, we're going to keep it with the monthly, weekly, or yearly over bits and your goals. A big word of warning here is to keep things really, really simple and really minimal. A lot of people start these journals, maybe you started the bullet journal, but you really just made it too complicated and made too many parts and too many things to fill out, and it just took you an hour every night, and you really just run out of steam after a couple of weeks. So start simple, remember we can always come back and add things as you start to build that routine and the habit. Now we're going to jump back into my screen and show you exactly how to do that for your goals in a second. But remember the biggest thing here, apart from the minimalist thing that I just mentioned, there's really no rules. Make sure that you're creating the journal that you're in love with, one that you're excited to actually write inside of, and one that keeps you on track and excited to lead the perfect life that you want to lead. Awesome. We're going to start here in the overview templates now. We're going to crack that open and we're going to see once again, just to give you a brief explanation, these are basically called dashboards or your overviews. We're going to break down things into pages, day-to-day pages, but these are the things that are going to keep you on track, year to year, month to month, week to week. Anything that is not a daily thing, is going to go in these overview templates. I'm going to run you through those, so it makes more sense. Before we do that, I included a really, really simple slide here in order for you to be able to break your goals down into habits. I know you probably already got a lot of habits going at the moment, so this is going to come pretty naturally. But just in case you're struggling with some of your goals, this really simple formula is all you need. So what is your goal? If my goal is to read 30 books this year. Very simple, but a lot of people, including myself sometimes struggle to make that into an action point which is where we create our habits from. Because the goal is not going to achieve itself without a consistent habit being actually achieved day to day or week to week. In order to read 30 books this year, I know that I need to read 25 pages a day, and you can do the math yourself or whatever it is the goal, if you want to lose weight, or put on weight like I do. You know exactly how much weight you need to put on or how much weight you need to lose just by breaking it down into month by month or day by day. Something with like wait, don't measure it day to day. But something like reading, you definitely want to average 25 pages a day. So for me, this is one of my goals, I need to read 25 pages a day in order to smash through these 30 books. If you want to duplicate this and really bright out all your goals, this is not going to go in your journal, this is just for us to brainstorm and think through what we need our habits to actually be. You can just come over here to the side, hit Command D on a Mac or Control D, I believe on a PC. You can copy these out and put in your next goal here. So it could be, mine is weigh 195 pounds at 12 percent body fat. I know I'm currently at about 187 so I need to put on eight pounds throughout the year, so I average that down and I can say I need to put on 1.5 pounds per month and I check that one over monthly. Also, it's not really a habit. In order to break it down to a habit, that's more a way to track it, is I know I need to eat. You can break it down about 3200 calories a day. My habit tracker would actually be, did I eat 3200 calories that day? You can also put in workouts here, but this is just a way for you to get clear from your goals into your habits. I'm just going to delete these from mine because I don't want them in the end product. I'm going to go through the yearly overviews given my goals and my habits and show you where you need to sub in yours. The first template here is the yearly overview. Also, just remember if you don't want a yearly overview or you don't want a monthly habit tracker, or you don't want a weekly review, I don't personally use this one, I made this just for you. You don't have to include these in your journals. It needs to make sure it's serving you. So this is the yearly overview. The big thing here is I track my photo, I put progress photos across here. Then I've just put in one tracker, two tracker, three here into this template so you can fill it into whatever you want. I can put in weight and I can measure the pounds throughout the year, which is exactly what I do. Actually, once it's in my journal, I fill in backwards just in a really light gray, the progress that I should be making in those months to months. The second here actually measure my heart rate variability, which is essentially my recovery, and I measure that. It's just in milliseconds, but I've changed it here so you can write something out of 10, because the third one I personally track is emotional health. How good am I feeling out of 10 that month, and I write that here. So you can see, you can come in and track as many things as you want. If you don't want to track something, you can come in and just delete the rows and have it really fit exactly what it is that you want. Once again, you can come in and you can change these colors and these schemes in order to match the exact type of journal, exact aesthetic of journal that you want. The other thing is what is your yearly motivational quote or purpose? You can put that down the bottom, so every month when you're coming back and filling these in, you can come in actually write in what you want. The next thing, monthly habits. One of the biggest things that I really love is I track my habits over the month. Now I have a lot of habits and I don't necessarily recommend having the same amount of habits that I have. But you know what's going to be right for you. But is simply you come in here and you can fill in the names of the habits that you want to track. Now I have three golden habits, the three biggest things that I want to get done that day. You want to also put the cadence in here. If habit number one is meal preparation, for example, you want to put how many times a week you actually want a meal prep. For me it's one time a week. Now, you know when you're going throughout that week, that you only have to do it once. However, you're going to mark off which we'll get into in a later lecture. Habit number two, what's your golden habit? Then I break them down into morning. For me I go on a morning walk and I do that five times a week. Then the second morning habit would be meditation, and I need to meditate four times a week. Then the third morning habit I do is I drink one liter of lemon juice, and I can just shorten it if it's not going to fit, and I do that six times a week. You can basically just build out your habits here, and I like to do it based on the time. But once again, this is all customizable, from colors to everything, to deleting the rows you can come in here and obviously just hit those delete buttons. That's the way that I do my monthly habits. This is one of the biggest reasons I actually credit this journal is to check my monthly habits. I used to have papers and Excel sheets and everything all over the place. Now it's all in one place and really easy to get a overview, and I love looking back at the past months to see what I did well and what I didn't. This one and once again, I don't use but I know a lot of bullet journalists love a weekly overview. If you're going to put in what you're going to do in that next week, you can use this one as a template for your journal. Once again, we're just picking and choosing the pages that you want to use. I'm going to show you how to come back and put it into your own design and put it into the actual journal format. The other one that I really love is yearly lessons. What are the 10 biggest lessons that I learned throughout that year? What I do, because I fill out this journal every night, is I come back and I actually write in as I'm learning the lessons what they are and they sort shape over the period of a few days or a couple of weeks or even a couple of months, I come back and I refine those lessons. But this one's really cool because in 10 years time or in five years time, I can come back and I can see what it is that year really taught me in terms of my lessons. These are the overviews. Come in and customize these overviews in order to serve your habits, in order to serve your goals, in order to get you the most out of your year and out of your journal. Now, we're going to jump into the daily practices of this, and exactly what you want to create in your day-to-day template.
5. Your Daily Page: Awesome. Now, what we need to do, is we need to build out your day to day pages. For me, I love to come in and journal at nighttime and fill in the day to day things that I want to keep track of. Things like gratefulness. I'm going to jump into more examples, so won't give anymore now. But you need to decide, when you sit down to journal or when you sit down to fill in your habit tracker, whatever your nightly routine is, what is it that you actually want to be filling in for you to achieve your goals and be happy? We are now going to pop open general elements. This is the actual day to day writing part of our journal. You can see, I've done some cool stuff for you. I've created some templates for you to adapt to whatever you want your day to day journal to look like. For me, this is my day to day journal. I want to show you what I'm using and then you can adapt the page for whatever it is that you want. You can see I have the date up the top here, and this one page is just that one day. I'll have 365 of these all labeled with their correct days. Now, on the left over here, I have journaling, this is where I get my Apple pen, pencil or whatever it is that they call these things. Pick a nice white or light yellow color and zoom in quite a bit so you can actually get that full page of writing and I write whatever it is that I want to write. I like to write things about my day. I like to write things about my goals. I like to write whatever I'm thinking, just put it all down there on the page. The next thing I've got up here on the top right is actually a section of my dream board and I have this rotate through different sections each day. I come over here and I just circle something and just reconnect to that dream board and make sure that I'm actually knowing what I want. Because a lot of time you can get distracted and confused with the day to day things. This really does help, especially you don't get banner blind when you're zooming in on different parts of it. Then I have a quote which rotates day to day as well. I can see this is a Benjamin Franklin quote. I have a life improvement opportunity box where I write down one thing that could improve my life. Then three gratefuls which I really love. These just help you feel really grateful and help get you into a really good mindset, especially before sleep. Then the one thing, which is the one thing that I have to do tomorrow in order for it to be a great day. Pretty simple, pretty straightforward. You can see it's not overwhelming because once again, the more minimal you go, I only have to journal and I don't actually have to fill out all these boxes. Sometimes I just do one one two lines if I'm tired. These ones over here, take about a minute between them. I could get this whole thing done in about 2 to 3 minutes on a tired night, sometimes I spent up to half an hour over here doing the journal. So that's what mine looks like. You need to now design your own. Take the template that we created. You can see this is a blank pages now. What we're going to do is you can come in and if you want to do journaling on yours as well, you can come and select. You can just drag using this little drag tool. So stop off of it and then make sure you select all these little lines that will set up for you, command C and then come over here and just pop that in on top here. Then you can resize it however you want. You can put a title at the top here. Even if you wanted to keep this white title. I put this here just for reference for you, but you can actually becoming, pop that in there or you can use that as a date or whatever it is. You're basically designing a day to day pages of your journal now. Now I know a lot of people like to do a monthly overview where you can just see, where you are in the month, if that's something you want to do, come in and grab that. Come and paste it back into your day to day page, maybe you cross off the day or whatever it is that you do and feel free to play around with the aesthetics of this. Everything here is customizable. You can change the dimensions and sizes of everything. It's very much just a template, the colors are very easy to change if you come in over here and you just choose whatever color and is that suits your color aesthetic. A couple of others, a photo journal actually might be adding this one to my journal. Where you might want to put a photo from that day. You could even do a week to week photo journal if you want to come in and just put that element wherever it is, that you'd like to put it on your journal. Remember, but it's all very customizable and editable. One of the easiest ways to edit is actually in this, because there's nothing behind it. If you wanted to make this journaling books a lot shorter, a lot smaller, you could come in and don't do it like that, but grab those arrows down here and just pull it up and then you can come in and delete all these lines below here. Maybe you only want a half-page of journaling. Come and see if you want a checklist and number list, a quote box, any rating scales or some short texts, come in and design your own little modules and elements. This one here is just a brain dump or a Doodle. If you want a little Doodle box, just to get everything out in more picture form than actually journaling form. But by the end of this, you should have a page that represents a day of the year that has everything that you want to habitually do every night during your journaling ritual.
6. Bringing It Together: Awesome. Now we're going to be putting everything together and it's a little bit of a technical process. I want to walk You through step-by-step so You don't miss a beat and I make sure we can get it onto your iPad and ready for journaling. I'll show You exactly all the tips and tricks for that. I'm going to pop open all of our sections once again. Now, what I'm going to actually do is I'm going to come in and delete these placeholders. Our front cover is now going to be our actual front cover. The second page in the document is our yearly overview. You can see whatever your yearly overview that we made together will be up here. Then our monthly habits, we actually don't need that up there, so I'm dragging it down. I don't want the weekly overview, but I do want the yearly lessons. I'm just planning the order of when You open this book, what is inside it. Yearly overview, yearly lessons, and then we jump straight into the months for me. The first month will be January. Actually I'm going to copy my template down here just for a little bit of a shortcut, delete that one up there. This is my actual habits and my actual general template. You can see the first thing would be January there. The next thing is we add in our pages of that month, so we're going to need 31 pages for January. I'm going to delete this general elements bit here. I'm going to come in now that I've got my elements and delete these ones here because I've built my own page, which You could see this was the custom page that we built together, but make sure You're building whatever page it is that suits your needs in here because that's the one we're going to come in and duplicate out. You might not look like this, mine's already done. I'm actually just going to delete this here and come back into the one page that we have here. I'm going to go through and just hit command D. This is a little bit of a tedious process, but You only have to do it once for the year or if You're doing it in three to six months chunks, You only have to do it two or three times or four times if You're doing it every quarter. The first thing is I'm going to come in and put my date. If You don't have dates, it's going to make it a lot easier, but anything that changes day to day is going to obviously be the biggest time, don't waste it, take the most time. I want to change my dream board. Remember I want to have it focusing on a different part of my dream board every time, and I want to change the daily quote. For me, this process looks like this. I delete all of them except for this one. I push Command D, command D, command D, command D and I'm just going to go through and change it to January 2. I'm going to come down and batch change it like this, January 3, come down and batch change that to January 4, and then January 5. Obviously you do this through out the entire month of January. Once you've done it once though with January, we can copy month a month and then just change the actual name of the data over there to February. But before we get ahead of ourselves, this journaling element stays the same for me. These three elements all stay the same as well. It's just these two. What I do is I have a big list of quotes that I like and I want to put into the day-to-day thing and I use my second monitor over here and I just come in and on the next day, I'll come in and I'll paste in that second quote here. We don't actually have to do that together, but you understand how to paste a quote into this. You'll just go down the page, copy the next quote, paste it in there. Go down the page, copy the next quote, paste it in there. If you're doing daily quotes, which I really highly recommend you do, it's really nice to have that freshness on your page every day. Then the last one for me is a part of my vision board. If I edit the mask, you can see this is the full vision board here, and I can actually move that to wherever I want on my vision board in order to give me a glimpse of just a section or a corner of it. Because if I always put the same thing on it, it's not going to be very much variety, and I'm not really going to take it in like I would if I could just zoom on those people, if I could just zoom on that house style that I want. I'll just come in here and I click, "Done" when that's done here, and you can see that's going to be a different part of the vision board. You can just keep on doing that. Come down to edit a mask and see what part of the vision board that you want to zoom in there at each time. That's basically it. Once you've done that, you times that for the month. We do all 31 for Jan 28, or 29 for February, whatever it is. Quickly running through say we've done Jan, I'm just going to put a little arrow and so they're altogether command D. We duplicate that whole month that we just set up and I'm going to come in here and type in February. Like that. Then I would go through and I will change the dates here. The quotes here and you can change the vision board but month the month you can actually keep it the same. Now I'm just coming in and changing these for month to month and essentially, you can see that is how our journal is built. You'll end up with 12 months. I actually do my journal about two months at a time because I know there's habits, new sections or things that I want to bring in, but at the end of the year, it'll be a complete file of everything that you've done that year, habits, journaling, everything you could ever dream of all in one file. I recommend you can do maybe the first three months or maybe you can do the first two months now and then come back and I'll show you how to add to the same file in GoodNotes. What we want to do now is we want to get ordered out and spaced out properly. We want to get it into GoodNotes. Awesome. The next step is getting across to GoodNotes. What we want to do is come up to File, find the export to PDF. What You want to do, image quality, You can change here as You put good because it's going to be very high-quality anyway. A lot of these PDFs actually are going to be quite a big file, especially if You have a whole year's worth of photos and pages and graphs and stuff like that. I'm going to put good push next and then export it just to my desktop. I'm going to call it 20, we'll pretend is 2030 journal of growth. Let that export to your desktop. Then the easiest way that I find to get it into GoodNotes is just to simply add, drop it over. I'm going to get back to the homepage of my iPad. Then I'm going to go to my desktop over here, find that PDF document, share, and drop. You can see my iPad pops up here, just going to wait for that to come in. You can see automatically it says edge drop with, and I'm just clicking GoodNotes at the top there. That's going to try and pull it into the current document, which is my actual journal, but what we're going to do down the bottom is input as new document down their, input the document, it's going to pull it straight in and You can see our journal of growth is here ready for us to actually start drawing in and writing on. I'm just going to grab my apple pen just to make sure this all works. Now there's two modes in GoodNotes. One is edit mode, and that one is view mode. This is the view mode here. We can scroll down and we can see, just viewing but if you try and draw it, nothing's going to happen. Then as soon as you want to edit, you click that little Edit button at the top right. Then you scroll down and say we wanted to fill in our first general over here. What I really recommend you do is the great thing about this PDF is you can zoom right in. You can write really small. I'm going to write with my thing standing up, it's going to be weird but I'm going to write "Hello, how are you. " Like that, remember you can choose any color you want. Normally I write and recognize yellow. I've got my custom colors sit up there, and then you zoom out and you can see that the writings are nice and small over then you can fit a lot in. If you want to write a lot, you can see, you can zoom in 10, just drawn that thing but we are just going to undo that. That's the best thing that's show everything you can undo, everything you can erase with a little eraser tool. You can come in and just type in the life improvement opportunity here, the great fouls. The one thing that you want to do tomorrow and you can simply keep zooming out. Now, the other thing that you want to do is may want to be inserting a photo or something into here. You can simply just click Photo button right here and I'm going to click a photo that is appropriate all across and pick on any photo from my iCloud in here. This is my friend riding a scooter actually, and you can come in and resize it. You can crop it to any dimension. If you're doing a photo journal, it's a really cool way to stay on top of things and keep it all in one place so that if you want to crop, just going to undo that re-sizing, you can actually hold down on it and just click that crop there, and then move into exactly what you want that photo to focus on. I hit that done, and you can just pop it exactly where you want. If you wanted a little memory from January, there's your photo right there. Essentially, you can come in and we're going to get into the actual rituals and how I would recommend you set up using this channel in order to maintain consistency and to really get the most out of it.
7. Journal Rituals: Awesome. So now we have your journal completely set up and onto good notes on your iPad. The biggest thing that we need to do now is make sure we set up a ritual. This is really important because a lot of people get overwhelmed or even they just forget to log in to their journal every day or every week or however frequent you set it up for yourself. For me, I've set it up to go in every single day and do my journal, fill out my gratefuls, my life improvement opportunities, see my quote, and then obviously tick off the habits that I've done throughout that day. I really like this because at a maximum it'll take me about 3-4 minutes to do including the habits and checking off. But normally I spend about 10-15 minutes doing it. I have an alarm set at 09:30 PM to journal and it's really helpful because I never have to remember to do it. It's going to be the last thing I do before bed and my alarm always tells me when it's time to actually do that. I treat it pretty religiously like brushing your teeth. It's just something that has to be done, otherwise, I'm going to skip it on certain nights. I make sure I travel with my iPad and where I don't forget sometimes I have take my Apple Pencil or Apple pen, whatever that thing is called, with me. So I can just fill it out as I'm on the go. When I am home though I actually journal from this desk right here. I put my red light which is a Joovv, it's like a red light therapy thing, which I really like in front of me. I put on some meditation music, normally some 432-hertz music from my iPad, which has great speakers, and just really get into the zone and do my journaling and filling out the habits. I highly suggest that you pick a time and a place for you to actually do your journal. For me, I know I'm also not going to be perfect at all times, so I've given myself five misses for the year. At the moment it is March 9th, and I haven't taken one miss yet, but I know some emergencies might come up or some crazy travel things might come up that I just won't get to it, which is also okay, I can miss five of those over the period of the year. The last thing that you need to take away too is make sure you enjoy the process, make sure you feel you're progressing, you're moving forward. If you're not, what elements do you need to add to your journal in order to keep you motivated and keep it exciting for you? One of mine is that dream board where I can see what it is that I'm going towards, one of those. The other one I look forward to the end of the month where I get to take a progress photo and fill in the details of that month. So find what excites you and make sure you include it in your journal.
8. Final Thoughts: Thank you so much. I hope you enjoyed this course. I have plenty of other courses here on Skillshare I'd love for you to check out. We also have a YouTube channel if you want to get some more bite-size, fun little projects to do together. Go over and follow us there, I'll put it up on the screen. Lastly, if you haven't left me a review for this course, I would really appreciate it if you could leave me your feedback. Make sure you post your project in here. I'm very excited to see it. Thank you so much for going on this journey with me. I'll see you in the next course.
9. 7: Now we have your journal completely set up and onto good notes on your iPad. The biggest thing that we need to do now is make sure we set up a ritual. This is really important because a lot of people get overwhelmed or even they just forget to log in to their journal every day or every week, or however frequent you set it up for yourself. For me, I've set it up to go in every single day and do my journal, fill out my gratefuls, my life improvement opportunities, see my quote, and then obviously, tick off the habits that I've done throughout that day. I really like this because at a maximum it'll take me about 3-4 minutes to do, including the habits and checking off, but normally, I spend about 10-15 minutes doing it. I have an alarm set at 9:30 PM to journal. It's really helpful because I never have to remember to do. It's going to be the last thing I do before bed, and my alarm always tells me when it's time to actually do that. I treat it pretty religiously like brushing your teeth. It's just something that has to be done, otherwise I'm going to skip it on certain nights. I make sure I travel with my iPad. Where I don't forget sometimes I have to take my Apple Pencil or Apple pen, whatever that thing is called with me so I can just fill it out as I'm on the go. When I am home, know I actually journal from this desk right here. I put my red light, which is a Jew if it's like a red-light therapy thing, which I really like in front of me. I put on some meditation music, normally some 432 hertz music from my iPad, which has great speakers, and just really get into the zone and do my journaling and filling out the habits. I highly suggest that you pick a time and a place for you to actually do your journal. For me, I know I'm also not going to be perfect at all times, so I've given myself five misses for the year. At the moment, it was March 9th and I haven't taken one miss yet. But I know some emergencies might come up or some crazy travel things might come up that I just won't get to it, which is also a Kayak and miss five of those over the period of the year. The last thing that you need to take away too is make sure you enjoy the process. Make sure you feel like you're progressing, you're moving forward. If you're not, what elements do you need to add to your journal in order to keep you motivated and keep it exciting for you? One of mine is that dream board where I can see what it is that I'm going towards, one of those. The other one, I look forward to the end of the month where I get to take a progress photo and fill in the details of that month. Find what excites you, and make sure you include it in your journal.
 Benji Wilson, Social Media & Entrepreneurship