Transcripts
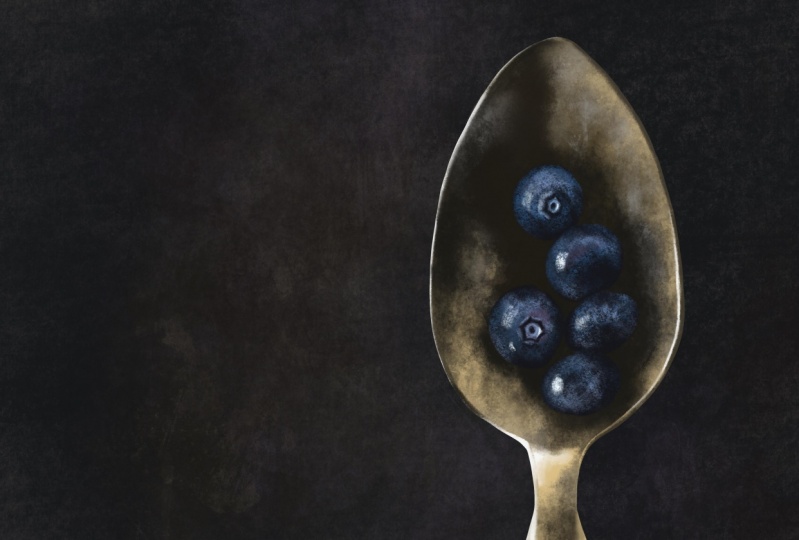
1. Fruity Intro ;): my name's Jennifer Nichols of Les Lamppost Studio, and I really love drawing fruit. I have drawn almost all the fruit I can think of. And, um, I have a bit of a high texture style ice to look. But I also enjoy illustrating rial looking fruit. So I'm gonna teach you how to do some simpler fruits and work our way up to some more complex fruits, including a strawberry, which I find challenging. And, um, this spoonful of blueberries. That's much easier than you might think it ISS. So I hope you give it a try. I'll give you all of the brushes for free. And all of the reference photos that I've found on free use sites are all provided for you to save you the hours of searching and we'll have a great time. Come and find me on Facebook. I run a art group with Liz Color Brown, and it's a wonderfully supportive art group for all skill levels. It's linked in my sculpture profile, along with my instagram and everything else
2. Downloading Resources for Classes: to download. Resource is, you need to be in landscape mode on your iPad, not in the app, but in a browser. So once you're in the class that you need the downloads for, just go down to the tabs here to projects and resource is and you should see them on the right hand side, depending on your browser, this will be, um, slightly different. So I'm gonna walk you through all of the's. I have appropriate file. I have a palate, which is the dots watches. I have a brush set and I have an image. The other thing, actually that I don't have here is an individual brush. If you download an individual brush, it will go into your imported category of brushes in your category in your list of brushes . So for safari, you can tap and hold is one way to do it or you can just tap. And there's a few ways this actually says download really small. Let's tap it one time. So opened in a new um tab and it is tapped, download, and right up here is this little arrow and it bounced down, which means it was downloading and then it completed. So I'm gonna leave that there while I get the rest of my things. Hedgehog swatches. So watch this little arrow. Little did a little bounce. Sometimes they'll be a little progress bar for a larger Della like that. Hey, go. And this will just open up into a new tab and show you the image. And then if you want to save it to your camera, you can tap and hold and tap. Add two photos. So now let's go to this download button. And there you have your downloads so you can tap on those. So it looks like it was a zip file. So that is right here. Gonna go back? Oh, I think it got all of them. Maybe I don't have to do these one at a time. So that was appropriate file. And so it opened right into procreate, and it opened into my very first spot on the gallery. But the rest of the stuff is in the files tab. If you can't find it, you need to just go because from safari, it just kind of bounced us over to file. So if you're not familiar with files and then you go to downloads and then you find the name of what you have. It's gonna be in alphabetical order. So if you tap on this thankfully, I'm with the update them, you know, several months ago, toe IOS 13 ipads Condell with zip files Now. So if you tap on the swatches imports right into procreate, if you go into a one of your files, you can see in your list of pallets it will be right down at the bottom. And then I believe you can move it around, go back into files and this is the brush set and it's at the top and then my imported brushes that are way down at the bottom because I don't use them that often. So if you have a separate brush that you have a download of, that's individual and it's not in a set, it'll be in your imported brush section, and then you can drag it out and drop it into any, uh, category you want. I would suggest keeping them fairly organized
3. Brushes: so I'm just going to the palate papaya, peach, Citrus and grabbing a red. I'm gonna show you some of the brushes. I have a European paper brush and a raw canvas brush. These brushes are just from pro creates provided images for grain source. My model and big brush is pretty common in my classes. It's just regular monoline, but it gets really big. Let me actually select it, so it's really big, and it also gets really small. This one I called huge block lettering and I'll show you later what I intended this for. But it's It's more, um, for just at an outline of some lettering that you might want to dio. And sometimes it can be intimidating to. I think that you you need to draw block letters. So by using something like this, let's go a little thicker here. Then, on a new layer, you can actually trace over those instead of trying to draw them on your own. And I added that to the class, in case you want to do any lettering, hand lettering, big paint streaks, very streaky brush. We used that in the Rose Mulling Classic. It's really big. I'm just a simple wash brush. It's also pretty streaky. Rough streaks. Most of these air from other classes. I used this for the watermelon. I love this brush. This brush is very useful for animals and lots of things soft. Kran is another one I made recently that has a nice texture but doesn't have rough edges. Peach fuzz. Pretty self explanatory. My six B pencil isjust for sketchy, and I use it for other things, too. It's a great brush. Ah, the wide pencil stroke is a nice, gets pretty wide, and it's and textured wolf. I'm having a hard time with that chalk fresh. It's not really it has pressure sensitivity. So that's not like chalk. Chuck doesn't really get thinner and thicker as you use it. So, um, but it kind of has a nice chalky texture. Mid century Kran is a nice ref cran with hard edges, so great texture, no taper wide. No taper just means it's, um, it doesn't start Finn and get thick is just no pressure sensitivity at all, and it has a nice texture. So it's six b, no taper white. It's similar texture as my six B, but my six B is much smaller and it does have a taper. Juicy fruit is one of the only new brushes. I haven't altered Salamanca brush as well. This is the procreate Salamanca brush that I've made some changes to. So it's not really my brush. Um, but the juicy fruit IHS a fun texture that we will add some white speckles and make our fruit look juicy. And then the Salamanca is changed in that it has some pressure sensitivity and it doesn't have a really ref start in a rough end like the regular Salamanca brush. I've also added some, um, just normal procreate brushes down here that I use a lot the soft airbrush, the studio pen, the jagged brush and the artist cran. So these are the brushes that will be using for this class. If you are new to my work, I offer a lot of free brushes in my classes for this particular class. I ended up not needing to make too many new brushes. I used a lot from my other classes. So if you like my brushes, go check out my other classes and you'll see lots more, especially the mid century class has a ton of brushes. All right, see in the next video
4. Canvas Set-up: So let's go ahead and tap this plus sign. And if you don't already have an ideal canvas in your list top of this plus Sinus. Well, if you have upgraded procreate if you used to have an older version and now you have a newer version, it, um they have new color profiles. So if you haven't created a brand new canvas since procreate five came out, you might want to start, um, investigating the color profiles. This display p three is kind of the newer, better rgb profile that your older canvases won't have will default to one of the older RG BCE. I do everything in RGB. I don't do a ton of printing, and when I do, I'm able to actually work it out still, and I do a lot of for spoon flour and they actually want RGB images. So So that's something that we're not gonna go into in this class too much. But that's something you can look into. I said my time lapse recording to studio quality. Um, I am going to test out this next step up the lossless because I like using process videos, and it defaults to this good quality, and I've noticed that it, um, is a It's a different color. It's much darker in the video, then it is in actuality. So, uh, you know, play around with those and that's all. You don't really need to play around with too much. I'm going to inches 10 by 10 and I'm always at 300 d p. I and then tap create. And now that is in your drop down list. So when you want to start a new canvas, it's gonna be down here at the bottom of your list and you can title it. You can move this around so it's at the top. So once you have your campus set up, however you want it, you can make it 10 by 10 12 by 12. Um, if you think you might want a pretty typical print size, maybe eight by 10 maybe 8.5 by 10.5. So you have a bit of a border. So think about that. But this is just practice, so it really doesn't matter. At this point, we're just gonna practice, and then when you are ready to do something for print, you can really think about what size you should dio. All right, I'll see in the next video, and we'll get started on our first fruit.
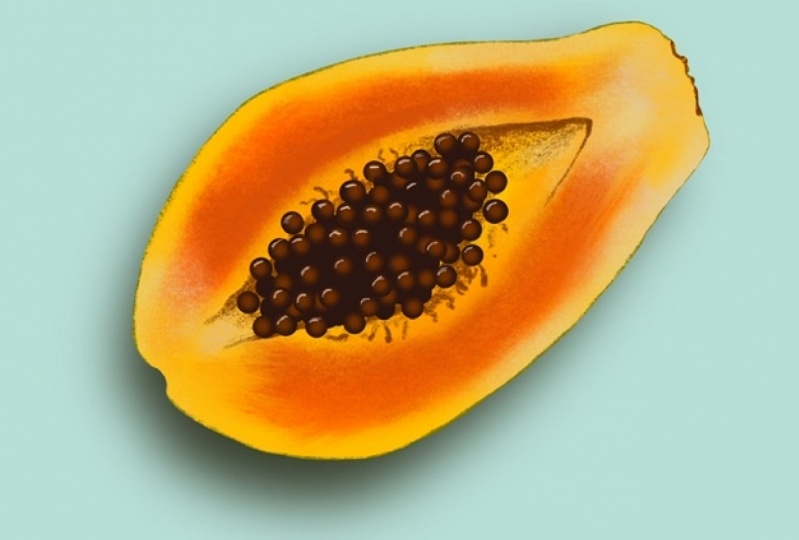
5. Papaya Part 1: I used this canvas to show you all of my brushes, so all of that she can scratch of those brushes that I used is all going to be in the process video at the end, and I don't want it to be so I'm gonna erase all of that. So if you go into the wrench, tool and video, you can turn off the time lapse recording and purge it, and that just clears it. But make sure you turn it back on so that it'll start fresh from now. All right, I'm gonna pull up. You should have a J peg of all the fruit that we're gonna he is. We're not using every single one of thes reference photos. I just added extras so you can make your own choices. All of these air free use photos so you can actually pull it in. Get rid of it over here, add a layer on top, choose papaya, make it. Besides, you want it, and you can sketch around it. If you feel more comfortable as you're learning how to draw by starting with a quick sketch , there's nothing wrong with that. It's helps your brain kind of learn some muscle memory, so you can just kind of do a quick sketch. You make it a simple as you want. Maybe have the center and then turn that image off. Oh, I drew it on the wrong layer so you can go to the layer above it, make a quick sketch, turn that papaya off and you have a basic start. So if you want to do something like that, don't feel bad. I'm going to show you my process for, um kind of how I think things through. When I'm looking at a reference photo and trying to draw it over here, I'm going to clear my time lapse recording again So that sketch isn't there, and I'm starting fresh, so I'm looking at this papaya. I put both of these papayas in this collage because I like the deep colors in this one. But I like the overall shape of this one. I can't quite tell if this is a photo or not. This shadow doesn't look real to me. It doesn't fade away at all, which makes me wonder if this is art. But it looks rial, so I'm not sure, but it doesn't matter. All of the photos are from unspool ash and picks obey, and they are free for you to do whatever you want with. So I'm just gonna use this really just as a quick reference. And I'm seen a circle here so I could start with a circle or I can start with kind of an almond shaped and it's almost at a 45 degree angle. The angle doesn't matter too much. I'm on my six B and I'm on a dark color and I'm just going to draw what I see. So drawing this curve up and over and I can already tell him too big for my canvas. So I'm on a uniform and going to shrink it down a little bit and the top part kind of like a avocado shape here. So we have a wide bottom part in a narrow top part, and then it's kind of of kind of, ah, more rounded corner here in here. If you see that the bottom has a little, dip it right here and you'll see a whole bunch of different types and shapes of mangoes. So our papayas Sorry about that. There's a bit of a bumpy area up here where the fruit used to have a flower or a stem. I don't I can't tell which side is the stem side. This looks like it was the flower side. All right. If you tap and hold the eraser, you will have your six be selected for the eraser. Now, I like to clean up my sketches a little bit, but not terribly much. And the opening in the middle, There's kind of two lines down here. Open up and then it doesn't go all the way to the top. So there's fruit flesh all the way around. And as long as you have a very general shape like this, this is gonna look like a papaya when you're done. So spend some time getting your sketch, pause the video if you like, and come back when you're ready to add color. I'm going to move this sketch to the top and I'm gonna turn the opacity way down. I always start with a little layers. It's just how I do it. You don't need to add a whole bunch right now, and I'm going to the second layer from the bottom. And this was going to have my shadow on it. So I'll come back to that later. I'm on my papaya peach Citrus palette and I'm going to choose this middle light orange, dark yellow right here. So this is where I'm just going to show you how I do a few different, slightly different styles of illustrating fruit. You can do it differently if you if you use the kind of basic layer system that I'm showing you. You have a lot of options for getting some different styles with the same process. So, for example, I'm about to lay a base color. And for this papaya, I'm just going to use the monoline brush, and I'm gonna drag and drop to fill the outline that I make. And it's going to be a very, very, very solid color, no texture at all, really crisp, clean edges. And that's actually what are papaya has. Anyways. If you like texture, goto a texture brush, I would probably go to the six b no taper wide. Um, so then you'll have texture on this base layer, and anything you do above it if it's on a clipping mask will keep that texture. So I am going to show you that in a different fruit tutorial in this class. Eso for now if you just want to follow along. And she was the same brushes Ideo. I just wanted to explain that one little bit first. So choose your monoline big brush. So I'm down here. I'm gonna go really small here and make these little bumpy areas here. And as long as your shape is complete and no little gaps, you can drag and drop to fill. I would go around and check where I picked up. Let's turn the sketch off where I picked up once and started again. I have a little bump here so you can kind of come through and smooth out any weird edges. And you can always come back to change this because we're going to use Clukey masks on top of this layer. This layer can be changed in shape and the clipping masks above it, um, will still show what needs to be shown. I hope that that isn't too confusing. So, um, go to a layer above it and turn it on clipping mask and choose this bright orange, and I'll just show you really quick So if you have, let's go to it. Opaque wash. If you have some work done on a clipping mask above this and then later you want to change the shape of the papaya a little bit, you can come back down to the papaya. You can go back to the brush you used for that papaya. Go back to the color you used this base color and you can make changes. And this orange clipping mask above it is still showing above that change. You can also erase lips and it doesn't affect the clipping mask. The clipping mask is still there. If you accidentally do that and you want to bring it back so it's all there. If you were just using Alfa Lock and making this change So if you're just on this base layer and you're using that wash brush to I didn't Alfa locket to finger swipe to the right toe. Alfa luck. If you're on this, um, base layer and you're doing your tints and shades, maybe you're blending you doing all sorts of things to this layer. Your we can't look really good, but then you see and a goof and you want to fix it. Let me show you. What have you have to do you if you try to go back to the brush unit initially used? Well, it's on Al Flock still. So if I filled in that gap, the only way to do that is with a color. If I did it with this color, even that isn't quite the right color. So you can't make quick, easy changes. It doesn't mean that this isn't a good way to do it. If you have very limited layers, clipping masks use a lot of different layers. So if you want to just get used to a way of doing art with Alfa Luck, you can definitely come back in and turn Alfa. Look back on again and blend that spot. So there are ways to work around it. I'm gonna go ahead, and actually, I'm gonna end, do all of that. So we're on a clipping mask above this, and we're gonna go to that orange color. I'm gonna turn my sketch layer back on. And if you look at your reference photo, the orange is concentrated in the center. I'm gonna go ahead and go to my I'm gonna go to my soft cran on a pretty big size about 32% and I'm looking over here and I'm seeing the orange kind of fades out down here ends up here. There's a nice golden yellow edge around here, and just for an initial based color that looks good. And I'm gonna go ahead and go to my smudge tool, and I think I'm going to go ahead with this big paint streaks. Now let's go to rough streaks for smudging. There's not a lot of streaks on this, so I'm not going for a really streaky lick, but I do want to smudge a little bit. So I'm seeing some lighter colors here and here so I can go back to this light and then bump up my color a little bit lighter, and I can goto a new layer. Go turn that into a clipping mask, stay on my soft cran, but maybe bring it down in size and get some lighter areas over here. I want to go back to my orange, but I want it to be just a little bit more yellow and lighter, A swell, and I'm just getting some variation so I only put a few colors in the color palette, but you can make some changes from there and get some variation. I'm coming in here to get some dark. It's the little bit of dark. It gets much darker down in here, and it's gonna smudge this a little bit.
6. Papaya Part 2: on a layer above that. It doesn't need to be a clipping mask. We're going to go to this super dark color right here, and we're gonna start on these seeds, go to the big model a brush and play around finding a good seed size. The percentage that I am telling you that I am using is going to be different for you if your campus eyes is different. So I'm on 14% with my canvas size. And I'm just going Teoh randomly add some seeds that are not overlapping. And I'm looking on here. The seeds don't go away up in here, they're concentrated down in here. I'm going, Teoh, go to a layer above that one and add some more and these air going to not overlap each other. So I'm watching carefully where my dots are to make sure that this layer has dots that are not overlapping each other on the same layer. And now I'm going to turn the bottom layer off to double check That last dot I did was an overlapping dot Turn off this first layer of dots that we did double check, see if I like how many seeds there are his squeeze. One more in right here. Lips. Uh, we go. It's okay if they're touching a little bit. So we have two layers when they're both on it Looks like quite a few seeds. That's good. I like that. And now we're going to to finger swipe to the right for both of those layers to turn on Alfa Lock, turn one of those layers off and go to the layer that is on. And you're going to select this brown right here in a double check. We're gonna drop the size a little bit. I'm going to zoom away in and show you when? So I'm tapping the center of all of these dots. With this lighter brown, you could go a little bit smaller than that, too. So I'm on my lower layer right now. Those air going to be more kind of in the dark, so I'm gonna leave the center ones alone and only put highlights on the outer winds. Now I'm going to turn on the second layer of seeds. It's already on Alfa Lock. I'm going to slow like to that layer and this layer is on top of the other layer, so they're all going to get a little bit of light shining on them. So I'm gonna put a lighter dot on all of them and with the Goshen Blur. So go to that magic wand and goto Goshen Blur. I'm just gonna blur it. It looks like about 5%. And that only blurred within the dot because we have Alfa Luck on. So all it did was blur that lighter brown dot We'll do the same thing with that lower layer . If you've never used Goshen Blur, I'm looking up here at the percentage so somewhere between four and 5%. All right. And now I want to start with my top layer. Turn off my bottom layer so I can tell which ones are on the top layer and add one more little highlight. So just kind of bump up Teoh a really light version of this brown and come down really small. You can use this model a brush or a studio pen. If you need a little pressure sensitivity, it looks like the light. You can choose where the light is coming from. Well, if we're going to do the shadow in the similar way than the light is coming from the top and coming down. So that means that a little glisten will be on that side of the little seed. So if you don't want it to just be a little dot like this, um, that kind of looks like a fish egg to me. You can also switch to something else, like maybe the six b and do a nice little highlight like this. That's much more my style. So I'm gonna go back, undo those, and put a little swish and not all of them have it. But I'm gonna go ahead and put it all on the top layer here. And then when we turn the bottom leer on and select that layer, I can kind of see, maybe these outer ones might have a little glisten on them. Just kind of judge for yourself, which ones you think might have a little shiny reflection. So keep playing around with this. I think I'm gonna go back and add some more seeds if you if you look down here, it's really solid with seeds, so I can maybe just add 1/3 layer, go back to that dark color my modeling brush and fill in groups that was too small. Fill in some of these spaces down here and make it and I send dark. So once you're done with this seed area, then we're almost done. There are some final little bits that really make this look complete. And I'm gonna turn the sketch layer way, way, way down. So hopefully you can see it a little bit in the video. Um, for you just make sure you can see it so that you know where the little edges around here. And if you look at this, you can see there's a light edge remaining and there's a lot of texture in here. And then there's this shadow right here. We're gonna go and take care of that shadow. So I'm going to add a layer under all of my seeds, and I'm going to select this brown right here that when we used for the highlights on the seeds also, as I'm looking at these seeds, they're looking a little bit light compared to this, but not really compared to this. So if you don't like how light these turned out, you can actually just go into hue, saturation and brightness. Select one of the seed layers and dark in them and maybe turn the saturation down a little bit. Since we did our highlights on the same layer, it is also darkening those highlights. So if you want them to really shine, you can go back and add those highlights again. But I think they're still good. I didn't worry about the very bottom layer that we did, although maybe I should. I can see it's kind of light in there. So we have three layers of seat and I'm on a brandy layer underneath all those seeds. And I'm on this brown that we used for one of the highlights on those seeds. And I'm just going Teoh, go to my wide pencil stroke and I'm on 71%. I need a little bit of a crisp edge along this top. Somebody dropped the size down a little bit and you can see this shadow is curved around this inner area, and it even comes down a little bit over here when you go back up in size and get some nice texture added in here, the shadow kind of widens down in here and I like to fill in in a yellow. There wouldn't be any bright yellow down in here. You would all be really shadowed. We have some more shadow here, a little bit of streaks. So I'm just kind of filling in little yellow gaps under here. And this is also a good time to get a little bit of texture. Don't fill in all the yellow that's up here but draws to some squiggly lines and it gets that little texture going where we have the little prince of the fruit that are attached to the seeds and the same thing on the side. Since squiggles from far away. This is going to look like you spent a lot of time, I promise. Look at that, all right. And then I am gonna go underneath all of the's layers, going to this base color and adding another layer above it. It automatically turns it into a clipping mask because it's sandwiched between other. Another clipping mask and I have a bit of a green, you know, papayas, air kind of ah, greenish on the outside. So let's find a yellowish green. Just come over here to this. This part of the color wheel that's between green and yellow, and it's just goes straight across. I am going to stick with my wide pencil stroke. I went a little bit of texture doing this, and I'm just gonna put a hint Jeff Green. And I'm realizing when I did this, I went under the orange texture and I've got some orange texture that this green is kind of hidden under a little bit. So I think I will move this clipping mask up earlier. So maybe move it to the top of all the clipping masks are seeds weren't on clipping masks They can be, and they'll be fine because they'll be all clipped to this. But they don't have to be. All right now, I'm on top of all of these clipping masks, and now my green is nice and bold. There's not a lot of green up here. It's more of a dark brown, but I'm going to start with some green there and I'm gonna keep going around and I'm going to fast forward this, all right? And on that same layer, I'm gonna go back Teoh a brown. Let's choose this. Just go to the dark brown we used on the seeds and just kind of scribble a little bit up here on the little bumpy area. You can see the brown in there and I'm ready to turn the sketch layer off and stand back and take a look. To me, it looks a little bit flat right now. Of course, we still need the shadow. But I'm talking about the flesh, this dark, dark flesh. There's more than just one shade of dark orange in there. And so I'm just gonna add a little bit more to that. I'm gonna go to that fleshy layer and that dark orange color. And I'm just getting good, darker, little bit darker, and go to my soft cran again on a pretty big size. And I'm just very lightly adding a little bit more texture of a darker color. I'm going to do the same thing with a lighter color, almost white right up in here. So go round and look closely at your reference photo. If you're familiar with the texture, I'm pressing really lightly with this brush. Hopefully you can see the texture that that gives. So if you're familiar with the brushes, you will be able to look at the photo and say, Oh, I think the soft cran brush will make that texture and you'll get, um, used to being able Teoh. Figure out these things without having to refer back to my video and remind yourself which brush to use. And I think I'm gonna get somewhere orange down in here, a swell going to go to that base color and a spring it to a little bit more orange and come down really small on this soft cran brush Just a little darker down there, All right, I'm pretty happy with that. I like my kind of uneven skin showing around the edges and lots of different shades of this orange going on nice and dark through the center. Now let's add a shadow, so I'm going to go down to this very bottom layer. Let's look at this one for a shadow for a shadow, and you can look at some of these other reference photos to depending on how bright the light is, you're gonna have a different look. So the peach one is great, the lights coming from the other direction, but it's very dark shadow right here. and then it fades. This strawberry has a nice, solid, um, shadow. So it's probably a pretty bright light, and it's really dark right under. Just go around and kind of get an idea of how shadows look because this isn't really how shadows look. It's more like this. One of the ways you can get a nice, easy shape for your shadow is to duplicate this base layer, so I'll show you that method. If you just swipe to the left and duplicate. Then this one turned on Al Pha lock, and she's a nice dark color. Shadows aren't black, so think about what color you want. Phil, turn the Alfa lock back off. You can't see this cause it's directly under that papaya right now and you can move it around like this. I would turn freeform on and just change the shape of it a bit. Caution Blair. I'm at 10% right now. Think I'm going up pretty high. I'm at 20. Almost 25% with that. Actually, I'm really happy with that, just as it is. Um, it makes the papaya look like it is raised up in all the right places, but not floating in mid errors and times when you have more of a side angle like this. If you're not careful with your shadow, you can make it look like it's floating. And then I might play around moving that shadow a little bit more. I'm going to group all my layers, including the Shadow. Then I can move the whole thing over. I would recommend if you're going to have a background color, let's do a nice tropical color, then play around with the blend mode on the shadow. Linear, burn, color, burn and multiply. I would mostly check out those, um, it tends to make it look less like a color that you've added. I don't know how to describe it, so I just put it on multiply and it kind of somehow reacts with the color that's under it a little bit better than just having a color there. All right, there's your papaya
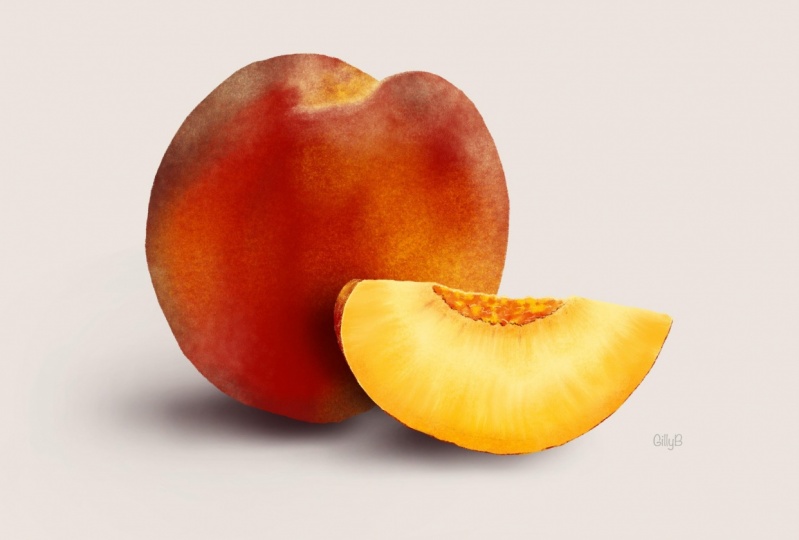
7. Whole Peach: All right, I'm gonna open another campus. The one that we already created. Just a 10 by 10. And we're gonna do peach next. So we're still in the same palette. Papaya, peach, Citrus. I really liked the shape and color of this peach and the shadow. But I added this to show you all, though. Is that a nectarine? I added this to show you the color of the flesh. So we're going to do both. Let's go to the six B two and I start color just for a sketch. I add a few layers and start on the top. And I met. 30% issue. So for the peach, we have basically a circle. Let's get a circle. If you want a perfect circle, you can let it snap to a circle. Put your finger down. I'm gonna make this a little smaller so we can fit the peach slice over here later. Now, this circles not a perfect circle. So let's kind of make some changes to make it more of this peach shape. So for this we have kind of flatter. Over here we have this top part where we know that stem used to go down in there, right? So that's about right in the middle appear. And if you look at what you're seeing in the reference photo, you're seeing a line. You're seeing a line right here. So this is a lie in wait here and then it kind of bumps out and this kind of bumps in. So this peach kind of bulges out right here, not quite that much. And in right here and then let's erase those parts so we don't get confused. And this side is a little flatter. Let's just kind of cut a little bit of that circle off. Actually, it's a little bit flatter down here, too. But peaches come in many shapes and sizes, so just you just don't want a perfect circle and you'll be fine. I am going to do a cherry later, and it's going to be just like this. So, in fact, you'll be able to use this exact outline for the cherry. I'm just looking at this part, making sure I'm happy with how that line meets up. I have kind of a slope right here, and it doesn't really do that. It kind of comes in. I heard point down right here. So I am just gonna touch this up a little bit, All right? Once you're happy with your peach, you can also get a little bit of shadow on there. If you want to draw the shadow, there's your sketch. Let's go to the second layer from the bottom. I'm gonna go to this. This is actually a really dark red right here, but I'm going to go to the one below it. And I know we're using red when the peach isn't red everywhere. But this is just the base color. So a peach, Unlike the papaya, we used this model a brash. We had nice, crisp, clean edges. The peach doesn't have crisp, clean edges, so I am going to choose a more textured brush, at least for the edges. Sometimes when you use a texture brush to go around your outline and then you drag and drop to fill, it doesn't work. Or sometimes that leaves a weird a weird edge where the m Phil meets the textured brush. So I'm gonna go with my wide pencil stroke on about 28% gonna turn my sketch layer down and actually let's go smaller 13% and really just want a ref edge. I'm going to be adding a lot of texture on top using clipping masks. So right now I'm not too worried about this part having texture. I just don't want a super clean, crisp edge on my peach. And then let's see if the dragon drop fills without filling the whole page so it fills the whole page. You can go around again, and that will usually fix it. Or you can go around and check for any gaps you might have left. Usually the gap when you're using a texture, brash is something you can't really see. It's just that the textured pixels are just happen. All it takes is one little section of gap that goes from here to there all the way through , and that Phil will just go all the way through. So this is how I would test out a second time, and then I have. If that doesn't work, I would duplicate this layer and merged those two layers. All right, I think I went around a second time. Now let's try still didn't work. So now I'm going to duplicate that layer and merge them now let's try so that worked. So I still have a nice textured edge. The line itself isn't textured because I've drawn over twice and I duplicated. But that's OK. I just needed that edge. The other way you can do that is do the peach with the model a brush, and then once it's filled, go around with the six B pencil and at an edge to it. Go to a layer above it, turn it into a clipping mask, and we're going to start adding, uh, lovely peach colors. We have some deep oranges and kind of poppy reds. This dark red is over here. So is this even darker red? I'm going to my soft cram, and I'm at about 30%. I'm going to get my dark reds over here, just more of a big section here, and it tapers down. I'm not looking at my peach fuzz yet, just the base colors, although this is going to give a bit of a fuzzy look this brushes. There's a tiny bit of dark here as well, and just a hint of dark here. This is a pretty dark starting color, so we don't need to worry too much about the darks. I'm just gonna stay on this same layer and I'm going to switch to this lighter color right here and a pretty big size 50. I can't see it. I'm in a pretty big size. Well, actually, I think I'll go mostly all the way up to the top. Have a nice light color here. I'm being careful what I do around this line because I have a very light color on the other side of that line. I don't want to add anything there yet, so you can use multiple clipping masks if you want to have more control about each color you're adding or you could just stay on this same could be mask and play around with these colors. I've got some more peachy colors here. I've got this orange. You can get some orange here. I'm pressing really lightly, so I'm not getting a stroke. I'm just kind of getting some texture. And you can already see how much this is looking like a peach. And I would recommend definitely using at least three colors if you've taken any of my classes. You know I like to use at least three colors. Looks like they're some yellow down over here and I'm keeping all that based color texture showing. And even though I did a dragon drop, I have a nice texture going here. So I'm on this yellow and I want to go to this yellow section right here said, zoom in and look at what you have here. Gonna go down small so I can be very precise. And here's my dark line. Turn that up so you can see it better. It's definitely more golden down in here. Gonna go even smaller on my size so I can get a nice lying here. And then it fades up to a lighter color so you can choose this creamy color here. I'm gonna turn my sketch layer way back down so I can barely see it because I don't want that to make me think that I've got a nice line there on my illustration. I don't want the sketch to give me a false sense of what this is gonna look like. I'm gonna go ahead and go to another layer, turn it into a clipping mask. I'm going to be playing around with this area on top of this. So now and playing around with the the very light line that is on this side, that's closer to us. Right here, Right here. So it needs to be on top of all of that, and I'm gonna go even closer. Toe white. So I was on this yellow right here, and now I'm bumping it closer, toe white, and I'm pretty small on this brush, and I just want to get a little light edge here, and I can see that light comes down a little bit right here, and I can see it over here a little bit too. So I'm just looking at what I see. Kind of goes over to the far edge. We're not trying to do the peach fuzz per se, but this is part of the peach fuzz. Let's go ahead and turn the Sketchley. You're off, all right. When I zoom out and look at this, I think I've lightened it up over here a little too much, So I'm gonna go back to this deep red, although I bump it closer to read and going back down to our first clipping mask and increase my soft crane and brush size and get some more deep red over here, Up here and down here. Once I'm happy with my base colors and this top little part here, I'm going to go to another clipping mask above everything and and go to my peach fez brush . And I mean, I go to a pretty light color for Peach Fez. Let's go to this creamy yellow. I'm gonna go to a big size display around with your peach fizz. If you don't like this peach fuzz brush if it doesn't quite look like peach fuzz to you, Um, go back to the soft grand brush. So I like this for parts of it. If you look at some of the areas where there's just some soft highlights, like over here down here and it gives it a nice Matt look, whereas most fruit is shiny and that then I am gonna go back to my soft cran and go almost toe white again at a little bit more peach fest, barely touching the screen. I'm keep looking over here to draw what I see, and I went around out my line, the white line we made there, and I feel like this is almost done, except I want to brighten it up back here some more. So I'm gonna go back down to our very first layer. I'm gonna get this. Let's get this yellow this time. Go down and size on my soft cram and just brighten it up a little bit, Being kind of squiggly about it. And there's your peach. Then let's get the shadow one. So turn your sketch layer back on. Let's go to in a stark color. I almost go to the purples, foreshadows a lot of time. You can change it later if you don't like it. And this time let's go ahead and just to use a soft airbrush and I'm going to concentrate that rate under here. I'm going to soft airbrush be for the eraser, and I'm just fading this out a little bit by erasing part of it. Turner sketch off and there's our peach. Next step is the peach slice
8. Peach Slice: for the peach slice. Let's just look at this sideways slice right here. Go ahead and you can keep your sketch layer if you want. You can copy and paste that for the cherry. It really is just like the cherry, or you can just delete it. But group all of your peach together and we're gonna add a layer actually, at a few layers above that because we're gonna be in front of this peach, which means this we need to work on layers above it. And I'm thinking about how tall this peaches when I am going to draw a peach slice next to it. So I'm on a top layer for my sketch, going to go to my six b Amman and I start color. And I just want to get approximately this height for the whip of my peach because it would look silly if you had a tiny little peach slice down here next to that peach or a big giant page slags next to that peach. So you wanna you want to get, you know, just an idea and you just draw in a semi circle. Really? For the top, go ahead and just draw a straight line across. We can get this into place later. I'm gonna angle it a little bit. So it's not straight across. And for the details that we have here, the peach skin where it comes in like this, we need to make sure we get that in her illustration. So good around off the top, a little bit like this. This is going to be the edge of the skin that we can see right here and round off a little bit. Here, you need to select the right brush here for my eraser and then round Oh, down like that. So you're seeing a little bit more of the skin, which is what we're gonna show right here for the area where the pit is. We're gonna just We're not going to keep this going straight across, but we're going to go ahead and first get an idea of where that pick goes. So it kind of is up this way a little bit more, but pretty even. And then this part is gonna come down a little bit. So go ahead and erase that first line that we did. This is the trickiest part. This area where the skin goes. So I'm going to spend a little more time on this. I think I'm gonna have this curve a little bit more and have this curve a little bit more. And as I look at it, I think I am gonna have this come down a little bit more down here. So the first time I did a peach slice, I traced it. That's why I made sure all the photos I provided our photos that you countries, you can safely trace these. Okay, So, um, don't feel bad if you need to trace. This is a really tricky little slice to Dio. It's part, especially. Zoom out and look at that. See if you like the overall look of that. And once you have your overall shape, um, go ahead and turn your schedule your down and go down to the second from the top. This is going to be my shadow layer, and I'm going to start with this creamy yellow right here I am on the six p. Still, I'm gonna go up in size and I just want to get the whole thing. I'm going to do the whole thing. I may make it kind of bumpy up in here and smooth over here and get the whole thing filled in. This does have a bit of a textured edge. Let's see if we can drag and drop. Yea. So I'm going to turn my sketch way, way, way, way, way down. Make sure you can see your sketch. Go to a clipping mask above it. Go to you can see the flesh. Color is really golden down here so you can go to this Golden or this one. I think this one's a little bit more creamy, so I'm gonna choose that. And I could just go ahead with, uh, my wide pencil stroke on a really big setting and get some nice gold down here. I'm looking at my photo where the gold is. I'm going to be blending smudging this so I'm not too concerned with exactly where this deeper color ISS get some around here. Maybe go to this even darker gold. And now let's smudge. I'm gonna smudge with my gosh and I'm on About 37% gonna zoom in and, um, if you aren't familiar with peach, you can't really see the fibers go this way, Lips. I'm not on the smudge brush tap and hold this much brush on bueche 36%. And I'm just pulling the color up towards this pit and pulling it down, changing my size, Getting some variation. I am going to another layer above that and making that a clipping mask. And now I'm looking at these poppy colors down in here. So let's choose this puppy red, and I'm gonna go to know this wide pencil stroke is good, good with smaller size. And I'm just gonna get some squiggly reds, kind of like we did with the papaya. This can squiggle go to some of the orange here. I see some orange in there and some of the bright yellow, and I'm going to smudge it just a little bit. And I'm going to stick with the white pencil stroke form a smidge. Okay, And now let's do the skin. So we need to go to another layer above everything, turn it on a clipping mask and I'm going to get this middle red right here for the skin to start with. And I'm going to stay on my white pencil, just going to go around the edge. I'm gonna keep my sketch on Do it thin, thin layer around the edge. I'm looking over here and now the skin comes up into here and I don't want to do a clipping mask. I want to change the color of the skin, but it's a clipping mask, so I can't. I need to Alfa lock it to change the color. So once you have the skin exactly in the place that you want it, just go ahead and two finger swipe to the right toe Alfa lock and then play around with the colors you want. So up here, it's nice and golden going to go to my soft cram, change it up here a little bit. I'm just going to stick with this golden and add a little variation down here, so it's not dark red alway crust. Let's turn this sketch layer off so we can get a better idea of what that's looking like. I'm not a fan of how streaky this all is right here, and also, if I look really closely at this skin, I can see a nice, solid yellow along there, too. So I'm going into my six B and I'm going into this. I'm going to go to this lighter yellow on a pretty small size, and I'm gonna go to one of these two clipping masks. I'm going to go to the one where we Dale these dark colors. I just want to get a little bit of a line here, Really thin line. So I don't see that going all the way crossed, just kind of up in this area. And I want to touch up this flesh a little bit. So I'm gonna go down to the streaky layer that we have and I am going to choose this nice golden color here and my soft cran. Let's get a little different texture added with those streaks. So I'm not trying to cover up those streaks. I don't know if I want to go to this dark. No, it's too orange. That's better. It's a nice deep color down here. And then I'm going back up to the later that has all of this start on it, and I'm gonna add a little bit more and still on hopes I'm on six b. Can I just want to kind of add a little bit of squiggle here along this edge. It's not a solid line. It's kind of a broken at squiggle and then maybe a bright yellow one. Now let's go with this light, creamy one along this back edge people, a little bit of highlight there. And then I'm gonna just do a couple little squiggles with that creamy light yellow color. This particular image isn't showing too much of the peachy color right here that a lot of peaches will have some of the poppy color down in here, and then it'll be pulled down like this. It's not quite like that. So just be little patches and get a more of a streaky brush. So just look and see what you have on your reference photo. And that's how you get that look if you have that peachy color up there at the top. As for shadows, I would recommend going back to the same color we used for this one. Go back to the airbrush, and of course, you're gonna win the shadow to be in the same direction. And this peach slices also going to be shadowing that peach itself. So let's get a little bit of shadow down here and got a smaller size. Take it a little bit more concentrated right under here, and then I'm gonna also put a little bit of shadow right behind it. So it's on that peach, and that's where it's going to be helpful to turn that tumble to play. It just makes it look a little nicer on the peach there tap and hold the eraser to get the airbrush on the eraser. Think that shuttle might be a little bit too dark? Here gonna go? There's your peach and your peach slice.
9. Watermelon: all right. I am on a new 10 inch canvas, and I'm going to a new color palette. We're gonna go to watermelon, kiwi, cherry, pull up our photos. So I included these two watermelon images. When for the shape and one more for the colors. I like these brighter colors. So I kind of use a bit of a combination of the two. I'm gonna go to my sketch brush. I'm already on a dark color, and really, I just have a triangle. And this doesn't need to be exactly like the photo, because just depends on how your watermelon got cut. So if you have a triangle and then the curve down here, then you have, um the dark pink area goes closer to the rind down here, and then it comes up in away from the Rhine a little bit, and there's a couple of seeds, add some layers underneath. My sketch turned my sketch opacity way down and a second layer from the bottom. I'm going to choose. We're gonna go ahead and choose the model a brush just to do our Phil. And we're going to choose this middle pink right here. I'm actually gonna go really small on this brush size so I can get a nice corner on these little corners here. I'm filling the entire thing. Make sure shape is closed all the way so you can drag and drop. Now I'm going to go to a textured brush my wide pencil stroke on a pretty big size and add some texture along the edge, just like we did on the orange slice. Not this bottom edge. That's the smooth rained down there. So just a bumpy watermelon pink area and let's go to a layer above it and make it a cooking mask. We'll use a lot of clipping masks so you can do the same thing I did before with the orange slice and make a whole bunch of clipping masks by making them automatic clipping masks like that. Okay, let's go to this deeper color here, and we're just gonna play around with texture right now, so I really like this rough streets fresh, pretty big size. If you look at the watermelon up close, you'll see fibrous swirly streaks happening here. We're not worrying about the rind right now, so don't worry about that. We can stay on that layer Or go to another layer and shoes the lighter pink. Maybe choose the soft cran looking at the picture you can see it's really light over here and over here. So maybe concentrate your light soft cran along this edge over here on this edge Maybe a little bit up here. If it's easier to change your background color to this blue so you can seal of that much easier, go ahead and do that. And I think for now I'm gonna turn my sketch layer off and continue to play around with the texture and colors I'm gonna brighten up this read a little bit so chose this dark red And then I moved it that way and I'm moving my red hue a little bit more orange If you go to big paint streaks, you can get a much whiter brush and I'm going to I'm on a new layer but I'm gonna go under this soft pink cran brush We just did, and I wanted to concentrate on some of the darker areas and I'm seeing that my soft cran brushes really hiding all of this streaky texture. So I'm gonna come back any race some of that soft cran brush with a streaky brush, some on my big paint streaks and got a bigger size here and get some of that He raced. I got a little too heavy handed with that soft cran on that pink layer. And I'm also going to erase now that I've done a little too much red on this layer underneath. Um, I got heavy handed with the red because I couldn't see it very well under all that pink. I'm going back down to the super dark red color and that grunge Sorry. Rough streaks fresh. So your watermelons gonna turn out different each time because this part is different each time, Um, I'm gonna go to the light pink cran brush, and I'm going to smear that with my ref streaks. Sorry I was on the race. If I go to my smudge tool and go to ref streaks, I can see Mudge that cran a little bit here and there. So it's not so, um Cran textured. And I think I might go ahead and go to the light pink and add some light pink streaks as well. I'm not focusing on this center because I do want that center to be nice and rich red. So just play around with streaky brushes and that soft cran brush. The soft grand brush is really going to get you this, um, a little bumpy texture that you can see in some areas. Now we're gonna go to a layer above all of those and go to black. And I'm just gonna go to my six b pencil two pretty big size and get my seeds. If you want to turn your sketch layer back on for your seeds, do you can see where you added those And for these seeds, if you look closely to make them look buried in the watermelon a little bit, just go to a layer under them and go to a nice dark, maybe even jerk in that dark red. And I'm still on May 6 p brush and I'm just going around the edge of them a little bit, and that kind of gives them a shadowed look around him, and it makes him look sunken in the's. Don't have any little highlights on them for any glistening sparkle little white dots, but you can add that if you want All right. I'm going to another clipping mask above all of that and starting on my rind. You mean to start with this light green here and back to my soft cran brush. So if you look here, it is pretty high. The the light color comes up pretty high, so if you want to look at this one, it's a little bit more green. This one is a little bit more white, so you can bring it up toe white a little bit. And right now I'm focusing on just this top part. So if I want thes areas white and then it gets darker as you go down. So then go down to this green. You can blend that with the same brush. If you want to blend that a little bit tap and hold this much tool. Remember, though any blending is going to expose that pink underneath. So I'm undoing that. That was too big of ah smudge tool anyways, and it kind of pushed it around a little too much, but that'll smooth the texture a little bit, and you can stay on this same layer to do the dark green along the bottom or just go to a new layer above it. I'm gonna go ahead and stay on the same layer. I'm gonna get a little bit more of a solid brush. I'll go with my white pencil stroke on this one. I'm seen kind of a lighter area of the dark green, just a lightly textured area here before the super heavy dark rind skin. I should say so now I'm doing the skin and on a clipping mask up of that, go ahead and go to juicy fruit and go to this super light pink right here. I'm trying to stay just on the pink areas and I'm trying to avoid I can erase it later if I get any on the seeds, but I'm just adding and hopefully you can see that I'm adding a little bit of white speckles. I'm going to erase the part from the seed area. I'm pretty happy with that. I might go back, enlighten this area right here, but I don't want to change it. So I'm going to Alfa lock back and go toe white and go to my soft cran. And since it's L ful act, I'm not I'm not doing anything other than changing the color of the pixels that are already there. So I'm just lightning this edge a little bit. I think I might do the same with one of the lighter pink. So this super light pink I can go. We haven't done this light pink right here on that Something. I lighten that some of these edges on here a swell. I didn't Alfa lock this later, but that's okay, all right? I'm happy with that watermelon. If I look at the reference photo, I think that the dark color comes over to this side a little bit more than what I've got so I can erase some of this pink layer a little bit and exposed the dark that I have underneath. And now let's do our shadow. I know we have all these layers up here, and that's just because I did the two different ways. I added layers before I started, But I also then added a bunch of clipping masks, soft air, brash. I don't always use soft airbrush for the shadow. And there's no shadow in this picture. Um, you can kind of assume that since the curve is here that the shadow is going to be more faded over here and over here and more concentrated right here. And if you're not careful, it's gonna look like it's floating. So maybe make sure it's really dark right here. I know it looks like I'm coloring the watermelon itself. I'm just letting the edge of my brush color down here for me so I can get it nice in come faded but with a little bit of control there. And I think I am going to move that up closer. If you play around with the location of it, you can tell where it should be where, where something is really close to whatever it's resting on. The shadow is just barely visible, and it's really dark right there and fades out from there. So this one has sun coming down or light coming down. And so it's shadowing both edges there, and let's go ahead and turn that to multiply. And that's just in case you end up doing something else underneath all of that, and it'll look really nice if you dio and I know this is a very simple triangle watermelon , and this is more of a side view So, um, the procedure is exactly the same. You can get the edges like this if you just focus on what you're seeing in the color. So, um, let me see. For example, if you me start with a quick sketch if you want to show a little bit of a side view So here's your rind. Then you're gonna need to make sure you turn your sketch way down So you're not focusing on the pencil line as your edge. And I mean, just color this in really quick when your you can still do the whole thing all at once. You don't need to have this triangle be a different layer than this. Traps await or whatever it is. Over here, you can do the whole thing all at once, just like we did here. And then as your addy and texture on top, you're going to make sure that your colors air looking different. The light will be hitting this side differently than it will be hitting this side. So let's turn the sketch off so your colors over here are going to be slightly different than your colors over here. These are going to be much darker. And, um, you know, you can use different clipping masks for this side vs this side. But if you use completely separate layers than you could have a really hard line dividing this side from this site, I hope that makes sense. Um, you can message me if you struggle with something that's a little bit more, um, with death like that. But this is a nice, simple shape to start out with. All right, See, in the next video.
10. Citrus Slice: we're going to do a Citrus slice. And in the palate, I've included lemon, orange, blood, orange and lime colors. So we're just going to do the orange and you can play around with the other ones with the same exact method. So we're not actually starting with the sketch. Go ahead and get the dark orange. This is going to be the rind color, but we're going to make a big circle. This is going to be the circle that is the the outer edge of the orange. So think about how big you want that. Hold that still so it snaps to a shape tap. So it's to a perfect circle. If you're not sure if it went to circle, you can select the edit up there and shoes circle. Oh, and I'm on the monoline brush, drag and drop, so I like texture, as you know. So I am going to add some texture around the edge of this. You can use multiple brushes. White pencil. Six B. Um, I'm just gonna use white pencil. The dry ink brush in the inky in section of the procreate brushes also works well on a layer above that. Go ahead and select this middle creamy orange and the bottle lane brush. So we're doing a slightly smaller circle inside the bigger win tap. It's off center, but that's OK. It's on a separate layer so we can move that around. This is going to be the base color for the actual juicy orange slices. Go ahead and select it and move it more centered into place, So you kind of have an even border of that dark orange all the way around. We don't need to worry about the textured edge on this one. It's going to be covered up. Let's add another layer and go ahead and get this creamy color the middle one of the lemons colors, but pump it a little closer toe white. And for this we do need a pretty textured brush. I didn't put the dry ink brush in here, So if you want to go ahead and go to the inky and category of the procreate brushes and find the dry ink brush, it's right here. You can pull it right out. It pulls a copy. I know it looks like it just pulled the actual brush right out. Tap on fruit and then slided in. I'm gonna slide it in down here by the native procreate brushes. And then if you go back to the inky and you can see it's still there, so it's a little deceiving that it shows you pull it completely out of the category. So all of the native procreate brushes should do that? Um, mine Don't do that. I don't think if you have other brushes of mine from other classes E think that it'll just move them completely if you move him like that. So now we have the drying brush, go to a pretty big size. I'm on 74% and we're gonna go around. We're making the rind. I guess we should pull up a reference photo. I've done Citrus a little too many times, so I didn't even think to do that. So, um, it's what have I got going on here? So your reference photo has, um, a whole bunch of Citrus here. None of them are really exactly what we're doing here. This is the closest one. So, um, just zoom in on that lemon and it gives you an idea of what we're doing. We're doing this outer rind on a lemon. It's much whiter, and on a orange, it's a little cream here, so you can play around with that. Get it how you like it. Find a different reference photo if you're not happy with these, and we're gonna just get this rind, just the base you can do am you can do a circle just like we did with the other circles. I just went to a larger size of that drying brush. Let it snap, and then you can. Since we're on a separate layer again, you can move that whole thing and then maybe do another one. I want a thicker rind, so this brush didn't quite go as thick as I needed it to, so I'm just going to do another one. So get a nice thick rind on there, and while you're still on that drying brush, find the center. Just put a dot on the center so you can stick with that brush and you'll get some consistency with your texture. But come down to a nice small size and think about how you want your wedges, the wedges, this membrane in between, each wedge is sometimes barely visible says, Spend some time getting your wedges exactly how you'd like them. And then I'm going to fast forward this part because it's going to take a while. Make sure you take some time on this part. You're going to need Teoh round us the edges of each of these and blend it right into the rind. Once you're done with that, do a little bit of the same thing up here at the top. So nice on even little area there. And then you can tap and hold the eraser so you get to dry ink on the eraser and just tap a little round in here. Teoh, erase some of that just to give a little bit of depth in there, little shadowing darkness and the other thing I'm going going to do. If you look really closely at a reference photo, there's kind of little dots. I think they contain the oils of the Citrus in the rind. So if you just stay on your eraser and maybe go to a bigger size and, um, tap and do some darker and lighter and thinner and thicker little dots around this very far edge, be careful. You don't go too far in because you'll hit the lighter orange color. The edge of that is in there somewhere. Hiding under this so fast. Forward this part too, and go around one more time. So we're going to go to this layer right here. Also, If you're not super happy with this creamy color and you want it lighter or any other color , you can change it at any time. It's on its own layer. You can alfa locket and change the color by filling the layer. Or you can go to hue, saturation, brightness and play around with how light or dark you want that layer. The reason we did these on separate layers is we're going to be using a lot of clipping masks on this middle layer right here. And since we're really going to be blah, being paint on pixels, whatever you wanna call it, um, I want it to be contained on that circle. I don't want it that blah being to go and be exposed above this circle, so that's why that's completely separate. And go ahead and add a layer above this creamy orange and turn into a clipping mask. You can go back down to that creamy orange and add a couple more layers. I can't remember if we need three or four, um, and will automatically be clipping masks. So that's just a simple way to make clipping masks really easily. And we're gonna first think about light the lights going to be coming from up here. So the thickness of the slice is going to cast a shadow inside the orange here and then on the table counter over here so that layer is going to be set to let's let's do color burn right now. We might play around with that later and go ahead and get this kind of brownish orange, this top orange right here. Our brush is going to be jacket brush, and I'm only at about 9%. I went some strokes that are really covering, um, all of just to give some texture to all of the slices, and all of my strokes are going to go towards the center. And since it's all one layer under there, you're gonna be ableto overlap that, um, each slice is all connected underneath. I'm gonna go ahead and get rid of the reference photo. For now. so we can zoom and more here. So with the jagged brush, if you press hard, you're going to get a lot of color. And if you don't press too hard, you're gonna get some nice texture and streaks. So I am doing a gentle touch right now, and I'm trying to cover everything. But I'm overlapping and tickets and streaks, and I just went a little bit of texture covering all of this orange before we do our shadowing. I'm not going for a solid color here, so let's go up a layer. Make sure you change the blend mode. Start with color, burn again and our light is coming from up here. So our shadowy and is going to be up here and this center area is going to cast a shadow. A swell Let's play with blend mode on that linear burn turned out to be a nice, deep, rich orange instead of the neon. That color burn was turning out to be multiply is a little bit less bright. It's a nice rich color to I think I like linear burn right now, though, and this is where these tam colors come into play. You can use thes and play around with these for these blend modes on this shadowing, if you want an even richer shadow for maybe just the part super close to rind there you can just keep going down, darker and darker on that que I didn't play around with this other blend mode. I'm pretty happy with it, though. Linear burn is too bright on that one. Multiply works and color burn works, so those are the three I alternate between for getting a darker color, multiply color burn and linear burn. I know this says darkened, but, um, that says darker color, but I don't usually find that those work in the way I want them to. So now we need some some light texture again. I didn't put the brush I need in here, so come down to painting and down to dry brush, and let's get that into our fruit category as well. Select painting and then let's just go toe white. Sorry, select that dry brush so there's dry brush and there's dry ink. I will sometimes call them the wrong thing. So just that warning in advance there, um, I met about 20 something percent and this is going to give me some streaks. Can you see the streaks? This is going to give the illusion of you spending a lot of time drawing each one of those little capsules of juice. So we're not going for realism. If you want to go for realism, you can spend a whole bunch of time on this drawing all sorts of little capsules in there. I don't like this big white blood here, so I'm gonna tap and hold ticket the dry brush as my eraser and see if Italy race in a streaky way, which it did. And I'm going to play around. I can't remember if I mentioned that we're on a new layer clipping mask. I'm gonna play around with that color blend mode as well, and I want this one to be bright. So I know it's not up there in those darkening modes. Some of them are going to be way too bright, but it then you can change the opacity, so that's kind of nice. I like that. So either just keep it on normal or add and turn the opacity down, which is what I think I'm going to stick with here and will go to another clipping mask above that one more oversight going back down to inking and go to tinder box. I forgot to add this brush to your categorias well, tinderbox, and we're going to stay on white and I'm on a new clipping mask. I'm adding just Cem glistening little shiny, juicy texture. And there is your orange. So let's get a shadow under there. This is one of the reasons that I always start one layer from the bottom because I I don't know why. It just bothers me. What's added to to have to add a layer and then drag it down. I wish I could tap the background layer and then add a layer to get a bottom layer under there. But that's OK, a soft brush and I like to go to purples really dark, and we're just gonna let the snap tool do its thing for 1/2 circle here. Okay, I'm pretty happy with that. I like to turn my shadows to multiply as well, and there's your Citrus slice
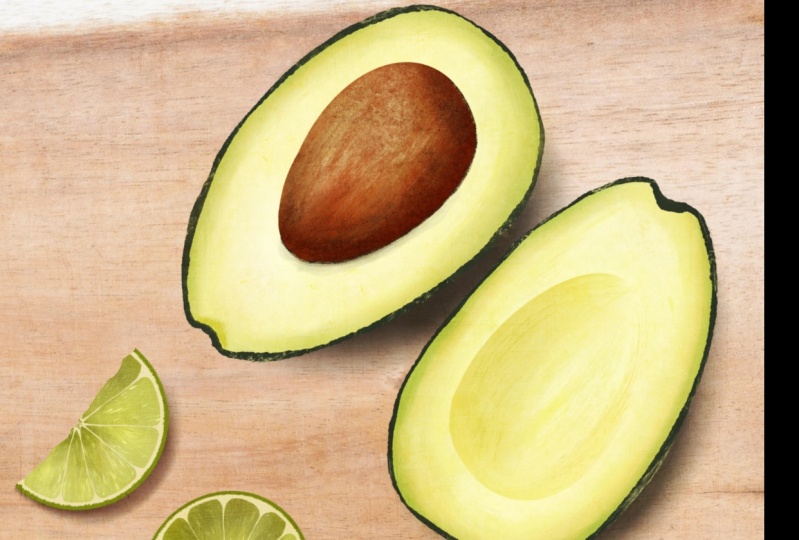
11. Avocado part 1: it's time for avocado, the long awaited avocado. I get a lot of requests to teach how to draw on avocado. And I couldn't find the perfect photo on a free use site. So if you're just practicing, you can use any photo you like. Um, if you're selling your work, you need to make sure that if you are Tracy and or anything like that, you're using a free use photo. And just in general that you know all of the rules about that kind of stuff. Go to your strawberry blueberry avocado palette. I am not going to show Ah, full blueberry. But I did add the blueberry colors, some deep blues and purples and light blues. And so it would be awesome if you attempted blueberry. We have it on the page here, but we're just going to do strawberry and avocado now. Avocados, super duper easy. Strawberry is tricky. And maybe I shouldn't say that because then you might not want to give it a try, But, uh, give it a try. Um, and this practice and it will get easier. So here's our avocado colors. We have the dark skin color here and the pit colors here. We're not going to draw this. I think the outside of avocados not very attractive. So not drawing that. I'm just drawing this and it looks a lot like a papaya right now, the shape of it. So to start with a dark color on the six p sketch City will its Cub Jen's six B for your sketch and let's look at what our shape is here. So you have a nice circle right here. If you wanted to start with a circle and then it comes out almost horizontally right here. But it's angled up a little bit. This comes down almost at a 45 degree angle from the top, and let me just kind of have it. They both meet around here so it doesn't need to look exactly like this because, of course, it's, you know, an avocado, lots of different shapes. There's a bit of a div it right here. All right, so let's erase this line right here, and you have your basic avocado shape that's kind of leaning over. That's just the cut surface. So now we need to get this back part here for that. It looks like it kind of comes around a little bit right here and down, over and for this side. If you look right here, you can't start seeing the avocado skin besides the cut edge until you're way over here. So don't start over here and come down, start down much further in this way and kind of curve down and around. Then you kind of following the along the line of this curve here and it's bumpy, so it doesn't need to be all perfect for the pit. Don't let your brain fool you here. Don't just put a circle in the middle. Look at what you're seeing. You're seen. First of all, this really isn't that much of a circle. It's kind of egg shaped tickets whiter over here that I'm any longer that way. And look how little space you have between the top curve of the pit here and this back edge . They have a lot more flesh showing here in here and, of course, up here and a little bit over here. So let's get that line there. Also, from here to here is all exposed pit. That's going to be a nice, smooth line. But all of this is going to be rough in the end because it's all kind of buried in the avocado. All right, so let's go back to our pit shape. We need more of the flesh showing here, maybe even more. Why aren't you undoing? Probably because my fingers are on the screen over here and down here. So if we just generally have those as guidelines for where that pitch should be, looking over at my photo I'm seeing this line is kind of curved more this way on this comes down and meats. It almost meets it right here. Even though it's a nice curve, this is the top of the pit that's exposed, and it meets the avocado right here and about. Right here is Well, then this one comes down here. I hope that makes sense. So it's, um, kind of, ah, kind of, ah, weird shape here because it's partly exposed out of the avocado and then partly in, and you can barely see it that there is a little bit of that stem hole right there, and now you have your avocado shape. My pencil was way up high so that the lines are very thick. but I'm gonna turn that opacity way down and at a couple layers on this second layer from the bottom, I'm going to choose this very light green this time. Most of this is this light green. Let's go ahead and do modeling. We're gonna bring that down really small. We're looking at the outer edge of this entire shape, not just the green, fleshy color. You can see that it's bumpy. So I'm not going to just be going like this. I'm gonna be a little bit messy and bumpy and wavy all the way around. I'm not sure how well you can see my green line, so I'm just kind of wiggling my hand back and forth a little bit and making sure I have a close to shape in the end. So each time I pick up my pencil and put it back down, I'm making sure I touched the last line that I had bumpy, bumpy avocado all way around drag and drop. If it fills the whole page, it's because you have a little gap somewhere. All right, on a Phillipe mask on that, let's go ahead and make that clipping mask go back down to our avocado color and add some more layers. So they're all clipping masks and on the top one, just like the Kiwi. Let's do the skin. So go ahead. And she's this super dark green. I know that that's hard to see on the video because it's so similar to this background color and you can see skin all the way around. So it's very similar to the Kiwi. I'm gonna go to a little bit of a larger size, and it's still kind of doing a bumpy thing here. And I'm going to just focus on where the edge of my avocado skin is going to be showing right in here and filling in the rest of this. So that is your base avocado skin. And now we can focus on some of these greens in the flesh, so it's a lot like the Kiwi. Let's go to this middle green here for a brush. Um, it's I'm not gonna use the soft cran because that's not quite the texture that we have here . If you're familiar with avocado, which I'm sure everybody is, it's bit fibrous but also very smooth and buttery, so you can kind of play around just like we did with the peach slice with Cem streaks. And, um, you can just add some color and then blend it. And so there's a lot of ways you can do this. You can kind of play around with some of the other things that we've already done in class on the other fruits. So I'm just adding on a start green layer here where we have dark all the way around and I'm on my wide pencil stroke and then I'm going to smudge it. You know what? Let's smudge with jagged brush, See how that looks. I like that. I'm gonna go around in the direction that those fibers would be going. It was kind of following the flesh there and barely tapping. I don't want a lot of streaks, and I also don't want to pull the green away from the edge too much. You can see it gets a little bit more yellow down here and a little bit light up here so you can go back to this base color we have and go a little bit more yellow down here. Maybe a little yellow in here go a little bit lighter towards white and, like, I always say, adding a nice variation ISS key. I'm gonna add some more dark here. Even though we're on that same layer, we already blended that dark green in and we're about to do some more. Blending some on all of this is on the same layers and being very careful here, I really don't want those colors to mix together too much. But I like the idea of them not being separate like we did on the cherry. And this brush on this bigger size is giving a completely different look than the streaky, painterly look we got on the cherry. What I'm doing is I'm making sure I'm getting rid of most of this kranish texture here with the blending here. I'm pretty happy with that. I think I went a little too light here, and I don't want to race. So I'm gonna go back to this flesh color that we used here. And instead of adding with her pencil stroke and then blending with the jagged brush, I'm gonna go ahead and add with the jagged brush some of that color back as my way of removing some of that white, all right, I'm really happy with that. There's a lot of brushes you can use for this and get totally different looks and just kind of use the same steps with the same layers and you'll be good.
12. Avocado part 2: we can keep this pit on a clipping mask because it's with in the edges of that base layer. It's not exposed around the outer edge over here for the pit color. Go ahead and just choose this nice burnt sienna. And let's go ahead and do this monoline big. It's a nice, smooth edge, and we're going to get the rough edged down here later. Not super happy with me. Shape down here. Something to tap and hold the eraser and spend a little time on that. All right, that is better. And I just realized we don't want to be on a clipping mask for this because we're gonna need clipping masks for the pit itself. So I can't use this pit color as a clipping mask because any clipping masks I do above that are going to be clipped to this very bottom one down here. So just happen it and turn clipping mask off lips. So we need that to be above the layer that are dark. Skin is on so that dark skin can still be a clipping mask. Well, we just, uh hold on. We need to move that clipping mask down to be connected to this. So we have the base layer. Could be mass clipping mask, and these are just empty layers so that those don't need to be there. That just turned it back into a clipping mask. Turn that clipping mask off and add a clipping mask up of it. All right, that was confusing. That was just, you know, I with my dark setting here. I didn't see that the skin layer was way up there. So, um, now we have the base color, the green shadows and tints and shades on top of that, and the green skin on top of that on a brand new layer. That's not a clipping mask. We have our pit color, and now we have a clipping mask above that, and we're going Teoh her super dark. Let's go back down to the Maybe this, Chuck. And if you look really closely, there's some lighter. We're not looking at this highlight here. We're just looking at the dark, dark, dark areas and the lighter, orangey brown areas. So it's I'm on the darker one right now, so it's much darker over here, and this part is going to be important to get you to have this rounded look, Andi, I have some dark streaks and just kind of messing around a little bit here. And I'm also going to this lighter color right here and getting some later winds, and I'm gonna stick with jagged brush and just kind of just kind of blend of those a little bit, kind of keeping them in their space, but smudging those edges. So I have some lights and some darks, and I have my base color showing through, and I'm going to a clipping mask above that and give me that. Do it again. Gonna get a little bit. Maybe even a little Brecher over here. And I know I'm doing this quickly. Hopi. I'm hoping you can see it. It works pretty well to do about two layers of of these three colors. It doesn't have to look exactly like that, but just kind of have the dark areas where they need to be and one more clipping mask above that, and we're gonna get some of these highlights. If you look up here, there's some almost this green Pete avocado color and all over here. So let's go to this avocado color and maybe just dump it a little bit more towards white. And I am I'm going to start with that same brush were on the chalk brush, and I'm gonna get a little bit over here. Just gonna have a tiny bit. I'm looking over here at where there's just a little bit. I mean it. Blend that. Hmm. Maybe a little bit more. Here we go. And then I'm going to the jagged brush on that same color on a fairly small size. I'm on 6% and I'm just gonna get somebody's more concentrated streaks of highlight here. So the jagged brush gives this sort of crazy start shape. So I like tip stripe. Kind of, I don't know. Before I tap, I'm already moving to make sure you're looking over here. All right, Now we need to get a little bit of shadowing down here along this edge and a little bit of roughing up along the edge down here. I'm gonna turn my sketch layer off and focus on this clean, crisp edge from here to here. It is not clean and crisp, so there's a few things you can dio, um, one of the things you can do is go to the base layer of the pit itself and erase part of it with a textured brush. So I'm on the eraser. I'm on the wide pencil stroke, and you can just come in and rough up that edge by erasing. That's exposing the green underneath. I'm looking back and forth so I can see how far I should go with bag remembering to stop because this is the top exposed part of the pit. So it's not up here that we want to rough up stone here. And the other thing you can do if you don't want to change the shape of your pit, which is this is doing piggery. Racing is you can just add. Some were color, so you'll want to go to a fresh layer above everything. That is not a clipping mask. And that way you can overlap where this in this meat, and it looks like there's some nice dark color right in here as a shadow. So there is a color on your palate right here. I know you can't see that in the video right here. Let's see if that's gonna work. I am going to my six B, and I'm just doing a scanty little line right here. Then you can look around and see where else you might want some little dark areas and just kind of add some more roughing up to that part of the pit, and it will make it look like it's sinking into the pit a little bit more. There is also a bit of a shadow on the avocado itself right there. So there's multiple ways you can get that I would go back down to one of the layers that is clipped to the avocado itself. And maybe not this later that we focused so much time and attention on. But this skin layer would work. He wanted to do it on that layer and maybe just go to jagged brush can get a little shadow there. Great. A tiny bit of attention here, up on the little stem, spied. While we're already on that layer that has the skin, let's go ahead and Alfa Luck that and we're gonna go to pretty much black. And let's go to the soft cram, this one ad Cem texture and darkness down in here, and I don't think you're gonna be able to see that. And then after that, I'm going to my wide pencil stroke and this very light color right here, Teeny, tiny size, 20 something percent and just get a little hint of a stem there. The little circle, it doesn't take much. And then the other thing you need to do and you can do it on this very top layer that we did this super dark line on. So it's not clipped to anything else. You are going to come in. And if you look really closely where the skin meets the green avocado, there is a light brown line there. So it's nice to go over the edge from this switch, brushes to my six b go over the edge of um, where the skin and the avocado meat just like that. So I zoomed way and so you could see that, and I don't know how well you're gonna be able to see it when I zoom out. But this can have a wiggly line and I am going around, and it's just kind of showing that cut edge of the skin. I look on here, It's not really ah, solid line all the way around, and it does vary in width. Um, this little addition really helps the overall real nous factor. So now I'm kind of breaking up my line and doing a bit here and there. I've only seen a little bit down here. All right, I think we're done with the avocado, and now we need to do this shadow. I'm not sure what's going on here. I think it's just my skin layer gonna turn Alfa lock off. Didn't quite get colored in there. Yeah, all right. And now, my shadow, the shadow is quite faded. Except for right under here. I'm gonna stick with this really dark color here, this super dark skin color and go to may soft brush. You do a pretty small size at first and just get the super dense shadow right here. An increase. And if you're not careful with your shadow, it's not going to look like it's coming up like this. Tap and hold the eraser like All right, put that on. Multiplying lips that was not multiply, multiply. There's your avocado. Looks like there's a little bit of shine on here. I think I want to add to my pit. Let's go to Jack it brush again and I'm on a white. Let's get a couple more highlights on there. Have fun.
13. Avocados part 3: I found more reference photos. I was up late last night going through all the free use photos I could find and on picks, obey and unspool ash. When I just typed the word fruit, I found way more awesome photos than when I was trying to be very specific and type papaya and strawberry and blueberry. So, um so I just threw together another page. And so all the videos that you've watched up until now have no references to these photos at all. So I am currently filming a couple more tutorials to finish the class, and I am throwing this in there right now. I want to show you how to do this side of an avocado. So we just looked at the one side and it was a different photo. So when you get this file, I have two pages here. And so when is the photos that we've been looking at already? And then this is another one. So I found this photo and this photo, which is a great one, and I want to show you how you can do this side really quickly. It's really easy. So go ahead and go to your avocado drawing and group all of your avocado layers together. So here's your whole avocado that we did group all of those layers together. To do that, you need to swipe on all of the layers and then tap group and then duplicate the group, Turn off the original and open up the duplicate. So all of these layers right here have the pit on them. So we're going to delete those. And we still did some shading on a couple other layers, so we need to figure out what layer those things air on. I'm toggle ing this layer and I see a dark line. So I'm gonna tap on that layer and go to any racer and just erased that line. And then that shadowing was on this layer right here. All right, so now we have a fresh avocado here, and we're going to go above the group. Just add a fresh layer, appear or up here by this sketch layer. I'm not using our original sketch because that pit shape is for that three dimensional pit . Now we just need a con cave pit whole, So I'm just going to draw a new circle. And so just find a dark color six b brush and just kind of get a general idea of your pit size in there can move that around. We just need that somewhat similar sized to the pit itself and turn that capacity down. Make sure you can see yours, and then you can come down to these avocado layers. We're gonna use clipping masks, although it really doesn't matter cause we're staying within this shape, we're not going to be, you know, blogging any paint out of the lions. But I just always make clipping masks. I'm using this Jen's altered Salamanca. Um I am going to smudge it with the jagged brush, since that's the brush we used on this other area. But this is a nice, um, see through color, so we can just kind of add layers with it. I'm gonna go go to your avocado colors here. So here's your avocado right here. Go to the green that we used as this main layer of green and just come down a little darker . If you look at a reference photo, go ahead and pop up either of the two reference photos, I believe the other one does have, Um a picture with this is Well, the's are going to be a little different because of the angle of the light for this particular view of the avocado. Our avocado was shadowed over here and lit up over here. So that means Pitt Akane caved part is going to be shadowed here and lit over here. So this part over here will be lit up and this part will be shaded. So it's gonna be very similar to this right here. And so I chose that green, and then I just went down a little bit, and I'm on that altered Salamanca brush, and I'm on 20% and I'm just looking. It looks like the light is about 1/3 of that circle over here. And then it gets darker and darker as you go up to this edge up here. So just start adding and we're gonna blend and I'm going out of the lions, and that's okay. Maybe go a little bit more towards a mustardy yellow. I'm just kind of looking over here trying to get some similar colors, maybe even a little darker right up by this edge. And then we need a really bright color that's almost white. I don't know why that just changed colors. That was weird. So let's go ahead and go toe white. But then just bring it over towards yellow a little bit and get some brightness over here. I think it needs to be a little bit more yellow. And also, if you want to do your light on a different layer, that would also be a good idea. Because then you can play around with blend modes for this dark area. And I'm going to ignore this light area and show you what I mean by that Tap the N and then check these blend modes. You can see that that just made it very vibrant, multiply looks really nice and multiply doesn't really work for the light area. So I'm leaving that and multiply, and I'm just going to come in and do just kind of ah quickie race on this light section here and go to a new layer. Make that a clipping mask, a swell and kind of start over with the white great area, all right, and then I'm going to go to Jagged Brush and I'm on the white area and I'm just gonna blend a little bit. I can't really see because my dark area is a little bit more obvious here, Going to my dark layer. Let me zoom in for you here. And I just want to make sure I have a nice transition here to the light spot. And then I like how the texture is showing up in here with the different strokes. Um, so I don't want to just blend those all into one color. But Salamanca has a little bit of a canvas texture, which isn't really the texture we have on this avocado right now. So I am kind of blending that texture out. Go back upto white and I could see that a little bit better. And now I want to go to my eraser. I'm just going to this No taper wide six b no taper wide I'm on the white layer is gonna come around this edge and I'm on the dark layer. I'm gonna come around this edge might need to go over it twice for that darker, more obvious my brush Just world and then turned the sketch off because sometimes it's easy to rely on that sketch and I'm gonna go to any racer. That's a little bit more easy to control and get a cleaner edge. But not a super clean. I didn't I don't want to use the model a brush because you know, that avocado pit coming out of there isn't going to be a super crisp line left behind. And there you go. So if you find a photo that you like where you're going to have both the pitiless side and the pit side showing you can now you know how to do it. So obviously they're going to be, you know, mirror images or something. And we just used the same avocado, But that's just because I already showed you the rest, and now you know how to do that part?
14. Kiwi: All right, so four key be We're going to use thes colors right here. I'm going to start with this middle green. I always tend to start with the middle, and then I add darker and lighter onto it. And I am going to draw the entire thing and fill the entire thing of what you see here with that green and use clipping masks above it. So for my sketch, sorry. L minutes start with black on six b, and this just looks like to ellipses. That's pretty good. So this ellipse is kind of angled this way, and this ellipse is angled this way. If you're worried about getting them to be similar in size, just go ahead and duplicate this and rotate it and move it over here. I'm going to flip it as well. I'm just looking at my reference photo and trying to get a good idea. And then you can come by those. So they're back on the same sketch layer. And on this one right here, we can see part of the Kiwi. All right, I'm happy with my sketch, and I'm going to keep it on the top player. Turn my opacity way down. Let's add one clipping mask. Go back down to the bottom layer and add more layers. So we have clipping masks already set above base layer. Oh, I want one more base layer. Turn. Let's see if I turn this clipping mask off all of those air going to get turned off. Okay, How about a duplicate that layer? Okay, so now I have my layer. I can put my shadow on later. And then this layer will be my base color of this middle green again. Let's go ahead and start with You know what? We're not going to start with Monoline. QE has a lot of texture, so I am going to use this six be no taper wide. You could also use this wide pencil stroke. I'm gonna go to the white ist setting and I'm going to fill this whole thing and with color while keeping the texture So I don't want to go back and forth too much on the same stroke . So kfit overlaps a little bit, but then I can keep my texture on this base layer. And that texture since we're using clipping masks, will come through on all the other layers because those clipping masks are only going to show up where there's pixels of color on the layer there clipped to. Since there's no pixels of color in all these little whiter areas, the clipping masks are not going to show up. The color that's on those clipping masks is not going to show up in those same exact areas . Does that make sense? So I'm coloring the whole QB. I know this part is the brown part, and we will add a clipping mask for that later. All right, on a clipping mask above that, let's go ahead and add that brown. Actually, you know what? We're gonna add the brown much higher, so let's go. Um, let's go to the very top clipping mask and I'm gonna add this darker brown. I'm just going to stay on this same brush, and I'm gonna add this, um, main part of the key. Be back here filling it all, and it's okay if you overlap now, because the texture is staying there due to the texture we have on the base layer. So there's no amount of coloring in that I can do that's going to fill that texture because this is a clipping mask on top of other texture. Now I want to go down in size and get a brown rim all the way around. This is looking a little too flat for me, so I am going to change my curve here in Purvis down. So that's great. If you look closely at the skin, you will see the cut edge of the skin as well. So that's another thing you can just add right to this same layer. So if you alfa lock the layer lives Alfa, lock the layer and go to a light color. Um, let's go list does go almost toe white here and go to a scanty little brush. Six b on a smaller size, and you can just come around and add a little light color. If you look some places, it might be darker, but it's nice Teoh kind of show where the cut edge of the skin is so it doesn't just look like the fuzz. And finally, on this same layer, I'm going to choose this lighter color here and get some highlights on that skin. Let's choose the soft cran. I'm trying not to overlap the skin. That line. We just did too much. Here, get some highlights up here. Makes it also look a little bit more fizzy. Looks like there's some down here over here. I might even go lighter on that. And I'm I'm having to do this on an Alfa lock the layer Because if I did a clipping mask, it would be masked to this whole clipped to this whole green section and the texture would be showing up on the green. And if you look closely again, you can see that you can see a little bit of green through that skin. So if you want to see a little bit of green through your brown skin, you can't see a little bit, and right here you can erase a little bit. So I just stayed on my cran brush there and he raised a little bit of the brown and you can see a little hazy green. All right, that's all we're doing with this skin. And now let's focus on the flesh. So we're going to go to the first clipping mask, and we're gonna be doing all of this flesh texture here so it gets Dirk or appear. We're not worrying about thes green lines, the seeds or the center. We're just looking at this outer area. So we're gonna go to the darker green and I'm already on my cran soft grand brush. The next layer up would be all of the little green stripes. For that, I'm going to my wide pencil stroke, and you could also go to my chalk. I'm going to a new clipping mask above all of that, and what I'm gonna do is start out with this middle green and turn the blend mode to multiply. The reason I like to play with blend modes is it's going to adjust the color based on what's underneath it, and since we have so much variation underneath it, that'll be a good thing. All right, look at what your stripes look like. They are faded at the tips. They're darker towards the center, and they all come in kind of like the spokes of a wheel. So you're not going to have them be, you know, like at weird angles. I can already tell that color is going to be a little too light on multiply, so let's try. Go ahead and draw stripe. What is it? Oh, it's there is just on the wrong blend mode. Uh, and it looks like linear burn might work. So I think I'm going to stick with multiply but go to a darker color. So let's just drag this down a little darker. I'm gonna go to a bigger brush, and it's pressure sensitive. So I'm starting out light, and I'm getting, um, thicker and darker, and they also very in length. You can go right into it. We're going to cover all that up so you can go right into the center, go to a clipping mask above that, and we're going Teoh, go ahead and do the the white center so that we have so we know exactly where those seeds should go. So go to this light, light, light green and let's just push it up a little brighter. I'm still on the wide pencil stroke going to come down in size. Yeah, I like that texture and I'm going to turn my sketch off, even gets in my way. Now go to ah layer above all of these clipping masks and go to black, and I'm going to my six B If you look really closely, there's two or three seeds in each. Well, sometimes there's only one. They don't go all the way down to the white area and they fit within these dark streaks. So they're teeny tiny, and I would just alternate how many you're doing. So it doesn't look like 22222 all the way around. This brush ends at being a little bit too square. Go to my wide pencil, see if that's any better. It's a little better. So I just went back and made him a little bit bigger, and I also went to darken underneath them a little bit more. So what I'm gonna do is go back to the layer that all those little stripes were on and duplicate it and merge them. That works. I like that a lot, and now I want to just add a little bit of juiciness. So I am going to go to a layer that's under this white. I don't really see a lot of juiciness in this light area. Add a layer, go to white and go to my juicy fruit on a pretty small size. Just get a little glistening, juicy texture on their And now it's at our shadows down here at the very bottom, almost a purple e blue Really dark color, soft air, brash. Our shadow on this side is pretty dark in our shadow On this side is pretty dark. I'm not liking the purple color I chose for this. So I'm gonna change that when I'm done. I'm just gonna get the shape that I want here, tap and hold the eraser. Actually, I'm gonna tap and hold this smudge brush That helps me change the shape a little bit. And then the eraser. So the darkness is concentrated right here and right here I am going to Alfa Lock that and it's almost a dark green. So this super dark green watermelon color might work and then just bring it way down and fill. Now that does look really green to me. So I'm gonna go even darker and Phil. And even though that's probably pretty close to a black, it's still not quite black. So it does work really well. I like that and it's turned that layer on board to play whips. Cand I might add a little bit more texture and little hairs around this part of the skin. To do that, you want to not be on a clipping mask, so go to that skin layer and go to a layer above it. That's not a clipping mask and go to this light brown color but a little bit lighter, even. And maybe just the six B, but a pretty small size. And the the reason why you don't want it to be a clipping mask. It's because now you can go off the edge. If it were clipping mask, it wouldn't allow you to do that so you can spend some time going around and getting some hairs on here. Looks like we might need a brighter color to make it even noticeable. I don't think it's necessary to put them everywhere, but you can look at your reference photo and get a good idea of some really great spots for this. There's your Kiwi. As I'm looking at the photo, I'd probably do a little bit more, um, dark green on this Kiwi. If I spent a bench of time fixing that up to be super realistic. Oh, also, I don't really see highlights on the seeds But what? You can see our little membranes between these start green lines, and you can add those right on the same layer as this. And you could even just go to that color, get a brush that's you can go super skinny with, like, the six B and just get some very faint membranes coming out from this. All right, see in the next video.
15. Cherries: so I have more photos than I did earlier. So I've added them. Um, since I already I already recorded some of the other lessons and now I have new photos. So, um, that's going to be a little bit confusing, but it should be fine. I am starting on a new canvas on a dark color and go to the watermelon kiwi cherry palette . And here's the cherry colors right here. These air Rainier Terry colors and then the stem color. So, um, I'm gonna sketch this and then I'm going to do the colors of a reindeer cherry. So the Cherries air whiter on top and narrower on the bottom and the kind of bulge out. - All right. So spend some time on your sketch, and then let's go back to said, Oh, So the sketch, the cherry that we used is on this first page, and then we have another page of photos that have the rainier Cherries. This is really what the Rainier Cherries look like right here. So they're very pinkish red poppy red as well as orangy yellow kind of about like this, but a little bit deeper. So I'm going to start with this poppy color. I don't know what color that IHS fluorescent pink. And let's just go ahead and do you monoline big. I am going to the second layer from the bottom so we can add our shadow there later. And I'm going to turn my sketch down and I'm gonna fill in the hole. Cherry, all right. And the layer above that can be a clipping mask, and we're gonna go to these golden colors, but you can see here there's also just very, very bright yellow. So go ahead and find a yellow A swell, just the nice, solid yellow and added And then we'll also be using white. I am going to I'm gonna go ahead and go to my soft cram just like we did with the Peach. And I have looking at these two photos. I'm gonna add a lot of yellow over here. A lot of the bright yellow who that might be a little too bright. I'm gonna take that yellow off on and bring that down a tiny bit. I am also going to add some dark red that while the kind of normal red right here, and get that behind the stem back there If you haven't watched the peach tutorial yet, you'll see when you do that that this is very similar to that tutorial. But we're not gonna leave this high texture on. So now we go to the jagged brush for the smudge tool. I want to go to a pretty small size like 4% and let me zoom in here. We don't want to leave this peachy texture. We're going to go for a bit of a painterly texture Here, go in the direction of the shape that the cherry ISS. So don't just go straight up and down your curving. Hopefully, you can hear the little tepid he taps. I do short, quick strokes so that I don't pull color too far. Crust and I still have some of that initial color exposed there. And I'm going to a clipping mask above that because the next thing I want to do, I don't know if I want to mess this up. So I'm going to go to this really dark red now and add that way over here A swell, maybe a little bit up there. I know. I'm kind of winging it. You can look at photos. There's some nice, dark red areas I couldn't find the perfect photo I've used before. It wasn't a free use photo, so I didn't feel comfortable adding it to class. You can use any photo reference you want if you're just, um, looking at something and you don't intend to sell what you're making and you just wanna practice and you're not tracing and things like that. So if you're just trying to practice getting used to something you don't need to use for use photos But since this is a class, I decided I needed to do that, and I now want to get some nice bright spots. So I'm gonna go up another layer, and I'm just gonna go to Let's start with this that I already had in the palate might not be bright enough. Oh, maybe it is. It might mix that with a little white. If you're not careful about your lights on your cherry, you're gonna end up kind of looking like you have a candied cherry. It's to colossi looking all right, and we're gonna look at the highlights, though this set of pictures has very dull highlights. This has very glossy highlights. And so did this. And are lighter areas air over here? So I'm gonna put a couple highlights over here. Um, I am going to use this six b no taper wide, and I'm already on white. I'm just going to stay on this layer, and I will blend that a tiny bit, but leave it nice and bright, and I think I'm gonna come back to this dark side and get it a little bit more dark over there. So go to this dark red and just bring it down a little darker and then come back down to our dark Clear. I'm going to turn the sketch off for this so I can really see what I'm doing, and I'm gonna get a little bit more Apache. It's a little too dark toe light right now, so I'm gonna just get a little more darkness over here. A little more variation. The amount of blending and I'm doing is just ticket rid of the sharp edges of the color I just laid down. I don't want to see the square edges of that. So if you want to lay down color with the jacket brush that's also an option. It's a little trickier, though. Okay, I'm liking that. And now with the stems, If you really look at, we need to go back to the photo that we used initially. We have some very light areas over here and up here in the front of the stem. And that's just gonna help us see where that front of the cherry is. That's coming down into the stem. So we're gonna go back up to that light lier and let's choose this. Let's choose this light pink right here and I'm gonna choose this chalk brush just cause it's a little softer and I'm gonna just get a little highlight in here and a little highlight over here and then smudged those smudging a little area with this jagged brushes . Pretty tricky. That might take a few tries, and you can come back to it and be careful not to smudge too much where your white is because we are on that same layer. If you want it to be a different layer, you can just start out on a different layer. We may come back to that. I'm going to go ahead and do this stem. So not on a clipping mask. Add another layer above everything and let's go to this. Let's go to this darker green right here and let's go to six B and on the largest size. So down here you can see a little wider little ring on this side you can't really see. It does get a little bit whiter as the stem comes down there, but it doesn't have that ring showing. And I'm looking at the stem and it's a pretty consistent width, except it's whiter at the bottom. So I'm just gonna go pressing kind of hard trying to get a nice, smooth line, and it's not really going as wide as I want it. I'm gonna, um, switch to this six b no taper wide and then find the width that I want come down in size. If you want to spend some time making that base look a little lighter. And for the top really, really don't spend time making it look like this on purpose, and it still does so pretend like you have to widths of stem up here and then just make some bumpy sides to it. That's all. Turn the sketch off so you can see what I've done here. I have a nice textured brush here going for the stem, and I'm gonna leave it that way. If you decide to make this background really dark, you might be able to see the dark background through those little textures butts. So you might want a more solid brush. Go to a Colombian mask above that And let's go to a lighter color, maybe just by a pencil stroke. And if you look on here, you have some highlights over here in here. So just, you know, not being super precise, not going for realism. And you go even lighter with that almost towards white, maybe a little darker down on the bottom. So go to my dark green and go down a little bit more dark in this side, dark and down here by where it meets the cherry. And then the top gets really light and almost yellow right here by this stems just kind of scribble and maybe even scribble all of that light yellow up there and go to this brown and scribble on some brown. Maybe go to a darker brown, get a couple dark spots on there, and now we're going to blend just a little bit. So blend with something that just takes a light touch. I'm going to go to the white pencil. I'll zoom in here for you among the biggest size. And I'm just and of sweeping up, I can see that my stem is looking like it's on my little highlighted part of the cherry. So I'm going to move just this cherry down. To do that, I need to select all of the layers that the cherry is on. Even though both Cherries air on those layers, you can select this cherry. Don't let it trick you. It's gonna make all of the clipping masks go away. So all you see is that base layer, which makes it a little tricky to know how far to move this cherry. But go ahead and move it down a little bit. All right, So I guessed. Well, I just moved in a smidge, and it worked. So now it's closer to the right spot. I'm also see, You know, we'll wobbly nine here on this cherry, um, from this base layer. So to fix that, all you need to do is either add or erase to that base layer. So I'm going to erase. I'm on that layer and I'm just gonna smooth this out. I'm gonna clean up the base of my stems as well. He, Reese, those a little bit to the shape that I want TEM maybe move those down a little bit. A swell kind of take a look at how it's very dark around the base of those. Right now they just kind of look like they're sitting on top of the Cherries. So I'm gonna go on top of all those cherry layers and add another clipping mask and get a darker color. Let's go with this darker red right here and the white pencil stroke is fine and just dark in a little area around the base of that stem on both areas, both Cherries and basically went. What I'm having you do is try to draw what you see, and because we're using multiple reference photos, it's a little trickier. So I'm going to go to the clipping mask of this stem and go to a dark green and darken it down there, too. The darkening just kind of helps it look more sunken in and less like. It's just sitting right on top and then the bottom layer for a shadow. Me to go to a super dark red, almost black, a soft brush about 11%. So right now those look like they're floating. And if you look at the shadow, it's very, very concentrated right at the base, where they're resting on the counter dish, whatever they're on. And that's how you'll get rid of that floating look tap and hold the erasers. You're on the air, brush for the eraser to do any cleaning up, and there's your Cherries.
16. Strawberry Part 1: Alright, guys, we're going to do this Strawberry right here, So let's get a kind of that Just typical strawberry shape drawn. I'm on a top layer of multiple layers on a balmy six B on a dark color. It's a nice wide strawberry comes down to have a point here that shape present super important. There's so many different shapes of strawberries. And if you look really close the width of this green section, it goes from here to here at the base. So just kind of find a nice average width of where that green is connected. I mean, I bring this down a little bit and make it a little bit smaller, and we have this stem that comes right down to this center. So the center right here does kind of get your stem sketched on there. So as for these leaves that we're seeing here, hopefully you can see in the video. But you have the reference photo. So there they go out to about the same width as the strawberry itself. So they're really not going to come too much farther than this. And this that's good. Um, I have a lot of little little Harry things coming up from the base down here. And then we have this leaf right here. Let's That's the most prominent leaf. Let's go ahead and it's kind of just in almond shape. Just get an almond shaped sketched and don't worry about how it's connecting. We can't really see how it's connecting, so we'll have to just do our best. And then this almond shaped leaf over here and I can see one more way back here and it's kind of the side view of a leaf. I can see a leaf way back there by this stem, and I see a big leaf. I'm not looking at this dark when here I'm not looking at this dark one. I'm looking at the one behind it, and then there is that one in front of it, trying to get my shape correct here, and I'm just drawing what I'm seen. Then we have when coming out over here, and it kind of curves up. There is one right here in the middle to, and it's really hard to tell what direction that's going. So I'm just gonna put a little a little spot here, and then now that we have all of those leaves. We can see better where they might, how they might attach and where they might attach. So we didn't need to worry too much about that till we got them all drawn on there. And they just kind of all, you know, sink into that spot. So spend some time on that, and then the seeds air pretty close together here. So I am going to go to the biggest setting on my six B, the seeds kind of angle with the berry. So don't just make them all straight up and down. They're going to angle with the very I've drawn this strawberry before and I have a totally separate palette for it. So I am going to call it dark, not Arc Dark strawberry. And I'm gonna make sure that you have that pallet. It's very Seiji greens. It's some much different than a lot of the other pictures, so I don't know. It's kind of cool in artsy and very deep reds. So some of these look almost black. But if you look here, it is really almost black over here. When you're drawing something that start, it does work best to start with a dark background, and it's harder to draw it with a white background and then change the dark background. Jake, change it to a dark background later. It just kind of almost looks funny. Let's go ahead and bring our color down pretty dark. This is a super dark red. I might change it to a super dark green. Yeah, let's do super dark green. And then we need to be able to see this sketch. So, Alfa, lock this sketch layer and just choose Ah, light colored and then fill layer. Yeah. All right, so we're gonna go down 2nd 1 from the bottom and we're going to start with this red right here. I'm debating on what brush to use. I think I am going to start with the model I brush and then rough up that edge later. So Kenny went out of the lines a little bit, and later, I'm going to erase the edges a little bit and thinking that the video might be making this hard to see. Um, so I'm gonna make sure I really point at the colors that I'm using. I'm going to turn my opacity down on my sketch. Let's go ahead and get our basic shadowing done on the strawberry. So we have the really, really dark red over here and a little bit over here as well as right up in here under the lease. So let's go to a layer on top of the strawberry and turn into a clipping mask and go to this. Who? Let's start with this dark red right here. You know what? I'm gonna go too soft. Cram. I met about 28% and I want to get the dark, dark areas. I can tell it's actually not dark enough. So I have that darker red in there. It looks almost too dark. So it's hard to believe that that might actually be the color. And I'm seeing I have a red spot down here when it you race really quick. Maybe that dark, dark, almost black Red is the color that we need. All right, So this red is all in this lower area going to go up on my brush size a little bit right up in here, and then we'll go to that super dark red. I'm gonna be very careful with that. I don't want it to be overwhelming here. It's almost black. And then let's go to this red right here. It's more of a pink. Just get a little highlight in here. It's kind of lighter right up here, over here, A little bit down here, and we're gonna blend this a little bit. I don't want to blend in a streaky way with the jagged brush gonna blend with Salamanca. And I'm able to get rid of some of that cram texture But not all of it cause Solomon cause a very, um, light touch brush. I don't know how to explain it. We need to deal with the seeds themselves. My little lines air much longer than the seeds actually are. I'm going to go to another clipping mask and I'm actually gonna go These Berries seeds seem a little bit light pink, so I'm gonna go to this light pink in a minute, go even brighter and I'm gonna go to the the six b. I remember with the key be seeds was to square and I'm gonna go to this white pencil stroke and try that one. Yeah, that's good. We can always dark in these later So if you when I just get all of them on at the same color, we can Alfa lock the layer later and change the color of these seeds. I just turned my sketch layer down. Go to a slightly bigger size, so I don't have to really make sure I color them in Feli. If you want to move any, you can just grab when and shifted a little bit. Don't be too much of a perfectionist about that. We're not going for hyper realism here, remember? So you can see Look, hell, look how blobby might my seeds are. Okay, so for now, we're just gonna leave them one color. So if we look at the picture, we can see there's dark rings around each seed. They're not perfect circles, that kind of, you know, following the seed shape. So we're gonna go on a layer under those seeds and we're gonna go to a darker color. So over here, it'll be darker than over here. So right here I can go ahead and go to this dark red right here and this state on the pencil, the white pencil stroke. And here's what I'm gonna dio around each seed go to a bigger size. It's going to do that around each seed. But I am looking cause as the light changes, you might have, um you might have that darkness be more prominent on one side than the other. So I'm gonna fast forward this part and get all my seeds darkened. I'm looking around to make sure I got all of those. So this is a part where it gets a little tricky what layer to use. So I'm gonna go ahead and smudge these a little bit. So I'm going to go to the smudge tool on the same brush. That wide pencil stroke. I want to blend the edges of these dark areas. I just wanna blend them a little bit, but I want to maintain that texture. Otherwise, I would do the Goshen blur. Now we need highlights.
17. Strawberry Part 2: now we need highlights. So let's go to a clipping mask above that one. We're still under the seeds. We're gonna go to one of these to graze, so the darker grey is for the highlights that aren't super break. And the lighter gray is for these shiny er highlights. And if you look at them, they're all in between the seeds. And so they're in this all this light area. So let's go to let's try the lighter one first and I'm still in the same brush. I'm on the biggest size. I can see some highlights in between since seeds around here and here, I'm not coloring over the dark sunken in areas of the seeds. If it's hard to not color those areas, you can actually do this layer under those sunken in areas on a layer under. So there's not a whole lot of of bright highlights on this particular strawberry. We're gonna blend on that same brush when it come down a little bit, and when I'm blending, I'm I'm just gonna blend around the edges here trying to make it have that roundy look that it has around all these seeds. And I'm trying to prevent the white to get turned into pink. I don't want it to mix really with the pink, the red that's under. So I'm I'm just letting I'm just drawing along the edges and letting the blend tool Smith's things around without going back and forth, which would make it look pink. So if I went like this, it's gonna look like it's mixing with the red. But I am again trying to get rid of the texture. So now that I've gone around all of those seeds, I'm gonna just try to smooth out the texture a little bit. And the reason I even used a texture brush to begin with is because I didn't want to hurt Crisp Line, either. So if you were going for realism and you're looking down here, it's a hard, crisp line, so you might wanna have that on your strawberry. This part is something that takes a lot of time to just add and subtract, erased some errors. Try again. Sometimes I go, Really, if you zoom way out. Wow, that looks like a strawberry. But right now I like hearing about that, Uh and then I want to use that darker grade to get a little bit of highlights in some of these. So when you have a sunken area, there's gonna be light that hits some sides of it, But it's not super bright, and I need to make sure I am above that layer. So I am above the layer that all these dark circles air on all these dark rings. So I'm still on the same layer as this, which I think I'm just going to stay on. I'm gonna come down in size on this brush, and I just look in at some of these that have a little highlight here. Not all of them have it. Some of them have it much smaller than others. Some of it have it. Some of them have it on the other side, dependent on how the light is hitting. So I'm just drawing what they see. And I'm not getting every single seed just getting a few and something have it just right down here. It just depends on how the light iss all right. And then I would probably go to white one last time. We didn't go toe white white before we This was all the light gray and just get some really bright spots. You look on here, there's some really, really bright spots, and I'm pressing a little harder, and I don't think I'm going to smudge these at all. And maybe I should have actually gone on a new layer for this so that I can erase it if I need to. But I just need to get a few more little highlights, stronger highlights, and that will really give it that, um, shiny Look, I had an ah ha moment when I drew an ant close up of an ant. I should show it to you. I remember looking at it and going, How do I draw the stripes of the abdomen with shiny stripes and Matt stripes? How do you draw Matt? How do you draw shiny? And then I just draw. I drew what I saw, and then I backed up and looked at it. It's training, all right. I am not going to spend any more time on this part of the strawberry on the highlights. This part you can play with to your heart's content. I might darken over here and down here some more on my final Berry, but I want to just get the leaves done. And I'm going to do that in the next video. But one of the things you can dio, I'll just show you really quick on the seed layer. You can change the shape of those seeds if you need to erase little bits. But you can Alfa lock bat, and you can dark in some areas. So just any brush you want. The seeds down here are much darker, so maybe you go over them. I just chose a dark red, but you could even go, you know, almost black. And, um, just change the color of those seeds directly with Alfa Lock. Now I'm on a roll. All right, so I'm gonna come back and finish the leaves at top, and then we'll be done.
18. Strawberry Part 3: for the leaves. Start with this really light green that is that section that sticks into the berry where the leaves come and sprout out of it. We're gonna go to some layers above all of those if you want to combine all your red berry layers on when you could do that and then here's our greens. So I'm gonna use this light green here. You know, I'm just gonna stick with my six b. I know I use it a lot. I never came back and changed the outside shape of my berry. So if you look, it's just kind of bumpy because of those in and out areas where the seats are. So if you go to the very base layer of your very you can just erase is I'm not sure you can see this. I'm gonna change the background color just a little when I go up to this, that green so you can erase. And this will help give your bury a little bit of texture. So it's not perfectly model and brush smooth and just kind of make it a little wobbly in where the seeds are, if you can. Looking at the reference photo. If you went to then hopefully you can see this is giving it a texture. Not I'm not trying for a high texture because, of course, Berries are nice and smooth. But I do want Teoh fix up how the shape is up here before we start our leaves. Some cutting that down a little bit. Yeah, I really came up too high, looking at my sketch his way down in there. The leaves are so which is kind of a race. All that, and go to a layer above all of that. And let's go to this super light green. Six B can always add strawberry back so you can add just like we erased from that layer. You can go to that color and add anything back to it as well. All right, so we have that light, light light color right down in here, and there's a couple shades of green down in there. So if you want it at a bunch of color down in there, look at the reference photo. It gets almost white, but not quite. And then there's thes a little bit brighter green a little. These were probably all the little, um, stay men from the flower. Well, Harry things and I am going to Ah, layer that's under that. So that all of my leaves kind of get buried in that. Let's go to this green. That's gonna clash with our background. I want to go to this screen right here. If you can't see, there is a darker green right here. But I want to go to the next one. So I think that's the same color we have for the background. So I'm gonna change the background color. All right, so we have our pencil sketch, and I'm just, um So I do two layers of leaves. So the 1st 1 is going to be the the layer. That's all the ones there in the front of the stem. So that, to me, looks like this one. And this one, This one, This one. I don't know if you can see my sketch very well, but hopefully you can see yours. And then I'm just gonna go ahead and put this one on as well. Even though those two are touching on a layer underneath all of these, open the other three leaves and then and probably another layer for the stem. So I'm gonna color in these leaves with this same color. I'll go to a layer under that. So I need to drag a layer down. And just so I have a slightly different color and working with, I'm going to darken that a little bit so I can just tell the two layers or different. I think I'm on the white pencil stroke now. As long as they have something, I can get it. A bit of a crisp edge may come back with a different pencil for the edge, but I like the texture for the Phil. The stem is coming in between those two layers, so I'm gonna add a layer in between. And I'm just gonna choose this 2nd 1 from the right Really hard to see on this background me change that background again. How about blue? All right. So we have our base layers for our lives and our stem. And I think I'm happy actually, with this just the way it is, because I'm I like the texture and I don't want realism, but I'm going to Alfa lack this. Damn, I'm gonna turn off my sketch and I'm just looking really quick. It looks like the highlight on the stem is right down the middle and it's a little bit darker on the sides, so I'm just going to do it all on one layer. So I'm still on May 6 p. And I'm just gonna rough up the sites with a little bit of a darker green and then blend. And for the leaves, let's start with the front leaves. I'm going to go ahead and make a clipping mask and it looks like this site is really dark on this leaf right here. So let's go to the start green. I'm gonna go to the white pencil stroke and make a nice dark back side of that leaf. And I just blogged that green down onto this leaf, and I don't want that there. So coming. Erase that. But I'm looking and it looks like that whole backside of that leave is dark. And now I'm going to erase where he got it on that leaf. And then the whole backside of this sleep is also dark, but not quite as dark. So get a little bit on there. Not quite as much of that dark green. Hopefully, you can see this. This leaf over here has a lot of the dark over here and this leave. If you turn your sketch back on, you'll see that we have a folded leaf up here. And so it's this backside that's dark. So we're just gonna get some dark back here now. Let's go. Toe lights. I'm just doing them all on one clipping mask. So let's goto this. Not this really light one, but, uh, this really light green over here. This leaf right here has a lot of that night and hey, swooping in the direction of the leaves. Now the veins in the leaves. This one has some light up here. This one's got a little bit of light around the edge. Are we ignoring this one yet? We've been ignoring this one. So it's the This one's got a little bit of light and a little bit of dark, all right. And we're gonna smudge those later. Let's go to a Collopy mask above the other leaf layer and do the same thing. So I'm on the dark green, go dark back here a little bit dark here. This one is a little bit dark on top. You know, I'm going really fast, but just watch the process, and then hopefully it'll kind of click. I'm gonna go. Well, lighter green on here. Get some variation. I just like the variation and the streaks. All right. And now I'm going to blend a little bit, which, actually, is it really necessary? The streaks look nice going in the direction of the veins. Blend on this other, uh, clipping mask on the other set of leaves. Looking over here, there are some hard lines. This is one of them. So this has a nice hard edge, and this one does, too. We're gonna come back and do the hard edge next. So I've got just the base colors. They look really rounding and soft. Um, but now I'm going to this really like color, and I'm gonna go to a pretty small size and I want to come in and get the more highlighted edges. And I'm not gonna blend of these. And if you really want a separate layer to be a little bit more precise, that works too. Sometimes these highlights just are really what makes that's That's the wrong layer. just really makes the final piece look finished. And I'm keeping in mind what? My strawberry overall look, ISS get some streaks in here that are not going to be blended. So the overall look of my strawberry, I want it to be a similar illustration style and the other clipping mask Wrong layer. This is kind of the side of view of a leaf. So this is the hard edge that's a little bit highlighted. I need to come back to this clipping mask and get a little highlight on this guy. And then I think we're done. Maybe a little more highlighting on the stem. Well, streaks. That's it, guys, I'm not sure how, um how you can tell if you can tell very much that the background is really dark blue right now. Looks really good. It was a dark blue eso I definitely will spend time more time on those seeds. Let me show you the other one. I did. So I ended up making the seeds that greenish yellow we talked about down here
19. Blueberry Spoon Part 1: I made another pallet and it's called blueberries Bone. So these are the spoon colors and the blueberry colors and or right up here. And here are the background color. I'm gonna go ahead and change the background to that color. And now I need Teoh turn my preference light interface. This spoon is very symmetrical. So I went ahead and used the symmetry canvas drawing guide edit Drawing guide Symmetry automatically goes to this vertical symmetry. I'm gonna turn my line toe white. Apparently it won't go away. The white and my thickness and opacity up so you can see that Hopefully, I'm going to May 6 b and to a light color for sketching on this dark background. And I'm just going to try to draw this spoon. I am going to clean up my sketch while I'm still in symmetry. So I'm pretty happy with that. And I think that I'm ready to get started. So I am going to turn the drawing guide off and also turn drawing assist off. So we just needed to get our sketch of our spoon, and now we need to move it into place and make it the size we want it. So this isn't a square, but it is after this side, you know, it's probably off to the side just for an artistic reason. I think it looks great after the side. It's hard to tell in the video, probably that this photo actually is really dark around it. And it's really light. It's much lighter right here. You can see a lot of high texture, so make sure you're looking at the photo, uh, that you have in front of you. I'm putting my sketch way about the top and adding a whole bunch of layers, and I'm going down to this very bottom layer and I'm going to this dark. So these were our two background colors. This is the one we used for the background. Now I'm going to this stark. It's basically black and going down to artist cran on a really big size. I'm not sure you're gonna be able to really see this. Uh, this is a high texture brush, and I'm gonna use it to darken the areas around without just meeting it solid black. Like the photo. I'm leaving it lighter right here, but I am giving it some texture and that's something that you can play with to your heart's content. I'm not gonna do too much with that. I'm just getting it nice and dark, and now I'm gonna turn the sketch layer way down on a different layer. I'm going to sketch the blueberries really quick with my six B for your background texture . With the artist cram, I would rotate and change the size of the cran and just have a lot of fun with it and add more color at a little bit of hints of maybe a rusty, dark, dark, rusty color. Um, maybe a little bit more of a purple hint, since that will look good with the blueberries and have a lot of fun just playing with texture in the background. Just keep the highlight right here next to the spoon because our light is coming this way. You can tell that because the light is hitting this upside of the spoon over here, and it's also hitting that that side of the Berries and the spoon is highlighted all on this side. So keep the light over here and then make this side of the spoon really dark. Let's get our strawberry are blueberries sketched on their, um, the amount of space they're taking up on the spoon is about from here to here. And there's only five blueberries on there. I have a side view blueberry here, a top view blueberry here, a side view here, top for you here. I'm already making them a little bit too big. But that's why I'm on a separate layer. So we have the side view blueberries, air, more of an ellipse. The top few are circles, and then I'm on a separate layers. I can move that around to where I want to change the size if I want to. Doesn't need to be exactly like the photo. And then once you're happy with it, you can merge those two sketch layers. All right, so the spoon, of course, is going to be under the blueberries. And we're going to start with that, and I'm going to go to this bottom layer right here and for the spoon. I'm going to start with a really dark color. So, um, it's up to you. If you want to start dark and then add highlights or start medium and then add highlights and ship shades. So I'm gonna go ahead and start with this one right here. It's kind of the middle tone, and I am going to use this crisp monoline big brush. If you're more comfortable doing that step with the symmetry on, you can do that. But you need to do it before you move it. Once you do this sketch, then go to a new layer and fill the spoon like we just did, but using symmetry. So that's our base layer for the spoon. Now you can add a clipping mask and I'm gonna pretend like the blueberries are not there. Does pretend like they're not there, and I'm looking at how dark it is over here, and I am seeing these dark, shadowy bumps. That's all I'm seeing. I'm not seeing blueberries, and I can see that underneath the blueberries it's all really dark under there, so just go. These are basically the same color. This is a little bit more brown, and I'm just gonna go. You can go to the soft cran. I'm going to go to this, uh, no taper wide actually go to mid century Cran. It's a nice texture, and there's a lot of texture on this spoon, someone has zoom way in. I'm not worrying about this highlighted edge anywhere, Any of the highlights. I'm just getting my dark color here. And I'm of course, going to be smudging this later. So my shadows here, my stark area underneath blueberries. It's a little dark down here. I'm going to go to this gray here, get a couple. We're going for high texture. It's a little bit light. We're going for, um, you know, unevenness here. So just kind of lots of colors. And I don't like using a ton of layers, so I tend to stick with fewer layers, and now I'm kind of covering over my shadows a little bit, but that's okay, can add more later. I'm just looking over here, and I have this sort of goldie colored and getting some highlights in on here, but I am going to do the stronger highlights later. All right, now I want to smudge and for smudging. Just go ahead and get the artist cramp because it has a high texture, but also it goes to a really big size, so I would come down to a fairly small size. I'm at 9% and tap around a little bit. I don't want the texture to go away. I don't want to smooth the texture out. I'm going to add some more dark down here. You can see on here. It gets really dark. I'm tempted to get rid of my sketch right now because it was showing me the white edges there and I don't want to see my sketch edges, but I do still need to have an idea of where those blueberries are. All right, I'm smudging again. So I had added three or four colors before I switched. I added it with a high tech shirt. I'm smudging it with a high texture, and I know that my drawing If you saw it this morning, let me show you. I know that it it looks Rio, but I didn't spend hours trying to make it look real. And that's something that, um, I've learned that you don't really need to do. You don't have to get every single line. So So this might not look exactly like what's going on over here, but it's going to look pretty close in the end when we get all the important parts, so I'm going to leave that alone. I'm probably need to fix up my very shadows more, but for now, I'm not going to add any more of that metal layer. I am going to another clipping mask above it, and I'm gonna go to some of my highlighted areas. This is almost white in its for this and this and this side over here, and that is all. So if you want to go to the six b on a fairly big size and look what you have here, that highlight isn't at the very edge. It's in a little bit, it's in and it goes from about. It fades to, ah, brighter highlight, and then it fades back up. So I have to turn my spoon because that's easier for me to draw to make sure I got a good size a little too big. And I'm going, if press harder, canon lighter. And I think that maybe a little bit too far in from the edge, so well, since it's the first thing I have on the page, I can actually move it and top top tucked up. Here we go. This highlight is along that outer edge and it starts way up at the top, can see the unevenness of my spoon shape. So that's something I will need to fix. And then it kind of extends down here a little bit, too. This highlight down here is wide cause it's that cut metal edge, so to go to a bigger size and it's right here at this curve and it continues down the spoon and it fills this whole a little flourish over here, and then it tapers as you go down this spoon. I need to fix my well, I'm not gonna fix it for this tutorial, but I I don't have a very clean edge over here, so I would make sure I have a clean edge before I keep going. The other thing we can do on this layer is the more golden highlights. So right here, it's almost like a little triangle sticking out right here blends up into their There's a little bit over here, and it was a little bit down this side over here. There's a tiny bit over here and then more up here, and I might get the bigger mid century Cran to get a higher texture for this area as it comes down this way for the other part of the spoons edges. We have a darker line, so maybe we go to this gray. Now let's go back to that base color and back to the six B biggest size and to start cannot edge. It's almost needs to be a little bit darker and darker over here, darker right here in a darker. So as long as you're drawing what you're seeing, it's going to end up looking pretty realistic, and it doesn't need to be. You don't need toe. Overthink it. So I'm just zooming in and I'm seeing I have this light edge that's a little bit more faded than when I have going on up here. So maybe all blended a little bit. Not with the artist Cran maybe with this one. Blend that out a little bit, and the other thing I see is it gets really dark along this edge. So I want a really dark color, and I want to go along this edge. All right, that IHS Well, I'm gonna spend a tiny bit more time on this highlight right here, and I'm going to use the mid century cran again, and I'm just going to get a little bit more sparkly. Whiter highlights on that gold cold color. So I would blend some of these where it's looking more out of focus and spend a bunch of time just going around making sure I have the spoon edges kind of looking. All of a sudden, it seems like it's all of a sudden where you have. Oh, now I have this cut edge of metal where the edge of the spoon is, but it's it's just looking that way because we put the highlight where we did, and then we put the darkened area where we did.
20. Blueberry Spoon Part 2: All right, let's focus on the Berries and then we'll take one more final look on a brand new layer. That's not a clipping mask. Let's go with this Really dark blue. It looks black, and I'm going to go with this. No taper wide and I just really did. I'm gonna turn my my sketch layer really far down. I really can't see this very well. It's good that it is dark because they're really dark in the shadows there. So just make sure you're getting a general blueberry shape there and it's all filled in. I could barely see what I'm doing here. Blueberries Turn the sketch off and now go to a clipping mask above the blueberries. This is a really light blue, and I am using that for the very lightest highlights. The purple is pretty dark. Remember these air, the background colors, that purple is pretty dark, and really, I can only see it on this one, but I like to think that this one has purple on it, too. So I am going to stick with the brush I'm on. Actually, um, let's go to, uh, artist cramp. It's better texture. This blueberry has the purple. It doesn't look like I selected purple Good some purple on the side of that blueberry and then get some purple on top of this blueberry, Maybe a little bit back here. It's all going to be hidden underneath some of the other colors. And then let's go to this. This is almost a little bit too bright. Don't use this blue too heavy handed. And look at your very where is the brighter blue? This berry right here has it mostly on this almost stripe across the top. So I'm barely touching the berry and just getting uncovering the purple a little, which I knew I would, and getting some nice texture across the top. This one has it mostly on the the top, like a moon shape crescent over here. And then we have that center of the Barre, which is going to be right here. There's a little bit in the center and a little bit on the underside. This very has kind of a stripe of it right here. And the light again is coming from this side. So it's more blue on this site and this blueberry I'm looking. I'm not looking at the super highlights and just looking at this kind of mid tone blue, I want a lot of this super dark blue to be still seen, not just covered up by this blue. And this one has a little bit in the center of that little um, where the flower used to be there and then the spot and blueberry has a lot of it, but it's also not very even. It's kind of blotchy, so make sure you're not just coloring it in an even way, and there's a little bit more right here. We're going to go up to a more grey Blue said that way and then a little bit later. So good this way and a little bit later, and we're going to do the same thing, and I know I'm on the same layer. Maybe it could go toe bigger size. Now I'm just gonna add a little bit more here and there of a lighter blue, and I'm looking here. Where is that light blue? It's over here. I'm still not doing the super highlighted parts, so you can. If it's a little too blue, you can go back. And I had a little bit of Dr Blue, right on top of it. And finally, this very light blue right here on a much smaller size. Where are the highlights? Well, in this blueberry has a pretty strong highlight. You can go on a new layer if you want to. This land just has almost a faded highlight right here and a little bit inside where the, uh oh, lower piece is gonna be this one has it. May way over here by the side. And then a stronger spot right here. And then a tiny been inside that flowers, but and then this one has a pretty big spot, but it's pretty blended. I'm just gonna put a tiny bit of light on this one. And as I'm looking back and forth, I want to go ahead and choose this super dark one more time and dark in a couple areas that I made a little too late. And I'm just doing this all on the same layer. Okay? And the final step is getting these little star bits on top. So this guy didn't go to a new layer for that. It can be a clipping mask if you want it to be and we're gonna go to We're gonna go to the second to the lightest blue that we've been using. So not this blue, but just the one that's a little bit later and we're gonna go to my six B and assuming for you here. What do I see? I see a little ring of light with a dark center. So here's a little ring of light. I'll get my dark center in a second and the same thing here, maybe too big. And the other thing I see is a little bit of light outside of this dark little star shape. So I'm gonna switch back to this super dark blueberry color, and I'm still on my six B and I'm gonna get the little squiggly star shape. This is where the flower used to be, and that was a little too heavy handed. I'm looking over here, and then I'm gonna go back to the lighter and the lightening up on the outside of that star shape which will help highlight that star shape. Maybe go to this super light on the smaller size and zoom out. I want to highlight God very a little bit more right here. Whoops. Mad that match. I was gonna go ahead and get that edge a little. The edge of the whole spoon, a little texturizing. I can either erase from the spoon like we did on the strawberry, or I can add to the spoon. So this spoon has such a delicate little, um, highlight along the edge that I don't want to change it too much. I don't want to add really or subtract. Really? So I'm just going to try to smooth it out with a little bit of a racing right here. And I think that worked pretty well. Um, as I look at the spoon and the layers and underneath the blueberries and when I spend a little bit more time on that so I'll just stick with my mid century cran, and I'm gonna go to this base spoon color, and I'm gonna lighten it up a little bit over here. Well, it over here, this lighter color, that was a little too much. And I'm changing my mind. I'm darkening it over here and now I am looking at my blueberry shadows and you can smudge it a little bit more if you like, but I'm going to call that done
21. Paper Texture Brushes for a Finished Look: All right, so we're done with class, and I wanted to show you one more thing about kind of finishing up on illustration. And we didn't use thes brushes up here, the raw canvas in the European paper brush. So I wanted to just quickly show you something that you can have fun playing around with. With those two brushes. They just give a nice paper texture. So let's go ahead and turn the background to kind of a creamy color on this one. And these this brush isn't gonna necessarily look super fantastic with all background colors. So you'll have to play around with that. Ah, but turn when layer on temple to play and on top of all of your work and then one layer onto linear bird and then let's find just a nice medium grey. So I'm just going straight across and go up to raw canvas. I'm on the biggest setting and I'm to squint to make sure I'm on the right layer. I'm gonna fill the whole layer on both of these so that, if you can see, is really, really dark. Um, you can play around with the opacity, so you're gonna wanna turn, multiply pretty far down and linear burned down even more because you're going to be messing with the color of your overall illustration when you do this, so you play around with that and I'm gonna is keep this zoomed in so you can hopefully see the texture. So I'm going to keep the, um, opacity a little higher than I would keep it normally, so you can see it better in the video. And what that's done is it's given this canvas texture to the entire illustration, and it almost makes this watermelon look like it's been painted on canvas like like on a canvas bag. Even so, if you did something like that, you might want to remove the, um, shadow down there so just looks like a flat painting right on canvas. And then you can also play around with the colors that you choose to do this with and get different looks. So, um, maybe do a golden and fill the canvas with that, and it gives a completely different canvas look. It's made our watermelon look very yellow, he aged, and maybe that the background color could also be brightened to give it a different look. So you you have just a plethora of ideas. You can play around with background color with the color of the canvas. Brush itself and with the blend modes you can play around with blend modes and opacity on all of this and get it to just how you like it. You'll find that sometimes it won't. You won't be able to see it on certain colors. You won't be able to see that canvas texture if you have a super dark background color, for example, and so you might be able to if you change the blend mode on the canvas texture when you have a dark background color, so half on experimenting and you can also put those layers down at the bottom. I just have one canvas layer down here. I'll show you what that looks like. Oh, I used. I actually used the other brush on this one, so I used the European paper brush the same idea, but I didn't do it on top, which means it didn't really apply texture to my image itself. So that is something to think about. And then I just used the Salamanca brush on a linear burn these air both on Lanier burn, um, to do this kind of give a little added color down here at the bottom. And I think I had that set with a blue background. Give it a more tropical look. All right, well, that's the end of our free class. I can't wait to see your projects. I hope he puts them in the project section. Come and find me in my Facebook group as well. And I'm a little more available there for chatting with and asking questions. The Facebook pages linked in my skill share profile so you can find it in the probably about me section of my sculpture profile. All right, see you later.
22. Apple Towel: I'm going to show you guys how to do this towel. The apples air done very similarly to some of the other fruits, the towel was tricky. The towel was tricky because I have the tell that's coming in front of this apple, but it's really underneath and behind most of the apples. So I just made the apples exactly the shape I needed the apples to be. So I made this apple right here exactly this shape right here. So I actually have the towel layers under all of the apples, even though this looks like it's in front of this apple. So my tell is just this slightly off white blob. So I just did the general towel shape based on the reference photo, and then I have a brush that is this flower pattern. So I created one big section, and then I duplicated that and moved it around, created this little section here, and then it's still all very flat, So I started adding some shading. You can see that right there may toggle it and more shading of a blue to make it even darker. And yet another layer of more of a texture layer for that towel canvas. So this is the part I will show you now, but so I have my white, and it's really just this whole section of white. If you turn the apples off, you concedes the white back there and you're gonna add a bunch of clipping masks. So on the very first clipping mask, um, just find a pattern brush. If you've taken in my mid century classes, there's our class. There's a whole bunch of powder brushes. If you know how to make pattern brushes, you can make a pattern brush. And for this quick little tutorial, I'm just gonna show you really quickly with one of my flower brushes. So, um, I'm gonna pull up the reference photo, actually. So here's my reference photo. I'm just kind of judging to see how big to make the flower texture. I'm gonna go ahead and sketch on a very high layer, the where the folds are. So I'm gonna turn that texture layer off. I'm gonna get us sketch brush tips, and I just want to sketch this little fold right here, which comes up to here so just kind of right there. And this extended line along the apple up to here. So this line just keeps going and it curves a little bit. There's a couple folds down here. There's a pretty, you know, pretty serious fold in here. And then there's a teeny, tiny, dark shadow here of ah kind of a fold. So that's kind of where I'm going to do my sections of my flower layer. So for this, I don't want it just to be a grid like this. I'm going to duplicate that flower layer and turn the original off. Now I just have when and I want to select it. And I'm going to focus on this part of the towel right here. And that's kind of aiming this way. So getting them kind of lined up, I'm keeping a big section of this flower pattern because now I can go into liquefy and on push. Um, I can play around. Hopefully you can see this. I can look here and kind of squeeze certain areas in and play around with lining these things up with how they look here and then later it's going toe look more kind of wavy, and once I have that into position, I am going to erase the parts that I don't want on this layer so I can just come through like this. What I'm doing right here is carefully erasing so that this line is just kind of extended up there. I mean, raising on my little sketched areas. So the sketch line I had down here and then I'm gonna bring this size way down small, any race way up in here and then over here. So this section right here is now on a layer, and now I'm going to duplicate this original layer again. Turn that layer on and move that one around and play around. Where's the next section? Said this section The grid is kind of going this way. So I'm gonna rotate and I'm just looking right here and used the liquefy again. I don't need too much liquefy on this one. And the erase again, All right. Snagged on that section, duplicate that original layer again. Turn the duplicate on. Now I'm looking at this section the grid lines going this way for this one. So I'm gonna rotate it So it's going this way. See, right here. It's kind of going this way go to liquefy. You know, I'm just gonna I'm just gonna mess with it a little bit. It doesn't look like I need to do too much, but I don't want it to look so perfect either. Get rid of all of this. All right, so that's all I'm going to do for the tutorial. For for this particular I went too far. I'm gonna start over. That's all I'm going to do for the tutorial. For this part of the this step, you're going to keep doing that for, um, this area down here a swell. So I'm erasing. I have a little section here that looks like it was from a different layer. Yeah, it's from this layer right here to make sure the race. Okay, that must have been from that layer up there. Okay, so that's what I did. Just ticket my my, um, design on there to get this little stripe. I just went to that layer. Gonna find that layer. So it's this layer right here, and I'm gonna erase part of this. This curve can It goes up and down. I'm gonna follow along one of these lines. This little flower line right here, so I'm gonna go down and up a little bit. Doesn't need to be perfect because you can cover that with your actual lines. I'm gonna fresh new layer to that same teal color. Let's see, we're in the fruit class. So, um, let's go to this. No taper wide to the biggest setting. That's pretty big. So we could How Why do you want it and then follow along that line, Change your color if you want tap and hold to get your eraser to be that same brush and just kind of clean up that edge that one's gonna not be needing to be erased over there. Two smaller size. Do a couple more lips. Do a couple more lines that are parallel to However you have that first line and whatever designed you wanna have. I didn't do this particular design. I just duplicated this design right on here. So that's that part. Um, I did this part in the same way with the with The pattern did it in the same way that I did all of this pattern, but I didn't do it in a whole bunch of little sections. I just kind of did it in one section and shoved it around a little bit with liquefy. And then I blurred it. So if you look at this section back here, it's quite blurred. So you can go to that section and gosh and blur it just a little bit like 1% a tiny bit more 0.5 1.8. So one or 2% um, if you noticed, this towel is blurred around most of the edges. So for that you would go to this base layer that you're working with and blur it, and that's gonna blur those edges. Still like 3%. They won't be such a crisp, harsh edges all the way around. All right, and for shadowing. Let me double check what I did up here. Multiply, multiply, and linear bird. Okay, so for shadowing, turn a layer on multiply, get the airbrush, and then get a gray color Get kind of a dark gray color. You can start with just thief aided areas. This the light shadows avoid these super dark shadows. Um, with the airbrush, you need to play around with your size. Yes, I had that later on, so you need to play around with your size a little bit. This is very grey. This is very blue, so I might even go toe a darker blue for the shadowing. Just look at what color your shadows are. You can play around with this size a little bit and get your shadows to start playing and playing and playing, adding, Look at what you're seeing. There's a really dark shadow, but that only goes to not up to the edge. Right? So you're just going in right here. It was a little bit down, and then it gets darker again down here. If you make a mistake, you can go to the airbrush to erase. There's a little bit of shadowing up in here, and then I've been here and then down. Look at where they're shadowing along the apple. Get a little bit of shadowing on the curve of that towel that will make it look like it's curved. It's quite dark on the towel back in here, so you're going to darken it. I used to layers for shadows both on multiply and being very quick about this here. I'm just following along now with this big shadow here. You can start with a bigger brush because it's pretty big section. It's faded right here. A swell, faded fate, faint shadow and that automatically looks like it's curved now. Looks like it's curved right here, and it looks like it's curved right here. Just like this. Looks like it might be a little bit darker. This is definitely darker. And then start darkening your color and going smaller and go in so that you're at a hard crease right in here. So you're drawing what you're seen. That's what I always say. Looks like there's some shadowing here. I did a very quick, messy job with that. You do a better job and right here. So anyway, so that you get the point. So it already looks all folded and you can spend a bunch more time on that. I did another layer. Put that on multiply and I did. Some were deep blues for the shadows toe ad, Um, to all of these same areas. Okay, the next layer is super simple. I go to the raw canvas brush in the fruit class, and I went Teoh a lighter grey and doesn't matter what size cause the green is gonna be the same size and I went toe linear burn. I did go over a big area and I am playing around with liquefy again just so that that grid doesn't just look like a straight across grid. I'm just moving in and smashing it a little bit to follow the flow of the fabric just a little bit, cause you're really not going to see much of this. And then I turned the opacity down a little bit and I don't know if you can really see that in the video. If you can see that hopefully the last thing I did was to Alfa lock all of my flower layers . So two finger swipe. Also, this lined layer here, two fingers WIPO this one isn't even turned on. That was our original toe Alfa local Off those go to white or really light blue I This is the color of the towel. Maybe that would be a good one to choose just super light blue And I went to soft cran on a pretty big size. Let's see so this layer So we're on this layer and what I wanted to do was fade out the flowers in some areas because if you look here, the brighter areas are a little bit more faded. But I didn't want to erase them. So I'm adding the towel color to the top of them. And so I'll do it drastically here to show you what I mean. And what that's doing is coloring in the flower because it's on Al Flock and it looks like it's erasing it. And so I'm just doing it to the highlighted. We spent all these this time on the shadows. But now we need toe highlight the high the brighter areas that the higher areas of the towel folds. And by doing this too, parts of the flowers here and there, it's kind of break me in those areas and making them look higher. So just go around and look at your picture. Draw what you see. I see a really light area here and here, kind of like a t. So right here. Oops, I'm not on that layer. All right, so now I'm on that layer. So right here, I'm gonna add some towel color to that blue flowers and then all along the top edge. Since I'm not on this later I keep You can combine once you have your layers. All exactly where you want them. If you want to, you can combine them. Um, the ban means you can't really do too many adjustments after that. So here. I'm just gonna add a little bit down here. It also kind of roofs the edges up a little bit. It doesn't make it so digital looking and crisp and clean. And there you go. So I hope that helps. I know if you're in my Facebook group. A lot of people were asking how I did my towel, so I just wanted to show you really quick. Have a good day.
 Jennifer Nichols, Artist & Teacher, Procreate