Transcripts
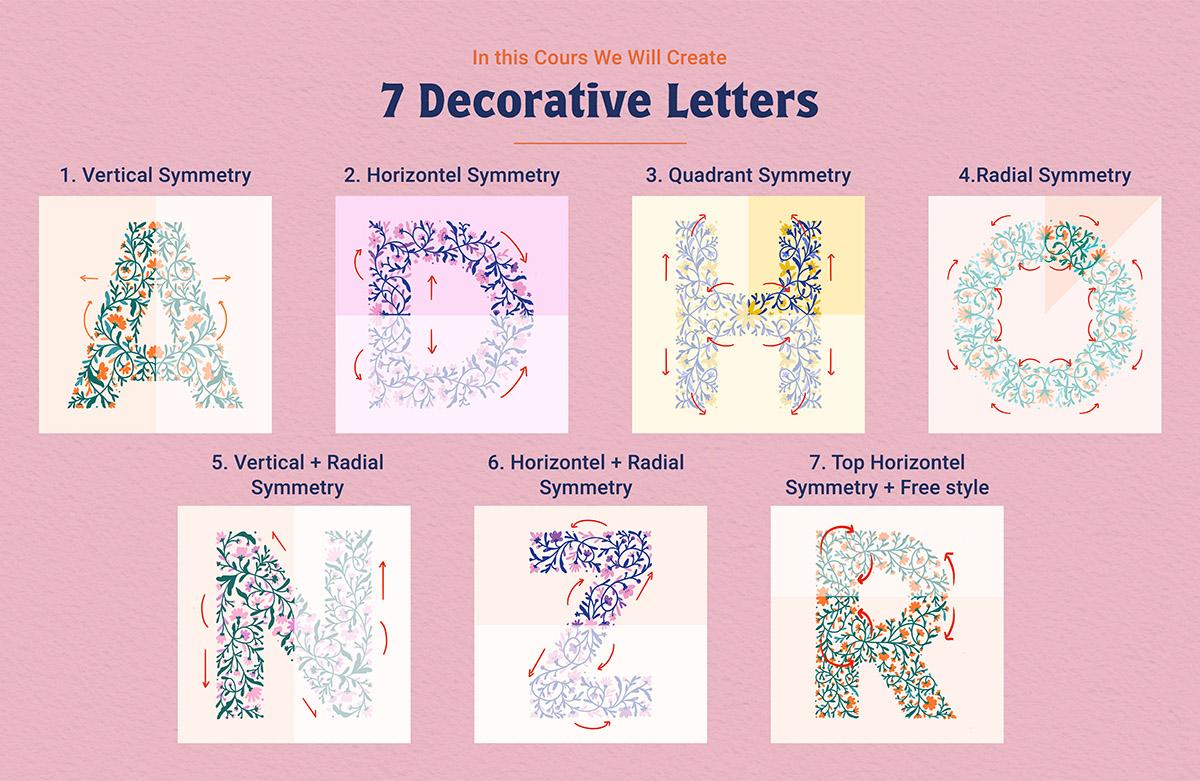
1. Decorative letters intro Course: Ready to explore decorative
lettering in a new way. In this class, I will
show you how to create stunning letters using
Procreate symmetry tools. Hi, I'm Usme Her a mix
of pattern designer, illustrator, and
lettering artist. I'm best known for the
pattern builder kit, a tool that helps patterns
easier and faster. Whether you are a
lettering artist looking to add elegance and flow
to your letter folds or a pattern designer
wanting to get inspired to apply these
techniques to your motif, this course will give you
fresh tools and inspiration. We will explore
vertical quadrant, radial and rotational symmetry, and I will show you step by step how to build intricate
designs with ease. So grab your iPad, open Procreate, and let's
start creating magic.
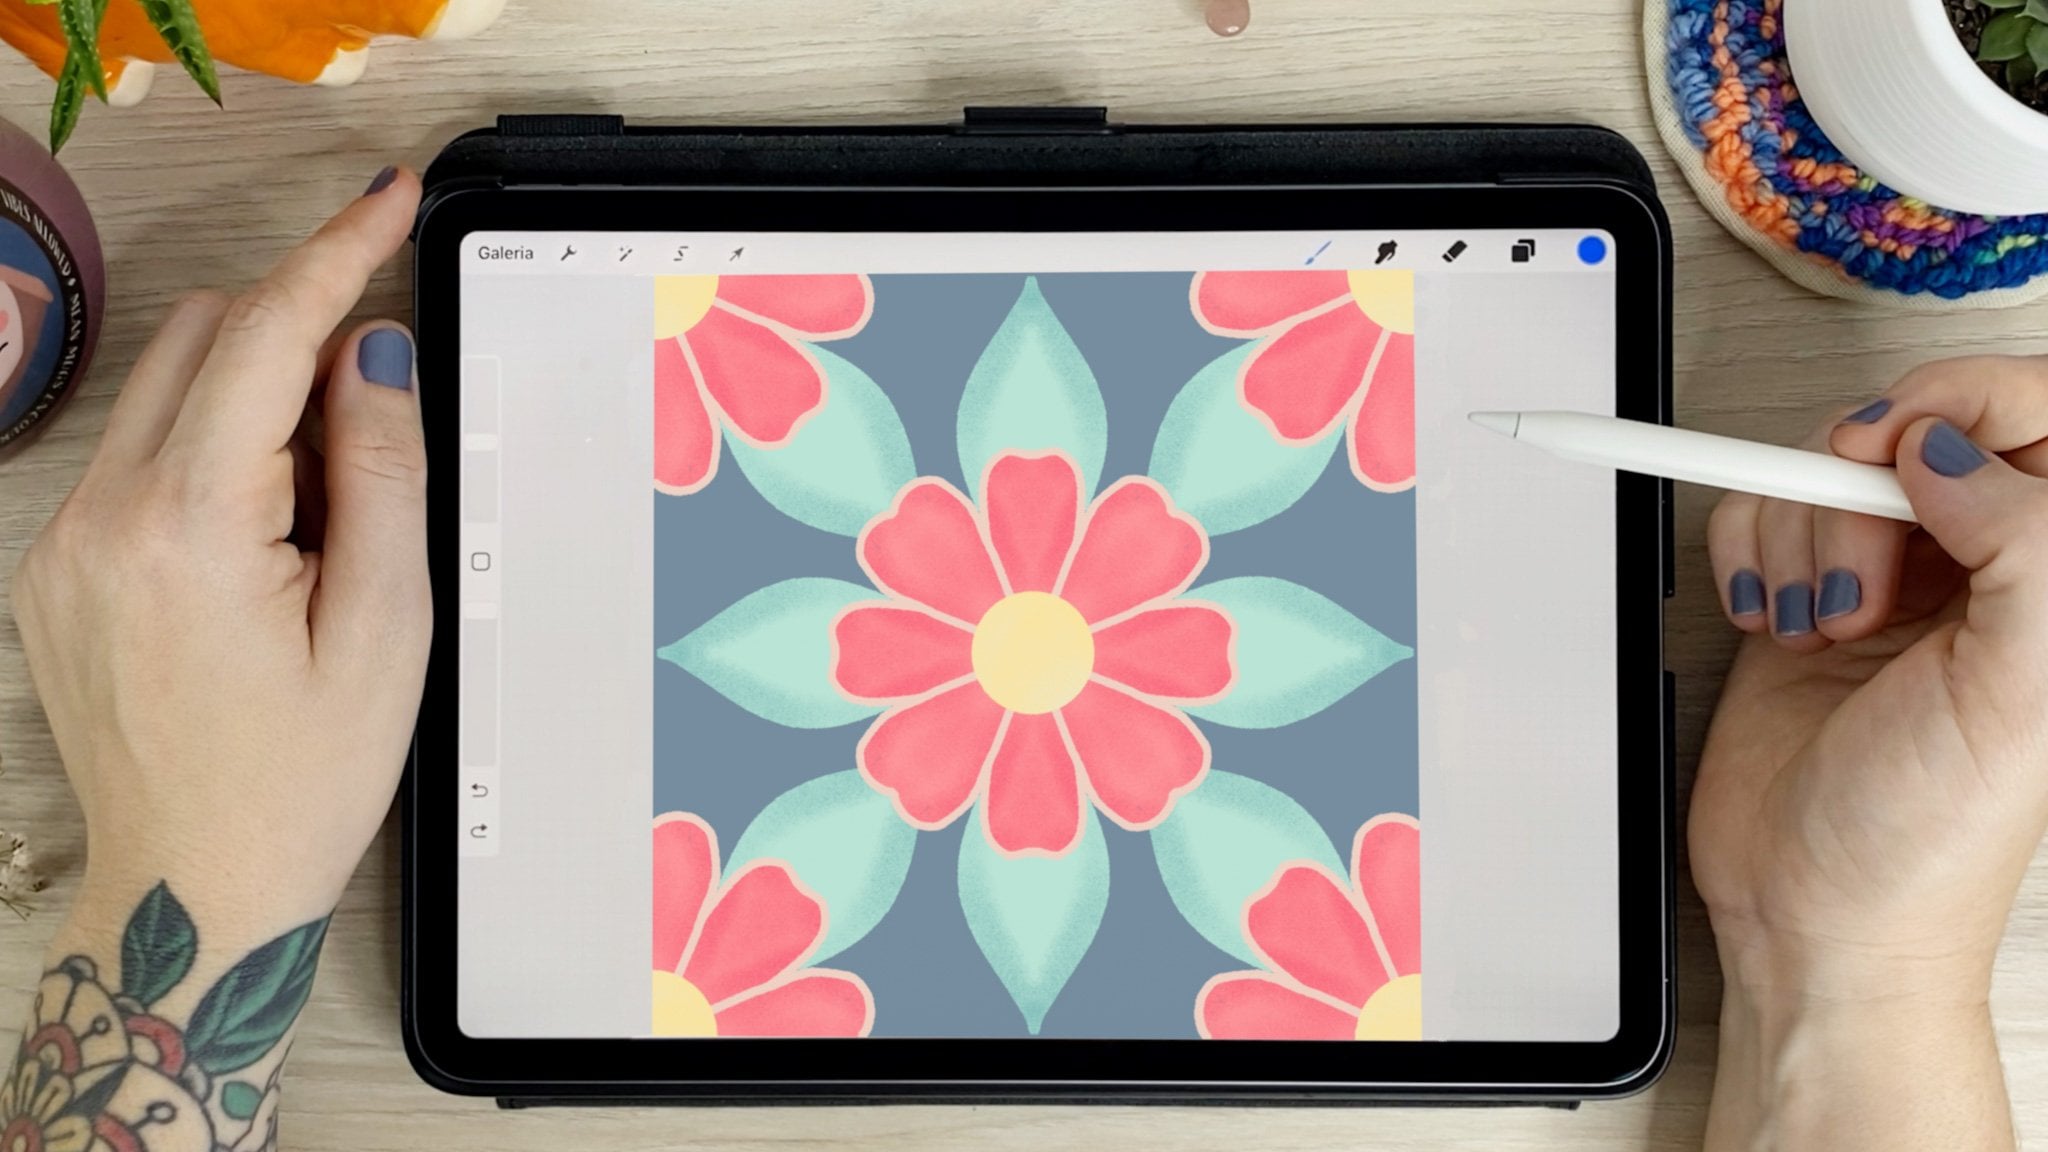
2. Decorative letters general info: I will start by
opening Procreate, select Import, then
locate your file. I put my file in Dropbox and created a folder
to contain everything. The Procreate file,
if you tap on it, it will open automatically
in Procreate. It's 2000 by 2000 Canvas, where you can find all the letters that
we'll be working on. And to locate the symmetry, go to the wrench tool, select Canvas and
activate drawing guide, select Edit drawing guide, and here you have more options, but select symmetry and tap on the options to locate all
the symmetry options, vertical, horizontal
quadrant and radial. And here you can adjust the
thickness of your guide, the opacity, and the color
of the guide that you want. And select the for the palette, go to the round circle, colored circle, tap on
it and select plus, move from file and
locate your swatches. I put it in the same folder as my procrete file in
the dropbox file, and you can see
the word swatches. It means this is a swatch to contain a palette that
we'll be working on. Tap on it, and as you can see, it will be imported on top of all the palette that you have, and we'll working
on this palette. And I recommend for colors. Complimentary colors. Then go to the layers, select plus to
create a new layer, tap on the layer and
select drawing assist. The word assisted will
be shown on the layer. It means you can use the symmetry option on
this specific layer. I will show you also
how to use the guide. If you return to the
edi tron guide option, the blue is where your
guide is located. So you can move your
guide wherever you want. And the green one is
to rotate your guide. For example, if I'm going to use an element and I want
to have the rotation here, I can place it where I want and rotate it like
I want, select done. That I'm going on the layer
and start drawing a shape. It will be symmetry on
this specific spot. I'm going to demonstrate
for the radio. So you return to the
edit drawing guide, select a radio one. It will automatically be at
the center of your canvas, but you can place
it wherever you want and rotate the select done. And here because I have
the word assisted, it means it will be active for the
symmetry that I changed. This symmetry now is radio, so I'm going to start
to draw my flower here. Now that you created
a specific element from the rotational
symmetry or the vertical, to return to your basic guide, what you can do is
tap on the blue dot. It will have the word reset, and it will reset to the center, so you can return to your basic guide that
you are working on. And few elements to help
you when you are working. You have the eraser. You can erase anything. The eraser is still working on both side because
it's vertical symmetry, so I'm going to deactivate
the drawing assist. And the eraser, you can use the same eraser that we
use for the for the brush. And if you go to recent, it show you the recent
brushes that you worked on. So I'm going to return
to studio for this one, and the eraser will do
the same as drawing. So you will have similar
effect when you erase. If you tap on the layer, you can clear the layer
then with two fingers, you can undo and three
fingers to redo. And in the layers, you can tap to add new layer, drag to delete the layer, and you can drag to duplicate the layer if you
want to work on. And if you have a layer that
you don't want to touch it, maybe the guide or
something, you can lock it. For example, I can the letter A, so I can tap on it or move it. But you can drag to the left and unlock it and
return to the options. The N is you can use any kind of options
like multiply color. If you want to work on ample, I'm going to have a green, then create a new layer. Tap on the end to select the multiply and select
a different color, and you draw on top, the multiply will have a
multiply effect to work on. It's fun if you have two
colors for this one. Here. Then for the brushes, we're going to use
a native brush. The studio pen is located in the inking section in
the brush library.
3. Decorative Letter A in Procreate: I'll start with letter A, and letter A is
vertical symmetry. So if you go to the wrench
tool and make sure you are using the vertical symmetry and don't activate the
rotational symmetry. We'll work on this
later on. Select done. So vertical symmetry,
whatever you draw on the right side will be
reflected on the left side. I'm going to use the green, the brush studio pen, and I'm going to start
with the center. I prefer to have a
swirly kind of design, make the movement interesting and build the
elements around it. When you're working on a letter, try always to
consider elements to touch the outline
of the letter for you to create a letter that is comprehensible
or readable. If you want to fill
shapes inside, what you can do is select the color and drag
it inside the shape, then select continue
filling and tap inside the other shapes
that you need to be filled with the whole color. I'm going to create a new layer. And it's better to rename
your layers and make sure on your layer to have the
drawing assist activated for you to use the
symmetry on this layer. I'm using orange and green
complimentary colors going to start
drawing my flowers. Like I said before, when
you're working on a letter, try always to consider elements to touch the outline
of the letter. If you don't close your shapes, if you drop your color, it will fill the whole thing. Make sure your shapes
are used before selecting the color and filling
the inside of the shapes. I keep jumping from one layer to the other
to build my design. So I recommend that you follow the direction of the sword or
the line that you created. I'm using only two colors. I'm going to create a new layer, activate the drawing assist, and use a lighter
value of the green. It makes the composition more diverse without adding
too much colors. I keep jumping from one layer to the other
to build my design. Now I'm going to add a
lighter value of the orange by creating a new layer and activating the
drawing assist. What I'm going to do,
I'm going to hide the guide and see if I'm
seeing the letter A. If you want to have a sharper
corners for this letter, like the center of this one, what you need to do is I have these points corner of the interior of my design. When you hide your guide, your letter will be
sharper in construction. So for this one, I'm going to create a
pale background orange, but pale for this design, and here our first letter. Now I'm going to show you how to add details inside your flowers. I'm going to add a new
layer, select clipping mask. So whatever you
draw on this layer, it will show only inside of the shapes
of the layer below. I'm going to add a few
details as you can see, this detail didn't
reflect on this one. So what you need to
do, I'm going to clear everything
on this layer and activate the drawing assist
because even the details, I want them to be reflected
on both of my flowers. And if you draw outside
of the flowers, it won't show because
it's a clipping mask. If I remove that clipping
mask, for example, you can see this is the
point I've drawn and it wasn't showing before
because I clipping mask. So I'm going to continue adding more details to my flowers. And here our letter A.
Gonna group everything.
4. Decorative Letter N in Procreate: I'm going to work on the
letter end because we're going to use the vertical symmetry, but we're going to use the rotational
symmetry for this one. What rotational symmetry do is I'm going to
create a new layer, activate the drawing assist and rotational symmetry
before the vertical, you have right mirrored by left, but now we're working on the
opposite side of the line. This one and this one, and if this one, the other way. I prefer to have a
swirly kind of design, make the movement interesting and build the
elements around it. Now, I'm going to
create a new layer, activate the drawing assist, and I'm going to use maybe
purple for this one. Maybe the color is
not to my liking. So what I will do, I
will create a new layer, select clipping mask, and fill
it with a different color. Then select merge down, and I continue with a color
that I selected or I changed. And like I mentioned before, select color and rackets and
select continue fill color. Like you see here, I tag, but the shape is not closed, so you need to close the shape before filling it with color. I'm always jumping from
one section to the other depending on how that
design is flowing. So I recommend that you follow the direction of the sewer or
the line that you created. A Now I'm going to add a new layer, select drawing assist,
and maybe use a darker pink to color
more elements. Gonna reactivate my guide to see Now, what I'm gonna
do, I'm going to create a new layer on top and remove the
rotational symmetry and keep it vertical and
add a flower on top. I should activate the
drawing assist for this one, maybe even use instead
of the vertical, the quadrant and create. Maybe return to the
vertical remove these and go back to the top and make sure that if you go to the other layers on the bottom to activate
the rotational symmetry, if you want to add
different elements. When you're working on a letter, try always to consider elements
to touch the outline of the letter for you to create a letter that is comprehensible. And I'm going to add a new
layer and fill it with light color and here my letter end using the rotational symmetry
with the vertical. So I'm going to group everything and rename it, then hide it.
5. Decorative Letter D in Procreate: I'm going to select letter D, go to the wrench tour, then select Edit Drawing Guide. And from the symmetry options, I'm going to select horizontal. I'm not going to use
rotational symmetry now. We're going to see how
it works later on. Then I'm going to select Done. From the layers, I'm going to select plus and add a new layer, tap on the layer and
select drawing assist. I'm making sure that the
word assisted on the layer, go to the colors and
select a dark color. I'm going to use
blue for this one, and I'm using the
studio pen as my brush. For horizontal symmetry,
whatever you draw on the top, it will be reflected on
the bottom and vice versa. Start with the center. And I'm always creating swirls to make sure
to have a movement. I'm always jumping from
one section to the other depending on how that
design is flowing. A new layer, activate
the drawing assist, and I'm going to use the
pink color for the flowers. I'm gonna fill the flowers by dragging the color
inside of the shape, then select continue
filling and tap inside all the shapes
that I want to fill. And I keep jumping from one layer to the other
to build my design. I added a new layer
without activating the symmetry and introduced some elements just to break the repetition and add
a visual interest. I added another layer under without using symmetry
for the flowers, then I continue on the
symmetrical layers. Turn to the section
with the symmetry. And for this one, I didn't fill the leaves, so I'm going to fill
the leaves in here. If your color don't
fill the whole shape, drag your color inside and
keep your pen on the screen, drag it to the left or right
till your threshold is 65%, and the shape will be
filled completely. And I'm going to
create a new layer, activate a drawing assist
to add more leaves and more details with
colors similar to the pink but bit different
or darker or lighter. If you have flowers
on the layer of the pink and you want to change
the color of the flowers, you can create a new layer, use the clipping mask, and now you can
adjust the color of your pink flowers
without redrawing again the elements if
you're not happy with it. For example, here, I'm doing the same because this
section, it's extra. I didn't use asymmetry, so I go to this layer, create a new layer and
select clipping mask to make changes to a few elements
in this section. How I drew this letter, but I'm hiding the guide to see if the letter is to my liking. I still see white space here. So I'm going to return
to the guide and add few elements
just to make sure. That those elements are
touching the border. And I'm going to hide the
guide, create a new layer, and select a clear purple and drag it to fill
the background, maybe a little bit clearer. And here my letter D using the vertical
symmetry in Procreate. Now I'm going to select
everything. Group them
6. Decorative Letter Z in Procreate: We're going to
work on the letter that go to the range tool, select Edit drawing guide, and select horizontal and making sure the rotational
symmetry is on. Select done go to the layers. Then add a new layer, tap on it, and activate
the drawing as. Tsantal symmetry
with rotational, it's the same as the
basic horizontal. Whatever you draw on top will
be reflected on the bottom. But this time it will be
in the opposite direction. So if you draw on top right, it will be reflected
on the bottom left. I will start from the
center with a swirl then add different forms
from different sections. When you're working on a letter, try always to consider elements to touch the outline
of the letter for you to create a letter that is
comprehensible or readable. To fill the shapes with color, drag the color inside the shape. And if you have other shapes
that you want to fill, select Cotinufll
and drag inside. Now, what I'm going to do, I'm going to create a new layer and I'm going to
activate the drawing assist, and now I'm going to use the pink color to start
creating my flowers. If you encounter something
like this, hide the stand, and you see the
shape is not closed, so you need to close it before
you fill it with colors. And I keep jumping from one layer to the other
to build my design. I want to add a
flower in the center, but I'm going to create a new layer because
I want it to be on top of this one and activate
the drawing assist. I don't like this option. So what I'm going
to do, I'm going to the wrench tool at
the drawing guide. For this one, I'm
going to use radial. Select done. And
the centerpiece. Then return again and activate the horizontal and
return to my design. Gonna add a new layer to
add a different color for this one and activate
the drawing assist. When you're working on a letter, try always to consider elements to touch the outline
of the letter. Now I want to add
details to the flowers. So to do that, I'm going
to select the pink color, add a new layer,
select clipping mask. What will happen is whatever
you draw on this layer, it will be inside the
shapes of the layer below. So for example, going to add details to the
inside of the flowers and make sure that you
have the word drawing assist on it to fill both
sides of the letter. And as you can see
the flower here. So if you draw something, it will be inside of the
shape that we have here. And I will do the
same for the purple. I'm going to add a
new layer on top, activate the clipping mask, make sure it has
a drawing assist, and now I'm going
to select the pink. Now, go to create a new
layer on top of the guide, and I'm going to fill
it with a light purple. Maybe lighter because
it seems it's too much. I can't see the elements. And here our letter set I'm going to group everything rename
7. Decorative Letter H in Procreate: I'm going to activate the
letter Go to the wrench tool, select Edit drawing guide,
then select quadrant. And quadrant divide the
ravas into four sections. What you need to do
is draw on one of the squares for it to be
reflected on the other three. So I'm going to create
a new layer on top of the letter activate
the drawing ***, and I'm going to use the
blue for the branches. And what's fun is
you only need to work on one section
of the chips. So I'm going to create a new layer because I want the flour to be
on top of this one. I'm going to activate
the drawing asyst. And for this one, maybe
I'm going to use maybe a yellow yellow and
blue are nice together. And here my center flower. Then I'm gonna return
to the leaves. And as you can see, I'm jumping from one
section to the other. And as I mentioned before,
and I'm repeating, you can jump from one
section to the other to create your designs. Feel free to do that because
it's to be comfortable. Maybe the flower
on top is too big, so I'm going to make it smaller. Back to the stem. And if you hold the color, you return to the previous
color that you worked on. So now I'm going to
return to the yellow, create a new layer
under the stem, activate the drawing assyst
and start drawing my flowers. I'm hiding the guide to
see if the letter is okay. You can keep it, like,
really simple and free. And for example, you can
remove all these sections. So your letter can
be more organic. But I'm a sucker for details, so I love adding lots of
details to my letters. So I'm going to return to
activating my guide and continue or I'm going to add a new layer, activate the drawing assist, then I'm going to select
lighter color for the blue. Maybe to add another. It's too dark, so I'm going to make it a little bit lighter. A I'm going to go to the top of the flower, add a new layer, activate
the drawing access because I want to
add details inside. Maybe I'm going to go
to the stem color, then go to the yellow, add a new layer,
select clipping mask, then go again to the
pale blue that we added, and I'm going to
add a few details. And as you see, I did that, but I'm going to clear this layer because I need to activate the drawing
assist at the same time. If you want to add details to the four
sections of your designs, For this one, I'm going
to add a new layer, select the pale yellow, and track it under
maybe it's too much. And here my letter H. So I'm
going to select everything, group them, rename the
group, and hide it.
8. Decorative Letter O in procreate: Now we go for the letter O
and go to the Ranch tool, edit drawing guide
and select radio. So for radial symmetry, whatever you throw inside
one of the triangles, it will be reflected on
the other seven sections. So I'm going to create a new layer on top
of the letter O, activate the drawing assist, and I'm going to return to the
green orange for this one, and start with the stem. I'm jumping from one
triangle to the other, but it's still the same. You only working on one section. Now I'm going to go to the layers and create a
new layer under the green, activate the drawing
assist, and this time, I'm going to start
drawing my flowers. I'm going to lower
the opacity a bit of the O or hide it
to see my letter. As I said, you can
stay in this shape, but I'm going to
add more details to the border because I like a letter O to be really evident. So I'm going to
create a new layer, activate the drawing assist. And this time, I'm going to use another green for the Shapes. Maybe this section, I
want to add more details, so I'm going to the stamp. Remove this section. And go back to the orange and add a new element here. And here our letter O. I'm
going to add a new layer and fill it with clear
color and group everything, rename, and here our radial
symmetry in Procreate.
9. Decorative Letter R in procreate: Now for our last
letter, the letter, the letter R is composed of
two sections, the symmetry, horizontal symmetry here, and organic shapes
at the bottom. So what I'm going to do, I'm going to go to
the wrench tool, select Edit drawing
guide and go to the symmetry and place
it in the middle here. And remove the rotational
symmetry and select done. I'm going to test if my
guide at the center, so I'm going to
create a new layer, activate the drawing assist
on it, change the color, and I'm going to see where my elements are
so it's not at the center. So what I'm going to do,
I'm going to return to the guides and move
it a little bit here. Go to the layer, tap on it, and clear to remove
everything on the layer. Now I'm going to
start for this one. As for the letter G, I'm going to start
in this section. And as I said before, I love making swirly shapes. It makes the movement of the
letters more interesting. Always jumping from one
section to the other depending on how the
design is flowing. So I recommend that you follow the direction of the swirl or
the line that you created. Now, I'm going to create a new layer by going to
the layer select plus, activate the drawing assist, and now I'm going to
return to the orange color and start drawing my
shapes, my flowers. And like I said before, when you're working on a letter, try always to
consider elements to touch the outline
of the letter for you to create a letter that is comprehensible
or readable. Now the fun part is to add elements that
are not symmetrical. I kept this section
because I don't want it to be totally
reflected here. I'm going to create a new layer without adding the
symmetry option, built elements that are different then I'm going to continue on the stem
or the leg of the R. Now I'm going to
create a new layer under out activating
the drawing *** because I'm going
to add colors to the sections that don't
have symmetry on it. I'm going to return to
the symmetrical option. I'm going to hide the guide
or lower the opacity of the guide and see if or
actually, I'm going to hide it. The design seemed detached, so I will try to
join elements from the symmetry section
to the other parts. So I'm going to add orange
again to continue my design. Gonna show again my guide. And what you need
to take attention is to make sure which
layer you're working on. So you won't be
mistaken and draw on the one with assisted and
it will be, for example, if you're working here, it will be reflected
on the other side, not to mess with your layers. Maybe add little bit details or change some colors
in the elements. So what I'll do is I'm going
to create a new layer, select the clipping mask, activate the drawing assist, and I'm going to use a lighter to change the color of some elements in my design. And here for this one,
I'll do the same. I'm not going to
use clipping mask. I'm drawing assist. I'm going to use only
the clipping mask and change elements here. Maybe I'll add a new layer and add few elements
for this section. Now I'm going to create a
new layer under everything, select the light orange
and here our letter R
 Ouss Mezher, Graphic Designer/illustrator