Transcripts
1. Welcome to data merge in Indesign: Hi. My name is Alzhes. I'm a Skillshare teacher. I'm a graphic
designer, illustrator, photographer, author, and
I live in the Netherlands. I've been working with in design ever since it's seen
the light of day, and I love to share my
knowledge with you. In this class, I'm
going to teach you how you can work with
merging documents. And instead of talking about
it, I'm going to show you. Select the source? And now let's preview. Hi, I'm El zits. And this is merged
documents in in design. Both text files as well
as text and images. Your own assignment,
should you like to join, make your own merged
documents in in design. And you can use whatever kind
of files you have or need. Requirements are a computer and in design, Excel or numbers. This is for in design users who are intermediate
to advanced. This is not really the place for beginners because it's
a bit too complex. So let's get started.
2. What is data merge?: So what is data
merge in in design? Imagine you have
a document in in design like a business card, and you need to
create 100 versions, each with a different name, a job title, and
contact details. Normally, you'd have to edit
all those hundred manually, which is time consuming. It's prone to mistakes, and let's face it, it's pretty
tedious and boring, too. Well, with data image, this process is automated. You might have seen it
before in Word, for example, but in in design, it's more powerful and it's
designer friendly. You link in design to
a spreadsheet such as a CSV or text file that
contains all the data, and in design automatically fills in the right information
in the right places, generating all
versions in one go. You can use it for business
cards, address labels, personalized letters,
event badges, product catalogs, tickets with unique QR codes and
much, much more. It's a fast and
efficient way to create large amount of
personalized designs without manual input. So in a nutshell,
how does it work? First, prepare your data in
Excel with columns like name, job title, phone
number, et cetera. Export that information
to a CSV file. In in design, open a
feature called Data Merge. Select the data source, which is your SSV file. And then from the panel, drag the field names
into your design. Preview the merge result
and adjust if necessary, generate the final document
and export that as a PDF. That's simple? Yes,
that's simple. Of course, you might run into some problems on the
way, but don't worry. I'll cover those as
I encounter them and let's head over to
in Design and Except.
3. Processing text only: So first things first. I'm in in design 2025, and I'm working on a Mac.
That's always good to know. I have a setup for a
business card here, and I want to fill this with the information
from an Excel file. Let's head over to Excel. In the resources section, you will find this particular
document, you can use it. It's called List one text only. It's very important if you
make something similar, that the first rule, the first line is reserved for frame
holders, placeholders. So in this case, the
placeholders are first, last job title,
company, and phone. But of course, you can make
it anything you want as long as you keep on
the same first line. Once that's done and all your information
has been processed, you go to Archive and Save As. Now, it is important to save your information as a CSV file. I'm not sure about the
correct English term here, so I'm showing
this in the video, and if you have a Macintosh,
you'll take the top one. If you have Windows computer, you'll take the second one and just save it in the same folder. S. Don't worry about the warning that you'll get in this top bar. That's not very important
for our function so far. So let's head over to in design. And now I'm going to
window utilities data Mag. In design will ask me, What is the data source
that I have to use? So, going to the Hamburger menu, select the data source. And I'm going into
that same folder, and I'll use the List one
text only CSV file open. And now you see here
the placeholders that we just made in the top
bar of the Excel file. Here's my text file. Let me turn on the frame so you can
see what I'm doing. And I'll just put my
cursor in and then I'll tick tap ones on
first in this case. Don't try to type this. If you type it, it won't work. You need to use the information from
the data merge panel. Now, I'll have a space,
and I'll type last. I'll add a return. It's also possible to take it and drag it
into the right place. Job Title Company. Just m and phone. It looks a bit old,
so what I'm going to do is align center, and I also want the text
to be aligned like that. Let's say that the phone
number can be a bit smaller and the names
can be a bit bigger, and I want some more room, and maybe the job title can
be a little smaller, as well. Now, you don't see anything yet, but it's waiting
to be processed, and you can do that by
tapping the preview button. And now you can see that
all the names that are available in the Excel
file appear here. That looks good. Just go through it and you'll
see that it works fine. Here's something that is
worthwhile looking at. Flurschmt with a
very long last name, either use a smaller last
name or close the preview, make the frame larger. Now let's do it again. And she still has
a very long name. So I'll just make
that a bit smaller. Let's see what happens. And you can see that when
I do that in one place, it changes in all the places. If I want to change this, it is important that I go back to the CSV file and change it. I'll say it's ten points. Let's make that ten
points as well. And now at tubes, it looks a lot better. So when I do the preview, I can see that everything
has been processed properly. Now I can make a
merged document. And I want all the
records to be merged. If you want to do
just from one to page ten or from ten to page 15, you dipe your range. And it's important
to leave this on. If your text is too long
and you'll get offset text, and if you're working
in in design, you know what that means
that you have to either make the frame bigger or
the text smaller, it's important to
have that turn on to spot any mistakes
if necessary. Now, let's see. Call that okay, and look
at the name before I tap. Okay, this is the Basis
Basis business card text only Indesign file. And Okay. And it gives me a warning. No Oset text was generated with merging records,
and that's a good thing. If I had overset text, I would have to look it up and see what I
could do about that. And you can see now that
the file name is new, well, there's a new file,
Bass Business Card text only one. And that one will
say or will tell you that it has been generated
from an Excel file, from a CSV file, and that
it is a merged document. So you still have your basis. If you turn off the preview, it's the same as it was, but the generated file has
the number one behind it. And that's the first part, and that's pretty cool,
really, isn't it? I mean, if I put this
to the right size, this is the true size. Oh, there's a blank page here. I have all those names. Oh, I had a blank page in my original business card.
That's why it's still there. Okay. Now, if I want to,
that's a good example. Let's not save this. And if I want to do that again, I can just take out the blank page that
I had in my basis, and I can do the
preview is good, and then I can just create
the merged document. Okay. And it's called Basis
business card text only one. I didn't
save the other one. And look, now all those
blank pages are gone, and I can just go through the
file without any problems. Of course, I can
save this as a PDF. So as you can see, you can go
back to your base document, make changes, and well, you've seen me take out the blank page that wasn't
supposed to be there. And then when you do a rerun
of the merge document, you have your updated document, and that works just fine. In the next class, we're
going to add images.
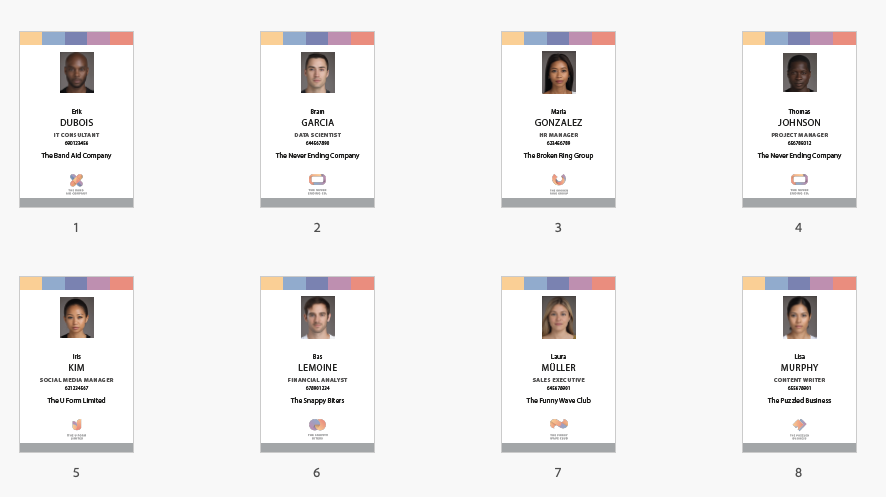
4. Processing text and images: Okay, we've seen how
you can easily import texts in design and merge them. But it's also possible
to add images. And I'm going to show you in
this class how that works. Here's a slightly altered
but same idea business card, and I want a photo to
be in this top frame, a logo of the company
in this lower frame, and I want the text to be here. Before I head over to Excel, let's take a look at
the paragraph style. If I double click
in this text frame, I have first name
selected automatically. And when I double click that, I have set the next
style to last name. And when I look at last name, then the next style
will be function, and function will
have a phone number and company name, et
cetera, et cetera. The great thing is that
when I press Enter, it will automatically use
the correct paragraph style. So let's put this in first name. And now let's head over
to the Excel file. Here's a CSV file that we've seen before or
something that looks similar. First name, last function
company and phone, but I've also added a column with photo and a
column with logo. It is important that
when you want to add photos you use in Ed sign first. Ed photo and Ed logo. I'm not sure, but I
have to look that up. It might be so that when
you are working in Windows, you put quote mark first and then add the Ed
sign and then the word photo. These names should be exactly
as the names in your file. Like here is Anuk Avaga where
is she Anuk Avaga there? It is spelled exactly the same. These are all PNGs,
but of course, it's not a problem if one of them is a JPEG. That
doesn't matter. And here's the Band Aid company, here's the Band Aid
company do PNG. These names need to
be exactly the same. Now, let's head over to Excel file again
and let's save that as a CSV in the same folder using the CSV that is appropriate for
your operating system. In my case, that's
the Mcintoish. Okay. Now, let's go. And we're in data merge. Remember Windows,
utilities, data merge. Let's load the file. Select the data source. There's list two with images. And now we see again, first last function company
phone and photo and logo. So the first thing I'm going
to do is just tap this once. And now I hit Enter, tap last, I hit Enterkey. Tap function and I
hit the enterkey. Tap company, I hit the
enter key and tab. It is possible to drag
it from this data merge panel onto your
in design document, but it's also possible to do
it like I just showed you. And now let me drag the direct direct
selection tool and use a photo and just drop it into the frame that
I intended it for. And the same for logo. Now, let's take a
moment to look at the preview if everything
goes as planned. And okay, I'll change
the preview mode to, what is that called
in English view. Preview? Oh, preview. Okay, so that looks good. The snappy biters. And I'll just go over this. Let's go all the
way to page one. And now I have a problem. The data source references
one or more missing images. We'll take a look at that later. Just remember that's
page three, okay? And that is Maria
Gonzalez Adagio. Okay. I have to remember that. Now, let's see if there
is more. This looks good. Ah. And Laura Miller
doesn't have a photo, so there must be a reason why
that is happening as well. So you see that you
get one message, and it might occur on
several occasions. Okay, it seems to work out fine. And here's a man with
a very long name ost Williams Van Melhof and don't forget that when I change the size
of the font here, it will change in
all the places. So that's something that
you have to think about. Do you want the names to be that even if it's a very long name? If you want the name
to be like that, or will you make everything
a little smaller? Okay. And that's it. 20 pages. And I have two with a problem. So let's go to the Excel file, the CSV file, and
let's take a look. Now, here is Laura Miller. She was missing one. This
is the name that appeared. But I can already see that something strange
is happening here. It doesn't look like Muller. When I tap it double tap it, I get the umlaut over the, the u, but it doesn't come through the
way it should come through. So maybe it's easy
to save that as Ooh, Ma just without the umlaut. And take a look at the
photo and change that hoop to Miller as well,
without the Umlaut. Sometimes, such symbols can
cause a bit of problem. So that was one. Let's take a look in a moment to see if
that's gone right. And there was another one,
and that was the one with a lovely lovely name Gonzalez
Angelo, it says here. That's already very different. And oh, it says Maria Gonzalez without the
second part of the name. So I'll change the photo name. You can either do
one of two things. You can either change it in the CSV file or you can
change it in the image name. Depends a bit on what you
find more appropriate. And this works fine, I think. So just save the
file, command S, Control S. Go back
to your in design, and then update the data source. And now do the preview again. Let's begin with page one. And here is Maria
Gonzalez Adagio. And as you can see, her name
is still complete there. The only thing that has changed is that the name of the file itself has been adapted to
make it easier to find. And now let's see if Laura Miller has come
in. And there's Laura. So as you can see, this works really pretty good. If I go through everything, we already did that.
That looked good. And we can now make it
into a merged file. So we'll tap this,
create merged documents, and we'll get the
dialogue screen again. I want all the
records to be merged. And if there is
some offset text, please tell me where I went
wrong, so I'll leave that on. And I'll just go, Okay. And now, that was
very quick, right? There were 20 pages, and it was done in an instant, and there was no offset text that was generated.
So that's good. Okay. And just like we've seen
in the previous lesson, there's a one behind the name, and I have an entire
document withal, if I go to the pages, you can see it and it's better. Hang on. Oh. I'll make
the pages alt. Okay. You can see that
they are all there, and now I can save this as a PDF and send it
to the printer. In the next lesson, we'll look at some potential problems.
5. Note for Windows users: So the correct input in Excel for Windows
users is apostrophe, adsiPhotoame dot
JPEG or dot PNG, and for the logo, apostrophe
at logo dot PNG or JPEG. It is important that you put the apostrophe in
front of the adsign.
6. Troubleshooting: Lesson is about troubleshooting when you run into Oset text. I've made a document
in in design, and I want to fill
it with some text. I've already prepared an
Excel file. This is a CSV. I've already exported it, and it has number and description
as the place markers, and then there's one, 26 and the description getting
longer and longer. Okay. So here's my text, and
that all looks fine. I'm going to import that or merge that into in
design. Let's head back. In the data merge panel, we'll select a data source, and I've got my CSV and I've
got the troubleshooting. I have made a paragraph
style number, and I've created a paragraph
style called overset text. Do. And just let me make
a text frame first. And I'm starting with number. That's okay. Okay, cans. Now, I'm going to add the
first frame placeholder, and I'll just hit return, and I'll add description. Now, if I do the preview, then page one looks fine. Two looks fine, but here's the dreaded red
plus in the corner. And here's another one.
So what can you do? The most logical way is to go back into your CSV file and take out everything
that you don't need. But maybe you do need all this information.
So what do you do? When you go back,
turn off the preview, you can bring down the size of the font that you're using. And I'm going to make a bit
smaller, too, let's say, 11 points. Redefine the style. Okay, now let's take
an old preview. Page six is still running full and five
as well, four is okay. If you haven't merged the document yet and you're
still working in your basis, you will apply that changes to the font size to every
document that will be merged. So think about what
you need to do. Sometimes it's good to just change it a little bit
in the merged document. Suppose you have
a very long name, that name doesn't
fit in one line, then it might be useful to
change that name only in that specific page area and
not for the entire document. A few things to consider. You might run into problems
with unexpected characters, and everything that is not
standard on a keyboard, like a CCD in French or umlaut, as we've seen with the image, what else do we have? A slash and the backslash. That sort of things might
might give you trouble when you are exporting it to CSV and then importing
it in in design. Think about that. When
you run into trouble, remember that is probably to do with either the past
that doesn't match up with the names that
don't match up with the photos and the information
in the Excel file. Or with some strange letters that cannot be read properly. Another one that might happen is that in design
freezes or crashes and that usually has
something to do with the amount of data that
you are feeding it. If you have a somewhat
older machine, I have a very quick mac. So my mac runs smoothly, but if you have a
somewhat older machine and you have a lot of data, suppose you have 1,000 records, that might make indsign well, freeze and even crash. In that case, split
your document into smaller parts in chunks
that it can work with. You can use the
same base document. Each time again,
the merge document will have a different name.
7. InDesign Bonus: As a bonus, I'll
show you how to use the multiple layout option in merge documents in in design. You can use this feature to place multiple business
cards on a single sheet. In this case, a four. You can do that to combine
photos with text, for example. It is important to remember that the document you use to bring in these separate items should be larger than the
individual components. As an example, I'll show
you how to set this up with the business cards that we used in the first lesson. I want to place multiple
business cards on one A four, so I can print them all at once and cut them to
size immediately. To do this, I position the cards right next to each other without any
spacing in between. That's something
to bear in mind. My page size is A four. The individual component
is 85 by 55 millimeters. I've prepared this
one card and I have already chosen
the data source. It's the same one as
we've used before. And I format the card as I've done earlier, let
us check there. The styling, the first paragraph will be followed by last name, by job title, by company name. So I can just add that, click Enter and continue now I don't need
that last return, and now my card is set up. When I do a preview, I can see the same way as I've done before that all
the names are there. Let's go back to the first one. Now I'm going to this feature and create the merged document. Right here, you can
see that there is an option now for
multiple records. In the previous lessons, we had a single record and multiple records weren't
possible because the page size was no different from what it
needed to be in the output. But in this case, it is. I can choose multiple records. I'm going to the
multiple record layout. Let's click the preview
multiple record. Let me put this aside and
here are all my names. I can change the margins here. I can make the
margins smaller or bigger and then everything
will move up or down. Same goes for the
bottom up or down. When I choose the left
and the right size, I can make, for example, space between the columns
and between the rows. Let's make that a bit
bigger in the columns. Just suppose that this is
the layout that I want, then I can click Okay,
and that's done. But I don't want anything
between the elements. I want that to be
zero. In both cases. Now this is fine, and I have two pages with
all the names. I can still see
that Fleur Schmidt with a very long
last name is there, but when I have generated it, I will have a new documents
one, as we've seen before, and I can edit this
particular card individually. So I can just click Okay. And now I have a new document, basis business card text
only, multiple one. The one is the sign that
we've made a new document. Nothing was overset. So let's take a look, put the bits aside. And the next page is fine, too. The great thing
about working with this in design file
instead of directly into PDF is that I can just edit this particular name for
this one particular item. Okay. Now my document is ready with ten business
cards per A four sheet. I can now create a PDF
in the usual way or print it directly from in
Design, whichever works best. Now I have explained that it is possible to
send your document straight to PDF that you don't need to make an extra
in design document. I'm not a big fan of that
because as we've seen, it's sometimes easier to edit a very large text or something
that doesn't really fit. But if you're certain that
everything goes as you want to and you just want
to send it to PDF, then here's how to do it. Just go to the Hamburger menu. And click Export to PDF. You will get the same create
merged document window and you will have multiple
records. Turn that on. Let's take a look, let's preview it. That's what I want to look. The top might be important for you to edit
because sometimes printers need a bit more white to grab the paper and sometimes
it is very precise. You might have a try there, and I don't want any space between the columns or the rows. So I'll just click Okay. And now I get my PDF window. I can choose the
settings that I want and I will ask it to show the PDF after exporting and
just choose a location. There it is. Straight
to PDF two pages with in total 20 cards.
Now let's have back. And as you can see, there is
no extra in design document prepared or merged from
what we've just made. So I guess now I'm
really through. If you have any questions,
if this is unclear, I don't think it is,
then just leave a note. You can download all
the resources files, all the in design files, and all the Excel files
in the resources section, and this should be it for now. Okay, I think I've said enough for now. I'll
see you next time. Cheerio. Bye bye.
Thanks for watching.
8. Thanks for watching!: And I think that somehow
concludes what we've made now. So, if you have
trouble or questions, don't forget to ask and leave your remarks
in the projects gallery and make a screenshot or a PNG or JPEG
of what you made. And well, let's
see what you make. Thanks for watching, and
I'll see you next time on the next in design class
in Here in Skillshare. Cheerio. Bye bye.
 Els Ruiters, Graphic Designer from The Netherlands