Transcripts
1. Intro: Welcome aspiring treating
design enthusiasts to the groundbreaking
defender mastery course. Get ready to embark on a transformative journey
into the pile of Fa wind will unlock the full potential
of your creativity. In this exciting course, we'll delve deep into the DefaI, unraveling its powerful
features that were three, design process,
seamless and natural. Dive into the Fa
Material Museum, where innovation
meets creativity. Learn how to weld materials like an expert crafting scenes
that captivate and inspire. Ever wondered how to breathe
life into your creations. We've got you covered. Discover the art of
texturing as we explore techniques that will elevate your designs to the next level. But that's not all. Navigate the vast defer
at library with ease. Unleash the full potential of embracement of assets
at your fingertips. Propelling our designs
into new dimensions. Lights, camera action. We'll explore the details
of lighting in definder, transforming your scenes into the visual and
stunning masterpieces. Fitness and magic of phoralytic
rendering tools elevate your projects with the
realism that not only impressed but also
tells visual story. Finally, that's not all. Brace yourself for the future. Fell unveil the last AI tools that redefine the way you
approach three D designs. This course is tailor made
for enthusiasts like you, ready to master, Defi, render, architects, designers, and anyone with the
passion for creativity. Join me in this course. Let's shape your
dream into reality. Don't miss out the Fi
render 2.5 and beyond. Together, let's bring
your designs to life.
2. Chapter 1-Introduction to D5: Hello everybody. I welcome you to the new Fair
Render course. If you have subscriber
or if you have watched my previous
Deferenda courses, you can just keep these part. But maybe you'll find
new things because the defender has updated
since my previous course. Currently it's on the Defender 2.5 Hope you'll find new
things in this course. I mean the people who come to
the course as a newcomers, you can start from
the beginning. The rest you can start from the middle section
in the description. Also I'll mention about
they are the new parts And there's a lot of updates in defend the
previous versions, I, a lot of updates with
related to the rendering, image rendering,
video rendering, and overall I, as well as some settings as well
for the newcomers. I welcome you to the new course. Currently I'm weaving
as a Defender.com That is if you just Google
it from the Defender, because I want to show this because there's a couple
of questions about the version you need to download and what are the prices
of this defender. Currently, I'm weaving in the Defender.com If you just
go to this website, you can see all
the capabilities, all the things you can do it in Defender is demonstrating. Here you can have the
live sync workflow, several other major soft like
sketch up three dice mats, Rhino and some other blender. Likewise, again, if you just
move on to the other parts, you can have this path
tool that means you can drag some of the objects in the Fi assets library
or any other objects. You can use the path tool
to create them in a line. And you can use the
brush tool that you can paint like this again
for the entire area. Specifically for the grass
types you can fill it. And with the new
defer vender you have the section that
means you can cut through some of the sections and
you can waive it in three D. These are the
things actually, and these are the
new capabilities. And don't worry about
this because these are the things you can demonstrate. In the Defer Ender 2.5 you can see the
weather conditions, snow precipitation and
the fog and the cloud. You can do it again
if we just move on. There are a couple of things
you need to mention here, animation and some of
the BR functions now you are capable of doing
in defender basically. There's another thing
called the four teams. Definitely this is not for
the individual person. If you have organization
more than two person the Fi team has suggesting
the D four teams. I'll go to the couple of tabs here and you'll
know about these things. Then again, now the people asking about what is
this free version and the free download version, yes, you can utilize
defender free of charge, but there's a catch actually. If you take here you can
see the act in Fi assets. There are
photorealistic objects, these vegetations or some
of the other objects, humans, vehicles and
a lot of things. You can use them if you
have Fi vendor Pro, but if you're using
it, the free download, there are a few models
they have allowed for the free version
because vendor is actually basically for the I mean it contains with
the DFI assets library. Because if you don't
have the asset library or if you don't have
access, I mean, I'm not recommending to
use Deferena because the asset library is
the one you should choose Deferena because
there are a lot of objects. I mean, you don't have to
go through the Internet and you don't have to
find these objects because DFI has all it. So don't worry about it in
upcoming video as well, Just address those
issues as well. Moving on to the workflow, you can see these
are the sketch, a private blender, Archicad. There are the
softwares you can use. I'm not going through that one. And you have the resource
blog and the Express. Because in Express you can
download some of the community has done existing models
free of charge thing. These are the free samples. If you just go here, actually there are a lot of
good models here. You can download them and you can utilize them in your Finder. These are the Express. If you have Fcunt, you
can download them. They said, I'm not going
through that one now. I'll just go back to here. This is a community and I'll
just go to the pricing here. These are the pricing
defect community that is free of charge one. You cannot use the
asset library, but if you take the defect, currently I'm having
the perpetual license. As I remember, it ended in 2021. But now it has the subscription model
that is $30 per month. If you are taking it annually, it will be cost around 30, but if you're taking monthly
it will be cost around 38. The more it's better to understand about
the consequences of this defender pro
I mean if you are a user that he's always
using a defender, the wise decision is
going to the annual, then your monthly charge will be around $30 But if
you need it by maybe a one month or two
month better to go with the $38 month price.
This is the new one. It's called the Fat team. As mentioned, it suggested for the team consisted
with two or more members. You can choose it wisely, same thing you can use. There are a lot of
similar things in between the Fap and the Defi teams. But better to understand
about the capacity and the requirement of Defy
software and choose wisely. So these are the things I mean you need to
understand about. Again, there's another
thing that is called the Defi education you
can apply from here. Maybe there will be some slightly delays
from the Defi teams who apply this
education license. But they will reply eventually. If you are a person with the education or maybe undergraduate or postgraduate,
you can apply this one. Try this as well. I hope you understand about these
plans and defender, so this is the product actually and if you just go
to what's new here, it will give you
the new releases of the defender currently has the 2.5 0.2 The
hot fix has released, all the things has been updated, all the things they have
modified under the 2.5 since 2.4 to 2.5 there's
drastic changes happened. I hope you'll catch up. If you are using a
previous version, better to update
the newest version, that's better because
there's always hot fix, because the team is always
active on the discord as well. If you want to reach them, you can use the e mail
and the discord as well. There are a lot of things
you can do with five render. Stay tuned. There
will be a lot of good softail lessons if you
are coming with this course.
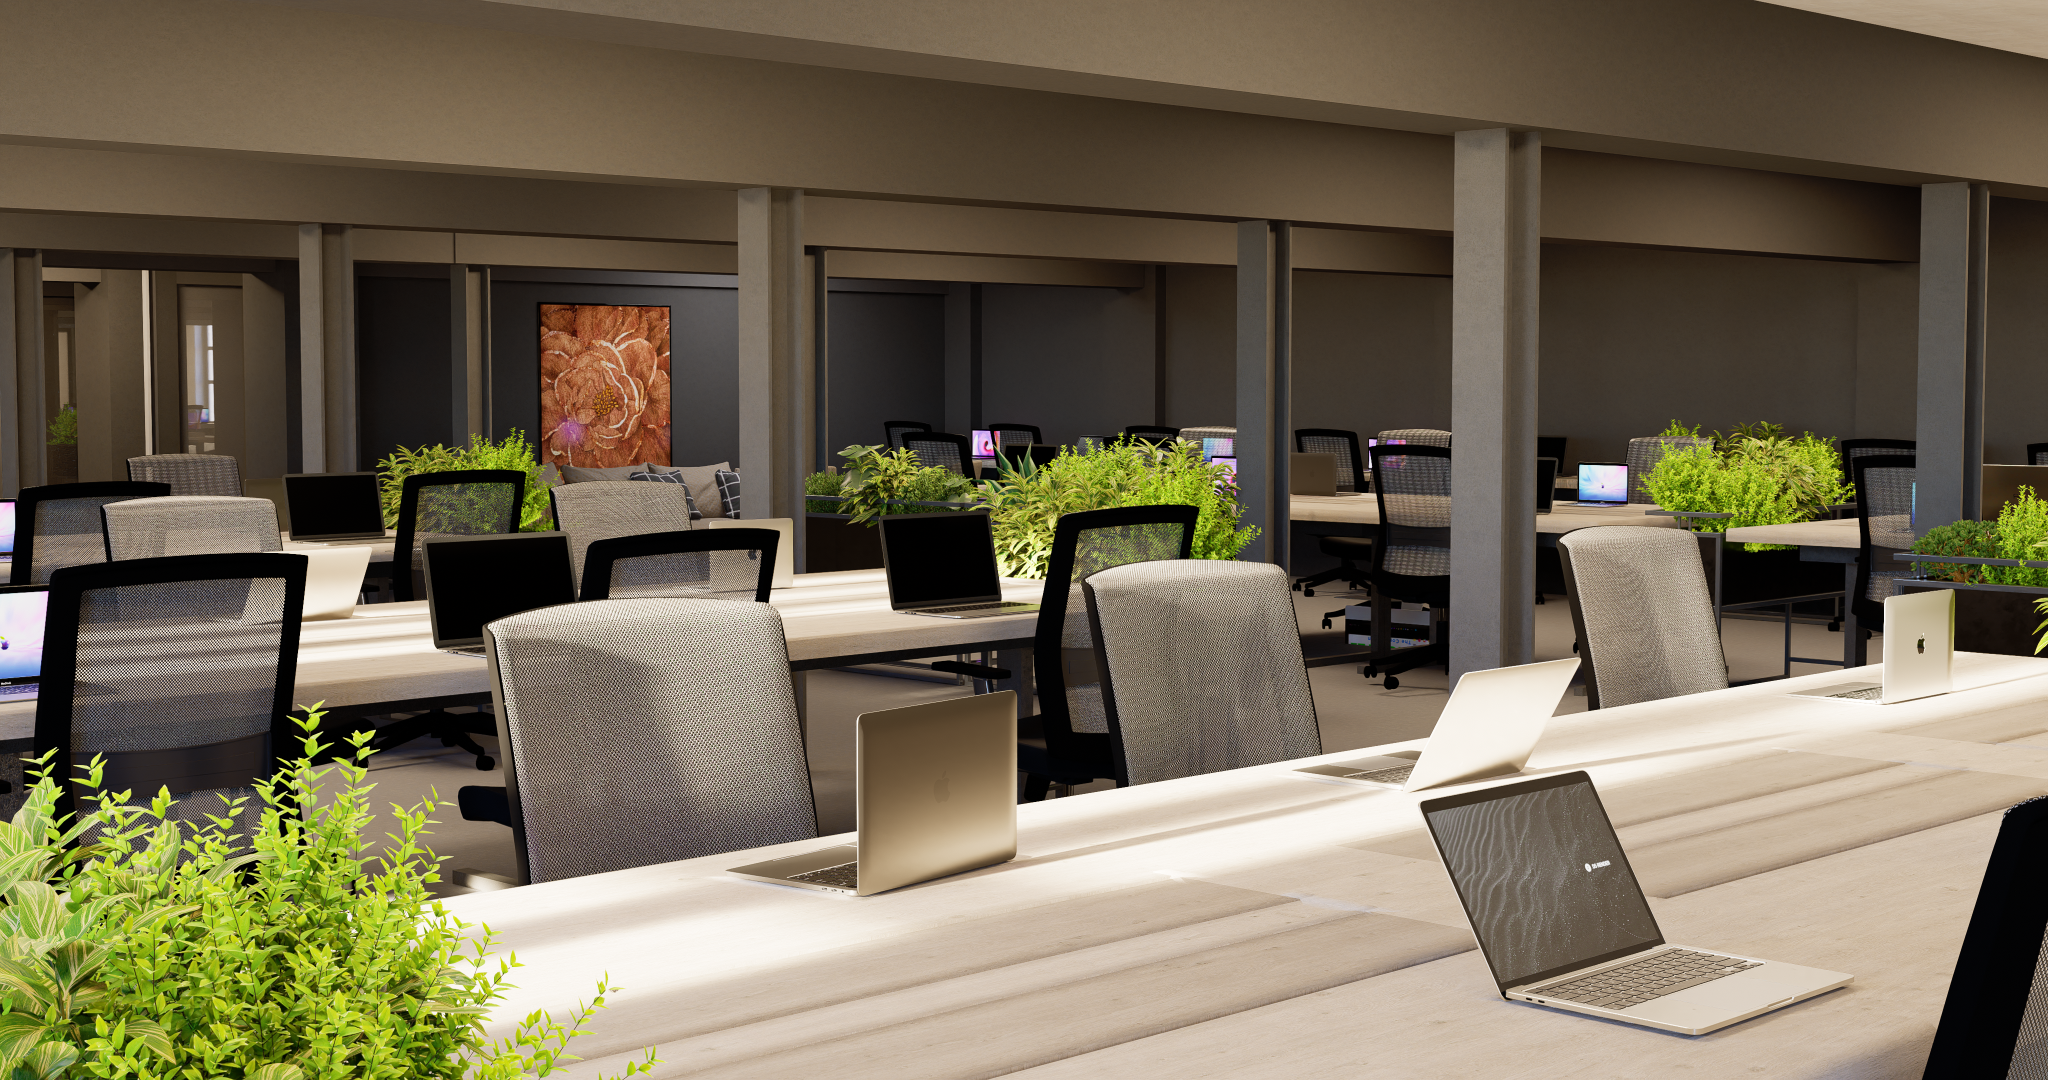
3. Chapter 2-Material Museum : Once you have downloaded Def
Vendor to your computer, you can place an icon shortcut inside your desktop and you can double quick and open
Once you have opened, this is a new interface here. You can see from
here the first step, you can keep the glimpse of seen per the new things what has been updated
in the Deferender, for example, the new global
plans has been updated. It will demonstrate here here some other important
information about the Deferender things
in the Deferenda. Here you have the
couple of Democenes here to talk about the
Democenes. These are the things. You can download it free of charge and you can utilize
them in your project. There will be seen, list, images, all the
video renderings. You just have to download
it and open it and it will appear in your viewport. Now, before that,
for the newcomers, I want to express when
you are selecting and some settings of the materials you need to download
the museum of material. It's a new come to the
defend in previous version, you don't have this
museum of material. What this does is
actually it will give you about the lot of things
about material settings. I have downloaded this one. You just have to
double click open This Material museum will be the basic guideline book for the defender material settings. I mean, in a minute I will
show you how you can choose different materials and
how the properties has been you can change
upon your request. And this Museum of material
will guide you through that. We'll wait a couple of minutes
until it will be loaded. It's like a museum that you can walk through and you
can learn a lot of things. I will guide you
through that as well. Okay. This is the
material museum. If you just walk through from the button inside your keyboard, don't worry about that one. And the navigation panel and those things will be
addressing in upcoming videos, but for now you can use D, like when you are using games, when you're playing games
inside the computer. C. Welcome to Defy
material, museum materials. And you can identify those
materials and the settings. These things will be here. If you just move on, I'll
just go to the next section. Now if you just move on, it will say the Select Material. Either you can click
button in your keyboard. Now I'm just now you
can see my mouse has been changed to
this selection button. But I'll just press here. From here also you can
press this material. T just click this one. Now you can see, again, my mouse has been changed. My mouse point has been changed. These are the materials. Now, we'll just go to
the next section here. Here, if you just
click this one, you can see the menu
has been changed. Why? Because there's a lot of material settings here you
can adjust as your request. Now you can see from here
the base color or any other. If you just click this one, can see I can change
different color. Now the color has
been changed, okay. Again, you can adjust
this color as well. Now this is the meaning
of a base color. It will give you
the RGB HSV and the HX settings to change your color. It's up
to you, actually. If you just click this one, you can select the RGB. No, change the RGB color here. If you use the X can
change this color asphew. We'll just move on to the next, that's called the
Base color map. Again, I'll press in keyboard, now if you just press this one. This material here, okay? Now, here you have the option
called the Base color map. Now if you just click this one. Can see if you just click this one and you can
adjust some colors here. Now I can see that my
color has been changed. That is how you can change
the base color map here. Click this one again here. If you just press this
one, can choose lines, our GP can see what
happened here. Okay, now moving on, further editing on the textures, the similar things which
I have told you here, there are two or
three options here, saturation and the
brightness here. That is why it has
been mentioned as what you can do is just
click this one, click, this one can change
the color from here, and you can change
the saturation here and you can
increase the brightness from that is basically
the base color map. Okay, moving on. Okay, This is
interesting actually. If you are choosing material
in Fand for example. There are a lot of things
you can use as a template. In materials in,
and for example, if you just press
this wall here. Now here it cool the
material template. I mean under the
material template, there are a couple
of templates here. You can choose custom, you can choose subsurface
scattering, transparent water, carpet, displacement,
cloth, custom alpha, video foliage, and the grass. If I just zoom this one, it's say the custom Alpha. That means, for example, if you want to use some
material as a fence, this alpha material
that you can use because it has some
voids and like this, you can use them as a mesh. And the hollow material, again, you can apply some
video material onto a surface if you
just press this one, and I'll just click
here, Video now, you can add your
custom video from your computer and you
can use them here. That's how you're going to use this material as
a video material. Again, the next material
will be the foliage. That means if you're using some third party plants or any other material for
this kind of a thing, sun voice hits your surface, there will be some transparent
inside your plant. I usually it's not happening. A lot of the Renin doesn't
have that support here. Defi has that kind
of a support here. If you just click
the A leaf material, leaf material as a foliage, then you will be able to
apply this kind of a thing. The next template is
the crash material. You can just click some horizontal surface and you can change it to the
grass material from here. This is the grass material
moving on the subsurface scattering this a glass or maybe a crystal or maybe
a waxed skin material. You can use surface
scattering I, it will be really nice from the other side if
there's a light object, the light rays will be come through this per surface and it will reflect or maybe
it will glow like this. Again, the transparent
material you can use. The similar glass material,
if you just click this, one can just click
the transparent here. Now you can see this cap effect here, some flowing liquid. It can adjust from
here for the carpaint, you can adjust from
the carpaint and the displacement and
the cloak material. Without further ado, I'll just move on to
the next section. If it just close here, closely monitor here, it's
in the transparent material. For example, if I just
press here in my keyboard. Now if I just click
this surface area, now you can see it's a
transparent material. And the settings
will be like this. Normal specular refraction
and the roughness can see same settings applying here. Now it will give you
the certain guidelines, for example, this one. The specular, how
the specular work. If you increase in specular can see what will
be happen here. For here, you can change the color from here,
this map here. You can choose color here. And I get the transparency. How the transparency works. If you are increasing
transparency, this is how it works. I hope you understand about it, do it yourself, and get
to know about this. Moving on to another
glass material settings. Here there are two types of glass material and you have
the surface modeling here. You have the solid
modeling here. You don't have thickness
for this a glass here. But if you just go in
front of the glass, you can see what is happening. This is a statue behind it. It will be enlarged from the surface modeling
thickness of option. Now if you just move
closely and look this up, it will be apps normal here. What you can do is just press
this area, surface area. Just click the thickness on. Now you can see it
will be apps normal. Usually you should
remember this one. If you have solid modeling
that has this thickness here, you can see the thickness here. This is the thickness here, so you don't need to
have the thickness on. Okay, Just remember that. Moving on. These are the material types
in the defer render for the glass materials. You can have a lot
of glass materials. You can customize these things. Moving on when you have how the light
will go through this. A glass here so you can
see your shadow will be, appear like this
from the behind. Okay, moving on another one that's called the
water materials. We just first this one here. It says the water material, you have a couple
of options here. You can see the normal specular refraction flow, the depth. Now this area demonstrate
the depth area. You can see it says
0.1 That is here, 0.30 0.5 and how the depth will be looked like
this from the water itself. So if you go to the 0.9 the water area is not
a bit transparent. That is how the water
material depth option colon. And this is a normal
setting here. If you just click this one, you can see this
is that is zero. We just click this one. You can see closely it is 0.3
There's a bit of flow here. Now go to 1.0 this flow
will be appear like this. Hope you remember when you
are using water materials. Moving on the grass materials, there are a lot of
grass examples here. You can see the
012 and these are the types of grass here
can choose here, okay? You can see three types of
grass here. This is one type. Here. You have the one
type and the type. If you just click this one, these are the type
and the type C. And you can change a lot of
things in this grass here. If you just click, you can
appear some logo from here. Again, if you just move here. This is the option Trim option. You can see the
difference between the trim, 0.2 0.6 here. This is a trim here. Trim option, you can
click and the Trim. Okay. Hope you can
catch these up. Moving on to the video
material. Just click the area. Just click this area and you can import and a video
from your computer. This is a displacement or
you can say height maps. Now this option is
displacement of. This is displacement
from the far side. I mean, you won't
see any difference. But if you move closely, you can see this has a lot of difference
because this has a height. But here you don't have height, it's just a plain surface. But here you have this
kind of effect, okay. Again, moving on. These are
the lot of maps move closely. Again, I'll just click this one. You can see the difference. You can see the difference. It's surface now, it
has some hikes. Okay. That's everybody that is the media museum from
the D five render, so hope you'll learn
about these things.
4. Chapter 3-User Interface(UI): Again. Hello everybody. Welcome back to another lesson. If you are going through
my previous course, so you don't have to follow it, because this video is all about
the user interface or UI. Prior to that, just remember, this is the menu, double click can open. This is the way you
can have the menu. You can see the new if you
want to have a new one, If you have a D five file. So you can open it from here. And this is the file
you can just click. And recent files, the things
you have done in previously, it is here and here. Another important
one that is called the workflow where you have such add ons or you can say plug ins related to
the sketch up trades, Max Bit, Rhino,
and the Archicad. Most of them are supported
with the live sync option. You can either download
it from here or you can go to Bit or any other files. Or maybe you can visit the Find.com and you can find
these plug ins as well. And here you have the
Explorer that you see this current, the menu here. And I have gone through this
one and you can see that we have already talked about
the Museum of materials. These are the things
from the D file vendor. You can download it and you
can learn it as a tutorials. You can use them. Again,
this is my license. If you have a license, it will be appear as a
pro lisin version here, the option called the updates. I mean, if you have got any update it will be
automatically appear. Sometimes you have
to go it manually. From here you can do it. This is the forum which
I've shown you in the Finder.com This is the
forum and help center. You can open a help center either you can get any
support from the Fi team. That is how we are going to get. Fine, these are something if you have encountered a
problem previously, may be sometimes
a previous forum, the solution will be there, so we can find it from here. But now without further ado, we'll just score the new here. Once you click the new, it will be loaded like this. And this is a interface, or user interface or UI. So you can see my Clouds
is moving in the viewport. This is my viewport, the area where you
have to work on. And there are left side menu
and the right side menu. Basically, left side menu
manage all the assets. And the right side menu will be responsible for
the certain effects, environmental or either you can see image or video
rendering like this. Hope you are familiar
with this one. I mean, if you are new to the Defer render,
this is the menu. Here you have a menu Options,
New projects reasons. Import render, and here
you have the Edit button. Either you can use the keyboard command control for the undo and the
radio control shift. And you can duplicate, unlock, hide, flip, align, coordin. Likewise, there are
a couple of options. Once we are working
on a certain model, we'll go through a
lot of these things. Again, the view, all the things in here shows light sources. If you don't want to
see a light source, just untick this one. And assets also again, the perspective, two
point perspective. It will be appearing
in here as well. We'll give a couple of seconds. We'll come back to this session
as well and insert that. Means same as like this. If you want to
insert a point light or spotlight strip light, or rectangular or
stage projector, you can go here either. You can just click
this one and you can get an option
like this, okay? Now, again, go back to here, window here if you want to hide a left side bar or if you
have a dual monitor set up. I mean, you can
place one, a menu, a side bar to another or maybe to get large
viewpoint to a con, again, that's how
we're going to do it. And here the health center, the beginners guide
the system information all about de render, the just click preference. And here you can see
the interface language. Here in F you are able to do the auto save now currently
it is default as 10 minutes. I mean you can adjust it as
you want. The asset storage. There are a lot of assets in the Def assets
library. You have to I mean if you are selecting specific current
location because if you are downloading from the
Internet for the D five assets, I mean it will be very difficult because
these models are very realistic and they are going to fill a lot of space
in your hard disk, Better to have a separate
hard disk for your assets. So that's why I have keep a separate area for
these kind of assets. Again, the proxy system CPS, and that's not very relevant. Again, shortcuts, these are the shortcuts
for the old things. I, if you want to go forward and backward
is typical software. I mean gaming if you have
done any gaming console. So these things are very
easy and you can see, but better do have an idea, S DQ is forward, back, left, right, up and down. If you want to speed up, just press Shift button in your keyboard and press any of these buttons in the camera. Movement will be very speed up. Again, if you want to slow down just space and this one, okay. Again, Display, you have a
couple of shortcut keys. Display on light, and those
things are up to you. I cameras, you have
the camera option, but I'm also using this
camera, not from here. But better remember the
shortcut keys and the tools. You have this tool
set for the brush. And likewise, I'm not
going to go through all this because you can
go through this one. The widget is important. This is the advanced
camera tool Beta. You know, you can have the
customer aspect ratio. These things are beta from
the render Pro version, so you are able to do that. You can add these
wigits, I'll just add. Now you can see a new pattern
has been enabled here. Again, I'll add it here. And the section two, it's
currently available with the Finder 2.5 Now we can see the tool bar has been added. Currently we are beta. And these things are
image rendering, advanced video rendering. Likewise, this is
the merge project. I mean you can merge
25 projects from here. And the adaptive system scaling, it's real time window. If you want to have this kind of a rendering
better to have it, but for me I'll just
disable it and the level of detail better enable it
here the call distance. This can be optimized
when you have a lot of the grass
or vegetation. These other preferences, it's up to you
system preferences, whether you are a
disabling. The effects. Again, we'll just move here
and this is the assets. I mean similar to this here. Dls, super resolution. I mean if you just disable it, I mean your view port
will be optimized for your current
system preferences, better to have it enabled. But if you are model very large and a huge number
of assets are present, better untick this one
and this is my account. If you want to go back to the welcome, just
click this one. And I'll just say one, and this is welcome back again, I'll just click New One. Again, this is a quid pattern.
This is basically it. And here you have the
option called import, I mean you can import
a lot of files here, especially Archicad sketch up at three D max files from here. Just click this one
and just open from your hard and this
is St library. It's a separate video
but I'll just show you. And there are three type, you know, online assets here. The first one is a model. There are a huge
number of models. More than 10,000 assets here. And here you have the material, and you can see more than
2000 material presents very hyper realistic material
and this is the particle. I mean, if you want to have
some snow effect rainfall, you know this kind
of a firework or any other fireworks things and the leaves pooling effects. So these are the things
I can hear from here, you can adjust as icon size. If I just press this one, you can see a lot of
things can be done here. And again, you can pin your asset library
to hear side menus. But for me, I prefer
to have unpin. If you just press this one, it will be enlarged to here. Okay. The other acid
type is local acts. From local assets. I mean, if you have import any file
from the third party apps, you can save these
assets as a local. So either you can use
it in another project, or again, similarly
from your online asset. So you can save that
asset as a local and you can get it
very instantly. So again, this is the
asset types here. This is the Defi studio. Currently, I don't have any
access to the Defipace, but it's a separate function we'll discuss in couple of
upcoming videos about this. Again, you have the scene list. Scene list is where you can see, I'll place some assets here. I just want to show. Okay. I'll just place
my favorites here. I just want to have
an idea about. Okay, Click this one. Okay, now what the
scene list is. Okay. I'll just click here. Now click here. If you just press this one, it will create an area again. Now I'll enable the fly moon, because don't worry about that. Will come up in a second
about these options. Now I want to have an
camerangle like this. So now we can see
I have two scenes, you can say two camerangles. What you can do is
just click this one. It will automatically
come to here. And again, just remember you can have customized settings for this one, only for this scene. Again, I'll show you now. Okay, Now this is the
current scene list. Now if you just press this one, you can see the weather or the time will be
different to unique. Likewise, you can have
unlimited number of scene last. Okay. Now this is
another important one. It's called the layers. If you are dealing
with a lot of assets, I better to have layers. Because if you want to have a separate vegetation layer now I'll show you how to add layer. What I'm going to
do is I'll just rename this one vegetation. Okay. Now I'm going
to click this one. Now we can see my asset
has a default layer. Now what I'm going to do is
I'll just put this one and I'll just put this tree
under the vegetation. Now say that you have
a lot of assets now. You want to have your models, you know, bit stuck. So what you can do is
just press this one. Now we can see your
layer has been gone. Okay. If you are familiar
with the Autocad or rabbit or not in the rabbit, only the Autocad, you
know what is layers. So likewise it will
be appear under this. Likewise, you can have a number of layers as per
your requirement. Again, all the imported
objects, whether it's online, no assets or maybe a
third party assets, it will, you can see all
the details from here. Again, if you just
press this one, you can see this is my assets. You can either click
this one or you can just click back the logo
to appeal it again. And if you just press
this lock button, so you know that you cannot, you know, move that file
so it will be fixed. So it's better to have this kind of understanding
about these things. And here all the imported
objects like Thredsmx, Arch can sketch a file,
be appearing here. Okay, I hope you're
understanding about this side menu here. And here you have another option called move rotate
and the scale. So again, if you notice if
you just press this asset, there will be X, Y three axis, and the rotation also. So again, from here
you can move from the x axis and is
it axis or y axis? Likewise again, you have the
option called the scale. Now you can see axis
has been changed. If you just press this
one and drag here, you can see my y increase. But again you see all
things will increase. You have the option, untick
this one and you can see on the hype be increased here from the width only
will be increased here. Again, this side width
will be increased because it is depending
upon this tool here. We just again press this one and press any of this item here. It will be sized
accordingly, right? You can size the object
from here as well. Again, if you just
press the move, and just similar to this one, you can see the location. You can either from
change from here as well, just press this left button
and move like this, okay? And the rotation, So if
you want to have rotation, similarly rotation
and the scale, you have the option to scale down a rotate location from
this side menu as well. I will be coming back
in another video about this side bar here now. Until then, goodbye.
5. Chapter 4-Part 1-Scene Control, Environment Side bar: Prior to going up the menu. Decide here. Here you have another option called
the Material Picker. Either you can press eye
button in your keyboard. Now I have, now I'll press here. You can choose Material here. If you just press this one, you can see a new
menu has been appear above all the material,
all stuff here. That is how you're
going to click here. You have another option
called the camera. Now a very important tool here. If you just press this one, I'll always have the
auto exposure here. If you just press this one, you can either manually
adjust this exposure here, but better to have the
auto exposure here, okay? So here you have the
field of view here. Now we can see how you want
to see this one, okay? Here, this is another
field of view, either you want this one, okay? Okay, Likewise, camera has all this is how your
section will be cut, but this is a different one, but this is how your camera will be cut through
this section now. Likewise, okay, hope you
will get that one again. Another important
one, depth of feel. If you just enable
this one and set and focus for example, okay, my camera angle. Okay, I'll just
press this one here. I'll just set this one now. I'll just increase. You can see these
things will be blood. Okay. These things
will be focused, all the other area
has been blood out. What I'm going to do is
I'll just defaulted. I'll just square here. You have two option perspective and the two point perspective. The perspective here, like this, you can either have
similar things, but if you just press this one, it will be 90
degrees angle, okay? Every time at any moment
it will be 90 degrees. But this is the perspective. For better view, it's better
to have the perspective. And here you have a
couple of options like in rebitoyather,
some of the soft. As you have the top menu, front, the left, the bottom
pack, and right. And if you want to go back, just press the perspective. Okay, hope you get that. Here you have another
option called the display. Here. You can choose the light source and
the acts and the part. If you just press
this one, I mean, you just can't place these
assets from here, okay. Now, again you have cameras. You have the sections here. So, likewise here, as
you can see, the Gratia, I don't want the Gratia
Here you have the mode, the first one and
the wire frame. This is the normal one. If you want to claim model, just click this one and
you can see the dynamic where you have
important animation. If it's not animated,
just press this one. It will be animated like this. Again, I'll just go
back to the normal one. Here you have the two
real time quality here. The precise one I always and has given the precise one
always the smooth one. You can see it is smooth
but it will be optimized. Your graphic card,
I mean if you are seen is pretty large, it's better to
have this preview. If you want to have a
preview render preview, just click this one. Now we can see this is how we're going to
appear in the end. Okay, I'll just go the precise and it is
always like this. Here you have another
option called navigation. And if you just
press orbit here, only the mouse can be
accessible for your viewport. Okay? But if you want to have
your keyboard like WS keys, just press the fly
button here and here you have the speed
of the fly button. If you increase it, can see
now I'm going pretty fast. If you just decrease it, you can see I'm now going
with a very slow rate. Okay. This is the height
of the camera angle. I mean, if you decrease it, you can see as a
normal human being, it is like 1.8 or maybe 1.6 between so well and here you
have another angle that is, you know, you can
rotate to a camera. I mean, it's pretty handy if you are doing some video rendering and have this kind of
a video angle as well. Now, I'll be quick one. We'll go back to here. The other side of the sidebar. The top you will see this
is the virtual reality. If you have one, just connect it to a computer and
you can access from here. But currently I don't have
one, so I'll cancel it. And here you have the image
rendering. Video rendering. And the render que me, you don't have to go one by
one if you want to render it, you can this scene to the render que if you just go to another
scene and add that one. Likewise, it will automatically
render upon your request. At the end, you have
the ability to close, defer render
automatically once you are already completed
all the renderings, those kind of options there. But when we are doing
some kind of rendering, we'll test that as well. Again, moving back to the
environment and the effect. Most importantly, if you
just press the environment, you have the skylight here. Under the skylight, there
are two options and the sky, currently I am geo hamming sky. You can see this is the
current time of my model. Again, you can use
the north offset. That means you are sun area. You can see my sin
is now moving. Likewise again, if you just
press this reader button, you can see this, all
the cloud details. If you just press this one, the cloud will be
disappearing again. The cloud amount, the
thickness of the cloud, the density of the cloud, you can see the height of the cloud and the speed
of the cloud moving. Those things you can do. And here you have the
option called the fog, if you just enable it, if you just increase
the fog now you can see there are
a lot of fog here. I hope you can see this
is the clear image now. This is a lot of fog here. Okay. And the fog height also, you can adjust from here. The fall, if you increase, can see the falloff, how it will be appearing, and the star distance, okay? This is another option
called the volume lighting. If we just have a point lo here, I'll just make it environment too dark to okay, I'll just go the
point light here. I'll just enable it. Can see there's a effect, that lighting effect will be appearing for this thing again, if you just increase it, you can increase the
scattering here. I'll just increase
the intensity here. Now you can see it's a fog. Okay? Can see, I'll
just environment here. Very dark now. See, I hope you will see. Just go back to here and
decrease the lighting effect. Now. Again, we'll go back and the volumetric
lighting now. I hope you can see
you. Just press one. It's just a light. Okay.
Just press this one. It is volumetric lighting. Hope you understand about it. Okay, so better have this one and having this kind of effect, maybe you can click this one. Okay, I've this one. Okay. Fine. Good. Okay.
Now I'll just enable it. This is how we're going
to the night scene again. The wind option, we'll
wind option will work here if you just
cool the assets here. If you have vegetation, you can see this is the tree. It has this effect. That means logo here that it does have the
animation for the wind effect. We increase the wind here. Volumetric lighting. Okay? We'll just dip
the fog now you can see this is the
wind defect, okay? Just decrease it, you know, this is how we're
going to do, okay. Hope you're clear about that. And the next option,
precipitation. So again, if you want
to have rain now, you can see it will be going to the snow area if you want
to have the rain here. So now the rain will be up here. So if it just close,
okay, still rain. Okay. Again, I hope you can
see now the rain has been, you know, appearing in here. Okay. And the puddle? The puddle means, you know, when the rain hit the ground, you know, some kind of a
pond defect will be up here. That is the puddle. And I will increase the
strength of the rain now. I hope you will see the rain. Okay. You can see
some bloody effect. I mean, if you have a, you know, closed or exterior and ring, I mean exterior scene, it will be up pretty
nicely. Okay. I hope you will go
through the old table. Another thing, the second
option of the skylight is HDRI. If you just press this one. So now what has
happened to here? The old sky has been gone, the cloud defect has been gone. This, you know, HDR skies
given by the Fa team. Let me just press this one. You can have a couple
of HDR effects. You can see a very pre
realistic sky types here. Now if you want to
have midday here, now I will be, click this one. I'll be clicking this one and
it will be appearing here. Okay. We'll wait a
couple of seconds. Okay, Now we can see again there are a couple of options
for the TRS sky. You can select the lighting, this is the lighting effect. And you can rotate it. That is how we're
going to do it. And you can adjust the
color temperature as well. Again, if you want to have
warmer, then you can. Again, if you want to appear the sun, just click this one. Sun will be appearing. Just remember, when
you are rotating, your sun will be
rotating the sky, the sunlight intensity and the sunlight Varius also appear. You know, you can check whether I mean this
button to follow HDRI, because if you click this one, your Sun will be
following your HDRI. But if you just
click the custom, it will not follow the
HGRI, for example. Now see my son. I will check the Sun. Yeah. Okay. Now here the Sun. Okay. Now hear the sun. Now if you just rotate it, okay, It will be happing. But if you click this
one and rotate it, okay, It's not the sun, okay? Better to have another
HGRI to get an idea, okay? Okay, better. Okay, now you can
see this sun here. Now follow HGRI means
if you just rotate, this one sun will be gol. But if you choose the custom now you can see sun
will be moving, but sun rises, rays
are coming from here. Because it's pretty
unrealistic for scene. I mean, you can have
that kind of effect but usually it's not like that. I mean you should be used
to follow HTR button. Okay. I hope you'll remember. And other things are same again. Another thing is if you
just press this one, there are a couple of things. If you just press
this one custom, because the TRRkyes are
imported by myself, you can either import it from the Fi or either import
it from your computer. Okay, now if you
just press this one, now you can see a
pretty realistic sky. Okay, this is the
sound effect again. If you just roll it, can see sun will be moving. But if you just click this, can see sun rays are
coming from here. But your sun is move. Okay, that's pretty much it. About the environment. In the upcoming video, we'll just talk
about the effect.
6. Chapter 4-Part 2- Side bar-Effects : In the fact tab here, you have the first
option called LUT. That means look up the table. What does that mean? Actually, it means it's a predefined settings for
you, a image renderings. I mean in Fi there
are a couple of LUTs given by the Fi team. And you can either
choose a customized LUT. You can see now if I
just apply this one, it will change a codling. Likewise, you have
this kind of LUT. It's better to have that
kind of LUT effect. Usually, you can increase or decrease your
intensity from here. These are the options
for the post processing, I mean for the exposure
again from camera. Also you have the exposure, You can either click
exposure from here and it will be come back
to the normal again here. You can either increase or
decrease the exposure again. You have the contrast,
you can see. You can increase or decrease the contrast better to
have zero and you have the highlight here
and the shadow can see and the slope and
the white balance. And to get warmer environment. These are the effects
and the tint effects. You can see the tint effect. Okay? And the Bloom, I mean, Bloom is responsible, when you have sun, it usually sometimes have a lot
of lighting area. The bloom will be lit up
the old area like this. I mean, if you increase it and I hope you can see my sun
effect with the bloom effect, it will increase
the overall area. I mean volumetric area of this area if you have
a lighting effect. So, I'll just I hope it will not show because my environment is
quite large here, but I'll try to effect it. I'll chose it or it will not
show according to that one. But anyway, that's the
Bloom effect does. And you have the lens flare, You can see this is the lens
flare from the sun rays. It will be a kind
of a lens flare. I mean, usually when you
are taking a photograph, lens flare will be appearing if you want to have
that kind of effect. This is the effect you
want to be effect, that is where the
edges will be a little bit dark and give you a realistic camera kind of
image from Gard effect, okay? And the chromatic abbreviation, you can see, you know, some dissortion about
these areas that these things are usually done
with you all the cameras. So usually these things
are given, okay, I'll just secure and
the saturation here, you can see the
saturation does, okay? I'll just go to zero here, you have the style here, you have the O here. You know what happen is, you can see, I don't
need that one. And the depth, these are camera and the post
processing options. And the outline mode. And it will give you
the outline mode for everything for
this kind of a thing. And you can decrese
like a artwork. Okay, I donate it, outline it, and
the color grading. You have a lot of options
here for the colgradingI. In upcoming videos, we'll
just go some colgrading also can have this effect here if you want to have
the shadows effect here. If you want to
have the mid tones here so it can
create these things. Okay, highlight again,
this kind of thing. You have the RGBHSV, These colors you can
change codingly. Likewise, you can do it, that's the effect and this
is the inspector mean. If you just click
this object here, the options will be appearing. We have talked about this one, the location, rotation
and the size. Here, this is the layers, and here you have the option
called the duplicate. If you just click this one, you can duplicate
the object here. If you want to flip that object, you have the option from here. If you want to focus on, I mean, if you are far away
from any object, if you just press this one, it will be appear like this. Or if you can press button in the keyboard
and just se it, okay? And I'll just go here and I'll just press
this perspective. Okay. I'll just add to here. And here you have
another option called the add to locals where
I have told you about, you know, I can add
these things to the local and this is
the local library. Okay? And this is
the reset button. If you just press and it will be come to the default location, and here you have some
other options called the replace from this asset. If you just press this one, you can either change this
object from the asset library, it will be changed, okay, I don't need that one. And you have the replace
from the local folder. If you want to replace this object with
the local objects, you can choose this
buttoning up here. If you want to export
this object to a different fa thing, I mean the file type, you can either open it to another computer and
import it from here, okay? And here it will be,
make unique here. And not much about
talk about this one. So that is what
you're going to do. Again, I want to highlight
about these things here. Also, you have these objects. Just right click this one. You have this kind of
options similar to this one. Duplicate, make
unique on vertically. These are P we'll discuss
about in upcoming videos. Others will be similar. If you want to delete this one, just press this one. Okay. I hope you are
clear about this one. Again, we have to talk
about this menu as well, but we'll discuss it
in the next video.
7. Chapter 4-Part 3-Navigation Bar : To show about the top menu here. Now I have just opened the sample file
given by the defer render. Now I'm using my keyboard. I'll just go inside this area. I'll just click this one here. It's called Add light. You can add the
point light here. Now you can see my
point light here. It will be point to a
certain area from here. If you just click
this light here, you have the intensity. You can increase the
brightness of it. And the actuation radius
is this is the radius. That means you can increase it. The intensity will be
growth like this. Okay? And the light source radius, I'll just increase it. And the light source itself, size and light shape, yeah, now you can increase it. Now you can see light source
radius disable in elections. And better to have that form
and the temperature and the color if you want to have warmer now we can see
my warmer colors here. And you can choose
the color from here itself, the caustics. Usually, it's a
separate video about the water and some
other effects. It will be appearing here, but I'll just disable it. I'll just keep it in
a separate video. Okay, I'll just delete this one. I'll just go with
the spot light here. Now you can see
my light is being spot and this is
the point light. It has all the directions. Okay. Spotlight will be
on spot area, similar. Other lighting, all
things will be similar. Okay. Chest, see the
effects of here. Now, if you just press this one, the light source will
be not appearing, but if you just press this one, it will be appearing like this. Now I'm going to
delete this one. I'll just add the strip light. You can see similar
light, only a strip. And from here you can
change the bond angle. You can see what happened here. The length also you can see the length and other
things are similar. Close this one. And
the rectangular light, you can see light will
be a rectangular here. You have the ability to
change the sizes here, can increase the size
of the rectangle. I'll just dilate this one. The stage light can
see this light. This one can see this
is a stage light. These are some light types here. You can see you can use this, a light effect here. Either use this thing, okay? You can use a customized
Google here, okay? The other things are similar. Just click this
one into the city. I can see the size can rotate
it, you can have the haze. Also delete this one
and the project. If you just place the
project here and rotate, just remember you
can upload any, a video here and play
from this project. A pretty good right? Okay, this is the
project effect. So I'll delete this one and
I'll just go the path tool. In the asset library, you have the characters, and the vehicles,
and the animals. I mean, if you want
to walk them in a particular a line or
any other direction, this is the way you can do it. I'll just cancel this one and you can just press this one. I have to click on. I'll make it a working person
in the downloaded work. Okay. I'll just add this one. I'll just press this one. You can see it gives you a
certain direction accordingly, the objects will be moving. Okay, See. Okay. Now what I'm going
to do is I'll just click this one and you can add
certain models from here. Okay? If you just add
this one in a time, you will see that it's moving. So now what I'm going to do is, okay, that you can
see the option. When you choose dynamic, it will be apparent like this. But if you choose to
close this one or better, we'll go outside
and do it because it's really easy, okay? Effect this person
and this person. You can have a bend linear. Also, if you just
place the curve, you can see you can curve
very nicely from here. Okay, so again, if
you just press okay, and you can either place them in the default layer or
any other layers, you can add people from here. Okay, I'll just add
another working person. Okay, this guy here, envelope I have added. If you just go the display
here and the dynamic now, now I'll just remove this
person from here, minus button. You can just click this
one and remove this. Now we can see my
people are working. And here you can choose the
locations of each care. If you just press this one are what we call the path here. You have the ability to
change the path here. If you just press
the edit button, you can see my path here. Now you can add another part. From here, you can see likewise, okay, again, press Do here. This is the density, the speed
of these objects moving, you can increase or decrease it. Now you can see
the width of the, now we can see path
has been increased. Now I'll decrease it. This is the direction, if we
just press the direction, they will move to other side. This is the drop,
but I'm not using Drop button because it
will be this effect. Now you got clear
about this one, I'll just press this one. You have a couple of options. You can either this one
and create the likewise. Similarly, you can use the vehicle as well
and the animal. This is the tool, you can use, the moving effect here. Now, call the tools here. If you have a brush tool, especially for the nature, this is the nature brush tool. I mean, if you want to
paint it, for example now. Okay, I'll have a free download. I'll just download this one to show you how this tool works. Okay, now I'm going
to press this one. I'll just go here and
I'll just paint it. Now you can see I can paint
wherever I can from here. If you just enlarge it, you can see the
increase the radius. Now radius has been increased. Can see, okay. And you can size of the tree. You can click this
one and place. Now you can see small
trees, the random size. Then it will appear random size. You can see a small
trees and large trees. Also here you can click
the Align to Terrain. That means will align automatically this kind of
a terrain or any surface. Okay? If you want
to place it in, you know, the vertical area, it will align to that as well. Okay. And the density
also, I mean, the trees, how you're going
to place and how dense it should be, it
will be up here here. Similarly, you have the
tool called the erase. I mean, the things you have
painted, you can erase. This is a tool. Now, I'm going
to delete all the things. What I'm going to it, okay. I hope you are clear
about this one. Again, I'll just move to here. It is called the Align Tool
for the vegetation here. Now see what you
can do from here. You can place them
in a certain path, a pretty good right, Similar to this kind
of path tool here. I mean, you can place either the objects from the acid library and you
can do the alignment. Can fix alignment and spacing. You can manage the
spacing as well. You can direction,
random direction, all things you can manage here. Okay, you're clear
about that one. Now I'm going to discuss about this tool, the scatter tool. For example, if you just
click this one and scatter, that means the radius
up to the full, then it will automatically enable the scatter
tool, for example, if you just press this one and I'll just increase the density because it will fill a
lot of trees in my area, the size and the density. Now you can see my mouse has been changed to this
kind of a tool here. Now if you just press this one, you can see my whole area
filled with the trees. Okay. This is pretty easy. There's two way to, you can enable this one from
here or either if you just press this one and you can press the radius
button to the full. Okay. Now, the final one, it's called the part we have
already talked about it. Now we'll go to the particles. There are particles. I mean, if you're going through
the asset library, these are the particles,
you can use them. These particles, for example, I'll just show this
particle here. I'm pretty hard anyway. Until then, I'll just go to the new section called
the add camera options. Camera options, you can
see like the V ray. This is the tool, you can
have this kind of effect. Because it's better
to have this kind of a camera effect because either you don't have to worry
about the second screen. So this is the second
screen you need, okay? You can place them in another
monitor, it's better. Okay, I'll just delete this one. And you can have the current camera in a
separate, in a small one. Okay? This is until beta. Okay. I'll just delete
this one. Okay? Okay, now this is
the section two. Now I'll add the
section plane here. You can see how the
section plane works. It will cut through
my plane here. Okay? So you can change
the altitude here. I'll just decrease it now. Article now, you
can go from here. You can see it will
cut through here. Okay, got it. Delete, I'll just delete this one and back to
normal and the section, if you just place this one and you can increase
the size of the cube, I'll grease to 5,000 to show. Okay, now it has been filled. This is a new from the D52 0.5 comes here. I'm
going to delete it. I hope you learned
about this top menu. It's quite important
you can use a lot of utilized useful tools from here.
8. Chapter 5-Materials: Okay everybody, let's start with the initial part that
is called the material. Now I'm going to
apply some materials, just remember these things. You know, I was placed
according to my specification. But you can customize as
you want because, you know, there's no, this is the exact
order you need to follow. But you know it's better
to have an order and at the end also you can customize your project as
your requirement. Now what I'm going to do is
initially I'll just go to the materials here and I'll just apply some
materials for my model. The first thing is first, so I'll just use this
concrete pole here. So if you just move closely, you can see this is my material. But if you want to
have a stretch, these are some settings where
you can apply like this. I mean you can stretch
your UV and texture. And here from here you
can get some offset. And if you want to
rotate your material now you can see my
model has been rotated. Now what I'm going to do is
I'll just click 90 here, so it will rotate my
texture like this. I have applied this
wall material, concrete wall type
material here. Now what I'm going to do is I'll just apply this black metal to the malians in order
to get some rich look. Now I'm going to go
to the glass here. I'll just go to
the normal glass. I'm just going to apply
this normal glass to here. And you can see there
are some other, the frame as well now. I'll just apply my metal
color to that as well. Again, this is my do I will
apply to this as well. So moving on. Okay. I'll just apply to this as well. Okay. Now, if you just go
to the glass here, now I'll just go to
the normal glass. Okay. I can see normal glass. Yeah. Now I have applied normal. You can see these are the
settings for the glass. So we have talked
about these things in the museum library, but, you know, I'll just have some
thickness in order to get, you know, a proper look. Now what I'm going to
do is here I'll just make a little bit less
transparency here. Okay, now I have applied that
as well for this actually, I want to make this project as an art gallery in order
to get some art gallery. So I need to have, you know, picturistic or maybe art, you know, feeling,
artistic feeling. So now I'm going to click here
and I'll type brick here. Okay. Now I'll just
apply this brick here. Okay, I'll just close this one. I'll just make here. Okay. Now I'm going
to stretch this out to get a bigger
this kind of feeling. Yes, that's good for me. Now you can see another
big advantages. If you want to copy material
properties to another area, what you can do is
just click this one. If you just go here, you will be seeing
Duplicate button. Now what I'm going to do is I'm just going to duplicate it. Now you can see my model
has been duplicated. This is the basic structure
of my model here. Again, for this one, this is nice board something. The entrance for that one, I'll apply this brick type here. Again, I'll just click
here. I'll just. Okay, Just close here. Yeah, I'll just make
it a larger one. Okay. Learn this. Okay,
that's good for me. Again, another important
thing you need to here apply. That's how you're going to get some access
from your keyboard. Now I'm using my keyboard
here for this kind of a roof. I need to have a
roof material here. I'll just type roof
material here. Okay, You have a couple
of options for this one. I'll okay this one again, this is quite big. Now what I'm going to do is I'll just click scape and I'll just. Okay, that's good for me. Okay, now we can see I have
missed here for this one. I'll let this count
for a break here. Okay, That's pretty good. Okay, Now if you just
close here to get an idea, you can see you have a
good area at this moment. Okay? That's pretty much it. Just go to the sky, You can see how the
things has been changed. Here again, just remember if
you have input for example, I'll just click this one. These are the specular
in order to get a shiny. I'll just close this up. This is my material.
Here you can see some height maps
has been applied, just increase the specular. You'll be seeing some
reflective thing. But here the roughness is
already high and just increase the metallic you can see it
will be, goes like this. But for me I don't need it. This is the height
map. You can see how it will change accordingly. When you change the height. Here you have the base color, but if you want to import
some colors from outside, you can import that
as well for me. Now, I'm just going to
go the linear color. You can see how the
things has been changed, how you can change
the brick color. Likewise for me, I'll
just go to the control Z. Okay, that's how we're
going to change it. Now what I'm going
to do is I'll apply some textures to my
surface here. Okay. What I'm going to do is I'll
just go to the ground here, not the ground here, natural. I'll just, okay, I'll just close this
feelings pattern here. I'll just choose, okay, this dry grass effect for me. Now if you just zooming, you can see it has been, the stretch is not up
to good standards. So what I'm going to do
is I'll just stretch it. Okay. So that's better for
me now at this moment. Okay, now we have
already added some, you know, this kind
of materials here. In the next video, we'll
add some default assets. I mean, the default assets from the asset library.
So stay tuned.
9. Chapter 6-Part 1-D5 Assets-Nature: Okay, now you have added all
the materials to your model. Now what I'm going to do is I'll just use some file assets. But the nature assets, if you just go here, you can see a lot of
assets are there. I mean, more than 10,000 assets is currently present
in the Defi library. But for this video, I'll use the natural grass
trees for photo realism. Okay, for myself what I'm going to do is initially
I'll just fill this area, I mean this covered grass area from defy asset grass type. So just go to the
ornamental grass. I mean if you just go there, I mean you can see
t the grass types, lot of vegetation
you can see this is the well famous
grass cluster. But for me, by my experience, I usually prefer to have, you know, just go
to the down here, I'll just make it larger. So this is the perfect glass. I mean, I mean, if you just
combine this Gruss type with this kind of
grass around there, it is, can see, okay. This cluster, I mean, you will get a pretty
realistic view. Now what you can do is you
have the brush option. What this brush option will do, if you just click
this brush option, you can add some material, one or more materials. You can paint from
a radius circle. You can paint all
the area you want. Now, there are a
couple of options. The first one is the radius. If I make it smaller, and you can see this is
my brush circle radius. You just, I'll, for example, I'll just make some
grass here, okay? I'll click this one. Now if you just go,
you can see how it will create a
grass type, okay? So it's pretty much
easier rather than placing one by one and likewise, but you have that
kind of option here. Another option is the density. I see if you just increase the density and
if you just place it, I mean all over the circle. I mean, if you just
increase your radius size, you can see if you
just press one button, you can see the circle area is fully filled
with the density. I mean, if you just
decrease it, I mean, you will see this
kind of effect, okay? It's less density,
less grass type, okay? And the size will be depend on this kind of a material
or vegetation. If you just increase
the material again, if you just place some material, you can see my grass has
been increased the size. This is another option
called the random size. I mean, if you're
just placing all over the surface like this. I mean, if you just
increase it, I mean, Defi will automatically select
some random size grasses. Now I have a P. This is another handy option that is called the Align
To Terrain Here. If you just press this one, it will only align to
a certain terrain. Just cancel this button. I still you are paint or
maybe the brush option will be there is shift
button in the keyboard, you just place your material, You can see the black border. That means I have already
selected surface as this one. Now I'm pressing my shift
button in keyboard. And if you just go
to any other places, I mean it will say, I mean from the mouse itself, it will convert to
me like a no entry. Or you cannot do this brush in here because I already
selected this kind of a thing. Again, if you just move closely, I mean the option called
Align to Terrain. This is my terrain.
Actually it's horizontal. I mean, if you just go here, you can see the
vertical surface. This button is disabled. It will be pretty difficult
to place the terrain here, but you can see
which I have placed. It is not perfectly vertical. It will be horizontally
parallel to the surface. If you click this one, if you place this one, you can see it fell a
line to my terrain. That's the difference between the line to terrain on and off, that's a quite,
very useful button. Again, Similarly brush, you can delete the print
brush and everything. Now I'm going to
delete this one. Okay, now I'll just
increase my radius here. Now I'm going to delete
all the things again. Remember again, I'll just
paint something because I want to show some really
useful things. Okay, click now it has been appeared, if I just close this
one and I'll cape. Here you. Yeah. Okay. Now what you can do is
just click this button and you can see these are
the brush records. I mean, the Defi will crack all the things you
have done previously, especially with
regard to the brush. Now, it will highlight the areas you have done through this
kind of a brush here. And it will give you
the further ability to extend your area. Or maybe if you want
to deleted one of the important thing you can
turn off that a layers here. You can create an layer,
for example, vegetation. I'll just click this
one and I'll just add this brush to the
vegetation and once you have currently currently the older model has been transferred to
the vegetation but Okay. I'll just do another thing to show this is and the type here. I'll show you the
difference pen now. This is I have selected
the vegetation as my current layer now
that has been added to the vegetation here now. Okay. I'll just go
the bit file here. I'll just select it.
I'll make it a default. Now, default is enable. Now, what you can do is if
you just move closely here, if you just turn
off the vegetation, you can see only the model. I mean, the things I have selected under the vegetation
has been gone here. Again, if you have pretty much large number of
assets under the vegetation, it's better to turn
off the brush type. Now, you don't have to
turn off the vegetation. You only can do the brush
history hide from that. You can hide it if you
are models too large. I mean, it's pretty much
easy to use this kind of a material and you can turn off as your requirement
in order to get some optimize free you are a memory especially
the graphical memory. I mean it's better to turn
off it, that's handy now. Again, what I'm going to
do is I'll just delete this as well because I will
do with the model now. Okay, now I'll just
click my assets here. Now another option
is if you just increase your radius type to
the end of this bar here. I mean, you can see it will light up as the
blue color here. That means I just
select a material here. Okay, I'll just select
the material here. If you just go to the down, if you just tear, I'll just make it a
little bit less dense. And the size will be
decrease like this. The random size also decreases. Now you can see my mouse
has been converted to the pain painter.
10. Chapter 6-Part 2-Other D5 Assets: Now what you can do is
if you just click here, if you just zoom here, now you will see my whole, the surface has been transferred
to this material here. If you just increase the
density, you can see. And again I'll just increase the random size in order
to get some realism. Okay, now you'll see these
are my two assets type here. Now I'll just increase
the density a bit. Likewise, you can fill it, but there's a catch here because if your
surface is too large, I'm not suggesting
to do it because, I mean it will eat your graphic card alive in
order to understand it. So I'll just choose the
area I'm going to use it. I'll just increase the
radius similar to like this. I have deleted it again. I'll just go here and I'll just decrease
the paint brush size. Now what I'm going
to do is I'll just increase a bit of size here. Okay. And I'll just paint
it as my requirement. I'll just press shift here and I'll just increase the density because I feel the
density is too low here. Okay. We can see I'm
pretty much painting it. Likewise, you can paint
as your requirement. Because if I do it
like the previous, the activity, it will eat
my graphic card alive. It will use a lot of graphic memory to gain this
realism into five model. What I'm going to do is you can see I'll just use the area
which I'm going to use it as my picture in the
video rendering again, you can see I'll just there use some of the a close area like this. I'm pressing my Chip
button here now. I'll just use this area as well. Okay, We'll do
some other things. Again, I feel much, pretty much a bad feeling
about the texture I have used. What I'm going to do
is I'll just click it. I'll just go to the nature and I'll use
this kind of gravel. I feel it's a graft
here, but for me, okay now it's a better for me, so it has been covered
with the grass here. Okay? So I can see
pretty much it. Now what I'm going to do is
I'll use some assets here. These are my favorite
assets at this moment. So use this kind of a type here. Now you can see
it's a small tree, but usually it's not a small tree because of
this option we have Nable. So what I'm going to do is I'll increase the size here a bit. And I'll just press
this pattern again. Now you can see a
pretty much large tree. Now I'll just place
this tree here. And I'll use another tree type. Okay, this one. Just remember why I'm placing
this tree types here. Because I want to have a scene. Or you can say, I want to have
an image from this angle, so I need to have this kind of a leaves effect that
is covering my image. That is where I have placed
this kind of a thing. I mean as your requirement,
you can do it. So what I'm going to do
is I'll just create a in because it gives you whether
you are in any other angles. So if you just press this one, it will go to the automatically
to your default on again, I'll just place this flower
material here, okay. That's pretty much it. I'll use some of the. So I'll use my local assets now. Okay? I have you save Defy default
assets to my local library, because otherwise I have to find it from the Defi library. But it will give
you some kind of a headache because there
are a lot of materials. In order to avoid that, I just save my assets
to the local. Now what I'm going to do is I'll just place here like this. Okay? I'm going to do, I'll just cover this area with
some of the tree effect. Now what I'm going to do is
I'll just click this swan. And this is another handy tool. I'm going to click this swan, it will give you the trees. Now what I'm going to do is I'll just place my trees here. I'll just click here. Now I'll just
increase the number. You can see I have
increased my number here. Random spacing and the random direction,
that's important. And most importantly, random. Most, this is how you're
going to create it again if you just click this
one and random size as well. Because otherwise it will be
pretty unrealistic again. Similarly, what you can
do is you can click this one and you can add some
other materials as well. What I'm going to do is
I'll just click this one and I'll just make
combination of crease here. I'll just go this side. Okay. Okay, done. I'll just increase the
number and the random, like this and the random size. Okay, I'll just make it a bit smaller and the
random direction, okay, If I just go here, I know that it will not cover, but it will, gives
you a certain P. But still you can see some of
the areas are not covered. So what you can do is
here under the landscape, you will be finding
the backdrop plane. Now what I'm going
to do is I'll just plate place my backdrop here so you can see
it's the photo usually. I'll just click this one in
here and I'll rotate it. Okay. And I'll just
make it a bit. And I'll just duplicate
it to here again. I'll just copy that one
to this side as well. Now if you just go here, can see it will be
filled like this. You can see it has been filled. Now what I'm going to do is I'll just fill this area as well. Okay, I'll just short ate it. Make it a little
bit because from the reflection it will see
a lot of trees like this. Okay, now I hope. Good to go. Okay, now in this video, we have talked about how
you can play some assets, especially from the nature
assets in the fire vendor. In next video, we'll
just talk about some of the other elements like
HDRI skies, statue.
11. Chapter 7-3rd Party Assets: Hello. In this video we'll
just learn about the third party assets, especially from trades max. Or maybe you can say
could sell mega scans. Plus I will talk
about the HDRI sky, I mean, how you can download
them in the DRI heaven. But before that
I'll just teach you a small trick in
order to optimize, in order to differentiate your
image and video rendering. Currently you can see the main tree from here
and as well as here it's gone because I have disabled from my object
in this property here. If I just click this one, you can see it will
be appear again. Now again, I'll just click
this one for my scene. I have refresh it because
I have updated my scene. From my skin scene,
it has been gone. Now what you can do is just
click another Dz in here. Now if you just go here, can see similar to my scene one, it has been already
hidden all those trees. Now what you can do is
just unhide these objects. Now again, if you just
click the update button, now you can see it
has been appear. Now what you have to, what the benefit you are getting from this camper effect is if you just go
to the scene here, you can see my two
tree has been gone. If you just go to the
scene two here now you can see the model has been updated according
to my these objects. It's a beneficial for you. Now again, let me just
post about these things. And now what you can
do is I'll just go the quick megalcans if
you're familiar with it. Ire using twin motion
for your rendering. I mean, it's a
biggest thing in the, I mean importing a
material because Quick Mega Scan already incorporated in the
Twin Motion license. It's better and it's very easy. But for you, I mean, this is if you're
using defer window, I mean, it's pretty much handy. And again, you don't have to do it because I already
signed in from my account. And what you can do is here
in Quicksell magazine. If you just go to the
home here in Quicksell, you have material caictures, you have three D objects
and hyper realistic. For example, if you
just take a plant, I use reality scans
for that model. And they have imported
to the Quicksell. And they have
uploaded this kind of realistic objects to
the Quick Sil magazine and you can utilize them
inside your project. These are some three D surfaces
you can hyper realistic, and these are some
three D objects. You can say it's free plants. Now again, what I'm
going to do is I'll just click this
is the metahuman. Use metahumans for
the Unreal engine. They have this scan object
as well for the collection. Now I'm going to just
go the environment. And here you have the natural for me, the
forest underneath. You can use them. You can just click this
one for me, at least four. And the two K
resolution is enough. And some of the objects have up to eight K and
the 16 K. Again, this kind of a surface,
you can use it. Just download it.
And what you can do, I'll just press eye button here. Okay. You can import
the normal map, you can import this pecular, you can import the
roughness map, and you can import the height or the displacement map because and the albedo map for this can
here for the base color map, you can import the
albedo map as well. Because once you have downloaded
the quick mega scans, it will show as albedo. That means you are
base color map. Okay, I hope you can do it. I'll show you how
to do that as well. Again, now if we just go here
now what I'm going to do is I'll just download some
of the pretty objects. I just this rock type here. This one again,
I'll just reduce it because I don't need that
kind of re effect now. I'll just download it. Okay. Now you can see it. My download has been initiated. If we just go here and here you have the
option called import. Now what I'm going to do
is I'll just import here. These are some of the assets I have downloaded
from the quick sale. Now what I'm going to
do is I'll just click this button here and I'll
just import it again. Now we can see my model has been imported to my scene here. Now what I'm going to do is
I'll just add my scene here. Okay, this is my N, it's pretty much larger. Now, I'll just decrease
the size here. Now you can see there's
no texture at all, so don't worry about it now. I'll just go here. I'll just click eye
button and I'll just place my paint
mouse button here. Now you can see I don't
have any base color here. What you can do is
I'll just click here. I'll just have to go
to the base color map. This is the albedo map. I'll just import it now. You can see if I
just move closely, it does have pretty much all of the colors but cannot
change the normal map. What you can do is
just click this one. Here you have the normal map. Here you have the rough yes, roughness map or a
displacement map. The specular map usually contains the black
and white colors. If you have the specula, you can see some
glass reflection. If it better to have this
increase the roughness here, this is pretty much it
if you just increase, but it gives you a certain idea. Again, I'll just
press Scape here. And I'll just click here. And I'll just reduce my object size because
I need to show this a beautiful backdrop
here from the flowers itself. Okay, if you just go
the scene two here. Okay, now you can see. Likewise, you can import any of the three D objects
because currently I have done the quick
see mega scans, but you can do it for
any other sites as well. Again, if I just go
the assets here, now I have been save
my some of the assets. Again, this is pretty
much a three DS max file. But prior to that I'll just move on to the scene one here. Now what I'm going
to do is I'll have this three D max file here because I have imported
it from the three DS max. It's a pretty much
hyper realistic tree. If you want it, I'll
show you that as well. So what I'm going to
do is I'll just place my tree here and
I'll just rotate it. Okay. Okay. I'll just choose another tree because
it does not have much, you know, a free variety in order to covered
inside my image. So I need to have a
pretty large here. Okay, that's better here now. I'll just this model here. Okay. Now I'll just go
move up a little bit. Okay, I'll just place here. Okay. Okay. Okay, that's good. And I'll just make it a bit
downward. Okay, Like this. Okay, that's pretty much good. Okay, Again, press and
click this back here. Now you can see I need
to reduce my specula, and I need to increase
the roughness, because specula is not good for this kind of material here. Similarly, I'm going to reduce it and I'll
just increase it. Okay, Specula. Okay. It does not justify
from my viewpoint, but if you are closely
monitoring these things, I mean, it's pretty much
hyper realistic. I mean, if you have
that kind for now, If you just click this
scene one here, okay. And there's another thing
you need to know about it. If you just press here and if I just move here very closely
and select my leaves here, you can see it has already
selected as foliage. Because if you have a
custom material, I mean, it's not cut out from this kind of tree and
it's not realistic. In order to cut out from the, from this opacity,
you need to change it to the foliage and it will cut. It will give you
a realistic view. So if you just go to
the scene one here, now we can see this is my
scene one, escape here. If you just go to the scene two, again from the scene two, what you have to do is you just have to
deactivate this one. Just disable these 23
types here and press it. Now if you just go
to the scene two, you can see this
is my tree type. If you just go to the
scene two, this is Def. Okay, I hope you
are clear about it. In next video, we'll learn
about the DRS Skies.
12. Chapter 8-HDRI sky: Okay, in this video
we'll talk about how you can control
your environment. I mean, in a defer
wender you have two options called the an sky and the second option is HDRI. We just switched to Janky. I can control my
weather from here and you can control
the nth of set. From here you can see my son has been setting up according to my mouse movement and here you have the
cloud movement as well. If you just enable it, you can see the amount, how you can enable
it and thickness, the density of the cloud by
just moving a little bit. Up here, you can see my
cloud has been like this. If you just thicken it, you can see the
thickness of the cloud, the amount of cloud, you can have a null. And you can have
a cloud like this and change the height of
the cloud here like this. And you can increase the
speed and the direction, can see how your
cloud will move. Okay. So basically this
is the you know, and sky. Now what I'm going to do is
I'll just go to the here and you can see it will be light lit up
according to my here. But in this video we'll
learn about the HGRI. If you just move on to the HGRI, you can see there are the default o HTR skies they have given they
have early morning, they have sunrise and likewise they have pretty
much a lot of cloud here. I mean GR skies here, if you just select HGRI sky, you will be seeing now
in a minute, okay? Now if you decrease
the light here, you can see this is my HTR sky. If you just rotate
it now you can see, you will be able to see. Now, these are some of the
options for the HDRSkyow. This is still intensity. If you just increase
the skylight, you will be seeing this effect, a pretty good effect. If you increase the
background here, you can see all the area
will be very light up. If you just decrease it, you'll be seeing a
good color again. You have the option
to rotate it. I mean you will be not seeing, you just move here. Now, this is my HGRSky here. If you rotate it
can see likewise. Okay. Again, I'll just
increase the background. You can see the color
will be lit up. But I don't need it.
I'll just decrease it. And this is the area and the old environment style
light will be color, but I don't need that
much of you can see. And all this area, once you have increased it
and you will decrease it. Okay. Now I'll just move back to my original position and Okay. I'll just go quick Coke. Now again, just remember if you have a pretty
much good HDRI, I mean, it will give you
a hyper realistic view. I mean, if you're using a
pretty basic, for example, I do not recommend to use two HGRI skis from
third parties. I usually use four K or maybe eight K. For better picture
quality or image rendering, you better use a 16 K. I know that it's
heavy to your model, but it will give you a very
pretty realistic view again. Now I'll just create another
scene for my HDRIka'jt. A little bit here. I'll make my camera settings as the perspective now I'll just
reload, update it again. I'll just increase the
skylight here in order to have some you can see now my scene has been
lit up because of that. Again, just remember you have
the option called the sun. If you just click it, it will give you the sunrise. But just remember
there's a two option. If you want to follow the same HDR by
rotation with the Sun, you just better to
follow this one. If you don't need to
follow your sun and you need to place a
particular location, just click this custom button. According to that, you can change the altitude of the sun. Now you can see you are changing the altitude
of your sun. You can change like this as
you are project located. I mean, you can pretty much use it according to
your requirement. Again, for the background I
need to have a little bit, a less background color or not that much and
I'll just rotate it. Okay. So now you have a pretty good and I'll
just increase it a bit. So this is pretty much
the TRYkies for me, I'm not using this kind of default HDRI from the Fi because there are a
lot of good HDR skies, but usually I'm using a
third party custom skies. You can see these are the custom skies I
have already imported. For example, if you
just just closely said, if you just go to the
this HRI heaven can see. I'll just reload it. It's 100% free. Actually, you can download
it as per your requirement. There are outdoor
skies, indoor studio, sunrise, night, and
the nature example. If you just click this old warehouse and
there are options, you can either download
eight K or 16, or maybe 44. It's up to you. Actually, I'll just
go back here again. There are pretty much good
selection of the outdoor. If you just go to here, this HDRI sky is pretty good
and you can download it. Once you have download it, just go to the per vendor here. Just click the customized HTRN. From here you can import it. Now this one, I have already imported one and it's
pretty hyper realistic. Now you can see now
what I'm going to do is I'll make this one smaller. I'll just decrease my
skylight color here. Okay? And I'll just
make it rotate. And you can see my mountains. And I'll just increase
the background as well. Okay. And okay, this
does have some, you know, sky effect. So now what I'm
going to do is I'll just make the custom now. It's pretty much good now. You can see now I'll
just click this one. Okay and Okay. No, I'll just use. Okay. I'll just use the two, I'll just use the one with my
realistic three D objects. Now what I'm going to do is
I'll just call H TRI custom. I'll just select this one. Okay. I'll I hope you
are clear about it. I have done here
because from the Defi I said this one and with the sky and again, I need to rotate it. Yes. I forget that one. I I'll use the sun
intensity is okay. And I'll just increase the background until I see
the scars, cloud scars. And I'll rotate it. Okay. That's pretty much it. I'll just update my screen
here now I can see you. I'll just decrease
my effect a little bit to show these
shadows. It's clear. I hope you're clear about the skies will give you
hyper realism to your model. Now I'll just okay
to clear this one. And I'll just decrease skylight a little bit to have
a pretty realistic view. That's how we are going to
deal with the Acherkies.
13. Chapter 9-Human Assets: Hello again. So now we have already
talked about the materials, deferred assets, third party
assets, and the HDRSkies. This video we'll give or
else I can say I'll add some colors to my images and videos because until
the human part, human contribution
for this kind of a three D model requires, until then it's not
quite up to standard. And I have changed about these Sturesf previous video as per your requirement,
you can do it. The important part is the filling the gaps or maybe
the filling the blanks. And we'll add some humans in
order to fill out our image. We'll just go there, sits here. And I'll just click
the model here and the character in file. You have a couple of
options for adding humans. The first option is you
can add animated options. Animated humans. The second option is you can
add still three D humans. And the third option is
you can add two D cutouts. Once you have placed
the two D cutout, it will follow the camera angle. I'll show you in a while
how you can react that one in here, for example. For this environment,
just remember, always you have to have an idea. If you're building an
important project or anything, just remember or
maybe just Google it. How the people, the
clothing pattern and what kind of a people is living around
your model project area. Those things you have to keep
in mind because otherwise if you place for this
kind of art gallery, maybe a business person, I mean, it will not suit it
better to have an idea, Understand about the
situation for this here. I'll just go to
the costume part. We'll have a look, not this
one, for this project. Initially I'll place
some two D people because two D people will take a bit less
graphic card memory. Because for example,
now I'll this here. Now for example, now I'm
currently facing this angle. But if you wrote your angle, you can see two D cut out people will
face my camera angle. It will follow the camera angle. Better to remember about it, we have to do it manually. Again, I'll just go the favorites and
I'll place them because I have some
favorite characters. Okay, this part, I will
place them inside. Okay, here and create the
same pat room not to use it. Okay, so anyways, we'll just
go to the two D people again and um okay part, same here. So I'll just choose a better option from here. Okay, I will place them and I can place this person A nearby and these two
people talking here. Okay. So I have click Okay. This person, he's
taking a photograph here and I think
that's all good to go, but I'll place another one
near the other three DS. Max tree is two people close to this string because if you are filling
these gaps from the assets, it will give you a unique form that might be feeling,
a real feeling. If you just go over
the picture here, you can see my
whole area has been lit up because of this people. The crowd is there. You can add some animals to here or maybe
any other places, and that will give you a
realistic and real feeling. So that's how you
can add humans. If you just go to here, you have the option
called slightly moving. Some people are there, they have this very
slightly movements here. And just remember these
are the range you can have and the speed
of the animation. I just go here and
I'll just press this one now we can
see my model is low. Okay, This is the animation. You can reduce the
speed as well, the animation speed and
the range can decrease it. You can see that the
range has been decreased. I will change color to here. These things you can do, again, only on the revinedl can
do the animation part, but for now I'll just hanging
onto this here again. Similarly you can do the
character animations. You can create a path from here. For example the creating part, you have the option called the straight linear
and the curve. Now for the curve one, I'll use the curve one. And you can see how this
can be using a turn and I'll make a linear one
into the correctly here. Now just press
scape or done here. And here you have a
couple of options. You can add these
animated people, Better to have animated and
the working people here. If you want to filter that one, you have the dynamic option. Once you have clicked
the dynamic option and only the animated ones
will be appear, right, I'll have some other people, for example, sport and fitness, there are a lot of
animated people. This one I'll add here. Okay. We can see it
has been added here. I'll add this person as well. Okay, I'll just click this one. I'll again add this. I'll click this one. I'll add this person. You can see the density. It can increase the
occupancy of my path. It will increase and you can increase the width,
what you have defended. Now, currently I'm
going to now you can see a lot of
people are moving. And this is the width. You can decrease the
width size and this is the direction in this is
the things you can do. Okay, I hope you are
clear about that one, about the humans
and how you can get colors and lit up your model.
14. Chapter 10-Decals & Interior Parallax : Okay, in this video we'll
learn about how you can adjust your settings for images
and the video rendering. For example, if you
just click here, just click this environment
and the effect, because we have already
talked about the environment. We'll just go the effect here. And you can see my exposure
and all the things are said to the automatic. But here I'll just turn off it. And from here I'm just going
to adjust my exposure here. Now you can say
immediately does have some really realistic
effect here. Okay. And I'll just a little bit make it more
colorful or maybe less. Okay, Phil gives you a very good looking
here and highlight. I don't need that one highlight. I'll just reduce the highlight the shadow to better have
a bit more shadow here. The slope, you can see it has more vibrant colors
in this as well. And the white balance, I'll make it a
little bit warmer. Temperature here from
here change a little bit. Again, You'll have to have
lens flare because if you're facing your camera or
the image towards the sun, it will have the bloom, the lens flare effect. The Bloom means if you have it, will show it like a bloom. For example, this is the sun, can see my bloom
has been increased. Always remember,
you have to press this update button because in
order to update the scene. Because for example,
currently I'm here. If you just press this
one without updating, I mean it will go back to the
previous settings of yours. Now I'm here, I'll make it here. Okay. Better camera perspective. Always have the
perspective effect again. I'll just increase the
vineyard effect, will, gives you a very dark shadowing effect
from these corners. And the chromatic abroationI'k saturation. I don't need it. These things are not needed for
me at this moment. I mean, you can see these
things this, but outline more. I don't need it at this moment. If you need a color grading, you can do it from here. Can see how the effect has
been affected the viewport. Now I'll just have this
effect here again. There's another
option called LUT. If you just apply this
effect for the vibrance, I'll just reduce it as much. It will pop up the colors so
those things can be done. Now you can see it is quite realistic rather
than the previous version. If I just render it, render the image, you have this. A new panel will be appearing. Just remember, you can turn off some of the assets
from here as well. Again, you can only
apply your settings to a certain or specific
picture from here as well. Again, this is the image. You can do the
panel Roma as well, and this is the four horizontal. If you just reduce it, you can see it will go back to here. But this is enough. I'll just update it and the focal length and you can
see how you can zoom it, but I don't need
it at this moment. This is the aspect ratio. Whichever you want,
you can do it. Currently, I'm
moving as original. The preside, you
can do the 24616 K. At this moment it's
enough for me as the four. And again, you can do the customized settings here as well if you
want the channels. For example, if you need
the mass O material ID, the reflection
transparent, and the Z De, if you need this format you
can just click this one. Because I mean, I hope you're familiar with that,
with that as well. Because once you have rendered
with this channel effect, I mean all the maps and all the things will be
happier Again, I don't need. Then I'll select it and the
format will be the PNG. You can have this type
of other types as well. Again, this is the render
option if you just click this one and it will last the destination and it will
save to the destination, but there's another one
called the render que me. If you have multiple number
of renders to render up, it's better to have render queue because once you
have clicked this one, you can see automatically this icon will be pop
up with the blue tick. That means inside you you can queue up all the
things and you can do it at, at the same time. And again you have the option, if you just click this one, you can see this
is the location. And you have the option
called auto close, defer after rendering finish. If you take this one,
once the render finished, it will automatically
close the defender. It's quite handy. I mean, if you have a long day and
you have done a lot of renderings and once this
rendering has been completed, you can automatically
close the defender. Now what I'm going to do is
I'll just render this one. I'll just save it. You
can see the time bar here and it will give you
the estimated time as well. Okay, Now it has been completed. If you just go here, you can see the total
time is 8 minutes. So that much actually
this scene is actually, if you just go to the
open folder here, I'll show you the settings
and you can see it's quite pretty realistic
grass shadow and this sky effect
and these things. If you just go back here, you can see without
the settings. Now you can see even though you have a lot of this
kind of assets, you can have a lot of HDRIs, but without the settings,
it will be nothing. I mean, setting, this
is without setting, and this is the width setting. Now you can see clearly
how the difference is. I hope you will learn
about these things. I just always remember in order to get a
photorealistic rendering, you need to have
proper materials. You need to have rich fi assets, as well as rich
third party assets. Especially if you have hyperrealistic treatise
from the match free or maybe they have motion, it will be added
advantage as well. If you have a proper
CRIky and you can rotate them and you can adjust colors according to
your requirement, then it will be
hyper realistic as well as you need to
have the humans decals. I mean, if it's a residential
or any other project, it's better to have
interior parallax. And ultimately you have to always remember
these settings. You need to practice
these settings because even though I'm teaching you how to adjust
these settings, I mean it will change
as per your project. I mean, you need to understand
about the project itself. I mean, if it's like
maybe in a coal country, I mean, these settings
can be adjusted. For example, you need to have a very gloomy sky for
that kind of project. As well as the grass will
not match because they might have a dry grass
type or any other. Again, you need to study
first about you need to research the area and all
the people, people wearing. Those things still matters. Likewise, you need to
analyze it. Analyze it. Once you are analyzed, you need to have all
the important items. Materials, assets, RR,
sky, third party assets, humans, decals,
interior parallax, and the render settings. Once you have all things
come to do together, you will get a
realistic image again. I hope you will. You have
learned at a, from this video, and I wish you to do
your project as well and to get outstanding
winds after that. You can just do that and you
can practice by yourself.
15. Chapter 11-Render Settings: Okay, in this video we'll
learn about how you can adjust your settings for images
and the video rendering. For example, if you
just click here, if you just click this
environment and the effect, because we have already
talked about the environment, we'll just go over the effect here and you can see my exposure and all the things are
said to the automatic. But here I'll just
turn off it from here, I'm just going to adjust
my exposure here. Now you can say immediately does have some realistic effect here. Okay, I'll just a little bit make it more
colorful or maybe less. Okay, Phil gives you a
very good looking here. Highlight. I don't need
that one highlight. I'll just reduce the desk. No highlight and the shadow to better have a little
bit more shadow here. The slope, you can see it has more vibrant colors
in this as well. And the white balance, I'll make it a little bit, a warmer temperature here. From here, he, a little bit again, you'll have to have lens
flare because if you're facing your camera or the
image towards the sun, it will have the
lens flare effect. The Bloom means you have sun. It will show it like
a bloom, for example. This is the sun, can see my bloom
has been increased. Always remember,
you have to press this update button because in
order to update the scene. Because for example,
currently I'm here. If you just press this
one without updating, it will go back to the
previous settings of yours. Now I'm here, I'll make it here. Okay, Better perspective. Always have the
perspective effect again. I'll just increase the
vineyard effect, will, gives you a very dark shadowing effect
from these corners. And the chromatic aberationI', saturation, I don't
need it and things are not needed for
me at this moment. I can see these things outline more I don't
need at this moment. If you need a color grading, you can do it from here. Can see how the effect has
been affected the viewport. Now I'll just have this
effect here again. There's another
option called LUT. If you just apply this
effect for the vibrance, I'll just reuse it as much. It will pop up the colors so
those things can be done. Now you can see it is quite realistic rather
than the previous version. If I just, uh, render it, render the image, you have a
new panel will be appearing. Just remember, you can turn off some of the assets
from here as well. Again, you can only
apply your settings to a certain or specific
picture from here as well. Again, this is the image. You can do the
panel Roma as well. This is the horizontal. I mean, if you just reduce it, you can see it will
go back to here. But for me, this is enough. I'll just update it and the focal length and you can
see how you can zoom it, but I don't need
it at this moment. This is the aspect ratio. Whichever you want,
you can do it. Currently, I'm
moving as original. And the preset you can
do the 2,468.16 K, because at this moment
it's enough for me as the four Gary again, you can do the
customized settings here as well if you
want the channels. For example, if you need
the mass material ID, the reflection transparent,
and the Z depth. So if you need this format, you can just click this one. Because I hope you're familiar with that,
with that as well. Because once you have rendered
with this channel effect, I mean all the
maps and you know, things will be happier
again, I don't need. Then I'll deselect it and
the format will be the PNG. You can have this kind of
type of other types as well. Again, this is the
render option. I mean, if you just click
this one and it will last the destination and it
will save to the destination. But there's another one
called the render que me. If you have multiple
number of renders to, you know, render up, it's better to render queue because once you
have clicked this one, you can see automatically this icon will be pop
up with the blue tick. That means inside you you can queue up all the
things and you can do it at the same time. And again, you have the option, if you just click this one, you can see this
is the location. And you have the option called auto close, defer after finish. If you take this one,
once the render finished, it will automatically
close the defers. Quite handy if you have a long day and you have
done a lot of renderings. And once this rendering
has been completed, you can automatically
close the find. Now what I'm going to do is
I'll just render this one. I'll just see it. You can
see the time bar here. And it will give you the
estimated time as well. Pokoindi, Pokindi,
Pokindi, Pokindi, Pokin, Pokin, Pokin. Okay. Now it has been completed. If you just go to here, I mean, you can see the total
time is 8 minutes. So that much he actually
seen is actually, if you just go to the
open folder here, I'll show you the
settings rendering. And you can see it's
quite pretty realistic. I mean, this grass effect, this shadow and this sky
effect and these things. If you just go back here, you can see without
the settings. Now you can see even though
you have this kind of assets, you can have a lot of HDRIs, but without the settings, it will be nothing I set. This is without setting, and this is the width setting. Now you can see clearly
how the difference is. I hope you will learn
about these things. Just always remember, in order to get a photorealistic
rendering, you need to have
proper materials. You need to have rich fi assets as well as rich
third party assets. Especially if you have a hyperrealistic treats from the mat tree or maybe
they were motion, it will be added advantage
as if you have a proper CRIky and you can
rotate them and you can adjust the colors
according to your requirement, then it will be
hyperrealistic as well as you need to
have the humans decals. I mean, if it's residential
or any other project, better to have
interior parallax. And ultimately you have to always remember
these settings. You need to practice
these settings because even though I'm teaching you how to adjust
these settings, I mean it will change
as per your project. I mean, you need to understand
about the project itself. I mean, if it's like
maybe in a coal country, I mean, these settings
can not be adjusted. For example, you need to have a very gloomy sky for
that kind of project. As well as the grass will
not match because they might have a dry grass
type or any other. Again, you need to study
first about you need to research the area and all
the people people wearing. Those things still matters. Likewise, you need to
analyze it, analyze it. Once you analyzed, you need to have all the important items. Materials, assets, star
Gis, third party assets, humans, decals,
interior parallax, and the render settings. Once you have all
things come together, you will get this
a realistic image. So again, I hope you
will learn about, you have learned about a lot from this video
and I wish sure to do your project as
well and to get outstanding winds after that, you can just do that and you
can practice by yourself. Podido pod pod, pokin pod pod, pokin pod. Pokin. Pokin, pokin.
16. Chapter 12-Video Renderings: When it comes to the
video rendering. Similar to image rendering, you have the scenes here. I mean, you have the
complete scene list here. Actually, this is
image rendering and this is a video rendering. You can see there's a new panel rather than the previous
image rendering panel. You can see it's Eclipse. That means you can add a
several number of clips here. This is the where
you are going to need if you ever work
with the Ad Premier Pro. I mean it's similar to
here, your timeline. You are time slots as well as camera will be
present this area. And here you have
the player post us forward and key
preanalysis options. Here you have the options whether you want to
change the resolution, whether you want to
change the frame rate, if it's a sequence. These things are here.
Before anything, we'll just add a new clip here. Now, currently this
is my new clip here. So I'll just go to the
scene number seven. And I'll just press
this camera view here. Now you can see once I
have picked that one, I mean, my first
frame has been fixed. Now if you just play here, you can see it will be
still. Just stand still. And just ignore this
bird because you know, I have added this
bird for a purpose. In a while, I'll tell you why. Now I'll just go back here. Now what I need here, I'll just move my view part here and I'll just
create a frame. Okay, if you just play this one, you can see my animation
has been moving like this. But you can see my
body's substantial, but it's animated again. If you just go here, I have created a sequence. And here you can change the time duration for
this one at 5 seconds. Again, as I mentioned
you earlier, we can change your resolution here if I just put ADP and
this is the frame rate. Currently only two frames rate are available with the
Fern at this moment. That is 30 frames per seconds
and 60 frames per second. If you need to have channels
like the image rendering, just stick this one. And the older channels will be saved as per your
resolution type. Okay, I don't need this
one at this moment. Again, these are some of the elements you need to
play with your clip here. Now before that, I'll just go here and I'll just click this Create Shot and
the current them. Once I have clicked that one. Actually these are two
videos, two separate videos. So this is the first one
and this is the second one. Now I'll just go to another location and
I'll just refreshing. Okay. Now again, I'll just move my camera here and I'll
just add another frame. If you just go to the beginning here and if you
just play this one, you can see my video
has been playing. This is my second video. Again, just remember if you just go here and you can
see the camera, is that means you have a
couple of options here, the linear, the easy and is out. And the easy, net out example. If I just click this one again, I don't believe that you will
see a bit difference here, but you know there's
a difference. But again, if I just go here, I'll just make it a linear one. You can see there's a very fraction of thing you will understand
about this thing. But these are things when
you have a lot of turns, a lot of upside downs. So if you have that
kind of clip with you, so this easiness will be there. Again, the view interval
will be custom. You can customize
because like this, again you are weaving
angle will be. And the interval will be there. But again, for me
now, it's enough. But again, there's another
very important thing with the video rendering
that is called the key frame analysis
of key frame sequences. What is a key frame actually, when it's come to the rendering
or video edited software, Basically a key frame is if you want to
start an animation, you have to define a specific key or a
specific start point. Again, you need to have
a specific endpoint. That is the second key point. It will you highlighted
where it should be, start and where it should be. Again, we understand by the rendering or video
editing software, that is basically it
for the key frame. Now if I just go here
from the start point, now what I'm going to do is I'll just click this Perd here. And I'll just click
the rate matching, because it will match the
rate video will be moving. Now what I'm going to
do is I'll just press this one and it will add
a new keyframe here. Again, you can see a small, a blue dot has been appeared. And what I'm going to do is
at the end of this clip here, I'll just move my bird to a
different location like this. And I'll just add my
second key frame. Now you can see
the start point of the key and the end
point of the key. If you just play this one, you can see your
bird has been move. Without that, it is
like a very stands still bird like only the
animation will be there. But if you just add these key frames, it
will be like this. Okay? Like its movie. That, that is the key frame
matters again, my bird. All movement and all things will be matched as per
the frame rate here. But if it's 60
frames per second, it will automatically
adjust related to the frame rate because I have enabled my keyframe here. Again, similar to this one, you can add many key
frames as you want. It's up to you totally. Likewise, you can have multiple
number of clips here if you need this as a one clip
and if you need more clips, you can add create clip here. And again, you can create
another sequence of clips. So that is basically it. Again, you have to do it
by yourself to understand about the key frame and the
video editing You currently, you might see this viewport a bit different
because I have applied some of the LUTs from my own and it has been
changed the viewpoint, that's the main reasons it
has been more realistic. Now again, those things
are very important. I mean, if you're doing a
proper image rendering, a proper video rendering
where you have some lutes, because it will be very
easy to apply this one. Win, win, win, win, win, win, win, win, win, win, win, win, win win.
17. Chapter 13-Tips & Tricks-Caustics : Hello everybody. Welcome
back to another video. In this video, we'll talk
about the tips and tricks. Basically what you need to learn about five
vendor tricks and some shortcuts where
you can apply in your project for you are
a better photo realistic. The first tip I'm going to talk about is talking about
the water materials For that, I'm just going to
now import pol. This is a sketch up file. Now we can see I have imported
a sketch up file here. If you just move here and just press eye button in keyboard, you can see this material has been identified as
the water material. Again, the water material, there are some map types here in order to understand
about these maps. Usually the base color will be whether you can change color. If you different color, color will be changed. Now we can see it has
been changed here again, if you change it
to another color, it will change again. The base color will decide
the type of your map type. Here again. Here also. I'll just make another
map that is normal map. It will control the
height of the water. If you just increase the water, you will see that only the
surface will be increased. The height of the surface
will be increase in here. Again, you have the
refraction here. The refraction means index of refraction of
the water surface. If you just decrease so you can see how it's becoming
more calm here. If you increase it, you can see the refraction here. Again you have the flu velocity. That means the rate
of water animation. If you just increase
it, you can see it will be much faster than
the previous on here. For this type of water material. I mean, basically you need to
have below 0.3 here again, the UV map here. The UV map decide
stretch of your map. If you just decrease it, you can see it will decrease
or increase your water. Want to show this as a large area of potter to
increase the stretch share. You can differentiate the offset and you can rotate
the water as well. Here you have another option
called the depth here. From the depth, you can see
how it has been changed. If I just move a
little bit further, if I just increase, you can see the overall depth has been increased
because of this map here. If you just decrease, better to have water material
here in just cool here. And type water material because this water
material, I can apply here. If I just again press here. If I just increase
the depth here, you can see now I can
see the below surface. But if you increase the depth, it will be very difficult
to see this water material. Similar to other maps, you can change the
color of the water. You can see now clearly
it has been changed now. Again, I'll just
see water type now. You can see it has been
the height of the water. We move it a little bit closer, you can see how the
hip will be changed. Okay, then talking about another very important
aspects since the 2.5 update that if A
has released the costi, the co six means
usually light ray. When you have a
surface like water, the outer surface light rays
will be transferred through the water surface after
it has been transferred. Usually it will go
like a straight array. It will bend as per
the surface type. It will reflect
different a shadow type, very different thing
because that is actually the caustics it is happening
with the water material. And the class material as well. Again, for that I'll just make the environment a bit here. Now, I'll apply some
light materials for this kind of a thing. I'll apply some strip materials. I can say this is
my strip material. I'll just turn on here. For this one I'll just
increase intensity. Okay, this is my light material here. Now, in order to have at what you need is
basically two things. The first thing,
you need to turn on the caustics in the
light source here. Now I'll turn on the
caustics here again. I'll press here, I'll make the water surface
as caustic here. Now I'll just apply. I'll make the intensity a bit. Light here and the barn door. And go, and now I'll make this
water refraction a bit. And Pollo Seaway. I can see what has happened is actually my water
surface Low, low cities, little bit high polity can see because of
my water surface. The light, original
light source rates has been distracted
from the surface. That's why it has
happened like this. For better meaning purpose, I'll make the flow low city a little bit less again. So this is actual caustics. You can do it with the
glass surface also. It will bend the original
light rays as well, not only the water surface. This is actually
the 2.5 You can use this light surface when you have a pool or maybe when you're creating a ocean type project. You can utilize them for the cats, for
better photorealism. Similarly, when you
have co sticks, when you are light source
inside the pool I inside the water and you have a surface like a wall
or anything like this, this surface will be also
reflected by the light rays. Usually, this is my light
source I have previously used. What I'm going to do is I'll just make it inside the pool. I'll turn this like this, it's inside the pool. And I'll turn it now. We can see my because of my light source and
the water surface, it has been reflected. This surface has been
reflected. These things. If I just turn off
the caustics here, you can see there's
nothing in here. If I just turn on here, you can see these are the
caustics because of this light. I hope you are clear about that. I mean, you can use the caustics in three
ways in water surface. You can use it on top of
the water surface again. You have the caustics
underneath your pool. Or maybe if you are light
source inside the pool. Or you have this a wall here. If you need to have a weird reflection because
of this water surface, then better to your light source inside the pool and turn on the costics here when you
have the glass material. Or if you have a glass
bottle or a glass cup, again, you can use acoustics. U. A better way. Again, there's another very important tip or trick about how
to align light, choosing a wire frame. Again, what I'm going
to do is I'll just make turn on here. Again, say that you have
a light source here. I'll make this one my
light source here. But okay, now it's very small. Now I'll make it a larger. Similarly, you have this
type of light source here. Now you have a sign, some point light here. But when you are placing
a light inside the Fa, you will not see a perfect
location for that. You need to have a
wire frame here. If you just so the
wire frame here. Now you can see from the wire
frame you will be seeing exact location and
the light source is actually where you are. Light source should
be placed this cube. Again, just press
in my keyboard, that is F or maybe button. When you press button, that means means top
and the F means front. You can place them very nicely if you just move
your light here. Now you will be seeing. You can perfectly
align your light here if you just
press button here. Now this is the light source, you can place them again. Similarly, you can copy
them from your shipped. A button in your keyboard and I'll press my
ship button again. If you just press a button here, it will be a perspective view. Now you can see my light has
been placed perfectly again, go here and go to this button. Now you can see
my light suss and the light bulb has
been placed perfectly. So this is another trick, You can use them in project
two other tips and a trick. I mean, if you have any object, you know a gizmo on the navigation in
Defi is pretty easy. In order to scale up or down
or maybe move any object, you just have to press here. From here you can go
to the scale here. Or from the arrows you
can move your object. Again, if you need to
change it to a scale, just press in your keyboard. If I just press here, you can see my gizmo has
been changed to the scale. From here, you can increase
it in order to a particular, or specific, or same
number of scale.
18. Chapter 13-Part 2-Tips & Tricks-Animated Files : The x, y, z. In
order to stop that, you just have to click here, and from here you can make
your own size, right? So this is a pretty impressive
and pretty easy hack. Just press here again, it will change to the
moving gizmo here. Again, there's another trick that is called if
I just press in the keyboard here under
the base color map. If I just press
this button here, you can see it has been the space transfer
function as SRGB. In order to change your color, you have to adjust
these colors here. But photorealistic rendering, there's another very
important thing. If you can enhance the
surface a contrast, that will be a huge advantage. Actually, if I just
press here and here, you have the option to enhance this brightness or
a contrast from the material and it feel
a glow up a little bit. For example, if I just
press this one and go to the base color map here, you can see now it has
been a more darker. Likewise, you can enhance color. Contrast it again if you have a very complex object. I usually when you have apply some material
surfaces or a texture, I sometimes say that it
has a very good curvature. But when you are
applying material from third party
from your library, you will have a lot of problems. But if you just press here, I just go here, there will be a trip. Just turn on this option. It will automatically,
will automatically try to correct you TriplanV
from this option. Usually it will blend with
the current surface here, but it will work and sometimes
it has been not working. I hope I will work on
that aspect again, there's another very
important thing is if I just press here, you have the option called
the round corners here. If I just enable this one. And if I move closely now we can see before applying
this tool here, it has been no round corners, it has been very sharp corners. If I just turn on
the round corner and you can see it has been how the effect
will be working. I mean, it's better
to have usually in our life or in our real life. I mean, there's no
such a thing as, you know, very sharp corners. But because of this option, you can apply this one. Another trick is, I mean you can import ABC animated
file to the Fi render. I mean, I have a separate
course for that as well. I mean, I have imported
from some files from the blender and I can
use these dote BC files. That means animated files inside the default render
in order to create. If you need to
create a story line, you can use sketch fab basets. You can use Aqui, you can use Admix Mo, and you can use the blender. And you can utilize them all
the dote BC files inside the default render to create a perfect story or a movie
or maybe any story line. I'll just show you
a very sample file. I mean you can check out my other course that is five vendor for
the advance rigging, you have to import it as a BC file if I just
click import here. Now these are some of the
files I have already imported. Now I'll make top downloaded. Now you can see it has been
uploaded to the five vendor. Now I'll double click here. Now this is my file. Actually it's too small. What I'm going to do
is I'll scale up here. Now you can see this is the total ABC file
with some animations. This is actually the
Spider Man here. Now I'll press here and I have to apply
texture separately. I'll just go the
base color map here. I'll apply some base color map. Now we can see it has
been applied similarly. You can have other adopt
ABC files as well. Again, I'll just press
here base color map. You can see you can
create a story line like this if you have the animation usually narrow mixamo
or the Ac will give you a large number of
animations for your model. From the Acc you can
create your character. Also you can check out my other course with
related to that. Similarly, you can have
multiple number of BC files to create
a perfect story. You don't have to depend
on the Fi assets. Usually for example, if you
just go to the human site, the animations are
not nearly perfect, but you can use character from
your own or sketch fab your fan favorite character, and you can download them
and you can utilize them in. And for the final tip, I need to talk about
one last scene. I have not used
precipitation in my lessons, I have not covered much. But this is actually a sample
project from the finder. I need to have
some precipitation here if I just call the environment here and you have the option
called the precipitation. If I just enable this one, you will see this
is actually in, this is actually the
snow from the rain. Your mouse going
to the left side, you will have the rain effects. You can increase the strength, and you can see all the
rain type will be here. Here you have a very
important option that is called pudding. If I just move closely, I'll just disable the
depth of field here. If I just increase the
puddle now you can see the surface has been
because of the in here. If I move it here, you can see there's
a lot of partly if I just increase it will
have a lot of part. If you just decrease it, it will be less puddle. Now, I'll have this one. This is actually the
precipitation in effect. If I just press this precipitation
into the white side here, it will be snow. Yeah. When you are dealing
with snow types, I mean, it's better to have some
third party assets, especially like
from the Quicksall. You can download them. I mean, for example, I have already downloaded some
of the assets here. So if I just press this one, you can see now I'm going to
apply some snow pile here. Better to have this kind of a realistic three objects which I have downloaded from
the Quicksall mega scans. And better, just
always remember, you need to change sky as
you are a snowing type. I usually you don't have very clear sky when you
have a rainy effect. And again, when you consider
about the tree types, better to use leafless trees, better to use some
dead trees like this. Because when snow thing happen, I mean usually you don't
have leads left in the tree. Again, if they're using some
humans or a threat persons, I bet to have this
rain coat better to use jacket humans with some jackets because it will
be more realistic then. Because as I told you earlier, in order to have a better
realism inside your project, your environment, you
people tread objects. All things matter, especially
the HDR skies matter. Again, you can use some
of the textures as well. Again, I'll use some
object for this area. I can see it has been
piled up like this. It's quite pretty realistic when you're using this
kind of snow effect. I mean, look alike some snow pile contained in front of this
wall, type here. Again, better to apply some textures texturing
for the snow here. What I'm going to do is
I'll just press here and I'll just apply
some other materials. Okay, score here. I'll just go to the quick Ya'll use the albedo map
for the base map. Okay, Now you can see it has
been changed to the surface. Again, you can use
the roughness and the normal map and
the D map as well. Similarly, better surfaces, it will reflect
your snow project as a more realistic way. Again, I hope you
have learned a lot of things related to the Fa
render from this course. If you are subscriber to the
previous course of mine, there are some tricks, you can learn very new things
to the Nd 2.5 and some of the things I have not talked about in my
previous course. You can use them
for the newcomers. It's a whole new journey. I hope you will master Fand
because it's a very handy, very realism is a
very good software. Very soon it will update to
the 2.6 I mean, there are, you know, speculations about new camera tools
and new objects. Likewise, in the
fan camera tools, again, there will be much more. I mean, they usually update the asset library
every day and they are committed if you have
a problem with to the different you can reach them
as well to resolve that. Again again, they are using a lot of new technologies
in their new updates. I hope you will learn about it. I mean, it's better to
have spare some time for learn this kind of a new software rather than
using any other software. The Defi is a very handy tool because a lot of live
sync options are available with the sketch a private Likewise,
there's main software. Again, thank you very much for subscribing my course this time. Also, I hope you will learn
if you have any questions, you can reach out
to me and goodbye.
19. Chapter 14-D5 Render 2.6: Hello everyone. This video
is quite special because, you know, it's not related
to the previous session. In this video, it's
purely based on the newest Find update that is Find 2.6 update very recently
released to all the public. Now in today's video, I'll try to justify the all of the features
that has been released to 2.6 since my previous videos has done through a 22.5 version. Since 22.6 version release, I thought of having
ideas to do a video. That's why I'm doing
a special video with related to the 2.6 update. The interface, if you're
familiar with the interface. If you have followed all
the previous videos, you can see there are a couple of changes to the
interface as well. The AI has been introduced to the render engine one by one. We'll try to talk
about these things. First thing, this is
actually the sample model. If I just click eye button in my keyboard and if I just press this button, you will see a very new option that is called the randomizer. What actually this is when you apply some textures
to some surfaces, usually from the finder, you will get a very
similar pattern when you are enlarging, when you are stretching
from this stretch also. But since the Nib update
randomizer has been introduced, I differences are like
if you see there, all the pattern
will be randomized. I mean these patterns are quite similar to the one pattern
and it will duplicate it, that is the randomizer before. But with the U randomizer, all the textures has
been randomized. Randomized. You can see it's quite handy feature when you are applying to
a very large area. It's better and it will
meet you for example. You can apply this effect
to the water as well, water material as well. So then you are waves are the old water surface will be changed according
to the randomized. That's quite a new option. You can see randomly
remote rotate and blend texture void repetition on the surface sets a
very big achievement. Thank you. Dfi team. Another good feature
is I mean AI engine. If I just click this
one and this is actually the final image similar to this we put my final
vendor will be like this. But since the newest update, if I just call the
environment here, you can see there's a new option called
the atmosphere match. That means similar
to when you're applying some LUT
for your model. It's rather hept in
the previous versions but with the newest version with the I introduced
to the vendor. I'll show you how you can do it. Just click this one here you will ask to upload
a reference image. For example, I have uploaded
this one according to this, the HDR K and the
old, the settings, the exposure will be adapted according to your
uploaded image. That's a really
good thing done by the defer render because usually if you are doing
something like that, I mean you have to
change the environment, you have to change the effect, and a lot of time will be
wasted because of this. But with this option now
I'll show you how you can up some images I have
downloaded from the Internet. Now you can see I have applied this swan and you can see it
will ask to snap current. I'll just press this swan
and I'll just generate it. Now it is being generated
within less than a minute time. It will generate my atmosphere according to my upload image. That's the magic of
D AI technology. It's a very, very good thing. We'll wait a couple of minutes
to apply these settings. Once this has been done, you will ask to
apply your settings. We'll see the
changes in a while. Okay, It is almost
completed now. I'll apply it now. You will see it has
now been applying. Now you will see some
changes to the material. Now you can see photo
realistic setting has been applied
because of my model. So it will match all things. I see the difference. I mean, there's a lot
of difference between the things or each has been applied in the
previous one, right? Similarly, you can do
multiple number of AI images to here and you can change your
environment according to this. Again, new function if you
just call the effects here. Now in previously you have only the option
called exposure, but with the 2.6 update, you will have the
highlight local exposure and the shadow local exposure. You have some two additional
exposure types here. If I just decrease it, you can see how it
has affected my area. And all exposure, the
highlighted area, the local exposure
will be changed again. If you change the shadow, you can see the shadow
exposure has been now, it has been really
nice because rather than changing the whole
environmental exposure, you can change the highlights
and the shadow zone. Okay. Again, if you
just assets here, you can see the particles. There's a new particle type that is called future particles. If I just click this one, okay, now you can see
it has been applied. The things you can
apply with the different 2.6 you have
a lot of options here. Again, if you just go inside and I need to show you a
very cool feature that is called the multimedia
material transparency. For that I'll just
go to the model here and I will go
the other here. And I will apply a
plane here, okay? I'll make my plane
a very small, okay? Make it read better. I'll it Now what I'm going to do is
I'll just apply some multimedia material here. Okay? If I just
go here and here, you have the option
called the multimedia. Now you can see from
the multimedia itself, you can apply a
video or an image. Now in, previously you have
only option that is video. Here you have the transparency. So what I'm going to do is
going to apply a video here. This is my video here. Click this one and I'll
make my transparency. Now you can see my
multimedia matter. Transparency has been changed. And you can see the, you know, ability to increase the
intensity and the decrease it. And you can adjust your color, temperature and
very nice features. I think about it, I mean, you can apply these things
to various materials, for example, you can apply this material to the
ocean type things. Or maybe if you go, maybe you can fire those things. You can apply. So this is
a very cool new feature. Again, if I just go the view here with a new option
call, I'll just go here. Clip three here you
have a new template that's giving us a different
type of camera movements. For example, if I
just apply this one, you can see I'll just play. These things are pre installed
templates for the video. You can very easily apply
these things again. If you just go edit here, you can change your
part as it will open camera angle because I have another
camera angles wise, it will give you very handy
movements. Camera movements. Likewise, you can customize it. If I just this one you
can see my camera, how it has been moving. Again, a very good movement. Again, I'll just
press this one here. And if I just go here and you have a new option
called the walk here. If I just press Walk here now, you can see from the
Ok, I'll just crazy. It is the walk mode actually. Now we can say this is
actually my walk mode. This is a very handy
function also, Again, I'll just press this one. I'll just go the assets here. I need to show a
very cool functions. I need to go to the model here. Just here, Okay. Now, I'm just going to the Y. And here, Okay, you have
the procedural generated Y. And I mean, it's a
pretty cool function because if you are applying
Ys in previous versions, it's a very heptic process. I mean, you have to select the surface,
you have to align it. But even though it's
very difficult, but with this function,
it's very easy. I'll show you how to do that. I'll just click this one. Now I'm going to
turn my pole here. Now I can see my pole here. What I'm going to do is
I'll just make it okay. This is my wine area. Just remember, you have to
appear this leaf type here, otherwise it will
not appear again. Now what you can do is
just call generate here. Now you can see it has been
generated very accurately. They have identified
old areas like this and it can
lower that as well. But because we have
applied this one again, if you just press this one, you have a new thing that is called random winds
and you can scale up, you can change the let
density random mangles and the length also can change. So it's a very good function, good feature which has
been introduced again. Another very good function is if you just go the
environment here. If you are applying
GM sky in previously, you don't have a custom
sun but you have it now. I mean, you can change custom sun setting from the GM
sky rather than the HDRI. Again, a very cool function. That is HDRI function. I mean they have
introduced a lot of a good quality HDRIs
to defer render. That's a pretty
good when you are doing some photo
realistic renderings. Again, you might have
learned a lot of things about Va Render 2.6
It's a cool function, just update it and
you can walk through all the stuff with things again. Thank you very much for
involved in this course. I hope you will learn a
lot about these things. And again, I will try
to update my course accordingly when
the new update has been released again.
Thank you very much.
 Krishan Pathirana, Civil Engineer, 3D Designer