Transcripts
1. Introduction: 14 years ago, a friend
showed me how to take a simple plastic bag and turn it into a yarn and
then crochet with it. And it blew my mind. I love the idea that I can take those bags
that I keep under the sink and use them creatively and make
something new and unique. Since then I made
a lot of bugs in all kinds of ways
and combinations. Hi, I'm Naama, I'm a graphic designer
and artist from Tel-Aviv. In this class, I'm
going to share with you what I know about crocheting with plastic bags and how to make the most of it. We will learn what
bags and tools to use, two methods of
making the yarn, Then we will make
a simple project, a cover for a jar to
make a unique holder. And finally, we will
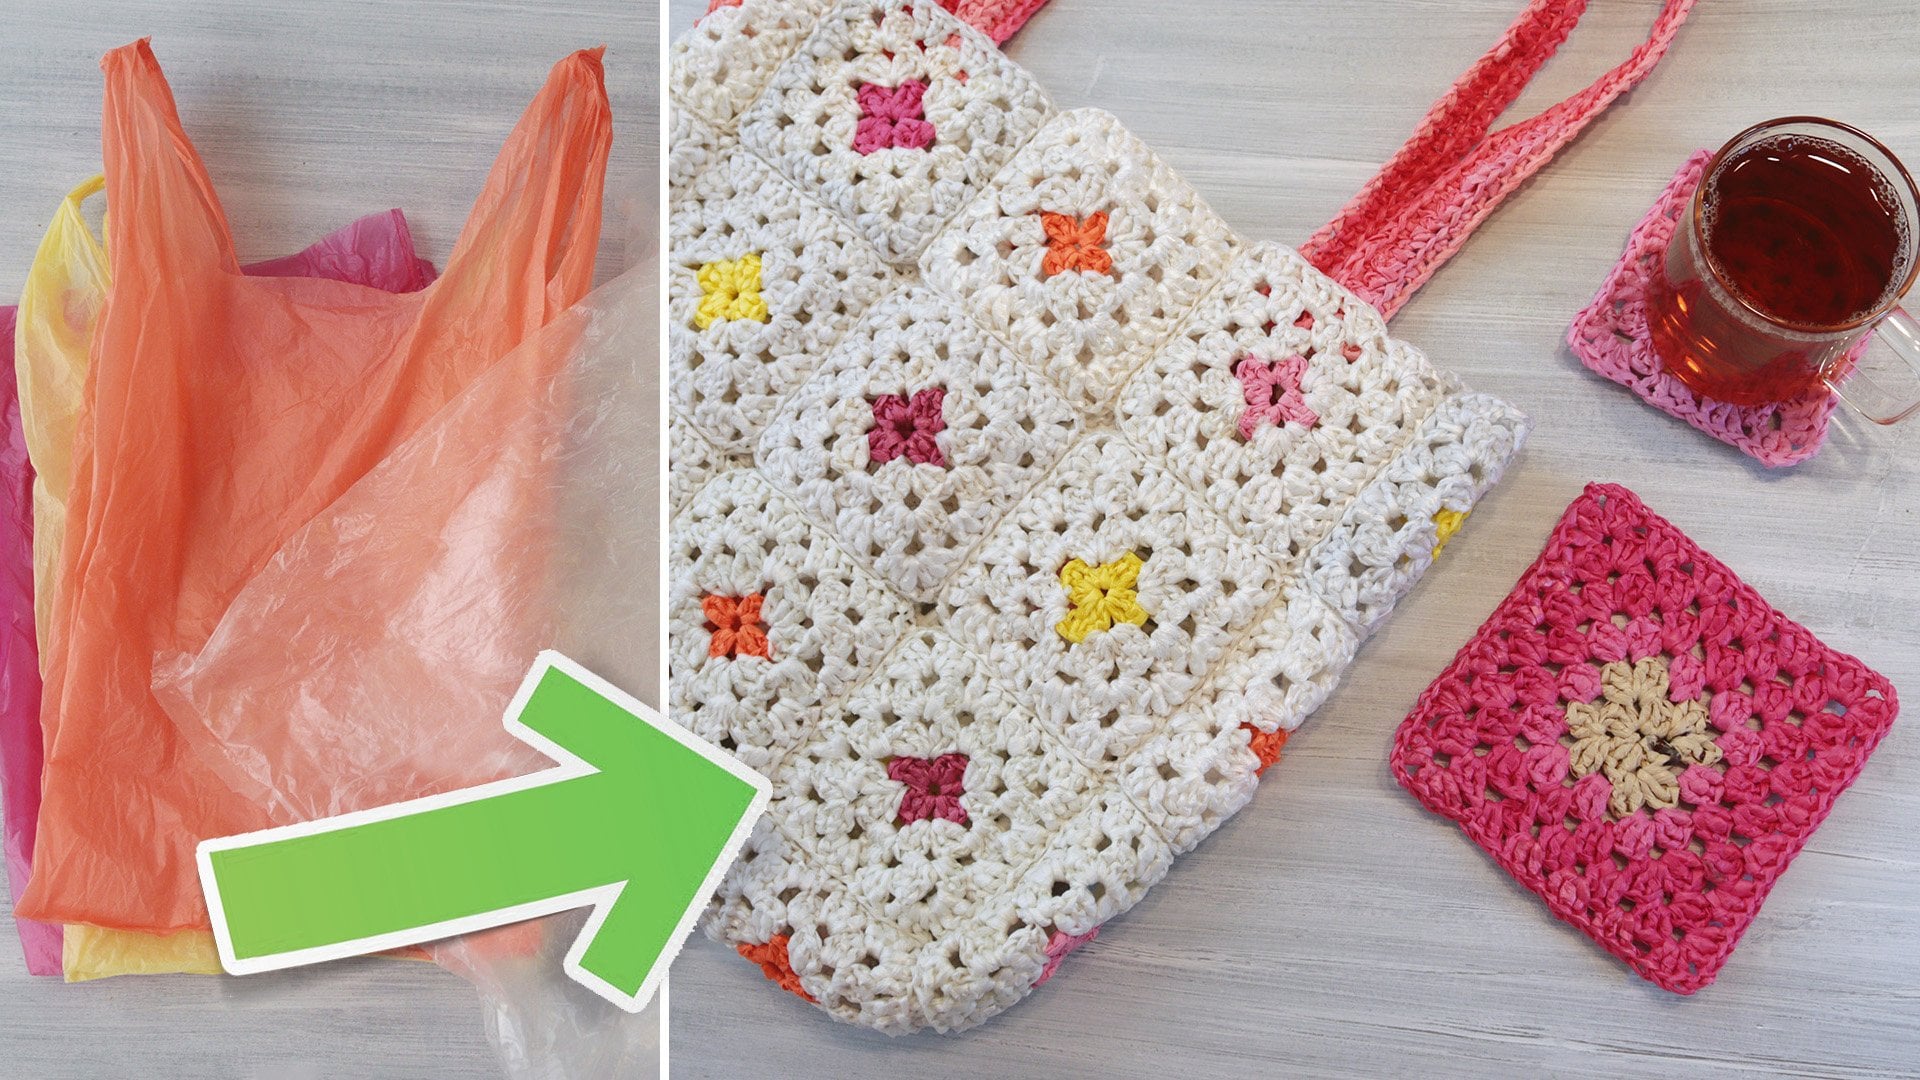
make a colorful bag. The material is a bit
different than regular yarn, So if you didn't crochet before, this might not be the
best way to start. If you have some
experience with crochet, this class would be a great way to make something
new and unique. It will surprise
everyone when you show them what you made and
what it's made of. You don't have to be
an expert at crochet. We will only use
the basic stitches I made the project
as simple as possible. There's no pattern. We don't have to count stitches. All you need to know is how
to make a start loop. Chain, single crochet, and slip stitch. That is it. So let's begin.
2. Your Project: In this class we will
learn how to make Yan from plastic bags. And we will make two projects
to practice that technique. We will make a cover for a
jar or another container. And that way we can reuse an
item and give it a new life. In the second project, we will crochet a bag. The bag I maid is medium-size, but you can make it
any size you want. The principle is the same. You can make one of the
projects or both of them. I recommend to try both. My main goal is to open
new possibilities for you. So you can crochet another
object and post that in the project gallery. I really like to
see what you make. So let's start.
3. Bags & Tools: In this video, I'll talk
about the tools that we need, the bugs that we are
using, are grocery bags. They are thin and soft.
There are bags that have uniform colors or white
with prints on them. Usually the store
logo and information. Please use only used bags because it's a
recycling project. If they are dirty or
have strange smells, you can put them in
the washing machine on a low temperature. If you like the
print on the bags, just know that the
washing machine will probably take
some of it out. There are also thick bags, some of them relatively soft, and you can also use them. I will show you how we can make a yarn from these types of bags, In the lesson called
the "grass skirt method". You'll need a crochet hook, of course, the size should be 5-9. For the projects I'm doing in this class I'm using this one, which is number five. But if you don't
have that one or you prefer to use a larger one, you can simply use a
thread that is thicker. I will talk about that
in the next video. We will need a yarn needle
or a tapestry needle. It is a needle that is
blunt and has a large eye. You will also need
a measuring tape. And most importantly,
good scissors. If you use simple officer scissors, it might be difficult because cutting plastic is not
like cutting paper. That is, it. The
list is very short. In the next video, we
will make the yarn.
4. Making the Thread - Loop Method: So we have our bags and now
it's time to make the plarn. Plastic yarn. There are several
methods to make the plarn. In this video I'm
showing the loop method, which is my favorite. It works well with
thin plastic bags, like groceries bags. In this method we
link loops like that. So when we change color, we don't have to
knot the threads. You can see that every
time I change the color, there isn't a knot. I just connected the loops. You can connect loos from different plastic bags and make interesting
color combinations. So let's see how it is done. I'm taking the bag
and flatten it, cut the seam and the handles. Now I can open it. So now the bag is a tube and I
want to cut along the tube. But to make it easier, I will fold the bag. Before we proceed, we need
to consider the hook. I want to use a small size hook. This is number five. I will need the plarn to be about one-and-a-half centimeters
or about half an inch. I just trim the edge here. I usually cut without measuring, but you can make a guide to
help you cut even strips. I cut a piece of thick
paper, half inch wide. I'm right-handed, so
I will hold it in my left hand and make
a cat with the right. It's about the
width of my finger. I will cut the rest without a guide. But now I can visualize
the right width. It doesn't have to be
precisely on the millimeter. If you want to use a bigger hook like number seven
or number ten even, then you should cut
the strips wider. I recommend that you cut one and then check it with
your crochet hook. The thread is sitting
nicely inside the hook. If the size is okay, I can continue with that guide and cut the
rest with that size. So I have this lovely loops. Now it's time to connect them. But I will connect
different colors. So you could see the
connections better. Open one of the loops, hold it close to the edge. I'll put a second loop. Insert one inside the other. And then take the tail
insert it into the top. And pull gently. If you pull too hard... I'll do it just now to show you. It will break. I'll do
it slowly one more time. I want to connect the second
loop in the middle here. I don't want to connect it here because it will be uneven. So I pull and hold it in
the middle of the loop. Hold it close and
connect the third loop, it may look
complicated right now, but after you do it a few times, it gets simple and intuitive. I usually hold it like
that in my left hand. And open the next
loop with the fingers of the same hand and
pull it like so. That is how it is done. In the same way you can
connect another ball of yarn. If you want to connect
a different loop, or you made a mistake or
you just want to change. You can separate them like that. Push them towards each
other, and separate them. If the knot is too tight or if you don't have the
time or the patience, you can just pull and break the last loop and get
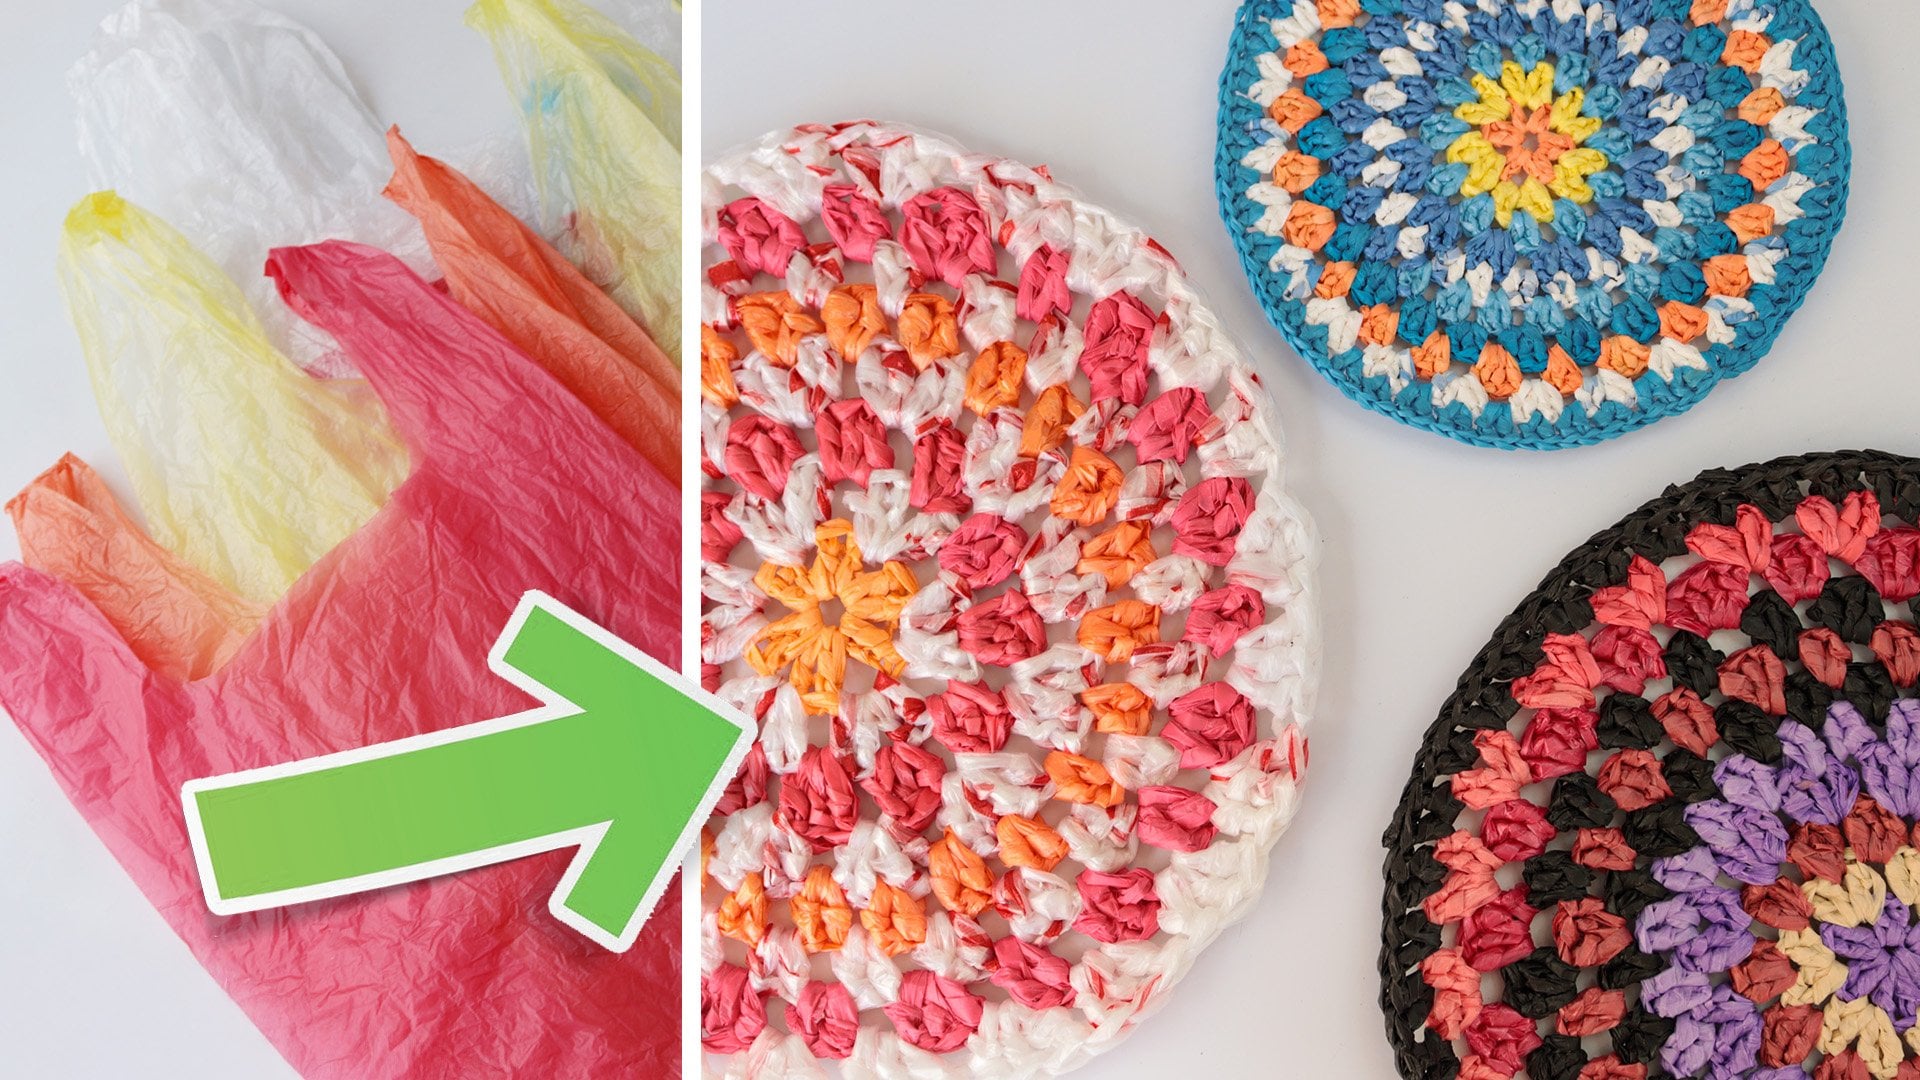
rid of what is left. Here are some examples of things I made using
the loop technique. I made tissue holder,
coasters, Jar covers, plant pot covers, and of course bags. So your mission is to
choose your crochet hook. Cut one loop and see if
it fits inside the hook. If the size is good, make a template to help you assess the width
of your loops. And then connect a few loops to make your first ball of plarn. Don't cut and connect all
your bags at this point, because you may want to combine colors from different
bugs later.
5. Makind the Thread - "Grass Skirt" Method: The loop method works
great with thin bags, but not so much on thick bags. But you can still make a
thread from those bags. They should be soft. There are bags that are thick and hard and it's not pleasant
to crochet with them. I will demonstrate
on a small bag so that the camera could
see all of it better. Lay the bag flat on the table, fold it, but leave a
small gap on the edge. First, we just cut
the seam of the bag. Now we'll make narrow cuts, but not all the way to the edge. Spread the folds of the cuts. At this point, it looks like a grass skirt, hence the name. At least that's how I call it. But if you know the method with other names, please write to me. Make a diagonal cut like that. And this is the
start of the thread. Now make all the other
cuts in the same way. That is how we make one
long thread from the bag. From a larger bag, the thread, of course,
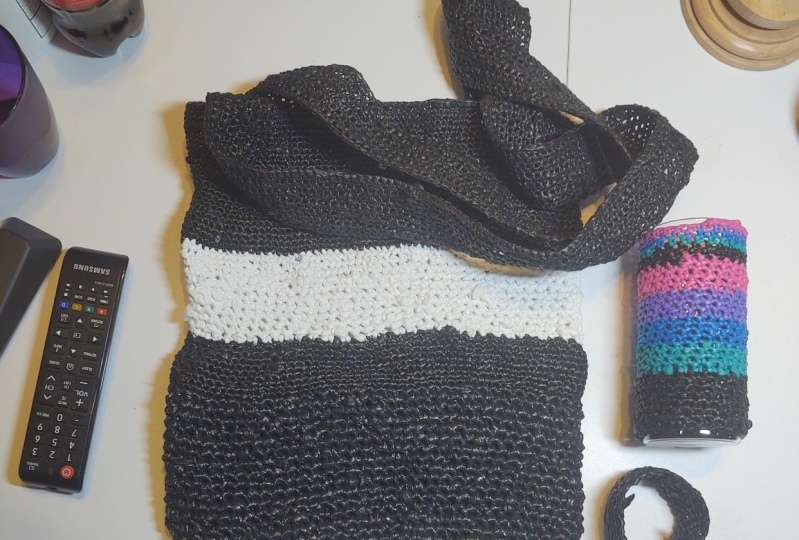
will be longer. And now we can use it to crochet colorful and unique projects. I made this jar cover
with a bag like that. And also plarn that I made with the loop method from
clear plastic bags. So you can combine threads
with the two methods. Here, I upgraded
a simple plastic box with a cover made of
toilet paper package. and toy store bags. This bag is also made
from toy store bags. Parents of babies have a lot of these packages and with
a pair of scissors, you can make interesting stuff. I hope I gave you
inspiration and some ideas on how to reuse bags that you
already have at home. Find a plastic bag and make
a ball of yarn from it With this method. I usually prefer the loop
method, but maybe you will like this one better. So give it a try. If you use this method
on a grocery bag, make the strips wider. Because in this technique, the thread is not doubled.
6. Plarn Vs Yarn: Now that I have my plarn, I can start creating with it
like regular yarn, Almost. There are some
differences between working with plarn
and regularly yarn. One of the limitations
is the bugs that I have, and the colors that are
available to me right now. It is a recycling project. So I don't go out and buy
plastic bags for my project. But I can choose which bugs to use and how to combine them. I can crochet with the same bag, one continuous line,
and then the next bag, and the next. I can do large
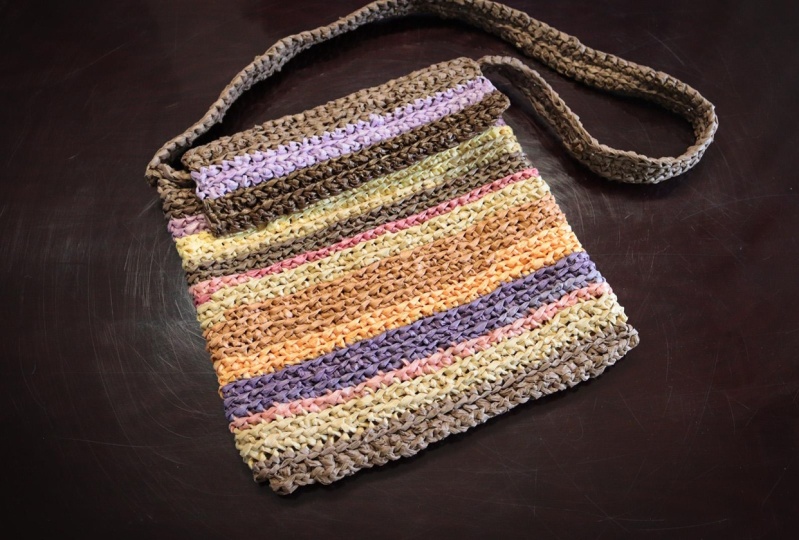
sections with the same color. If I have a lot of colorful
bags to choose from, I can make a gradient like that. I can use the bags
that have prints on Like the logo of the shop. Here, I combined colors
from the same family, But I can put together bags that are not in the
same color family, but arrange them
in a pleasing way. Another way is to mix
loops from different bags. Every section here is one loop. It has really nice texture. So although I have the limitations of
the bags that I have, I can make creative choices
on how to use them. Another important
thing is that you can't pull the thread
with too much force, the plastic will
stretch and break. So if you want to
make a magic ring, use regular yarn
for the magic ring, and continue to crochet
with the plastic yarn. Another thing to be
aware of is to take the whole thread. Because
it is made of loops the thread is double. So pay attention not to insert the hook
between the two parts. The material is plastic so
it's not as soft as yarn. So you can't crochet
things that you can wear, But you can crochet
accessories like bags, hats, and household items
like coasters, covers for plant pots and jars, lampshades, and so on.
7. Crochet a Jar Cover: I gathered some plastic bags. I have some blue bags and
I have some with print, blue and black print. I think it will go together well. The print has faded because I washed the
bags in the washing machine. To make it more interesting, I want to add another color. It is from the opposite
side of the color wheel. It doesn't have to be with
a complimentary color. Try to put your bags together and see what
combination you like. These are a few
examples of pieces I made with bags that
I had at the time. I'm going to make a
cover for this jar. Crochet a chain. That will be
the circumference of the jar. I will use a crochet
hook, size number five. So I'm going to cut the strip in the width of 0.5 an inch, or about 1.5 centimeters. I have my ball of plarn and
I can start to crochet, making the first loop. Gently pull up the
thread to close it. Not too tight. I hold the tail of the
thread to give it a little tension.
And I start to chain. Pay attention not to insert the
hook between the two parts of the thread. Take
the whole thread. The chain is now exactly the
circumference of the jar. But I want it to be more tight, because the cover
needs to be a bit tight, so it will be held in place. I'm going to take out
one of the chains. Almost. I want to
take out one more. Now there is a gap of one chain. That is what I need.
Before closing the circle, make sure all the chains
are facing the same way. Close the circle with a slip stitch. From now on, I'm going to crochet single crochet
in the round. When I get to the end of a row, I can decide if I want to keep going with the same
color or change it. If I want to change, I can wait to the end of that section. Or go back a little
and change there. To separate them. I push the two sections
against each other. Then untie the knot, changing to a lighter blue and continue with single
crochet all around. I want to finish the
row and I want to end here above where I started. To make the final stitch, I cut the thread, pull it out. To make a nice last stitch. I insert the hook from
behind, pull the thread in. And now I insert the
hook from behind, but only through the top loop,
and pull the thread in. That way, the last stitch
looks like all the others. To hide the ends of the thread, I can use crochet,
hook, or a yarn needle. But first I will turn
the cover inside out. The stitching looks
different on this side. So if you like that look better. You can make this
side the right side. I will use a smaller hook. It is easier this way. The second one with
a yarn needle. So you can see another method. By the way, I made this
wallet with plastic bags to make it easier to
insert the thread. First I fold it on the needle. And now there is a nice edge. That tail is a bit short, but I will manage. Take care not to puncture
the thread, to get under it. And it's time to dress up the jar and complete
the makeover. I completed this one. And I made another one
for a different jar. But this jar has a narrow top. So I want to make the last row of the cover a bit narrow too. I'm going to decrease
the stitches like this. Get into one stitch. Pull it a bit high so it
will not be too tight. Get to the second stitch. Then close all the
three loops together. One... two..., and close them together. And now it fits better. I really liked the results
and I had more bugs. So I made a complete set. Now, it's your turn. Find a gar or a container and
crochet a cover for them.
8. Tip: Tissue Roll Dispenser: In this video, I'm going to show you a little trick
with tissue home. It's not related to
crochet that I found. It's very useful. I made a cover for
this container, has a date in the
gel cover lesson. I made it a bit smaller, so it will hold the
container and not slip of this tube is the perfect
size for tissue role. So I want to turn it into a tissue role dispenser.
This is how I do it. As quizzes the role, the role in the
center have a gap. Then I can insert my fingers and separated from
the tissue paper to get it into the box. I squeeze it a bit. And now I can use it. I just hold the paper
from the center. The tissue role doesn't
roll around on the table. It stays in place
and it looks nice.
9. Crochet a bag: I have these balls of
plarn that I made for a previous project, and
I will use them now. I start with a loop to crochet the base
row of the bag. I'm creating a chain. I'm not going to
count the chains. The length that I need
is 56 cm or 22 ". That will be the
circumference of the bag. Now I have a chain
that is 56 cm long. And like we did
with the jar cover, I first straighten it. So all the chains will
face the same way. I will close it to a
circle with a slip stitch. I have the first row now. I can choose either to
continue the next row with the same color or make a
change like lighter color. I will continue with
the same color. From this point on, I will crochet in the round, and I will not mark the
beginning of the row. I just go inside the
first chain and continue with single
crochet in each chain. And I will continue
to do so until I reach the height
that I want for the bag. Because there is no
complicated design. I don't have to count stitches. I can relax and listen
to a podcast or music. Oh, just meditate and
get lost in my thoughts. I got near the end and I
have the length that I want, 28 cm or 11 ". I decided that this side
will be the front side. I want the row to end here. I put a paperclip. To close the bottom of the bag, turn the bag inside out. Use a yarn needle or a crochet
hook to tuck that tail. For the bottom, you
have some choices, like creating a rectangle
and sew it to the bottom. But I'm going to do
something much simpler. I can sew that
with a yarn needle. But this time I'm going to connect them with
a single crochet. Just a reminder, the inside
of the bag is facing out. For some reason this is
called the wrong side.
Insert the hook into both
of the parts and proceed with single crochet stitch all the way to the
end of the row. Try to say: "three
single crochet stitches". Just for fun. I tried to incorporate
the end of the thread in this way
I'm hiding it as I go. Pull the thread through the
last loop to make a knot. I can leave it like that, but I want to give the
bottom a little bulk. So I will sew it here, about 3 cm. I did the same thing
in the other corner. And now when I flip it back, it has a nice flat base. Now the bag needs two handles. One of the ways is
to braid the bags, make wide loops, connect them. Then braid three of
the ropes together. I made a little flower here. You can chain a small row and keep crocheting
back and forth. But what I'm going to do
is make one long row, then go back until the width
will be about five chains. When you measure the length
of the handle that you need. Remember that over
time it will stretch. Make the handle a
little shorter and a bit wider than the final
result that you want. For the handle, I
crochet chain that is 71 cm long or 28 ". I got to the end of the row and now I will crochet
it the other way. Make one chain in the air. Get into the second stitch. Keep with single
crochet in every stitch. So I finished making the handle. It should be about
five to six rows depending on the
size of your hook. And of course you
can make it narrower or wider. It's your decision. The two handles are finished. To connect them, I will turn
the bag inside out again. I will add the handle like that. The same on the other side. Don't insert the
needle all the way to the other side
because the thread will be seen on the
front side of the bag. And that is it. The bug is ready. Now it's your turn. Your mission is to gather the plastic
bags that you have, make a plarn and crochet a bag. If you have more
experience with crochet, you can try different
stitches and designs.
10. Q&A: Thank you for
watching this class. Before we go, I want to
address some questions that you may have about
crocheting with plastic bags. What to do with the leftovers? We use most of the bag, but there are still leftovers. You can save them to
use in another project. Like using them as
a filling material. Or fusing them to
make plastic sheets or art. More about that
in a future class. If you don't want to keep them, gather all your
leftovers in one bag. If you don't have a recycle bin that includes plastic bags, then close the bag tightly and throw it in the
regular garbage bin. How to wash the items? You can wash them by
hand or put them in the washing machine on a
low temperature or medium. Don't put them in the dryer. It's usually too hot and it may affect the elasticity
of the plastic. Hang them to dry
outside, but not in direct sunlight for
a long period of time. How to keep the thickness
of the yarn uniform? Different plastic bags have
different thicknesses. Thin bags will
produce thinner yarn. So if you mix two kinds of bags, cut the loops of the
thicker bags a bit narrower. Can you make a pocket for a bag? With a pocket, you can easily access small items you need, like keys and the phone, without having to dig through
the entire contents of your bag. Attach the pocket to the bag
by sewing it on, with a yarn needle
or by crocheting it on with slip stitches along
the edges of the pocket. What I made doesn't look
like what you made! Fantastic. Your project
is one of a kind. You have different
bags than I have, and you'll make your own
personal creative decisions depending on your taste. So different is good. Post a photo of your
creation in the gallery. I'm excited to see
what you make. If you have a question I
didn't answer in this video. Please post it in
the discussion tab. I hope you enjoyed this class and that it gave
you ideas on how to reuse materials that you
already have and how to upgrade and reuse objects
instead of throwing them. And finally, please
leave a review. This will help me know what you think and how to
improve my classes. I appreciate your opinion. So thank you.
 Naama Yaffe Mendelboim, Graphic designer and artist