Transcripts
1. Welcome! Let's learn to Crochet: Hello, and welcome
to this class. My name is Heidi, and I am here to teach you on how to crochet. For that, we are learning
how to make this beautiful banding
in triangle shape using the granny stitch. I will guide you to
the whole process starting by the
materials you need all the basic teaches
for crochet that you will use during the class and more that you can use
for other projects. And I will teach you also how to join the different panting
that you will be creating. If you have an idea
of making a garland, then I will show you how
to join all of them, and you will have
super super fun. Crochet is a beautiful skill that will allow you to create wonderful things for
your home or for yourself as garments
or accessories. I am happy to have you in class, and I hope you are
ready to learn a new, wonderful skill to add to
your crafting materials. And I can wait to
see what you create. Remember, you can follow
me here on a skill chair, so you don't miss
any new update or any new class that I am
teaching and chaing with you. I can wait to see you in class, and I will see you in
the next video where we are talking about
the materials. And then I will do a
preview so you can see how this class
process will unfold. See you in the next video. O
2. Materials: For the project, you will need jar in any size as
you wish or you have at hand and a croche hook, according to the
size of your jar. Normally, the size is briten on the description for the
jar you are using Tiss. And a tapestry or jar needle
to whip all the ends. Mi also want to
have another color to make a multicolor banding, and I have another color. I will show you how to do
and how to connect them. I will say you in
the next video.
3. Basic Crochet Stitch: Slip Knot Slk: Let's make a slip knot. Grab your jar and go around your index finger
and cross over, making an x on the front. Then grab the loop
above and pass through it the other
piece of the jar. Then pull it and make it tight. This is the slip knot. I will say you in
the next video.
4. Basic Crochet Stitch: Chain Ch: L et's make a chain. Grab your hook and grab the slip node with did
in the previous video, and insert the hook into
the loop we made before. With your hook, grab your jar, and pastogen through the loop to make this beautiful chain. This is a chain, and we are going to
repeat this process until we complete the number of chains we need
for all projects. In the case of this class, we are chaining 25 to
start our project. Here you have it. Easy it
is to create your chains. I will see you in
the next video.
5. Basic Crochet Stitch: Single Crochet SC: Make a single crochet, insert your hook into the change that you
have underneath, and then john over. Now you have two loops in
your hook, grab your ang, jo over, and pass through
all the two loops. Again, insert the hook
in the loops, an over. Now you have two
loops in your hook, grab your jar, and pass
through the two loops. We are going to repeat this a couple of times so you
get the hand of it. Inside in the chain. Now you have two loops, grab your jar, jar over, and pass through the two loops. Inside the hook, two loops, and jar over, and pass
through the two loops. A, and this is the
last single crochet. I will see you in
the next video.
6. Basic Crochet Stitch: Doble Crochet DC: Make a double crochet, we do the following. John ber, insert your
hook into the change, stitch, then john over, pass through the change, and now you have one to
three loops in your hook. John over, pass the jar
through the two fierce loops. Now you have two
loops in your hooks. Again, jon over and pass the through the
remaining two loops. This is called the double
crochet. Let's do it again. John over, insert the hook
in the change, Jo over. Pass the an through the change. Now you have three
loops in hook. John over and pass the jan
through the two loops. Now you have two loops
remaining in hook, john over and pass the jan through the two remaining loops. This is how it start to look. Let's do it again. Jo over inside the
hook in the change. Now you have three
loops in your hoop, turn over and pass the jar through the
two remaining loops. Again, turn over, pass
to the two loops, and then to the two loops. You will repeat this as many times as it is
called in the pattern. I will see you in
the next video.
7. Basic Crochet Stitch: Slip Stitch Sls: To make a slip stitch, insert the hook in the
loops on your chain. John over and pass the jo
through the two loops. Now you have two loops in
your hook and pass one of the loops through the other
loop. Let's do it again. Insert the hook into the change. Jo over and pass the
j through the loops, and then pass the loop
in the other loop. Insert the hook in
the change, J over, and then insert the loop
into the other loop, and this is called
the slip stitch.
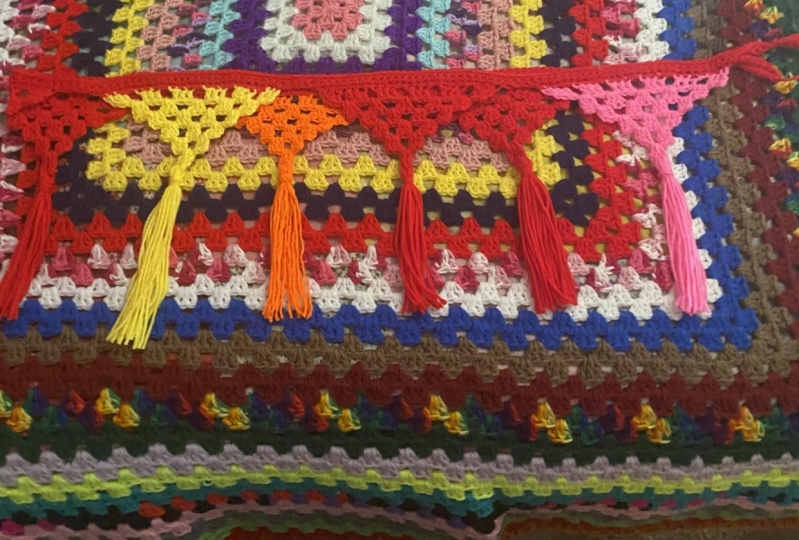
8. What we are doing - Preview: To show you before we
start with our project, what we are doing, actually. This is what we're doing. We are doing a
triangle shape bunting using the granny stitch stitch, which is consist in
three cluster of three double crochs
separated for a chain, skipping a chain and then
forming the next cluster. You will get this better
when we start the class, but I want to show
you how this looks. For this, I use a cotton jar, and I use a hook four
millimeter in size. This is the hook that
this arm ask for. For this particular
bunting, you can see, we have one, two, three, four, five, six rounds. We are standing phone
above, then going down. And we are decreasing so we
get the triangular shape. Depending on the and you use, er banding can look
very different to mine and depending on
the length or chain, urbanting can be
bigger or smaller. I will show you next. As you can see,
all these pantings are in different sizes, and some of them have different number of rows
that we are crocheting. This is the biggest one. This is the smallest
one. This one. For this I change change, you will understand this better. I change a chain
foundation of 29. For the formula for
creating the bands consist on chaining even number and then adding one chain more. From that, just start
constructing ger banding. Then we start with the rows. We s these clusters
of three doubles, making them in the spaces for the stitch we skip
in the row before. Always we decreasing. That is why we are looking as we are getting this
triangular shape. For this one, I change 29, meaning I have one, two, three, four, five, six, seven clusters of
double crochet. For that, I have one, two, three, four, five, six, seven rows of clusters
from this double crochets. Because we are decreasing every time I go to the next row, I will have one
cluster less two. Here, I have seven clusters. Here I have one, two, three, four, five, six cluster. In the next round, I have one, two, three, four, five cluster. In the next round, I have one, two, three, four, and so on. Three, two, one. Always,
I am finishing my work with one cluster
of three doubles. In this one, I have one, two, three, four, five, six rows. In the starting row, round round number one, I have six cluster. In this one, I have seven rows, and I have seven cluster. You can have this in mine, so you go, you can count easier. Then I have here one, two, three, four, five, six clusters, and I have one, two, three, four,
five, six rows. In this one, we have seven
clusters at the beginning, and then seven rows.
As you can see. For this one, I
change 21 change, and then I have one, two, three, four, five clusters of double crochs for my granny stitch stitch. I have, of course, one, two, three, four, five rows. As you can see, this
is the smallest one, is because this one is
made with a smaller jar. These two are made the same
way with the 21 change, but the size of the
jar is smaller, so my banding looks smaller. For that, you have
different hooks sizes. The smallest one and other. But organ when you buy
organ in the package, it always will tell
you which hook is the recommending hook
for the jar you are using. Pay attention to that
because that will make your work neater
and beautiful. For the class, we are
working with 25 change, and you will have
something like this depending on the size of organ. Well, let's speak, I hope you
understand this. Very well. If you have any question, please ask me a question in the section for your
questions below this video. I will see you in
the next video.
9. Triangle Granny stitch Bunting: Chain 25: Welcome to the grass. I have here my jar and my hook, and I will start by doing a slip knot to start
chaining 25 chain. If you don't remember
how to do it, I explained just how to
do it very clearly in the basics of stitches for crochet in the
previous videos. Please refer to those. Now I will start chaining 25. One two, three, four, five, seven, eight,
nine, ten, 11, 12, 15, 16, 17, 18 19, 20, 21 22, 23 24 and 25. Now I have completed my chain, and I am ready to start all beautiful three younger
granny stitch bunting, and I will see you
in the next video.
10. Round 1: Starting to crochet the Triangle Bunting: Round number one.
We are going to be placing a double crochet in the fourth chain stitch
from our chain 25. One, 23, four. Here, we are placing
a double crochet. John over, go into
the change j over, and I will place the double
crochet here. This is one. Then I will place
another double crochet in the follow chain stitch. John over and john over and pullthrough and
on over pull thru. I have one, two,
three, double crochet. C chain one, and now I will
ekip one chain stitch, and I will place
another double crochet in the follow stitch. One and two more. We are creating clusters of three double crochs as keeping one stitch and
then chaining one, and then placing three
double crochs again in the following three
chain stitches. This double croche
then chain one, and again, where I
will show you, one, two, three do crochet, chain one, ekip one stitch, and then three double crochs, chain one, and Eskip one stitch. Then in the next stitch, we're placing again, one, two, three, double croche. In this way, we are creating clusters of
three double crochs. For doing or first round for triangular gran
stitch bunting. I completed the three cluster double crochet
then chain one. Again, skip one stitch and placing three double crochets
in the three next stitches. One do crochet in every three of the three
chain stitches. Don't forget to chain one. When you complete the clusters. Chain one, and we have. Here, 123, first cluster, chain one, one, two,
three, chain one, skip one stage, 123, chain one, skip one, one, 23, chain one, ski one st, 123, Chanin one. And we're repeating
this until the end of our 25 chain foundation. One, Dcroch, two Dcroch, and three double
croche then you go. Chain one, ki one stitch, and now we are completing the last cluster of
three to croche. I hope it is getting
easier and easier for you. Remember, you can
always practice all the basics stitches with the single videos
for the basis that I show you at the
beginning of the class. Here, we are not chaining one. We are just finishing our last three crochet and
or last three p cluster. We have one, two, three, four, five sex cluster of this. Now, I will see you
in the next video to continue our
beautiful projects.
11. Triangle Granny stitch Bunting: Round 2: Now turn your work flip
to the other side, and we are going
to be placing here three slip stitch in the
next three stitches, starting with the first
stitch closes to or hook. This is one, this is two, and this is three slip stitches. My got a little bit
of splitting here. Now we are also slip stitching
in the chain space once, and then we are going to be chaining three, one, two, three. This is our fierce double
of or fierce cluster of three do croche We then are going to be placing two cross more in the same
space as stitch like this. Then chain one and
repeat the same in all the chain
spaces to follow, placing three double crochs, in all those spaces, and then chaining one and
going to the next space chain. With this, we are decreasing
or clusters to five. In this second round, we are completing five clusters of three double
cross, like this. In every chain space, we are placing three dobrohs, then chaining one and going to the nest to the
next chain space. So easy is this,
and so much fun, and this work out so
quickly that you will be making triangles
like a machine. This is a very fun project and I hope you are
having super super fun. I hope the colors
that you choose for e panting are vivant or pastels, will make also a beautiful
panting if you are planning to decorate your home or a
party or whatever you want. E banding garland to be
displayed. Chain one. Then last cluster of three double grochs in
the last chain space, Remember, we are no changing
one in this last cluster. This is how we have until now, and this is our second round. We have five cluster of
three double crochs. In the first round, we had
six cluster of doubles. I will see you in
the next video.
12. Triangle Granny stitch Bunting: Round 3: L et's start the round
three. Turn your work. Now we are ready to
start a slip stitching in the next three stitches. As you can see, these
are the stitches on the top of the
double crochet, D did in the last round. You have an idea
on how this works. We do next as a slip stitch
in the space change, and then we chain three,
and add two more doublross. We complete our three
doubectros, clusters, which are the basics for
our granny stitch pattern. Then in the chain one,
and then in the next, space, we add three
more dobleross. Then chain one, and again, repeating or clusters of three double cross in
every chain space. The last one of this
round to complete or clusters of double
creches or round three. Remember, you don't
need to change one in the last one
in the last cluster. Now we have three rounds and
we're decreasing or work. I will see you in
the next video.
13. Triangle Granny stitch Bunting: Round 4: We are now at the round four
and to begin to new work, and we are doing the
same as we have been doing during all the
previous rounds. First, we slip stitch in
the next three stitches, and then we slip stitch in the space chain to start
creating or clusters. Then chain three and two more double crotches
in the same space. To form the gran stitch,
and then chain one, and move to the next
space stitch or chain, and add three double crechester again, and then chain one. And then the last in this round three Drachs
in the spay chain. Our banding is taking now the triangle shape that
we are looking for. This is how it is looking now. We have four rounds, and I will see you
in the next video.
14. Triangle Granny stitch Bunting: Round 5: For the round five,
turn your work. Now we are slip stitching in the first three
stitches that we have, as we have been doing
and all the rounds. Now you can see that
or banding is taking the triangular shape and we are having less and less
clusters to make. Then we continue slip
stitching in the chain space, and then chain three, and then adding the
two double cruces. And then chain one, and going to the next space chain to make our cluster of three double
egress for this round. Now we have one,
two, three, four, five rounds and every
time is getting easier for you to make the
clusters because we need just to
make less and less. I will see you in the next vivo.
15. Final Rounds: Round 6 and 7 for the Bunting: Round six and the final
round for us to make. Turn your work, and as always, we are a slip stitching in the
first three next stitches. Then a slip stitch
in the chain space, chain three, and then
adding two double a crochs. With this, we complete
the all the rounds. Now we are just turning or work, and a slip stitching in
the next two stitches. This is to secure or
work. One and two. Now we chain one, and then pull the
strand a little bit, leaving a long tail, then cutting the yarn, and pulling it with our
hook, making it tight. I will see you in
the next video.
16. Adding a simple Tassel : Time to add the simple
tassel with jar needle, take a strand of jar and cut a strand as the same length of the jar strand you
have in your inj banding. Cut it with your scissors. Then with your jar needle, just go through the stitch, where the long tail
that you leave in ban is and then pull the jar
one side of the jar. Take off the jar needle. Try to accommodate the
length of the three strands, and then pull a cannot. To secure the three
tassel strands. This is a very simple tassel. This is not the fluffy
and very fat tassels. You can do it if you prefer. I just living that
way and you will see why when we see how to use the bans and garland that you don't need
to make a big tassel. You can also add a bead on on the base of the tact
to make it cutter. But for now, I don't
think it is necessary. Now let's just whip
this tail from panting, with your hook, or
if it is longer, you can use your jar needle. Just go through the
stitches one by one and not pulling
it too tight. Hiding those extra
jar that you have. So you work, looks
neither and clean. To as many rounds as
you need depending on the length of this tail. And then you can cut
the end if you need, or you can just
hide it very well, so it doesn't unravel. So we can say we
have finished or first triangle granny
stitch banding, and now we are ready
to assemble this, make more and joining it with
other banding we have done. I will see you in
the next video.
17. Crocheting A Bunting in Real Time: Now that you have done your fierce banding
with me step by step, let's take a look at how
it really is to create your crochet tangle granting panting from the
beginning to the end. I wanted to show you the
whole motion in real time. I am crocheting and you
can see the first step, which is the slip note
and then chaining 25. Then I can start placing my first double crochet
in the fourth change from my hook to start the clusters to
create the bunting. This is three, and then
chaining one kiping one stitch. And placing one double groche
in the next three stitches, creating the second cluster
of three doublerchs. This is the gran stitch stitch. T doblrochs, and single
crochet stitches. Chaining one and then keeping
one chain and placing the next three doublerchs,
to form cluster. Remember we are creating six clusters of three double
cross plus one chain. As a beginner, you may find
this a little bit fiddly, but trust the process and
goes slow if you need, help yourself with your hand, and you don't need to rush
because you are learning, and the more you practice
your stitches, the easiest, it will be for you to
and to croch And does happen with everything you
learn at the first attempts. You will find it very difficult. But when you get practicing
your brain to the path, the part of your learning, then you will find
it to be very, very easy, and then you can you can start using
what you have learned. This is amazing
how our brains can connect the dots without
doing almost anything. You can watch the video and then post the video
or make it slower. So you have a more comprehensive view of
what is happening. Here, we turn our work and
place the three slip stitches, and then the slip stitching in the space, and
chaining three, and then adding two
double crochs to complete the cluster of the second round, chaining one, and start placing three double crochets
in the next chain spaces. This is my real time
speed when crochet. I wanted to show you
how it looks really for me to make these bands. So you feel encouraged to try
it and to practice it and to really try something
new and enjoy the process. It is not that I
am doing this fast is just like when
you practice enough, then your brain do the work and your hands and all the
coordination that happens without really being managing or micromanaging every movement. Here, let's continue slip stitching in the
three first stitches, and then slip stitching in
the space and chaining three. And then adding two
double creches, chaining one, and doing this
until the end of this row. By the end of this class, you must be dreaming with this instruction because you are hearing this and
hearing it and hearing it. That is what I want
to do with you, so you ingrain that
into your brain. So you don't need to
think, just your hands. Very relaxing and very
therapeutic process. Now, round four. And we are doing the same. The J got a little
bit fit in here. So and starting to
make the clusters. Chain tree, and
two double crochs. As you can see, the more
the advance in the rounds, the less cluster you need to do, and the easiest it gets with
the stability of the work. Had you noticed
this, I hope you do because that gives you
the sense that you are managing to get
the stitches correct. Another round is t. Then
let's go for the fifth round, starting always with
this for all the rounds. Then starting the clusters, and enjoying the
process, of cose. And the last round round six. Slip stitching in the
three first stitches. And then making
the first cluster, or the only cluster
we need to do in the last drown to complete or banding with
this triangle shape. Then the last part, slip stitching in the
next two stitches. Then chain one, and a tail, I want to show you how it looks. That is why I am rotating this. Then leave a ten as
long as you want, as short as you want. Then pull the jar and
tight and fasten off. Adding the other three or two or four or five or
whatever number of trans you want to make the tale a bit more plumpy and beautiful. With your hook placing the
jar in the same stitch as the last as where you have strand. And that this
complete dar tussle, then a slip note. It doesn't need to be perfect. It's just to give a more
festive bite to the bating. You can also avoid adding a
tussle if you don't want to. This is just a decoration. So this is the real time when
I am making my triangle. Hope you like it. I will see you in the next
video. Thank you.
18. Joining the Bunting Garland: Here I have three
triangular bantings to show you how to
join your pantings. You can make this as long as you want, doing
multiples pantings, or you can do only in the same color or
multicolor or different color, a rainbow palette,
whatever you want. The distance between
the panting, you can also decide by the number of
chaining that you do. We are going to start by
chaining ten stitches. This is to hang jure banding. Here you can do the fierce
chain stitches as long as you need depending on where you are hanging e garland
when it is complete. You can do 15 chains or
20, whatever you want. We are doing here ten. Now with my hook, I am inserting it in the fierce stitch and then
pulling the jar through it, and then I have two
stitches on my hook, and then I will
pull ja through it, doing a single crochet, and we are going to place
a single crochet in every stitch we
have on or banding. Thats meaning we are single crochet 21 single crochet across the base of or banding. To make the joining
of the bantings, you can use the same color
of your banting triangle, or you can play with it
and use different color or a neutral color to make it
more cohesive if you want. Don't hesitate to use your creativity and
let your maine and your creativity flows as
to create your panting. If you're using it for
decorating your home, then try to maintain the colors according to
the colors to use at home, or if you're using
it for a party, then go with the
vibe of the party. This is very versatile. You can really make
wonderful things with this simple pattern
There is really no limit for your creativity to go wild and play here around. We are almost completing all the single crushes
on top of or bunting. And now tone. This is how it is looking and Now to connect or fist
banding with the second one, you need to decide how how apart you want
your banding to be. In chaining here five stitches, making a change
of five stitches, and then connecting
the next banding with a single crochet as
we did at the beginning. If you want your
banding to be closer, then just change less stitches and if you want them
to be more apart, then change more chains. That is the easiest
explanation we can do here. Then we are continuing single cru across
the next banding. As you can see in the video. In every stage, in
every chain stage, we are adding a single crochet. So simple and so easy and looks really so
beautiful and cheerful. I am using, as you can see, I am using the same color of my base color for the
bantings, which is the pink, and I have this peach color for the second color of my bans to make a
little bit of contrast. And you could use
the same color after second color if you prefer to maintain all in the same change. But I find it more beautiful
making this contrast. We are finishing
it and then adding the five change because I want
them to be this far apart. Remember, you can play with
the length of the change, adding more or less change. Stitches. We are then
connecting the next banding, using the same technique, adding a single croche in
the first stitch and then continuing adding a single
croche in every stitch. We have for banding. So easy it's this. If you don't remember how to do the single cruce, remember, you have the basic stitches coche videos
at the beginning of the class and look for the
single cruce stitches video, you will get more slow pace show in the bd and explanation
how to do it. By now, you must be a
master on the stitches. Having fun, please let me
know in the comments or when you upload your class
project for this class. Comment me what you
like it about this, how you play with the colors, what was the most
difficult part. But remember, practice
makes you better, so you need to practice these stitches and the
holding on the hook or the type of the fiber of your arn to see
how it work for you. Now to close, I will add then a change of ten stitches
to finish my work. Remember, you can add a
longer tail or a shorter one, depending on how you are
going to hang this garland. Then I fast enough
and cut the yarn. Now it's done. This is how it looks. You can add, of course, more and more and more bans to make it adequate for the place where
you are putting this. I am here just weaving the ends, going with my hook with
the tail of my jar in all the single croche that
the tail looks and beautiful. You can just simply cut it
or use your needle as well. I hope you like this, and I can wait to see
what you create. Please let me know in the
comments please please check your questions or your
doubts, or the suggestions. I will be gladly reading
them and talking to you. I will see you in
the next video.
19. Thank you: Thank you so much for
taking the class. Congratulations for
finishing completing it. And now you have acquired a new, wonderful skill that you can use to make beautiful
things for your home, for yourself, for others, and enjoy the time creating. I think we to see how
Garland turned out. Please share that with me in the class projection
for this class uploading class project
with your materials, to your progress,
your final piece. I will love to comment on that. And I will also
to hear from you, how was your experience, learning all the
basics as teachers, doing with me all the process of creating your panting
and then joining them, and let me know anything that you want to share
or your questions, just suggestions, your ideas, and what has impacted
you the most. And what was the more
difficult part of the process? And I will love to
interact with you. As always, you can follow
me here on scripture, so you don't miss any update and any new class that
I share with you. And I hope to see you in my previous classes that are
so on watercolors and wash, and we can have this beautiful, creative town time together. Learning something new and expanding or crafting palettes. Let our creativity flows and
create beautiful things, relax, and enjoy just
the process of it. So thank you so much, k, and keep creating, and I will see you pretty soon. Bye bye.
20. Class project: For your class project
is super easy. You just need to share with me a picture in the class project
section for this class, showing me your process or your final piece,
or your materials. It's always a wonderful thing
to share together and to comment about the process on how you learn this new
technique in this case, the crochet, and what was the most meaningful to you
or the more difficult. I can wait to see
what you create, what color to choose for your
garland and your batings, and to know how your
impressions for this class are. Remember, you can always
comment or chair me question. If you have a question, I will be gladly
answering to you. And I always upload a sample
project for each class. So you have a better
idea on how to upload your own class project
for the class. I will say you in
the next video.
 Artjourneywithme Heidi, ARTIST AND FACILITATOR