Transcripts
1. Creativity Blast!: Creativity is the
foundation of innovation. It's the catalyst that allows us to see the
world differently, making connections that would
otherwise go unnoticed. Just like a muscle,
creativity can be developed and strengthened
through daily training. Hey, guys. My name
is Kyler and Carson. I am a graphic designer, illustrator and top teacher
here on Skillshare. I've worked with
healthcare organizations to develop branding
and logo designs. I've created illustrations for local nonprofits and
community organizations, as well as an assortment of
other creative projects. I am no stranger
to having clients come to me to help solve
their creative issues, whether it be design, illustration, video, or
something else entirely. I am tasked with a mission
to find creative solutions. I believe creativity is a
muscle that can be developed, and this is why each
morning I start my day with a ten minute
creative workout. There's no need for fancy tools to exercise your creativity. All you need is a
piece of paper and a pen to get those
creative juices flowing. In this class, I've laid out five daily exercises
that will help develop your creative
thinking so you can see the world in
new and novel ways. By the end of this class, you'll understand
the foundation of creativity and how
you can better develop a daily habit to supercharge your
creative potential. Okay. Creativity is not a special
gift given to a chosen few, but it is an integral part
of what makes us human. So if you're ready for
a creativity blast, I'll see you in class.
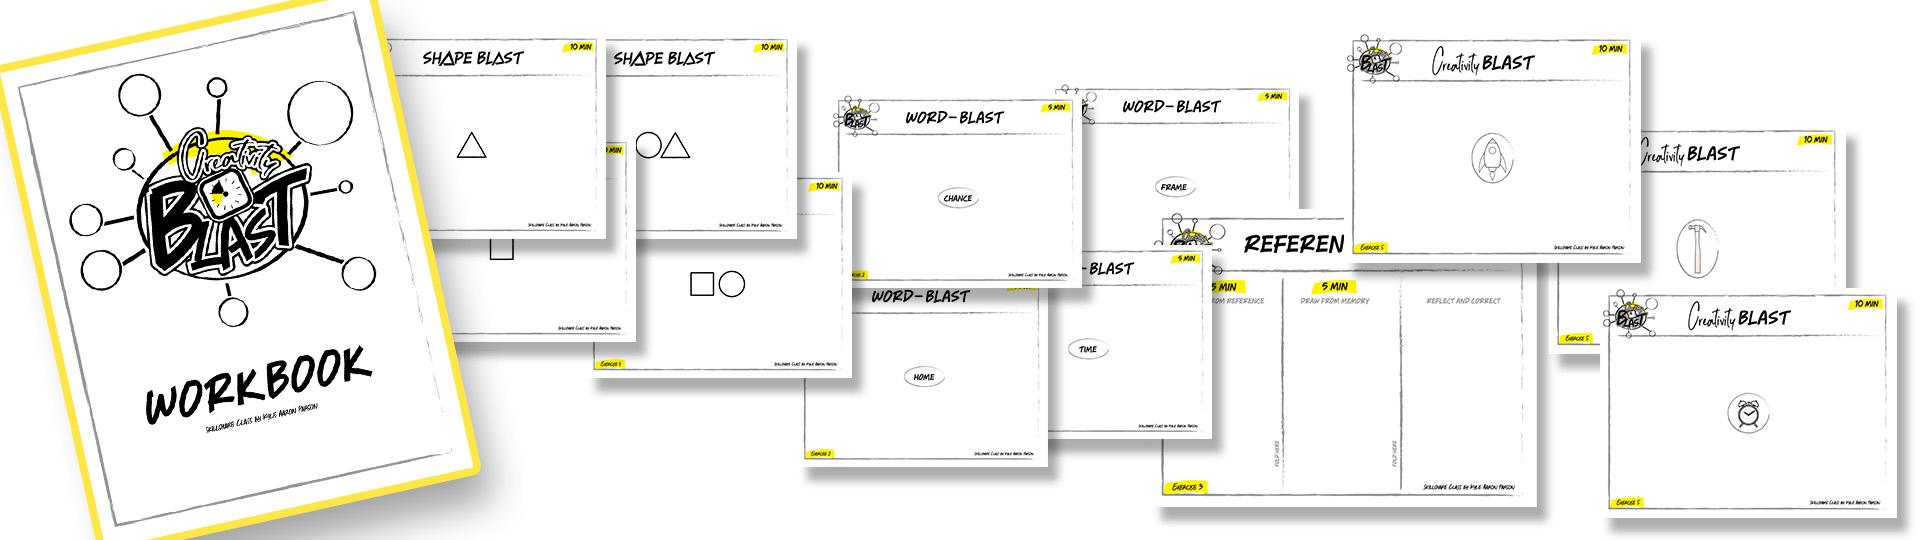
2. Class Project and Resources: Welcome to creativity blast, class full of self discovery, creative exercises, and learning how to increase
your creative potential. Throughout this
class, we will dive into understanding
how creativity works, where original ideas come from, and how we can develop
our creative thinking through a set of five
daily exercises. These exercises are short, ten minute creative
workouts that focus on essential skills that when developed can help lead to
creative breakthroughs. Although these
practices are geared towards illustrators
and designers, I really think everyone can benefit from the
lessons that follow. To get started with this class, you'll need some
paper and a pen, as well as a timer of some kind. You can use your phone, but I'll explain why I
have a dedicated timer for this practice when we get to
the habit building section. If you want some more
structure for the exercises, I have provided
worksheets for each of the lessons that can
easily get you started. But note, in order to understand
how to use the material, please first watch
the class related to the worksheet so you can understand how the
exercises work. After the creative exercises, we will dive into
how to implement a daily creative
habit into our lives. I've spent years developing various positive
habits in my life. Some successful, others not. I'll talk about how habits form, as well as some
best practices to get your habit off
on the right track. Your class project is to create your own ten minute
daily creative workout by using any one of the
five exercises shown. You can modify the exercise
to fit your own needs. You can simply take a picture of the exercise you completed and share any ways you'll implement your own
creative workout. If you're ready to get creative.
I'll see you in class.
3. Creativity: Building Your Muscles: In this class, we will
quickly talk about creativity and how we can develop more of it
in our daily lives. Creativity is a muscle
that can be developed, and we can do this through
daily creative exercises. Pushing ourselves to
complete creative exercises, develops our creative
muscles and can help rewire our brains
in order to make it more adept at finding new connections and in
turn more original ideas. The ability to think originally is a highly sought
after skill that if you can attain will set you apart from
others in your industry. One thing that often prevents
people from creating original ideas is that
they get idea fatigue, a point in time where
they become exhausted in their creative pursuit and stop short of
finding innovation. People are often
overly critical of their initial ideas and end
up giving up too early. But what we find in
highly creative people is that they push past
their idea fatigue and overcome self
criticism to explore uncharted territories where
true creativity lies. Albert Einstein once said, it's not that I'm so smart, it's just that I stay
with problems longer. Endurance is one
factor that will determine whether or not we
reach our creative potential. He also said, most people stop looking when they find the proverbial needle
in the haystack. I would continue looking to see if there
were other needles. If you find yourself
having a hard time developing ideas or
becoming stagnant and becoming content with your first idea without
exploring more possibilities, the exercises shown in this
class will help strengthen your creative muscles so you can do more reps and lift
more creative weight. Just as if we stop exercising
our physical muscles, they become weak and over
time, our strength decreases. If we neglect to put into
practice a creative habit, our creativity will
trify and we will have a harder and harder time
coming up with original ideas. Some exercises in the class are geared towards
creativity in general, and others are for
illustrators and designers. However, wherever you are
on your creative journey, you will benefit from
the lessons that follow. These practices can
be used simply as exercises to work out those creative idea
generating muscles or as a quick warm up before your creative tasks
to get you in the right mindset and
get your gears turning. Everyone is unique and the
exercises described are not hard and fast
rules that have to be applied exactly as shown. You can modify your
practice to fit your creative needs after understanding the principles
of the practices. Just think of these exercises as a starting point in which you can develop your
own creative habit and work out your
creative muscles. Going back to the
exercise analogy, we all have different body types and we all have different
goals for our bodies. To say that there is one size fits all workout routine that solves every physical goal
would just be ridiculous. But the one thing
that applies to all achievements is consistency. It's the same with creativity. We all have different ways of learning and different goals. We will have to
discover what works for us based on our
wants and our needs. But the most important
part to move towards success is consistency
in your practice. In a later class, we
will dive into how to create a habit out of
our creative exercises, understanding how habits
form and what we can do to make our practice more effective and get
our habits to stick. One thing I would like to
ask of you as we embark on this creative journey
is to let go of any assumptions and
just enjoy the process. Having the mind of a child is
so important for developing creativity as they
let their inhibitions run wild and allow their minds to create
whatever their hearts desire. Pablo Picasso said, every
child is an artist. The problem is how to remain
an artist once he grows up. In the next class,
we will look at the fundamental principle
of idea generation, and through this understanding, we will have insight
on how the practices work to develop your
creative thinking. I'll see you there.
4. Idea Generation: Connecting the Dots: In this last will dive into
how ideas are formed and the principles we can apply in order to take advantage
of our creative habit. The information we receive in our daily life is at the core
of our creative thinking. What we see, what we
learn are all dots that have potential to be
connected in exciting ways. Creative thinkers are able
to connect these dots in unexpected ways to generate
new and innovative ideas. Let's look first at
how ideas can be generated by the concept
of the adjacent possible. The adjacent possible
simply means the possibilities that can be created with your current
knowledge and information. They are the potential
combinations of what you already possess. When you connect the things
you already know in new ways, original ideas can be developed. The more you learn, the more
dots you have to connect and the more possibility for creative opportunities
will be available. As a simple example, I will use the information set of letters in the alphabet. Let's say the only letter
you know is the letter A. How many adjacent
possibilities are there. Zero. With limited
knowledge and information, there is no room
for possibilities. There's no room for innovation. However, after we increase our knowledge and add
more information, the adjacent possibilities
start to appear and the more opportunity for
creative endeavors emerge. Let's say we now add the letter C and T to
our knowledge base. With these three letters, now within our scope, we can freely connect the dots and combine them in
new and novel ways. How many possibilities
do we have now? With the letters A C and T, the adjacent possibilities are the combinations of
the things we know. We can now create
words like Act, CT, at tech or even abbreviations
like CTA or TCA, by adding two more dots, we have multiplied our creative
thinking exponentially, and now we have nearly
limitless possibilities. Creative minds are masters of connecting dots
in unique ways. But before we can
be dot connectors, we first must be dot collectors. Unless we spend some time
collecting new dots, meaning learning in
our chosen field, Our idea generation
will remain limited. And this is where the
class exercises come in. We are constantly bombarded with information
every single day. So we are not so limited in the information
and knowledge. What we may struggle
with is learning how to connect these
daily occurrences in unexpected ways that can later be developed
into creative pursuits. Let me share with you one
way I was able to make an unexpected connection and turn it into a creative pursuit. I, the creation of a
skill share class. I was just getting started on my journey as a
teacher on Skillshare. I made two classes so far and I was hoping
to make a third. At that time, I was having so much fun using shape building tools
in Adobe illustrator, and I wanted to make
a class on how to use the pathfinder tools
to create illustrations. But I wanted to make
it unique in some way. To practice my skills, I decided to do a series of illustrations
with the thought. What would it look like to have a digital tool as a
physical product. Through this
question, I was able to illustrate
keyboard shortcuts, the pen tool, the brush
tool, and various others. But then I got to the
Pathfinder panel. I asked myself, how can I make the Pathfinder panel
into a physical product? At the time, I was having a pizza night at
home, and I thought, what would it look like to apply the pathfinder
options to a pizza. I hopped on the Illustrator
and I started to experiment. I then created a
fictional company called the Pathfinder
Pizza Company. By connecting the Pathfinder
panel with pizza, I was able to create a series
of eight illustrations. That was a great
creative opportunity. But it didn't stop there. After creating these
illustrations, I asked, how could I incorporate this into my skill share class? I asked the question, what if the Pathfinder panel
was a pizza menu, and the shapes
were the toppings. That's how the shape building
master class was formed. In the next class, we'll start our first
creative exercise. Grab a pen and a piece of paper, and I'll
see you in class.
5. Exercise 1: Word Blast: Let's get our creative juices flowing with our first exercise. Words have an important role
in our creative process as words can easily lead our imagination to
see what is unseen. As we go through our daily life, we often miss out seeing the connections of
seemingly unrelated things. However, if we learn to
make new associations and learn to develop
our creative thinking through creative exercises, over time, we'll have
an easier time making these connections and have more opportunity for
creative growth. Okay. I'll briefly explain the exercise we will
do and then go through some tips to help
you make the most of the process in order to get
the most effective result. For each of the exercises going forward, we
will use a timer. For now, feel free to use your phone or another
timing device. However, in the class
about habit formation, we will dive into best practices for how to set up
your daily practice. The timer will be
used to help you focus in on the task at hand. This will also be a tool to let yourself be free
to just explore. After the time is up,
there's no pressure to continue for that day.
Your job is done. There are no grades, there are no right
or wrong answers. This is about letting go and allowing your creative
thinking to flourish. For this exercise, all you need is a piece of
paper and a pen. Word blast is a word
association challenge that will help you
make more connections in your creative thinking. Your job is to start with a word at the center
of your page. It could be a subject
or an activity. It doesn't quite
matter, and then blasting out like
spokes on a wheel, write words that are associated
with the central word. As you write more
and more words, you can then draw
spokes out from the new words created and
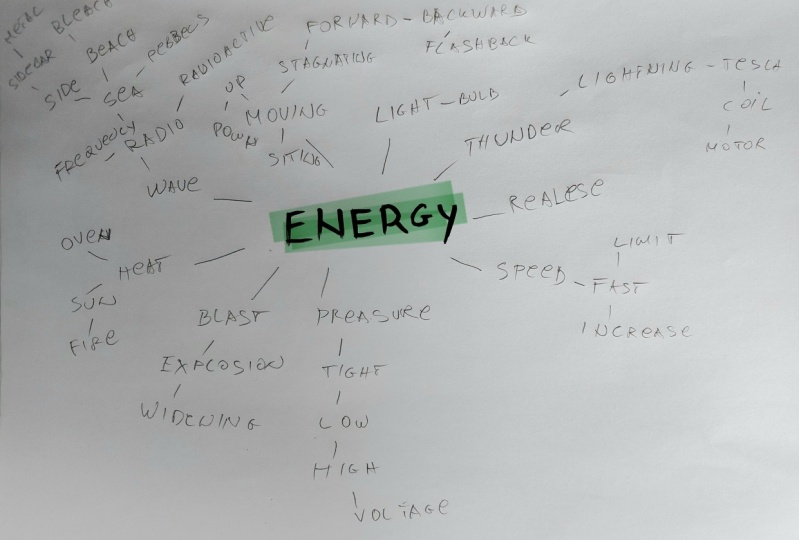
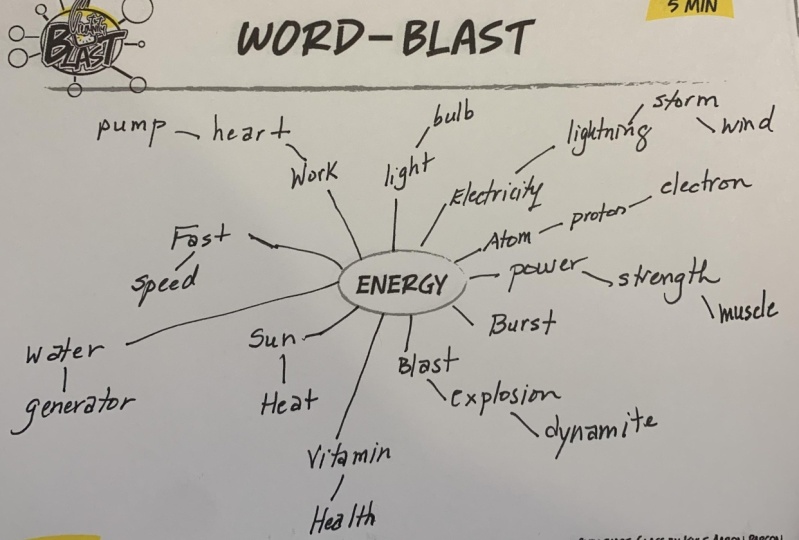
make more connections. As an example, I'll
use the word energy. When we think of
the word energy, many things come to mind, and it may be different
for everyone. Lightning, speed,
batteries, charge, rocket, electricity, fuel,
sugar health, coffee. By doing this exercise, we can dive into building
more relationships and finding novel
connections that at first, we may not have seen. Afterwards, we'll be more
comfortable exploring our creative minds and generating increasingly
original ideas. You can set your timer to five or 10 minutes and as
the clock counts down, start writing as many
words as you can, and try to push past
your initial assumptions and see if you can discover connections you
couldn't see before. A great way of
finding new words and connections is to
think like a child? A child is always curious and asks questions
constantly. Trust me. I know, I have a toddler
that interrogates me every day about all the
things in the kitchen. Oh, what's this? What's that? Why does it make
that sound, Daddy? What's that? How does this work? So if you're stuck, try unleashing
your inner toddler and bombard yourself
with questions. Where does this
come from? How does it work? What does it mean? Does it glow? Is
it hot? Is it hot? This is a great question. In regard to energy. It instantly made me
think of red hot. What's red hot? Molten lava. Now, I just associated
energy with molten lava. However, this connection for me would not have been made unless I started
asking questions. This is why questions are so important for your
creative process. Let yourself ask some
stupid questions from time to time because it may just be the prompt you need to get yourself
moving forward. If you want some direction to get started with this exercise, I've provided printable
worksheets that you can use with pre
populated central words, simply print it out,
set your timer and go. I can't stress enough that
this is not about perfection. Although it may be hard
at first and you may struggle with coming up
with 20 or 30 words, after practicing it,
it'll become easier and you'll find yourself unable
to stop finding new words. Just have fun. In
the next class, we will tackle our
next exercise, the shape blast.
I'll see you there.
6. Exercise 2: Shape Blast: An. Let's dive into
exercise number two. Shape blast. In the
previous exercise, we learned to generate associations between
words and developed an increasing number of connections with the
power of questions. In this class, we will continue our pursuit of our creative
potential by using creative constraints to develop our original thinking and
problem solving ability. In essence, creative
ideas are simply solutions to problems
and the ability to work through a wide range of solutions will give
you an advantage to get you to your solution faster and produce
higher quality results. During this exercise, as
well as all exercises, I want you to forgo your
inner perfectionist and let go of your desire
to focus on quality. Here's why. When we focus our efforts in perfecting
and refining a single idea, we limit ourselves on
opportunities we can learn from. However, if we open ourselves
to explore as many avenues, we will find more things that work as well as
things that don't. Through this learning, the overall quality of
our work will increase. We must learn to accept that not everything we
make will be perfect. But if we just keep
creating and exploring those wow worthy ideas
will inevitably happen. Focusing on quantity is like
having your foot on the gas, you'll reach your
destination soon. But when we focus on
quality before quantity, it's like having your
foot on the brake. You'll not move forward
until you learn to let go. Remember this. Quality comes from learning. Learning comes from doing. The more you do,
the more you learn. And the higher quality
you will create. For this exercise, you'll need a piece of paper and a pen. Shape blast is a creative
exercise to develop your problem solving ability and increase your original thinking. It consists of starting with one or two simple shapes
in the middle of your page and making unique combinations while sticking to a
set of constraints. By setting specific constraints, you must think outside the box
to develop original ideas. As an example, we have a circle in the center of our page. Our job is to take the circle
shape and arrange it in as many unique ways as possible while not
breaking the rules stated, The rules are the shape
must be used at least one time and you must scale
the shape proportionally. An example is the
circle cannot become an oval or a square cannot
become a rectangle. Keeping this in mind,
let's set our timer for 10 minutes and start
developing our ideas. I start drawing a line
blasting out from the center shape and I'll
draw my first iteration. Just a simple circle. Then I'll draw another line and I'll start asking questions. How else can this
shape be arranged? Well, the rule is, we must
use this shape at least once. That means I can duplicate it. Now that I know that I can
use more than one circle? What else can I try? I can overlap the shapes, I can stack multiple shapes, I can add contrasting sizes, I can create a formation, I can make it revolve. Should I fill in the shape
or keep it as an outline? Now that we have been asking questions and discovering
what I can do, I can push each
of these concepts further by asking more
specific questions. How many ways can I
overlap the shapes? Can I add more contrast? I can think of what
I've already created as potential categories
or groups of designs. Drawing a line from
my secondary shapes, I branch out into more
possibilities of that group. Then I can try to
combine iations to make something more unique
from what I had before. Instead of just being
abstract with my shapes, I can use the shapes to create more literal
interpretations, like a snowman or a face. As you can see, from
a simple shape, an infinite number of
possibilities are available. You just need to keep trying new things and asking
more questions. Again, if you want some
direction to get you started, I have provided
printable worksheets that you can use with
assigned shapes, simply print it out and
set your timer and go. I recommend just using basic
shapes for this exercise because you're going to have to redraw them over and over again. So they're easy to scale and it allows you
to problem solve. Although you may not get any incredible designs from
this exercise, that's okay. It's the exercise
itself that matters. It's training your
brain to be okay with pushing forward and
exploring new ideas. This is probably one of
my favorite exercises. Since it's super simple, you can get a new
result every time and the possibilities
are nearly limitless. Just remember, everyone
is unique and you can modify your practice to
fit your creative needs. You can change the constraints, the shapes, the time,
however you see fit. I have taken on many logo design projects
over the years and sometimes the solution comes to me right away, and it works out. But other times I keep trying and nothing is jumping
out like this is it. In times like this,
it is essential that we have built up our
creative endurance in order to push
through and keep exploring more ways to
accomplish our mission. When I was designing a logo
for a University Bible club, I made so many
attempts to develop a memorable and eye catching
logo that holds meaning. Iteration after iteration, nothing satisfied
my internal critic. However, I eventually ended up with the final
result which showed the contrasting and H of the Mystery lies in
History Bible club name, as well as the connections of the two letters by
using swooping arrows. The goal of the
club was to share love with their fellow
students and community. The intersection of the arrows also formed the
shape of a heart. And when I got to this point, I had that. This is it moment. I would have never come to this design solution without
having the insurance to push through all the
design iterations and constantly trying
out new ideas. By practicing this exercise, your creative
insurance increases and will allow you to go
further than ever before. In the next class,
we'll get into some sketching practices
to help you collect more dots and add to your visual library.
I'll see you there.
7. Exercise 3: Reference Blast: Let's jump right into our next
exercise reference blast. We've learned how to work out our creative muscles
by word association, asking questions and using constraints to unlock
our creative potential. For this exercise, we will be spending time putting
our pen to paper and collecting more
creativity dots by developing our
visual library. Our visual library
is the place in our mind that we can pull
from when we want to create, explore, and experiment
with new creative ideas. If you have a limited
visual library, your creative ideas will
therefore be limited. But if we continually add to it, our creative potential
will be unlimited. This exercise is put
into three parts, two five minute sections, and a third section
that is optional, but very beneficial for
building your visual library. The three sections are
draw from reference, draw from memory, and
reflect and correct. Section one is draw
from reference. This is the time you'll visually analyze and try to copy your
chosen reference picture. I will show you how to choose your reference picture in a bit. Section two is draw from memory. In this section, you will put your reference away and cover your previous drawing and try to sketch out the
subject by memory. You only got 5 minutes, so don't worry about having perfect lines or how
accurate it really is. Just try to articulate the image as best as you can
in your style. The third section is
reflect and correct. This is where you analyze the reference alongside your
first and second drawings. You will want to make notes of the proportions, the shapes, the positions that may
have shifted between drawings from reference
and from memory. By doing so, you
will help lock in the subjects information
into your visual library. I recommend getting a different color pen
to make these notes. This will help you visually
see the adjustments. Of course, the more times
you repeat this process, the better you will be at recalling and
drawing from memory. So if you have time
to repeat the cycle, go over it one more time
and make notes of what have improved and what you are
still struggling with. If you practice this often, you will build up your
own sketch notes library. And you can call back to it whenever you want to start
sketching something again. To set this exercise up, you'll need a reference image. I suggest having a
collection of references readily available to you for when you want to
do this exercise. I recommend printing out a handful and when you
want to do this practice, randomly select one,
set your timer and go. The randomness of the
selection process keeps you on your toes, add
some spontaneity, and this also gives you
an unexpected challenge or possibly if it's an
easy reference for you, a happy, easy going session. Consistently making a habit
of drawing from reference, we'll build up your visual
library so you can connect more dots and have more
confidence in your practice. If you don't have
many dots to connect, the ideas you can
generate are limited. The more dots you
add to your library, the more possibilities
are at your disposal. This is why having a daily
practice of drawing from reference is a great habit
for idea generation. For this exercise, I've provided printable worksheets
for you to use. One sheet is a selection of random reference pictures
for you to print out. If you want to select
your own reference, feel free, it's your practice. You can decide what
you want to draw. The second sheet is
a simple template, which is broken
into two sections. One section is for
your draw from reference and another section
for drawing from memory. Simply draw from
reference and then cover the section so it's no longer visible and then
draw from memory. Afterwards, you'll
have both drawings side by side so you can analyze, take a different color pen
and make some sketch notes. In the next class, we
will continue adding to our visual library with a sketch last. I'll
see you there. Okay.
8. Exercise 4: Sketch Blast: Welcome to sketch blast. In this exercise, we will continue our pursuit
of adding dots to our visual library so we can
have greater opportunity for creative solutions
when opportunity strikes. Last time we used a reference
picture for our practice, but this time, we are going into the real world and selecting
a household object. This exercise will help develop a greater understanding of
three dimensional forms, as well as ad in understanding
how to break down complex forms into
more basic shapes. By understanding how to break down forms into simple shapes, it will make it
easier for you to remember objects and build
up your visual library. Whether you are good
at drawing or not, this is a fun exercise that if practiced consistently
will improve your drawing ability
and allow you to have more fun expressing things
from your imagination. As with all exercises, I want you to let go
of any expectations and let yourself freely explore
with your pen or pencil. No judgment, no pressure, have fun and experiment. To complete this exercise, all you have to do is grab an object that you
have laying around. I would recommend choosing something that has a
super simple shape, but still has some variety, like a coffee mug,
a book, a bowl, a toy car, earbuds, even a pen that you
have lying around. There's no right
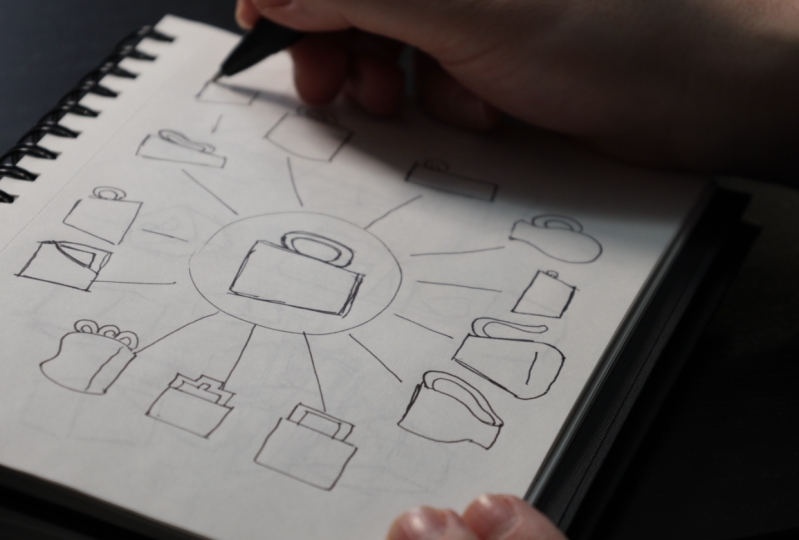
or wrong answer. Sketch blast consists of
choosing your object, setting your timer for
10 minutes and sketching the object as many times as
you can in various angles. Since you will draw your
subject from various angles, it is good to choose
something that is quite small and
easy to manipulate. It might help if you have a book or something else to
prop up your object, so you can a variety on
how it is displayed. As an example, I'm
going to use this mug. The first thing that
I'll do is I'll look at it front on and draw the
shapes that make it up. Looking at it front on, it's a simple tapered rectangle and a C shape for the handle. Now I can move on
to a new angle. Do I notice any new shapes? From the bottom, well, it's a circle with a rectangle
coming out of the side. To get started
with sketch blast, I recommend drawing the object
without using perspective, simply looking at the various
planes of the object, front, back, side, top, bottom. Once you get those down, then you can push
yourself to work towards the three
dimensional forms. I'll change the position
of the mug again. Now, if I look at
it in perspective, the top section is an oval
and the bottom has a curve. I could draw two ovals
and connect them with two vertical lines and
then draw in the handle. For more complex objects, it's better to start
by building up simple three dimensional forms
like blocks and cylinders, then go back in to
add more detail. However, if you've
never drawn in three dimension for the
sketch blast exercises, I would recommend just
using basic forms and drawing them at different angles without adding any detail, like drawing a block or a book or a soda can without
the tapered ends. I'm going to continue
my sketch blast rotating my object at various angles and see how many times I can draw it
within 10 minutes. In our previous
shape last exercise, we drew basic shapes
over and over again, combining them in various ways. That not only helped
our creative thinking. It also gave us a lot
of practice in getting comfortable drawing circles and squares and triangles and ovals, which is important
in breaking down your objects during your
sketch blast exercise. This practice really
helps when you want to draw from memory and
creates something unique. I draw a lot of characters and add personality to
everyday objects. A lot of the time I
just draw from memory. I can only do this
because I've put in some work to understand the forms of the
things around me. All these drawings, you see, I did spontaneously at the
request of friends and family. I didn't have a taco or a table readily available
for me to reference. But from my accumulated
visual library, I had a general understanding
of the forms and could create the illustrations
freely when prompted. Practicing this sketch blast
will eliminate the need to always have a reference
for your initial sketches, and this allows you
to play around with your ideas in a more
easy going way. In the next class,
we will discover our final exercise and have fun generating
creative ideas. I'll see there.
9. Exercise 5:Creativity Blast: Okay. Welcome to
the final exercise. Creativity blast. We've stimulated our
creative muscles by asking questions to break down assumptions and force us to make
novel connections. We've unlocked our problem solving skills by
using constraints, and we have added
more creative dots to our visual library. So we have more resources at our disposal to
generate unique ideas. Now it's time to
blast our creativity into outer space with
our final exercise. Creativity blast is an
exercise developed to explore the vast possibilities and learn to see things in
interesting and novel ways. We'll take a simple
subject break it down into its basic forms
and then blast it out into an alternate reality in which the only limit is
your creative imagination. Let's take a look at how we
can implement this practice. To start this exercise, you can either use a
reference or you can use up your built up visual
library as a starting point. Again, it doesn't necessarily
have to be a thing. You can try this with
typography by picking a letter. Whatever you want to
explore works just fine. For this example, I'll go
back and use this mug. After we have decided
on our subject, we will then break it down to its basic structure and see
how the subject is made out. We will draw the
basic building blocks of our subjects in the
middle of our page. We will set our timer for
10 minutes and blast off. We will draw lines bursting
out from our center shape, and at the end of each line, we will take our shapes and stretch and push
and pull them in various ways to see how far
we can take our subject. Keeping in mind, we still
want our illustration to have the likeness
of the subject itself. The mug, although
the proportions are stretched and it has
changed dramatically, it is still recognized as a mug. You can keep things simple, or you can dive in and
go for more detail. But remember, this is just
a ten minute exercise. It's better to explore as
many possibilities than to focus too much on the detail and perfecting
the illustration. There are no limits
to this exercise. If you think you need
to add something to develop it into a new
creative possibility, do so. If you want to transform
the mug into a rocket ship, do so as long as it
still reads as a mug. Maybe during the exercise, you've come up with some
really fun creative idea that you really want
to pursue further. Okay. Make note of it, flag it in your
sketchbook so you can access it when you want
to develop it further. To get you started
with this exercise, I've provided printable
worksheets for you to use. I have placed a
reference picture in the middle and outline
the basic shapes. You can blast out
from the center and explore the
creative possibilities. Now that you have seen a
variety of daily exercises, we can implement to increase
our creative potential. I want to walk you
through some of the best practices on how to
form a daily creative habit. Without having a
consistent practice, our creative muscles
will weaken. But if we are able to do
even a little bit every day, our creative potential will soar higher than we ever
sought possible. I'll see you in the next clash.
10. Habits: Understanding How Habits Form: In the following class, we will learn how to
set ourselves up for success when developing
our creative habit. We are what we repeatedly do. Excellence then is not
an act, but a habit. The practices you've learned
so far in this class, if only practice once or twice may give some initial benefit. But in order to get the most out of our
creative exercises, we must learn to implement
them into our daily lives. Habits are like a
compass that point us in the direction of our
ultimate destination. Doing your habit is like taking one step closer to
that destination. If you have a habit
of overeating, eventually, you're
going to gain weight. If you have a habit
of exercising, over time, you
will get stronger. If you learn to develop a habit of strengthening your
creative thinking, over time, we will become
creative thinkers. Now, the goal is not to do
every exercise every day. The goal is to do one
exercise that lasts only 10 minutes consistently
on a day to day basis. Everyone, no matter
how busy you are, you can put aside 10 minutes in your day to devote to your
creative development. I know what you're thinking. I've tried to create a
habit and it didn't work, or there are too
many distractions that I can't focus on this. I want to address
all these concerns here and share with you some best practices to help get your habit off
on the right foot. To understand how we can
effectively develop a habit, we must first understand
the key structure of how habits form and what exactly
goes on in our brain. There are three things that are required for a habit to develop. You need a cue, you need the act or the habit and
you need a reward. A is something that
triggers the habit or act. The habit, in other words, the act itself, and the reward. This can be an
intrinsic reward of, Hey, I just
accomplished my goal. Now, the primary
motivator that makes your mind develop a
habit is the reward. Your brain recognizes the reward as a good thing, and therefore, it is important that it repeats whatever you did to
get that reward again. Your brain looks
back at the sequence of events that led
to that reward. First, the habit and
then ultimately the Q. Your brain then
makes an association between these three events. This association then
becomes stronger, the more times you
repeat this cycle, Q Habit reward, Q habit reward. Since your brain is
looking for the reward, after it sees the Qe, it releases a chemical in
the brain called dopamine. Dopamine is often
connected to pleasure, but it is also used as a preemptive
motivator to get you to pursue the act that
leads to the reward, that is associated with that Q. This is why we feel an urge to do something
in various situations. Like when you smell fast food, you start to want it and
actually feel hungry, even though a moment before, you had no such desire. Now that we have a basic understanding of
how habits work, we will learn how to set up a creative habit for
maximum potential. I'll see in the next class.
11. Habits: Establishing Your Creative Habits: Okay. Now that we
understand a little bit about what goes on in the brain when a habit is developed. Let's go through
some best practices to create our daily
creative ritual. The first thing to
do when developing habit is when we should
do our daily exercise. It's best to practice it at a similar time each day as
part of your normal routine. Maybe right after you wake up, when you come home from
work, right before bed, we are all different and we
all have different schedules, and our biological
clocks may differ. This is why you must decide when you can put
aside 10 minutes on a regular basis
for your practice and do it consistently until
the habit is developed. It has said that it
takes about 60 days for a habit to be locked in. So be patient. You'll have to do the habit
cycle consciously at first, but over time, you will hardly need to think
about it at all. To better achieve the habit, you can link it with
something you already do. You wake up, you
brush your teeth. After you brush your teeth,
do your daily exercise. You might have to wake up 10 minutes earlier to fit it in, but over time, your body will adjust and you'll do
it without effort. Now we are at our table, our desk or wherever we're
going to do our practice. It's good to have a
consistent place to do it. And then also have everything
you need readily available. You want to make it as easy as possible to start your
creative exercise. This is why I always have a pen and a sketchbook
within arm's reach, and that's all I
need to get started. Now it's time to talk
about the timer. I said at the
beginning of the class that you can use your
phone as a timer, but when it comes time
to develop a habit, it'll make things dramatically harder for your habit to stick. Here's why. Your phone is a
reward generating machine. Every time you
unlock your phone, you check your
notifications or e mail or social media and you get
a boost of dopamine. And therefore, your
brain has made an association with your phone, that when you unlock it, your brain will push you to the act that
leads to the reward. IE, check social media
or something like this. Since an association has already been
developed between you unlocking your phone and getting some reward
from some app, It will be much harder to make a new connection
that pushes you in the direction of one such
as the creative exercises. This is why I highly
recommend getting a separate timer designated specifically for
your daily practice. It doesn't have to
be anything special, just a simple kitchen
time rule do. But I do recommend
something that allows you to visually
see time passing. It's much easier to build a habit from a
novel cue that has no current association than to have to fight with
previous conditioning. I have a specific timer
that I use for my practice, and my brain knows that when I set that timer to 10
minutes, it's time to work. My phone is put to the side, so there's no
distractions and I see the timer counting
down and I am focused. The same principle can be implemented with your
sketchbook as well. Having a specific sketchbook for your practice tells your mind that when this book is open, there is only one thing
that it needs to do. It's time for a
creativity blast. I want to emphasize
again that it takes roughly 60 days for
a habit to develop. Don't get discouraged
if it's hard at first. If you push through
and keep building the Q habit Q habit
reward relationship, you'll be activating your
creative mind effortlessly. Even if you miss a day, don't discourage yourself
and just try again. And when you complete one round, give yourself a big
pat on the back and solidify that
habit association.
12. Additional Tips: My Personal Practices: So As a final class, I want to leave you with
a few additional tips for training your
creative muscles. These are things that
I have found that have significantly increased
my creative thinking, and I want to share
them with you. As with everything
in this course, we are all made differently. What works for me,
might not work for you. So everything that
has been taught can be altered to fit
your specific needs. Take what you want and
leave what you don't. If you think only one of these exercises practice will benefit you, just do that one. If you've found
that these aren't your cup of tea at
all, No worries. I hope you have learned a
bit of how you can better establish habits defined by your own personal
values and goals. My first suggestion
is stepping back. Creative ideas are heavily influenced by our
subconscious mind. So in order to allow your brain to make novel connections
and solve problems, you may have to step back from the constant input
of information. Sit in silence for
a few minutes, go for a walk without
distractions. Just let yourself be bored. Allowing your mind
to wander can allow your subconscious mind to make connections that aren't
apparent at first. In addition to my
creative exercises, I have an eight minute
meditation practice. I do first thing in the morning. I use an hour glass that
has an eight minute cycle, and when it starts
trickling down, I sit and let my mind relax, focusing on my breath. Although my mind may try to push me to check my phone or
write something down, until the time is done, I resist those urges. Through the single practice, I have seen a
significant increase in my focus and controlling
my impulses, allowing me to get more
creative work done. My second suggestion is
to keep a notebook or a sketchbook accessible
as often as possible. Ideas can come to us in
times we are not expecting, and if we don't note
them down soon, they will all but
vanish from our mind. Keeping a place for
yourself to jot down your ideas and
thinking will improve your chances of
retaining and being able to execute your
creative endeavors. I believe the act of writing things down apart
from typing things on the computer has a
significant impact on how much information
I can retain. I have a notebook on my desk. I have one in my bag, I have
a pocket sized notebook, just in case I need
to travel light. If you don't have a
notebook near you, when inspiration strikes Grab the nearest piece of paper and pen and capture your ideas. You never know when
that idea will pay off. My last piece of
advice is to try to implement a practice
of constant learning. Reading has been one of the most rewarding
habits when it comes to my creative thinking as it feeds my mind with ideas and insights from other excel
and creative individuals. Videos can be a great
resource as well, just like the ones
here on skill share. They are very
engaging and deliver valuable content in a
short amount of time. However, unlike watching videos, reading fully engages your mind as you cannot read and do something else
at the same time. Therefore, your mind
will soak up and retain more information when reading than just watching
a few videos alone. Alongside my reading
and learning, I always try to take
notes and journal about ideas or thinking that really
captured my interests. I try to summarize as best
I can from my memory so I can keep that information for when I might want
to review it later. We are all constantly growing
as creative individuals. Experiment in finding
what works for you and find fulfillment
in the process. Creativity is not a destination. It is a constant
journey of discovery. I encourage you to do your
own countdown and blast stop
13. Thank You! You Are Awesome: I want to thank you so much
for joining me in this class. This has been such a
fun class to teach as it is quite different from what I've
taught in the past. It also gave you a better look into my personal
creative process, and I'm so glad I
could share with you. Everyone is different and have their own personal
creative journey. So what works for me may not work for you.
And that's okay. What I hope you can take from this class is that wherever you are on
your creative journey, there is always time to increase
your creative potential. Try applying the
things taught in the habit building section to something that
resonates with you. It could be 10 minutes of
learning a new language, writing short stories, poems, or whatever your heart desires. My hope for you is
that you begin. A lot of opportunities
in life are missed because we have
delayed getting started. If you did a little bit every
day over the next year, just imagine where you could be. If you have tried one of
the exercises in the class, I would love to see it. Simply post a picture
in the project panel, and I'll take a look at it. If you tried to implement a new creative habit
into your life, I would love to hear
your experience. It would be a huge
personal favor to me if you left a
positive review of the class as it will help other students like you find
this class in the future. If you're interested in
learning more with me, check out my profile here on Skillshare of my collection
of other classes, as well as follow me
there so you can be notified when future
classes are posted. Okay. If you want to
stick around and join me, I provided five bonus lessons in which I'll go through each of the creative exercises while I try my best to give
commentary on my thoughts. Thanks again, and I
wish you all the best on your creative journey.
I'll see you next time. Okay.
14. Bonus 1 Word Blast: Hey, guys, welcome
to the bonus lesson. Glad you could join me here. I'm just going to go
through the exercises, how I would normally
go through it, and I'm going to give you as
much commentary as I can, in order to understand
my thought process as I go through the exercises. The first one we're
going to do is the word blast.
Let's jump right in. I'm going to set my
timer for 5 minutes, and then I'm going to
use the word time. You can use whatever
word you'd like. When I think of time, I think of how do I read time clock. Watch. What else? And I think of time, I
think of the minute hands. And then just asking
that, you know, minute. Maybe think of hour. Second.
And then as I go on, then I can look
back at anything. What kind of clocks are there? Well, I know that there
are the hour glasses. I have one. There's a sundial. That's another type of
clock, Watches, you know, that type of watch
is a pocket watch, you know, It has hands, it has minutes, hours, seconds. How can we tell time?
Well, with the sun dial, the sun, We can go through
days months years. How is a year calculated? Well, 365 days, 3605. It's a number that's
connected to time. There is 60 seconds in a minute
and there is 60 minutes. Minutes in an hour.
Sorry. My writing's not the best, but
let's go through this. Well, what else can
I think of time? I can think of speed because, you know, time and speed
are sort of connected. When I think of speed and time, I think of, you know, the speed of light
is a unit of time. Of light light speed, you know, space, space travel, you
know, it takes time. You know, another form of time is what we do
during our time. We work, you know, what else do we do
during our time? We have rest time, play time, you know, rest we have time at home. We have time for friends. Okay. Okay. All right. What else can we say with time. There's so much we
can say with time. What is the sound
that time makes? I would say, you know, it ticks or TikTok
goes the clock. Tik Tok makes a sound. That makes me think
of the mechanism that actually makes it talk. So, you know, gears, gears. Another part of a clock or time to tell time is
the mineral quartz, Quartz is inside many watches,
gears, they're mechanical. There are kinetic watches, watches. Kinetic is movement. You move through time movement,
kinetic, gears, quartz, mechanical, TikTok.
You spend time. I'll just say you can
spend spend time, rest, play, sleep, speed
of light, travel travel. That makes me think
of time travel. What do you need
for time travel? You need a time machine. Watch, pocket watch, hands, days, hours months.
What is a day? A day has a day and night. It's about, you
know, 12 hours, day, 12 hours night, sun shining. And then the moon sort
of indicates the time. Um. Okay. If we go
through a year, go through a year,
what does that mean? The sun orbit or
the Earth orbits, you know, the
orbiting of the Earth is a certain amount of
time, it's 360 years. And the Earth revolves revolves. Okay. As day occurs. So that's that. And yeah. So my time's up. But yeah, looking at time, I was able to connect time
with many different things, and I just look back at what I previously stated
and see if I can find any other connections with those elements
and those words. And obviously, there is an infinite number that could
be connected back to time. But that's sort of how I would go through the process
in the morning. This really stimulates
my brain and gets my gears turning Gears, like a clock, gets them
going and running smoothly. This practice is
actually really helpful when I'm sort of in
a creative block, and I'm trying to
move forward towards, you know, a creative endeavor, whether that be a client
project or a personal project. I might just think,
what am I going to do and I isolate it
to a single word? Then I'll take that word, I'll branch it out into a
lot of different words. And usually after I branch out to a lot
of different words, I'll find some connections, and I can really move forward
with my creative project. So it's a good jumpstart, and it's a good exercise
to do in the morning and get your gears
turning and Yeah, it's really a lot of fun. A lot of times I use this
when I'm doing design work or I'm doing client
based work and I just want to make
something more unique. I go through as
many iterations or words as possible in
a set amount of time, and it pushes me to push
past my initial assumptions, and then I can get things get connections that I never
thought I originally had. So, try it out yourself. If you do the project posted in the project panel,
take a picture of it. I would love to see
what you guys create. If you use the same word as me, I would love to see if there was any different words that you came up with in your 5 minutes. I'll see in the next class.
15. Bonus 2 Shape Blast: Hey, guys, welcome to
the second exercise. This is going to be
where I am going to go through the
shape last exercise. So whenever I do a shape
last in the morning, I usually randomly
select any shapes or something that I want to pursue and try out and experiment. It doesn't have to
necessarily be a shape, but it can be really,
whatever you want. Just hold to the constraints
that you've decided upon. For me, I've decided to use
the shape last exercise in which My shapes have to
remain sort of the same. A circle has to stay a circle. Square has to say a square. I'm not going to
stretch them anyways. I have to force myself to learn how to combine them
in new and novel ways. So for this exercise, I think I'm going to
I'll use a circle. And I'm going to
use just a plusin because plus sign is really
easy to, you know, draw. It's like a simple shape. So I'm going to set my timer. I'm just going to
do 5 minutes for this one, and we'll go. The first thing that I can
think of is I can draw a circle and I can do
the plus side inside. I can draw the circle
and then I can do the plus side
off to the side, but at an angle, and maybe I can add one off to
the side there, maybe it looks like an xx. I can do the reverse of that. Do that. Now I can
add some scale to it. Let's add a really
big circle circle. That looks pretty cool. Maybe if I do the circle, I can do little x
around the edge. That might work and maybe add
in little circles as well. Another thing that I can try and do is I can make my circle. I can put my plus sign
in the middle and then maybe I can shade in certain sections of
where they connect. That looks pretty cool. Let's try that a little
bit differently. Let's draw two circles, one on either side of
the plus sign like that. Yeah, a little different. Just from what I'm seeing, I can do what I have there, but I can encompass
them all in one circle. Again, my circle doesn't have to necessarily be just a stroke. I can fill it in entirely
and then on the outside. I can do my plus signs there. I can use multiple
circles as well. Maybe I'll stack
my circles up and then maybe I have plus signs
out I't's do the shading. Yeah, it looks pretty cool. Now, how can I add a
more contrast to this. Let's do a big circle like that. Sure. What else can
I do with this? Let's do one circle in
the middle and maybe plus signs going out from the center. But then with circles
on either side, and maybe a revolving.
That one's pretty cool. What else can I do
with that? Let's see. I can stack plus signs too, so it's more of a line.
Looks like a football. Maybe just a nice
round football. That one is not
perfectly circle, as I stated in my condition, so I'm going to try
and change that. But what I could do now that
I think about it is I can draw two circles like that. Then I can do my ple signs
in the middle like that. Then maybe I can
shade in the outside. The center is just the football. That's one way I could work
around that situation. I do like experimenting
with this one here, so I'm going to draw a little
differently, circle here, let's do a big, but then I'm going
to draw a circle on either side and maybe
shade in there. Then where these ones, I can do a plus side
and the inside. That's a different that's cool. This one, Okay. Yeah. Well, this one
and this one can sort of I can sort of make it work in a combination form
where I have like that. Cool. What else do I
got going on here? The, maybe plus in vertical, so it rotates that side
by side. Maybe one more. Let's just circle. Let's Really big. Oh, yeah, I guess we can
do square like that. Okay. Yeah. And then perfect. Okay. So in 5 minutes, I was able to go through multiple different
arrangements of the x and the circle or the
plus sign in the circle. And I modified it
in various ways. I created angles, tried overlapping them
in different ways. Obviously, I went through this
pretty quick in 5 minutes. And I was able to experiment
and try a few things, and I noticed that I was sort of going back to the same
thing over and over again. But that's one thing
that you'll learn when you go through
this process is you have to start asking more questions and then
you can push yourself past your initial assumptions if you get stuck doing the same
thing over and over again. So obviously,
everybody's practice is going to be a little
different and the more often you do it, the better you'll
be at coming in and coming up with more
original ideas. So try to yourself, if you use the same
shapes as me, go ahead. If you use something different, I would love to see
what you guys do. Just take a picture of it,
post in the project panel. And yeah, let's go
to the next class.
16. Bonus 3 Reference Blast: Hey, guys. Welcome back. This is going to be our
reference blast exercise. I have decided upon one of my references that I
have printed out here. I'm going to just use this
simple bird for illustration. Again, I'm just going
to do a quick session. So I'll do maybe just 4 minutes
for my initial reference, and then I'll do 4 minutes
for my draw from memory. So I just draw a line
right in the center. And then what I'm
going to do for my my draw from reference. I'm going to analyze the
picture and just see angles, forms, shapes, stuff like that. So I can see that initially, there is a there's sort of
a line that goes like that. And he is pretty big
almost a ball, like that. And then from that line, we have his head
coming out like that, and a small little beak. Yeah, probably actually
smaller than that. But what I'm noticing,
his head goes back. Monger and then fat. Then I'll draw in his big eye, and I'm just going to
give some shading there. He's got a big belly,
big and round. Then his tail feathers
come out like that, and he has wings. They start here, and come out and then they almost
follow that angle too. And then they go. Then I'm just looking at the angles, seeing what I see. Again, this is just reference. Now that I've drawn
in my initial, I can see if there's any areas
that I can improve upon, and I can see that, like that. Then here it sort
overlaps feathers, so I'm going to sort
take note of that and shading and Okay. There's a little overlap here. And then the feathers sort of follow the
direction of his stomach. And there's a little bit of sheeting in between. Noticing. And Speaks probably smaller than what I have displayed
there, but that's okay. When we do our
reflecting correct, we can address that. Okay. Okay. Again, you can be as
sketchy as you want. There's no right or
wrong answer to this. It's just having
fun, feel it out, draw lines through it. You can shade it if you
want or just get the forms. But yeah, just have fun with it. It's your practice. You can
do what you will with it. I enjoy putting a little detail, and I enjoy being
pretty loose with it, especially for these
exercises because I'm not planning on really showing anybody them there quick things. It's just for my practice and my personal creative
development. So whatever you
feel, However, far, you want to feel
you want to push your illustrations when
you're doing this exercise. Go right ahead. But now I've addressed most
of the main forms, and then I can
move on from here. So now we did our
reference illustration. Now we're going
to move on to our from memory illustration. So what you can do is simply
just flip over your page. Now I can't see either of them, and I'm going to
try to draw from memory about 4 minutes and
draw this illustration. So from what I remember, as I noted that there was a specific angle going
from his head to his tail, and then he was really round. And his head was
also quite round, but it was more flat at
the top, as I recall. And then it sort of came out
like that round very round. Okay. And then he had a small little beak
and his eye. Okay. Now, from his big belly, his tail followed that line. And then we had his wings sort of came out from the
center of his body. That, from what I recall. And I think his head was a
little flatter than that. Okay. And tail feathers coming out. Again, there was an
overlap here and his legs were nice and thin coming out at slightly
different angles. And he had longer feathers. I remember the feathers at the bottom sort of
follow this direction, and he was sitting on a rock. And there was shading here. Shaded sort of like a, you know, sphere because he is very
round round pudgy bird. And his eye. Kids back more at the angle
with everything else. There we go. I'll just put in a little
more shading there. Okay, so I'm going
to stop it there, and then I'm going to reveal the other side and
see what I did, what I did wrong,
and I'm going to reflect and correct it. All right. So bringing
back my reference picture, and I'm going to switch
to a different color pen. And then, honestly, looking
at my reference picture and looking at my illustrations,
it looks pretty good. One thing that I do notice with the wings here is actually
I made them quite round, and I think they
tapered off a little narrower and had a
really sharp angle that sort of follow this line. And his tail feathers, they were a little
thinner as well. So here, Okay. That's where I could
have corrected it a little more and
they ended there. I did pretty good. He does
have the bulging belly, but I see also here,
it connects more. If I were to redraw this
really quick with the shapes, I would say that I
have to make sure this is more connected
here to the bird. And then there's
sharper angle here. This is a narrower
angle like that, and that's more the shape
of the bird that I see. So I had to sharp angle,
that's not right. I need it more like that. Those are the things
that I'm noting. The beak, I feel is still a big, it should be thinner and
longer that a little than the eye placement
is pretty good. I think it could have been a little
flatter near the back. Like that. Yeah.
That's a nice curve there. And these wings. These wings they went
down and then they poked out and went straight and then it came up
a bit, like that. Then there was a
second tail feather. Again, it was thinner. These are the notes that I'm
sort of making for myself. The angles, the proportions, where the placement of the
wings are, and in comparison. I don't say, I did
relatively good in comparison with other drawings that
have done in the past. But now I'm just noting all these little
things that I missed. And by doing this exercise, especially doing this reflect and correct and noting that, I have this in my
sketchbook now. So if ever I were to go back and want to draw a bird
or something like that, I could just flip
back to this page and just look at the things
that I've noted. And since I did this
with my own hand, it'll sort of retain
in my visual library. So I can pull it back more often than if I never did this
reflect and correct. There we go. So this is
the reference blast. It's really fun to do. And
if you do this over time, you're going to improve your
drawing ability as also, you're going to improve your ability to observe
the characteristics of the things around you
and from references and just building up those simple shapes in your illustration. Yeah, find those simple
shapes and then work. At adding detail later on. Again, you can go into as
much detail as possible, or you can pull it back and make it as simple as possible. You can have a very
sketchy style like mine, or you can try and
do it very cleanly. It's definitely up to you, and it's your preference
in your style, so fit it to your own desires. All right. So I'll see
you in the next class. Okay.
17. Bonus 4 Sketch Blast: Hey, guys. Welcome back. In this class, I'm
going to go through the sketch blast exercise. And for my sketch blast, I chose this little candle, and I'm going to use it
for my sketch blast. So it's a pretty simple shape. I can tell that it's cylinder. It does have two parts, so I can actually incorporate
both of these things into my sketch blast exercise and try to see what
I can come up with. As I go through the process, I'm going to first look
at the faces of it, what it looks from the front, bottom side, and side. Obviously, it's going
to be 360 degrees, so it's going to look
the same from all sides. The top and bottom might
be slightly different. So I might address
that, and then I'll go into more perspective. All right. So I'm
going to set my timer. To let's just do another
five minute session, and I'll get going. I'm just looking at it front on and what I can see
if it's front on, well, it's pretty simple. Then at the bottom, I
see that it curves down, and then it flattens
out and it has a little bottom piece like that. The top, it has the lid on top and really that's
what it looks like to me. Now if I look for a at the top, I'll just draw a simple circle and then it has some
writing in there. The bottom, it might
look a little different. So I have that,
and then I have to be careful and I'll try
and draw the bottom. I got my faces down.
It's pretty simple. Whenever you're looking
through your sketch blast, try to find the faces and try to draw them out
in a flat plane, and then we can go into
more three dimension. So I'm going to hold
it up slightly. I can see that the top
is more of an oval. I'm going to draw a line
to address the angle. I'll draw an oval for the top and then an
oval for the bottom. And then I'll simply
connected like that, and there's a little
piece underneath, and it's round at the bottom, so I should change that. Then I'll just finish the
oval there for the top. Cool. What I'm going to do
is I'm going to take off the top and I'm going to try
it at a different angle. For me, when I'm
looking at this, it's a wider opening now. And then it's around at the bottom, I can't
see the bottoms. But here, is the top, and then inside there
is the candle wax, and we got the wick. Okay. All right. Let's try
and change it up. Maybe I'll draw the
cap now. The cap. I'm going to actually just do the front facing of the cap, looks like that, and then
it goes down quite a bit, but it also has this
middle section here. Let's try an angle and then has that section the
protruding section, the grip, I guess,
where it catches on. Okay. Then if I wanted to, I can ander shading
lines to wherever. Okay Let's try at a
different angle. All right. Okay. Mm. Angle. I don't see
exactly what you're seeing, so yeah, I'm going to sort of just overlapping
everything here. Yeah. Cool. To go
back to this guy. And let's draw it at a
different angle here. For me now, just sideways. A little less more
of a perspective. And then we get a little bit
of the candle wax in there. Then maybe I'll shade it a bit. Add some character to
the illustrations a bit. Yeah. And, let's draw the top view, it's the edges the candle
wax on the inside, and then the candle wick. All right. I think
that's our time. Okay. So that was our
sketch blast exercise. Just 5 minutes, I was
able to go through a few different variations of the illustration
or of the subject, which is this simple candle. And it's good to work
through simple shapes like this for your daily exercise because they're really
quick and easy to do, so they don't take
more than ten or five, 10 minutes to get
something down on paper. And you can also go in
and you can incorporate more shading if you wanted to to add a little more dimension
to your illustrations. Again, this is just for
practice and it's for building up your visual
reference. All right. So by doing this
exercise, often, you'll get acquainted
with how you can draw three dimensional forms
in different ways. And by addressing
the planes at first, you can sort of
understand how things you haven't seen in three dimension actually could be portrayed
in three dimension. Yeah, so definitely
try that out, see if you can find something
simple around your house, even a soda can or, you know, a book even. Draw a few rectangular
prisms in three dimension, draw the planes of
different objects, and see what you
can come up with. If you have any little toys, those are always fun to
draw and play around. If you do this project,
post in the project panel, I'd love to see what
you guys create, but I'll see you in
the next class. Okay.
18. Bonus 5 Creativity Blast: Hey, guys. Welcome to the final exercise,
the creativity blast. So in this exercise, I've actually decided to use my previous reference
picture that I use for my reference
blast exercise. And I'm going to use the
bird and I'm going to, you know, blasted out into different versions
to see what I can create. Again, these are to
experiment with the forms and the structure and
to see how far you can push creatively
this illustration. Then from there, if you wanted to actually
go into detail, you can circle the concept that you really enjoy
doing and you can take it into an actual
sketchbook and you can refine it and
illustrate it how you will. But first, it's good to just explore and experiment
with the shapes. So let's jump bred in. The first thing that
I'll do is I'll just draw a little
bird in the middle, noting the shapes. So
there's a big circle. He has his head there, his beak, his feet and his tail. I'm just blocking it out
in simple forms like that. And maybe his eye. Okay. So from there, I'm going to start blasting out and experimenting
with the shapes, proportions sizes and
see what I can create trying to retain that
this is still a bird. Okay? So I'm going
to set my timer. I'm just going to do maybe
a five minute exercise, and let's blast off. So I'll start by drawing
a line, spoking out. And I'm going to start by increasing some of the contrast. So the first shape,
the big shape. And then I want a
really big body, and then I'm going
to take this head, and I'm going to make it
really small like that. I think that'll be pretty funny. If I see a bird like that, and then a little
tiny tail feather. A nice fat little bird.
Let's do the opposite. Let's take this round body, and I'm going to make
a really big head. Again, sticking with this style. Push the legs maybe a
little longer, think that? Then maybe have a
big eye. See that. I'm taking what already exists, and I'm just pushing
and pulling it in various ways to try to create something a
little more unique. Let's do another
one. Big circle. I'll do a little head like that. Maybe a really long beak. Maybe a long legs. Okay. Let's try. Let's make them
even round or really round and squish this up against make those wings really small
those legs tiny tail feather. Like that. Pudgy bird. The breast does come out a little
more in the bird. I'm just taking note of that. So I think I want to push that a little bit and
pull the head back. Maybe more streamline him. Push the breast and Okay. Okay. I'm always looking back and I'm referencing
the shapes there first. As you can see, I've created already five
different variations of this bird in various ways. Yeah, just pushing and pulling it to see what I can come up with. Start with the head. I'm going to make
a really big eye in a really small beak. I like the line at the back. I could just go straight
this time. And then Okay. See those wings. Okay. I like that one.
One is a fun one. I do like the big eye, so let's push this out a bit. Let's go even with the eye
and smaller with the beak. Let's do some small
wings for this guy. Sappy wings. Okay. Yeah, let's try even more exaggerated
version of this guy. Let's make him maybe have
a bigger. But really. Okay. Cool. Is interesting. Okay. All right. There we go. That was my
creativity blast exercise. I took my simple forms from my basic illustration
of the bird, and I really tried to push
and pull the proportions. However, each one,
it does resemble a bird or the bird that I
illustrated a little bit. Obviously, we can take any of
these a little bit further, shade them appropriately,
round off more of the edges. Make it more realistic. But the point is to go through as many
versions as possible in that time and see where you can push and pull and what works and what doesn't
work. All right. So when we do this often, we can take our illustration
to the next level, creating more unique
illustrations and just having fun
in the process. I really enjoy doing this
with just simple objects, like even mugs or you know, taking the basic
structures of cars and pushing their proportions
to see what I can create. You can try them at
different angles. You can try them at
different shapes instead of the bird
being a circle, we could have tried it, pushing it to be more of
a blocky bird like that, pushing the angles like that, but still having the
same key components that make up the
bird itself, right? And then maybe a
triangle like that. So again, you don't have
to limit yourself to, you know, saying that it
has to fit proportionally. You can be as
creative as you want. Again, like I said,
in the class, if you wanted to turn this
bird into a rocket ship, turn it into a rocket ship, have fun, as long as it
still reads like a bird. This is what you're
experimenting with. You're pushing your
current illustration past what you thought was possible and having a creativity blast. All right. I had a blast
teaching this class and I hope that you've enjoyed the class and
learned something from it, something that you can apply
in your creative practice. I really hope going forward, you can experiment with your own creative workouts and see what works for you and
build a creative habit that will last for a long time and increase your
creative potential. I'll see you next time. Okay.
 Kyle Aaron Parson, Graphic Designer and Illustrator