Transcripts
1. The Number 1 Ingredient For Great Portraiture: If you have watched any off my other tutorials, then you know that I think the number one ingredient for great portray photography is storytelling. When you start playing with gels and color, understanding what kind of story you want to tell is really important. Otherwise, the color can easily look tacky. So I recently saw images from a workshop where the attendees shot a nude model. But she was just standing there. What's being lit was pink color on the background, and she had blue collar on her face. While I appreciate experimenting and photography and also the creative aspect, poor traits like this are neither here nor there. You need to do something that bring such images together in terms, off mood and atmosphere and the moderates expression so that such an image make sense and can be lifted to a whole new level of creativity. But how can you do this? First of all, when you plan any shoot, ask yourself the five W's what, who, where, when and most important, why? What is the story off your image? Who was important? Where is the image supposed to take place? When is the image supposed to be and, most important, why are you doing it in the first place? The what? Off your story. The word story can be taken literally or figuratively, literally means that your image could show something that looks like a movie or TV seen, especially when you are starting out with gels. This is the easiest way to get familiar with callus theory and the placement off your lights, because you can copies look from something that you already like figuratively means that the story off your image could be anything where the viewer might wonder about. Or that's packs his or her interest so the story could be about closes off the model, like in commercial advertising, for example, or designer wants to sell. Has Fashion was an interesting concept. All the story could be about the model off the client like moody, sexy or playful fun expressions and so on. All the story could be an editorial story like in magazines. You will often find this editorial spread of some hip and edgy models who celebrate a certain lifestyle, so he had also helps. If you have a certain advertisement in mind or an image from a magazine that you could copy how to get started. So be honest that you just cringe when I have said to copy the work off somebody else like Oh my God, how can you say this at it's always cringe a little when they hear they should copy something because it sounds like they are supposed to steal somebody's else's vision without giving them any credit. If you also feel burdened or inside, it was a suggestion you should read Austin clearance book Steal like an artist. So the idea is that most inventions are based on some kind of ideas anyway. But when you start to copy something, it helps you in two ways. Who first off all you will properly understand the concept. Shooting with gels can be quite challenging as the life placement or your own camera angle can reside in a completely different look and analyzing a picture off a TV show, for example, and just trying to set it up the same way that will help you to understand the concept so much better. And secondly, in photography, it is very rare that your image will look like a copy kits because most off us we're using different models and make up artists completely different gear and brands and so on. So it would be nearly impossible to think that you store that idea and even better, many times the copying leads to brand new ideas and, most importantly, your own ideas so the copying can develop your own results and will help you to find your style. And you will become so much better at analyzing images and to develop them from there. So don't be afraid to copy anything you like from this tutorial and make it your own through different life placements or play with different color gels and so on. Have fun.
2. Quick Review Of Portrait Lighting Basics: a little bit about us as you can probably tell about my accent. I'm originally from the UK Sandys from Germany, and now we're here in the great city of San Jose, California and now a little bit about studio photography. LIGHTING basics. If you're already familiar with key lighting, fill lighting in terms such as High Key and Cats Lights. Feel free to skip to the next lecture. We're gonna do a light speed review of the main lighting concepts that form the basis of our own studio. Set up for portrait and then, as we build, the sets will show you where you can bend and break some of the rules as we start to add color. If you've never worked with lights before, you might want to pause and replay this video a few times. So here we go. So let's say you only have one light on one model. What do you do? So take a speed, light or stroke, such as a flash 0.3 60 assuming you have a good location background. Typically, you will situate this key light at about 45 degrees to the one side on 45 degrees, pointing down When the model angles of face towards the light, you get a nice catch like a 10 o'clock or two o'clock and be the face will be shortly, which is the most flattering as it slims the face and you use a pocket wizard or a similar trigger, actually trigger the flash for outdoor portrait photography, this is a perfectly portable option. An important tool is a light meter, which will tell you which opportunity to set your camera at at the shutter speed, and I so you already have, he pointed to the light from the models. Position on simply triggered the flash to give you the reading. So what if you need some more options? How about a fill light to fill the shadows without being noticeable as a catch light in the eye. This light will go behind the photographer or to the side, depending on the space, and there will be a lower power. A good rule of thumb is 2 to 1 or 3 to 1 in ratio. With the key light, be careful not to make them equal, because the light they will get flat and this makes the pancake faces. You don't want that one cool option will show you later is called clamshell lighting, and he had the fill light comes from below, with the key light above at about 12 o'clock. So let's say the model is in front of a dark background with dark hair or clothes. So what, That here we can add hand or rim lights behind the model. They will accept you in the hair and give a three dimensional aspect to your image. Any of the above lights can have color, and it's them by using gels, but you have to be careful not to mix your colors. Most importantly, you have to think about what you're attained to achieve by using color in the first place. Remember one light, one job. The great thing about this tutorial is that you will always see the image is straight out of camera rather than retouched unless otherwise stated. Many online sites only show the final image, which can be misleading, and you don't know where to stop. So let's dive right into it.
3. Ask Yourself These Questions Before Starting The Shoot: But now you have an idea off the story off your image. Or maybe an advertising you're thinking off copying for now, and this will give you a good idea about who off your story and the posing that should be involved. So if racing back to the example off the workshop like this nude model in front of a pink background and shared like blue light on her face, we need to wonder. What does she have to do to bring this concept to life lighting? Lexus suggests the story is figurative, unless you're shooting the movie Alberta because there is no real life scenario or TV's in where you would have a pink background and the blue faith. Such a dramatic and different light works well in fashion and advertising, where the designer wants to portray his or her funky wardrobe and just want to have an interesting concept. However, in nude photography, it is even more difficult to pull it off unless supposes are equally funky and the concept is rather abstract. So in short, if the WHO is not in the story or the fashion than the who is the photographer himself, just be careful. If you don't deliver a concept with a story or a fashion editorial, but you just want to be abstract. You really have to shine through the images as an artist wasn't even greater. S a really concept, and you have to become very abstract. Think Picasso or Salvador Dali as a wise, dramatic, light and boring subject that will not work well together. The wear Off Your story, the beauty off using props and gels is that it's very easy to design scenes and places, even if you only have a small budget. So it was a simple blind. You can pretend that you are in the living or in the bedroom, and this effect becomes even more believable when you're attached gels to bring certain colors into your set up. Which brings us to the wen off your story. So with gels, you can easily design the concept off time for your story. So blue gels they could suggest that it's night time, and with orange gels, you can simulate a sunset
4. Why Should You Do Gel Photography Right Now?: Why should you do gel photography right now? So the reason why you shouldn't really care what other people are thinking is this gel photography is still fairly new. Well, not really new, but just started to become a famous since recent years. So, of course, many people don't quite know understand that yet, especially all the people and in Germany, we have to saying what the family doesn't know. You won't Gasol meaning what we don't know we don't like. That's called human being. And however, the reason why it became more mainstream since like a few years is just this creativity or this creative freedom was never more affordable. So in the olden Finn camera days, photography had to serve a specific purpose or I had to immortalize a specific fact. So photography. Klein's wouldn't really pay for creativity. But for company head shots, reading pictures form it's cool portrays or newspaper images. Or just maybe they would buy Finn to capture holiday memories. But clients like photography clients, they wouldn't exactly be happy if the photographer had said after the shoot. Oh, by the way, I used a blue gel for some creativity, so your face very turnout. Blue CIA. So yeah, they wouldn't be happy. And that would have been very expensive for the photographer to try out creative looks, because I would have to invest into film and prints, or at least buying contact sheets. However, nowadays creative freedom, it's more affordable than ever. So now you can say to your client, I think we really got some good headshots. However, I saw that you brought this really nice jacket. Do you mind staying in a few more minutes that we try out some colorful and dramatic images ? And the worst thing would be that decline may be raised it a couple of minutes and didn't buy his images. But other than that, creativity is now more affordable than ever. So go ahead and have fun visits. Working with gels can be daunting, and a lot of photographers are actually afraid to use them. But why so whites? I'm telling you to have fun with gels. I do understand why can look dancing when you're just starting out. So, first of all, there are many different choices. You will find sick gels and sin gels. You will find colored cellophane wrap gels for flesh guns off us tropes, and you might wonder how to set some up. And which mother fire should I use. So recently? I was also asked how I knew that it would look good and how I decided on the intensity off the calla. Well, I don't. So that's why they are called subjective lights, and I will increase or decrease the light intensity until I personally like it. So it's not objective. It's just up to me. And that's another sweet fact about the modern days. At least you have now on led display, so you can judge your progress, however, not having any rules. That can be daunting for many photographers, too, but there are a few tricks that we will tell you later. So again there is no need to worry. You also have to know a little bit about color theory as complementary colors. They can cancel themselves out when you mix them, and you should know when you can do this and when to avoids us. So there there is a saying in photography, one light, one job, and that's especially true for jail photography. Usually you don't want to mix gels if the color can get muddy or messy and the next uncertainty the distance to the subject and your own camera anger that can also play a role when shooting was gels EST us under exposure and over exposure and your Apertura.
5. How To Approach Lighting With Gels: so s you can see there are quite a few factors to take into consideration. But why is gel lighting really different to normal white light? So when you shoot with white light, you can meet her for it. I always use a light meter and the studio as it helps me to avoid any guesswork. All I have to do is to decide which Apertura I'm looking for. Usually more depths off field when shooting fashion like F A to F 11 and less steps off, feared when you shoot the background that has textures, or maybe about F to toe F 5.6. And the moment you attach a gel despite it to know that gel. So depending on its color and its sickness, it might lose 123 stops, which changes your overall apertura unless you want toe under expose. So, however, the reason that I say it's vital to know your gel, that's not really vital. But it helps you to understand that at the beginning is that you can still predict and what happens. So, for example, if you want to use a gel as a hair light, you could simply meet her for that, at least then you have a starting point. So usually a hair light is in the ratios rito one or 2 to 1, depending on the hair color. So if you have a model with blond hair and you're shooting at F eight with your key light, then the hair lights would be at least two stops down. So that's a hair is not really blown out. So, for example, the hair light would be then at F 2.8. However, if you have no model with dark hair than the Apertura, could be F four or even 5.6 whatever you prefer and not to blow out any hair. But you just want to add a nice separation to the background. So let's say you decided that this Hail Itis F four and you want to have now a gel on this light, maybe a sick, dark blue foil and from testing this jail before you know that it cuts the light by three stops. So instead of having an F four that you would normally use now, you could meet her for drumroll F 11 so this will give you at least a good starting point because now your light is equivalent from the brightness, and now it's just up to you to judge if you like it this way, or if you want to have a lighter or darker and then you're just accordingly. So as a rule off, some under exposed for more saturated and darker colors and over exposed for more airy and lighter colors. And this would be then also the last thing where you would have to make a decision on in terms off fit for your story or your preferred look. You have to say, Do you want to have, like, a hazy picture versus a contrast? Look, Do you want boiled colors or pastel colors? Do you like vibrant, lighter look or a dark under exposed look? Do you want to have direct light with modifier or indirect light, where you can also bounce the gels against the war? So again, don't worry about this right now. We don't have to decide it. The right local will form in your mind the moment that you decide on your own story, and if you find that the daunting than in the first tutorial, I will break it all down for you.
6. Lighting Gear And Preparation: all right, so let's talk gear and preparation in this tutorial will set up all kind of creative scenarios, from story to fashion to more abstract scenes. The lighting is possible on every budget. We will show setups that could be achieved with simple flash guns. Hours of from the young newer, about $60 each. Ah, Flashpoint SL 3 60 which is a battery powered flash, come with more power around $300 and with studio strokes. Hours are bowing. German eyes, their 400 what's each? And they're about $400 each as well. In all, we'd suggest a minimum of two lights all the way up to four or five if you have the budget and if not, then access to a studio with them. The modifiers that we use are also very easy to get holder. We will use simple umbrellas on reflected issues that often come with strobes. If no umbrellas easy to find on Amazon and they're pretty cheap on a beauty dish from well focused light. We'll also show you a mixture of gels that are available, and this is really the focal point of this entire cost, because this will literally light up the story that you want to tell from Roscoe Color effects You get 15 thin gels are around $30 to newer eight thick gels around $12 or even colorful cellophane wrap that you can buy your local craft store the possibilities of huge and can bring out all sorts of creativity. These are our favorite, however. We will also show you how to set up gels in soft boxes and in strict boxes as well. We'll be using a grid on the flashpoint to really focus that light. Our background paper is also kept very simple. You'll see different effects on white, black and gray paper. Our backgrounds are from savage. So to help construct the scene and tell the story, you want to find affordable props like blinds or plexiglass sheets, and especially fog in a can, which is an amazing tool, which you spray between the light source on the model. And it really looks like smoke without the danger of setting off any smoke alarms. We found a vintage theater sign Hobby lobby, which will be key to one of the sense on lots of other small props, like coke bottles, vintage telephones and a lot more. And if you want to be even more creative, the following items are amazing. We rented a pets file or mammography lanes to create more bouquet. We will shoot through a UV filter smeared with hairspray or battling toe. Add interest to the foreground and will shoot through a soft filter to enhance the flare from the colored lights as well. You could also breathe onto the lens to get the same effect. I made a very interesting milkshake out of potato mash to set up a movie dynasty. Sandy shoots with a full frame canon camera. The five ds R and also we were making recommend experimenting with different lenses. We have a Sigma are 24 to 1 of five millimeter cannon prime 135 millimeter cannon, 100 to 400 millimeter lens. Wider lens is a usually sharper and very polished, so you will not see too much flair from the lights. And that's normally your intention. You'd even want to use a lens cap, typically to avoid flare. However, when you're working with gels, you're gonna want to see this colorful flare effect and to test different lenses or manipulate that flare with their filters In our studio standard studio setting is either 100 shutter speed either 120 50 per second or 160 there for a second, but only other ingredients will be described in the individual tutorials for each set.
7. The "Hitchcock" Look Intro: Achieve A Movie Look With One Light And Some Blinds: all right, So in our first tutorial, I did exactly this, breaking it all down. And as I said, if you never worked with gels before understanding how to use them in a specific scene instead of random fashion, that might be the easiest. So we will start from here. And, as I said before storytelling, that's my number one ingredient. But now we also have to include the other six, which are lighting exposure, style, posing, composition and post production. So let's build up a Hitchcock scene and let's look at the lighting methodically. So Step one. Just one light step to colorings, a slight with orange gel on top. Step three. Bringing in separation. So the second light was blue gel and step for making the background more interesting like patterns on the background. Or maybe some Hayes. And the great sea thing with this kind off seen is that everybody can do it on a budget. Your main properties of simply window effect was blind and the sheet of plexiglass, if you like, so the lights can be flesh cans or strop's, because the heart doesn't like the better. So even if you don't have any modifiers That's not a problem in this case. And from here, it's important that you also know when at this time to break some roots. So in typical report relighting, we want to pretend that it's similar to the sun, so it's most flattering when it's soft. Therefore, we use really big soft boxes, and typically it's important to have a least one catch laden the eyes so that the eyes appear alive. And this is usually place a 10 o'clock or two o'clock, depending on whether soft boxes placed and this will produce the most flattering shadow and the nose shadow is going down. However, in movies or infection, we often break these rules so we don't really look to flatter somebody, but we want to make it more realistic or even more dramatic. So in our case, we needed the really hot light sauce to produce these Hitchcock shadows, and we have to also ask ourselves, What else do we want to achieve with the story? So if the light comes from, if the lights through the blinds comes from above, this means that our window it's most likely on the ground level as a model is lit by a street light or maybe even the moon that comes from above. But in our case, the light comes from below, meaning that our window is in the higher building and the model is looking down to the street lights. So it's less flattering for the model as it produces is really harsh shadows and also this uplifting lighting, which is typical for horror movies. And that's exactly what I'm looking for in such a theatrical setting.
8. The "Hitchcock" Look - Step 1: White Lighting: open. Yes, Perfect. All right, so we're going to start things off easy with this Hitchcock inspired look. So before we add, any gels will start with simple white light. So what have we got here? We have the blinds and the perspex hanging from extends that you can see up there in the top, right? Phoebe is in front of the blinds, as if she's looking out. The window on the flashpoint is on the other side. It's at about waist height pointing up, and that, with the grid gives quite a strong light, too great the shadows onto her face. Sandy's going to use a couple of different lenses for this life, sir. 101 125th of a second F 7.1. So let's go have a look. So this is a step one in the slighting set up, placing the one light. And don't forget to achieve thes shadows across the face. A small and heart light source works best. That's why we use a flash point. 360 street light and a flash can would produce a similar light, but the recycling time takes longer. Therefore, our flesh point or any flesh with the battery pack that works great here. And if you want to use a stroke with a heart modifier like a beauty dish, you want to place that further away because the further away, the harder the shadow. If this is difficult to remember, think about the sun and how the sun produces produces a shadow. So ah ha shadow. It's when the sun small and first away in the softer shadow and like bigger light source is when the sun sets down and goes through the atmosphere and everything looks beautiful and soft. So whatever you do, kind of like your now detective. So we're kind of looking through their like something spooky is going on awesome and really kind off. Not with this front hands, actually. But with your backhands that you open the blinds and really like rip rips and open. Yes, perfect. Awesome. Yeah, that was great. And you can just change whatever, even when you kind of look up to the ceiling that look good as well and just kind off like you're in the spooky hitch car scenario where you have somebody out there who really freaks you out. Very good even if it's more, I hide. So how you would normally look out? Yes. Perfect. Awesome. Okay, - now we could just leave it like this because it looks great and we can bring in some color in light room or photo shop. Or we could also convert this image into a classic black and white Hitchcock look. But we are here to learn about gels, and therefore we will go into Step two.
9. The "Hitchcock" Look - Step 2: Adding An Orange Gel To The Key Light: so a street light is most likely orange. So instead of using white light and doing any post production, I can add an orange filter here. We used to gel that this specifically for the fresh point. But you can use any orange gel that you like, Very good. And just look down a little bit. Was a phone perfect. Okay. And wow, again, like you're very secret. Spire. Yes. Perfect. And now you're getting really angry. Yes. Perfect. Very good often. Okay. I think this looks cool. Let's do one more Where you brings us. Maybe a little lower with candles. Yes, perfect. And maybe, like all your hair onto the front. Shorter. Perfect. Yes. Great. And just eyes at me. Perfect. And now again, like you're very top spy. So not scared. But now you really want to see what's going on often. All right, let's bring in the blue jail
10. The "Hitchcock" Look - Step 3 And 4: Adding Separation (Blue Gel, Lightblaster): nine times suggests that it's a cool blue tone. So I added another light on the moderates back to separate her from the background and to help my story to the next level again. In such cases, there is no right or wrong. All these lights are purely subjective flights, so the only object of flight is the first white light, and we can meet us through the blinds. The moment we attach the gel, we can decide if we want to add now more F stops. So if our light is meted for F eight and we know that the Orange gel would swallow two stops, then we can meet. And now for F 10. Or you can also decide if you like and under exposed look, and you can keep it at if eight. So that really depends on how Bryant you want these street lights and how you like your story and the same as with the separation light. Some photographers hated when the model blends into the background. And here I don't mind if there are no as a light on in this house off your story, then that's perfectly fine of some model blends into the background. However, here, I kind of like the idea that it's night time, which suggests another light and blue. In this way. I can also separate than my model from the background. So let's talk about the other ingredients exposure. So again, this is subjective. If you want to have the background out of focus, I suggest that you use an aperture at F four or 5.6. This will still keep the blinds and the eyes shop, but the background will be less focused. So the first images without background were shot between F eight or F nine, and then the last one's was a light blaster and this fake folk they were shot around F 4.5 composition, so that depends on the type off blind you will find. In my case, the composition is fairly tight as the blinds on the background stand and I try to capture the model in an interesting rule of Sirte's kind of way, without getting those stands into the image. So if you can find a boom arm for your blinds, then your life will be a lot easier, because you don't have to worry about this back sends. Supposing so. My model Phoebe is a very happy go lucky model, and big smiles are easy for her. However, here I had to brief not to smile and toe look more mysterious and dangerous, like a spy. Or maybe being afraid so props can help your mother to become the character in your story. Styer. So as this is supposed to be dark and mysterious, I briefed my model to bring back closes all those orange and blue they bring, like a pop of color into the scene. It doesn't become too light and happy and should keep the mysterious FIPE. If you don't have or used gels, you can shift your tones that into this block. Pastor effect is a light room or a C, our photo shop and this block pastor or movie effect That's very similar to the jails that we used and can be done in the split toning option so you can shift your tones, toe, orange highlights and blue shadows, and the intensity is up to you. You can even at some grain, and then you have more vintage look to make the world story even more three dimensional. I also wanted to add some interest to the background so you could easily at another flesh from above. So kind of like if it's in the room that you have some light from above, and this way you could have a motivational light. And a motivational light doesn't really lie. It's the subject. It would just explain why there is no separation between the model and the background. It basically just adds to this room look and becomes more realistic without really lighting anything. So the power output would be very small, like 2.8 or something. Or you could also add in some smoke, like was a fork machine. If your house or studio allows us without starting any, Um, yeah, fire or smoke detectors or any sprinklers are the talk that reuses fork and they can buy the company atmosphere. Air Soul. So it's had just arrived after the shoot, so we used a certain option to get some folk and talk like pattern onto the background. That's why we used a global and the global just means go between object, and our one is called a Life Blaster so you can attach certain slides in, and then when the out of focus. I can throw some interesting pattern onto your background similar to a projector, and that's another great way to just at some interest to your background and to help your image to appear more realistic.
11. The "Shadows On The Wall” Look - (Plus Green And Red Gels): as you have seen to set the scene with gels straightforward. When you have a story in mind and with a simple items such as blinds, you can actually create a variety off things. For example, if you place it closer to your background, you can use these blinds as a global and use the shadows for an interesting effect. He's always always out jets from the side. So for our first set up, I kept this light clean again. You can still change it later and light room or a C R if you want to add color. And this could be a great set up for some interesting portray. Its or headshots are moody fashions by a shoot. So then I added some color to create a more dramatic effect with the blinds. So I used green jell like a green jell on one side and the red one on the other side and red and green color combination that can be seen in movies like Blade Runner. I sing or family and can look mysterious or romantic. It's up to you which direction you want to go with this Look also, in case you don't like this color choice. You can still Trickett in post production to a slightly different color. Look. If you don't like post production at all, playing with color might be more difficult year. So a lot of time it looks actually better to slightly under expose in camera and to bring the highlights out with dajun burns in photo shop. So that brings us to talk about about the exposure. So you want a little bit more depths off fear to actually see the stripes and shadows on the background. So maybe between F eight or F 10 composition. This depends on where you place the shadows. So you want to create an interesting look, but without taking the attention away from the model. So I normally don't crop too tight and camera and leave a bit more room. So there's still have the chance to figure out a better composition in post production. So in light room you can find many crop guides overlays that can help you to make your images more interesting. You will find there the rule of sorts, the golden ratio grit. You will find Certs, diagonal try anger and aspect ratios, so you have a lot off different options to decide which kind of composition you like. Best anomaly. I think that's helpful, especially when you have this kind of shoot where you don't quite know yet. Will it look more interesting maybe to have more shadow on one area or one side off the model? Why do you want to have from war? Yeah, in the middle. So it's still me, I think, easier if you leave yourself a little bit more space, and then you can work out the proper composition in post production. So saying that post production you can add or change color imposed and bring out the contrast. Or you can intensify the effect off the shadows and the lines off course and also the style and supposing because we have shadow and lines as their things. This is a little bit more moody and mysterious, but if you bring in funky kala, then also anything goes so that really depends on the style off shadows and callus that you want to use
12. The "Neon Fashion Look" Part 1: Blue, Pink And Orange: and like, very mysterious again. I actually have fewer body, maybe a little bit side. Yes, beautiful, beautiful. So they set up is just a little bit of an evolution from the previous one. Again, we're keeping the same light from behind the blinds, and that's where the blue gel this time move the other jails around to about a 90 degree angle to the model. And here we have. A pink gel will add a red gel as well at a slightly lower position, and the combination of blue and pink gives his neon effects, which sandal describe in a little bit more detail. So we used the blinds for shadows and interesting effects, but we can also use them as a background. So here was inspired by images that had a certain vintage dina style. So I added some funky props and a Coke bottle so that the model had something to play with . So here you can go wild with color. If you like pink and red and orange that we give you this topic a neon sign pipe or if you use blue, ours I am. You could be maybe again in the bedroom and then It just looks like the light is coming from a TV. So he adds up to you in which direction you want to go. Story, fashion or abstract. Anything goes beautiful. Just go one here like this for a second. Yeah, I just throw your hair actually all the way. Yes. Perfect. Let me go around. Beautiful step timing, but more in the middle. Crutches. Yeah, that's great. Even further back. Kind of like, really against. This is not just you can perfect. And just to your own beautiful
13. The "Neon Fashion Look" Part 2: Blue, Red, Orange: really nice one more time. Just beautiful. So you have noticed. Is we've built the set ups is that they will share a similar theme of the blinds on the light coming from behind the planes and other lights congest be moved around at various positions. So experimentation is really important here. But for this set up, you can take the blue and the orange complementary colors opposite each other at about a 90 degree angle to the model. And as you can see, Sandy will just position herself at various angles to get different perspectives for this particular set and just look into the life. Yeah, that's great. I mean, beautiful office. You don't just want off. They just look into the life. You really cool and just look up. Yeah, that's great. Yeah. Look into the light. Beautiful. This is really good. Do this one more time. Just look into the life. Just look into this and come in their time, Like again. It's perfect. Maybe one more. Kind of like a pony tail. Like a pull me up. Yeah. Yeah. Really Cool, sailor. Free tonight. Often
14. The "Neon Fashion Look" Part 3: Blue, Pink And White Light (Key Light): and just look up into the light. Yeah, I know it's a little bit. So this is another variation off that neon theme. You can set two lights behind the blinds facing forward, one with a pink gel moment, blue gel and the key lights at the Classic 45 degree angle there as well. And in this case, we've removed the modifier to make that light a little brighter. A little harder. Yeah. This is whatever you do, This is your life. So just look up to this guy. Perfect. Very nice. It comes down. Just look absolutely perfect.
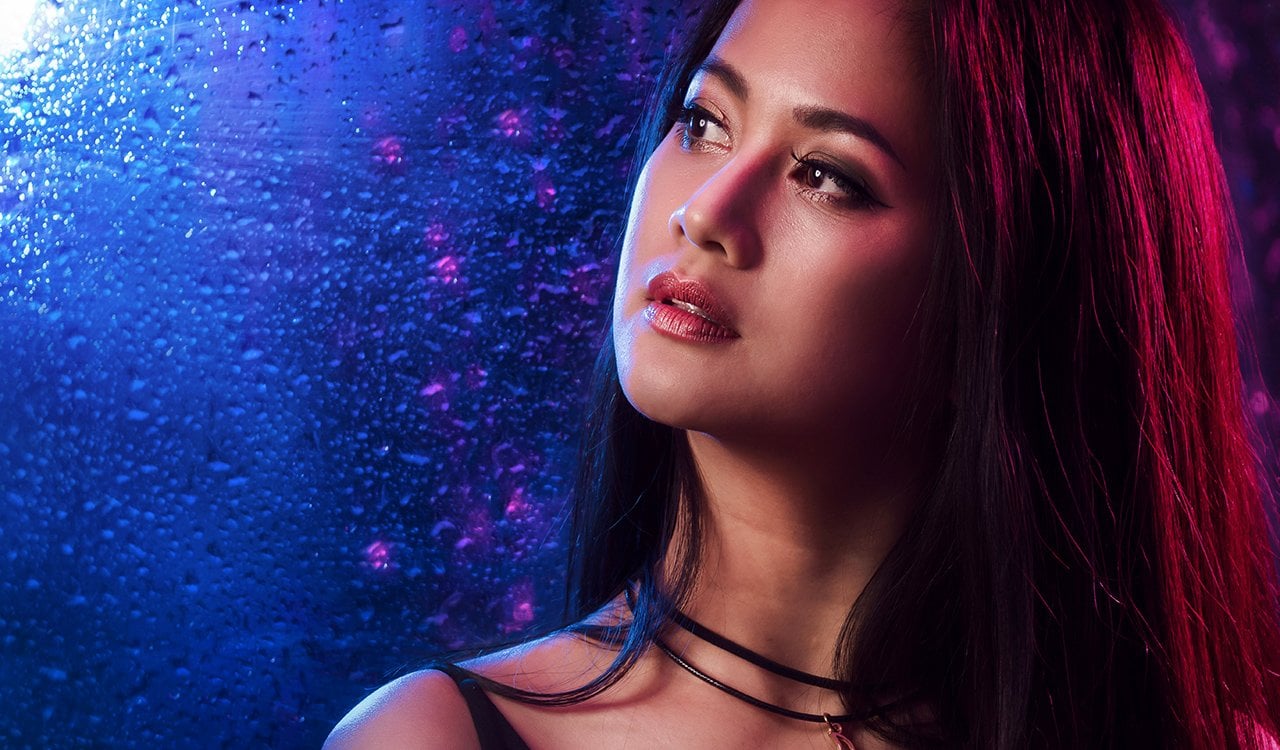
15. The "Riverdale" Look Part 1: A Simple Window Effect And Gels (Pink/Blue): beautiful from here we moved the blinds away and created another story. This time was plexiglass that we had behind the blinds. So plexiglass is and as a great prop for creating a windows seen especially when you can spray water on it. So it looks like rain and replaced blue and pink lights behind the plexiglass to create a nights street scene so blue for night time and pink to achieve the illusion off neon signs . But we also changed it from there and later on, we also plate with different color combinations and the exposure that depends how shop you like the raindrops. So for me, F eight worked well here. Composition. Those depends on the room you're shooting in. So the plexiglass is a bit limiting off course unless you can use a real window or just a bigger plexiglass. But you also have to play with potential reflections. So with these shoots, when you just watch me shooting, you will see the actually work a little bit slower. Because normally I'm just like you to, true to truth. And I kind of know what I want. But when you work with the plexi glass and you have to look out if you maybe see yourself in the reflection. Or in my case, I could see the windows behind me inthe e plexiglass. However, I didn't really mind it, so I saw that looked actually quite interesting. But that's just up to you. Just be careful that you might have to work a little bit slower just to make sure that all the reflections in the plexiglass are reflections that you actually like. Also play with different angles and positions, because with two gels that are coming us through the plexiglass towards you, you can shoot against visa or bulls. So this way, um, you see some off the shots, um, that have this mixture off blue or pink, which can look interesting. Or you can anger yourself in a way that you see only blue or only pink. So that's pretty cool. The style and posing toe fun and lighthearted or river, the mysterious anything goes very nice business one more time. Just have. So it's more like a finger again, like nearly like you're playing was your strap here, but not like the whole hand. Just like one thing. Perfect and then hatred taxes like really in there? Yeah. Perfect. Really nice. And does the same thing. Maybe just crossing. Yeah, I have. Perfect. Beautiful. Very nice. And just your eyes. It's a life perfect in post production. It might be worse. Wire toe under expose in camera a little bit and then to work out the highlights with dodge and burn and post production. So I just like to add more contrast and more saturation to my calluses that the pop even more. But of course, this is up to you and even some off the images later on in black and white, that could look interesting as well. Or if you want to have a more vintage vibe and you, Yeah, just East trade some off those images in postproduction that can also look very interesting .
16. The "Riverdale" Look Part 2: Create An "Outside World" With Props / Reflections: Yeah, it's nice. Now we just need a little bit this way and I'm really close with off. Beautiful. So we also found this method. See it a sign in the craft shop and initially related with the pink lie it so a little bit that it looked like it Waas let. But then we decided it would look even more realistic to add a certain light from above. So our flashpoint on medium power was an orange jail on so that the theater would look like it was actually switched on. So again, if you find a quick prop, that might be worth while to see if you can bring a gel on that light's specifically this prop. So when you remember that, we said one light has one job and the result first, maybe we just keep it just precip include because it was some kind off illuminated. But then, was this orange specifically for the theater that looked pretty cool. So pink and blue is probably in itself my favorite color combination as it has once more. This river they look so if you Gugu river their promo images, you will see these typical pink and blue images where the characters they sit in the diner . But as I said, we also experiment. It was different color combinations, so complementary colors for the most harmonious effect, like purple and yellow or blue and orange and so on. And from here we went one step further. To create even was a style off a Dina and placed a small table in the scenes of the model could also sit in the tien, our strings or props, and again, it's up to you which way you would like to go here. So in the original Archie Comics, apparently they were lighthearted. Why? It's the show River Data, which is based on those. Actually, comics is a lot darker and mysterious, and I think the style it speaks to me. So I edited phone and a fake gun, and vintage looking drinks ends this milkshake and again, that's up to you. If you wanted more lighthearted or more mysterious and oh yeah, quick tip to create this milkshake. Um, it's not actually a milkshake reused mashed potato and food color. And that's that's pretty cool, because if you create something nexus in the morning, this actually stays Lexus for the whole day, so you don't have to worry that it gets Yeah, running or anything like that. However, the cream on top that it's real cream from a can, and that will run. So if you can bring a cooler or something with you in the studio, that's a scream, actually, states a little bit cool. That probably helps for the whole day off shooting. But that's just a fun fact. If you want to create such American shake school really nicely, I look all the way up and lowers a 10 actually, little down Perfect. Now this is really cool.
17. The "Riverdale" Look Part 3: Alternative Diner Setups (Table, Milkshake, Props): I think being compelled feelings I've never found used to be controlled by came along. Thank you. So your looks, your eyes, something chance. There's no one in. There's no want the super natural roles. Father Side, I think. Been feelings. I've never felt witches on broomsticks Feel like Good with knows a little bit towards me yet. Perfect. Awesome. Very nice. Thank you Somewhere outside, right? You know one officer model, she said. What do you mean was jelled? She thought it was actually taking outside. I'm like, no taken studio. Let's see what that's like. Very nice. Very nice. I'll stay exactly like that. That's gorgeous. And now just look into the light. Very cool. Little bits this way. Look. Kind of like right towards met. Yeah, that's gorgeous. And just lower your chin. A tiny but down, Down, down, down Yet Yeah, that's cool. Very nice looks, Lena. Tiny but backwards. A few camp. Yes, perfect. Awesome. And for the military closer to you, if you can, without pushing it all over your dress. Beautiful. Also. Yeah, it's awesome. And maybe once more we can turn around and then you just look over your shoulder. Yeah, with the bottle. Awesome. Beautiful last year. Yeah. Beautiful. Really nice. And let me take that and actually turn to what? Fine. Like to watch the Plexiglas. And then you kind of touch it full. See if I can see you. No, it doesn't like, maybe like one. A little higher. Yeah. Perfect. And there's even a little bit more to your belly. Perfect. I think being compelled feelings I've never found used to be controlled by came along. Thank you. So your looks short rise something so
18. Let It Rain - In The Studio: straight man risk of once in more than Frances around, it's fresh.
19. Going Further - The Endless Possibilities Of Using Gels: By now you have great ideas about placing lights and droughts to create realistic stories. So let's talk now about gels that are just used as a stylistic device and at interest to your fashion shoots. So how can you use gels? If gels are not used as motivational lights as an story, then they can use directly as you would use regular studio lights, so just like can be as rim, light or hair light. It could be a background light. It can be a fill light the key light. Or it could also produce colorful flair. Those the great thing is that you can have a normal three point lighting set up with a key . Fill your hair light, for example, and you do your standard white light session first. And then you can pop gel to your hair light to create a whole new look on the fill light. Or you can change the color off your background without going through the travel off, changing the rule off paper or even buying all sorts off backgrounds so the possibilities are endless. However, you might wonder what is the best background to use for gels, so he has answers vary, so some photographers will tell you medium grey, as us will say why it and personally also got good results with black paper backgrounds. So how to choose if you want to light new background with color, Gray might be the easiest choice as it avoids the color. Becoming to pastor like what would happen was maybe white background or you don't really have toe worry that the light becomes toe swallowed as it might happen on a black background. So it was a neutral gray. So in the studio, use fashion grave by Savage. You can't really go wrong with so, however, if you want to create images where you see a lot of flair than a dark, how are black background that might be more beneficial? Otherwise of flair might lit lighter background, and this could distract from the flare. Or if you want to create colorful shadows, then you would need a wide background because that would work best So as usually, it depends on the use case
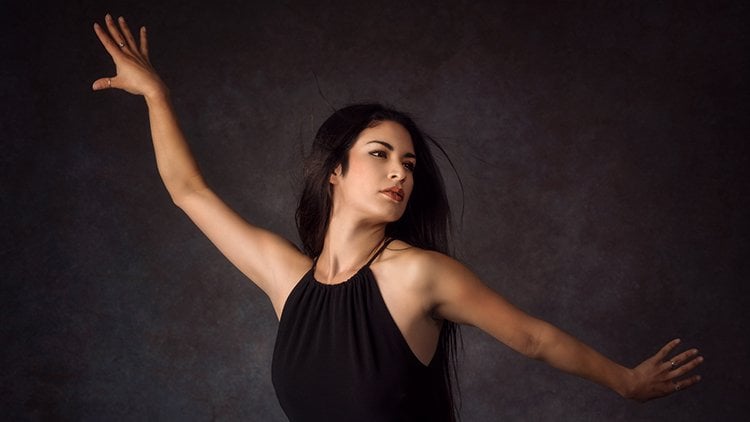
20. The "Romantic Fashion" Look Part 1: Red, Green & Blue Gels With Phoebe: beautiful. That's good. So in our romantic fashion, look, we're using a gray background paper and three lights as room lights, and so they are placed behind the model and they are flaring towards the camera. And attached are gels in the color green, red and blue to add some interest to the modern and just laugh how it colors her hair. And the lighting said I can be used for fashion or beauty. You shots whatever you like. Really, Um, it's also great if you just want toe, give the model a little bit off interest, like a little bit different hair, Or depending on your anger, you can shoot with less or more flair, toe at some interest to your image. Also, if you add soft furter, you can intensifies this effect. Even more was a flare, because that's how we will see it. In the next tutorial, you will have even a softer flair and adjusting. It looks super interesting exposure, composition and style as imposing and post production that will all depend on the seems that you have in mind. So here I kept it simper with elegant beauty shots, and I decided to have more depths or feared with F 11 which helped me to keep the ice and vocals when the modern turned in her poses. But that's up to you. Be more like arresting on here, but kind of just relaxes Arm down. Perfect. Beautiful. It's very nice. Often maybe something again was kind of like, Perfect. Yeah. Beautiful. Now this is gorgeous. Perfect. Stay Lexus and just look up to the light again. Beautiful. Really nice. Close the eyes and look after the legs. Perfect. All right, take one. Look. Can we get Yeah, that's awesome. Beautiful. Awesome. Yeah, really cool. Yeah, Just look down. Beautiful. Awesome. Really nice, beautiful.
21. The "Romantic Fashion" Look Part 2: Color, Flare And Smoke With Nathana: beautiful. Yeah, that's great. Beautiful. Just I said me. Yep. Perfect. Very nice. You can also maybe just play a little bit, like with your face. Perfect. Beautiful. Very nice. Just lawyers. And down. Perfect. And awesome. Very nice. Can you bring all your hair up into, like, a ponytail? Yeah. Beautiful. Very nice. Beautiful. Yes. Stay like that. Gorgeous. And just eyes at me. Very nice. Very nice. - Often beautiful. OK, and now let's bring in this movie. Awesome. Beautiful. Very nice. Just play, but yeah. Perfect. Very nice.
22. The "Romantic Fashion" Look Part 3: Color, Flare And Smoke With Julia: eyes up to the ceiling. So just looking at beautiful. And from this position, I'll just go back into this kind of framing your face. Yes. Beautiful and spray. Yeah. Awesome. And looking down. And lawyer, I'm also a little bit down, down, down, down Recognize beautiful and changed the position. Beautiful. And maybe frame your face again. Beautiful, awesome. And turn yourself backwards and just look over your shoulder. Beautiful When the life is when you just keep your hand Just just like that. Perfect. Yeah. Perfect. Awesome. And just look down to the floor. And now, just up to the ceiling. Often beautiful. It's a Lexus, and you can just move again. Just play maybe with your face, maybe something like re Alexis. Beautiful and maybe Oh, yeah. Do that again. Yeah. And then one words Kind of just like with your front. So you're kind of like Yeah, and just lower your chin down. Yes, gorgeous. Okay, let's do this
23. The "Romantic Fashion" Look Part 4: Color, Flare And Smoke With Deepti: cool. Yeah, I got to Syria. Oh, yeah. And I have to be sexy, Serious? Like, really? Like Don't smile like really mysterious. Very serious. But don't put on your head like I want to kill yourself, But, like, maybe just like, like, very kind of like, yeah, perfect. And just look down perfect And just eyes up No, Like lower your chin Down, down, down And just I expect towards me Perfect And just lowers again A little down perfect And gets again The little bit I app Lower your year towards me Just Lexus Yeah, And just drops the gun down And like, serious again Really sexy. Serious Because it looks more mysterious now. Often? Yeah. Very good. Yeah, that's cool. Yeah, beautiful often. And come again. A little closer to the light. Perfect. Beautiful. Yeah. Awesome. Beautiful. Very cool. Play a few more. Maybe with your color. Kind of like wild, like in and out. That's not your callable. That's your second. I'm thinking lluvia. Yeah, yeah. Yea, yeah, that's cool. Often
24. Colorful Shadows: okay. And this shoot to create this colorful shadow effect, the basic set up is actually very simple. Have a white background. The beauty dish is the key light up there about a 45 degree angle. And the model in this case is actually very close to the background. And the main things to create this colorful shadow be red and the blue gel lights that are quite low down. And they point towards the ground onto a reflective surface so you can use a reflector. Or in this case, we just got one of these panels from Home Depot. And when those lights flashed down onto the reflector, they will bounce back up, hit the model on either side and kind of wash out on to the background on either side of her. So the blue will be on one side, and then the red will be on the other side, creating this kind of opposite colored effect. So take a look at this. Perfect. Very nice. They exactly that. Yeah, that's cool. Very nice. And you can also turn back to the paper and then just look back into the light. Yes, Perfect. Yeah, like this is perfect. Now I just have to see your face also both. Like Beautiful. Yeah, that's great. Beautiful. Yeah, that's perfect. That's great. And actually do the same polls. But just with the other arm What you did before Where you have, like, the legs a little bit apart and then kind of like hands. And then just looking to the side perfect and rock your shoulder a little bit like left and right. Perfect. Awesome.
25. The "Madonna" Look : Orange, Purple, Blue: I'm a little bit more in an anger is away, yet perfect, beautiful, awesome. Often the Madonna effect. That's what I call the effect when you have around light on background behind the model, as it reminds me off a halo, especially here we used to set up with this orange or yellow circle and the second light Waas actually like a dark purple gel on our strope. So it added the sort off in yet, and it's a very interesting effect, and that's a lot of drama toe the image, but you need to be careful. That's the lighter color doesn't distract from your model, so there are three guidelines. However you are looks at an image. It's first of all from dark to light, also from blurry to shop and then from less contrast, toe more contrast, which means when the color is to contrast e or too bright behind your model, you might lose your viewer because instead off looking at your models phase or wardrobe or whatever story you want to tell, they will look at the background. However, when done right, it adds to your image as it makes the viewer wonder how it was set up, which is easy. You will produce a shop circle with the grit on your flesh and this month s and behind your model. So you need to position your model in a way that her body covers this flesh. And here we used the Flesch point again. So that's a small unit, and that's very easy toe Hyatt. So, as we said and replaced a second color from the site. And again, complementary colors look good together, but make sure that they are separated. So if you place complementary colors too close to each other, well opposite off each other, then you will have the risk that they cancel each as out meanings. That's the resides, this white light, so he has a second light is purple and it comes from the site. So if you want to add even more drama, you can also have a gel in your philae it, or you can produce another tint to the shadow area off your model. That can be interesting as well. So here we kept it simple again. As a model, we have a black top so that we can see this gel effect, but the gel light could also work rate with maybe a more colorful wardrobe. For example, if a fashion designer needs more poppy concept, you could suggest the color concept Lexus with complementary colors on. And, yeah, just to add more interest to the design. Enough for this. Yeah, fashion Woz, this wardrobe. But here, as I said, we kept it simple to be. Yeah, I'm more interested in the gels, so exposure compositions die opposing and post production that will depend on the seems that you have in mind, and it could be edgy or fun or play for it could be used for poetry, fashion and beauty. So here you have a lot off different choices. Beautiful and look up through the slit. Perfect, Beautiful. Close your eyes. That's great. Awesome. Very life, often off beautiful, often beautiful, beautiful, often very nice and look up to the life against perfect
26. The "Stars and Flare" Look - Create An Amazing Star Effect With Your Speedlights: that's gorgeous, and you can do whatever if you don't have any strokes and would love to create an interesting effect with your flesh guns, then this photo shoot is wells to try. So position the flash guns close to the modern on the boom arm, if possible and points them towards the camera. So normally you want to avoid flare. But here's a flare at interest to your image and an aperture between F age toe F 11 that we produce a nice star shape off your flashlight and wider upper to over produce more flair and less off the star effect. So it's worse. Why? To play with different app. Atriss. But I personally like the F A A to F 11 so that I received the star effect and color wise, you have your plenty off options. So for the first round, we used a great background and add it blue gel onto it, then the flesh guns where a bear was no jets to produce this white star. For the second round, we changed only really that we put the child's on toothy flesh guns, so we didn't have any jail on the background. That state gray, however, on the flesh guns we had now a specific gel for the flash guns, and one was an orange on the viewer's left and one waas blue on the viewers. Right? And here you will see now that the light mix us with the color off the background. Well, it wasn't really color, but you can see that the gray and these different callus that's us were mixed together. If you would want the flesh color more defined. So if you really want to see just orange and just blue, then a black background will help to separate the color from the background and to set up that is very playful and a lot of fun, so it can be used for many fashion scenarios. It could also be used in a dreamy or light hearted or fantasy or fun and play for scenarios . So have fun experimenting with those start effects Garage's often and maybe, like, even kind of like hands on air on, like, really fashion off, beautiful like cross your hands over maybe. Yeah, are perfect. Gorgeous, beautiful Cuban clients. Yeah, that's perfect. Very nice. Perfect. Beautiful. Maybe something kind of like Yeah, perfect. Awesome. maybe even kind of like crossing. Yeah. Often. Maybe one wall where you can frame like this. Beautiful. Yeah, that's good. Very nice. Oh, yeah. Maybe. And that's Ah, wired ponytail. That's awesome. Yeah, that's perfect. Beautiful. Very nice. Awesome, beautiful.
27. Amazing Bokeh And “Unicorn” Flare: if you like playing was even more flee. Also, if you can like this last tutorial about the stars and the flare, and if you want to try this now with strobes, here comes a quick bonus toe toria, because we will also use one off my favorite backgrounds. But you will find in any kitchen, which is aluminum or aluminium foyer, and if you crumble it, just be careful that you don't kept yourself and you attach it to a background. So in our case we're using Styrofoam panels. You will achieve a great Boca effect, especially if you shoot with a wider Apertura between F two or F 3.5 and to go step further off the editors lens flare again. As I said. So we had on Orange and the blue gel on the stroke, which was pointed towards the camera to create a magical effect. If you would like to play with even more Boca and shapes, ever look at the blue mammography pets by lenses, so they are Manyara, so the focusing takes a little bit more time and has to be practiced. But the Boca is amazing. You can create stars or drops or shapes or like around Boca, and this way you will at a very dreamy and fantasy look to your images.
28. "Special Effects" With Simple Ingredients:
29. Review Of Various Gel Lighting Setups:
30. Important Tips & Tricks: tips and tricks When using gels, don't leave your modeling lights on. It can melt your gels and then mature. Strope. Test your gels so that your light up in front off a neutral background and then meet as a light. Then you can attach a gel and meet again, and you will see this way. How many stops the gel swallows, and we'll give you a better understanding about your gels. Gels are different and color and sickness, so balloon it's more light while it's orange or pink, needs less intensity in your light. Less light means darker, more saturated color, and more light means lighter and more airy. Pastor color When working was gels and flare, there are different ways how to enhance this flare so you can place your gel hires and the model and shoot a little bit from below and just play with your anger. Or you can also add a cheap UV filters that you spray it with a little bit off hair spray Boy that you prepared with Basilan to intensify this flare and as a great filter toe Adisa , soft filter and again, this will just spread the flare lenses thes days are very polished, and usually you want to prevent the lens flare. Therefore, you have even a lens sort, so you have to somehow manipulates the lens that you can actually see. The flare fork in the can is another great way to add drama to your images. But keep shooting with somebody, maybe an assistant or friend spraying it because it's very unpredictable and can look different than every single shot. Make sure that any color combination as ammonia was and fitting to your story. Keep in mind that people associate certain colors with certain scenarios, so red and blue could look like police lights, for example, or green and red like Christmas. Also keep the wardrobe and makeup off your model in minds. Color and concepts would work well together and not distract from your story. Keep in mind who is who in your story. Umbrellas are your friends. I don't use umbrellas in my usual photography, as I prefer beauty dishes and soft boxes, but in gel photography, our fans and quite effective and very easy to set up. If you don't have timeto order gels by a colorful cellophane wrapped in your local craft store and wrap it around your beauty dish or your soft box. It's really cheap and easy to set up and just once more, keep in mind that your modeling lights are off because cellophane wrap it's really sin and were married easily.
 Sandy Dee, Sandyseyecatcher