Transcripts
1. Introduction: [MUSIC] I've created a lot of classes where we
do fun projects, where we cut up art, and I always have people
come back and say, ''what do I do with
these leftover scraps?'' This class is what came of all those questions
because usually I tell people they're
perfect for collage, don't throw your scraps away. But then a lot of
people are thinking, I don't do collage, so I'm not
sure where to get started. In this class, I'm
going to show you how I use these pieces and different little bits and
scraps and old papers to make really beautiful collage pieces that you're going to love. I'm Denise Love and
I'm an artist and photographer based out
of Atlanta, Georgia. In this class, I'm going
to take you through several projects that are
going to be super fun, starting with working in our sketchbook and doing little collages in
the sketchbook, and learning mark-making
and putting in some extra little bits and
pieces and color and texture, and coming up with
things that we love. I like starting in a sketchbook because it's low commitment, it's not expensive,
and when you're done, I know you're going to have few pieces that you're
going to be like, I love it so much, I want to cut this out, frame it and hang it up because
I love this one so much, I want to cut out frame
it and hang it up. I've resisted cutting it up so that I could
make this video. [LAUGHTER] But we're also going to learn how
to do pieces outside the sketchbook and I'll show
you how I decode the edges and create on a nice piece
of watercolor paper. We talk about color
and texture and different elements
that are going to make that collage really,
really interesting. Then we'll go into making a little bit larger
piece on a cradle board. I'm going to show you my little trick for
creating on board. Because cradle
board is not cheap. It's not as cheap
as using a piece of paper to collage on. A lot of times I'm
like, I hate that. I'm just going to have
to throw it away, I've wasted my money, and that really creates a
barrier for a lot of people. I'm going to show you
my little neat trick for creating a beautiful
collage and using a cradle board to give you something that you love
every time so that you're not going to
be scared to spend a little bit of extra and have a piece that you
love in the end. I'm going to show
you my hack there and I know you're
going to love this. They're perfect for
hanging, selling, giving as gifts.
These are fantastic. Then the other project
that we're going to do in class is the micro collages. Again, I'm going to play and
show you my little hack on creating a whole little series that I know you're
going to love. These are super-duper
fun, low stress. You're going to get a
lot of fun out of these. I can't wait to see what
you come up with those. I'm super excited to
have you in class. I can't wait to see
what you come up with. Let's get started. [MUSIC]
2. Class Project: [MUSIC] I'm glad
to have you here, and your class project
is going to be to create some collage pieces and come
back and share with me. I don't care if you do those
in a sketchbook and show me those because some of those end up being my very favorite, so I'd love to see what you come up with in your sketchbook. The micro collage ones are some of my own
personal favorites, so that would be super
fun if you wanted to do a few of those and come
back and share those. If you get brave and you do my little hack and you
do a cradle board one, that would be fantastic. I just want you to get
creative, enjoy the class, clear your mind and don't stress about some of the
pieces you're going to create. I'm going to show
you some good hacks basically so that you're not stuck in a little box thinking, I don't know what to do
and when you're done, you're like, I don't like that. I'm going to show you my hack
for getting around that. [LAUGHTER] I can't wait to see what pieces
you come up with, so come back and share
some of that with me. Can't wait to see it, and
I'll see you in class. [MUSIC]
3. Gathering Collage Elements: [MUSIC] In this video, let's take a look at some of the different options we
have for collage materials. I've got lots of different
little piles here and they're all very different
elements that we can use to put together collages
that are interesting, have lots of color and
depth and variation. To start with, this
little pile over here is handmade papers
and things that I might've found at the art store. I like handmade papers
because they still have that little element of
somebody handmade these. But I get some colors
and some patterns I may not have
thought of myself. But we can certainly
make things that look like this just as easy. I find interesting patterns and textures and
papers anywhere I can. This is a piece of burlap. This is a piece of very
stiff natural paper. It looks like it's made of some type of straw or something. I really like these
handmade papers that look like wrinkled paper. This is one of my
favorite pieces here. You could also get old
bits of painted canvas or we could paint pieces of canvas
to use a scrap elements. Another piece of
pretty handmade paper, and then I particularly
like some of these that have a
lot of texture. Maybe it don't have a lot of color because I like
the white element here, but you can see that
there's some thread, there's some holes, there's
transparency to the paper. This is another one
of my favorite papers that I found at the art store. Some of these I have found
as little 8 by 10 sheets. Some of these are quite
big 22 inch size. They're big rectangle sheets. This was actually
a great big sheet. When you go to the art store, go over to their
handmade paper section, where they have them folded over on different things to show all the papers or maybe
they have them in big drawers because there's
some of the prettiest papers. I really love this one. Look around for handmade papers. That's one option. I also like vintage papers, things that are
out of old books, or just old pieces of paper. I do buy some books for the
purpose of tearing them up. Big old dictionaries are a perfect thing for that
because those books are like this thick [LAUGHTER] and you'll have that book to tear up for the
rest of your life. If you don't want to
personally tear up books, then you can get books that
have already been torn up, so you don't have the
guilt of tearing them up, but the antique market I always find books that are
ready for craft. You could also,
if you don't have access to or you
just can't find, you can look on Etsy and eBay
for collaging materials, old books for decorating. They come under lots of
little headings there, but I got to a thrift store, buy a couple of old looking
books for the purpose of art. Old papers, one of my favorite
things to use in collage. I also like natural elements, things that are going
to give me texture. They're going to give me
some height differences on the canvas and make things very interesting as
you're looking at it. I like old piece of
burlap is really nice. You can find some of these
at the fabric store. Tea bags, this is one of my
favorite collage elements. It's transparent. I like the lightness or
darkness that you can get from boiling the tea bag
and then you can drink the tea and have
the tea bag leftover. You can also just buy
cheap tea and dump the tea out and a half white tea bags. You can also buy
tea bags out there. On Etsy, you might find unused tea bags
because some people make their own tea bags
and brew tea in it. They do sell at, if you don't want to
buy a cheap box of Lipton and use the tea
bags from the tea. But I love tea bags, so that's great element. Also, like book
covers, book elements. If you tear up a book, don't throw off the cover, keep those elements to use as
something in your collage. I also like old bits of lace
and tatting and ribbon. Some of these you can find randomly at the antique market, you can find old
lay scraps on Etsy. If you make lace or you have something that somebody
in your family made and you really have the most perfect
peace to use it on. I probably wouldn't use
something my grandmother made, but [LAUGHTER] because my grandmother used to do tatting, but I do love tatting and
it reminds me of her. When I find a scrap piece somewhere or a piece that I can just buy for a
couple of dollars, I can use those elements and not tear up her
elements [LAUGHTER] and still have that feel and memory of something
my grandmother did. I do like vintage pieces of lace and ribbon
and things like that. The main reason that doing a collage workshop is to really talk about
using art scraps. Because I have
several art workshops in my variety of classes where we are making a big
piece of art and cutting little pieces of art
out of that bigger piece. Then I have lots of people say, "What can I do with
these leftover scraps?" If you're one of those that's
throwing this scrap away, stop throwing it away. These are fantastic
collage pieces. This right here, is so
beautiful you can see all the elements and the
interests and the color. This could be our focal
element on our collage piece, and while it wasn't
enough leftover to do a piece that I
might cut out frame, but actually now that
I'm looking at it, I could cut little
mini pieces of art. I could cut a book
mark out of this. There's still lots of
uses for this piece, but I thought
collage is perfect. I wanted to talk about all the little scraps
that you end up with. Don't throw them away. I even did with
these in dot art. There's a dot art class on using this for your
leftover pieces. But even in that, I didn't throw out the scrap that was leftover
from the dot because, imagine cutting this
element out and using the dots as part of our collage. I have tons of these because making a big
piece of art and then cutting beautiful little pieces out of it is my
own personal way, favorite way to make art, because now I'm not
as worried about color and composition and
where I'm putting things. I don't have a
specific rectangle where I'm trying
to fill it up and then I get to the end and think, "Oh crap, I wish I had Photoshop that I could shift
it over a little bit." When I make these, I can make quite a big piece
of just big mess, have fun, mark
might do whatever. Then when I'm done,
I can then cut out the element that worked the best with the best composition. It really takes all the
stress and pressure off of me when I'm creating art. Because I can't tell you how
many times I've sat down, I've looked at a
white piece of paper. I want to create
some masterpiece, and I get angry [LAUGHTER] because nothing is coming to me. I don't
know what to do. I'm frustrated, and then I
get up and I storm off and leave my art table and don't even know why I'm
trying to make art, because obviously
can't make art. I mean, I just have all
these terrible thoughts. [LAUGHTER] Making the big pieces and cutting wonderful
little pieces out of it, really pulled me out of
[NOISE] that null drum. Here's one that I have framed
up on the wall behind me. Look how pretty these
are when you frame them. I think this might be one of these pieces that I cut
out of this bigger piece, and you can even see how beautiful the little
piece turned out. This was actually one that I got several pieces this size out
of and framed at the framer. Beautiful. Now, I have this piece left over to
do something yummy with. Just in case you're wanting to see what did you do
with the original? I framed some of them
and hung them on a gallery wall sitting in
front of my table here, so I can be inspired
as I'm making stuff. I can look up, but I can
say yes, I make pretty art, look how beautiful this stuff is framed and it pushes
me on further. [LAUGHTER] I can sit
in front of it when I do a class like
welcome video and say, "Hey, welcome to my class", and you can see
my art behind me. [LAUGHTER] Save all the pieces, if you're doing any of
those cut out pieces. If you haven't done any
of those cut out pieces, now is a great time
to go back and do that abstract class
where we talk about making art without all the pressure we
put on ourselves. Because that's the first class
where I really dive into creating these big pieces
that we cut things out of, and then you'll have some
scraps left over to collage. Also, we'll dive
a little bit into making our own little
collage pieces. These are just pieces
that I have painted, randomly played with color,
played with mark-making, played with different
materials, different papers, and just make our own elements to use and tear up as collage. That's what a lot of these are. Just little scraps of things, a piece of painting
that was cut up. There's all kinds of wonderful
yummy things that you can use as collage
elements and we'll be making a few of our elements. Hopefully you've made some
art that you wanted to scrap, and really in that
vein, I'll show you. I sit down here
at my table a lot and just try to play
out new ideas or experiment with
new art materials and play with water and I try to figure out what do I want to use and
experiment with today, because I have lots of
different supplies. When you have as much
art supplies as I do, too many supplies overwhelm. Is just as bad as looking
at a white piece of paper. I will sometimes think
up a color palette like, I'm going to work in
purple and green today. I'm going to work
with neo color to pastel crayons and just
see what I can create. That's what I did with this one, and I was coloring different
spots with the crayons and then activating it with water and then mark-making
and just seeing, what are these supplies do? This is how I
experiment and play sometimes on a little
piece of paper. I really like how
this one turned out. Then I can see what different water-soluble materials do with. By applying, I can figure out, do I like working
with acrylic inks? Do I like working
with these crayons? Do I want to work with
Darwin Ink, tense pencils. What do I want to work with? Let's try out different
colors and let's just see. I mean, you can definitely
see that these are not works of art
that I've created. These were more of experiments. But once they're done, if you don't think you like them or you want to do
anything else with them. These would be perfect
collage pieces. These are great if you
were experimenting, especially with color palettes and just trying things out. Now, we have another element
that we can cut up and use. I really liked this one. That's another thing to your
different art experiments. If you haven't done the big
piece and cut stuff up, if you've just
experimented with stuff, bring those out and instead
of throwing them away, keep them in a bin for
collage materials. Then you know that
you're not scared to tear this up and
try something with it. I have some more over here
where I have played with different watercolors and just seeing how the color blooms out. If I could get different
textures depending on how I spread the color and
the water and pieces of salt. These experiments too could be different collage
elements with different watercolor paints and the things that I was
experimenting with there. Just lots of different options
for you to think about. You could also use tissue paper. You could also probably go
to the craft store and buy a little bundle of
collage materials. Look around and gather everything that you think might be something you want to try. Just gather a whole
little plastic tub of stuff, which is what I do. Here's my little plastic tub. I just collect a whole
bunch of different papers and elements in here that
I can then pull from, and see, what can I create with the different
things I pull together. Hope some of the different
items have inspired you. I can't wait to see
what we create today. [MUSIC]
4. Paper Surfaces To Collage On: [MUSIC] Let's take a look at a few different surfaces that we could be working
on for collaging. You can do like I'm probably going to be doing
throughout the class and you can work on watercolor paper or
Mixed Media paper. I'm going to be using £140
Canson watercolor paper for a lot of the things that I do because I have a lot of it. I had some Michael's
points and I got to go get a couple of these
that were free, and then was school time and
they had extra bonus size. It was extra big
[LAUGHTER] She'd have it. I've got a nice big thick
pad of watercolor papers, so you use what you have. If you have watercolor paper, Mixed media paper, those
would be fine to work on. We can cut these out. We can deco the edges so
that they're not straight. There's lots of different
things that we can do. That it's just not a
white piece of paper. I like to do a lot of collage
and then cut the piece out. I like to cut up artwork
no matter if I'm making a big piece
or I'm collaging. Those cutout pieces
we could mount on pretty white paper to be framed. Lots of things that we can do. So definitely pull
out a nice white, I like this £140, 300 g white paper. We could also work in a
sketchbook and I like a £110, which is the 200 g paper. Any of those is fine. I've got a couple here
that I just got recently, so they're good size. I don't even know
what brand these are. I don't think it says
in here what they are. This is the Moleskine. I do have a couple
of Moleskine here. I do like the Moleskine. You do not feel like
you have to get those. Another sketch book that I use
quite a bit this one here. This one is less expensive, the pages are bigger. This is the Arteza. Depending on where you're at, these may be the same type of sketch book under
a different brand, so just go for the £110
watercolor paper sketchbook, that's my favorite to work in. If you get, there is a
smaller size like 5 by 5. I actually think that
5 by 5 is too small. I have a couple of
those stashed here. I got them and I'm like, "Oh that's really smaller
than I even thought." Go for, this is 10 by 10. These are like 5 by 8
or something like that. Pick them up at the craft store for collage until you get to the point where you're
making some pieces that you really think,"
These are amazing. I want to sell them or
I want to frame them." Or you know you've progressed in your art practice where you're
like," This is my thing." Use student grade materials, and practice and get really
good at it before you upgrade to artists grade
materials for paper. Because we're not using
this to paint on, we're just using it as a
background to glue things too, so cheap is fine. Another thing that
you could consider using is Postcard paper. I've got a couple of
these boxes of postcard. This is £110 cold
press watercolor paper and I did not buy
this especially, this came because I get the sketch box every
month [LAUGHTER]. This was one of
the fun surprises one month in that art box
that I get in the mail. If you've got fun
things like postcards, perfect things for collage, anything that you
happen to have. Then if you want to kick that
up a notch and you're like, I want to collage on things
that aren't standard paper, something like that,
you use book covers. So if you buy books to
use as collage papers, tear the covers off. We're going to be using parts of this book as collage
pieces like the spine. This was the spine of this book, but we could also use the cover. We could cut the cover up
to use as pieces like this. This was the spine of this book. Or we could use this
as our surface. We could use the front
side or the inside, and that could be our
surface to collage on. Get creative in you're
thinking there. If you've got the watercolor or the Mixed Media paper
already, start with that. Then that's what we'll be
working with here in class just to give you some ideas on different things that
we can do with collage. I can't wait to see what
fun stuff you come up with. Let's go ahead, and move
into our next video [MUSIC].
5. Wood Surfaces To Consider: [MUSIC] I want to mention another surface that
you can collage on that's different
than the paper. I could have mentioned it in
the paper video but I forgot and then I was doing something else and
I was like, oh no, this is a great surface to work on and I at least
want to mention it and we might do a piece
in here on cradleboard, so I don't want to leave it out. But there are different
types of wood board that you can work on and
different brands. If you've got some
of these experiment, if you don't have them, I don't think for your first projects, I would start here. I would probably work on paper and build your way up
to pieces like this. If you were going to hang
them in your house or put them up for sale
or give them as gifts. They're really great on board. It's just another choice, another option for you. That was fun. This
is in the middle. This is more like
a paper option, Artist Tiles, which is fun. They're cut pieces of paper
all ready for us. That's fun. Cradleboard, these come as flat panels or the
cradle on the back, which gives it the depth. They come in one-inch, three-quarter inch,
all the way up to two inches inch and
a half, two inches. I think the deeper the side, the more expensive the piece
looks when you're done. If you were doing stuff
for like an art gallery, I think pieces on the deep cradleboard look the
most expensive personally. I do like having
deep cradleboards. But for little projects, I might like to
experiment on a board. Maybe I'm not going to do anything with it
or maybe I'll hang it on a gallery wall in my
house for something like that, I might just use
an artist panel. Then if I were wanting to
play with cradleboard, and maybe I was
going to hang these. Then I would experiment
with the different options. They come in different sizes, and these are raw wood
when you get them. You're going to have to prep the surface before you use it. That's a little bit different
than working on paper. Working on paper, you can just glue right down to the paper
and you're good to go. You don't have to
prep that surface. But if you're working on
a wood panel of any kind, you need to prep the
surface before you begin and I do that with gesso. I've got white gesso and
I've got clear gesso, either would be fine
if you're not wanting the surface to have a color,
you could do the clear. I also have randomly hiding in my art room
somewhere black gesso. You could go
white-black or clear. You'd want to paint
two coats of this on, so paint it, let it dry, maybe paint a second coat
and you're good to go. I also have this one that
you can see underneath. There is some paint and texture. This is a piece that I was
playing as a piece of art, trying to make something
I'm sure amazing. [LAUGHTER] But in the
end, I'm like, I hate it. [LAUGHTER] You can also
use something like this. Because it has texture and
pattern on it that could ultimately be possibly
part of the collage. But on the thicker pieces
that you're putting on, it would cover that completely. If you were to use, say, like a piece of tea bag, then that texture would
probably come through on that transparent thin
piece of material, which could be fun. If you do a piece
on a cradleboard, a painting or something
like that and you say, oh, I've ruined it, I hate it. I just going to have
to throw this away. Keep it, put it in your
closet and just keep it. This has been in my closet for I don't even remember
[LAUGHTER] how long. But when I was looking for
cradleboards to show you, it was in there
and I want you to know that these can be re-used, doesn't matter that
you've painted on it. You can cover that with
a couple of coats and gesso and you're ready to then collage on top of a used
canvas or a cradleboard. You can collage on canvas too, but what I don't like about
canvas is it's flexible. That's my own personal
preference though. If you're using a board, you want to play with
the cradleboard. You can gesso that and that'll
get that surface ready to take the glue and stuff without soaking in and
releasing your piece later. That's mainly why
you're doing it. Because when you glue that
board, soak stuff up, your piece may not be as
securely fastened as you think and one day you
might walk around the corner and part of
your collage fell off. [LAUGHTER] If you're thinking of skipping this step, don't. Another thing about these
with the deep panels. If your collaging and stuff, you want to paint the sides, this side is going to
be part of the art so you can pick a
color that's similar. You can pick a white,
you can think of black, you can pick a charcoal gray. I like charcoal gray. You could finish the side so that piece is ready to
hang when you're done, you don't need to gesso the
sides and then paint it. Then I would probably collage and then do any touch up later. If you wanted to, that's my own workflow so you decide what works
best for you there. This is another option
and for the collage, I find it hard even in painting, to paint something amazing
in the confined area and go, okay, that's a masterpiece. I love it. That's not my
favorite way to create, which is why I make these
pieces that I then cut out. For something like this
you could even collage a bigger piece
[LAUGHTER] and then cut your collage piece out of the bigger piece
and glue it down to the cradleboard
that might be less stressful for me if
that's the way I did it. Then you could enjoy the gluing and placing
process a little more when you're not confined to an exact area and you glue the finished
cut-out piece day on, so your choice there. Just some things to think about. I wanted to give you
more options and talk about if you use wood panels, you need to gesso them first. All right, I'll see
you back in class. [MUSIC].
6. Collage Glue Options: Let's have a little discussion
about different types of glue that we can use
to collage with. There's a variety that I would recommend and any of
them would be fine. Pick one and go for that if you've already got
some of these, start with what you've got. One of the easiest things to use with collage
is a glue stick. This would be more, I don't know if I would
use this for big, expensive pieces of art that
I might be going to sell, but I would definitely use it for anything I'm
doing for myself. Something I might frame
for my own house. I get the photo glue sticks
because they're acid free. Technically if it's acid free, it should last a very long time. You could probably use this in a piece that you
were going to sell. But that's something I
use a little bit less, and it doesn't go
as far like when you're scrubbing that glue
on the back of something, you're going to use that glue
stick up really quickly. Have several available if that's the route
you're going to go. More common is a matte
medium or a paste. Mod Podge is probably the
most common matte medium. This is a glue and
a top sealant, so it's good for either. I like the matte medium. Don't get this in
the shiny if you're going to be using it to
glue your pieces down. Here's a piece that I
did a long time ago, but if you have any
glue spillage out here and it's shiny,
you're going to see that. You want to have the
glue go up under it. If it goes on top of the art
piece, it doesn't matter. It's not going to
change the look, the feel or the shine or
the gloss of your piece. If you go with mod podge, get the matte mod podge, not the glossy mod podge. I've made that mistake and then was using it
and thought what is different about
this and then read the cover and realized I
had bought the wrong one. [LAUGHTER] This is the most
economical way, probably. The most common way that
you see most people doing collage work is with a gel medium like
Liquitex matte medium. This is a lighter weight than the golden gel medium that's in the little
container like this. This lighter weight one would be appropriate for
translucent materials, lightweight materials when
you get into trying to glue down like old
book pages, maybe. When you get into
trying to glue down thicker pages or things
on watercolor paper, you need a thicker gel medium. I would probably, if
you just picked one, go for the matte
regular gel medium in the container like this. Because it is thicker, we scoop it out with
a paintbrush or a palette knife and
we spread that on the back and then we have some girth to that to work with. My very favorite one of those really thick
mediums is Yes paste. It's acid free. It works for so much stuff. [NOISE] It's amazing. It spreads on a bit like butter. If you've never tried Yes paste, it is a dream. It's what I will
probably be using the most because I prefer this one. You put that on with
a palette knife. These gel mediums, you probably put them on
with a paintbrush. I would pick a one
inch size brush or whatever size you feel comfortable working depending
on what you're doing. I get cheap paint brushes from
the crafts store for this, I don't want to pay
anymore than a couple of dollars for a one-inch brush to put glue on because you're
going to ruin that brush, basically using it with glue. I do go to the sink and
wash these out frequently. But once you've used them for a glue medium or a matte medium, eventually that's probably not going to be a good
brush for painting. I keep my glue brushes separate, and I pretty much after
it's been used for glue, keep it for glue because you can see there's paint on this. At some point it was one
of my paint brushes. [LAUGHTER] I stuck it in glue and I'm like this
is now a glue brush. [LAUGHTER] Different
options there for glues. I like acid free. Depending on how heavy your
materials are going to be, you'll need to move up
in heaviness of glue. If it's a lightweight material, maybe the liquid, because this one's very liquidy,
it's very lightweight. The gel medium, the
matte medium is really the best
all around option. My favorite just happens
to be the Yes paste. Different glue options that you could try. Use what you got. If you've got one of
these, start there. Then I'll see you
in the next video. [MUSIC]
7. Finishing Sprays: [MUSIC] Let's talk
about finishing sprays. I wanted to get a lot of these little fun
supply videos done one after another so
that I can talk about each aspect of doing your piece. When you get to the end, if you have used anything on
your piece that could smear. Say like in this piece that I
had done quite a while ago, this has pastel on it, so soft pastel
smear quite a bit. If I was making a
collage piece with one of these elements that
had pastel krylon in it, I could smear that and get
the art supply on my fingers. If I can still smear piece because if it's a
scrap like this, I've never formally
finished it in any way. Then when I get to the
final piece of collage, I'm not going to
want to do anything that ruins that piece. If I've thought this
is my favorite, I'm going to frame this, I'm going to give it as a gift, I'm going to do
whatever with it. I don't want somebody else to be able to smudge their finger and ruin that whole
collage piece by maybe getting say that pastel on the white paper that
I had used to frame the whole thing out or just ruin the piece in
the middle in general. I'm going to want to use some
care in a finished piece. Scraps don't have
any finish on them. I haven't taken them outside and put any kind of coating on it to stop anybody from being able to come back and smear
and smudge this piece. You're going to want to
do a couple of elements of protection on your pieces. If you're using pieces like I'm probably going to
use this in something because it's so yummy
and I forgot it was in here and I know it's got
things that I can smudge, before I start cutting
up on this piece, I might go ahead and
add a fixative to the top of that so that hopefully as I'm working
with it and gluing it down, I'm not going to do any
additional damage to it. Because even if you
put matte medium on top of this as a clear coat, anything that's chalky and still smudgy or anything
that's water-soluble, maybe use some Neo
pastel krylons like I probably did right there. Anything that's activated with water or liquid or
something that's wet, you'll want to seal that down so that when you map
medium on top of that, you don't ruin
that piece or move those materials around in a way that you weren't
thinking you were going to do. To do that, I
normally personally use the Sennelier
workable fixative. This is for soft pastels
and any soft stuff. They also have a fixative for oil pastels which stay really
creamy rather than chalky. These you get at the art store. I think I've ordered
them off Amazon, which comes from an
online art place. The other option that you
could use and I found this at the craft store is Krylon. It's over there in their craft paints where
they've got crafts and spray paints and glues and all that is this Workable Fixatif. The Workable Fixatif I think is maybe a couple of dollars
less than the Sennelier. The difference in these two, I'd be able to really tell. I just got this one
about a week ago. When I saw it, I grabbed it. The Sennelier one doesn't change the look of
my piece of art. If it's a really important piece or a piece that I'm doing
that I'm going to frame like the pretty piece
that I showed off in an earlier video which is hanging on
the wall behind me. But if I'm going
to use it on, say, a piece that I feel is
going to be important, I don't want the
colors to change. I did everything
here on purpose, I've cut it out to the
composition I wanted, now I don't want this
to darken and change in any way and the Sennelier
does not change my colors. The Workable Fixatif
it if may or may not change my colors and
so the more I use it, the more I'll form an opinion on whether I
love it or don't love it, but it is an option. For collage work,
it won't matter because if it changes the colors or it does
something different, this is a piece of a bigger
overall collage piece and it was a scrap junk piece that was leftover
so I don't care. In something like
this, I might use a cheaper fixative like maybe the Krylon and if
it's really important, use the Sennelier one. That's how we're
going to seal things around that might move, smudge or activate with
water-like the Neo color krylons. When we get to
finishing the piece, let's say you've got all
these collage, you love it, and now you just want to
protect it for the future, now you're talking about
a finishing spray. This Krylon Gallery
Series UV Archival, I like the matte finish. I would not add a glass of a glossy service to my collage. I wouldn't recommend that, but you experiment and if you decide that you'd like
the gloss finish, then you go for it [LAUGHTER]. But this Krylon Gallery Series has been a really
nice one for me. It is made for art. It's archival varnish. It's clear, it's non yellowing, so it's not going
to discolor later after that piece of art is gone and hanging on
somebody's wall. But you could also try
some of these others. I've got Matte Finish, clear protective
from Rust-oleum. This one is non
yellowing, fast drying. The Kamar Varnish,
non yellowing, Polycrylic, clear,
ultrafast drying. It's water-based. Water-based things are less
likely to yellow compared to oil-based things and they stink a lot less and
they dry a lot faster. I've had good luck
with the Polycrylic. Then I've got this Valspar
perfect project top coat. Seals, protects,
stays crystal-clear. I have different
things because I do lots of different
types of projects. I don't know that
if I were doing a really nice piece of
art or collage work, I would use a standard paint, one I'd tin towards like the
ones that are made for art. You can get this krylon
at the art store. I would stick with the ones that maybe are made
for art a little more than the ones that are just paint surfaces for stuff. But I'm showing them
to you because I've got them and I have tried them and I just wanted to talk
about that in case you think, "I'm just going to
go to the art store and get a clear finish." If it's going to be
a nice piece of art, try to get the ones that
are really meant for art. They're a little bit nicer. They're more archival than
just your paint one's. Little bit on finishing. These we would use
after we've got everything on there and we're ready for just a finish spray, I would take this outside, I will do three thin coats
of the finish spray. Let it dry and between each
coat for a minute or so. Spray it, let it dry,
a little spray it, let it dry a little, spray it, let it dry. Then this whole piece would be ready to frame or give away or hang or do whatever you'd like to do with
it and you're not going to damage the
surfaces that you've got. If you use the matte, you're not going to
have weird shine in places you didn't expect. [LAUGHTER] Just a
word on [NOISE] fixing stuff and finishing
your piece when we're done. [MUSIC]
8. Making Some Collage Papers: I like having options
when I do collage stuff, so I thought we would
take a look at making some of our own collage papers. Now, one of the
things that we've already talked about in making our own collage stuff
is using all the bits. Look how pretty this one is, using all the bits and scraps
and leftover pieces from the big art pieces
that we've created and maybe cut up like this was a great big piece
that I painted. Then I cut little pieces
out of it to frame and hang which I've shown you
in some other videos, one that I have hanging up
here behind me on my wall, but some of these, as we've already
made collage papers. If you've done some of those, and I've got lots of choices. Of course, this is
lots of stuff in here. Also paper with holes in it, so if you've got a hole punch, we can make little
hole punch papers. That's definitely an option on some of the papers
that we've made. Also, if you've got
any little pieces of art that may be you
started and you thought, I don't know where this is going and you set it to the side, this could be some
collage bits that you're willing to cut up
and use for other things. I also like to have teabags, and I like them to be used
so that you brew tea in it. You let it sit for a
bit so that paper gets nice and dark. I also like painting and
doing some mark-making on different lightweight papers. You could do that on deli paper. This is a deli paper that I have a box of that I
got at the supermarket, and that's a really nice
weight for painting on, and then using this collage, its semi-transparent,
it's not super thick. It's a nice common
kitchen supply that you can get pretty cheap. We can mark make, we can do different things
on here with pencil. This is just a regular
graphite pencil. I could use my mechanical pencil if I wanted to come through
and just draw some shapes, and create myself little
collage pieces to cut out. I could also use
colored pencils, I've got this is a
pit oil-based pencil, but I could use
anything like this. I could use any of my
neo color crayons, I've got lots of these
and then I've got a little stash here of overflow, but I could use those. Generally what I'm trying
to do with some of these is create some pattern, add some color,
give me an element, so when I cut this out, I have some type of pretty patterned
little element that I could then use for a
piece of my collage. I've got different colors, and the thing that I
really like about these, let me grab a paintbrush
is they're water-soluble. I could paint some of this, and then I could
come back in and then smear some of this color around and really make it yummy and interesting
as a collage piece. It doesn't have to be all-solid
mark-making it could be some solid mark-making and
some color smeared around. I could also then add
some paint into this, so if I get into my
little paint cabinet, maybe I've got a color
or two that I can then add a little paint
or smush up some color, that wasn't going
to come out yeah. I'd have a little
paint palette out, but I'm just trying to give
you little examples here, on how we might create with
some collage bits here. Any art supplies that you
have fair game also have. This is which is
waterproof India ink. A lot of times what
I'll do with this is I'll actually use
this to make marks, and I'll drip accidentally. I use it as a mark-making thing, I'm not looking for something
specific here other than create some marks for me to then have
as a collage element. Now when this is wet, you can add water to it and
smear some of this around. Once it's dry, it's waterproof, you're no longer
going to be able to activate it and do
anything else to it, so you're stuck with
whatever you get once it's dry but I do want that
little collage element. This so I don't make a mess, but I do like having little
black collage elements, little colored collage elements, things with marks, using
different materials. You can use pencil, you can use any kind of
ink pen, colored pencil. We could get into
watercolor pencils. We could use our crayons. You can be pretty creative here, and just to show you a few of these I've made in the past. I've made marks and then painted some stuff with
acrylic paint on top. Different colors
scribbled through it and added some marks. These are like little
tiny pieces of art that maybe you've
created that then we can tear up later and
create from these used some little crayons to mark make and a
little bit of acrylic, and then I took a skewer and just dragged through the
wet paint for some marks. Stamped on a black
stamp and added a little bit of white
paint on an old book page. This is on tracing paper, so it's a different kind of
paper or the deli paper. I like it because
it's transparent but once you get some ink, some paint splattered on
it just something random, it doesn't have to
be anything great. Also, like papers with
words written on it in black marker so you could
do a bunch of these, and then when we tear them up, nobody really knows
what you've got there, but if you've got like
a favorite quote or a favorite line out of
the Bible that you love. I like quotes and things, or if you've got a nice
thought that you want to write out or a wish or a
dream or something like that. When we tear these up
and use them as collage, It's not really going to
be there for anybody, but you'll know what it was, what it was for, and
the significance, but I like papers with writing and when you're
doing that writing, I like it to be
something exaggerated. It doesn't have
to be real tight, but maybe we could be like nice, tall, exaggerated writing. You could do real
short, tight writing. You could do real
scribbled writing so that maybe it said something,
it's really scribbled. Nobody can read it but you. You knew what it was. That's a fun little
collage thing where it's implying
there's a writing there, but you're not quite
sure what it said. Some different
things to think of. Again, more crayon that I have mixed up with some
acrylic paint and some marks, I like to do in a lot of these. I was playing with different
colors and a little bit of gesso on this translucent paper. I made a lot of these
for myself a while back. I want you to play and make
some of these for yourself. I really love using a little bit of paint than
a lot of gesso because, let's say we even add like, I would usually have
a little palette over here with some paint, but let's just add a
little gesso here on this, we can now spread
that gesso around, change our colors and
our whole feel up. Now when that's done, I'll end up with something
more like one of these that I created because I had that gesso smashed in there. I could also take my
mechanical pencil or I could take a skewer and now come
back in and add some marks. If I wanted to just have
that implied in there, then we can let that dry. That would be a piece just like one of these
pieces that I created. So those are fun. This is deli paper that I
created some of these on. I also like to use newsprint paper and you can just order a package of these. What I like about
it is it's thin, like the deli paper. But unlike the deli paper, you're not going to have the paint soak
through to the back. It's like infused a
waxy kind of paper. This paper, you're going
to see whatever it is and spill through
to the back. So even though I spilled
some ink on here, I don't want to throw
that out because I could actually spill a
bunch of ink on here, just take one of these and
come through and do that. Then we could
squish it together. We could make it a nice piece of just random abstract collage, something that we
can tear up and use. So don't throw these out, even if you get a block on
something you didn't plan on. Also have tracing paper, which is the paper that I was actually using before on these, and I like the tracing
paper because it's a little bit like an
onion skin paper. You can also use
onion skin paper. You can use rice paper. You might even be
able to use vellum, but I haven't played with
the vellum for a long time, so I don't know if it's
going to stick down or not, but tracing paper is nice because you can just
get a pad of it. By Strathmore at the art store, and it's a great collage weight and it's what I created
a lot of these on. So definitely get creative
with your surface. Also have coffee filters. I love coffee filters because they are really
nice weight also. They're like a tea bag though, because liquids are meant
to soak through them. Anything that you
do is going to soak through it like a tea bag, but it's just a thicker
consistency than a tea bag, a teabag is a little thinner. But I do like the texture and the weight
of a coffee filter. You could also consider both a few of those
out of the kitchen, creating some designs, patterns, texture, color,
just get creative. We're just making junk pieces really doesn't matter
if it's beautiful. It doesn't matter if it has any other intention
other than, oh, I'm going to tear this up as a little interesting elements somewhere in a piece that
I'm going to create. If we do something like that, come back with, again, these are going to soak through. Now we can switch some colors around and then you would want to set
these to the side to dry, because anything you do is
soaking through just like water soaks through to let
the coffee come through. But I like the weight
and the texture. Now if you don't want to
make this mess go with the tracing paper
or the deli paper. When I say deli paper, this is actually called, let me get this out
of my drawer here. I have a whole box of it that I got at the big warehouse store, actually called dry wax paper. You can see comes in a great
big container if you get it from somewhere like Sam's or Costco or something like that. I like it because it's not that shiny wax paper
that you can get. This is more mad at wax paper, but because it's wax paper
stuff doesn't soak through, but I'll be able
to glue this down, so I can paint and make
great services on it. The tracing paper also, let you do that without
soaking through, all of these that I
did on tracing paper, they dried really nicely
without soaking through. If you only have one choice. Did the tracing paper
from the art store, if you have wax paper at home, use it because it's great
and I already have it, so I decided to use some of it. We can do a lot with this, we can get some color added in. Like maybe I want some
just spots of color. This is how I can
create that color. Now I can let that dry. Maybe I'll need a
little swish blue somewhere. What have you? I want you to experiment, do some mark-making, do some
color things like this. I want to see some of these
because these could be a nice spot of color
in a piece of collage. Do a bunch of these, set them
to the side, let them dry, and then just keep a
stack of them handy and one ended up at a moment
that you're like, I love this little
piece right here. I'm going to use that
in my collage piece, you have these
options to work with. I wanted to just show you a few things that I
tried in creating my own collage papers
in addition to using pieces of art that
you don't necessarily love, and all the leftover scraps from the larger pieces
that you've created. If you didn't create any of
these and you think, oh, those look interesting, go back to the abstract classes. This is the one
that is on making abstract art without
all the pressure that we put on ourselves. I show you how to really create
beautiful pieces of that. Then those can be
in our collages. All right, so go
make fun papers. Colors that you like, patterns that you're
interested in. Just experiment with
some watercolors and watch how the
colors balloon, and just create some
options that you can then put in a little basket
for possible use later. One other thing I want
to mention on making these little papers that I just happened to think as
soon as I cut the camera off. You can also paint
and scribble and draw and create your papers or whatever it is that you want
to do on old book pages. The thing about using
an old book page is if you want to soak into the page and be part of the page that way you can
use it unprimed, if you want to do it where you can paint on top of the page, but the page is still intact and the paint is not soaking
through or whatever, you can coat the page
and clear gesso first, then paint on top of
this and make marks and smudge things around like we did here on this wax paper. Then the stuff
doesn't soak through. It's a nice barrier for
creating a surface to paint on. So clear gesso, if you want to paint on
old papers and have those as some of your collage experiment pieces where you've mark
made denied color. Another great surface
to experiment on, but definitely use
the clear gesso on top of it to protect the old page itself for all the elements that you might be putting
on top of it. All right, see you
back in class.
9. Gathering Extra Art Supplies: [MUSIC] In addition
to gathering up our art supplies for our collage materials
and stuff that we'll be making or
using during class, I also want you to gather up different art supplies
that you might want to use in your
collage pieces. Or just keep in mind
that art supplies are an added element that we can do finishing touches
with on our pieces. Gather your favorite
things that you like to do as finishing things. I like neo color to crayons, they make nice marks. I can pick different colors. They're water-soluble
if I want to get courageous and add some water and do some stuff like that. I have a little collection of the neo color tutorial ions that I like to use
for mark-making. I have a mechanical pencil that I like to use for mark-making. I have my posca pen that I love to add some extra marks to. Sometimes I like to add some extra black
ink to the piece, extra little pop a contrast
somewhere or mark-making, and so I have some
India ink for that. I like this because once
it dries, it's permanent. You're not going
to be able to do anything once it's wet again. I got a hole punch because
on some of these pieces, having that extra element
of a cutout is really fun. I'll show you that in a couple of projects and
then I have a couple of bigger pieces with cutouts that could work their
way into a collage. But I do like a hole punch, [LAUGHTER] got a
pair of scissors, and also have just
some random paints and stuff like some metallics
that are fun because sometimes adding a
little metallic pop on the top gives it even
another layer of dimension as you're
looking at the piece from different angles and
you see that little bit of shine, it's exciting. I do have some little metallic
paints, gold and silver. I've got some copper
and bronze also. Then I might keep in mind
for different pieces. Then I'm going to try
to keep it simple, I don't want to
overload myself with too many collage materials and too many art supply options. These are basically my favorites for that extra touch on
the top kind of thing. Gather a few of your
very favorite pieces for the art supplies and have those handy
because then we can, after we do a collage piece, add some finishing touches. I'll see you back in class. [MUSIC]
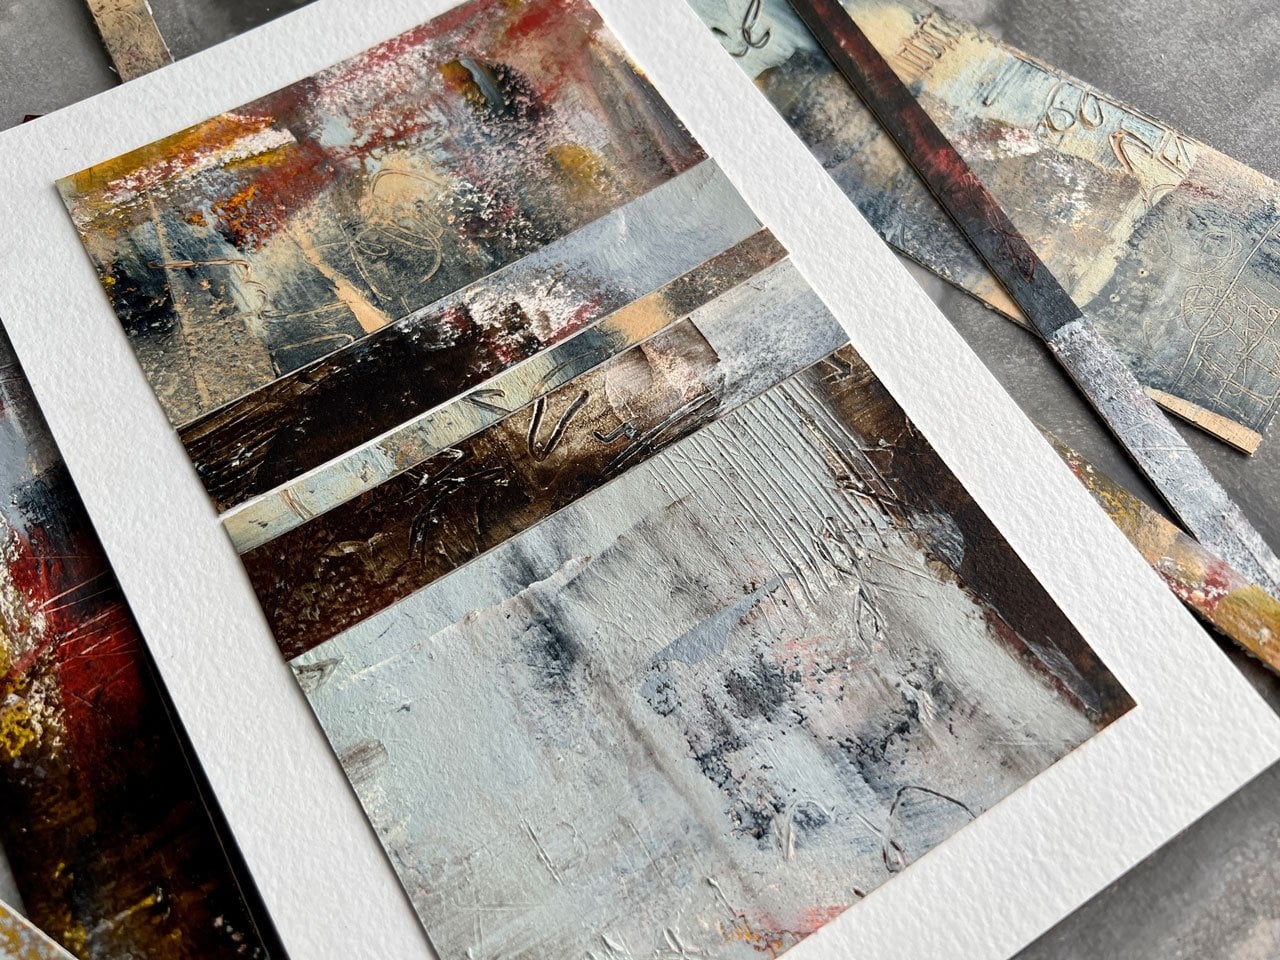
10. Thoughts On Composition: [MUSIC] In this video, I want to talk a
little bit about composition as we're creating. I'm going to talk about some
of these elements as we're going in the different
segments of class. But I want to talk
about the things that I'm looking for and
thinking as I'm going. When I talk about composition, I'm thinking rule of
thirds, repeating patterns, contrast, texture, I'm thinking of the things that
are going to make my collage piece the
most interesting. I don't want everything to
be the same color tone. That's very boring
and flat and bland. I don't want everything
to be the same texture. Again, that's not as exciting
as if you vary that up. I don't want everything
to be the same elements. Like I want some fabric pieces, I want some solid pieces, I want some transparent pieces. I want there to be
enough elements on the page that I'm
looking around it at all the interesting
things and I'm admiring all the elements that came
together to make my piece. So for instance, on
something like this, I was thinking nothing, I don't want to
center my main thing, when I first looked at this, I looked at the colors. So I'm looking on this
side of the composition. Then I'm also then moving
my eye around thinking, Oh, look this is a
little bit transparent. Oh, and there's some
dots and I've got some fun writing coming through and I'll look at this
old book page and what does that say
and what's on it? Then look at these
interesting scribbles and Oh, look, if I move this, I have some shiny elements. Wow, look at this
three-dimensional piece of burlap that's
coming off of there. There's lots of
elements in here that I get excited about when
I'm looking at collage. This is a piece that
I want to tear out of my sketchbook and frame
because I love it. One of my favorite.
So on this one, that's what I was thinking. I'm thinking off
center of my subjects. I want rule of thirds, I'm thinking maybe
I want a third, a third and third on
my different elements. Maybe I want to cut
something off in the top third and have something else in the bottom two-thirds. So as we're looking at
the different pieces, you'll see some of those
elements coming in. I also want to think
about repeating elements. A lot of times I
don't want to just use all the elements once. For instance, in this one you can see a little bit
of writing here. You can see a little
bit of writing here. If you can repeat an
element or a color or say like the scribble I repeated
here and here and here, the gold element I repeated three times
here and here and here. So I want you to think, repeat some of the
elements so that you pull the whole
collage together. If you're doing a little series, those repeating elements
help tie a series together so that's something
to be thinking about. Let's take a look at some
of the other pieces. This is another piece that was inspired by the
sketchbook piece. I do that a lot. I want to create in my
sketchbook to flush out ideas, nail down color choices, figure out like,
what's my thing? What do I like? How
do I like to do it? Then I'd like to move into
freestanding pieces that I can sell or give away or frame. A lot of times I'll do a complete finished piece
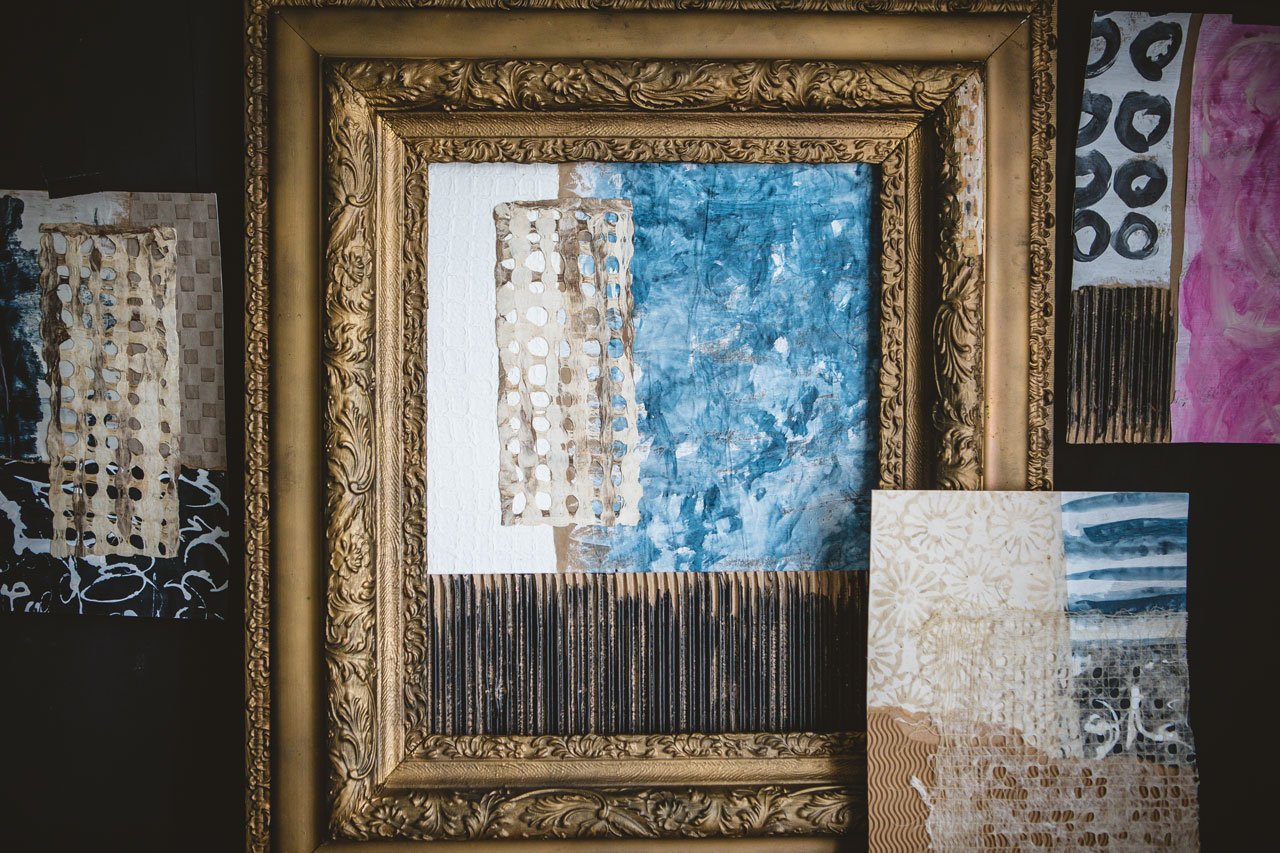
of art with a deck old age. Then it can be framed in a float frame sitting
on top of a mat. I can show you an
example of that. I have one of those hanging. Have a lot of these
hanging but just an example of something
floating in a frame. The deck old edge and
how beautiful that is when it's framed
up and finished. I particularly love doing that, especially with art because it allows the entire piece
of art to shine through. There's no mat coming
on top of it covering part of it and with a collage, they're usually
thicker than just say, a photo or a flat piece of art. So in a case like this, you definitely want to float frame it or
have something where the glasses a little bit off in the frame is
a little thicker. I like to have sometimes a fun finished edge to complement
that and finish it out. Again, I was thinking my
main color focal point off to the side more to the right so that's on
the thirds this way. I've got a big piece of page. That's another thing too. I don't want all the elements
to be the same size. So I'm thinking whatever
my focal point is, do I want it to be bigger? That's what's going to
make me focus that way. Or do I want it to be
some pop of color? That's what's going to draw
my eye to the focal piece. But I want that
to be to the side because once I'm drawn
to that element, I didn't want my eye to wonder around and admire all
the other elements. I've got some flat
parts and shiny parts. I've repeated some elements with the writing
and the black ink. I've got dots that
I've repeated. I've got my
three-dimensional piece of fabric year that
pulls off the paper. There's lots going on in
that. That's super fun. On our piece where we're
creating for a cradle board, in this one we teach, do a great big piece
of paper and then come back and search out the
right composition forests. I find it more difficult to
just work on this square and create the perfect
piece of art that I'm excited about because
when I'm all done, I'm thinking, I just
didn't quite nail it. But in creating this way, where I create a big piece, I'm just slapping stuff down and playing and experimenting
and working with color and then coming back and searching out a
great composition. I am much more successful. So for me in my art practice, that's what works best for me. You're going have to figure out what works best for you
if working straight on a cradled board is
your thing and you excel at that and you're
excited at what you create. That's fantastic. I cannot do that. I get angry [LAUGHTER] bigger. This is terrible, now I've wasted my money on this expensive wood board
and I have nothing I like. Why do I even like
to make guard? I should just never
come up here again. I mean, I go through the gamut there when I get mad
at a piece of art. I want to create in a way
that works best for me. I have figured out, searching out beautiful
compositions out of a larger piece really
works best for me so when I'm doing
this piece and I'm searching out that composition so that I end up with this. I was thinking rule of thirds and look up, third,
third, third. You can see how
that's divided up. Also this piece that's
on the horizon line is on the top third and we
have two-thirds below it. Then we have some
elements and pops of color and texture
and things that are visually interesting
and different and make interesting pieces for your eye to wonder
around and admire. So I do particularly love this piece that got
created today in class. [LAUGHTER] I hope
that this sparks some fun things for you
when you're doing it. I also have very
dark and very light. So I feel like I've got
my contrast in there. I'm thinking of all
these different things. Rule of thirds, contrast, repeating elements, give me some texture or something
three-dimensional. So that particularly worked
well for me on that piece. Then when we came to
our micro collages, and if you're playing
with these like I am, and then you get
something on your paper, this fun little kneaded eraser that you use
from the art store is the perfect way
of just getting rid of any weird pieces of art
that ended up on your paper. Which I try not to do that, but I've moved these around several times during
the filming of this class to talk
about them and show them and [LAUGHTER] we backup. So you can see all of
these in the same frame. Because I keep touching and
move them when I haven't put them in a little
mat to protect them. I keep moving some
of the art supplies that still on here that's
not finished on it. So when I'm done with this, I will take these outside
and spray my piece of art here with the
finishing spray. It would've been ideal if I had sprayed it before I cut them up. That is a recommendation I'll give you if you
make the big piece, spray it with a finishing spray and then come back
and do your cut ups. And that way you won't have
any miscellaneous art supply coming off on your paper
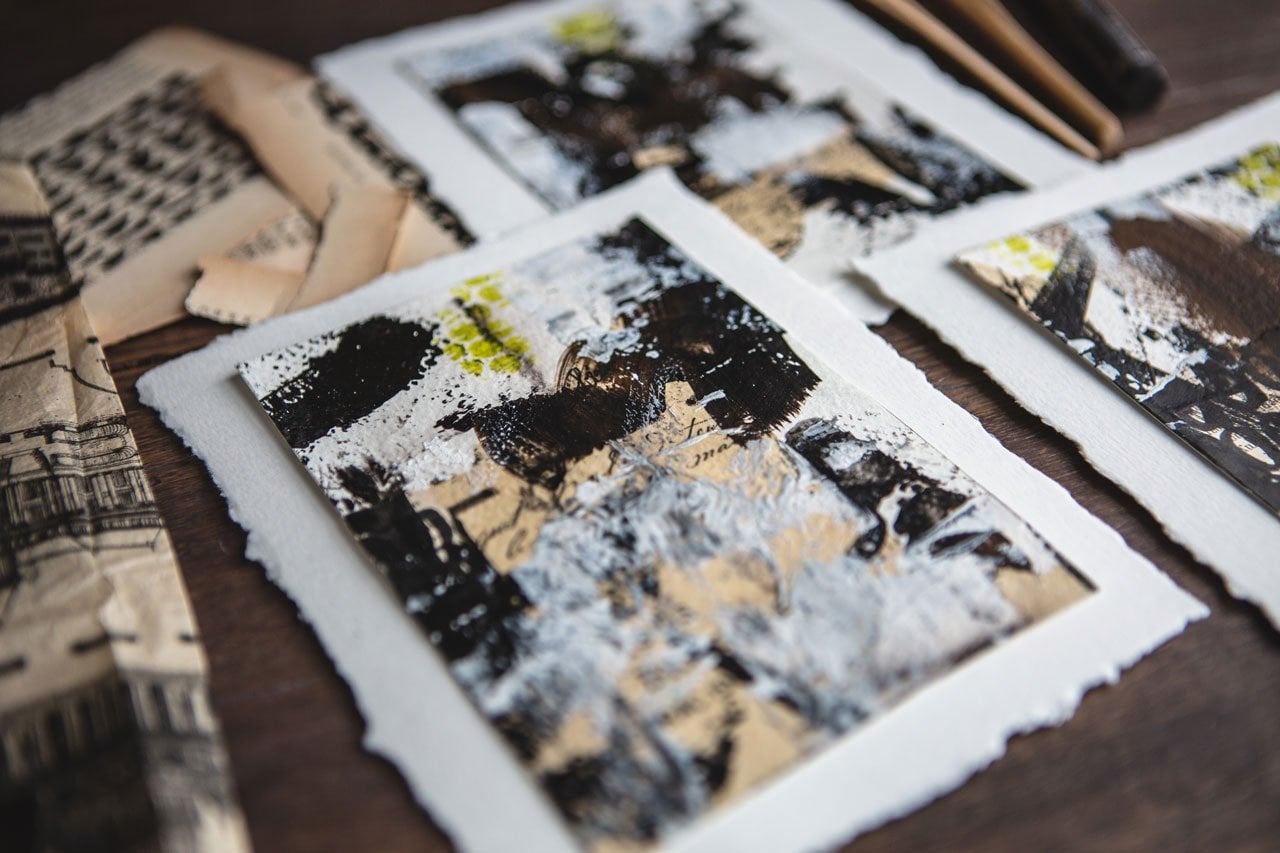
like the pastel that I used. So these are because if we say I've got a
collection here of five, then the colors go together. There's a repeating
element running through here with the
colors that I've used. With the circle. I like these little
half circle cutouts. These are little scraps
that were leftover from the class I did where
we did circle cutout art. I like that I kept all those
because look how interesting that element is in these pieces and there's
no circle on this one. So I could possibly say I have a collection
of four instead of five, but I love this piece too, so I hate to throw it out, but it could be one
off on its own. But as a collection, this works because
we've tied it together. They all look
drastically different. If I'm doing little
squares and I'm trying to make them all at drastically different
for some reason. I just don't get
the authenticity and I don't know serendipity of the way that
I've done this collection. What I like about this is the circles repeat on every piece and they're
all in different places, they're not all in
the same place. It looks organic
the way it's done. It doesn't look like
oh, she put that there. So she put that there.
So she put that there just to put that there
like it was on purpose. I like that a little bit of organic feel I get from that, also like that they're
tied together by color. But again, they're all
drastically different. We see different colors
standing out on each piece. Like for this piece, it's the yellow for me. For this piece, it's this
darker, purpley coloring. For this piece, it's this pink and yellow coming
out. For this piece. It's more than lighter,
pink and lavender. I see different things
popping off at me. But they all still look like a cohesive set that I
could use as a collection. So that's what I'm
thinking on these. I'm looking at composition. I don't want anything smack in the center and
thinking third, third, third rule of thirds. These are cut in half, but this is off centered, so this one's probably
less rule of thirds, but at the same time I have enough elements going on
where you're not like, Oh, it's in the center
and it's boring. This is definitely like
third, third, third. So that's super fun. I want you to start thinking about these different things. Make your most
interesting elements. Be off to the side or
on a third of the page. Repeating elements, repeat different
elements throughout your piece or throughout
the collection. Let color be a running theme. Think about contrast. You want light and dark. You want it to really
have something that's going to pop
off the page I use. So it's not all
the same color and the same level of contrast
so that it's just boring. Then texture, little bits
of texture here and there. This one's got the
texture with this paper, that's wrinkled, paper
that's wrinkled. This one's got the
texture with this paper, that's wrinkled and this
little bamboo paper. This one's got the texture with the piece of art
that I've picked. They're so different
elements giving some different exciting
aspects to our composition. I want you to think
about that all the way through class with the
pieces that you're creating. Then I can't wait to see
what you come up with. So I'll see you back in class. [MUSIC]
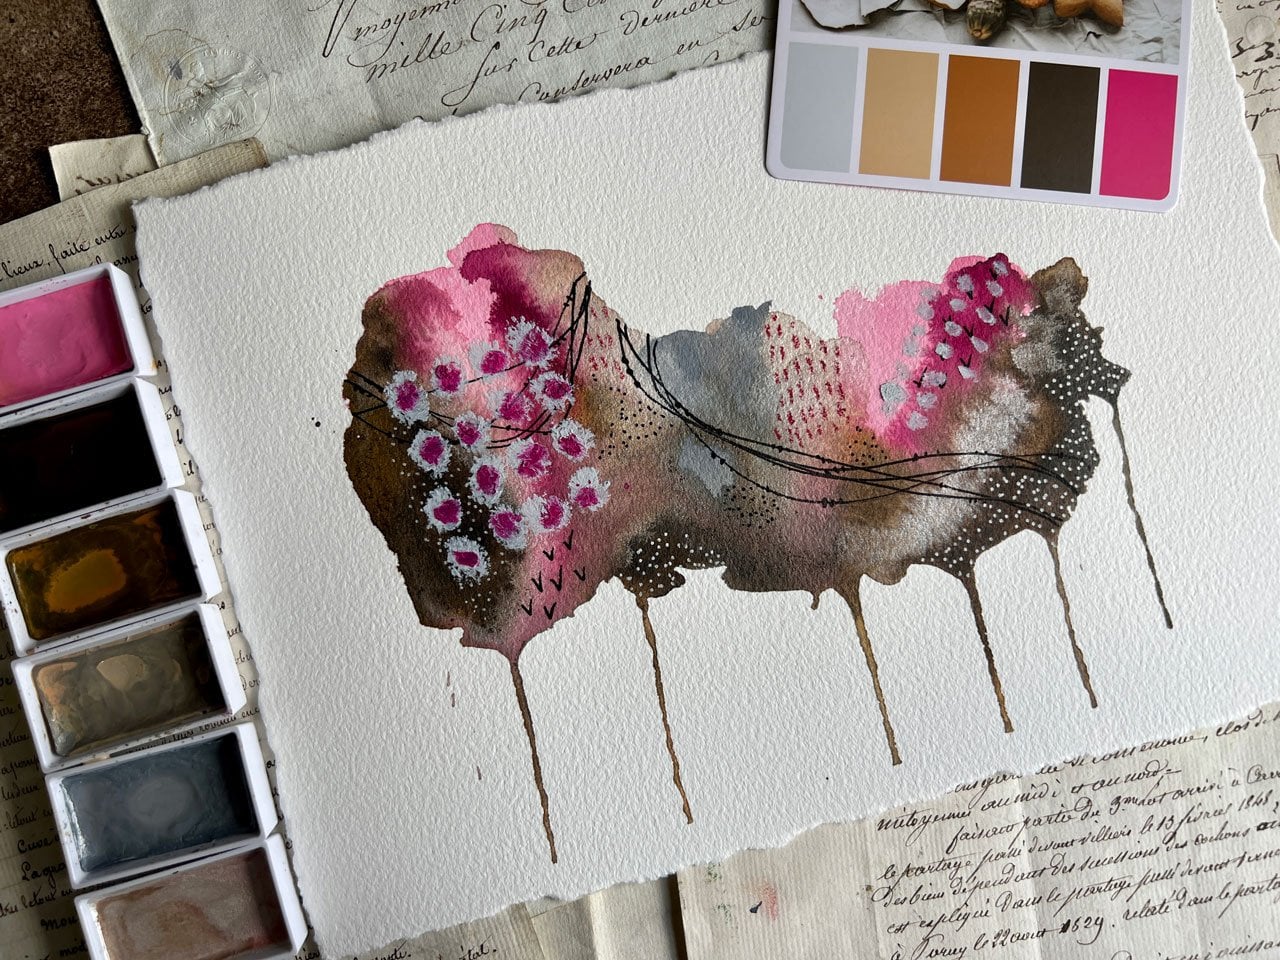
11. Starting With Sketchbook Play: I thought it would be fun in this
project to work in our sketchbooks and give
ourselves a couple of prompts to work from
and create our piece. These are some
pieces I've created before in my sketchbook, and this is the guidance that I want to use for This project. I want to use a piece
of previous art that I created that I've cut up
like these little pieces and samples or a piece that
we've created in our making our own pieces section. We can very easily,
for instance, take a piece that we've
painted with a little bit of paint and some
neo-color crayons, and we could use this
as our statement piece. We could use something that
we've created for this with the collage papers or one of those bits of art that
we have leftover. If you did some of the
art pieces where you cut pieces of art out of stuff
and you had leftover scraps, we can use some of that. Now what I like
about having this is the wide color
variation and things that I have available for that. What I've done is I've taken my prompt that I've decided on. I want a piece of a little art, I want a piece of
an old book page. Any little old page out of a book that
you've torn up or old paper or something that you've maybe tea-stained
and written on, you can get creative here, but I'm going to use an
old dictionary page. Piece of old dictionary
page piece of artwork. I want a piece of something
that's going to contrast, maybe with a dark color like this had some black ink on it, and I just took my hole punch
and I punched some holes out so that I had some
extra shape in there. We could say
something was shaped, I can use something like this piece with these
bigger holes cut out, that would've been fun. I could use a contrasting paper that I've painted
with watercolor, and that would be fun with a previous piece of
ink that I'm using. There's lots of choices there. I want some type of contrast with a shape
cut out possibly, and then something
transparent like a tea bag. I do like this tea bag, I have lots of little
tea bags that I have used and collected
over the years, so I like a piece of tea bag. Here's what I'm thinking.
A piece of art, an old piece of paper, something transparent
like a tea bag, and then something to
add a little bit of contrast or shape or a cutout
or something like that. I've done that prompt
in both of these, you have the piece of art, the old book page, the piece of tea bag, gotten a little contrast EPs, and then another little
piece of my art. This is a little more organic in the flow on this piece of art, I just tore the page, and it really does depend on which way you
tear is to if you end up with a pretty edge on the end or if you end up
with this white edge. If you're wanting to use the
piece of art on this side, you need to tear down on the edge for the
side that you plan on using because the side that
you plan on not using is going to have this big white edge that
might not be pretty, but this side would have
a real pretty edge. Just practice a little
bit on a piece of junk, piece of paper to get your bearings on which way to tear if you're
going to do a tear. On this one, I did a cutout, so I just took scissors
and I used that piece of the artwork and just cut that piece out with
a pair of scissors. I like both of them. I like the organic feel of this, but I like that
they're straight edges and ripped edges on this piece, so there's definitely a
reason to use them both. I like having these
little tiny pieces. If you're cutting pieces
off and you end up with little bitty pieces left
over, don't throw those out. This is a piece of that
book cover that I have that we talked about in
different surfaces. Let's see. It's probably right over here. It's a piece of the
spine of this book. If you have little
tiny pieces like this, I love that because
it adds a contrast, it adds a texture, it adds a different element, so I could have added
this in here on there for a different
element, that would be fun. I also could have had as
my piece of contrast, piece of lace or old
fabric or something, so that would've been fun
layering those in there. Get creative. You could have actual bits of stuff in there, doesn't have to just be paper, it can be pieces of
fabric and book cover. That's our goal. Our goal is a piece of art, some old paper,
something transparent, and some type of
contrasty dark punch that we can pull
out of there with either something
that we've painted, or put some ink on. I could've used one
of these papers that had this yummy ink contrasts, so that might be used in my
next collage, so we'll see. That's the prompts
I'm looking for, for the piece that we can
create here in our sketchbook. I love working in a sketchbook because if
you want to do something that will really
grow your skills like a 100-day project, sketchbooks are
perfect for that, you could do this as
today's a sketch, you could sign it
and date it and then go to the next page for
your next day's work. Then by the time you
fill up a sketchbook, you have an amazing sketchbook
to look at, number 1. But you'll also see
the differences and the skills and the decisions that you made from the
start to the finish. I love being able to
see that transition. One thing I will mention
that when I was doing this, these are raw pieces of art, they haven't had any
finishing spray put on them, so as I touch them, the art gets on my finger. You can either if you
want to not have that, go ahead and put a
finishing spray on here, which I've actually done with my favorite piece over here. I put a finishing spray on here. I used that, the
workable fixative by crayons because I wanted
to test it out and see how it was looking. It's still a tiny bit wet, I can smell it
because it's fresh. I think it darkened
the colors just a tad because this is a
piece of that same art, but it doesn't look bad at all. I don't mind a bit
the tiny bit of color variation if there is any and once it's
completely dry, there may not be any, but I do like the
way that's come out. Now this piece out, I shouldn't smear if I'm putting glue on it and putting it down
here on my paper. Now having art supplies
all my fingers, I do keep baby wipes around
to be able to very quickly wipe off my fingers in
the art supplies on there so I don't
have to get up and run to the sink
every few minutes. Keep some of those handy. If you do like I
did on this one, I actually smudged and got
it on the white paper. To correct that I used
one of these art erasers. You just need up to a new side. I took it and just erased that little bit of color
because I don't know if you noticed there
was color there, or if I smear some color there. This eraser erases
lots of stuff. If you end up with a piece, because when I was done
with this, I was like, "Oh, I love this piece," but
there was art stuff, medium stuff from my fingers smeared on this paper over here. I'm like, "Oh, I so love this," but I don't
even feel like I can show it on the
camera because I've smudged off onto the paper. That little eraser just
cleaned that write-up. If you don't have one of
these needing erasers from the art store. This one I've had
for a long time, and it still needs
up really nicely, so you erase and
then you need that whatever you erased
off there right into the eraser, basically. But these things are fantastic. It cleaned up the smudges on my paper beautifully without
making any extra marks. Now I feel like that's a
beautiful piece again. If you're worried about
these in your sketch book, smearing onto the other page and you just want
to protect them, then you can take a piece of wax paper and put
those in-between your pages when
you close them up so that they stay
fresh and pretty. You may not care about that, and some people do. I like these enough
where I would like them to stay
nice and pretty so I might consider just
slipping a piece of that in there just to keep
them pretty for later. This is our project
for this segment, let's do one in our
sketchbook with a piece of art that you've either
cut up or created. Old piece of paper or something transparent and
something with contrast, maybe with shapes cut out of it, and let's just see what
we can come up with. Now, I'm going to
be using Yes Paste, probably maybe matte medium
depending on the paper. I've got the Yes Paste and the gel medium
here, the Yes pace, I'm going to put that on
with my palette knife, which I'm keeping in
water because I don't want a lot of glue to dry
on the palette knife. In-between uses, I'm just putting this over
here in my thing of water so I can wipe any
glue off of it that I want. I've got a piece of tea bag here and I'm just going
to start playing. That's the thing
with the sketchbook. You just want to not think
super hard about it. I really like this green, I want to use this
as my contrast. This is just watercolor
painted onto the paper and then let dry and it's a piece
of watercolor paper. I might put some shape in
this and then cut around it and see what I can get. Maybe even like a double circle. Let's just like. We could do a double circle like that curve when would that
be a little bit different. Each time you do a
collage, you can think, okay, so I like my basic format, but how can I make this
one a little different than the last one
and then eventually you're going to get around
to some amazing pieces that are like nothing else
anybody else's ever created. You're going to be like, wow, this is mine, it's my style. This is the look
I'm hoping forward. Let's just cut this out
and have it available. I like that a lot. I think I'm going to cut it tighter and then I can just
keep these little scraps over here in my bin and I
can come back out later if I need to have
a little scrap of some color, I can save those. Don't throw your
little bits of white, just keep them off to the side and a little
container there. Also want a piece of old book page that
can be old music too. This is really fun
with the words on the back and the music on
the front on this side. I think I'm just going to tear a piece of
this out of here. Actually kind of like
this piece here. I'm very loosely
placing the art. I don't want to start
gluing it down yet. I want to get a feel
of where I'm going. Once you get started, even if you give yourself
some parameters, don't feel like you
have to stick to them. If you get something that's like really knocking your socks off, you get that, then
just go with it. I almost love this
piece right here. It's the second
transparent piece, but what if we cut some of
this out and give it a try? Definitely, save these. That's a great little
extra piece there. I might not like it,
but you start off loosely placing things and
thinking, do I like it? Is that what I was going for? Let's pick out a
piece of this art, I do like the torn edges, so I'm going to
go ahead and tear down on the piece that I
think I'm going to use. I like this side. Let's just tear that down. You've got to look at which
side you're going to use because if you pick
the wrong piece, you'll end up with an edge
that you didn't intend. I'm going to go back and
just tear a little piece off there to get rid of
that white edge. You can leave a straight
edge if you want. You can cut all four edges, but let's just try with
the straight edge. That's fun. Do you want it to be a square? Do you want it to
be more organic like the pieces I was
originally doing? That's another
thing to consider. Shape this one's super organic. This one's a little more square. Really dig in the square. We might try for this
one piece to say, well, what happens if we
kept it all in shape? That's fun right there. Then when you think,
I think I've got it, then you can start
gluing stuff down. If you have so many pieces
here that you're like, oh, I don't know if
I'm going to remember where they'll all go, you could take a picture
of this one with your cell phone and then glue each piece down keeping your cell phone
as the reference. It's hard to tell. When I'm looking at an angle and not straight
down on it but if you look, if you're with the camera, you can tell some
composition also. If you think, oh, is
that the one I want, take a picture of it and see if that's doing what
you wanted it to do or not and the side because you may need
some differences. I don't know. Let's see.
If we put this in here, we'll have that
little bit of green. That's fun. I want to see how like
that right there. I think I'm going
to glue that down. Let's take a mental picture
of that or picture on our phone and that's the layout I think
I'm going to go for. At the point that you think you've got something you like, take a picture of it
to reference if you think you'll forget
where the pieces were, and then go for it. On these little pieces
with the holes, you got to be
strategic on the glue. I don't want glue to be
squishing at all over my sketch book here. I want it to be light but
enough to really glue it down. I don't want it to
be going anywhere. Then if you think this
glue is going to be too heavy because the
yes paste is heavy, you can get a brush and then
dig into some matte medium. That might be the way to
go here on lighter pieces. I just put those on
with a paintbrush. I really like having
a spare piece of wax paper and then I can glue down on the
back of it without worrying about something
messing anything up. Now, if you're using really light-weight
transparent materials or lightweight book pages. You can use the
liquitex matte medium. Now, if I do it that way, I don't remember, I cut this
piece off accidentally. If you're doing something
like music or words, they need to be facing up. Keep that in mind. Face up. You don't want to
stick it on there, and your whole collage
be done on your piece of music to be upside down. Let's get this
little guy in there. I'm back to the thicker piece. Again, when I stop using
that for a second, I put my brush over
there and some water. I don't want the glue
dry and in the brush, but this thick paper, I really do like this thick
or paste a lot better. I'm just eyeballing in my mind what I thought we'd just did so I should have
taken the picture, but it's hard to do all the stuff you might
think of as you're filming.
12. Adding Extra Marks & Color: Why do I even need to have this under that paper there?
Let's just see. I don't know, this was it, or this is going to be it now. Rather than squish this down
with my fingers, I'm going to take this
piece of wax paper and use that as my piece
in-between because this is how you smear stuff onto your page that you
didn't intend to is by not having something protect your piece that you're trying to stick down really nicely. But if you have anything on your piece of paper
that also will get onto your
collage background. This blue eraser is fantastic. Then if you have any pieces that aren't wanting to stick down, before you leave
the piece to dry, you can stick some
glue in the edges. Look how pretty that is. Glance up into the little mirror
screen here like that I have. Beautiful. Something clean on top of this to squish it down. It doesn't have to be wax paper. Here's a clean piece
of this newspaper. Just get something
else to help you smash down rather than smearing
your art with your fingers. I'll just take a second. If you've got glue on top
of stuff like you're using a liquid matte medium and
got glue on top everything, then that's not
going to be as easy. But because I had the glue
under everything here mostly, that made it easy to smash down. Here we've got our
piece of artwork, our little pieces of
contrast with some shape, we've got our
something transparent in our old book page, and that one is super pretty. There was our inspiration
and where we ended up. Let's do another one
before we get out of this. On this next piece, I'm looking at my
different supplies. Here, I've got a bunch of this stuff here out to the side, just this whole stack of stuff that we looked at originally. I'm seeing what blends
and what's appealing to me as I'm thinking what I want this next
piece to possibly be. I thought maybe a piece
that I created rather than one of these other pieces from a leftover piece of art. But I may still throw
something like this in, but just to give a difference
in our collage look, maybe one of these
pieces that I've just scribbled some paint, white and green, onto a piece of paper. There's so many different
ways to approach a collage. I really like this one too, maybe we should do that one. There's so many different
ways to approach collage and the reason why
I wanted to do a simple collage workshop like
this where we're maybe not getting into gigantic
difficult pieces, I'm keeping it a little simpler, a little more streamlined. Because when I made those abstract
workshops where we were cutting little pieces
out of our big piece, so many people said, "What do I do with
all these scraps?" You can say, "Oh, you should use them in collage." But sometimes, what
does that mean for you? Do you immediately think, "Oh, yes, I love collage. I can't wait to do it."
Or are you thinking, "Okay, I've never done
collage. How do I do that?" A lot of people were like, "Okay, how do I do that?" I thought it would be fun. Let's just cut this up here. Nobody knows what
this says but me. But it's a fun
little contrast of dark and white. Look at that. We could have more
than one of these in there if I wanted a bit
sticking out somewhere. So many people were like, what
do I do with these scraps? Do I just throw them away? I wanted to just give you
some ideas on the way that I sometimes approach collage, it doesn't have to be this
big, hard, difficult thing. I'm picking out a few
rules for myself, some old book page, something transparent
like a tea bag, little piece of art, and something to give
a pop of contrast, and that pop of contrast
could be color, it could be something black, it could be a lot of
different things. It could be something
like a texture, like what if we took a
piece of this burlap and maybe this was part of
our contrast and our texture. We could have had
that extra feature as instead of just contrast, contrast and texture,
look at that. Also I want to throw in another
step on this one that I haven't shown you on the other collage pieces or
done in that first collage, one that we just did. Once you get pieces
like this done, you don't have to be finished. I'm trying to keep it simple for this first little
sketch book thing so that you feel
comfortable getting in your sketch book and
laying out compositions, and figuring out
color choices that you like and you're
figuring out depth of pieces and is something
coming off the page with extra texture and you're
dipping your feet in. But the next step
can be after you get all these pieces in there
glued down where you want it. We can then add marks and paint and more things
on top of that, you don't have to stop there. If you're thinking, I love this, but it's missing something, you can go ahead and
do your next step too, it doesn't have to be done. Once I get these on here, I may add a little bit of extra marks or contrast
or doodles or shapes, maybe dots with white paint pen. All kinds of things
that we can do there. Don't start gluing
down until you're fairly sure you like
the composition. That way you don't get things glued down and then you're like, "Oh crap", which trust me, I've done plenty of times. Once you get more
comfortable doing this, it does get easier. Then you might just
glue as you go. But I do find it, if you'll just take a moment to place things before
you start gluing them. I don't know if that's
where that was or not, but that's where it's going now. You'll be happier with your piece
when you're done, if you'll eyeball these out
before you glue them down. I like that. I'm sticking
to my Yes Paste, but you can again use any of these that are
kind of grabbing you. Let's keep that clean. Let's use this right here. If you have an old phone book or
something like that, those are really handy for scrap paper for getting
your glue smeared onto your little piece
of art. Look at that. Let's get this little
piece glued down. I do like that a lot. There's that. Let's take this and start pushing that down a
little and then we can look back at it and think, okay, are we done? Do we want to add more to it? Let's just get it
stuck.See what we got. If we got any art medium
anywhere on our paper, we can take our little
kneading eraser and get that right off. Now, we can step back and
look at it and think, okay, does this need any
other elements added to it? I love keeping the paper clean. This is like my new re-discovery I used to use these years ago in art classes and then
I've gotten away from using stuff like that. Now, I'm like, oh, I need that. Now, we can evaluate. Do we need any
more pieces added? Do we want any more contrast? Do I want to take a
pencil or some graphite or any of my little
neo color crayons and embellish this, any? Do I want to maybe add some? I do like lines. You might wait until this is dry before you start doing
something like this. But I do like the extra element that something like this
adds if you come back over. Now, this is coming
off out of the layers. It's not like it's
on the same layer, visually has that step-down. Look how pretty that is. We could come back with a
paint pen if we wanted. Let me get my little POSCA pen. Paint pens are my very favorite
little art supply tools. Then, for something like this, if I wanted some
extra mark-making say here on my piece of art, I could come and just go
ahead and add that in. This is why I like
to encourage you two to use supplies that
you already have. Because it gives
you new uses forum. It teaches you how they work
with different materials. You figure out things that maybe you wouldn't
have thought of before. I'm one of those people where
if I want an art supply, I want all the colors, look at this, this gold stuff is some
of my favorite stuff. Let's add a tiny bit
of gold in here. This is just like a gold
acrylic paint paste, but you can certainly use
inexpensive gold craft paint. You can use calligraphy ink. I think I've got a
little thing like this little craft paint that I've got,
metallic craft paint. That works great. This is silver. I think I want gold in this, but silver would be nice
to mostly the silver out. But what I like about this paste is I could maybe come in
here and do some lines. I could do some dots. I could just do something
like that right there. Take a palette knife, and then spread
some paint on top. You can do that with any color. It doesn't have to be a metallic.That could've
been with black paint, white paint, green paint. I didn't want too much, but just a tiny bit. Then look, it has
that little sparkle in it.Look how
beautiful that is. On this one, we
leveled up a tiny bit. We went from doing our initial piece where we weren't adding any
extra marks for layers. And if you'll look at the
difference of these two, you can see how building
up those layers really did make a more full
piece of art there. It really added to the depth
that almost finished it off to the point where
you're going to start looking at these
pieces and thinking, okay, now I want something
that's coming off the page. I want to add some
extra marks and maybe some color and I want
to embellish that. But I want you to start off
with just the paper pieces. Figure out what
composition that you like. If you'll notice on these, I was doing a little bit
larger piece of art, maybe a little bit
larger piece of book page and then
I was offsetting those with little pieces of
the transparent tea bag. Then a little pieces of that
pop of color or contrast. Same with this. I had the bigger piece of art, the little bigger
piece of paper. The transparent tea bag was
a little smaller and then my bits that were popping off and contrasting were littler. Then I had this
three-dimensional element of this burlap to put on top, which let me tell you, it was just like all I have of this piece of burlap and it's like
my favorite element. I might put that like in every
collage ever because look, I can put that right on there. I can put ribbon on there. I could put like an old
military flower on there. Let me show you these. You can get like an old piece of ribbon can be part
of your piece, they easily could get
at the fabric store. This is not even that old. But looking at this,
if you collect antique millinery pieces, these are like
pieces that may be more pieces for old hats
and things like that. But how amazing would a three-dimensional
like fabric flower or something like that be. You could have any
kind of element, little element glued to your
piece like this piece of fabric to give you that
three-dimensional feel. Look how beautiful that is. I want you to start off
with your paper pieces. Bigger piece of art and
piece of book page, smaller pieces of contrast
and transparency and start laying things
out and getting a feel for the look you like, the composition you like
if you'd like torn edges or straight edges and
then come back in your next pieces and level that up and
do some mark making with some neo color to crayons or graphite
or a piece of pencil. Add some marks in there and maybe a splash or two of
like amount metallic paint or a paint that will contrast
stick or some India ink. That ink would have been
a nice contrast on here. Maybe you want some drips, maybe you want to
try watercolor, and then some paint pen marks
if you want and see how you can level up that piece that you started with
to the next level. The sketchbook play
is our first project. I'm really looking forward
to what you do with these. I'll see you in the
next project.[MUSIC]
13. Larger Piece Selecting Elements & Composition: In this video, let's go ahead and start our next piece that's
a little bit larger. When I say larger, I don't
necessarily mean gigantic, I thought maybe we'd move on to a free-standing piece of paper. This is just some cold
press watercolor paper that I have cut in half so that I get
two pieces out of it. Any surface that you want to work on is fine if
you feel comfortable moving on to other
surfaces like the cover of a book, some vintage papers. I mean you could definitely start playing on other surfaces, but I'm going to keep
this one a little simpler and I'm going
to work on a piece of this is probably a nine
by six piece of paper now. Six by nine, whichever
way you want to say that. I want to put the collage in
the middle of this and then maybe tear the edges so that we have a nice deckled
edge when we're done. Something that would
be good to frame as a free-floating piece of art, similar to this one that's
on my wall behind us here. This is not a collage obviously, but look how beautifully
a deckled piece frames up in a floating situation. I thought it would
be fun to create a piece that you could
then free float frame. We've finished our
sketchbook pieces. Hopefully you've
practiced and played with lots of different
components and elements in your sketchbook and created lots of different
layouts and settings. I want to take some inspiration from our theme that we were working on in
these sketchbooks. I want a piece of art, I want a piece of
old paper book page. I want some colorful
elements that can pop. I want a transparent element, and in my case, that's
going to be the tea bag, and impossibly some
type of element that's actually
three-dimensional on the page. We can come back, add some marks and maybe a little bit of paint, and we can do that with
any of our art materials, pencils, acrylic
paints, pastels, you can definitely just
play with your supplies. Paint pens for your extra
little bits at the end. I'm going to do a video
just on composition, because a lot of times as I
was putting these on here, you might have been thinking of, I wasn't thinking
of composition, but I was, I was kind of
thinking rule of thirds. I wanted my star element
to be centered off center, so that's about a third, and then the paper here
is about two-thirds, and so the elements
that I was placing around that were helping to move the eye around that frame. I don't want any of the
elements to be the same size, I don't want them all
to be the same color, I don't want them all to
be the same transparency. I don't want them all
to be the same texture because everything all
the same is boring. If we have all the
different elements that we have on our
little wish list, a little piece of art, old book page, elements that can contrast and pop something transparent,
something with texture. Now you've given
your eye something to look at and move around and appreciate and really get into the intricacies
of what we've done. I mean I've even chosen
a metallic paint to shine differently
in the light. I like all those differences
that we can get if we think a little bit ahead and give our self a
little list of goals. I'm going to continue on
with our little list of goals as we create
our next piece, that's going to be a
free-standing piece. I was just pulling out elements, I've got my little tea bags, I've got the piece of green paper that I had painted
with watercolor paint. I actually have other papers I've just painted strips
of watercolor paper. This is acrylic paint.
Do I like that? Maybe I like that little bit of this maroon burgundy color. Do I like a brighter pink? I like this tone down pink, I love this mustardy color, that might be a choice. I do like having
strips of paper that I have just coated with some watercolor or
some acrylic paint. These are some pieces
that we can then cut up and get a little interesting
strip of something out of. I really liked this orange
and I like this way that the color has ballooned out
on here, really beautiful. I like having a couple of these, just handy to look at and
pull out and consider. I'm going to have these off
to the side ready to go. Another thing that
you could use is your transparent
item that I have sitting over here
is tissue paper. That's always a
nice little choice. I also painted some
tissue papers, I'm just trying to give you
a few more ideas on things that you could paint and have
ready for collage sources. Some of these, like look at this bright pink,
that's really fun. This one might actually be a nice choice to
go with our piece, so may be I could set that out. Look at that, that's
really pretty. That's just watercolor
paper on a piece of tissue paper set to the
side to dry. I love that. I do love the green to. I don't want all my pieces
to look exactly alike, but I do want to use in my
mind the same elements. I'm using something,
a piece of art, an old book page, something with texture or
something transparent. You can have more than one
transparent item or I could replace this
transparent item for the tea bag. So we'll see. I did like this little page
with the writing on it. This is just a piece of
sharpie writing that I've done on some watercolor paper and we used a piece
in our sketch book. I've got a piece
of that left over. I went ahead and on
this piece I did put some finishing spray on the art piece because
there's pastel on it, and the pastel gets
all over the place. I do want this to maybe a
pretty finished piece of art, so if you have anything
on the paper like a fingerprint from something
that you've touched., one of these little kneaded
art erasers that you get at the art store or the
office supply store does clean your paper up really
nicely for any little bits of chalky art that you
have on your bigger piece. But I did go ahead
and put some of the finishing spray on this piece because I know
it's covered in pastel, so I went ahead and sprayed
the workable fixative on it. A couple of coats outside. So at least maybe I won't smear stuff all over
the place today. I really like this
fat chunk here. I'm thinking a piece
of art over here, a piece of book page. It really would be nice on the book page is if you
went the extra step, I'm using dictionary paper because that's what
I happened to have. But if you have a favorite book, you could get an old copy of that favorite
book for instance, and perhaps pull the page
out if that's your favorite, and have some lines and quotes that could be read when you're done with
your final collage piece. Something to keep in mind. I don't necessarily want it
all to be exactly the same. I did not mean to tear
that with the white. You've got to be careful
on the way that you tear. I do like that this is a little hourglass
figure shape there. That's a fun different shape. Let's just start visually
placing things and saying, "I think I've got the
direction I want to go." I did really really like
black sharpie on paper. See it doesn't matter really
what you write on here, so you might write your hopes, your dreams, a quote, just something that you came across or something interesting. Because when we use
it for collage, you're going to know
what that meaning is, but nobody else is
going to really know what you had there, what it said, what it meant. But you'll know in your mind, behind the scenes, you'll just have a feeling that, that was infused into
that piece of art, so I like that right there. I like this ink on
this wax paper. Just, I want to use it I don't know if it's going
to work on anything, but I want to have it in
there. Let's just see. You don't have to be in a hurry. This is not created
as fast as you can. This is go ahead and
take a moment and think outside the box and look at your elements and see just what you think and
what you've got going. Tear up pieces and just keep a little tray of torn up pieces because then
we could come back and say, " Look at this little
piece of whatever, " I think this is
part of a book page, and maybe in one
of your collages, that's going to be the very perfect thing that you needed. You can cut, but I like to
have uneven edges on stuff. We're just going to see what
we can have go in here, and keep in mind, I do try to think in a composition
rule of thirds. I don't want everything
in the same direction. I don't want everything
the same size, I don't want everything
the same color, so as I'm placing I'm still thinking and moving
and deciding. I want this to be in a semi
rectangular when I'm done, because as I then
deco the edges, hopefully, we'll get something that we love, and we can frame. I'm always looking for
stuff I can frame and hang up on the gallery wall here in my art room or
throughout my house. That's fun there,
and then of course, when we're done, we
can add extra marks. How do you feel about
this piece over here? I'm also thinking with
composition repeating elements, so if I use the
black thing here, maybe I want the
black thing there. If I've used a
touch of pink here, maybe I want some
pink in the art. Let's try some of this crazy, I don't know, rice paper, bamboo paper or whatever
this weird stuff is, and just see if we can get another texture in
there somewhere. I don't really like that. Maybe it's a layer down here. I don't want you to
start gluing stuff down until you're
to the point of, " I love that." Look at this is hilarious. The words that I've
gotten here on this dictionary
page is boogie man. If you have a weird
page and you're like, this is the only book page I have and I really
want to use it, but the words are weird, this might be an
instance where you take some India ink
or something on top afterwards and you
obscure what's going on. That's really funny.
What's on the other side? Rosemary, I like
that word better. Let's use the side instead and not fill in this
little piece here. I do like this
transparent pink thing. Let me tear this piece
of art down a little bit so that it's a little more, one thirds two-thirds ratio. I also like, and we might
try that with this. I might not like it but I also like the hole punch things. I've gotten a little
hole punch over here. Maybe we'd like this
with some holes in it. Then of course, keep the little
holes that you punch out because those could make a nice little element
on your collage also. I like that with the little
cutouts peeking through. That's fun. All right, so let's go ahead and start gluing
some of this down. Of course you can
use matte medium, you can use mod podge, you can use glue sticks. I am going to go back to my own personal favorite
which is the yes paste. Yest, I want to say yest. Just the yes paste because it's archival and now I'm to the point
when I make stuff, I want it to be
something that I'm going to love and want to hang, so I want to go ahead and use materials that will be
okay through the years. The glue stick and stuff is
perfect for like sketchbook. My glue stick, I don't know, it just didn't seem as tacky or stick down
as well as this paste. I just loved the paste. I want to put this
underneath that. Make sure when
you're gluing stuff down that if you've got writing on things that the writing is
going the right direction, I've got a piece of
wax paper here that I can just lean onto. Put some glue on
this paper here, and you can mix your glues if you're using something thin, like this piece of tissue paper, you might use a glue stick
or matte medium for that, and then for your
thicker pieces, move up to something
like this thicker paste. I also have just some
old credit cards which are really nice to
smooth your stuff down. Its real gentle with that. Here's our piece of
newspaper which I stuck to the piece of
paper I was just using. Let's pull this back over here,
piece of newspaper. This is a piece of book page. Sorry. That's the funny thing when you're working
with glue stuff. The glue gets everywhere. All right, so let's
just visually see where we wanted this. This stuff is pretty thick. You have a minute or
so that you could come back and rearrange
if you needed, but after a bit you don't
have any extra time. If I need to move that
little piece of paper, I've got a second.
14. Finishing Marks And Adding Interest: [MUSIC] [NOISE] Just take this down. Let's go ahead and do that
before I get these all set. Yes, you have glue all over your fingers [LAUGHTER].
Is what it is. Just know that that's
what's going to happen. I'm going to get a piece here of extra wax paper so that I can come and just flatten
this on here. I like using something like the wax paper because
it's less likely to stick and more your piece. [NOISE] I do like having something like this
to lean on my piece with maybe flatten out if I need to because we're not
going to damage what's underneath and it's not going
to permanently stick down. We can pull it right back off. I love the direction
that this is going. Let's just think. Now I'm going to want to do I want to glue
anything else on here. I still have my
layer of texture, so yes, I do want to still
glue something thereon. I like it right here. What do we think of
that liking that? This is a little bit
similar to what we did on our sketchbook piece. At the same time we're moving
stuff in different spots, and just seeing, do we
like this layout and this texture better than we
did on the last piece. I want that right there where that
piece of art goes in. [NOISE] Then we'll let that dry. We're having that, we've
got some movement. We've got color and we've
got rule of thirds, third bigger, two-thirds bigger. We've got our purple color and our little pop of little items. Now, I want to add maybe
some neo-color crayon, I really liked the way that
looked on our practice piece. I'm going to go back and
do some little marks here. Don't be afraid to go
outside the collage area. On the collage area
and get some marks in there and just extend that to however it is that
you're feeling of that moment. [NOISE] I like that little bit of mark making one extra
dimension that we've got. I've got some paint pen. Actually, I love dots. I might just put a dot in
everything I ever make. I like paint pen dots. That's your preference
there you can, as many or as few in your extra little
elements as you want following a line that I drew on top of this piece
of tissue paper there. I like that, fun. I was following that
little green line as a possible stoppage place, but I could keep on
going with that line if I wanted because it actually does gray here and goes up. We could fill this whole
little spot with dots. You want to be real
careful where you're touching on your
paper at this point, if you've gotten any art
supplies on your fingers, you don't want to be
smudging your paper any. I like that, I've
got some lines, I've got a texture, I've got some marks. I also like a little
bit of paint on here. Pick your favorite
paint element. I'm going to go from my
little metallic paint again. Of course, you can get yummy
metallic paints to play in, but I'm going to play
in one that I love. You, pick the one that you love. It gets easier the more things that you play in and discover. Then I'm going to take
my palette knife, and just see where can
I add some interest? I don't want it
everywhere but again, I'm thinking in repetition and multiples cannot put
that in more than one spot, and is that going to be
all that I do like that. [NOISE] Maybe, look at that
right there on the edge. [NOISE] That was
pretty now we see this little tiny bit on
the edge, I love it. [LAUGHTER] Super pretty. Now, I told you that we were going
to maybe deco these edges, but you cannot do that
while your piece is wet. At this point we
would need to set this to the side and let it do some drawing before I tear the edges and
to tear the edges, I'm basically going
to take a ruler and hold it down on my piece and tear the paper so that I get that nice torn edge but
when this piece dries, we'll come back and do that. Let's set this to the side and let it do its little
thing for a while, and then we'll come back and
read those edges and have a final piece that we're
ready to mount onto, a piece of mat board and frame in some type
of floating frame. I hope you enjoy this project. I definitely can't wait to see the pieces that
you come up with. I will be back in just
a bit after this dries. One of the things that I'm thinking as I'm talking
and looking at this, I'm almost feeling like it
could use some more contrast. I'm looking at it and
I'm thinking, yeah, we have those little
black elements on there, but are they enough? Let's risk it. Now you get to a point because
I get to this point too, and I'm thinking, crap, I don't want to ruin this and at this point, I could ruin it. [LAUGHTER] Let's just hope we
don't but I'm going to take some India ink and come in
here maybe do a few marks. I just hope I don't hate it. But I do feel like it just needs that little bit of
contrast for some reason, I'm not feeling like I
got enough dark in there. Now that's fun. Look how that did. I don't feel like I ruined it. [LAUGHTER] I could have come in with some splits
that might've been nice. I like that black
is different than the words that we
have that are black. It's not overwhelming
with the other marks because the other marks
are that greenish color. They're blending in.
Don't be afraid, I know you're like,
I did all this work. I don't want to ruin it. If you felt like that was a step where you
would have ruined it, then definitely stop until
you feel comfortable doing that but I do want a level of contrast in addition to different size pieces
of collage element, matt versus shiny color
versus neutrals, texture. Things that come off the
page also need to have enough contrast so
that everything's not blurred all along
the same color range. Let's set this to the side
and I'll come back and we'll deco the edges
when it's dry. [MUSIC]
15. Adding Deckled Edges: [MUSIC] This piece, all the elements are dry. The scalloped globe
of glue might not be 100 percent under there, but it's enough for me to
definitely do something with this and not ruin it. I'm going to decal the edges. I've just got a metal ruler, and I'm going to
show you what that means to decal the edge. [NOISE] You can see, I'm basically tearing the paper, which may or may not work. You got to hold it down and
be careful all the way to the end so you don't have a
little piece off like that. But if it's at the end, it's probably a piece I'm
cutting off of my thing anyway. This is a decaled edge. It's a nice finish torn edge. Depending on if you tear
up on the art side, you'll have this edge with
that line almost on there. If you flip the art on the back, you'll have a nice clean
torn decaled edge, which I actually prefer. But it's hard to tear
on the backside of the piece of art and know if you got it
in the right place. What I'm going to do, I'm
going to give this a try. I've got some needles for sewing some embroidery threads on pieces of art or whatever. These are a little
bit larger needles. What I'm going to try
to do is just poke a hole through where I
want to line my ruler up on the four edges and
see if I can get an even set of holes back here
to line my ruler up with to tear it in the correct spot. I think I'm going
to mark them with [LAUGHTER] the
ruler and just see. I've got two inches
about right there. I've got about two inches there, so that's pretty nice. Then I've got about an
inch there, an inch there. I think I want the decaled
edge to be half an inch, say like this half
an inch right here. That should give me a nice white border with a decaled edge half inch
all the way around, and still have enough to
grab to tear with this. I want to come in. I'm at the two. I want to come in
about right here. If I do it just outside
where I want to be there. I'm going to use this
to poke through. Perfect. Probably
would've been easier on my cutting mat rather
than the hard table. [LAUGHTER] Now, I am just inside the
inch and a half line. Let's go ahead and mark that
all the way around just inside that
inch-and-a-half line. It is worth it to take this moment to get this
part pretty exact. This is your finishing
element of your piece of art. This is what we're going to
be using as marks to tear, so you want to go ahead and
take a moment and be exact. This one I want to
go inch-and-a-half in too. Let's go ahead. I want it to be the same and with a line
right inside that. When I go to tear, I can tear the circle. I'm going to have my
ruler just inside of it so it won't be
part of the tear. [NOISE] Then here we want these at
half an inch so I'm going to come just on this side of the half inch if it's
100 percent exact. lt's probably okay if
you're a tiny bit off, but be as careful as you can. I'm going to mark too over here. I used to just eyeball
it and mark them. But in another class which you may or may not have
seen in the comments, might have been the decaled
edge class, actually, somebody mentioned, maybe
poke holes through the paper, and then you could tear from the underside without guessing, and I thought, well,
that's a great idea. That's what I'm
going to show you. Now we got four holes. Our little pin backup. Now, we're ready
to flip it over. I want to be just inside the hole so that the
hole is cut off. I'm just going to
hold the ruler down. The more weight you
put on it, the better. [NOISE] If you stand up, you're less likely to
have a little rip off at the edge here. There you go. That is how easy making
a decaled edge is. Let's take a look at what
that looks like. In this way. Look how pretty that is. That edge is so pretty. The art itself is a
tiny bit crooked, but as long as our whole
piece is straight, you're going to love
it when we're done. Let's go ahead and
cut the next piece. [NOISE] I'm not trying to get these exactly perfect. I want these little variations. Let's go ahead and
cut this piece. This one's very tiny, so I'm just going to grab a
little edge and be careful. [NOISE] Then if I end up with a bigger
edge here than I wanted, I can very carefully
come back and just tear those with my
finger after we're done, but I might not mind. Let's just get all
four torn and see if we'd like that or
not. Let's just see. [NOISE] If you tear towards the ruler, we get less of that
large piece left. Now, I do want that side to be a little bit more like
this side so I'm going to come back over here and
put the ruler on it so I don't accidentally pull
anything I didn't mean to. I'm just going to tear that
edge a little tighter. If you end up with something
bigger than you thought, not a big deal,
we just fixed it. Now, let's flip our piece over. Look how good that looks. Now, if we mudded
this in a color, sitting it say on
top of a teal like I did that piece that we
originally looked at, how pretty would that be? Mudded on top of
something and framed. Look how beautiful that is. Oh, my goodness. Now, I want to go get this piece to the framer. [LAUGHTER] If you end up with a piece where
your dots still show, that's not a big deal either. You could come back
through with your ruler and just tear a little piece
extra if we needed to. I apparently didn't
line that very good. Look my dots are there. But I could come back through. As long as I was tearing down, I could still tear
a piece off of here and we could get those
dots out of there. I left a little extra piece. Let's just tear
down. There we go. [NOISE] Everything you do is fixable. If you have a dot leftover, tear down at the dot, and just create
that little decal. Now, we've got all of our dots. I got a dot here. [LAUGHTER] That's the pin
dot where I went through. But there we go. Now
we've got those dots off. This is the way I think is up. My framer happened to mention on the piece that I
was just showing you, I think it's upside down. [LAUGHTER] It's just like
it's an abstract piece. How can it be upside down? In my mind, this is up. But when we framed it, this is how it got framed. I can certainly have
her go change it. But because it's
an abstract piece, it doesn't really
matter, not really. But in my mind this way is up. She mentioned to me that
most people sign their art. [LAUGHTER] [NOISE] I
don't necessarily always sign my art on
something like this. But if it's a piece I'm
going to take to the framer, I do know now to sign the
art sign it in pencil, and then sign your name and maybe a date in the
lower right corner. Then your framer will then
know which way was up, in which way was down, and there won't be any
confusion when you get it, and you think, I think that should have
gone the other way. [LAUGHTER] What I
like about collage is we can flip this
around and say, I like this better
or I like this better or, l like this better. It just depends. In my mind, this is up, but
this could be up. It looks great.
This could be up. Which one did you like the best? I wish there was like
a little vote button, and then I could see which
corner I needed to sign. [LAUGHTER] I hope you have
fun giving this a try out. I definitely want you
to try decaled edges. You could tear your
piece of paper first. Like if we had this
piece of paper, we could decal the
edges first and then have a piece already fixed, ready to put art on. But I feel like that's
a limiting to me. It's closing me into a specific box like
the sketch book closes you into a
specific page piece here. If you have a
little bigger piece of paper that you're
working with, you can be a little freer
and then cut around it. That's why I chose to do
it that way so that it wasn't hemmed into a space
that I then thought, crap, I messed it up. I didn't get it in
the right proportion or I didn't get
everything just right. Now, I can trim the
paper around wherever my finished piece
of art was and it's trimmed out with a perfect edge instead of something where
it shouldn't have been. Just my own personal preference. I hope you enjoy this project. I can't wait to see your pieces. I'll see you back in class. [MUSIC]
16. Working With Cradled A Board: Thought it would
be fun if we did a project on cradled
board so we can get a feel with how that works and how we
could finish it. You can collage right on cradle board and get
your piece if you want, you could do rule of
thirds where you have a horizon line and do
different things out there. I personally don't like being conformed to a square to create my different
pieces of art. I know on the last piece we created within a larger square, but my piece wasn't exactly
even on all the edges. I had whitespace leftover. There wasn't a spot where I had a hard stop and I was like, "Crap, maybe I didn't get the things in the right
place where I wanted." I thought it would be fun to try something
a little different, but within the realm of
how I like to do stuff. I thought maybe
instead of gluing directly to the
square for our piece. So many times I've done that and I felt like it was a piece of crap and I was unhappy
and I would throw it away or I don't think I
would mess something up. Instead of doing that, because usually when I'm
working on cradle board, that's a piece I want to
savor and hang and use that, hang it up on the
wall as part of a gallery wall back behind me. But when you do a
piece and you're like, "Well, that's ruined. I guess I'll just throw it
away and I wasted that money on a board," or
something like that. It's very discouraging
and has left me at my table mad more times
than I care to admit. I thought we could do
this my favorite way, which is create a big
collage piece and cut out the part of it that
works the best for us and glue it on our board, ready to hang and finish. That is the way I'm going
to do this project. You can glue right
down on your board if you're feeling comfortable
and you like to do that, you don't want to glue
directly on the board. Make sure you prime
the board first. I prime it with gesso. I will be priming this board. Then I do personally go
ahead and paint the sides. I like charcoal gray, but you can paint on a
color from your collage. If you're collaging
on the board, you can collage down the sides. You could paint
them black, white, gray, or pick a color from
your piece, your choice. But I'm going to
prime the board. I have that sent to the side. We'll need it last. I'm going to create a big, messy whatever here on my paper and just glue and
draw and have some fun. We'll pick the best composition
out of that to use. Got my glue ready. You could do matte medium, you could do Mod Podge. Mod Podge might be nice, but I do like the paste. Now what I like about
working this way, instead of how we
were working on the littler pieces is I could come through and
put great big pieces. I'm just going to try to get a little
color in my mind here, but we don't even have to
stick to a color range. We can go through and mix colors and then be
surprised when we're done. If I wanted to do this on one side and maybe
when we're done, we like that little element of surprise and collage
that we end up with. I like this weirdo little piece of art that I never
did anything with. I love the texture of this. I just have my big pile of pieces of art
that I've created over here. I do like things with
holes cut out of it. You got to be real careful that you're not
getting art everywhere, but it's less important on this, we're covering the whole thing. Then I'm doing blue. Do
I want pops of orange? Maybe I do want pops of orange. I just love this.
Does that not look like the most perfect bookmark? You could do something
at this point that you never thought you would do. Let's just go ahead. Let's just start gluing stuff. Are you sure you like that
piece of paper there? Something this big, the matte medium might
be easier to work with. I like to paste. It didn't matter if I get a little bit of glue on
the paper because we're covering all the
surfaces of the paper. Then I'm going to just
work haphazardly. I'm not thinking
about composition, I'm not thinking about, did I get that in
the right place? Do I like what it's doing? I really like working in this way because
it's more organic, fits in with the way I like to create a little more serendipitous there with
what we end up with. I love that. Because what we're going to do is then
find the piece out here that we liked
best, more than one. If you are working on a big
enough piece of paper and you feel like you got more than one piece
out of there possibly. Then we'll add elements to it, we'll add art mixtures and
elements to our piece. Of course I've got
my little card here. Just help me spread out. If you've got stuff
that you'll smear, put a piece of wax paper
on there to do that. Let's just go ahead. Work in this postcard. A lot of times I will make a bunch of
art thinking about what's my next idea for whatever class or project
that I want to do. Then I have plenty of things like this piece of art
leftover that just didn't come together for me and create anything that I thought would
work or that inspired me. I'm really looking for the
pieces that inspire me. If I create a piece of collage, I'm like, "This is
what I'm going to do." That's the feeling
that I'm looking for. Something that gets created. Then I get excited. Then I'm like, "Okay,
I got my next idea." Really liked this stuff. Let's go ahead and just
claim a piece of this. Maybe I'll try to stick
down with a glue stick. Don't be afraid to
mix your glues. You don't have to
use all the same glue throughout the whole piece. If you think lighter pieces
work better with matte medium and heavier pieces work
better with yes paste, then mix up your
glues. Not a big deal. I mean, if you're
doing jump pieces, you could even use like
Elmer's glue if you wanted. Just depends on
what your goal is. My goal on these is to have something to
hang up when I'm done. Got some blue in
there. Let's see. Now, I want to keep on adding. We don't want to stop there. Let's see, what do
we want to add? I do like this piece here. I'll go ahead. This is just
some black and white paint and some marks. I made some collage materials. You can spend whole
days just making collage materials,
which pretty fine. I've got glue on the fingers, let me just get a baby wipe. I love having baby wipes
handy as I'm working. You can just write
off any art medium in any glue that you
stuck on your hands, so you're tearing your new piece you're not sticking to it. You can spend whole day just
creating collage materials. I've seen lots of artists on Instagram doing exactly that. Let's put that right there. Now you just have
collage element days. I love that idea. Just sit here, make
pretty things, collect them in your basket
so that when you get to the day that you're
ready to create some collage, you have options. That's what collage is
all about, options. I got that. Stick that in here. I love having options because at the point
that you're creating, you don't want to get
stuck and think, Oh crap, I need to go make something or what other element I
have nothing to work with. I like options. I like
that piece there. We could come in and
draw on this and see where that gets
us for a moment too. Try not to leave my
glue open too long. I do like this little
pop of weirdness here. That's fun with the little
half circles still on it. Let's just stick that down. We're not judging it right now. Right now we're just seeing
where the flow takes us. Now when we're all done. We might think
differently about that, Like why do we put that there? But at this moment it's more about the process
and having some fun. It's not necessarily
about perfect composition and perfect placement
and perfect pieces. We're just going to try to see. The reason why I like
working this way is maybe I will create something that I never would have
created any other way. My piece are fun,
let's go for that. When I'm laying stuff like this, I'm also keeping in mind one of the composition elements that I was talking about,
repeating elements. If I put down a big
swath of green, maybe, I want a big swath of
green somewhere else, maybe not just in one place. I don't have the paper
a 100 percent covered, but I do have quite a bit on it. We made now come back and
add some art elements. You don't have to have
paper on the entire thing. I do like doing that, but it doesn't have to be that. But we can come back
through now and start adding other elements. Maybe, I want some
India ink marks. Let's go ahead. What was that? There we go. Let's
get that over there. We can come back and mark make after we get our collage
piece cut out too. We can add elements
there if we want. Maybe, we want some
dots, white dots. Maybe I want some crayon, maybe I want some pastel. You got to be careful
working with pastels though. That stuff is messy. Because I already
had some pastel on these pieces of art
that aren't sealed down, so I got color all over
my fingers already. We can keep adding, but let's just start and
take a look at what we got. I'm going to grab a piece of paper with a
hole cut out of it. I'm going to use my wood piece to cut a hole out of
the piece of paper. Then we can use it
like a viewfinder and decide which part of this
really works the best for us. I'll be right back.
17. Cutting Out And Finishing Up: All right. Our piece, well, it still has
some wet ink on it, so we'll be careful. But I have cut out
a little window, the size of my board. I just put it on a
cutting mat and cut around the board so
the size was exact. Now I can go around this piece of paper and depending on
how big the paper is, you may even get two
collages out of it. I think it's really
fun to go really big, paint collage,
whatever on top of it. Then come through and
see how many things we can cut out
that look amazing. I can tell you a certainty
I know you're going to use more collage paper and
stuff in doing that. But I don't care. Because I can tell you with
a 100 percent certainty, I'm going to get
something I like every single time doing it this way and doing it the other way, I can almost guarantee you 98 percent of the time
I'm going to be angry and leave my table mad. I'm really loving
that right there. I'm looking up in the little camera viewfinder so that I can judge
what we've got going. I really love this right here. Look at that. That just saying
to me like I love that. I'm looking up in
that viewfinder and I know this is what I want. At this point, I actually want to cut this
a little bit larger. I have my board right over here. It's still a tiny bit wet, but I went ahead and coated
it with Gesso and I painted the sides gray
because I was trying to pull just something
neutral out of here. I'm setting it up here. I want to cut it a
tiny bit larger than the board because I want my
art to overhang the board. Then I'm going to use an exact dough knife to get
it exactly cut on the board. Because if I cut
this out exactly, and it's even a smidgen off, that's going to suck. What I'm going to do, we've
got more scissors over here, and I'm going to
judge a little bit on the outside of this
and cut this up. You know what's nice about
having these cutout pieces? Now you have a collage
element for something else. We've now created some
more fun collage pieces to use later. Yes, I liked it right there. Let's just come outside of that. Cut that a little bit larger. I know you guys think I'm
crazy, but that's okay. Art is supposed to be fun. I want you to have
some more fun with it. This is what does it for me. This is how I have
more fun with it. This is how I get
past those blocks. Pass being mad about not creating anything
good at my table, which has happened
many, many, many times. There's been years when I wanted to sit down and
create a masterpiece and nothing came out of me, and I was just so mad that
it worked out that way. I'm going to put a little mark right there so I know
where that is and I cut outside of that. Look how good that
looks, just right there. Oh my goodness. This is the excitement that I go for when I'm cutting
up pieces art. This is why I love
to cut up art. Now, look at these collage
pieces you have for later. Beautiful pieces. Save all these
pieces because you can use these as elements
and things later. I love this piece with this extra texture and height on it because we had
that edge of that on there. I love that. Look how pretty that is. This just makes my day. Now, this is a
little bigger than our board which is
still wet. That's okay. I can come back and
touch up the sides with my little bit of silver paint. I'm just using craft paint for that from the **** Blick and
I picked a shiny silver, so this is the silver
metallic, I love metallics. But if we flip it over, you can see that my piece art is slightly
bigger than my board. To be honest, we
might have to just leave it right there
and glue it down because I'm just centering
it wherever I had it. You can get more
exact if you want, but pretty good if
I just do this. I'm going to put glue
on this board and we're going to stick
this baby down. I already know I'm going
to love this piece because I loved it cut out. Makes my day when I
can create something, especially when I can create something on camera for you, and it ends up beautiful, and then hopefully you see
how inspiring it is to come and sit at your table
and enjoy the process more. It's not like I'm sitting
down to create a masterpiece. I'm not that kind
of art creator. I'm a little bit more in
the serendipitous kind of, what can I create? Then I surprise myself
with how good it came out when we're done. Because then I get excited. I like hanging the
stuff on my walls. I'm not an artist
that wants to sell all my art. That's not my goal. My goal is to make
workshops basically. Because then I have
given myself permission. I'm not one of those
people that sits and does things for the fun of it. A lot of times I need a goal. If you're one of those people, and you're sitting at your table and you're thinking,
what's the point? What am I going to do with this? Give yourself a goal. My goal is to think of
yummy things for workshops. Your goal could be good enough work together
to be in a gallery. That's a really great goal. A friend of mine, that's her goal and she
creates photography. She's looking for pieces
to create that she could put in the
gallery that she's in. That's a fantastic goal because now you're out there
creating with a purpose, you're creating art that you never would've
created otherwise, you're thinking up things that maybe you wouldn't
have thought of. You have projects that
you never would've done. I like having a goal
and doing a workshop gives me the goal to deep
dive into a project, learn all the ins and out, figure out different
ways to do things, work on different materials. Here we have this
nice and glued down. You can take something
like your credit card. Now notice I have a
piece of wax paper, and in this case,
I actually have this newsprint because
we're mostly dry on there. Even if your glue is still wet, use that wax paper instead
of a regular paper, but I know we're dry because I did some stuff in between
glue and then doing. I just want to make sure all the edges and
everything is tagged down. Look how pretty that even
looks like right there. So beautiful. Now I want to let
that, yes, paste. This is a very thick
piece of paper. In something like that, I do want to use a thicker glue. If it's YES paste, that's great. If it's real heavy, matte medium, that's fine. Heavy Mod Podge, that's fine. I probably wouldn't use
just the matte medium. It's very light and liquidy, so I wouldn't use
that to glue down this multilayered paper piece. A little bit heavier glue. I wouldn't just use a glue stick either probably because
it's a lot of paper, but you do want to glue it down and then let that
sit for a minute. You don't want to
immediately cut because right now I can still move
this piece of paper around, and so it wouldn't
actually stay put. I might cut this side
and then I might cut this side and I
might cut this side and, oops, it's too short because it shifted on me and
I didn't realize. Do that cutting in a minute. Let this dry. I'm just so excited every time I turn it over and look at it. It's just perfect. You saw how haphazardly we just
threw stuff down. We weren't thinking
about composition, we weren't thinking about
trying to cover every surface. We weren't thinking
about making it perfect. But now that we're done, as I was visually viewing this, I was thinking rule of thirds, and so you can very
clearly see I've broken this up into
three parts basically. This piece here cuts it off at a horizon line and you have
1/3 up here, 2/3 down here. We have a little bit
of dark in here, and with our little mark-making, so I feel like we
have the light, we have the dark, so we
have the pops of contrast. Look at everything that
we got out of there. That was so much easier
than trying to place all that in a perfect
place on that board. This is the best
one I've ever done. [inaudible] my art table, and that's what I think. This is the best I've ever done. We have let that dry. We're going to, for the
sake of the filming, pretend that I left
and ate lunch and came back so that it
was good and dry. I'm going to take a nice
very sharp X-ACTO knife to cut this. You got to be real careful. Let's just pray that we
don't move anything. I don't want to ruin my
very perfect piece here. Very sharp X-ACTO knife
with a brand new blade. I'm going to work
this direction, turn my piece of art, work this direction because
I have tried to go this way and this way without
moving my piece, and the piece of
artwork has shifted, I'll cut things crooked. I cut a piece of
my board one time. I have found it if I would
just press down very hard and just pull
the knife down, we're working with
multiple layers here, so you may have to do
more than one swipe, and then pull that
piece of paper away, I will have a perfect finish. Now I want to move the board. I don't want to move my body. I want to move the
board, hold it down, do a swipe, come back,
do another swipe. Then I'll tell you a secret too. If let's say you cut
one tiny piece off to the point where
you didn't really intend or shifted on you, what do I got on there
that's so thick and heavy? There we go. You could
come back with whatever this side paint is and touch
up a piece if you had to. Look at how beautiful that is. I know. I sound like a nut, but I just get so excited
when things work out. They're beautiful
and I love them, and that one didn't
cut straight. Shocks. We're just going to come back real tight on the board. If you cut a piece of board, it's not a huge deal, we can come back and
touch up our paint. Let's just see
what we did there. Oh yeah, see, there we go. That still looks great. Just got to be careful. This might be harder in your opinion than just
gluing down on the board. You just got to decide for yourself what works
best for you. What's going to make
you happy while you're sitting at your art
table creating. How are you going to walk up? How are you going to
finish and get up with a piece of
art that you love? For me, this is how
I'm going to get up with a piece of
art that I love. Look. Oh my goodness. It's so beautiful. Whether you agree or disagree
is not really the point. Art is very subjective. It's what you love when
you get up that matters. I love this. Then I can come
back and touch up my gray paint now that I have got that glued
down and finished, and then we'll be all
finished and set. I already have the
paint out here. I'm just going to
come back and do, with my little paintbrush, just touch up all the edge
now that we've got it cut. I did cut my piece
of board one spot, so I'm going to touch
that up with gray paint, and then this is done
and ready to hang. Look how beautiful that is. Here's my recommendation
on the boards. Do your piece like this
and glue it on a board, but you're certainly
welcome to work straight on the board if you're feeling
comfortable about that also. This just happens to be my own personal preference and a way that I wanted
to show you that you could end up with
a piece that you love instead of a piece
that you hate and you want to throw away
because if we had hated this and nothing worked
out on that piece of paper, I could have thrown
it to the side to be more collage materials, but because I found a piece in that bigger piece that
I really truly loved, it was perfect to cut out
and then worth mounting and spending the money for a cradled board, in my opinion. That's the way that I get
around creating stuff that I hate and then
feeling like I need to throw a board or a
piece of canvas away. I like to create on paper. I like to cut the
part out that I love and then mount it, ready to hang or
sale or whatever on the finished piece
that I want it to be. Then to finish this completely, once I paint the sides again, I would go outside and
give it a coat or two. Probably a spray this way, let it dry a minute
in-between coatings. I'd probably coat
this three times with my UV Archival matte spray. It won't change the color, it won't make it shiny, but it will secure down
any of the pastels are the art supplies or the
mediums that I have that could be ruined if somebody
touched it or got it wet, and it will also
protect it for future. When you got a hanging in your
house and dust sits on it, you could go through
and dust that off and not ruin your piece of art. Always consider, in the end, what's the end-use of this
and do you need to finish it? I would use an Archival matte
finishing spray to finish this off before I sold it or hung it up for something
on my gallery wall. Hope you enjoyed this project and I'll see you back in class.
18. Micro Collage Collection: Let's take a look at
doing a little series. Thought it'd be fun to do
just a set of small abstracts that all flow together but don't necessarily look
exactly like each other. I think what I'm going
to do is I've got some paper that's from choosing keeping that's already
cut into a square. It's like a six by six square
with a deck old edge on it. But also took some
watercolor paper as a six by six and tore
my own deck old edge, just like I did in
project earlier, where we just tore the edge off so we could
do it either way. I like the pre-cut pieces
because convenient. But this was very
easy to create. I thought what we might do is create a big cut up by abstract, like we did in the
cradle board project because I surely
love making those. Then all what we
could do with that is cut the pieces into some little three by three
abstracts that we can then mount to paper and then this whole piece would be
ready to do something with. Then we would have
hopefully at least three, possibly six that we got out
of that was really cool. We can be real
strategic about it, and we can have a little three by three window if we wanted. I can make a smaller
one of these. This is from the
earlier project, but we could go
through and actually draw out each one that
we want and cut it. Or we could just cut it in pieces and just
see what we get. We can definitely do either way. What I want to do is I have some previous art that I've
made in one of the workshops. These are the leftover pieces. I thought this color way is a little bit out of
my comfort zone. It's not one that I go towards. It's purple and yellow and
purple is not really my thing. But I thought the fun of projects like this
is exactly that step outside your comfort
zone and learn something new and create something that
you never would've created, just sticking with the same old. These are the little
scraps I pulled out. May have some more scraps
in my little scrap bin, I don't know, but
let's see if we can make our little
scraps. Here work. I liked that they're circles
cut out of it already because as we've talked
about in other segments, I do like little circle cutouts. I had this bright orange
piece that I had originally thought I might try, but I think I'm not
going to do that, I think I'm going to do these. I pulled out a handmade
piece of paper that I got at the art store that
was really beautiful. That could be our
dark contrast piece. I also have this piece
that I painted on, a piece of tracing paper, tissue paper, wax paper or
whatever it is that you have, that's the semi
transparent paper. I got that piece that
is in this color way. It's a piece that I did on
a previous day when I was randomly just creating
collage elements. Also got teabag, got a old piece of paper. I got some tissue paper that I've put watercolor
paint on and let dry. Also pulled a piece of orange, but I think that I pulled that when I was thinking orange. I'm not sure that's going to
be the one that makes it in. I'm almost thinking I
need like this yellow. I don't know if I made
one of these in yellow. Let's just take a look
at our paper choices. I do like just cutting a big piece of
watercolor paper into strips and then just
painting it a color because then we have
something to rip up and use. Look at that one. I
actually liked that. Weirdly enough, this color is in here and I can
get away with it. I painted these thinking, what a fun, unusual
little color combos. Why not? Let's use them here. You can see at this
is acrylic paint, painted on this
watercolor papers. I did watercolor
on some of these, I did acrylic paint on some
of these, let's go for that. Then I've got some of this
stuff that might be nice, store some of that in there. Just like with the
one that we just did in the other project, the one with the cradled board, I'm glue all these
down randomly, and then we will cut these out. I'm going to probably speed
this up as I glue these down. But you already
watched me do the glue down in one of the
other segments, so don't feel so bad to speedup. I will make you sit
through the whole thing. I'm going to go ahead and use the Yes Paste because
that's my favorite. Pick your favorite
and go for it. This piece of paper has
cool stuff on both sides. I used to not want
to use old paper because I never was going to get something
that I liked anyway, so why waste that
piece of paper? That was true for a long time because that's when I
would sit down with a square piece of something and try to create
within those bounds, and then leave my art table
mad because whatever it was didn't end up like I
wanted it or like I imagined or like I hoped. Then I was like, "Well, I
ruined that piece of paper." I got away from using
real vintage stuff, but some of these came
in little scrap packs I found at a booth at
the antique market. They were cheap, so I don't
feel so bad about it. Now, when I do pieces of art, let's put this on the side, what we're doing, I
always get stuff I like, and so now I don't feel so bad using an old piece of paper. But if you just can't
bring yourself to do it, then you should make a
copy of this old piece of paper and save the
original and use the copy. No sense. Then you can use that same supply over and over. I'm being random here. I'm not trying to get
exact at this point, I just want to
fill the page with interesting things and then see what we can cut out of that. I like that because
it takes the pressure off of making the stuff. Takes all that pressure off. Let's just put that right
there. How about that? When I get less pressure
at the art table, I'm a much happier
camper creating. I love what I end up with, so I like these no
pressure techniques. I have glued down
a lot of stuff. It's a little further
than it was a moment ago, but that's all I've done. It's still wet. I just glued stuff haphazardly
everywhere. Then I was trying to
keep in mind if I cut a little piece
out of each area, did I have any repetition? Am I going to have enough
bits that I could cut out and say I have a collection? At the moment, maybe, maybe not. Like I might need
to come over here and put another one
of these in there. I think I will now that
I've thought of that. But I also want to take
this moment to then come up with my art supplies that I
want to throw in here also, so I'll glue that one
down in a second. But I might want to
come in here with the neo color crayons
and do some extra mark-making and
pull some of this together with my
marks like this. This is sienna, raw sienna, ain't it pretty, which is kind of like
this yellow ocher. Of course, I think it's pretty I'll just draw some of that, I might come in here, I've got a lavender, got a bunch more colors too, but these just happened
to be this is color pink. But it looks more lavender. These are just some
that I happened to have out in a little container here. Not only can we do scribbles, we can come in and
do some mark-making. Now keep in mind too that neo color crayons
are water-soluble. If you're using any type of water-soluble crayon or
something like this, we could come in and strategically with
a wet paintbrush, we could come in at this
point and smear some of this and blend it in and make it more of a
watercolor in there. I could do that with
that yellow smear a little bit, which is fine. It just is another way
to use this medium. I like water-soluble things. I could also come back with
my black magic India ink. We could throw some really
dark contrasty spots in here. Keep in mind again,
at this point we're not thinking composition. We're not thinking about where stuff's really going formally. We are playing and experimenting
and mark-making and throwing stuff in and
doing some things that we wouldn't normally
do because we can. We are not trying to
create a masterpiece yet. We're trying to just
create some yumminess. Let me glue this down
before I forget. Then once we've got
this glue down, we've got a bunch
of yummy marks. I'm not done mark-making yet, but I'm going to forget
this isn't attached. Once we get this glued down and wet ink supplies
and stuff everywhere, we'll have to let
this completely dry. This would be like one of
those things where you could go ahead and do part
of the project today, maybe leave it overnight
or go fits in the morning, maybe going lunch, and then come back before we try to
evaluate and cut this up. I really like
three-dimensional papers. If you ever go to the
art store and you can find any papers that
are like three-dimensional, wrinkled like this has
got free wrinkles in it. The one that we used
on that other project was real thin and had little holes all
the way through it. If you ever find that
dimensional paper, grab a piece, you
won't regret that. They make the most
interesting extra element in something like a collage
and it makes me want to go downtown to the big
art store where I know they have all these
yummy papers and buy some more just to
put in my stash because I like to come
back and use them. The other thing that I love to do some mark-making
is my paint pen. We might as well throw some
of that in, maybe some dots. It's these little
extra elements, the little extra
details that really make the most fabulous pieces. Don't skimp out on the details. Have enough little collage
papers filling things up, and then come back
in and fill in some holes and spots and
areas with scribble, color, dots, marks, lines. Let's see where to put this. Try not to put my hand in that ink that had plotted
down that I know is not dry. Again with the marks and the dots and things I'm
looking at repeating elements. Do I have in enough places
where if I cut something out, Would that be an element in our little finished
piece? I don't know. We'll see. I don't usually add too much to
my little art pieces because we already
did all that work on those when we created that
original piece of art. But you can just judge
what you want to do there. I also have pastels
that I like to use, sometimes soft pastels, but if you add soft pastels
to something like this, spray it with a fixative spray before we come back to cut it up so that we don't end up
with powder everywhere. But why don't we
just come on in here and throw some little marks and stuff just because like I said, lavender and purple a little bit outside
my comfort zone? That's fun to sometimes just play outside of an
area that you're not comfortable with. All right. Now I'm going to let this dry and then we will cut
out little pieces. Then if we need any
additional marks after that, we can do it at that time. But I'm going to
stop for the moment and let all this dry, all these glued areas
go ahead and get stuck. I feel like this one is
just not glued very well. While all these get stuck down, then we'll come back and cut
this up and see what we get.
19. Cutting Out Pieces & Finishing: [MUSIC] This is dry. I have cut out a
little square that is roughly three by three, and I say roughly
because it is rough. [LAUGHTER] I need to make up, I don't know more exact square. I like it when I have my little
cradle boards that I can use as a template almost because they are
exact but this close. This is the size
square that I'm hoping to end up with on
these little pieces, and this is the six by six with a pretty torn edge that
I'm hoping our piece can be mounted
right in the middle of and could be our micro, wonderful, yummy piece of art. I thought about just
doing the cutoffs. But that just
doesn't appeal to me as much as searching out a yummy composition out of all
the fun bits that we have. Look at that one there.
This one very much appeals to my rule of thirds, feel. I've got a third,
a third, a third, and then cuts here
at the bottom third, and I like all the fun elements and things that are
drawn in there. Also, let's see what else. This is fun with this yellow here on this bold on this side, and it a third, third, third, and there's something on
this third, also filling. Something like right in here. I like this because
I've still got third, third, third, we've broken up. We've got the holes in there. I probably would cut
that one little piece of this straggler if I
cut that piece out. Now I got to remember
what I said. Let's go ahead and
say yes to this. I'm just going to very lightly draw with
a pencil on here, and that'll be what I cut. I can see about where that is. Then, I do really like this one. I like that this
piece will be in there and that
piece is in there. That pulls me in with
the repeating element, and definitely
makes me feel like, they're part of the same series. I'm filling that
one up there too, but let's cut these two
out and see what's left. My goal is to have three. Three when we're
done, that's my goal. [NOISE] I'm just cutting with scissors and I'm sure there are lots of different
ways we could do this, but because this is so thick, I'm just going to do my best cutting it with the scissors and pull
that little piece off. Here's my scissor line. Because sometimes, I could have put this
on top here too to guide me if I lost my way. [LAUGHTER] Let's see what
we got. I love that. How beautiful is that piece. I think I love it
many ways actually. [LAUGHTER] When we mount this, if we have a deck old
edge on the bottom, just tear the edge of
your watercolor paper, so one edge is tore. We can mount these
with square edges, or if you happen to
have a corner cutter, then we could cut the corners. I have a couple of
corner cutters. One of them has scalloped edge, coupled with liaise edges. Sometimes just the
rounded edge is nice. Basically, what we would
do is clip that edge for a finished edge rather than
a square edge, which is fun. If you think you'd like an edge on that instead
of being square, we could cut those edges off, or you could just
leave it square. Which is also very interesting, and I would basically
take some of my glue and glue that right
down in the center of this. Let's go ahead and
say, that's a winner. [LAUGHTER] Again, any
pieces you cut off, keep that for collaged pieces. Look how amazing
that that pieces. We've also got this
one here that we've already said okay too. I'm going to go ahead
and cut across on that. I just overcut my line. Let us go ahead and come over. I might not have one leftover. It just really depends. Let's cut off this little
tighter so that we're actually on our
pencil edge nail. If you end up with at least two, yeah, my goal is three. [NOISE] Here's a line here that I can see. These leftover pieces are
working super-duper, yummy. Let's take our little edge here, so I get the third
side. Here we go. Look at that one. [LAUGHTER] Oh my
gosh. Oh my goodness. Look at that one. Might be my favorite one ever. [LAUGHTER] Look how these are as a little set.
Let's just see. Look at these yummy leftover collaged pieces that we can use later in something
else that's fun. [NOISE] I don't want to get these dirty, let's
sit these over here. I liked this bit
with the yellow. See right in there,
I'm filling that. [LAUGHTER] Are you loving the little Southern accent
I've got going on there. [LAUGHTER] Can you tell
him from the South? [LAUGHTER] What do you think
about that one right there? I think I'm thinking
of this one. [LAUGHTER] Let's commit to it. Where did my scissors go? It looks like this is the
piece we just cut off. We could maybe, look
at that right there. Oh, there you go. I'm filling that with
the circle in it. I feel like we've
got another piece, and I'm almost felling like
this could be another piece. Let's cut this out. I was starting to doubt, certainly think, are we
even going to get three? I'm not on my pencil lines, so I'm going to trim
a tiny bit of that. [NOISE] That's a thick piece. If you get it where
you think, oh, I didn't get the pencil line
and you think it's safe, you could take your art eraser, which we know I love my
little rubbery art eraser, and erase a little piece of line if you needed to without it getting into your art supplies. I have a little
piece of line there, and then, you'd be good to
go. Let's check it out. Look at that. I'm
feeling excited. Look at those. Oh my goodness. This one I'm really loving. Let's put this to the
side for a moment. This, I'm really
loving this with this little circle on it. Do we want the circle
cut off or do we want to include
the whole circle? I feeling like I can
include the circle. That's what we're going to do. Oh my goodness, this is
even better than I hoped. [LAUGHTER] I can't tell you how good it feels when you
sit down to film something, and everything works
out the way you want, versus when you film half a
workshop and you're like, nothing is working, let's just scrap this, which I have done. I have done that. [LAUGHTER] Sometimes
nothing works, and sometimes everything comes
together and you're like, this was its moment. Look at that. Let me get another piece of paper already
got cut over here. Oh my goodness. Almost. I don't know. Am I liking it with the
circle somewhere else, I feel like I'm liking
it right there. I like it because this one
the circles are on the side, this one the circles
are in the middle, this one the circles
at the bottom, this one doesn't have a
circle, but that's okay. Still amazing. [LAUGHTER] Let's see, is there one more in here? Let's just see, do we like this enough, are we fill in it. That's fun in the middle, but I don't know that
this is my favorite. Maybe if we cut it over
there and let the yellow. I am filling that with off
to the side and the yellow. I was about to say
let's scrap it, but let's just go for it. [LAUGHTER] Look at that. Oh my goodness. I
do like this one. The whole is in a different
spot than it is on all the other ones.
Look at that. Got a little series
of five out of here. This first one is definitely
my yummy, yummy favorite. That too much stuff
on my art table. But, look at that
collection that we just created out of a great big mess. We've created five
miniature pieces of art, that I'm just going to take the yes paste and glue in
the middle of my paper, and call that my set. Look how beautiful those are. These are amazing. Let's just take a
look at each one. Look how pretty that
is. I'm loving that. The only thing about that one is there is no circle in
it, but that's okay. I do like the colors. I think this one
could be my favorite. It is very pretty. [LAUGHTER] This I would
probably float frame, since I went to the effort
to have a decored edge, you could float frame this. Look how pretty that one is. This was a fun set. I definitely want to see
you my quantities where you have little three by threes mounted in
a piece of paper, and just show me what
you came up with, what colors you picked,
what marks you made. Favorite, a little foursome. I definitely want to
have these framed and hanging somewhere
[LAUGHTER]. Before I glue them down, I will make sure that
I don't have any marks on my white pieces of paper from anything I
might've had on my fingers. I want them to be
crisp and clean. I would definitely
spray this with some finishing spray
before I glue them down. I want to spray these with
some finishing spray. Again, I'll take these outsides, and spray them with
my archival matte, finish spray, varnish. I'm going to vanish those four, then once they're dry, I'm going to glue them
down with my yes paste, and we'll call
those, a collection. I hope you have fun
with this project. I can't wait to see your
little mini collection of micro collages, and I'll see you back in class. [MUSIC]
20. Final Thoughts: [MUSIC] What did you think? I was so excited
to have you here. I hope you enjoy creating a little bit larger pieces that you then cut pieces out of. That's my own personal
favorite way to create. I do it with painting, I do it with watercolor, I do it with collage. It really takes a lot
of the pressure off to create that way because I'm not constricted to a box thinking, what am I going to create today? Then I start creating and I'm like, "Oh, I've
already messed up. I'm just going to
throw this away." I don't get stuck in
those things that stop me from creating my
best, highest work. If I'll create a
great big piece, just having fun
haphazardly putting stuff in and making
and playing with color and then come
back and search out that amazing piece within
that larger piece, I end up with stuff I
love every single time. Hundred percent of the time, I guarantee you, you will
make things that you love. But if you're more
of the go ahead and create on that constrained parameter's piece and you do good work that way,
then that's fantastic. Every one of us works
a little different. You just have to figure
out what works for you. That's going to give you
pieces that you love, give you enjoyment of creating. Because I guarantee you
if you enjoy creating and the pieces get you excited like this
one is so beautiful. Every time I look at it,
I get super excited. I want to make
some more collage. If you create pieces that
get you that excited, you will come back
up here and work and practice and play a lot more. I hope you enjoyed some
of these techniques. I hope you're going to have
lots of little scraps in your bin ready to create that you've been
saving and you're like, "What am I going
to do with these?" [LAUGHTER] I was super
glad to have you here. I'm looking forward
to what you create. Please, make some fun things and come back and share them. It really makes my day to see
the work that you created. I will see you next time [MUSIC]
 DENISE LOVE, Artist & Creative Educator