Transcripts
1. Introduction: A Sala Malik. My name
is Willem Takin. I am an entrepreneur and have founded several creative
based companies. I have done hundreds
of design projects and work with dozens of
clients around the world. I am also an academic lecturer
and corporate consultant in computer graphics
disciplines. For more than two decades, I have been teaching graphic design study trade animation, video editing and
motion graphics, architectural visualization, digital painting, web design, game development, et cetera,
Kva online application. That has forever changed the
face of the design industry. Canva has made it possible for anyone to create stunning
designs quickly, even if they are not a designer, while still giving
professional designers p***ty of room to channel
their creativity. With Canva, you can create graphic designs for
print and digital media, create presentations,
edit videos, and add admission,
write content, and even build websites. If you want to master Canva quickly from
beginner to advance, then this online core of
series is the answer. Throughout this
course of series, you will be guided
step by step to master and utilize all
of canvas features. As for this course alone, this is the second in
the series and it is a continuation of
the first course titled Canva for
Complete Beginners. Here you will learn
and website projects. You will learn how to create online documents
by combining text, graphics, charts,
and even video. Then you will be
guided to create a website without
writing any code, a animation effects
to the website, and finally, put
the website online. As a final project, you'll be asked to design
your own website from scratch using
everything you have learned so far in course series. Since this is the second
course in the series, you will need to take
the first course before taking this one. Then, because Va is an
online application, you will also need a computer
and an Internet connection. Throughout the course,
I will be using a PC with Windows ten
operating system. All of the keyboard
shortcuts that'll be demonstrating
will be off the PC. If you are using a computer, you can still follow the
lesson as I will be using Canvas user interface moves of the time which is consistent
across different platforms. The only difference is
the keyboard shortcuts. In general, you will need
to replace the control key, command key, and the Al
key with the option key. This course series is
perfect if you are a hobbyists who are sto***
design from the basics. Also, if you are a teacher or a student who needs a
free design application, if you run a business, this core series can
be very valuable as Canva can help you create marketing materials
quickly and easily. If you are a
professional designer, you'll find that canvas
library and easy to use interface can help you speed
up your work considerably. But not least, this course
can help if you are a content creator who wants to take advantage
of the leaders. Ai technology course does not yet cover
canvas AI features. However, the lessons
in this course, we'll lay the groundwork for the future course
where we will discuss the AI features by taking
this online course series. In Shall Law, you and all your business will be able to use canvas
faithful potential. Creating designs of any kind will no longer be
a burden for you. Instead it will be your
age over the competition. Don't wait any longer. Take this course
now and continue your journey to
mastering Canva Salam.
2. About Canva Docs: In this video and
the next few videos, we will cover the various
features related to Canva Dogs. Please note that
the term dogs in Va is not a regular paper
size design project, like for letter and so on. But it is a special
type of project in Va that has text
editing features. By default, it does not
have any specific size. To be clear, let me show
you the difference. If you click Create
a Design button, then look at the document
for portrait option, you can see the size
in millimeters. If you click to
create a project, you can see that this
project is no different from other design projects
we created earlier. You can access the element step, You can also create a
text object and so on. This is not the type of project we are going
to discuss now, even though the template
name says Document. All right, let's go
back to the main page. If we click the Create
a Design button again and look at this option, it doesn't show any
specific dimension. Instead it says order size. This is the Canva dogs or the project type we will be covering in the next
several lessons. You can select this option to
create a new dogs project, or you can also select the doc's category
from the front page. Then click on this option
for a new blank document. If you scroll down, you can also choose from the various templates
provided by Canva. For now, let's just
choose the one above. So we have a blank
canvas project. You know this in the
panel on the left. Although you can find
the element step, you will not find
the text element. Why? Because for Canva Dogs, writing text is already
a default feature, just as you would work inside
Microsuportor, Google Docs. Also, you won't
find a feature to organize pages in
this type of project. Unlike a regular design project where you can add or remove pages when you work
with Canva dogs, the document size
will keep expanding automatically to accommodate
the content you create. If you write articles or blogs
before using Wordpress or Perhaps Notion and like you are most likely to understand can
Va docs as they all work. Similarly, if you haven't
used any of these apps, don't worry because
we will cover all the features from the
very basics step by step. At this point, you
might be wondering, what is the point of
creating Canva dogs? Why don't we just write it in Microsoft Word or
similar software? The answer is you generally
want to use canvas to create online articles
similar to web pages or blogs. Because in addition
to static images, you can also insert
online videos. You can share a document
through a special link so that your colleagues or even
the public can access it. You can even embed Doc into your own website outside
the Canva domain. Since the content is
originally hosted in Canva, any changes you
make in Canva will automatically be reflected
on the embedded websites. But aside from online content, Can Vero has flexible
publication features. You can convert Can Verdot
into presentations. You can also publish a
PDF files and so on. We will discuss all of this in more depth in the
next several videos.
3. Editing text in Canva Docs: In this video, we will discuss the various text editing
features in Can Va dogs. To start using Canva dogs, you can simply type
in the text just like you would in any other
word processing software. To save time, I have prepared
the text of the record. This is actually a content
from one of my blogs. When starting a
Canva Doc project, the default active
style is heading. We can type in the title
text for this article. For example, how to b***d
or mix colors in Creta. If you press Enter and
start typing again, the active style is not
the body or a plain text. Used four paragraphs. Let me just copy in pace
the text to save time, if you want to add
a subheading style, you can press the plus button that appears on the left side. Then select the H two
subheading option, and then we can type in
the text, say gradient. At this point, we
already know that there are three default
styles in Canva Docs, Heading for the title, subheading for
chapter or heading, text smaller than the
title, and the less, one is the body
style for the main that forms paragraphs
1 Thing you need to keep in mind that a
dog does not support the styles feature as you can find in Microsoft
Word or Google Docs. If you want to
change the phone of all your headings or subheadings at once,
you cannot do that. At least that feature
wasn't available in mid 2023 when I
recorded this video. Basically, you need
to do that manually. On each of the text, you can fully change
a text that was initially a subheading to
look like a body style. For example, by changing
the form size to 12, we versa change text
that was originally body style to subheading by increasing the
form size to 22. Next, let's focus on the
text formatting features. We will just quickly
review them because all of these features are generally
found in other software. First, make sure we have
some text selected. This rainbow button is used to define the
color of the text. This is for setting the
text to be bolt or not. You can also use the
shortcut control to toggle this bolt option. Next, this is to make
the text italic or not. The shortcut is control. This is for adding a
line under the text. This is for adding a line
crossing the text in the next. This button is for controlling
the text alignment. The default mode is left if
you click on this button, once the text will be
aligned to the center. If you click it again, the text will be aligned to the right. If you click it again, it will return the
text to left lineman. Currently, it does not support
the justified alignment. If we create super lines
of text like this, then we select them all. By pressing this button, you can turn them into an unordered list or what is
also called a bulleted list. If you click again, the text will change to an ordered list, also known as a numbered list. Then this is probably
unique in Canvas. If we click the button again, the text will change
to Check List. With this, you can utilize Scan for dogs as a simple to do list. You can click on these boxes
to toggle the check marks. If you click the button again, then all the structured texts
will go back to print text. Next, this is to shift or
in the text to the right, and this is to decrease
or reverse the in. Then back to the left, if you proffer shortcuts, you can press step to increase the Ind and press Shift
step to decrease the Dn. Next, if we click this button, we can use the slider on top to adjust the spacing
between letters. The default value is zero. We can use the strider
underneath to adjust the spacing between
lines or rows of text. The default value is 1.4 We have discussed and use the plus button to add new element
to the next line, or the one below the
active text line. In addition to the
various styles, we can also insert
Design projects, tables, charts, and so on. We will go through this gradually
in the next son videos. This plus button can be very useful if you're working
on a mobile device, but if you are using a computer or a device
with the keyboard, changing the position of your
hand from the keyboard to your mouse back and forward
can disrupt your workflow. This is the biggest benefit
of using the shortcut, which is the forward
slash symbol. For example, you want to add
a subheading text below. Press Enter first, then press the forward button
on your keyboard. Canva will display the
same panel as when you press the icon, just type sub. Use the down arrow key
on your keyboard to select the subheading
option. Then press Enter. Then you can go back to work typing the content
with the keyboard. Once again, this forward slash
shortcut can help to keep your hands stay on
the keyboard so you don't lose focus on
what you are writing.
4. Adding design elements to Canva Docs: Besides text, you can also add various design
elements to Can dogs. In this video, we will
focus on working with photo and graphic elements
inside Canva dogs. There are at least
three ways you can insert graphic elements
into Canva dogs. The first is to use the plus icon or its
shortcut, the forward key. The second is by using the
panel on the left side. And the third is to click Brack, the content directly from the file browser into
the Canva Dogs area. Let's try each of
these techniques. Let's say that between
these two paragraphs we want to insert a photo
related to art or painting. Remember, if you want
to use the plus icon, make sure the text cursor is on the line before the line where you want to
place the element. But if you want to use
the keyboard shortcut, you need to press Enter first
to create an empty line. Only then press the forward
key on the keyboard. We want to search for photos
related to paintings. We can type in the search
box, the word painting, Then press the down arrow
key on the keyboard to select the photo
category, press Enter. Just select the photo
you want to use, then press Enter again. This is the result, the photo we selected have been inserted into the document. Keep in mind that this
first method can be used to insert design elements that are available in canvas library. If you want to insert
your own file, then you need to use one
of the next two methods. For now, I undo it by
pressing control Z. The second method to
insert design elements into Canva dogs is through
the panel on the left. At this point, I am sure you
already know how to do this. Let me just explain
this quickly. Let's say we want to
insert a graphic element. You can use the search
feature if you want. You can see that Canva
provides a variety of graphics and some of them
have an emission features. Just pick one that you like. For example, I want
to use this one. If I click on it, it will
be placed on a new line below the active line or where the tax
cursor was located. But if you use the
click drag method, you can place the
graphic in any line or row independent of the
tax cursor location. Now if you want to use
your own image file, same as before, you can
first open the upload step. If you haven't
uploaded the image, then you need to press
the upload button first. After the image has
finished uploading, you can use the
click drag method or the click method to
place it in a project. What I want to show you now in this video is the last method, which is to click
back the image from the file browser directly
into the Canva Dogs area. I have prepared this file
before of the record. Simply click back this image. We can select where
to place it in a document and then
release the mouse. Canva Wolfs upload the file to the uploads folder and once the upload
process is complete, the image will be inserted into the location where we
release the mouse. The technique of editing photo elements in
Canva Docs is quite similar to other types of projects with some
differences and limitations. Click Brag to move its location from one line to
another in a document. You can also just its size using the control
points in the corners. You can use the control boxes on the sides to do crapping. What you cannot
do in canvas dogs is routed, the design elements. Perhaps this feature will
be available in the future, but this is how it is in a
version I am currently using. Now, if the image size is smaller than the
document width, you can use this button
to set the alignment. Click to change it to line left. Click again for a line right, and click again to go back
to using line center. You can flip the image if you want, horizontally
or vertically. If you want to have more
control over the crop area, you can press this crop button. We are now in crop editing mode. You cannot just the control
points in the image to have finer control over which
area you want to display. You can press done
to apply the crop, press cancel to abort it. The last one is the
edit image panel. Technically, there is nothing
different from how we apply a filter or color correction on ruster images in other
design projects. We have covered this before, so we can safely skip
this to save time. The last thing I want to
cover is how to delete an existing graphic
element inside Canva dogs. To delete an element, you need to select it first. If you prefer to use the mouse, just click on the element. Then press this trash icon. But if you want to focus
on using the keyboard, only you can press the arrow keys on the
keyboard to move the texts. If the Tex cursor is
on a graphic element, it will automatically
be selected. Then you can press
the delete key, or the backspace
key to remove it.
5. Working with videos in Canva Docs: In this video, we will
discuss various techniques related to embedding video
elements within Canvas. To insert a video
into canva dot. The technique is similar to how we insert graphic elements. We can use the plus icon method
or the forward slash key. We can use the panel
on the left side, or we can drop the file from the file browser into
the Canva Dog area. Just for example,
we can press Enter, then press the forward
slash key on the keyboard. Let's say we want to place a
video related to painting, this type painting
in a search box. Then use the down arrow key, select the video
category, then Enter. Select the video
you want to use. Then press Enter
again to confirm. And here is the video. You can scale a video element
inside a Canva Do project, but you cannot crop them.
You can rotate them. You can specify the alignment, whether it is left,
right, or center. You can also flip
the video element horizontally or vertically. If we click the Edit
Video button at the top, we can add effects. We can also ****
video viaja step. What is different from the
graphic element is the icon. We can use this to determine the default volume
for the video, whether we want to
set the volume to 100% or lower than that. We can also mute the sound. You should note that
this volume setting does not apply if the
video has no sound. Also, users who open your canvas page can still control the
video to their liking. They can make the
video full screen. They can also use
the speaker icon at the bottom to
adjust the volume. Even if you mute the sound, users have the freedom to turn the sound back
on if they want to. Next, what differentiates
the video element from the graphic element is the cut feature which you can access via this
skier shaped icon. With this, you can determine the starting point of
the video by drugging left border and determine the end point by
drugging right border. You can also drag
at the center area to slide reactive video area. When you are done, you can
click the done button on the right or just click anywhere
outside the video area. If you have your own video that you want to
upload to can va dogs, the technique is the same as, so we upload graphic elements. You can either drag and drop it directly from the file browser, or you can open the upload stab. Just make sure you open a video stab instead
of the images stab. One major consideration when uploading videos
is the file size. In general, video files are
much larger than image files. This is because a video is basically a collection
of many images. I mentioned this because if you are using a
free Canva account, you only have a maximum of
5 gigabytes of storage. Frequently upload
video files to canvas, You will find that your storage
space runs out quickly. One solution to getting round canvas limited storage is to use video platforms
like Youtube. You may already
know that Youtube offers limited video
storage for free. I won't explain how
to upload videos to Youtube because it is outside
the scope of this course. Let's just assume you
already have the video on Youtube and you want to display
it on your Canva project. First, you need to get a
special link to the video. There are many ways to get link, but the easiest way is to just right click
on a video area, the copy video URL. At this point, the video link is already in the clipboard. We can then open Canva again to insert the video
into a Cava Do project. You can press Enter to
create a new blank line, then press the forward symbol. Then type Embed or
just EM for short, select the embed option. Press control V, two page
link, then press Enter. Since this video is originally
stored on Youtube surfer, there aren't many options
to edit the video. We can only change the scale, also just the alignment.
6. Embedding design projects: In this video, we will
discuss how to work with the Cava design element
within Canva Docs. What Canva design means is any design project that
we created in Canva. Any design project
we created in Canva can be embedded inside
a Canva dock project. For this, there are two
approaches that we can use. The first is the
internal approach. This means storing the reason internally within
the Dc project. The second approach is
the external method. That is, we embed the
reason project using a link similar to how we embed
Youtube videos previously. Let's look at these two
methods, one by one, starting with the first method, which is the internal method. Let's say we want to insert a design element after
this opening sentence. We use the four shortcut before. Now let's try using
the plus icon method. For this, we don't need
to create a new line. Just press the plus icon, then use the design option. You can see Canva opens a floating window where we can create a new design project. You are free to use any of the design editing techniques
we have discussed before. To save time, I
will just randomly select one of the templates
provided by Canva. After selecting a template, just like any other
design project, you can still change, add, or remove elements from it. For example, I changed the
text to welcome to my page. We can expand your size
while holding down the outy. Unlike a regular design project, you do not need to give
this design project a name. Why? Because the design project stored inside a
Canva dog project, any name you give to it
will be ignored by Canva. If you are done editing the design and want to
use it in your document, you need to press
the Safe button. But if you want to cancel it, just press the X button
on the top right. For now I press the Safe button. This is the result. You can adjust the scale
of Ova design element. You can also just line if the width is smaller than
the width of the document. If you want to edit Ova
design element again, you can click on the Design
button on the top left. Or you can press the Murk
and select Edit Design. Or a faster method is to double click directly
on the design area. Canva below in open a window
to edit the design project. One technique I want
to cover now is Recs. In the design for designs
inside Canva docks, you cannot change the width. The width is fixed
at 2000 pixels. However, you can still
change the height. To do this, you need to select the background
object first, then click drag the
control box at the bottom. Feel free to just the
height as needed. If you are done, you can
click the save button again to save all the
changes we made earlier. So that is the first approach, which is the internal method. Next, let's discuss
the second approach, or the external method. To use this method, we need to get a special link from the design
we want to embed. To do this, if you
have the project open, you can press the Share button, then click the Capling button. You can also get the link. When you are on the main pitch, you can press the
dotted button on the project's thumbnail
and then select copil Ing. If this is your first time
accessing the piling feature, V will usually show you some
information or Osmo guide. We will cover different options in link publishing
in a later lesson. For now, just select
the only you can access option, then press Copil. Now the link to the project
is copied into the clip part. You can go back to the
canva dot project, then we can press
the plus button. Next, you can type E M or just scroll down until you
find the embed option. Press control V to
paste. Then press Enter. And here is the result. Since this element is actually a standalone
design project, any changes you make to the design project
will automatically be reflected in the appearance of the design element
inside the can dock. Granted the changes don't
happen immediately, sometimes you need to close and reopen the can dock project to see the latest changes to the externally embedded
design elements.
7. Publishing Canva Doc projects: In this video, we will discuss the different techniques for
publishing Vado projects. There are at least three
methods that you can use. The first is to download
it as a PDF file. This will be useful if
you want to print it out or you want to share it with others as a digital document. The second is to publish
it online through a link. This is like having
a blog or a web page that people can access
using an internet browser. And the third is
to embedded into an external website
outside of canvas domain. Before we discuss the
techniques one by one, I want to first
include two types of design elements that we
haven't discussed before. Namely table and chart. You can open the element stab, then open the table subcategory. Feel free to use whichever
type you prefer. You may input some
random data into the table or you
can leave it blank. We will discuss table and chart features in more depth
later in their own chapter. For the chart type element, Canva has already provided
some dummy data into it, so we don't need to
enter the data manually. The reason why we do
this is just to see how these elements look when
we publish the project. All right, the process
of downloading Canva dogs as PDF files is similar to any
other design project. We just need to click
on a Share button, then select the download option. You can see that
for the file type. Canva dogs can only be
downloaded as a PDF file. In this drop down list, you can select the paper
size you want to use. Automatically,
resize your document to the size you specify here. For example, I
choose a four size, then press the download button. Now I will try to
open the PDF file in the Microsoft H browser.
Here is the result. You can see that Va will
automatically crop or split our long document
into four size pages. If you have ever
printed a web page, it should look similar
to this PDF file. You won't see any problem
with the text as V will follow the text to the
next page if it is cut. However, video content,
images, tables, and charts will be truncated if they happen to be
at the page border. If you want to avoid
truncated elements like this, then the solution is not to use can va doc
in the first place, but to use a regular
design project type that we set the
size to four paper. The second approach is the
online publication method, using a special link. If you open the shared menu, you can see the capiling button. We have discussed
the copil function before when embedding
Canva design projects, but we haven't discussed the difference between
the two options above. If you set this to
only you can access, then the link created by
Canva will be private. This means that only you
or the owner can open it or certain people whom you
intentionally give access to. To add people who can
open the document, simply press the plus button on the side of your
con photo here. Or you can also do it here. Then type in their e mails. We will discuss canvas
collaboration features in more depth later in
a dedicated chapter. For now, let's look at the second option which
is anyone with the link. With this option can doc
will become public or accessible to anyone who has
the link on the right side, additional parameters
will appear. It is best not to set
this to can edit, as this means that anyone with the link will be able to make
changes to the document. In a public setting like this, it is better to use the
view option so that others can only view the document without any
ability to make changes. Or at least use the comment option if you want to enable
the common feature. For now, let's try activating
the comment option. After that, press
the Capling button. The link text has been copied
to the system's memory. We can try opening the
browser in anonymous mode, or incognito, if you are
using Google Chrome. If you're using Microsoft H, this mode is called in private. This way Va cannot detect
our active account. It is like we are random
user who can open the link and not as the
owner of the document. Just base the link into
the address field. Then press Enter. If
you are a general user, in order to comment,
you need to sign up or login to Canva first,
once you have done that. You can select the text
you want to comment on, then press the comment
button on the right side. You can see that because I am
using private browser mode, Canva thinks I am
not logging it, won't allow me to
write any comment. One important thing you need
to remember is that when we embed a Canva design
project into Canva dogs, if you remember, we set
the link in private mode. This is what happens.
Canva needs to make sure that you are the
original owner of the design. If not, then the design
content will not be displayed. If you want the design to be visible to the entire public, you will need to
reset the link for the design project
to be public too. That is, by going to the project and then changing the option to
anyone with the link. For now, I'll just delete it so our document
looks cleaner. We can press the Refresh button in the browser to
see the changes. Another thing you need to pay attention to is
the video element. If the video is on
Canvas servers, users can simply press
play to watch it. But if the video is on another platform such as
Youtube user swords the block, click on a video area. Only then they can press the
play button to watch it. The last method is publishing
the document via embed. To try this, you must at
least have a website. I happen to have several
active websites, one of which is Creta tutorials. This website uses Wordpress as its CMS or content
management system. To embed Canva dogs, you need to open the
Share menu again, then choose the Embed option. Currently, our
Canva Dogs document does not have an
active embed link. Press this embed
button to activate it. When active A provides
two types of links, TML, Embed code and
Smart Embed Link. Generally, ML code works
globally on all types of CMS, whereas this Smart
Embed link only works on certain platforms
that support it. One of them is Wordpress, but only ones that are
hosted on Wordpress.com You cannot use this link on regular Wordpress website
or the community version. Let's use the TML option by
pressing this copy button. The TML code is already
copied into the memory. Next, go to your
website CMS dashboard. Again, you can use this
technique for any website that supports custom CML embedding,
not just Wordpress. I happen to use Wordpress for this Creta tutorial website. If you use CMS other
than Wordpress, the steps may be a
little different, but the basic
concept is the same. I have prepared a dummy
page named dummy of record. To try this feature, I can click this plus
button, then search TML. Here is the element
called custom HTML. Click or click red this
element to the page area. Then press control V two page to code to test or
preview the page. You can press the
preview button, then desktop, then
press this icon. You can see that
canva rocks that are embedded into a web page are placed inside a container
that uses an iframe tag. In my opinion, users will feel uncomfortable reading
content in a box like this. Indeed, users can press the full screen button
on the bottom right. But it would still
be better if we don't require users to
do too much interaction. This course is not
about website design, but just for a tip, if you want to make
the Iframe box taller and also want to remove the
information text below. You need to edit the
code a little bit. First, you need to
change the height value from 600 pixels to larger value. This value depends on how
tall your document is. Let's try for Tops
and Pixels leader. We can adjust it again. If it is too high, then you need to
delete the max height, perimeter, and its value. Finally, we can delete
the entire anchor tag to get rid of the information
text at the bottom. Now we only have the
iframe, open tag, and close tag if we
try to preview it. Again, we can see that the frame container
no longer displays any scroll bar as it is already larger than
the content inside it. Indeed, it is now too tall that we see empty
space at the bottom. You can try reducing the height
value again if you want. You can also see that now there is no more text
below the container. Let's go back to Canvas. If you don't want to enable the embed feature
of this document, you can click the link says
and publish this design. In this case, all
external websites that embed the document will display an error are
forbidden for 03 message.
8. Creating Websites using Canva: One project type in Kva that is similar to a dogs
is Ken Va websites, although both project
types can be made on line. As the name suggests, Va websites is more suitable for creating websites rather
than just online documents. But please don't
compare the features of Ken Va websites with popular professional web
design tools like Figma, Webflow Framer, or
perhaps Wordpress based builders like
Elementor Oxygen and so on. Since Ken Va website
is relatively new, at least at the time I
recorded this video, features were still
very limited. But on the flip side
of these limitations, can Vo website is
very easy to use. It is a great starting point for beginners who want to create a simple website
quickly without having to learn coding
using HTML and CSS. To save time, we will not
create a website from scratch, but we will pick a template
provided by Canva. From the main page of Canva, you can open a website category, then scroll down to
the template section, or you can also make
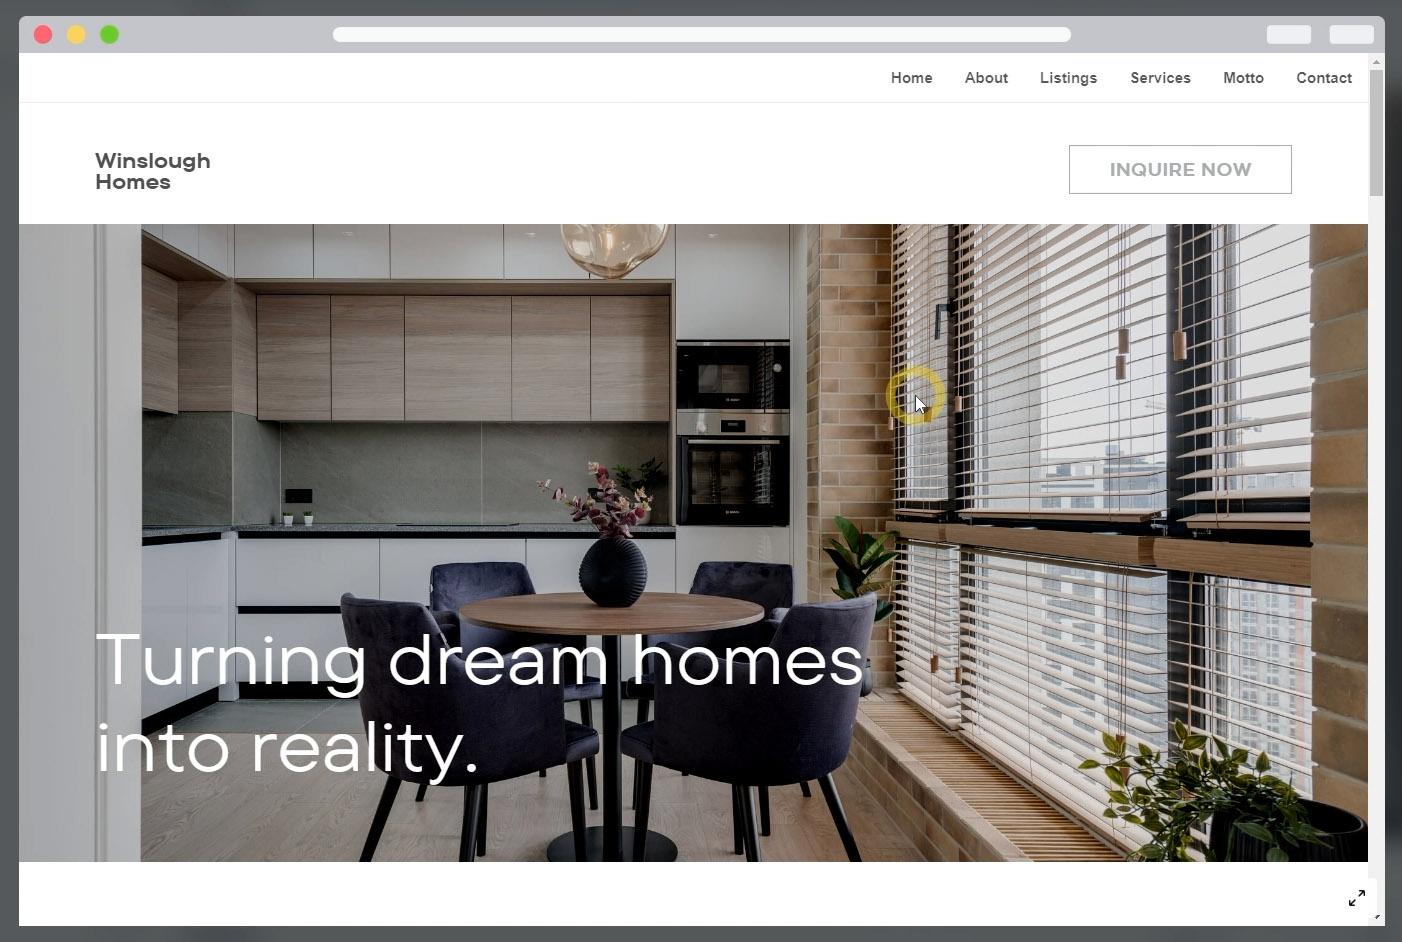
use the search feature. Let's say we want to create a website for interior
design surfaces. Type in a search box,
interior design website. Make sure we are looking for
templates and not projects. Then press Enter the
template that you like, Try to find a free one. For now, click Customize this template to
start the project. We already know
that the focus of the canvas project
is on text editing. That is, you can
directly type in text similar to a normal word
processing software. You may notice that Canva
websites do not focus on text but rather focus
more on design layout. More or less similar to other
types of projects on Canva. You can add different types of design elements
and then edit them using various editing techniques we have discussed in
the previous chapter. I am sure by now you
already know all of that. There is no need to
go over it again. In this lesson, let's just focus on things that are unique to
the Canva website project. The first thing that we need to discuss is the page divisions. Canva uses the term page
which may be a bit confusing, especially if you are used to creating web designs
outside of Canva. Usually the term page refers to the entire website page
from top to bottom. Meanwhile, the parts of website
page are called sections. Again, these are
the common terms among web design, software
and professionals. But in Va the Tom page is
used to name the section. This is the first page, this is the second page, this is the third
page, and so on. I understand this is
not a common term, but just to avoid confusion, I will use the
terms used by Kva. From now on, on the
left side of each page, you'll find small icons. These up and down
arrow like icons are useful for organizing or
sorting the page order. We can move the
corresponding page to the bottom or to the
top of other pages. Then this icon is for
adding nodes to the page. The function is the same as if we press the notes button below. The notes that you
create will not be visible to others who
visit your website. This feature is more useful for internal needs or if you convert your website project
into a presentation. We will discuss the
presentation feature in more depth in
its own chapter er. The lock icon is useful for securing the page you have created from accidental changes. Then this is for
duplicating the page. This trash is for
deleting the page. Finally, this icon
is for creating a new empty page. All right. You should know
that the height of pages in website
project is not fixed. You can freely adjust the height by first clicking
to select the page, then click drag, the
control box that appears at the bottom
border of the page. You can make the page
taller or make it shorter. For example, I want
to rise this group of text up a bit and then reduce the height of the page
because I think there is too much empty
space on this page to see how the website we
look when it is on line, we can press the Preview button. This is how our website looks when opened by a
large monitor screen, such as a computer or a TV. Well, this is how it
looks when viewed on a cellphone or a mobile device
with a small screen size. Now, one drawback of
Canva websites is that we cannot customize the layout of the small screen
version independently. We can only set the layout of the large screen version and the small screen
version we just follow automatically without our
intervention or control. Sometimes the layout is not
quite what we expected. For example, this text doesn't look right
because it's left lined, whereas the text below it
is center lined and so on. Hopefully the responsive
design feature of Mva websites will
become better and better. So we can control layout of
the small screen version. Also, to return to the
main project screen, we can click on
this close button. Since this video is
already quite long, we will continue to
lesson in the next video.
9. Adding interactivity to Websites: In this video, we will continue our discussion on
Canva websites. A common element in every
website, is navigation. It can be in the form of a
menu or in the form of links. One of the limitations
of Canva websites, at least at the time I
recorded this video, is that all the pages we created will be connected
into one long page. We cannot separate them
into standalone web pages. The second limitation we also cannot create
a custom menu, will create the menu
for us automatically. All we can do is name the pages, because for a page to
appear in the menu, it must have a name. Pages that do not have a name will not
appear in the menu. To be able to see and
change the page name, you need to open
the notes panel. This is the name of the
currently active page. Another way to tweak the
name is via the grid view. In this mode, you can see the number and
name of each page. Below the thumbnail,
just click on the name or the pencil icon that
appears to set the name. Just for example, I give the
seventh page the name motto. Meanwhile, I intentionally left pages 4 and 5 without any name. We can click this icon again to return to the
standard view mode. Let's preview the website again. Currently, our website
does not display a menu. In order for the menu to appear, you need to change this without
navigation option to with navigation. Here is the menu. You can see that pages 4 and 5, which do not have names, do not appear in the menu. We can try pressing each
of the links in the menu. What is interesting about
the menu navigation in Canvas websites is that it
has an animation effect. That is, when we
click on a page link, the target page does
not suddenly appear. Instead, the browser will scroll progressively to that page
and then slowly break. Next, we will discuss the
technique of creating links. Let's say we want that when
the user presses this button, the browser jumps to
another website or simply scrolls to a certain
page within this website. Let's go back to the main
project screen first. To create a link, we need to
select the element first. In the case of this button, you should select the
rectangle element instead of the text. The goal is we want to make the entire rectangle become clickable and not just the text. After that, right click or
click on this dotted icon, then select the link option. You can see that the shortcut to set a link is control key. Now in this field, you are free to enter any
link for external links, Just make sure the URL is
written correctly, that is, starting with HTTP or HTTPS, then colon double, and so on. But if what you're targeting
is an internal page, just choose from the list below. Let's try targeting the
contact page just for example. Click Done to confirm. Now if we pre view the website again and then
press this button. The browser will scroll
to the location of the Conte page that
we selected earlier. One of the features of Canva websites that I find
interesting is animation. We will discuss the
animation feature in, in more depth in its
own chapter later. For now, let's just
discuss it briefly. As an overview, we can apply
animations in Canva per page or per element if you want to apply the animation to
one particular element, just like the element. And then click on the animate
button above in its panel. You can choose the animation
preset you want to apply. Canva immediately
shows the preview of the animation on
the main screen. To save time, you can apply the animation to the
entire page at once, even to the entire
website at once. To do that, you need to open
the Page Animation tab, or you can also click on
a background element. Let's say we choose the
baseline animation preset. Every element on the
page has not been given a base line type animation
automatically by Canva. Now if you want to apply the admission to
the entire website, you can press the Applied
to all pages button. We can preview the
website again. As you can see, each
pages animation will be triggered when a
browser screen reaches the page to publish website project so that it is on line and visible
to the public, you need to press the published
website button above. Canva provides three options
for website publication. Using the free domain option, your website will have Canvas, LD, or top level domain. This is the only
option that you can choose if you have a
Canva free account. Furthermore, this option is
also limited to a maximum of five websites if you plan
to purchase your own domain, can do so through Canva. With the second option, however, you should note
that in terms of price, buying a domain through
Canva is a bit more expensive than buying it from other domain or
hosting providers. But at least with
the second option, you don't have to set your
domains DNS records manually. Finally, if you already have
your own domain and you want to connect it to an existing website
project on Canva, you can use this third option. Again, this feature is not available for Canva
free accounts. If you choose this option, you will be guided to
upgrade your account.
10. The next step: Congratulations,
you have completed this course from
start to finish. You have learned a
lot in this course. But we have only touched a small part of
what Canva can do. As you may already
know, this course is the second in a series. If you want to master even
more of canvas features, you should check out
the rest of the series. You can't pick any of these
courses that appeal to you, but I highly recommend that
you watch the next one, editing videos and editing
animations with Canva. The curriculum in course
is designed to be a continuation of the first
course you just completed. Also because it covers a lot of things that
will be useful to, not to prepare you
for the next courses. You can search for the
course yourself at Skillshare or just use this link I provided
on the screen. I hope this course
series can have positive impact in
your life and career. See you at the
next one. Salakum.
 Widhi Muttaqien, CG expert & entrepreneur