Transcripts
1. Introduction: Welcome to this new class. We're going to do
something totally different than I've
ever done before. We're going to create
a paper cut light box. I'm going to show
you how to build the paper cut lightbox. And for that, I'm just
going to show you that I want to switch off my
light so it will get dark. I'm going to show
you some things. I put down the
blinds and now you just don't see anything anymore. That's the whole idea. This is what I created
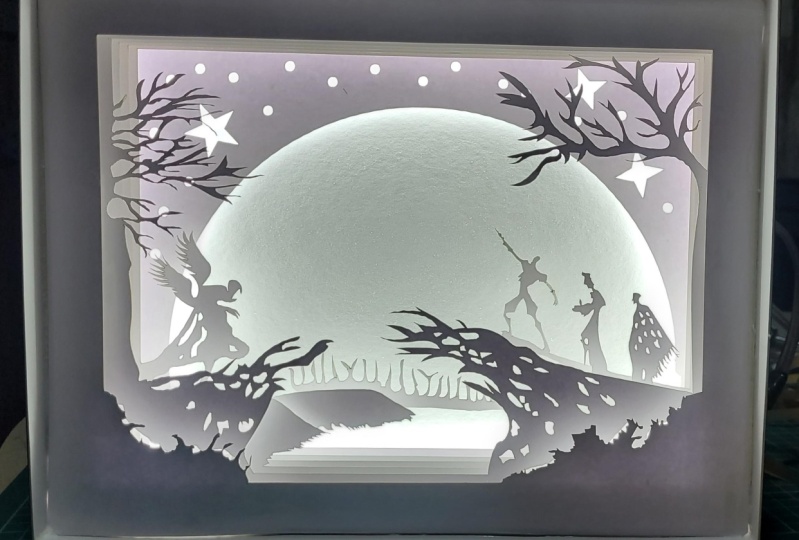
for my previous class. Bohr effect in Procreate
and I really liked this. And while creating this afford, we just need to do
the real thing. We need to create
a real light box. And that is what this
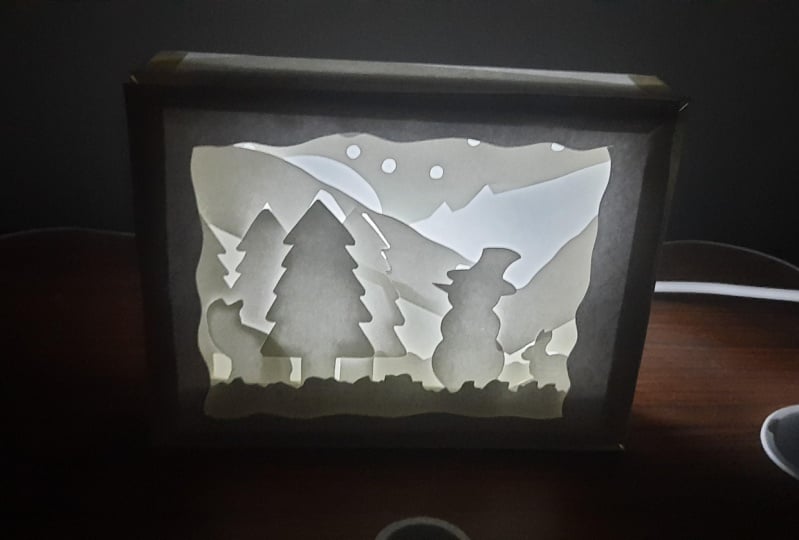
class is all about. We're going to turn this into this that you
don't see much. Sure, Let me switch it on. You go, we're going
to create this together from the actual
appropriate design. I'm going to show you how to
build a light box like this. We're going to have
some fun with that. I do like this. This more just something
magical about this. Now to create this light box, we're going to need some light, definitely because
we'll do some cutting and assembling and that's
best done in the light. So I've put up my blinds again so that we can
see each other again. And we can actually start
creating the light bulb. In the coming
lessons, I'm going to just take you
step-by-step through the process to cut
how to assemble, how to add these lights, to do some special effects. And how do you just have
lots of fun creating this? In the next lesson,
I'm going to show you the materials you need so
that you can get at them. And then we can just
start building together.
2. Things you need: Built a paper cut light box. We're going to need
some materials, some supplies to create it. In this video, I'm going
to talk you through what I'm going to use
and some possibilities, what you could use instead,
some alternatives. Alright, let's get into that. The first thing you already
see laying on my desk, that's a cutting mat. I would really recommend
using a cutting mat. So we're going to
cut some stuff. So best to use a cutting mat. And as you can see,
this cutting mat has seen some good use in its life. Already. Attached to this class, you will find some documents on PDF documents that contain the
design for this light box. There are two A4 versions and there are two
letter version. So whichever kind of paper you use to print or to work on, that's the one you pick. There's a regular
version that's this one. And there's a version for
printing that is this one. And what's the difference
between these? What I'm gonna do
is I'm going to just take a piece of paper. I want to clip this on here and then I'm
going to cut that out. Then I'm left with the
cutout on this paper, but you could also print it
directly onto the paper. Then you're going
to need this one. With this one, what I'm gonna do is the one that is
not footprinting, I'm actually going to
cut out the white. It doesn't matter that
this is in color. And the other one for printing
your best using this one. And then you need to cut out
everything that is gray. And you need to cut out
around here in the line, around, not in the
line on the line. For printing, use this
version if you're going to do cutting like I will do by
using a separate paper, then you have this version. Now if you do not have a
printer, what you could do, you could just take
a pencil and start drawing designs on the paper. They're not really
complicated design, so you might draw every
panel on a separate paper. And while we're on paper, I'm going to use some
watercolor paper and something like this. Just a pet like this, which has some paper with a nice texture because
I just liked the texture. And I also like the way light shines through
the watercolor paper, which is different
than regular paper. This is quite heavy paper, 300 g, hundred and 510
pounds, something like that, I think will be quite a
challenge to cut through, but I'm gonna do that anyway. If you're going to use
a different paper, the different papers
you could use, you could just use
regular white card stock. Then I would go for 180 g. That is quite light already. 200 g or above 200-300 g works
best to own 50 like that. Some white craft
paper would work, some Bristol paper would
work or mixed media paper. And he sturdy paper. We're going to build
a box 2.4 the box. Then you will see in
the PDF after designs, you will see this,
these cutouts ends. There's a second one of this box and there's
this back plate. We're going to build a box self. For the box, I would
really use 300 g, nothing less, what
to 50 might work. Just some sturdy paper, even if you're gonna do
lighter paper for the panels. So the panels that are in here for the box itself, the outside, I would use really heavy
paper and here you see half of the
design already ready. And that's what we're going to make with this texture on it. As you can see, that
looks quite nice. So the watercolor paper, and if the light comes
through very nicely, alright, that's the paper. So if you have a printer, then print it out on either the paper you're
going to work on if your paper printer can handle that or do the same
as I printed out. And what I'm gonna do next
is when I have this print, I'm going to put
it on a piece of card stock and let
me find a good piece of card stock like here. And what I'm gonna do is
I'm going to just take this paper and I'm going to use some document clips like this or what they might
call them, a binder clips. I'm not sure what the codes that they have different names. And you fold these. These come like this. Normally you fought them. I clipped them on
the documents so that this will stay sturdy,
not going anywhere. And then I can cut if you print it directly
onto your paper. Of course you don't need these, but I really would recommend using these because they give a very nice and firm
grip. Don't move easily. And once these clips around, we can just start cutting. So that's how the process
I'm going to follow. Now to start cutting, we of course need a knife one-on-one use is
just a craft knife. She will seem, I've
got two versions here. One, a bit smaller blade. I'm using this to cut
out the more details. But then I'm using this one
to do the larger lines. You can use one, just a regular crafting
knife like this, or get a set with
different blades and just find out which blaze
work best for you. But one craft knife is enough. I'm going to use a ruler. You see me use a metallic
ruler like that, but you can use a simple
plastic ruler like this too. And it's mainly to
cut out the outside. So we're going to do
that with the ruler. That makes a nicer cut. So a ruler. We're going to use the scissors to assemble the light box. I'm going to use
double-sided tape like this. Just double-sided tape. But you could use this glue or do I have one
or laying around? Or you can use just a glue gun. So regular glucagon, I'm using double-sided tape
because for the video, this makes the list
mess of all of it. And I don't need to wait
drying and I don't have to worry about something
drying too quickly. Now, if we look inside this box, see if we can pick it up camera, you will see that I
use dividers to space these layers so that
they get some distance. If I let for the light on that, you can already
see the effect in a little bit by shining
through the light. So you need to use spaces. What I'm using four spaces is this isolation
strip, just a strip. It's I think it's six 5 mm. Measure it for you. My main Demeter's 9 mm
and it's 5 mm thick. It's a form. You can use craft form for it. And that's around four
or 5 mm to a half. 5 mm. I'm not sure what is in inches, so it's not this is
not fixed stuff. This is two gaps between the window to make sure the draft
doesn't come through. You can use foam crafting form for this and you need
to cut it into strips. And then it's about 9 mm thick, while about a centimeter
there's enough space. Measured this part. So if you're going to use your own strip measured
this part that needs to fall inside this strip here. You can also use
something like this, just a regular box. It has a nice thick
cardboard on it. So thick cardboard
boards and then you just cut them into
strips like this. Measuring again how wide this is and you need
to get it on there. Alright? If you're going to
use debt cardboard, then you may use a regular
utility knife like this. Not, not these
other nice we use, not as craft nights. Those will get
blonde really fast with that thick
kind of cardboard. So then it's better
to use one of these. The last thing we're
going to need, well actually I'm going to
show you two more things, but the last thing
you need some light, of course, let's strip. This one is battery-operated. You have used be operated. And this is about meters. So that would be meter
would be about 3 ft, three to 4 ft. That is long enough for this. We're gonna put that
inside the box for light. It needs to be light
powder, of course. Then the last thing you
will see me using at the end, it's colored paper. I've got some
colored paper here. And this is not a requirement. This is an extra, I want to use some of
these cold favors to, once it is done to
put In the back here, right at the back here to get a different light effect on it. But that's for last stage, that is optional if you have some colored paper,
regular colored paper. So not thick, just
regular copy paper. But then in a color, you can
get some special effects. Well, I think that's about it. Let me think this through. We've got everything. We got a knife, we got a
paper without Eclipse. Yeah. I think I've
showed everything. Oh, and if you don't have a
LED light, light like this, you can use these three lights to these are the work fine too? Yeah, you can use them to, these are easier to use. This will work fine too. Whatever your choices. Alright, good. Well, I think we're
set for the materials. Well, and that's
the materials sold. Say check the list. I've got a list with
this class too, so that you can see what
materials you can use, what you need, what
you could use. Once you get it all
those materials, we're ready to start
building this light box.
3. Notes on Design: Now that we have our materials, we're not going to start
cutting right away. But what I wanna do is just
walk you through the design I created first and how I
came about to create this. Let's do that. Don't worry, you're not
going to need an iPad. I just want to show
you something. This is a design I created for a different
class for Procreate. How to create a paper
cut Lightbox effect. Yeah, in Procreate. And once I was done, I figured, why not take this
a step further. Actually create real
light box of it. And let me get that one. Again. You saw in the previous
one there it is. It's not totally ready yet. I need to finish it. I'm filming this class
on different days and in different orders and creating
a bit of a mess for myself, the coupling is a mess
and this paper is a mess. And now even my editing and
filming is kind of a mess. But once this is all done, you get a nice smooth
massless class. Can I say that massless? But this is actually,
as you can see, the same thing but
in a real box. But there's some difference
here now with Procreate, I don t need to pay
attention for the light. I can just simulate light here. But with a real box, if I would start cutting all
of this out in these layers, then actually the light box
would not really work well. It wouldn't get
the right effect. So what I've done, I've
altered this a little bit. So if you want to make
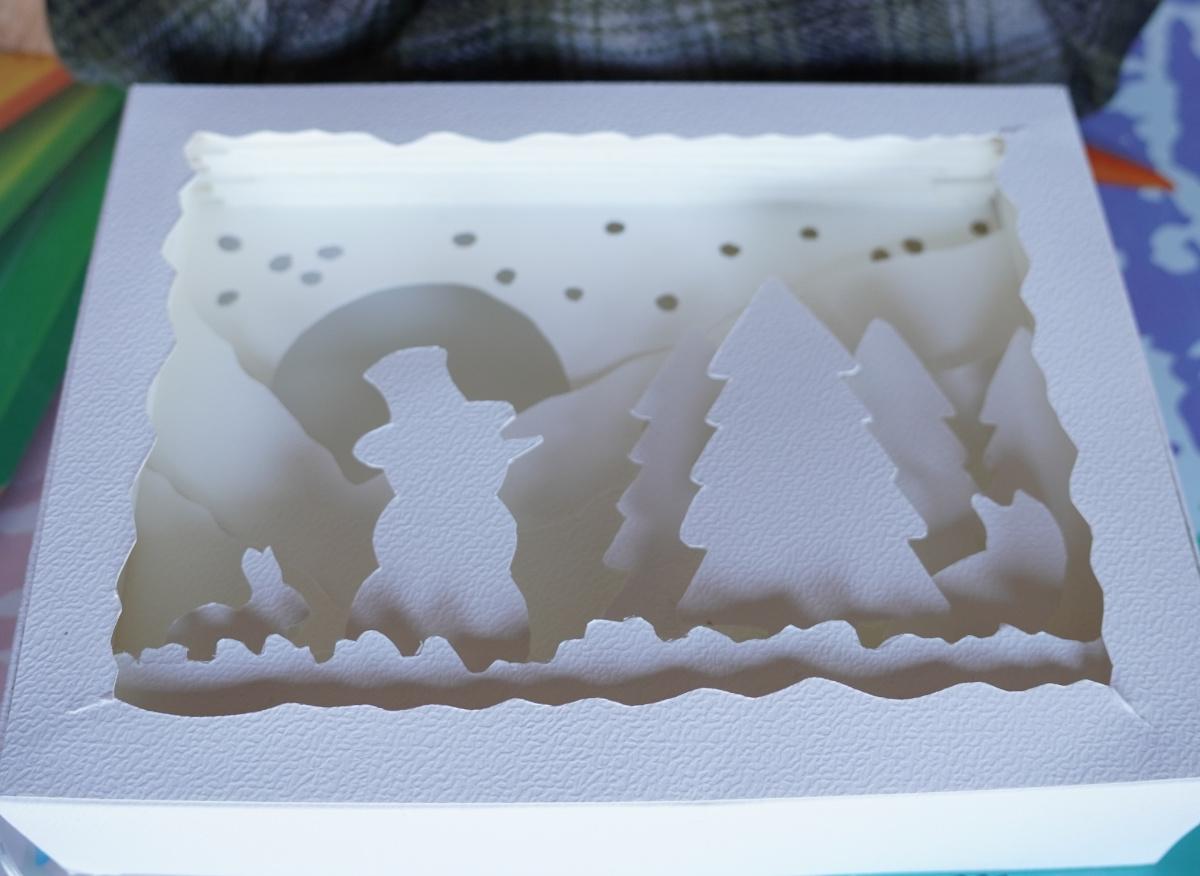
your own light boxes, you need to think about a few things and I'm going to show you that Here's the one I created. And I divided everything. Like here it is. We've got the background, we've got the mountains, then there's some
bushes behind it. Then we have some trees. We cut this fox. And the reason there's all different layers. And what I've done is
I've taken these layers, create new layers of them, and let me show you them. I'm going to hide everything. There you go. That's the first layer you
just see simply here on top. And that's a very simple one, is cut out this layer
and nothing else. The next layer is pretty much a simple tool that
is this layer here. Just cut that out. No regard of light,
that is fine. And with the third layer
where the snowman and the first tree bonnie
is on. The hair. Might be a hair or a bony. I don't have to worry about anything either
because this layer, this layer and this layer are
all in different heights, so the light will work fine
once I get to the next layer. That is the fox and the tree, you see me that I have
cut out a part of the tree and I'm going to show you that from the
bag, how that looks. And what that does is it makes sure that the light
that is behind here can actually reach
the parts on front, create a nice glow
around the book. And you probably
already right away. When I tilt it like that, you see that effect here? That now the trees lights up, the snowman lights up a little bit and depending
on the angle you look at, every part gets a little bit
the light shining through, which creates that
magical Lightbox effect you want for that. And you cut out certain parts. So instead of the
background, e.g. this is my background. Instead of doing just
a complete background, I cut out the bottom part
where all the trees, so a little bit
of the trees off. And so this part needs to go completely because
in front of that, As you said, there's a mountain. Now, as you see in the design, I let some parts
really overlap so that you get the best effect and don't get
everywhere gap snap, there might be a
little bit tricky to create now and for this
class I've created. But if you want to create
your own light box, you may need to pay attention to that to make sure that
the light can reach every part of your
lightbox by cutting out some pieces so that
the light can get through. So e.g. if I take this layer, this mountain here,
you can see cutout, the bunny, the hair again, part of the snowman, part of the trees, and
even part of the fox, so that all the light gets
through nicely and you get this effect of the
light shining through. Well. Now I've chosen to
do the actual designs, but to show to take
the actual bonding, actually snowman
and all the trees. But you could get away
with just creating here. Circle, just an oval here, and some shapes here. So you don't have to go
completely with the same shapes, but it works pretty well
with the same shape. But it's not necessary
just as long as there's parts where
the light so there's, there's holes where the
light can get through. I really want to
say about design. Now we're just going
to start cutting. While at least you're
going to catch up with me. The next videos will
be where it will start cutting all of this
and assembling it. And the next thing I'm
going to film this and the lights to my books. But you can't add
your light yet. You still need to
cut everything. And that's what the next lessons are for. Cutting together. In the next lesson,
creating the box, we're starting with the box. And then in the box, adding layer by layer
until we are at the stage where I met and I'm going to add
those lights now, you're going to
create a box first.
4. Creating the Box: People got light box. You could buy a wooden box or a wooden frame where
you put it in. But we're going to
create our own frame. And we're going to actually
start with the frame. If we start with the frame, we know that every
part which comes after it will just fit in
the right place. Well, let's start cutting. Cutting. Throughout this class,
I'm going to use the same watercolor paper that's very inexpensive,
cheap watercolor paper. It has some structure on it. And actually for
watercolor paper, it is not that great, but for these kind of
projects, It is great. Now if you're going to use the thinner paper for
your lightbox itself, makes sure you get a nice sturdy paper like
free on those grams to go around your light box. So the frame, the frame
needs to be nice and sturdy. And I would say it's probably about at least 105 pounds paper. I'm going to get three sheets. Need three sheets for this. The next thing
you're going to need is a printout of these papers. Or if you want to print right onto your paper, you
could do that too. Then this is the print out
the sides, top and bottom. And you need to do
backing boards. I'm going to start with
the backing board. That is the easiest one I'm
going to do with death. Simply. I'm going to put this
piece of paper on it. If you have printed it, then of course you
can skip this part. The next thing what I'm gonna do is I'm going to clip them with this folder or the binder
clips, document clips. Then this paper is going
no, where anymore. The next thing which I'm
going to do is I could cut this off with the knife or
just with the scissors. I'm going to use this. This is for that
because this is quite easy and it doesn't
matter if these fall off, the rest will stay on. So I'm just going to
cut this with diseases. For the backing board,
that is the easiest. I think I'm going to start
on this side too now. Alright, there you go. Last one we're going
to do is I might just put extra one-on-one so that it won't fall
off right away. So I'm putting securing this just a little bit
so that it will stay on. All the way. There we go. Good. This piece of cardboard. We're gonna do our
lights later on, or that it's just the back of the box and the lights
will go on the site. Actually. I want to put this aside and go
to the next part. Let's see how I'm
gonna do to them are going to cover
the next part. Or I'm gonna do something
the same force, of course need paper. And let's see, I
could cut this and I could do this with
the scissors and I could do this with a knife. I think I'm going to stick
to the CSS for this. Make sure this is a little
bit nicer than I have it. I might use a few more of these clips to flip everything. Fine. Cut right there. Start right here.
I should be fine. Never used this before. They come like this. And you just in-between, clip them over and
then you can use them. And if you put them away again, then they go like this
in the box again. Alright? So if I cut right here, everything is going to fall off. So I'm not gonna do that. Now. If you have printed your design
on the paper right away, then of course you don't have
to go through all of this, but this way I won't
have any marks. And I can use this very
rough paper and still get. Very nice. Results. Come, I do the same. On the opposite side. You go cut it right there. Right there. There and there. And she can see I cut a
little bit further so that later on everything
will fall off. Let's go for the next piece. It straight. There we go. And I cut should fall off and fall off and I'm
left with this piece. Now, these are the
folding lines, so this will just fold. This is outside. I'm going to keep
the smooth side inside so that it looks
nice from the outside. So we're gonna put
some scoring lines right there in a minute. But let me first cut this one. Kotlin here. There's the second part. Alright, now I've got
a mess on my desk. We get all these clips up of and put this mess away.
Don't tell anyone. I'm just throwing it on
the floor to make it easy later on our screen. So keep that to yourself please. Alright, I got this
part and this part now, I'll do the scoring
lines in a minute. Let's get rid of that and
let's do the last bit to see where do I have
this one? Here it is. Okay. I think I'm I pretty
much do the same. That worked pretty good. Get to those clips on it. That's too far. And I don't want
to cut these two. Alright, I got four parts
needed for The box. Alright, I'm going
to start with this. Now I know where
scoring line can do. Now you can do, do
this in a few ways. You can take the blonde side of your scissor and
go right in there. You can take a scoring tool. I might actually have
one laying around. Let's see. Actually do
something like this. A scoring board that
gives you a nice line. You line it up and
score it like this. Or you could actually
take the sharp side of the scissor and carefully
cotton scoring line. That is what I'm gonna do. And for that we're
going to need a ruler. Could make sure that
the paper is secure. And if you need a
length first for that, you could put a line. But since we're gonna go from
this corner to this corner, I'm just going to put
my ruler nicely in those corners a little bit
further then the color. Because I know my scissors
are slightly more like that. And there you go. Now I can score them. They need to go inside. This is the outside. So this needs to go inside. That's why I'm putting the
scoring lines right there. And I'm going to
do the same here. Taking off a little
bit of the ruler. If we do it nice and neatly, we get a nice box. So I'm going to score
actually all of these cues, the blood inside for that too. By the way, this side
might be better for scoring. Now, let's do better. Good. Last one. There's the first
part of the box. I'm gonna do the other
one right away to on the back corner to corner. The other way around.
That's better. That's formed every part. And there we go. Now I need these scoring from corner to
corner and put them right. Well, on the desk. Little bit of Campbell for me, since I'm quite far away from the design because
there's a camera, of course on top of it. And if I bend, what you're going
to see is this, and then you probably don't
see much else anymore. So I do everything
from a distance. It is working, but it
is tricky normally. I would be a lot closer on, but when you filmed quite a
lot, you get used to that. Alright, that's the next
part and the last part. Corner to corner again. Bit. There. That should do it. There you go. That's all the parts of the box. Now. The back part I've
put aside for now. So what we're gonna do is
want to keep these paths. We could put them together. And the simple things. If we've colored them right, you should be able to fit them right nicely together like this. And get a nice box. Well, let's put it together. Let's see. I'm going to
use double-sided tape. I don't want to
mess with the glue, but if you want to
use regular glue, want to use a glue gun? Go ahead. Please do so. I'm going to use it in the back. What I'm going to do
is get myself though. This is again, I'm going to
cut off this under an angle, throw that path away. Take a scrap piece of
paper for the parts. Should fit nicely on here. I want it at the back. And you can guess what I'm
gonna do on this side. Cut off an angle to the ego. And now I should be able to
use this on the other side. Well, my put on the tape
on all of the parts. Why nuts. For this. I don't need to go all
the way till the end. Could put it on. But I'm not gonna take
off the protection yet. Let's see how we
can solve for the one now I need to pay attention. One needs to be on the inside. If I have this one
on the outside and this one needs to be on
the inside because that's where later on the board
comes inside of them. Design. Inside of the box we're
building. Alright, good. So I need to do the same
with the other one. So let's say this is
gonna be the outsides. There we go. Then this
is going to be the, our insight and dynamic
need to make sure that when I put it all together, I'm going to not miss a mess up the sides. Alright. Want to keep that one? Let's see this one
the same. This one. This is, this is gonna be
my outsides. Line it up. Otherwise I'm going to get mess. Alright, if that is my outside, then this is going to
be later on my insight. Don't want any dust
and things in it. Okay. So this one is on the inside. Then I'm gonna do this one on the inside to outside in surf. We can turn it around for now as long as we haven't
put it together. I can definitely
change my mind what is inside and what is
outside. This bit here. And now we need those flaps. I've got these. Let's see. This cut enough. Might get away with that. The last bits. Let's see. Yeah, that is the right side, a bit closer to default
than the other one. Okay, That we go, alright, let's put it together. Started this site. We're only going
to do these ends. So I need to make sure that is this is my front
here. On here. We stick our design in here. We stick the other thing
that I need to make sure that a line
these up just right. And then that should
fit nicely together. Let's do this one too. We want to have this
one peel that off. They go straight, that we go. And then the last bit
peel off the right part and not everything there. Yeah. Better do it this way. I can't see what I'm doing. Line these two up. Alright, now I'm
at the right side. Now I can push it and
stick this part in. And there we go. Now. Push all of them. Sticky. There we go. Now I'm having everything
like it should. The rest I'm going to leave
for now because we need to cut the part that
goes on top of it. And then what we're gonna
do is we're going to open this slide every pardon. And then at the end, we're going to put in
our backing board. But for now, we're going
to leave this like this. I'm going to put this size. And that's the first part
of our paper cut light box. And the next part we're going
to cut all of the insights, the front panel and
all the panels inside. I want to show you
how to do that. Alright, see you
in the next part.
5. Cutting the Panels: Time to cut our panels
outside of the box, there's a panel and
inside the box there are various panels to we're
going to cut them together. I'm not going to
cut all of them. Yes, of course, I'm
going to cut all of them because I
need all of them. I'm going to only demonstrate
one than the rest on speedup that you can cut
all these panels to. And then in the next
lesson we're going to assemble the books together. Let's start with
cutting a panel. To cut the panel, what you're going to need is a printout. Now this depends on
what you're gonna do. If you're going to follow
the principle I do, then you're going
to need this one. We're going to cut
out everything that is white on this one. But you could also take the
opposite one for print. And it says on the PDF
file that is for print. Then what you're gonna do, you're gonna cut
away all the black. The older black will disappear
so that you're gonna stay, keep the white so you
need to cut inside here. And on this one it's
the other way around. We're going to cut outside here. If you would print this
on the panels, this one, then you going to print and cut dose is not
going to work of course, because then you're left
with this oldest gray. So that's why this
one is inverted. But I'm going to
use this one then. Oh yeah, and, um, pay
attention, of course. Then there's your outside
line of your panel. The panels are the same size, so you need to cut this way, but then you need
to cut around too, so that you keep this
panel inside here. I want to actually
demonstrate only this one. What I need for that is again, a piece of paper. And there's exactly one
left in this block. Now that is quite something. This block is empty. Now I didn't use all of
them for this project. Painted on some of them to good. The next thing is, I'm
going to put this on here. And a little bit
different than before. I'm going to put one on the top, one on the site. And of course than
one on this side too. And I'm going to put
one here. There you go. The next thing, what
I'm going to do, I'm just going to take the
craft knife and I'm going to cut out these pieces
now I have to craft knife. I have blade like this and
I have a blade like this. This one is a bit
more sturdy than one. I can put a bit more
pressure on it, but you can use
displayed everything. Do that with one blade. That is fine to just
what you prefer. Alright, I want to start
with the tricky part. I'm going to start here. I need to make a night
nice incision here. Press quite firm. And I'm checking on the back
if I'm through yes, I am. So that's the good pressure. Now, to maintain pressure
on these little parts, I want to move you there. That is tricky. So I'm just cutting I know
I'm going to cut that away. So if I cut further into
this part, doesn't matter. If I cut into this part, is this, then I'm in trouble. And you will see in the
video that comes after here, that on two of the panels I actually cut a little bit wrong. But they're not a
great disaster. I show you that later on. Now you want to make
sure your fingers, these fingers which hold r away from the direction
that you cut. If you put Excellent. Make an uncontrolled movements, can use your fingers, are out of the way. Tricky. This I'm pressing pretty firm because I got
this really thick paper. Now a cellular materials, you can use printer
paper if you want to, then this process is going to be slightly easier
than what I have it. I'm going to use the same
paper for everything. Because I like the
way that the light shines through this
watercolor paper. Alright, I'm through with this
now I'm going to check if, if I can loosen this. Almost. There it goes, right there, it's stuck. So where it's stuck, the easiest thing is to
do is to turn it around. And you might see the
cut line right there. If you cutting yourself, you're going to see a cut
line right there and it's easier to loosen
it from the back. Then go over the front again. Now it's pretty much, should we lose almost
there, it's loose. And now it's Lucy. There you go. Let's see if I cut
that right too. Yeah, now, this is
the trickiest part. I always like to start
with the trickiest part. Then. Once fie fie tik, tik, cut their hair, fatigue sets in, then I'm
already at the less hard parts. So if you've cut a bit outside of the design,
that's not a problem. Try not to cut insight
where, what needs to left. So it's better to have
more left than less left. Let's see how you
know, you're not free. Might do this one. Again. Now it's getting unstuck. But I'm not pressing,
I'm just letting the knife do the work now. Yeah. Now it's getting loose good. I like to turn the paper. Keep a nice insight. Although once I
get sore fingers, I'll let it go to, alright, let's see how far are we. Check the bank holds
pretty much through. You can see that it's
still stuck around here. There's a nice clean cost. One isn't open yet. You can see when you turn it around where the light
shines through your okay. Alright. That one
is open to here. Now careful that I'm not going to cut off
his nose per accident. And then we go I want to get outside AND you go. All right. This part is nucleolus c. Now I can clearly see this has
not gone totally through. So I'm going to cut this
carefully the second time so that it will come loose. And he's loose. Yeah. Good. All right. So there we go. That might right away cut
the swamp. There we go. Now these I have to let go because the
paper is starting to buckle a little bit
and you don't want them, then you have no clue. If you're cutting in
the right place. Loose. Alright. Alright, I'll
have the knife. I'm here. Okay. The last bit. And then we have our panel. Not not ready, but a lot
of it is already see that. Does it come out and that
we'd want that is loose here. It isn't this side, definitely isn't loose. See what comes loose. Now to treat this stuff here. Now I'd shoot. Come
loose. You go. Right? Now I'm going to change
knives. Get the ruler. That is easier for
the straight part. Let's see. I want to have this
site probably for cutting. Align it like a nice car. Go through it twice
and I can feel that I'm totally through. Let's do this side too. Not totally free. Try to decide again. Now it's better. Alright? And this side, if you made it, you made it streetcar
at its best. Too few seconds pass that you
are actually stuck here in the corner steel now it's
loose and it's not stop there. There we go. That we
have this part of our panel. Okay, good. Now this part I don't need anymore throwing that
for all the others. This I'm going to take a
look at once this is off, but first we're
going to cover cut off the complete panel
this side, right? So I'm going to line up my
ruler so that I don't see. There you go. Don't see
that great anymore. Here to make sure you secure your ruler nicely. There we go. The last bit. We still stuck. Somewhere, stuck,
well, there we go. I think this knife might
slowly be getting blonde. And here's our panel under it. And now we're left with
a nice white panel. The only thing which
I'm going to do is now clean up some
of these parts. What I haven't made a
clean cars like in here. Bunny's head is not
totally nice cut. If I need some effect
or some rabble, I'm just scraping it like that. Not with my fingers. And there's our panel. I think I'm okay. Oh,
here. A little bit here. Paper tear. This is not nice. That still needs to go. And here it cuts
the paper a little bit. There you go. There's a piece carefully
taken together. Yeah, no, good. Here. This is not nice. It's definitely not nice, but let's see how
much I can take off. Good. And now it's
nicely cleaned up. And that's our first panel. Now I'm going to speed up the other panels
which are caught. I'm going to show you how I
cut those just sped up thing. And once I'm done with that, I'll see you in the
next lesson where we're going to actually assemble our panels into the box
and create our light box. So now we've got some layers are released. We got one layer. I'm going to create
some more. Once we got all the layers done,
then I'll see you back. Hello.
6. Assembling the Box: We've got our box,
we've got our panels. Now it's just a
matter of assembling. Or you may notice
a little bit as getting slightly
darker out here. The sun is setting, but
at the end that might be really good for our
light box once it's done. So I'll see how far I
get if I get this done today or if I need another
day to continue this. Well, but for now, we're
gonna put it together. So I've got my panels. I just need to put
them in order again. And I messed them
up a little bit. So here's the back panel. Then this one goes on top of it. Then we have this mountain
going on top of that. And we should have a little
bit of a background. And here's the Fox
Tree or something. And yet there's the
trees behind the fox. Here's the fox and the trees. It's on. Then we have the
snowman. In front of that. We have some scenery,
grass or whatever. And then on front of that, we have the front panel. We're going to start
with this front panel. So now I assembled
it and putting this site in the right order. Because we're gonna work
from front to back. The first thing we're
gonna do is we're going to put this front panel on. Now this is the back. So I'm going to open
this up a little bit. And this is the front. So what I need, I need this to go off starting
with this one or this might putting it might
be slightly tricky. So I'm not gonna do them all. I'm going to just
start with this one. See what is the bottom? What does the doesn't
really matter that much, which I'm going
to put on top and which I'm going to put on front. I should check the original now. Let me first put the box
away. Here's the original. Now I can see, oh,
I don't want that. What's happening? And once
this the other way around, this is the right way. There's that corner, that
straight corner. Yep. Alright. So I know now
this is the bottom. Okay. Now I need
to line this up. And on purpose, I
haven't done this, so I can line this up
with the bottom nicely. There we go. Now, I'm
going to turn it around, press the bottom and
that is stuck K. What I'm gonna do next is I only
need to do one of the sides. And then I'm pretty
much done with it. Then it's stuck. Yeah. We could have moved it
over a little bit to this side depending
on how you've cut it. So I can put this up the way. I'm going to do one of the sites and line it up with one of the
sides way I wanted. I'm going to start actually
at the other side. Let's see. I wanted like this, then it should work
on the other side. Yeah, that is good. Now I can do this side. If I managed to pull this off. Here, there we go. I'm actually not I'm
going to hold it, put my arm in it, make sure it doesn't
fall down because I want this part to get off too. Yeah. There we go. Make sure it's not stuck on me. Now I can line this
up a little bit. And it should line up
at the top right way. Let me secure this. You go. So if you blew this, I would follow the
same procedure. Pretty much. Do the bottom. Do one side, then glue the top and bottom and press it so that it's stuck. We have our box and
everything else goes in here. Now let's think what's the
easiest thing to do with this? The next thing we need
some of that foam I have. And if you have,
don't have the phone, but you use the distance by
using the cardboard pieces, then you've got to put them in right here on top of each other. And I'm going to use the phone. Let's see, The easiest way is probably to just start with. A panel, let me think for this amount want then we're
going to throw this in. Yeah. I think the easiest
way is to start with putting the tape in there is probably I don't
think it matters much. I might put in. Yeah, let's do that. Let's go for the panel first. We're going to stick
this stuff on the panel. So I'm going to measure this
is about the length I need. And if it is too short or
a little bit too long. Another big issue. Actually. Now, make sure you don't stretch this stuff so that there's
a lot of tension on it and just let it rest easily. Because if you put a
lot of pressure on it, then this thing
has gone to Ben's. Okay. That's one of them. Do
this one slightly better. That's the next one. The next piece needs to be cut. Right there. These peel off a lot
easier than the tape actually on the bottom. Making sure. Hope I'm not
putting tension on it. Stay on the bottom place. And heroes the next piece. And there we go. Now this panel will go in here. What we're going
to stop at first, but to make it ourselves easy, what I'm gonna do on the back, I'm going to add the tape
right away on this back. One. On the bottom. There you go, so that I can fit the next panel on
It's quite easily. Now I'm doing all the way, but you pretty much could also do smaller pieces then this I'll leave that up to you. And the stapes
should fit nicely. On there. Comes off the last bit. There you go. There we go. What's next? We need to do that in here. We could have done
that from the start. But for some measuring, we should be okay
because we don't need it to go all the way. So getting it, It's tricky. Alright, now I need to do
that the other way around. It's going to be tricky
without getting close to it. Take you go, This should
work and we both see it. I hope so. Okay. Could have done that. At the beginning. The sugar. There you go. You didn't make that slightly shorter so that
it's easier for me to do. Alright, should work. Let me do one right here. And as you can see, this goes slightly shorter or
you do a couple of pieces. Let me not to go too long. That is no problem at all. Sticky stuff. Going. Not right. Take this off. Do that again. That better. Yeah. Alright, and now it's in this, get rid of the mess and
see if I can peel it off. I can That one is not peeling off, so I have to push that
a little bit firmer. There you go. And this one is gonna be tricky
to get that off. There it goes. Here. Right? Now, the next
thing I need to do, slide in the box. Now, what would be easier is, remember what's the button? Let's see, this
is the bottom-up. Easier would be to
peel this off now, but then I'm
sticking everywhere. So I'm going to make it
myself slightly harder, Put it in, push
it in the bottom, straight, and then just
basically let it fall. Don't push it until, you know, for sure. You've got it in
the right place. And there we go. I already can see if you put it in against the light sunlight coming here to move to the
other camera somewhere. I'm not sure if you
can see that there's light coming down there. But we've got a nice, Let's see. You can see that
nice edge already. And that's how we're gonna
do basically all of them. There's one thing you
need to remember. The last one doesn't
need tape on the back. The rest needs old tape on the back and the
foam on the front. But the last one,
no tape, no phones, nothing on the back because
that's the last one. Right. Good. I'm going to do this. I don't think you want to see me do this the whole time I'm going to film it and when
I'm done, I'll see you back. Every layer of the light box is in now so I can
turn it around. This is what our
light box looks like. Well, for now, just
a box with layers. We of course need light in it. But that's for the next lesson. So the next lesson, we're
going to add lights and create magical look. The light box is half. Alright, see you in
the next lesson.
7. Adding the Lights & more: It got a little bit
too dark to keep on working while I could keep
on working in the evening. I've got light
enough in my studio, but I had to do
some other things. So it's another day. I'll have to start and I
wanted to really finish it while it was dark to really show you
the lights the best, but we got to figure
something out. I put some lines
down at the end. We're going to continue. We've got the box ready. We've cut the layers ready. Now it's time to add the
lights. Let's do that. For the lights as you have seen, I'm going to use this
strip of LED lights. Now if you use the fairy lights, you can do that too. Might be slightly tricky to
get them all neatly in there. But what I will do is show you that I would put
them in like this so that they're hanging down and creating that
light like that. Alternatively,
what you could do, you could also stick them to your back
ground, here it is. And then just stick them to the background and
go around like this. If you have a lot of lights, you may want to
fill them all up. If you have a huge string, just start here and
then go, Go back, go like this around the corner, and just fill up the whole
back with all of these lights. That would be okay too. But preferably go
around the corner if you can if you have
lights left over. Technically what you could do, you could go outside again
and just put them around. So if you have them
insights inside here, bring them outside again, put them around the box. You could do that too. Or at the back of this plate. That would,
that would work too. That will create an
interesting effect to now, I'm going
to put this aside. These gifts, a little bit. Less strong. Load is very light. These LED lights are pretty
strong and as you can see, I've got a new strip here. So I'm just going to
use that new phone. And a nice thing about this
is that it doesn't open. Now, that it does open, that this actually
has taper on it. So there you go. Here's that. This has double-sided tape. It already is, as you can see, it is stuck there. And I need to flip that back to make sure it doesn't
get stuck everywhere. So I can very easily
stick it onto my box. Now, here's the box. So I'm going to bring in those lights around where they
aren't, these edges here. Depending on how thick you use, your spaces, you might have
less room than I have, but you should have enough
room even if you use some thicker spaces
to get the lights on. So I'm going to
put the lights on. I think I might put them
right here at the end. So not right against this. I'm going to use them at the end and leave some room there. D power, power supply I want
to keep outside of the box. So what I need is I
need to make sure I can put this box in
the back of it there. I need to cut out a little
piece here where that can go. I'm gonna do that right
away in the corner. Let's do it in the
corner right away. I'm going to create
a little hole like that so that I can
put my wife through. And in my playback
backing board here, I need there you go. A little hole too. That should work
fine. There you go. So we need that to get. You could put it in the
middle wherever you like it. This is just the easiest
to put it right there. Alright, good. I'm going to
put those lights somehow. Going to be too long,
probably probably. I'm pretty sure they're
going to be too long, but you can cut these. These are the ones you can cut. So I might actually cut them. I'm going to start right there and put it all
around like this. Let's see how far we get. I might stick them
right away. Why not? Can I do that now? I need to go from
the other side. Probably not. When did
you measure first? So let me hold this right. Instead of cutting it
off, what you could do, you could just glue
whatever is left on the, um, what do we say
on the backboard to on this piece of thing? I might only have a
little bit leftover. So there you go. There we go. That should work. Yeah, there we go. So this is what
I've got leftover. And I'm gonna do this one. Cut it here. And now it
should still work fine. Now these don't work anymore, but this is the
peace of God over. You could put on the back plate, stick it on there, or something like this, like that to give
some extra light. But these are pretty good, so I should be fine now I can't get the tape of only
from this side. I want this. See if I can get it
off from this side. Doesn't have it. So what I'm gonna do, I noticed that if I
put this one here, that the first light
needs some room. So I'm going to start right there in this corner with
this first light here. So peels off. If I managed, that
could be enough. There we go. Yes. First light, I'm going
to put right there in the corner and I'll
put my box like this, but that is a little bit
of an issue then you can see this should work. I'm going to try my best to
show you what I'm doing. I'm starting with dislikes. And it needs to go right there. Give it a little bit of room
so that the board can go in. Now I'm going to move it. You can see that this thing
doesn't fall down and press it nicely in the corner and put it down like this. Now what I should've
done tested the light, see if they actually work. So I'm trusting this
company I love. And that we go. And I'm just sticking these lights and turning
those blocks now. And I've gotta get through
this corner as well as I can. There you go. We're continuing. This is the fun
part because we now know are almost at the end. See, I've got them here. I'm going to put
them right there, turn the box and try to wiggle its Can you see it
neatly into debt corner? There we go. And I need to move this slightly so that the back panel
can still go in. I think I'm getting there, make sure you can see it. And I'm pushing this one
into the corner to end. Now, if I've done as well, being in this off now I should get close to the last slide. I'm actually might get on
top of the last slide. So let's check that you can
see a two. There you go. Now I'm on top of
the first slide. So I may, well, since I'm pretty
much to the corner, I think I made this cut this
light off to right there. Maybe I can get it out. Actually. I can. There you go. Alright, since it's pretty much in the corner, I can cut one off. That's the nice
thing about these. You can cut them by one. You have strips, you can
cut by three, but by one. Alright, now, putting
this down again, putting this camera back
again in its regular angle, I need some batteries. I should have some
berries somewhere. You hear some stuff
falling down. Some batteries, yes, that they are using some rechargeable
batteries for this. I don't like buying
these non rechargeable. There you go. That was quick and it's
working fine. As you can see. We gather. Close this works.
Turn it around. We wouldn't have the
back plate in yet, but this is what it looks like. See, I got to stand up,
take a look at it too. That looks pretty
good. Doesn't it? Really? Pretty.
There it is. Okay. Good. Well, I don't think I don't even need to close the blinds. You can see it pretty
well like this. They go. Now. I haven't put on
the backboard yet. Now if you put that in, that is just to make sure
the light doesn't spill. Because this is white, it will reflect the
light to the front too. So if you put that in, reflects a little bit more
of the light and you get a nice lighter background. Alright, I'm gonna put
this away for now. The next thing I'm
going to show you what I'm gonna do if
that colored paper, I'm going to do a little
trick with the color paper. I'm going to bring some mood, some atmosphere into my lightbox and that's why I
haven't closed it yet. Now this is fully optional. If you think you're done
now, you say, well, you might want to watch it
and then afterwards decide, I'm not gonna do any of that and just close the box as
I will do later on. But if you don't
want to do that yet, if following this and
see what I'm gonna do. Alright, What I need is some
of these colored papers. Now, there's all
kinds of colors. Now I know already that this really dark red color is stuck behind some
wise is going to work, but you want the light colors, so add some light colors here. There's livelihoods better
than the dark blue. I'm just going to
show you some colors. But there are some
nice orange in here and I know that works great. But I want to open this pack and I'm going
to take some papers out. I want to cut them into the
same size as this board. And then once I've done that, I'll show you what to do. So I want to speed this part up. Well, let me take the box. Let me just put one
of these papers in C if I cut it pretty well. Yeah, that's pretty well. Alright, there we go. It's probably not going to
stay where it's supposed to stay because you need
to stick it somewhere. I don't wanna do that. Put it on. Put my hands in front of it. I'm going to show
you the effect. And now you can see there I'm, what I'm gonna do
is I might just close my blinds for this one. I'll be back in a second. As you can see, it
suddenly got a lot darker. Switch it on. And this light needs
to be disliked. This paper needs to be in there. Nicely going to hold it. And now you can see the effect. Seeing you get a whole
different atmosphere. So if you want some, a greenish tint, I'll come take it out. You can see how bright it will become if I can get it out. This is the light
box in a nice glow. Interesting already. Looking pretty good, doesn't it? So there's different colors. I've got let's go with
some pink line up. I'm just demonstrating. I'll leave it up to you a few. When you use it. I'm blocking some of the
light because I'm holding it. And look at that. You get this a whole
different kind of atmosphere right away, different kind of life. I know yellow works nicely. Here's the yellow gets a very pretty moot in your
book that you go see. Really nice, doesn't it? Now, we're going to
demonstrate them all. I got the yellow somewhere. That's a bright yellow. This is a there you go. And you get this tone here. I like that too. That
is very interesting. K. Now, let's go with
the blue then. The blue, you can more of a night shade if
you put in a blue. Of course, we still need
the back panel on this, so it's not totally, it's spilling light to the side. Let's see you get
this might look like that. Very interesting. Now as I said, too
dark, it doesn't work. So let's go for a
really dark color. There you go. And
as you can see. Kind of works and it makes
it really, really dark up. Some people like the stone
is an interesting term. And then the dark blue. Let's do that. Oh, I got purple too. Let's go for the
dark blue first. And then you can see, and this is a really dark and it blocks pretty much
all of the light, so you won't see that much. So that's not working too well. But what you could
do is you could cut some holes in this and
then some holes and then let some light come
through at a different effective might have to
same with the purple c. That's the same thing. That light is not
coming through. If you get it too dark color, it just not gonna work. And then the last
one I'm going to do is this orange and that
should still work again. See how that works again, because it's a lighter
color. There you go. Now what you could do also, let me demonstrate
that with this. Do they lifted darker colors? See what happens
with the dark blue? I'm gonna get my scissors. I'm going to cut off a piece. It's going to be a bit random. You see me cutting? Yes, you can. Even in the dark, you can see me cutting. I managed to do this up. This is without
measuring anything, creating a little bit of
that hole right there. And let's cut this for now. Let's just cut in a hole. You wouldn't have
to do that a lot more nicer than this. Of course. I'm going to put this in again. Hopefully it sticks. And then you would get
a bit of this effect. Some nice lights under there, some darker tones up there. See this kind of paper.
It's not the best. Alright, good. Well,
I like it this way, although I do like
with the yellow too. But let's continue with this. I'm going to put on my back, instead of opening my blinds, I'm going to put on my
main light formula. And then we can finish this. Alright, the last part, we're gonna put in
that Back parts. Now, we could have
done it like that. I've done it inside. If you wanna do it outside, I think I said that to you. You can do it outside too, if you want to do
this slightly easier. Now we need to reach
in somehow I'm going to get this off. I'm going to move this way. I'm gonna make sure
this is correct. I'm going to push that away. Make sure it is nicely inside. That should work. Rather measure it and then see that I have
a problem later on. Stick that that's my back plate. And what is easiest
probably do this one. Move it and see if I
can close it nicely. There we go. It's not
going to stick like this, so turn it around, put it down the ego
and I should be able to carefully reach inside, taking the scissors to give myself a little bit
of extra reach. And there we go. Now it should stick on
this column and not yet. Well, I can't reach carefully with my fingers making sure
I'm not destroying anything. You go up again. There you go. Push that in. Right?
Now I can do this. Once. And the Swan and then shoot. Get rid of all the
light spilling too. It's sticking yet is
how I did that already. When I push it, push
it over like this. You go it should pretty much stick on all the corners
except for there. But the nice thing
is I might get something fin and be able to reach through
there and push it. I've got something thin
enough that a good Push. There you go. Now
it should be stuck. There we go. And the back panel is on. Alright. Now it should reflect
that backlight nicely. And that's it. My box is done. Okay. Let me switch off
the light again. There is our light box. Look at that. It looks really, really nice. I've adjusted my camera a little bit so that it picks up nicely. And now I can enjoy
the light box and this is what our
light box looks like. Pretty nice, isn't it? There's one little
mistake in it. I've noticed that
I've somehow for some reason cup the back of
the bony a bit too high. Now I've checked my design. You shouldn't have a problem. You should use, should
be done a little bit. But for some reason, or I eat a lower this for some reason while cutting
it or putting it in, I didn't do it perfectly. But I've checked the designer, that should be okay. And even if it isn't,
if you look straight onto it, still looks good. So we have all the light
coming through nicely. And that is why we
cut out this part so that you can get all
these Night Lights, this nice light shining
around every part. That looks good, doesn't it? Alright, showing it on the other camera to
bid upside down. There you go from a
slightly different angle. Now you look up top, you can see this really well. If I turn it around, hi, You shouldn't be able
to see it anymore, but you can still see all
the light spilling through. And that is the whole idea. Bright, nice scene.
And that's it. Alright, I think our light
box is done, is totally done. And of course you don't
put it laying down, you put it upright, like this. Camera doesn't have the
perfect angle for that. I might change that. And then one is upright. The trees, they all fit
well and if you need to bend them a little bit so that things spacing
a little bit, pushing some parts of
it so that you can get a little bit of a
better nice light bills. What you could do here too, you could put some
foam right there. Can you see that? Yeah. Pushing this
back a little bit, put a little bit of foam or
one of these three d block, these 3D double-sided
tape thing is in-between so that you create a little bit
of distance there. That would look a
little bit better. Alright, good. Well, that's it. We're going to move to the
last part of this lesson. I'm going to just
close it like this. I'll see you in the project.
8. The Project: Well, we're, at the
end of this class. We've created a beautiful
light box together. It's still laying here. It's pretty let's see if we can put it on the help
I can get it going. Yeah, there it is. You gotta hold it. There we go. Now, this you could just tape on the back
of the box like I have. I hold it now. You could lay lay it still. You could just stick it on the back of it so
that it won't move it. I will then line it
up with the bottom. So that's it. Just put some weight and then the box won't blow away either. So now I'm getting really
strange tend to probably. But there it is, our
light box, it's done. Alright, I enjoyed doing this. This was really fun creating this from the previous class, just going one step
further and actually creating the real thing or Procreate thing is really nice. But doing this in real
life, I was gonna say, yeah, not digital is really, really fun to create this. Thank you for being
with me in this class. I've got more classes here. Before you go, we got to talk about the project, of course, for your projects, I would definitely love to see
the light box you create. And perhaps you have
other light boxes because perhaps you've done
this before, created them. I would love to see them, post them in the
project section. But I would also like a
review of this class. I would really like your
feedback on this class. What do you think
about this class? Did you enjoy it? Should I
make more classes like this? I love to hear from you. Alright, so post
your light boxes. Let me know what you
think about this class. Perhaps do another class I have. And I love to see you
in another class.
 Benjamin A, Art Teacher, illustrator Art by Benjamin