Transcripts
1. Introduction to Class: Hello everyone and welcome
to this new course. In this course, we will go
over the entire process of creating a traditional
Chinese rule using Unreal Engine five, blender acts substance
painter from start to finish. We will go over modeling
in vendor extra using Substance Painter
and setting up the scene, lighting and materials
in Unreal Engine five, all the modeling will
be done using blender. However, the techniques
used are universal and can be replicated in any other
3D modeling package. The materials and textures will be created using
substance, painter, level lot lighting and composition will be done
in Unreal Engine five. In this course, you will learn everything you need
to know to create the final results that you see in the images and Rayleigh. The same techniques
can be applied to almost any type
of environment. This course has over
11 h of contact. And we will go at every step in this course together and
nothing will be skipped. This course does not
have any kind of time lapses so that you can
follow every step easily. Start by gathering some
reference images to gain some initial ideas and
the mood for our scene. We will arrange these
reference images in a free program
called pure ref. After this, we'll
move on to blender and start modeling
our main assets. We'll start by modeling things
like the writing table, cheers, cheers, Different
rocks in our scene. The entire process of modeling will be covered in Blender only. After the model, all
amino acids when UV unwrap and export them
to Substance Painter. To start with the texturing
process will learn to create high-quality and
realistic materials. And the key features
of toxin Spain, they smart mask, generator,
smart materials, etc. After this, we will
import all our models and textures into Unreal Engine and set up the same hole there. The next step would
be to set up lighting and create a mood and
atmosphere for our scene. We will use the new features of Unreal Engine such as human, to get realistic
lighting for our scene. And also set up a
post-processing volume to further enhance
the scenes visuals. Then we will spend some
more time creating a lot of small drops to further detain the scene even more
like some vases, lamps, the ports, etc. We will end discourse by adding a couple of prompts from books and mega scans to give the environment of
finishing touch, setting up different
camera angles and taking high-resolution screenshots
for our portfolio. So I hope to see you there
in the course. Thank you.
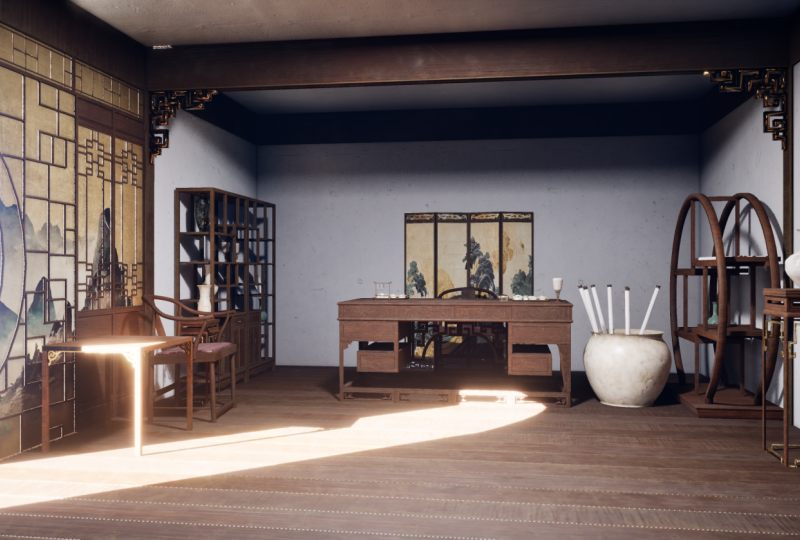
2. Setting up the Reference Images: Hello and welcome everyone. In this new course,
we will be creating a traditional Chinese
room environment from start to finish
using Blender, substance, painter, and
Unreal Engine five. So let's get started. In this very first lecture, we will be just going
through a reference images. You can find them in the
course files provided to you. Open up that folder, and over there you will find this reference images folder. And here are all our
reference images related to this course. You can just quickly
go through them. Some of them are like how
our final environment is supposed to look like and the general feeling mood
for our environment. While some of them
are related to specific designs are objects like this is for
a window frame or a door, this small table. These images will help us in creating these specific
designs are objects, and the rest of them are just for general feel of
the environment. Also, one more thing that
I want to mention is that the main reference
image that I will be referring to are
using is this one. That doesn't mean that
we will be exactly following this particular
reference image only. We will use this as our
main difference that our final scene would look
mainly like this only, but we will use
other images to take more ideas and add
some other objects. Also, you guys are also
completely free to experiment if you like a particular thing from some other reference image, you can definitely add that to make the environment unique. Also, these are not all
of the reference images. As the course keeps on
proceeding further, I will be adding more to this. And you can definitely
ask some of your own. You can search reference
images related to this topic only on Google or maybe Pinterest or any
other image platform. Say up to view and organize
these images properly. I will be using a program called PRF that you can download
for free very easily. You don't have to use it
necessarily as you can view the images normally also in
an image viewer like this. But pure ref helps us a lot
in viewing them together. And it can help you
speed up your workflow. Alright, so to install it, just quickly, go over
to Google Chrome, Search pure ref, and
click on the first link. You can click
download over here. You can select your
operating system and you can also donate
to them if you want to. But as this is a free program, you can just select
custom amount and put in zero and hit Download. Now the download
will start as I've already downloaded and
installed pure ref. I will not be doing that again. You can quickly download
the setup and install it. And once that is done, come over here and search
for pure ref. Open it up. And yeah, basically this small
little window is pure ref. You can use your right-click to move it around your screen. You can also resize this like this by
adjusting the borders. If you want, get a little
bigger in size or smaller, you can adjust it very easily. Alright, so to add these images, to be honest, it is
pretty straight forward. You can just select them
all and drag and drop them onto the pure ref
window like this. And you can see all of them
have loaded into our scene. And we can view them together. Alright, so let's
quickly go over some of the important
things of PRF. One of them is that you
use your right-click to move it around your
screen like this. You can select any
image that you want by using your left-click. You can select them,
move them, scale them, and you can also zoom in
using a scroll wheel. This is pretty basic stuff. You can hit right-click. And we can save
our scene from air so that we can open it whenever
we want. Google to save. And let's just quickly
save this first. I will save it as New seen only in this reference
images folder. So it's safe. Wait for it to save. It
might take a little while. Alright, so now that we
have saved our scene, you can also right-click
and load the scene. Whenever you open a PRF, we want to load a
particular scene. You can see you can open
and load from here. Alright. Next thing that I
wanted to show you is if you go over to mode, make sure always on top is enabled when this
will help you do is, let's say we are in Blender. And we want to model something particularly
like this table. We can place it on a screen like this and we
can see easily work in Blender while pure
ref stays on top of our screen so that we can view the reference images
at all times. This makes her work a lot
easier as we don't have to move back and forth between
the sender and the image. And we can easily view
the reference image over here only on
top of Blender. If you want to
minimize pure ref, you can just click over
here on the taskbar once. And you can see it is minimized and you can bring it
back like this also. Next thing is you can double-click on any
image. Focus on it. If you wanted to create this, just double-click on it, focus
on that particular image. Next thing that I
wanted to show you is that it's pretty
useful in this. As you can see, all
of the images are of different sizes depending
on the resolution. I think we don't have to select each one of
them and scale them. You can just press Control or
select them all like this. Right-click, go to images and
normalize and select size. And now they are pretty
much all of similar size. And now again,
right-click images. Arrange and select optimal. Now they are arranged
properly with somewhat similar size so that
it is easier to view them. If you feel like some
particular image is important, you can select it particularly and just increase the size. So yeah, pretty handy stuff. You can hit Control S
to save this scene. And you can hit
right-click and just go through the properties
and experiment yourself. Because some of them are
pretty self-explanatory. For like proceeding
through the course. This much is enough to
learn about your life. You will be easily able to work with you and
read through this. And yeah, I think this is
it for this first lecture. In the next lecture, we'll be starting with the
modelling process and I think we will be
creating this table first. Where is it? Yeah, this one over here. As you can see in
this reference image, as I said, we will be using this one as the main reference. You can see this
table over here. This will be the focal
point of our scene. So we will start
by creating this, and we will like one-by-one, create all the
important props offers seem like the chair, the table, the shelves, and then
we will attach to them and place them
together, all that stuff. We will be creating a lot of things and learning
a lot of things. I will see you in the
next videos, guys. Thank you.
3. Creating the Base Shape of Table: Hello and welcome guys. So in this lecture
we will be starting with the modeling
phase of our goals. And as I mentioned
in the last video, we will start by modelling
the writing table. So first let's open up pure ref would be a search bar
and type in dollar ref. You can just hit right-click
and go over to load, load recent, and
select the scene. Wait for it to load. And
yet over here, Let's see. So we have this reference
image over here and we are trying to make somewhat
of this kind of table. Alright, so now back in Blender, I have opened up a
new blender file. You can just press a to
select everything and then press delete so that
we have an MTC. Also, I will turn on
my screencast keys so that you can see each and every shortcut
that I perform. As you can see,
whatever I'm doing, even the mouse
clicks are available over here so that you
can easily follow me. So yeah, the first
thing that I want to do is if you will look
through the reference images, there is also a reference
image for this table design, which is quite handy. It is really good if you have Lego orthographic view of any kind of object
that we want to make. It makes it a lot
easier to model that object as the dimensions
and everything, right? So what I will do
is come back and vendor shift plus eight
or first press one. For the front view like this. As you can see,
if you press one, you will get in the front
view seven is for top view, 3s for the right view, you can see over here the views. So I will press one and
that is our front view. Press Shift plus a
to add a new object, and I will add an image. I will add a reference image. Quickly head over to
my tutorial directory. And in reference images folder, just select this reference
image like this. And yeah, now it is here
in Blender. Let's see. One thing that I will
do is I will select this window and I will just
move it to my second monitor. And you can also do the
same if you want to, because it is kind of
blocking the view right now. So I will just
move it over here. I know you cannot see it, but you can open it
up in your own PC. I'm just basically viewing
this immediately right now. Alright, so before we actually
start modeling our table, the one thing that we
need to make sure that our scale remains uniform across all the objects
that we model. So by that, what
I mean is that we need a reference
model that we can look at and we can
scale the objects accordingly according to
that reference model. So if you go over in
the course files, in the exports folder, you will find a human
reference model that we can import into Blender. And we will use that as
a reference for scaling all the objects so
that the scale is uniform across all the
objects that we model. So to bring it in Blender, what we need to do is
go over to File in both the x and over here it
is in the exports folder. Just select it. And yet, the human
model that we can use to scale our objects
accordingly. But right now this human
model also is pretty huge. If you go over in the item, we can check the dimensions from here and we can scale
it accordingly first. So I checked on Google, the average human
height is around, I think 1.7 or 1.8 m in height. So that would be the z axis. So I will just select
this complete object, press S, and scale
it down the z axis. We're only seeing the zed axis right down the scale on it. It is around 1.81, 0.8 m. So yeah, I think this would be a
reference human model. So now we can scale the table according to this human model. Select the reference image, press S to scale it down. Let's see. Still pretty big. This image is fine. So you can see the scale over here for this reference image. It is 0.4 721, All Access just
rounded off to 0.475. So now as you can see, I think our table looks pretty good according to the human
model in terms of size. So now I will press one again and start actually
modelling the table. We can select this
reference character, press M to move it
to a new collection. And now let's rename it
as human rights. It okay? And you can see over here
different collections created that we can easily enabled or disabled
whenever we want. So let's just
disable it for now. I will select the
reference image, whereas G, to move it around. And you can lock
it on any access. So if you press Y, you can see the movement is
logged on the y-axis. So make sure to first plus G. Then by moving back over here. You can do the same
thing with like any of the movement,
rotation or scale. You can press S and then scale it on the x-axis
only by pressing X. And you can see we are
scaling on the x-axis only. Now to just cancel this
movement hit right-click. And yet that is cancer. Alright, so make sure to move it a little
bit backwards on the y-axis like this now
plus one for the front view. Shift plus a. And
let's add a cube. You can enable or disable
extra from over here so that you can see through your model on the reference image. Now when you select the
cube and press S to scale it down like this,
with all the axis. There's Zhe and move it over
here at the top like this. So first we will
be just creating this top part over
here, this one. So now again selected
press S then x and scale on the
x-axis like this. Make sure that it is equal
from both the sides like this. All right, next, we also need to scale
it up on the y-axis. So press S and Y. And let's see. I'm checking
the dimensions over here. Maybe we will give
it a length of around almost one
meters, so 0.95 m. So yeah, I think it
looks pretty good. I'm just eyeballing this
and yeah, this looks fine. Now what we need to do is
first one, enable X-ray. Now as you see all these
ridges and detailing, let's create that now. Before that, I will just quickly save our file so that none of the progressive lost mixture to just keep saving your
files frequently, go over to File Save. And I will save it in the directory only
in the blender files folder named as Chinese Room. And hit save. One more thing that I want
to do before proceeding is if you go over here
and click on this arrow, you can enable this
option, this cavity. This will help you make the edges and the local
little bit better. And you can easily view them. Because if you disable it, they are a little
bit tough to view. Enabled cavity and shadow. Yeah, it's pretty good. Rest one again, enable X-ray. Let's start now press Tab
to go into the Edit mode. And before proceeding, make
sure you apply the scale. Whenever you change the
scale of the object, we always need to
apply the scale. So press Control a
and apply the scale. You might think, what
is the reason for this? Because when we use
certain properties like Bevel and they will insert, extrude anything like that. It is necessary that
the scale is applied. What I mean by
that is let's just quickly show you in action. I've created a cube. By shifting, just add a cube. You can press Shift plus D
and duplicate it like this. So what I will do is basically
I will select them both. And I will press S and X. You don't have to like
copy me for this. I'm just demonstrating something that's x and scale them on the x axis like
this. Basic stuff. Next word I will do is I
will select one of them, press Control a and
apply the scale. And the scale is not applied. So let's say I tried
to use some kind of property or some kind of action. Select this one, press Tab, press three for Face Select. One is four edges, two is 31 is for vertices who is four edges and
threes, four faces. So let's select this face and I want to insert this like this. As you can see, it works pretty nicely and uniformly
you can insert this, this by pressing E. So
we insert by pressing I, you can risk tab select
this face press I. And you can see we are easily
able to insert this one. But if you select this one, press tab, select
this face, press I. And now you will notice that the inset on both of them
is pretty different. As you can see,
this one is pretty uniform and this one
over here is kind of stretched out because we stretched out this
object like this. That is why it is stretched
on the x-axis like this. And it is not fixed because
we did not apply the scale. So if I just select this one now based controller by the scale. Now if I try to
insert this again, you can see now is also perfect. So one thing to
remember, whenever you change the scale
of your object, make sure to apply the scale. You might not realize
it might fix a lot of your problems
whenever like modeling. Select this press Control E, apply the scale and now
I will press one again. Press tab for the edit
mode, enable X-ray. Let's see. We can press Control R or control R is used to add
edge loops like this. It will add a complete edge
loop through your model. To press Control R, add
edge loop this way. There's G, then z. And move this edge loop
over here at the top. Add another one,
place one over here. Again, add another
one over here, like this, pretty simple. Next, what we basically can
do is just press Control R, add edge loop right
in between them. So to add an edge loop in
center of two edge loops, you just need to
press Control art and you can move it
like this, right? So just hit right-click and we placed exactly
at the center. Press Control R.
Add another one. It right-click. Now to select two edge
loops at the same time. Hold Alt and select the
first one. Like this. You can hold Alt and use your left-click to select
the complete loop. Now hold Alt and Shift, select two of them at the
same time, like this. And now we'll just press S to scale it outwards like this. You can also scale
it a little bit more on the y-axis
plus S Then why? And as you can see, it is very sharp right now. So
select it again. Now press Control
V, bevel the edges. As you can see, we
are beveling it. Like kind of smoothening it so you can increase or decrease the level
by moving your mouse. And you can use the scroll
wheel to increase the amount of segments In-between segments is like the amount
of smoothness. As you can see, you can
increase the amount of segments to make it very smooth. I don't think we need that much. Maybe two or three segments
would be pretty good. And something like this. Now, select it, right-click
and select Shade smooth. And as soon as you
get Shade smooth, the object is very Vietnam. So to fix that, you can see we actually don't
need these lines. We want it to be smooth, shaded. We just right-click and
choose smooth it again. And to fix this issue
is come over here and the object data properties go to Normals and select autism. As soon as you do that you will see everything is
now pretty good. But as you can see, it is
kind of smooth over here. And we see these
edges over here. And that is because we did
not scale it up properly. So what I will do is hold Alt, select this loop and
this one, and this one. Now this plus S then y
and scale them inwards. You see these edges. Make sure there are like
equal on both the sides. So I think that is pretty good. That looks fine to me. I will hit Control S to save this one again, enable X-ray. And we also have this
small section in a table. So press Tab, press
three for Face, Select and select this
top face, rest one. And enable X-ray again. Let's move it a little
bit downwards like this. And basically just
press I to insert this here I think, and just press E again, extruded outward like this. Something like that. Or
the size can be a bit off. But that does not
matter that much as you can see where it does
not matter that much. We don't have to exactly
follow the reference image. We can definitely eyeball
a couple of things. If you're going to
want to add this, you can also completely
skip it out. All right, Next, let's see, we have these boxes like
tin created in our table. That is a little
bit more detail. So before creating that first, let's create the
remaining of the table, the base design for it, and then we can focus
on detailing it. A bit more. Suppressed one again. Shift D. Let's add another
cue scaling down. Enable X-ray and this time
place it over here like this and scale it
according to this box. S then x, scale it up. Now press S then Y. Also makes sure to
open up your ref and keep on looking
at this image over here so that you
know exactly what is going on in this table
over here also like this, as we can only see
it from the front, we need to make out
what is at the back. Yeah, That is no big deal. I think we can definitely do that now select this press S1, so the SDN Vi and scale
it just about in here. I think that's pretty
good in my opinion. Next thing that I want to
do is I just want to use the mirror modifier to copy it on the right
side of the table. So that's pretty easy to do. You go over in the
modifier section and select the middle. Right now you will
see nothing really happens because the origin of this is over here and the mirror modifier works according to the
origin of the object. So we want to mirror
this object on the axis of this
object so that it is exactly over here according
to this big objects. So I will select this one in the middle object
option over here. Take this, drop it, and
select this object. And you can see it is
mirrored perfectly. Now, if you don't
really understand it, I will just quickly
explain it once again, I will add a cube
listed over here. And let's say I add a mirror
modifier to this press Tab. And you will see it
kind of does not work properly. Let
me show you why. To make it work properly,
I will just press Tab, press Control R, add an edge loop right in
the center like this. So hit right-click, and I will just delete this face
completely suppress. So just press three,
select this face, press X and delete the vertices. You can see basically
the cube is in half now. And now I can use
the mirror modifier. And you will see it will
work perfectly now. This way we can use a
mirror modifier to like copy it on the other
side of the object. And as you can see, there
is the origin point. So the mirror modifier
is a metering the object according to this orange color origin point only. So yeah, we are mirroring
across this point. But if you want to change the origin of the
mirror modifier, we need to use this
option over here. So let's say I add another cube. This time, I would
like to have them. So just scale it down,
press Shift plus D and place this one over here. And now let's say I want to create another cube
right over here, like this, exactly to
the right of this cube. So for this, we can easily
use the mirror modifier. Select this one. Go over here, add a mirror modifier. Click on this middle object, and now it will use the
origin point of this cube. So just click over
here and you can see it is mirrored perfectly
on the x-axis. If you select the
Y is not really working because for
disabled x first and let's place it a little bit like this on the y-axis,
then enable the y. And you can see it is now
mirroring on the y-axis. Also. You can use multiple
axes at the same time. Them like this. So you can see it is
moving on the x, y, z axis according to
this origin point. If you select this
cube and move it, you can see all the cubes are moving because
they are being affected by this origin point, which ultimately affects
the mirror modifier. And yeah, that's why the
position of them is changing. Yeah, it was just a little
bit of demonstration. Show how MIT and modify works as it is a really
powerful modify. And you can speed up
our workflow a lot and we will be using it a
lot in this course also. So now to come
back to our table, we have easily
mirrored this object. You can see over
here, you can enable or disable the mirror
modifier like this. Easily mirrored this,
and we have mirrored it according to the origin point
of this object over here. Not the origin point of itself, but according to this
particular object. As you can see,
you can select it. Now, there's three. Let's say I scale
this face down. You can see both of
the phases are being scaled down. Will help us a lot. We can only work on the
left side of the table and the right side would
be done on its own. And I think this lecture
is pretty long now, although we haven't done much. But I think it is enough for this lecture as it is
a pretty long video. So I will just hit
Control S and save it. And in the next video,
we will continue working on our table
and modelling. So yeah, thank you
guys for watching. I'll see you the next one.
4. Detailing the Writing Table: Welcome guys. So let's continue
with modeling a table. I will quickly this
enables swing cost keys. And yeah, let's start. Next. I will be creating this piece
over here in the middle. You can just press one
for the front view. And the view this is, let's just add a print, press Shift plus a
and add a plane. It is added over here like this. Rotate it, then this x to
lock it on the x-axis, then plus 90 on a number back
to rotate it by 90 degrees. Okay, So now make sure
that it is in the center. So just select this
object over here and type in zero over here in the
location in the x, y, and z. You can select this item
tab from over here. Also, if you don't see this
complete menu over here, you can just press N
and this will appear. Then select the item tap from over here and you can put in the transform values to 000 so that it is
exactly at the center. The reason I'm doing this is so that you can see it scales up perfectly over
here and over here. And now I can easily use
the mirror modifier, divide it in half, so that we only have to create the left
side of the model. So press Tab, press Control
R at edge loop right in the center and then hit right-click to place this
edge loop in the center. Press one for the
word de-select, and select the right side would seize best x and delete them. And now pretty
simple, you just add a mirror modifier and you can see it is easily duplicate
it over to the right side. Now this tab, and
let's start creating this first one
towards the Select, select the bottom vertices. Let's place them over here. Press Control R to add
this edge loop over here. Next, select these two
words, these pesky, and then make sure to present, to lock it on the
z axis like this, so that you can
move it this way. Press Control R, add another
edge loop over here. Again, select these
two risky than X, lock it on the x-axis. Now just select these vertices and place it back over here. Now what we can do is
basically select these two risky and create this easier way to do this would be
just undo everything. And let's come back over here. Select this word is the
first press E to extrude. And just place it over here
like this, 12,345,678.9. So the reason I'm
counting this is so that I exactly create nine vertices over
here on this side also so that later
on I connect them. There is no problems. So 12,345,678.9, not worry, you don't have
to follow this exactly. It can be a little bit off. Now to join all of
these vertices. There is a pretty easy way. The long way would be to just select the first
two words season, then select these two, then press F to
fill in the bass. Easier way would
be to just press to go into edge select
mode, select this edge, and keep on pressing
F. And you can see all the faces are being
filled out very easily. Now it is done. Next, select the stewardesses risky than z, and scale it in. This way. We can just move this
vertices over here like this. Also, if you want to place
these two exactly together, we can use snapping. So come up over here and select vertex so that it
can snap to vertex. And there is a shortcut to use snapping. You press G and Z. Select this word C plus G, then Zach to move it. Then hold Control and
move over this vertices. You can see instantly
snaps like this. And we can see this token. That means it's snapping
to this vertex right now. So now they're perfectly
straight in line. You can see right now, when
I add a loop is controlled. Art, add a loop. It is kind of slanted because the edge over
here is slanted. So that's why this is
also becoming slanted, but we want to add a straight
edge loop over here. So to do that, press Control R and first add an
edge loop like this. You can see there are
some shortcuts over here, like even that is currently off. So if I press E, Now, even is turned on and
you can see it is even more slanted now because it is copying
the bottom edge. But now, as you can see, we have another option
that is over here, flip. So press F to flip this. And now it will follow the
upper edge with this trait. That's where it is straight now. And now we can
place it over here. Select these two, press E, raise x to extrude
them till here. Let's not join them. You can join them
if you want to, but let's keep a little
bit of space over here. Also makes sure to enable clipping in the middle modifier. What this will do is let me
just quickly show first, I will disable clipping. Select these two
vertices and if you move them past the
minute modify, you can see they're like
merging with each other. But if you enable clipping, they will join right
at the center and not really collapsed and
merge with each other. This can be pretty
useful right now. We can keep it disabled
or enabled does not really matter because we are not really joining at the center. So let's just keep
it turned off right now and let's proceed further. I will add another edge
loop listed over here. Select these two vertices
and extrude them downwards. Basically, we are doing the same thing over
and over again. Right? So this is overhead is done. As you can see, the
mirror modifier is doing its job perfectly. And let's move over here. Press Tab, press
Control R. And you can use Colvin to increase the
number of loops like this. Let's add to S to
scale them down. Select them both risky X, lock it over here and
place them like this. Again, add to
another edge loops. Let's move on over here. We have a little bit
of space around here. So press Control art to add another issue so that we
can create it this way. And then now I will just
quickly finish it up. And you guys can
also do the same. This is pretty protected stuff, so I'm pretty sure that you guys can also do
that pretty easily. Alright. Now we also have to join these two
areas over here. So what we can do is basically press Control R to
add two edge loops. First, place them over
here, scale them down. And now I will add one
edge loop like this. What I will do is press G Then X to move it on the x-axis. Hold control. And if you remember, we can snap it to this
vertex like this, as you can see, it both
at least snaps this way. And again, add another one. Hold control and
snap it over here. And now we can just select
these two vertices and these two press F, join them together. And similarly, I will do
the same thing over here. I do give them down. Again at two of them. Select the first one and z, the next old control and snap. Again, g and x hold
control and snap. Now just make a face
plus f. Alright, so we have created
it successfully. I think it looks pretty good. Let's move it out
here, the front. Now we want to give it a
little bit of thickness. Again, there are
two ways to do it. We can just select this
press Tab to go into a mode, press a to select everything. Then just press E to extrude
this outwards like this. As you can see now the
thickness is there. But I think the better way to do this would be to use a modifier. So let's just undo
everything that's Control a first and make
sure to apply the scale. And now I will just add
a solidify modifier. And as you can see,
we can control the thickness of this very
easily using the modifier. I think it makes it a
little bit more handy. Now let's just hit
right-click Shade Smooth, and make sure to enable auto
smooth to fix all of this. Also, we can add Bevel. As you can see, to make the
edges a little bit smoother, we can maybe increase or
decrease the amount of bevel. Also. Let's increase
the segments so that it is a
little bit smoother. Now come down over here under the shading section and make sure to enable
hardened normals. As you can see, it makes
a lot of difference. Now. It looks much better.
Alright, let's hit save now and
proceed further. Rest. One for the front view. And let's see. We can maybe select this press Tab Control R to
add an edge loop to this. Create this section over here. Also, I will quickly open up your ref and see how exactly
the table looks over there. As you can see, we have
something like this over here. What we can do to create
this as select this first, the staff to go into edit mode. Let's add an edge loop this way, press Control, Act,
which looks like this. And hit right-click
to place them in center press S and X and Y, and scale them over here. I think till here is fine. I'll select this loop also and move it a little
bit to the left. Select these two faces. Press three for Face, Select
and select these two faces. One. And let's see. I think it
is a little bit thicker. I will move their eyes, look back till here only. Again, press three,
select the two phases. There's one for the front
view and now press U to extruded, extruded till here. And then again pesky
once again and extrude it till here. Alright. So we have something like this. Now, as you can see, we have another box
like thing over here. So we will create that. Now. What we need to do for that
is we need to basically join these two phases though, but we need to join
them properly, like we need to bridge the book. So there's a command for this, just hit Control plus e. After you have selected
both these phases, press Control plus a0 and then
select bridge edge loops. So as you can see, they are
now connected properly. You cannot just select
them both and then press F. It won't work properly. As you can see, this is
something very weird. So just select them both, right-click and Control E
and then bridge edge loops. Now we have this
thing over here, and now we can select this face, this face, and this one. Again, press one
for the front view, risky and extrude it till here. Pretty simple stuff. You can see our model of the table is
coming along pretty well. I will just select
this and move it towards the right a little
bit, just a tad bit. And select this and move it
a little bit in the front. Alright, save and
let's move on further. Restaurant again
for the front view. Let's create this
thing over here. So one more thing that
I want to show you is you can select any object and then press Slash
on your number back. And you can isolate that
particular object to work with that easily so that
none of the other objects, like like none of the other objects
are in your way and you can do it properly
and work on it. Specifically. Slashing in on the number pad, you will come out of
that isolation mode. It is a pretty neat
little shortcut that you should remember. So let's continue. What I basically
want to do is I will just select this reference image slash so that I can isolate the reference
image, then press one. And now I can easily work on this thing over here,
press Shift plus B. And instead of
adding any of these, I will add a single word, so add a single vertex. So if you don't see all these options over here, don't worry, but you basically need to do is I will minimize
your risk for now. So to enable all these options, you need to go into Edit Preferences and we just
need to enable an add-on. So in the add-on sections
search for extra objects. So by default, this is disabled. You can enable them both, and you will see all the
extra objects of fear in your shift plus a menu. After enabling them both
close this press Shift plus a go to Mesh single word
at a single vertex. All right, So now
as you can see, a single vertex has been added exactly what this
orange color point. To see it properly, just press
one for the vertex select, save this over here. Press one for front view again. You can see we have this vertex listed somewhere
around here like this. And again, we need to
just start extruding. Resolve the shape. You can
also lock the vertex on the z axis while
extruding gene and z. And you can move it in a
straight line this way. Again, keep on pressing
E to extrude it. Over here selected press E
and X completes it like this. E and Z. They are
pretty basic stuff. Again, this E and Z, to move it in a straight line. So this thing, we have
already done a lot, so I will just
quickly finish it up with and you guys can
also do the same. Eden x and move it
right over here. We can just select
these two and press F, join them together like this. Now press a to
select everything. Then again, press F to
fill out this face. And we have basically
created this flat shape. Now if you open up the pure ref, we can see this kind of 3D. So let's see how we can do that. We cannot really just, first of all, let's print slash to come out of the
isolation mode. And let's bring
it out over here. Now let's see if we can not
just press Tab to select this and press U to
extrude this like this. And create something like
this because I don't think it looks good. Excellent. Do this. Alright, so again, I will
select this thing only now, the slash 74 top view. We cannot really see
anything right now. So I will just, for now, I will add a solid if I modify it so that I can
see it properly. So now what I basically
want to do is I want to move this object right
at the center over here. This is the origin point. So to do that, just select
this press Shift plus S and then select selection
to cause this thing. This option will move the, whatever you have
selected to the cursor. The cursor is this thing which is currently
add the world. Or you can move this cursor by holding Shift and using
your right-click. But that is really not that
important right now to move the location of this curve
though back to World origin, just press Shift plus S for select closer
to world origin. And now we can select
this object and then use the command Shift and
selection to cause. This will bring this
object towards the right. Now it did not work
that properly because the origin point is far
away from this object. So what we basically can do is press Tab to go
into the Edit mode. Let's select everything. And whatever you do. In the edit mode. If you're moving
any kind of object, the origin is not affected
when we are in the world, but it is affected when
we're not in the HTML. So right now I'm not
in the edit mode. And if I move the object, you can see the origin
is also moving with it. But if I go into edit mode and then I tried to move it,
it does not really move. I just wanted to place
it close to the center. Now I want to rotate it
at 45-degree angles. Superstar, then type in 45 in your number pad and place it just like this
along the centre. This week. You will just understand
why I'm doing all this. I will remove the solidify
modifier for now. We have something of this sort. So we have the origin
point right at the center, and we have this thing placed
at an angle of 45 degrees. This way, I will now
add a mirror modifier. Let's add it on the
y axis like this. And you can see we're kind of getting what
we want it to stop. Enabled flipping and rigid invite and move it like this so that they will join together. Now, just press Tab again, press eg, select everything, then press E and extruded. Like this, but this does not
give us that good result. So what I will basically
do is first recipe. Then I will press Y, lock on the y-axis and then
join this way. This way it comes out much better and it looks
pretty clean. Now what we can do is first let's shade smooth this and also enable auto smooth tab again. And just select this
edge over here. Hold control. And
you can deselect all of these vertices like this. And make sure only
these vertices are selected over here on
this side of this object. Now press G and X and move it in the forward
direction this way. And I think this
looks pretty good. And now we can place
it on the corner. We can add a little
bit of more detail. We won't be adding
all this stuff. I will just select this face. So press tab for edit mode,
press three for fish. Select this press I to insert
this just a little bit. Then press E,
extrude it inwards. Yeah, I think this looks pretty good to come out
of the edit mode. Currently it is over here. Explicit like this. And make sure to again
rotated by 45 degrees. So best art the lock on the
z axis and type in 45 again, so that it is like this
exactly at 90 degrees. One more thing that
I want to show you is if you press G and then you can lock
it on the z axis and g Then X lock on the x-axis. So yeah, this much
you already know, but if you press G,
then Shift plus x. It will only move on
the y and the z plane. It will exclude that
particular x axis. So let's say if you press G, then you press Shift plus z, then it will not move on the z-axis only on the
x and the y plane. This is also pretty
useful as now I want to place it correctly over
here without moving the z, g, then Shift plus z and
place it over here like this. You can also hold
Shift so that it moves slowly and you can make
precise movements this way. Alright, so it looks perfect. An expert I will do is select this and I think
you already know, I will add another
mirror modifier that mirrors is on both
sides of the table. This mirror modifier only works on this particular object. It uses this originally
origin of itself. But now I will add another
mirror modifier that we'll use this table as the
origin point for metering. And you can see it mirrors
perfectly on the x and y also. We have it something like this. And yeah, I think this
looks pretty good. Hit Control S to
save the file. Best. One again. Let's keep
on moving further. It is a little bit off, but I don't think that
really matters that much. Alright, let's see
next what we can do. Press Shift plus eight. Let's add a cube.
Scale this cube down. Over here like
this. Scale it up. S then x, scaled on the x-axis. So yeah, this much, Let's
bring it out in the front. And best S and Y. Just scale it. I think this much only
one again, enable X-ray. Now press Tab, go
into the Edit mode. First, stab, rest three, and select these two faces. Then press one for the
front view, enable X-ray. And just insert this till here. And you can see it is not
really inserting properly. Because if you remember, we have not applied the scale yet. So press Tab to come
out of the edit mode and now first select the object, risk control a lie, the scale. And now again, if you
will try to insert that, I think now it will
work perfectly. As you can see. Now
it is inserting perfectly and insert
this circle here. Then rest x and
delete the phases. Now again, we want to join
these two edge loops. Again, we will use the
bridge edge loop gamma. So first, hold Alt
and select this loop, then hold Shift and
Alt select this loop, then press Control
E and rigid groups. Both it. Next we can create this
small thing which is inside, I think it is pretty easy. I think creating this
is pretty easy to do. So let's select the image. I mean the reference image,
press Slash plus one. And this time, I think, I mean, I can add a plane,
rotate it by 90 degrees. I think it is a
symmetrical objects. So we can use the
mirror modifier. Scale this down
till here, right, like this, so that
it fits perfectly. Let's apply the scale
births per staff has control our add a loop
in the center here, right-click and delete
the bottom part. Add a modifier. Let's select the
middle and make sure to disable the x-axis
and select the white. And yeah, let's see. I think it would be difficult
for us to work in this way. So I will just
select this vertex and this x and delete it. Now we can select this
vertices and just easily risky again and
again to extrude it. And you can see the middle
modified is working correctly. Join them at the center, make sure to enable
clipping first, then plus D again
to move the word c and join them over
here like this. Let's controller, Let's add another vertex and
yeah, that's perfect. Estab plus a f. Alright, again, press Slash to come
out of the edit mode. Let's place it
right around here. I think I will decrease the thickness of
this a little bit less than y. That's fine. I guess. Scale it up a little bit so that
it fits perfectly. Good. I will not give it extrude. I will just add thickness. By adding a solidify modifier. Make sure to apply the scale. Right-click, Shade Smooth
and enable auto smooth. Estab, enable X-ray, select the top vertices
and just move them up a little bit so that they are completely
inside this object. And yeah, I think you know what we need to do now we need to
again add a mirror modifier. And this time, I will use the
middle object as this cube. And you can see it
works perfectly. Let's hit Save. Now. What I basically want to do is we want to duplicate this four times and also
on the back and sides. But right now, I won't do that. The reason being, if
you see over here, we still have to detail
these pieces a little bit. It's not exactly detailing, but we will add a couple of more edge loops, extrude them, is to make it a little bit
better because right now it looks pretty clean
and pretty boring. So I will not duplicate
them right now. When we detail this completely, then we can duplicate it so that we don't have to like
stuff again and again. I think this is enough
for this lecture. Again, this is a
pretty long lecture. I will hit save now and most probably we will finish
the table in the next one. Thanks for watching. I'll
see you in the next one.
5. Finalizing the Table: Hello, Welcome guys. So let's continue with
detailing our table now. Alright, so let's start. I will be starting with
this piece over here. Press one and enable X-ray. You can see we have
all these ridges created to add more
detail to this piece. So let's tune the same. What I will do is I will
just isolate this first. Stab, the editing
mode press Control, and add edge light like this. Now, you can just
select the faces on this edge loop
for risk-free will. Select all the faces and extrude
this inwards. This week. I will also add a
bevel modifier. You can see it makes
it a bit smoother. Shapes moon enabled hard normals and also enable auto
smooth from over here. Another thing that I want
to do before proceeding is we have this
appearing on the front, but I also wanted
on the back side. We can use the mirror
modifier to do this. The way to do that
when we first press Control R at right in the
middle over here, right-click. And now enable X-ray and
just select this side of the vertices x
and delete them. Now we can basically add a
mirror modifier on the y axis. So now as you can see, this loop that we
just created and extrude it is a beard
over here also. There is a little bit of problem because we deleted
all the Word sees. Now it appears follow. So to fix that,
again, very simple, hold Alt and select
this inside loop. Makes sure the first enable
clipping on mirror modifier. Now press E, the invite and
join them like this. Perfect. Now we embrace tab and add a
couple of more edge loops. In the middle. The industry will
extrude this outwards. Let's add the last edge of it. Move this a little
bit. It works. Now I will add the last
age group like this over here and selected all threats
extruded outwards again. And yeah, I think this looks
pretty good. Now, let's see. If you press one. We have this duplicate
it four times. So obviously one way
would be to just select them both
redshift plus D to duplicate plus x and just
copy them four times over. I think a better way to do
this would be using modifiers, select this, and now add the
array modifier. Modifier. You can see we can
basically say set the distance on the x and
increase the number of counts. And we can easily
duplicate anything. This way. You can increase or
decrease the distance. You can also like in a diagonal way by adding y
value or writing z value. There are a lot of
options with this versus set it back to zero. Now we need to obviously
sent this to one on the x. Like this. The count back to for now if you press one
and dry seeing this, you will see that it
does not really fit perfectly with our
reference image. I think the reason for this is, let's just disable
array for now. The reason for this is the
size of the middle two pieces, a little bit smaller
than the one on the ends in the
reference image. But I don t think that
really matters to us. I will enable the array and
just to fix this problem. But I will basically do is
press Tab enable X-ray. We can only select this
piece because the rest of them are being created
by the modifier. So we cannot really,
we can just add it. This one, the one we
actually degraded. Just select all the
word cyst is moving over so that it fits
perfectly with our table. Here, I disable x-ray. And yeah, I think
that looks perfect. Now as you can see, this thing over here
is incorrect now. So now instead of fixing all
the mirror modifier stuff, there is another
easy way to do it. What I can do basically is just plus one from
Grandview first. Now, as I mentioned earlier, if you press Tab enable X-ray, you cannot really
edit this piece because that is being
created by the modifier. So to edit this, we need
to apply the modifier. Now I will just select this, go here and hit Apply. And now if we press tab, you can see you can
edit this VCE also. Move this like this, because now we have applied the modifier so we can
edit this in edit mode. And now plus g, z and move
it outwards like this. And yeah, that's
pretty much fixed it. Now as you can see, we still have this mirror
modifier, bulky. So right now we cannot really edit the bottom part of this. This is just for demonstration. We don't really need to
exit the bottom part. But now if you
apply the modifier, come out of the edit
mode, apply the modifier. Now you can see, you
can indeed the bottom, but also, but again, we cannot really ended
the thickness right now because the thickness is
being added by the modifier. I hope this makes sense. We can undo the last
mirror modifier because you don't really
need to apply it right now. Next we can just add the array modifier restaurant
for the front view. And let's see. We need to give it a
little bit more distance. I think 1.15. Let's put in 1.155. That looks pretty good to me. Increase the count to four. We have created now
this side of the table. So let's just select this. Again, add a mirror modifier. Select the middle
object as the table, and select the y-axis. Pretty easy, I think by now, you should be easily able
to use the mirror modifier. Now I'm doing the
same thing over here. And select the Y axis.
We're good to go. I will just select
both of these pieces, redshift plus d. Let's move it over here a
little bit inwards. And now just remove the
modifiers that we just added. Basically, I just want a
single piece over here. So I will remove the
mirror modifier, remove the array modifier,
select this, also. Move the mirror and
remove the attic. We just have the
single V. Select this. Press three for the
right-side view this time and press R then z, rotate by 90 degrees. All right. Let's press seven for the top
view enable X-ray. I don't think we can
already see right now. You can also press Control plus seven for the bottom view. And I think that works
much, much better. And we can easily place this. Now. This was the thing that
I forgot to mention. If you breastfeed, it is
for the right side view, but if you press Control plus three, it is for the left side. So it has 7.4 top controlled
plus seven is for bottom. Now let's just press Tab. Go into the Edit mode
for both of them. Enable X-ray and
select this side. And move it. Again. I will select this and again
add a modifier to copy it. On the other side. The table is coming along pretty well. Let's just hit Save. Next. Let's start
detailing the top piece. So this one enable X-ray. Again, you can see all
these ridges created. So what I will do
now is instead of like reading the whole table, I will just divide the
table in four parts. And again, I will use
the mirror modifier so my workload is
reduced and I only have to do it in this one side and the rest is done by
the middle of modifier. So just press Tab.
And risk control. R and h looked like this. We'd right-click in the center at age group like this also, right-click and in the same
74 top view enable X-ray. Select this side x and lead the vertices sitting beside this x and delete
the word season. We now basically have
one-fourth of the table. We can use the mirror modifier, duplicate it on the x-axis
and also on the y-axis. This is also really useful. Basically have to design the
table on this one-fourth. And you can see the rest of it would be handled
by the mirror modifier. Pretty easy stuff. First one, Let's come out of
isolation mode. Flash. This one again, enable X-ray. And I will now just add a bunch of edge
loops. Risk control. I add one over here, add another like this. Or here, or here. All right, now I've addressed
three for faith tillich. And just select this face. And this face. Legs are the same edge loops
over here also just going to pull our blending like this. And I will add one
over here also, we don't really have
the reference mic, but I think we can
eyeball it pretty easy. I'll select this face. This face and this face. This one again for a
front view enable X-ray. Now press I to insert this. Makes sure the scale is applied so that it inserts perfectly. I again, something like that. All right, now we basically need to select all the
edges that we created. So this one, this
one will say, look, this, this one, this one. Hold all, select
this 11 over here. Hold Alt again, Shift and
Alt and select all of this. Now instead of pressing E plus E and extrude
faces along normal, because we have faced
along different normals. So select this option this time. There's risky
extrude faces along normal and just push this
in words just a little bit. Next we can select this, add a bevel modifier, shading or the normals. And yeah, I think
this looks perfect. As you can see, the whole table is then by the mirror modifier. Basically just had to do
this quarter of the table. And yeah, that's pretty cool. Let's just hit Save on a fight. And the last piece
to do is this one. So again, what I will do is currently already have
the mirror modifier. But what we can do is we can
also press Tab Control R, add a loop over here. It right-click, add edge loops over here it right-click
in the center. Enable X-ray restaurant
for vertices. Select all the left side
vertices plus x and delete them. So we already have
the middle on the x. So now also enable it on the y. And you can see, now again, we have to do only
this part over here, as you can see from disabled men and modified and
we only have two. I read out this part and the rest would be done
by the middle modifier. Let's start doing that. Slash one. Enable X-ray. Let's see. First let's
select this face, this face, and these two
faces, I for insert. Okay, right now you can see inside is not working properly. And the reason for this is we haven't applied
the scale yet. Select the object, risk
Controlling, apply the skin. Now let's try doing that
again. Works perfectly. Now. Again said this
didn't hear Yeah, in here is fine, I think because you're feeding
said more than this. As you can see, it will start to overlap and some
weird things will happen. There's just select this loop. This loop. First, let's just select
the outer loops of both and extrude them inwards. Select this loop now, and I will extrude
them outwards. Add a bevel modifier. Enabled both hard and
normals and or the smooth. Now I think we can leave it at that and just do this
side also for press tab. And let's select
these two faces. And again, we just need to
insert this a couple of times. I've pretty much stacked. Just makes sure that your
insert is not overlapping. That's both. Hold, Shift and
select the groups. Alright, so now we've saved and I think our table's
pretty much done. One for the front
view, enable X-ray. And you can also see the design lighting
created over here. So obviously, what
I will do for now, just first, let's
select all the tables. Make sure everything
is selected. This m, and let's move
this to a new collection. And let's rename this to
writing table that we can easily identify it later on when we do have a lot of crops. As you can see,
we can enable and disable it anytime we want. So let's disable it for now. You can see this little ornament type
shape created over here. So what we can do
is begin redshift. They go over to single
word at a single vertex. There's one for what? Select, Move it over here, and we can start tracing it out. But I think it would
be really tedious and counterproductive because it does not add that
much to our model. Our model already
looks pretty good. In the actual scene. It would be viewed
from a distance. So these designs that
women spend a lot of time on won't even be really
visible that much. But if you still want to add them and don't want to
waste as much time. There is a quick
way to create this. So I've been just
disabled this again. The quick way
wouldn't be shifting. Again, add a single vertex. And instead of now, unlike racing it out completely, but you can do is
you can just trace out the basic shape like this. That is pretty fast. I think. We'll quickly do that. And I will show you a
couple of ways in which we can add detail. If you want to. I won't be adding it. But yeah, I'm just
quickly showing how we can do such things. So I'm just quickly
tracing it out completely. I mean, as you can see, if student takes a
pretty long time and if we had to trace
it all perfectly, equally, take lot of time. I just couldn't get
finished just too late. Showcase. I'm not really
doing everything perfectly. But this method is like a lot
faster than the first one. And obviously it does
not look that good. But when viewed from
a bit of distance, I don't think it would make
that much of a difference. I'll just join these two words. See sutras. And yeah, we're pretty much done now. Alright, so the first
thing that you can do is you have created this very
basic shape of the design. Let's enable the Azure tables so that we can do it properly. Select this, bring
it out over here. So the first method
is very simple. You first raise everything
out completely, then you basically
add a skin modifier. And you will see
this monstrosity. Just press Tab, press a
to select everything. Then press Control a. And you can scale it down. Make sure to remember this
shortcut controlling. And you can see we have kind of solidified that shape
that we just created. Shapes, mood, board
and work on this, you can just enable
smooth shading from over here and now enable auto smooth. You will notice that although
it does not look perfect, but if you go from, let's say this much distance, it looks pretty good and
then duplicate this. I don't think anyone would even be able to
tell the difference that we have just created this in like less than 2 min, 3 min. Whereas if he started to
trace it out completely, it will take a lot of time. And you can maybe
add Bevel modifier. You can see we went
smooth it out even more. Or maybe stuff like
subdivision modifier. And you can see it does
quite a good job of like smoothening it out
and making it look a little bit more data. The reason is if enables
statistics from here, you will notice that
the vertices count has gone up by a lot. Because dislike adding
Veblen subdivision or the skin modifier is like
really a polygon heavy. So that's why I think I'm just going to skip on this part. I mean, I've shown you how
would I have created this. I'm not really going to add
this thing in our table. Another way would be to just
remove the skin modifier. And you have created this. You can press F3, search for a command and search
for Convert to mesh. So to convert to go, so convert this to a goal. And after you've converted, you will see the properties
over here have changed. You can make it more like round if we
increase the depth now, you will see that
this is like more rounded and
cylindrical in shape, whereas the one with the
skin modifier would be good. If you want to add it this way. Definitely, you can do that. But I think the skin modifier when looks better, so
you can undo this. And again, this is now
a mesh skin modifier. Makes sure to just
press Tab, Escape, select everything the
interests controlling. Use the scale. And
yeah, this looks fine. I think if you vote, you can definitely add this
duplicated over and over again all around the table. Or you can just use
the array modifier and the mirror modifier
that we have learned. Quickly, speed up
the process and duplicate it all
around the table. But as I said, I
will be distributing this and I will not be
articulating with this. Pretty much our
table is done and we have finished modeling
it so it's saved. And yeah, in the next video, we will be creating the chair. So thank you guys for watching. I'll see you in the next one.
6. Creating the Chair: Hello and welcome guys.
So in this lecture, we'll be modeling our next
drop that would be a chair. So as you can see,
we have one over here and one over here, so we can place them
around our scene. We will be creating that now I will just disabled
the writing table. And also I will select this
reference image, press M, and move into a
new collection of reference images that we can put all the
images over here. Alright, so let's just
disable this now. And yet there's one
for the front view. And again, there is this reference image
that we will be using. It has moved the front
view and a side view. Now shifting and let's
add it in Blender. I will also enable swing cost
keys. It's pretty shifty. Go over to image the fence. And in the folder,
just select this file. Here. Alright, I will
minimize pure ref for now. Let's see. We obviously have the
front view like this. So what we can do is we can
duplicate this offense image. So press Shift plus
D to duplicate it y and place it over
here like this. Then press R, then z, rotated by 90 degrees. Then plus g than x, and move it over here so that we also have the front view and the side view
at the same time. So we can press one for
the front view and then three for the side view.
It's a pretty simple. One thing that I will
do is I will flip this side reference
image so that the chair is facing
the other side. Press S to scale it, then press Y to lock on the y-axis and
then type in minus one. We can flip the image like this. And now the chair
is facing this way. Alright, so the way
this would work is after you have placed both the reference images in this font. Let's say we start by creating this very simple leg over here. So we just need to add
a cylinder shifting. Let's add a cylinder
scale this down. Enable X-ray. Let's
place it over here. Scale this down, press S and
scale it up on the z axis. Now to make sure we are in line with the side reference
image suppress three. I can see it is not in play, so just press G then vi
and place it over here. And now as you can see, it
is a little bit slanted, which we couldn't see
from the front view. So now we just press tab, select all the top vertices, and then the z, then y, and move it a little
bit like this. So yeah, this way we can work both in the front
view and side view at the same time so that our
model comes out to be perfect. And let's see, we
obviously won't create the right side because we can use the mirror
modifier for that. So let's see next what we
can do is press three. And let's create this
leg over here, this one. So again, I will add a cylinder. Scale this down and just try to line it up
with the reference image. So press Tab now, select all the vertices, placed them like this. And now just press E
to scale it down a little bit because it is a little bit thinner
towards the top. To create this
slanted like shape, just press R to rotate it. This way you can rotate it. Now press one again
for the front view, and let's press G and X and
move it over here like this. So this is the one. As you can see, this
way, we can work more precisely and create a
better looking model with the front and the
side reference image. Make sure to select them both. Right-click, Shade Smooth, and enable orders food
for both of them. Alright, so now we need to
use the mirror modifier, but we do not really have
anything in the center. What I will do is I will first
create this tender object over here so that I can use
that as the middle object. And then I will duplicate these
pieces along that object. So let's create this
thing in the center. First plus three
for the side view and let see this kind of shape. I think it is pretty
easy to create. We just need to
press Shift a to add a plane rotated by 90 degrees. Enable X-ray staff. Let's see, place it over here. Select the top vertices,
bring them down. And now just press
E to extrude it. Now first one for
the front view, and then press S, then x scaling down on the
front view also. Let's move it a
little bit upwards. Alright, so to make
sure that the origin of this plane is in
the correct position, and that means
exactly I hit Center. There is a nice little command. We can go over to object, select the object first,
then go into Object menu. And you can see
the second region. So we have multiple options. We can set the origin
to the 3D cursor. You will see the 3D cursor
is placed over here. So if I select this option, you'll see now the origin
is moved to this location. And you might think, what is exactly the need for the origin? The origin is like
all the transforms will take place from the origin. So let's say if I
try to rotate this, you can see the object is
rotating from the origin. This week. Scaling
or even movement, everything takes place
from the origin. Also the mirror modifier also works through the
origin point only. So it is necessary that we
have it in the correct place. Alright, so right now,
I don't really want to have it on the Gaza point, but rather in the original
position of this model. So go over to Object
set origin and just select origin to geometry. So this will place the origin
at its correct location, that is at the center
of the geometric. And now what we can do
is let's press one. And as you can see, it is almost exactly at the
center of the chair. So I will add mirror
modifiers to both of them. The legs that we created, and select the middle
object as this. Now as you can
see, everything is pretty much in line with
the reference image, and it works
perfectly. This way. We can make use of this command over
here to set the origin. So make sure the origin is at the correct
place of your model whenever you are trying
to use something like omitted modifier because if
it is at the wrong position, so let's say I just change
the location of this origin. So to change it, I can just
maybe use many commands. There are different ways
to change the origin. I can just press Shift plus right-click to move
the 3D cursor. Let's say I place it over here. And then I select this object and set origin to 3D cursor. You can see the mirror modifier Instantly change according to the origin point
and not really the object. Let's just undo this. Also. You can change
the origin according. Also you can change the
origin to any way you want. Let's say you want
do the origin right? Exactly at the
center of this face. So what you can do
is select this face, press Shift plus S, then
closer to select it, bring the cursor over here. And now you can again
simply do set origin, origin to 3D cursor. This will place the
origin right at the center of this
particular face. So you can customize the location of the origin
using these commands. You will notice that the mirror modifier didn't really change because although the position
of the origin is changed, it is still exactly at
the center of the model. So that's why the middle
modified into genes. So let's just undo this. And yet now the origin is
right back its location. Alright, so let's move further
and created the chair. Three for the right side. Let's see you next week can maybe create
this simple stance. So just add a cube.
Scale it down. Scale on the y-axis like this. Press one for the front view. Enable X-ray,
something like this. Let's scale it down even more. Select this item
middle modifier, and select the middle
object as this. Let's save this one, and let's create this thing now. Add a cube again. We cannot really see
this thing over here, but let's just bring it
over here in the front. And the user to size like this. And yeah, that's pretty
much fine. Let's see. Next we can use this
shape over here. So again, I will just
basically add a cylinder. I think it is pretty
easy to create. You can do that
on your own also, we just need to scale
it accordingly. This DAB plus one for
vertices selected. Now just keep on pressing
extrude and align it with the shape and the
difference image like this. You can maybe scale it down, rotate it a little bit, and just move it around
to fit it perfectly. Alright, Next, let's just hit Shade smooth and also
enable auto smooth. From here, we can maybe
select this top loop, suppress 248, Select All to
select the complete loop. Then press Control V, and make sure to apply
the scale first. Now bevel it. We can do the
same at the bottom also. You can also use Beverly to maybe make some of the
edges a little bit.
7. Fixing the Chair: Hello and welcome guys. So this is just a
quick little video to fix a couple of
things with a chair. So one thing that I
want to do is I want to select this thing over here
so that our mean seat. And I want to just reduce
the size of it a little bit. So just press S to
scale it on the z axis. Makes sure to press
Z twice so that it scales exactly according
to the rotation. Also. Scale it down like this. Here maybe, and just put G Z, again Z and move it up. Next, I will select
this piece and I also want to move
it at the front. So just press Shift plus dy. And why? Just place it over here? Scale it up. And yeah, that makes a
chair look a lot better. Next, if you press
seven for the top view, we can see this curve over here. So I want to improve
it a little bit. Just wanting to do that, just press Tab to go
into the Edit mode. And from overhead,
as you can see, the curve is like not really
looking that great to me. I will just select this
vertices from over here, and maybe this one
from over here, then plus g, then vi, and move it upwards like this. And you can see that alone
has fixed.gov a lot. Yeah. No, I think it looks
pretty nice and uniform. Next I will select
the seat, Mainly. Press Delete, select
this thing again. And now I will show you
another use for the 3D because whenever you
add a new object, so press Shift and add a cube, you will see that it is created at the location
of your causal. So if you want to add an
object at a specific location, you can just maybe select
this thing over here. Press Shift plus S than closer to select it to bring
the cursor over here. Now I want to add
a cube over here. So Shift plus a or the cubes. And now as you can
see, this cube is added exactly over
here at the center. And I will just scale it down. Scale it up like this vial. So let's select them both press Slash to go
into the isolation mode. Select this press
three for right view. And just rotate it
and make sure that it is perfectly like in the
rotation of the seat over here. Yeah. That looks fine to me. There's a slash to
come out of it. I would just rotate
a little bit more. And yet now press S and Z and
make sure to present twice. Scale it up a little bit. And again, I will just add the
subdivision modifier only. Cheats moon this
enable auto smooth. Left side, two levels. Now just the edge
loops correctly. I think something
like this looks much, much better than the last one. When I drove. I will just start like this. Alright, so yeah, I think
this looks much better to me. It's Shade Smooth once. And yeah. And I think now our
chair looks much, much better than
the last version. I'll just quickly
make these changes. And yeah, that was pretty
much the point of this video. We are done with this tag us watching. I'll
see you next time.
8. Creating the Windows: Hello and welcome everyone. So now that we are done
with a chair model, we can just disable the cheer collection
and also select both of the reference images and press N and add them to the
reference images collection. Alright, so in this lecture we will be creating
some windows for RC. If you double-click on
the main reference, you will see that there are a couple of doors,
windows over here. Here we will create
something like that. But first we will create a
different kind of window, as you can see over
here in this scene. We have this
crescent-shaped window. So we'll create that now. As you can see, it is present in multiple different
reference images. So yeah, it is kind of a
traditional window there. So yeah, we will be creating
that in this lecture. And if you look through
the reference images, we have this image over here. We will be following this one. You will find many types
of different designs and variants of this type
of window online. So definitely if you want to
try modeling something else, you can definitely try that. Yeah, we will be creating
something like this. So first press one
for the front view. Let's press Shift plus S and make sure because there
is our boiled origin, because origin redshift, pay, Add Image, select the reference. I will select this
reference image. Now let's start by
adding a plate. So press Shift plus a plane. Press R then x rotated
by 90 degrees. Alright, so now press one for the front view and basically
just scale the plaintiff to match the reference image.
Something like this. Maybe. First let's just press Tab, press Control R to
add an edge loop. Make sure to add it right in the center so it right-click, select the side vertices, press X, and delete them. Now let's add a mirror modifier, because obviously this
object is pretty complex, so we only creating
the left side only and the right side would be done by the
mirror modifier. Alright, so press Tab again, select these vertices and
let's place them over here. I will just select these
vertices and place them in the center of these
lines like this. Because later on we
will be using like the skin modifier to
give this thickness. So that's why I'm placing
it in the center. Alright, I will just press
three for Face, Select, select the face x and
just delete the phases. So make sure to
select only faces so that we only have
these edges like this. Select the reference image. Let's move it backwards. And yeah, you can see we
only have these edges. Press tab. Let's select this middle edge and press X and delete this. Now we have something
like this. Let's see. Next what we can do
is we can just select this word is you also
press X and delete this. Now select these vertices E plus x and extrude
this still here. Press E and Z extruded
till here at the top. And you might notice
that it is not really fitting perfectly with
the reference image, but that does not matter at all. Because if you'll
notice correctly, the reference image is, I think, not really symmetrical
on both sides because if you notice
over here in the corners, that designs are completely different on the left
side and the right side. That's why I think it is not
really fitting properly. But that does not matter
to us because we will be creating only the left side and we can just duplicate
the right side. We don't have to like copy it exactly as it is in
the reference image. Because I think that
would take a lot of time. So you have basically my point
is that it does not matter if your middle modified does not match on
the reference image. Okay, so I will just
minimize pure ref for now. So now we will create these
semi-circles or circles. So to do that firstly, start to come out of
the edit mode and simply press Shift a go
to Mesh and add a circle. And you will see that this
circle is added first, let's rotate this by 90 degrees. So plus r then x type in
91 for the front view. And now just scale it to
fit the size. Like this. Now press tab, make
sure to just delete the right side so that only half of the
circle is present. Press X and delete the vertices. And let's add the
mirror modifier. Now. You can see it
is working perfectly. Now select these vertices, press X and delete them to
have something like this. Next, what I will do is
I will basically join these two objects so that
we can edit them properly. So select them both
Risk Control J to join them like this. Now they're basically a
single object press tab. And if you zoom in over here, press control are about
to see will be added. Jeden Z, move it down over here. Now basically just select
them both and press F to connect them like this. Now we have connected our circle with a main
mesh over here like this. If you want to just see how
the skin modifier will look, you can go ahead and add
a skin modifier right now only. Just disabled X-ray. You can see something like this. Rheostat press a to
select everything, press Control a, and you
can just scale it down. So this way you can see we
can easily create the window. Enables smooth shading
and also auto smooth. But right now, we don't really want to see
the skin modifier. So let's just disable this. And yet now let's
continue working. Again. I will add
another circle lungs. So press Shift D, add a circle, rotate this by 90 degrees. There's force press Tab and delete all the right
side vertices. Add a mirror modifier
and scale it up. Make sure it fits properly. This one is fine, I think. Reestablishing. And let's
delete the bottom vertices. And now again, select
this first and now select the main Mesh Control J
to join them together. Stab again, select this vertices and
phosphorus control arm. And let's add one over here. Select them both,
press F to join. We also have to do this
overhead at the top. So again, press Control
R and C would be added. Select them both and just press
F. Instead of pressing F, What I will do is I will just select this, then select this. You can press M to merge the vertices so you can do different things like at center. But if you added center, you can see the circle
would be derby little bit. So press M and instead of
center select at last. So what Atlas will do is it will adjoin out the vertices
that was selected at last. So I will select this word
C first, then this one. So press M. And now you select at last, you will see it is
joined over here. If you select like this one
first and then this one, then press M and
then select at last. You can see it was joined
on the second word to z. That was the last one. I hope this is clear. This
and this plus m at last. And yet one again, Let's start creating
these things over here. This might take a little while, but I don't think it
is difficult to do. So press Tab to go
into the Edit mode. Let's start from over
here, press Control R. And let's add three edge loops. And I mean three vertices. You can adjust it by
using the scroll wheel. So let's place it over here. Recipe then z and x. And now just select
these vertices. Make sure to select vertex
snapping, press G, then x, and then hold Control
and hover over here so that they are
perfectly in line. Now press F. Yeah, something like this.
Let's select this word. See place it over here. Press E and Z. Control R, add vertices over here, rigid and Zach to move it. Then hold Control to snap them like this and select
them both and press F. Alright, now I think I will be just using the commands
I've taught earlier. So I will basically just
complete this whole thing and not really talk that
much or common date over my actions because I think these steps are pretty
self-explanatory now as we have done
them a lot of times, you can just, I think maybe fast-forward through
this or just skip this part completely and try to complete this thing
on your own first. Alright, so now I will just
start completing this. Also one thing that
I would do want to mention is a mixture to enable flipping so that you can just join these vertices
together at the center. And there is no such issue. Alright guys, so now
I think I'm done with the creating of the
design of this window. Some of the edges I might
have left here and there, but I don't think it
matters that much. The design looks
pretty good to me. I think I will just enable
the skin modifier now. And yet, as you can see, we have a little bit
of problem over here. So let's see how
we can fix that. Select this press Control. Let's apply the scale. And it does not
really fix a problem. Let's see. We can remove the skin modify and let's try
adding it again. And yeah, that fixes that. Press Tab again and press
a to select everything. And now press Control a to adjust the thickness
of the skin modifier. Alright, so now I wouldn't do it looks pretty good in my opinion. Let's press Control
S to save this. And you can adjust
the thickness of the window, if you
remember correctly. We establish a to
select everything. Then you can press
Control plus a, and then you can adjust the
amount of the skin modifier. So let's see, press one for the front view and let's
try matching it with the I think this is too much this much pretty
good, in my opinion. That is pretty much
personal preference, but I think this
looks pretty good. It's smooth shading.
And also auto smooth. Alright, so let's hit Save, select this and press M.
Moving to a new collection. Let's rename it to Windows. Alright, so I think this
is it for this video. In the next one, we will
create a couple more windows, and I think we will try to
detail this a little bit more. Tenuous watching Hit Save, and I will see you
in the next one.
9. Adding more Window Panels: Hello and welcome guys. So in the last lecture we
created this window frame. So in this video we will be creating a couple
of more windows. So I have opened a
pure ref over here. And if you look through some
of the reference images, you will find these
types of windows or like door frames are used a lot like something
like this over here. You will notice,
like, as you can see, in many reference images, we have a similar path, no door frame or the windows. So it can be like the
used a lot of times. As you can see over here also. These things we
will be creating, basically this in this video. As you can see, I've
added a couple of different reference
images so that you can choose from different
windows styles. So I will be going for something basic and simple like
something like this. We will create
these and these can be used throughout
the entire scene, is pretty useful to create them. Alright, let's start. If you go over in the
reference images folder, you will find there are a
couple of different images for these type of windows
or dough friends. So one of them is this. We also have this and this one. So I will be choosing this one. First, select this image, press M, and move this to the reference
images collection. Now let's press one
for the front view. I, we minimize pure ref for now. And let's press Shift
plus a over two image at the reference image
and select this one. Basically, I want to create
the size pretty much same. Religious create first and we can adjust the size later on. I will select the
window collection and just disabled it for now. And yeah, basically focused
on this thing only. So this shape is, I think pretty easy to create. Let's move it backwards. Also. I will move it to
the center or the origin. So press Shift
plus S and select, selection to cause up. Alright, now it is exactly at the center
press Shift plus a. Let's add a cube In this down. Now basically match the scale. Let's quickly enable our window. Let's see, I basically want to give them the same thickness. I will select this and let's increase the
thickness a little bit. So press a to select everything. Then press Control a. Yeah, I think it's just fine. Now select this
piece plus seven. And let's just scale it
down to press S. And why. So you have basically
something like this because it will
be going this week. On the side of the windows. I think this much thickness
is enough for both of them and let's just
disable that Windows. One again, enable X-ray. Now what we want to
do is first we need to apply the scale tool, select it, press Control
a, apply the scale. Now for staff. Now let's add a
bunch of edge loops. So first, let's
add one over here, one over here, and
another one over here. We can basically select this
and select all these faces. And let's try inserting
them together. If you will try to
insert them together, you will see it will
insert this way, but we want to insert
them individually. So press I once again. Now you will see the
faces in individually. So again, go back to the
reference image, enable X-ray. I once again. And yeah, I think instead of
this much is enough. Let's press U to extrude
it backwards like this. Alright, so what I want
to do now is I also want the thing I did over here to appear
at the back also. So let's see how we can do that. Press Tab to go Eight more. Add an edge loop over
here in the center, so it Right-click like this. Now press seven for
top view enable X-ray. And just select all the vertices
on this side, like this. Now press X basically
and delete the vertices. And we can add a
mirror modifier. Now, on the y-axis, we have it on both sides. Now. Also, another thing that
I will do is I will select this big face, this one, and press X and delete the face so that it is hollow,
something like this. And now press Tab, press one, and now select
this edge loop over here. So hold Alt, select it
enabled clipping and just move it in like this so that
there is no visible spaces. And yeah, that
looks pretty nice. Let's add a bevel modifier. Apply the scale, enable harder
normals and auto Smoot. Next I will establish games. Just select these three
phases, so fourths plus three, and then select these three
phases while holding Shift. Let's press I once again,
extruded outwards. Again, I will insert this, extrude it outwards
and scale it down. And now you will
notice that when I tried to scale all these phases, this scale like this way, like they are skating like
a single entity only. But I want to scale
them individually. So to change this, you need to click on
this icon over here. So right now as you can see, it is set to medium point. It will take the median point of all the selection
and then it will do all the scale rotation
and things like that. But you can also change
this to individual origins. So now if you scale, you will see the faces are
scaling individually. If you rotate them, they
are rotating individually. This is like a really
helpful command. You can see the
difference clearly. So select individual
origin over here, and now scale it down like this. I don t think it looks good. I will undo it. Here. I want to just
insert this once again, but not give too much insect. This much is fine, then
extruded outwards. Let's scale it
down a little bit. Insect. Just a
little bit extrude. Yeah, I think this
looks better to me. I will press a to select
everything and then just move it a little bit on the y-axis to make it
a little bit thicker. Because I think it
is right now to ten. We will adjust the window
also later on. But yeah. Alright, now plus one
again for front view and we just need to basically
create this design over here. Let's see how we can do that. Obviously, we will use the mirror modifier
to either work. So let's see, I have
hidden the window for now. So you can just select this
and press H to hide it. And now let's add a plane first. Rotate this by 90 degrees. And make sure to like be, place it correctly. Over here. Just select everything
fits perfectly. It does not have to be
like 100% accurate, but yeah, just roughly place
it over here like this. And now first apply the scale. So press control a,
apply the scale. One for front view press Tab. Add edge loops like
this in the center. So it Right-click. And this time I
want to divide it into four equal parts
because as you can see, we can only work on quarter of this and rest would be done
by the middle modified. So we basically have to
divide it in four parts. So press Control R
again like this and add edge loops in the
center. From here also. Now press one and basically
select all these vertices, press X and delete them. Now add a mirror modifier. On the y-axis also basically set this vertices,
the center one. So let's start now
press Control R. I'd see over here. Extrude this downwards. Again. We basically have to
do the same thing again. Press Control R and add
a vertex u over here. Now just because Jeevan
zed and snap it together, select them both with F.
Press Control R again. Press E and Z. Make sure to enable flipping so that these joint in the
center like this. Select these two and press F. Again, press control our residents
and hold Control. Them together.
Selected, press F, select this word is c plus e, and just join it like this. Make sure to press X so that
is loved on the x-axis. Add one vertices like this. Extruded of words. Basically these are the same
thing that we did earlier. So I will just finish
it up quickly. And yeah, I think our design
is done not so it was pretty simple as compared
to the last one. So now press alt plus H to
bring it back. And let's see. I will just show you another
way to give this thickness. Instead of using
the skin modifier. Let's disable Extreme
Risk tab press a to select everything
and press Control J. We can obviously, definitely
use the skin modifier also. We have something like this. It works pretty good, but let me just show
you another way, which I think is a little bit better in terms of
adding thickness, as you can see
around the corners, skin modifier does not
do that good of a job. So let's see how we
can achieve that. So select this press Tab
to select everything. Now press E to
extrude it like this. Then press Y locked on the y-axis and let's
extruded this much. Now you will notice
that we have given it a thickness in the y-axis, but it is still 2D only. It does not have any thickness
in three-dimensions. So to do that, basically select it and this time we will
add a solid if I modifier. Now you will see we can add thickness in
three-dimensions like this. But you will notice it
is still pretty weird. Firstly, select this
and press Slash to go into the isolation mode so
we can view it properly. And to basically fix this
issue, just select it, go over to mode and change the mode from simple to complex. And as soon as you do that, you will notice that most
of the issues are fixed. But over here, you can see it
still looks kind of weird. And now it might be possible that you
absolutely do not face this issue because this
is like a weird kind of issue which depends
on how you model it. And it can appear in like a completely different
location to mind. Maybe it will appear over
here or here. To fix this. Again, it is very
simple press tab and we can easily see that the
issue is this face. So first press three
for Face Select. And we can easily see
the issue is this face. So just select this face, redshift plus n. And as
soon as you do that, you will notice that the
issue is completely fixed. So actually the problem was that the normals were flipped. This phase, as you can see, it appears on this side now, but if I press Shift plus n
and nothing really happens. But if I enable
inside over here, now the face is flipped. So basically that was the issue. The face or the
normals for flipped. So to recalculate normals, we have a handy little
shortcut that is Shift plus n. And you can see it will recalculate terminals
and normally it's fixed. Now, as I said earlier, it might be possible that
your issue is over this face. Let's see your faces
appearing like this. You can see this does not like
really cause any problem, but you can see how it works
like flipping the normals. Let's see if this
thing is affected. If I press Shift plus n
and you can see it kind of makes the face many viewed
or the thickness weird. It is not equal on
both the sides. It can appear on any
of the faces of yours. Say I just figured out which
face is causing the issue. Select it and press Shift
plus n and enable inside now. And yeah, basically
that will flip it. So you might have to do a little bit of work
over here, but yeah, this works a lot better as
compared to the skin modifier. If I just select it, press Shift plus D
to duplicate and press X, place it over here. Let's remove the solidify
modifier, press Stat, and also remove this the
thing we just extrude it. So yeah, we have
basically this thing that we created a
little bit earlier. And now we add the skin
modifier to this press Tab, press a, press Control a. And as you can see, it
will give us this result. Which to be honest, if you look at it
from a distance, does not really
matter that much. But if you look at closely, you can see around the
edges and corners, it kind of looks pretty weird. And over here, the
corners are pretty perfect in 90 degree angles. So if you feel like adding the skin modifier is
really easy and you don't want to like go through
this much of hazards. You can definitely just add a skin modifier
and we completely fine with it because from a distance it does not
even matter that much. They both look exactly the same. But now you basically
know how we can give thickness to a bunch of
vertices two different ways. So that will help a lot. I will now delete this slash to come out of the
edit mode, or sorry. Isolation mode. Let's select this and give it a little
bit more thickness. Make sure to apply this key. Yeah, so the scale is applied. And I think our result
is pretty good. Okay, so one more
thing that I do want to compare between the
solidify modifier and the skin modifier is that skin modified is
like really high poly, but the solidify
modifier is like pretty low poly and
works really good. So yeah, it is better
if you use this option. We can also add the
bevel modifier to this to make it
look even better. As you can see, the bevel
will work perfectly on this, making it look even smoother. Make sure to enable hardened
normals and auto smooth. You can increase the
number of segments if you want to make
it even smoother, but that will increase
the number of vertices. Let's see, I think this image is pretty good having
only one segment. Let's enable that the
windows now, the two pieces. Now press G Then x and move
it over here at the corner. Let's select our window. If you remember, we like give this thickness in a different
way by using solidified. Let's see if we can do the
same with this window also. So instead of removing the
skin modifier over here, I will just duplicate this, press Y and place it over here. Let's press Slash. And let's try doing that because this objectives like
fairly complex. So I am thinking that
solid if I modify it, might not work with it. So remove the skin modifier, press Stat, proceed
to select everything. Now just extruded outwards
like this on the y-axis. Now I will add the
solidify modifier. Let's increase the thickness. Make sure to change the mode
from simple to complex. And we have a couple of
issues here and there, like, unlike these other
issues of normal Sunday. So let's select this
and try fixing them. These two faces. And yet that fixed it
over here also, right? So basically I'm selecting all the wrong places and then
just pressing Shift plus n. I'm basically and yeah, that is, I think pretty
much solving a problem. Let's select both of these
phases then press Shift ten. Alright. Yeah, I think
that basically fixed all our issues and we created
a better window version. I think it would be better
if we use this one. Because over here we can increase or decrease
the thickness even better in my opinion. So let's just say I select this and instead
of deleting this, because we might
need it later on, Let's just select it, press M, and add it to a new collection. And I will name it as extra. Hit. Okay. And disabled
this extra for now because we might need it later on for
seven, for top view. And let's place this one. I think this is now
our original window. In my opinion, I think
it looks better. Shade smooth this and
also enable auto smooth. It looks better to the skin
modifier one because they are not like any annoying
edges and corners, as you can see in the extra one. These edges. And also, if you'll notice the word sees, the skin modifier has significantly more vertices
than the solid if I want. Let's just disable this. And now we have this
71 for the front view. And let's just place
them correctly. Select these two and let's just increase the scale of them. The size of our main window. And yeah, that looks perfect. We can also add the bevel modifier to
this if you want to. If you add a bevel modifier and it does not really show up, what you can do is go over to geometric and disabled
clamp overlap. Now we will have this kind of like completely weird thing. So just keep on
decreasing the amount. You have something acceptable. So let's just set them to 0.00 10.005 I think
is pretty good. And yeah, you can see
now we can add they will manually enabled harder normals. Alright, let's move further. I will select this window, these two redshift plus d and press X and duplicate
them over here. Just to see how it looks. Select these two again, press Shift plus D and also
move them to the right side. They've also use the
mirror modifier, but let's just list
them like this. And yeah, I think I want to
have something like this. Alright guys, so let's
just say 10 files. And I think for this video, this image is pretty good. It alt plus H to bring back this reference image
selected press M, and move it to the reference
images collection. Select all of this. Press M and move
this to the windows. So these are
basically a Windows. We have completed a
couple of models now, let's keep on moving
further in the next video. Thanks for watching. I'll
see you in the next one.
10. Creating the Small Shelf: Hello, Welcome guys. So in the last lecture we
finished modeling or Windows. So let's just turn this
collection of right now. And in this video, we
will be modeling a shelf. If you open up the
reference images folder and go through them, you will find that there are some types of shelf in many of the reference images
like this over here you can see we will be
creating this one also. But for now I think first
I will create this one. The circular type cells. They are present in a
lot of reference images, so we will be creating them. And we have this reference
image over here. Not really perfect, but we can definitely use it to
create the shelf. Alright, so let's start. First. We need to bring the
reference image into Blender, suppress one for the front view. And now press Shift plus a
image and reference image. This one. Alright,
so to start off, let's just add a circle shifting
mesh and add a circuit. We need to rotate this surface Arvin x rotated by 90 degrees. You can type 90 or the number, but I will select this image and just move it backwards on the
y axis like this. Okay, So there is one
thing that I want to edit before I start
editing our circuit, I want to increase
the number of words c. So I will just
delete this circuit, press Shift a, and
add another one so that we can edit the
vertices over here. As you can see, let's just
increase the vertices 32-64 so that it is a
little bit smoother. And yeah, I think that's better. Now rotate it on the
x-axis by 90 degrees. One for the front view. And let's scale it up. I want to roughly match
this outline over here. So let's just scale it up, move it here and there
a little bit and try to fit on the
reference image like this. Yeah, as you can see, this is pretty good
in my opinion. Now I will just press Tab and just delete the
right side would see so that we can use
the mirror modifier. Makes sure to enable
clipping also. Now DVDs bottom vertices
X, delete them. Basically something like that. And let's see next what
we can do is press Tab, press a to select everything, and then press E, wine
and extrude it like this. Right-click, Shade Smooth,
enable auto smooth. And now just press Tab again. Enable X-ray now to select both the vertices
because we have edge over here. Both of them now press E and then z and extrude them
downwards like this. We have, we want
something like this. And now we can easily give this thickness by
adding a solid. If I modify slider scale, Let's give it a
thickness of 0.05 Navy. Yeah, we can always
adjust it later on. That's pretty good I think. Alright, for seven,
for the top view. And Lexi press Shift
a and add a queue. And basically this will
be our bottom part. So I'm not really trying
to fit it exactly with the reference image and the
rest roughly modelling it. Something like this. So now let's just scale
it up on the y-axis. So press S Then, why? I think this much
is pretty good. Now we can select this, add another mirror modifier. This mirror modifier
is on the object, but we will add another mirror
modifier and this time use the middle object as this cube. And now select the y-axis so that we have
something like this. So just the placement
a little bit. And yeah, basically we have
a rough design of the shelf. Now we can start creating
these inside compartments, which is I think
fairly easy to do. Alright, so let's start press
one and press Shift plus a and add a plane less than x. Rotate this by 90
degrees. Enable X-ray. Scan this down. And now basically
what I want to do is I want to make sure that
all the edges that we create, all these ones are equal
in size because in the reference image they
don't really look equal. As you can see clearly, this one is wider and this
one is like a lot thinner. And I want to make sure that Size is uniform across
all these lines. So to do that, but
I will basically do is I will go over
here, first press tab. And you can come up over
here and enable excellent. As soon as you do that,
whenever you select the edge, you can see the length
is written over here. Right now, if you scale
this down or scale it up, you will see the length
stays at two meter only. The reason for that
is we first need to apply the scale for
this to work properly. So fly the scale. And
now if you press tab, you will see that the length of the edge is written over here. And now you can press a violin the edit mode only if
you decrease the size, you will see that the
Agilent is decreasing. So let's just place
it like this. And you can see the edge
length is somewhere around 0.07 right now, if you can see it over here, I will increase the scale and keep the size exactly
at 0.08 m or roughly at 0.08 m. And then what I
will do is I will try to make each h of 0.08 m only. Now press one for vertices, select these two, press G and Z, move them down over here. And now basically we have to do the same thing
that we have done. So long. Press Control R, add one
edge loop like this. Now, when you have added another edge loop and
now you press G and Z, you will see this edge. Agilent of this H will show up whenever you try to move
this edge over here. So you can easily place
it exactly at 0.08 m, so rigid and Z, and you
will see it is decreasing. And as soon as it's 0.08, you can just stop
somewhere around here. Similarly, do it for hair also. As I said, they do not
really look equal in the reference image because
the reference image is not. But we can make them
equal ourselves. So now select this
edge, press E, the next, extrude it till here. Select this edge, press either an ex,
extraordinary till here. Now similarly, keep on
adding edge loops like this. Press Control R
add one over here. Let's control I
add one over here. And now when you press G
and X to move it around, you will see that
this edge over here, the edge length
of this edge will show up whenever you
try to move this. So just place it at
0.08 m. Select this, press E and Z. Here. I think it's Control R again. Again, the 0.08 m. And yeah, basically we have to do
this again and again, so I will just
quickly finish it up. You can try doing it on your own or you can just follow me. As to press E then extrude
downwards still here. Again, add an edge
loop and extrude it is 0.08 m. Alright, so this part right over here. Now we have to first press E, then X and extrude it till here. And we basically need to
connect these two edges. So it can be a
little bit tricky, but it is really simple. Make sure to enable
vertex snapping. Add an edge loop over here at
the top press Control lot. While moving in, just hold Control and snap
it to this word, see that they are
perfectly in line. And now the inverse
control, our first, make sure that this edge over
here is 0.08 m, like this. And yet, as soon
as it is 0.08 m, you can add another edge loop. Just hold Control and
snap them together. Select these two edges. Now press F. And yeah, basically that was it. Select this one now press E
and Z extruded downwards. And yeah, I think we are pretty
much done. Disable X-ray. Let's bring it out over here. Press tab, select
this edge over here, plus g, then zeta, and
move it up over here. Let's see what we can do next. First, I want to add
a mirror modifier. Select the middle
object as this, and select the y-axis. Disabled x-axis. Stab a to select everything. And if you want, you
can now disabled Agilent so that it is not really visible
because it can get a bit annoying because you can
see all of these numbers. So you can just disable
it if you want to know, risky to extrude it backwards
still here I think. First what I will do
is I will add Bevel, press Control a and
apply the scale. If your bevel is
kind of messed up, you can press Tab, press
a to select everything. Then press Shift plus
n to recalculate the normals that can fix your
issues if there are any. Enable hardened normals and
also enable auto smooth. I don't think I will
increase the segments. I will keep it at one only. Now decrease the amount. I think this one is pretty good. Next, what I will do is
select this press Tab, press control loop like this. Select this face, press E, then extrude them to
join them together. But first make sure to enable clipping in the mirror modifier. And also what I will do is
again enable excellent. Just make sure like the
edge loop that I add 0.8 m, 0.08 m. I mean, something like this for S3, select this face plus e. Now joining them together. Similarly, I would just do it in a couple of
more intersections, like over here you can do it. Select this face, prestige
to join them together. This one and this one. Apu here, over here. I don't think I want
to add two of these, so let's just add one. So I will remove
this, select this and this y holding Shift and press Delete to
join them together. And lastly, I will
just select this one, press E and join it. Yeah, I think that looks
pretty good in my opinion. Next I will select this piece and let's increase the solid. If I thickness a little
bit more to 0.08, maybe. Yeah, That's pretty
good. All right. So yeah. This is
pretty much done. Now what we want to do is we want to like create some kind of stand over here where
we can keep the objects. So let's create
that press one for front view press Shift
plus a add a cube. And let's place the tube
over here like this. Scale it down and
scale it up on the x. Just that much so that it
fits over here perfectly. Now press S and Y, scale up on the y-axis. Selected press S then said, let's give it a little
bit more thickness. Yeah, that's pretty
good. If you want. We can just keep it this way and duplicate it on all the sides. Or we can add a bit more detail. So first let's press Control J. Apply the scheme slash to
go into the isolation mode, press Tab, press Control R, and add edge loop like this. It right-click to add
it in the center. Disabled, excellent. For top view enable X-ray and just delete all
these vertices. And now add a mirror modifier. Press Control R, and add edge
loops over here like this. And the corner slash
again to come out. Face Select, select
this face plus e. Extruded outwards like this. Maybe let's give it a
little bit more thickness, press Control R and
add it in here maybe. Now select this phase plus
three and extruded outwards. We also undo the
mirror modifier, so add it back again. Establishing risk
tool and select this edge and press Control
V to bevel it like this. It looks pretty
good in my opinion, right-click Shade Smooth. Also enable auto smooth. Let's add a bevel modifier. Let's decrease the
thickness a little bit. So select the bottom face these to press S and Z
and move them up. Enable harder normals, and
also enable auto smooth. And I think now it
looks pretty good. Just a little bit of
adjustments over here. I will select this
corner and this G and X, this movie till here. And yeah, that looks
pretty good in my opinion. Now I will just select it, press Shift plus dy. And duplicate it over here. Press Shift plus D,
placed one over here. Shift plus d plus
z, one over here. And let's see, we can basically adjust the sizes a little bit. Stab list is in the
center like this, this tab enable X-ray and
just move it like this. Similarly for this
one also stab again, enable X-ray and just
move it over here. This one also I think I
will increase in size. And if you excellent this one, press tab and select
this face and push it in a little bit so that they don't really
overlap like this. And yet that on SBA
thing looks much, much better and cleaner. Let's hide this reference
image so press H to hide it that we can look
at it even better. Yeah, I think shelf is looking
pretty good in my opinion. I will select this
press Tab to select everything and press S then Y, scale it down on the
y-axis a little bit. Alright, so I think
lastly we will just details the bottom
piece a little bit more because right now it is
basically just a cube. So let's see how we can do that. I don't think I will
be creating something like this result plus
H to bring this back. Because I think this is too detailed and we
don't want to spend too much time on this
because it will be in the background
somewhere, this prop. So I will select the
reference image, press M and move it to the
reference images collection. Alright, suppress one
for the front view. Let's see what we
can do over here. I will select this. Let's scale it down a little bit like this. Select this press Control a, apply the scale and just the naval harder
normals and auto smooth. Dab. Press three for Face, Select and select
this bottom face. Let's just bevel this. Create something like this. Smooth daughters
moved. Yeah, Honestly, even this looks much, much
better than the last one. Press tab. Let's
select these topics. Select the vertices.
Just a second. What we can do here is first, left side of the edge loops. So press Control R, add
an edge loop like this. Now select the top loop. So hold Alt and select this
and scale it up like this. Need to select the whole loop. It was not really selected. Selected manually
by using shift. Now press S and X less than Y. Move it upwards a little bit so that there are no
shading issues. Select this middle loop. So hold Alt selected
press Control v degrees of segments
using a mouse with. Now again select
this middle one. Now you can press Alt plus S
to scale it down. This way. We have something like this. Let's just reduce the
bevel and you should wait. Yeah, I think this looks
pretty good in my opinion. Let's press Save, select it and press M to move
it to a new collection. And let's rename this
collection too small. Because we will be creating
another shelf also, a little larger one. Make sure to like just this properly so that
it fits correctly. Everything. And there are not
any empty spaces through which like the
objects are floating. Yeah, I think this
looks pretty good. We can hit Save. And we can disable this. Now we can disable
this collection. We are done with
this. Alright, so I think this is it
for this lecture we will continue from
here and the next one. Thank you for watching.
11. Creating the Big Shelf: Hello and welcome guys. So in the last lecture, we modeled our small shelf. And as I mentioned earlier, we will be also creating
a bigger shelf. So let's do that in this video. If you will again, go through
the reference images, you will find this
image over here. And we will be following
this for our bigger shelf. So you can try creating this on your own because the way we create this is pretty
much similar to the last shelf that we
created in the earlier video. You can try this on your own, but if not, let's start now. I will bring this reference
image into Blender first. So press one for the front view. And let's see, press
Shift plus a image, the friends and bring
in the reference image. Alright, let's see. We will start by adding a plate. So go over to Mesh, add a plane. Again, rotate this
on the x axis by 90 degrees. Let's scale it up. Enable X-ray. And if you remember correctly
in the last video when we were modeling this, we tried to keep all
the edges similar by measuring the edge length. We enabled the edge
length from over here, select the plane, go into
edit mode and enable. Excellent. Remember we tried
to keep the agency. We can also do that
in this one also. But as there are a
lot of edges in this, it will be like quite tedious. So what I will be
doing is I will basically eyeball the
edges and tried to keep them off the same
size just by looking at it because we tried to
measure each and every edge. It will take a lot of
time creating this. I don't really want to
get into that right now. If you want to create everything accurately in both early, you can definitely enable
Agilent and do that. But yeah, I will just quickly go through creating this and I will show you how
we can do that. First, let's press Control R, add edge loops in the center. It right-click and we
can delete the vertices. So plus x lead. And let's add a mirror modifier. I will select this edge, press X, and delete the edge. Because we need
these vertices only, maybe not even this one. We can select this, these two, this x and
they need the vertices. Now we have these
two only press E and X extruded like this. I'll press Control R. Add
an edge loop over here. This edge risky than x. And make sure to not like
join them in the center. I want to keep like a
little bit distance. So yeah, just keep
a little bit of distance and not joined
them in the center. Let's press D than x and
move it like this so that this line appears
exactly in the center. Yeah, that's pretty
good. Press Control R. Add another loop here. Select this edge plus Eden Zed. Select the reference
image plus g, then vi, and move it like this. Again, responders tab. Now in basically do the same thing that we
did in the earlier shelf. We keep on just adding edge
loops and join them to create all these edges that you can see in
the reference image. So let's start. Basically pretty
much the same thing. So I won't really be
coming dating over my actions because I'm pretty sure you guys know
exactly how to do this. You can see we need to
join this edge over here. So how we can do that is
press Control R first, click anywhere, then breastfeed
and Zach to move it. Now you can hold
Control to snap it over here to this vertex so that
they are perfectly in line. Makes sure we have vertex snapping enabled over here and not any other
type of snapping. Again, press Control R, add one like this, but gene and z and
snap to this one. Now we can select this edge, this edge press F. And yeah, you can join them. Start from over here. Press Tab, press Control R. It's Control R again. I've been like this. Again now we need to
join this over here. Press Control R at AU, right around here,
then rigid and z. And while holding Control, you can snap it like this. This one plus E
extrude it in here. And now we need
to join this, uh, you press Control art, add an edge loop rigid and
Zach hold Control to snap it. Again, add another one. Gene zed, snap it together and just join
these two edges, press F. Alright, so now I
will just basically complete creating
all these edges. So yeah, you can do the same. We can fast-forward
the video and try doing all of
this on your own. Or you can just quickly
skim through the video and you can go to specific parts if you are
facing any kind of issue. But I'm pretty sure you will be able to read this easily now. Alright, so yeah, I
will do that now. Basically just adding a bunch of edge loops only and
joining them together. Alright guys, so now
we're pretty much done with the modelling of all
these edges of our shelf. So let's disable the x-ray
and see what we can do next. Properly make the building. Let's see, select
this press Tab. And now what I
basically want to do is I want to bring this forward. As you can see, the origin point is at the center over here. So I will enable the
mirror modifier add another axis also so that
we can make these 3D. First press Tab to go
into the edit mode. Now press a to select
everything, then press G, then vi, and move it
forwards like this. The reason I did this is because if we move
in the edit mode, if you remember correctly, let me just show you
if I add a cube. So right now if I move this, you can see the origin
point is moving with this. If I scale it or do
anything with it. But if I press Tab and now if I press a to select
everything in this cube, delta G, the origin point stays over here only and
the cube has been moved. So you had this can be used to our benefit as now,
if you'd like. Just to say again, yeah, if I use the mirror modifier
on the queue, right now, nothing really happens
because the origin is at the center and a cube is
symmetrical from all sides. But now if I press Tab, press a to select everything, and now I move this
in the edit mode. You can see I can edit
the mirror modifier now, because now the
origin point is not exactly at the center of the
cube and it is authentic. So that's why we can
see two cubes now. And the mirror modifier
is working properly. So that's why what I did. Basically, I selected this thing and I moved it in the edit mode. So that's why the origin
point is still over here. And now I can enable it
on the z axis, sorry. And this way you can see we
have something like this. So let's see how much thickness
we want to give this. Go back to item, press Tab, press a to select
everything then plus g, y and move it inwards. Let's just keep it at this right now and we can
change it later on. So now press Tab again, while everything is selected, press E and extrude
dislike this. Next what we can do is we
can join some of the edges. As you can see over here, we have like slabs created. So we will not join
a couple of edges to give it that shelf like look. So press tab risk-free for Face Select and select all
these faces at the top. By holding Shift one-by-one, then risky and join
them like this. Make sure to enable flipping. And now do this so that it
stops exactly at the center. Let's do the same for
a couple of mortgages. So press tab, let's
select this one. This E, join it. I have to make sure to like
look in the reference image. Let's join these on to next, as you can see over here
also this is joining. So press Tab. These two phases plus e. You can see the male modified is handling
the right side on its own. See, next we can select
these two edges. Obviously you don't
have to like go exactly according to
the reference image. You can definitely use some edges on your own and make it look a little
bit different. That's totally up
to you. Let's see. This one also, I think next
is this one in the center. Overhead. Also. Make sure to select this face also Na plus E. Yeah, that looks much better. This one over here, plus E. Alright, so yeah, I think
this was all of it. Now we can again
press tab and select all these pieces at the bottom. Enjoying these to create
this kind of float. We can maybe select
this face also now press E. All right, This looks pretty good, or shelf is looking very
nice in my opinion. One thing that you
guys might notice is, let's say we select this and
add a bevel modifier to it. I don't think it
is that apparent, but if you look closely, you will see some issues over
here in the center line. In some of the areas, as you can see, it is
not really that visible, but the line where the
middle modified joints, you can see there is a little
bit of shading issues. And the reason that
is being caused this, like if you don't
want to fix it, it is totally up to you because it is not even that apparent. We just show you why
it is happening. There's just done the
mirror modifier for now. And you can see we have
these phases or here. So if I enable that
the mirror modifier, these phases are like on
the inside of our object. So that's why these
can cause issues. As you can see there on the inside of the
mirror modifier over here. So what we can do
is basically press Tab and goodly just select all these pieces that are technically on the inside
of the mirror modifier. And you select them,
press X and delete. The face is like this, that
it appears to be hollow. So when we enabled that
the mirror modifier, so now there are no
faces inside the object. So now you will not see that line appearing
in the center. As you can see over here. I don't know if it is
visible in the video, but it might be visible
in your own mode. So let me just quickly fix this disabled limited
modifier, press stat, and just quickly
select all these faces that are on the
inside of the object. Like this issue appears
sometimes you have to make sure that whenever you are
using the mirror modifier, they are not really any faces
on the inside like this. And now press X,
delete the feces. Now you can just enable
that, the mirror modifier. And now you won't
see that weird line appearing in the same
time, even the slightest. Let's adjust the
bevel modifier now. Enabled harder normals
and enable auto smooth. All right, so that's
looking pretty good. Now. One again for front view, redshift plus a cube. Skin this cube down and we
will place this over here in the center to make our drawers. I'm just scaling it. Fit properly. Alright, that looks pretty good. Select this and press Control. Apply the scale first, stab and add edge
loop in the sangha. It Right-click. And again, we can delete this and use the
mirror modifier. One thing that I'm noticing
is the disabled the meter. And we like forgot to
extrude this face out. And if you enable the middle, it is looking kind of weird, like empty space in the center. So to fix this, and this would be like a nice learning
thing. How can do that? I can press one for the vertex, select hold Alt and select this complete loop x and
delete the word sees. Now first before extruding, let's just fill out this face. Select this press F, F, F, F, and fill out like this. So basically what I did
is select this edge and keep on pressing F
to fill the face. And yet, now press
three for Face. Select, select all these faces. Enable the mirror again and
just join them like this. That looks much, much better. And if you remember correctly, disabled a minute and
just remove this face. Now, this time we are not
removing the vertices, but we are removing
only the face so that now it appears hollow like this so that we don't have any issues by using
a mirror modifier. And now our model is perfect. Let's latch. Alright, let's see next what we can
do is first hit, save this one for
the front view. And let's create this thing
over here in the bottom. And I think that is
pretty easy to do. The shifting, add a plane, rotate by 90 degrees. They see it over here like this. Press S, then x, scale it up, enable X-ray staff x and delete all the
edges and faces. So this will keep only this
and that is what we need. Select this and now this extrude the outlined by pressing E again and again
and trace it out. One very basic and very easy. We can also use the
mirror modifier for this, but let's just leave
finish this up because it is not really
that big of a deal. For the last two
words is just select them and press F, we join them. Now this a to select everything. Then again press F to
fill out this face, Jeevan y, and move it
in the front like this. And now select this. Let's add the solidify modifier to give this thickness and
also apply the scale. Add a bevel modifier, Moody's, and enable auto smooth. Alright, so pretty good. Now we can add the
mirror modifier to duplicate it on
the other side. So Miller select the
middle object as this. Select the Y axis, the Z axis, I think. Yeah. Now the only thing left is to detail these
drawers a little bit. Alright, so what I will
do is first I will just, instead of keeping this as a
complete single queue bully, I will just delete this
cube and add a new one. Press Shift plus a add a cube. This time. Just like place it like this, only on a single rod. That way it makes it
a little bit easier to model them. Scale it up. Now the scale on the
y axis like this. Now we can easily add
a mirror modifier. Select the middle
object as this. Yeah, that's perfect. And Rowley, apply the scale. Now let's see. One for the front view. Risk dab, risk control are
an add an edge loop over here is three and maybe we can select these faces, press I to insert them. Press I once again to
insert them individually. Let's extrude this inwards. Hristov once again, and this time just select
this top face, insert it a little
bit, suppress. I inserted just a little bit. And now extrude it
outwards like this. Let's add a bevel modifier first and enable harder
normals and auto smooth. Alright, Next again, press Tab, press Control art and add an
edge loop in the center pit right-click to like create
these faces, these two. So again, press three
for Face Select, and let's just select
these two faces. And again, insert
them individually. Extrude them outwards. We can insert it once more. And I'm just inserting
an extruding to create a little bit
more interesting shape. And yeah, that looks
pretty good in my opinion. Let's just hit Save. And I think our shelf is
looking pretty good now. The only thing left is to create these handles that you
can see over these roars. But we will be creating
them at a later on point. For now I think this is
enough for our shelf. Afterwards we will create two different handles
for our drawers. But yeah, right
now I think it is enough press a to
select everything. Make sure to like
de-select this image. So hold Control
and deselect this. Press M, and let's
create a new collection. Let's name this big shelf. Okay. Disable this. And now let's select the image, press M and move this to the
reference images collection. Alright, we're pretty much
done with this video. Let's hit Save. And
thank us for watching. I'll see you in the next one.
12. Creating the 4-Fold Screen: Hello and welcome guys.
So in this lecture, the probe that we
will be creating is this one and this
reference image, you will see this folding screen that is behind that,
the background. We will be creating
this in this lecture. I have also added a
reference image for this. So this is the one
that we will be using. Obviously there are a lot of reference images
present online. You can definitely choose any other design if you want to. But yeah, we will be using
this one. It is pretty simple. And it basically can be modeled by all the things that we
learned in the earlier videos. So I'm pretty sure that you guys can easily
do it on your own. So let's press one and
start press Shift a and add an image In this end. Alright, so we just
need to create only one single door and
the rest we can duplicate. So I think I will
use this third one as the main reference
because as you can see, the first one is a
little bit tilted. So I think the third one
is the most flat one. So this one we can use easily. So Redshift a, add a
cube root over here. With the reference image. It does not have to be perfect. But yeah, just match it roughly. Yeah, something like this. Also, we will be using
the mirror modifier. So first let's select
the reference image and move it backwards. Let's add the mirror modifier. Now select this base
controlling of life scale. There's press Tab, add
edge loop like this. And also add one like this. So that we can only model
of water of this and we can remove everything except
this part over here. Press one for word, select, select all this like this. And you basically only
have one-fourth of the cube and now add
a mirror modifier. Also enable it on the y-axis. And we have something like this. Alright, let's proceed further. Press Tab enable X-ray. And the first thing
that we need to do is let's see if the
thickness is fine. I think I will reduce
it a little bit. We can obviously
adjust this later on. Let's apply the scale. Again, enable X-ray and let's
add a couple of edge loops. One over here, like this. One. Now just select
this face for Face, Select, select this
face, press I. And this time we do not
want to insert like this. We do not want to
insert individually. When one thing that
I want to show you is if you click over this icon over here on
the mirror modifier, you will also be able to
see the geometry over here. As you can see, if
a disabled this, we do not really see
the geometry over here. But yeah, we can enable this. And now we are able to see the faces on the
mirror modifier also. Now press I to insert the feces. And you will notice that
the faces are like in setting individually. We
don't really want that. We want them to insert
as a single phase only. Do that if you remember, we will press I once again. And nothing really happens
because you will notice that here when you are
laying in setting, you will see these two
options over here. One of them is boundary, that is the shortcut
and individual. That is, when we
press I once again, you will notice that the
individual I is not turned off. So what we basically want is we want both of these
options to be off. So now individually is
turned off bridge B now, now boundaries also off. Now you will notice that is
inserting as a single-phase. Make sure that both of these
options are turned off. Alright, so first let's enable X-ray and then see how
much we want to insert. I think somewhere around here is pretty good in my opinion. I don't really want to follow the reference image exactly. Yeah, that's pretty good. Now there's just extrude
this inwards pretty basic. You will notice that have this kind of face
appearing over here. We can just select this face and press X and delete the
face. Pretty simple. And now I will select this phase also that we just extrude it, press X and dilute it so that we have
something like this. Now, basically this one for
vertices select hold Alt, select this complete loop and we basically want to
join them together. So make sure to enable
clipping is D1. And join them like this. Alright. Let's also
add a bevel modifier, apply the scale and
use the bevel amount. Enabled hardened normals and
also enabled auto smooth. Let's see. Now again, estab again, select
this face over here. And again press I
to insert this. And maybe let's
insert it till here. Year I think is pretty good. Rescue to extrude it
backwards like this. And again, this x and
denude the faces. One, hold Alt and join
these two loops like this. Next we can press Tab again, press Control R, add an
edge loop like this. Press Control B to bevel this. You can increase the
number of segments. So I will just increase the
number of segments by one, like this large select
this middle loop. You can now press
Alt plus S and you can move the edge up or down like this to
create something like this. Let's first go to
the bevel modifier and enable auto smooth. Now it looks much better. You can also adjust the levels. I think this is fine. Again,
press Tab, press Control R. Let's add another loop. Again, press Control B. And this time select the middle
lobe again by holding Alt now plus Alt plus S. And let's
move it upwards like this. And yet we can do the
same thing over here. Is controlling be yeah, I think that's pretty
good in my opinion. Next, what we can do is press
one once again, the staff. And we need to create
these legs lengthening. Press Control R to
add an edge loop. Now you can see the loop is
being added in a slanted way. So press E to even it out. And you can press F to like flip between the two edges on the left side
and the right side. Right now, if you'd
like to even it out right now it is following the left side loop over
here that you can see. But if you like risky
then press F to flip it. Nowadays following the
right side one so we can place it around
here, I think. Now just select this face. So for S3, select the face
e to extrude it downwards. Let's click here. Next, I will select this and I want to add a
plane in the center. If you remember, I mentioned
that whenever we add object, it is added to this 3D cursor. So we can press Shift plus S, then select the
cursor to select it. This would bring the
cursor over here. Now I can press Shift
plus a add a plane. You can see now the plane
is added in the center, are then x rotated
by 90 degrees. Scale it down, scale
it up in here. And basically we will
use this way to project our texture onto in Substance Painter when we will
be texturing this object. So yeah, that's why
I added a plate. An expert we can do is
press one and we can create these designer things over here to give it a
little bit more detail. So let's see how we can do that. Let's just select both
of these objects, press H to hide them. Also, I will minimize
pure ref, rest one. And let's see, we can
start by adding a plane. So Redshift, they add a plane, rotate it by 90 degrees. Scaling down, lift
it up over here. Down again. Enable X-ray
and just try to place it in the center by hand like this so that we can use the
mirror modifier probability, That's why I placed
it around like this. Now, over here at
a mirror modifier. Or the first we need to delete the right side vertices,
select them, press X. Now add a mirror modifier. And what I would do is I will just select all of the vertices, press M and merge
them at center. That will basically
have a single word. See like this. As you can see, we have a vertice
v on both sides. So let's place it
somewhere around here. Now this E and start
extruding this image. It might not fit the reference
image properly over here, but that does not matter to us. Because we only wanted to
like create the left side. It does not matter
to us that it is not fitting on the
reference image of Narcan. Make sure to not
overlap these two. We are done,
reestablish a to select everything then plus F
to fill in the face. Let's disable x plus h, bring back the hidden objects. I will also hide the
reference image for now. And you can press one now. You will notice that
it is not exactly in the center of our object. So now I will show you a nicely if you drink
through which we can copy the location
of two different objects. So for that, you first
need to enable the add-on. So go over to Edit Preferences and search
for Coby attributes menu. So go ahead. It would be, I think disabled
by default, so enable it. Now, let's say we have this thing placed over here,
somewhere around here. And I want to place this thing over here exactly at the
center of this object, this one, so that we can place it over here
in the center. So to do that, you select
this, then select this. Now press Control C. So the
reason I selected this first, then second this one is
because I want to bring this object to the
location of this. I'll select this first, then
select this press control C. Now you will see this
whole menu up here, and you can easily
select Copy location. As soon as you do
that. You will see nowadays these exactly
at the center. Basically both of them
have the same location. Now we can easily press
one for the front view. Now press G and Z. I need
is exactly at the center. Now. Just scale it up like this. I will also enable back
the reference image. And yeah, what we can do
is they sit like this. And then maybe we can
just select this tab, enable X-ray and reduce the size of this from
over here like this. Yeah, I think that's fine. Now we can select
this press Tab. And now this E to extrude it. Shoots move this and
add a bevel modifier. We can also add a UV sphere. So press Shift, add a UV Sphere. Scaling down, basically over here is selected and the size of it. Now duplicate it over
to the other side. So either meter, select
the mirror object as this. And yeah, that's
pretty good. I think. Let's do the same thing for
the bottom one over here. Let's add another plane brush. If they add a plane rotated
on the x axis by 90 degrees, bring it down over here. Enable X-ray. And it is
already at the center. I think I will add a mirror
modify or add an edge, loop it, right-click and
delete the word disease. Now either minute modifier, select all of it, press
M and act center. Again, let's quickly start extruding pretty
repetitive stuff. And I think we can
easily do it now. Okay, I think this one is
like a little bit tricky to create because it is like
joining over here like this. So let's see what we can do. Let's start from over here
and just keep on tracing it. Yeah, something like this. And now when you
reach around here, what I basically want
to do is like instead of going around this corner, I will just basically
joined these two like this. Select them both. F. Okay,
it's something like this. I don't really want to join
it and go all over here. Now press Tab again, this a plus f. And we have
something like this. Now, restart enable X-ray and we need to create
these cutouts. That is pretty easy. You can risky and you
will have the knife tool. You can just raise this
out using the knife tool. Over here, then press Enter. Now you'll see we
have this new phase appeared over here for S3. Select this face base x
and the new interface. Similarly, there's
clear the other side also the Press K again
and start tracing it out. You don't really want to join
it or here in this edge, let's just join it like this. Press enter three for Face, Select, select this face
plus x and delete it. Now we have our shape. Again. Let's scale it up, maybe. Stab a dendrite 3D extruded. Shapes, mood, enable auto smooth and add a bevel modifier. You can see some issues
with bevel rest one, and let's see how
we can fix them. Br2 for it, select, select this edge here. And you can just adjust
it a little bit. And issues will be
pretty much fixed. Just because once I move it
a little bit, stab again. Yeah, now we're pretty
much good to go. It's smooth and
enable auto smooth. Let's just join it up over here. Maybe I will increase the
size, and this much is fine. Now we can copy these
spheres redshift plus D and bring them down over here. One. And place these over
here like this. Yeah, that's pretty good. We can select this face and moving a little
bit like this. The size of the sphere. Alright, I think
we are pretty much good to go. Let's save. Press Tab on this thing. Let's select this
face over here. We can be inserted and
extrude it out a little bit. Yeah, that looks
fine in my opinion. Let's hit Save.
And I think we're pretty much done with
that holding screen. Now we can just select
it for the top view. Let's place it like this, G plus G to move it. And now press R to rotate
it a little bit like this. You will notice that they
are rotating very weirdly. If you remember we enabling
this option from over here that is rotate on like
individual origins. So instead of that, select
back to bounding box enter. This way when I select them all, they will rotate like a single object. And
that is what we want. The seven for w plus r and
rotate it this much like this. Now press Shift plus D to
duplicate rests are again, rotate it like this. Press Shift plus dy. And again, I'm just giving them
random rotations and we basically have a folding
screen now it's saved. You can also create six faces. That is also fine. But I
think food is pretty good. I will now just select it all. M be the new collection and
put it in folding screen. Okay? And yeah, we're basically
done with this problem. Also select the reference image, press M and move to the
reference images collection. And we're done
with this lecture. Thanks for watching. I'll
see you in the next one.
13. Setting up the Room: Hello, Welcome guys.
So now that we have modeled a couple of different
drugs in this video, what we will be doing is we will arrange these props
that we have modeled into a basic layout for our scene to get a feel
how everything would look, and what else prompts
we need to add. Before we do that. First thing that we need to do is to scale the prompts that we
modeled according to the human reference
that we added. If you remember, we did
that for the writing table. So now let's do that for the remaining prompts and
then arrange them in a scene. Alright, so enable this
human reference model and also enabled this
chair collection. And you can clearly
see that the chair is pretty large compared
to a human model. So what we will do
now is select it all and try to scale it down
according to the reference. Let's see. Yeah, I think somewhere around
here is pretty good. If you want to like a closely matched my
scale information, what you can do is when you select all of them, just select, let's say this object so
that you can see the scale over here and match
it perfectly with me. But I don't think
there's any need for that because you can
just eyeball it pretty much. And it won't matter that much. So as you can see, it is pretty much the frame of
the human model. I've scaled the
chair accordingly. There you can also put this
game pretty much at that. And yeah, let's
just disable this now and move on to the next one. Let's select the windows. The windows one is
also pretty easy. What I want is that a human should be able
to pass through this. So I think right now
it is too large, so I will just select it all
and let's scale it down. Yeah, I think somewhere
around here is pretty good. So that our model can just
pass through this entrance. Like it should not be
that small or that big. So I think this is
pretty much perfect. Again, if you want to
match with the scale, you can just select them
all and make sure this is your active selection
so that you can see the
dimensions over here. And let's disable this, enabled the smallest shelf. Let's select it all. Press one for the front view. Yeah, I think around
here it's fine. Just about the size
of human Martin. Maybe a little bit
smaller than that. Yeah, I think this
is pretty good. Again, let's disable this, enable that the big shelf. Select it all. And
now scale it down. Yep, I think I will
keep it around here. Again to match my dimensions. Select this piece over here, their drawers, and then you
can match the dimensions. And last is folding screen. So again, we want the
screen to me like a little bit bigger
than the human model. Yep, somewhere around here. That is pretty much it
for the scaling on. That is all we need to do. And you will notice that the older models have
now skin like uniformly. They look pretty
relative to each other. And you're now what
we can do is we can start arranging
them into a scene. Let's see how we
can do that first, let's just disable everything. Redshift plus S to bring this cursor in the
center of our scene. So select closer
to world origin. And let's add a new
object for our room. So far the loom, obviously
we will add a cube, so press Shift, they add q. Now let's scale it up. I have already decided on
the scale for our room. So just put in the
x, y, and z values. So for the x put in at 6 m, Y would be somewhere
around 10.5 m, and that is 3.5. Next word I will
do is press tab. There's three for Face Select, select this phase plus x, and delete this phase. The reason I'm deleting this
phases so that it is easier to move in and out
of the room object, because if we don't like
delete it, it will be like. Very tedious to
move in and out and move all the objects into it. So yeah, let's just
delete this face. And now let's start by
bringing in our table. So that will be the first thing. It is exactly at center pretty much so let's
place it like this. Now I will open up beyond death to look at our
reference image. And we will place the objects according
to the reference image. This one was our main
difference image. So double-click on
it to zoom it up. And let's see. As you can see that the table is around at the center
of our scene in the room. So let's just select the table and move it back over here. And let's press 74 top
view enable X-ray. I think somewhere
around here is fine. Next we can enable the chair. Again, reset, enable
X-ray, select the chair. And you can then hold
Control and deselect the room and place a chair
like this over here. Three for the right side
view and move it down. That's pretty good.
One more thing that I kind of forgot to do is to make it easier to select
all of these objects. We will add an empty
object to control them. Let me show you what
I mean by that. Let's just disabled the
skew the room for now. I will rename this to two. And just keep it
turned off for now. And let's enable the
collections one at a time. So select the writing table. Now I will maybe just select this piece press Shift plus S then goes into selected to
bring the cursor over here. Now press Shift a, go to Mesh or go over to empty
and add a plane axis. So this is basically
empty object. And now what I will do is
while this is selected, so make sure to select
this empty object. Makes sure that this is
your active selection. Active selection is basically this yellow colored outline. And when you shift
select anything else, you will see now this becomes the active selection and rest
of them are orange color, so they are not really active. Make sure that this is
your active selection. So to do that,
first set of this, then press a to select
rest of the things. And now you can see
the empty object is the active selection. Hit right-click,
and you will see parent and now select object. So basically what has
happened is when you select this empty object now and
now you press G to move it, you will see along with it, the whole table moves
because this is now the parent of all
of these objects. So whenever you select it, rotated or scale it, it will happen to all the
objects that are under it. So all these that
we just selected. So this way it would
be very easy to manage all the things that we can
easily move them around. So let's do that for
each and every drop of ours so that it makes our
life a little bit easier. Disabled writing table
enable that The Chair. Now I will select this press Shift plus
S goes to select it. Again, add an empty object, redshifted, add empty
plea and access. You can maybe scale it
down earlier if you want. Also, let's select this
empty of the table. Now press M and move it to the writing table collection so that it does not interfere
with the rest of the things. Yeah. Alright, now select this, press a to select everything so that this stays
the active object. Right-click Parent and object. You can see all these dotted
lines are showing up. That basically means that all of these objects are
connected to this. Now when I move this, all
of them move together with it. Yeah, pretty easy. Select the empty now, press M and move it to the
chair collection. Disable it enabled the windows. Let's select this press Shift
plus S, call them selected. If the MDP an axis. Again, press right-click
parent object. Select this and press M.
Move this to Windows. And I'll disable right-click object m and move
this to small shelf. All right, Now
again, we are done. We can enable that the room, lighting table, and a chair. Now you will notice
that it is very easy to manage all the objects
and move them around. In our scene. We don't have to
select them all. Then de-select the room will now increase the
speed of our process. Let's move the chair
Electric going backwards. Yeah, Next let's enable
the folding screen. Only select this empty and now place it somewhere
around here. As you can see this overhead at the back and move
it back over here. Like this. Now we can start adding the small
shelf so enable it selected. I'm just basically
filling out the scene. Obviously you don't have
to follow me exactly. You can place them wherever
you want, however you like. Like it is totally up
to you the way you want to manage the scene. We have these windows, so what I will do
is select them, press Alt and z, rotate
them by 90 degrees. Let's just three for sideview. Place them somewhere
around here. As you can see, they are over here on the left
side of the table. So I will do the same.
Place them over here. What you can do is
select the room, estab move it down a little bit. Yeah. Next, select
the room press Tab, press Control R, and add
edge loop over here to here. Then again, here. Then again like this,
right about here. Then you can press
three for Face Select, select this face stress
x and delete it. And as you can see,
we have our new now, maybe not the window, it
is basically the door. Let's see. Next we
have this big shelf. So maybe we can rotate
it by 90 degrees, okay? Whereas art and Zaid
plus -90 -90 degrees. Please do over here in
the reference image, we can place it on the
right side also if you want to write on the left side only, so rotate it by 180 degrees and place it over
here like this. Make sure to only select the empty only and
not any other object. Alright, so I think seeing
is coming along pretty good. As you can see, these prompts
are nearly not enough. We need to create
some more of them. Like we can next focus on
creating these small tables, these stools that have, that have these plants on them. Later on we can focus on
smaller brands like the basis, the books scrolls,
everything else. But yeah, we need to create more browse to make our scene look more
like populate it. And yeah, as I said earlier, are setting up this layout
of the scene are will help us figure out what
would we want to create. What we can do is we can
select this chair, maybe. Let's quickly disable everything.
Only select the chair. And there is a little shortcut. You can select this
empty redshift plus g. And then this menu will appear and you can
select the children, and it will automatically select all the children of
that selected object. Make sure to also select
this empty again. And now press Shift
plus g to duplicate the chair plus y plus z the
next and move it over here. Rotate it by 90
degrees on the x-axis. So this R then z by -90. Yeah, like that. Let's enable everything back. We can place a couple of chairs on the right side over here. So again, select this
press Shift plus g. Children. Again select this press
Shift plus D to duplicate. Then you can just Jeevan y
and move them over here. You can rotate
them a little bit. So just press R then z and rotate them a little bit
on the z axis like this. Like make the positions
a bit more organic. Selected, bring it out here
in the front, like this, so that it does not
look all very perfect, like they're perfectly aligned
in a row or something. You can also maybe
select the table, rotate it a little bit
on the chair and it wouldn't backwards
rotate it like this. So yeah, so that
everything is not exactly 100% perfect because
that looks a little bit. Maybe the table I will set back to zero only the rotation. You can select the empty only, then type in zero. Back over here. Yeah. So we kind of set up a
layout of our scene. And now we can edit
upon This, only. Add things and change the layout of the scene
whenever we want. In the next video, what we
will do is we will create a couple of more broad
like these tables, some small stools, and yeah, we will add them to our scene. So thank you guys for watching. Make sure to hit Save. And also, before ending this video, I will
select the room, press M, and move it to a new collection and
lifts numerous as room. Because we will be adding
some things later on like these ledges or
these things overhead. We can add them to the
room collection only. Now let's just hit Save
and tenuous watching. I'll see you in the next one.
14. Creating Small Table and Chairs: Hello and welcome guys. So in the last lecture, we arranged all our
props into a scene. And as I mentioned earlier, that we will be creating
some more prompts like this small table over
here or like this tool. So in this video, Let's do that. If you go over here, we
have this reference image. So this is not really a reference image
that we can bring in, bringing into Blender and
then use it to model stuff. We need to just look over here from pure ref and then try to copy it up as close as we
can in Blender already. So I will just
disable everything. So you can drag your mouse
like this and disable everything is enabled back
the empty collection. Let's start by adding a cube. First, I will red-shift
test and cause it to gold origin to bring
the cursor over here, redshift pay, add a
cube. And let's see. We will start by creating
this thing over the David. So let's just scaled it down. Then press S, then z, and scale it like this. You want, you can see the
dimensions from over here if you want to copy exactly, buddy, I'm just
scaling it roughly. Move it up over here. And let's start by first creating a
basic shape of the table. And then we will
detail it further. Now again, I will press
Shift plus S closer to select it this time to
bring the cursor over here. Now add a cube, scale the cube down, and make it a little bit
smaller than the first one. Scale it down on
desert axis like this. Maybe around here. Let's select them both
risk and role-play. Apply the scale. I will select this cube. Press Tab, press three for face. Select, select this face and
also select the top face. Then press X and
delete the feces. Because the table over here, as you can see, it's hollow. So we need to create that. Next press Tab again, select all of the
faces to draft a, then press I to insert them. And if you remember,
you can press I to insert them individually. Let's insert this till here. X and delete the phases again. I think this is a bit too much, so let's just undo
this and insert it even more so that the
space is pretty small. I think this is pretty good
with x and delete the faces. Next we can select this, go over to modifiers
and add a solid. If I modifier. We'll give this
a little bit of thickness. Smooth and auto smooth. Alright. We can also increase
the thickness over here. Yeah, that's fine. Next what I will do is again, select this press tab. There's one for the vertices, select and select all the
bottom vertices like this. Alright, so now press Shift plus D to duplicate them like this. And now hit right-click
to place them exactly. As you can see if I press G, there are two sets of vertices. Now we can hit right-click to place them exactly
where they are. Now, press P and separate this. So if I press V, again, if I press P and
select by selection, so whatever is selected, a separate object would
be created out of that. So as we have selected
these forward, he's now you can press B and
separate them by selection. Now if you press tab, you will notice that this is a different object and these vertices are
different objects. So we can edit them further. To create this bottom part. I will remove the
solidify modifier for now and press tab There's a
to select all four vertices. Let's see, we can press E, extrude them like this, then print straight to
lock on the z axis. Let's move this to here. Now press S to scale it up. As you can see, it moves a
little bit towards the out. Then we can again press E, maybe the Zen again and again
press S to scale it up. Something of this sort. Now just press E and Z and scaling completely
downwards like this. Let's see how much
we have to scale. I will enable the
human reference model. According to this. This table looks pretty doll. As you can see, this
pretty tall for a table. So maybe we can increase
the height even more. Let's say somewhere around here. Maybe having this selected
all and scale it down. This way, I think this
feels pretty good. Now, select this
right-click Shade Smooth, and enable auto smooth. The next part that I want to do is obviously you can see all
this empty space over here. Let's create that.
I will just select this piece slash to go
into the Edit mode. 74 top view press tab. And let's see, let's divide it. Let's divide this into four equal half so
that we can read them and then use the mirror
modifier control on it. Right-click. Keep on adding
controller and keep on adding edge loops
and hit right-click to place them in the center. And now just select all of this. So press Shift and
select all this. And over here on the right, so that we have only one
fourth of the model left, respects and believed the feces. The word seize. Maybe the thing I did wrong was I did not
enable X-ray from over here. So extra helps us select like
the vertices throughout, you can see only the
top vertices are selected and the
bottom ones are left. So plus x. Now in hold Shift select
all of the rights or top side and the
right side, like this. And now as you can see,
everything's selected. Press X and delete. The word says. Next, let's add a mirror modifier.
On the y-axis. Also. Press Control R and add
edge loop over here, right-click and add
edge loop over here. Right-click. You can select them both or select
one at a time, G2 times, you can do two times moving just
along the edge like this. You can see if we
like move it along, you can see the values over
here on the top left corner. So let's say we type in a value so that we
can like perfectly align them from both sides
times. Let's try 0.8. That looks pretty good to me. Let's select this one. This DB2 times then type in 0.8, okay, it goes to the other side. So this nine plus
negative of 0.80 point. Next, let's see, I
will press three, select this face, this face
press X and interfaces. So I think this is pretty good. Let's add the solidify modifier now to give this thickness, as you can see,
slash to come out of the edit mode or
the isolation mode. Sorry. Yeah, I think this is
pretty good in my opinion. I will just bring these
down a little bit. And next we can
select the top piece. Let's add a bevel
modifier first. Just enabled both hard
and knowledge and smooth. We can create these ridges like, I think pretty easily the stab. Let's add two edge
loops like this. There's two for
Edge Select Folder. Then hold Shift and Alt to select both of these
loops like this. Press Control V, bevel. Then, first I will
press S and Z to move them apart a
little bit better. Now you can press
Control V to bevel. Then you can add a loop
just in-between like this, using a scroll wheel, you can add multiple,
but I think one is fine. Let's press Alt,
select this loop completely and hold Shift
and Alt and select this one. Result plus S and scale
it inwards like this. Make sure to scale it. This time. You don't have to like this
S to scale them inwards. You can also press
like just press S and then scale them
inwards like this. Or you can just
press Alt plus S. That will also do
the same thing. It is basically
shrink or flattened. So I would just press S now
and scale them inwards. So that's pretty good. Select, let's select the
top face and scaling this. And we can select
the bottom face and I was scared it outwards. That's fine In my opinion. Makes either select this
and add a bevel modifier. Lighter scale enabled,
hardened normals. And we can kind of
do the same thing. This also, alright, so Hristov and I will just add a bunch of edge loops
in the same time. So let's right-click. Again hold Shift and Alt and select all four
of these loops. And let's see,
let's try beveling them and select the middle loop and see if we can create
something out of it. I will this time
press Alt plus S because scaling I
think would work, that would result plus S. That works better. I think something
like this looks fine because we don't have to detail, dislike too much because it
won't even be that visible. One thing that I do want to
do is I will select this. And you can hold Shift and
setting these one-by-one. Let's select this and
press G Then why? I wanted to just move it
a little bit like this to increase the size of
it on both sides. Yeah, that looks better. S1 and I think I will make the
table a little bit longer. Enable X-ray and
select everything. Move this down. And I think
this looks much better. Next, let's create these
designs over here. These are, I think
pretty easy to create. You can select this piece, press Shift plus
S then closer to select it to bring the
cursor in the center. Let's start by adding a plane's press shift
D. Let's add a frame. Rotate this on the x by 90. Scale this down,
move it over here. And before doing anything, like, as you can see, the plane is currently in the center. So I'll press Tab to
go into edit mode, then press a to
select everything, then G to move it over
here to the left side. You can scale it
down a little bit. So the reason I did this in the edit mode is so
that the origin point stays over here in the
center of our table. So that now when I add
a mirror modifier, you can see because the
origin point is still here, we have like mirrored
this perfectly. Now basically what
I want to do is press tab this art and z and rotate it on the z axis
by 90 degrees like this. Again, scale it down. This way. We can use this shape
over here very easily. You can also enable distinguish over here so that
you can see them. We didn't modify it somewhere
over here. Select this. It's moving down. It makes sure to enable X-ray so that
everything is selected. Let's move this down risky
than x would like this. Even without. Then again either next. Edens that moves like this. Then make sure to
enable clipping first. Now press E, then X and join them at the
center like this. And you will see we have
something of this sort. We can now add solidify
to give this thickness. Apply the scale and you can see it pretty much have
something like this. Let's increase the
thickness a little bit and change it
to even thickness. Or maybe select complex
from over here. Then even these two are like
collapsing or like merging. Overhead is because
the space is too less. So you can press Tab and it will select this face and
move it out like this. And you will notice that
the issue is fixed. Degree the thickness
to 0.21 maybe. Alright, so now
we basically have to copy this on all four sides. So we can select this. Again, add a mirror modifier. Select the middle object as
this, select the y-axis. We cannot really use them. They're modified to put it on the other two sides because it is not really at the center. So what we will do is basically just select this, duplicate, this press Shift
plus d, z, then y. Let's move it over here. You can disabled
limited modify for now, rotate this by 90, like this one for
the front view. Here. I'm moving like this. And now basically again enabled
at the mirror modifier. But instead of writing
x expert in good. Let's create this
bottom thing now. This one also is pretty
simple to create. You can use the same
thing that we used. Just select this press
Shift plus d z moving down. You can keep something
like this also. Or if you want to create
something similar, Let's just select this
press Tab and even x-ray. And let's do need
all these vertices. Select the top ones,
move them down. I'm selling this one. Press G the next, and move it like this
after extruding. Yeah, pretty basic. Again, I will select
this, duplicate this. So you can disable
the mirror modifier so that it gets
easier to place it. One again, moment like this enabled the mirror modifier
on the x-axis. And yeah, that's basically it. You can give this, give them both a little bit more thickness on
the solid devices, the viewpoints you
like. This one also. Skip the 0.01. You can select it all. Then try like using scale, then press Shift plus
z and you can scale it like this to make it just
a little bit thinner. I think that looks pretty
good in my opinion. We can select it all.
I'll maybe first, let's add a empty
sub-array shifting. Let's add an empty. Disabled the human reference. And now while the empties,
the active selection, press a to select everything, then you can just right-click
painting an object. A to select everything.
Again, press Shift plus D to duplicate. And let's create
a smaller version of this table like this. You can again press
S then Shift plus z, make it a little bit
wider like this. Yeah, that is pretty
good in my opinion. We can maybe create
another thing. Let's see. We can get something like
this table that is very, very easy to create. Seven for the top view. And let's start
by adding a cube. So press Shift plus. First, let's select it all m, and let's move this to a
new collection and rename these two tables it okay. The shift day now
and add a cube, LLC. We want to make this table a little bit
bigger than these two. Maybe around this
size is pretty good. Scaling down on the z like this, we can enable that
the human reference to match the size of
it with the pivot. So this table is like you're not that big, but not that small. Also. Let's create
shorter like to Neil and I will first apply
the skill staff press Control-A add edge
loops both sides so that we can use
the mirror modifier again to create the legs. So select the top
side and selling the right side respects
delete the word sees. The mirror modifier
on the x and y. Now add an edge loop again, like this, you'd right-click. And like this, you
can select the loop. Let's do two times. Again. Maybe I'll just type in 0.8. The move it to here
and select this. And type in 0.8 are
known as G2 times. And then type -0.83, select this leg over here, then rescued to extrude
it downwards like this. It's a pretty simple
stuff. We have created a very
simple-looking david. Let's give this a
bevel modifier, supply the skin, bevel it out. I didn't normals and
enable auto smooth tab. Let's select this top face and liquid thickness
a little bit. Now what I will do is I'm pretty sure I added
in the reference image. Yeah. We can maybe use
something like this. Like a design like
thing over here. Give it a little
bit more detail. Because right now this way
it looks pretty plain. These are various
different styles which you can trace
it out again, a little bit long process, but yeah, we can
definitely do that. Maybe I'll use this one because it's pretty simple to copy. And as you can see, we
have image over here. Like this type of design. We can definitely use that. So let's see how we do it. First I will press one and quickly press Shift
a, either image, reference image, head over to your reference images
and add this one. Let's move it over
here to the side. Start by adding a plane. The spleen over here
rotate it first by 90 degrees on the x-axis. Enable X-ray by placing it in the center of this
image, like the small one. Like place it correctly this
way and just scale them down. Yeah, that's pretty good. This tab now, excited as
you move in the same time, it right-click and
remove these vertices. Again, add a mirror modifier. Just press a to select
everything and press M and merge and center to
create a single word. See listed over here. And we know again, just have to extrude it out completely. Rinse the reference image. I think this is the easier part. You can enable clipping and then join them in the
center like this. Again, join these
two now this tab, select everything, then risk
F will fill out this phase. Now you can press J
if you remember to use the knife tool and just create this cut out very easily. Now, again, this game, this out. Saying that again
is three for face, select this face and
this face with x. Make sure to select
the small fees also are best x and
delete the faces. I'm pretty much have our design. Well here, like this. And let's bring it over here. Selected design and David
slash to go into local mode. Now how we will place
it in the corner. So I think very easy to
scale it down first. Scale it down even more. Scale it down till you feel like the size is okay for the tables. So I think somewhere around
here is pretty good. This is like not to be not that smart, so yeah,
this is pretty good. Now you can press tab, go into the Edit
mode, enable X-ray. And basically what I will do is press one for the vertices, select and select all of these vertices here and leave
these two, just these two. And you can basically
now because g Then x and scale it out like this, we get a straight line. Then you can move it
in the same time. To do it even better. You can select this first, then select this,
then press Control Z. If you remember the copy, the location that they're exactly at the center like this. Now, open this divergent
and normally like this. And it would be exactly
perfect on both sides. So yeah, it will be a
little less effort. Now we can select
this, add a solid. If I modifier, I
give this thickness. You can shoot smooth,
enable auto smooth. We will modify them in the, yeah, I think this
looks pretty good. You can select this again, add a new mirror modifier. Select the table as
the middle object. Select the y-axis
instead of the x. And we have
duplicated over here. Now let's just duplicate it
over to the other side also. So again, selected
redshift plus dy. Moved out over here. You can press Add and z type 90. Let's disable the
mirror modifier. Three for the right
side view and place it in the same time. We can also use the
Control Z command for this to copy the location exactly what I think
is pretty good. Now enabled the z axis or the exciting yeah, on the x-axis. And we pretty much
have our table. I think this looks pretty good. This last to come out
of the local mode. And you're just adding
this part gives it. A lot more detail
and then select it and maybe increase the
scale if you want to. Select individual
origins from over here. And let's scale the
design and implement. Yeah, that's pretty good. Save. And again, I will
press Shift plus S because they're selected to
bring the cursor over here. Again, let's add an empty. Make sure wild empty selected. Hold Shift and select these
two objects like these three. And also before like
parenting any object, make sure your MD is
the active object. And if it is not as easily make it the active
object by holding Shift, taking it once so that it is de-selected and
again selecting it. And now it is active object. Right-click bearing an object. And you can see you can
easily move these three. The next thing to do is far as disabled human read
selling this thing, this m would do the
reference images. Let's enable everything. You say, well this next
extra part I think, and also disable the
difference images. And yet now we can select these. Let's select this one. Maybe I'm placing it over
here along with the chairs. These are like not
really conform. We can change it
whenever we want. But I'm just placing it for the sake of it
just to see how it looks. Select the chairs, you can move them a little bit on the right. Select this model one.
Is this one over here. Select the table and place them between these two. Select this thing and
select this and move them. On the y-axis, like this. Is the table over here, or over here, it
looks pretty good. I'm just arranging the
layout a little bit. You can obviously do it
according to your wish. You can change these
things whenever you like. Just placing them. However,
I feel like it looks good. So obviously you can change
them however you like. Maybe I will select
the room and the scab. X enable X-ray. And I will move the
location of this window. You can hold Alt, select this, press
G, the invite. Excellent, this
complete. This also. Then press G, then
move it to here, maybe just a little bit further. And now select the
window object. And also no good towards
the left like this. All right, that looks
pretty good in my opinion. You can also duplicate these
objects however you like. You can place them or
change the layout. Yes, I already said that. So yeah, I think we are
done with this lecture. This was pretty long one. So let's just save files and we will continue from
here in the next one. Thanks for watching.
15. Detailing the Room: Hello and welcome
guys. So now we are almost done with modeling all the major prompts
of our scene. So in this lecture, we will detail the room a
little bit more. And I will be making a couple of changes to the Windows.
Let's just start. First, I will use
disable everything and only enable the windows. We also have this
table left outside. So let's just quickly add this to our collection selected. I'll press M and add
these two tables. Alright, so basically what I
want to do now is I want to add a couple of panels on top of the window to make
them look even better. So let's just select
this press Shift plus S goes to select it. And let's add a cube like this. Move it to the top
down on the x-axis. And let's see, I think
this one is pretty good. Select this press Control
J, apply the scale. And before like detailing it, Let's just add a modifier. Set the X factor to zero, and increase it by a factor, and we will be
duplicating it this way. There's three for
the right side view also add a modifier. Now let's just add a modifier. So I want to make sure that
it fits perfectly over here. So just press Tab enable X-ray or we can basically just
increase the scale like this. Here. Select this,
decrease the bevel amount. Yeah, I think this is
perfectly without windows. Now we can start editing them. Let's reduce the
scale on the x-axis. Also increase the
offset a little bit so that we can see
them properly like this. Alright, so that's pretty good. Press Tab now. And let's see, plus
three for Face. Select, select this
face and this face. Press I to insert. Let's insert this till here. Press X and the phases. Let's insert a little bit more. So plus I again, insert this till here, plus x delete the faces. Now basically hold Alt and
select both of these loops. You can press Control plus e, then bridge edge loops. So pretty simple. We can
now sheets would this apply the skill and enable auto smooth over here and
enabled harder normals. Any of these panels look
pretty good in my opinion. Next, let's just create a very basic design.
To fit into them. I will select this
press Shift plus S and cause it to select it. Make sure that the cursor is
in the center of this cube. You can select this global
two objects at origin. And originally geometric,
it was exactly our center. Now press Shift a, add a plane
x rotated on the Y by 90. And quickly just add a
mirror modifier to this. So add an edge loop
in the middle. Delete board these vertices, and add a mirror
modifier on the y-axis. Let's see what we can do now. I will add a skin
modifier to this step, press a to select everything. And then you can press Control
a to like the thickness. And basically press Tab
now and just press Control R. And you can just add
edge loops like this. And I'm just creating
something very basic. Two edge loops like
this. Scale them up. Stab. Now let's press Control R at a couple of more edge
loops in the middle. Basically like to
create a better design. What you can do is enable X-ray and select the word
edges that you want to delete. You can press X and
delete these edges. We can create some sort
of very simple design. Let's see. Something like
this also looks pretty good. Yeah, I think I will
just go with this only. Select this sheets mood
and enable auto smooth. And again, let's just
add a modifier to this. On the y-axis. I'll just duplicate this five times and make sure the
last one fits perfectly. If the last one fits, rest of them would fit automatically. I think 1.031, 0.025. I think it would be pretty good. Yeah, that fits it
perfectly in my opinion. Let's just hit Save. Select this, press M, and move this to the Windows. Both of these objects. Now let's enable back
everything again and try to adjust the room
according to these windows. Disabled the extra leg room
press Tab, enable X-ray. Let's just select this top loop. What you can do is press three enable X-ray and just select this
completely like this. Instead of selecting
them one-by-one, then there's gene and
z and move it to here. Yeah, that looks pretty
good in my opinion. Now, the next thing that
we want to do is we want to edit the
room a little bit. So I will disable everything and just keep the room enabled. I'll let start. You can
quickly open up pure ref. To just get the differences. We will be getting
these sorts of things like this design over here and adding a couple
of good images like this. And that would add
a lot more detail. Let's just do that now. So first let's create these wooden edges
over here on the top. So what I will do is first I
will just complete the room. So I'll select this step and
press two for its select, you can select this
edge, this edge, press F, and then select
this one and this one. And press F to fill in the space just so we
cover everything. And now, to create
these wooden edges over here on the top,
it is very easy. I mean, you can do that
on your own first tab. And let's see, hold Alt and
select this complete loop. One thing that I want
to do before doing that is I want to reduce the height of the
room a little bit. So just select the
top three phases. Jeden zed, and move them
downwards just a little bit. Yeah, that's pretty
good in my opinion. Now, we'll press tab and
select this complete loop. And instead of
extruding over here, let's just duplicate
this press Shift plus D. And you can see
we have created a duplicate loop and now hit right-click to place it
exactly over here on me. Now we can press P
if you remember, and now separate by selection. So what has happened basically, if you press Tab to come
out of the edit mode, we have two different
objects now. We can just press Tab. Now press a to
select everything. Let's see. Then we can press Alt plus e to extrude faces along normal. And then extrude it like this. Give this thickness. So you can see we have
added a bit of thickness, or maybe even a better way
to do this wouldn't be too. Instead of extruding,
just select this and add the
solidify modifier. Now we can adjust the
thickness however we want. And yeah, I think that is pretty good because it is really just haven't loses,
keep it this way. Next, let's create
this thing over here. This plank is coming down
over here along the windows. So we can maybe estab, let's enable X-ray and let's see risk controller and add
edge right over here. Let's add this edge loop
over heroines will suppress control on an ad like this. G then, right? And hold Control to snap them both together. Enable X-ray. And let's select this
edge from both sides. And risky than z to extrude
downwards like this. Yeah, I think
that's pretty good. There's three slash to come
out of the isolation mode. Enabled back everything
just to see how it looks. Maybe we can give it a
little bit more thickness. This. All right, now let's just
select this press Slash. And basically receiving for the top view, let's press Shift. They add a cube,
scaling this tube down. And we now basically
want to create this thing running
along to the center. That's pretty good. I think there's pretty slashing him to come out of it and
see how it looks. I think it's looking
pretty good. We can add Bevel modifier
to this control. They apply the scale. Okay, so now that we
applied the scale, the solidify modifier also
change so just increase the thickness to fit properly. Yeah. Enable auto smooth and also enable hardened
animals from here. Now basically we can be this design lighting over
here to add along the edges. And if you look through
the reference images, you can see there is some light shading issue going
on over here. So basically to fix this, just select this
thing over here, press S and X and just scale it a little bit on
the x-axis like this. You will notice as
soon as you like, scaling down on the x axis just a little bit, it
will fix itself. So to scale like very little, you can press S then x, then hold Shift to scale it
very slowly and scaling down. And you will see
that it disappears. Now press S and Y and also scale it down very
little on the y-axis. The same thing on the zeros. So I'm going to select this one. And now press G and Z and
move downwards a little bit. Basically now everything
wouldn't be fixed. Alright, so if you go through
the reference images, we can use some sort
of design and add it. Now you will start to notice
why I deleted this face over here because it is really difficult to move in and out. Again, delete this plus
x and indeed the faces. Because we have
created this thing out so we don't really
need to have the face. I will just add back
the face when it is completely done and it is
time to texture. This way. It is then easy to move
in and out of the room. Alright, let's
bring in this image now and create this design. So I will just minimize PRF specific one for the
front view redshifted image, add a reference image. This one. Obviously
if we want to create like any other
design from here or from, you can search it up on
the internet and you will find a lot of these
corner designs. So yeah, you can definitely
do something else if you want to shift a and
let's add a plane. And to create this, it is very, very easy. First, let's move the
plane in the front. I selected the plane. I have to go into the Edit mode. Select this. Now press tab and let's see how
we can make this. I think it would
be really easy if we add the solidify modifier. So I'm placing this plane over here on the bottom
like this, LLC. If I add a solid, if I modifier, first,
let's apply the escape. The thickness in the
negative direction just to place it like this. Now press Tab enable X-ray. Let's see if we can
create something. I press E and Z and extrude
it towards the top like this. Make sure to enable
even thickness. And you will see as soon as
you enable even thickness, it matches perfectly
with the corners. Now keep on pressing E. Then X. Forgive we need to
extrude it till here only AT this time, extra till here,
then press Eden. Eden x and z. I'm pretty sure this
is easy for you. Let's just go through
and once again, press Tab and now
enable extreme, make sure to enable X-ray. Select any one of the edges, press Shift plus D, and
place it like this. Now press E. As soon as you do that, you will see it has appeared,
suppress Eden z. Place it in this corner
only plus ys and xs. And now like this, even Zelda game, here, only e x. Okay, no, we need to
go to the bottom. There. I think it is
pretty easy to do. Even Zen. Again,
select any edge, duplicate this press Shift plus d. Let's place it over here. X lives. Just to complete this, I want to select this
continuously move this down. Here. We need to like place this one over here. Just only thing we have to make sure is
that we place it on the credit side of a
lake in these shapes. Let's just select this
blizzard at the bottom. We all know Stan. You can see we have
created this very easily using the
solidify modifier. Now, let's just
select this, this, and this slash three
for the right side. New. Place it over
here like this. Are you rotate it. It's rotating around the
y-axis by 90 degrees. My vanity and rest one
and place it like this. Now to reduce this thickness, don't just like
degrees the thickness of the solidified because it is a different kind
of thickness for the solidify modifier to
degrees this thickness, just press S to scale it, then press Y, and you can
scale it down this way. Very easily. Select this thing and also increase the
thickness of this. I think it is too
little right now. Can decrease the bevel
amount a little bit. Obviously, we need to decrease the size because it is
too large right now. Let's just place it accordingly. You can place it this way. I'm thinking it
looks pretty good. Now just select this,
add a mirror modifier. And maybe we can basically select the room as
the middle object. And yet it has
mirrored perfectly. Now, maybe I'll
increase the size even more because I think
that's better. Let's just hit Save. I will select this now, press M and move this to
the reference images. These two, this one and this. I think these all belong in the room collection to
press M and move it to the new yep versus hit Save. And here basically this was the objective of
this video we have then I will see you in the next video.
Thanks for watching.
16. UV Unwrapping the Table and Chair: Hello and welcome, nice. So now that we're done with modeling most of the major
products of our scene. We can focus on UV unwrapping and texturing
them one by one. After we're done with the text, we can again focus
on modeling some of the smaller props, like books, vases, screws, things
like that to fill out the team and make it look
better. Let's start. I will first UV unwrapped
our table and our chair. So yeah, let's focus
on them one-by-one. So we can just quickly disable everything and just enable the table and a
chair collection. Alright, so now first
thing that we have to do is we have to apply
the modifiers because the UV unwrap them. We need to apply
all the modifiers because if you select
this table press tab, you can see this only
has like one-fourth of it and the rest of it is
done by the mirror modifier. So obviously to UV unwrap this, we need to have the
complete table. For that. We need to apply
all the modifiers. One thing that I
want to mention is that after you
apply any modifier, the changes done to
that particular object by that modifier
would be permanent. And you wouldn't be able to
make any changes later on. So if you don't understand
what I just said, let me just quickly make
this clear by adding another cube so you
don't have to follow me. I'm just doing this
for demonstration. Let's say I select this. Let's say I add a bevel
modifier to this, and I are just the bevel. This amount I will
increase the segments. Let's make this moot and
enable harder normals. Alright, so now
we have this cube with the bevel modifier
over here with us. We haven't really
applied any modifiers, so the modifiers are
not like not applied. And we can adjust the
amount of the bevel. You can see we can adjust
it to any way we like. We can increase or
decrease the amount of segments and we can do
all sorts of things. But now, let's say, I think that yeah, I feel like this
bevel is pretty good. I just apply the modified
light UV, unwrap this. So I hit Apply. And now we'll press tab. You will see the modified is now applied and we
cannot really make any changes to the
bevel amount down. Now that change is
permanent and we cannot make any change to that particular bevel
modifier thing. We can undo it and move back. Now you can see the modifier
is again not applied. And we have only this cube. But as soon as we apply this, everything is fixed and permanent and we cannot
make any changes. So here you just have to
make sure that whenever you apply any modified
to your model, you happy with it and you don't want to make any
further changes. But yeah, let's say
further down the goals. We want to change
something later on without like table or chair. So if that kind of
situation arises, what I will do now
is I will just create a duplicate of this fight to keep like backup so that if anything goes wrong later on, we can always come back to
the backup file and use that. So just hit Control Shift and S. And over here you can save as you can create another file. So he put Chinese room and in bracket I
will write applied. This just means I will apply all the modifiers in
this particular file. And we will have this file as a separate backup file for us if anything goes
wrong later on. So let's just hit Save As. And you will notice
now we are working in the Chinese
rule applied file. So we have basically
two fights now. We can, we can be
carefree and easily apply all the modifiers and
we don't have to worry about anything. Right now. You will notice if I press Tab and move any part of the table, we can only edit the
one-fourth part of it, and the rest of it is
handled by mirror modifier. But let's say I
just select this, apply the middle modified. So to apply any modifier, you can click on this
arrow and hit Apply. Let's apply the bevel also. Now you will press tab. You can see you can edit
any part of the table. And the mirror modifier is not really working because
we have applied it. And yeah, this is
like vomiting now. Alright, so you know how
to apply the modifiers. You can select any object and
go over here and apply it. But obviously we won't like select each and everything and then apply it because that would be like
really long process. So the shortcut for this, you can just press a
to select everything. Then you can press F3 and
typing convert to mesh. You will find this
command convert to mesh over here, select this. And now as soon as you do that, you will see all of the
modifiers are applied. You can see there are no
modifiers in the Modify tab. You can press tab and see for yourself the modifiers
that applied now. Alright, so the
next thing that we have to do is we can now
start with UV unwrapping. So before that what I will do is I will just select
these two chairs. Because obviously we won't be like exporting three tiers from blended Substance
Painter because we don't really want to texture
the chair three times. We will just share it one
time and then again we will duplicate it or add the same material like
those types of thing. So we can just select this one. H to hide them because you only really need this one chair. Alright, so let's see. I will move it to
the UV Editing Tab. And first thing that I will do is I will press a to select everything and make sure the scale is applied
for all of it. So press Control a
and apply the scale. Because the scale
is not applied, we can face some problems
where UV unwrapping. So make sure to just press a, then press Control a
and apply the scale. All right, one more thing
that I want to do before UV unwrapping is let's go
back to the Layout tab. And I want to add materials
to both the chair and the table because when we export them from Blender
Substance Painter, we need to have like
materials added to all of these objects that were
like Substance Painter, we can create different
texture sets to work with. You will understand when we export this to
substance painter, what I mean by this. Alright? So basically, let's select this
part of the table. Any part you can select. Come over here in the
material property staff. Let's create a new material. You can rename it
over here and let's just rename it to writing table. You don't have to
do anything else, just create a new material. And now we need to add this material to all
the parts of the table. So again, there is a very
easy shortcut to do this. Let's just disable the
cheer for now because we don't want to add that
material to the chair. So I will disable it for now. And now. Select this thing. Select that part of the table that you have added
the material. So this one part I have
added the material to. Now, while this is selected, this is the active selection, press K to select everything. Then you can press
control plus L. And you will see this link
transfer data menu. And you can link materials
as soon as you do that. You'll see now it is
written over here. That means this material, this particular
material is being used by a different objects. So yeah. You will see as soon
as you select them, this material has been added to all the parts of the table. All right, Let's enable
back the chair now. 74 top view. And I will just disable
the writing table because now we will
add the chairman here. Select this, create a new
material, your chair. We don't really have to add the chair material
to these pieces, I think because we will be duplicating them like
later on anyway. So I can just select them all and then press H to
hide them for now. And we have added a chair
material to the seed. So while this is
selected recipe, then press Control L
link materials again. You will see the standards
written over here. So this material is now added to all the other chair parts. Alright, so yeah,
basically that's done. Let's enable the writing table and move over to
the UV Editing tab. All right, so one thing
that I want to again mention is whenever we
add different materials, we need to like UV,
unwrap them separately. So let's say if I added the same material to
like both of them, the table and a chair also, I added the same audience, then I would have to UV unwrap them on the same UV map only. Now that I've added
different materials, like we have separate materials for the table and a chair. We need to UV unwrap
them separately because they will have separate texture sets in Substance Painter. So yeah, if you
don't understand it, understands this
thing right away. It's okay. You will get it when
we will be moving on to texturing
substance painter and exporting all that stuff. So first let's UV
unwrap the table. So select all parts of it. Make sure nor none
of the parts of the chair are selected
so we can disable it. And yet just press a. Then press Tab, press a
to select everything. And you can select this option. This will just select the corresponding
vertices in the UV map, as you can see in
the 3D view also, you can also enable
display stretch to basically stretch shows if you're uv maps are
stretching or not. So this blue color, this dark color, blue
is like perfect color. So if this is your, this is the color of
all your UV islands. That means your UV
unwrap was good. And if the color is like something different,
like green, yellow, red, that means it has stretching
and you have to fix it. Alright, so for this, I will just quickly use a smart UV project so that
our work is done quickly. So just press a to
select everything. Rescue and smart UV project it. Okay. And you can see that
the UV has come out. I think it's fine. We can open this option up. And we can increase the island
margin just a little bit. Not too much. Island margin is basically the space
between all these islands. Here. We can just set it to
maybe 0.001 to fill out beta and press Tab to come
out of the edit mode. And now let's just
enable the chair. Disabled the writing table. And I will again hide
these two chairs. We do not really need them. If you want, you can
also delete them. We will add them later on
anyway, so yeah, if you want, you can just delete them,
but I will just keep them around and press
H to hide them. This chair, press a
to select everything. Stab, press a again, select everything and press
U and smart UV project hit. Okay. And yeah, I think
this European rabbits pretty good, I'm happy with it. Let's just keep it this way. We don't really need to change the eyelid margin or
anything like that. You can play around with
the angle limit and see if anything comes
around your liking. But I think the default
values are fine. All right, so let's press tab and come back to the layout tab. Alright, so we are done with the UV unwrapping of
these two objects. And now we can finally export them from blender to
Substance Painter. So one thing that we should always check before
exporting from Glenda to Substance Painter
is quickly click on this arrow and enable
face orientation. And you will see that you will see this darker blue up here. So this is like for checking the orientation
of the normals. So if you see this blue color over volume at like objects, that means that normals are perfect and they are good to go. But if you see this color, so there are only
two colors in this. If you see this color over here, show you if any of your object
is like this red color. That means the normals
are flipped and you just need to reverse them
or we calculate them. So to do that, just select it, press Tab, press a to
select everything. Then you can press Shift plus n to recalculate the normals. Just make sure all of your
objects are this blue color. That means the
normals are good to go and anomalous or not flipped, red color means the
normals are flipped. Quickly, fix that if
there is any issue, and then we can get ready to export them into
substance painter. Alright guys, so now
before exporting, one more thing that I
want to do is let's just turn off face
orientation for now. I will just select this chair. Make sure to de-select it. David will just
select this year. Okay, I forgot, we can
just select this empty. And here I will select it and move it a little bit backwards. The reason I'm doing
this is whenever like objects are too close to each other in
Substance Painter, they can mess with each other
while baking them HashMaps, like we need to
bake the mishmash been in Substance Painter, it isn't necessary
process for that. I'm just keeping the
objects a little bit far away so that they don't
really mess with each other. We can move them back at the original position when we are done with the texturing. So to export, press a
to select everything. Then you can go over to
File Export, select FBX. And then let's come back to
our exports folder first. And I will rename this
to table and chair. You can limit to
selected objects. So what this will do is
only the selected objects will be exported. So right now, these are the only objects in our scene because we have turned
off everything. But yeah, we can just still
enable selected objects. And you can see we have this
object types over here. We have different object
types like empty camera. So we don't really
want to export these empties with us
into Substance Painter. So I will just select
mesh from over here so that any other object type is not really exported
with our model. Alright, so hit Export. Now, we can quickly open
UP Substance Painter. Alright, so substance
painter has opened up. Let's close this and
create a new project. Click on New and go
ahead and file select. You can select this
table and chair FBX file that we just
exported from Blender. So open it up. Rest of the settings, you can
just keep them as they are because we can always change them later on in
Substance Painter. So it does not really matter
what we keep over here. You can send the
document resolution took a normal map format
can be anything, because eventually we will be rendering all this
in Unreal Engine. Unreal Engine, I think
uses direct text format, but Blender uses OpenGL. So again, you can keep this at anything because we can always change it while exporting the textures. So we'll
just keep it going. Opengl only rest of the settings are not really of any use to us, so we will keep them at
default and hit Okay. You can quickly look through
your model if there are any issues with the exporting, if they're initiating issues
or anything like that. I don't think there are any. Now I will go here in
the display settings. As you can see, we can see
all these jagged edges over here just come down over here and enabling
temporal anti-aliasing. And you will see all those
jagged edges have disappeared, so you can enable this. Next. If you remember, I mentioned that we need to
bake them HashMaps. So yeah, whenever you like, add anything to
Substance Painter, the first thing that you need to do is bake the mesh maps. So for that you
need to head over to picture set settings window. If you don't find
this, you can go to Window Views and you
will find textures, et settings over here.
You can open it up. Also, if you are not really familiar with texturing
and Substance Painter, I have a complete guide to Substance Painter scores
that you can check out. It will take you from absolute beginner to an advanced level. So yeah, you can definitely check that out if you want to. But don't worry, I
will be explaining everything that I do in
substance painter here also. But if you need an in-depth
guide of everything, yeah, you can definitely
check that goes out. Alright, so let's move on
to baking the HashMaps. I will just click over here
on this button because HashMaps and this
window will pop up. Again. We don't really need
to change many things because the default values
worked pretty good. And I don't really
mess with things over here too much in
the baking window. So the first thing
that we need to change is the output size. The bigger the better. You can definitely get
away with to kill. So it is pretty good, but
I will just select for K. It is to have lego
really nice quality. Next thing we can do
is we can enable this, apply diffusion and use low
poly meshes, high poly mesh. So basically this
is used when there are two different meshes
to begun to each other, like low volume and high volume, but we only have a single mesh, so I will just enable this. The last thing to do is we need to come down to
anti-aliasing and we can select
four-by-four and rest. Everything is fine as default, you can just also
disabled this ID map because we won't be really
using id map workflow. So we only need
these six mesh maps. So you can just keep them in and rest everything you
can keep as disabled. And now select, bake
selected textures and just wait for
them to finish. It might take a little while, so I will discard the video and resume when
everything is done. Alright guys, so the baking
is done now you can hit Okay. You will notice
that the mesh maps are like filled over here. The slots were empty earlier, but they are fairly now for
the ones that we selected. And you can just hold Alt and use your left-click
to move around the scene and to just look at the big if
it came out good. And yeah, I think
it is pretty good. They are not really
any shading issues. Also, one more thing that
I want to show is you will see this texture
set list over here. We have these two
materials that we added. If you remember in Blender, we added the writing
table material and the chair material. You can easily enabled and disabled and see
these materials. So here you will notice that adding different materials is a nice way to distinguish different objects in
substance painter, as we can like work
on them separately. This is not really
a complex object, but when there is
a complex object, adding different
materials really helps because you can isolate things out and work on them easily. This is what I was mentioning. You can add materials
in Blender and they will transfer onto this texture sets in
Substance Painter. And we have two different
texture sets in this project. One of them is the
writing table, and one of them is the chair. Both of these will have
separate lectures. Just make sure you add like
not too many, many years, but also not too few because we have to like have the
proper resolution. So just make sure to add the
right amount of materials. Alright, now we can move
on to texturing them. We will start by creating
our very own words smart material that we will be using a lot throughout
this course. I think this is it
for this video. Let's just quickly
save our projects. So hit Control plus S. And in Substance
Painter files folder. Let's rename this
to chair a table. And yeah, we will
start working on the smart material
in the next video. Thank you for watching. I'll see you in the next one.
17. Texturing the Table: Hello, Welcome guys. So in this lecture
we can finally start with the texturing of
a chair and table. And as I mentioned earlier, we will be first creating
our mood smart, muddy here. Alright, so to start off, there are a couple of things
that I want to mention. If you want to create a layout of a substance
painter like mine, you can easily drag and drop
the windows like this Only. You can just select
it and keep it, place it anywhere you like. And you can easily create this layout like mine because I think this one is pretty good. But he obviously it
is totally up to you. You can create something
that works best for you. If you want to bring in
some of the windows, if you don't see any
one of these over here, the properties, layers
or anything like that. Again, go over to Window Views
and easily bring them in. Alright, so next is I will be mentioning each and every shortcut that
I will be using. But in case I forget it, I've also added a file
in your course files. Open that folder up. And in Substance
Painter files folder, you will find this Substance
Painter shortcuts. You can open this file up
and you will find all of the substance
painter shortcuts on a handy cheat sheet so you
can quickly go through it. If I forget any of the
shortcuts, but yeah, I will be mentioning
each one of them when I will be
using them already. So yeah, you can definitely
go through this and learn some of them to make
your workflow faster. The very basic shortcuts like holding oiled and using
a left-click to rotate. You can use your Alt and
left-click to rotate the scene. Then you can use it and use your right-click
to zoom in or zoom out. But I think a better way to
do that would be just use your scroll wheel to move the scroll wheel up or down
to zoom in your scene. And you can hold Alt and
click using a scroll wheel. So don't like scroll up or down. You can just click
using the scroll wheel and then you will be
able to pan the scene. These are some of
the basic shortcuts. You can also snap your
view by holding Shift. You will see if
as soon as I like Alt and left-click
and move the scene, if I hold Shift, you will see it snaps to like perfect
90-degree angles. It will be better
seen if you like, change the view from
perspective to orthographic. This is the top view, bottom view, right view, all those things that
we did in blender, you can just hold Alt and Shift. Then you left-click and you can see this is the front view, this is the top view. While holding Alt and Shift, we can snap any
kind of movements. So that is also very handy. Right now. Let's just change this
back to perspective only. We will be definitely using
orthographic later on. But right now perspective
is pretty good. Alright, so start off with
the texturing process. First. Let's select the texture set. From here. I will select the
table texture set because I will be creating
a texture in that. So select this. And in the Layers
tab you will find already empty layer
has been added. So I will just select this
and delete this using this button over here.
Just delete this layer. Alright? So any of the layer that
is selected over here, the properties would
appear over here. Let me just show this
with an example. So let's say I just select
this bras pure material from the materials section
in our assets are the shelf. You can just click
over here and here or like different
portions of the shelf. Like this is your
base materials. This one is your
smart materials, this one is smart masks. And then this is filters, then brushes, alphas, textures, yeah, all those kinds of things. We also have the environments. Environments are
basically different types of lighting in your scene. You can view different
types of lighting. Like first I will
show you you can hold Shift and use
your right-click. Rotate the lighting
in your scene. And you can also
change the lighting. You can just drag and drop it like this. Let's select this. Maybe. You'll see the lighting is now
kind of greenish because I think this is a cave
entry forest environment. That's where it is
kind of greenish. You can use different
lightings to view your model. I think that's
pretty cool feature, but we will be just using the basic one that
is the panorama. Let's come back to
the material section. And I was mentioning
about the properties. We can drag and drop
any kind of material. Let's say this simple
grasp your material. This is a simple metallic
material, brass metal in it. If you select this
layer over here, you will see we have some
of these properties. So this is basically
a fill layer. You can change
things like color. You can also change stuff like the metallic and the roughness, all those things like that. We will be also like adding
different types of layers. So this is like a
failure which lie completely fills the material
whenever it is added. But there is also
different types of lead, which is this icon. This is a paint layer. So when you add this, we will see you can paint
on this layer easily. You cannot paint
on a fill layer, but you can paint
on a ventilator. These are like different
types of layer. Let's just delete this. And the next thing
that I wanted to show you is the
difference between smart materials and base
materials or normal materials. So if you remember, we baked the mesh maps earlier when
we started our project. So for this reason we
being damaged maps to use features such as smart
materials and smart masks. So you will notice like
a base material or a normal material when you click this first
icon on the shelf, this is like a simple
base materials section. Let's say I drag and
drop any materials, e.g. gold pure material. This is like a very
simple material. The first basic difference
between base material, smart material is material
is just single layer. So this is just single layer. It does not have any
kind of details on it. Things like roughness,
variation, dust, damage, all those things are base
material is just simple, like single layer material
that we can easily build upon. But yet smart materials
are like fully-fledged, already created a materials for you that you can
use very easily. So for a very simple example, let's say we have this
gold pure base material or this normal material. Let's select smart material. And we also have this
gold damaged material. So let's drag and drop
this over our table. And now you will clearly
notice the huge difference between a normal base material
and a smart material. So the very first thing, a novel material is
just a single layer, but smart Medina
is like a folder. It is like a collection
of many different layers that are added together to
create the smart materials. We have this base layer. The base layer is same as
the pure material only. So as I said earlier, we can use the base materials or the normal materials to build upon and add more layers to
create a new smart materials. You will see different things like we have this surface green. If we look closely, we have
the surface green thing. We also have this dirt layer. So many different things
that are added to create this goal damaged
smart material. So this is like the
basic difference between smart material and a
normal base material. So let's just quickly
delete them both now. And we'll start by
creating our final. Alright, so as I said, we will be first
adding a base layer. So if you click over here on the search icon and
search for good, you will find this would
American cherry that is added to each and every
substance painter by default, only like all of these materials will be present in your
Substance Painter also because they are added by default to provide us with a gate so that we
can texture easily. Alright, so you can click over here on the Materials section. For good, drag-and-drop
this food, American cherry on our table. And right away, I think
it looks pretty bad. Alright, so let's try to
fix it up a little bit. You can click over here and you will see all these
properties are appearing of this
particular layer. Alright, so the first thing
that I want to change this right now the
projection is set to UV. Uv protection is like
if you press F1, you will see all these
UV islands of our table. So urine production is based
on all these UVs which can create this kind of disconnected type of
loop, as you can see. Because these islands
are different. Texture also looks like as if it's different
over here and it is, and it is different over here. This appears like a
very unrealistic loop. And I don't really want that. Luckily, there is
a very easy fix for this in substance painter. You can see it looks
very disconnected because of all the
different UV islands. Let's quickly fix this first
press F2 for the 3D view. And you can change the
prediction from over here. So I think the best
prediction to go for it, it's traveling a prediction. And as soon as you do that, you will see a texture looks much, much better now as if it is like a single entity only and not breaking up into
different parts. Alright, the next
thing we can do is we have other
options over here. You can play with the tiling, so the dialing will decrease. If you increase the tiny, the scale of the
texture will decrease. And you will see it
looks quite repetitive. Now, let's set the tiling to
something like two maybe. Alright. You can also change
stuff like rotation. But I think setting
it at zero is best. Alright, another thing that
I will show you is if you open up this 3D
prediction settings menu, you can offset the
actual little bit. What I mean by that
is let's say I don't want this part
to appear over here. I want it to appear
a little bit down. So what I can do is you
see this offset over here, not the rotation of the scale. We will change the
offset by move the z you will see is
moving like this. So I think the why, yeah, I will just increase or
decrease the viral little bit. Move this down like this so that the darker parts appears towards the
bottom of the table. And also I will also move the z so that we have
something like this. I overall one to make it
appear a little bit lighter. Yeah, that looks much, much better in my opinion. Next thing that I want to change this, if you look closely, we have the normal details like all these ridges and details of the work that
are added to our table. I don't like I don't want
it to be this harsh. So I just wanted to
reduce a little bit. So scroll down. You can also change things like
layers you will see. But I think the
default for is fine. You can also play
with the fibers. If you look closely. It doesn't make a little
bit of difference. Let's set this to one only. I think it's fine. Next to open up this
technical parameters. And we don't want to like
change too much stuff over here because I think the default
is a pretty good job. The only thing that
I want to change is this height range. You will notice if
I increase this, the height, height information
is like very harsh now. So I wanted to decrease
it by quite a bit. In my opinion. I think 0.02 is pretty good. Obviously, many of these things are laying completely
personal tastes, so you can adjust them
according to you. But I think 0.02 is fine. Also another thing, another thing that I want to
show you is let's say if you're feeling like the texture resolution
is pretty low. That is because the
substance by default, if you go to texture
sets settings, shows the size that you selected earlier when we
created the project. So currently the size
is set to two k. Okay, just wait, it is saving. Yeah, Currently the
size is set to two k. If you are like
Substance Painter is kind of lagging a little bit, you can decrease the size. It does happen when the
model is very complex. As soon as you decrease
the size, you will see. Now the resolution
is even lower. But Substance Painter
would be like really fast to calculate and
compute all the stuff. You can set it to very low also. Now basically it
is just nothing. The resolution is soloed, soloed that we cannot
even see the details. Let's set it back to two k. But if you want to view your model like a
good resolution, you can also set this to forget. It will make your, you will notice that the
texture is like much sharper now as the resolution
has increased, but it might get a
little bit laggy. So let's set it
back to do humanly. And yet we can move back to layers and let's
start working again. So I will add another
layer over this. Now, I will choose
another one of our base materials only if
you see this wood walnut. But let's drag and drop this on top of our
good American chains. Make sure it is on top of the wood American Jedi
and not on the bottom. So just move it towards the top. Now you will notice
that we cannot even see a little bit of this layer, would American cherry, that is because this is a fill layer. Whenever you add a fill
layer on top of another, the one at the top
is only viewed and the rest of the ones
at the bottom disappear. That means if you click on this icon and let's say I
add another fill layer, you will see now we can
only see the white color. So what can we do
for that first, let's just delete
this fill layer and try to adjust this
wood walnut layer a bit. So again, right now descent the UV protection and the
texture looks really bad. So quickly. Send this back to try. And yeah, that looks much, much better. Let's see. I will keep the tiling
and the offset, all of those things
to this only. Maybe for this one, I think everything is
pretty much fine. We don't really need
to change much. But to make this
layer appear again, because as you can see, it is completely disappeared. You will see this 100
written over here. So this is like the
Opacity channel or your opacity slider. You can slide this down and you can control the opacity
of your layers. You will see as soon as
you set this to zero, we can now see our
bottom layer because the top one is basically invisible as the
opacity is set to zero. So let's set the opacity to
maybe something like 75. Now you will notice
we can see both of the layers a little bit because we have set
the opacity to 75. So we can see a little bit
of the bottom layer and it adds a nice bit of
detail to our material. As you can see, this
word wall and a clear, as I kind of want to go for
a darker colored or table. That's why I'm
setting it to this. Alright, let's see. I will select this
back again and we can also change the color of
the wood from over here. You will notice, I have
already decided on a color, but you can obviously
play with this and experiment and find
what looks good for you. Or you can just type
in the values I use. So for the h value 0.054, only, for the saturation 0.6, 71.4, the value 0.543. Alright, so next I think it
is time to add a little bit of dust to our good material. We have added a base layer. So next we can add
things like dust or maybe edge damages to make art would look
even more detail. But first what I will do is I will click on
this folder icon. To create a folder, I will
select these two layers. So hold Shift to select them both and drag and
drop them inside. Rename this folder to. We can write something
like course. So that we know when create
a smart material of this, we know that this material is of our course so that we can
easily identify this. I feel like this is
it for this lecture, we can continue with
creating a Woodmont. You're adding things like dust is damages,
all those things. In the next lecture. Thank you for watching. Make sure to save a
substance painter file so it can float plus S. And I will see you
in the next one.
18. Understanding Masks: Hello and welcome guys. So before we start to work on a word smart material again, there are a couple
of things that I want to discuss before
in this lecture. So one of them is
I want to improve the color space of a substance
painter a little bit. So by default, substance painter works in a linear color space. And that can cause a little
bit of issues for us. Like it is not that
serious because it does not affect our
texturing in any way. The thing is, when we export
this out to Unreal Engine, odd colors can end up looking
a little bit different. So to make sure that
does not happen, we can make our colors accurate what they will look
like in Unreal Engine. So to do that, just quickly
go over to display settings. And you will scroll down and find this activity
post effects checkbox. So just enable this. And you can also enable tone
mapping from over here. Open up this menu and
only change the function. So change the function
from linear to log. You will notice that everything
gets a little bit darker, but don't worry, we will
just fix everything. And next, enable this
activate color profile. Again. This time we've got
a lot darker now, the only thing that we have
to do is just click on this profile slot and
select the second option, that is ACS UFO log. As soon as you do that,
you will see that I'm, colors have improved
so much now. And the table
already looks much, much better because of
the improved colors. If you just quickly want to see how our colors looked earlier, you can disable the post effects and also the color profile. And you will see this
is how it looked. When you enable it. These two checkboxes, you will see feathers have
improved a lot now and they are accurate
to what they will look like when we export
them to Unreal Engine. So it is not that
big of a change and it will not affect your
texturing in any way. If you don't want to do it,
it is not that necessary. Definitely you can texture like great things
without doing this, but yeah, it is just
better to look at. And yet this is the first
thing that I want to change. Next thing that I want to
discuss this before we actually start like adding more layers
towards smart material. That is things like damage,
dust, edge damages. I want to discuss a
little bit about masking. So if you have worked
with Photoshop before, you are definitely aware
of what masking is, is pretty much the
same as in Photoshop. Also, a mask is basically a black and white
image that decides where a layer should appear
and where it should not. So let's say I add another
fill layer on top of this. So I will click on
this filter icon. You will see as
soon as I do that the white layer completely
fills our model. We can change the color from over here to anything
that we like. Let's say we said this today. So I mentioned earlier
that we can reduce the opacity to make the layers at the
bottom more visible. But let's say we don't
want to do that. We want this red colored
light layer to appear in a certain pattern or
in certain places. Only. Then what we can do, we
cannot just decrease the opacity and call it a day because this does not
achieve anything. Let's say we want to only make
it appear in the corners, or we want to operate it in
a certain pattern of dust, then what we can do in
these types of things, a mosque comes into play. So one thing that I want
you guys to remember is in terms of masking. Black means invisible
and white means visible. If you don't understand
this, don't worry, but just make sure
you remember this. Black means invisible. Anytime you paint on a
mask with black color, it will make things invisible. And if you paint on a
mask with white color, it will make things visible. Alright, so with
that out of the way, what I will do now is I will add a black mask to this layer. So can you guess what
will happen if I add a black mask to
this red colored layer? So you can click
over here to add a mask and just select
add a black mask. So as soon as you do that, the whole layer has disappeared. If you remember, I
mentioned in terms of masking, black means invisible. So I have added a complete
black mask to this layer, which has made this layer
completely invisible. Alright, so now you will notice that alongside our
layer over here, we have this Black Mask icon and we can select it separately. If you select this layer, right now you have
selected the folder and you can change things
like color and everything. But we won't really see that
because black mask is added. But you can also
select this mask. And now you are
painting on that mass, so you can see this brush icon. And we have currently
selected the white color. So if you remember,
white means visible. So I'm painting with white, but red is appearing because we're not really
painting on the object. We are painting on the mask. We are painting on the
mask with white color so that the layer
underneath is appearing, which is this red colored layer. And you can now
select this layer. You can also change the
color to anything you like. So as you can see, this is
like the power of masking. That's why when you
select this mask. So right now you cannot really paint anything because
this is the fill layer. We cannot paint on a failure, but we can paint on our mask. So you will see
if you hover over this mask, this mask currently. So all the areas painted with white will make the layer visible as you can
see over here. And here also. And all the areas that are in black will make the
layer invisible. So let's again select the mask. And now we can paint anywhere we want this
layer to appear. Now let's say I want to remove
it from some of the areas. So what will I do
know I can easily remove from the mask by
painting with black color now. So one way to do this is just scroll down while
selecting the mask. Just scroll down. And you can choose the color
using this slider. So we basically have two colors, white and black and
everything in between. So as I mentioned earlier, a mask is a black
and white image. So therefore, we only
have these two colors. So if we set this
to black completely and now try painting
on our object, you will see now we're
removing that layer because we are painting with black and black means invisible. We have, basically
this is a very simple way of using a mask. We don't really use
them that much. I will just show you the many
different ways that we can use masks and you will
find them really useful. You can also set
something in between, like paying something
of this sort, like not a full opacity. If we set this to one, it will completely paint the color. But if you set it in
something in-between, it will be like really light. You can do these things. So black means invisible. You can raise all of the
things that you painted. And white means visible. The layer will start
to appear again, wherever you paint
couldn't bite. There's also a nice little shortcut in which you can switch between white and
black color so that you don't have to go again
and again over here. It really speeds
up the workflow. So if you press X, you will
see as soon as it breaks X, it will switch between
the two colors. So it is really useful when
you are using the brush. Like if I'm painting over
here something like this. You can just quickly press
X and remove the areas. Can also increase or decrease the size of the
brush using control. And then holding right-click and then moving your mouse
left and right, like this. These are some of the shortcuts. If you move your mouse up and down while holding
control and right, you can adjust the
hardness of the brush. So here these are some
of the shortcuts. They're gonna raise it.
You're going to get this x now and add some of the areas. A better way to do this
would be to just click over here on the
brushes in your shelf. And now you have a complete
set of different brushes. This one is the most basic one. I don't really use this
one when painting details. So let's say I use this one. That is I use this
one a lot Dirt one. These dirt spots or dirt. Something like this.
And as you can see, it looks much better. So it really depends
on your use case, what you want to like paint, and what is the
use of your layer. You can again plus x and
remove some of the areas. You can definitely
use a combination of different brushes with masks. And it is very powerful to create a nice looking textures. Alright, so now that you get a basic understanding
of what masks are, let's try to use them in
a little bit better way. I will quickly
remove this layer. Let's say e.g. I want to add very simple looking
dust to our model. So one of the ways would be you just add a fill layer first. Next, let's add a mask to this. So add a mask at a black mask. And again now click
on this icon. So add effect. While you have
selected the mask, I defect an ad filial. So now we have IDA
Fill Layer Mask. So what we will do now is
you can click over here on the textures
section of your shelf. So now we are in the
texture section. Let's search for some
nice-looking texture or you can just search through
this manually. As you can see, we
have something like this, black and white spots. So you can see all of these
are different types of masks because all of these
are black and vitamins. We can use them in
our field there. So make sure to
select this layer and drag and drop anything. Let's say I use this Clouds, drag and drop it on the
gray scale, plot like this. And as soon as you do that, you will notice that
now our white layer is appearing using this
cloud mask layer. Let's just change the color from white to
something like blue. For that, it is not
that confusing. Yeah. Alright, so now this is like
a different type of mask. We don't really paint on this. We can select the mask and
select this cloud three layer. So we have added
a fill layer and we can control things
like the balance. You will see. We can control the
mask like this. And this is really useful to create like
nice-looking pictures. You can change the color of the dirt to maybe something like yellow and make it darker. I'm sure you are kind of like realizing the users of this. Let's just make a
colored a little bit darker so that it
is easier to view. Let's select the mask again. And you can do all
sorts of things like we also have the
prediction over here. You can change projection
from UV to Dr Lina. Then you can change
things like the tiling. So we are adjusting the
mask using the fill layer. You can also visualize
your mask by going over here and
selecting the mask. You can see this is that mass, so this is the black
and white image. You are selecting
the mask and you can easily visualize it here. So wherever the white
areas are present, you will notice that the color
is appearing over there. Wherever there are
white areas and over the black areas,
it is invisible. Our basic concept of Black is
invisible, invited visible. Alright, so if you understand
this much like using, so this is one of the ways like using the mosque with a failure. You can now cross it out so you can remove
this filter like this. And let's say we
use something else. Like maybe use this
black and white spots, one, drag and drop it again. Now you will notice we
have a different kind of effect because we have used
a different kind of failure. I'm sure you're understanding
that we have to use different filters depending on different use case scenarios. So if you go through
them, you will find lots of different types of textures and guns map present that you can
use your for your maps. You can see this
fingerprints one, we have this paint one. We have these stains spots. So these are all different types of masks that we can use. And these are really useful. We can see all of them give
different types of loops. So you definitely have a
lot to experiment with. And you can create like various different looking
textures with this. You can obviously
change the color, do anything like that. Alright, so now I will teach you another advanced
technique when we combine it with this
film layer thing. Let's say you have added a mask. Let's try to adjust
this a little bit. You can add like any field
layer of your choice. Let's say maybe I search for grunge and I will drag and drop maybe this
one, grunge maps 004. So drag and drop it over here. And let's say you want to
remove some of the ideas. You have noticed
that we can control the leg balance and
things like contrast, but we cannot remove a
specific part of this mask. Let's say I want to remove
this thing from over here. So how we can do that, you can again select the mask, click on this add Effect menu. And this time, instead
of adding a fill layer, I will add a paint layer. So nothing really happened. Let's cross this out,
select our brushes menu, and let's select any kind of brush. Let's select this one. No, maybe some caveats. Let's select this one only. Now we're back to our basics. Now you add like painting
on the mask again, because now you have
added a paint layer. So this fill layer is our main layer that is
controlling the mass. But now we have added another
paint layer on top of this. And if I paint with white color, you will see again, if I'm painting with white, the blue color underneath
is now becoming visible. If I undo this and press X to
switch back to black color, I can remove this area because
I'm painting with black. So you can see this
is like really, really useful and you should
understand this properly before it's like
added a grunge map to create the base of our mask. And we created this effect. But we want to remove
certain areas or we want to add to some of the
areas to this mosque only. We added another paint layer. And then we can use the brushes to add some custom details. So if you press X, you can paint over here
whatever you want. You can change the brush even. Again. You can
press X and remove some of the areas from
this mosque or leak. These changes are completely being done to the
paint layer only. So if we remove the paint
here or let's say we just disabled it
using this icon. We have our mask back, we have the default
mask that was earlier and enable
about the brain. Here. We have all the changes
that we did is a little bit like maybe it is a little bit overwhelming or complex
to understand at first. But this is like a really nice and interesting
concept to grasp. And it will really
help you like creating a very nice-looking pictures. You will understand
when we will get back to creating our
good smart material. Again, don't worry if you don't
understand this properly. We will be doing this
a lot in our course. So eventually you will
understand everything of this. So you don't have
to worry about it. Let's just quickly
cross this out. And I will show you another
way we can use masks. And that is using
smart materials, are sorting using smart mask. So we begged mesh maps. So one of the reasons
is the smart mass also, smart mass are kind of similar to smart
materials only they are predefined mosques
created for you by Substance Painter so that you can easily speed
up your process. So let's say I drag and drop this dust occlusion onto
our mask like this. And you will see as soon as I do that dust has been added to my model in all the corners
and crevices of the model. The color is set to glue
that so it is looking good. So let's say if I
set this to black, you can see how much detail
it adds. If you remove this. You will notice that
the dust is only being added to all
the gardeners. So that's why it is looking
like really authentic. So this is like a smart mask because it is already
predefined for your use so that you can quickly create
great looking textures. Let's add another fill layer. And this time we can
again add a black mask, LSU the edges,
edges, smart mask. So we have this edgy scratched
edges, strong scratched. Let's use a restaurant. And you will see
it has completely masked out the
edges of our model. You can select the
mask editor again. And you can do things like adjusting the global balance
that will control the mask. Again, smart mask is a really
powerful feature that, that is another way to use mass. We have learned like do
three different ways. There is one more that I
will just quickly go over. You can remove this mask and
you can try something else. So yeah, there is a lot
to experiment with. Obviously adjust
the mask Editor to control the effect
of the mosque. Alright, so yeah,
this is the way that we can use smart masks. They are like really powerful. Let's just remove this layer and this one also
the dust layer. We will obviously
add this later on when we are actually
creating the wound material. Alright, so the last
and the final way to use the mask is you just add it. And let's say, I want to make
this object white colored. Only this object only overhead this design and not the
other parts of the table. So this also can be done
with the help of mask. If I add a mask like this, we can obviously go to
brush and select any brush. Let's say this one basic heart. We can paint over this area, slow this building wherever
we want the mask to appear. But this is like really tedious. And it is also not really
good because as you can see, the paint is appearing over
here also at the back. And this is like not
really efficient. And it will take us
a lot of time to put this thing into
complete white color. But there is a short
little way we can select this tool from over here. So the polygon tool, as soon as you do that, this is like a free tool. If you remember,
when we were kids, we used to use the paint. So we had the fill bucket
tool in the brain. So this is a similar
to a fill bucket tool. If you select the mask. And this tool has like
four different moods. But let's just go
over this one first. So this is the Nashville board. As soon as you select this. And currently you will notice
the color is set to white. You can change it with x. So currently it is set to white and as soon as you
select this thing. So this is like complete
mesh. And I will select this. You will see it completely
fills it with white color. Now, the mask has been
filled with white color over this mesh completely
using this fill tool. Now you can change the color of this to anything you like. Now let's say I
again select this. And now I want the mask
or the color to appear, or these objects also. So again, I will make
sure that Valerie set to white and select
the mesh fill mode, and then select these
objects very easily. And you can see like the paint bucket tool,
we're filling the color. So basically what
we are doing is we are filling these objects
with white color. And as we're painting on a mask. So whenever we like fill
this mask with white color, this layer starts to
appear over here. If I set this back
to black again, and then click on this object, you will see now the
color is disappearing. This is basically the
paint bucket tool or the fill tool for masks. Alright? So if you understand
that much now, let's say if I
said this to wine, you see we can select parts of the table and they are
being filled with color. Now you can press X to
switch back to black, and again, select all of these and the color
would be removed. Alright, now let's go over
the other modes of this tool. So let's say I only wanted the color to
appear over this phase, only, only over this series. I wanted this mosque or this color who
appeared over here. So definitely we cannot
really use the mesh field because if I select the
Nashville and fill it like this, first press X to switch back to white color and
fill it like this. You will see the whole
mesh is being filled. So for this, we have
the polygon thing. Mesh will change
back to polygons. Let's undo this. And now if
you click over this phase, you will see only a single phase is being filled at a time. This is like the
basic difference between all these votes. So the first one is
basically triangle filled. What it does is it divides
the face into two halves. So if this is a face, will divide it into two parts
like this into triangles. If you press X and remove it, you will see it removes and
basically two triangles. And it is not that useful. I never use this
only two modes or uses the polygon
field and imagery. So polygon fill is
for certain phases. If you press X again
for white color, you can see it is
for certain phases. And the mesh will is
for complete meshes, like complete 3D objects. If you press X and now you select the polygon
fill, you can see, you can remove the color
from certain phases only because we have selected
the black color and black is invisible for mask, and we have selected
the polygon field. We are removing one at a time from just one
single phase only. Now let's select the mesh and remove it from
all of these areas because we do not really want to make a selection this way. Alright, so the last one
is the UV chunk free. And again, I never
really use this, but if you press F1 to
bring up your UV islands. So this one basically fields
according to the UV islands. So as you can see, this
is a UV island over here. If you click over here, x first for white color
and click over here. And you can see this is
one single UV island, so it is very unpredictable
because we don't really know what will get filled as what is connected to each other
in the UV island. And you can see, when I
select all of these islands, different places are being filled according
to the UV chunks. Like whenever you
select anything, it will get filled
according to the UV island. So again, I'd never
really use this. The only two features I use are the only two
modes that I use, a polygon and mesh when you're going to press F2 to come back to the 3D view. Now again, let's
see if we want to remove all of this
color from the area. Try to do it on your own. First, you will press X to
switch back to black color. Select the mesh way
and just remove it from all of these
areas very easily. So yeah, I hope I was clear with explaining all the different
things about mass. If you don't understand it
completely, it's totally okay. Give it some time. Experiment with
this a little bit. Try to add different layers. Tried adding dust by using all these different smart
mask, then adjusting them. Try like using this tool
that I just taught you. You can also try using
the fill layer method. It is like smart mass method. We can also use filters. There are multiple
different ways to use masks and there is a lot of things that you
can experiment with. They are definitely try to grasp this concept completely
because this is very, very important in terms
of substance painter, as it will help you a lot in
creating realistic textures. But yeah, if you
don't really get it, it's okay because
we will be doing this a lot in our course while creating
different materials. So yeah, you will totally understand this when we are done with the course or
when we are done with the texturing of all the things. Alright, so this is
it for this lecture. This was pretty long one. But yeah, in the next
one we will start again with the texturing of
AdWords, Smart materials. And yeah, thank you
guys for watching. I'll see you the next one.
19. Finishing Table Texturing: Hello and welcome everyone. So in this lecture, Let's continue making our
word smart material. So in the last lecture,
I mentioned that I will be adding a couple
of dust layers now. So let's do that. So the first thing that
we need to do is we need to add a fill
layer for the dust. But one thing that I
want to mention before doing that is whenever
you add a new fill layer. So let's say if
you have selected this layer and then
you add a failure, the New Fill Layer
will get added to the top of the
selected layer. So just make sure
to remember that. Alright, so now this
layer has been added. Let's first rename this. So double-click over here
and rename this to dust. And next thing that
we can do is we can make it a darker color. To just bring this
down over here. I think this is pretty good. We can also change the
roughness of this layer. Basically, what rough
this will do is if you increase it
and set it to one, then no light will
be reflected off it. And if you set this
to zero than it is like completely
reflective and very shiny. So we can set it to maybe 0.4. Alright, so the next
step that we have to do is we need to add a
black mass to this. So click over here
and add a black mask. Alright, so now the
layer disappears. In the last lecture we mentioned like many different
ways through which we can paint for mask
if you want to add us. We can definitely like even
manually paint like this. But that looks like
really unrealistic. And it is not a nice approach of doing things in my opinion. And the next one is
we can definitely go over here in the
smart math section of our shelf and definitely use one of these
smartwatch so you can just drag and drop
them all here. There are a lot of different smart masks that
are related to dirt and dust. Like this one maybe or you
also have something like this. So yeah, there are a
lot of different ones. You want to select any
of the smart mass, you can definitely do that. But what I will be doing is I
will be using a fill layer, a specific failure that will
give it a really nice look. So select this mask, go over here and
select Add Field. Now we need to add a
fill layer to the mask. Let's head over to the
texture section of the shelf and searched
for directional noise. So if you hover over
these textures, you can preview them. So we have these two
directional noise, 1.2. These are like very
streaky textures and they give like a
rainy, nice, good look. So I would like to add them. Just select the directional
law is one texture and drag and drop it over here
on the gray scale slot. And as soon as you do that, you can see our dust
is appearing in this shriek like from you can go over here and
visualize your mask. But there is one problem
that we discussed earlier. The texture looks like really disconnected because of
this UV prediction thing. So let's just quickly change
this to pry planar from UV. And as soon as you do that, you can see now the
texture looks really, really good as it flows through like a
single texture only. And yet now you can press M
to view back the material. This material gives a
really nice would feel. One little trick that I
will also show you is if you go back to
your main layer, so that is the failure. And you try to adjust the height information
of your layer. Let's say if you decrease
it a little bit, just a very little amount. So that is visible.
Maybe a little more. As you can see for
degrees it they are like literally dense being
created on our wood. You can definitely
use that also. I don't really finding that good in this one,
like in this scenario. It looks kind of weird, but yeah, we can definitely
use this in future. Let's reset back to zero right now and click over the mask. Then the failure to maybe
adjusted a little bit more. So there are a couple of
things that you can do. You can adjust the tiling. You can decrease the
tiling or increase it. If you decrease the tiling than the scale of the
texture will increase. If you increase
the tiling, sorry. If you increase the tiling than the scale of texture
will decrease. And it will make
the texture like quite repetitive,
as you can see. Maybe set it to
somewhere around two or 2.4, something like that. Again, all of these
values are like totally up to personal
preference only. So you can just set
them anywhere you like. Maybe something
like that is nice. Next is the balance
and the contrast. And these ones are like
pretty self-explanatory. If you'd like,
turn these sliders once you will
understand what they do for the balance basically controls the complete
effect of the mask. So if you set this to zero, you can see now the mask
like completely disappears, like the dust layer
completely disappears. And if you set this to one, now it is completely black. So you have, we need to
set something in between. Maybe somewhere
around 0.6, maybe. Now you will notice that the table looks
like really dirty. But don't worry, we will
just fix this in a moment. The next is contrast. So basically what this will do is if you increase it to one, now your effect
will be like really sharp and have strong edges. I don't think we want
that because we want our dust to look like
smudgy and blurry. So we can set this to maybe 0.2. Alright, so now the
desk looks like this. If you want to go for a
dirty look for the table, you can definitely do that. But what I will
do is I will just click over here and
decrease the opacity. So you see we can just decrease the opacity to maybe
something like 16, my opinion, would look nice. So it adds a nice bit of detail, but it is also not in
the face completely. You can just turn on and
off your layers like this and see how they
affect your model. And then you can like
work accordingly. We can also just maybe like instead of decreasing
the opacity, we can also just
decrease the balance. But here they are like different ways to do different things. I will just decrease
the opacity right now. And yeah, this looks
pretty good in my opinion. Now I will add another layer. So click on this folder icon
and let's add another one. And this time I will be adding a little bit of color
variation to a word. So it is nice to add different
layers of roughness, variation in color variation,
dust, edge damaged. Said these are like
some of the basic ones that I usually add
to all materials. Make them look good. Alright, so let's rename this
to color variation. And what I will basically
do is I will choose a color that is related to this vertical
and only for this layer. And then add another like
mask and choose some of the grunge textures and then create a little bit of
color variation out of it. So what we can do is you
can click over here, and I have already
selected on a color. But what you can do is you can just disable this layer for now. You can select the sample color icon, the eyedropper tool. And you can just
choose a color that you like and select
it like this. And then you can adjust
it from over here, make it lighter or darker according to the
variation that you want. You will just
understand in a bit. Let's just keep any
color over here. For now. I'll just place it
over here like this. Let's enable it back. Yeah, something like this. Obviously we don't want this. We will add a black mass now. So click over here,
add a black mask. Again, click over here,
add a fill layer. And this time let's go
for directional noise to just to have some variation. Obviously, you can
select any smart mask, any like Fill Layer,
grunge, anything. But I will be going
for this and you can see how it adds like
a color variation. Definitely too much right now because the opacity
is set to 100. But don't worry,
we'll fix all that. Alright, so the
first thing that we need to do is we first
need to change the UV to Dr. Dana so that it does
not look like disconnected. Yeah, that's pretty nice. We can go over here, select mask to visualize it. Maybe I will increase
the tiling to this also. Come back to the material. And let's see. You
can see already, I think it looks really nice. It hides a little bit of dust in random places that makes it look a little
bit more authentic. Definetly, I will just
click over here and decrease the opacity to
maybe something like 50. Let's say. Let's increase the
contrast because right now I think it's too less. So maybe somewhere
around 0.3. Let's see. I always like to turn
my layers on and off to see how they
affect My Immortal. And yeah, I think I'm
pretty happy with this one. Alright, so next maybe, let's say, let's try
to change the color. So click over here. And I've already
selected on the values. So for the H 0.048, saturation can be 0.6. And four, the value is 0.5. Yeah, I think even this
looks pretty good. So you can definitely likes
choose any color you want. But I will just undo it and maybe I will go for
the older color only. Because in my opinion, I think it looks better. This one, if you want to copy the values, you
can see over here. That's pretty good.
Let's move on. And now we will be
adding a bit of edge damage to our table. Again, add another fill layer. This time, instead
of using any kind of like textures or failure, let's use a smart mass. So we have a little
bit of variety. Look over here,
select Smart mass, and there are lots of
different edge smart mass. As you can see, edge damage, edge TO digraphs, edge rust. So you can definitely
take select any one of these in just drag-and-drop
and see how they look. You didn't see they like
selectively mask out your edges. And we have something like this. You can change the color to maybe something
golden, yellowish. Because that would be the
color of the shift of woods. You will definitely set it
to like a proper color. Right now it looks like
very absorbed in wierd. Alright, I will first
select the mask. Let's just remove this one. The one that I will
be using is this one. It is scratched. I think this mask
is pretty nice. Obviously this is a
little bit too much. Don't worry, we'll
just adjust all of it. Alright? So you can select this. So there are two things, agate. One of them is mosque. This is like the Mask icon, and this one is a freedom. We will discuss what are
filters in just a little bit. So first let's select the mask and adjust its
values a little bit. So first we have the veer 11. So if we decrease it to zero, it is basically same
as balanced only. And it will set to one, like there is complete damage. So it is currently set to 0.79, but I think somewhere
around 0.6 would be nice. Yeah, 0.6 is fine and we can increase the contrast
a little bit. 0.1 maybe. Also set the color properly. First, select the color. Click over here. And the color that I've
drawn four is the H. You can write 0.125. Saturation is 0.42 and
the value is 0.717. Yeah, that's a nice color. And then we will just decrease the opacity To a lot to make
this a very faint effect, we definitely don't want
it like this vibrant. And it is like really
interfaces right now. Just click over this
opacity and set this to 30. And yet, this way it
looks like really good. And it looks as if the word has been damaged a little
bit from the edges. And you can just
turn it on and off and see how it
affects your model. And I think it adds a
nice bit of detail. Let's select it again. Click over here
Michaela edge view. And let's try to adjust
some other commands also. Alright, so another thing we have over here
is the grunt Jamal. Let me just explain
it what it is. Grungy is basically the dirt. So we have these
edges over here, but we also have a little bit
of dirt added to a table, as you can see over here. If you increase
the grungy amount, the amount of this
dirt increases. And if we decrease
it, it disappears. And the grand scale is basically increase the amount to one and then
adjust the scale. You will see if you keep
on increasing the scale, the tiling of the
dirt like increases. This way. It looks like
really, really weird. I just suggest you guys
to keep the tiling always to a low number because if
you keep on increasing, the repetitiveness increases
and that does not look nice. I think the grungy amount
to 0.21 is pretty good. And we can definitely
work with this. Next one I will do is I will
just degrees the curvature. Wait a little bit. So it is like related to
your mesh Maps and it will turn down the whole
effect a little bit. So maybe let's just
set it to 0.7. And yeah, I think this
looks really good. You can turn it on
and off and see. Yeah. I will just rename this
to H damage again. Next we have the sharpen
filter over here. So sharpen is like pretty
self-explanatory filter. A filter will enhance your
mask on your layer in a way, they're like lots of
different filters. I'll just show you
a couple of them. So sharpen is a
pretty simple one. If you like, increase
the sharpening density, you will see the edges of this mosque or not
like really sharp. And yeah, basically this
is the sharpen filter. So right now it
is only affecting this mask only because it
has been added to the mask. You can add a filter
to anything like you can select this and then
add a filter to this. You can select this layer also click over here and
then add a filter. But there won't be
really any effect because this is just a
simple color only. We are. Let's just select this mask and I will try show
you something else. Let's select this mask and click over here and
add another filter. And let's show you
some other filters. So we have, you also
have this blur filter. So you select this blur
filter and you would see as soon as you add that, now your mask is
basically blurred. So basically these are filters. They will be like a
lot of different ones. Let's just go over
a couple of them. We also have this walk
filter at the bottom, which gives this kind of
effect to your layer. As you can see, if you
increase the intensity. Let's select maybe this
layer would American cherry. And I will show you
another effect. I will just quickly
turn everything off. And let's select this
and add a filter. So go over here, add a filter, click over here and let's say
I selected HSL perceptive. So I just had perceptive
can change the hue, saturation, things like that, and the lightness of the layer. You can adjust these things. It is like really
helpful when you have added a texture image and you want to tone down the saturation a little
bit or increase it. That is a really useful filter. We also have other ones. A lot of them are
self-explanatory. You like, add them and
see how they work. So this is like blood
in a directional form. We also have blurred slope. Like lots of them will
give different effects. This one is looking like as if it has been
painted with height. Let's see some air. We also have like different matte finishes. These are like useful
when you are creating. Let me just turn off everything. And let's say they will do is I will just
enable back everything. And instead of
turning everything, we can just quickly turn
off the complete folder. Let's add another failure. So just click on this folder so that the failure
gets added outside. Click on Add fill
layer this time I will make this layer metallic. As you can see now,
it is a metal. Let's also adjust the
roughness a little bit and we have different
filters for this. Also, if you click over here, add a filter and we have
different matte finishes. So let's say we have this one. This will give this,
this looks so you can create like different
metal patterns. This one is like brush linear. Then we have this thing
matte finished, galvanized. I kind of went off in a tangent, but I just wanted
to show you like different filters and
they are really useful. Let's turn back the wooed. Now. Let's remove
this empty filter and we will go over the Sharpen. Sharpen is pretty basic. Just increase or decrease it
to increase the sharpness of the effect or the and at 0.4, I think it is pretty good and are damaged layer looks
really nice in my opinion. You can just turn off
everything and enabled at them one-by-one and see how we
have developed our material. Each layer adds a little bit of value and realistic
next to the layer. Alright, so again,
let's move further. We can add a couple more
stuff like scratches, some scratches to this table to add a little
bit of more value. Even if we stop at this point, I would material
looks pretty good. But yeah, I will just add a couple more stuff to
make it even better. Alright, So again, add
another fill layer. We named these two strategies. Click over here and let's
first set the color. I think the color We pretty
similar to the last one, only yellowish color to 0.12, 50.34, and then 0.55, something like that again. And let's add a black mask. This time I'm using a failure
because we don't really have any kind of smart mask for scratches
like which is that good? We might have a couple of them. Click over this ad
effect I'd fill. And let's come back
to the textures. And if you just simply
search for its branches, you will find this. We have like
different scratches. Japan, so grunge scratch dirty. I will use this one.
Grunts scratches rough. Just drag and drop it. Over here. Right away you can
see the scratches appear. We have a lot of different customization
options over here that we can adjust. First I will do is to make
the texture look proper. Set this to try plaintiff. And yet this way it looks
much better. All right. So now what I want to do is if you just come down over here, we have this scratch styling. We can also just a tiling
from over here also, but let's just do it from this option because it
has been provided to us in Greece a scratch styling because they want to make
the scratches pretty small. Starting at six is pretty good. I will also increase
the tiling alleviate from over here so that they're even smaller
because they are not that small right now.
Yeah, that's pretty good. Next, let's just decrease the opacity to something
like 30 maybe. Because obviously we don't want our scratches to look like this because right now it is
looking like really bold. But let's just set
the opacity to 30. And this way it
looks really nice. It adds a faint bit of effect. And you can just
write now set this to 100 only maybe because we
can view all these options. So they are like a lot of them. You can adjust the balance, which is the overall effect. Then we have contrast obviously. Like increase the sharpness, it will reduce the
effect a little bit. One option that I particularly
like is scratched masking. If you just increase
it, it will just remove scratches
from areas randomly. So it adds a nice
bit of randomness. We can definitely
increase it to one. And the rest of the options
you can just increase and decrease and see how they
affect your texture. Like we have this scratched
spot incident intensity because we also have these
spots like youth sports. If you just decrease it, we will see only the spots
are getting affected. We can definitely
degrees this one. We also have scratches length. They are like a lot of things. You have the word yeah,
basically that's it. You can just experiment
with all these options. They are pretty
self-explanatory. I will set this back to 30 now. I think the scratches add
a nice bit of effect. All right, before
we proceed further, let's just quickly hit
Control S to save our files. We can just add a little bit of more damage and some
roughness variation and then I think we would be done with that woulds
smart material. The reason I'm
spending so much time on this material is
because we will be using. This one a lot. We will be using this material
over and over again because our whole environment basically uses the
word material. So that's why I'm trying to make it look as good as possible. Alright, so now let's add some more damage to
add good material. Obviously, if you are happy
with this kind of look, you can definitely
stop over here because the material looks fine. But yeah, I will be
adding one more layer. So let's click on
Add fill layer, and let's choose the color
first to click over here, I've already decided on a color. For the h value you
can put in 0.1, saturation is 0.25
and values 0.4. Alright? This kind of color, Let's rename this to damage. Now I will add a
black mass to this. And basically we will be
directly using a smart mask. So you can just remove this
search first and click on the smart Mask icon
over here in the shelf. And the one that I will be going for is this one dirty, dusty. You can definitely
try out a couple of other smart mask to
see how they look. Maybe like something like this. Definitely not this one. There are a couple of good ones. You can definitely go for
them if we wanted to. But as I said, I will be
choosing this one dirt dusty listed over here. And this is the kind
of effected gifts. You can click over
the mask editor and adjust it if you want to. Like things like Louisville
balance contrast. We also have this blood
option over here. And they are like a lot of different settings which you can tinker through and get
the customized look. But I think the default,
Lucas pretty good. The only thing that we
want to do is we want to reduce the opacity because
this is too much right now. And I will just
quickly turn down the opacity to something
like 30 maybe. This way it is not really
that much visible. Still adds value to our material and immaterial looks pretty
good with this tradition. The last thing
that we need to do is now we only need to add a roughness variation
there and then we will be done
with this material. So quickly add a new field. And basically we have these
different channels for color, mental illness,
roughness, normal height. So this time we will be only
using the roughness channel, so we can just disable
the rest of them. You can see, you
can just click over the channels to disable them. Or you can just hold Alt and click on the
channel that you want. So we want the roughness
channel only and click on it. The rest of them will be
disabled automatically. So now we have this fill
layer at the top and you can basically control
the whole roughness of the table you can see. But we don't want that. We just want to add a
little bit of variation. So in a similar way only first, let's rename this to
reflect radiation. Now basically we can just add a black mask and we
can add a fill layer. Go to the texture section, let's search for grunge. And we have these
different grunge maps. And you can choose from
one of them. Let's see. I quite like this one.
So we can try this one. Grunge maps 007, just drag and drop it onto the gray scale. And right away you won't
notice any changes. Like the changes are done, but it is not that
easy to notice them. So yeah, you can just
place your model this way. And when you click over here
and adjust the roughness, you will see how we have added
like roughness variation. Some parts are like shiny, some parts are not
reflecting that much light. So this layer is just added to give more realistic
next to the material, you can adjust things
like the roughness. Also, if you come
back to the mask, you can adjust the overall
balance and you can see how it affects your
roughness Venetian layer. We can definitely go for
something like this. Reduce the contrast a little
bit, adjust the timing. Maybe. You can set this to try brainer. Yeah, then decrease the tiling. I think somewhere around here is pretty good
in my opinion. You can just turn on and
off the roughness layer and see how it affects some audit. I'm just trying to find the perfect balance
between the two. Yeah, I think
that's pretty good. You can enable the
mask from over here and see this
way how it looks. Let's just increase the
timing a little bit more. Rest M again to
read the material. Now we can come
back over here to the roughness and
change the value of roughness so that it is
like not that much visible. But yeah, just a
little bit effect. So we can put it
somewhere around point for writing 0.4 is a
nice value. You have. Yeah, that looks pretty
good in my opinion. Definitely. You can experiment
with this a little bit more and see the results. But I'm quite happy
with that material. So I will just quickly hit Save. And yeah, this is
it for this video. In the next video,
what we'll be doing is we will add this
material to the chair also, and we will create
a smart material out of it so that we can reuse it over and over
again in our course. Canvas watching. I'll
see you in the next one. You're also enabled back the
roughness from over here. Yeah. Thank you. I'll see you the next one.
20. Texturing the Chair: Hello and welcome guys. So now let's continue to
extreme art table and chair. So the first thing that we
will be doing is first I will select this writing table
texture set from over here. And we will convert this
course material that we have created over
the past few videos into a smart material so that we can reuse it over and other
objects and also over other projects that we will be using later on for other props. So you could do that. Just select this
complete folder, so make sure you
have a folder first. Also remove this empty freedom. Yeah, I will just
close this folder. Selected right-click. And you will find this create
smart material option. Just simply select this. And as soon as you do that, it will pop up in your shelf
over here, as you can see. Now, this would cause material is over here and we can just drag and drop it and reuse
it over and over again. So now let's come back to
the chair texture set. And I will just drag and drop this good
course material like this and wait for it to upload. And yet you can see automatically
it is added to a chair. All right, so now I will show you another use for
masks that we learned. So obviously we don't want this wood material over
the seat over here. What we can do is first let's select this empty
layer and delete this. And yet we don't want this
over here is Woodmont ear. So now there are two
ways to do this. I will show you
the difficult way first and then I will
show you the easiest way. So the difficult way is to just select this
complete folder. And we can add a mask to
the complete folder also. So just basically select
this whole folder, go over here and
add a black mask. So as soon as you do that, the whole body, it
has now disappeared. And if you remember in
a couple of videos, bathroom discussed about
this tool, the polygon. You can quickly
select this tool. So make sure the color is
set to completely white. And we can select this
option from over here, the mesh, because we want to
select the entire meshes. If you select this one, you can select each and every
face at a time. But that would take
a really long time. So yeah, we can just select
this option from over here, Nashville and deselect
them one-by-one wherever we want the
material to appear, Act. And we can just
leave the seat out. And you can see we
have easily added a good material to all the
areas where we wanted. And we have left this out and we can add now another fill layer. And then use like
maybe a red color. Then again, add a black mask. And this time, make sure that you have
selected this tool. Select the mesh will, and
now just select this. This way you can separate
out materials on two different objects as you
can see how easy it was. Yeah, but obviously we won't
be using this material. So select this layer
and delete it. Alright, so this is one
of the ways where you can like separate outer layer
from different objects. But there is an even
better way to do this. It was like recently introduced. And it is basically
a mask only but a different type of mask that
is called a geometry mass. And it is way easier to use. So let's just select this
folder and delete this. It works in a similar way to
work a normal mass fully, but it is easier to use. You just drag and
drop this again. And now again, the material is appearing over all the objects. If you see this box over here. So basically if you
select this box, you will see nothing
really happens, but we can select and deselect where we want the
material to appear at, and then we do not
want it to appear, as you can see from
disabled them. Now the material is like disappearing from wherever
you have clicked. So basically by default
everything is selected. So let's say we don't want the material to
appear over here. You select this object, and now it is these
electric from this one. Geometry mask is
really easy to use. You can see this nine
is appearing over here. That means this layer is being used by nine different objects. You can de-select
them one by one. Now it is 876. Very simple. You can just hit right-click and you can also
select Exclude on. So this way none of
them are selected. And you can also
right-click and included. So now everything is selected. You can just
right-click include all and just de-select this
part from over here. And yet, this is really easy. Obviously you can use the
earlier method also by adding a black mask and
then using this polygon. But yeah, this is also a
very easy way to do that, like using the geometric mask. You can add another fill layer again During the color
to something like this. Then you can select the
geometry mask, hit right-click, and hit Exclude on, so that nothing is selected. And now you can
selectively select the objects where you want
this blue layer to appear. So yeah, really simple. One thing that I
wanted to discuss this first, let's do this. Alright? So the Demetri mass
can only be used at places when we have
like separate objects. But let's say I add a layer and I only want this layer to
appear over this circle, not over the whole object, but this server only. So now this time I cannot really use the
Demetri mask because. Select the whole object only. If you want to link only selecting this certain
portion, this circuit. Now what we have to do is first
hit right-click included. And now the only way would be to just simply add a black mask. Select this tool. And instead of using the mesh, will use the polygon field. And we can easily say this single motion or
any other abortion. As a matter of fact,
just selectively, you don't have to select
the whole object. We can just select a certain
portions to take share from. So yeah, it is really
useful this way. But if you have to select
like complete objects, like all objects,
then you can go for directory mask as
it is really fast. This is the basic difference. Let's just delete this layer. For now. Let's keep
the chair this way only and come
back to the table. Let's select the writing table. Now what I want to do is if
you see this thing over here, this design that we have created at the
front of the table. I don't want this to be a wood material normally I want to change the
material for this, but this thing, and for
all these small pieces, just to add a little
bit variation, what I will be using is I
will be using a gold material for all of these pieces over here to make them
look even better. So instead of creating
a goal material, we can definitely do that too. Then just add a fill layer, give this a yellowish
golden color. Set the metallic to one,
decrease the roughness. And here you can see we
have something like this. Instead of that, I will just selling the smart
materials from over here and search for this
goal damaged smart material. I think this one is
really, really good. You can just drag and
drop it and you can see we can definitely use
this smart materials. But before using this
text, just undo it. First. What I want
to do is I want to be select the wood
material from over here. So now I hope it is very
easy for you to do is select the geometry mask and click over here to deselect and just complete select
all these pieces. Also de-select the wood material from all of them so that we
have something like this. You can drag and drop the goal
damage material like this. Again. This time select the
geometry mask and we can just right-click
and hit Exclude all. And basically select this
piece and these pieces. And you can see it complements
our table really well. And it looked nice. Yeah, I think it is
a nice addition. You can open up the
goal damage folder and you can maybe adjust the color a little
bit if you want. I do want to make it
a little bit darker. This was the original. I will just make it a little bit darker and a little
less saturated. That's better, I think. Oh wait, I think this
looks pretty good. You can district save. And we can now again
move over to the chair. So far the seat, I am
thinking we can use some of the fabric materials
that we have finished. Remove this filter first
and search for fabric. We have the radius like nice fabric materials that
you can just drag and drop. And again, see for yourselves. Maybe I haven't used this one. Just drag and drop it this way. First again, let's use
the geometric mask. Let's click over here,
right-click exclude all. And yesterday, we have
something like this. I will just open up this folder and let's try to remove these Checkout button. So we can just turn on and
off the layers and see which there is responsible
for these Jacob buttons. So I think it is this one
disabled both of them. And this is where I think
it looks much better. But we can do is
we can just find out what is causing all
these whitish grains. And I will just tone
it down a little bit. This layer, I will just select this and set this to maybe 40, set the opacity to 40. 40. Yeah. I think with this, we are pretty much done with the texturing
of our table and chair. We can just quickly hit Save on a substance painter files. And yeah, we can start texturing some other
things in the next video. Also, if you want to adjust
the texture of the wood, all the cheer, You can
definitely do that. Like if you are feeling like some of the layers like maybe the not a damaged but the edges. I think it is too much. You can just select it, go
to the metal edge view. And maybe we can just decrease the view
level a little bit. Maybe like little 0.55. Just to tone down the
effect a little bit. This way it looks much better. I'm pretty happy with how my
table and chair after now, we can just definitely
now it's saved and we can finish
with this video. And thanks for watching. I
will see you in the next one.
21. Texturing the Shelf and Tables: Hello and welcome guys. So
now we're back in Blender. We can again start UV
unwrapping some of the props, then export them to Substance
Painter and texture them. So it will be the same process over again for a
couple of more times. And yeah, if you also remember, we like move this chair back for the sake of exporting
the Substance Painter. So let's just move
it back forward now. I will quickly first
enable the rest of the stuff just to see
how a room looks. We can just select the empty
and bring it back over here. I think till here
is pretty good. Also, if you remember, we have these two chairs over here, so you can press Alt plus
H to bring them back. And now what I will basically
do is I will just delete these two and again,
duplicate this year. The reason being because these two chairs haven't
even been UV unwrapped. And the second thing is
they don't even have the chair material that we
have added to this chair. So de-select everything and make sure only these
two are selected. And then just press
Delete to delete them. Now we can select this redshift plus g if you remember the
shortcut to select group. All of this also
select the empty. Then you can press
Shift D to duplicate. And I will just place
it over here like this. G, the environment
we do over here. I will also enable my
screen casts keys. Yeah, buddy, you select the empty
now and we can just move the chair
using the MTU. This on the z by -90 degrees. Yeah, something like this. And let's place it backwards.
Old position only. Somewhere around here. This scale it down a little bit. And again, redshift plus G, Select Children and
select the empty also, then redshift plus D. Duplicate this and
place it over here. I will also rotate the
chair a little bit. Now it is fine because
these tiers also have the material and they have also been UV unwrapped properly. So when we add the material to them or they won't
cause any problems. Alright, so let's
move further now, make sure to hit Save. Now we can maybe
texture these tables. Because now that extreme process will be like really smooth because we have already created
the word smart material. And what material will be used heavily in
this environment. Now we can proceed quickly
because we've already created the most difficult
part in our text string. So let's just disable
everything now. Enable the tables,
all these three. And along with this,
I will also add the smallest shelf so that we
can take all of this stuff. Alright, so the first
thing to do is obviously, you need to first apply all the modifiers
for just press a to select everything and just make sure you are in
this Chinese room. Applied filed only and
not the other one. Alright, so while
everything is selected, just press F3 and there's
through mesh it enter. And yet, the next step is to just add a material
to all of them. So why all of it is selected? Just press knew.
Obviously the material won't be added to all of them. It will be just added to
this active selection. Let's rename this to be
the payables and shelf. Now while this is the
active collection, makes sure everything
is selected. Then press control plus L to link the data and
just link materials. And you can see now 24
is written over here. That means the material has been added to all different objects. Alright, so the next
thing is to UV unwrap. So let's go over to
the UV Editing tab. Firstly, staff to come
out of the edit mode, press a to select everything, then press Control a and make
sure to apply the scale. Alright. Now we can press Tab, press a to select everything. Then we can just hit you. And smart human project
this again, it Okay. I think this is fine. Make sure to increase the island
margin a little bit. I think we are fine with
this kind of unwrap. Go back to the Layout
tab and before exporting them to a
substance painter. Let's quickly check for
the face orientation. So go over here, enable
face orientation. And yeah, everything
is pretty good. If you remember, if you just
see anything of this color, this dark red color, you can
just select that object, press Tab, press a to
select everything. Then you can press Shift
plus n to fix the normals. Again, one more issue with this is this disabled
face orientation. If you see these kind of shading issues in your
edges, it might appear. So there is a really
easy way to fix this. Just select that
particular object. It might happen with a
couple of your objects. Don't worry, you can just go to modify and select weighted normal that will basically
fixed your issues. Make sure to apply that
particular modifier after you have done adding it. Yeah. Alright, so now we can
export them to substance. Painter made sure to just
select the shelf and just move it back over here for the same reasons only because we will be making the mesh maps. And I don't want them to
interfere with each other. So press a to select everything. Go over here to
File, export it FBX. And let's come back to
the exports folder. And I will name is Michelle. And David. Make sure to enable
mesh from over here and selected objects. Let's hit Export and also
open up substance sphincter. New Project. And
click over here, select and select the
shelf and table file. Let's say everything
is fine, just sued. Okay, now, so press F1 or F2 to completely new the 3D view and just quickly check if there is any kind
of problem with the export. I don't think there
would be any. We can now just go over to the texture sets settings
and hit vague mesh maps. If you remember, we will
do the same settings now, change the output
size two for k. Enable these two things. Disable ID and just said the anti-aliasing
to four-by-four. So everything is good to go now, just hit bake selected textures and wait for him to finish. Alright guys, so the bank
is done now it okay. And again, quickly check for any kind of potential big shoes. I think everything
is pretty good. So we can move further. Also, I will quickly go
to the display settings and enable temporal
anti-aliasing. And also let's quickly
fix the colors. They are not really
any colors right now, but yeah, you get
the point. Enabled. Post effects enabled
tone mapping. Change the function
from linear to Log enabled color profile and
select the profile as this one. Ace is useful. And yet. Alright, so texturing this would be fairly straightforward. We can go over to
the smart materials and search for it good. And this is like the
power of smart materials. You can easily like create a smart material and reuse
it over and over again. So we have this word
underscore course materials. So just drag and drop
it onto your object. Right away. I think
it looks pretty good. We can now come
over to the layers, tap, delete this default layer. And again, I will use
the geometric mask. Just click over here. And I will quickly de-select a couple of items
like these things. On these objects, I will
be adding the bowl, but didn't only just to
add a bit of variation. I will also be
selected these parts. And these ones at the bottom. Yep. Now what we can do is
we can search for the gold damaged and just drag
and drop it over here. Alright. Now we can again click on here, right-click and
exclude everything. And just select these parts only where we de-selected
the wood material. You can press F to focus on the complete
object. Like this. If you are like zoomed in, in anything and you want
to like move out quickly. You can just press F and it will focus on all of the
objects at once. That looks pretty
good in my opinion. Last thing that I will do is what I will do is
I will just create a duplicate of this good
material and just give it a little bit
different color just to have some more radiation. So let's see, we can
select this folder right-click and just
duplicate the layer. Let's first select
the older layer. And I will deselect this one, this one, this
one, and this one. And now I will
select this top one, right-click and exclude
everything first, and just select
these four slabs. And then we can
come up over here. Select the boot Aramaic and JD maybe just try to give it a
little bit lighter color, kind of yellowish, maybe. Something like this.
We can also change the word walnut color and
of a yellowish color. I think something like that. I will just make it
a little bit darker. Obviously, this is totally your preference only if you don't want to change this
to a different material. You can absolutely
keep this one only. I don't have to add
this another layer. I will just quickly added, I think it adds a little
bit of nice detail. I think this looks
better in my opinion. We can just select over
here and rename this to yellow so that we know
the different material. Also, let's quickly just press Control S to
save our project. And name these two shelves. Table. It's saved and wait
for it to save. So yeah, I'm pretty satisfied with how my tables
and the sheriff look. You can see how quickly we did all of the text
string of these objects. We can just hit Save. And I think this is
it for this video. You can adjust the colors a
little bit if you want to. But yeah, I'm happy
with all this. I think this is it
for this video. I'll see you in the next one. Thank you.
22. Texturing the 4-Fold Screen and Shelf: Hello guys. So now we're
back in blended again to UV, unwrap and export our props from Denver to
Substance Painter. So this time I will be UV unwrapping the folding
screen and the big shifts. So let's just
disable everything. Also, if you remember, I think we move the
location of this thing. I haven't just quickly
enable back all the objects. And yeah, it is out of the room. So just select this empty, move it in here, I think. Let's move further now. I will disable everything except the folding screen
and the bookshelf. Alright, so before we start
off, if you remember, we need to create the
handles on these drawers. So first let's do that. I think it is pretty easy to do. So now there's three for the
front view of the shelf. And firstly, let's say this red shift plus S
then closer to select it, bring the cursor over here, press Shift plus a,
and let's add a plane. What we can do is we can
select the plane and we can just select these drawers
and then press Slash, go into the local mode. And I will scan this
down first three again. Let's see here. Scaling down and rotate
it on the y axis by 90 degrees. Bring it out. Alright, so give it
a shape of a handle. So basically
something like this. You can just roughly eyeball it. I think that's pretty good. Now, you can press Control. Apply the scale first.
Then press Tab. Let's press two for n. Select, select these two edges and just be an x and extrude
them inwards like this. To create something
of this sort, then you can just add a
modifier and add a solid. If I modifier makes sure to enable even thickness
to fix this. Now just adjust the thickness. I will just select this, press two for x and f, select these two edges. Press control V, and they
will look like this. You can give it a
couple of segments. I think this looks pretty good. It's pretty basic, but it
won't be even visible, I think in the scene
because it is so small. It will be this far away. Just scale it down
a little bit more. This gate, I will also
decrease the thickness. I think that's
fine. Alright, now I will select this or
the mirror modifier, selected dropper
and selling this. Next I will add another
mirror modifier. Let's just check if it
is placed correctly. I think it's fine. Next we can add another
mirror modifier. And this time slashed forced to come out
of the local mode. This time in the
middle object option, you can select this object. So this way it will
mirror it over here also. Actually pretty good. We can just select this
press Shift plus dy, G then z and move it upwards. Let's remove this
first video modifier. So we only have one of it. Rotate it by 90
degrees like this, and displays it in the center. To place it exactly
in the center, what we can do is we can
select this press Tab. Then we can maybe plus
three for Face Select, select this phase shift plus S, and then goes there to select it to bring the cursor
over here in the center. Then I will select this
object redshift plus S, and then selection
to go this way. Now it is exactly at the center and we just have to
bring it out like this. And yeah, that's pretty good. We can select all of
these objects and make sure to select the empty now and right-click and
weighting them. So that when you select them, all of it moves together because all these objects
were added later on. Alright. Again, I will select these two handles that
we have created, press M and move them
into the big shelf. Alright, let's turn back on the folding
screen collection, and now we will just
apply all the modifiers. So press a to select
everything, press F3, and then search for it,
convert to mesh it, enter. The next thing to do
is to UV unwrap them. So first I will press control a, apply the scale to make sure to do that while
everything is selected. Head over to the UV Editing Tab. And before UV unwrapping them, I want to show you one thing. These four screens that
we have added like this. I want to mention that it will quickly open up VRF right now. So I will just show
you something. Let's load our reference images. If you see this folding screen
in the reference image, we have something
like this over here. So you can see it has this
kind of texture over here. So when we will be texturing
this in Substance Painter, we will try to add
a similar kind of texture like not
exactly this one, but some kind of
artistic texture on all these four screens. And you can see that the
texture is like connected. It is a single texture only spread across four
different screens. We cannot add different
textures to different screens. We have to add a
single one only. So to do that properly, we have to make sure that the UV unwrap of all these
food like planes. So back together, what I mean is now we can just disabled, I mean, minimize pure ref. If I select these four screens, this tab, and I'll
go first, let's see. What we can do is let's
just UV unwrap them. Simply press a to
select everything. Make sure to have
active selection. Then press Tab, press a
to select everything. Then you can simply press U and smart UV project and hit Okay. You will notice now what
has happened is if we select any of the
phases from over here, you can see it gets
selected over here. If we select this,
this face is selected. If we said this, then this
bottom one is selected. Do that. You can just
enable this, this way. Whenever you select
anything over here, it will get selected
in the UV is also. Now the problem is all
four of these planes have been like UV unwrapped in different positions like this. And they are not
really together. So we cannot place
a texture properly. Like we have something like
this running along perfectly. So it will be very difficult
in Substance Painter to like projected texture onto these splints that is like
a single texture only. So to do that properly, but we have to do is we can either make all of these
into a single objects, so we can just
select all of them. Press Control J, then press tab. There's a to select everything. Now instead of the
smart UV project, you can trust you and
just select unwrapped. There you can see
this is what I meant. I wanted to UV unwrap
them like this. They are all parallel
to each other and we can easily place a
texture onto this. And it would be like
projected perfectly. So this is what I wanted. You basically have
to do is you have to just join all four of them. This way they are
like a single object only I will just
undo everything. Right now they are like
different objects. So just select them all. Join them, press Control J to join them into a single one. You can press Tab plus eight. Then you can press U
and simply unwrap them. Instead of smart UV project, I will just unwrap them and
we have something like this. Alright, so now
the main issue is how we fit this thing
like this uv island. If you press a and now press
tab with all these islands, because as you can see right
now they are overlapping. So there is a very easy
fix for this first, what we can do is press a to select everything and
we will just smart UV project all of our objects
except the screen objects. So you can just select it, press H, and now press
a to select everything. Press Tab, press a to
select everything. Press U and hit
smart EV project. And we have something like this. And you can now press alt plus H to bring back the screens. Press a again, press tab. And you can see now we have
this sort of UV island, but the main problem is
this is like overlapping. These phases are overlapping
with these UE's. So how can we fix this? There is a very easy
command for this. Make sure to select everything. Go over to the UV
menu over here. And then you can basically
select back islands. What Pat islands will
do is basically it will arrange all
the UVs properly. You can see now they
are fit properly over here only along with
the rest of the UV islands. You can enable this option over here and increase the
margin a little bit. Maybe 0.011, 001
I think is good. Yeah, that's fine. I think this UV unwrap this,
I think pretty good. So now you know how you can
merge different UV islets. So you can UV unwrap things separately and then
you can select them all together and
just use this command UV, then back eyelids and it
will be arranged together. Yeah, it is really good to avoid overlapping in UV islands. All right, so now we are
done with a UV unwrapping. We can select this and
let's add a material. Select any object,
just press New. Now to add a new material, let's rename this to maybe screen shelf,
Something like that. Now while this is selected, which has the material, press a to select everything, then press Control L, link the materials like this. Alright, so we're basically
done with everything. The only thing we have to
check now is face orientation. Before exporting, open this up, Check for face orientation. And yeah, you can see
this thing is now red. If you have exported
it like this only we would have
got some issues. If you really want to
see what would happen if you export
something with this, like with this flip normals? Let's just quickly see that you don't really have to
follow me right now. I'm going to select
everything and he explored this, select FBX. And I will rename this to test. Do all the settings and
exported right now, open UP Substance Painter. Let's close this and
create a new project. Click on Select, and I will
select this file that we have just exported it
open and hit Okay, press F1 or F2 for the 3D view. And now right away you don't
really see any problem. But if you zoom in and drive to closely
look at the model, it looks very weird. So basically this is what
will happen when the, when all the normals
are flipped, you can see everything is
looking like inside-out. And the area wherever there
was like red color in Blender looks very weird in Substance Painter and rest
of the stuff looks fine. But only this thing,
object looks very weird. So basically this
is what it means to have flipped normals. Everything is like inside out. Make sure to just fix this. So to do that, I will
just select this object. Press Tab, press a to
select everything. Press Shift plus n,
recalculate the normals. And now it is fine
if you disable this. Now, the face orientation, you can see whenever we like
flip normals and fix them, these edges get like some
kind of shading issues. So yeah, we fix this
in the last lecture. You can select this object and add a modifier and
add weighted normal. Basically that will
fix everything. Now you can just hit
Apply before exporting. I think we are good to go now. So that's a to
select everything. Go to File Export and Vx. I will delete this
old testifying to select this and press Delete. Let's name this file as finches. Makes sure to neighbors
selected objects and mesh. Now hit Export. And let's come back
to Substance Painter, overdue file, create
a new project. Select and select
Screen shelf it. Okay. Now you can see the
model looks pretty good. And quickly check for
any kind of issues. Then we can start
with the baking and then we can start
with the texturing. I think this looks pretty good. Go over to display settings and enable importantly
anti-aliasing. And also let's fix the
color while we're at it. Enabled this tone mapping is to log and change the
color profile UE for. Alright, so now head over
to the texture set setting, stab it make mesh maps and quickly do the
default settings, which we were doing
in the last lectures. I will enable these
things and set this to four-by-four
Electric textures. Let's wait for him to finish. Alright guys, so the baking
is done now, let's hit. Okay. And again, we check
for any kind of issues. I don't think there are any. We have this thing over
here where we don't really see the backside of our
model of the folding screen. And the reason for this is
if you come back to Blender, I will just quickly
explain this. Because these things, the
screen is really just a plane. It does not have any
kind of thickness. If you enable the
face orientation, you can see one side is blue
and the other side is red. And if you want to fix this, we can basically just add a
solidify modifier to this. And you can see as soon
as it has some thickness, it will be blue from both sides. But I've just kept it this way. Basically it is just
a plain right now and it has no 3D depth or thickness. But it won't really be a problem because
of the first thing is we will be only seeing it from this side,
only like this. In Unreal Engine also, we will be facing this way only and won't even see
the backside of it. And the other thing
is, we still don't have to worry about it even
if we see the backside, because only in
substance painter, it is being viewed like this. But if we export this
to Unreal Engine, we won't be able to
see through like this. In Unreal Engine,
everything would be fine. We cannot really see through
planes in Unreal Engine. You don't have to
worry about this. We will be fine.
If you are feeling like it looks weird to
you in substance painter, you can just select this, add a solid if I modify it to it and everything would be fine. You can just UV unwrap it again, but trust me, you
don't have to do it. Everything would be
fine and Unreal Engine, we won't have any
kind of issues. Only Substance Painter, we will be able to
see through it, but that's no problem for us. We can now start with
the texturing process. Let's come back to the layers. I will leave the default layer. And basically we
can start by adding a normal wood material
that we have created. So go over to smart materials. Good. Let's drag and drop this
course material onto here. And I will again, first click on the
geometric mask, right-click, exclude everything. Or maybe we can just
include everything. And I will de-select the areas where I don't want
to add the word. I will select this. These things over here, we can add the gold
material to them. The circles also I will
disable the wood material. Also these little
balls over here. And for this thing,
we can de-select. These handles and
pretty much rest of it can have the same Woodmont
even only if you want, you can have a different
variation for these roars. But I think it's pretty good. It won't really
have any problems. Yeah, now we can quickly
add the goal damage. Again, drag and drop it, Right-click, and this
time exclude lot. And I will just
quickly select all of these objects over here. Just select them like this. Now select these handles. Now the only thing
is left to add the texture to these screens. That also wouldn't be very easy. But before doing that, I will just quickly save my project. So hit Control S. And let's save the project
task in shelf only. Save. And now we can add the texture over
here on the screens. So to do that, we first need to import a texture into a shelf. So if we look over in the
reference images folder only, you will find this image. I've added it right now. This is the texture
that we will be using. So to import anything
into substance vendor, you can just drag and drop
it like this onto the shelf. As soon as you do that, you will see this window pop up. You can click over here, you select the type of thing
that you are importing. So we have alpha colored
environment texture. So obviously we will
select this as a texture. Next thing that you have to select these three
options over here, we have the current session
project and library. So if you select
current session, that means this asset would only be imported to this
current session only. That means if you closed often sprinter and
then open it up again, you won't find this particular resource and Michelle, for me, if it's a project, then it would be important to
this project only. That means you can
only use this, the source in this
particular project. And if you select as library, it would be like embodied
permanently into your library and you can use
it in any of your projects. So I will just select the second option project we only needed. In this project only. I will hit Import now. And you can see it has
appeared over here. Alright, so what we can do is let's come
out of this folder. This folder add a failure. So it gets added at
the top and drag and drop this texture over here onto the base
color like this. Very simple, you can see
it has appeared like this. It does not look
that good right now, but don't worry,
we'll fix everything. Let's rename this to maybe
printing press F4 now. So now this thing will
be really useful. If you remember, we changed the prediction to
drive the energy UV. But for this type
of things where we have to project
perfectly everything, a UV prediction is
like really good. If set this to Dr. Brenner, it would be like really
difficult to set because you will see
when you select UE, you can easily change the transform of your
pictures like when easily. Place it over here, scale it down like this. So it is really easy to adjust any kind of texture
with UV protection. So first what we need
to do is obviously we need to click over here
on the geometric mask. Right-click, exclude
everything, and just select these four screens. And you can see in the UV map also it has started to show up. You can press F1. If I forgot to tell you this, you can press F1
to bring this up. And now we can start to adjust
this texture over here. Right away we
notice a huge issue with our UVs and textures. If you notice over here
in the UV islands, everything is
looking pretty good. Like the texture is looking connected and it
is looking great. But in the actual model, it is looking like disconnected. Something is
appearing over here, something is
appearing over here. Nothing is like in
particular order. So how do we fix this? What we can do right now is the best method to do this
would be to go back in. And if you select the UVs
in the UV Editing tab, select your screens press tab. And if you remember,
we enabled this. So make sure to enable this. If you select any
face over here, you can see it
appearing over here. To select the first phase. Make sure you are
properly oriented. So yeah, this is the
first and this is the last because that is
important, I think. Yeah, So this phase
is the first one. And you can see it is
appearing place over here. Just make sure to select
this press G than x and move it over here
in the first place. You don't have to worry
about overlapping because they will
arrange themselves. Now, select the second phase, and you can see it is
currently over here, so plus G the next. And just move it over
here in the second place. Select the third one plus G. The next, move it
in the third place. Like this. Select the
fourth one and again, move it in the fourth
place like this. Alright, so now they
are perfectly aligned. If you select the first one, it is first over here, then
second, third, and fourth. So that is really important. What we can do now is we can
again select everything. I'm sure that it is not
completely fixed right now, because I think it is. Some of the textures
are upside down also. We might need to
export it once again, but don't worry, we'll fix it. So with this selected all
over to File Export and VX. And just replace this one only. So select screen-share
so that it overlaps the File Export. All right, so now you
don't have to worry, we don't have to like
export everything again, like big mesh maps and we can just import it
over this only, none of our progress
will be lost over to Edit and select
project configuration. Now go over to File
and again select, just select this newly exported screen-share,
double-click and hit. Okay, wait for it to load. You will see now all the UVs are updated and now
they will be in order. But still you will
notice that these are not looking at it because
I think they are flipped. So you can see the
first one is fine. So we don't have to
do anything with the first 1 s one is like
flipped upside down. Third one also, and the
fourth one is correct. So again, let's head
over to Blender, come back to the UV Editing. And basically what I will do is let's select this
first press Tab. Only select the
second phase, only. Make sure to select one
at a time, press R, and then rotate it by
180 degrees, like this. Odd. Then type in one AT, then select the
third one plus r. Then again type in vanity. Rotate them by 180 degrees and I think now it should be fixed. So press a to select
everything again, go to File Export and it is Vx. Select this only again so
that it gets replaced, it to export or save
the blender file. And let's come back
to substance now. Come over to reject
configuration. Select and select this one. It okay. Now you can see this
perfectly correct the way it is appearing
in the UV islands, it is also appearing
in the 3D view also. I hope this was not as
confusing and I was cleared and explaining all this because these kinds of
things happen a lot. You have to go back and forth between like Blender and Substance
Painter again and again, sometimes even four
or five times to like perfectly
export your models. These things are
completely normal and I hope you get
everything right now and you can tackle
these kinds of issues. Alright? So what we can do
now is right now the texture is looking
kind of stretched. So I will just scale
it down like this. You can hold Control to
scale it from both sides. You can see we see
these things overhead. The texture is getting repeated. You can set the UV lab to none so that it does
not get repeated. Then you can again
scale down from over here and hold Control and
scale it up like this. I think this way
it does not look stretched and it
looks pretty good. This was it. I think this is pretty good. You can F2 again to come
back to the 3D view. And we will now use the filter. So go over here and
let's add a filter to this to adjust the HSL values. So just select the
painting a layer, add a filter from Effects
menu and select the Filter. This one, HSL perceptive. Basically I will just reduce
the saturation a little bit. Maybe around 0.4. I think. I will also decrease the lightness to
make it a little bit darker. I think around 0.44
is pretty good. This looks really nice to me. I can just hit Save. Now. We're pretty much done with the texturing
of these things. The last thing that I want to do is over here you will notice that the vertex
shader is running along horizontally like this. So I want to change this to vertically because I think
that would do better. So let's do that first. I think that is
really easy to do. Open up good course and come back to the
wood American cherry. Just set the rotation to, I think 90 degrees. Similarly do that for wood walnut also set
the rotation to 90. This way, I think it
looks much better. So we can just hit save now. And we are done
with the texturing of shelf and affording sweep. So yeah, I hope you
understood everything. The only tricky part of this
lecture was like exporting it again and again and
adjusting the UV eyelids. But yeah, I hope you
understand it by now. If not, you can watch
the video again. I'm Dr. Like practicing. Once again. Thank you for watching. I'll see you in the next one.
23. Adding the Balcony: Hello and welcome guys. So now we're pretty much
done with all the props. And the only things
that remain are this room and windows. But I'm also thinking of adding a balcony over here to our room. I think that would be
a pretty nice addition to this scene. So let's do that quickly because
it is really easy to do. So basically what I
will do is Let's just select this red slash to go
into the isolation mode. Seven for top view,
the Shift plus a. And let's add a cube. This cube over here like this. Scale it out. And I'm trying to make like
a plank of wood that we can duplicate over
to create a balcony. So let's see. Just place it like this. So maybe something like this. It can also act like
the floor for a room. Just place it over
here in the corner. Let's just apply the scale. And I will also add a
bevel modifier to this. Decrease the debit, and also add hard enormous
and enable auto smooth. And yeah, now we can
just select this, go to modifiers and
add array modifier. Makes sure to set the factor on the veto and increasing
on the y. Like this. Just make it like this so that they're ready
close to each other. Here I think is pretty good. Now we can just
increase the count, duplicate them all over
the room like this. And yeah, that's pretty
good in my opinion. I will also quickly just select this room press tab and let's
fill out this empty space. So press two for its select
and select these two edges. Press F and select these
two. And again dress F. Let's also enabled the windows. You can just press Slash to
come out of the local mode. And yet now we have
something like this. We can also increase the size of the balcony very easily just press Tab to go into
the Edit mode, enable X-ray. Let's select this
side vertices and can increase the length
to wherever you want. You can maybe increase
it a little bit more. We can also maybe quickly set up a camera to see how
our scene would look. So I will just quickly
enable everything. And we can press Shift a
and let's add a camera. So from over here you
can add a camera. The way to set up a camera
is like really simple. While the camera is selected, you can just first set up your view to wherever you
want the camera to appear. So let's say we want the
camera to appear over here. Just like this. Adjust the view. Then you can hold
Control Alt and zero. And as soon as you
do that in Vinci, the camera has set
up over the view. Now you can go over here in the View tab and enable
camera to view. This way. You can just move it around and set up the
camera very easily. You can zoom in or zoom out. Zoom out too much because then you will come
out of the room. So something like this. Make sure to disable
this afterwards. Otherwise, it can
mess up your camera. And as soon as you use your
scroll wheel to move out, now you are no longer
in the camera view. So to get back in
the camera view, you can just press zero
on your number back. And you can just view things through your camera very easily. It isn't. Nice
little handy trick. Next word I will
do is come back to the camera and we can decrease the focal length like degrees
the size of the focus. We can decrease
the focal length. And when you degrees of Oakland, you will see the camera has
now more things in the view. So if you keep on decreasing it, you can see how it
reacts with our scene. So obviously we cannot
reduce it too much. But somewhere around
five or maybe 30, I think is pretty good. If you increase it,
then it will zoom in. And if you just decrease it, then the size of the perspective would increase and we will have
more things in view. I think 30 is a nice value. You can again enable
bad this camera to view and just adjust the scene. I'm just setting this up so
that we can view the balcony. According to the
rest of the things. You can see outdoor here. Let's add other things also. So what we can do now is we can really
shift a and again add a cube extra 74 top view
scale this down like this. Place it over here like this. X, scale it up. I can press S and scale
down on the z axis. We will create like a small
region who didn't balcony. Now we can just duplicate this. So press Shift plus D, duplicate
it downwards like this. Alright, next word
we can do is we can select both of these, press Control J to
join them to voice. What I will do is I
will just press Tab, press Control R and add to it
loose right in the center. Enable X-ray and just delete the right side or
the left side to quickly add the mirror
modifier like this. And now we can add another
edge loop over here like this. Somewhere around here I think. Then you can add
another edge loop. And then this g, then
vi and hold Control to snap it together so that
they both are equal. Then there's three
for Face Select. Let's select these two faces
and extrude them over here. Obviously, I think
this is too thick, according to the
rest of the balcony. So let's just again
undo everything. Rest one whole lot to select the vertices and hold
Shift and Alt to select them both and
just squeeze it out. I accidentally undo the
middle modified also, I think so let's just add
it again on the y-axis. And yeah, I think this
looks pretty good. We can maybe enable the
human reference selected, bring it out over here. And we can maybe decent
size of the body. Can you hear all we can select this press Tab, enable X-ray, and select
the bottom one like this. Make sure to only
select the bottom one. And just moving downwards. Also, you can see this is like peeking out
through the room. So make sure you just select it from over
here, enable X-ray, select them both,
and just place it in here so that it does not
walk through a room. And you're lastly,
we can just add the leg bunch of wooden planks to select this press Shift plus
s goes to the ceiling. Let's add a cube, scale it down. Scale it up on the
axis like this. Move it over here in the corner. Let's see, I think this
size is pretty good. Let's add a bevel
modifier to this. The bevel enable both harder
normals and auto smooth. And again, we can
just add a modifier. Let's first use
it on the y-axis. So type in one on the y. And let's increase the count. We definitely we don't
want to disclose. So there's degrees it like this are adjusted to fit like this. We can maybe select
this press tab. And again, I will just select this and press Shift
D to duplicate them. I think adding three
would we predict good? No, I think that does
not look that good. What I will do is one, for this view, enable X-ray. Select everything,
deselect these two things. Press Tab, enable X-ray and just select the top
part and move it down. And maybe I will make
it smaller only. That way. I think it looks much better. Let's view it from the camera. This way it looks much better. Instead of having
something like this. I will just keep it smaller. Obviously, this is totally
up to personal preference. You can change it
however you like. And now I will
select this again. Duplicate this,
experience it over here. You can set the y to
zero on the array. Degrees account something
like four maybe. And Greece, the X
factor like this. Just duplicate it
over here also. Now selected, add
a mirror modifier. On the y-axis. Select the middle object
as this thing maybe, yeah, I think this symbol
balcony looks pretty good. Do not have to do too
much stuff on here because it won't be that
visible from like a camera. But yeah, we can definitely
add it to just give it a little bit more
detail in our scene. Alright, Next, I will
just disable everything. I will first select
all the stuff, the balcony that we created. You can press M to move
this to a new collection. It okay. Now let's
quickly disable everything and only keep
the windows enabled. And the thing that we
need to do is we need to add a plane over
here in-between. Similar way that we did
the folding screen. So we added a texture
onto these four planes. I'm trying to do a similar
thing for these windows also, we can add like a 3D plane
over here and we can add a nice texture to it to
give it nicely details. So the way that we can
do is let's just select this press Shift plus S because they're selected press shift D. Let's add a plane
rotated on the y-axis. Scale it up. I'm just trying to fit it properly
with the window. This way. Indicated on the y-axis. X apply the scale first
and also move it inwards. Epsilon, this portion over here and move it down like this. Yeah, that's much better. Now the only thing
that we have to do is we need to
create this cutout over here because obviously this cannot be
completely blocked. Press Tab enable X-ray and
let's see how we can do this. We can basically
press control our first add edge loop in the
center, hit right-click. Obviously delete
this site and just add a mirror modifier
on the y-axis. Next I will add
another edge loop, plays this one over here. Now we can simply just
press K for the knife tool. And I had a bunch
of edges like this. That is pretty simple.
And join it in here, then hit Enter three now and you can select this face respects
and delete the faces. Yeah, you didn't see
it was that simple. Let's quickly enable everything
and see how it looks. Now the reason I added a
camera so that you can easily move inside the room or we
can just view it from Brazil. Who viewed from the inside. And I think the room
now looks pretty good. The addition of the floor
like this wooden plank for floor and the balcony
is I can really nice. We can just hit Save on a file. And in the next video,
what we will be doing is we will UV unwrap our
room and windows. And finally we texture it. That would be the end of like UV unwrapping and
texturing all the props. We can then move on to Unreal Engine to set up
the scene over there. And after doing all that things, then we can focus
on creating some small prompts us for watching. I'll see you next one.
24. Texturing the Room: Hello and welcome guys. So in this lecture we will
UV unwrap our Windows room and the balcony and also
texture them. So let's start. We can just quickly disable
all of the collections. There's just disable
everything except the windows room and
the balcony collection. Alright, now what we can do is we can move this plane that
we just added to the Windows, press M, and move this to
the Windows collection. Alright, so I think
what I will do is I will disable the
windows collection for now. And we can have both of these
on the same material only. Let's just select any object, go over to the Material
tab. Create New. And let's rename this
material to room balcony. And we can add both the things
to the same material only. The wireless object is selected, press a to select everything. Then you can press Control L and link the materials by
selecting this option. Next, we need to apply
all the modifiers. So while everything
is selected again, you can press F3 and search
for it's converted to match to apply all the modifiers and we need to also
apply the skin. So press controlling
and apply the scale. Alright, so now this is done. Move over to the UV Editing Tab. And now as both of these things like the room and the balcony have the
same material only. So we need to UV
unwrap them together. If they had different materials, then we need you
to UV unwrap them differently on
different uv maps. But right now, we
can like UV unwrap them all on a
single UV map only. Just select
everything. Press Tab. Again, select everything
and press you smartly, we project it okay. And maybe what we can do is adjust this a
little bit more. Go over to the UV
menu over here, select average island scale, and also again select
bad guy links. Now we can maybe increase
the margin a little bit. Yeah, I think that is fine. We can now proceed further. Let's press Tab, disabled both of them and
enabled by the windows. Now again, we need to press
a to select everything, press F3 and convert to mesh. So hit Enter, select
any of the objects, go over to the
Material tab, hit New. And let's rename
this to Windows. Risk a to select everything
and you can press Control L and link
the materials. Now what we need to do is if you remember this
plane that we created, we will be adding a texture onto this like the
folding screen only. So we want this to
be UV unwrapped as a single thing will leave a
note in different phases. So what we can do is
first we can just select this thing only
display this tab, make sure everything
is selected, pursue and then hit graph so that it is UV unwrapped
as a single thing. Then we can just press H to hide this thing and now select
the rest of the objects. Press tab a to
select everything. Rescue and smart UV project it. Okay. Alright, now we have
something like this. To come out of edit mode, press alt plus H to bring
back this hidden object. Now you can again
select everything. Press Tab again. And we have this
overlapping a UV. So now we can just
select everything over here in the UV islands. Would you even knew
and hit path islands? Just like that. You
can also first select average landscape that they
are averaged out together. Then again, select back islands. Alright, yeah, this way I think everything is done
correctly because we want it to like UE and
wrap this whole thing together only because we will be again adding
a texture to it. That's why. Alright, so with this
UV unwrap is done. Let's enable all three of them, the room, the balcony,
and the windows. Last thing to check before
exporting is to just quickly enable face
orientation from over here. Now you will notice
that there are a couple of objects
with this red color. That means they have
flipped enormous, but we don't really
need to fix all of them because we will be only
viewing our room like this, like from the inside
in Unreal Engine. And we won't be really
viewing it from the outside. And as you can see, this window appears fine from over here, as you can see the blue color, but from the outside, we can see this red color
on this window. But that does not really
matter to us because we won't be doing the
window from the outside. This is the same as with
the folding screen. The reason it is read from one side and blue
from the one side is because it does not really have any 3D thickness or depth. So you can just fix it by
adding a solidify modifier. But I don't really
want to do that. I will keep it this way only
because in Unreal Engine, it does not even matter. And we won't be when viewing
it from the outside. But we need to fix this room because as you can
see from the outside, it is blue and from
the inside it is red. So we basically need
to flip the normals. So the select this press tab, There's a to select everything, redshift plus n and
nothing really happens. So you can enable
inside like this. You can see with this,
it appears blue from the inside and it will be
read from the outside. But again, that does not matter to us because
in Unreal Engine, it won't even matter. And we won't be viewing this room also from
the outside like this. Yeah. Everything is fixed
now because if you view from the
inside this way, everything is blue-colored only. So that means all the
normals are correct. We don't really have to
worry about anything else. One thing that I will fix this, I will select these things. Also that select the room slash to go into
the isolation mode. Seven for top view enable X-ray. Let's select this press Tab and just select them
both members Jeanne and x. And move it just like this so that it is just touching
the surface at the wall. And yet this is much better. Let's press Slash again. I think now we're
pretty much good to go. We can disable the
face orientation now, press a to select everything. Go over to File, export it as Vx and enable
selected objects and mesh. Make sure to come back
to our exports folder. And let's rename this
to room and hit export. Let's quickly open up
substance painter, and now we can create
a new project, go over to File New, and just select the
file you export it. So selling this
room file and hit, Okay, let's press
F2 for the 3D view. And yeah, you can notice
that in Substance Painter also you can see through
all of these objects because they were exported
that way from Linda with the red color facing outside and the blue
color facing inside. But if you just go inside
the loop like this, that you will notice
that everything seems fine from inside the do. And yet that is the only thing
that matters to us because we will be viewing it
from the inside only ano. And we won't even also have this like this see-through
issuing unreal. It would be like
everything would be solid 3D adjusting
Substance Painter, we have this, so it
does not matter to us. Now. We can just go
ahead and display settings and enable
temporal anti-aliasing. And also let's fix the colors. So enable this enable tone mapping function to log
and enable color profile, the profile to UE. For. Now we can again
make the mesh maps, go over to Texas Tech settings, hit big mesh maps, do the usual settings, disabled ID, and set
this to four-by-four. Now we can basically hit bake and wait for
the bank to finish. Alright guys, so now
the bank is done. Hit Okay. And you can hold Shift
and use your right-click. We rotate the light to see
the bacon different angles. And I know it looks
weird from the outside. But don't worry if you
will move inside the room. There will be no
issues with the big. As you can see, it is pretty
good From the anxiety and not really
initiating issues there. Now we can start with
the texturing process. You can just press with lead to come out of the
room this way. Yeah, we basically need to
add our Woodmont ear first, go over to the Slack or D, This section, search for good and drag and drop this
course material over here. Alright, come back
to the layers. First. Let's delete this before here. Click over the
Geometric Mask icon, right-click and exclude all. And you basically need to
select the guinea first. And all of these inside
parts like this. I will not be selecting these
designs that we created. We can add the gold
material to them. And now you can click
back here anion. That is pretty much it. Next we will go over
to the windows texture set and drag and drop this
book goes material over there. Again, click over here. And we only need to
de-select this plane, rest. Everything can have
the Woodmont here. Delete these default tail. Now let's add the goal material. Search for gold damaged. Drag and drop it over here. Now again, click over this Geometric Mask icon and
right-click and exclude all. We select everything and just
select these two pieces. Alright, so basically what we need to do now is we need to add a concrete material
overhead to a waltz. And the last thing
to do would be to just add a texture
to this window part. So let's do that now. Before that, I will
just briefly hit Control S and save our file. So let's name this do
loop and hit Save. Alright, so now for the walls, if you come over
here and you shelf, Let's come back to
the base materials. And search for concrete will find a different types
of concrete materials, but we have this
concrete clean material. So you can just drag and drop it onto your walls like this. And again, we can use
the geometric masks. So right-click over here, exclude all, and then just
select the wall spot. Alright. So you will notice
that right off the bat, this material does
not look that good. We can make a couple of changes to the material to make it
look a little bit better. We can increase the tiling. You can also adjust the color and the
damage from over here. But I think I have added like a better material than this
in your course files only. If you come back over here and you both files open this
Substance Painter files folder, you will find this
concrete dot SPSS. So this is like a
smart material fight. So to add this to your project, you can just again drag and drop it like this onto the shelf. And you will notice
that automatically smart material has
been selected. So again, you don't have
to do anything now. You can just select
project from over here, or even you can
select the liability. Then just hit important.
I have already added this into my substance
of interest, so I won't be adding it again. But yeah, you can just
select project then hit Import and it will
automatically appear over here. I will hit Cancel and come back to the smart
materials section. And you will find this concrete
material up over here. So again, I will now
drag and drop this onto the walls and I will delete
the older concrete clean. So just select this
and delete this. And now for this also will
click on the geometry mask, right-click exclude all,
and just select this part. And here you can see this one. It looks like a little
bit more cleaner. And I think it looks better. We can now open this folder up. There is only a single layer, only select that layer and
let's increase the tiling. Maybe something like ten. Yeah, I think this
looks pretty good. Next, what we can
do is we can add a little bit of dust
and dirt to our walls. So I think that is an
easy thing to do. By now. You should be able to
do this on your own. So we'll just add a fill layer, this to a darker
color like this. Now let's add a
black mask to this. So click over the layer, click on this icon,
then add black mask. And I will come over to
the smart math section. Let's move the search now. And I will be using this
simple desktop illusion. Just drag and drop it
over here like this. And you can see it is kind
of like very dirty now, but let's just select the mask. So let's reduce the dirt level now to maybe
somewhere around 0.2. I will also reduce
the grunge amount, which is this dirt
that is appearing. So degrees of granulocyte
also do somewhere around 0.25, maybe 0.25, yeah. And lastly, we can also reduce
the opacity of the layer, so scientists to maybe
somewhere around 75. Now you can just disable
and enable the layer. So this looks pretty
good in my opinion. I will also rename this to dust. And yeah, I think the last thing to do would be to just add a texture to this
class over here. So let's come back to
the window texture set. And again, you can open up
your course files and you will find this image over here
in the reference images, which is similar to that
picture of the folding screen. So yeah, these are
like similar designs. So we will add this
texture over our window. So just drag and drop it
into Substance Painter. I will select over here
as texture and import the resource to project
only. Then hit Import. Alright, now we can
basically just create a new fill layer and drag and drop this texture onto the base color
section like this, we can press F1 for
the UV island view and you can see over here we can place our
texture accordingly. First, let's just
click over here, right-click, extrude everything, and just select this plane. And the texture is
appearing over here. Now, we can first,
let's rotate this. So hold Shift while rotating
so that it snaps like this. Now you can see your
district, I think. Let's decrease the
size of the texture. Let's move this down. This way. It looks pretty good. Yeah, that looks
nice in my opinion. Next, what we can do is let's first breaths to come
back in 3D view. This is looking
like really bright according to our rest
of the environment. So again, click over here
and let's add a filter to select the field
that as HSL perceptive. So let's decrease the saturation to maybe somewhere around 0.350, 0.35, I mean. And also decrease the lightness. So it will decrease
the lightness, the texture would become
darker and if you increase it, you can see it becomes brighter. We can set this to
somewhere around 0.45. This way I think it
looks much better. Maybe I will decrease the
saturation a bit more to 0.3. Maybe. Like looks pretty
good in my opinion. I will select bad the room
balcony texture sake. I also want to like degrees at tiling overhead because we can see a little bit of
a reputation over here. So let's just select the
concrete and maybe set the tiling and decrease it to maybe somewhere
around seven. Yeah, setting it to seven. Looks pretty good
because we cannot really see any kind of
reputation over here. That's fine. Lastly, what we can do is we can add a little bit of dust
to our Windows also. So we can just copy
this dust layer, hit Control C over
here and come back to Windows and just paste it over
here at the top like this. Second. Now we can see the dust is appearing over here
in the corners. We can select the mask. Let's decrease the contrast
a little bit to point to increase the dirt level just a little bit
to around 0.25. Then you can just enabled
and disabled and see, yeah, that looks pretty good. Let's rename this to painting. Degrees opacity even more
for this to around 60 maybe. Yeah, that's pretty nice. Also select this back and let's
add a bit of grunge also. Yeah, that could be good. It is a little bit difficult to move in and out of the room. But yeah. I will also
change the like. You can see, the orientation of the wood material
like we did earlier. So open up the wood
material folder, select this and set
the rotation to 90. For both the base
materials, wood, walnut, and Rubin editing che. This looks fine. I think. Maybe I think we should
go back to the earlier one only because these
things over here, you can see odd looking at it. Yeah, I think this is better. So yeah, let's just move on with this only we can hit Save now. I'm pretty happy
with the texture. We are now done with all the texturing of the major crops. So in the next video, we can start to export everything into Unreal Engine and set up the scene over there and
set up some lighting. After all that, we can work on maybe some small props
where Anglos watching. I'll see you next month.
25. Setting up the Scene in Unreal Engine: Hello and welcome guys. So in this lecture we will be setting up everything
in Unreal Engine, will create a new
project in bold, all our models and
textures that we have created in Blender and Substance Painter
into Unreal Engine. Now, we'll start in Blender by exporting of everything
in a single file only. So that way it is
easier for us to emote all the models at once
only in Unreal Engine. So what we need to do
is basically we need to enable that all the
collections first, enable all the process
that you have created. And now we can just
select everything and export all these into
a single FBX file. And that file we can
import into Unreal Engine. But before doing that, I will just select this piece. I want to duplicate this one. Let's just quickly do that
first I will select this move, this word can write
listing also. See somewhere around
here you can now press Shift G and select the children. Make sure to select this also the empty redshift
plus D to duplicate and y, Let's place it just like this. So you can make a
couple of changes to move things around
here and there, or maybe even
duplicate something. You can also do that
in Unreal Engine also, but it would be easier
to do that in Blender. But I think I'm happy with
everything right now. So I will just press a
to select everything. And then we can go over to
File Export and select MDX. Let's come back to
the exports folder. And I will rename this
to full room so that we realize that this is the complete file
with all the models. Make sure to enable the
cell to the objects and also enable mesh from over
here and just hit Export. Wait for the export to
finish. It is done. Now, you can click
on Unreal Engine. So open up Unreal Engine now. And now you will have
something like this. So just click on here games
to create a new project. Select blank all these settings. You can keep them
at default only. Let's rename the project to
Chinese underscore course. Let's hit Create and wait
for the budget to set up. Alright, so after Unreal
Engine has opened up, you will see some
sort of this level. You can move around in Unreal
Engine by just holding down your right-click and then
using your WASD keys, like you would do in a
video game is very simple. Just fold your right-click. If you simply hold
the right place, rotate your view, and
if you press WASD, you can move around the view. So very simple. Now let's see. We can start by
creating a new level. So this is a default level. We won't be doing
anything over here. I can just come over here in the shelf or in the
Content Browser. If you don't see the
content browser, you can press Control plus phase and you will see it
will pop up like this. But if you click out
of it, it can go away. So to keep it permanently
in your view, you can just press
Control plus space first and then select
darken layout. So as soon as you do that,
you will see it will be permanently
there in your view. Now, after bringing the
content browser in, just hit right-click over
here and create a new level. And just hit Enter. And now this new
level is created. You can double-click
to open it up. Let's hit Save. As soon as you do that,
you will be welcomed with this completely black stream
because this is a new level, so this does not have
anything added to it. So we can start by adding stuff. So first let's set up
the level a little bit. We can set up things like
lighting and all that. And after that we will
export all our stuff. So yeah, what I will
do is go over to Window and search for
this place after window, select this and displace
actor window will appear. And now you can search for
things like that extra light. We can start with a
directional light and just drag and drop it
into our scene like this. Nothing really
happens, but wait, next thing to add
this guy atmosphere. So search for supplied
and atmosphere. We have this thing over here. So just drag and
drop this one also. And you will see
something is happening. We have a little bit
of sky in our scene. Also make sure to select
your directional light. If you are not
seeing disappearing. Select a directional light and an OH here in the
details section, search for atmospheric sunlight. We have this
atmosphere sunlight. So I think by default
is enabled it now, but sometimes it is disabled. So if you're disabled
this, you will see it is not working anymore. So make sure this is
enabled in your scene or in your directional light to make sure to enable
atmospheric sunlight. And next thing to add is the search for
exponential pitfall. This is like basically fog. We can adjust the, if you remove the
search from over here, we have all these details. So we can search the beginner, just the fog density from
overhead and things like that. Right now we can keep
these are default only. And here we have a
basic scene set up. Now the next thing we
will add is the skylight. Search for Skyline and add this. Select the skylight and make sure real-time
capture is enabled. And the last thing to add is
basically Volumetric Clouds. This will add a bit of clouds in your scene and you can
see they look pretty good. This is the basic scene
setup. We are done with this. We can select all
this and click over here on the folder to keep them all in a
single folder only. Let's rename the
folder now so you can just select it and press F2, or you can just
double-click over here. And let's rename this to lights. Alright. Now we can come down in
our Content Browser again, I will close this
place actors window because we do not
need it right now. We can bring it back
from overhead also. And we also have this small little menu that even just quickly
add something to this. Also, come back to
the content browser. Let's right-click and
create a new folder. This folder, two
models. Open it up. Let's create another
folder over here. And I will read in the
full room because we will be importing our
complete room into this. So now again, open
this folder up. Let's flip over to Add import. Or you can also
right-click and important to game models like this, come over to your directory
and in the exports folder, open up this full room and now just hit Import All and wait
for the import to finish. Alright, so the input is done. Now let's close this up. And now you will notice that
along with all the models, the materials are
also added over here. So that is really helpful for
us because we can now add textures to these materials and it will be
really easy for us. Alright? So what we can do now is we can just basically
select everything. Click over here, down at
the bottom hold shift and select this thing so that everything is selected
except the materials. And just drag and drop it into your unreal
scene like this. Wait for it to
load a little bit. Now that everything
is loaded up, you will see right off the bat, we're kind of seeing
through our Windows. That is the same issue that we faced in Substance Painter. But don't worry, I will
fix this just in a minute. And we won't have these
see-through walls. We don't have to
worry about that. First, what I will do is
while everything is selected, make sure to set the location to zero comma, zero comma deal. All right, so now we have
models into Unreal Engine. We can start by fixing
this issue only. It is very easy to fix. We need to just select
each and every material one-by-one and just turn
on a single option. What we can do now is we
have these filters over here in this folder
only click over here. And we can select
the material factor so that only the
materials are shown, that it is easy for us. So select the chair material, open it up, you will see
something like this. Make sure to enable two-sided. So just come over here, select this big node, this big node, and make sure to enable
two-sided like this. This will make the
material to sign it and it won't be
like see-through. So now saying, wait
for you to save, nothing won't really change because this is the
chair material. When ordering need to make
the chair material two-sided, but we can just say every
material inside it. So first let's start by doing the room balcony so that
you can see the changes. Select the big node
enabled two-sided. As soon as you have seen, you will see now all
the walls would be 3D. Yeah, you can see it was really easy to
fix in Unreal Engine. You can see now the light
is not passing through. Let's just quickly do this
for each and every material. Enabled two-sided, one-by-one. You can see right now
this window is also C2. We can see through the
window from this side, but we cannot see
from this side. But if you open up
the windows material enabled two-sided. And now again, if safe, we'll see that would
also be fixed. And yeah. Let's just do this for
the last material also. Able to sign him hit Save. Alright, so we are done with
the basic things right now. I won't really set up the
lighting or things like that because we can do
that properly later on. We can also see some of
this light bleeding issue. When do we fix that also? Alright, so now what
we can do is we can start by adding our textures
into Unreal Engine, and then we can add the
textures to our models. One more thing, if you want to adjust the lighting right now, it is very easy to do. You can just press Control L and you will see you can move
the lighting very easily. This is like a really nice
setup in Unreal Engine. You can create
evening time also. And we can also read grind day setup is very easy to do and
it is very fun also. If you view this from
inside your room, you can see how it
reacts to the lighting. You can create some
nice looking setups. You can see, let's save
this for later on. Right now, undo. And I will maybe start by
adding all the textures. Alright, so let's
open up Substance, Painter, and wildlife. It opens up first, I will just undo back to
lighting default only. Yeah, that's nice. Next, I will also
quickly add a camera. So click over this menu, go to cinematic and selects
in a gambler active. You can see this has added
a camera into our scene. So to adjust the camera, again, it is very simple. You can use your
right-click and set up the scene using a WASD keys. Very simple. Maybe something
like this looks good. Then you can select the camera, right-click and select
Snap object to view it. As soon as you do that, you
select Snap object to you. You can see a view of
the camera has changed. So to view things
from the camera only, like from the
camera's perspective, you then select the camera, right-click and select violet. As soon as you do that now
you're piloting the camera. You can control it
also from over here, or adjust things like
the placement of the camera or focal
length, all those things. So select the camera,
Let's come down over here and send the lens
to dwell on them. So this I think is too much. You can increase the
focal lens from here only set this to maybe
something like 30. So I think there's
just too much. So what I will do is I will
set a custom amount, 12-30. So set this to custom, or just open up
this lens setting. You can first set this to 12. And now just keep on increasing the minimum focal
length like this. I'm planning on setting
it something like 18 because I think that
is the perfect value. You can set both the minimum
and the maximum to 18. And then you can use
your right-click and use WASD keys to adjust
your camera perfectly. Along with the views,
something like this. You can also come over here, like select the camera
speed and set this to one so that we are
Camden woman would be like very slow and very precise that you can
place it like perfectly. I'm just holding right-click
and simply pressing S or WASD like all the keys and
trying to set it up perfectly. And I think this view
looks really good. We can set this back to fourth. One thing that I
like to do is so that I don't lose this view. I select the camera
right-click and come over here and transform and select Lock actor movement. So what this will
do is this will love the transform of a camera. That means you cannot
move it anymore. If you now hold right-click
and tries to move it, you will see it is not moving. You can see this log
written over here. So this helps us do not accidentally move the
view of a camera. Because sometimes I feel like I have found
the perfect shot of my camera and I
accidentally move it away. So to make sure that
does not happen, I always enabled this log
transformed movement. Whenever I feel like I've found the perfect shot for my camera. If you feel like
you're not liking it, you can again select this and now you're going
to get, move your camera. But I prefer to keep
it exactly like this. Then just quickly Right-click
and enabled locked at the moment that we don't
accidentally move it away. And yeah, this is perfect. We have done everything that we wanted to do in Unreal Engine. So let's quickly come back
to Substance Painter. Now, let's close this and what we will be
doing is we will one-by-one open up all
the projects and then export all the textures from over here into Unreal Engine. So first, let's
open up the file. So from over here,
the same fines. And I think I will start with
the chair and table only. Select this fight. Wait for it to open up. And before we actually export
the texture from over here, we need to create a
folder in Unreal Engine. Let's come back to under limited from back
in the content. Make sure to remove the
material filter like this. Just click on here and right-click and
create a new folder. Let's rename this to textures. And now what we
will do is we will directly export
our textures from Substance Painter into
our Unreal Engine only in this Textures folder. This will save us a lot
of time because if we don't export our textures
directly into the project, we will have to import them again and again
into Unreal Engine whenever we make a small change in any of our textures
in substance painter. This is kind of difficult
to understand at once, but I will explain it directly
by demonstrating only. So just follow my
steps right now. And you will see after we have created this
Textures folder, double-click to open it up, Let's create another folder now, right-click and
create a new folder. And rename this to cheer table because we
will be exporting our chair table textures from Substance Painter directly into this folder only in unwillingly. And now we have
created this folder. Select this right-click. And you can see
showing exploded. You didn't select this option. And as soon as you
do that, you will see now this folder has been opened up in
its actual location in the Explorer only. So click over here and just make sure to copy
this complete path. So you can see this path, select this right-click
and copy it. You can now close this and come back to
substance between them. Alright, so now we need
to export our textures. You just hit Control Shift and E explored the
textures like this. We have some settings over here, but we only have to worry about these general export parameters. You can enable or disable the different texture sets from over here if you will live on to enabling the writing table or if you only want
to enable the chair. But we want to export everything so I will
keep them both enabled. Alright, so let's see
these settings now. The very first is
output directory. This is very
important as we need to specify the output
directory properly. So if you remember, we just copy the output directory
or this folder. Paste it over here. So
select this click over here at the top and make
sure everything is selected that's controlling
and just delete everything. Now, press Control V to
paste the path that you just copied and make
sure to hit enter. Because if you hit Enter, then only you will come in
that particular folder. Make sure to
double-check this that you are in the
chair table folder. You can hit Select Folder now. And we have said the export path now for the output template, click over here and we have different templates like we
have different for Blender. We also have like
Maxwell Kishore. These are different softwares. So you can scroll
down and you will find this Unreal
Engine four back. Select this one. We are working in
Unreal Engine fine, but it does not matter. This will go perfectly. Next. We can select the file type. I will select, scroll down. And you can select eight
bits plus D3 size. We can certainly is
to forget to get the best quality
of our textures. And these are the only settings
that you need to change. Now, as soon as
you could export. Wait for it to finish, even see it over here. So now the export is done. If you come back
and Unreal Engine, you will see nothing really
happened in this folder. But if you hit Import over here, you will see this pop-up like six changes
have been done to the source content files because the textures
are added into this, we can see this pop-up. You can hit Import and
wait for this to finish. And you will see this chair
table folder reappear. After all the exporting is done, you can open this
folder up and you will see all the textures
have appeared over here. So if you have noticed, we have really skipped
a step in between. We didn't really put
anything into unlimited. If you remember, we didn't like right-click and import all
these textures into it. Directly, just exported from Substance Painter directly into Unreal Engine only
because we already specified this
directory at the start. So this is the reason
that I indirectly connected like substance
painter and Unreal Engine. Because anytime we make a
small change to our texture, we can directly exported
from over here, from Substance Painter
directly into Unreal Engine. And we don't have to do all
those steps again and again. It will just hit one button over here and all the
changes would be done. Again. If you don't understand
this completely, you don't have to
worry about it. Let's just add all the textures and then you will understand. Now let's come back to Substance
Painter. Close this up. Let's open up the next project. So go over to File. You
can just hit fopen. To save on this. Let's come over to our
substance painter files. So we have four different
substance painter file, so we need to export it
like four different times. So let's select the next one. Says the room. Open it up. Alright, so now this
file has opened up. Let's hit Control
Shift and E. So first we need to get
the output directory. So come back to Unreal Engine, right-click and
create a new folder. Rename this to rooms. Now select this and
right-click, show in Explorer. Click over here, copy this complete bought,
and now close this, come back and substance painter, select the output directory, click over here. Again. Click once over here,
then hit control V. Make sure to hit Enter. Then only you will come
in this room folder. So make sure to double-check
that you are in that particular folder that
you want to export to. So now we are in the room
folder, hit Select Folder. Select the output template
as Unreal Engine four. Let's do all the same settings. Foci, and hit Export. Now, wait for the
expert to finish, and as soon as it's done, we can go back to Unreal Engine. We need to just hit
one button over here, this import and all the textures would automatically be
inputted into religion. We don't need to
do anything else. Alright, so now
all the export has done is create another folder. And I ping. First, I will check
the name of the file. Let's close this up. Go over to File and legs
open up the next File. Save on this. And we have the screen share
files open this one up. Come back to Substance Painter, select the new folder, hit F2, and rename this to screen share. Again, right-click
showing exploded. Click over here
and copy the bot, knows this and come back
to Substance Painter, Control Shift and select
output directory. Click over here, paste
this, hit Enter. Now select folder. If you do all the things. Now hit Export, Export As then. Now let's come back
to unreal engine and hit Import over here. Alright, so check if
the board is done. We can go back with
substance being done. Close this open, save. Now open the last
file, shelf and table. Coming back to underlings index, create a new folder. Shelf. Right-click, show in Explorer. Click over here,
copy this, this out. Now we can again
hit Control Shift and select output directory. Hit Enter, Select Folder, rectangle, Indian food packed. Now again hit Export. This is pretty easy to do. In the next lecture, I
will show you what is the actual use of
connecting these two. Because anytime we make a small change in
substance window, we can easily important
all the textures into Unreal Engine without any
hassle. So they can vote. Alright guys, so now all the
import and export is done. We have all our textures
into Unreal Engine. So I think this is
it for this lecture. What we will do in the next
lecture is we will add all these textures into
our material so we can actually see them appear
over here in Unreal Engine. And one more thing that I
want to mention is that I'm seeing this small little
issue with our table. As you can see, we have this small little
shading issue where we cannot see this object properly. So let's fix that also
in the next lecture. Also before going, I will open this lights folded
up and drag and drop the camera into the folder only. And we can select
the folder F2 and rename this to me.
Like some camera. Also, I will select
all the models. Click over here, come down, hold Shift, and click over here. Create a new folder. And let's rename this to models. Just so everything is like
little bit easier to manage. I'm happy with all this. We can hit Control S to save and also just make sure to
close Unreal Engine ones. You will see this whole menu. And we can just close
it once and hit Save Selected so
that we can just save everything once
hit Save Selected. And yeah, we're
good. Alright guys. So thank you for watching.
I'll see you next time.
26. Exporting Textures: Hello and welcome everyone. So before starting,
I want to mention something that I don't
really know what happened. But when I close my
unveiled Project and reopened it for
recording this lecture, all those lighting
issues that we were seeing at the back of the
room in the last lecture. Most of them are fixed automatically just by
restarting and we'll reject. So unreal can be a bit
unpredictable sometimes like this. So if all those issues
are fixed for you Also after these starting,
that's very good. But if they are still
there, don't worry, we will tackle them
after we are done adding all the textures
to the materials. But first we have to fix this small issue in
this shading issue of this piece over here, I think it is really easy to do Eigen goodly open up Blender. And let's see. What I will do is I will
select this and just press delete and delete
this from over here. Come back in, Blender,
open a bar fight. And we can only export
this thing out again. Once again, just select this press Slash to go
into the local mode. And to fix the issue
I think it is being caused because of
this geometric. You can just press Tab, press a to select everything. Then you can just
press Control plus T. That will triangulate
all these phases. So I think that
would fix the issue. So let's just export this again. After you're done triangulating, after pressing Control D, just basically select this
while in the local mode only because you only need
to export this thing only. Now go over to File export,
FBX, Export folder. Now rename this to
something like legs, underscore fix, enable
selected objects and mesh it Export. Now we can come back
to Unreal Engine. Let's open up our
model's folder. And they don't add in board. And just select this table
legs underscore fixed, fine. Let's import all. And here it is. Now I will just quickly show you the benefit of putting in the location coordinates as
zero comma zero, comma zero. If you remember at the
start, we did this. We put in all the x, y, and z coordinates are
zero for all the objects. So now we can just drag
and drop this table legs underscore fixed file. And we don't need to like set it properly according to our table. We just need to type in zero
comma zero, comma zero. And you will see it is
exactly at its position, the same position that
was in Blender only. You can just like
add any object. You didn't place any
object in Blender anywhere you want
in this scene only, then you can export
it out to blender and just type in zero comma
zero, comma zero. And it will be placed exactly at the location that
was in Blender. So yeah, that is like
really small shortcut, but it helps to speed up our workflow because later on when we will be
creating crops, we can place them properly. Overhead are in all these
places in Blender only. And then after we're done exporting them in Unreal Engine, we can just type in
zero comma zero, comma zero, and they will
be placed perfectly. Alright. So now we can start to add
textures to the materials. Let's enable the
Material Editor. And first let's
open up the chair. Full-screen this, select
this thing and delete this. Now even risk are enrolled plus space to bring up
this Content Browser. Go into the texture folder
in the chair table. So now there are six textures. We only need to
select the chair one. So you can see over
here in the naming, you can see cheered is written. So these three are the
chair materials and these three other
they will materials. The three chair textures,
drag-and-drop them. Now it is very easy. So the first one,
discolored one. You can select the RGB and this one goes into
the base color. Now the next one is
a normal texture that goes into that normally. And the last one is
like a bag texture, which is like three
different channels carved into a single one. So you need to remember that the R channel goes into
ambient occlusion, the green channel
goes into roughness, and the blue channel
goes into metallic. This is like a bad picture. This helps us to
save memory because in a single direction only
in three different channels. We have three
different textures for metallic roughness and
for ambient occlusion. You can check this
over here also, if you open up
Substance Painter, maybe you forget a word
channel corresponds to what texture you can move you open up
substance painter, and just wait for it to open up. And yet now we can open up
any project just to show you. Alright, so when you press Control Shift N E to
export the textures, we also have this
output templates. Here are all those templates, like for Blender, for
unwilling, and also over here. So when you select the Unreal
Engine for bad picture, now you will see there are
four different textures. If you will, notice
this thing over here. So this texture set, this has three different
channels, RG and B. If you hover over
the blue channel, you will see this is metallic,
it is written over here. And then the green channel
is for the roughness. And the R channel is mixed air, that is mixed ambient occlusion. So yeah, you can just
double-check it from over here. So these are like three
different lectures packed into a single one onto like different
color channels. So here this is
really helpful for us as it helps in saving memory. Alright, so now we
can just close this. So you just need to
remember this thing. That our sash for
ambient occlusion, green stamps for roughness, and blue stands for metallic. Alright, now we can
just quickly hit Save, wait for it to load. Let's go back to
our 3D view so you can just close this out. But there is still one
issue that you will notice that our material
is looking like really shiny all over the place. You might not notice
with this small texture. But if I add these two, Let's just go ahead and add the texture to the
Truman Balcony also. Then you will notice,
let's select this, close this out, press
Control plus space. Go back to the textures. Now in the room folder, drag and drop this
room balcony textures. So these three
drag-and-drop them. Again, we need to
do the same thing. So the RGB goes into
the base color, for the base color map, for normal, goes into
the normal channel. And for this one goes
into an illusion. Green goes into roughness, and blue goes into metallic. You can see over here
even the preview, this is looking really shiny. This is like a small thing that we need to
fix, don't worry, we'll just do it right in the
moment. When you hit Save. Now close this. And now you can clearly see that the complete material is
looking like really shiny. Even though we did not do all these things in
substance painter. This is like a little
problem for bad pictures. You need to enable
one single option. So if you quickly open up the
room balcony texture again, select the bad picture. And click over here.
Just double-click over here. This
window will pop up. You just need to disable sRGB. So when you disable sRGB, there would be this edit very smaller that you can read
this error over here, sampler type is set to
color, should be linear. So now we need to just
change the sampler type from over here via this
texture is selected, change it from color to linear. Now, let's just
see if you'd save. Wait for all the
materials to load. Now you can see,
you can clearly see that they are not
really shiny anymore. And they accurately
represent how we created them in
substance painter. So let's do the same thing
for the cheer when also select this path
texture double-click over here, disabled SRGB. Now set the sampler type
from color to linear color. Click Save again. You can see as soon as we
change the sampler type, the texture like you
started to recalculate. Yeah, now you can clearly
see it is not shiny anymore. And this way it
looks much better. I will also scroll
up. Let's close this. And in the lights camera folder, right-click on the camera and piloted so that we can just
view it from a nicer landed. And one-by-one, Let's add
all the textures now. So open up screen shelf. Maximize this, close this
up and roll blood space. Now select the screenshot. Drag and drop these
three lectures is to base color
this one to normal. Ambient occlusion, roughness,
and the metallic Save. Now you can see the
texture is appearing. Let's select the path texture. Double-click over
here, disabled sRGB. Answered the sampler
type linear column. It's safe. So now I will be just repeating this process again and again. So you can also quickly do this. Select the table
and shelf there, solute this press
Control plus space. I'll drag and drop these three. Again, I will select the
texture disabled SRGB, and also change the sampler. The window material was
in the room folder only. So open that up and
now drag and drop the window textures in, connect them into base color normally and all their
respective channels. There's also change this
first before saving. And now I've saved. Alright,
so we are almost done. Last thing is this table. Select the texture. I'm disabled SRGB and change the sampler type linear
color. I'm safe. Alright, so now we are done with adding all the textures
to the materials. And now our scene
looks pretty nice. Obviously the
lighting is really, really flat right now, so it does not look back. Don't worry. We'll change the lighting and add things like post-processing, make it look even better. You're going to press Control L and just change the lighting and see how it reacts
with your environment. You can see we can create some nice lighting setups,
something like this. You can also press
G to just disable all these things like this is the grid and all of these icons. You can just press G and you can just view your
environment properly. You can also come over here, click on this button
and open up this menu. You will see the screen
percentage option. If you increase this
to 200 per cent. And now you will
notice that the scene is much more sharper and looks really good because This is like the resolution
for the environment. If you increase this, it will increase the screen
percentage and the resolution degrees it. Now like Unreal Engine
would be really fast, but it would be like really
bad looking as there is no resolution and
everything looks very fuzzy. But if you increase the
resolution to do 100 per cent, now everything looks
crisp and clean, but you can see
it is very laggy. They are, we can set it
to somewhere around 100. I think. That would be the perfect
mix of the things. Alright. Let's come back
to our camera only. And I didn't change
that the lighting too. Something like
this only for now. We also have this fog enabled. You will see when I
disabled the fall, Let's see, it looks much
different because of this fox. So you can select
the fog and maybe decrease the density to 0.0 001. Yeah, that would make it look a little bit better
because I think too much fog in this scene looks really bad. Before proceeding. Let's just hit Save. And let's see what
we can do next. Right now, a lot of
light is leaking into our room through the
corners of the walls. We cannot really
see it right away, but it is making a boom look really bright more
than it has to be. And it might look a
little unrealistic. Also. Click over here outside
anyway and press control plus L to move the lighting and move it completely
up like this. You can clearly
see that the light is coming through
all these areas. So how do we fix this?
It is very simple. First, let's just
undo the lighting. So press control Z, and
let's keep it this way. Only. Come up over here,
select the camera right-click and
let's stop pirating. And I will just move
out of our environment. And basically what I will do is I will add a bunch of cubes all in different directions of the dude just to create
a lot of shadows. So basically what I mean by this is let's just click over here, go into shapes and add a cubed. Basically what I want
to do is first I want to raise the skewed right
around the corner like this. We can also click over here. Right now we are in
the perspective. We can view the top view. So this way it is easier
to place this cube. Also, if you are looking
for shortcuts w, using w, you get like
moving around the object. E is for rotation and scaling. Really simple. Now, after pressing W, you can move around
the tube like this, just along the wall of the room. Now press R to scale it
up and just scale it like this just along the
wall of the room. Now we can come over to
the left view and again, press art and scale it this way. Let's place it along the wall. Now come back to
the perspective and you can clearly see
what I mean by this. Basically, I want
to place the cube along all four
sides of our room. Basically what this
will do is it will cast shadows and not allow the
light to pass through this. And basically, that will make our room a little
bit more realistic because no extra light is coming into a room through
the corners of the walls. Alright. We will see this in full action. Just a second. First, I will
select this table legs that we just imported these things and drag and drop
them into the models. I will not move this cube into the models because this
is a separate thing. Let's just select this now. I will press R and
make it thinner. And just make sure to
place them exactly. We don't have to scale them
any much more than needed. This much is pretty good. Let's move it like this. Press Control C and
Control V. And we have created a duplicate of it and placed a duplicate
over here like this. You can see it is
casting shadow and it won't allow any light
to pass through. If you go into the
room right away, you won't notice any difference. But if you disable these two, you can see all this extra
light is coming through the walls if you enable
both of them back on. Now all that light has
disappeared and the coordinates are looking much more realistic
because they are darker, and that is how it
is supposed to be. Let's just add these cubes
in all four directions. I mean, all six directions. Now I will select this press
Control C and Control V. Move this one up, this E to rotate and rotate it by
90 degrees like this. You can snap your
rotation movement and scale by different amounts
using these options. Over here you can see rotation
is currently set to ten. So it is rotating by
ten degree increments. Then we also have
movement and scale. You can adjust these kings. There's W now.
Explains it over here. Press R to scale it up. Again, press Control
C and Control V, and place this one
at the bottom. Just control C, control V again. And let's place this one
over here at the back. Make sure to place them
like very close to the walls but also
not overlap them. So just make sure there is a little bit distance.
Dislike this. We can also select this thing
is control C, control V. And place it like
this over here. Because we cannot really see this portion of the environment. Let's just build
things towards camera. Kind of see this. So select this and move it a
little bit backwards. That's come out of the camera. Alright, again, duplicate this and place this one over here. Now let's come back
to the camera and you can see how things are
much more darker now, we can easily view this. So just select all of them
and add a new folder. And let's rename this folder
with something like shadows. Now, if you're disabled this entire folder or hide
it by clicking over here, you can clearly see how
much extra light was being added into our scene
through these walls. Now all that is fixed. And I think the
scene looks much, much better this way as the corners of the room look much more realistic and darker. Now I will just quickly adjust the position of these
cubes a little bit. Because as you can
see, we can kind of see a white cube
appearing over here. So let's just come
out of the camera quickly. Tried to fix it. Also. I think this one is
kind of interfering with the normal light of
the scene. As you can see. It's just placed it
a little bit towards the right, like this. And also I will select
this one and move this one on the left just a little bit. You can also disable
snapping from over here so that you can
move freely like this. Let's just viewed
through the camera once and see if
everything is nice. Now I think we cannot really see the juice from this window. So that's pretty good,
I think right now the lighting looks really
valued is not that great, but don't worry, that will be the focus of our next lecture. We will be adjusting
the lighting, adding the post-process volume, and try to make the scene look as good as possible visually. So yeah, this is it
for this lecture. I will see you in the
next one tenuous watching and also make sure to
save your own projects.
28. Creating the Vases: Hello and welcome guys. So now we're back in blender again. And in this lecture we can start with creating some of our
small props for our scene. So if you go into Resource
Files of the course and in the reference
images folder, you will see that I've
added a couple more images. So we have different
types of vases, lamps, we can create them. You can also go back to some of the older reference images, like we were using. This one. I think we can create some
sort of these small props. So we have this small d bought a cup and this incense burner. We can definitely
create these things. We can create like four
or five different types of VCs to place on our shelves. And yet, this will help
us to fill up our scene. Alright, so let's start.
I will close this. Right now. What we can do is
you can just quickly disable everything because you really don't need
anything right now. First I would say this because a point right in the center. So press Shift plus S and
select Gaza to world origin. And now we will start
by creating some broth. So let's start by
creating a simple way. So I've added this
very simple image of ways we can
start by creating. We also have a couple
of different ones. So you can choose from these and create whichever
one you want. Alright, so we can start
with the simple one. First plus one for
the front view, Let's press Shift plus
a and image reference. And in the reference images folder you can just
select this phi. Alright, so creating
this is fairly simple. I will also turn off the camera. I will just hide it so that
it does not block of you. Alright, so now press Shift plus a and let's add a cylinder. So press tab, select the
bottom loop and you can just try to match it with the
reference image properly. Scale it down, and just place it perfectly with the
difference image like this. Now we can just basically select the top loop
and delete this. So press X and
delete the vertices. And we can start to create
our vase from the bottom. So just select this completely. Now press E to extrude and extrude it to
wherever you want. And after clicking,
you can press S to scale it up and try to match
it with the reference image. Again, press E for six through this till
here, scale it down. We need to just repeat
it again and again. Basically just press E, basically here press S to
scale it up like this. Now I will just quickly
repeat this process again and again and completely trace
out this reference image. Alright, so we're already done. Let's select the
reference image. Move this backwards,
disable x-ray, and select the ways. Right-click and Shade Smooth. Come over here and
enable auto smooth. Stop. Three for the Face. Select, let's select
this top face and delete the face so that
our ways actually looks like a vase and we have
this empty space in here. We can now basically to
give it extra smoothness, we can add a subdivision
modifier if you want. Like as you can see as soon
as you aggregate this, now as you can see as
soon as you argued this, everything is a little
bit more smoother. So yeah, we can
definitely add this rest, rest 34 face, select
this bottom face. And you can just press
I to insert this. And this will fix the shading
that you can see over here. Alright, so we are done
with the first ways. Now we need to scale this waste properly so enable
the writing table. As you can see, this
table is really small compared to our waste, so we need to scale
this accordingly. Place this one over here. Let's scale this down
because I will be placing this ways beside our table only as you can see in
the reference image. Also, quickly open
up your wrists. Right-click and load the scene. You will see we have this
huge base over here, please, right beside a table. I'm trying to create
something like that only. I think this much
size is pretty good. That's pretty nice.
Alright, next we can create some more vases, so I will just minimize
pure ref for now. And also, let's select this
reference image press M, and move this to the
reference images collection. We can also turn off the
writing table for now. Alright, so let's continue. Redshift plus k. Go to image reference and let's add another difference
image of all these vases. This one. I will select this image and brett
slash to go into the local mode so that we
can work with this easily. Alright, so now you can choose a couple of different phases. I think we can create three or four years to
have a little bit of variation and add
them in our scene so you can create
whichever one you want. Alright, so maybe I will
start with this one. So again, we just need
to add a cylinder. A cylinder, place it
over here, enable X-ray. And just try to place the
bottom loop like this. The bottom line of this vase. Now just press tab. Let's select this top
loop. Bring this down. We don't have to create this one perfectly as this will
be like really small. Now, just press P
extruded inwards, press E and extrude this
outwards like this. You can see that
the reference image is not matching perfectly. You can try to match
it on your own because this is not really
a perfect reference image. That's why it is
quite possible that the lines don't match on the right and the
left at the same time. But it does not
matter that much. Because you can just
scale it like this and create something acceptable. Because as I said, this
problem would be like really small placed on a shelf. So you can just match
it with one side of the reference image
and the other one. Can we just kept that really. As you can see, it
does not really match, but I think the
way it looks fine. Let's disable X-ray. We can just right-click,
Shade, Smooth, enable, auto smooth the staff, and receive a facelift, and just delete this top face to create this hollow shape. Yeah, I think the
way it looks fine. And again, press Tab or Alt
and select this top loop. Then press S to scale
it outwards like this, this control beak. And they will this
one like this, so that it is a little
bit more smoother. You can see this kind
of like shading for this is because they are a
lack of geometry over there. So just press Control R and add a couple of edge
loops in between. And you can see it is a
little bit better now. You can add one more like
this. Now it's pretty good. I think. I'm happy
with this way. So let's continue
and reshift day. Let's add another cylinder. Let's create this
one. Enable X-ray again, scale this down. Again, try to match it with the bottom line is
tab. Select this. Now this scaled up. Again, I'm doing this
pretty fast as I said, because these objects will be
really small in our scene. We don't have to spend
too much time on them. Delete the top face and
enable auto smooth. I would like to more
edge loops over here. So this press Control R
and then hit right-click. Alright, so let's
see plus one again, and let's create this one. So again, redshifted. Let's add a cylinder,
enable X-ray. This loop recipe. I'm excluded according
to the reference image. I'm trying to match it
over here like this. It does not really
come along well with the left side where it
does not matter to us. You can scale it
up a little bit. Next weekend, just disable x-ray and shade smooth this
first enable auto smooth. We can maybe add the bevel
modifier to this one is to add a little bit of
more smoothness staff. And let's delete this top face. Like this. Yeah,
that looks fine. I think. Next let's create this one. So again, I press one for the front view press Shift
a left sided cylinder. And as I said, this is like totally up to
personal preference. If you're fine
with like creating two different bases only you can definitely just create
to skip this video. Because I'm just
creating a lot of different ones so that we have a lot more variation
in our scene. But yeah, you definitely
don't have to like create so many because we can just
duplicate them also. I you just move this
one a little bit on the left leg this so that I can fit a little bit better along these
lines as you can see. Alright, so I think
that's pretty good. Let's hit right-click,
Shade Smooth. Again, enable auto smooth. And let's delete this top face. I will also add the bevel
modifier, this one also, because I think these ones are a little bit larger
compared to these two, where we can definitely
add the bevel to make them look a
little bit smoother. You can select the bottom
face and press I to insert just to
control the bevel. Alright. I think I will create this
one as my final ways. So this one we can create. And yeah, I think
that would be it. So in Redshift day, Let's add a cylinder. Enable X-ray scale this down. Stop. Let's select this top
one. Just scale it up. I mean, we can just move it
towards the right a little bit just to fit it properly. Along the reference image. With this, we are done with
creating all our bases, which leads us to chase mood and enable auto smooth, stab. Let's delete this top face
plus x and delete the faces. You can either add the bevel
modifier to this or you can just raise to four
and select hold Alt, select this complete loop, then press Control V and
bevel it out like this. You can also create
smooth shapes this way. Also I will add a couple of
more edge loops over here. Press Control R, scroll
up a little bit. And I do all three age groups just to fix the shading issue. Alright, so now you can press Slash to come out
of the local mode. And we can just select
this reference image, press M, and move this to the reference
images collection. Let's also place
them side-by-side suppress one for the front view. And let's paste them like this. Also, we need to scale
them down because this one is like a
largest ways I think. So compared to this, these ones, should we
like a lot more smaller? See, I just place
them side-by-side. And just select them all. Hold Shift, select this one, just select all these. And then we can first
move this back. Now we can come over here,
select individual origins. Let's press one
for the front view and scale them down like this. I think this much is fine. Yeah, now you can press
a to select everything, press M and move this
to a new collection, rename this to resist. Okay, Risk Control a, and also don't forget to apply
the scale of all of them. Now let's hit Save. Alright, so I think this
is it for this lecture. In the next lecture, we
will continue creating some more props. So thank
you guys for watching. I'll see you the next one.
29. Creating Small Props: Welcome guys. So now we can
continue modeling approach. So first let's
open up your life. Come down over here. And
let's open up our scene. Okay, so we can start by getting some of these small prompts that are on the table. So let's create this one first. So what I will do now
is I will just disabled this basis Collection and
let's enable the table. Alright. So we can start by pressing
Shift a and let's add a cube. We are creating
this outer shape, so let's scale it
accordingly to the table. Yeah, I think this
is pretty good. I spin this down. Next. We can first apply the
scale to press Control a, and apply the scale press tab
and select this top face. And let's hit this next weekend. Just add a solid. If I modify this to give this a
little bit of thickness. I think 0.015 is pretty good. Next, we can just
press Tab again for the edit mode is
three for Face Select, and select all four
of these phases. Now just basically
press I to insert them and press I once again
to insert them individually. I think till here
is pretty good. Now, as you can see, here
are like rounded edges. So to create that, we can bevel this, but we are not
doubling in this way. We want to bevel the
vertices this time. So instead of
pressing just control the press Control Shift and B. And this way you will
notice you are doubling the vertices and
increase it till here. Then you can use
your scroll wheel to make it smoother like this. So maybe we can add
just two segments. This one is pretty good. Yeah, Now just press
three for Face. Select, select this face, this face, this and this. Now, this first X. And
then he told the faces, we can reduce the solid if I thickness a little
bit to 0.012 maybe. Also enabled even
thickness from over here. Yeah, that fixed it. So
0.001 is pretty good. 0.01, right-click Shade Smooth, enable auto smooth from here. Yeah, that looks pretty
good in my opinion. Next, we can create some
of these small utensils. So let's just select
this press Shift plus S because of the selected. Now press Shift plus a. And let's add a cylinder. Again. Scale this down and we will be creating this teapot like thing. So just select the
slender and let's select distinct slash to boon
to the local mode. Let's see this one
for the front view, scale this down, S and Z, and scale it like this. Now what we can do is we can first
right-click Shade Smooth. And in a lot of
smooth, also makes sure to press Control
a and apply the scale. Stab, risk control art and add two edge loops in
between like this. Then hit right-click to
place them at the same time. S and Z. S and Z and
scaled them apart. As you can see, they are not
really moving because we have currently set this
to individual origin. So change this to
bounding box center. And then if you press S and Z, yeah, scaling apart this way. Just scaling them in here. Now press S and
scale them outwards. We can just press Control and
V and level them like this. Something like this. And yeah, it kind of looks like the shape one liter scale this down. Now to create the top thing, we can just press Tab plus
three for Face Select. Let's select this
face only press Shift plus D. To duplicate this, then hit right-click to
place it exactly over here. And you can just press P
and separate the selection. Now if you press tab,
you can see both of these are not two
different objects. So now we can just
select the face that we separated out this tab. Select just the face rescue
to extrude it outwards. And just keep on extruding it. I'm just scaling it
inwards like this. Extruded outwards
like this idea. Here we have this kind of shape. It does not look
like exactly same, but this would be
like really small in our scene and it won't
even be visible that much. Like we wouldn't be viewing
it from this distance. So I think it looks fine. In that respect. You can add a bevel modifier. This give this nice little
partition that you can see. Yeah, that looks pretty
good in my opinion. I will just select this,
scale it up a little bit. We're going to go next. Let's clearly these
two things again, these tools are pretty
easy to create. We don't have to exactly
follow the shape. Just add a cylinder again, Let's scale this down to
one from the front view, I will first press Tab and
they need this top face as x. And the new interface
that we have, this hollow shape for our
glass shape smoothness and enable auto mode. Let's see, we can create
this very simply, this press Tab, this one, and select this bottom loop. So hold Alt and click over here. Then we can just move it upwards a little bit
and press Control V. I'm not completely sure to
apply the skill first level is selecting this top thing. Bring it down and press E. And you've been opposite
to lock it up or textbook listed here
and scale it outwards. That pretty much looks fine. You can press S then hold, Shift to scale it like this. I'm going to scale
it up a little bit. In my opinion, this
looks pretty good. We can maybe see it over here. We can press 74 top view
and move it around easily. Let's place this over here like this and duplicate
it a couple of times just to fill out the next weekend cleared
this another thing. Again, press Shift plus
a and add a cylinder. Scale this down. Let's see. Again, I will
just first press tab is three for face select. This face is x underneath this. Enable auto smooth and make
sure to shade smooth this. So this one kind of have like an edge loop in
between this way. So press Control or add
edge loop over here. I'm scaling this down. I don't really
understand this shape, but maybe it is like flipped. We can just create
something like this. Press Control R and one
over here, scale it up. You can just select
this and divide it out a little bit,
smoothing the shape. I'll scale this down. I would say this pretty
much looks the same. Maybe it is flipped so
we can just press Tab, select the top loop and
press F to fill this. You can see a little bit
of shading issues or press Control on and add a
bunch of edge loops over here. Again, I can just
press Shift plus D, seven fourths plus Shift plus D and just paste them over here. They're scaled them
up a little bit. Alright, I'm pretty
satisfied with how this looks pretty
slash to come out of the local mode. This
is pretty good. I think we have this model
incense burner also. So maybe I want like create a separate one for
this because again, it is like really small if
you put zero on a number, but you will see
the camera view. You can see how small
they actually look. We don't really have to
spend too much time on this. I will just select this
one only redshift plus D. Duplicate this. Right-click to place it exactly over there
and just press G to move it. And I can just scale
it up a little bit. And this wouldn't be
like incense burner. We can just give it a separate material
substance painter, that it wouldn't look different. Maybe we can scale this up a little bit less controller and add edge loop like this.
I think that's good. Let's save and we can
just select all of this. Make sure to
de-select the table. Or we can just turn
off the table for now. Now, just select all
of this and let's see, we can press M and move
this to a new collection. And I will just
create the collision by the name of drops it. And yeah, we can just keep
all the prompts in here. You have this raises
the problem set. Let's see next week. Thank you. There are a couple of
things that we can do. We can mimic a lamp. I will not be placing the lamp like this as
we have in the scene, but I will read like a
small lamp and maybe place it on the table or maybe place it over
here on the shelf. We can also create even see these blades like thing to add. Or we can also create
a small threshold. There are a couple of
things that we can do. Alright, so let's see. I will start by creating this breath-hold only because
it is pretty easy to do. If you will look over in the course files and in the
reference images folder, I have added this rush to animate that we can
use as a reference. So that would be really
easy to do with this image. Alright, so let's just
disable everything. Press one for the front view. We can brushes plus S
goes towards origin. It goes right over here,
press Shift plus a, and let's add an
image reference. Let's add this
reference image now. Definitly scale this down. Now we can just basically
Redshift a side plane. This plane by 90 degrees, enable X-ray and this
makes sure to place it accordingly on both sides so that we can use the
mirror modifier. It does not really
have to fit perfectly. But as you can see, currently, both the edges of the plane at the edges of
the reference image also. So now we can just press
Tab, press Control R, group in the middle,
it right-click and just delete
the side vertices. Left side. I'm
mortified over here. Let's see. We can dislike this. They're selling these tools of this X and delete the word seed. This word is C plus E, then X to lock it over
here and extrude it. And now let's just
quickly paste this image. Select this vertices as G and Z, or Control and snap them
together. Like this. Not even just select this one. Make sure to enable
flipping first and press G the next and
joined them over here. Staph aureus, it'll
select everything. Then you just press F
to fill out the phases. This image backwards. And just add a solid if I
modify to give this thickness. Sheets mode enabled auto ship, apply the skin. All right, now I have a shift plus s goes to the
selected press Shift a. And let's add a cylinder. Scale this cylinder down. Here. Let's scale it up. Sit in the middle
of the sculpting, shapes, mood, and
a lot of sports. We can add a bit of details if you want to press Control R, add one edge loop over here. Add one over here. Select them both their scale, the amount that's controlling
V and Bevel them. Make sure to reduce
the segments. Now we can select the
loose in the middle. First row is true for
Edge Select and make sure to just select these
two edges like this. Risk and roll them out. You can reduce the
segments, do one only. Then just select the
segments In-between. Hold Alt, select this, hold Shift and Alt select
this scale, this out. I'm creating
something like this. Again, enable X-ray and we can do similar things
over here also. Don't have to create this one exactly and scale it down
a little bit from here. Now just add a couple
of edge loops over here who give them a bit more
detail. So select them all. That's going to be an ion
that looks like this. And just select the beveled in the middle. Scaling them out. Make sure to select
individual origins. Yeah, now they're
scaling properly. Also, let's select these
two press control V again. I think we did not
apply the scale. That's why the bevel
is kind of weird. So first press Control
E applied escape. Now select both of the loops and immediate and scaling
them outwards. I think this looks pretty
good in my opinion. Not that great, but this
problem be like really small. So we don't have to worry
too much about this. We can add one edge
loop at the bottom. Press three, oh
Lord. Sixth room. This outwards. There's three full face
select and hold Alt. Select this complete loop, press Alt plus e and
extrude faces along normal. Now we can just duplicate
this completely. So select this, add a
mirror modifier to this. Select the middle
object and this. And yeah, that's pretty good. We can add another cube. So select this press
Shift plus SQL to select it to bring
the gospel here. Either cubes in this town. I'm now creating
this part over here. Scale it up like this. Now just press Tab,
press Control. Act two edge loops. It Right-click and scale them both on the y-axis
progress S then by make sure to change that bounding box them
outwards like this. This triple Face,
Select and select these two faces and
extrude them downwards. And yeah, that's fine. Again, are the mirror
modifier to this. Select the middle object
as this is pretty simple, we can just, I do cubes. So add when you first
scale this down, scale it up like this, and we need to create
this thing over here. Now, just duplicate
the bottom thing. I don't have to like read
this exactly accurate. I think this image
is also pretty nice. We can just shift
they add a cylinder, scale it down, rotate it
on the eggs by 90 degrees. I'm pleased. Dislike this. Create
these hangers. Shear smooth. This again enable auto smooth. Now just start to add a modifier to duplicate it a
bunch of times. Maybe five times is enough. Yeah, that looks pretty
good in my opinion. So I would just
hit Save on this, select all of it, and move this to the
Project Collections. Press N and move this to prop set naval back to
Professor collection. And first I will select all of this before doing anything. I mean, especially if
they add an empty object. And now just select all of this. Makes sure that empty object is the active selection.
Rests right-click. Now I'm painting an object so that you can easily
move these now. Enable the writing table, and let's just place
it on the table. Make sure to select this
empty and place it over here. Obviously this large compared with the demons scale this down. This one is pretty good. Again, you can see
this really small. Next we can add some
brushes to this to give this a little
bit more detail, I will select this
image, press M, and move this to the
reference images collection. I think this image is pretty
good for this lecture. In the last lecture, we
finished with the project. We can utilize a couple
of these plates. We can create the lamp and
we can add these brushes. And yeah, that would be pretty
much it for our process. After that, we can start
with the texturing of all these prompts and
then place them in IRC. Alright, so I think this
is it for this lecture. Thanks for watching. I'll
see you in the next one.
30. Creating the Lamp and More Props: Hello and welcome guys. So let's continue making our broth. Now, I will open up the reference images folder and let's see what
we can do next. There are a couple of things, so let's start by creating
these small brushes. I think it is really easy to do. And we can add them in art. Brush stand over here that we
created in the last video. I will press seven
for the top view. Let's disable
everything for now. And we can select this empty and move this to the problem
set collection only. So press M and move this
over here. There's disabled. This also. Press seven for top. You
press Shift plus S because the world origin shift a and
let's add a reference image. Brushes reference image. That scheme is down. Alright, so it is pretty easy to do the shift D. Let's
add a cylinder. Scale this down, rotate it
by 90 degrees, like this. Given this down again, scale it up like this. Let's scale it in here only. Then we can basically just
duplicate this best x, lock it over here, then
scale this down like this. Just so all of these
objects are different. We can also like created in a single one only and extrude
all the parts. Over here. We can select the cylinder only and extrude all the radius, but it would be kind of
difficult to texture. That's why I'm
creating completely separate objects that will be easier to like texture in
Substance Painter sheets, moon, this enable auto smooth. Select this Shade Smooth,
and enable auto smooth. I spent seven again
for top view. Next let's again select
this, duplicate, this press X recipes,
this one over here. Began enable X-ray. Bring this back like
this, and scale it up. Pretty simple. Shear smooth this one again, a
lot of smoothing. We can suppress Th2 for
intellect hold Alt and select this age press Control and V. Make sure to apply
the scale first. Then we can just beverage
it out like this. And now let's just
create this brush part. We can again add
a cylinder only I think on the Bible
and 90 degrees. Now just press Tab enable X-ray, select all these
vertices to this, place them over here and
scale them down like this. Yeah, that's pretty good as
this will be really small. So we don't have to like
create everything accurately. I think that's pretty good. We can now select
all of them and then just press Control plus j could join them so that they
are a single object only. Yeah, that grid is really easy. Let's create one more brush. And yeah, that would be eight. So again, add a cylinder,
scale this down. Rotate it on the
Y by 90 degrees. I'm skating like this. Again, duplicate the cylinder
plus x plus this over here. Scale this down a little bit. Then they start to go
into the Edit mode. Press three for Face, Select, select this face. I do insect. And this extruded
outwards like this. Create this sort of thing. And you can select them both, right-click and shade smooth and also enable auto
smooth for both of them. Again, select this duplicate
ECS, paste this over here. Make sure to enable X-ray
first so that you can select everything and
place it back over here. Next game, this will
now look like this. Again, scale it up like this. Press tab has been
thoroughly apply the scheme. And then we can just
label this edge out this next week. And again, add a new selector.
It's scaling this down. Rotate it by 90 degrees, and place this over here
like this to enable X-ray. Select this and
place it like this. It didn't down this one out. Yeah, that's pretty
good. I think. I can just right-click
and shade, smooth this out as mood. Again, select all
of these species. Then press Control
J. We join them. All right, I think
is pretty good. We can select this
reference image, press M, and move this to the reference
images collection. Let's enable the
prop set collection. Select them both.
And first rotate them by 90 degrees
like this. By -90. Then rotate them on the
zig and zag and type in 90 and just place
them like this. Obviously we need
to scale them down. You can press the dot key on the number pad to focus on
any of the objects like this. Bring them back over here and just place them,
select them both. And we need ways
to mitigate this. Instead of duplicating
them right now, we can duplicate them later
on after texturing so that we only have to take these two and then we can just
easily duplicate them. Right now, duplicating
would be like a hassle because if
you duplicate them, then we have to take all
of the duplicated copies. Let's just keep it this way only afterwards we
can duplicate them. When we are done
with the texturing. Let's see. Next I will open up VR
range, open arsine. And if you look over in
this reference image, I think we have
this kind of lab. So I want to create
something like this. So next let's do that. First I will select these two, press M and move them to
the proper set collection. Alright, so I have added
a reference image, so breastbone and add
the reference image. So press shift the
image reference and add this lamp
reference image. So this is like a
full-blown large lab, but we won't be creating
something like that. But this is something like this. But I don't want to add
something like this. I just want to add
a small table lamp. So let's do that. What we can do with, I think it is really easy. We can create specific
parts from this lamp. Like we can create
this thing over here, the designer mode, and we can add it over here
in our small lab. So let's see. First let's add a cylinder listed over here.
Scale this down. Scale it up to here.
I think this fine. Shift plus S goes into selected. Bring the cursor over here, right-click Shade
Smooth and autos food. I will add a new cylinder. This down. Scale
it up like this. Place one at the
bottom, also like this. So just select this again, duplicate, shift and
place it over here. Let's make this one
a little bit larger. Select them both, right-click, Shade Smooth and enable auto. Select this top one, scale
it down a little bit. Press tab, and select
this top loop, press control, beep
and bevel it out. Make sure to apply
the scale for us. Tab is controlling,
apply the scale. And then we can divide
this out like this. This one also first let's auto smooth and we can just simply add a bevel modifier to
this. Applying the scale. Let's create this top thing. So I think I don't want to
go for something like this. Like this is really complex. I will just simply add a cylinder and let
Z scale this down. Scale it up like
this, it over here. And we can create
something of this sort. So what we can do is first let's shade smooth this and
enable auto smooth. This DAB is to
select and hold Alt, select this bottom loop and scale this from the bottom like this selected dog loop, I will move this
down a little bit. And now we can just
apply the scale first and then select
both of the loops. So hold Alt again
and select this. Then you can hold Shift
and Alt and select this, then press Control V
and Bevel them out. I think that's pretty good. Next, I will just simply
created this thing over here, just to add a little bit of
more detail into our lap. Just press shift D. Let's add a single word. So at a single
word, you can press one for us to move into the word select. Then
you can move it around. As you can see.
Let's place it over here and erase this out. Not that difficult. We have done this quite a few times now. You don't have to
be like perfectly accurate because as this
will be really small, we just quickly trace it out. Hello phone over here like this. And then we can just
basically connect these two and press F. You join
them all together. Press Tab risky to
select everything. F to fill out the space. And then we can enable excellent staff or the edit mode and in risky for the knife
tool, if you remember. And let's just use
the knife tool to create these inside shifts. Let's show him this over here. Hit enter. To select this face. This face. Scale again. Go into the eight
mode best game. Again, just using
the knife tool. Students this one out now, hit Enter and delete this face. And yet we are done
with this design. Now what we can do is basically just select this one
for the front view. And let's place this over here. G and move it over here. Scale this down. As you can see, the origin is not
placed correctly. So to place the origin
of the object correctly, you can just go over to Object set origin and
origin feature matrix. As soon as you do
that, you can see the origin point
is now over here. Scale this down and
paste this like this. Yeah, I think it
looks pretty good. We can add a solid
if I modify to this. Shade smooth this, and
enable auto smooth. Now just use the
mirror modifier. Like Why. Select
the middle object. And we can say that this thing. And we can maybe select this
again and duplicate this. Rotate this by 90
degrees, like this. Change the middle access
to y and disabled the x. Okay, We need to rotate it again by when 80 degrees like this. We can place your
feet like this also. This wave looks really nice. I think. We have
like a small lamp. We can scale it down a
little bit if you want to. Let's just place it on
the table and then we can see if it looks nice or not. Just hide the reference
image for now. So first edge, select the lamp, one for the front view.
They see it over here. So I think it looks all right. We need to just
decrease this thing. So let's just select these
two press Tab enable X-ray and bring
them up like this. And we can select all of
it and bring it down. Also, if it does
not look that good, we can always put
it on the shelf to fill out things if you
don't like it on the table. It can be a nice
addition to our theme. I will maybe select this thing, select this and rotate it completely suppress
our than x and rotate it by 100 degrees.
Place it like this. I think this looks
much better than x. Then y, and rotate it by 90, odd and y and rotate 90 degrees. I think it looks nice. Let's save this. I will select all
of these pieces. First, let's disable the table. Select this cylinder pressure
plus S Go to be selected. Let's bring in Mt. Now just select all of them. Make sure empties the
active selection, right-click, Parent and object. All right, Now we're going
to select all of it, press M and move this to
the project collection. This edge to bring back
this reference image, select this press
M and move this to the reference images collection. So let's come back to the
reference images folder. And we have, I think pretty much created
all of this stuff. If we want, we can create these very simple looking
blades to add into our scene. I think that would be nice. So let's just create
them like that. Only subtle shift plus S, because the world origin, we can start by
simply just adding a stab risk F to fill out this. And now we can just
press I to insert this. Move, this downwards like this. Before moving downwards,
Let's press I once again to create another insect
and then move this down. Like this. Scale it inverts. And I think that is pretty
much looking like a plate. Right-click and shade
smoothness. Enable auto smooth. Let's move this down. Press Control R, add
edge loop in-between. Move it up like this. Applied a scale first, Risk Control V to
bevel this out. Hold Alt, select this loop. You can best G2 times to
move downwards like this. Then we can add another bevel. And lastly we can reach tab. There's three for Face
Select, select this face, press control V again, and bevel this out also, just to create a little
bit of smoothness. And I think this
looks pretty good. We can maybe scale this
inwards a little bit. Yeah, that looks nice. Lastly, I would just
add a solid if I modifier to this scheme. And yeah, that looks nice. I think we can enable the big shelf and just place it over here
just to see the scale. Rotate it on the y axis by
90 degrees, scale it down. And we're going to place it, something over here like this. Yeah, I think this
size is pretty good. Let's disable the shelf. We also have like a small
little stand for this rate. We can create this very simply, select this press Shift plus
S because of the selected. Let's see, we can
just add a cube. Maybe. We can clear simply something
like this because it won't be visible
from far away. They can definitely get away with something like this only. I think I'm pretty happy with
this color just selecting this cube or smooth this
and enable shared smooth. We can just join these two. So select this and like this
press Control J to join. And maybe we can duplicate
this press Shift plus d y and place them
both like this. Just so we have two
different blades. And now we can just select
them both and press M and move them through
the prostate collection. Enable this. And let's see. Now we have a
couple of different props. We have the probe set
and we have the races. Now we can definitely add all these prompts into our scene so we can start by
texturing all of them. We will move that to unwilling
it and start placing them. Watching. I will see
you in the next one.
31. Texturing the Props: Hello and welcome guys. So in this lecture we will
UV and wrap up rocks and export them to Substance Painter to start with the
texturing process. But before that, I
just wanted to create a small probe that I forgot
to make in the last lecture. Quickly just open up your list and we can
right-click and load RC. If we zoom into our
main reference image, you can just double-click
to focus and zoomable here. In this vase we
have these scrolls, so we can add that
to fill up our ways. I will also create them. You can just select
the waist press Slash to go into the local mode. And we can just create one of them and we can read around, duplicate them in unwilling
giant Redshift plus a, let's add a cylinder,
the cylinder down. I think this much
thickness is pretty good. Right-click and shapes move
this and enable auto smooth. I will again select this
cylinder only redshift plus S, Because if you selected and
again add a new cylinder for these top pieces it down
and move it up over here. Let's see. We can read
anything we want. We can just select
this cylinder. This DAB is three-phase select. And first insert this like this. And then extrude it upwards. Extrude distinct yet add another digital thing
he had three fold art. Select this complete loop now resolved plus e
and extrude faces. A long novel. Right-click
Shade Smooth. This enable auto mode. Estab, enable X-ray. And I will just decrease the
height of this a little bit. Yeah, I think this
looks pretty good. We'll just select this now. Go to the modify and add the middle modifier and select the middle object
as this cylinder. And now I will just
say the z axis, I think the duplicate them. And yeah, I think this
looks pretty good. I'm going to select the
cylinder and this S and Z. Use the height of
it a little bit, like them both and
move them downwards. Alright, so I'm pretty
happy with this now a slash to come out
of the local mode. Select them both. And let's just place it over
here like this. And now we can finally
start with the texturing. I will select these
two and press M and move them into
the project collection. All right, now we can create
two separate materials, one for the basis and
one for the prompts, so that we can picture them
separately and easily. Alright, so let's see. We can first risk a
to select everything, then press F3 and
searched for it, convert to mesh, hit Enter, and now all of them have
their modifiers applied. Next, we can just add
materials to them. So let's select this face, go over here and
add a new material. Let's rename this to basis. It Enter and now makes
sure to just selling only the basis to hold Shift and just select all these basis. While this large list is there. Active selection. Now we can press control
plus L, link the materials. Alright, so now this material is being shared by six
different objects. And as you can see,
we have six faces. I would just disable
the VCs collection now. And let's edit any of
the object being new. And let's add a new
material as Rob take a to select everything, then you can just press
Control L, L link materials. Alright. I will also select
both of these plates and just rotate them so
that they are like straight and not
really on this angle. It is a little bit
easier to picture them. So just type in 90 over
here for both of them. Also, there is a
nice little shortcut that I want to share
with you guys. Let's say if you have selected
both of these objects and you want to make the
same change to them, like you want to put in
90 degrees over here, but only one of
them gets affected. And that is the
active selection. So you have to do it two times, but there is a
shortcut for this. You can select them both. So you can click over here, type in 90, but before
pressing Enter, just hold Alt and
then press Enter, and you will see both
of them get effected. So this is like a
really nice shortcut. It can be used on
any kind of setting. Like let's say I want to disable auto smooth
for both of them. Hold Alt and then
click over here. And you can see both of
them are getting effected. This is like a really
nice shortcut. Alright, now I will select these and we have added the material so we can
start with the UV Editing. Let's just close
your rib for now. Go to the UV Editing tab. Let's just select
the project first. So press a to select everything, risk and growling and make
sure to apply the scale. Then press tab with a rescue your smartphone
project and hit Okay. Adjust the island margin so that everything
fits properly. Yeah, now you can
see everything is really nice. That's fine. Press Tab again. Estab now disabled the props or collection and
enable the basis one. Again, press Control,
apply the scale first, then this tab, there's
a deselect everything. Then if you just press U and
smart TV, budget it, okay. We can add a little
bit of margin and I think the uv maps are fine. You can come back
to the layout tab. Now just enabled, both of
them select all of this. We'll do File Export
and it is Vx. And I will just name
it as profit one. Enable the selected objects
and mesh hit Export. Now we can just simply
open UP Substance Painter. Okay, One thing that I
completely forgot to do is we need to check for
the face orientation. So enabled face orientation. And as you can see, most of them are fine. All of these vases
are like hollow, so they will have like
red color on the inside, but you don't have to worry
about that as you know, we can fix that in unreal, but this one we have to fix. So select this press Tab. This isn't select everything. Press Shift plus n,
then enable inside. And yet all of the bases and the glasses
will look like this, like read from inside because they don't really
have any thickness. But we don't have to add the solid if I modify it to them, we can keep them this
way only, it is fine. Next we need to select
this one, this tab. Select everything. I'll press Shift
plus n. This one also select everything
by Shift plus n. Now we're good to
go, so we can press a again disabled face
orientation over to File Export. It has vx and just select rob set one and hit Export again
so that it gets replaced. Alright, now we can hit Save on a blender file and come
back to substance painter. Let's close this and
create a new project. It on Select and select
the proper set one. Select the proper set one
from here and hit Okay. Let's quickly look through
for any kind of issues. You can see the vases look very weird in substance painter. But don't worry, we won't have this issue in Unreal
Engine because we can just enabled two-sided over there and it
could be fixed. But if you still want to fix this issue in
Substance Painter also, it is not really a problem. But yeah, if it looks weird, you can fix this they easily just by going into the
shader settings over here. And we have this ASM
metal roof selected. So click over here and just
hover over this one, I think. Yeah, BBR, metal roof
with alpha blending. So make sure to just
select this one. As soon as you do that,
you will see, yeah, Now all the bases look like
they look 3D and we cannot like seafood and now come
back to display settings. Let's fix the colors
first and also enable distinct
temporary anti-aliasing. Enabled color profile and select the profile
as you before. Alright, we also have materials, Rob said, and vases. And now we can
just go to texture set settings and
hit big mesh maps. The lady said this
to fork a neighbor. Both of these options just quickly do the
usual settings and hidden based electric textures
and wait for it to finish. I'll resume the video
when it's done. Alright guys, so the beak
is done now hit, Okay, and quickly just look through
your model for any kind of issues with the big and you kind of like
shading issues. But I don't think there are any. Everything looks
pretty good to me. Now we can just save the file
before starting picture. Just hit Control Plus. And good at that entry. And let's just save
it as props it saved. Now we can start with
the texturing process. So you can start
by taking a basis. Let's just select the racist
XY set from over here. Come back to the Layers
tab and we can delete this layer that is added
by default if over here. Alright, so now for the basis, I will be adding a marble
smart material to them. If you come over here into
smart materials section of the shelf and
search for marble, will find these three really
nice material so we can use all three of them
differently on different basis. So let's just drag and drop this one first. Marble, find y. And you can see this one,
it looks pretty good. We can click over here on the geometric mask,
right-click exclude all. And let's just select
this one first. We can select this
one also, I think. Next I will use this
one, a marble polished. Again, drag and drop it
over here like this. You can see it appears
over all of them. We can adjust that by
using the geometric mask. Also, one more thing
that I do want to mention is if you
open it up from here, you can adjust all of the
things like the base color. As you can see, you can adjust the base color to
anything you want. You can also. And do this and see
all these veins, like all these blood veins that are appearing
over the marble. You can also adjust them
by selecting the mask, then selecting the failure. Then you can adjust
things like dialing. As you can see. I think
this looks pretty good. You can adjust the balance and
contrast all those things. This material is
completely customizable. Now again, I will
click over here, right-click and exclude all. And we can maybe select
this one and this one. Select this one and this one. Next, we can drag and drop this third material onto
our bases like this. And again, if you open up
the material from over here, you can also adjust all of the things of this one
also like the color, things like the grunge,
the marble veins. I will also adjust
the marble veins right now, select the mask, select the failure, then you
can increase the tiling. I think if we increase the
tiling, it looks very nice. Then we can click over here,
right-click exclude all. And let's see, we need to add it on this one and this one. We can also create two completely separate
materials like let's say, I just first remove
it from here. So let's just remove
from this one so that only this space
has this material. Now I will select this folder, complete folder,
then duplicate it. So press control C, control V. Then you can click over
the geometry mask, right-click and
exclude everything. And let's just select this one. We can create a completely
different marble material just by things like adjusting the marble
veins to something else. Like we can increase the number of degrees, that
number a little bit. We can change the color also. Maybe let's say
something like this. As I was mentioning,
it is completely customizable, totally up to you. Just set up bluish color. And also j, this
color variation. I think something like
this looks pretty good. We have a nice little
variation with all our bases. As you can see,
you can completely customize these materials
however you want. So I won't be like spending
too much time on it. You can definitely experiment
with all these settings. So now let's just move forward and move over to the prop sets, select the props that
there's remove this layer. And we can first start by texturing some of the
very basic stuff. So just add a fill layer. And we can create a
simple porcelain material for all these glasses. So just give it a white
color and give it a roughness of 0.05 to
make it like really shiny. And you can see,
click over here, right-click, exclude
everything and just select these glasses. I'm displaying also. These glasses are
like kind of flying. I think we did not
place them correctly and then we'll do that later on. I think this looks fine. And as you know, this prop
is like really small. It could be viewed from
this much distance. So it does not matter
that much there. We can keep this material
only just give it a white color and make
it like really shiny. By reducing the roughness value. For this thing, we
can just simply use the wood material that we
created for our course. Drag-and-drop the
word course material. Wait for it to load. Click over here, extrude
all and just select this. You can also use the
word course material for all these items. Select this, this,
these things over here, this one, this one. And plus one. Now what we can do is we
can change the color of this wood course
material to maybe a bit lighter or darker, just to give it a little bit of variation to the rest
of the materials. So that does not look the same. Like this maybe. Yeah, I think in my opinion,
this is pretty good. It looks fine. Next we can proceed further. I will also select
this posterior in our material for this
thing also here, as you can see in
the reference image also it was white
from over here. We will make the nth black. Next time we'll
search for a bruise material or a go-go material, I think for this thing over
here, or incense burner. Because in the
reference image also it was kind of cooperation,
brownish color. So just drag and drop this bronze armor material over here. And I think this
looks pretty good. The bronze material looks pretty nice even on the utensils also. But let's just keep it in here. Only click over here, right-click exclude all,
and just select these two. Next, let's see.
We can simply add a fill layer, make it black. And then click over
here, right-click, extrude everything and just
select these two pieces. And this will be our
scroll. Pretty easy. As you can see,
we do not want to spend too much time
texturing all of these rows because
surely they will add a lot of value
and detailed version, but also they would
be like really small and not really
that much, no disabled. So we have to manage
their time properly and just keep everything
nice and quick. And the only things
that are remaining are these plates and the
brushes and the lamp. So I think what we
can do is we can use the porcelain material
only for the plates. And as you can see,
because these two objects, like these two were a single
object only That's why the geometry mask is not really working properly because it is being added to both of them. So what we can do is we can just remove it
from both of them. And instead we will just
duplicate this layer. Press Control C and Control V. Right-click and include all. And instead of using
a geometric mass, we have to use a black mask. So add a black mask to this. Now, select this tool, select the Nashville
from over here. If you remember, make
sure that those set to white and select
these two. Like this. Very simple. Because we only want to add the material to these two only. We will add something
else to the bottom ones. Alright, let's see
Next for the lamp, we can basically use
simple fabric material. Search for fabric. And we have lots of
nice fabric materials. Maybe I will go in this one
only fabrics and technique. This gives us a nice lamp feed. What we can do to adjust this is go over here and
select the surface, select the mask, and just
increase the tiling so that it is really small
all the circles this way, I think it will give
a nice lamp feet. Let's just set this to 30. All right, yeah, I'm
pretty happy with this. These bottom pieces, I think we can maybe just add the
wood material only, but we need to duplicate
the wood material once again because the geometric
mask won't work on them. We'll just duplicate this layer, right-click and include all, and then just add
a black mask to this and select this
piece and this piece. Alright, so now to
texture the brushes, Let's see the resumable here. And I'm basically just open up my reference image only
in the course whites. And just look at the
brushes that we modeled. Double-click to open them up. I will just place
them like this. We can open up your rough
quickly and drag and drop this image into pure ref so that we
can view it easily. Just drag and drop it over here. Let's see. I think it is really easy, but we can do is we can just
first create a new folder, the name these two
brushes so that we can add all the layers
over here only. Let's start by
adding a fill layer. And we can set the color of this layer to this
peach color over here. So let's just open it up. Setting the color to
something like this. Click over here,
right-click, extrude on. And we cannot really
use the geometric mass for this because all of
this is a single object. So let's just right-click include all and
add a black mask. Quickly. Select this
object over here. Next we can add another layer, may dislike darker color. Add another black mask. Select this piece and this
one. These two will leak. Then we can add
another fill layer, make this brownish color, brownish like dark brown color. To make the tip of the brush. Add a black mask and
select this one. And we can also select this one. Then for this one, we can again come back to
the black material. Only. Click over
the mask and select this piece as the black color because as you can
see, this is black. And again and again
select the peach layer and we can select the peach
color for this object also. And this one, we do not have
to like add too many layers. I will select the
color for this tip of the brush and make it
a little bit more darker. Or maybe a little bit
lighter, I think. Let's just go with this only. I think that's fine. It's safe. Quickly
lose pure ref for now. Now I think I'm pretty happy with how all my
small profit look. And we can finish
this lecture or here. In the next lecture,
we will export everything back
into Unreal Engine and we can start
placing our props accordingly and give
it a lot more detail. Hangovers watching. I will
see you in the next one.
32. Placing the Props: Hello and welcome guys. So now we're back
in Unreal Engine again to that we can import our models and textures
of the prompts that we created back
into our project. Alright, so let's start. First. What I will do is I will go into the models folder, right-click and
create a new folder. Let's rename this to Rob. Enter and open it up. Then you can hit
right-click again and select Import
from over here. Come over to the
tutorial directory. And in the exports folder, you can select this prop
set one and you put this in bold all alright, so now we have all the
models in our scene. We also have this material that we can add
the textures too. So let's just select
this and select here and drag and drop it
into the scene like this. Wait for it to load and
then you can just type in zero comma zero, comma zero. And all of the prompts are in their place where we
placed them in Blender. We can adjust them later on. As you can see. We can see
through the vessels right now. But let's just enabled
two-sided for the materials, for just open up this material
and enabled two-sided, you can select this big node
and enabled two-sided, safe. Wait for it to load this up, then you can sell it
the VCs Material. Double-click to open it up
and again enabled two-sided. It's saved. And now as you can see, everything is
looking pretty good. It is looking 3D. So let's see. Next we need to import our textures quickly, open up your substance painter, and open up the file so that
we can export our textures. But before come
back to and engine, we need to create a folder
over here for our textures. To open up the textures folder, right-click, create
a new folder. Let's rename this to Brock. Say they kinda come back
to the lecture folder. Select the project folder, right-click, and select
showing exploded. After this has a
beard, then you can just copy the bot
from over here. So select this part that's controlling and press
control C, to copy it up. In close this now and come
back to Substance Painter. Now, just press Control Shift
N E to export the textures. First, we need to change
the output directory. So click over here
and click over here, press Control C,
and then hit Enter. Make sure to hit Enter so that we are in this
prop set folder, as you can see, then
hit Select Folder. You can then select
the output template as Unreal Engine for
PAD file type can be set to eight, which is 23. And sizes for k, we can just hit Export and
wait for it to export. Alright guys, through
the export is done. Now, hop back into Unreal Engine and again
it in board over here. But that all textures
get into the project. Then we just need to
wait for them to finish. And as soon as it has
done, we can start placing our textures
into the material. Now you can just open up the project folder and
see the import is done. So we can come back
to the models folder, open up this trough, sit, and open up this material. Next full screen this, and we can delete the default node to select
this and hit Delete, press control space to bring
up the content browser. Now in the broth that folder, make sure to select the remedy hills are the three
textures of the problems. Set material, drag and
drop them like this. First we need to connect the
base color to base color. Then you can connect
normal to normal. And if you remember, this
is the bat textures. So I goes into
ambient occlusion, g goes into roughness, and v goes into metallic. And you will notice
everything is really shiny. So we can just
select this texture. Double-click over
here, disabled SRGB. And also j is a sampler
type two linear color. With that, everything is done
and we can just hit Save. And we can look over the
changes in the main 3D editor. Let's just wait for
it to finish here. Now you can close
this and you can see the texture has appeared
over r objects. All right, so now we can add
the textures to our racist. So open up the basis material. Now double-click to open it up. Let's again remove
this default node, restaurant food recipes. And now these two
textures rob them. The neck, the
texture, base color, then this one to normal. Occlusion, roughness
and metallic. Open up the texture and disabled SREB and change the
sampler to linear color. All right, so now we can close this and see if
everything is done. You can see all the changes
have been made and they are added to our models. And yet now you can see all the lectures have been added to the material and
they are started appearing on our models. So now what we can
do is we can start placing our stuff accordingly. Let's see. We can start by selecting this. Make sure to set both
of these objects. And now you will notice that
it is really difficult to move around these objects
because as you can see, the 3D gizmo is appearing over here very
far away from the object. And it can be a little bit
tedious to place them around. So for this one as they
are two different objects, like one of them is this
one, then this one. Then we can just hold
shift to select them both and then press
Control plus g. And you can see now it
is very easy to move it because both of them
are now grouped together. So we can easily
place this over here. Now let's just
rotate it like this. And you try to place
it inside the waste.
33. Finishing Touches and Taking Screenshots: Hello and welcome guys. So now let's continue placing
our props in our scene. And as I mentioned, we will
be using Quicksort bridge now to place some extra props and are seen to increase
the detail level. So you can go over here
and select books that bridge bit for it to open up. And it is completely
free to use with Unreal Engine so you don't
have to worry about anything. So as soon as you open up, you will see that you can
use all these materials, all these 3D assets, plants, decals, anything for
completely free. You can select all different
categories from over here. So now we can start by adding a couple of
plants on our stool. So first let's search for
a simple bot type in what?
 Aniket Rawat, 3D Artist