Transcripts
1. Introduction to Class: Hello everyone and welcome to this new course in which
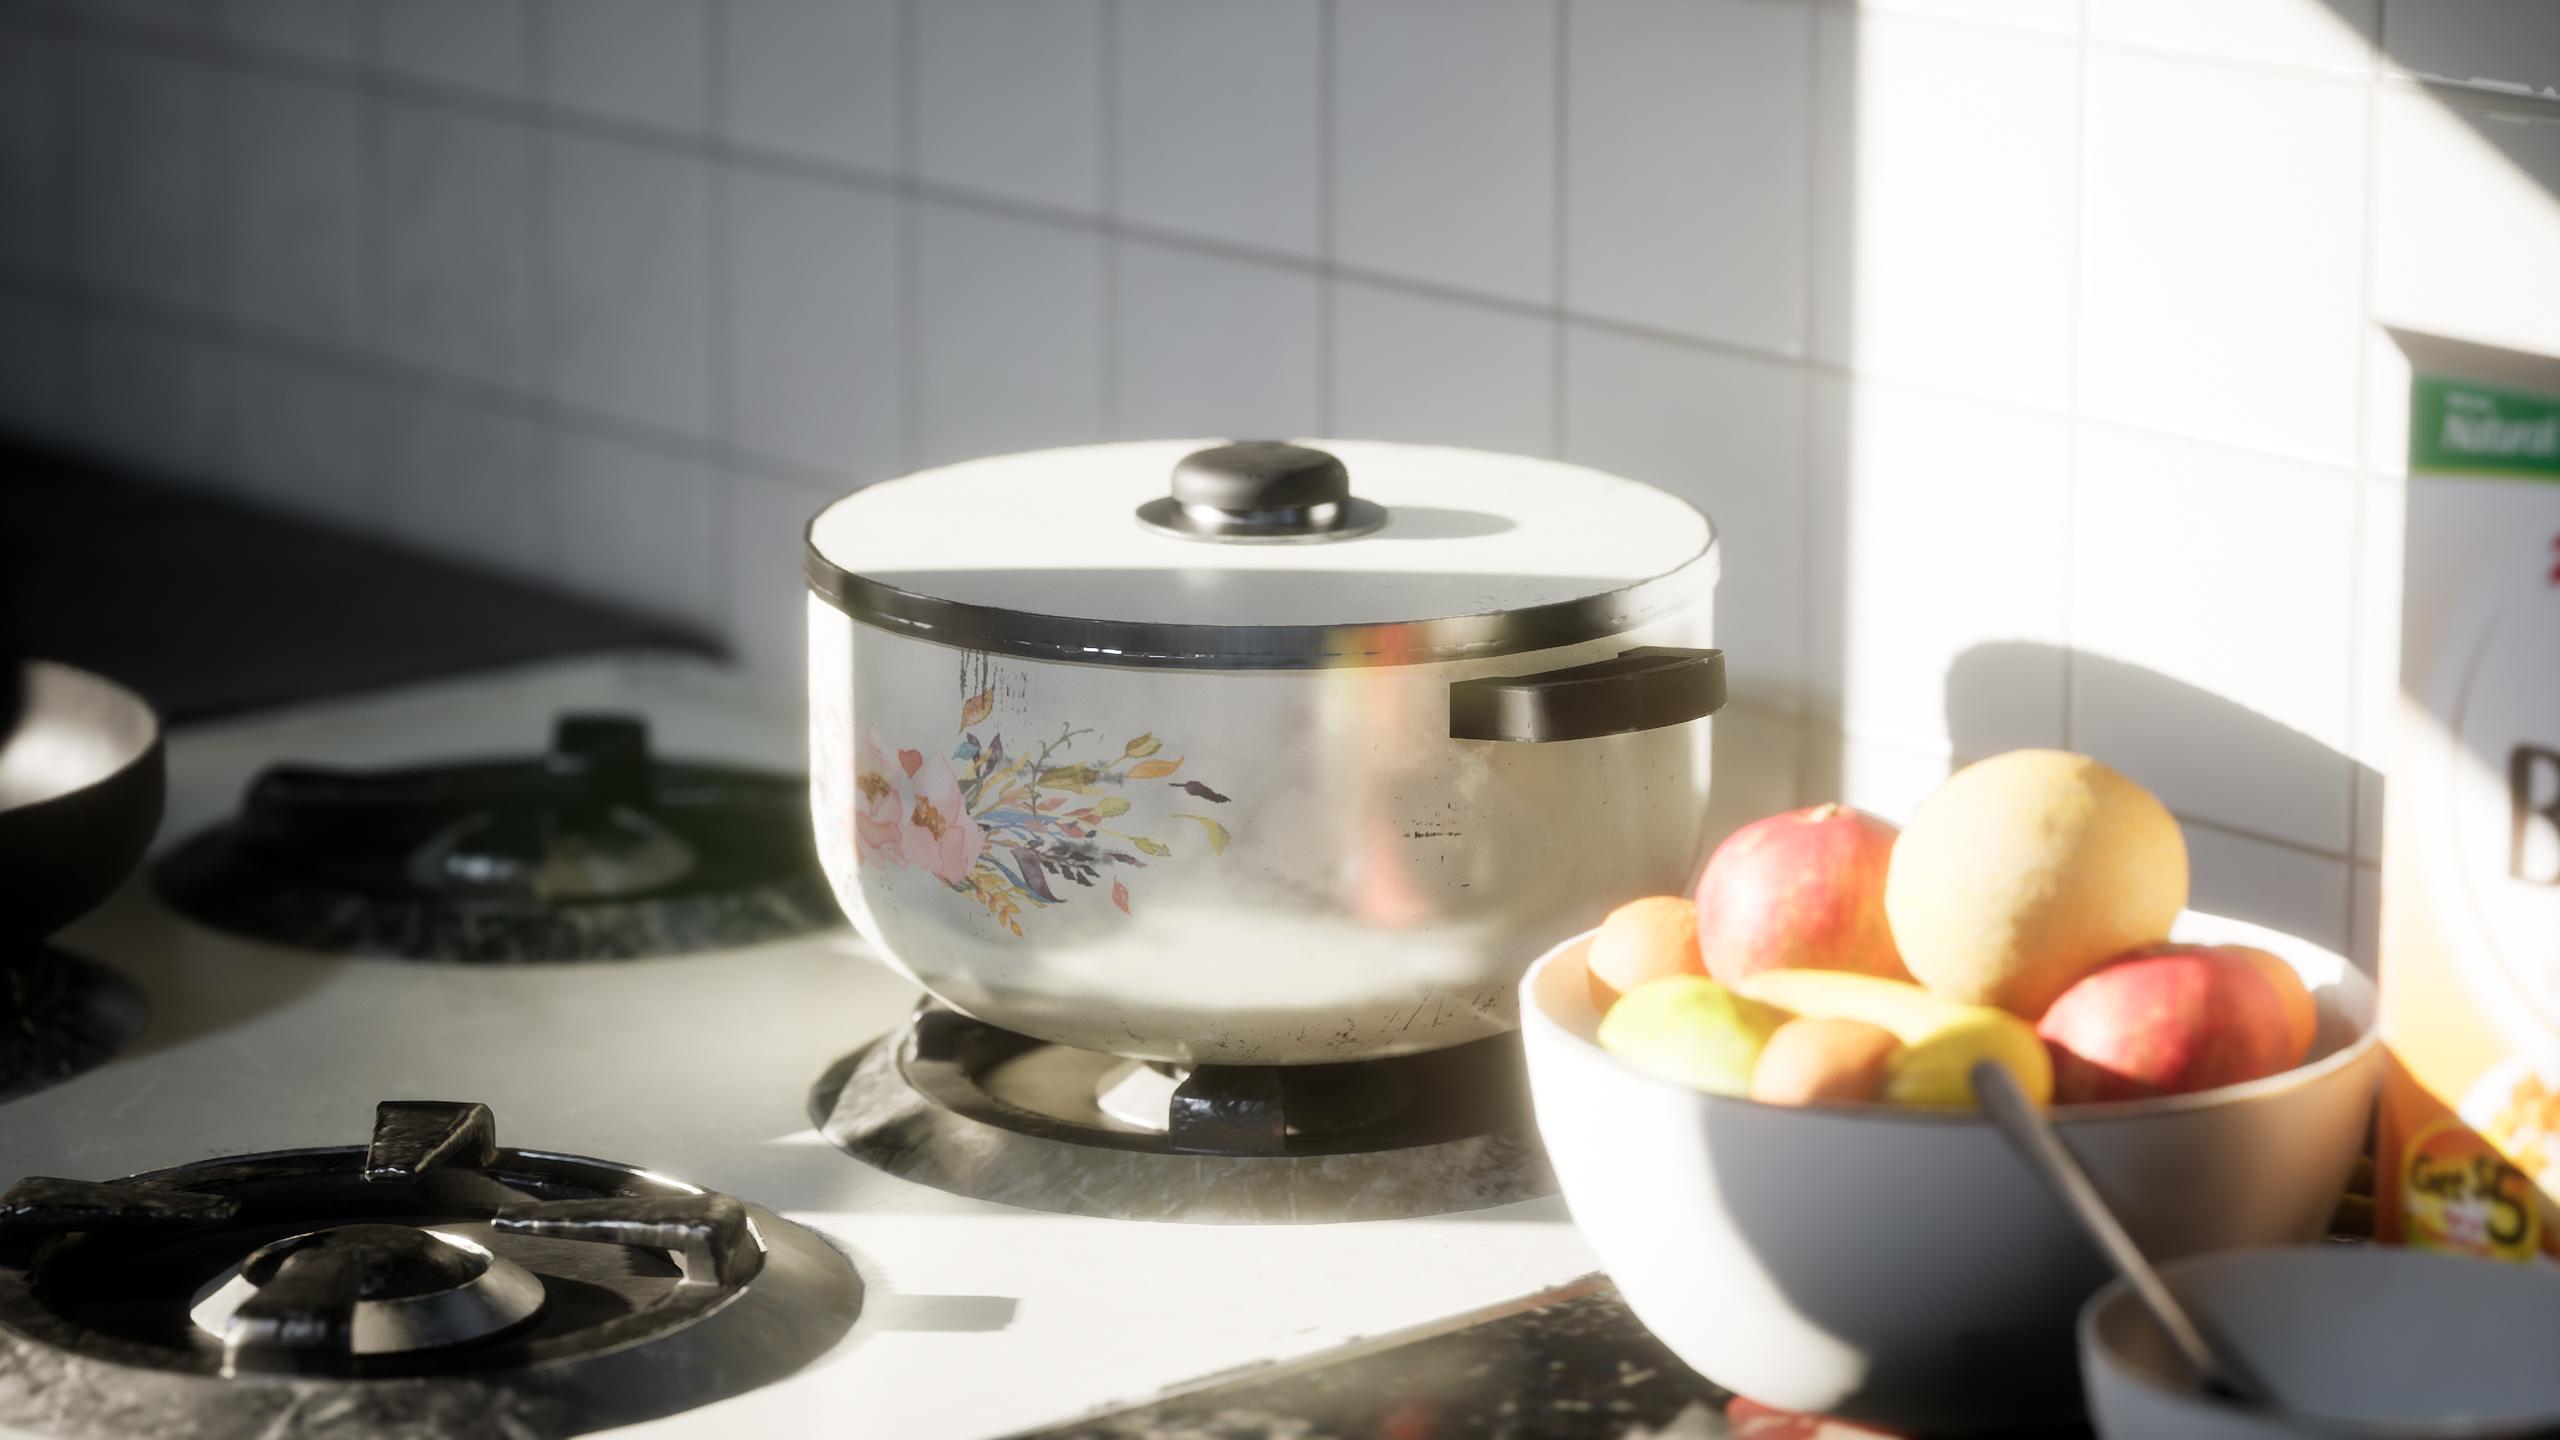
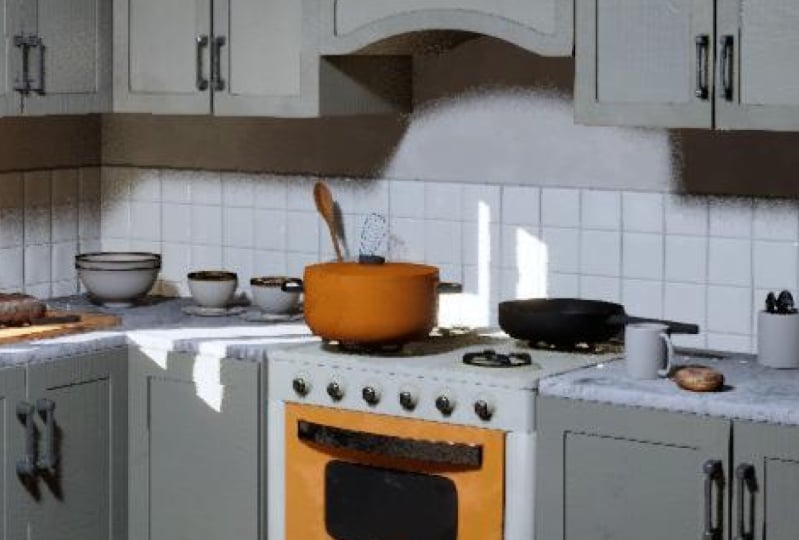
we will be creating this complete kitchen
environment from start to finish using Blender
substance painter, and Unreal Engine five. We will go over
monitoring in Blender, texturing using substance
painter and setting up the scene lighting and materials
in Unreal Engine five. This course contains over 11
hours of content and we will go over each and every step together and nothing
will be skipped. The course does not
have any kind of time lapses so that you can
follow every step easily. You will also be provided with all the source files required
to complete the course. This includes all the defense
images, the textures, blend files, and also the
Unreal Engine project. The course is perfect for students that have a
basic knowledge of modelling and wanted to learn
how to create environments. Everything on this course
will be explained in detail, but some prior knowledge of the software would
be really helpful. You will learn everything
you need to know to create the final results that you see in the images and trailers. The same techniques can be applied to many
other environments. We will start by gathering
some reference images to gain some initial ideas and
the mood for our scene. We will arrange these
reference images in a free program
called pure ref. After this, we will
move onto blender and start modeling
our main assets. We will go over
the entire process of modelling in Blender only. It will start by morning. Some of our main assets, such as the stove,
fridge, and the cabinets. After we have modeled
all our assets, we will exploit them
for Substance Painter. To start the texturing process, we will learn to create high-quality and
realistic materials and the key features
of Substance Painter, like smart masks, generators,
smart materials, etc. After this, we will import all our models into
Unreal Engine, unexplored the textures from
fainter To Unreal Engine. The next step would be
to set up lighting and create a mood and
atmosphere for our scene. We will make use of the new
features of Unreal Engine, such as lumen to get realistic
lighting for our scene. Next, we will set up a
post-processing volume to further enhance the visuals. Then we will spend some
more time creating a lot of small props for our scene to further detail the
scene even mode. We will add the scores by adding some food items from
fixed Omega scans, setting up different
camera angles and taking high-resolution screenshots
for our portfolio. We are going to learn
a lot of things, so I hope to see you there
in the course. Thank you.
2. Going over Reference Images: Hello everyone and welcome
to this new course. In this course, we will go
over the entire process of creating a kitchen environment
from start to finish. In this very first lecture, what we will do is
we will go over our reference images
and learn how to organize them properly with the help of a free
software called your Riff. I'm pretty sure most of you
guys already know about it. So for those who don't know, Let's quickly install it. I type in pure ref
in the search bar. Click on the first link, head over to download and
select your operating system. So I am currently on
a Windows ten PC. I'll select this one. Although it is a free software, you can pay for it if you want to support the development. But right now I'll go over to customer amount and set it to 0. You can just download, as I've already downloaded and installed this software before, I won't do it again. So you can just click
on this file and install pure RREF if you
haven't already done it. So I'll just open
it up from here. Before starting, let's go over
a few basics of pure ref. Alright, so let's bring in
our reference images now. So to do that, just go
over to your course files. I'm heading to the
reference images folder and just select all of these reference images
and now drag and drop them onto the
board referendums. Now we'll just wait a
bit for them to load. Now, all of them are here. Alright, so these are all the reference images
that we have right now. The very first thing is you can hold your right-click and move the pleura window
like this by holding your right-click and place
it anywhere on the screen. Next is you can
resize the size of the pure ref window just
by dragging its edges. And you can also select
the images and scale them, rotate them, and organize them
in whichever way you like. Next thing is if you
just hit right-click, you can access all of the
commands and the settings. First, let's save our scene. So go over to save it, save. And let's see if this
as reference images. I will save it in my
tutorial folder only. And let's hit Save. Next is if you just hit
right-click, go to mode, enabled always on top from here, this will do is this will keep our revenue always on top
of the other windows. If you just open a blender, you can see pure
ref stays on top of this and it does not minimize. Now you can just maybe
select this image like this. For example, if I'm
trying to make this, I can just place my window over here while
working in Blender only. So it makes it a lot easier
to work and create things while I can view the
images simultaneously. The next thing is if
you want to minimize your PR referendum while you are in this always on top mode, you can just use your
task bar from here and minimize and
maximize it like this. Or you can just hit right-click, go to Window and hit minimize. The next thing is if you want
to focus on a single image, you can just
double-click over it. You can see your reference. Automatic zoom over it. You can select maybe an image and just double-click
and it will zoom. Okay, So I think these are all the basic functions that
I wanted to show you guys. And now let's bring in our actual reference images that we will be using in this course. Now, I have opened up
your reference again, and these are all our
reference images. You can find these reference
images if you had you into the resources folder
that I have provided you, and you will find all these
images over there along with the rest of
the project files that are needed for this course. Now let's bring in these
images into pure ref again. To do that, just
select all of them and drag it and drop them
onto the pure ref window. You can arrange them
however you may like. These are all the
reference images that we have right now, but we will keep
adding more to these as we keep on moving
further in the course. And you can also add some of
your own images to these. I have taken all these images
from different artists over on art station and also
from Pinterest and Google. Looking at these images, you can kind of understand what kind of environment
I'm trying to go for and what type of prompts we will be
creating in this course. Now, let's save our
reference image file. I will just right-click. Save it. Will save it in the reference
images folder only. Let's name this to kitchen. Wait for it to save. Alright guys, so I think this much is enough for this video, but we will be doing
in the next video. We will start by modelling some of the main
props in our scene. Like we will be adding these 2 first and then we will
move on to the fridge. So we will start this
course by modeling some of the main
props in our scene. I'll see you there.
Thank you for watching. I'll see
you in the next one.
3. Modelling the Stove: Hello everyone, Welcome to the second lecture
of this course. In this video, we
will start with the modelling of our props. Right here I've opened up a new blender file so you
can go ahead and do that. I've also turned on
my screencast keys so that any of the
shortcuts that I perform, you can easily see them over here so that it is
easier to follow me. What I will do first is I
will just select everything. You can select it
this way or just press a to select everything. Then you can just
press Delete to delete all of these
existing objects. Next, let's search over here
and open up our pure ref. You can right-click go
over to load, load recent, and let's load the kitchen file that has all the
reference images. We will start by modelling
this stove plus overlay thing. I don't know what it is called. So let's model this first. Alright, so to start off, let's add a cube, because the basic shape of
this object is a cube. So I'll press Shift a, go to Mesh and let's add a cube. Let's change the dimensions of this to better fit the size. So press N to bring up this menu inverse n. Then in the
dimension section, let's set the x value to
2.8 meters into 2.5 to 2.8. We have some sort of a similar structure to
this reference image. Alright, so let us move further. What I will do first is I will press Tab to go
into the Edit mode. And you can see over here we can select all of these vertices. So if you press one, then one is for the
vertices select mode. If you press too, it is
for the Edge Select, and three is for Face Select. So make sure you remember that. First one to come into
the vertices select mode. And what I will do is I will use a mirror modifier
on this object so that we only have to
create half side of it. And the rest of the half would, would be done by the middle
modifier only, sorry, press Control plus
R. While moving it, you can just right-click to keep it exactly
at the center. Let's enable X-ray from here and select all of these
right side vertices, then plus x and delete them. Now what we can do is go
over to the Modifier Tab. Let's add a mirror
modifier and you can see it has copied over
to the right side. So whatever we do over here, it will automatically be
copied over here also. Alright, so the next thing to do is if you just
zoom in over here, you can see all these
different partitions created in this particular cube. So we have to do that. I'll press Tab, press Control
R to add this edge loop. And you can, if you want, manually place it
somewhere around here. See the reference image
and try to eyeball it with the reference image like this
distance and this distance. What you can do is
we can also type in the number part to get
the exact measurements. I will type in negative of 0.7. And I think this is fine. Next what you can do
is press Control R again and add edge
loop over here. And let's type in 0.7 once again to move it
somewhere around here, what I will do is I will press G to move this, then press X. Let's move it a
little bit outwards. Here. Next, let's add a
bevel modifier. Makes sure to select
it, press Control a, and apply the scale to make the bevel modifier
work properly. Let's adjust it. Enabled hardened normals. And also you can see
this edit over here. So go over here in Object
Data Properties it says to enable auto smooth
in object data properties, in object data properties in normals and enabled
or the smooth. You can go over here in this shading tab and enable
shadow and cavity also, this setting is to view
all the edges properly. So if you enable and disable
cavity, you can see, we can see the edges more properly and it is a
little bit easier to work with shadows,
pretty self-explanatory. It will show all the shadows
casted in this scene also. It is easier to work with. Now, let's press tab again
to go into the edit mode. And now we will create
these partitions. So to do that was press three, and let's select
these three phases. Now what we need to do is press P and then
separate the selection. You can see over here. Now this is a separate object, and this is a separate object. So again, I will press
tab, select this face, this face, these top faces. Again, I need to separate
this so I'll press P and then separate
the selection. You can see now we
have three objects. Let's select this one. I will press tab, and let's just select these bottom phases. Press X and delete
them completely, so that we have
something like this. Alright, I will just press
Tab over this object, select both of these edges and move them a little
bit forwards on the x direction like this. You can see this Z
fighting over here because the phases are
overlapping over each other. So to solve that, you need to just select
this face press Tab. To select this face. I mean, press 32, go into face select mode
and then select this face. But as G then y, and move it a little bit
backwards like this. Similarly, you can do
it for this one also. Alright, so the next step
could do is select this piece. And we will add the
solidify modifier to this. Because as you can see, it has some kind of
thickness over here. But if you just see
this object or here, it has no thickness, it
is basically a plane. We will add thickness
to this selected. Go into Modify tab and add the solidify modifier like this. Make sure to apply the scale. Let me tell you when it's small. Little trick. If you want to isolate an object to
work with it properly, you can just select it. Then press Slash to go
into the isolation mode. And you can see, I can work
with this object very easily without any of the other
objects like blocking my view. And I can press Slash again. To come out of the
isolation mode. You can select any of
the object, press slash. Now work with it properly, then press Slash again
to come out of it. All right, so I will
select this press Slash. And you can see this
little shading issue here. What I will do is I will move the solidify modifier at the
top of the bevel modifier. And you can see the
issue is not solved. Let's open up the
solidify modifier and increase the thickness. If you just press seven
for the top view, you can see some weird
kind of thickness. It is a little bit more thicker over here
than in the center. Suggest enabled even
thickness from here, you can see it is proper. Now. Next I will open
up the bevel and reduce the bevel because
right now it is too much. I think this will be fine. Slash again to come out of it. Let's select this
piece and this piece, select both of them at one time. Press tab, then
select this edge. Now to select edges, we need to go into
the edge select mode. So press to then
select this edge, this edge, this
one and this one. Now we will press
Control plus b two, bevel them like this. As you can see over here, it has a smooth edge and not
a sharp edge like this one. So I'll press Control B. And you can see we
are beveling it. And you can use your
scroll wheel to add more segments to
make it even smoother. I will let side 123 segments,
maybe three segments. I think three segments
will be fine. Let's Beverly this much. You can see these weirdly
shaded over here. Just right-click Shade, Smooth
them to solve this issue. Alright. Next thing to do is if you just
zoom in over here, this corner you see it is
also a little bit beveled. Corner is kind of sharp, so I will select this
again plus slash and press Tab one for the vertices select, and then select all
of these vertices. Right now we buried an edge, but this time we want to bevel vertices. To bevel the vertices. Instead of pressing Control B, we will press
Control Shift and B. And you will see bubbles in
a completely different way. So I think this
much would be fine. Let's reduce a segment. I think two segments is fine. The staff to come out
of the edit mode then press Slash to come
out of the isolation. Yeah, I think that
looks pretty good. Next, let's clear
this front door over here and this box
over here also. What I will do is first let's
select this piece per step. Three for the Face Select, let's select this face. I will move it a little
bit backwards on the y-axis plus g. And then Y, lock it on the
y-axis and then you can move it a little
bit back over here. Then plus one for
the front view. And let's press Shift
a to add a new object, go over to mesh and
let's say the queue. And let's see, for
the size I will press S then x to increase the
scale on the x-axis. Something like this. Let's save this to
2.3, rounded off. Then reduce the size of
this on the zed axis. So press S and Z. I think 1.65 will be
fine. It out over here. Let's just slash to isolate this press tab for
the edit mode. 34 fifth select. Let's select this back phase
and move it over here. Again. You can see over here that
it has rounded edges. So let's do that now. First let's select this piece, press Control a, and
then apply the scale. Always make sure that you apply the scale
because if you don't, it can cause some issues. So just press Control
a and then apply the scale pre-step
for the Edit mode. Let's put a slash to
go into the isolation. I will select this edge, then this one and this
one and this one. Also there is a quick
shortcut for this. You can de-select all of them, press Control and Alt, and then click over on this edge and you will see
all of them are selected now. So hold Control and Alt and just click over
this edge like this. Slash again to come
out of the edit mode, I will press Control
plus b to bevel this. Let's see, I think this
much will be fine. I think I've been
really do much. I will just reduce the pivot, so I will undo everything. Move it a little
bit up over here. Press Tab again, press Control be this much bevel is fine. Right-click and shade smooth. This enable auto smooth. And also let's add
a bevel modifier. Decrease the amount
enabled hardened normals. And also to smooth, it is already enabled plus
one for the front view. Let's press Shift plus
D to duplicate this, place it over here like this. Then what you can do
is instead of just pressing S and Z to
scale it like this, you can see it can cause a gardener's to be
shipped very weirdly. Instead of doing that,
I will just press Tab, enable X-ray and select all of these bottom vertices
and just move them. So plus g, z. Instead of scaling, we are just moving these vertices over here that there are no issues and I think
that looks perfect. All right, next let's
add again a queue. Place it over here. Let's
get this down. Scale it up. I think something like this. What I'd select this press
Control a and apply the scale. Let's add a modifier. Just amount. Enable
hardened normals and auto smooth press Tab
to go into the Edit mode, press Control art
and add edge loop. Let's add one over here. There's three for face
select and hold Alt, and click over here to
select this complete loop. So this is a shortcut. You can just hold Alt and click over a face to select
the whole loop. Let's press Alt plus e, then extrude faces along normal
and extrude it like this. Let's reduce the size. So press S this time,
press Shift plus z. This is like a shortcut. If you will press S, then press Shift plus z, then it will only scale
on the x and y plane. It will leave the xy-plane out. Similarly, if you press
S, then Shift plus y, then it will scale
on the x z plane. Pretty handy shortcut. So plus x then Shift plus z. Scale it down. I don't
think it looks good. I will just undo everything
back to this cube. Instead I will first one, let's hold Alt, select
this complete loop. I will just delete this loop. So to do that, you
need to press X, select edge loops from here, and it will remove this
complete edge loop. There's 34 fifth select, and let's select this face. I will move this up. So press G then z. Here I think. Next what I will
do is I will press I to insert this like this. Let's inspect this till here. Then you can proceed to
extrude it downwards. And let's extrude. I think
this looks much better. Now before proceeding further, let us save a blender file
to save our progress. So press Control
plus S to save it. And I will save it in my
tutorial folder only. Let us name it as props. Hit Save. Next thing could do
is let's create this thing. Extrusion created
over here at the top. Select this piece press Tab
to go into the Edit mode. But we can do is press three
for face select Analytics, select these top faces, rest you to extrude and
extrude them like this. I think would be fine or we can increase it
a little bit more. Next, let's first reduce
the bevel amount. Cause honor sleeps too much. Let's see. This has 0.0120.013. Let us keep it safe to 0.01. I think this one also
0.01. This one also. Alright. Next press
tab for the mode. Press three for Face, Select, hold Alt, and select
this complete loop. You will see a
problem over here. We are having this space in-between super slash to
go into the Edit mode. And first let's enable clipping. Clipping we'll do is first, if I just disabled it, press one for the word select. If you select this vertices, press G to move it. And you can see if I
just cross over here, you can see these two vertices
are crossing each other. But if I just enabled
clipping and try to move it, you can see the joint right
at the center and do not cross each other. That
is pretty useful. I will just enable flipping. Next plus three for Face Select, select this face, press
X and delete the phase. Alright, let's press Slash again to come out of
the isolation mode, press Tab, press three for Face. Select hold Alt and select
this complete loop. Now plus Alt plus e and
extrude faces along normal. Let's extrude it till here. I think this will be fine. Next press Tab again. Let's select these
two top faces. This I to insert them. And you will see it is
inserting like this. We don't want to display. You can press B to
turn off boundary. This is how I wanted
to insert it. You can see the difference
between the two. I want the boundary off. Let's insert the steel here. Once again, I will press I to insert this
still here only. Then press G, Then I move
downwards like this. I think something like this. Let's move it a little
bit more down here. Okay, so next, let's select
this piece plus dot 34 fifth, select, select this face. And let's move it a
little bit backwards. Also, you can see this
empty space over here. So I will just select
this piece and let's add the solidify
modifier to this. I will just increase the
scale of this anaerobic. All of the vertices over here, G then y, and move
it till here I think this piece again alerts, move this phase delay here. All right, yeah, I
think this looks fine. Although no one would
be able to see it from the back. This looks fine. Guys. I think this much
is enough for this video. We have created the basic
shape of our store, so we will continue from
here in the next one, adding all these
remaining details. I'll see you there.
Thank you for watching.
4. Adding more Details to the Stove: Hello everyone and
welcome to Chapter three. Let's continue from
where we left. One thing that I wanted to fix was if you just click
on any of these objects and check the height of this
or the overall size of the x's 2.82.5 and the
z is 2.4 meters. Now, in real life, obviously a stove
won't be that large, so I was hoping that
we can fix this issue. So to do that, let's just press Shift a and create a new queue. Before that, let me turn on my screencast keys that you
can see all the shortcuts. Let's do that
again. I will press Shift a and add a new cube. Let's move this over here. And in the dimension section, there's give it a height
of average human being. I think around 1.75 meters. The Z and for the x
and the y values, Let's set it to 0.5 meters. I think that would be fine. All right, so now we can
select all of the pieces of the stool plus one
for the front view. And let's just scale
them according to this human moderate
that we are considering. This cube. Stove is generally around the
waist of the human. So I think somewhere around
here, I think we'll be fine. Yeah, I think this
looks much better. Now what we can do is let's just rename this cube to reference. We will select all of the
objects from this stove, press M to move them
to a new collection. Let's create a new
collection and let's name the stove it. Okay, now we can easily disable and
enable this collection. Let's just hide this collection for now because we
will not be using it. What up over here. Now let us open up
your rough again. Right-click load and
load recent kitchen. The next thing to create is this glass-like thing and
these cutouts over here. So to do that, I will
be using the Boolean. So let me tell you something
about Booleans first. The first thing that
we need to do is go over to the Francis. In the adult section, search for bool tools. I've already enabled it. Make sure you guys also
enable this because we will be using them to
create different Booleans. The concept of booleans
is pretty simple. Let me just add two
cubes to show you. Alright? So the
Boolean operations are basically three types. One of them is a union, the other one is different, and the last one
is intersection. So let me show you first defense because that is the
most basic one. So to perform a Boolean
difference operation, first, let's select this cube, then select this cube, then hold Control and hit Minus on your
number by like this. And you will see this cube has created a cutout
over on this cube. You can just select this
cube and now move it. You can see the cut-out
is also moving. So using this Boolean
difference tool, we can create various
differentiates. What we can do is we can duplicate this cube,
place it over here. Again, select this first, then this one, then hit
Control plus minus. And you see we have
created another cutout. This is the Boolean
difference tool. One thing that I should
mention is that, for example, I want
to create a cutout of this Q over on this cube. So make sure you select
this cube first. Now I will select this, then
this, then Control Minus. And you can see the
cut-out over here. But if I select this 1 first
and this will later on, and then hit Control plus
minus this cube will cut out, create a cutout
over on this cube. So make sure you remember that. Next thing is the union. Union is pretty
self-explanatory. You can just select this one then this one then
hit Control Plus, then hold Control and just
hit plus on your number five. And now these two cubes
or like a single object, this is the union operation. You can also add a bevel
modifier to the skew. And you can see
the edge of where the boot joint is
also being buried. You can just smooth it out. You see this is the
union operation and the last one
is intersection. Again, I will just
undo everything. Let's first select this one, then this one,
then hold Control. Slash on your number. And you can see it has created like a band
unlike thing over here. To make it even more visible, you can select this at
the bevel modifier. Let's just adjust this. You see, it gives it
a great panel effects that we can use in many ways. Boolean intersect tool use a lot in like a hard
surface modeling. So you see this is
the intersect mode mentioned all the
Boolean modes now, so I will just
delete everything. And let's move on
with a modelling. So I will create this
glass-like cutout over here. So to do that first,
let's add a cube. So I will press Shift
a and add a cube. But more thing that I
wanted to tell you, whenever we add a new object, it gets added to discuss
a point over here. So if we want to change the
location of this course, a 0.1 way to do that would be hold Shift and then
use your right-click. And you can drag the
cursor like this. And whenever you
add a new object, it will get added over here. Now, another way to do this more precisely would be
you can maybe if you want to add an object directly at the center
of this object, what you can do is first
select this object, then press Shift plus S
and cause it to select it. Now the cursor is over
here right at the center, and you can add a new object. You see it is added
exactly at the center. This thing is also
pretty helpful. Next thing is, you can
again press Shift plus S and then select cursor to world origin to move the
cursor back at the origin. Let's just select
this press Shift plus S and closer to selected, add a new cube. Let's see. I think we'll be fine. Let's move it over here. Now first let's press Control
a and apply the scale. Next thing is we will
create an intersect. As mentioned earlier. I will select this piece first, then this one, then press
Control plus slash. You see, it has created
an intersection. Right now it is not
doing very good. So one thing, there is a
thumb rule that you must remember that whenever we
add a Boolean modifier, we must make sure that
the bevel modifier is always at the bottom
of the modifier stack. You will just see it now. Right now the bevel modifier is not affecting the
Boolean cutout, but as soon as I move the
bevel modifier at the bottom, you will see now this cutout is being affected by
the bevel modifier. And it already looks much, much better than this. Just make sure no matter how many Boolean
modifiers are there, always the bevel modifier
should stay at the bottom. And now select this piece also and move the bevel modifier
at the bottom, like this. Already, the bevel modifier
is affecting both the pieces. The next thing to do is obviously this has
rounded corners, so we will create that. Let's select this now press Tab. Suppress staff for
the Edit mode. Let's press two for
the edge select. Again, you can hold Control
and Alt and click over here on this edge to
select all four of them. Then press Control plus b, the bevel. Let's see. I think 1234 segments will be fine with this
much amount of vivid. Really up to your preference, I think it is huge. I will just scale it
down a little bit. Yeah, I think this
is much better. Next thing you can
do is you can select this piece and push it
a little bit inverts. So press G to move it, then press Y, and let's move
it somewhere around here. Also, if you want, you can
reduce the bevel amount on this. Like this. Next, let's create
a similar thing over here like this one. What we can do is let's
create a new cube, supra Shift plus a beauty cube. Scale this down. Over here. Scale it on the x-axis. Now press G, then y, and let's move it over here. First thing, let's
apply the scale. So press control a
applying the scale. Now let's create
the intersection. So select this LAN this and hold Control and hit slash and
a number pad like this. Then again, we need to move the bevel modifier
at the bottom. This one also. Next, let's
reduce the bevel amount. For this, we have 0.005. So let's select this, set it to 0.005. Now again, we need to
bevel the corners. So press Tab to select
hold Control and Alt. And select all these four edges then hit Control plus
b to bevel this. Think a small W will
be fine for this one. We can reduce the
segments to three. I think that looks pretty good. We can hit Control plus
S to save our files. Alright guys, so next let's
create these handles. For these, I will not be going
with the reference image. Let's create something on our own best one for the front view. Let's enable this back, a shift a, and this
time let's add a plane. Express G to move this, press Y, lock it on the y-axis, Let's place it over here. Next, let's rotate it. Rotate plus r. Then you can press X to lock
it on the x-axis. And then in your number
pad you can type 90, rotating by 90 degrees. Next, let's add the
middle modifier to this. So press Control plus r to add an edge loop
right in the middle, then hit right-click,
Separate at the same time. One for the vertices. Let's select both these vertices and press X to delete them. Start a middle modifier. Alright, so the next step
is to scale this down. Let's see something around here. I think. The next thing to do is first let's
apply the skill. So press control a, apply the scale, reads
seven for top view, estab. Select both these vertices. Make sure you enable X-ray
to select both of them, like this one and this one. And then plus g. Then why did here like this? What I'm trying to do is I will, next I will apply
the middle modifier. So just go ahead and click
on this arrow and hit Apply. Next, step, two for H
Select and let's select this edge Control V to bevel this and let's double
it till around here. And then you can increase the number of segments
to smooth it out. We have got ourselves something
like let's shoot smooth. This also enabled auto smooth. Next, Let's are the
solidify modifier, obviously to give
it a thickness. To again, also the press Tab
again for the edit mode. Select this edge, then select
this edge. Let's press E. Then you can right-click to keep them at
this position only. Then press G, then phi, and move them like this. Bevel modifier. Naval
harder normals, reduce the available. Also let her just
to solidify mode, I will increase the thickness. Here. I think you can enable even thickness so that it is
equal from all the sides. Next, if you want,
you can press tab, select both of these edges. Control plus V again
to bevel them. Reduce the amount of segments. We can create it a
little bit smoother. Then let's just press G, the invite and
place it over here. I think this looks pretty good. Let's press S and scale
it down on the z-axis. Now I think this looks fine. We can just select
this redshift plus D. Duplicate this and let's
place it over here also. Or if you want, we can create a separate handle for this part. So let's press one
for the front view. Let's create another plane, rotated by 90 degrees. Let's just go with the
simple high-level for this one, something like this. And press Tab for the edit mode. Select both of these edges, E by two, extrude
them like this. Next layer system estab, again, I would say both these edges and let's bevel
them a little bit. Mostly supply the scale of
control layer, either scale. Now, it's pebble them
around here, I think. Right-click and shoots. Solidify modifier.
Enable auto smooth. Let's see, this has a
thickness of 0.02 liters. Let's say this also to 0.02
molar solubility modifier. This also over here. I will select this
piece and let's reduce the size of
this a little bit. I think. Yeah, I think
that is much better. I will also reduce the
size of this a little bit. Next what we can do is
let's add another cube. Let's just select this
press Shift plus S then closer to select it to
bring the cursor over here. Now let's add a cube so that it gets added
directly at the center. Scale it up till anode here. Move it back. Now I will again
use the intersect Boolean. Select this first, then select this hold Control and hit Slash. Let's select this move, the bevel modifier
at the bottom. Over here also. I will select this piece and reduce the development on this. Also, let's select this estab, hold Control and Alt, and select all four
of these edges, then hit control plus V alerts. You see now when I
hit Control plus v, It is babbling very weirdly. And that's because we
did not apply the scale. So let us just press
control a lighter scale. Now if I press Tab it Control B. You see now it is
beveling properly. Make sure you just
apply the scalable. Let's just copy distinct shift plus D and place it over here. Reduce the size of this to
match with the bottom handed. Select this piece,
then select this, then hit Control slash. Now we just need to change
the order of the modifier. Again, I will reduce
the amount of level. Alright, so I think
this looks pretty good. I will hit save on
my blender file. Next, see if we can increase the bail
amount the little bit. Increase the scale
of this allotropic. Select this and move it
a little bit downwards. Alright, so I think this much
is enough for this lecture. We'll continue from
here in the next one, creating the remaining pieces.
Thank you for watching.
5. Creating the Stove Coils: Hello guys, welcome
to Chapter four. Now let us start with
making these coils. So the first thing
that I will do is select this
piece. First step. As you can see, we already
have the middle modifier on. You can just enable and
disable it from here. If I try to add a cylinder. So let's add a cylinder, press Shift a cylinder. Let's place it over here. We need to create for
holes here 123444 coils. We can use booleans to do that. If I just select
the cylinder first, then select this piece. So hold shift and
select this piece. Then hit control and
minus like this. And you will create the
Boolean defense operation. You can see it is
working properly. Next, what we can do
with a weekend move this Boolean modifier at the top so that the mirror modifier
gets effected by it. But thing is, these are
only two, we want four. Next thing we can do is we
can just duplicate this. But rather doing all this, I will just delete this quickly. But I will do is let's
just remove this modifier. I will select this
piece and I will instead use the mirror
modifier four times, two times on all four sides so that we just need to
create one single hole. And the rest of them would
be done by mirror modifier. First, let's symmetrized it
on the y-axis over here. Could do that. Just press
a to select everything, go over to mesh and
hit symmetries. And make sure you select this. You need to just make
sure if you just select a plus z minus z, you will see
something like this. It will summarize
over the z axis. You can see it is over
here also and here also, it will symmetries according
to this origin point. So actually we don't want this, we want to summarize it over the y-axis so that we get
this line in the same. Next, what we can
do is we can just select all of the
left side vertices, press X and delete them. The reason I did that
was now what I can do is I can use the
mirror modifier on the y-axis also that we just have to create
one single hole. So now if I just select these vertices and
try to move them, you can see it is moving
on all four sides. Now the next thing to do is let us just select this object, press Shift plus S. It
goes there to select it, press Shift a and
add a cylinder. Let's scale this cylinder down. Let's say if you do 0.3 meters, listed somewhere around here, let's move it up and select
this shape smoothed, this first, enable auto smooth
and also apply the scale. So press control a,
apply the scale. Then we will select
the cylinder first, then select this piece, then hold Control plus minus. Right now, it is not copying on all four sides because the Boolean modifier
is at the bottom. First move the bevel modifier at the bottom to fix
the shading issue. Next, move the mirror
modifier at the bottom, or move the Boolean modifier
at the top, like this. Now you see it is being
copied on all four sides. And if we just try to move it
or even increase the scale, it is being affected
on all four sides. So that is pretty handy. Let's just move it like this. I will increase the scale
of this attribute to 0.32. Yeah, I think this is better. Right? Let's move further. I will add
another Silicon over here. Just select the
cylinder or this cube. Then press Shift plus
S then closer to selected new cylinder
or maybe add a circuit. Scale this down till here
I think just the boundary. Then press Stat, then
press F to fill in the face like this, 74 top view. And let's just press I to
insert this like this. You see? I will press I to insert, let's insert this still here. Then I will delete
this inside face. So plus x and delete this face. Now I will select
this inner loop, hold Alt, and select
this complete loop. Then press G, then z, and move it up like this. Let's right-click and
shapes mood this. Next we can just
start to solidify modifier to this and
also apply the scale. Enable those smooth. And also let's add
a bevel modifier. Alright, now I will
add a minute modifier to this over here. So as you can see,
the middle modifier is not working correctly. You see it is working over here. And the reason of this is because the origin
point is over here. The reason this
middle modified work perfectly with this object is because the origin
point was over here. If I just turn off
the mirror modifier, you can see it is over here. And if I just enabled that the mirror modifier
and enable the x-axis, you can see it duplicates over this origin point to the x-axis. And then if I enable the why, it duplicates it over the
y-axis to this origin point. To leap. To solve this
issue with this piece, I need to copy it over
all these footholds. So to do that, instead of
moving the origin point, we can do that thing, or instead we can just go
over to this meter object. Select this drop-down,
select this eyedropper, and select this cube as the
middle object for this. And you can see it
mirrors perfectly now and even I can
enable the y-axis. You see, everything
works perfectly. Alright, so next
let's add a cylinder, press Shift, or the
cylinder scaled it down. Press Slash to isolate this. Then let's start to go
into the Edit mode. Press three for Face, Select, select this face, press X
and delete the word disease. Let's select this top face. And again, I will just
insert this like this. I think somewhere around here. And I will just again press X, then delete the face. The next thing that I wanted
to do is I want to use the mirror modifier
on this piece because as you can see in coils, it is like very symmetrical. And I will create a coil
with four of these lake, with four of these things
over here that you can see. What I can do is press one
for the vertices select, and you find this middle line and just select all the
vertices above this, like this. And then plus x and delete them. Next, select all the
right side vertices. Press X to delete them so that only a quarter of
this circle is left. Then use a mirror modifier and enabled the y-axis to
create something like this. That when we extrude this, it gets extruded
from four sides. It will make our work easier. Alright, so the next
thing that I will do is press a to select everything. Then let's press three. Press E to extrude this. Let's move till here. Risk control a, apply the scale, Right-click and shade smooth. This enabled auto smooth. Let's see. Now what I will do is just select
these two phases from here, right at the center, 123123. Now press I to insert this. Again, extrude this deal here. I think. Let's press Control R, R, the edge loop over here. Risk-free for Face Select, select both of these phases. Seven for top view. And again, press E to Extrude. Extrude this still here. Scale this down. Yeah, We have ended up with something looking like a coil. Let's add a bevel modifier. Also enable hardened normals. Estab again and press
two for Edge Select, select both of these edges. Then press Control plus
b two, bevel them. Alright, let's see. Next what we can do is
let's just select this. Again, add a new
mirror modifier. This time select the
middle object as this. Now we can enable the
y-axis to meet four times. Again, I will add
a new cylinder. Scale this down. Over here again are
the new cylinder. Scale this down. And this will be
something like this. Risk Controlling, apply the
scale for both of them. Also right-click
and choose smooth. Enable auto smooth. Select this. Rest two for H,
Select, hold Alt, select this complete loop, then pre-screen volt
plus b to bevel it. Next, select the cylinder, the stamp for mode
plus three for free, select, select this top face, press I to insert this, let us say insert
this still here. Press Control R. And let's add another edge loop over here. Plus three for Face,
Select hold Alt, and click over here to
select this complete loop. Three. Bring it out like this. Then plus 14 vertices selected. Let's select these vertices or Lloyd and select
the complete Lu. Scale them outwards. This a little bit upwards. Let us start the bevel modifier. Next. Extra we can do is let's press Tab on this
piece plus 34 fifth select. Let's just for scale this down. I think it is fine like this. Only. Select this Lord, and select this complete loop. The Shift plus D.
Duplicate this hit right-click to place it
over here only plus b, and then separate the selection to make it a different object. Next weekend, the
solidify modifier, dump off the Boolean
modifier like this, increase the thickness
on the outside. I think something
like this is fine. Let's just mirror it
on all four sides. Select this piece are
the middle modifier. Select the middle object. Has this enabled the y-axis
and select this piece. And do the same thing
for this one also. Right, so we're almost done. Let's just add these
dials at the front. 1234566 times plus one
for the front view. Let's just select this piece
and press Shift plus S goes into selected press Shift
D are the new cylinder. Rotate it on the x-axis, suppress our lock it on the x-axis plus x.
Then type in 90. Let's scale this down. Let's see. I think this
much size Ruby fine. Staff for a read mode
plus three for Face, Select, select this
face, scale this down. If you are seeing these edges, you can add a couple
of edge loops. Hold Alt to select this
complete edge loop. Then you can press do
two times, u plus G1. So you've got to move this. If you press G one more time, you can lock it on this edge only and
you can move it like this closer to both the edges to solve that children shoot. You see nowadays a
little bit less visible. Let's just select this piece, press Shift plus S, and
closer to selected, add a new cylinder, scale it down, rotate
it by 90 degrees. Again, shirts move this,
enable auto smooth. Let's press three for
Face Select, bevel this. Before let's apply the scale. So press control,
a applied scale. For edit mode, Let's
select this top face, press Control plus b, the list. This is kind of too much.
I think this is fine. Select this piece
plus S to scale it and press Y to scale
it on the y-axis. Alright, Next, let's
just join both of them. Select them both,
press Control plus j. Join them like this. Let's place this one over here. Now could duplicate
this instead of just pressing Shift plus
D again and again, we can just add simply
add a modifier. Let's increase the count to six. The fact to make the
place this over here. I'm just trying to
place it in the center. I don't think it is fulfilled, but it should be
roughly at the center. And yeah, I didn't this is fine. Now, I think we are done with the modeling
part of the stove, so let's just hit Save. I will press a to select
everything and then press M to move it to the collection
and just select tool, move them all in a
single collection. Alright, so I think
this much is enough for this video we'll
continue from here in the next one. Thank
you for watching. I'll see you in the next one.
6. Modelling the Fridge: Hello guys, welcome
to chapter five. So let's continue
from where we left. Now that we have completed
the stove model. So let's just hide this
collection for now. I will again open up your ref. Right-click load, load recent. The next prompt that I will
be creating is a fridge. I think I don't really need a reference
image for the fridge. Maybe we can just
follow this one. We can follow the
general concept of this. Just press Shift S then goes to world origin to bring
the causal point over here so that whenever
I add a new object, it gets added to the origin. Okay, so I press Shift
a and add a cube first. I can do is first press M
and create a new collection. And let's name this
collection as fridge. Okay? That everything stays organized and we can easily
manage your routine. Alright, so if you press N, this menu will open up if
it is already not open. And you can see the dimension. So over here, let's put in the
dimensions for the fridge. For the z, that is the height I will give you the height of around 1.8 meters. The x. Let's set this to 0.9
to 92 centimeters. 0.9 to lean on the white. All right, so let's
move further next. Select this piece press Tab
to go into the egg mode. Before let's just first enabled screencast keys because I
forgot, sorry about that. Next, let's apply the scale. So let's select this
press Control a and apply the scale press Tab to
go into the edit mode. Now if you press Control R, you can add edge loops. If you just hover over here, you can add one over here. If you hover over here,
you can either this way or even like this also, let's add an edge
loop like this. Just click over here. Now I want to place the
edge loop just like 14 centimeters from this edge. How can I please start exactly are perfectly I
can just go over here. Click on this and
enabled edge length. Now if you press Control
R and add edge loop, you can see the measurements
written over here. One thing that I wanted
to do first is let's change the units from
meters to centimeters. Let's just go over here. I think it was here somewhere. We can change the units. Yeah, it is here over here. Length two inch from
meters to centimeters. If you want, you can also
keep working in meters only, but I think centimeters is a
little bit more convenient. So I'll press Control plus r. Let's add an edge loop
just around here. It should be roughly
1470 meters. I think this is fine if you
just press two for H Select, now select this edge. You can see this is approximately
around 14 centimeters. Next, let's create
these two doors for the Phrygian and
the normal fridge. So again, I will
press Control plus r one over here around. Let's give it a length of
around 60 centimeters. Let's place this one over here. Around a 120. You can see this edge length over
here of this edge. When you move this, you
can see the edge length of all the edges that
are being affected. Let's place it
somewhere around here. 120. Hold Alt and
select this whole loop. So you can just hold
Alt and click over here on this edge to select
this completely. Let's move it a
little bit upwards. I think this is better. Alright, So the next
thing that I will do is I will create
these two doors, like these to those
as separate objects because currently they are
one single object only. So to do that, press Tab
to go into the Edit mode. Press three for Face, Select, select this face, this face, this face, and this one. Now to separate this, just press and separate
the selection like this. Now if you press Tab to
come out of the edit mode, you can see this is
a separate object and this one is a
different object. Estab again, and let's
select this one, this one, this one, and this one again, plus b, and separate
the selection. All right, next
thing that I will do is let's select them both. Press H to hide them. Let's select this press tab and I will delete these faces. Press three for Face Select, select these three phases and
press X and delete faces. Now you can see this
is kind of like hello. So let's fill these phases. There's two for H Select. Click on this edge and just
press F to fill it like this. If this does not work for you, for some reason, just press one for the vertices selected. Select these four vertices, then press F and
you can one-by-one like select all the
vertices are either ways. You can just press two
for the edge, select, select this edge, and
just press F repeatedly. And it will automatically
fill the phases. Press alt plus H to bring
back both the hidden objects. One-by-one, select them both. You can just slash to go into the isolation mode like
this, work properly. Then again, estab,
residue for Edge Select, select this edge, press F,
and then one more time. Let us do for this one
also. Slash again. Press tab. Select this edge, press F one more time to
fill all the phases. I kind of feel like
this space is too much, so I will just select this
press Tab three, free. Select, select this
face, move upwards. Select this face over here
and move this like this. I think this much gap is enough. Now let's select all of them. Press Control a and
apply the scale. Alright, so the
next thing to do is let's add Bevel
modifier to this, select this piece over here, and modify and RW modifier. Obviously this is way too much, so I will decrease this
around 0.4 centimeters. Enable hardened normals, and also enabled auto
smooth from here. Next, let's select this piece. Again, I will add
a bevel modifier. Keep the same around
all three objects. So set this to 0.4 centimeters. Enabled hardened normals and
also enabled auto smooth. Let us quickly do this
for this piece also. Alright, so the next
thing that you can see over here in the
reference images, then the fridge
has rounded edges. Let's create that now. I will select all
three pieces at once. One more time. Press Tab
to go into the Edit mode. Press two for H,
select this edge, I mean these three edges
over here on the corner, and these three edges in
this one and this one. And let's label them. I will just give them a tiny
amount of bevel. First I want to disable the edge length because I
really don't need it now, when we needed, we can
again enable this, but for now let's
just disable this. Now it is much better. Let's hit Control Plus B
and give it four segments. I mean, two segments
In-between like this, use your scroll wheel and a Bible amount of mismatch
I think would be fine. Press tab. You can see these edges
like very weirdly shaded. So just right-click and hit
Shade Smooth. Once again. Also, we can go over here and
add a beta normal modifier. Improve the shading. I see
that kind of looking weird. So let's just hit Undo. I will add the weighted normal modifier to all three of them. The Weka nominal modifier does nothing but it just improves the shedding a little bit
if there are any issues. So I just select
all three of them. Once again, press Tab. Again, the edges are selected, just hit Control plus b. I think this is
much, much better. Alright? So the reason I did not
bevel these edges because I wanted to give it a
little bit bigger bevel than the other three. Just select these
two pieces plus tab. Select this edge, this edge, and hit Control plus b. And let's give this a larger
vivid around this amount. Also increase the number of segments to make it a
little bit smoother. This would be fine.
Yeah, I think the basic shape of a
fridge looks very nice. Alright, so the next
thing to do is, let's give it a little
bit more details. So what I will be
doing is I will add, you place this cube over here. We can enable X-ray, and let's just place it
around here somewhere. Now what I will do is I will use the intersect tool that I use in that I used while
creating the stove. So let us just select this
cube, select this piece, then hit Control Plus slash to create
something like this. Now I know it does
not look very nice, but as soon as we just
set up everything, as you remember, we need to move the bevel modifier
below the Boolean. So I move the Boolean
modifier at the top. Like this. This piece
also select this piece. And the reason you are
seeing this weird shading is because of the bevel solar
system reduced the bevel. This is much better. Alright, I will just duplicate this
piece. Place it over here. Let's see, press one
for the front view. Around here I think
would be fine. Again, select this piece, then select this one and
hit Control Plus slash. Move the Boolean modifier
desktop, like this. This piece also check
the bevel amount. It is 0.1 centimeters. Let's set the 0.1 development
for this piece also. Obviously we can just select this cube and move it
a little bit down if the cut-out seems too large. Just wanted to say the same
size for both of them. I think this is fine. Let us just do the same thing
for this dog also. Again, I will
duplicate this cube. To duplicate, I'm just
pressing Shift plus D. You select this
press Shift plus d, then press Z to lock
it on the z axis. Sorry, Is it like this? Let's see, plus one
for the front view. Move it over here like this. The top. While this is selected, select the bottom door. Risk control plus slash. Again, Let's move the Boolean
modifier and the top, and also decrease
the bill amount. So quickly let us do
this over here also. Alright, so you can
just click over here to disable the overlays to see
your 3D model properly. And it is like a
very small detail, but I think it adds a mode of details to a fridge and it looks like better
with these additions. One more thing that
I will do is I will add quickly another cube. Let's scale this down on
the y-axis like this. I will move the same thing
once again. Over here. While this is selected
this huge cube, select this piece and
press Control plus slash to create
something like this. A bit in the front. Alright, let's arrange
the modifiers now. Reduced equivalent amount. Alright. I think we are
done with the basic shape. Next, let's add another cube. Shift D or the queue. Next, place it over
here at the bottom. Press Control plus seven
for the bottom view. Scale this up. I will just select all of these
cubes and press H to hide them that they don't
bother us in the viewport. I think from faraway
this looks fine. What we can do is
select this piece, press Control a scale. Again at the Boolean modifier. This we will reduce the amount. We can start to go
into the Edit mode, control our edge
loop at the bottom. 34 fifth select will
select this complete loop, express all plus e and
extrude faces along normal. Load. Again, select this
loop. Let's scale this up. I'm just editing
things a little bit to make them look a
little bit better. All right, I think this is fine. So the last thing to do
is I think we just need to create the handles
now for the fridge. Also, I will just decrease the thickness of
these two pieces. So press alt plus H
to bring them back. Let's see. Plus g then
decrease the thickness. And also let's see if I
selected the right cue. I think this is much better. First, let's press Control
plus S to save our files. Press a to select everything, then press M to move them, and let's move them to
the fridge collection. Again, I will select them all
and just hide them for now. And let's move on to
creating the handle. If you go into the
reference images folder, you will find this handled reference image
that I just started. So let's just bring
this into Blender and I will use this
to create a header, suppress one for the front view. Let's press Shift a.
Go to image reference. The reference images folder. You can click over here, get the review, and just
double-click over here. Let's just minimize
pure ref for now. All right. We move the reference image over here and let's scale this down. Shift plus S then
closer to selected to bring the cursor over
here, press Shift plus a. And this time let's
add a single word. A single word is basically
just a single word. See, we can just extrude
this to create stuff. But if you do not see the single word option in your menu when you
press shift D, if you're not seeing
the signal word. The reason of that is you
need to enable the add-on. So go to Edit Preferences. In the add-ons section,
search for extra, extra objects and you're
gonna enable both of them, had gov and mesh extra objects. After enabling, you
will press Shift T and you will see the single word
option. So just add it. Alright, let's place
this vertices over here. Now I will press
E to extrude this like this and just
trace the outline. This handle. I'm distributedly
pressing E again and again and extruding
the vertices. I'm tracing this
complete referencing. Instead of creating
this pattern, I'll just go straight like this. Now you can just select this word seed and
select this one, then we join them. You can also press
Control plus r to add vertices in
between like this. Just lays it over here. Alright, so now we have
created the outline. So there's just select
this reference image, press H to hide this. Select the handle estab
selectivity thing. Press a to select everything. Then press F to fill
in the face like this. Move it up here. I will rotate it by 90 degrees on the z-axis. Let's scale this down first. You can also move the origin
point from over here, which original location you
just need to go to Object, set origin, origin to geometric. Right now for example,
if I just rotate, you can see it is rotating about this origin point to leak. Let's just go over to Object set origin and origin to directory. Now if we rotate this, you can see it is rotating
about its origin point. To scale this down. Tap to edit mode, press E, and let's extrude this. I think, right-click and sheets mood and enabled or the smooth
one for the front view. Let's place it over here. Scale this down obviously. Also I will scale
it on the x-axis. All right, now let's just
duplicate this press Shift plus D and zag to lock it on the z-axis and
place it over here. One more thing that we can do is let's just select
this piece per shift plus S. Then it goes up to selected to bring the
cursor over here. Now I will add a cube. Scale this down. I will place this cube
over here like this. Right-click Shade Smooth,
this enabled smooth. And I will use the difference
Boolean operations. So first select the
skew in this piece, then press Control plus minus to create
something like this. First you have to select this. I move the Boolean modifier at the top of the bevel modifier. Next, let's select this piece, scale this down
according to the angle. Let's see. One
more thing that we can do is let's just select this cube press Tab
to go into edit mode. 34 fifth select. Then enabled x-ray. And I will select
this back face. Firstly, supply the scale. So press control a,
apply the scale. Now press Tab again and wireless faces selected press
Control plus b. Disabled x-ray press
Control plus b. To bevel this Let's see. Earlier one was fine. I will just select
this piece per step instead of selecting
the back first, let's just select
all these edges. Hold Control and Alt. Click over here on this edge. Select all four of them, then press control plus
V. Instead of like this. I will add one more segment. I think this is much better. All right, So let's just
select this again and duplicate it this time,
please. You do here. While this is selected, select this and press
Control plus minus. And obviously we need to move. We need to move the
Boolean modifier and the top of the bevel. Lastly, let's just
select both of them. Again, press Shift plus
D, list them over here, and do the same steps again, select this, then this
can control the spinous. The Boolean modifiers
at the top of this. You can also scale handles
like this space S and Y, and scale them a little
bit on the y-axis. Alright, so I think
this is fine. Let's just check our model once. I think everything looks fine, one last thing that I want to do is make changes to this base. So press Control plus
seven for the bottom view. Let's press Tab to go
into the Edit mode. I will select all of these
edges, the gardeners. So hold Alt, click over here. So I will make them rounded
like the upper body. So hold down, Shift and Alt to select all these corner
edges like this. Again, press Control plus seven, and let's just press control
V naught to bevel this. We can give this two
or three segments, maybe something like this. Next I will just press one for the vertices, select,
enable X-ray, select all of them, and place them just close to the boundaries
of the upper body. Let's just see if
this looks better. Let's right-click and
choose Move this. Alright, so I think this looks much better
than the last one. Let's keep it this way only. Also who wanted to
add something we can also add later on stage. But for now I think
this is fine. Also, I will delete this reference image or
if you want to keep it, you can just press
M and move it to a separate collection named disconnection as
reference images. There's hydrated for now. Select all of these pieces. Again, press M, I move them
to the Frick Collection. Let's save a blend files and I think this is enough
for this lecture. We have completed the
fridge model also. We can do from here
in the next one. Thank you guys for watching.
I'll see you the next one.
7. Modelling the Cupboard: Hello guys, welcome
to Chapter six. Now that we're done with
the modelling of a fridge, let's move on to the next prop. I will just open
up your rep first. Right-click and load
the kitchen team. Alright, so if you just go
over the reference images, you will find discovered
reference image. And we will try to create
this prop in this video. So first let's hide
the collection. I will done on the
screencast keys. Let's start by first, basically just blocking it out. I will add a cube per shift
left side of the cube. Press N to open up this
window so that you can put in the dimensions
for the top cabinet. So you have to set the x
two hundred thirty five and sixty five. Let's move this up here. I will duplicate this
place over here. For this piece, Let's
just increase the wide 60 to 87 for the top view. And we need to make sure that
both of them are in line. We can also snap them together so you can
just go over here. Enabled vertex snapping. Jeden, hold Control. Snap it like this. They are perfectly in line now. Alright, Next I will just
duplicate this piece. Here. For this one, I will reduce the
x2 a lot around 2.5 centimeters and the y
to 35 and zinc 245. Again for seven
for the top view, let's place it over here. Let's just scale this down
a tiny bit on the y-axis. So plus S Then why? This is much better, I will
move this up over here. All right, Now I want to copy this piece over
here on the right side. So one thing that we can do
is just basically select this press Shift plus D
and please you do here. But we can also use
the mirror modifier. So that would be quite handy. Let's just select this object. Go over to the Modify
section, minute modifier. All right, So currently you will see if
you just press Tab and try to move some
of the vertices. The modifier is currently
not working at all. It is working, but it is not
working as we expect it to. And the reason of this is
due to the origin point. So the mirror modifier works according to the
origin point only. So let me just quickly
show this to you. I will add a new cube. Let's just press Tab Control
plus r to add an edge loop, hit right-click to just
base it on the center. I will delete all of these
right side vertices. You can see the origin point is currently over here,
right at the same time. Now if I add a mirror modifier, you can see it in
meters perfectly. I can just select these
vertices, move this. And everything worked great. But if I were to move this origin point to
some other place, for example, I just
select this face. Maybe this phase
press Shift plus S then cursor to select it, to bring the cursor over here. Then go over to
Object Set Origin, and set the origin to 3D cursor. You can see how the
middle modified instantly updates and creates a
completely different object. It is still quite working,
but not as perfectly. Let me just show you how we can easily mirror this piece over here to the right side without actually
moving origin point. Let us just delete this cube. I will select this object, go over to the mirror
objects section, select this eyedropper tool. And I want to merge this piece according to the origin
point of this object. I will just select this. Click over here and
select this piece. And you see it meters perfectly. Now this mirror modifier that actually taking this mirror, this as the middle object. So as soon as I move this, you can see the middle modified as updating and moving it
along with this piece. So the origin point of this
piece is actually acting as a reference for this middle
modifier. It works perfectly. Alright, so now we have created the basic block out shape. Let's just select everything, control a and apply the scale. Alright, so the next
thing that I would do is create these cabinets are doors. I mean, what I can do is let's just press Control plus R. Hit right-click to place
it exactly at the same time. 34 Face, Select,
select this face, press Shift plus dy. Then again hit right-click
to place it over here only. Now I want to separate
it from this object, suppress B, and
separate the selection. Now this is a separate object and this piece is
a separate object. That's just one for
the front view, I will scale this down.
8. Modelling the Cabinets: Hello guys, welcome
to chapter seven. So again, now that we're
done with the cupboard, move on to a next
drop and we will be making some cabinets
for our kitchen scene. So let's just turn off
this collection for now. I will open up your RREF. If we will look over in
the reference images, you can see all
these cabinets or a year in all the
reference images. We try and create
them in this video. If you open up the
reference images folder, you will find these cabinets or underscore reference image
that I've just added. Minimize that for now and I will import this cabinet reference
image into Blender. So press Shift plus S then
closer to world origin. Let's press one for
the front view. Shift a, go to Image
and reference. The reference images folder, open up cabinets and
the school raffinate. Alright, so now creating
this is pretty simple. These are the two
types of cabinets that we will be creating
and the handles for them will express Shift
plus a and add a plane. This plane by 90
degrees like this. Press our than x, then
type in 90. Enabled x-ray. Place this over here. Stab wound to the edit mode. Press one for vertices select and let's just
place all of them. What we can do is we can
again just create half of it and we can mirror it
on the right side also. Let's add a mirror modifier. You will see the mirror modifier won't work correctly because the origin point is not
in the correct position. So we'll just do for a select, let's select this edge, the Shift plus S Then
because if you select it, The bring the cursor point
over here right at the center. Now I will move the
origin point to discuss over to Object set origin
and origin to 3D cursor. Now you will see it is
mirroring properly. Let's just press a to select everything and move them
a little bit apart. They are not exactly
laying joined. Something like this. Select this reference image, g then vi, and move it
at the back over here. Select this object.
Select this object. Huge risk control
a, apply the scale. Staff. Press a to select
everything, then press E, extrude this
backwards, like this. Alright, again, press
one for the front view. So press three for Face Select. Let's select this front face. Press I to insert
this still here. Again, let's extrude
this invert. This time. Let's add
a bevel modifier. If you want, you can give it
a little bit more detail. You can press I once
again and extrude this outwards to create
something like this. And maybe some more stuff. You can just create some
inserts, some extrudes, maybe add some loops by pressing Control plus r and create
a more interesting shapes. But for me I think something
like this would be fine. Obviously, we can add the
details later on stage. Just move further. For now. I will just select this piece. Or maybe let's just create a new piece, that shift plus C. Let's add a plane move
displayed over here. While this is exactly
at the center. So I addressed are then
x rotated by 90 degrees. Stab wound to the edit mode. Press Control R and
excited the edge loop. Right-click. Put it
exactly at the center. Select both of these vertices, press X, believe them. We will add the middle modifier. Duplicate this to
the right side. Now we can easily create
this bottom piece. We just have to create
the left side and the right side will be taken care of by the
middle modifier. I will select this vertices, press X and delete this. Select this vertex
breastfeed to extrude this, press X to lock
it on the x-axis. Now, we just trace out the
reference image roughly. One thing that I
wanted to mention it, if you press E Once again, we extrude this and
tried to join them, they will move apart
from each other. To solve this simple issue, you need to just
enable flipping. And now if you move them, you can see the join
right at the center. So you can place them like this. Tab. There's a to select
everything and press F. To fill in the
face. Alright, Next I will again extrude
this backwards. Press E and extrude
it like this. Risk and truly apply the scale
side, the bevel modifier. Select this face and
let's insert this. You can see it is not
inserting the way we want. It is inserting this way. So to just solve this issue, be disabled boundary so we can insert it properly like
this to just enable X-ray, press I and press B
to turn off boundary. Let's insert this tool here. Now extrude it
backwards like this. Alright, I will enable hard
enormous and also autosomal. You can see some
issues over here. Let's just quickly address them. I will just move it a
little bit backwards. I'm pretty sure they
resolve themselves. Yeah. Alright, next lips
move on to this piece. I will just select this object, press Shift plus d. Let's
place it over here. Estab to go into edit
mode, enable X-ray. All of them will
displace them like this. Again, let's just duplicate this less disorder
here. Estab again. Enable X-ray, select
all the top what season less than
over here like this. And yeah, I think we have
created with the two cabinets. Let's just move on
to the handles now. Press one again. Shift plus a, and this time go to Mesh
single word and add a lot. Make sure you are in the
vertices select mode. So if you are not just stress
one plus G to move it, and let's place it over here. Again, we need to extrude by
pressing E multiple times and just trace this complete
reference image like this. Now, select both of these
vertices interest f, a to select everything. Then again, plus f plus
f fill in the face. You can press Shift
D to duplicate this, press X to lock it over here. And let's place it like this. Select this vertex, duplicate it by pressing Shift plus
d. Place it over here. Let's just increase
this part out. This is pretty easy and
the predictive task, I'm just pressing
E again and again and extruding and tracing
out the reference image. Again, I will hold Alt and
select this complete loop. Then press F to
fill in the face. Stab AT selectivity. Let's extrude this like this. I'll add a Boolean
modifier scale. And let's do all the usual task I will right-click and shapes. Notice. Yeah, I think this
looks perfect. One for the front view. Anybody, X3, let's
scale this down. Right now you can see
it is scaling this way because the origin
is placed over here. What I will do is I
will just move it origin point, correct location. So let's just select this. We'll do object set, origin and origin to geometric. Now I think it'll scale
this, scale properly. Scale this down, roll it
up over here. 90 degrees. The z-axis also by
minus 90, like this. Alright, again, we can add
the mirror modifier to this, the eyedropper tool and select this piece as
the middle object. And you see it works perfectly. This again under
says duplicate this. And you see this is
happening because the Of the middle objects. So let's just
disable it for now. Naval x-ray, place it over here. A new minute modifier and
select the middle object. This piece, this Alice is duplicated. Don't think it is
working properly. It is. Finally here. Instead of
using the mirror modifier, let's just duplicate this. Not complicate things.
Both of them now, let's just press
Control J to join them. Enable X-ray press Shift plus d, then z to lock it on the
z-axis and place it over here. This one also, let's just
remove the mirror modifier. And I will just use shift
plus due to duplicate this, press Shift plus d x to
lock it on the x-axis. Please do go over here. Back. Looks pretty great.
Let's just join them. Select them both
press Control plus j. We can basically add it to cue. You place them at
the back of it. Alright, so what I
can do in series, press Control plus add an
edge loop in the middle. It right-click to keep
it at the center. For H, select Next, select this. Move it up over here like this. Before we need to add two more edge loops
here also like this. Now I can just select this. Move it up over here somewhere. Now select this complete loop. Press Control plus b to Beverly. Costlier supplier scale. So press control a,
apply the scale. Estab again, press
Control plus V2. Let's see. I think something
like this is fine. Obviously it does not have
to be exactly accurate. Yeah, I think this
works perfectly. Is right-click and shade smooth. This enabled auto. Connect all the back faces and let's move them
somewhere around here. Next door with electric pick up. Alright, so yeah, I
think this looks fine. Sided mu cube, so redshift plus a cube. Place it over here. Again, let's match it according
to the reference image. I will hide the
reference image for now. And let's just place
it accordingly. Again. Let's just select all the backwards
disease and list them. I just snapped it
according to this piece. So I will press G then. We'll control and
snap it like this. Make sure you have enabled
vertex snapping from here. You don't need to enable it. Just select vertex
snapping from here. And while everything
is selected, just hold Control to
snap it like this. Alright, so I think
we are good to go. Let's just hit Control
plus S to save our files. Select all of them. Press M, new collection. Let's move this cabinet. Also. Let's move
this reference image into the reference image folder. We will adjust the size
of them later on stage, but for now I think
this is fine. We can also add more
details to them, like creating the
shelves inside them. But for now I think
this is fine. So yeah, us watching who'd saved to your files and I'll
see you in the next one.
9. Creating the Kitchen Room Layout: Hello guys, welcome
to chapter eight. So now that we have created
a few main prompts, or what I wanted to do in
this lecture is I want to create the basic layout
for our kitchen room. So let us just press
Shift plus S then causes world origin to
bring the cursor over here. And let's add a cube that
will act as our kitchen room. So press Shift plus a cube. Let's go over to item I'm
putting the dimensions for the x. I will put
it 500 centimeters, so that would be five meters. Let's take the y to around 420. And for the z, I
will set this to do 851 thing that I will do is I will move this origin point that is
currently at the center. Do over here at the bottom face so that we can easily snap it. And whenever we will scale, it will be a little
bit easier for us. I will just show you guys. So press Tab, press
three for face select. Let's select this face. Then press Shift plus S. Then it goes there
to select key, to bring the cursor at the
center of this bottom face and go over to Object set
origin and origin to 3D cursor. Now what I will do is I will
move or hearing snapping. Select the increments. Snapping, enabled
absolute grid snap. This will snap any
object to this grid. So press G then z,
now hold control. And you can see your test snap exactly at this line,
I mean at the grid. So the advantage of this is whenever I will scale up things, it will scale in a very
convenient manner. So if I change the Z, you
can see how it scales. If I just started a new
cube, place it over here. You can see if I increase the Z, it scales from both the sides because of the origin
point being at the center. But now the origin point
is at the bottom face. So if I increase the z value, you can see it just
goes on in height. So that is pretty handy
in quite a few stuff. So let's just delete this. Now what I will do is I
will just select this cube, the Press tab, and
select these faces, this one and this one. Then press X and
delete the phases. The reason I did this
was it is easier and convenient to work
this way because if I just undo back
everything and you can see I have to place all these objects
inside this room. And it will be very
difficult for me to work because of these walls. I have to constantly move
my camera inside this cube. Instead, what I
will do is I will just delete these top faces and the sideways so that I can easily view all the
things that I'm working. And then we are done
with everything. I will just press Tab, select the feces and just
fill them like this. And like this. I will just delete them for now. Okay, so now what I want
to do is that all these products that we have created
over the last few videos, I want to place all of them in this room to create a
basic layout of our scene. But before doing
that, I want to apply all the modifiers for all the products that
we have created. What I mean by
that is right now, if I just disabled, I mean hide this room and enable
any of the collection. What I mean by applying the modifiers is currently
if you just select this, you can move the
Boolean modifier and it will update immediately. You can also change any of the values like the bevel
amount or anything. So I can make any kind
of changes, modifiers. But as soon as we decided
to apply all the modifiers, we won't be able to make any of these changes and everything
will be permanent. So what I will do is before
applying all the modifiers, I will create a duplicate of
each and every prop that has all the modifiers in tax so that if we need to make a
change at a later on state, we can easily do that. Let us just quickly start. I will select this
dove collection, right-click and
select all objects. I will press Shift plus
D to duplicate this, Let's press X and
move it over here. Now, while all of
them are selected, I will just press M to
create a new collection. And let's name this
collection as stove. Underscored applied means that it has all the
modifiers applied. Now I will just hide the
older stuff collection. So now let's move on to
applying all the modifiers. One way of applying would
be just select this piece. And you can one-by-one select
each and every modifier, click over this
arrow and hit Apply. Then one-by-one, you need
to apply all the modifiers. But obviously this is a very
long and tedious tasks. So the shortcut
for this would be to just press a to
select everything, and then press F3 to
search for the command, convert and select
Convert to mesh. Now if you will see, if I
select each and every object, you can see no modifiers
and all the modifiers have been applied. Immediately. We're hit with the problem. You can see that as soon as
I applied all the modifiers, this middle piece disappeared, leaving us with just this
one and this one only. So let us just quickly
solve this first, I will press Control Z to undo everything that all
my modifiers return. Yeah, now all the
modifiers are bad. This issue is being
caused because we use the Boolean
intersection tool. So what this will do is as soon as you use a Boolean
intersection, maybe for example,
on this object, this object, this one that has the intersection
and this one, all three of them share the
same object data properties. And that can be confirmed if you just see over here,
this three is written. That means this
particular object data properties being used
by three different objects. Let's do all of the other
objects that we have not used the Boolean
intersection modifier, all of them have
unique object data's, but these three have the same. There is a very
easy fix for this. Just select this object,
click on this three. And now this piece has a
unique object data property, but these two still have the same as you can see,
there are two over here. So just select this piece
and click over here. Do the same thing for all the intersection Boolean
modifiers that we used. Alright, I think these were the only ones. We
are good to go. So make sure you just
remember this thing. Now again, I will press
a to select everything. Then press F3 and
hit Convert to mesh. All right, so now if we just look over your object quickly, I don't think there
are any issues and all the modifiers
have been applied now, alright, next thing that
I will do is I will select this cube because
it is of no use anymore. I will just delete
this because we have already applied all
the Boolean modifiers. I will delete this one, hold Shift and just
select all four of them and hit Delete. And now we have applied
all the modifiers to this. We cannot make any more
changes, but don't worry, we still have the
original story to which we can make any change if we want to add later on stage. Alright, so let us do the
same thing to all of them. Select the fridge, right-click
and select objects. Let's press Shift plus D to
duplicate this, press X. And let's place this over here. Again, press M, create
a new collection. Let's name this fringe
underscore applied. Alright, Next what we need
to do is before applying, let's solve that
intersection problem. So select this piece. Go ahead in the Object Data
Properties. Click over here. Let's quickly do the same thing. Over and over again. I think we are good to go. We have selected all the pieces that have the intersection. Now we can just disabled the older fish
collection that it does not get accidentally applied
with all the modifiers. Press a to select everything, and then press F3 and
just hit Convert to mesh. Now I will select
all these extra useless objects and
just delete them. One more reason that I'm applying all the modifiers
is because it will be easier to work with because we don't have all these extra
objects flying around. Alright, there's disabled this. Next enabled the cupboard. Press a to select everything. Press Shift plus D to duplicate. Then press X. Let us just move it over here
on the y-axis like this. Press M, and let's move
it to a new collection. Disabled the older
cover collection. This one, I don't think we use any of the
Boolean modifiers. So we can just hit F3
and convert to mesh. Alright, so the last
one is the cabinets. Select all of them.
Shift plus d, less than over here. Press M, create a
new collection. Let's name this collection as
cabinet underscore applied. Disabled the older
cabinets collection. And again, press F3 and
hit Convert to mesh. Alright, so I think
we are good to go. Enabled all of the
applied collections. Now we just need to
place them one by one in our room to create the
basic layout of our scene. First, let's hit Control
plus S to save a file. Okay, so before we start placing all these drops
onto a pigeon seen, there's one more thing
that I wanted to do. Because if you see right now, selecting this one object like
would be really difficult. I have to select all
of these like this, then move it or rotate it. So easily. Tackle this problem,
what I will do is, let's first do it
for this object. I will disable all of them. Just this one. Select all of them and press Shift plus S then
cursor to select it, to bring the cursor
somewhere around here. Now what I will do is I
will press Shift plus a, then go over to empty
and add an empty object. You can add a plane
axis like this. Next, just select
all of them like this and make sure this empty object is
your active object. So what I mean by
active objectives, that this object has
this particular orange or yellow colored light. Yellow colored outline means that it is the active object. So make sure you select
it at last like this. So it has the active
object selection. Now just right-click
if you were to predict, select the object. Now, what this has done is whenever you will
select this empty, you can easily move all
of these objects at once, but make sure you
select this empty only and not any of
the other pieces. Because you can still move them, but make sure you select
this empty only so that you can move
all of them at once. All right, so there's this move, this MD in cupboard only, and I will hide this. Let's enable the stove. Select all of them. Press Shift plus S then goes into selected. Let's press Shift plus a
and add a new empty object. All right, so just press
a to select everything, and this is our active object. Now, hit right-click
creating an object. It is pretty basic thing. But let's just do this
quickly for all of them. Saw the effort to turn
on switching cost keys, but I did nothing much, just press Shift plus S
then cursor to select it, and Shift a to add
a new empty object. Just select all of
them and make sure you select the empty
object are the last. To make it the active object. Right-click Parent and object. Alright. Just move this into fridge. That's enabled the cabinets. Now let's do the same for these. Select this first cabinet press Shift plus S then goes
into the selected. At the empty. Select all of them. Right-click and select
this right side, one. Plus S goes into selected
a and the empty. Select all of them. Make sure this is
selected at last. Right-click and bedding. Alright, so now we're basically done with everything
and we can move on. Placing all these
prompts into our room. Enabled this back again. I will just move them over here. Enable all of the prompts.
Just select them. Let's move them over here. To start with, I will just
select discovered rotated by 90 degrees minus 90 degrees
seven for top view. And let's place it
over here like this. Make sure you select
this empty only. Alright, so next, let's select the fridge and place it
somewhere around here. The next thing that I will add, if you will see indeed all these reference
images they are, there are these kitchens labs. So for now let's
just add a cube. A shift plus a are the cube. Let's place this
cube around here. I will scale this up. Let's say three meters,
3300 centimeters. I mean, the x, we can set this to 93 meters. And for the z, let's
say this to 98. Let's increase it on
the XL little evict. I think 315 centimeters. I will move this over
to the right like this. Select the fridge and
also move it over here. Next I will select the
stove and let's place it. First. Let's rotate it. So press R to rotate
it 90 degrees, and let's place it over here. I will increase the height of
this a little bit to match with the stove like this. Let us just decrease the size of the store where little bit. Select this, scale this down. Let's create another slab. So press Shift plus D, rotated by 90 degrees. And let's place it over here. I will select this cupboard and move it forward like this. Both the top faces and
decrease the height. Also, I will select
this piece press tab and make sure it is in line
with the store like this. All right, next is the
turn of the cabinets. So let's select them. Rotating by 90 degrees minus 90. I will place it over here. But first, obviously we
need to scale this down. I think something around here. We decrease the scale
to around 0.544. For this one also, let's set the scale
to around the same. I will select all three of them. Said this period of 0.5443 or Control plus
three for this view, rotate this by minus 90 degrees. Let's place them both like this. 74 top view. Let's move it over here. Let's see now we can just
select this, duplicate this. We need to select all of them. Control, hold Control
and deselect this. Make sure this is
selected then Shift plus d. Like this over here. Again, I will duplicate
this, press Y, lock it on the y-axis, and let's place it over here. Select all of them. Let's move them over
to the right side. What I want to do is I want to duplicate it over,
over here also. So let us just select all of this full control deselect
this shift plus D, express G, then x, move it like this, rotated by 90 degrees. I will place it somewhere
over here like this. But obviously now we
need to select all of these and move them till here. What we can do is let's
just delete this one. I will select all of
them and delete them. I will just select this side. Just select this V slash slash
to go into the Edit mode. I will select all of them. All right, so now let's
select all of them. Press Tab. To go into the Edit mode. You can select any object by hovering over it and
pressing L like this. So just select these four. This one also hold, press L while hovering over
the objects like this. And make sure you select
the right side completely. Then just press Shift
plus D to duplicate. Then press P to
separate the selection. Let's just select all of them. I will just hide this for
now and then select it. Select all of these. Let's move it on the
y-axis like this. Obviously we don't
want this to be a parent with this empty object. Just right-click
and go to gradient. And where is it? Clear and keep
transformation like this so that it gets disconnected. And now I can place it
over here like this. Let's see, I think it looks good and it also fits perfectly. So next I will just
create a cube. Again. Let's select all of them and move to the isolation mode. Suppress slash. Move this cube over
here, press Tab. Enable X-ray, select all of
these vertices, press G. Then why hold control? We first need to select
vertex snapping. Now plus g Then why hold
control and snap it over here. Select all of them. Snap it over here. Snap all of them into positions. This next what we can do
is first place alt plus H. To bring everything back. We forgot to move
this one over here. So plus g then Y, or Control again,
snap it like this. If you want, if you want to view everything without
all these lines, you can just click over here. I think our basic
layout of our scene, or I mean, the kitchen
scene looks pretty good. Next, what we can do
is let's just create a gradient for this one also because I'll
select all of them. Shift plus S then
cursor to select it. Shifted left, empty. Now just select all
of them one-by-one, and make sure you select the
empty object or the last. Then right-click
Parent an object. Alright, let's see
what we can do next. Next weekend, refine the shapes of our
slabs a little bit more. Let's do that now first
I will just hit Save. I will also minimize
your risk for now. Let's see what we can do. Alright, so now for this lab, I will just select one of them. And then Chris slash to go into the isolation mode. Press Tab. Now I will just press Control
plus r to add an edge loop. Let's add an edge loop
somewhere around here. Now what I will do
is I will separate this piece from the
rest of the slab. To do that, Just
press three for free. Select, select all
of these phases. Then just press B and separate
the selection like this. Now let's just hide
this one for now. Select this one plus tab, hold Alt and select
this complete loop. Then press F to
fill in the face. Let's add a bevel
modifier next also, you can see the bevel
is David overhead. It is pretty large and it
is very small over here. Just press control
a apply the scale. You can see it is perfect now. Decreased to somewhere
around one centimeter maybe or maybe even
less than 0.5. Enabled hardened
normals and auto smooth plus H to bring
the hidden object back. And let's hide this one. Now. Select this one. Hold Alt, select this
complete loop, then press F. Again, apply the scale enabled order smooth and left
side the bevel modifier. Set them out to 0.5 centimeters. Alright, next what I will
do is pretty simple. I will just, all
right, What is this? I forgot to copy this piece. Let's just quickly select this. What we can do is let's
just select these two. Press Shift plus d, G then why? Make sure to copy
them perfectly. I'm sorry, forgot about them. Somehow. I think this is fine. This one also, again select
this press Shift plus D. Select both of them right-click and go over to paid-in and clear and keep transformation because clearly they have
a different gradient. Now just select this one. This press R then z, rotate it by 90 degrees. I think this is fine.
Is move them back. Slash to come out
of the edit mode. Let's see, There's moved
back to this labs now I will select this tab. Select this edge, then press Control plus b and just beveled, look like this and give
it a number of segments. Right-click, Shade Smooth. Yeah, I think this
looks pretty good. I will just select this lab. Select this one
slash 74, top view. Let's select this. If there's D to duplicate
this by 90 degrees. Let's see. I will just
snap it like this. Seven or top view press
Tab enable X-ray. Select all of these vertices as G. Then why smack
them like this? Again, select all of them then G and why snap it over here. Also lets move them back. Make sure you
select all of them. Leaves bottom to also
just move them back, snap them over here. Okay, what did I forget now? Let us just enabled x-ray
and select them like this. Then press G, then x, snap them over here.
This is perfect. Select this inner tube. Then press Delete slash to
come out of the edit mode. And let's see. I think everything
looks pretty great. Kitchen scene is finally starting to come
along with vibrate. Also, these two handles
that we just started, Let's just select them. Select this piece, right-click
and creating this one also for this, we
are good to go now. Logistic control plus S and we will continue from
here in the next one, guys, thank you for watching.
10. Modelling the Door: Hello guys, welcome
to Chapter nine. In this video, I
just want to make a few changes into our
already created scene. The first thing
that I want to do is if you see this
covered over here, I will go ahead and just
remove discovered for now because I'm not quite liking how it looks
with our scene. I wanted to create a more
uniform look of our scene. And the cupboard is not really
fitting, in my opinion. But again, this is a very
populous base thing. If you want to,
you can just keep it over here in your scene only. But for me I will just
remove it for now. So let us just selected, I will say this parent, then press Shift plus G, plus G and then
select children's. What this will do is this will select all the
immediate children. And now we can easily just
select the parent again. M. We just don't
need to do anything, we just need to disable it. Sorry. I'm not
going to delete it. I will just disabled
it from here so that if needed later on
we can then use it. But also this piece that
we created earlier, I will just remove
this one quickly. Because instead of this piece, I will just select this one. Then press Shift plus d 30. Select the grading,
then press Shift plus g. Select the children. Again, select this painting. Then press Shift plus
D to duplicate this. Press x, the g. Then why lock it on
the y-axis like this? Let's place it over here. Alright, let's see.
The next thing that I want to do is I will just select the tab. There's three for free, select let me select the sidewall, and let's move it on
the y-axis to here. Seven for top view, It's really just
about here for now. Alright, so now before
moving further, I also want to reduce the
thickness of these cabinets. So let us just quickly
select all of them like this slash to go
into the Edit mode. Let's select all of them first, press Tab, enable X-ray. And let's just select
all of these back faces. And I will move them around six centimeters plus g Then x. Now you can just type six. But I want to move it backwards. Suppose G then x, then type
in minus six. Let's see. Yeah, I've been minus
six like this to reduce the thickness slash to
come out of the edit mode. Now let's select all
of these buildings. The seventh of u, du plus g and x and
move it over here. This one also I will reduce the thickness by
six centimeters, g. Then I'm typing
six minus six. Just select this
and move it over here, somewhere around here. And then again, we need
to select all of them. Move them like this. This seems fine. Next I will
just select this role again and a little bit like
this on the x-axis. Now let's select the slab. Both of them just tap to
go into the Edit mode. Press 34 fifth select, and let's select
these two faces. Then just press E extrude. Let's extrude this still here, near the volume like this. Now in my opinion, this thing looks much more like a uniform as compared
to the earlier one. I will be going
with this one only. These were the couple of changes that I want to make all so let's select these objects. Let's move them to a new
collection, press M, and let's name this
room, kitchen. All right, so moving further, what I will do is I will also
create a window over here. Over here. So let's start by
creating the dope. All right, so now for the door, if you again head over to
the reference images folder, you will find a reference image name with the name of dough. So let's just import it now and blender prints one
for the front view. Just hold Shift and
right-click over here to place our cursor
somewhere around here. The Shift plus C at the image. Alex added a new
reference image, go into the folder and
look for this image. Again, the shape of her
daughter is pretty basic. But let's just take the help
of this reference image. I will add a plane. Let's
rotate it by 90 degrees. Enable X-ray plus dab. Let's just select these
vertices and place them according to
the reference image. Next, I will just press
Control plus our loop. Let's sag when you
look over here. Another one over here. One more over here. 34 Face Select, let's
select this face and then press X and delete the phases. The leg, this object, press Control plus a apply the scale staff to go into the Edit mode.
Let's extrude this. Also, we need to add
a bevel modifier. Obviously, we need to
reduce the amount, you call it something. This will be fine, I think. Next let's add another cube. I will scale this up. Magic with the reference image. Next year, I think
something like this would be fine. Scale this down. Again. Let's select this
press Control a and apply the scale modified to this. Again. Now let's select
this enable X-ray. Let's press Control plus r. If you add an edge
loop here somewhere, this face and this face, make sure you select
the front-facing only. Now let's insert this. You can see it is in
setting this way, but we do not want it
to display so best high one more time to insert the
individual phases like this. Let's insert this around here. And now we need to just
select the vertices and place them according
to the reference image. Now let us apply
the scale first. Select both of these phases. Let see, I will just extrude
this backwards like this. There's extrude this outwards. I will first extrude this here. Then again instead this
extrude this one more time. Something like this.
But let's just reduce the development on this 0.1. Select this complete loop. And similarly for this one, I will just move it a
little bit forward. I think this is much
better. Enable X-ray. Let's clear these simple shapes. Cubes skins down.
Listen to over here. Next, let's add a mirror
modifier to this. Select the door, go to object and set our region and
auditing antigenic drift. And now select this piece and cylindrical object as this door. I think wizard access,
disable the x-axis. Next what I will do
is I will just select this piece and duplicate this. And right-click to place
your door here only. Now while this
object is selected, select this, then press
Control plus minus. Just hide this one for now. You see the Boolean properly. I will say if this object
again and then again, press Control plus minus. Obviously they need to change
the order of the modifiers. If you are seeing
some shading issues, you need to just move
them a little bit and let me just mostly
solve themselves. Yeah, this is fine. Now we can just press Alt plus H to bring the
hidden objects back. I will just scale this down
a little bit like this. I think this works perfectly. Next, if you will see
there is also a handle. There is another reference
image in the folder. Select this image, press M. I move this to the
difference in this section. I will now add a new
reference image, one for the front
view Shift plus a reduce the size
of this algebraic. This is beta one for the front view press Shift plus a over to the image defense. This reference image
of the handle. Let's bring it in.
Select this image and let's slash to go into the isolation
mode to work properly. Aleksey, suppose press one for the front view and
I will add a cylinder. Rotate the cylinder over
90 degrees on the x-axis. Scale this down, Let's place
it somewhere over here. Next what I will do is I will duplicate the
reference image. I'm also rotate the defense
made by 90 degrees. Press R then x type in 90, taken by 180 degrees. Let's just flip this
sort of flip it press S Then why? I've been minus one. Perfect. Now we need to just
match it with this. Select the cylinder
scaling down in here. Match the reference image
properly like this. Now you see if you've missed
one for the front view, you have aligned this
front view and there's 37, then you have aligned
it to the top view. So it will be easier
for us to work with. Let's select this
piece right-click, Shade Smooth,
enabled or to smoke. And also let's add a modifier. Apply the scale and you
all when necessary steps. Next I will select this face. There's seven for
the top few insect this study press I
to insert this lip, see this a little more. Seven and now plus e
to extrude any item. This is perfect, please. Next what you can do
is press seven for top view, shift plus a. Then go to Mesh single word
and add a single word, one for the vertices
selected now plus G to move this and
place it over here. Now again, we need to
extrude again and again by pressing E and just trace
out the reference image. You can also select the image. Over here, I enabled
opacity and decrease the opacity of it so that you can see your
vertices properly. Is keep on pressing E and grease out the
difference it makes. I'm just pressing Control R
to add a bunch of vertices. Perfect the ship. And
I think this is fine. Now, I'll press F to fill in the face and then just extrude it like this one
for the front view. And let's just extrude
this thing here. I know if you just rest one, it is not matching ready perfectly with the
reference image. But that really does not matter because either
ways it looks fine. So I will just right-click
and Shade Smooth. Smooth. I also scale this
down and review week. I move it inwards like this. Excited a dividend modified
to this maybe hard, enormous one again, enable
X-Ray outside a new cube. Scale this down, place it over here on the x-axis. Now just press S and scale it up large enough to
cover the whole object. Tab to go to the Edit mode. Before dark, just
apply the scale. So press Control,
apply the scale tab. And let's select all
four of these edges. Hold Control and Alt. And click over here like this. One for the front view, we enable X-ray and
let's now devil them. Basically over here. Now press Control plus v to w. Give it a bunch of
segments like this. And yeah. Now I'll
right-click Shade Smooth. Select this piece then this one, then hit Control plus minus. You are seeing this
video, we're changing. This wouldn't be easily
solved by moving the webinar or modifier at the
bottom, like this. Next, let's add another
small cube. This over here. What I will do is I will
just select this piece, shift plus S then
because there are two selected to bring the
cursor over here. So there is an
academic that was, if I now press Shift
plus C at the cube, the boat will be
perfectly in line. So now I can press gene
and x, move it over here. I don't have to adjust take, I will just now scale it up. Now scaling on the y-axis to completely covered
the object like this. I mean to Z and X and move
it a little bit on the left. Now just press control
a, apply the scale, estab, hold Control and Alt
select all of these edges. And just roughly around
the same amount. Right-click Shade Smooth. Now I'll just select this and this piece then
control plus-minus. Move the bevel modifier
at the bottom. Now we have created
a door handle, made it again select both of
these reference images and move them into the
reference image. Election result plus h. I mean this for slash to come
out of the isolation mode. One for the front view. Vector fence images. Let's see, I do
not need this one. This one or this one. I just need your door
reference image. Select all the parts
of this hydrogen. One for the front
view enable X-ray. Scale this down and just
place it over here, matching with
something like this. Alright, so our door looks
pretty good in my opinion. I will disable the
difference image collection and I will select all of them. Again. I will press Shift a to add a new object
and looks at Mt. First redshift plus S, then it goes at selected to
bring the cursor over here. Now press Shift plus a
and the empty everything. I mean, select all the
parts of the door. Then make sure you study
this empty at the last one, right-click creating an object. Now just press M and let's move it to a new collection
by the name of door. I'll select the MPL explicit. This by linearity
degrees 74, top view. Next place or
somewhere over here. Obviously the door
is huge right now, so I will scale this down. I think a scale of somewhere around here
wouldn't be fine. Let's move it somewhere around
here. Which you can learn. I think this looks pretty good. Hit Control plus S
to save your files. I think this is much was
enough for this video. We will keep on adding
more details to our room, like maybe adding a sink and
a window in the next video. Thank you guys for watching
us Union Excellent.
11. Modelling the Sink and the Window: Hello guys, welcome
to chapter ten. So in this video, we
will start by creating our sink static ligated onto it. I will select this piece, this one, then slash to go
into the isolation mode. Seven for top view, I will press Shift plus
S. Then it goes up to selected to bring the cursor
somewhere around here. I will press Shift a
and add a new queue. Again, you can just press M
to bring up this toolbar. If you go into the items
section and in your dimensions, Let's put in the
dimensions for the sink. For the x, I will save
this 210 centimeters. For the y around 70, and for the sentencing
to around 25. This wouldn't be a good size. Next, I will just press
Control plus a lender. Let's apply the scale. Estab, press T for Face Select, let's select this top
face and delete it, because obviously
things are hollow. Now, the thing is, this is currently a flat plane, this has no thickness. So I will add a
solidify modifier from O'Hare to give
it a thickness. You can see clearly. You can press Control plus
a and apply the scale, the bevel modifier to this. Right-click Shade Smooth,
and do all the usual stuff. Next thing please. Thickness a little bit. And also we need to
decrease the debit. The thickness to somewhere
around 1.8 for now. Next, let's stop. Now I will just select
this face press control plus V to bevel this to create a smooth surface and you scroll wheel to increase
the number of segments. I think this much will be fine. I think I want to try adding a greatly nominal
modifier. Just a second. Once again, to bevel it, let's increase the
number of segments. Yeah, I think this is fine. Next what I will do is I will be establishing and this time
select all of the side edges. So press two to go into
the edge select mode. Select this complete age. Now hold Shift and Alt. Then keep on selecting all
of these edges like this. Now again, I will press
control plus V, bevel them. Make sure to not give
them too much segments. I think something like
this looks pretty good. We'll add a vacant
normal modifier. This solid color shading issues. If you just remove the
weighted normal modify, you will see this
a little bit of weird shading going on that this is what I
was worried about. Just enable this modifier
and it solves perfectly. Yeah, I will just select this
press seven for top view. Let us see split here
somewhere around here. Move this down. Next. Let's just select the sink. I wanted to set the origin to geometry. It is already there. Press Shift plus S then cursor
selected, add a new cube. Let's set the initial
dimensions 210, network of simply send the
deck to around 50 something. I think. I will just select this
cube is controlling. Apply the scale first. Shared smoothness obviously. Now I won't use the Boolean defense operation
to select the cube, this one that we just started. Select this piece, then
press Control plus minus. Then again select this. Now select this huge cube. Then press Control plus minus to create
something like this. Obviously, we can see
the shading issue, so I will just select
the Boolean and move it. I will just select
the Boolean modifier and move it above the devil. And similarly for this one also, next thing to do is
you can clearly see that this thing
has rounded edges, but this cube does
not. Select the queue. Again. Hold Control and Alt, and click over here to
select all four edges. Then press Control plus v two bivalent justice accordingly and make sure everything
matches up perfectly. I think this looks pretty good. I will just decrease
the 75 to 1.5, maybe 1.2, because right now
it is looking very thick. Next, also decrease the devil. Something like this. Select the Boolean,
then select the sink, and let's move them
over in the front. Now you can press Slash to come out of the isolation mode. Yeah, I think it
looks pretty good. Next, let's just
hit Control plus S to save of identifiers. And let's start working on the window to just
select this room slash. You go into the isolation mode. One more thing, I will just
print slash one more time. I will select the sink along with this and then press Slash. Because the window that
I will be creating will be according to
this single leak. I will try and align the
window with the sink. This room press Tab to
go into the Edit mode. We can go over here and
also enabled edge length. Just see the edge lengths. I will now press Control
plus add one edge loop over here. One over here. First, let's apply
the scale for this because I don't think the
measurements are accurate. Now you can just hold Alt, select this complete loop, and then plus g two times. So make sure you press
G not once but twice, because if you just
press it one time, you can move it anywhere. But if you basic two times, it will be locked on
this particular edge, only. One enable X-ray. Let's keep it
something like this. Next I will add
another edge loop. Now I will select
this whole loop. So hold Alt and select
this complete loop. Then hold Shift and Alt. Again, select this
complete loop and let's move it upwards over here. We can press Slash to come out
of the edit mode analysis, match it with the
cabinets. For now. I will just press
Control plus R again and add one edge loop
somewhere around here. Just above my kitchen
slab like this. Hold Alt again and select this complete loop
and this one also. I will move it
somewhere around here. Yeah, I think this
is much better. I will just select
this complete phase. Then press first I will disperse to extrude
this backwards. Then press X and
delete the phases. Alright, so this is the
basic structure just establishing I
will press Control plus to add edge loops here. The reason I did this was so I can just press Shift
plus D to duplicate this. Right-click to keep it over
here only then press P and separate the selection so that this is now a
separate object. This small little face. I will press tab and press
F to fill in the face. Make sure you select
everything by pressing a and plus F to
fill in the face. Alright, Next, again,
I will best tab. Before that, let's
apply the scale. The estab plus three
for Face Select, select this complete phase. Instead, this would be fine. Press X and delete the phases
again to select everything. Then let us just
extrude this graded. Think I will insert it a little bit more so I will
just undo everything instead. Select little bit
more till here. Now press EX Delete to face. Select everything, extrude
this. Listed over here. You can go to Object Set
Origin oriented to geometry. Alright, something like this. Let's add a modifier to this. Just decrease the scale
of this a little bit. Alright, Next I will
press Tab again. Let's add a new edge
loop over here. Right-click to keep it
exactly at the center. Again, press Shift
plus D to duplicate. Be to separate the selection. Estab, press a to select
everything that address F. This time I will add another edge loop
over here. So press control. Those are hit right-click to keep it exactly
at the center. Enable X-ray, and let's just delete both of these vertices. I will just add a
mirror modifier, stab dress, and extrude this. Before extruding, again,
we need to insert this so press Control plus a apply
the scale establishing. And now let us instead this, I will insert this
still here I think. Press X, delete the face. No, I think a little bit more. Sorry. I'm just trying stuff out. Again. These all
stuff that I'm doing, it is very preference
based and you can do it. How will you may think? Something like
this will be fine. So just press X,
delete the phases, stab with a, select everything and
let's just extrude this. Alright, Next I will just select this outer tube estab
for excellent hold Alt, select this outer
loop, this one. So hold Alt and just click
over here like this. Then I will press
control plus V to bevel. I will create
something like this. Just right-click and
shade smooth this first. I think this gives it a much, much better loop dander. Very straight, sharp corners
that we had earlier. I will just receivable
edge length for now because it gets really annoying to see
all those numbers. One more thing that I wanted
to do is let us select this cube slash for the
isolation press tab. And select all of these coordinate register
that you can see. Hold Shift and Alt, and just
keep in selecting them. But I don't want to bevel
it or all the world, the backside like this. I will just hold Control and
deselect all of these edges. Over here also make sure you
select every single edge and not miss any one. Also. I will just enable X-ray. You can clearly see which all
edges that I've selected. So make sure you say the same. Just press Control plus b. Now, I think I, by mistake de-selected this one. We need to select this one also. Just press Control plus b. Decrease the number of segments. Something like this. Yeah, I think this looks
pretty great for slash. I think we gave it a little
bit too much parallel. So I will just undo this
again, bevel it out. Something like
this will be fine. Hold Alt and select this loop. And all these things that I'm doing completely based on
my personal preference, only 30 is totally up to you if you want
to follow me or not. Alright, so I think our
window looks pretty good. We just disable
all the overlays. The scene comes along
pretty nicely with it. Let's just hit Save first
and save obligor files. And I think I will stop
this video right here. And we'll continue from
here in the next one. Add some more stuff
to our window, or maybe we'll add a tab. I'll see you in the next one, guys, thank you for watching.
12. Adding some more Details: Highlights. Welcome
to Chapter 11. So let's continue
from where we left. The first thing
that I want to do is if you just
come up over here, you'll see this empty space. I will just select these pieces. And along with the rule, the slash for the isolation
mode for seven for top view. Let's clear the cube to
just fill up this space. I will create a cube. Please sit over here
and scale this down. Now just place it
over here like this. Make sure you can
also Control to snap it with the vertex overhead. Also press tab, select this face and just
snap it over here. So I think this is fine. Next one more thing that
we forgot to create this range trainer for the sink. So I will just select
this thing again, press Slash is
seven for top view. We can press Shift
plus S then cursor to select it and bring
the cursor over here. Now press Shift plus a cylinder. Scale this down. What I will do is first right-click
and shapes with this. Let's disable edge
length for now. Best I to insert the face. Let's extrude this. Inverts
began to scale this down. Right now I'm just coming
up with random stuff. Next, what we can do is
best 34, Face, Select, hold Alt, and select
all of these phases. Press I to insect. Before. Let's apply the scale
and also add a modifier. Stab insect. Press Ivan more time to
insert the individual phases. Make sure you hold
Shift to just insert them a little bit like this. Then just press E, extrude
them inwards like this. The address x and
delete these faces. You can also press Tab and
delete this bottom face. That it is hollow and
just place it over here. Like this. Again, I will select
this press Shift plus S, then cause it to select it
and add a new cylinder. Scale this down. Now I will use the
Boolean modifier. So select the cylinder
then this zinc plus minus. Move the Boolean
modifier and below the solidify and Andrew top
of the beverage, like this. I will just scale it properly. All right, so I think
this looks pretty good. I have a slash to come
out of the edit mode. Next thing that I want to add
is there select our window. We did not add any kind of bold dot latch to our
window, open or close it. Let us just quickly add it. I will select the
window press Shift plus S goes to select it. First, let's add a
cube scale this down. Just place it over
here to make it look like as a hinge for that window. I'll place it over here, scale it up a little
effect like this. Now just select this piece. And let's add a mirror
modifier to this. And I will mirror it
over all four sides. So just use the middle object
as this window because we wanted to mirror it over all the four sides
of this window. Next time we should
take the y or the z axis slash to go into
the isolation mode, press one for front view. I will add a cube.
Scale this down. This dispute
somewhere over here. I'm just scaling
it up accordingly. Controlling, apply the scale. Stabbed. Again, I will select
hold Control and Alt, and select all four
of these edges, then press Control plus b. And we had something like this. Extra shifts plus S Then
because if you selected, let's add another cube. Scaled it up on the
z axis like this. Again apply the scale priesthood controlled an art.
And the next revenue. Would this integral
out of smooth, mortified to this model of gene calculated is
harder to control. The bevel. Self-care day is 0.05. Selected. There's slash and press
Tab to move to the mode. And now if you'll try and
press Control plus r, we can see we cannot add edge loops to the
lake complete object. We can just add it
to these areas only. So the reason for this is we can only add edge loops
when there are like portable core topologies when each face has only
four vertices. If you try to add an edge loop over here you can see again, add a complete edge
loop like this, but not in the other way. And the reason for this is
if you will see this phase, this phase has more
than four vertices. You can see this is the N1, both of these pieces. That's why we cannot add
an edge loop to this. So the easy fix
for this would be to just select these vertices, this one plus J to join them. And just quickly join all
of the vertices like this. Over here also, let's
quickly join them. Make sure you are pressing
G to join the vertices and not F. F is for
filling the face. But when we have to
join the vertices that are already existing
interface, we need to plus j. When you have selected and
join all the vertices. Now if you'll try to
press Control plus r, you can see we can
add an edge loop like this or even like this. Just select this
loop. So hold Alt. But as you do times and
move it a little bit dumb that it does not cause
the initiating issue. Overhead also, we then see it is looking
quite sharp over here, but just do two times
and move it like this. Alright, I'll press Tab, press Control R and
add another edge loop. Let's place one over here. It will select all
of these phases. I inserted them, make sure you're not inserting
individual phases. So press Ivan more time to inject the complete
face like this. And then let us see
its extrude, it, extrude this like this slash to come out of the
isolation mode. And let's see. We'll just
rotate it on the y-axis. I think something
like this looks fine for our boiled or latch. Next what I will
do is right now to try to rotate this
on the Y-axis, you will see you
cannot locate this properly because the origin
point is obviously over here. What I will do is I will stand. While this phase is selected, I will press Shift plus S, then it goes up to select it. Then go over to objects at origin and origin to 3D equals. Now if you press R, Then why? You can see we are rotating it about the origin point only. It will be easier to handle. Also, reduce the developer
little bit. Maybe. Now I will just
join both of them. Make sure you select this first in this first,
then this one. That's this way. If
you just join them, both of them will get
the bevel modifier. If you change the order, if you select this 1
first and this one, then actually the bevel modifier that we have on this one, it will actually acquire all of these modifiers,
this objects. But this object does
not have any modifier. The bevel modifier will go away. Make sure you select this
1 first simplest one, you can press Control
plus g. Then left side, and we didn't modify it to this. Select the middle object, I'll just read it on the z-axis. Yeah, I think this looks fine. I will hit Control
plus tes to film this. Next thing what we can do is
let's add a tab over here. Alright, so just select, I will select the sink press Shift plus S goes up selected. Let's add a cylinder. Scale this cylinder down. I will just reduce the radius. Let's send the request to
somewhere around five. Now scale this down. Located on the X
axis by 90 degrees. Over here. Right-click
Shade Smooth. This enabled order smoothly, and also add a bevel modifier. Before proceeding.
If you will just go over to the reference images, this folder, you will find
this tab reference image. I will just quickly
open up pure ref and bring this in so that we can just have a reference
image should look at and we will create
something looking like this. Only. A zoom it out and drag
and drop it over here. Double-click and focus on it. Now we can easily create a
tab like by looking at it. Stab, let's select this face. I will also enable edge length. Alright, so let's start first, supply the scale estab, recycle insect this face, as you can see to
create this over here. I think something like
this will be fine then distress E extrude
this outwards. I will extrude the steel here. I think. I will insert
this a little bit more. Then extrude this. Next part I will do is I will
just press Shift plus D to duplicate this and right-click
to keep it over here. Then again, extrude this just to create a little bit
of separation over here. Next, what we can do is
we can press Shift plus S then because it was selected to bring the cursor over here. Excited new cylinder. Scale this down. My opinion, this portion kind
of still looks very huge. Wanted to reduce the size of it. So hold Alt and select
the complete loop. Just press S and then Shift plus Shift plus white so
you can scale it like this. Something like this
will be much better. I will right-click Shade,
Smooth this piece. Sad order, smooth. I will scale this down. Place it over here. This
looks much, much better. Now, I will add another cylinder
against scale this down, or let's just and it once again and I will
reduce the radius. Try radius of 1.5. For now, scale this down. Total here. I will just select all of
the objects for slash to go into
the isolation mode. This piece right-click sheets, mood, enable a lot of small. Let's see. Best controlling.
Apply the scale first pre-step for
the heat mode. Select the top face. Instead this in words. Now extrude. Let's insert this one more time and then
extrude it upwards like this. This much size would be enough. Let's add a bevel
modifier to this. Apply the scale enabled
hardened normal. All right. Now I think we can
turn off edge length. Let's see. Next. As you can see, we have this rounded curvature like create it, it is pretty simple. For the right side view. Next, what you can do
originated right view, I will just use the left view, so hold Control and
then plus three because it feels like a
little bit more comfortable. Press tab and make sure you
have selected this phase. Now to create this
kind of structure, we will use this pin tool. If you go over here
in this toolbar, if this is not
appearing for you, you can just press
T to bring this up and select this
pin tool over here. Alright, so the way we
use the sprint to list, we can spin the selected
face about the cursor point. So we need to move
the cursor point somewhere around here. It is. Trial and error thing.
So hold Shift and right-click to move your
cursor points like this. And let's place it over here. Now you can try to
spin this again, press Control plus three again. And if you just go over
here in the tools section, you can change the axis. So I think we have
selected the wrong axis, so I will select the X. The X is the correct one. We were earlier in z, so it will spin like this. You need to change the axis, press Control plus three
again and select the x-axis. And you can see we can
create something like this. It is not looking as what we can do again is change
the cursor point in. Let's see somewhere around here. And keep on trying. Until we have something. You'll see, we've already
got something like that. What we were looking for. Let's create
something like this. I will just move the cursor
point over here a little bit further. Insulate the x. Make sure you select the face. Try once again. This
is much better. Next, what I will
do is it till here. If you go over here, you
can increase the steps. What this will do is this will make it a little
bit more smoother. I think this is fine.
There's three slash to come out of the
isolation mode. And see. I think they're
tab is quite high. I will just for
slash, there's three. Naval x-ray select all of them. Move it down like this. Let's move it a little
bit in the front and select the tap and see if it is like
matching up properly. This is fine. Obviously it does not look like
exactly like that, but I think the tab looks fine. Maybe I will scale
it down a bit more. Now you can see, you know, how to use Spring tool. What I will suggest
you is that I came up with this innovative
short amount of time, but you can spend
some more time with the spring tool and keep
on experimenting with it. Make sure to do in
the tool section. Change your axis so that you
can easily use the tool. And after you are
done, make sure to just select the
selection tool because it can cause
you some problems by working with it if you
are not intending to. Next, what I will do is I
will best 34 facilities. Select this face,
hold Shift and Alt, select this face
and this one also. Then press V and separate the selection to create
something like this. Over here. I will select this object slash. One more time to
isolate this truss tab. Select this complete
loop by holding Alt and then press F
to fill in the face. You can see something like this. It is because of the
magnitude obviously. You can also add a vacant
normal if we're feeling like the shading is not quite
right, but I think it is fine. Next I will press Tab again.
Press three for Face. Select, select this face. Press I to insert this and
extrude this in words. I will reduce the
bevel even further. Let's say 0.01. Biting this is much better.
I will select this one. Now. Hold Alt, this 1 first, then hold Alt and
select this loop Pinterest F to fill in the face. Let's see. I think that
looks pretty good. That comes along
well with our scene. I will select this
piece again, estab, hold 34, Face, Select, hold Alt and select
this complete loop. Then press S, then shift plus y to scale it down
on the x and z plane. All right, so I think
we are good to go. I will hit save on my identify. Watching. I continue from
here in the next one.
13. Modelling the Kitchen Slabs: Hi guys, Welcome to Chapter 12. So in this video, I will start
by creating a molding over here on our cabinets that goes from here
to here like this. I'll just show you in the Google Images
something like this. We will be creating something
like this over here. So it looks kind of difficult, but it is very easy to create in vendor. I'm back to Blender. What I will do is I will
select all of them, control and de-select
the root slash to go into the isolation
B7 for top view. Shift plus a, go to Mesh single word and
add a single word. One thing that I should mention one more time is if
you're not seeing the single word
option when you are adding, when you're
pressing Shift plus. And if you do not
see these options, you need to go over
to Edit Preferences. In the Adams section, search for extra objects. Extra objects and
enabled both of them, the curve and the mesh. And then you will get
all these extra objects in your shift plus a menu. Alright, so to move this mixture you under
vertices select mode. Press Tab, press one
for vertices select, press G to move it, and I will place it
somewhere around here. Then plus e to extrude this, then press X to make
sure to lock it on the x-axis so that
it stays straight. Somewhere around here. Then again, e, y, lock it on the y-axis. Move it till here.
Again, press even x and let us move this still here. This one also I will select this move it a little
bit over here, and then press skied and Y. Move this over here. All right, next thing
to do is let's play G, then move it up over here. These are the origin.
So go over to Object set origin and
origin to which electric. One more thing that I
wanted to mention it, if you go over to these commands that you use very frequently, you can just
right-click over them and add them to your
favorites like this. I have already added them.
Let's try this command. You can add them to pick favorites, and you
can just press Q. You can quickly access all the commands
that you use a lot. So maybe I can add the lake extrude normal command
or something like that. You can just go over
and right-click on the tomorrows that you use occasionally and then add them. I will just remove
this from micro favorite slash to come
out of the edit mode. Move all these objects
that are out here in their respective
sections. Let's see. I will select these, this one, this one, this one. Let's move them into a new collection or you
can move this to pigeon. Let's move the Sink. Tab. All these stuff also in the
kitchens collection only. Move all of them in the continuous present and
then move them to get you. Now to create a morning
from all of these vertices. But we need to do
is first we need to create these set of
vertices into a curve. So to do that, just
raise F3 and typing convert and search for Convert
to go and select this. As soon as you do that,
you will see a set of completely different
options over here that are of a curve. What we can do is open up the geometric
section, the debit. You can go over to profile. If you just increase that, you will see we are creating
something like this. You can also increase the
resolution to their symptoms. Before the increasing revolutionary
contribute something. I will set the depth to somewhere around
eight centimeters. Let's move it a
little bit over here. Like this. Next, what I will do is I will
show you something. What you can do is go over
here in the profile section. Click over here in the B6. And if you say Nice model, More link will see something
like this over here. But right now, it does not have much resolution
to if you increase, the resolution,
gets much bigger. I will set this to max 32. You can see we have
creating the More link. I will select this volume. Maybe I'll just select
all of them over here. Enable X-ray. Let's move
it over here like this. Next I will select all
of the tabindex. This. And let's move it up over here. Let's select the room press tab and I will quickly fill up the face just to see
how everything fits. I actually don't want to
show the complete molding. I will just show up here. Half of it is
actually like half of it and the other half
is completely safe. We just needed the half of it. Something like this. The
word receded also do them. Please. I think everything
seems fine overhead. Alright, so the next thing
that I wanted to show you, this thing that we currently use is the preset overhead that is already created for
us by Blender will lead. Iodide is added over
here to the research. You can select something
else like crown molding. But I think this one was better. I will tell you
how we can create something of a very own also. So you can just go
over to Reset Default and you will get this
very default basic loop. But what you can do is you
can just add vertices. And if you just start moving, then you can see how everything
is updating over here. You can see you can create
something of a rainy, cold vein customize
however you may like. So as soon as you
are adding Woodward, see, it is getting updated. And all these ridges and empathy and cleared
on your own by adding simply just vertices. We can fear something
on our very own. I'm just trying to really going
over and adding vertices. Distract from the fault, strike creating something
really thickness. I'm not trying to spring
too much time over here because this is completely
preference based. You can spend like a learning time-honored and create
something very defined. Just want something to gain by. Next, if you just right-click
and choose Move this, you will see all
this weird shady. But don't worry if you
just select this press F3, and again, search
for Convert to mesh. You can just move it
here and enabled auto smooth and everything
will be fine. But make sure after
you convert this to mesh and enabled auto smooth, you won't be able to
edit its property, property, so make sure you
are happy with everything. So I will just undo this
and we're back over here. Make sure when you are
happy with everything, all the depth and
everything then only you convert
this to match so that you are happy
with your results. What are you going to do is
after you are satisfied, you can just duplicate this. Move this piece to a
different collection. And then the one over here, you can apply the modifiers
and converted to mesh them. Cheats move this and everything. And if later on stage you feel like you need to
make some changes, you already have it in
some different collection. So you can do that. I think for me I
will just select the preset and smarter,
more reading only. I think it looks pretty good. So I will just
share smooth this I will convert to mesh
enabled auto smooth. I think this looks pretty good. Let's check Control
S to save a file. And the next thing to do is
I will create some cabinets. But yet in our slots, I think that is the last thing
to do for our main crops, will select both of
these pieces per slash to go into
the isolation mode. This last tab, respond
for the front fill enable X-ray and Lexi respond rule R and I will
add an h over here. I want to create a cabinet
right under the sink. Something like this.
Next part I will use. I will also enable
the link from here. Let's try adding some
more edge loops. Let's give this distance
that is over here. You can see u is 2.58. That entity, I will
say these 2.5, maybe. Not sure if you can see it, but I'm talking about
this age over here. These 2.52, as you can see, the same mayhem and
starting over here. So 2.5 and I will
keep it consistent. Oliver, naive model. Let's add one over here also. From year one. Like this. Here we really
don't need to add. The goal won't be visible. Let's add one like this. Over here. Next, I will just quickly go
over and miscibility with all of it is ready to work with. I will select these two phases, extrude them
backwards like this. Something like this. Where
stab, let's look deeper. Shift plus D to duplicate them. Right-click, keep
them at dislocation only then press P and
separate the selection. Make sure to remove the Boolean modifier so that it does not cause any
issues and move it. There's bring them
out over here. Next tab. Select everything, invest e to extrude them
backwards like this. Alright, next part
I will do is press Tab again. And let us see. I will select everything then again press P and
separate them by loose parts. So what this will do
is it will further separate them into two
different objects. Select this piece, go
to objects at origin. And actually I've added
this in my favorites only. From now on I will use that. I will select this
rescue directory because I really use it a lot. Next thing I will
start with this one, press Control R at
edge loop and hit right-click to keep it
exactly at the center. Now let's select
these three phases. We can do is we can select this and this one also press tab, go into the Edit mode of both
of them are the same thing. Silica, all three of
the feces press one for front view and press
I to insert them. You can see these two
phases are kind of inserting together when these
two are single-phase only. So you can just press i2 times in certain
them individually. Let's insert this still here. Next what I will do
is press control, not control plus V.
So Control plus b is only used for like
Devlin edges and feces. But right now I want to label
these vertices for that. But what we need
to do is we need to hold Control
Shift and then press V. And you will see it will
be completely differently. Let's add a bunch of
vertices like this. This looks pretty good. I will select these three phases again, press I to insert one more line. Will also select
them. Press Control, lay apply the scale. Now hold Alt, select
these three loops. Now hold Shift and select
all three of them. Then just extrude them. Before that I will just delete
the right side of this. Just quickly use them modifier,
this object modifier. Perfectly. I'll say both of them hold Alt and select
these complete loops. Now please eat to extrude them. Something like this. Yeah, I think cabinets look pretty good. Select them both,
right-click and choose food. You can also reduce the bevel
if it looks like too much. One more thing that I
wanted to tell you guys. Maybe you want to, again, properties of multiple
objects at the same time. So like I want to
reduce the bevel of both of them
at the same time. So I will just select both
of them first pulled. Or if you see now if I
turned down the Bible, I am doing it for both of
them. It is pretty handy. Mark hold Alt and let's
just reduce them. If you hold Shift, it will
go on slowly to 0.3 maybe. Yes. Fine, looks good. Next, let's see. First lexicon volt plus
S to save our files. And I'm thinking about using these handles over here also. There's this redshift
plus D to duplicate it. Right-click and go to
paint it and cleared, cleared and keep transformation. So that it is not for the
connected with the painting. Again, I will select
both of them. Slash, select this press
Q origin, the geometry. One mode add-on that I wanted to show you guys is if you go over fences and search for copy, you will see a copy attributes menu add-on just enable this. So now what this
will do is if you just select the handle, then select this object, then press Control
plus C. You will see this completely new menu. And you can copy like
different things for B location rotation and even the different modifiers.
I will select location. And you will see immediately it gets pasted exactly
at the center. Make sure you select
this 1 first, then select this one so
that this objects get, gets copied to the
location of this object. So press Control plus
C and copy location. Move them out over here. Next what I will do this, select this press Tab, and it will x-ray, select
all of these vertices. 70 drew over here.
Delete this one. I will denote real issues. It's fine. Now, select all of
the right side would seize, disabling just these two. Control and deselect them. Come out of the x-ray and just rigid an x and
move it like this. You just give the
space to the handles. I think this looks fine. I can fold plus
S, save my files. Also, we cannot see the
partition over here. So just disable
clipping for now. Also disable the
middle modifier. Select this rigid and x and
move it a little bit further. Select all of these words. Then plus g and x. Move them a little
bit to the left, enabled back the modifier. Let's see. I think the real reason if you let a minutes because we do not have select this press F
to fill in the face and enable the middle
back again. Risk tab. Select the face. You can enable this option to show up the mirror
modifier in the edit mode. And let's move it like this, really close to each other. It looks perfectly. Hit
Control S to save our files. And let's see if we will create something
different over here. And also the fibula here. Also I will select this, both of these to VCs or selectivity showing
you select motor deficits. Formula. Move them to the
end of the loop. Let's see something to
create over here and let us say both of these
press Slash again. First, let's again
enable the edge length. I will add another
edge loop over here. If it had 2.5 distance. This face. Then just extrude
this backwards. For this piece, I will create
a sliding type cabinet. Let's just select this face. Press Shift plus S then
because there to select it, I will bring the origin
point over here. We can just add a new object. Shift. They are the cube, one for the front view
and scale this down. Scale it down on the y-axis. Next, I will just
duplicate this, move it back on the y-axis and literally move it over here. Something like this. Select this piece
and if this phase, then plus g, Then why? I moved the face still here. Next I will just
join both of these. Select them both press Control
G, you're joining them. Next let's add a modifier. Apply the scale first. Next I will add another cube, one for front view. Let's scale this down. We create something
sort of a handle. I will select the cube again, result plus H to
bring this back. Let's scale it like this. Something of this sort. Then just apply the scale first. Tab. Control and select
all of these edges. Press control plus V to bevel. G2m. This enabled Lotus Notes. Move it out first. Three for Face, Select,
select this face. Let's just turn off
a glint for now. Use Control plus b to
create something like this. Now I will use the
difference operation to select this piece
first and this control plus minus c, I will move the Boolean
modifier at the top. For some reason,
nothing is happening. Let me see what went wrong. Quickly show you
what went wrong. I've figured it out. First, I will enable
this Aztec ship. You don't have to
do this. I'm just doing this to show you. Now, if you just enabled
finish orientation from here, you can see this object has the that collect
fees or condition. That means the
normals are flipped. So what we need to do
is we just need to press start with a to
select everything. Then press Shift plus
n, flip the normals. Now if we've done our
face orientation, you can just hide this. You can see the Boolean
is working properly. But the reason you
are seeing this is because we are
secular deistic shared. So we'll say
feedback the bounds. Now you know what happened.
We just need to press Shift plus n to recalculate
the normals. Next, I will select this, move it back over
here, like this. Select this piece
30, both of them, a slash estab to go into mode, select this face backwards. Just to give it a little
bit more thickness. I think something like
this looks pretty good. We can also select this cube. You can just press L to
select it as a whole, then G, Then x, and mood a little bit forward the vertices and let's paste them over here. Alright, so I think we
are done with this site. You can see a kitchen is
starting to look really good. Now, the last thing
for this video, we will create some cabinets
and drawers for this slab, I will slash to go into
the isolation mode. Really don't need this part. I will just select
this then press Slash, alright, dress tab. First hold Alt and select
this complete loop. Then press X and
delete the edge loop. Just to remove this. Let's see. First I will shift plus S.
Then because of the selected, let's add a new cube dimensions, typing x, z, and d. Be the dimension for our drawer. Place it over here like this. Scaling down on the x-axis. Next what I will group is first, let's apply the scale. So pre-screening, truly applying the scale at any modifier. I will use the add a
modifier on the z axis. First, duplicate it four times. Try to adjust the factor. I think this is pretty good. Now what I will do is I will
just quickly duplicate this. Right-click to place
it over here only. Select the values are selected, select this, then this
control, this minus. Alright, let's hide
this peaceful. Now. Select this first move, the Boolean modifier at the top. You can see a devil is not
quite working properly. So I will just open
up devil first and in the directory section I
will disable clamp overlap, and this will solve it. Let's press Alt plus H to
bring that the drawers. Next Risk Control plus K, apply the scale upside a
bevel modifier to them. Rescue and dirty to
genetically scale this down. I mean, I'm setting
though among count. Next, I will just quickly
be one of the handles. Press Shift plus D. Duplicate this. I click
Anglo would repeat it. And keep transformation.
Slash again. Select this, press tab
X-ray to need all of them. X and delete the vertices. Control plus three.
For this view, I will rotate it by 90 degrees. And next I will again
use the copy menu. Select this, then this, then press Control
plus C copy location. It is, if you just
double-click over here, you will select it and just
move it out over here. Excuse the add a
modifier on this. Excellent, this restless
leg press I said this. Then extrude this outwards. I can just pull this
out a little bit. Just check if everything
is in the middle. So I think it seems fine. Let's select this again. This tab to go into
the Edit mode. What we can do is we
can select this option. You even view the
Booleans in the egg mode. Control plus our
add an edge loop. Let's add one over here. You can also enable
edge length and Wi-Fi. I will add this again around
2.5 centimeters. One also. I think this is fine. Next I that edge
loop by it in the same right-click over here. Alright. Now I will just disabled
wireframe. For free. Select, select both of these phases to inject dye molecule and then
extrude them backwards. I think this looks quite thick, so I will select
them both, press S, then Y, scale them down. Next I will select
both of these spaces. Press Shift D to duplicate them. Presby and separate
the selection. Just bring them over here. Again, let's do a similar thing. First, let's extrude
them backwards. Select them both. Press
Control, apply the scale. Select them both,
press I insect. Then press Control Shift and B to bevel the vertices first, let's disable edge length. All right. This is fine. Select them both again, press I to insert, hold Alt and Shift
and Alt select them both received to
extrude them outwards. Click shoots smooth, reduced. Alright. I will again educate
this modifier. Select this and
select this slash. Staff press a to select everything recipe and then
separate by loose parts. Select them both, and rescue
and other eugenic tree. Now select this, select this, then press Control
C, Copy location. Now we can easily place it
in saying this one also, I will just duplicate
this, place it anywhere. Select this first and select this Control-C Copy location. I did something wrong. Yeah. I accidentally
selected in the wrong order. Also makes sure they are Slash. And I think almost done with the modelling
section of our main props. We forgot couldn't
move in this piece. It uploads. Select this
and move it over here. Snapping by holding Control, forgot how to snap, just
select vertex from here. And while you are moving, you need to just hold
Control and hover over the word fee Into
snap it like this. Save and I think we're
almost done with the main modeling part of it. You can also move
a little bit back. Alright, so let's hit Save. We continue from here
in the next one. Thank you guys for watching.
14. UV Unwrapping the Stove and Fridge: Hello everyone.
Welcome to Chapter 13. We are done with the
modeling part for now, and we'll start with
the texturing process. First, we need to apply all the modifiers and
then UV unwrapped. And then we will start with
the texturing process. What I will be doing is I will texture the
prof one-by-one. So first we will start with the texturing of the
stove and the fridge, and then we will move on to
the rest of the prompts. But before that, let's just arrange them first so
I will select all of them, move them to the teaching. Next, what I will
do is I will select the kitchen drew the slash. Done on Screencast Keith first. Yes, I will. This phase that we
earlier left out, I will do is select
this edge brush tool and select this edge press F to fill in the face and fill everything
one by one like this. One more thing that
I wanted to do this, if you just press
Tab, select the room, press Tab Control plus r to add an edge loop like this slash to come
out of the edit mode. And I will place this
edge loop somewhere around here. Like this. Then just quickly select
all of the faces. Don't want to select these faces while holding shift,
just deselect them. All right, Next what I will
do is I will press Alt plus a0 and then extrude the phases. Just to leave it like this. The reason I added
this was we will add a different texture
tiles over here. And the rest of it
would be like concrete. And it will add a nice
bit of the radiation. Let's also add a bevel
modifier to this. Apply the scale. Set them on 02517
divided will be fine. Alright, let's see. The next thing that
I wanted to do is, as I told you earlier, when we apply all the modifiers
of a particular object, we won't be able to
make any changes. For example, if I apply the modifiers of this
particular object, right now, I can move the
position of the Boolean, however, I may like. But as soon as they
apply on the modifiers, I won't be able to
make some changes. So make sure you are
satisfied with anything, but also do not
take any chances. What I will do is I will
create a separate file. So just hit Control Shift and
S handover to your folder. And I will save this as, let's save it as final scene. I will write in
bracket has applied. That means we have applied all the modifiers and hit Save. Now we are in the financing
applied file is right-click. I will open up a new blender. These are two separate files, so one of them has all the modifiers
applied and in one of them we will keep everything without the modifier supplied. So for example, if you wanted to change
something later on, we can come back
to it and do that. This file that is with the name of Prof. we will keep
everything as it is. We will not apply any
of the modifiers and just close it. For this file. That is this final scene one, I will select everything, press F3 and then convert
to mesh like this. Now if you just, for example, select this object,
try to move it. You can see nothing happens. Modifiers are all now applied. Also, what I want to do is
I will just turn this off. I will enable all these
collections one-by-one and delete them because we really
don't need knew this stove is laying earlier, one that has all the
modifiers intact, but we actually have
a copy of this. So I will just
delete this delete this collection just to
remove some of the clutter. I will also remove all
the reference images from this particular file. Move the cupboard. All right, so the only things that are remaining are all
the applied ones. That is our main scene. I will also delete this cupboard collection because we already have it
in the other file. This quickly delete this
and also the collection. Alright, so now we only have
the objects that we need. Now I will start to quickly delete all the stuff
that we do not need. Right? Let's see. We need to dilute all
the Boolean objects that are left-leaning
like these ones. Alright, so next, I will
disable everything. This one is Jeff. We are done. I think I will conclude
dissemble everything. Only enabled the
stool and the fridge. Next step will do
is I will select this object over to materials and add a
new material. Do this. Let's name this
material as stove. Now, I want to
copy this material or undo all of the
objects of the stove. I will, while this is selected, I will hold Shift and select
all of the remaining. And make sure the active make sure the active object is
the one with the material. This one, make sure this has
the yellow colored outline. Now while everything
is selected, just hold Control
plus L press control plus L link materials. You can see 18 is written
over here that meets this material is being shared
by 18 different objects. And if you go over here
and enable statistics, you can see we have
selected 19 objects, but this is because one
of them is this MP. Now at this point we can also
remove the empty objects. So while everything is selected, right-click over to paint it and clear and
keep transformation. And just delete this empty. Because everything
is placed right now, we do not need to move
or rotate anything. Next time we'll select the
fridge, add a new material, let us name it as ridge
shift selectivity. While this is the active
object press control plus L. Link the materials. Right-click, go to painting and clear and keep
transformation. The MD. Alright. Now let's move on to
the UV Editing tab. The first step that I will do is I will proceed,
select everything, then press Control
plus C and make sure the scale is applied
because it can mess up our UVs. Now we will UV unwrap them according to
their material sets because they will be
separated according to their material sets in
substance painter also, first, let's UV
unwrap the store. I will select this only went on. Then I will press Shift plus L and select linked,
then select materials. This will select
all the materials that have the stove material. This will select all the objects that have the stolen material. Then you can press Tab to
go into the Edit mode, press a to select everything. Also enable display stretch. Alright, now I'll
just press U to UV, unwrap and hit smart
UV project it. Okay. You can open this up and give it the island margin of 0 or 0123. Yeah, I think this is fine. To come out of the edit mode. Now select all of the fridge
or just select one of them, redshift plus G, Shift plus L. Then select material, estab
press a to select everything. You then Smart TV project. I think just one is fine and at 0.0025 does not matter much. I think this is fine.
Next, let's just quickly evolved into
substance painter, but before importing
you must check one thing you need to go over
here, enable fees are due. In addition, all these red
colored objects that you see, you need to flip them over
so that they also have the blue color because
color just flip normals. Just before solving
this problem, I will show you what will
happen if we just import these particular objects
with the Flip Normals? You don't need to
follow me right now because I'm just
quickly showing you. I will also open up substitute sprinter.
Select them both. Go over to File, export
and export them as FBX. Select these two options, selected objects and
active collection, and also select poorly mesh. That way that I do not
accidentally import anything else. I will create a new folder. Name it as exports. And I will name the
FBX as stove and fridge and hit Export. Now open up substance
painter availability. Later on. Create a new project. A new project
section in the file, select and select the
export you just made. So select this FBX file
and everything rest. Everything remains same
and just hit Okay. Now if you just come back here enabled face
or do you envision? And you can see this
particular object has the Flip Normals. And if we zoom in over here, you can see how
weird this looks. It looks flamed out. And that is because of the
enormous that are opposite. They are flipped.
As you can see, these handles also
look very weird. This will happen if you somehow important did wrong normal. So let me select this object, proceed to select
everything by stabbed him. Proceed the Shift plus n. Just flip the normals. Next, let's select this mode of the handles press tab and
press Shift plus n can split. Coming out of the face
orientation mode. If you just select
this focus over them, you can see this has
caused some issues because the shading around the
edges now look very weird. It easy fix for this move or to modify an advocate
normal modifier. And you will see
everything is fixed. Csu and apply. I'm also noticing another issue
that if you just look over all these gas over all the edges that we
use the mirror modifier on. There is quite a weird
shading going on. I will also address this
first before importing. Let's solve this first. I will select this
object press Slash to go into the isolation. And to solve this issue, I will just restart, press a to select
everything This p, and then separate
them by loose parts. So that I can call each
one of them differently. Select all four of them, go to Object Set Origin,
origin to geometry. I will select this 1 first stab enabled x-ray and just
quickly delete all of them. The other three sides
as x and delete the vertices. Not this mixture. You deleted only 3 fourth of it so that we can
again beta rate. Now if we just select this face. Now if you select this
face and delete it, because I think this is the
one that was causing it. Both of these phases. Now let's add a grating
normal modifier to it again. And again, add a
mirror modifier. I think seems to have
worked pretty fine. I will just apply both
on the modifiers. Now, I will just duplicate
this, keep it over here. Select this, select this and Control plus
C copy location. And make sure you
delete the other one. This one plus H to
bring this back. Now again, I will
duplicate this, select this 1 first and this one Control C, Copy location. Tied this one and
delete the older one, then hit alt plus H. Again, duplicate, select them both
Control C for relocation. Alright, so I think we
have fixed the issue. Let's just quickly turn on face orientation once again
to see if everything is fine. Yeah. If everything looks
fine and I will just now I will just select
all of these two objects. Hit Control per se,
apply the scale. Uv, unwrap them once again. Because obviously we
created a new object. So that's why we need to
unwrap it one more time. Alright, so now that we have
tackled all the problems, I will press a to select
everything again. Save Google to File export
and export this as FBX. Click over this file only because I want to
replace this one. Selling these two
options and enable mesh. Then select click over
here and then hit export. Alright, come back to Substance Painter and let's
create a new project. Over to File, select against,
select this one, hit. Okay? Now if you just see
everything looks fine. You can hold Alt and use your left mouse button to look
through your entire scene. If everything looks fine, it looks pretty good to me. You can also hold Shift and then use right-click
to move the lighting. I will also go
over here and also enable entirely thing that
all these jagged edges. Alright, so the first thing
to do is as soon as we create a new
substance project is, is that we need to
bake the mesh maps because because we need
to use a substance, painter features
like smart masks and smart materials
generators, etc. And for them to work properly, we need to have the mesh
maps baked correctly. If you go over to
the texture save settings and hit
vague mesh maps. You can also see we
have two texture sets. One of them is the fridge
and other one is two. So we can work on
them separately. I will hit big mesh maps, select the output size as 2048. If you have a decent a PC, you can go for 2048 or even for k. But for k would
be pretty overkill. And if you do not
have a decent PC, you can go over it
with one key or 52. But I suggest going with
at least two kids disabled ID maps and enabled
both of these options. Since the anti-aliasing
to read by eight. Yeah, I think there's
two of the options are default pretty much fine. Now just hit big
selected textures and it might take a little ride. I will just cut the video and resume when everything is done. Alright, so now the baking
of the HashMaps is done. Hit Okay? Just look through
your entire model if everything looks fine
and there are no issues. Yeah, I think they bake
came out pretty well. And everything looks great. One more thing that I
wanted to mention is that all these problems
that we face right now, there is a chance
that you might face, might not face any of them. And everything goes
smoothly with your project. Or there is a chance
that you can face difficulties with different
set of objects in your prop. So if your problem
was not one of them just mentioned in the comments,
what was your problem? And I will try to solve it, but most probably it will
be one of them only. And if it is a shading issue, most of the shading
issues are solved by adding a break
in normal modifier. Alright, so now I will just hit save it over to my
tutorial directory. Create a new folder
with the name of a share files, Substance
Painter files. Let's name this as
stolen and fridge saved. In this lecture, we learned
how to light UV unwrapped, apply all the modifiers and import them into
Substance Painter. We also tagged a few
issues that we might face while mitigating through
Substance Painter and Brenda. Thanks for watching.
In the next video, we'll continue on
with the texturing. And both of these objects
say, thank you for watching.
15. Texturing the Stove: Hello guys, welcome
to Chapter 14. Now in this video, let's start with the
texturing process. I will start first by
texturing this door. To begin with, let's select the stove extra set from here. You can just clip over here
and select it if you want. You can also disable the
fridge texture set to work properly with the
stove and only you can press or hold
Alt and then use your left mouse button to
move the scene like this. Then hold the scroll wheel to pan and right-click
for zooming in or out. These are some of the
basic stuff of the inter. Next, you will see
a layer over here. I will just delete
this layer and what we will do is we will
add a new fill layer. Fill layer is
basically it will fill the complete object
with a single color. You can see with a signal layer, we can change the color. We can increase the
metallic sickness or set the roughness values. So these are the
different parameters and also the height
and the normal. There's just reset everything. Before starting. Let's open up your ref. Let's see the storm model. So I wanted to create
something like this only along the lines. Now that we have
added the fill layer, this will be our base color, our very first year
and we can build upon we can add different layers upon this
to give it more details. Like if you see
over here there are some edge damage and things like roughness,
variation and everything. So yeah, we will
add all that first, let's select this layer,
double-click over here and rename this to base. Thanks, David, set
a color for this. I've already decided on a color. You can go ahead and
experiment with it. I want to go with
something light yellowish. We developed for the new
values are equal to 0.174. Saturation later 0.035. Obviously, we can change
all of these values or delete rows if
you feel like it. And the value to 0.9,
something like this. Next for the metallic value, I want to make it a
little bit metallic because the thing is this material kind
of looks like paint. Underneath it is steel and
it is painted over it. I want it to look a
little bit metallic, but not, not much. So I will turn this to 0.6, maybe, something like this. Next, let's select the roughness for the reference value I will say point to make it reflected. You can hold Shift and then use your right-click to
move the lighting. The next step is,
as you can see, this material is only over these areas and not on
all these other parts. To separate it out
from the other parts, what we can use is we can use a black mask or we can
use geometric mosque. First, I will show you how
to use the geometric mask, but because it is fairly
easy, just click over here. Like this. Right now everything is added
in this geometric masks. As you can see over here, you can select one by one like this and remove all of the
objects that you don't need. This material on. The other way would be
to just click over here, right-click and hit Exclude all. Now this 0 over here it
is written that means this layer is being
used by 0 objects. None of the objects
are using this layer. Click over here again, and I will just select the objects that I want
to use this later on. Let's select this one, this one. This one. This also for this piece, I will use a separate
this module is fine. This back face I
want you to select. Yeah, we're good. Next what we can
do is let's start by adding this edge
damage rule here. We can add that I will
create a new layer. Let's rename this
to edge damage. I will give this
one metallic value because as you can see, this kind of mega logo
here for the color. Do something like this. I think. Again, it is completely based
on your preference. Center of minutes to 0.23. Now what do we do
is we want to add the edge damage over
here on our edges. So we will use something
called the generator. Do user-generated just go over here and add a black mask first. Next click over here, and then add generated here. And I will use a metal. This one metal edge view. The select it. And instantly you will
see this layer is spread upon all of our
edges mode right now, obviously it does
not look very good. But right now it obviously
does not look very good. So let's make it a
little bit better. First, I will select this base. One thing that I want to
do is, as you can see, is this edge damage is being spread upon over
all our objects. So we actually don't want that. Instead of going over in this geometric mass for
every single layer, what I will do is I will
just create a folder. I will put distinct in this folder and
this one over here. Let's move it below this. And next thing I wanted to do, leak over here, right-click
and just include all that. Now this layer is over all our objects and
now what I can do is just click over here,
right-click exclude all. And now select the
objects that I want to apply all these materials on. I mean, all these layers on. Now actually what this has
done is this folder has made a lot easier because
now if I add another layer, for example, I add a new layer. You can see this
layer is being added, is being added to
these portfolio. And if I move this
out of this folder, now it is over, over
all of the objects. We can create folders
for different parts of the model and fill
it accordingly. Let's delete this layer for now. Next, rename this
layer to metal paint. To exit the properties
of this generator, you can just click over here. You can adjust the real level. You can see how it is updating. You can also increase or
decrease the contrast. If you increase the contrast, your dirt would be very sharp
as you can see over here. If I just increase it
and if I decrease it, it is kind of smooth. Also, you can
increase or decrease the grungy mountain ranges
like the dirt, increase it. You can see all
the dirt appears. And there are various settings
also like the grand scale. Change the scale of it to
make it smaller or bigger. Like this. This variable also
works out pretty good, but I don't think I
want to use this one. If you want, you can use
it. But what I will do is instead I will just
remove this generator. Instead of a generator, I will use a smart mask. So this group out here to
access the smart masks. And now you can find various
smart mass over here, like concrete edges or dirt. You can just drag
and drop like this, any one of them just to
see how all of them work. And you can see this particular
smart marks looks good, but obviously it does
not up to our needs. I will just remove it
and you can just try different various ones and
see which one of you like. But I will be going
with this one, paint old to just drag
and drop it over here. Next, I will again click over here and let's
edit some settings. Check the global balance 2.3 and I will
increase the contrast. Something like 0.8.
Focus on next, as you can see over
here, these corners. This is looking like baby it. First I will move ahead in the section,
decrease the curvature. And as you can
see, as soon as we decrease it, it is updating. I will set it to 0.8, I think. All right, next
thing that I will do is we will add some
custom details. So this guy over here
and add a paint layer. And now what we can do is right now if you
just start painting, you can see we are painting the steel paint over here because we are currently
painting with white. So we are painting on a mask. That is why we can
see the steel. But if I just press X and you
can see we flip the color. So it is now black. And
now if I try to print it, you will see now I'm painting
this paint layer, the base. This is pretty handy,
but obviously, right now, it looks weird to paint this
way with this brush. I will go over here and I
will select a dark brush. You can hold Control and right-click to increase or
decrease the size of this. And now I can just remove some
of the details like this. Then press X to flip, flip the color and
make it white. And I can also add some
of the details like this. This is pretty handy. So what I will do is first I will select this and make
this brush hard enough. Let's select something else. Let's go with node three. So first I will press X and
remove some of these parts. Make it look a
little bit better. Extra this brush. Alright, yeah, I think
this looks much better. Not too many details worked. I think we have enough
of them over a hill, so I will remove
some of this stuff. And you can just press X and
add some of it on your own. Make it organic and natural. Like this. Again, press X and let's
move some of this. Alright, yeah, I think
this looks pretty good. Something like this.
Only. Next what we can do is now I think this is
enough for our edge damage. I will add another layer. Another layer I will rename
this to roughness radiation. Little bit of
roughness variation. And what I will do is
I will disable all of the channels except
the roughness channel. As you can see, if I
increase or decrease, if I'm increasing and
decreasing the roughness, I will set the
roughness to 0.25. Check the base fellow roughness. It is 0.20.25 or we can change it later
on to 0.3 something. I will add another black mask. This time I will go over
here and use a fill layer. And for the fill
layer I will select, click over here and
just type grunge that these are different
grunge map or dirt maps. These are pretty well as
their masks for deafness, radiation and color variations. So we just hovered over here, you will find this
grunge maps 001. I will add this right away. You won't see any difference. But if I try to make
it a mode of this, I will increase the contrast. Now you can see some of it over here like this
roughness variation. Increase the balance. Let's try increasing the scale. I can certainly supply
planar projection scale. Now, as you can see over here, we have some roughness
variation in our model. If you go over here
in the main layer, you can increase or
decrease the roughness. This is very drastic, but yeah, I just wanted
to make a point clear. I will set this to
somewhere around 0.235. Let's increase this to one so that everything
just blends in properly. If you just click
over here again, in the grungy map, you can increase or decrease the
balance even further. The contrast decreases. The contrast will take
the value is 2.4. And I will say across 2.5, you have something like this. It is very faint, but
it is still there. So yeah. Also one more thing that
I wanted to do is if you just do it here in
the display settings, you can click over
here and change the environment that and
I will select this bus get adjuvant because I
have found this one to be like it has any defective. So it helps with these
types of models. I think this one looks good. Maybe I'll just call
back to normal. It is totally up to you. Alright, Next, Let's
just collapses. I will rename this
macro paint yellow so that we know it is
the yellow Bella layer. Alright. One more thing that I wanted to
show you guys is we have added like
edge damage and we have some roughness variation. Next, we can also add some color variation ahead
and add a new fill layer. This time I will disable all the channels except
the color channel. For now. I will give this a color of
saying the hue to 0.0879. Saturation and value
I will share these 2.71, something like this. I will add a black mask again, and this time I will
add another failure. Grunge. Number seven. This time. Again, see how we have
added like collaboration, but obviously this is too much we can do is first let's
select type in a prediction. From here. I will increase the scale. Make it a little bit smaller. 70s to five, extra five. Maybe for was finite thing. I will decrease the balance like this. Next, what we can do
is we can go over here the opacity section and just decrease the opacity of this. Do something like 30. Even 30s, like very obvious, I will decrease it even less. Let's say execute to 15. Now if we just try seeing it, it is like very faint. But again, it is still
there and that's what matters. Let me just disable it. Both of these roughness
radiation and the radiation, you will see the model looks kind of plain and unrealistic, but adding these things, it gives a lot more
detail to the model. And if we look even better than rename this to
color variation, I will select this
layer right-click, and let's duplicate this, and I will create
another color variation. Now let's set the
color of this layer. I will just select
this something random. I think this color we'll refine. It really does not matter
much, but the color is, I will remove this branch map, or I can just replace
it from here. Let's try number 15. As you can see, we have
something over here. We'll save this to try
pinna and full-scale. Let's decrease the balance. So again, it is very thin. Something like this. Decrease the opacity
for it even further. For this one also content. This is vector. Next, let's select this layer. I will collapse this folder
and just duplicate this. Press Control C
and V. Rename this to blue because we will be
creating this blue color. I will click over here, right-click and
exclude everything and just select this piece, the color base, and let's
change the color to 0.52. New one. The value of employing 67 for the color looks fine. Uh, Doc, I will just
decrease the value, or I mean nucleus, it is 2.775. This looks better. Next I
will again select this, duplicate, this total
here at the top. This time right-click
exclude everything, and select this piece. This one I will just move with a darker version of this color. Select this and reduce
the value like this. I think this looks perfect. Alright, so we are done
with the MATLAB rate. Next, let's move
on to the glass, something like this
to create over here. I will again add a new folder this time
in the starting only. Let's rename this to glass. I will select here, right-click
exclude everything, and just select this piece. Now I will add a
fill layer to this. Again, rename this
to base this piece. I will be saved this
to a very dark color. I will set that to 0 and the metallic to 0 and
rest everything is fine. Currently, as you
can see, looks fine. What we will add a bit
more detail to it. Add some roughness variation. Let's start another failure. Rename this to
deafness variation. Disabled all the channels
except roughness. Black mask. This time I will
use a smart mask. For the smart mass, I will
use this just surface one. Drag and drop it over here. You can see it
appears over here. You can click over here. Increase or decrease the level. I will just select this layer. I will duplicate this
sufficient rule C and Control V. Select this and
remove the dust surface, and I will add
another black mask. To add some more details. Let's use, let's try this one. Does plastic. Nothing happens. English says increase
the balance and see. No, this one does not work
out. I will remove this. Let's try the soft. Increase the global
values again. This one looks good. It adds does to all of the edges and I think
it looks pretty good. I will go ahead
with this one only. Let's increase it. No, I
think this one was fine. 0.8. I didn't assign. Next. Let's move on to adding these
materials to the coils. So for these ones, I will
directly use a smart material. Just go over here,
search for steel. Let's see which
one we again use. I will use. Try this one. Steven painted. Drop it over here. Again, right-click
exclude everything. Let's select these
four pieces first. Now as you can see
these edges over here, I think I'm going
to remove them. Just click over here
on this folder and let's see the scratches. I will just decrease
the opacity for them. So we'll set this to something around 30 so that
they are still there, but not so much
visible. All right. Or the bottom piece, Let's drag and drop
and use this one. Right-click, exclude
everything and just select this piece. Yeah, I think it
looks pretty good. Also, one more thing
that I'm noticing is these edge damage over here. If you just open this
up, select our geometry. I want to remove
some part of it. So press X to flip, flip to black color
to remove it. Because it is kind of
looking too much over here. Again, it is very process-based. If you wanted, you can
keep it this way, only. Just removing some part
of it so that it does not look like much. Alright, Yeah, I
think this is fine. One more thing, we forgot to add this blue material over here. So select this if you want. Let's try giving it this one. I don't know. I
think it looks good. I think the blue one,
then you're fine. Next, I will select
the steel material, drag and drop it over here. I will use this one
for all these Hagel's. Click over here,
exclude everything. Select the handle.
And this part also. But again, if you just
zoom in over here, you could do read all
these Hide Details. We just opened this up,
disable the surface details and disabled that ethnicity is not the roughness the edges. Now it looks much, much better. If you go into the
base receivable, this finished brush linear and also the failure so
that it looks smooth. This is much, much better. I will also add the
steam layer here also. Alright guys, so now
I want to mention one thing we are faced
with the problem. For example, I want to add the steel material
arm to these diets, but not to this, this part. If you understand what
I'm trying to say, I want to add the steel material over here on these diets. But not on this backward part. But I cannot do that because all of it is
the same object only. So because all of it is
the same object when I'm, when I'm trying to select
it in geometric masks, this complete object
will be selected. That is a problem for us. There is a solution for it. Very, very easy solution. But first what we can
do is we can go back to Blender and we can just
make them separate objects. But obviously that would
be very, very tedious. What I will do is I will
just right-click over here. Hit include all,
include everything. And now we want to use
geometry mass at all. Instead, we will use
a black mask that we were using all these for this variation and everything, we will use a black mask. Click over here,
add a black mask. Let's remove that for now. And yeah, now what I will do is if you just
click on this tool, this polygon tool, this
is pretty handy tool. If you remember, I told
you that in Mosque, in terms of mask, white means visible and black
meets invisibility. It is a pretty easy
concept to understand. You can see OVN currently
white color mode. If you select this tool, you can either select white
or either select black. So currently we are invite. If you select any
one of the face, you can see we're adding this particular steel layer to this single phase
only like this. If I express x and again
switch back to black. Now if I click on this face, you can see we are removing
the steel colored layer. Again, this lake proves my point that white means visible
and black means invisible. I want to select white, but I don't want to select
each and every single phase. Currently we are in the
polygon filling mode. Supported. Polygon Fillmore just fills
or one phase at a time. But if I select this Nashville, I can select complete
objects like this. Now I will select
these objects also. This one with this one and this. And now if you just go over here and click on these dials, you can see we can easily select just these ones in the front and not the ones at the back. So let's do this pretty handy, make sure you make use of it. Also. Just wanted to remove the layer from any
one of the objects. You can just select the black color from here
and now select this. You can see we are
removing the layer. You can also use X to flip
the black and white color. The other two modes. So this one is actually
like faithful only, but it only fills half a face. It fills in triangles. Let me just show you. If I just select this and remove it from
here and select this one. Just a sec came. First, I need to select
the white color. And now you can see I'm filling
in triangles like this. This one feels like this. This one is for complete phases. This one is for
complete objects. And this one is a different one. It feels based on the UV chunk. If you just press F1, you can see all
these UV islands. This tool, this mode fields according to
all these UVA islands. Again press F2 and
let's come back. I hope you understand
these masking things. Again, I will select this and you forgot to
select these two. Also. Select them both. And next, just, let's
just open it up. Select the base for
the base color. I will make it a little
bit more bright. I think this is
better. Lastly, I will select this meglio paint. Let's press Control
C and Control V. To duplicate this,
what I will do is right-click and exclude
all and then select 30, just right-click
and include all. Because I wanted to add
this material over here. Instead I will use
a black mask again. Select this tool, then select polygon fill,
I mean Nashville. Then select these
back faces to go. Set the color to
white for this piece. First, let's hit Save. And we are done with the
basic texturing of our store. I think this much is
enough for this video. In the next lecture,
we will begin with the texturing
of file storage, and we will grab the
texturing of both of these objects are. Thank
you guys for watching. I'll see you in the next one.
16. Texturing the Fridge: Otherwise, welcome
to Chapter 15. Let's continue with
the texturing process. In this video, we will start with the
texturing of a fridge. But before that I want to add on a few more things to
our stove texture sec. So first I will also add
a dust layer to this. So just go over here and
add a new fill layer. You can see it will fill the complete object
because it is at the top. Let's rename this to dust. And I will send the
color to black, something like this, and rest everything
remains the same. Next I will click over
here and add a black mask. Now, if you go over here
in the smart math section, I will use this just
occlusion smart mask. Just drag it and
drop it over here. You can see it adds
some bit of detail. If you just disable this, you can see in all these
corners and crevices, it has added some dust, which makes it look a little bit more realistic. Like this. You can see you can just click over here and
increase the dirt level. You see as I'm increasing
in the dirt is increasing. But obviously, we don't want
to go this much overboard. Let us try 0.4. I
think 3.4 is fine. Retards a nice bit of detail. Next, I will add one more
thing that is scratches. Let's add another fill layer. Let's just duplicate this one. So I will select this
press Control C and V to duplicate this. Let's rename this to
scratches leak over here. And I will remove this
smart mask because obviously we really
use something different for scratches. If you come over here
in the texture section. Then search for scratches. You will find this
grunge scratches rough. We cannot drag and
drop this directly because we first need
to add a fill layer, because this is the texture
and not as smart mask. After you have added the
fill layer to our mask, then we can drag and
drop it over here. You can see it has
added some scratches. But obviously you can
see these are two huge to make them a
little bit smaller. First I will select
dribbling the projection. Then we can increase
the scale from here. See how size we want. Let's see. Let's try five. You can also increase
their tiling from here. It will decrease the size. Let's save the tiling to do I think this works best for us. Just wait for the perceive. Next, what we can do is as the amount of
scratches is too much, you can either just decrease
the balance like this. Better way would be to just
scratch masking to one. You can see this
will automatically reduce some of these scratches. Like this. The last thing to do would be just reduce the
opacity of these 2.5 to 50. That they are very faint, but still they're always
adds a nice bit of detail. Next, I will also
add one more thing. Can see these dials over here. So let's add some more
detail to these dials. Growing the defense images
folder of your course files, you will find this dialogue. Just drag and drop this
into Substance Painter. Click over here and make sure
you import this as alpha. These things. If you import this to
the current session, that means you will
only be able to use this image file in this
current session only, which means if you close
Substance Painter, you won't be able to
use this in your shelf. Again. If you select project, then you will only be
able to use this file in this particular project only
and not any other project. The last one is library
or your assets. That is basically you can use
it anytime in any project. So let's just select the third
one only and hit Import. You can see this dialogue for over here with all
these other alphas. What this can do is let's
create a new fill layer. The color to black. Black, and just
started a black mask. Now what I can do is you have right now are
selected this brush, select this brush, and then double-click over
here on this alpha. And you will see automatically
we have a cubed, this alpha as a brush. And now if I try to
paint it like this, you can see we're
painting the Alpha. We can easily stamp
these dials around our actual diets to make
it a little bit easier. First, you go over here from perspective change
to orthographic view. This will do is if you hold. It and shift, and
then move your mouse. You can snap it in perfect
90 degree angles like this. Let me just show you once again. First we are in perspective
changes to orthographic. Then hold Alt and shift. Use a leftmost button
to snap it like this. That it is absolutely
straight and we can easily, Stanford alpha's, just
place it like this. And you can see if
this kind of small. So I will hold Control and use right-click to
increase the size of it. Let's try this much. We just need to place it
exactly at the center. I will decrease the scale
of it a little bit. I think this is
fine. Let's quickly do this for each and
every one of them. I think this works nicely. If you just move back to
the perspective view. I think it looks pretty good. It adds a nice level of detail. Also, the nice thing about
adding it to a fill layer was now that we have added a
fill layer and we have painted all these
dials using this mask. First, let's remove
this alpha from here. And now we are in
our normal brush. Next, what we can
do is now you can easily get the properties of these dials like even change
the color red or anything. And we can also change stuff
like roughness values. So I will increase the
roughness of them. So let's say the metallic, maybe not metallic morning five. Alright, I think
this looks perfect. Let's hit Control S
to save our files. And I will rename this to Alpha. Let's name this diet. Alright. I will disable the stove
and enable the fridge. And let's work on a fridge. Now, I will click on
the first texture set. They're stealing this layer. For the main body of the fridge. If you go into this Smart
Mask section over here. So a smart material section
and search for steel. You will find a
particular material. This one, steel
paint clear code. Let's drag and drop it over here and we will
be using this one. The first step is to let
us use the geometric mask. Right-click exclude
all. Select this piece, this piece, and this
piece. Just these three. Next, open up the
folder and let's see, we need to remove
some of the things. Obviously. Let's turn
off metallic contrast. Nick over here and remove this
metal edge view like this. And also right-click
and remove the mask. Make it like this.
I've done two things disabled metallic
contrast and you will see a mosque right next
to the coating folder. So just right-click on
it and remove the mask. Now I will click on this underpaid section and
let's change the color for it. Saying that you do 0.120196 value 0.9. Alright, so the next thing that I will do is I will select this metallic contrast
slip and just delete this. Also one more thing as this particular
environment lighting is not so good for this morning. I will just go over here
in the display section. Click over here on Panorama and change this to bus garage. You see this one is much more reflective and
it looks better. Already. Basically looks fine. Let's see. I will just duplicate this steel painted clear coat. Make a color variation of it. So just hit Control
C and Control V. Rename this to
color variation. And let's rename this to basically open this up in
the underpainting section. Let's change this to you. I will say 2.091. For the saturation,
I will set it to 0.5 feet nine fraud the value I will save this to the reporting line, something like this. Now I will collapse this
color vision folder, select the whole folder and
add a black mask to this. Next I will add a fill layer. Click over here and
let's search for. Another branch back. This time we will use the goblet for the name of this particular branch
map is grunge color. I will select this and you
will see something like this. First I will say five,
then a projection. Alright? Next I will
just increase the scale. Something like this. Now the only thing
that we need to do is just reduce the
opacity of this. Strife 2525 looks good. Next, for all these
handles and everything, I will use steel material. So let's open backup our stove. Click on it. Just copy this steel fight
or I mean steel layer. Just hit Control C and
then go back to fridge. And let's just
place it over here. So weed control plus V, we need to right-click
and remove the mask. Instead, we will just
use the geometry mask. It exclude all select
this this piece. This one, this one, this one. This one. All right, So now I will just disable
the stove back again. And for this bottom
part I will use search for plastic dysplastic
thermostat material. Drag and drop this over here. Right-click exclude
all and just select this piece. I think
it looks fine. I will take the plastic
layer, the base layer, and I will just make the color a little bit lighter, right? The next thing that I want to
add is again, a dust layer. So this opened it up. So just start a new fill layer. Set the color to a dark color. Again, add a black mask. In the smart mass section, I will use just occlusion. Increase the third level. Something like this. I will reduce the
opacity of this tube 70. That it is a little bit fainter. This will also, our
fridge looks pretty good. One more thing that I want
to add this edge layer, again, create a new layer. Let's rename this two edges. Select the color white. I will add a black mask. And again in the
smart Mask section, for this one, there are a
lot of different edges. Smart mass like this
one, edge damage, edge dirty and edge first,
I will use this one. Does soft edges, just drag
and drop it over here. And it will create
something like this. Obviously right now it
looks pretty weird. What I will do this, please to balance, Let's see. One thing that I want to
do is I don't want to use this edge is layered
on all these pieces. I just wanted to use
it on my base color, so I will drag and
drop it over here. So it is only on these pieces. Only. Next, I will again reduce the opacity
of it to very low, maybe something like 35. And I will also save the color
of it to absolute white. You'll see it adds a
nice bit of detail, but it is still to multiply. We'll set it to 2020. Looks fine. Let's rename
this tube dust first. Pick them told plus S
and also this one also let's also add a scratches
will create another failure. Let's rename this scratches. Give it a dark color. Again, add a black mask, then next add a fill layer. Let's search for
scratches. Come over here. Let's use this only. With Christ plaintiff
flexibility, the scale. The masking to one. Also decrease the balance to make them a little bit lighter. Last thing I will
reduce the opacity. Obviously they are too much. Right now. This looks fine. If you
just zoom in over here, you can see all these details. I think our fridge model
looks pretty good. If you enabled that the
stove, I think both of them, you will find that control plus S. Maybe I will select this
D layer, the base color. I will make it a little
bit more brighter. Like this. For now, I think this much
is enough for both of these tenuous watching. In the next video, we will
share the rest of our assets. I'll see you then. Thank you.
17. UV Unwrapping the Remaining Assets: Hello guys, welcome
to Chapter 16. Now we're back in Blender UV, unwrap our remaining
assets and to prepare them to export
the Substance Painter. Now that we are done with detection of both
of these objects, I will just turn them off. And let's turn these
three on one-by-one. Now I want to create collections based on the material sets
that I will be creating. Substance Painter. These all handles, Let's move them to a
different collection. So I will select all of them. This m. Let's move them to teach in
collection. Maybe for now. I will just enable the
kitchen collection. And instead of having
this kitchen collection, what I will do is I
will select all of these slabs and I will move them towards
separate collection m. Let's create a new collection
for them and name it slabs. Let's just name if Slavs, these two objects, I will also press M and move them
to the cabinets. Now for the door, I will select all of it, press a mistress a, then press M and move this
to the kitchen collection. And I will just delete
the dual collection. Just right-click and delete it. Alright, so now these
two collections, according to our material six. So it will be easier for
us to add materials. I will just disable everything. First. Select this piece, Excited a material to this
unnamed cabinets. Remembering that I will
create new material. And let's name this cabinet. Now just press a to
select everything. And while this is the active
object that we are good, the material to just
press control plus L liquid turn on
switching costs. Now press control plus
L, link the materials. As you can see it 26
is written over here. Now the material is being
used by 3600 objects. Disable this and enabled
back to kitchen. I will say this big
room, new material, let's name this has kitchen a to select everything
then control plus L and link the materials already done on the
last collection. Name these two slabs. A to select everything
then control plus L link materials. I will do is I think I will
select this piece, this one. This one. Let's move this to the
slabs collection only. Press M and move
these two slabs. Now select this piece, this one that I didn't copy the slabs material
to these pieces. Now press Control L and
link the materials. Now look, these have
the slabs material. Alright. Next lets you will
rub them one-by-one. So I will enable the cabinets procedure to select everything, control a, apply the scale. Now let's head over to
the UV editing tasks. Now press a to
select everything, then pursue and
smart UV project. Now angle limit is 66. I will just reduce
the angle limit. Let's take it around drainage. The eyelid margin to 01. Yeah, I think this is fine. So by estab, come back
to the layout section, height, the cabinets
enable the kitchen. Again, press a to
select everything and controlling apply the scale. Go back to the UV Editing, let's say to select everything. And then you and
smart TV project. For this lecture.
Suppose 66 only. Let's see, increasing. I think 66 is fine. I'm just trying to find
the right eyelid margin. I think something like
this, you'll be fine. Let's hide this and enabled slabs just a to
select everything. But truly apply the scale. Alright, Next, let us
just keep this one. Go ahead and enable
face orientation. Make sure to flip the objects that have
long face orientation. I forgot to tell you, just
press a to select everything. First, select the object, go into the edit
mode by pressing Tab to select everything. Then you can press Shift plus n. Do the same thing
for all of these. One thing that I can go wrong is when
we flip the normals, the shading can
look all weird to just go over here to add a
weekend nominal modifier. I think it is fine now, let's just keep it this way. Select this one are
degraded normally. You can also add weight
to novelty piece, fixed the shading over here. Now just to select everything, then press F3 and search for Convert to match so
that we can apply all the wicked normal
modifiers at once. Let's enable the kitchen. Go inside like this. Enabled face orientation. And quickly, just selecting each and every
object and flip it. The complete room press Tab, redshift plus n. If
nothing happens, just enabled insight that
the red faces are facing on the outside and the new
faces I didn't cite because we will be reviewing our scene from the inside only. The red feces on the outside
really don't matter. This one also per shift in. Excited waiting normal to this. Next, just select everything. Then plus F3. Just hit Enter convert to mesh. Lastly, enable cabinets,
face orientation. Let's just select
all of them at once. Like this. We don't need to add a vacant
normal for these objects. To shading is fine. Normally lead society. One thing that I will tell you, we can also copy
modifiers at once while this object is
selected just quickly, all of them, select
all of them like this. Let's select this
one at the last, the one that had the
weighting normal modifier, press Control plus C. This menu will appear. If by any chance this
menu does not appear. Just go over here in
Edit Preferences. And in the add-on
section search for copy and enabled a copy
of attributes menu. This now just hit
Control plus C. Go over here, copy selected modifiers,
select rigid normal, and you can see each, each one of them have the
recognizably at once. This is for candy. Press a
to select everything again, press F3, you convert to mesh. All right guys, so I
think we are done now. I will just enable
all three of them. There's a to select everything over to File Export and hit FBX, export them now, go over
into my export section. Let's keep it. This only
final scene applied, enabled selected objects,
active collection, and also make sure you
select just mesh because we have all these empty objects and we don't really
want to import them. So make sure you just
select mesh and hit Export. All right, now let's open
up Substance Painter. Alright, next I will
create a new project. In the file section, select your file, you just
export it and hit Okay. Now you can see through
your room easily. The reason you can see through your room easily
is because if we go back here and enable
face orientation, you can see we have red
faces on the outside. We forgot to flip the
normals for all these. Quickly do that for sodium. I will select all
of them at once. Let's just slash to go into the isolation press Tab
to select everything. Then hit Shift plus n. Also we need to add
the waking normal. You select this one,
anyone of them adequately normal? To select everything. Then press Control C, Copy Selected modifier,
and hit Okay. Slash to come out of the mode. Again, a select everything. If you just see over here. If I remove this vaguely normal, you can see some kind of
weird shading over here. We can quickly solve
this to start a weighted normal and
enabled keep sharp. I think I just missed it. I will quickly add the waking
nominal modifier again. When it's enabled, keep
sharp through all of them. Just hit Control C again and
copy selected modifiers. And yeah, I think people know
stress a selectivity thing. F3 worked to mesh. Now let's again export them. Select this again,
because we will just replace this
file and hit Export. Generally these
back-and-forth, we need to do two to three times to get the perfect export from
blender to substance painter. Let's just create
again a new project. And select discipline who I was talking about actually how we can see through a room, because the room is actually just a single 3D plane
only on six sites. Because it does not
have any thickness. As you can see, the red
faces are on the outside. If we selected this and Agadez solidify modifier to maybe, then you will see a blooper
literacies on both sides. Then we won't be able
to see to her room. But actually, I don't want that because then it would
make really difficult for me to picture
all these objects because we won't be
able to see through. Just removed the solidifying. And I just wanted to mention why you are seeing
through the room. Because these vaults are just basically 3D planes
with no thickness at all. We don't have to worry about this in Unreal Engine because in Unreal Engine it will
act as solid volume. Because if you go
inside the room, you can see, we can see all
of the walls perfectly. But if you're outside the room, then we can see
through the room. But in unreal it would work perfectly as solid walls only. So it helps us in
substance painter because we can easily texture
and see everything at once. Over here and first enabled
in portal indeed leasing. And also next thing, obviously we need to bake the mesh maps. So go over here, takes your settings enabled
vague mesh maps. Set this to two k
in a disabled ID, and rest everything
remains same. You can just use anti-aliasing. I will go with four-by-four. Obviously the baking
retake a little bit of time because there are three
different texture sets. So I will just hit week and cut the video and resume
when everything is done. Alright, so now the
bake is complete guys. And as I hit, Okay, we'll see that there are
some huge issues with that. And there is a chance
that you might not face this issue at all, that you're bake is completely clean with no shoot whatsoever. But if you are facing an issue like this one
are similar to this one. Let's try and fix this first. I will go back to Blender. And I will disable
these two collections because the problem, because the problem is
only with this collection, I mean detection, this
kitchen texture sake. Let's try and solve
for this one. What I will do is we can try selecting
this piece estab to go into the Edit mode. Let's add a bunch of
edge loops like this. Next, I will just press, Select and select all of
these bottoms thesis. Separate the selection so that they are a separate object. A to select everything, press Tab to go into
the eight mode. Let's UV unwrap them once again. Smartly we projected okay. I'm just trying to find
the correct settings. Good maximum coverage. I think something
like this is fine. It does not piped on much. Just estab to go out of
the edit mode enabled the capability to
select everything. And let's export this out and
see if this fixed studies you just hit Export. Come back to substance. Let's create a new
project altogether. I think I missed something. Let's explore this once again. I think something went
wrong and only export it. Let me see. Yeah, I will
miss select everything. Make sure one of the objectives,
the selected object. And again, export this. Alright, so this is fine. Let's take vague and try
to bake the mesh maps. For now I will just keep the default settings
only and psyche to 52 and just quickly hit big
to see if everything is fine, then we can make a final week. In this week, we'll be
done pretty quickly because it is a very small size. Next exert issue. It was pretty easy to fix if
you had this similar issue. I hope you've fixed
it and if not, if you have a different
kind of issue, you can leave in the
comments or leave me a message and I will try
to help you to fix it. And now that the VQ is fine, I will again hit vague, increase the size to
get a proper week. Also enabled mTLS and hit peak. Alright guys, so now
the bake is done. Let's hit okay. And check for any potential
issues in a week. I think everything
came out pretty good. Most of the big issues, if there are any shading issues, they can be solved by adding a vertex normal and
stuff like that. If you have like the baking
issue we had earlier, you can try dividing up your objects and maybe
it will solve it. I would also activate
temporarily and TEC. And now let's hit Control plus S to save
a substance file. In the substance
big file folder, I will create a new file. Let's name this room. Save. Also, save
a blended fight. Alright guys, so I think this much is enough for this video. In the next video, we will share all these objects. So
thank you for watching. I'll see you in the next one.
18. Texturing the Kitchen Room: Hello guys, welcome
to Chapter 17. In this video, let's start with the texturing of
all these assets. I will start by
texturing the cabinets. So let's just disable
both the slabs and the kitchen so that we
can maneuver easily. You can press F to
focus on this object. All right, for these
particular cabinets, I will be using a
smart material, but I won't be using
any one of these. I will be downloading
a free smart material. If you go into the
resources section or the resources folder
of your post files, you will find this texture
links Notepad file. You can just open this
up and copy this link. For the painted wood. We will be using this one. It control C. Open up
your Google Chrome. I've already opened it, but you can just
quickly open it up. It is a free texture set of four very nice wood materials
and it is also free. The download this. If you have never
used gumbo root, you just need to type in. You can also pay for
it if you want to, but you can obviously set it to 0 and just
select I want this. Now you can put in your
e-mail address and just hit get and then you will be
easily able to download it. As I've already downloaded it, I will not download it again. After downloading the file, you will get this zip file. You will get the zip file
hood smart materials. Right-click on it and hit extract two root
smart materials. Open up this folder and you will find these for smart
material files. Just select them all and drag and drop them onto
substance painter. So it has automatically
selected smart material. We don't need to do anything. Just select all four of them like this by dragging
your mouse click. Or you can just hit Control a. After this, you can select
where you want to import. I've already told all
three different modes. So I will just select project and I've
already imported them, so I won't employ them again. So you can maybe import them to a library
only so that you can use them in
any other project of yours because they are
pretty good materials. You can then hit Import. I have already imported them, so I will just hit Cancel. Now in the search bar, search for printed
word this material, and just drag and
drop it over here. Alright. Now I know it
is looking pretty bad, but we can solve
this up very easily. First, let's remove this layer. To solve this, we can, it is basically a
simple material only with different layers. We can just see disabling. We can see for ourselves by
disabling different layers, we can change the new coffee. And first I will disable the dirt layer and
also the most layer. Next, you can see these masking. All this is happening because
of this particular mask. As you can see. So
now what I will do is I will just right-click on
this mask and hit remove mask. From here. Let us see next what we can do is let's select this
dirt road green. This is the large
meaning problem. For this, what we
can do is we can reduce the opacity like this. Let's set the opacity
beauty something like four. Maybe. Also as you can see, it has
lots of height information. So I don't really want that is if you just select
this layer from here, you can see the
height information. If you increase in
degrees that you can see, it can look very bad. If you've learnt, we can
even set it to 0 or maybe give it a very small value
like negative of 0.01. Something like this. Alright, I think the
wooden materials this way looks pretty good. Next, let's use a steel
material for all the handles. I will use this
one. Again first, let's disable this Patroclus
details and surface details. Now right-click and exclude all. It. Simply select all of
the handles one-by-one. Using the geometry mask. I will also use the
geometric mask over here, even though we don't need it. I will hit Exclude
all and quickly just select each one of the basis. Make sure you don't
select the handles. I think this is good. Next, let's add a
little bit of dust over them to make them feel
a little bit old. So I will just add a fill layer. Let's give this a dark color named this to dust of delusion. We will be using the
desktop pollution mask, add a black mask to this. Now in the smart mass section, we will use this
particular smart mass. Again, this is a very
prestigious based thing. You can go for anyone, whichever one you like, but
I will go with this one. Obviously, we need to
decrease the dirt Levitt. You can see I think something
around 0.15 loop look good. You should also reduce the
opacity, something like 50. Next, let us just
duplicate this layer to add a big mode of
dirt on other places. Next, we can use
the dust surface. Not really visible this way. See, try increasing the level. I think this part is fine. You can again duplicate this. Move, this particular mask. This time use something
like let's see, Let's use dirt soft edges. This one looks
good. If you want, we can reduce the
global violence. Reducing the global balance. We can just decrease
the opacity. Let's try 50. I
think this is fine. Next I will rename these. You just want to just surface. Isn't too soft edges. For now. I think this much is enough for. One thing that we can
do is we can also add some worn-out edges
of wood to this. Let's see. Let's search for words
in our materials. And if you go in your
base material section, we can just use any one of
these. Let's try this one. Would walnut. I will send this to Dr. Dana. Now it
is pretty simple. I will add a black mask, go into the Smart mass section is something related to edges, just to show a bit
of edge damage. So let's see what we can use. Let's try this one. I don't think this
one works well. Next move this. Let's try edges strong. I think we need
something like this, but obviously this is too much. I will reduce the
global balance. Even at its lowest, it is too much for us. I'll introduce, remove
this one for now. Let's try something else.
Next, try this one. Edge damage. Also, we just need to use this
painted boot section, so I will just drag
and drop it over here so that it does not
appear over on handles. I don't want to use this one instead of the smart materials. Let's try to go over
here at the generator. Extra metal HVO. Reduce the real leverage. I think this one looks nice. Their central level to 0.55. Now, let's reduce the opacity of this fluid volume
at layer 265. Yeah, this looks good. I will turn off this. For now. I Let's enable the kitchen
or maybe the slabs first. Yeah, then next we
will do the kitchen. Alright, so I'm just noticing
this issue over here. I think this is pretty easy to solve and I know what
is causing this. This open up your
blender quickly. Open up the file. With
this particular scene. The reason we're seeing that
over there is because we forgot to delete
this cube over here. So that is why it is
appearing over here. It is not a cube actually, it is the cylinder that we used for Booleans
fairly quickly deleted. Obviously we need to
import once again, go over to File Export. And it is a good thing that this happened because I
will show you one thing that might help you
a lot in a later on stage and hit Export again. All right, Now, back
in Substance Painter. And now you guys might think
that we have already done the fracturing of the
cabinets and we don't really want to create a
new project to import it. Once again, don't worry, there is an easy fix for this. Without losing any of
our details or anything, we can just go to Edit, Project configuration, select the file we
just imported and hit. Okay. And we just see
everything gets loaded back. If I come over here, you will see this is a
plating bath again, but the reason it is
black and all everything, because we just need to bake
our mesh snaps once again, then this will also be solved and the rest of the texturing and everything remains the same. So I will quickly make the HashMaps and all
the settings are fine. Just hit bake. All right, So the biggest done now
guys, let's hit okay. And check if everything is fine. Kind of hard to maneuver. Alright. Yeah. I
think it looks good when we'll add the materials
it won't looked at by. And obviously we add in
the low size right now. Let's disable the
cabinets and the kitchen. Let's first add the
steel material. I will quickly just
copy it from here. So click over here,
hit Control C, come back to slabs, your solute this
layer and paste it. Click over here and just select all the objects taking wanted
to add the steel material on to select the handles. Alright. Let's enable that
off Mr. Dale's for this. I will remove this
finished brush linear and the fill layer that don't
have all these linings. Yeah, this looks
much, much better. One thing that I wanted
to tell you is if you if you just select this
roughness detail layers, and you want to reduce the
opacity of this roughness. And you try to
decrease the opacity, you will notice that
nothing happens. And the reason for
this is because this particular layer only
has the roughness channel. And we are trying to reduce the opacity of it in
the color channel. You can switch over from
color to reflect over here. And then if you try to
reduce the opacity, you will see that
we are reducing the opacity of the roughness. Let's move it a little
bit lower value like 50. I think that works much, much better because the
roughness is just too much. Like next. For all
these cabinets, I will use the same
painted wooden material that we used in the cabinets. Have some kind of uniformity. Let's copy it. Bring back in slaves, and just hit Paste. Again, select this
and quickly select all of these pieces. I think it looks pretty good, but I will remove this food wallet layer because it makes it
look kind of weird. Alright, Next for the slabs, if you go back in the
links Notepad file, you will find this
mobile actual link. Copy it up, and I hit Control C back in Google
and just paste it. Should enter. And I have found this pretty
nice mobile material. This site, ambient CGI.com is
a website we just show you. If you just open up the
materials in a new tab, you will see all these
nice materials and they're free to use in any
kind of project. Search for model over here, you will find lots of
different kinds of models. And if you want, you can
go for any one of these. I've gone for
personally this one. But as I said, it is totally up
to you which one? Whichever one you want to
select, you can select. But I will select
this one only and just quickly hit Download. All right, so now the
download is done. You will find this file
in your Download section. Just right-click and extracted. Now let's open it up. You will find all these different
texture maps over here. The only ones that we need
to copy are the colormap. There's also used
the displacement map and there are two
different normal maps. One is direct texts and OpenGL. We will be using OpenGL
as our substitutes paint of projectors in overall
yield format only. And the last one is
the roughness map. Now after selecting all, just drag and drop them
into Substance Painter. Now, we need to give them
a type to explore them, select one of them, and just drag it like this
to select all four of them. Or you can just press Control
plus a select them all. Click over here and select
Import drastic shift. Again, we need to import
our resources to, as I've told you, these
two different mode. So I will just select
project and hit Import. All right, so now
they're over here. Do add them at these
texture maps onto our slab. First, we need to
create a new failure. And you will see all these
different channels over here. This color, Roughness,
normal and height, one by one, drag
and drop them into each one of these
respective channels. If you just hover over here, you will see this is the
colormap that is named written over here.
This is the colormap. I will drag and drop
it into base color. The next one is
the displacement. Displacement goes into
the height channel. Then the next one
is the normal map. And the last one
is the roughness. So the displacement
makes it look very bad. Let's just go into
the high channel and try it. You're using it. I think on second thoughts, I will just go back to base pair and just completely remove the height map because I
don't think we need it. I think it is fine this week. Next, rename this to mobile. Next click over here, right-click and exclude all. And just select this
piece and this one. All right, next time we'll
set this to five, Lena. I don't know, maybe we
can increase the scale. Now this does not
look that good. Try setting it to 1.5. I
think this looks fine. Next, let's copy all
the dust layers that we did for our cabinets
into the slab section. So I will select all
these three layers, hit Control plus C,
move back to slabs, and let's just paste
them over here. You can see this, this
is the surface layer. So I think this is too much. I will reduce the
opacity for it to 15th. It is totally up to
your preference. You can also keep it
the way you like. I will also set the opacity for this one to 50 in
the cabinet fund. I don't want that to
be like two apparent. Just wanted it to be subtle.
I think this looks good. Next, let's move on to the
final, the kitchen room. I return both of
these off for now. First, let's download
the textures that we need to use to texture
this texture set. Open up the file first
is the white tiles. Copy this up. It control
C. Open up Google. Next is this ground tile. To just copy this up. Open this link also. Again, if I just
search over here, four tiles, dual, find various
different types of files. So I suggest you go
through all of them. There is one more site,
free texture sites that is with the name
of polyhedron.com. There are various HDRI is
textures and even models. You can look for some textures over here also, if you want to. I just wanted to give
you guys a bit of auctions so that you can go
for different type of looks. I will be using
these two materials. This one for our tile and
this one for our ground. There's disclose this and
download both of them in foci. And wait for it to finish. Alright, so the
download is done. Now again, open up
your downloads folder. We need to extract both of these again and import them
into Substance Painter, right-click and
extra appear. Also. Don't have this
extracting software. The software that I'm
using is Windsor. It is a pretty common
one and you can use that to actually have soften it up. And this time I will
select the color map, the normal, sorry, denormalize
jail when the roughness. Let's also use the displacement, but I doubt I will be using it and drag and drop
it into Substance. Painter. Again, select them all important domestic
shares into a project. Before importing the next one, let's just go into the
kitchen texture SEC, and add a new fill
layer and drag and drop them into the
respective channels. Let's try the displacement. And also, I don't think
I'm going to use it. It looks pretty bad. If you
want to actually use it, you can just go to the height. I'm Shannon and decrease
the opacity for him to a very low number so that
it is like very subtle. Something like five.
Let's try five. Yeah, Maybe next right-click, exclude everything and just
select the bottom piece. Alright. Let's rename
this to fluid flow tight. Make sure you're
naming your layers because it tends
to get very messy. So just stay organized. I will check district right? Interjection. Increase
the scale of 55 degrees. Honestly, I think even at five, it looks pretty weird to me. I will just remove
the height lab. I just wanted to
be played to 1.5. Yeah, I think this is better. Next, let's bring in these
tiles. So open it up. You don't need the
advantage illusion, math, just the color, misplaced,
normal and roughness. Drag-and-drop them, domestic shares and putting
them to your project. Let's create another failure. Come back to the base, basically the channel, and
rename this two times. Drag and drop this
one into the color. You do normally. Try
using the height. If it looks good, really use it. Now what do we need to do is we cannot use the geometric mask anymore because I only want
the tiles only on this area. This extrusion that we
created over here like this. Now we will add a black mask. Alright, let's select
this tool again. And as I told you, this, this mode was for
each and every phase. This one was for Nashville. Just select the Maxwell. We cannot really use it because this is a complete single mesh. So let's select the phase one, one-by-one, select each
and every phase like this. Make sure you don't
select any extra faces. Also makes sure your
color is set to white. Alright, so I think yeah, we didn't check everyday. Working properly and you haven't accidentally applied
it to any other phase. I think we're good.
Next, let's say the supply painter
increase the scale. I will just remove the
height map because it looks pretty weird. Scale of five. I think five is pretty good. These things are totally
up to your preference. Also, if you are setting a
scale of maybe let's say four, and the tiles are not
coming out to be perfect. You can just open this up
3D prediction settings and you can give the texture
and offset it like this. You see, but not on his legs
but on the y like this. Yeah, just to have a
perfect alignment of tiles. Secularity for only, let's say for, I
think it looks good. I will enable that
both of the things. Let's see. I think this way
our scene looks pretty good. Next for these windows, I will use the same. You wouldn't material again. Copy the sub, select the kitchen scene,
paste it over here. Select this. Select all
the parts of the windows. Next, for these small
pieces on the window, I will use steel material
to come back to slabs. Just copy the steel material. Kitchen pasted over here. And just quickly
select all of it. Alright. Now for the
upper side walls, I will use a concrete material that is already presented in your substance painter
base material section, not in the smart material. Search for concrete. You will find this concrete, clean their substrate
and drop it over here. Again. First we need to
add a black mask. Just start selecting
all these faces. I know right now it looks very, very weird, but don't worry, we will fix all of the self, both of the remaining
texture sets, and just select
all of the phases. Make sure you select on
the top face it also. I think I've
selected everything. We can enable bag both
of these textures. So let's just see how
everything looks right now. This concrete materials,
which looks very, very bad. And I think the reason for
it is because of its scale. The scale is too
large right now. So I will say district traveling again and just try
increasing the escape. Next. Save this to five for now. Maybe even six. Yeah, I think this would find
if you go over here, you can also increase or decrease the amount
of scratches. Scratches to read only.
Also one more thing. The tiles are looking like really white and I
wanted to give them like all fight color so that it matches with the wood
material and everything. To select the tiles and to give it a little
bit off white color, or to just change its color. There is a very simple way. You go over here, and this
time we will add freedom. And the name of this filter
is HSS perceptive, this one. Just bring this in and you
will see I change the hue. Like nothing happened. If
I change the lightness, you can see I can increase
or decrease the darkness. The knees and the hue and saturation are not working is
because the color is white. The color was something else. You can see it is
changing a little bit, but not on the white part. You see does not
really work well, that white colored stuff. But we just wanted to decrease the lightness by a little break. Distributor 0.48. Yeah,
something like this. Alright, so the last thing
that is remaining is our door. First for these pieces, Let's just use the steel only to select this,
select this piece. Select this piece. These two. Now for
the main door, I will just use the
printed word again. Just for select this
and this piece. Now what I will do is instead of having
this off-white color, I will give it a little bit more of a white color to this. Open up this painted wood layer, the paint layer section, and in the base paint,
select the color. And let's set it to
something like this. Maybe. I think that
suits much, much better. Also, I will select the tiles. In the HSL perceptive filter. I will set this to 0.4, maybe. Also the concrete. You can also change the color
of the concrete from here, and I will set it to
completely white. You can also access a little bit of more settings from over here. Increase the scale to eight. Largest scale of 15, maybe something like that. Look good. It gets quite
replicative over here. So let's try it again maybe. Alright, so I think
we're almost done. The last thing is to
add the dusk layers. It will go overhead
in the slab section. So now I will just copy
all three of them. So select them all
and hit Control C. Move back to the kitchen, space them over here. I think I will remove this
just surface level project. Looks kind of weird over here in this
particular texture sec. I will just remove this one. The rest two are finite. Think. Now first let's hit
Control plus S to save a file. Let's see if anything
is remaining. I think everything
is done for now. In the next video, what
we will be doing is we will create a
new Unreal Project, an export everything
into unreal and just dry out our scene and see
how everything is looking. Alright, so we will continue from here in the next one.
Thank you for watching.
19. Exporting to Unreal Engine 5: Hello guys, welcome
to Chapter 18. So now that we're done
with the texturing of our complete
seen, in this video, we will create a
new Unreal Project and export all our models
into Unreal Engine. And also create materials
for our textures. And then we will just look how our scene is looking
right now in Unreal. So right now I'm using the latest Unreal Engine
five that just got released. We were in early access for
a lot of time, but finally, the latest version of
Unreal Engine five is here. So I suggest you guys do download that if you
haven't already. Maybe some of you
are still using the early access or
the early access to. So as highly suggest
you go and download the newest underlined five version. You just need to go into
the epic Games launch. You can just open it up more
to the Unreal Engine tab. And from here, head
over to library. As you can see, I have the Unreal Engine
five early access to, and this one is
older one like 4.27. And this is the newest
one, Unreal Engine five. You can download. Download the latest version
of Unreal Engine from here. Just click over this, and then you can select
the version from here. And then you can just
start downloading. I will cancel this one and just launch Unreal Engine five. Wait for it to open up. Alright, so now under
engine five has opened up and you need to
select games from over here. And we will create a
new blank project. Just select blank. And let's name this
project as pigeon scene. Now over here, make sure you have the same
default settings. If you have a stronger
car like an RTX card, Thirty 6370 or any one of the cards of
the artists lineup. You can go ahead and
enable ray tracing. But to just keep it general that people with all kinds of graphic cards have
the same result. I will not enabled
redressing and we will use the newest features of
Unreal Engine five like lumen to get the
global illumination and nice bounds and
genetic lighting. So we won't be using
retracing at all. But if you have a card
that supports RTX, you can just go
ahead and enable it. But yeah, I will
just keep it this way only and hit Create. When creating a new project, you would have
something like this. First, let's hit
update over here. Next, what we can do is
just right-click and create new level name. This has leveled one dental. Double-click to open
this up. Just hit save. One more thing. If you're not seeing this
content browser over here, maybe the screen is like this, just hit control and space,
and this will come up. But as soon as you
click away, it will go. Just hit Control plus phase. And you can select
dock in layout. I think that looks much better. And yet, as soon as you open
your new world or new scene, you will just see everything
is pitch black because there are no lights
currently added to this. Will just show you two
quick ways to add lights. One is plugged long
way so you don't really have to follow
me for this one, the first one I will show you a very quick and short
way of adding lights. So first let's go over to
Window and enabled please actors that this menu appears over here and we
can search for actors. First, I will search for directional light and just
drag and drop it over here. Next is the sky atmosphere. Make sure you select
this slide and then go over here in the properties
and search for atmosphere, atmosphere, sunlight, and
just make sure it is enabled. Because then, now if you
press control plus L, You can see you
can move your son. This directional light
will act as your son. Yeah, make sure you
have this enabled in the properties of
directional light. Next thing that we need
to add is this skylight. For the skylight makes sure you enable real-time
capture so that it, so that it updates in real-time. And we don't really have to capture the scene
again and again. So make sure you
select real-time. The next thing is
exponential height fault. The last thing to
add is volumetric. Loud. You add some clouds. This is the basic setup to add some atmospheric lighting in your scene with the proper
sun and everything. If you press control plus L, you can move your
son and it will react according to
the atmosphere. This was the very long way
of adding lights to your. And now I will just quickly
show you the short way. Just select them all
and let's delete them. I will also close this
place actors window. And I will go over to Window
and open up a new window, that is environment light mixer. This is a new window
and it is pretty easy to create lights in this
like you've been just hit. Create skylight, created
mosfet light, sky, atmosphere, volumetric, loud,
and create height folk. See how basic and easy it was. You just need to click
and everything is done. One thing that you
should check is that in the directional light
atmosphere, sunlight is enabled. I'm pretty sure it is enabled. Yeah. The skylight makes sure real-time capture isn't able to sell only these things. You need to make sure
you can just press Control L and check if
everything is working, like your son and the clouds are reacting to the environment. Alright, so we have set up a
basic lighting in our scene. And the next thing is to import our models that we
exported from the window. Alright, so I will create
a new folder over here. Let's name this as models. Open this up, go
over to Add import. Let's head over to oxygen
environment, google to export. Let's select them both
at once and hit Open. I don't think we need to
do anything from here. Just hit import all. Wait for it to import. All right, So now the
important is done. You can just close
this and you can see all the materials
have appeared over here. We can just select
them, select all of it. Make sure you don't
select these materials. I will just go ahead
and deselect them. Hold Control and
de-select both of them. Now what you can do
is just drag and drop them into your scene.
Just like that. You will see your entire
scene has appeared in Unreal. I know we can see to our walls right now,
but don't worry, we will just quickly fix
that right about now. Only there it is a very
easy fix for this. Let's see. I will do this for one-by-one for each
and every material. So first let's open up
the cabinet material. Then let's just flow
Substance Painter. No, maybe just keep it
open because we need to export our textures
into Unreal Engine. They are first, let's open
up this cabinet material. And the only thing
that we need to do is just enabled two-sided from here and hit Save so that the material acts
as a two-sided material. You'll see nothing
happened because the cabinet material
is for these cabinets. You can just select the kitchen material that will be somewhere
around here only. Here. Let's open this up first. Enabled two-sided from
here and hit save. Now if we will close this, you will see everything is opaque and we can go through it. You can see that light
is pulling through all the corners and services. So don't worry, we
will fix that also. But let's first
one-by-one enabled two-sided for every
single material. I think we had
total six materials and I think I've
done it for five, maybe 12341 over here, the cabinet fund and
one more I think Let me see. I think
we can just sort them according to their type. Maybe me just check. Okay. Sorry. I think there are
only five more years, only three over here. The cabinet, kitchen cabinets and slaves and one for the
fridge and one for the stoke. So yeah, sorry. I think we
only have five more details. So here we have done it for
each and every one of them. Before fixing all of these lighting issues
and everything, I will first import
all the textures. Let's go back to content. Is create a new
folder over here. And rename this to textures. Come back to content,
right-click over textures and showing Explorer. The reason I'm doing this is because I want to
copy this part. Just double-click over here and right-click and copy this. Let's come back to
Substance Painter now to export textures
from here into Unreal. Just hit Control Shift and E. Next thing to do
is click over here. And first let's set the path. Hit paste. And now we are
in the pictures folder. Just select the folder. Next thing to do is select
the output Template and I will select it as Unreal
Engine four bagged. The file type I
will set as target. And this option and the size I want to go
max size that is a fork to get the best
quality possible. But you can maybe
go for to kill. So if you want and you
have lower spec machine. But I think I will go for
foci and just hit Export. Wait for it to export. It
might take a little while. Alright guys, so the
export is done now. So if you head back to Unreal, you will see this
pop-up over here. Just select Import. And wait for the textures
to import over here. The reason I selected
this Textures folder as the direct export directory
from substance is that whenever we
export any materials, they will directly get
imported into unreal and they will show the changes, like the changes will
show up in the scene. I don't have to import and
export again and again. Next what we will
do is let's open up the other substance
painter file, that is the stool
and the fridge. I will explore those textures also into this Textures folder. Only. Wait for it to open up. Alright, so now again, let's hit Control Shift and E. Click over here. First, let's paste the bot, it enter and select folder. Select this as Unreal
Engine foot back. All the same settings and
just quickly hit Export. All right, so back to unreal and just hit Import
over here again. Alright, so before starting, I will just close the substance
painter files because I don't want my computer
is slow down. Close this one also. Alright, so now guys, if you open up the
textures folder, you will find all these
textures that we have exported. Now we will add all these
textures into the materials. Let's open up the models folder. And one by one, we will start
applying all the materials. Open up the cabinets material, select this and just hit Delete. Press Control plus
space to bring this up. Select textures. And let's see, we want the cabinet structures. So just select the
first three or Shift to select all
three of them and just drag and drop
them over here. Alright, so connecting all these textures
is pretty simple. The first one is the base color that just goes into the
base color channel. Second one is the normal, and that goes in normal channel. And this one, it is just a little bit complex that
it is a PAC material. That means it has three
different channels and it's three different
color channels. So the R1 goes into the
animated occlusion, and the green goes
into the roughness, and the blue goes
into the metallic. Now we are done. Just hit Save. And if you come back and check, you will notice something that material is looking
very, very weird. If I just select this piece
and press H to hide it. You can see it looks like a very shiny from overhead also. And just looks plain weird. If I just press
Control Z to bring this back and wait for
it to just the exposure. In here, it looks like
very, very weird. It looks metallic and
it looks very shiny. So again, you have
to just remember it. There is a very
easy fix for this. And whenever you export textures from Substance
Painter into Unreal Engine, you just need to do this. One thing is open up
the cabinets material. Select this texture. The path doesn't go over
here and click over here. And make sure to disabled SRGB. And you will immediately
see an edit over here that just says sampler type is
color, should be linear. That is pretty easy to fix. A sampler type is currently
color and we just need to set it to linear color. Now if you hit Save, just quickly close
everything and see. Now it is not really looking
reflective and shiny. The reason it is looking still looking weird is because of all the light pouring out and
we will fix this later on. But if I just hide this, you will see it
does not look shiny anymore and it looks
like normal good. It's not like reflective. We just need to
do this one thing for each and every material. Let us quickly do that. I will open up the fridge, delete this risk
control plus space. Whereas the fridge one. Here, you can see the stove
and fridge underscore fridge. That means this is
the fridge textures. Select all three of them
and rather than rob them. This one goes into the base
color, one in the normal. The R goes into the
ambient occlusion, green and into the roughness, and blue into metallic. Before saving, just double-click over here, disabled sRGB. I said the sampler
type two linear color. Now just to save, Let's quickly keep doing it
for each and every material. These are the kitchen fixtures, drag and drop them over here. Now I'm just doing
the same thing for each and every material. Alright, so this
is the last one. Just click over here
and disable sRGB. I will just take you to
linear color and hit Save. And now we're done with adding all the textures
to our materials. We need to hit Save. Alright, so if you just view, you'll see now we have
applied all the textures. Still cannot view them properly because of the lighting issues. But if you just
press control plus L and try to move the lighting, you'll see that we can get some pretty decent
looking scene. If you will see it is not the word is not looking
reflective anymore. The reason it is looking like somewhat discolored from
over here is because of all the light leaking from all the different areas that
we will, we can easily fix. I will now fix that. So to do that, just add a cube. Go over here in the shapes
section. Add a cube. Place this cube over here. Let's just scale
it up. Like this. Scale it down. This will just act
as a shadow creator. Now just go in here, you will see the light is
not leaking from over here. But obviously it is leaking from all of the, all
the other angles. So we just need to copy this and move this
all over r cubed. So just press Control C then V, risky to rotate and
rotate it by 90 degrees. Let's move this over here. Control C and V.
Paste it over here. Select this one,
press Control C, then V. Moving this way, make sure you are not
covering the window. Again, press Control C, then V. Then also one more thing. If you don't want your
models to snap to different measurements
while rotating or moving. You can change the Snapping
settings from over here. You can turn it off
and on like this, and you can change the
values from over here. Make sure you are
placing them perfectly. You can press R to
scale up your tube. Again. Now press
Control C then V, and move it at the bottom. Just check if it is perfect. The VM maneuvering in
Unreal Engine is holding my right-click and
using the WASD keys. Pretty easy. Just told you right-click and
you can move it this way. Now if you go inside the scene, it will look pretty dark, but there is no
light leaking now. And even now, the scene looks pretty realistic and it even
looks really good. Now. We will add some
more lighting to this to make it
look even better. And you will solve all these
issues that are over here that you can see the light is not being
calculated properly, so don't worry about them. We will fix them pretty soon. Just hit Control plus
S to save your files. I think we'll continue from
here in the next lecture. Thanks for watching. I'll
see you in the next one. Before ending, you can just
close your Unreal Engine and you will see this huge list. Make sure to just
hit Save Selected or you can lose all your
files and progress. Make sure you disclose unreal
once and hit Save Selected, wait for it to save completely
and disclose it properly. Tenuous for watching, I'll
see you in the next one.
20. Setting up Lighting and Post-Processing: Hello guys, welcome
to Chapter 19. So in this video,
we will give our scene a basic lighting
and post-processing. Let's start. The first thing that
you will notice is whenever we are like
moving out of the scene, then the scene is adjusting
to the brightness. And if I go inside again, everything is very dark. But it will assume
stabilize and everything. Right again, but it
would take some time. This is being caused
because of auto exposure. So let's fix that
so that the scene stays late in one single
brightness the whole time. That would be much better. So first to do that, let's add the
post-processing volume. So if you just go over here in the volume section, select
post-process volume. Right now you cannot
see anything. But if I have, I am pressing G again and again to turn on or off the game view. It is basically like you can see all these icons and
everything currently, but as soon as I press G,
everything disappears. So it is a little
bit cleaner view. So let's press G again to
bring back all the icons. So you will see this
box-like thing. This is a post-process volume. Right now if I place
it in over here, what we can do
with this is like, let me just show you select post-process volume
from over here. I will do something that
is like very obvious. So let us go into
the temperature, increase it to some
observed value. So you can see the temperature of our scene looks
like very hot. And as soon as I move
outside of this volume, you will see the
effects go away. So whatever changes we will do, they will show up only when we are inside this
box like this. You see, as soon as I
move outside of this box, the scene goes back to normal without any
post-process volume. But as soon as I go inside it, we will get all the effects
that we make over here. Actually, I don't want that. I just want my post-process
volume to be global. I don't want to adjust
the size of it. What I will do is let us just move it outside
of the scene. Here in the settings
search fought in finite, finite extent list enable this. Now what will happen is
the post-process volume will cover the entire
word and any change you make sure quickly over the entire scene. This
is better for us. So let's just disabled
both of them. And first I will correct
that auto exposure thing. Under the exposure section. Enabled minimum and
maximum brightness. These are your minimum
and maximum brightness. And I will say both
of them to one. Instead we are seeing Ruth pretty dark. Don't
worry, been fixed. Start also. The thing is now if you move outside your scene,
everything stays normal. If you go inside, still, everything stays the same. Now what we can do is we can enable exposure
compensation. We can adjust this value
to adjust that brightness. With this, for example, if I say this to three. Now this brightness will stay throughout our
scene outside also. And as soon as they go inside, everything stays the same. Though we decided on this
value at later on stage, but for now I think
this is fine. All right. The next thing is first, I would like you all to just
press control plus L and then move your son
around and find a perfect or what should I say? Like an interesting
lighting scene. Like if you place
your son this way, we don't get any of the
lighting through our son. But if you place it like this, it costs a little bit of
interesting lighting. And I think it adds
a lot to the seed. Place it base your son's
something like this. Just experiment with it for a little while and you
will get the right thing. I will keep it. Maybe I think this one only this
looks pretty good. Maybe I just don't know. I think Ms. Was fine. Next, what we can do is let's make some changes to the
post-process volume. Let's see. One more thing that
I wanted to show you is if you just select the post-process volume and
you can lock it over here. So now you can select
any of the object, but the settings will remain a post-process
volume or leaked. It is helpful because
generally whenever you are making changes to
the post-process volume, as soon as you click away, the settings over
hitching changed. And that's where tonight. Then just lock it from here. And you can freely select
any of the objects. Also, disable all the selection. You can just press
do twice like this. And everything will be hidden so that you can view properly. Alright, before starting
what I will do this, let's just remove
this lock for now. I will add a camera first. Go over here into the
cinematic camera actor. And you can see the
camera is over here. Now what we need to
do is I weren't, the reason I wanted
to set up a camera is like so that we can get a final shot and we can set all the things according to
that particular shortened. To simply easily
set your camera, the best way would be. You just move your
view like this. For example, I want to set up
the camera just like this. As I'm seeing the
view currently. What I will do is first I
will place my view this way, the way I wanted the camera. You can hold your
right-click and then use the WASD keys to move your view. Next, you select your camera, right-click and select
Snap object to view. As soon as you do that, you will see the camera has snapped. The camera object to the view. And if you just
right-click and hit pilot, now we are in the camera view. We're seeing through
the lens of the camera. You will see it is not
quite like our view. And the reason for this is we just need to change
a few settings. You can go into the lens
settings and set this to 12 MM. You will see, argue
is exactly like this. Maybe you can
increase it 30 IMM, 50 AM, and whatever you want. Except district
12 women for now. Maybe I will change some
settings from over here. You can also move your camera
while holding right-click and just just your scene. Also if you are
feeling the spirit of the camera or the speed of the movement of the
camera is too fast. Just go over here
and decrease it to two so that you can
easily set up the view. I think something like
this looks pretty good. I will decrease the speed
of the camera even further. Alright, I think something
like this looks pretty good. The settings over here
on the film back, I've chosen 16 by nine DSLR
and the lens settings up 30. And then the next thing
that you will notice is that everything
in this camera looks very blurred and
nothing is in focus. So let's set the focus now. In the focus settings
you will see this just enabled Draw
Debug focus plane. What this will do is
just move this number, this manual focus distance. To just move it like this. You will see this pink colored, all sorry, poeple colored plane. This is actually
the focus plane. Wherever you will
place the spleen, it will set your
focus to that point. For example, if I set it
over here, now disable this. And you will see that this portion over here
is appearing very sharp. You can notice over here also, are everything is looking like in focus and
not like earlier. If I send this to
the default value, you will see how everything
over here is blurred and everything over here
also the tap is blurred. But as soon as I just undo this, you can see it is focused and
it looks much, much better. Alright? Next thing what
we can do is, let's see. Alright, so let's come back
to the post-process volume now. First thing is Blum. Blum is basically
if we just enabled intensity from here and you
increase and decrease it, which is quite
self-explanatory and visual. You can see wherever the
light is being exposed, that area will glow more and more as soon as
you increase this. I don't know. Maybe I
will say two to four now. It looks pretty nice. Yeah, I think this is good. Next, let's see exposure
we have already done. If you want, you can set
the exposure compensation however you may like
if you want to go for a dark scene or if
you wanted to maybe even make it brighter. That I think for
now three is fine. Let's see. Chromatic aberration. Again, it is very
self-explanatory and visual. As soon as you enable
intensity and increase it, you'll see how over the edges the colors
are being divided. So this is like a camera defect. Honestly. It really depends on the scene
if you wanted to use it. I honestly don't
like that effect. So I will just undo
this disabling. That mask is if
you've got a texture. Let me see if we have
a picture over here. Let's just select any deck ship. Increase the dirt
March intensity. You will see this texture would appear as a mosque and it
will appear over a camera. I know right now
this texture is very random and it does
not even look good. But if you have something like alpha or overlay, that
will look pretty good. Let's see if we
have something like that or for example,
something like this. Maybe. You see it acts as
a flair for the camera. And yeah, even though
this looks pretty good, obviously I'm not
going to use it. But yeah, it looks good. I will disable both of them. Do not use them. Camera, we
won't go over the stuff. Lens flare is again, if you just enable this, you can see all these cool lens flares. You can also adjust
its Moche size, increase or decrease
it like this. Again, maybe increase
it a little bit and set the intensity to 0.125 so that it is
very, very faint. But yeah, it is still there. Next. The image effects in
manufacturing is Vignette. Vignette is like a
darkening of the corners. If I just set this to 0, you will see the corners
are like very bright now and as soon
as I increase it, it makes the corners
pretty dark so that the focus has shifted to
the center of our scene. Obviously. Again, we don't
need you to do as much, but I will say to 0.6 to get more focus on
the center of RC. Like now the scene I
know is pretty dark, but we will add a few more light to make it a little
bit more right up. Next is color grading. You can maybe send a
team of 6 thousand. This will make your scene
look a little bit cooler. Cooler in the sense like it. We'll give it a bluish tones. As soon as the degrees
are, you can see it looks more bluish and as
soon as it increases, you will look more yellow. I don't know,
something like 1580. I think this looks better. Next, global saturation. If I increase this, I will increase the saturation
of the colors. I honestly don't want this. I will just disabled altogether everything because we can set all the settings in Photoshop also want to give
them much next to it, you can see this global
elimination method human, that is the latest feature
of a million five. Just say this to maybe
something like screen space. You will see how bad
lighting looks actually. Move back to human only. Now, if you will
open up this menu, you will find some
settings related to human. So basically these are
quality settings I will, for the sake of this project
to have maximum quality. I said most of the
stuff to full values. You can see this
final gather quality. If I decrease it to 0, you will see how the lights are flickering even more over here. And it is looking very bad. Distribute some
of the flickering has even reduced over here. Now if you see the reflections, reflections also use human. All these reflections
that you see over here. If I set them to
maybe screen space, you can see how bad they look. We'll send them to
do admin and I will also increase the
quality for them also. So these were some of the settings for the
post-process volume. You will see if I disable this. The difference between
the post-process volume with having it enabled and
we'd having a disabled. I think this way it
looks much better and more cinematic and dramatic. Now let's move on and add some
more light into our scene. Before that, I will
create a new folder. Let's name this
lights and camera. I will place these all objects, all the objects that are
related to atmospheric light. This one, this one, this one list one and this one. And Volumetric Clouds. The strike click and move
to light some cameras. All of them are here. Now. If you select this thing,
exponential height, fog and just disable list, you will see this is like a little bit of
fog towards seat. I don't think we
really need that. The scene looks like much more
clearer without the fall. Instead of disabling it, what we can do is just go over here and decrease the density. If you increase
the fault density, you will see the fog
appearing in our seat. I will just decrease this and sacred to a
pretty low number. I think this looks pretty nice. Next, let's go and
add a new light. So go over here and
light are direct light. Bring it in our scene. Alright, so here it is. First, let's rotate this
surface and rotate it this way. By 90 degrees. Obviously, you just really, really bright right now. Now we need to come out of the cameras right-click
and stop violating. Let's select the
direct light source. Here. Yeah, I will drag and
drop it in the folder only. Now selected. At the top over here you can disable snapping from over here. We'll just place it like this. Let's see. Let's place it around
here somewhere. Always change stuff
like this. Yeah. Now we'll move back to my
Camera, right-click and pilot. Alright, so the next thing
is select the direct light. You will see this intensity
option over here. You can increase or
decrease the intensity. So obviously we
need to decreasing. Let's set this to one. Yeah, I think something like this in our scene
looks pretty good. We can view all the
stuff properly. The lighting over
here also looks nice. If we turn off the
post-process volume, you will just see how much
of a differential creates. I think we did enabling the post-process volume scene
looks much, much better. All right, Let's
hit save for now. The next thing that I
wanted to mention is that the wood that you see over
here and overhead also. I think it's looking
like too much or here. So let's open up
Substance Painter. And I will try to
reduce it a little bit. Now let's close this and open up our kitchen room
substance painter file. I will disable everything
for now except the cabinets. And let's just
zoom in over here. So the easiest way to find
this will be, I think, no, not this enabling disabled, all the stuff to see
which one of them is the reason for these lines. It is this layer. As you can see, if you want, you can just disable
it completely. But we can also do is click
over here on the mask, then click on this failure. And I think if you change
the scale for this, as you can see, let's set this to five and
rejection first. Increase the scale to
something like six. I think that would look
much, much better. Let us do the same
thing for the slabs. I will select the slabs
texture set from over here. Open up the painted wood
in the basswood section. Select the mask further
knots in the familiar. Set this to five planar and
increase the scale to six. Alright, now I will just
quickly show you how we can again export textures
from substance to unreal. Now, you just need to
hit Control Shift and E. All the settings have
been already done. You just need to hit Export and after the
exploiting finishes. Okay, so now it is done. So come back to unreal Engine and just hit Import
from over here. And as soon as you do that, it will take a little bit
of wildlife, 1015 seconds. And immediately you will see all the textures
updated over here. You do not need to do much. Alright, so as you can see, the board is now
updated over here. And I think this way it
looks much, much better. I think I will just
leave it around, go over there and also reduce the height amount
of it a little bit. Because I think the height is
also if you make too much. One more thing that
I want to do is some of the stuff
that I'm noticing is this concrete layer that you look over here is
looking like very dark. Also the dust that we have applied to all
the cabinets and everything is
making the cabinets look like like really dirty. So I will just turn
them down a little bit. So to do that, let's head
back to Substance Painter. And what we can do is select the dirt layer
and set all of them, do 30, reducing
the opacity to 30. I think I'm doing
this for the slabs. Liquidus do it for the
cabinets also quickly. I think that would make stuff
a little bit more cleaner. Next, let's enable the kitchen. For this concrete. Let's select the concrete layer. I will flip over
the concrete color so it is already
set to go, right. Let's see what we can do. Let's enable, open
up this setting. Increase the luminosity a bit. I will try 0.6 maybe. I think it looks
pretty bright now. Somebody alerts us, strive for now and see how it
looks in Unreal Engine. Hit Control Shift and E
and again hit export. Wait for it to export, and after it is done, we'll move back to
unreal. It is done. Now let's go back
to it is the noun. Let's move back to
unreal important game. Wait for it to
import all the files and changes wouldn't be
done as soon as it is done. Right? So now I think it
looks really, really bright. Obviously, you
guys, we need to do a little bit of back
and forth between substance and Unreal all the time to get the perfect
looking textures. I will just undo this for now. Let's see. Yeah. I will move back to cabinets. In this section. Over here on the filter, you can see this height value
increases or decreases. This it is currently 0.00651 way we can just reduce the
height value from over here, or we can just change
the channel to height and just
reduce the opacity. So let's set this to 50 and you can see the high
degrees immediately. Let's do this for slabs also. Select this layer
and set this to 50. Quickly explored this again, and we will end the
video right here. Alright guys, so
the export is done, moved back to Andrea.
Adequately hit Import. Wait for it to finish and see if that looks
better over here. Or this height information
is just too much, I think. Alright guys, so now the
export is done and I think it definitely
toned down a little bit. This way it looks
much, much better. Guys, I think this much
is enough for this video. We did a lot of things. We set up our basic lighting,
some post-processing. Then we also learned how we can move back and forth between
Substance, Painter, and unreal to make
some changes to our textures will continue from here in the next one, guys,
thank you for watching. I'll see you in the next one.
21. Creating Props: Hello guys, welcome
to chapter 20. So now that we have added all our models and textures
into Unreal Engine, and we have also added some basic lighting
and post-processing. From this video onwards, I want to create some of
the props that we will be adding over our
slabs and everything. You'd like make our scene
look a bit more complete because obviously we will not
leave all these labs empty. We will add objects
over here like spoons, forks and everything like that. For now I think it
would be safe to disclose and will engine
and we can open up Blender. So just open up lender and we'll start to work in
lender only for now. I will hit Save Selected. And now one thing that
we can do is we can either start making
up ropes in this file only or we can use completely
create a new blender file. I will maybe create a
new blender file only we call that review will have
everything pretty clean. It will be easier to
organize everything. I will first en enabled
screencast keys, and also I will press K. And then we delete all
these existing objects. Now if you will go over
in your resources folder, you will find the
defense images folder. You will find this Props folder. They are some of the
images that I've collected that we will be using to
create all these props. Let's start with something easy. We can drag and drop this cup reference
image into Blender. So just press one. For the front view. We can just drag and
drop it like this. Now press Shift plus S Then selection to cursor to
bring it right at the center. All right, so let's start. I will press Shift plus a, then add a cylinder. Enable X-ray analytics.
Place it like this. Scale it up. Just match with this
upper line over here. Something like this. Stab one for the vertices, select, select all
these vertices. Let's move them up here. Now what I will do is I
will just keep pressing E and paste them
accordingly like this. Obviously we don't
really have to follow the reference image exactly. Shape can be a little off. It does not matter that much. Now, distress, ie the
next two days, I mean, scale it outwards like this. Let us see how it looks. In the top looks fine, just right-click and shapes
move this also I will enable cavity and
shadow from over here. The object data properties
under the normal section, Let's enable auto smooth. Next thing to do
would be to just stab of this 34 fi select, select this complete phase, just press X and delete the face that we get
something like this. Now let's start to
solidify modifier. As you can see, the
solidify modifier gives up a little
bit of thickness. So firstly, press Control
a and apply the scale. Also, one more thing that
I will do is hold Alt, select this complete
loop dentists Control V, bevel this give it
a smoother shape. Like this. Let's set the thickness to 0.1,
where this is too much. I will set this to 0.05 million. I think something like
this will be fine. At some 0.035. I think this looks
okay. That's one. Again. Let's create this
handle like shape. Let's just hide this for now. So select this cup and press H. We just add one more
edge loop over here. Estab for the edit mode, controlled our add one
edge loop over here. Scale this outwards. Now we'll press X to hide this. There's one for the front view. We're shifting and just add a
single word from over here. Please it like this also. I'm telling it once again,
if you press Shift. And you do not find
any of these options, you just need to go
into preferences. The add-ons section
search for extra objects. And you can enable both
of these four curve. And then you will find all these options
when you press Shift plus C. I will select this
vertex from over here. Press Tab, just quickly extrude this and trace out the
boundary of this handle. We have done it, I think
prior in the host only. So I think it is pretty easy. I'm just pressing
E again and again and matching it with
the reference image. All right, so just
select them both. Now press F. We can also press Control R and abnormal what is in-between
and displace it like this. And then press a to
select everything and you can press F, you
fill in the face. There's bring back our cup. So press alt plus H. Move
it a little bit over here. Press tab for the edit mode, press E to extrude it. And let's give it a thickness
of something like this. Shape smooth and also enabled
auto smooth from over here. You can also add a
bevel modifier to this. Also placed in lesser than
the center like this. Yeah, I think it
looks pretty good. Now what I will do is select this first enabled
hard and Normals. If you see something like this sort of better
to just press tab. We can select one of
these vertices and just try to move them
away from each other. That fixed the issue. Alright, so let's
select them both. Select all three of them, move them to a side m. Let's add them to
a new collection, and let's name this
collection as scopes. I will move the
reference images to a completely separate collection so that they don't get mixed up. So press M again, add
a new collection, and let's create this widening of friends images and hit, Okay. Alright, so the next thing
is let's create display. It does drag and drop
it over here again. I forgot to press one. So that's why, that's why it is not aligned with the view. So what we can do is
just select this image, select all three
of the rotation. First, press N to
bring up this view. Then go into the items section. You will access all these
transform settings. You can drag and select all
three of them like this. Drag your multiple, select all three of them
and just type in 0. Alright, now I can
just start then x and rotate it on the
x-axis by 90 degrees. One for the front view or Shift S and selection
grew closer. Alright. So again,
I will add a plane. I mean, again, I will add a cylinder rotated by 90
degrees of the x-axis. Enable X-ray scale
it up and again, try to match it with
the reference image. Yeah, I think this is fine. I will just scale it down
on the x-axis, y-axis. So press S then Y. Also left shifts moved this
ad enabled auto smooth. Now let's forget it. So press R then x, rotating by 90 degrees. One for the front view. And let's place it
over here like this. Enabled extra again. Alright, so again, press Tab, respond for the
vertices, select, select all these words, sees lips, move them over here. Select all of these vertices and scale them inwards like this. Again, start to extrude
and just keep on scaling in words like this. To create something like this. Select this reference image, I move it backwards. Again, what I will
do is press Tab. There's three for Face, Select, select this top
face and press X. And the phases. I will hold Alt and select this complete loop and
just scale it outwards. So everything is
smooth like that. Alright, next let's add a
bevel modifier to this. Apply the scale first. There's this plus x. And remove this edge loop so that everything
stays smooth like this. Adding a loop over here
starts to cause some problem. I think this way
it is also fine. Next I will add a
solidify modifier. Let's see first apply the scale. Be solidify modifier
above the bevel modifier. This looks much greater.
I will do is press Tab, press three for free, select and hit Control V to
develop this face. That looks much, much better. Let's set the thickness to 0.02. Let's try 0.03. Yeah, I think
this is fine. For seven. For the top view,
let's select both of these cups and try
placing them over here. There's some craziest
scale of the plate. All right, so I think
it looks pretty good. I will create another
copy of the blade. So press Shift plus g First, let us move them all over here. Select the plate
redshifts plus z. Scale it up. I will
just scale it up. But I will only scale it
on the x and y plane. So press S then shift
to scale it like this. That it does not
scale on the y-axis. Seven for top view, enabled X3. Hold Alt and select
all of these vertices. You can just press C and
select them like this. Just received, select them
all then hit right-click. Now plus S, then Shift plus
z and scale them outwards. This looks pretty good, right? I will select the top and
move it over here like this. Select both of them and move
them to a new collection. So press M new collection and let's name this
collection as plates. Okay. Alright, I think we are good. Let's see over here, I think is fine. Save. And I will save it with
the name of small props. We will you already have a filename Prof. I
think that is fine. I will just hit Save, select this reference image, press M, and move it to the
reference image collection. All right, Next let's see
we can create a spoon. Maybe. I will just press
seven for top view. Now I will drag and drop
the spoon image over here. Shift plus S Then
selection because unless start for the spoon
but I will do is first I will create a plane
per shift plus a. And let's add a plane In this
town and please go here. Before we start
modeling the spoon, what I will do is I will
select this reference image, g, then z, and let's move
it a little bit down here. Then I will duplicate
this reference image. So to duplicate, just press Shift plus D plus y
log on the y-axis. Let's receive over here. Now just rotate it on
the X by 90 degrees. One for the front view. Headed up link. And let's place it
just about here, like this so that we can
change the shape of this. Explain in two different
planes so that we can create the perfect
shape for our school. Seven for the front view. And just select these vertices and make sure you
enable X-ray G, then G, and move it like this. Seven for top view. Select them both and then
press S to scale them down. We can just select each and
every vertices then plus g, the invite, and
move it like this. Again, select both of
these plus e to extrude. One for the front view again. And let's select
the both vertices and move them down like this. So you can see how easily we can clear the shape
of this rule. Again, Let's extrude it and place it like this.
Then press seven. Scale it outwards. Again, test E then X, extrude it like this. Place the vertices according
to the reference image. One for the front view. I think this one is fine. Again, press T, complete the shape over here
and then the seven. Now we just need to
scale this down. Let's add one more
edge loop over here. So press Control R.
Scale this outwards. I think something
like this is fine. Press one for the front view. Over here, everything is fine. Just select these two
vertices and extrude them forward over here. Seven. Scale this down. Alright, so now what we need
to do is just press E again. Try to again match the shape. One for the front view and make sure you line up
everything over here also. Everything is fine. Now
extrude it like this. Seven from top view. Now let's scale them outwards. We don't actually have to get the perfect shape
because when we will be adding a
subdivision modifier, it will smooth out all the edges so you don't need to
worry about that. Like this. Again, extruded,
extruded till here. Then over here. Seven.
Let's just adjust this. Obviously we need to add a
couple of more edge loops. One again and let's see. Yeah, everything seems fine. Now what we can do to create the perfect spoon shaped is first let's add a
subdivision modifier. And you can see all these
edges as smoothened out. It can also give
it one more level. Right-click and shade smooth. This enabled auto smooth. All right, Next what we need
to do is press Tab again, select these faces. Here. I think it's seven enable X-ray. Excellent, this one also. Now press I to insert them to hear the address one for the front view and G and
move it downwards like this. And you will see we have got
somewhat of a spoon shaped, but it is still not
perfect in my opinion. Let's press one again, enabled x-ray press Tab. Now, press one for
the vertices select, and let's select each
of these vertices. Make sure x-ray is
enabled so that you select both of the
vertices at the same time. It also, I've done both ways, do two times so that you can slide the vertices across
the edge like this. U2 times. Let's
place it over here. Plus g1 listed over
here like this. Alright guys, so now press Tab to come out
of the edit mode. And let's see now, I think we have got a
perfect spoon shape. And you can see how easy it
was to create this book. Now to give it some thickness, Let's just add a
solidify modifier. Apply the scale first risk
Controlling, apply the scale. Let's give it a
thickness of 0.03 dB. Again, see, it looks perfect. I think this is too much. Let's save this to 0.02.
I think this is fine. Now select them both. Press M and let's move them to the reference
image collection. Please. The spoon over here. Right, so I will move this
into a new collection. So press M and let's place the spoon and the
folks in the same one, so spoons and forks. The next thing to
create is a folk. To now open up your
reference images folder. And let's bring in
this folk image. Again, there are seven
for the top view. Let's just drag and
drop it over here. Now press Shift plus S then goes there to
select it or sorry, the selection to Gaza
to bring it over here. Plus g, z and move it over here. Again, we will do
the same thing. We will be shift plus D. To duplicate this. Make sure to keep them in the same line like this
and press our than x, you're taking the 90 degrees. All right, Again,
let's add a new plane. Enabled x-ray.
Place it over here, scale this down like this. Now let's try to adjust it according to
the reference image. One for the front view. Select them all and place
them over here like this. One-by-one. Select
each one of them. Just place them according
to the reference image. Make sure always
your X-rays enabled. Because if your X-ray
is not enabled, you will just select
one of the vertices. And now if you place,
try to place it, it can cause some issues to
make sure x-ray is enabled. Alright, I will select them both plus e, explicit over here. Let's just do this
completely for one side. From over here also. Let's do this till here by
seven for the top view. Now we just need to list them according to
the reference image. So all the couple of vertices one by one just press S and scale them according
to the reference. Just extrude this one more time. Press S Then why? I would like to
move over here and scale them down to match
the reference image. Let's just place this over here. Like this. One over here, one for the front view. Now let's place them according
to the reference image. Let's add one more edge
loop over here like this. One again. Let's bring
this down over here. I think I shape is fine now. Right-click and shade smooth. Let's add a subdivision
surface and also increase the viewport level
two to seven for top view. And you can see this edge
over here has smoothened out. We can just press Control R
and add edge loops like this. But we will be just
creating the shapes now. So I think that would be
fixed itself. So let's start. What I will do is
press Control R, add edge loops like this. Keep on adding edge
loops to create. If something like this. Now I'll just select
each of the vertices, match them like this. Alright? Now what I will do is I
will just select this face, this face, these phases in the press X and
glue these pieces. Now if we will see we have got something like
a fork over here. Let's enable X-ray. Let's see risk unfold. And let's add an
edge loop over here. Again, press Control R and add
some edge loops like this. See I think we are good just
to solidify modifier Next, give it a thickness of 0. To select this controlling
and apply the scale. I will set the subdivision
modifier to one only. I think it will be fine. Next, select this one. We gave it a
thickness of 0.02402. I will also enable
statistics from here and just check the amount of
vertices or both of these. There are 2 thousand vertices. If I increase this
to two, Let's see. I think setting, setting them
both to one would be fine. That would keep our
vertices in check. Or this one I will send
you to lead. Yeah. Let's see. For this one, Let's try placing the
solidify modifier first. Then the subdivision. I think this looks much better. But our vertices are
up to 6 thousand. Yeah, I think this is fine. All right, so let's
just hit Save and I think we can work with this. I will select this, go to objects at origin and
auditing to be geometric. Alright, so our focus point,
I think look pretty good. I will just select them. Press M and move to the
school folks collection. Select both of these
image images and press M moved into the
defense images collection. Execute, save, and I think this much is
enough for this video. We continue creating
more prompts in the next video.
Thank you for watching.
22. Creating More Kitchen Tools: Hello guys, welcome
to Chapter 21. So let's continue
making up crops. If you will open up the
reference image folder, you will find that I've
added a few more images. So let's start with
something easy. We create these bolts. Again. Seem procedure. This first one for
the front view. First let's are the
reference image. Drag and drop it over here. Then Shift plus S
Then selection. Because again, it is
pretty easy to make. Just add a cylinder, super shift a cylinder. Let's enable X-ray and
miss this one over here. Like this. You can
also press S then shift to scale it on this
axis only like this. I will scale it
somewhere around here, match it with this top line. Something like this.
Then press Tab, go into the Edit mode, press one for the vertices, select, select all
of these vertices. Let's paste them over here. Again, scales down. Just keep scaling it down. All right, we are done already. Let's just select this
right-click and shades root enabled smooth press
Tab is three for Face, Select and select this top
face and just duplicate. Now we can add some solidify modifier to give it a
little bit of thickness. Also, don't forget
to apply a scale. I think this looks pretty good. Extra S1 and place it over here. Scale it up a little bit. Let's create the next one. Now. Let's see, I will
create another cylinder. Again, place it over here. Start to go into the egg mode. Press one for vertices. Select again. Right about here, I think, to create some kind
of leap for the bowl. And then just try matching
it with the reference image. Alright. That's fine. Right-click again, Shade Smooth. Enabled her to smooth
the solidify modifier. And also don't forget
to delete the top face. We can add a level
modifier for this. Just smoothen out the edges. Fine, I guess again plus one. And let's just press M and move this reference image into the
reference image collection. Let's place it over
here and we can decide over the size
later on stage. And we can also change
it in Unreal Engine also so that it does not
really matter that much. Yeah, I will just
select both of them and press M and move them to the collection. Let's see. Next what we can
create is the span. I will change the name to plant so that it
is easier to find out seven for top view and
add this image over here. And shift testing selection because let's scale
it up a little bit. Again, add a cylinder. We can match it with this point over here and just scale it up. Perfect. Now, just press, instead of creating
a reference images or we can just select the cylinder and rotate
it by 90 degrees. Then match it with
the bottom image. Absolutely a bit off, but that does not matter. We can match it on our own. That's fine. I
guess establishing, select all these vertices. You can also try and just press control plus V and
devil dislike this. That works perfectly. I guess before that, I will just apply the scale. Now let's press Control and
V. Beveling it. I think. Fine. I will now just look this band like this on the
x-axis by 90 degrees. Because we don't really need the reference image
anymore now I guess their ships moved. This enabled auto smooth. Again, select the top
face and exclude this. Set the origin to
genetic tree by pressing Q because it isn't
in my quick favorites. You can go over here, object,
origin, degenerate tree. I will also press S and scale it down and
regulatory like this. This looks better. I will also add a solidify modifier to this. I think this is taken off. I will press M on the reference image and move it to the
different collection. The pan folder, I have
a separate Panhandle. I have the separate
reference image because that one was
pretty complex and I don't think I want to spend too
much time on creating something as simple
as a handle because really it won't be that
much visible in RC. But yeah, exclude this one. It's pretty easy to create. I will again add a plane. Let's place it over here. Enable X-ray. What we can do, we'll just press Shift
plus S then closer to select it to bring the cursor
right here at the center. Then press shift D plane. Just try and move this plane at the center of this
handled not the image, but you can see it violate. When I try to scale this down, both the points should meet
with the huddle like this. The reason I'm doing
this is because now I will just first-person
controller apply the scale, the staff, and add an edge
loop right in the middle. So press Control R, then hit right-click to place
it at the middle. Just delete all these vertices. I use a mirror modifier that it is a little
bit easier for us to create this
express E and Z 30. To move it like this. Morning guys, even though we
have magnitude over here, it can still happen that these two things don't line up because the image
is not perfect. So don't worry about that. Just try to follow your mirror modifier and don't
worry too much about the image matching
the model perfectly. You can see if I select this word c is disconnecting
from the green. Just enabled flipping so that they stay at
the center only. Let's move on over here. I will proceed and y and just place it
directly over here. Now I will add a couple
of edge loops in-between. Match the shape roughly. Yeah, I think this is fine. Let's see what we
can do with this. Just for estab, press a
to select everything, then extrude this like this. Shade Smooth and also enabled
auto smooth for this. Now I will add a
subdivision modifier. I didn't. This looks
pretty good for a handle. If you want. You can also add edge
loops like this. Press Control R.
Just sharpen it up a little bit. Like this. And let's select
these three phases. I will add another
edge loop over here, another one over here like this. Then just select these
three phases. Insect them. Make sure to press V so
that the insect this week, I'll just press G, then move
them inwards a little bit. Then just press I
add the insect, create some sort of this shape. I think that looks good. If you want to
create this whole, we can also create that. Let's just select all of these vertices. Please
don't like this. Now just select this face, press X and delete this, select this face
also the interest x, you need this best
one for the vertices. Select hold Alt. Again, hold Shift and Alt and select this bottom
vertices loop. Then press Control E and
bridge these edge loops to create something like this. You can also go with
one subdivision level. It looks bad, but obviously it won't be that
visible in our scene. We can add a couple
of edge loops to solve. Solve the issue. If you want, you can go
with two levels only because it looks a
little bit cleaner. Let's see, Just for shift
desk because they're selected started
cube scale discount. And just place it at
the front like this. A seven. Let's just first remove this reference image M
and move it over here. By 90 degrees or no. Let's just place it over here. What we can do is select this piece and this piece also select this
one at the last, then press Control C
and then copy location. Now let's just move
it back over here. The reason I did this was because during this day would
be exactly at the center. We just need to place the
other objects selected. Three for the right side view. And let's place it over
here. Just like this. Yeah, I think that
looks pretty good. All right, press
M again and let's move it to a new
collection, namely pan. All right, Let's see my
blender fights and continue. Next weekend. Create
these cutting boards. They are pretty simple. Guys. If you're feeling like
something is pretty simple, you can try creating on your own rag and
drop it over here. Let's scale it up a little bit. First redshifted and
closer to world origin. And select this
object and Shift S selection because we bring
them right at the center. Now let's press Shift plus
a and add a plain x-ray. And let's just scale this up. You can see the images kind
of tilted a little bit, but it does not
matter that much. Let's just follow it roughly. I will prescribe slowly
apply the scale. And now to create
this hole over here, Let's press Control R and just add a bunch of
edge loops like this. One over here. Now just
press Control plus our use your scroll wheel
to act two edge loops. Press S, then x it to
scale them up like this. Alright, there's three. Then select this face
and let's delete this. Right? Now I will just
press one for the vertices, select and select all
of these vertices. Press Control Shift and V bevel. Then let's parallel
limited here. Select all four of
these vertices. Then again press Control
Shift and v. Let's see, I will be here, I think reduced the
number of segments. Yeah, I think this
is fine. All right. Now we just need to press
Tab to select everything, then just extrude it like this. Just proceed to
exclude it like this. No dissent enabled or too small. You can also add a bevel
modifier if you want. The Boolean modifier
is not working. Try disabling clamp overlap
and just reduce the amount. Now let's just remove this
seventh to talk through. Let's place it
over here and move this reference image
into the collection. So press M and
move it over here. Alright, so now if you will come over here and
the reference images, you will find one
more cutting board. But I won't be creating
this one if you want, you can go ahead and created
a procedure is pretty basic and I'm pretty similar to the other objects
that we have created. If you want, you then go
ahead and create this. Let's create this cooper next. So again, I'll address
one for the front view. Let's select them all. Move them over here, little bit. Drag-and-drop. Fancy
image over here. I've scaled it up,
press Shift S, Then selection to cursor. One thing that I've wanted to do before moving further is if you select this folk and press Tab
to go into the eight more, we can see some kind of
weird geometry over here. So let us just quickly solve it. I will select this
edge loop, sold all, select this edge loop
plus x and delete this. And I will simply add a bunch of edge loops
over here like this. Now you can see it looks much, much better and very clean. That works perfect slash to
come out of the edit mode. And yeah, let's move further. Press one for the front view. And let's see, let's place
this one over here like this. I will press Shift
plus D to duplicate this and rotate
it by 90 degrees. Let's see. First let's add a cylinder and try to match the scale
with the defense image. But before proceeding,
press seven and make sure to match the reference
image for this, like this. Now that we will press one, it is matching up over here
and then we press seven. Yeah, it is matching perfectly. Now we can just press control a, apply the scale estab over here, select all the Word sees
less than over here. Then let's try doubling it. So let's Control B. Yeah, I think that looks pretty good. Again, shade smooth, this
enabled auto smooth. Establishing risk control are, and let's add an
edge loop till here. What I will do is
press and hold Alt, select this complete loop. Then just press Shift
plus D to duplicate this, then right-click to
place it over here. Press P and separate
the selection. Now press Tab on this object, press a and Alt plus e, then extrude faces along normal to extrude it like
this just a little bit. Alright. I will select this cylinder press Shift
plus S then closer to select it to bring the cursor right at the center of the cylinder so that when I add a new cylinder, it will get added
exactly over here. Again, let's scale this up. Scaling down on the z-axis. Let's see. The Stamp Act
select this top face, extrude this and
scale it inverts. And do this. And I will just
press I to insert this. And just move it
upwards like this. Again, insert this and
move it over here. I will just undo everything. I don't think it is
looking at good. Let us just go with
a flat surface only. Instead this and press G and Z and move it just a
little bit upwards. Like this. Yeah, this is fine, I guess 74 top view. And let's see. We can add maybe
another cylinder. Scale this down. Move it over here. Also select this object, press Tab, press Control R and add an edge loop like this. Instead of doing this weekend, again, just press
three, hold Alt, select this complete loop, press Shift plus D
to duplicate this, and crispy to separate
the selection. Again. Select this object, selected,
received selectively thing. Then for salty and extrude
faces along normal. Something like this. This face recycle insert this. I will add another cylinder. Place it, place it at
the top like this. Now just press Control. Apply the scale, a tab
and select the top face. Then press Control V to W it up. See if it fits perfectly. It does not. I will just first one and move this over here. Now press Control V. I
think that works perfectly. Smooth this and
enabled auto smooth. Let's see, next weekend,
create these handles. Again. Let's add
a plane for them. Move it over here, enable X-ray. Going again, press Control
a, apply the skills, press Tab, and then add an
edge loop right in the middle. Right-click, replace
it over here, and just delete one side
and add a minute modifier. On the y-axis. You see on the x down over here. Make sure to line
these up probably with the reference image.
Just like this. Something like this. Next again, loop over here. Now let's just move it up over here and select this
face, this face. Next, enable X-ray
and select this face. Also. Select this complete phase then plus x and delete them. I think that looks pretty good. I will stab enable X-ray and
let's move it up over here. What we can do is
we can also add a subdivision surface modifier. Just motored out a little bit next week and
solidify modifier. Give it the thickness
that we want. Make sure to apply the scale. Enable largest moon. Let's see. We can add a bunch of
edge loops like this. One over here, one
over here like this. Just to sharpen up the
corners a little bit. Sorry, one over here also. And yeah, I think we are good. I will select this
middle modifier, time, select this object
as the middle object. Now, just select the x-axis to mirror it along the
cooker perfectly. You can see like
looks pretty good. Make sure to select
the mirror object as your main cylinder. Also. Now that we're done, I will just select both
of the reference images, press M, and move them to the
reference image collection. I think everything
looks pretty good. I will just select this handle, which are then y, and rotate it a little bit on
the y-axis like this. I can distribute
looks much better. Now let's list them over here. Press M, and move this
to a new collection. Name, this cooker. I will also receive
seven for rulers is duplicate this with
x, place it over here. This one, I will
just scale it down a little bit. Is fine. I want to reduce the
rotation of them are cubic, but if I now press R, Then why? You can see it will
regrade quite weirdly, but we can just go over here and select individual origins. So now if you press R, the invite, it will
rotate individually. Let us just like this algebraic. Just hit Control S to save. Select this plane
and press M. And let's add this to cutting board. Actually, we have a
lot of elections now. At least everything
is organized. So yeah, that's pretty good. Let's see what we have left. Next. Began cleared
this knife maybe. So let's go over to
blend up for seven for top view shift plus S Then
world origin to bring it, bring it right at the center. And now drag and drop
this knife over here. Shift plus S Then selection because I think this
one is pretty basic. I won't spend too
much time on it. I will just press Shift. Let's add a single vote.
Place it over here. I will just quickly reference image out by just
pressing E, extrude this. Select both of them and press F. Press a to select everything. Then again press F. And let's just give it a little
bit of thickness by using the extrude. Apply the scale. And let's also add
a bevel modifier. This is fine. I guess. Just move this a little bit
over here and scale it down. Next, let's add another word. Press Shift a to
add a single word. Lace it over here. Let's
now create the handle. Select everything then
plus f, fill in it. Now let us again,
Let's extrude this. Let's see, Let's try adding a solid subdivision
surface modifier. You can see everything
went pretty bad. And I think the reason
for it is default with directly like
extruding the vertices. And this whole thing is a single phase and
it is like an N1 and we need to have
quarter apology to make proper use of the
subdivision surface. So what we can do
is just hold Alt, select this complete loop to
interest X and delete them. Now I will try to just create squares using all
these vertices. So what we can do is
select this word, see this one where g, we join them, press Control, R. A bunch of vertices like this. We just join them all like this. When I'm selecting both
of the vertices and then just pressing
J to join them. The reason I'm doing
this is because I want to create boards. Accord is like a square
face with four vertices. Earlier it was like
this whole thing. If I just quickly
show you, was this, it was a single-phase
with a lot of vertices, so that is called the N1. And then that can
cause a lot of issues. But it works fine for flat surfaces that
tax why I used it. Yet now we need to add
a subdivision surface, so we need to have
proper chords. Over here also, I will
select this one and this one then to just
press J to join them. Now you will notice when
I press tab this a, then proceed to extrude this. You will see how everything
like smooths out perfectly. I can just add another level, maybe make it more smooth, and add a bunch of
edge loops over here. Just make it a little bit sharp. The origin for genetic tree, Let's scale it down like this. Yeah, I think that
looks pretty good. I will reduce
delivery to one only. I think that's fine
for this piece. Seven again, there's a slash to come out of the
isolation mode. Enabled x-ray alerts just act three cylinders over
here like this. Shift D to duplicate
and again press shifted to place
a one over here. Yeah, I think that's fine. Let's hit Control
S to save this, select the reference image, press M and move it to the reference image collection and select all of it, press M. Let's create a new
collection knife tool. See if I try to rotate this. It is rotating in a
pretty weird because we have selected individual
origins from here. So all the objects
are rotating on the individual originally,
that is this point. But if I select the
bounding box center, they will rotate
properly by 90 degrees. Basic like this over here. For now guys, I think these
many products will be enough. This will be a prop set one. We will definitely create
some more prompts after this. But first we will export
them all into Substance. Painter, start texturing them, and then we will
export them out to Unreal Engine and start
placing them in our scene. And after that, if you feel
like are seen as too empty, then we will start creating some more props and then
add them to our scene. I think this much is
enough for this lecture. And the next one we will
start to UEN rub them and export them to substance painter for
the texturing process. So thank you for watching. I'll see you in the next one.
23. Texturing the Props (Set-1): Hello guys, welcome
to chapter 20. Do so in this lecture
we will start with the texturing process
of all these props. But before that, we obviously
need to UV unwrap them. And before that we need to apply all the modifiers.
So let's start. First thing that I will
do is I wanted to just select this cooker
lid. Select them both. Press Tab to select hold Alt, select this complete loop, hold Shift and Alt. Again, select this loop. Then just press control V, and let's devalue it out. Just smooth it a little bit. That looks much, much better. Alright? One thing that I want to
do guises that we created all these different collections for different type of objects. I think that was a
mistake on my part. I will just put all of these into a single collection only. That way it would
be much easier to manage. Just select all of them. It is very easy to just shift, press a to select everything
plus m. Let's create a final collection and I
will name it drop set one. Now what I can do is just delete all of them except the
reference images collection. The reason I did this was
because we are going to apply all the modifiers
for these objects. And as I told you,
if you remember, when we apply all the modifiers, we won't be able to
make any changes. So do avoid that. I just put all of them in a single collection only
and I will now duplicate this collection to
just right-click and first select
all the objects. Maybe we can just
directly right-click and go over here and
duplicate this collection. This way it will be really easy to manage only
two collections earlier if we try to create a duplicate of 15 collections, it would give us 30
different elections, so it would get like
really chaotic. That's why I put them in
a single direction only. And let's rename this one. Prop set one in the brackets. You can write as applied. Alright, now I
will disable this. The reason we have created two different collections is this one will have all
the modifiers intact. That means I won't apply
all the modifiers. That if you, for example, want to change the
solidify thickness of this band at a later
on stage in the course, you can come back
and just quickly do this and re-explore this. I will just disable this
and enable all of them. Selected everything,
and then press F3 and search for Convert to mesh. Now, as I said, we have applied all the modifiers and you can
see if I select this piece, I cannot make changes
to its thickness. That's why we've created a duplicate of this
collection rate. The next step to do before
UV unwrapping is if you will just select this and go here, you will find the dimensions of this scope to be
three meters large. So actually here it
is looking fine, but when we will export
this into Unreal Engine, this scope will be huge
compared to rest of objects. I wanted to reduce the scale
before moving further. Obviously, we can also change
the scaling and we'll also, but let's just do
it in Blender only. Before starting. Let's just select both of
these objects and join them. So press control J to join. If you see your shading change
on your objects like this, the way it is changing my
scene, just hit Control Z. Then what we can do is first let's add a vacant
normal modifier to this. Enabled keep sharp. And let's give this
also written normally Modifier applied both
of the modifiers. Now. Now let's try joining
both of them again. Now it is fine. I will
just quickly join all the objects that are
like into different pieces. Select all three of them. By clicking Shade Smooth first. Also makes sure to
enable auto smooth. Alright, so we are
fine with this one. I will select all of the
other tips over here. Then Risk Control J.
Again, select all of them. Select this one limb, press Control J. Alright, now let's adjust
the scale for them. So I will select the cup first. And you can see the size
over here it is in meters. So first I will change this interesting
Devito. Go over here. The length section, centimeter. Let's decrease the
scale for the Gulp. I will set this to around. Keep on decreasing it. Well centimeters, I guess. Something like this. Actually
now it is quite small, so don't worry when all of the objects will be off
around the same size, it won't be such a problem. Now I will select displayed. Let's decrease it safely
through maybe 16 centimeters. The x and the y. This seven. Let's quickly place it over here. It is really,
really small. You can also press
Full stop that is on your number back to just focus
on the objects like this. Scaling all of them down. The large fleet, I
will say this to around 22 centimeters.
Something around here. We will be fine for the spoon and the fork. Let's just scale them
according to the plate. I think around this much
size will be fine for them. Next, let's select the moles, place them over here. I will decrease their size somewhere around 45, I think 45 centimeters
over here. Just to make sure they all look like pretty negative
to each other. Next for the band, Let's start
decreasing the scale. Give it around 30 centimeters. Somewhere around here
would be fine for this. Again, this one also
I will set it to around 3031
centimeters, I guess. Fifth swell. And this
one, scale this down. Maybe around five, maybe. Not fine, I guess. Now the last subject
from night flip steal this fuel around thirty five, forty, six, thirty meters. We can see it relative
to the cutting board. I think this will be fine. Now, all of our objects are, I think according to
the real-world scale. Let's move them over here. Full stop on a number back. Now everything looks fine regarding all of the
objects are small. Again, press a to
select everything and then press Control
a and apply the scale. Make sure that little
bit further from it, that will be easier
to picture them. Also select disk up and
place it over here. Now I will select all of them, press a and then press
Control a ply the scale. We will move on to
the UV Editing Tab. Press a to select everything that's enabled stretching from here and also enabled this, that all the vertices are
selected over here also. You then smartly with
reject it. Okay. Yeah, I can unwrap is fine. Again, give it a little bit
of Ireland margin to create some gaps between all
the different margins. Yeah, I think this is fine. Also worth noting
before exporting out, I will enable face orientation from here, as you remember, we need to flip all
these objects that have the wrong orientation suffers and then
press Shift Enter. All right. I think these
were the only ones. Make sure to check there no shooting issues in your object if there
are just started a weighted nominal
modifiers and I'm pretty sure it would be fine. So let us just stay
to select everything. Firstly, let's hit
save on Render. Now export. As an
FBX export section, I will name it as drop set one. Select selected objects
and active collection and enabled nationally,
then hit Export. And also in the meanwhile, let's open up substance painter. Substance is opened up. Let's create a new
project from over here. In the file section, select
the file, you just export it. So the prop set one. Check if there are any
issues with their export, but I doubt they would be anything. Everything
is pretty good. Let's just quickly go to Texture such settings and hit bake. Output size to Duke miscible ID. Just a couple of things. Rest, everything
remains the same. Now, just take a break and I will return when
the week is done. All right, guys. So the
biggest finished now hit Okay. And quickly check for any
kind of issues in your big I think mine
is pretty clean. So yeah, we're good to go. Let's start with the
texturing process. For these, it is pretty basic. We will be using some of the smart materials only
protection all these objects. Let's start with
something basic. I will search for steel. Drag and drop the steel material over our spoon and the fork. This right-click exclude all and just select both of them. Yeah, I think they
look pretty good. If you want, we can Let's see, disable roughness details
and surface details. Maybe it cleaner. Yeah, I will just
assume that in both of them and I think rest
everything is fine for them. Let's also use the stimulus
material over here also. Now we have a problem
over here because we join them all into a single
object in Blender only. If I try to select maybe this piece only or
this piece only, I will be selecting the
whole object because all of them are complete
single objects in Blender. Instead of using
the geometric mask, let's just right-click
include all. We will directly
use a black mask. So go over here, I
had a black mask. Let's select this tool. Select the mesh, fill this, select this piece, this one, and this one. Also. Before moving further, let's hit Save on a project
so it can for less. I will save it over here
as props set one only. Next for the span, I will drag and drop
the steel material. This one, just drag
and drop it over here. First, let's add a
black mask to this. Select this tool,
select mesophyll. And you can also make
a selection this way. Now if you see over here, there's some weird
lines over here. I think we can just disable the layers and check which one
is causing them. Yeah, so it is this one. Let's just keep this
layer disabled. Also, I will delete this layer. Next, select this
mask over here. And I will add the
steel material to a couple of other
objects like this thing, this thing, this piece. Also do this title. Now let's texture
this cutting board, if you will search for wood
over here in your search bar, just go over here and look
out for this material. Would ship hull old, that is the name
of the material. This would be in your
Substance Painter also, to just drag and drop it
on this cutting board. We can use the geometry mass
for this one is right-click exclude all and just
select this. Right now. I know it looks very weird because there are a lot
of stuff added onto it, but we can just disable the
layers and it will be fine. So the Sharpen Layer,
sharpener is fine. We will remove the stains. Let's remove the white
stains, the dirt edges. Thus, basically everything. We want it to be clean. I think that looks really
good for the cutting mode. But we can do is we
can enable these edges thing and select the
layer from here. Just make sure to
set the height to 0. That way it won't have any height information because it can look like very weird. I will send the height
in photo video. Select the mask,
select this thing, and just decrease the
global balance you can see reducing the effect of it. I want it to be just
a little bit subtle. Let us check it. 0.4, maybe. We can just reduce
the opacity of this layer. Looks much better. Let's collapse this layer. Alright, next, for
these copper plates, let us just simply
create a material because it is a
pretty basic one. So I will add a fill layer. Let's name this second. First, I will create a folder, drag and drop this
layer into this folder. And let's name this folder
is ceramic layer as base. I will send the roughness
to something like 0.05. Because you can see it already looks like a cup and blades because they are really shiny. That looks much better. First, click over here,
right-click exclude everything. We can simply use
the geometric mask. Select all of these objects. You can make the color
a little bit brighter. Around 0.8, I think
for the value. Yeah, that looks nice. Next, what we can
do is we can add some bit of roughness variation. So let's add a new layer and only enable the roughness
channel for this. You can just disable
all the other ones. And I will also tell you
a shortcut for this. You can hold Alt and just click on the channel that you
want to keep like this. And rest of them would all
be disabled automatically. I will send that off less
value to maybe 0.25. Again, change it later on. Let's try 0.25 for now, add a black mass to
this and add a failure. Let's search for having
selected 001001. We can go over here
and check the mask. And you can see this is the
way our mask looks right now. First left said District
Dr. Dana prediction. Increase the scale a little bit. Now let's try checking
the material. You will see over here
as soon as I disabled this is like really
shiny diet now. But if I enable
this, the roughness, both of it, I think it
is too much right now, so I will decrease the
balanced from over here. Right now you can see
the effect of it. Let's set it to around
0.3.3 will be nice. And also we can select the
roughness channel from over here and decrease the
opacity of it to maybe 60. Just make it a
little bit subtle. Now guys, I wish to
create some kind of simple design over these curves just to have a little
bit more detail. I want to add a little bit of golden trim over here or an
amide cups and my plates. I can just show you overhead in Google, something like this. I've already searched for it. It is pretty easy to create. Come back to substance. And first we will
add a new layer. Rename this layer to
roughness variation. Let's name this one to make
the metallic value to one. And let's set the
color, the hue value. Set this to 0.4,
saturation to 0. Evaluate something like this. Next, I will add a
black mask to this. And now initially there are two different ways
of creating this. One is you can
select your brush. First. Let's go over here and set this to
orthographic view. Now you can hold Alt and Shift, and then you can
snap your view like this using the
left mouse button. If you want to change
the size of a brush, you can hold Control. Then hold your right-click, then drag your mouse
right and left leg. Sold control then
hold right-click, then drag your mouse
right and left. And if we will drag your mouse up and right while
holding right-click, you will increase or
decrease the hardness. You can see over here. Let's set the size to something
small like this. Now if you want to paint
in a straight line, you first need to
click over here. From there you want to
start the painting. I can just click over here, then hold Control and Shift. And this straight line
will appear like this and just use your left-click
to paint this way. But I think this way like very tedious and too
much work to do. So instead I will just
select this mask, go here, select
the polygon fill. And we have already
added an edge loop. If you remember over here, I will select this
face select and just drag and select
all of them like this. Right now, it does not
look like very sharp, but if I just increase
the size to 40, I think it would look fine. The line like this over here looks much better and we will be viewing
it from pretty far away, so it will look fine. Also, let's enable
anti-aliasing forum here. Next what we can do is
again, go over here, select this mask,
select this tool, and we can also select this
bottom layer like this. So with this, you can
use it however you want. You can add maybe it
remover here also, if you weren't cern do this. And one thing that I
want to tell you guys, if you feel like you selected this black mask and you don't have a proper edge
loop over here. What you can simply do is
just quickly open up Blender. And I will show you the thing
which can help you a lot. Open up your small props file. Let's come over here
to a cup press tab. And I will simply add edge
loop, maybe like this. And just move it a
little bit up over here. So select this edge
loop by holding Alt and select it completely. Dentists do two times. Now you can just
press a to select everything and quickly
re-export this. And everything would work fine. Just make sure to select this. Select the proper state one only because we will be
replacing this file. After exporting, come
back to substance. Go over here in the Edit
Project configuration. Select your file as this one that you just export
it and hit Okay. Wait for it a little bit
to update everything. And also I will
set this back to k because it is a little
bit faster to work with. And yeah, now if you select
this mask, select this tool. You will find this
edge loop over here. Now we can easily fill this because it is a
pretty small loop. That's why you can see it is causing a lot
of issues for us. Let's just checking for
K if it looks good. The other line
kind of looks GTD, but from far away, I doubt it wouldn't
cause any problems. But let's just undo this
for now. This much is good. Next, let's move on to
select this rule here. Ms time, I will select
outer loop over here. Let's see if I can select this week with well-to-do where. It is much easier this way than just painting
them manually. Make sure to check
at the bottom also, by mistake, maybe
you have selected some extra faces
like I have done. Don't worry, you
just need to press X to switch the
color back to black. Select these faces
and de-select them. That they don't have the
gold material, the mode. You can also have them over here also press X to again
switch up the color. We can add over here also. I think it looks good. Also the bottom
phases would also be selected. If you want. We can just go over it, press X and one-by-one, select each one of them. But it wouldn't
be really tedious to add this in the video. I will do this off camera and I suggest you guys
to do the same. I will just move further
for now and select Display. And quickly select the mask, press X for white color. Select all these corners. It is pretty easy to do, but it is just a
little bit of work. Let's de-select these phases
plus x for the black color. Let's keep this
one, this family. Also I will press X for the black color and
remove it from this face. Let's just add it
over here this time. I will quickly just
select all these faces. Instead of making a
selection this week, just click on those
faces to select them. This way you won't accidentally
select the bottom faces. The bottom phases
are only selected when we make a
selection this week. You can see over
here. But if you just select them by clicking
and everything is fine. I think we are good
now this week. The plates and cups look good. You can also add something
over here also if you want, you can select it like this. I will leave it on
the bottom maybe. Before this one we do not have an edge loop close to the top. So let's quickly
add one over here. Press control our
Ag one like this, it to select everything. Now re-export them. Explored at vx, select drops at one
and hit Export. Back to substance. A good project
configuration. And hit Okay. Now the project has
been updated and you will see the edge loop
is added over here. This is a pretty neat
thing like this. What has happened at actually
the thing is we only added loop on the inside and
not on the outside of this. I mean, you did not add
edge loops one over here. Instead of adding one over here, let us just press Control
Z and select the faces. This will lead by clicking
instead of making a selection. Alright guys, so I think we
are good to move further. Let's hit Control plus
S to save our files. Move on to the cooker. For this Google I will be using. Let's first for these pieces, Let's select the
steel material only. Now select the mesh field and you select them, select this, select this, select this thing, and also select this piece. Now for some reason,
if I select this, the whole object
is being selected even though they are
two separate objects. And for this one it works fine. So I think I know
where the issue is. If you will quickly go
back to Blender estab. Now to select a single object, press three for Face Select, you can just hover over
the object and press L. So you can see this is a
completely separate objects. And what I will do is just press S to scale it
a little bit outwards. Now, again, re-export this. I think everything
would work fine. Sometimes happens
when the two objects overlapping or really
close to each other. Now if I select the mask, select this tool, make sure
polygon mesh fully selected. And now select this. You can see we are making the
selection properly. And now for the main
body of the cooker, I will use the metal
paint material that we created for our store. Instead of re-creating it, I've, what I will do is first
succeed on this project, then open up my stove and Fitch. Now what we can do is go to
the stove, texture sake. Select this metric paint yellow. Just right-click on it and
hit Create smart material. As soon as you do that, you will see this metal
paint yellow over here. As you can see, I've
already created last time, I was testing things. I have to now Michael Bay and yellow is the one that
we just create it. This way you can create
smart materials. So now I can use this
particular layer or folder that we have created this project in any of my other projects because
it is now in my library. The only I will come
back to prop set one. Now I can just drag and drop this metal paint
yellow over here. Add a black mask to this
and select this piece, this piece, this
one and this one. You can see it works perfectly. Alright. So the last thing
that I wanted to do is I want to add some kind of like
a sticker for a cooker. So now if you go into
the reference images folder that I have provided you, you will find these two
floral drink stickers type of PNG images. So just drag and drop them
into your substance painter. Drag them and select them as texture and improve them to
your project and hit import. What I will do is I will
just add a layer over here. This time, I will
add a paint layer, not a failure, we will
disturb the paint layer. Paint layer is basically
like how an affiliate, for example, if I change
the color over here, you will immediately
see the color change. But that is not the case to
the paint layer, for example, I can set this to metallic, set the color to
maybe something like red and start painting. And you will see now if I
change the color to green, the color does not
change over here, but now I can paint with green also in the same layer only. This is how I make
paint layer works. I will delete this layer and
create a new paint layer. Now what we will do is we
will use these images of these floral patterns
that we just imported to stamp them as
textures over these bookers. Also one more thing, if you
go to Google and search for maybe floral designs, you will find a lot of
stuff like this and you can use any one of this mixture to search for PNGs because they're transparent
and we can easily use them. So you will find a
lot of these kind of stuff and you can
select any one of them. But I have provided
you with these two. If you want, you
can go for this. And now I will show
you how we can just stamp these images
over these groupers. Make sure to just select the color channel because we will be using the
color channel list. So just hold Alt and click
over the color channel. Next. Come over here and
select the projection tool. And you will find this
square thing over here. Just drag and drop your images into the
base color channel. Now we need to once again, just disabled all
the other channels. Just make sure to
enable the color only. And now to adjust the size or rotation of this
projection, just hold. Then use your right-click
to scale it down. This way, you can use a
left-click to rotate it. And while holding left-click, when you shift to maybe snap it. And you can use the
scroll wheel leg, move it left or
right. Like panic. Once again, hold first S, then use a right-click
to scale it. You scroll wheel to move it and use your left mouse
button to rotate it. You can use Shift to snap it. Railroad. Now I will just
select S. I'm impressed. Then while holding right-click, decrease the scale of it
to somewhere around this. You can also move your screen. Hold Alt, and just
use the scroll wheel to move your screen to
place it accordingly. Now if you just increase the hardness to
one while holding Control and just drag your right-click while
holding right clean. Just drag your mouse
upwards like this to increase the hardness
to one is painted like this and you
will see we have easily created stamp this
floral tracking over a cooker. Yeah, it looks
pretty good I think. But first let's just decrease the scale
of it a little bit. Press S, decrease the scale. Alright, yeah, I think
that looks fine. I will move it over here. Drag and drop this
one over here. S again. And let's print it. Come back to the brush tool. And I think it
looks pretty good. What we can do is we
can go over here, add a filter to this and
select the HSL perceptive. Maybe increase the
lightness a little bit that we just match the
tone of the Koopa earlier. They were too dark to 0.55. Now you can see if
you change the hue, you can also change
the colors of them or make them very
saturated or unsaturated. It. But I wanted to just
increase the lightness. And I think everything
looks fine. Now let's hit Control
plus S on a project. And I think this
much is enough for detection of these objects. In the next video, we
will explore them all into Unreal Engine and
add textures to them. And then we will start
placing them in our scene. So I will see you there.
Thank you guys for watching.
24. Placing the Props: Hello guys, welcome
to chapter 23. So now that we're done with the texturing of a
props in this video, we will export them all
include Unreal Engine, and we will start to apply the
textures to the materials. And then he would start placing all these products
around our scene. So let's start first, open up Unreal Engine. Just open up your level. Currently I've said
this to unlit. You can also set this
to lead from over here. Setting it to unlink just helps a little bit
with the speed. It is a lot responsive
and foster. Next what I will
do is let's just right-click and create
a new folder for props. What I will do is
just click over this Add button and go to Import and just import this drop set one that we use
towards Substance Painter. Select this and open. We need not do anything, just hit import all guys, we have imported
all these models from rprop set one export file, but there is a little issue
with all these models. Let me just show you what is it. Let's come back to
late. If I just drag and drop this
Foucault over here. Like this, you will see
the origin point is far over here and the main
objectives over here. If you think what is
the issue with this? If I just press Keep
to rotate this, you can see it will rotate around this origin
point will leak. And it can get very tedious to place all of these objects. And if I will drag and
drop any of the objects, you will see this problem is with each and every
single one of them. This one also the origin
point is really off. The one fixed for
this would be to just select each object. First. Let me decrease
the cameras feed. Yeah, hold Alt and then
use your scroll wheel. Click your scroll
wheel and you can drag this origin
point like this. Place it somewhere around here. Then what you can do is
after placing it properly, just right-click Buber to predict and select the
option Set as pivot offset. Now, this is your new origin. But the problem with this
is we need to do this for each and every single
object one-by-one. And it can get a
little bit tedious, but there are a lot of props. You need to just select
Set as pivot offset. And also, if you will see
it is still not perfect. We need to do a lot
of trial and error. Instead of doing this, what I will do is let's just delete both of these objects. And I will also delete all of
these props from over here. Right-click and delete them. Delete. Let's save off
Unreal Project first, just hit save all
from over here. And yeah, we'll come
back to Blender. And to solve this issue, what we need to do is press
K to select everything, go to object, set origin, and set the origin to Gillette three for each and every
single one of the object. Then press Shift plus
S, selection to cursor. Make sure your cursor
is at the origin. So to do that, just press Shift plus S then because
they're too world origin. Then press Shift S
selection tool, cursor. You will see now
all of the objects are at the origin point only and they are overlapping
each other in Blender. But don't worry in Unreal, everything would
work out perfectly. Now press a to select everything
and go to File Export. If vx, let's create
a new file for this. I will name this as drop one in the bracket
right down unreal, so that we know this
one is for unreal. Select all these three
options and just hit Export. All right, Now back to unreal. Open up the Props folder
and go to Add Import. Just select drops at
one unreal import. All again. Now if I will drag and drop
any of the objects, you will see the origin is
perfectly in the center. And there are no
issues whatsoever. That is quite a
handy thing to know. Also, one more thing
that I will do is I will just undo this in Blender that everything is back to its original place,
only like this. Yeah, let's hit save on
Blender and I will close this blender file and
start to work in Unreal. Next, let's come to
the textures folder, and I will right-click and
open this in Explorer. Again, copy this Control C. Click over here
and hit Control C. Come back to Substance Painter. And let's explore
the textures now. So hit Control Shift N E over here and select the path as this one that the one you just copy and just
paste over here. It's Select Folder. We first need to hit enter. Now we can just select folder, make sure the path is over here. Over here, select this as
Unreal Engine full packed. And foci. Now just hit Export. And now they explored this done. Let's come back to Unreal Engine and he can port over here. Now the import is done. Let's come back to
the prof folder. You won't find any
material over here. The reason for this is if I will just quickly show
you in Blender. Actually what we did
was we forgot to apply any material for
all these objects. That isn't it work properly in substance PR intervals
because it took the default material as
a default texture set in a substance painter
for all these props. So therefore, there were
no issue in Blender. We actually forgot to create
any material for this. Don't worry, there's an
easy fix for this sheet. Right-click. Create a new material. Let's name this problem. Set one. Double-click open it. Let's press Control
plus space over here. Open up the textures folder. Search for problem
set one, this one. Select all three of them. Drag and drop over here. Connect this to the base color, and this went to the normal. And in this texture there are goes into ambient occlusion, green goes into roughness, and you wouldn't do metallic. Make sure to double-click
over here miscible SRGB, and also change these
to linear color. Now heard save this. And now when we just drag
and drop this over here, we can just quickly drop the material like this and you can see it works perfectly. But also one more
thing that we can do is just open up this model, come over here and
select the material as drop set one from
overhead only and hit Save. Now you will see the
material's already applied. When I drag and
drop this object. Let's just quickly do that
for each one of them. Double-click, select
drop set one, save, folder projects and
for folder Models, make sure to always
remember to create a material in Blender and assign it so that we don't have issues like this in Unreal Engine
or substance painter. Alright guys, so now let's start placing all our
objects in our scene. Now this processors, the only
based on your preference, only you can place these props however you
may like. Let's start. I will first drag and
drop this band over here. Let's place it on the stove. Something like this.
Let's rotate it. Just replace it like this. You can also do this. Just select top from here, go over and select wireframe. And now you can
easily see through and just place it
accordingly like this. You can also select the
left view from over here. I think it is fine over here. Let's come back to
the perspective. Next, let's place our cookers. Pleased to run over here. Another one over here. I will select this risk
index increases scale of this a little bit. That is a little bit bigger. Let's place it like this. I think I will
increase the scale of this also a little bit. You can also disable snapping from over here so that
you can scale freely. I think this much would
be enough for this one. I will also select this
press Control C then v. Let's move it
over here like this, and I will place
one over our stove. Let's also check it from the top view. I
think it is fine. We can also come
back to our camera just to see how everything
looks in our scene. Select this, Let's
rotate it a little bit. Yeah, that's fine. Let's drag and drop this
wooden board over here. Right-click and stop piloting
so that we can easily move. Select this press.
Let's increase the scale of it like
this. Just a little bit. Also, I will just control
C and control V it. And let's place from
over here also. Next we can start
placing these cups. We can also address
E and flip some of them like this. Let's flip this one
completely when 80 degrees and glazed over here. We also forgot to remove this
gold plate from over here. So let's quickly do that. I will select the cup, select the gold metals. This tool is x for the black. Nowadays find
quickly the export, it Control Shift E 30, export. Come back to unreal. And as soon as I
just hit involved, you will see everything is, everything will be
fixed over here. I think this is much better. Alright, let's place
some plates over here. Also, place them in a stack. Make sure to just move them a little bit here and there so that they look like imperfect.
Something like this. Again, as I told you all this
is based on my preference only you can place this
stuff however you may like. Next copy these 21
over here also. We can also select
drop it in over here. Like this. Yeah, something like this. Let's play some overhead also. Disable snapping so that
we can rotate freely. Also will reduce the cameras. Yeah, I think this is fine. Let's just duplicate this. Let's check in our camera
view how everything looks. I think it is coming
along nicely. Start placing some
more of these. I will replace this
bowl over here. Next place, one over here also. You can also duplicate this and let's just scale it
down on a cubic, will have a smaller bowl. That's also drag and drop
the knife. See it over here. Alright, so I think something
like this when you find, let's just hit save later view. And I think scene is coming
along pretty nicely. I think you should experiment
more with all the stuff to try placing all
these props here and there and see what looks
good for our scene. I think this will be
enough for this video. In the next video, what I will do is we will start creating some more props and we will start texturing them and
add them in our scene. So thank you guys for watching. I'll see you in the next one.
25. Modelling some more Props: Hello guys, welcome
to chapter 24. So again, let's start
creating some new props. First, I will just disable it. All of these. If you will go into the
reference images folder, you will find a couple of
new images that I've added. We can also create
these CDL boxes. Also, we can create
some new tools like this risk that is used
for the pin grid. Let's start with this. It
is pretty easy to create. I will also open up
your ref with lead. We just drag and drop it over here so that we can
view it easily. But actually it is
pretty easy to create. Now start by pressing Shift plus a and go over to cope and add a mesial rest are then x rotated by 90
degrees on the x-axis. You can see this kind of
structure with matches with the rest one for the
front view press tab. And you can see all
these vertices. So just select these vertices. Now we can rotate it to
create a more circular shape. Suppress our y type in minus 45. Rotate it like this. If you want, you can increase the dissolution of this to make it a little
bit more smoother. I think we'll be fine. We'll be a little low poly, but I don't think it will
be documented visible. Let's set the level amount
to one thing Demeter. Now just select this
press Shift plus D, right-click to keep it over
here only then press R, then x degrees. Now you can see both of them. Press Shift plus D. Again, hit right-click, press R, then x, taking 90 degrees. Again, press Shift plus D, right-click, rotated
by 45 degrees. And again, replicate
right-click. Risks are then x taken
by 90 degrees this time. Create something like
this and you can see pretty much
matches the shape. And next you can just press
Shift plus a cylinder. Scale this down, rotate the
cylinder by 90 degrees on the y-axis. Over here. Scale this up. Let's S then Shift plus x. Scale it like this. And also enabled or too smooth. I think something
like this is fine. Next we can again add
a circle to this, maybe scale this down, move it over here to create
something of the shape, the sort seven for
top view plus S, then x, scale it up like this. Let's come over here
and a skin modifier to this controlling,
apply the scale. Now to adjust the scale of
the skin modifier press Tab proceeded to select
everything and press controlling. You can scale it down like this. I think that was fine. It does not matter that much or shared smooth this and
enable auto smooth. Right? So we have created
a new problem. It's just a to
select everything, press M and move this into two. Place it over here. I
will close pure refer. Now, hit Don't Save. Open up the reference
images again. Alex created the cereal box. Now, this is the most
easy probe to create. It is basically just inbox
only seven for top view. Let's drag and drop
this over here. Shift plus S Then selection to closer to bring
this over here. Now pressed Shift
Plessy and the cube. And now we need to just
match it with the picture. So this is the front face. Make sure to match the front
face with this like this. Scale it up on the y-axis. Something like this. Now what we can do is instead
of again and again, duplicating the image, I will just rotate
it by 90 degrees. Address are then x is 97. Top view. Again. Align it with this and try to match
the scale with this one. Now, the top phase. Next weekend, just press R
then z, rotate 90 degrees. Just add an x again, rotate by 90 degrees
to flip it like this. It over here. I think this one
is almost perfect. Need not really edit this much. I think we can just delete
this reference image. And I think the CDL boxes done absolutely taken by 90 degrees
times listed over here. What we can do is
let's just duplicate this to create another
variation of this. Ms time through estab, rest 34 fifth select. And what I will do is first control our add
edge loops like this. Again, press Control R. Let's
add an edge loop like this. Make sure the origin point
is exactly at the center. Rest one for vertices
select enable X-ray. Let's select all of these
vertices x and delete them that only the 1 fourth
of the boxes remaining. Now we can just start the
mirror modifier to this tab. There's three for Face. Select, select this top face
plus x and delete this. Now select the edges. Select, select this edge. Also makes sure to
enable clipping. All right, Now just
press E to extrude this reserved for locking
it on the z-axis. Alright, now select
this H plus E. Again. This looks really good. Stab. I will just move this
a little bit. Inverts. Also. I will just select them
both and duplicate them. Like two different variations because I have two
different textures, so I will use both of them. Maybe. Let's just keep them both with two
different variations. Next, first, let's hit Save
and also select all of them, press a, press M and move
them to prop set to. Next, Let's open up the
reference images folder. We can also create
this wooden spoon like thing for seven for top view, let's just select all of them. Place them over here for now. Drag and drop this wooden spoon. Shift S selection to Kazaa. And this is pretty similar
to creating a spoon. I think you can try this on your own because you have
already created a spoon. So let me just quickly press
Shift a to add a plane. This down. We need not have two different views for this as we had
in this point. Because I think the spoon
is pretty much straight. Scale it up from over here. Makes sure to match the
reference image accordingly. Alright, but I will
do is I will add the solidify modifier
to this scale. Also add a subdivision modifier. Next, group over here like this. Also press tab. Let's select all these phases. To insect them.
There's de-select this face and just
selected here. Now move this inwards. I think in my opinion
that looks pretty good. We can increase the
subdivision level two to even smooth it out even more. I think for our wooden spoon, something like this will
be fine. It looks okay. We can increases solidify
thickness a little bit. Again, select this, press M, and let's move this to crop sec. Do it again, select this and move this
to reference images. Also, we need to scale them accordingly according
to the other props. So we will do that later on. Let's hit Save on
our blended file. Alright, so next I want to
read something like this, like a school
container in which we can keep our spoon and folks. So I think we can
create this will be a nice addition to our scene and it is also pretty
similar to create. Just press Shift
plus a cylinder. I will open this up
and I will decrease the radius for this. Around 50. Also decrease the
height to around 105. Something like this
would be fine I guess, or striped shirts would. This also enabled auto smooth, stab and let's delete
this top face. Also apply the scale and let's add a solidify modifier to this. Next again, I will press tab, select this bottom face, then press Control V
and beverage like this. I think this much
wouldn't be enough. Yes, something like this. Next, what we can do is let's increase the
thickness a little bit. Also, I will press Tab, press Control R. Let's
start an edge loop over here. Press three for free. Select hold Alt and just
select this complete loop. Then press Shift plus
D to duplicate this, right-click to
place it over here. Let's scale it a little
bit outwards like this. Press V and separate
the selection. I will remove the
solidify modifier and estab again just
eight selectivity. Then let's just press Aldi and extrude
faces along normal. Let's extrude this
in words like this. Next, I will just press
Tab to select hold Alt, select this complete loop
and select this one also. Press Control V. And
let's bevel this. I think this much is fine. Right-click sheets move. This also enables smooth. Yeah, It is done. I think
something like this looks fine. I will just select both of them. Let's press Slash
for isolation mode. I will create a
duplicate of this. Place it over here, then
press Tab enable X-ray. It, scale it up a
little bit like this. This one we can use for
knives and stuff like that. Let's say this to around a
180 centimeters for the Z. Smith is enough
for this one also, I will just increase
it a little bit. Maybe around a 120. Yeah, I didn't this much is enough slash to come out
of the isolation mode. Let's place them both over here. All right, so next weekend, create maybe a mug. It is a pretty simple probe to create for exquisitely
press one. Let's drag and drop
this reference image. Press Shift plus S Then
selection to cause up a cylinder again,
scale this up. I think something like this
is fine for step three, for Face Select, let's select this top face and believe this. Also add a solidify modifier, Shade Smooth and enabled
auto smooth time. I will just start the
bevel modifier to this. Apply the scale. Let's see. Shading too hard and normals
and also the school is enabling decrease
the development. Something over here. I think
something like this is fine. Let's quickly add a single word. 14 vertices select.
Place it over here. Just start pressing E to extrude and clear this
shape for the handle. Let's enable X-ray. And I will just press
straight up like this. Select them both
and then plus z. Select them both and
then press F to fill in the face plus a to select
everything and will thus f. To fill it like this. Next weekend. Maybe just select
these vertices, the Shift plus D to duplicate
this, place it over here. And you start
extruding this out. Now to select them both press F. Now just select this loop. So hold Alt, select this. Press F to first
fill in the face. I will put G then
move it over here. I will also separate it out. So please be and selection, create both of them
as separate objects. Both of them and express slash. And I will just show
you how we can use this piece to create a
cutout over this one. Now just follow me carefully. First select the object
that we want to cut. So I will select this one, press Tab to go into
the egg mode of this. Now hold control and select
this object like this. There's one for the front view. You can go over to mesh and
then select knife project. Now if you just
delete this object, you will see we have easily
created a cutout like this. So now I can just press
X and delete the face. You can see we have
created our handle. First, remove this
reference image. So press M and move this to
reference image collection. Let's just extrude this now. Pretty easy to create. Seven for top few places
it at the center. Smooth. This also
enabled auto smooth. And if you weren't, we can
also add a modifier to this. Enabled harder normals. Let's place it over here, along with all the rest of the prompts rotating
by 90 degrees. First I will press a
to select everything, press M and move them into
the proper set to collection. The next drop is the last drop that I will be creating for this prop set I
think is plus three. And we will be creating
the salt shakers. So let's just drag and
drop them into Blender. I will just select all of it and press H to hide it for now, rest one for the front view. Let's rotate it by 90 degrees. Shift plus S Then
selection to close up. Let's start a cylinder
now. Let's head over here. Again. This property is also
fairly easy to create. Let's select all of
them listed over here. Roughly try to match the
reference image like this. I'm not really exactly
following the reference image, but just trying to get something
along the lines of it. Let's just try
something like this. I think that looks perfect. Right-click, Right-click
and shapes mode. This also enabled, understood. Yeah, I didn't like
it looks perfect. I will just new cylinder unless quickly create
something for this one. Alright, so I think we are done. I will just move
this reference image into the reference
image collection. Right-click and shade smooth. This enable auto smooth result plus H to bring everything back. Yeah, let's place it over here. And I think these are
the only process that I will be creating because
we've seen a kitchen, I think we can go
on and non-work creating props and they
will never finish. For me, I think these will be enough to populate the
scene, but for you, I think you should definitely
create some more to give even more details
to your scene. That it is really
different from lysine. You can try and create
some more drops so that you're seeing is a lot
more detailed than mine. But yeah, I think
these will be enough for placing all the objects
all over the scene. Next, let's just prestige, select everything, press M, and move them to prop set two. And now we just need
to match the scale. First, select prop set one. This one has first, I will just create
a duplicate of this as we did with this offset. I'll just right-click and
duplicate collection. Now we will just see we have duplicates of each
and every prop. Rename this collection to
Prof. set to apply it. Alright, now I will
just disable this one. A to select all of them, then press F3 and search
for it, convert to mesh. Now all the modifiers
have been applied and now let's enable
proper set one applied. Just match the scale. I will place them all over here. Let's first select this. And also let's join all
the pieces together. These two also over here. Now let us select this risk. Place it over here. Let's see, I will just scale it relative to all the objects. Let's scale it
according to this bowl. Let's see, I think I
will keep this risk like this in the bowl around the size of
this would be fine. Yeah. Next, place it over here and
also set the rotation to 0. Next, let's select this mug. Scale it according to the cup. I think the mug should be a little bit larger than the cup. I think this will be
fine. Let's go here now. I will just maybe scale
it up a little bit more. These two, I will create
them according to the spoons and knives, maybe select this bone, Let's rotate it by 90 degrees. Now I can just scale this
down according to the school. Something like
this will be fine. I think there's 74 top view. Really far away. What headed a spoon to the size of around?
Somewhere around. This would be fine. Also, let's place the spoon back over here. I will just take it over here. Also. Let's scale this down. I will just duplicate
the night this time. Place it over here,
rotate it by 90 degrees. Now, I will scale this one also. Now, like this. Yeah, I think this
much will be fine. Also. I think our
mortgage really far away, so let's place it over here, 74 top view and let's
place them all in a line accordingly. This is fine. I guess. Let's delete this knife. Next, select all of these boxes. Let's rotate them by 90 degrees. Let's see. I think around this swatch
size would be enough. Displace it over here. Also, if you feeling
size is not right, we can always change
it in Unreal Engine. That is no issue. This wooden spoon I will just set according
to a normal school, Michelle little bit larger
than it around here. Let's place it over here now. These two, I think I will scale them according
to the cereal boxes. Yeah, I think this
much would be fine. I prophesied is done now. Safe on a blender file select Control plus S. I will also
disabled prop sec one. Select all of these press
controlling, apply the scale. Also let us check for
face orientation. Except these, I think
everything is fine. Shift plus end. I think for these boxes because
they're hollow, we can see that color over here, but I don't think we need to fix the normals for them
because they are fine. If you want to, you can just add a solidify modifier and you will see everything
would turn blue, just decrease the scale. I think not having the
solidify modifier better, I will just remove it and
rest everything is fine. Now the last thing to do is
just select all of them. Make sure to apply
a material to them, either material, Let's
name these two properties. Now press Control L and
link all the materials. Now let's go over to UV Editing. A to select everything. Rescue and smart UV project. Make sure to apply the scale
and smart people projected. Okay. Let's increase
the marginal cubic. Alright, so I think
this is fine. I will now export them. Go to File export FBX. And let's name this as brought to it explored and also
open up Substance Painter. Alright, so substance
painter has opened up. Let's close all of this
and create a new project. Select the file as
drop two and hit Okay. Check if everything is fine. And steel boxes
look kind of weird, but don't worry in Unreal, everything would be fine. We don't need to
worry about them looking like hollow
in substance painter. Global protect
your site settings and hit vague mesh maps. Select 2k, enable, disable AAD. Just the usual. I will hit makes electric textures and just wait for the
week to finish. I think it won't take long. Alright, so the beak is
done now. Let us see it. Okay. Yeah, it came out pretty good. And I think I will continue from here
in the next lecture, we'll start to picture
all these objects and then we will export
them to Unreal Engine. Thank you guys watching
a scene, the next one, also make sure to
just save your file. So let's hit Control plus
S and save this as say. Yeah, I'll see you the next one. Thank you.
26. Texturing the Props (Set-2): Hello guys, welcome
to chapter 24. So I have opened up
Substance Painter, and let's start with
the texturing process of all these props. First, I will delete this layer, and let's start by
texturing the cereal boxes. I will open up the
reference images folder, select both of these textures and drag and drop them
into Substance Painter. Select them both selected. And let's import them to
this project and hit Import. All right, let's first
create the folder. I will name this as box1. Create a new fill
layer and drag and drop this onto the
base color like this. Now what I can do is let's
name this layer as front. Add a black mask to this. Now select the mask
and select this tool makes sure of volume
and fill is selected, and just select these
two different phases. Now, click over here
on this failure. To bring this view up. Now, we can just adjust this picture according
to this face. So you scale this
down like this. We just want this font
face over here to just scale this up accordingly. All right, so I
think this is fine. Let's just scale it up
a little bit over here. Next, I will just duplicate this layer or maybe
let's create a new one. Mainly side. Drag and drop this over here. Add a black mask. Select these two faces. Now. Select the fill
layer. Move it over here. And again, we can hold Shift
and scale it down this way. Now we just need to place this side view or
here like this. You can just increase the scale. So you can just hold shift
and increase the scale. Just increase the
scale of it uniformly. I think this is fine. We can just duplicate this. Select the black mask, press X D, select
both of these faces. Nothing is happening because
this is already enabled. These two phases that actually
because of this left. Now press X again
for the white color. Select these two layers
listed over here. Now I will place the other side. Like this. Is fine. Again, duplicate this. Let's name this as backfill. Select the black mask and
select these two faces. Also makes sure to press X and
deselect these two phases. What I mean by de-selecting is if you just turn
off this layer, this layer also has these two phases that
are on the site, so make sure to remove them. And if we will enable
that this now, now everything is fine.
I'll select this. Placed the back face
that is over here. Next, place it accordingly. We actually don't
need this thing. We need to just have this much. That looks perfect. Lastly, what we can do is add
another fill layer, and this time as a black mask. Let's first give
this a random color. Select the mask and
select these top faces. I will just try to match it with the white color. Like this. Yeah, I think that is fine. Now we can just select
this completely, duplicate this mean
this as Box2D. Select the front layer. Make sure to de-select
everything from here. Select this face like this. Just place this face over here. Actually the scale is, everything is perfect because we've already matched it with the upper face and we have to displace it
correctly like this. We don't need to change
the scale of it. It makes it look a
little bit easier. Again, select this
side black mask, then press X to make sure
de-select everything from here, and select this
side from the year, so plus x for the white
color and select this. Now click over here on this failure is perfect. The third layer again, we need to press X
and de-select them. Look over here now, x
and select this face. Now click over here.
Lists this over here. Now it is currently
flipped so you can just hold shift and
rotate it like this. It's fine. We can turn off this box
for now and select this mask for the back layer, press X and remove it from here. It would be easier to
visualize, don't worry, the box1 texture is still there, but we don't want
anything to repeat. Now press X and select this
face. Click over here. Let's just take, let's see for the last layer. Let's remove this for now, add a new layer and drag and
drop this texture over here. Add a black mask and
select this face. And let's see, I think we have something for
the top face also. We can open this up over here. We need to place this thing. Let's see. First we
need to rotate it. I think one or two degrees
like this. It's fine. Yep, I do something
like this is fine. We don't need to
really like texture the bottom part because
if you see in the image, we also have something
for the bottom. But I will just leave it completely because
it won't be visible. So what we will do is first
let's enable this box1, open this up and select
this fill layer, and make sure to select
this bottom face like this. Let's create the same
layer over here. Add a black mass to this. Select the bottom face. Now let's set the color
to white like this. Right? So two of
the boxes are done. You can just call abstain,
create a new folder. Let's name this box three. Okay, so before we start
texturing the box three, there is one thing that
I wanted to check. Just open up the box
one and check if all the layers have
one single phase only. Like this, just
enable and disable it and see if everything
is working correctly. I think over here
everything is fine. Let's enable the box to rename this to top. And this one is the
bottom one over here, so everything is done correctly. Let's start with box three now, I will select it.
Let's start a failure. And I would also
like to suggest that as we have already
created the two boxes, creating the remaining
two would be a pretty same procedures so you guys can try it
out on your own. So let's just start. So I will just search
for CDN box quickly. Select these textures. Drag and drop this one over
here now on the base color. This is our front side,
the black mass to this. Select the front-facing,
select the fill layer. Let us go clear, just stick
or shift, scale this down. Alright, so I think
that is fine. Next, let's create
a duplicate of this name, these two side. Select the mask. Now if you've disabled
the front layer, you can see the front layer is still showing up over here. And that is because the
side Lear still has it. We need to select
the layer mask rest excel to switch back to black color and just
remove it from here. And now you will see, now
let's select the layer mask, press X to switch back to white color and select
these two faces. Alright, Next, again,
let's duplicate this. You can just right-click and
clear mask for this time. That will be much easier instead of just
removing them manually. These to please them over here. Alright, so the next
is the back face. So just Control C and Control
V. Right-click clear mask. Let's rename this to back. Select these two faces. Selected the Fill layer now, yeah, I think it fits perfectly. Can scale it down on attribute. Next weekend, just quickly
create a new failure. This to white color like this. Black mask. Select
these top faces. All right, So each one
of them is selected. Now, next, let's just duplicate
this complete folder. So Control C and Control V
rename this to box fort. I will just quickly select each one of the mask and hit Remove. Instead of remove mask, just hit clear mask. The mask does not have
any prior information. Alright, now select
the first Franklin and select this face predict applicative process. So let us just keep doing it. I'll select this side. Select Fill layer again, please. It does currently opposite, so just rotate it like this. It's fine, I guess.
For the final phase, let's select this one. Alright. Let's
create a new layer. Before that, I will
just select this and the bottom face
to it, like this. And over here also
in the box three, select this and select
the bottom face. Let's come back over here. Select this layer,
black mass to mass, select this top face. Now select the layer and
drag and drop this texture. It is literally just
rotated like this. Distributed to
place it this way. I think networks specifically, we are done with
detection of boxes. Let's move on to
some other props. I will float them down there. Search for steel again. Smart materials section, drag-and-drop the
steel over here. I will remove the roughness
details and surface details. Let's add a black
mask to this or we can just use geometric mask, hit Exclude all, and
just select this. I will also select the base and make the
color a little bit brighter. That is fine, I guess. Next for the salt shakers, let's just use the same
wood material that we used earlier to
search for a word. We will again be
using this worksheet. Just drag this foot, strike and Robert over here. Alright, I will add
a black mask to this and select this tool, and then select mesh
field. Select these three. Let's open up this folder. I will disable stains,
stains, dirt, edges. Thus, everything just accept base and the secondary color. I'm seeing this quite
weird lines over here. So to solve them, I think we do select the base layer and set the surprise in a projection just to increase
the scale for it. Yeah, I think that
looks much better. Let's select this and also said the subscribe planar
link over here, select the mask and select this also certainties
to try plaintiff. Setting it to Dr. Winner removes any of the weird UV seams. I think that looks good. Also, I want to add
the word material over here on this leaf-like thing. Select the mask and
select these two. Alright, so for the last thing, we just need to create
another sediment material. Let us create a new fill layer and set the toughness to 0.05. Again, let's start. I'm
black mass to this, select this piece, this
one, and this one. Let's try setting the color
to something different, maybe a yellowish
stone like this. Let's decrease the
value a little bit. Extra rename this to ceramic. New folder for this drag
and drop it over here. I think these two, this color is fine, but I will just
duplicate this first. Let's hide this layer
and also press F1, F2, make it full screen. Yeah, That is much better. I will select the mask for this and this x for the black color. And let's remove the
layer from this piece. Select this layer,
right-click and clear masks. Now for this mask, press X again for the white
color, select these two. And I will send the
color back to white. Because I think for this
type of coffee mug, white color would
work much better. Also, I will add a
little bit of dust over. Then. Let's create a new layer
at this tool, black color. Let's name this as just a black mass to this rule over here and
smart Mask section. Let's drag and drop
this just occlusion. I think that is too much. Obviously, cups, we
won't be too dirty from insight because they wouldn't
be washed regularly. I think 1 second thoughts. I will just remove this, just live like this
is much better. But I will maybe add
roughness variation to this. So hold Alt and select
the roughness layer only. It around point to rename
this to roughness variation. Outside the black mass,
add a fill layer. Select the branch map, and I will just go with
the number one only. I think that one is pretty good. We can go over here
and check our mask. Let's set this to try
to increase the scale. Yeah, I think that is fine. Let's say that the material, I will also change this
back to roughness channel. And let's decrease the
roughness down to 16. Alright. I think we are done
with the texturing of props. Let's set this back
to base color. I will maybe select this color and just make it a little bit more towards
the whitish side. Something like
this. Citing, Let's hit Control plus S
to save your files. Alright. Now I will
open up unwillingly, and now I've opened up my
projecting unwillingness. Let us come back to content
and open up the level. We need to start importing
the models in the pictures. But first thing if you would remember that we first need to open up Blender to fix the
issue with our export. Because as you remember, if you directly export them
into Unreal Engine, it can cause issues with
the origin point and it will cause a lot of problems for us in placing those objects. So let's open up
during the first, open up the small props
file and select everything. Make sure your cursor
point is at the origin. So for shift tests, because AT world origin also let
me enable screencasts. Key's already now after
selecting everything, just press Shift plus S
Then selection to Kazaa. Also before that
I will just go to Object set origin
or GPT directory. Now per shift test and
selection to cursor. To select everything. Go to File export,
FBX, export section. Let's name this
has dropped. Sake. We'll export. And I will just hit
Control Z over here. Open up unreal. We were to add import. Let's import prop set to
unreal taking portal. All right, so all of the
prompts are over here. If you just drag and drop them, you can see the origin
point is working fine. So let's delete this one
and before starting, let us explore the
textures also, go back to substance painter. Before we need to copy the path. Right-click show in Explorer, double-click over
here. It control C. Excludes this.
Open UP Substance. Hit Control Shift and
select this over here, paste your part and hit Enter, then hit Select Folder, and rest of the settings
remain the same, so I will just
quickly save them. Alright, so now hit Export
and wait for it to finish. Alright, so they
explored this done, let's hit Cancel and
open up unreal and hitting portal over
here. It is done. Now, let's open up the
Props folder and open up props that Let's delete this. Control plus space. Find our textures. Yeah, Drop sec to select
all three of them. Drag and drop them over here. With the base color
into base color. Normally the normal eye goes
into ambient occlusion, green goes into roughness, and the blue goes into metallic. Double-click over here
and make sure to disable SRGB and change this to
linear color. And hit Save. Alright, so now if you will
drag and drop your models, you will see all the
textures are applied. I think they look pretty good. I think this much is
enough for this video. In the next video, we will list all these newly added
objects in our scene. Tell us watching, I'll
see you in the next one.
27. Finalizing the Layout of the Scene: Otherwise, welcome
to chapter 26. So now in this lecture we will start placing a new
props onto our scene. So let's start, let's
open up the Props folder. And I currently don't have any particular ideas.
How will I start? The first thing that
I want to do is, let's just move outside of this. Or no. I will drag and
drop this thing over here. This will be like
our spoon container. So let's first start by
placing all the spoons in it. I will drag and
drop spoon or here, Let's rotate it and
place it like this. Let's go to the left side view. Alright, so now we can
place it accordingly. Yeah, something like this. Let us come back to perspective. Now what I will do is first
let's reduce the cameras P21. Move it over here like this. Now let's just copy paste it and make sure to have multiple
different rotations. They are overlapping
with each other. It does not matter
that much because it won't really
be visible so you can place it however
you may lay, just make sure it is likely looking like
completely failed. Place summing the same time. I also like this. We can also select one copy pasted and we will just flip
it opposite, like this. Gave some more variation. Let's just list some
in the center also. Let's see from over here. Select this move it
a little bit lower. Let's copy one more, and I think that
would be enough. All right. Now what I will do is let's just quickly
select all of the spoons. Make sure to select all
of them. One is left. You can just move it to check
if everything is selected. Then just press Control
plus g to just join them. And you can see now if I just
press G for the game view, you can see all of them are a single object from
that group together. So two group, you need to
just press Control plus g. And we'll look at a
single object now. And let's place it over here. Let's place them
over here like this. We can place them over there and we will try it out later
on, on different places. Drag-and-drop a new one. And this time I will do a
similar thing with the folks. Let's just drag and drop
it over here. Two decades. All right, so now we need
to do the same thing. Copy paste it, right, will have different
orientations and just move them all
lower the container. Again, we can just flip
one of them like this. All right guys. So I think something like this
would be fine. Again, let's select all of them. Let's place one overhead also. Also check it from different angles if
everything is fine. Over here. Yeah, So I
think they look fine. Let's move back to
perspective and select all of them one-by-one. Just move them to
check if everything is selected and yet it is suggested control plus G
to group them together. Let's face it over here. Along with these foods. Checking the camera view, how everything is looking
pretty good if you want. We can also move them over here. I don't know. Look better. I mean, at least the cameras. Because over here our
slab is to empty. Reduce it. Again,
this is a professing. You can place them
however you may like you can set up your kitchen
according to you. But yeah, let's just place
them overhead only for now. You can always change
the position of them. Alright, let's
place this one now. Right-click stop piloting. And in this container
we will replace stuff like knives that
I've just copied. I will send a rotation
that if you do this and located like this,
move it over here. Go to the top view. Here. Let's select both of
them and place them over here that it is
easier to look at. Let's check from the left. The ad that was fine. I guess. You can duplicate
the knife to have one mole. We can flip this one like this. Next we can drag and drop this. In fact, we added move it a little bit more here. Make sure to check
from the perspex. Iv or top and left view.
I think that's fine. What we can do is we can
also drag and drop this. Rotated like this. The sizes too much
so I will reduce, it, will be fine. I guess. I will just select this, duplicate this, and I
will rotate it this time. We just have a little
bit of more details. Now let's select all of them. Now press Control G to
group them together. Place this one over here. Let's move to the top view. All three of them
in a single line. Something like this. Shaking the camera view. It looks great. Next, next, drag and drop these boxes. Let's see how we can place them. Explain this one over
here, let me pick this. Rest are, and I will also
increase the scale of this. That looks fine. Place
this bowl close to it. And I will also drag and
drop a spoon into this bowl. Something like that. We can have a couple of boxes like
the way in the corner. Yeah, something like that. I'm just not sure about
these three dilute good over here or we should place them over there in
the corner only. Or maybe I can just move
this one over here. Let's see everything
about it later on. Also, let's right-click and you can go over to
group and ungroup them. Again, make them
individual objects. And I just want to scale this down a little
bit like this. Now I will again group them. Alright, let's see
next what we can do is we can use this mug. Place it over here.
Straddling the salt shakers. Also, I will drag
and drop the risks. And let's place it
in a bowl like this. Checking the camera view. I think that looks pretty good. Now I'm just not sure
about these things. Let's try them over here only. Like totally up to you, I will think about later on. But the rest of the things I
think look pretty good now. I think this will be
the end of this video. We have placed all your props. I suggest you spend
some more time on this. You can be even
more refined with all the details and all the
placement of the props. That I think for me
that looks pretty good. I think the next video
will be the last video. We will be using pixel and
we will be adding some of the props from that because it is free to use for
Unreal Engine five. And yeah, it can add a lot
of detail to our scene, and we will just use some
more rough detail our scene. Then we will take some
resolution screenshots, and then we will end
with the course. So thank you for watching.
I'll see you in the next one.
28. Some more Details and taking Screenshots: Hello guys, welcome
to chapter seven. So in this lecture, as I mentioned earlier, we will be adding
some more props from Switzerland mega
scans to further populated our scene and
detail it even more. One thing that I wanted to mention is we've
seen like a scans is a great library for 3D assets and it is also
completely free to use with Unreal Engine five for either personal or commercial
projects if you want to add Lake pixel content directly
in your Unreal Engine five. So earlier we need
you to download like another software
that is pixel breach. But with Unreal Engine five, that problem is solved. We can just directly
go over here, click on Add and select
Add Quicksilver. And you will see this window has opened up in Unreal
Engine five only. So what I want to add through this pixel bridge is lit
search for some food items. So if you click over here under the 3D assets
section, select food. You will find a lot
of great assets that we can directly
use in a project. What you need to do is the
takeover here that you can see he's means that I've
already downloaded them. So I downloaded them while I was testing out things
into my project. What do you need to
do is just click over here and just hit download. You can also select the
quality from over here. So I will just hit
download and you will see the download will
start to progress. Also, if it is your first time
opening which cell bridge? From inside Android Engine five, it might ask you to login
into your epic Games account. So you just do that quickly and then you can download
all these assets. After the download is finished. What you can do is if
it is a 3D assets, you can just directly drag
and drop it like this. And you will see it is in
our scene now. We're here. So here it is. This way
we can just easily add great quality assets
just to increase or enhance the quality of our overall project
a little bit. So what I will do
is first let's come out of this camera mode. And I will just start
dragging and dropping some fruits inside
this container, maybe like this bool. So this will be
like a fruit bowl. Over here. Let's add some more. I'm just randomly dragging
and dropping them right now. We can adjust them later on. Alright, let's drag
and drop this banana. We can use this fruit also. The great thing about this is we can have a lot of variety. All right, I think these
linear enough for now. Let's just try
placing them first. I'm doing nothing, just trying to place
them in the board. We have been doing this thing. A lot of course. Just press
Control C and Control V. Make a duplicate of this. You can just rotate
it a little bit to have same kind of fruit
in multiple times. X copy paste this orange. I'm trying to fill the ball
to the brain like the GAN, like see them from a
camera that fruits are placed inside this bowl, also called the
base, this banana. Rotate it up a little bit. Also decrease the scale for it. Yeah, that looks pretty nice. There's duplicate this one also. I will open up the window. Let's bring in some more. I will also drag
and drop this one. You can just spend some time to download all of these
different assets. First, let us try viewing
this from a camera. This orange look like really
out of place. It over here. Scale this down a little bit. Now that looks pretty
good. I think. Maybe scalable watermelon and
places over here like this. I don't know if we would
look good on camera. I don't know. We can remove this at any
moment of time actually. Let's just keep it
overhead only for now. Next. Again, just go over here and select
3D assets, food. And this time, the
big goods section. I will drag and drop this Bragg. Maybe next place it
over r cutting board. Also, let's increase
the size of it. Began also plays like
a knife with this 12. More depth. Then see just adding these things only. Datastore. See, let's
do something more. We can select displayed. Let's copy it up. Over here. Lips come
out of the camera view. So again, these things
that I'm doing are totally up to your
preference only again, because you can bring in
any of the proxy one. Just make sure don't go
too overboard with them. We are just using them to
enhance our scene a little bit. But we don't want to
absolutely fill them all with premade assets. Only. Next, I will just
select some vegetables. Drag and drop them on display. Like it can look like someone
was going to cook them. Let's try these bell peppers. This one is really
huge. I will rotate it. You can drag and
drop a character. Select this, duplicate this, and I will scale this down now. Rotate it up. A little break loose, some more dynamic. Maybe not this one. Let's put a potato here. Just adding these props only, these edibles adds
a lot to our scene. And I think it already
looks pretty good. Next, what we can do is let's open up bridged
only this time. Instead of adding
some 3D assets, move on to adding a
couple of decals. If I click over here. To leakers are basically
not 3D assets, but they are, you can
consider them as stickers. So maybe if I just
put the download this and I can show you. Now for details, you cannot
directly drag and drop them. You can just hover over them
and select this blue icon. This will appear over here. Now if you drag and
drop it over here, Let's first come
out of the camera. View this icon. Let's scale this down. On the Y and the Z, you can see how it acts like
a sticker over my flows. Not actually 3D assets,
but like a sticker. If you want to use it on
maybe like the front wall. What do we need to do
is we just need to rotate it 90 degrees. Now place it over
here and you can see it will now appear
over our tiles. Yeah. These can be
very handy to use. So let's first delete this one and go back into the
bridge and search for downloaded a couple of them like this
one and this one. So again, you can
go through like all of them and use any one. You may think, I will go with this one to select
this link over here. Go into the details
folder and table night. And I will just drag and drop
it on the floor like this. I will just decrease
the size of it on least two axis
on the y and the z. It does not matter on
the X because X is basically the height
and they don't actually have any height distributed
0.2505 over here also, I think a mat of this
size will be pretty good. Let's set this to 0.3. There. I think that
looks pretty good. Again, you can move with anyone. The Mac you may like. It is going to flow fever and tools. So yeah, you can select
that if you want to. We'll right-click and
let's move the camera a little bit far back so that we can see our Night Live View. Just go ahead and close. The decals is appearing
over our stove. So just select it and
just move it a little bit to the left and you
will see it is not a building over here now.
So everything is fine. All right. Go back
into the bridge left, search for some stickers. Maybe they can use
them on our fridge. Let's download them. All right, So the
download is done. Now, let's hit Export. Open up the stickers, strive and drop them
onto our fridge. Personal, reduce
the size of them. Also, you will see that they're appealing like very weird. The reason for this
is if you will see this blue pillar data, this is the direction
for the decals. Either direction is
currently downwards, That's why they are
getting stretched. But if I just change the direction of the
arrow like this, you will see
everything is perfect. Let's reduce the size for them. Instead of reducing the
size for all of them. Just reduce the size for
them on the y and z-axis. Looks much better. Excluded bag. I don't think it goes
value with our scene, so I will just press G
and remove this writing. These were the couple
of details that I want you to add through
the cell mega scans. So let's hit Save. If you want, you can add
a couple of more there, like a lot of assets over here. So you can go
through all of them. Surely you will find some mode. Maybe if I search for teaching
directly to 3D assets. Here are some prompts, but they are like some
kind of medieval kitchen, maybe like a coffee mug typing, maybe you can use that. You can use this. I don't
know what his fault, but yeah, it is like
a kitchen pool only. We can use this also. Here are a couple of things that we can definitely
place in our scene. But for me, I think these
many wouldn't be enough. So I will just close it up. Alright, so let's move on to the final section
of our course. And that would be just
taking some screenshots. To take some screenshots
First you need to right-click and just
violate your cameras. So I'm currently in
the camera view. You can set up your view. However you may want. Something like this
would be pretty good. Next, what you can do
is let's just close this content browser
so that the size of our screen is substantial because the
more your screen size, the better your
screenshot wouldn't be because it will
be more resolution. Before capturing the screenshot, I will just hit Control
S. From here also, I will select saver because
sometimes capturing a screenshot does not
go well and it can cause Unreal Engine to crash. Keep that in mind. Next,
I will just select File, not over here. Click these three lines and select high-resolution
screenshot. You will see this over here. Now you will see screenshot
size multipliers. So make sure to do not
increase this too much. Because even setting it to
something relatively small, like three or four maybe can cause your GPU to crash heavily. Even if you have a pretty
high-end computer, it can cause the Unreal
Engine to crash. I will suggest you guys to
not go over the value of two. Let's try to, I
will hit capture. Yeah, I think
everything worked fine. You can click over here
and this will open up the directory that has
all the screenshots. These are the
screenshots that I took earlier when I was working. You can already see how much
of a difference scene has. Now with all these drops, you can see screenshot
is over here. Now, one more thing that
I wanted to mention is if you disclose this
and click over here, you will find something
over here that is screen percentage will increase this value in your computer. You will see
everything looks much, much better than if everything
looks like really sharp and the resolution
is like really good. This option basically increases
your screen percentage. That means it increases the overall resolution
of our scene. It can cause computer
to get really lucky because you can see
the screen percentage right now is 200 per cent. If I stop violating and
try to move around, you can see how
everything is so laggy. Make sure to keep
it at a low number. Now. Everything would you
like kind of blurry. I've said this to 50 to 25, so you can see everything
is like really blurry, but it is very responsive. I suggest while
taking a screenshot, I always said this number 200100 is fairly acceptable,
still pretty responsive. Right-click. Violate. Let's
take a new screenshot. So hired a screenshot
I22 and he'd capture. All right. I think that
screenshot is pretty good. What you can do is next, let's close this up. And what I will do now is first let's press control space
and hit docking layout. Alright. I click
and stop piloting. And what we can do now is we can create multiple angles for our cameras to take different screenshots
from different angles. So you can say one maybe
over here like this. It's duplicate our camera. I hit Control C, Control V. Right-click over it and
hit Snap object to view. You will see over
here. Now again. This now we have
created a new angle, the camera to take screenshots
from something like this. Also, I will suggest you guys to experiment with the film
back and the lens setting. These two super ADMM. So it will be like really
close for close-up shots. You can see how precipitates
with the high focal length. Let's just decrease it for now. Yeah, there are multiple
different types of cameras that you can try from maybe something like
this, super 35 them. And you can also change the resolution
of the screenshots. You can experiment. Overhead also. Like
a general rule of thumb this then we will move
with higher focal lens. It is generally used
for close-up shots. So whenever you are taking
a close-up shot of maybe make something very close like
this over here like this, or just the focal length. Something like this. I
think you can see how good it looks with
the close-up shot and this type of full Berlin with a camera with a
larger focal length, because for close-up shots, larger focal lens work better. And if you have to take
like wide-angle shot, and if you have to take a
shot of your complete scene, then I would suggest to
go with a lower number. You can see where the gap. You can see. You can see that 12 MM
captures even more part of your scene like it kind
of looks weird right now. So let's set this back to 30. Yeah, that looks perfect. And you can see this
is really closer shot. I think it looks pretty
good, so I will keep it. Let's hit Control C and V. This camera and alerts set
up something different. So again, this one is again really very close with
the iPhone purlins. Something like this.
Again, draw the, the focus plane and let's
set the focus for this. Looks really nice.
I think I will again copy paste this
right-click and pilot. And let's create something new. I think this angle
also really nice. Sort of just the focal length. Again, let's duplicate
this camera and this time I will go with
a lower focal length, like 30 MM. Right-click
and violet. Let's come over here. You can take a short maybe
like this shot also. It looks really, really nice. Die. Let's try adjusting a different
focal length, like 50. No item 30 MIN was perfect. This is what I was
talking about of having multiple
different camera angles. Let's try one from
the top over here. Again, I will duplicate this. State one formula here. First, something
like this. I think you guys get the point. I suggest again to experiment with all these
different camera angles because as you can see, we can get like
really cool stuff. These are the different
camera angles. And this is something
that I came with a guest on the spot. So if Lake spend
some time with it, you can get like
really cool shots and cool-looking angles. Again, what I wanted to
find that you mentioned was like example if I
select this angle, now let's take a
screenshot of this one. I will just close the
content browser to get the highest screen size,
high dissolution screenshot. Let's type in to capture. The file is already
opened up over here, and you can see a screenshot
is over here now. Now you can also edit these
screenshots a little bit. You can open up Photoshop. Now I will just open
up the two screenshots that we just exported from
unreal into Photoshop. All right, So they
are over here now. In Photoshop, you can do all
those stuff like adjusting the brightness of your
scene if you feel like it was too low or too
high in Unreal Engine, you can do all those stuff. You can also add some, maybe you change the lighting up and the mood a little bit. These are the basic stuff of Photoshop that
I won't go over. Some things that I
usually do in Photoshop. One of them is go
over to Filter, sharpen, and select
sharpened more. But this will do as soon
as you hit sharpen more, you will see all the
edges are pretty crisp, looking like really good. After you selected sharpen more. It just makes the
details pop out even more and I think it does
a really good job at that. You can also select Auto Tone, like fix up the tones
and colors a little bit. These are some of
the stuff that I do in Photoshop, not much. You can always do some
color correction and adding up a little bit of
color tones are filters. All of that stuff you can
experiment on your own. I won't go over that. But yeah, again guys, I think this will be the
end of our course. But I suggest you
guys to do from here. And notice you can create
some more props to add NFC. You can maybe create a
short animation video. Useful your portfolio. You can take
multiple screenshots from different camera
angles for your portfolio. You can also do some of the
breakdowns stuff and you can maybe show all the
props separately that you have worked
upon all in this course. So I think that's
it from my side. Thank you guys for
watching this course. I really appreciate it. I hope you learned a lot. Again, if you have any doubts, you can boost in
the comments and I will make sure to
apply to all of them. Thank you for watching. I'll
see you in the next one.
 Aniket Rawat, 3D Artist