Transcripts
1. Introduction: Hi, I'm Alison Kolesar. I'm an artist and
illustrator and I love sharing some of the ways I've learned to create beautiful art. Working in collage is great
for all kinds of reasons. I find it makes me less
precious with fiddly details. It encourages me to be bolder and to simplify
the shapes I use. It helps me find unexpected
juxtapositions of color, and it allows for lots
of interesting textures. I have another Skillshare class called collage from scratch, which talks about the many, many ways you can
create your own hand painted or printed papers
to use in collage. But what if you find
the whole process of making physical collages
just too messy, you hate having sticky fingers. This class is about how you can use those unique papers you created to make a collage digitally using an
iPad and Apple Pencil. And the Procreate app. You'll still use your own
lovely hand painted papers, but you won't have a floor and the work table covered in
little snippets of paper. Your fingers won't be
all sticky with glue. And you can even make your
art curled up on the couch. I'm going to assume
you already have a certain amount of
experience with Procreate. If you're an absolute beginner, you should first find another Skillshare class that
will teach you the basics. This class will give you
the information you need to create beautiful
collage work digitally.
2. Gathering your papers: I'm going to assume
that you already have a stash of physical papers
that you've painted, crayoned, inked, decorated in
whatever way made you happy. I have a few here of my own
that was done with acrylics. This made use of
a crackle medium which breaks up the top layer
of the paint like that. That one is watercolor. Another acrylic. And of course, you can always
use bits out of paintings, either if they didn't work so well or if you still plan to use them because you're not going to be
actually cutting them. If you don't have a pile like that and you'd like some ideas, Consider taking my class
called collage from scratch. Tons of techniques for creating your own unique collage papers. Of course, it's
also easy to find colored or patterned
images on the Internet. But there are a couple of
obvious problems with that. If you haven't
found something on a copyright free site or
paid to download an image, you may be using someone else's
work without permission. Also, images found on the
Internet are likely to be low resolution and could end up looking pixelated in
your final collage. That's why it's best to
use your own paintings. There are no
copyright issues and your final product will
be 100% your own work. The first step is to either scan or photograph your papers. I often use a scanner and
adjust the levels in Photoshop. But the simplest
thing is simply to take a photo with your iPad and then use the Edit
function to adjust for contrast or brightness
or color if you need to. Here's the photograph I took
of that piece of paper. You can see that
there's a little bit of the table visible behind it. I might not want to include this little bit of
torn paper here. So if I go up to Edit, I can use that to make the
image a little smaller. Then I might decide
that I want to make it a little brighter. So I can go over here, find brightness, and
scroll up a bit here. And obviously there are lots of other adjustments that
you could choose to do and you can make
further adjustments once it's in Procreate. I'm going to click Done. Now this little arrow
allows you to send this image somewhere else. And what I'm going to do
is to add to this album here. I've already set
up an album within my photographs called
collage papers. I simply tap on collage papers. This image is in there. That way all of the images that I use for my collage papers, which actually could do
this in the same place. Under albums, collage papers. And here you see a
bunch of things that I've collected over time. Different textures, different
patterns that I've created. A few photographs, even
just paper textures. Here's the new one
that we just added.
3. Creating the outline: It's time to start
creating our collage. Go into Procreate to
your gallery here, and add a new canvas. You can either make something
completely new dimensions, in which case you're
gonna click on that little thing
with a plus sign. Or you can use a size
You’ve used before. I'm going to use this eight inch
by eight inch square. You just want to make sure
that your piece isn't so small that it
wouldn't reproduce. Should you want to
print it out later or so big that you won't have
enough layers to work with. The first step is to
make a base drawing. I'm going to keep
it fairly simple. I'm using a pencil that
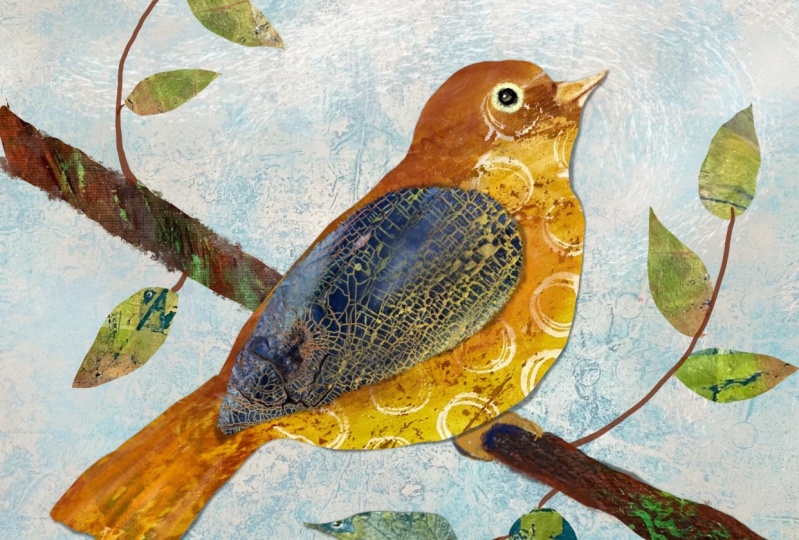
comes with Procreate. And I'm gonna make
a little bird. I love drawing birds
because they can be both decorative and realistic. Now this is obviously pretty sketchy as I'm
still figuring out. What I wanted to do. His head a little bit fatter. Now you could obviously
do this stage on paper instead of directly
in the Procreate app. But if you do that and once you photograph your drawing and brought it into procreate, you'll need to add another layer and trace over your drawing. Because what you want are the outlines with no
white background. Now, because I was working quite sketchily and have
multiple lines here, I'm also going to add a
layer and switch from my pencil to the inking and studio pen and make
the first layer, turned off the first layer. Somewhat lighter. Then work on the second layer to create a more precise,
well-defined outline. This is gonna be your guide. It obviously can be
changed along the way, but it's a starting point. If you knew that
you were gonna be using almost exclusively
dark colors in your papers, you could make this
outline light. I know that I'm going to be using mostly
light-colored papers. My outline needs to be dark. Okay, so now I can turn off
that first sketch layer, and I'm left with this outline. That is going to be my guide for when I bring in the papers.
4. Starting the collage: We're ready to start
adding our collage papers. What order you choose to
work in is up to you. If you're figuring your
image out as you go along. But you already know
that you want to use a particular paper
in the foreground, it might make sense
to start with that and then add a
background later. For this particular image, I think it's gonna make
most sense to work from the background forwards as
you would in a real collage, where you're gluing pieces
on top of each other. When you're ready to
add a collage paper, go to the top left
of your screen, to the wrench icon. Then you want to be
showing this add. Then go to Insert a Photo. Now this will take you
to your camera roll. You can then go to albums, collage papers, and
pick the one you want. I'm going to use
this blue paper. As you see, it's not
quite big enough to fit my Canvas as I have it. So I'm just going to expand it. I use free form, then I can expand it
this way and this way without changing the sides. Okay. There's my background
color in my layers panel. It's underneath the outline, so you can still
see the outline. Now obviously, I
didn't need to do any cutting for that one. But we'll do the
branch next on that. We'll need some cutting. Go back up to the hopes that one, Yes, I want to insert a photo,
albums, collage papers. Let's use this one which has lots of
interesting textures. It's not quite the right shape and place for the
branch as I have it, so I'm simply going to move it a little bit
until it's good. Let's also just make the canvas little smaller
so we can see better. Now, I'm going to make sure I’m
on the imported layer. I'm going to go to that
small S selection tool and select this branch, join it up and that is selected. Now the simplest thing
is to go down here. Copy and paste. Oops, didn't work
It’s not in the layers. Try again. Copy and paste. And then when
you go into your layers, you can see, there it is. If I turn that one off, you can see the branch. As you can see, my outline
really was just a guide. I can certainly
come back in with the eraser and do a
little cleaning up. Let's try this
again with a leaf. Go to the wrench. Add, insert a photo,
albums, collage papers. Let's pick a nice green. I'm going to go to
the selection tool. Select all the way around, copy and paste. To my layers panel. You can see it's there. Turn that off. And
there you see it. This is the process you'll
repeat each time when you bring a new piece of
paper into your design. One thing to be aware of is that the selection tool can be a
little hard to use precisely. You're likely to end up
with some little extra bits sometimes where you join the start and end of
your selection line. Part of the charm of collage, whether it's done with
scissors or the selection tool is the less than perfect line. But sometimes things
get a little too wonky. So be prepared to go back
in with your eraser and smooth out some of those
lines as necessary. Because we've been copying
and pasting our selections, rather than cutting and pasting. The papers we've imported remain intact in the layers panel and
can be used over and over. Just make sure to go
back to the right layer. Each time when you
want to use them. Having said that, it's
nice to have plenty of variety in the
papers you use. For example, I wouldn't recommend using the same
one for all of the leaves. Two or three
different papers will give some nice visual variety. I'm now going to
continue working, but speed up the video.
5. Alternative ways to copy and paste: Just a quick word about
some different methods of copying and pasting
or cutting and pasting. I'm working on version
5.2.5 of procreate and you may have a
different version in case you don't see, let's see, let me
make a selection. In case you don't see
that handy copy and paste button at the bottom of your screen when you've
made a selection. Here are a couple of other
ways to do the same thing. First, the three-finger swipe. Now I've seen videos. When, when you do that, There's a copy and paste option, but here you can
see I either have copy or I have cut and paste. So if I click on cut-and-paste, it shows up in my
selection here. But you can also
see that it's made a hole in the base paper. Let's make a
different selection. Oops, I'm gonna make sure I
go back to the base layer, make another selection, and do the three-finger
swipe again. This time I'm going to hit Copy. I'm going to go up into my
layers panel and add a layer. Three fingers swipe and paste. There it is. Here's
one more method. Go back to the base paper. Select it again. Go up to the wrench icon, make sure we're on Add. Go down to copy. Again over to the Layers panel. Add a layer. Back to the wrench. Paste. There it is. You'll see only one of
these made a hole in the base paper because only one of them was cutting
as opposed to copying. But I did make sure
each time I took my subsequent
selections to do it away from that area
where there was a hole
6. Making adjustments: We're at the point where we don't need the outline anymore. Let's go in to the layers
and turn it off. Things certainly look very different when you turn it off. You can now see clearly
where there are edges that need tidying up with
the eraser like this. And it's also time
to think about whether you want to
make any adjustments to the color or size of
the individual elements. Here's where the
benefit of keeping everything on separate
layers really comes in. I think I'm going to want
to make my leaves bigger. To do that, I have to go into the layers, Make sure I have the
right one selected. Let’s see. That's this one. With this tool on that little arrow button, I can gradually Pull the corner out, just make that leaf
a little bit bigger. Pull it down a tiny bit too. Let’s go and do another one. Let's pick this one. Arrow tool. Pull it out
a little bit like that. Now I could decide also
that I wanted to change the color or saturation or brightness of any
individual element. To do that, I once again have to make sure I'm on
the right layer. And then use this little
adjustment button here that looks
like a magic wand. For example, I think the
wing needs to be more clearly distinguished
from the rest of the body of the bird. I'm going to adjust that. There we go. That's the wing. Click on that little magic wand. And then I'm going to go to
hue, saturation, brightness. I think I'll make it
a little bit darker. So then it's clearly standing out from the rest
of the bird I made. Increase the saturation
a little bit. But it may be that the
pink is just too similar. So I can then play with the hue. A little bit more orange
in that direction. A little bit more towards
purply pink in that direction. I think I like that better. If you look closely, This is also one of
those places where the selection tool has given
me a little extra bump here. While I'm working on that layer, I will just erase that. I'm also not really fond of the yellow decorative
element on the tail. So I'm going to play with the
color of that little bit. That layer. Go into the Magic Wand. Hue, Saturation, Brightness. Let's see. That’s getting too green. I think I like it better if it goes a bit more in the
pinky direction. Increase the saturation
a little bit. Maybe decrease the brightness, Okay, that works better. It's also possible
that you might want to emphasize an edge on
one of your cut pieces. If this were a physical collage, you'd probably be able to see a little cast shadow by
the edge of the paper. And there are a couple of ways working digitally where you can emphasize where one cut
Piece meets another. I'm going to create little bit of an edge on
the bottom of the wing. Let's go back to that layer. Then I'm going to turn
the alpha lock on. That. This will mean that any
lines that I make will stay on this selection
and not anywhere else. Let's see, basically
that kind of pink if I'm just go for
a darker pink. And I think I'm going to go with my 6B pencil rather than something
as hard as an ink. I'm just going to very
carefully come along the edge. I don't want to overdo it. But let's just again
emphasize that edge. Now, I could also either
instead or as well, create a shadow underneath that wing on the layer
that's beneath it. So here's the layer that
has the body of the bird. I think I will go with
something even more diffuse, like this bonobo chalk. Remember I'm actually working on the bird itself, not the wing. So it's going to show
up along the edge here. Obviously, how much of
any of that you do is just a matter of
personal preference. You obviously don't
need to create your whole picture
from collaged papers. You might find that
the process gets a little tedious to use
over and over again. Maybe the surface of your
image starts feeling too busy and you want
some untextured areas where your eye can rest. Feel free to add any details or whole sections using the
various brushes in procreate. For example, I'm going to draw my bird's eye as opposed to
cutting out a shape for it. Fairly dark. I'm going to add a layer for that just
in case it doesn't work out. And I want to change it. And go back to six B
pencil rather than the chalk and draw in the eye. Similarly, you could
decide you wanted to draw veins on your leaves. Or draw in some flowers. There are no rules here. Do whatever works for you
and for your artwork. I'm going to go on
working on this piece. But I'm going to
speed up the video.
7. Final tweaks and thoughts: I'm going to stop at this point I think. I wanted
to keep it fairly simple for
demonstration purposes. The blessing and the
curse of this kind of digital work is that
you can keep fiddling with it forever. When
you're working with a real collage and you
finally glue something down, then that's pretty much it. You've made your decision. With digital work, you can keep coming in and making changes. And at some point you have
to say, okay, that's it. Thanks so much for
coming along on this digital collaging
journey with me. I hope you've had fun and
learned some useful things. And I hope you've
been able to see the possibilities
for your own art. To my mind not much beats
the potential of collage. Whether you use it
throughout a piece or just in a few spots to provide interesting textures
in your pictures. Some digital work only ever
looks like it was created digitally. By including images of your hand painted papers, Your final product will itself look much
more hand produced. Now go and practice
it for yourself. It's the only way to make
the steps stick in your mind. Use any imagery you're
comfortable with. I'd love to see
what you produce. And please do upload your
work to the project gallery. In parting, here's a
little digital collage flower inspiration.
 Alison Kolesar, Artist and Illustrator