Transcripts
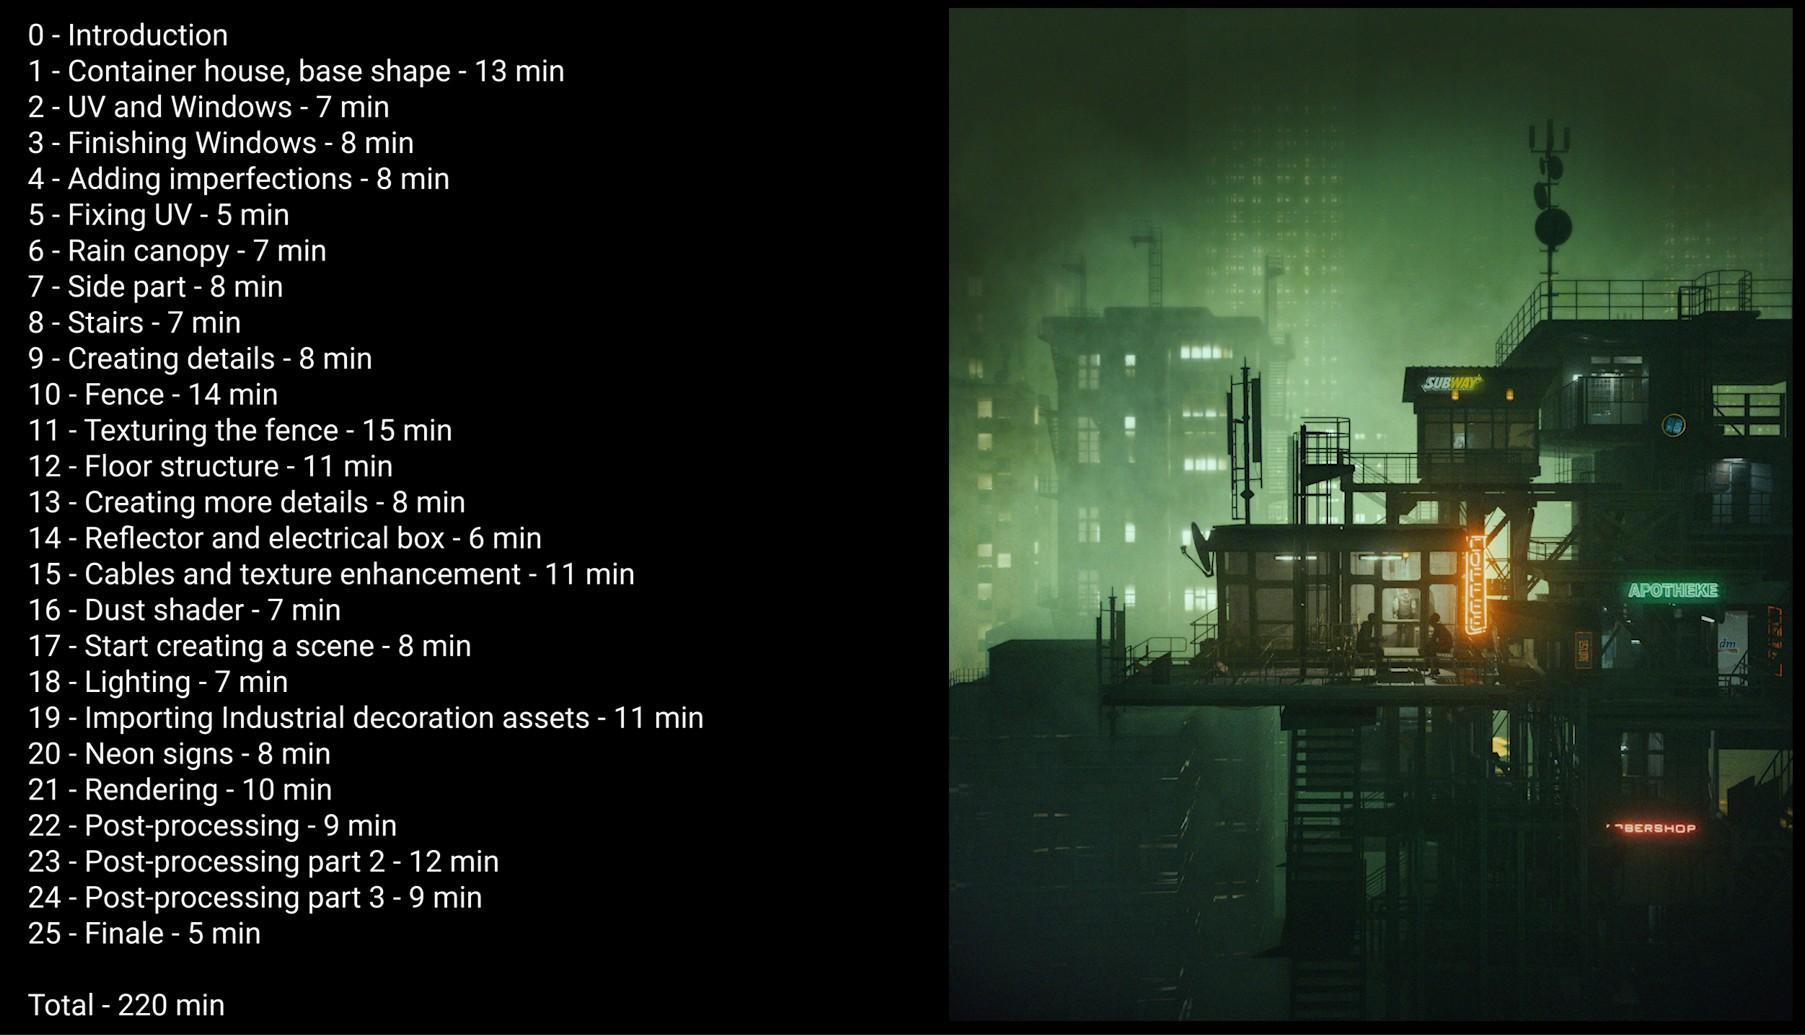
1. Introduction: Hello, and welcome to a
new tutorial in which we create this cyber punksh scene
in Blender step by step. The tutorial is about 4
hours in total divided into 25 chapters with an
average duration of about 10 minutes to make it as easy to
follow as possible. In the first part, we start from Blenders default cube and turn it into a
detailed coffee bar, using only one
reference image plus an additional concrete
texture for imperfections. This is an ideal practice if you want to learn
modeling, texturing, and UV projection in Blender, because we go through more
or less all the tools and the whole process is
recorded in real time. So the tutorial is also
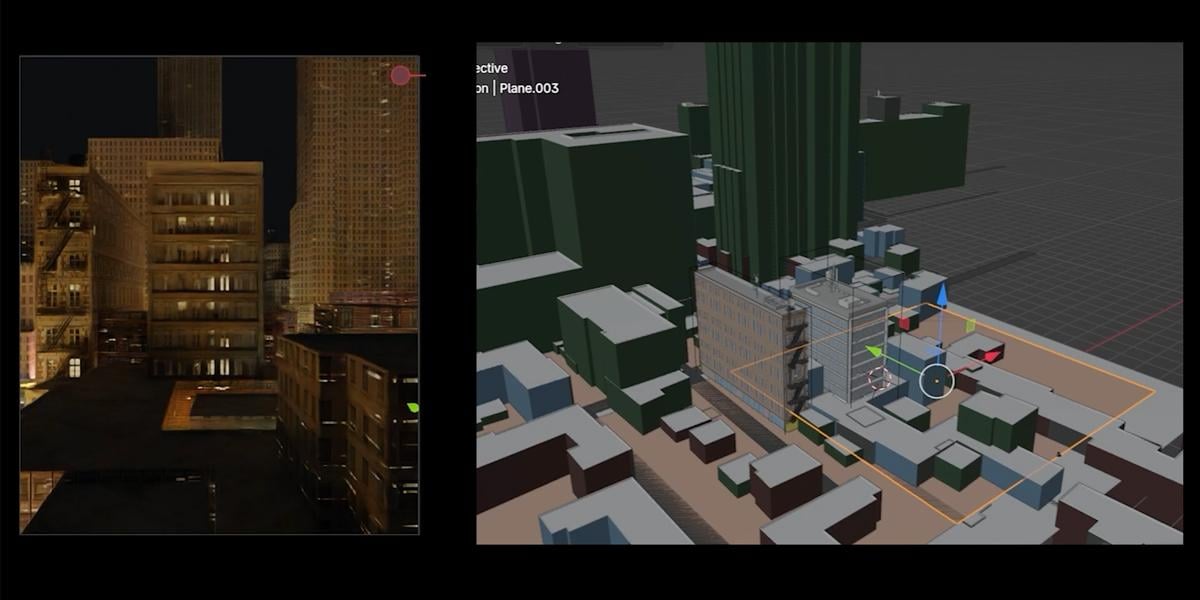
suitable for beginners. After we finish our coffee bar, we continue with
the sync creation. In this part, we use
other assets that I created earlier and talk
about the camera, lighting, post processing, and more. O.
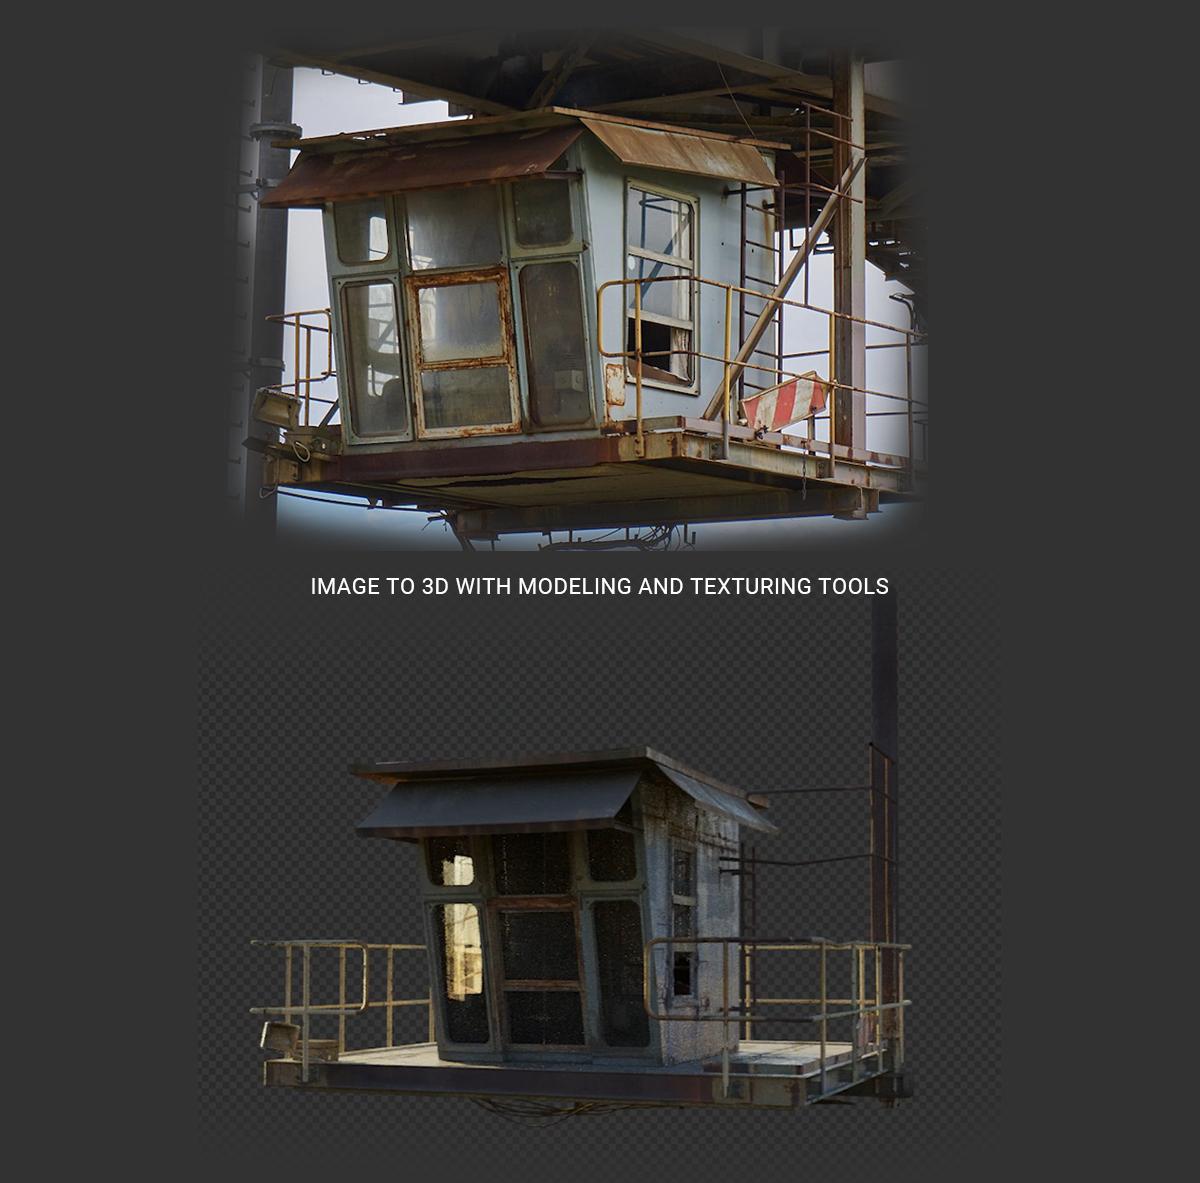
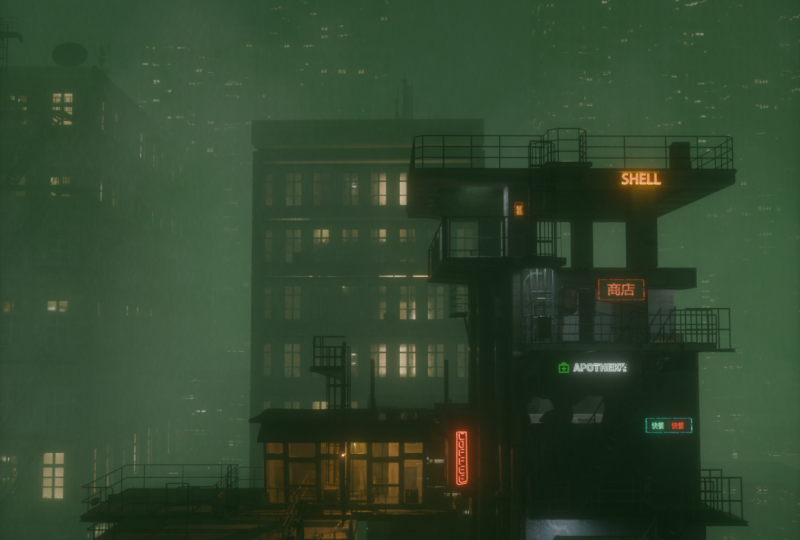
2. Container house, base shape: Hello, and welcome to tutorial. In this tutorial,
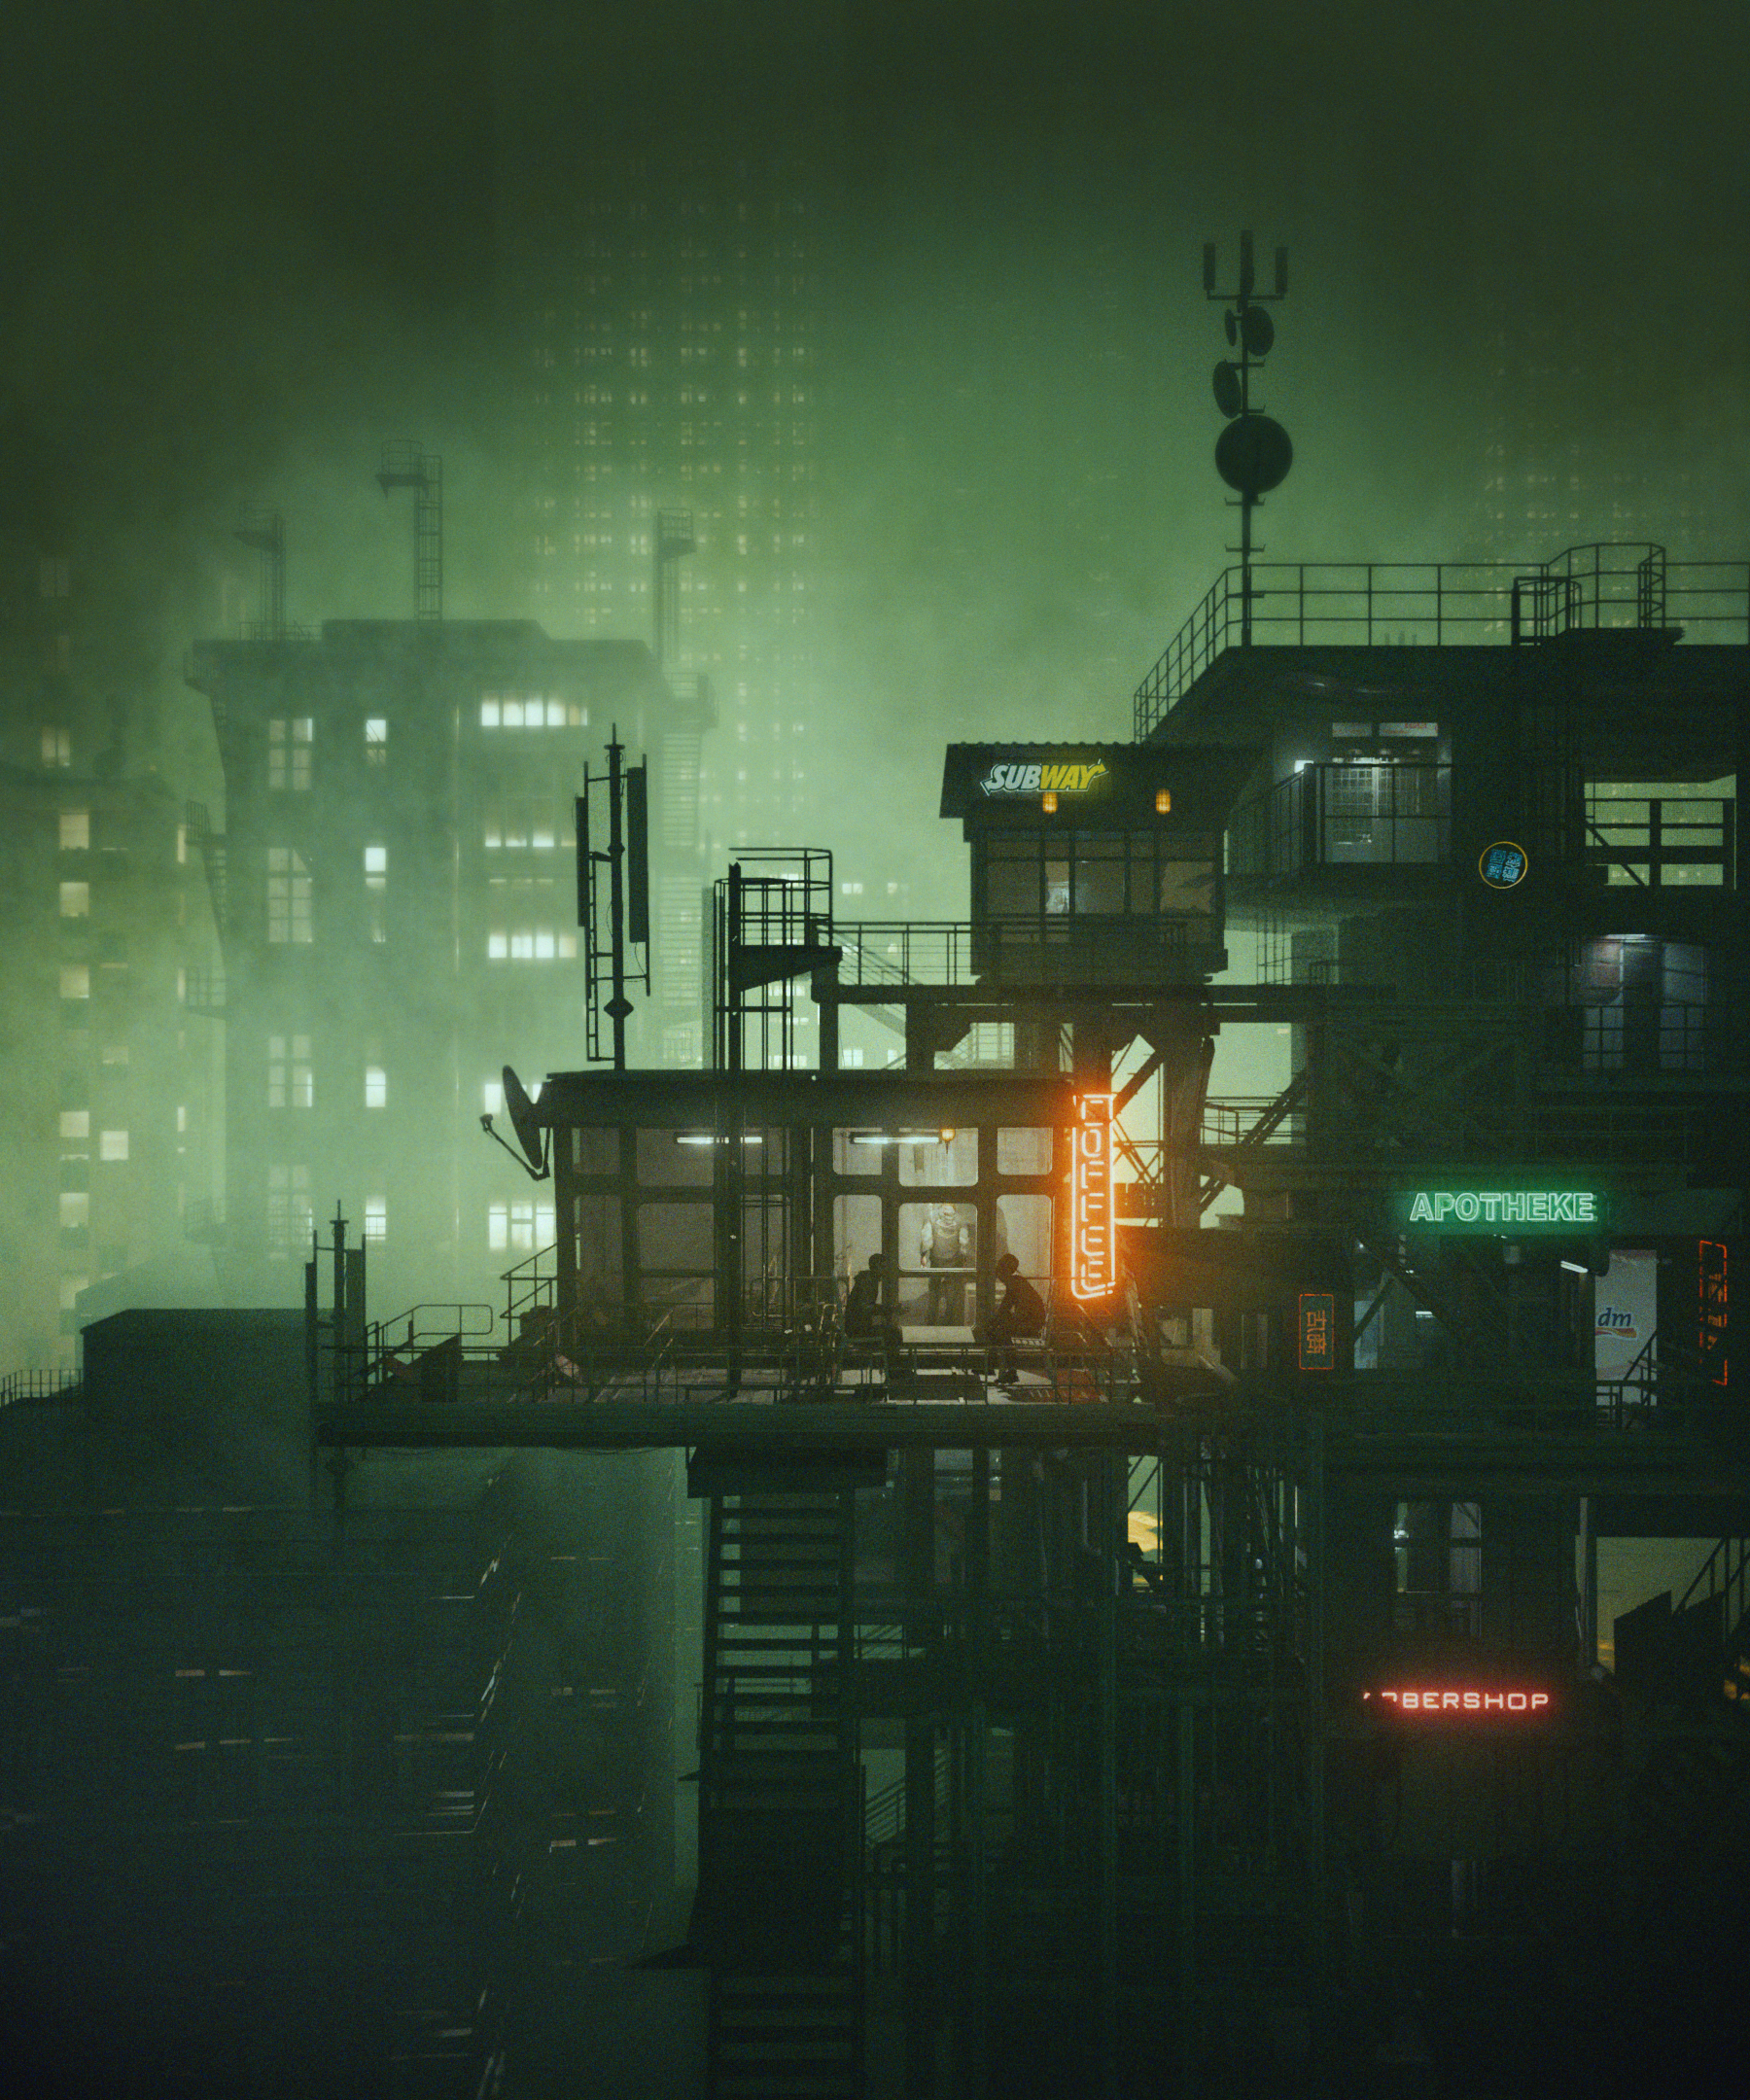
I have planned to build this small
container house. And after that, I think we will also recreate this artwork
because in this artwork, I also use this house here. I duplicate this twice, so it looks a little different, but this is this model here. But I also with the same
modeling techniques, build rest of this so you can see all these structures here. So when you learn how to
build this small container, you will also know how
to build rest of this. I also have plan
to maybe animate this because we have
everything here. So these three
guys here are also animated because I
download this from Mixamo. And for whole tutorial, we will actually use
only these two textures. So let's open this. This is just concrete
texture we will use for roughness bump and
some other details, and this is our main texture we will mostly use
for color input. I think I download this
image from AsprerePixa Bay. I think I will also
share link with you, and here we have some parts
we can use later NUVditor. Okay, so let's
start with Blender, and I see that I use 4.3 and a few days ago,
4.4 was released. So I think I will go to blender.org and
download new Blender. Okay, so 4.4 is here and I hope nothing important
changed because otherwise, I will have problem. But let's see how
we can recreate this small home or
small container. And first, okay, I
forget to tell you so. I just want important
reference images here because I don't want to
open this image all time. So we can go with right
click, horizontal split. I will open here image editor, and I can outload
this image here. Okay, now I will maybe make more space here and let's
place this image here. Now, I will also enable screencast keys so you can
see what I'm typing here. So here you can see
what I'm typing and let's now back this item. And let's see what
we can do next. So I will delete maybe
these two objects, and we, of course, delete default cube and now default cube
again with Shift A. Let's now estimate
dimensions of this. Let's say that we have
here door but small door, maybe, I don't know, 1.6 on Xaxis and maybe
same on Y axis and maybe same on Z axis and
maybe 1.4 on X axis. Okay, I will try with
these dimensions, and I will bring
this here on X axis. I think I don't
use this too much, but if we enable these
increments here, we can snap here. Okay, now I will press Sen and
let's start with modeling. But before we start modeling, be sure to save this file. So file save. And I already create this modeling
container house folder. So I will call this
I like the number. So this is, I think,
about 167 project I do in blender and sometimes it's easier if I need
search on computer, something for my old
project type, this number. So I will call this Container. House. And save
this blender file. Let's see what is best
solution for start. So I did this model
maybe one month ago, and I cannot
remember steps I do, but let's see what
is logical here. So I want you can see this angle here so
we can do this easy. Okay, we need to disable
these increments. Now we can move
something like this, and I will project
this texture on this object and we can
modeling according this image. So to do this, we first need
to go to material preview. Okay. I hope that this is not a bug for this new
version of Blender, but my computer is
frozen for now. Okay. Now this work. But let's continue
with modeling. First, I will open
here, shade the editor. We create new material, and I will call this may. And now I will just load this image because
we load this image here. We also have this image here in shader I will load this image here like
this to base color. And now I will separate
this window here, and we need UV Editor. Okay, let's also load
this image here. Let's now project
this from view. I want to get similar
angle on this photo, and I think this
angle is about here. So we also see this bottom part. And let's rotate this. Okay, now I will try
project this image. U project from you. A, to select all in edit mode. So you can skip between object
and Edit mode with tab. This is shortcut or
you can go here. A to select all
project from you. Okay. Let's now try
reproject this image here. Okay. I see that this angle here and this one don't batch. I will try to better
projection. Project from you. But actually, this
is not so important because we will project
phase one by one. So we can actually
just grab this. Because of this rust part, we cannot see where this finish, but we can guess that
this edge finish here. So I will go with G. And let's
now project this one here. Okay. Let's now project this here and this one about here. You can see that this projection from view is not so important because we can always we
need to fix this manually. And let's maybe stick one here. And this part is not
good for projection. So I think later, we will use maybe some of
these textures. But for now, okay, this bottom part
will not be visible. Let's project this here, but we will later
make this structure. Before I start with
adding loop cuts, I also want to make
this top part and this bottom part when we
have this clean mesh. So I will go with **** D Z
and move this slightly up. Let's scale this to about here and let's go let's
scale little down. Easy. So extrude on Z axis. And let's see this down part. So this one is much bigger. Child, again, as to scale, I like move this little down. I don't want this intersection. Let's see how big is this et's now press W L,
we can select lose part. With A, we select, but with L, only lose part, and let's
now see what we can do. I will go with EZ
and bring this down. And now I will try
add more details, so I will insert this with I, EZ, and with holding shift, we can move this slightly. To get this type of structure. I think this part here
is separate part. With one, two, or three, you can skip between vertex
edge and phase selection. Let's select this part. Let's
create this detail here. I will go again with I or T, extrude along normals
and move this inside. Let's just continue
with adding details. We have this part here. We can create this
if we duplicate this phase shift the SY. Something like this. And
let's make this bigger. I want to move this down as
X and maybe S Y, a little. Now, E Z, extra on Z axis. And what I will do
now, I will press. Let's see how big is this L
to select a whole, lose part. I. If you go with
I In this case, I want press I twice to
insert individual faces. So Ii and move this out. A click and T extrude along
normals and move this inside. This is not the same like
in this reference image, so maybe I want to
avoid this phase here. So let's just select this three. Now, you need to press I once, not twice because before
you press I twice. So once T extrude along normals, let's move this inside. Okay, let's try to recreate
this more part here, maybe S Y. I don't care
too much about this, so let's just maybe go
with EX, move this inside. But now I will click
here and I will click Dissolve orthogonal edges to remove these
edges I don't need. And now we actually
just keep this part. Okay. And we can maybe also move this little out to get something similar
like we have here. I can press L maybe shift Z, and we can create also
this detail here. XY 90. And we can stick this here. Maybe scale this a little. So if you want scale
on X and Y axis, you can press Shift Z. Okay, so you need
hold a shift and Z. So now we basically scale this only on X and Y X is not Z. We exclude Z axis. But this is not for beginners,
so if you are beginner, just go with Y, X, and we can now just
bring this little up. So similar thing we have here and let's now continue
with modeling.
3. UV and Windows: Let's try fix this UV map, so we can select this part
and maybe U project from you. So we can do one by one piece. Let's tick this here. Now select these two
parts as to scale. G, to grab, let's maybe stick this here and
let's see this one. Okay, this will be okay
let's see this part. So when I select this, I want to go with Control NumpED plus to expand selection to select hold this part,
project from you. Now, I will project this
here to scale this down. S Z to scale this on Z axis, and we can maybe scale little here and
let's see how this look. Okay, I think we want
to fix these parts. So we can always
look cards here. And we can now just
select this part. Okay, select whole this part select this part with control, select everything
between, and we can now just maybe move
this to about here. This part down. I'm
not sure if I want project this here because
this part is in shadow. And here we don't
have enough texture. So let's if I zoom this out. I think I will project
on this area here, but let's see how
this will work. So in this case, I will go with projection. And let's now maybe go with let's try reject this on this ras part to
see how this look. I think this will
not work. We can clearly see that this
is much brighter. Let's see what we have down. Maybe I actually want
to stick this here. Maybe later I will if
this will be obvious, I can later separate
material and make this bottom material more bright to avoid this
difference in shadows. I will press maybe L
just move this here. One thing I will do for now, I will maybe bring
this specular little down because we have all these reflections
and which are annoying. So I will bring this all to zero so we can clearly
see this texture. Let's see what I want
with this part here. Q projection. We will see later. Let's
now continue with modeling. So what I do here, I want model this
windows and this door. So I will go with Control R, add one loop cut here, and I will add a
similar loop cut here. I don't care too much about
this reference image I want the same distance between this one and this
edge and this edge. So I will do this again, Control R. A Control Z
to undo this control R, to a cat, scroll mouse up, and now SX now I
stretch this UMA, so I will go here under option, correct phase attributes
and now we can go with SX. Now we have same distance. I will now go with Control
R same on Z axis, SZ. Because we made this edge here, we don't stretch texture. We actually stretch this mesh. So in this case, I will strike this one and I
will go with G twice. So G G, now we can slide
according this mesh here. So, click here, G twice. Let's bring this down. Okay, let's now add
one look at here. X. Let's now follow this
edge here or this one. But because we have this
angle, it will not match. So let's find something between. Okay, and now control vie. Now I want to follow
this edge here. And let's now just place one cut here and maybe isolate
this part here. Control slide. Control R in middle, move scroll mouse up
to add two edges. And now, again, I
will not go with SZ because we stretch
this mesh G twice, let's slide one here, G twice, let's place one here. We also have this part here. So let's go with Control R, place one here. Let's see. I want to select this one down maybe G twice to
slide this down, and I want to add one
more here and here. Now, I want, be sure that
I can select all windows. So this is first window. We have second here. And with the shift,
we add selection. So this is another window. Let's select one, this one here, and this is class window. Okay. Now, what I will do, I will go with EI the
Y move this inside. And before I click anywhere, I think we can also
create glass material. So I will go under
material, tab here. And I will click here two plus, and I will select same material. And let's click here to
duplicate this material, and now I will call this glass, and we can now
click assign, okay?
4. Finishing Windows: Now create these buwels
we have on these windows. So except this in middle, all these have this
very intense buwel. We can select this
only manually. So if I now click here
with holding Shift, we can add selection. Or let's see, I think I want fix these
stretch parts here. So I will go with
maybe Shift G, No. Yes, Shift G, select similar. Normal. Okay. We select everything we want except this part we don't
want so control, and just dissect this part. And also, here. And I think you should
be in RF remote when you do this
to see everything. Okay. So we now see
also this part. And let's now go
with projection. Let's now just project
this somewhere here. So we fix basically this side, but let's now go with Shiv G, select these parts, Shiv
G, select similar normal. Okay, now we select
opposite side, and let's now go with remote. The select everything
we don't need. Now, we don't have this
stretch part here. We have better
projection in this area. Okay, let's now add
actually the beers. Select this part,
this edge shift, and I will just go here
with shift shift here. I think I select everything, but we can see this. If I can go to solid beauty to see
this better. Control B. Okay. Let's see.
Actually looks good, but I don't need to
select this part. And I think we have
stretch better. So that means that
we need apply scale. Control A, let's press N, Control A, apply scale. And let's now back to
this random preview. Let's go back to
material preview. If I now go with Okay, go to Edit mode with tab. Let's now try
create this better. Okay, so scroll mouse up to add more segments here
and let's see how this look. I think this match
our reference image. Let's see solid view. So this window also
have this bevel, but this one don't have. I see that this door
is little inside. So let's see what we can
do here. Numbed one. And let's try select
hold this area. This should be door. Let's
see material preview. Let's now go with EI, move this little inside. Okay, this don't work. So let's see, F three
merge by distance. So let's check double vertices. Let's now try and do this again. If I select this with naped one, you go to front Orthograph.
You can see here. Now we can select this part. We also want select
this part here. So let's go with Npet plus. Now we are sure that we
select also this part. And now I want select this part I don't need so
control to remove selection. And let's go with vertex select. First, I will go
with face select. And now I also want to remove the vertices here.
This one here. Okay, let's see what we will
get if I go now with EY. Okay, this actually work. So we can move this
door inside a little. One thing, which is
my recommendation, so we can in a
solid review enable this cavity option
because let's see before. If we go with numbered one, we cannot see any
of these edges. But if we enable this cavity, we now need this to both. So this is with screen,
we can see this, but we need to move a
little So this is world. This is screen,
and this is both. With both, we can see this even in front orthographic view. I take small break and
let's now continue. So this is where we
stopped yesterday, and I think this stage, I will change from EV to cycles and I
will load some HDRI. So we have better
preview in cycles. So in shade the editor just
switch the world and we can now search for
environment texture. And we can now search
for environment, texture, and I will load. So HGRI here. Maybe this one. So
you can just go to poly Heaven and click to *** HGRI and you can here type this name if
you want, exactly this one. But this is really
not important. So you can take anyone. And let's now ploug this here, and I will go here under render properties film
enable this transparent. Okay, and with Control T, if you want, you can also
play with some rotation here. Maybe this one, but we
will back to this later. I will now back to object and let's see where
we stop yesterday. If I go to solid Preview
and under materials, we create this material, but I will change
Port color down. I see that I apply this
material on these faces. And I want back my
reference image here. This part will be glass. Now we can improve
this glass shader.
5. Adding imperfections: Let's back to object. For now, we just have this, which we just have this base
color and let's now Okay, under UV maps, we didn't
create another UV map. Yesterday, I say that we
will use also this concrete. So let's pour this
concrete texture here. And because these textures
are not the same proportions, we want new UV map. So if I now, for example, go to Edit mode and
change this UV map, you can see that we
destroy this texture here. So we need another UV
map just for concrete. Now, I don't need plug anything
here because by default, this blender use first
UV map, but let's plug. So if I select here and this first UV map
and plug this here, you know that we
use this UV map, and for concrete, I will go
with Shiv D to duplicate this and I will now and I will now select this concrete
UV map, plug this here. Now, if I select
this second UV map, we can actually just
reproject this. We can just reproject
this concrete texture. So if I go with U projection, we can actually play
only with this. Concrete here. And if
you now back this, you can see that we didn't
touch this first UV map. Okay, so this concrete
texture is good. So if you want, you can
always play with this. And you also see here that
we play with this UV map. If, for example, change
to this first UV map, you can see that we
affect this first UV map. So you can change this
here or also here. So this concrete will
be for roughness. And now I will go with color. You know that black part
will be more shiny part, and this white part
will be rough part. And let's now plug
this to roughness. So I mostly want glass
make more shiny, but also keep some imperfections
with this white color. Okay, we cannot see anything because we are
in material preview. Let's switch to render preview. Actually, I think we also in material preview can see
something, but let's see. As you remember, we bring
this pecular to zero, and when we bring
this all to zero, we don't have any
roughness information, so we need these two. We need back 2.5, which is default value, and now we can play
with this roughness. You can see that
in this preview, this now become shiny because we have a lot of black colors here. Actually, I don't need
this principle BSDF. I want glass and
transparent shader. So I will cut this
shift right click. I will go with glass
BSDF and transparent. Now, shift click
to mix these two, and let's make more space. Plug this to surface, and we actually get
transparent glass here. Now I will use this for
roughness in glass shader. And in material preview, we finally can see what I too. So with this color ramp, we can actually affect how much we want this clean
glass and this dirt glass. I avoid keep this
perfectly shiny, so I will bring this
little up and we can also bring this
value little down. And you can see
this effect here. Let's see in render preview. Okay, let's keep this
material preview, and let's see how we can
improve this glass shade. So now, glass is
completely white, which is actually
color of glass, but let's see if
we plug this here. You can note the
small imperfections we actually get
from image texture. Even this is not
physically accurate, we can get some more details. So I will keep this but
maybe just 50% of this. So we can mix this
with white color. And let's now create some bump. So for this, I will
use noise texture, and let's see how this
look with colorRamp. Let's make more contrast. And now you can
use this for bump. We will get some distortion
on this glass here. So let's maybe play
with this scale. Okay. And now if I let's first scale this to
make more space, bump. So this should go to height, and now this to normal. And this is effect we
get This is too much. So let's bring this
2.1 still too much, and now we can maybe
play with this strength. Some distortion here, and
this should look okay now. Okay, but we lose all these
details from this photo here. Is not physically accurate, but let's see if I mix this
with this principle BSDF. So I will use this as color, and let's use this for
roughness. Shift click. Now we use half of this. So if I go all to left, we just get this
transparent glass. Okay, this new blender
is pretty slow. I'm not sure why this take too long to load
this material preview. But now, if I go all
to one, we get this, and I actually
want to keep maybe just small value of
the second shader, so I will move all to left. No completely to left,
maybe maybe 0.3. We now get this
reflection from this. Actually, this is just a
window from another side. And this is not
physically accurate, but it just creates
some more detail, maybe too much 0.2. From distance, just look like some shadow from inside
or some reflection. And I always like keep, maybe just more value of
this image texture in glass.
6. Fixing UV: Next, we need to fix this
part, the U V editor. So to do this, we select this first UV
map. And let's see. Now I will go to Edit mode and I will fix one by one piece. So let's see what if I select this I will disable this correct
phase attribute for now. I think I want to go with. Okay. This will not work. So I want to go with K. We have this rust part projected here which I don't want.
We can just with K. Go with K here and
maybe select this part. And maybe we can
bring this down. Okay, in this case, I have this stretch part
because we add bevel here, so you can see that
we have holes here. These holes create
these stretch parts, so I will go with you
project from you. Maybe perfect this here. Okay, it is better than before. And I will also do
with this part. Actually, I just want
to fix this two. So view project from you. Okay, and let's place this here. This is not a good idea because we have a hard time
to match this. But I think, okay, let's reproject
everything again. So I will select hold this part, but not this glass, and let's go with you
project from you. Okay. This is now
better. Let's see. This part looks pretty good. This part. Let's now
fix this part down. So you project from you. Let's now fix this part. I actually just want to avoid
this glass in this area. So I will just go with flex
one vertex G, bring this up. And let's now also
project this on glass. As to scale and let's
place this here. And also fix this part. Here we have this green part. I want to avoid of this here. And now we get separation here. And we also get
this shadow here. So we are too much
in this shadow, which look weird, so
I also avoid this. I will select I will
select everything with A, ax and maybe rotate
this GX of this here. You know what I'm doing, and I think I will speed
up this part because this is just repetitive
boring task. So I need to fix all the
stretch part, for example, this part here with N
0.1 project from you.
7. Rain canopy: Let's now create this last part. We can create this very quickly, and we will then see
what is visible here. So let's see how this look. In this case, maybe we can just grab this maybe just this edge. SZ. SX, move this about here. Let's see here this
start and now E Y, extrude this Y axis L to selectl and SX scale
this on Xaxis. Now, I will bring this down, move this down and let's
see something like this. And now I will go with easy
extra dist on the axis. Let's move this little inside. Actually, this is all we need, and we can now just
add some imperfections here so you can see that
this is not perfect. And let's maybe bring
something like this. Control B to smooth this and maybe on X axis
also some imperfections. Let's see Control R, maybe move this down. Control B to smooth
this maybe also here. Little. I will go down. Again, throw B. If you want, you can
press L and maybe scale this little on X axis or Y. Let's now reproject this here, so I will go with a
similar camera angle like this and maybe
project from you. Okay. This angle is good, and let's stretch
this air to rotate. You can maybe select this part
and maybe move this here. Let's see how, this part
of texture look good, so we can do this. Let's place this here this part here and let's now
select all this as to scale. S Z maybe. Okay, we should first project this texture and later on imperfections,
it will be easier. You Veditor now we have
all these vertices, and faces, but I
think it is okay. Let's now add some
thickness here. So I will press L, ft
extrude along normals, move this little out. And let's now create this part. So to create this, I will
go with Shiv D Y Y axis, E Y, extrude this out. Okay, this should go in half. I will press L ax to
select this part. Let's now bring this here. S Z Y, and let's
see how this look. I want actually move
this inside more, and now I select this edge EX, extrude this on X axis, L. Let's now go with T
extrude along normals. E, let's see where we can
project this project from you. But I want similar view, in this case, maybe
hear project from you. Let's see if we can
project this here. I think this is okay. Or you can always, like, project this somewhere here. No, I like this before. Now, shift the move
this to another side. And let's switch to Cycles
preview to see how this look. Let's now create this
on another side. Let's see this here. So this one is smaller
and more rotated. So we can actually duplicate this one to speed
this process a little, shift the X or Z 90, scale this down, maybe six
to scale this on X axis. Let's switch to
material preview. It will be easier
for my computer and let's now maybe go with S Y. Maybe a sex Y again. And let's stick this
somewhere here. Okay, this one is almost
connected with this part here. So we can move
this out and maybe you can move this
a little inside. Now I want similar
angle in this camera here, U project from you. Let's now try
reproject this here. Okay, this is pretty
good. I want fix. First, this part. Let's see. This part down is too
much in shadow and I don't want that so I
will project this here. And let's now just
fix this part. We can use proportional
editing here. Just grab this scroll mouse down to affect only this area. Let's now stretch
this part a little. Maybe this o
8. Side part: And now I want to maybe create
this part, this side here. So we have this big window, and we cannot reproject
on this area, which is pretty bad, but let's see what actually we can do. Now I will go with
Control R here. And now I want to rotate this
or line up with the Y axis. Y zero. Y zero. And now I line up
this. Let's see. Okay, here. This area is okay. Control R here, and again, control R S Y zero
to line up this. And with double tap, G, we can slide this about here and let's add
one part here. Okay. Now, what I will
do in this case, I think I will select
hold this area. You can also use C for brush to get this brush and we can
just select hold this area. I think I will go
with UQ projection. And let's call this area
reproject somewhere here. Here, we don't have
enough texture to reproject this good, so let's stick to this
area to this door here. Okay, here will be my
edge of my window, so I want this area
move little on right. Let's actually see what if I set this area and a six mis one. Now I can also use
this edge. Maybe here. Okay. And now this area
will be our window. Let's see. So first, this go out, then inside. So we can go with EX,
move this little out. Then we can go let's back these little sides
I to insert this, but I twice in my case. Let's now go again with EX
mood this inside again. And we can create a
few details here. So let's I again, EX last time, maybe I. Now I will go with
EX modi inside. Now, let's see what we can do. We need, again,
this bubble here. So I will grab these edges. Let's first reproject this
bed area, stretch area, select all these Q projection, and maybe just place
this somewhere here. Okay. Now we can add this bevel. So I will go to Edit
mode, phaselec selection. And with holding Shift,
select hold this part. Let's now make
this big Bwelow B. I want maybe apply
scale. Scale is one. Let's see what this problem. This actually starts
stretch when we hit this vertex
down, this one here. So we cannot fix this now. We can, but I will
not care too much. We have enough bubbl here. And let's see. So this will be our window, and we can maybe
project this on window. So I will first assign this glass material here and let's now project
this on this window. So similar angle
project from you. Let's see what if
we stick this here. I will move this
little inside. A here. Let's now use similar
ranger project from you. These edges look too perfect. Let's see what I can do. I think I can maybe
project on this area here to get some texture on this and let's do
same with this one. And this one here. Now, this actually looks like we have some edge on this window. And also, this part, I want to project
on this rust area. And we can just rotate
these two parts. Select first one which
shift second one, HeZnty maybe project this here. And this one also. Now we
can do same with this part. Now, this actually look that
we have frame for window. And we also have
this stretch part. This one. That's inside
okay projection. Just rotate this or 90 SZ This look
okay, in my opinion. And with another site, I will not model this. When I finish this site, I will just duplicate this
part and move to another side. Let's see how this
look in render Prim. Maybe some overcast day, but maybe or what we can do, we can add here sun lame. So we can see the glass
and all these shadows. I will keep this for now. And let's bring this to two.
9. Stairs: Let's now create
these stairs here, and this should be
easy so we can for this use curve object and
cover this to mesh later. So let's see our reference, I will go with just plain plane, x 90, Z 90, scale this down as Y. As Z about here. And let's now go with I
will first apply scale, control R to add cats. Now, I think I will delete
this first and last one, delete all the delete edges. Now, I will also
delete these phases select all these delete
only pass with L, we can select this part. I think we need go toward
text Select and convert this to first piece separate by selection and cover
these two curve. Now, because this
is curve object, we can add depth here. So under geometry depth. I'm not sure why I
get this problem. Let's scale this down. I think we can scale
individual vertices, maybe all S. But this
don't fix our problem. This is me from future, and I think there is a way
we can avoid this problem. So if I now add Loca here, I can just go with Control F. Or you can add here modifier. But so this here
is no destructive, but this one here with
Control F is destructive. And now we can change
thickness here, Control B to bevel this, and you can add more
segments if you want. Okay, now I forget
delete this part here. Let's see if I look
here, delete vertices. And if you want to
fix this problem, we can maybe look
cut here a Z zero. And now we can delete
these vertices, but you should do
this in fremde. Control R, S Z zero
and delete this. Now we avoid this
problem and you can maybe shade out
or smooth here. But I don't care. So nothing in real world is not perfect. And let's now back this to mesh. And let's see how we
can now fix this. Actually, I know
where is problem. So we can see that
problem is rotation here and we have bad rotation
of some of these vertices. So when I go with Control R, you can see this rotation. From distance, this
will not be visible. Let's see what we can do now. I should extrude
this four vertices here to get this part. But let's now do this manually. Shift right here. Let's go. Cylinder maybe just 12. I 90 scale down. We have this proportional
editing and a sex h. Stick this here and let's see if I go
with Nap key to sow, we can now just
select this part. Ex scale this and EX
to stick this here. Let's now just duplicate this. With L, we can select
this loose part, Shap Y. Stick another one here, and we cannot see down, but I think we can
also bring this down. Share the Z Nplaky
back to our scene, and I think this is okay. Maybe scale all this down. I also want to join with
this object to control J. So everything is one object. Let's now go to
material preview. L to select hold this part. And projection. Let's now just project
this to some rusty part. Let's see what we have here. Z 90, maybe just on this area. Okay, let's see
where is problem. Why, this don't work, so
let's go to material. Okay, I think I create new
material, but empty material. But if I in edit mode, we cannot delete material. What if I read this here. Okay, now it's glass material, but I want this main material. And now, this work. And I think I think
I can improve here. So you can see that
we have rusty area on this part and this
connection doesn't look good, so we can maybe fix this control R G twice to slide
this maybe here. And also another side. Now, if I select these phases, I can maybe just reproject
this to some rusty part. Okay, I think I want to select
all this area, projection. Okay, this is not perfect, but let's keep playing this.
10. Creating details: Okay, we can duplicate this
place to another side. I just want maybe create
this detail here. Let's see how we
can create this. So let's zoom to about here. Shift click plane. Ex 90, RZ 90, scale this down. S Y, SZ. Let's now EX do this on XX. Let's go let's first
select these edges here. Control B to bevel this. Now we can go tell to select
this loose part a x a Y. And move this here. Now we can join this object
to get this material. Now we can select both objects
and go with Control J. I'm not sure why. Again, I
get new material. I want. Maybe this is buck of
new blender version, and let's now get similar angle like this
camera project from you. Let's again go with
project from you. And I want maybe
reproject this here. Okay. Not so important detail, but we create this now. And now let's see. I want to delete this part here. Let's go with C or brush. Select Let's go with
fake selection. C, select, hold this area. Delete faces. And let's see if I go with num
pack three, what I can do. I need select everything here, actually, everything from here. And let's see how I can now deselect Now I will go
with Num pet seven, and let's go to R for a mode. I actually don't want this
part here and this part here. Let's see. Now, I think we have selected
everything we want. If I go with, let's see
this Control umptPlus. We need to go with
Control amped plus to select this before. You can see that so control amped plus and maybe one time
Control lampd minus. Let's see what we
have selected here. This look good. I will also
select this lose part. Shift, shift, shift here to add selection with control
select this part. Now, let's press L to
select these tires. Okay. All these are
small loose parts. But let's select everything. If I now go with, let's
see, on this side, if I now go with Shift X, X minus one, I can flip this, and this should match perfectly. Okay, now we have everything
also on another side. Let's increase this maybe
to see this better, and we can change maybe
this color of the sun. And let's fix projection
of this part. Let's see what we have here. Not too much, but maybe
we can also use this. So if I go to material preview, let's try get similar angle and select these two
faces project from you. Let's try stick this here. Place this here and I will
add one cut in middle. And I see that this
should go down later. So Gs Now we can select this again and we
can this middle part fix. Let's add one here.
Select this move down. And let's see this part has to scale and move
this about here. Let's start some
perfection here. And let's see what we can do this part and also
this part down. Q projection. Let's see what if you project
this on this door. No, this don't work. I want maybe this
rust part here. It will be stretch a lot, but I think colon
will match better. Okay, this will not be
visible from this angle, so I think this is okay. Let's see what if
I put point lamp inside or maybe just area lamp. So I will make this point
lamp and maybe just print. So we can see something. We can see inside
a little better. And if you want, you
can change color. Maybe we can make
this sun bluish. So we have some contrast. Okay. But
11. Fence: Let's now build this fence here. Let's see our reference, and we will again start
with YR Fram tool. So I will switch
to solid preview. We can maybe grab
one of these edges, and I will go with shave D Z, maybe move this to about here. Let's go with S Y. And now I will go actually, I will convert this to face, so E Z so hold Z to
stick on Z axis. Let's see about here. Let's move this about here. Actually, this
should go outside. So this should be here. Let's now extrude this
on X axis to about here and EX again. And let's do same
on another side. So EY and Ex. Okay, this will be
base of our friends, and now we just want to
follow these edges here. So we have one on top. Let's place one here. I want this loop cut here and let's add three
on this side. So one, two, three. But actually, I want place one here and maybe another one here. Now I will add we have
a lot of space here, so I will add maybe
two loop cuts. Here. Let's do same on this part. Here, I
will go with two. And here I go with
three and one here. Let's see what we
need to do now. I want to delete these edges. So delete edges.
Let's do same here. And now I will press L
over this part. Let's see. I also want to delete
these vertices here. Delete vertices. Now I will press L over this
part and delete only faces. I don't need faces. Let's now bevel these
edges we want bevel. Okay, so this one
we also don't need. We don't have anything here. Let's delete this
delete vertices. Now, I will start beveling. So we want B, this edge here, this one here. So let's select these two, this one, and we also
want bevel here. Also here and here. And also this corner. Okay. Now, to be vertices
we go with Control Shift B. But my screen cas
keys don't work, so I will enable this. So you will see here
Control, Shift B. Now we can scroll with mouse up. Okay. But I have problem. I need to delete these edges. So let's go again to see
where I get problem. Okay, this one, this one, delete, delete edges
and also this one. Delete edges, and I also forget. And I also need to
delete all this down. So I don't need this edge down. Let's delete all this
part. Delete edges. Let's see what we can do now. So we want Bel this edge. So we want this edge here, this one here, this one. This one and this here. Okay, let's see
what we will get. Now, control shield B. Okay. I think now this work, let's let's just see
how much we want BF I will, we need apply scale. I see that this buwel
is not how I expect. So Control A, apply
scale because this effect on Bwel now
if I go to Edit mode, Control Shift B, we
now get smooth bebel. I think this is okay. And now because this is
part of this object, we need to separate this with L. So select press L
here and we can now be separate by
selection. Let's see. Now we need to convert
this to curve object. And under geometry, Bel
can add depth here. I think thickness is okay, but I will not
apply this for now. Now we can just move this down. Okay, maybe X a little. Move this down. I want to
make this connection here. I think this is nice detail. And let's see how
we can do this. I can just maybe grab one
of these phases, shield dY. Y, scale this on Y axis. And I think I want
extrude this EX. Let's add two loop
cuts in this part. S Y, scale this on Y axis. And now, Ex move this on X axis. L, and let's take this here. Let's move this even more, and I will press L and
SZ sce this on the axis. Okay, this should
go to about here and let's bring this little up. Let's create this grow so. I think it is a little hard to navigate about this part here. So maybe we can enable Log to treat the cursor and
now if I go with shift, for example, before
cursor was here, but if I now place this here, it will be easy to navigate. So you can just rotate this to here and
we can select this here. And for example, if you
later model this part, we can click here and it will be easy to work
with this part here. For example, we
can just up here. Let's now with shift, try, click Place origin here. So shift right click. Origin here and now we
can model this part. Now I will go with
Control B to add one segment of bevel here. Now I can go ship here and place origin here and
now I can go with cylinder with six edges. Scale this all down. Her Yale rotate this on Y axis. Maybe SX. If you want, you can insert this Ex to get even more detail. Shap Z shave the. Okay. Now, this is too big
so Sx place this here. Now, I think I will unwrap this before I duplicate
this to another parts. Let's switch to
material preview. Let's select all. And now I will This is part
of this object. So we have already material. Let's just go with
you project from you. Maybe we can project
on this part. Okay. Okay, and this part is bed. We can just scale,
place this here. Okay, This not perfect, but it will work. Let's see what I can do here. I can just go here with
you project from you. Place this here, maybe
6 miles one flip this. Let's see, this part
scale a xjt this here. From distance, it will work. Okay. Now, what I will do, I will go with tab to edit mode, L to select all these parts. Let's now just think
this W number three, we can go with Shift
D Y, stick one here. Shift DiY another one here. Okay, now you can just
go with again, Shift DY, but Zi and Shift click
to back cursor here. Now we can go to this view. So you can click this Gizmo
to rotate about here. Let's place one here. Okay, I look this one, which is prong this one here. Let's see, we need to
move this about here and let's again go to the
axis and shifd the X. Shield the X, and
again, her Z 90. Shift right click
to B origin here. Okay, but we should
move this out. But this part called this part will not be
visible from camera. Usually, I will use
this part camera, but let's see what we can do. Shield the X or Y. Stick one here. Actually,
what I will do in this point, I will just move this
inside to make more space. Now I will go with Tell, select all these parts. I forget this part. Now I will go with control. Now we can move this
here and Shi divY. Two of this here, dis
select this part. Shiv diviY again. Shift click Shift click
to place origin here, Sid diYERZ 90, enter, place this here, and
last one **** the X. Okay, now we have all
these connections, and let's see I want now maybe
apply this curve object, convert this to mesh, and we
can unwrap this actually. So let's see this is okay. I don't want play
with that here. So I will go with right click, convert this to mesh. Okay, now, this is mesh object. If we select this object,
this one, Control J. So we actually create with this new material
which is nothing. So we need now we have applied this material
here, which we don't want. So I will manually
select all these, and now just assign
this material.
12. Texturing the fence a: With this first UV map
selected, let's see. This will be a little
hard to unwrap. But I actually like
this yellowish color. I will even try to project this. This is a similar camera angle. Let's go with you and let's
try with project from you. This will be pretty hard to project on this fence
here, but I will try. Okay, this is almost impossible. Let's see. I think this
is not a good idea. So let's go with Q projection. Okay. Now, if I project
this on this flat area, I will get the fence,
which I don't like. What we can do here,
we can maybe separate this material and maybe paint
these two yellowish color. Let's try and do this. So I will actually
clie to new material, main duplicate this and
let's try go with yellow. Okay. Now, in edit mode, we have everything selected. Assign this material.
Now this is main yellow, but we need to change
this material. Okay, let's go to object mode. I will change viewpoint
display color to some yellowish color, so we can actually see that we have different
material here. Let's now back to material
preview and what we can do. We can go with mixed color. We can maybe sample
this color from here, if I now move this here, I actually want said this
to color blending mode. So we actually get
all these details, but we just change
color. Let's see. I want maybe bring saturation. But if I just project this part from here down to this edge. Let's see what we will get. And what if I now maybe
grab only this part. I can go with old and
with Control Number plus, I can expand
selection about here. I will even try. I will try
project maybe just this part, you project from you. Let's see if I try
project this here. Let's see how this look. Okay, this looks like
we take dirt from here, but because this is
too much yellowish. Okay, let's bring
this to about here. Or maybe we can just this part assign us this material which
is not so yellow. Let's see is this
big difference. No, actually, I think this work. So we can just paint a little more time to
fix this projection. Okay, so we fix this part, which is not so
important very quickly. And now we can get also details from this area
also on this part, which is close to camera. Let's see we can assign this and let's project
this little better. We have some stretch area here. Okay, let's see what
we have on this part. This will be a little
hard to project. So what I can do, I
can maybe grab this. Maybe you project from you. S X minus one, maybe we can just
use this part here. Okay. And if I assign
this material, let's see how this look. Okay, be sure that we avoid this bluish color here
because it is very visible. So I want with
proportional editing we can scale this Okay. I think this look good. I just want to play a little more with this
yellowish color. I don't like this tone. Maybe more orange and
maybe less intense. Not sure in which point, but I stretch this. Okay? Now, I think I
cannot fix this anymore. So I will just press
el delete vertices. Maybe I will fix this
later without recording. And what I will also do, I will maybe just this part. Project on this area,
we have nice area here. I think I will go with
you project from you. You can now see that this better connect with this part here. Okay, now we can later
compare this color. So you can see
this is to orange. So we need more go
more to yellow. Maybe I can try. Okay, it is not easy, but now they look
pretty similar, so it will match with the
rest of textures here. Okay, you can play with this. You can spend more
time projecting this, but I think this is okay. I get a nice piece here. This part in background. I will not be so visible. Let's see what we can do next.
13. Texturing the fence b: One detail here,
similar type of fence, which I didn't see last time. So let's try create
this and we can start. You can see that this is
connected to the fence. So we can maybe go to edit mode. Vertexelec let's grab one of
these vertices. Shift dY. Maybe start from this point. Let's disable this
proportional editing. And let's see if I go with EZ, I can extrude this on Z axis. Now I can go with EY. We can maybe stick to
this rust metal part. Let's now maybe stick. This should go in
the stairs here. We need to bring this a
lot down to about here. I will also press L.
I want to maybe place this here. Let's see. Now I can stick to the stairs. Ex move this about
here. Let's see. Now we want extra this up, easy. Maybe to about here, easy. Again, now we can
stick this with EX. So this one is plug in this part here so we can easy
see with number three. Okay. About here, now we can shift click to
place or cursor here, so it will be
easier to navigate. And because we still have
this locked 23d cursor, and let's now see EY. Let's stick one here. Now we can go with
EY about here EY. So I follow this shape here. Shift the Y. Let's
place one here, and this should go all down. Easy. This one here. And I think we are
actually done. Now I can selected everything, all this part with L. We can press P separate
by selection. Select this object, rightly
convert this to curve. And let's now under geometry, add some thickness here. I forget to separate
this part also. So what I can do now let's select this object
tab to go to edit mode L, L and P separate by selection. So now we have two objects. And if I go with
Control J, Okay, I cannot so this one is this one is mesh,
this one is curve. So we need convert
this to mesh again. Now, we can now both objects are mesh
Control J now. This work. Let's now go convert this to curve again. Now,
this should work. Okay. Now I will again, convert this back to mesh Control J join
with this object. And I think we again
get same problem. But now it's fixed, and let's just press l
overhaul these close parts. Which is not so easy. Okay, I think you
need place mouse where you have more
vertices in this area. Projection, just project
on this metal door. One thing we can actually do, you can see that this
part here is too flat. With holding shift and we can
basically select this loop. I want maybe project
on this rusty area. So if I scale this maybe stretch a little
on the axis scale. We will get more this
rusty area here. And this one down is too flat. So let's just scale this This part up is rusty, actually, so you
can see this here. Actually, I I now need
select this again. You can also selects part
you'll be edited with RZ 90. Mm. Let's see how this look. Actually, it looked good. So we can maybe I see
this white color here, which I want to avoid. That's because we move to
this part and this part here is bad. Not sure why. Okay, because of this area here. So Zt G to move this here, Zt, and let's also fix this. And this actually looks good, and we forget this
one also. So art. So I told this, let's
place this down. The reason why this is yellowish because we also need to
assign this material. And I think this
actually look good. This yellowish is maybe, again, a little too saturated, so we can or we can go with another hue
saturation value node. Maybe this value make
this little dark. And one thing we can also do here, maybe some imperfection. You can see that everything
here is too perfect. So Control R here, maybe G, move this down. Control B too smooth. Maybe here. Control B. I will again play with
this here in the RI.
14. Floor structure: I know one big problem. I'm not sure if I forget this, but I need to go to GPU. I see that everything is
a little too slow and noisy because I all
the time use CPU. And I have good GPU
so if I go to system, I have this 40 80 and I
know that my computer is struggling whole time rendering this but this should
not be a problem. Okay, you can see that now
everything is very fast. This part here little look bad. So let's see where
we can project this. I also want to create maybe
a little more details here. So I will select this one
with holding control. We can select all this part, and let's go with projection. I think we don't
have choice here. We need project to
this metal part, this door here because this
is only flat area we have. We can again maybe
separate this material. If I go to material here, Maine, I can go with Maine and
maybe make this more dark. More dark and less saturated. Okay, we need a sine
first this material, select this assign can
play with this value here. Make this little more dark, and I will also
bring saturation. We have a lot of bluish
color here, bluish tint. With this part down, we
actually need the same. So I will select this part. Q projection, project
on this door here, and let's now assign this
little more dark material. And let's see how we can
create more details here. If I know, I will select
all these and delete edges. Let's go to solid Preview. Delete the low edges. Okay. Now what we can do here. Let's go to material preview. We can maybe go with subdivide. Okay, this will
not work, but if I go with phase, book phase. I see here, we have all
these vertices here. If I go with delete, so we delete actually
edges, but not vertices. If I go with delete,
limit and dissolve. What this does, I think nothing. If I again go with
subdivide, it will not work. What I will do here, I
will not care too much about this shift I click plane, scale this plane, SX GZ
because this now intersect. Q Q projection,
project this here, and we fix this problem. Sometimes it's easier
to fix this problem than think how to remove
all these vertices. Let's now, if I go
with subdivide phase, I can get, I will not
go with subdivide. This is too much
mesh poke phase. And if I now press I twice, I can get structure like this. But before first I
want extrude this EZ. Let's move this all down. Now, I twice. In this case, I once EZ. Let's bring this up. Okay. Now, first, I will fix
all these stretch parts. Okay, I didn't hold
Z when I extrude, so I will control Z. Now, E. What I do I forget called, but now Z is activated. Now I can fix this. Q Q projection. I want to project this
on this rusty part, so Air Z IT. And I also want to project
this on this rusty part. I will rotate this air to rotate and maybe
project this here. This actually look good from
distance and if you want, you can also follow
these edges here and with tab, let's see. Okay, I should do this before. But what we can do, we can always take knife.
Maybe cut this part. I enter. Maybe easy to get these details here. And if you want, you can play with this to
extrude also. Maybe this part. Now I can just press L over for this area and add one bevel, Control B to smooth
this a little. Let's see. Now, this actually look much better than before. So we have also nice part here. Let's see. This is
still too blue. So let's see if I move this here and I need to bring value
because when I slide this, I actually add more white
color here, which look bid. We can bring all
saturation down. Okay. Let's make this window a little better so you can
see that this part is open. What we can do here. I will go to Material Preview
and tab to go to edit mode. I think we can extrude this part to get
this part here, E Y. Let's extrude this one here and let's add Control
B one bel here. I still have no, I don't have enabled this
correct phase attributes, but I didn't stretch
this too much, so I will again go with
phase selection, EY. Let's now just project
this little better. I can go with you,
project from you here. And I can project this here. And the second one also here. Okay, now I will select
only this one so I can. Maybe I will also apply
this main dark material. This looks too bright. No. Let's see in render preview. Okay, this is some bug. This should not be so black. Let's apply assign
this material. And I think I know
why I get this because we have
overlapping phase if I extrude this little out. Okay, a little too bright, but let's see if I now, again, apply this
to this dark end. Let's keep like this. This part here is maybe
a little too dark 0.2. And we don't have glass here. One thing you can also do if you want to be more creative, you can maybe just
with K or knife, make this glass broken,
something like this. Okay, and let's see. Now I will select
everything I want. Delete, delete pass. Now we have broken
glass effect here. When we create glass, it is not the same if this
glass have thickness or no. So if I go with EX
with thickness, this glass should look
a little different. But this also affect
this pace orientation. And I see. Okay, this actually good. So this pass inside, we only need maybe fix
this part F three. So edit mode, F three and flip. And I also see that
this part intersect. Let's move this little out. We also need maybe
fix this part here, which is in red,
three F three flip. Let's see here. I have three. This can affect the
shading a little. It materials can look a little different if we have
bad face orientation. Ex I extrude this
a little too much.
15. Creating more details: This part in front look
a little too flat. Even we don't have
this extrusion on this part, let's create this. So select this pace, maybe I and maybe
just a little E Y. And we don't have
any bevels here. So you can manually
select everything, but all these edges, but I will just press L.
I don't care too much about extra vertices we will get on this
part we don't want. Let's just start.
And it will look more realistic now because we actually get some
highlights on this area. And let's add one bevel here, so we need bevel on this edge. So you actually one bevel
on all these edges. Control B, smooth this. Now, it looks little
different in render preview. So click here and with Control, select hold this line between. And now Control B. And don't forget that we use
this lock to three cursor, so you can always go
with three D cursor, shift try click and it will
be easier to navigate. Let's create this
small detail here. Shift click here,
shift plane Irwine 90. Mood this all down. S Y. Let's tick this here
and what I will do now, I will go with tab to edit mode. Let's scale this even more. Tap to edit mode,
control R here. Now I will go to vertex select. I will go to R for a mode, vertex select and maybe
SZ scale D like this, maybe move this little more out. Control R here, SZ
scale about here. Control B, maybe to
smooth this a little. Okay, this is actually shape. We want EX we can now
maybe select this I. Okay, we want apply
scale maybe here. So I Ex maybe we can
select this edge here. But with two, I will
go to edge selection and hold here, hold here. I will also select this
one hold Shift, old here. Okay. Control B,
smooth this a little. I think maybe we have hole here. We can also create
this very quickly with Look tool with
shift select this one. Now I hold Control, Shift. So click to this one. Shift click Select this one. I, maybe subdiv subdivide once, right click circle and
right click bridge. Okay, I didn't get
what I expect. But I will not care too much. I think these faces was
not in the same position. But this also creates
some details, so I will not care too much. I will maybe bevel. Okay, let's try with F
three. Merge by distance. No this don't help. Let's manually select
withholding control. And I work all time
in render preview, and you can see that
this is pretty fast. So we can now just bevel this. Okay, too much for this detail, which is not so visible. Now, select all this Control J, and now we have the
same problem we create. Nothing here. And let's now just
assign this material. Let's go with project from you. So I want now rotate this So Air X to place
the same position. No, I want maybe get similar camera
angle project from you and project to this part. Okay. Now, let's scale
this on x mod here. Hello, it is another
day here and let's see what we can do today. So I think we can
make this part here, and we can do this pretty easy. I will go to edit mode. Maybe we can grab. Let's see, I will grab only
this edge here, Shiv DZ. Let's move this about here
and SY scale this on Y axis. And now I will go with EZ. Let's now, I didn't hold Z. So now I will press
E and hold Z. Let's now go with EX
extrude this about here. This part here is not visible. And now again, let's see. We can just select this
part, assign this material. And let's go with project from you. I will
scale this down. And with A, we can now select this and we can
reproject this here. Now I will select
only this part. Okay, now we have this
part we want to avoid, so you can just go with Control R. You
can select this phase. G, place project
this on this area. And let's see, maybe
this part here. Control R. Okay. And let's now go with L to
select this loose part. As Z, maybe now
just move down and all T extrude along normals
to add some thickness. And so this is perfect now, and let's maybe add
some perfection. So if I add one cut, maybe I will go with G
twice to slide this. Now, maybe just move this
little down, Control B. Okay. And if you want, you
can add small bevel here. Control B. Okay, now we
have one more detail here.
16. Reflector and electrical box: Next is this one detail here, and let's now create this. So we have one box. You can note here, one box, and let's
quickly create this. I just cube. Z, bring this up. And let's now I see
this seam here so we can quickly control R
Control B to add bevel, all T extrude along normals. Let's now select everything. Control B to smooth, all this. And now Control J
to join all this. We again get this material, empty material and now I
will assign this main. Let's go with U
project from you. Hey. Okay, let's
now grab this part. Maybe project this here. Okay, so this is very low, polydtil but from distance,
it will look good. Let's now create this
small reflector, and we will again
start with cube. So cube scale this down. SX, SY. Let's move this about here. And now, what I will do here, I will maybe control
R R map card here. Maybe we can. I
don't see behind, but let's maybe create
something like this. And now I can go with I here. EX scale this all down, move this maybe up. And maybe some
random details here. Control R to add cut scale
on X on Y. Y and EZ. Okay, now I press L to
select, smooth this a little. Let's now just make
this in position. Z, maybe R Y. Again, control
select both of this. Select first this one and
then this one, control J. Now we again get
this wild material, et's now press L assign. Let's now project
this from U project from you and project this here. Okay, this will from
distance also look good. And we have some cable which are connected from this
object to this one here. So let's see how we can do this. I will go to okay. Let's see. I didn't do this last time with draft
tool, but let's see, can I Now, I will place origin here and let's go
with curve busier. And let's see if I go to edit mode then
delete this curve. Now we are still in
curve properties, but we get this draft tool here. Let's see if I just try
and draw this to here. Okay. But I don't see
perspective in three D space, so we can now maybe
just select this. Maybe this move tool and let's
now maybe stick this here. Okay, let's try follow our
reference image so you can press to scale to rotate. We can even add one
more point here. So if we select this and if we select this
one and this one, we can subdivide this and let's now move this
to about here. Okay And now we can do
what we do all time. We can just go under
curve properties, bevel and add some depth here. With holding shift, we can move this slightly, maybe 0.004. And I don't want too
much resolution here. I will say this too, and I will bring also this down, and let's now convert this to mesh control J with
all these subjects. Remove this material,
and let's see, we can assign this
material here and we can maybe just project
on some white parts, maybe just on this sky, which is pretty white and let's see looks little too clean. So maybe we can project
on this area here. Okay. I'm not sure
in which point, but I close this UV
projection here, and I will quickly
just fix this. I think I have selected when I model this, but I'm not sure.
17. Cables and texture enhancement: And we have also
down these cables. So we can do same
what we do now. So if I now go with shift right
cl here and curve busier, we can play with this
curve in edit mode, but we can also go to
edit mode, per se, delete everything and we
can maybe drove here. Okay, I pick wrong tool. So here is drop tool. Let's see, what if
I drove this here. Let's see if I now
convert these two, if I now add depth here. Okay, so this is in
A, or this is in A. So let's see what if I pick this and let's maybe
smooth few of this. Et's see how this will
look if I add that here. Okay, let's convert these
two mesh and Control J. Again, add another
material here and this main material
with we can select all these loose parts and
assign this material. Let's go with project from you. Let's see what if I
project on this area. This rusty area
down is maybe okay. And we just get
some more details. We can make these
more connections here to look everything
is connected. And let's see if I go
with just plain X 90. Now I can maybe just
like this edge here, move this about here. I don't know, just
something like this. And let's see if I
maybe move this here. Let's maybe duplicate this
one more time. Shape the X. Let's now again, join this with this object and let's see
how this look from distance. This will not be so visible, but we have some details here. I think in this point, we
are done with modeling. So we can look this reference
image and find more detail. But I think we go through all these techniques
I use for modeling, and all this will be
just repetitive task. So if I continue modeling, it will be just repeating
same techniques. And my recommendation is also
to model something inside. And let's do weekly this. So let's see what we have here. If you just put some cubes inside and add some
random details, it will look better
because we will see something inside. So let's see. How this look. I S
Z, let's go with EY. Again, maybe bring this here. I'm not sure what is this, but we can just make
some random details, smooth this again, Control J. Let's again remove this material
and add this first one. And now we can with s like this. Let's see if I go with
you project from you, we can project this anywhere, but let's try project on
this small part here. Okay. And now we can
just move this inside. I will duplicate
this one more time, maybe shift di, maybe
place one here. And let's see in random preview this should be visible
through glass. So you can see that we
have something inside. Okay, so modeling part,
I think it is done. This is what we have for now, and I think we now need
improve textures a little. Let's see what we
have with texture. So basically, we just in this main color in
this main texture, we just have color input. Let's see what we can do. I mentioned that we have
this concrete texture, so let's pour this here. And for this, we
need another UV map. So we created this before, but I'm not sure
where we use this. Okay, we use this in
this glass material. Let's now use this also here. So UV map. Let's plug this here and
let's take this first UV map, Shiv D. Let's now select this concrete UV
map, plug this here. And this area looks good, but this one not
so what we can do. We can just be sure to select this concrete UMP with
A, select Q projection. Okay, let's just check scale. This should look okay. And let's now go with color what we can do we can add small variation of
this in color input. So if I make more contrast and with shift try clique
we can just multiply this. So now we have this input and second one,
which is concrete. But if we said this to multiply, we will take only dark parts
from this texture here. Let's see. This is too intense, but if we maybe keep
I don't know 0.3, small value of
this texture down. Let's now go again with color we can use
this for roughness. So if I plug this to roughness, we basically have rough or less rough parts
based on this texture. So if I now tweak
this, let's see. So these dark parts
will be shiny and these white parts
will be more rough. Okay, this is not so visible in these
lighting conditions, but I don't want to
strong contrast here. I will bring this about here. Let's Okay, this
should look good. And let's now see what
we can do for bump. I think we can also
plug this to bump. Let's plug this to height
and this to normal. This should be more visible. So you can see all
these details. Actually, for bump,
I want to use this mix of these two textures. So here we have this
main color input and combined with this. And if we now with colorm maybe we can use this
texture for bump. So bump, plug this to height, and this to normal. Let's preview this. Okay, so you can see all these
details and let's see. This is before and
this is after. You can also note here. So we can clearly see this
low resolution texture. And one thing I will do here, I will maybe make this
concrete texture more intense. Let's just make
another variation. So this is color, and this is concrete. Let's see. If I now preview this, if I now go through color here, let's now preview this so we add now more of
this concrete texture, which is high
resolution texture. Let's see if I said
these two pick. Okay, I actually want mix
because let's back to multiply. With multiply, we always take. We cannot fade these dark parts. You can see that just become more dark
when we slide this. But with mix, we can actually
choose how much we want. We can fade this effect here. And I think this
is better bumper. Okay, something
like this. And this is too intense.
You can see here. Let's now bring this 0.1. Let's bring this slider. Just be sure to keep
this very subtle. You don't want very
strong effect here. Okay, and one thing
we can also do, we can make this more
metallic. And I'm not sure. When you use this metallic, you want to make this
metal or not metal. But because these parts, we have paint over this part, we have this rusty part here. I think this also help sense if, for example, use
this color input. So we can go with color ramp. If I now plug this here
and these two metallic, we will basically
get some variation. I will look more. Some parts
will look more metallic and another part will look
less metallic. Let's see. So white part will be metallic, white is value of one, black is value of zero. So what actually you want? If you want to make
this more metallic, you want slide
this more to left. Let's see what if I cut
this before, this is after. Okay. This is not perfect, but I think it will
add more details.
18. Dust shader: Let's see if I now
add my dust shader, I will also share with you how
I create this dust shader. I save this in my
startup vendor file, and if I just now
search for dust, I have two dust shader. This one is when I first create this and this one is
when I record tutorial. Let's see what this does. Is this take a few seconds, but now we have
this dust shader, and this dust shader I create last time is a
little too intense. So you can just add
small volume of dust. And you can know that we
don't have dust here, and reason is very simple. This is another material. So we need to apply this
to another material. Okay, let's see
difference between this I created last time and
this I create first time. It should be the same but
with different values. So let's see how this look. And let's see this one. Okay, this color is maybe
too bright and saturated, so maybe I will use this one. Just to add some small
value of dust here. Okay. And what we can do, we can now just go to
main yellow material. And I think I will select
this one and let's, we should copy everything
also to this main yellow. So let's see, we have here bump. So let's just paste. Let's go with Okay, I think I need to
go with try click and cop now go to
yellow paste this here. Okay, I think it
will be easier if I copy everything here. I will just press
A, copy everything. So this should be say material, this yellow, but just
with yellow color. I will now paste this here. And it is easier to just
copy these two nodes down Shiv D and paste this here. Okay, we should stick
this here. And this here. Okay, now we
basically have same, but just with this
yellowish color. And we basically copy this roughness bump and
metallic information, but just with this
yellowish color. And let's see this is mail
more dark, what we have here. So here is actually
all important thing, this saturation and value. So I will just do same. A, to select tall,
copy, mail more dark. Okay? Delete everything paste. And now I will just go
with hue saturation. Let's bring this value
and saturation down. And you can see that
this metal part, I think this look pretty good. So it actually
looked like metal, and this should be metal. And let's now just play
now with this dust. You can see how we
add this dust here. We can maybe combine
both of these. But actually, this
is almost same. I just see that I create some
little difference in color. Okay, so let's see with glass, I think with glass is
a little different. If I maybe add dust here. Let's see how this
affect this glass. I think we add all the
brownish color also. Maybe we can also plug here. Okay. And if you didn't
watch my Last tutorial, you can clearly see here
what this Shad does. So I will open here. Shader editor. Actually, we have four factors to add dust. First of all, Zoxiso, the d shader appear more on
these top faces than down. We have this ambient occlusion. So this ambient occlusion
actually isolate these parts, these holes, gaps, creases and parts which intersect
with each other. For example, if we
intersect this here, you can see that we
get more dust on this area of intersection. So this is the second factor and third factor
is camera facing. For example, when you
look at dust from top, you cannot see too much dust
because of camera angle. But if you move this
down like this, we can see more dust. So this depends on
camera angle also. And this randomness,
you can maybe see this little
noise texture here. Maybe we can increase
this to see even better. We actually just create some randomness with
this noise texture. You can see this here. And when I create this, I
save this as node group, and I save this in my
vendor startup file, and I can always add this in
any material very quickly. But I record whole process
how I create this, and I also record process how to save this in
your startup file. So I will share this
with this tutorial ho. And let's now back to
to our container house. So actually, I
think we are done, and I will not do
anything more here. And we can now maybe skip
to another tutorial, which is recreating
this artwork here. But I'm not sure if
I will record step by step because it
will take some time, but this will be in
depth breakdown. So we can go through
all these steps, and I will show you how
I do this last time.
19. Start creating a scene: Last part of tutorial, we model and texture this house, and now I will show you
how I made this render. In this render, I use
this small house. You can see here, and this
will not be step by step, completely step
by step tutorial, but I will try to show
you as much as possible. And this is my blender file. You can see how
final render looks. It looks a little different, but I will show you how we can improve this
lettering compositor. Okay, so let's start
with new blender file. Okay, I will work
here, which is 4.3, but nothing different
in 4.4 we will use. So first thing I do here, I start with this
city background, and this is from my editing
building a setback. Let's first start with camera. I start with I think with this aspect ratio,
1501 thousand 800. So this is aspect ratio
more for mobile phones. And I will now press
and I want to line up this on Xx is by 90
degrees and here, zero. And with numpet seven, I
like play this here on YXs now I will delete
both of these, and let's press to
close this tab. Actually, I will place this
camera 20 meters on the axis because if you look
my final result, you can see that we
are pretty high. We get this drawn
looking footage, so you can see that this
camera is pretty high in a last time I go with
value of about 20 meters. Okay, so now our camera is here. We can move this maybe a little back and we can now make ground. And we need a big round
here, something like this. So it is about 200 meters, but it is not so important,
let's apply scale. And let's now see which
camera settings I use. So perspective, 36
millimeter focal length, and I will now go
with same value. And I also add some
deptan field here. I put little focus here, but we will do this later. Let's now go with first, I will split this window, and let's go with N to
remove this step here, number zero to switch
to camera view. And what we can do here, we can move this to make everything black
except this camera view. Okay. And let's now
set this to 36. Let's now switch to cycles. And for lighting, I
just make this black, maybe not completely black, but maybe just a little
bluish tint and almost black. Okay. Now we can place some assets from my
editing building asset back. First, let's close this
timeline because we don't need this and also here. And now I will open
my asset browser, horizontal split to remove this let's open
asset browser here, and I have here, building asset. And of course, you can use
any assets similar like this. And if you follow my work, you know that I also include
here low pol cities. And what is this? I will now bring this here. This is actually
one neighborhood I download from Google Maps, and I also add
some texture here, so we have these lights. And I think if I go to, I will try Open maybe
here, shade the Editor. So we have this day
and night shader. Let's see if I select
some of these buildings. We have this day
and night shader so we can add more light here. Okay. I'm not sure if I
which follow preferences. I use here, maybe Link. So this may not work with Link, but let's append this. So if I now bring this here. Okay, here is my camera. We now work with
big scale objects, so it is a little hard to find. My camera camera is here. Let's see. So we want to
maybe place this city here. And I will line up this
with my world axis. So RZ, let's line
up this a little. Okay, I just want show
you before that we can add more like turn on or
turn off these slides here. You can see how this affect if you want
to add more lights. Okay, so for background, this is assets for background. So we actually cannot
see more details here. You can see these few buildings are more detailed buildings. These are the low poly
city, but for background, which is not so visible, maybe you can see some lights here. I don't want to use
more quality assets, so I just want in some cases, you just want these
low poly assets. Let's maybe place this one here. So I don't like this one. Let's make this
bigger city block. Okay, so I will now go with RZ. Let's line up this and
let's see how this look. Okay, I see problem. So we have this
clipping problem. You can see that we cannot see these buildings in
background, but they are here. And we have also the same
problem in Viewport. So just press N view
and just at here 10. Okay, so you can see before we have this clipping problem, and if you now add 10,
we fix this problem. You can add even one more
if you think you need. And let's now do same. So this is viewport, but this here is render. So we are in render preview. We need to do same here. Okay, one, zero, maybe one more. Okay, now we can see
how I move now camera. Let's move. Sit here. Okay, this will be
good for background. I think we can also
now maybe place this city block
here in foreground. You can see some
buildings in foreground. Okay, so you can see with just
two assets, very low poly. So if I go to edit mode, this is very low poly assets, we get half of our C. Okay, now I think I will just
in for this as link. And I also talk
about this method. You can find one video
on my YouTube channel. Video here, difference between append link and
append reuse data. So if you want,
you can just watch this eight minute
video to understand. But in this case,
and here is video about building asset pack. So if you didn't
watch I recommend watch these two
videos. And let's now. And also here, I use a
lot of this editing, building asset Pack, and you
can also watch this video.
20. Lighting: Okay, let's now import
more high quality assets, not completely for
close up shots, but much quality
than the use here. Okay, now we can maybe just randomly import some of these. Let's see how this look.
Okay, this one can fit here. Okay, this is not so important. We actually see just
some of these slides. And we also have some
of these details, these small agreeable
stairs and similar. Let's see. Okay, we have
these details here. You can see if you go to
Edit mode, how this looks. Okay, I cannot go to edit mode here because I just
link this object. But we have a much more
detail than before. We have all these bevels, these windows, glass materials, and we have also this inside these
lights or rooms inside. And we also have all these
grounds, shops and similar. Let's now back to andar preview. Now I will save this.
I forget save this. Let's just place this on desk
Let's see what I do next. Let's now talk about lighting. For lighting, I use
volumetric cube, and I also add some lighting down on streets and let's
see how I do this. So this will be actually
final result from blender. You can see that
this is not good, but later I will show
you how to improve this. So we have this
greenish volumetric here and you can see
some lights here. On these buildings
and also down. Maybe this is here
is not so visible, but we have here some lights which actually come from street lights or
cars and something. And what I do last time, I just made this plane, which is about 150 meters, and I just plug this texture, which I found on Google, and this is how this look. I search for
something street from A at night or something similar. It is not so important. I just want some random lights. And what I do, if I
go to render preview, I just plug these two. So this is plug by
default in base color, and I plug these two emission, color, and now I can control
strength with this slider. And let's see how this effect. This is for now very subtle, but if I set this to zero, you will see some effect here. So this is zero, and let's no set this maybe
to 100. This is too intense. You can see that
we get light from streets which these
buildings here. I will now just copy this. So you understand how to
make this very simple. Let's see if we place this here. I will here disable
this overlay. I see this overlays. Okay, let's see. GZ. Let's move this
little up to avoid this intersection and let's
find out place this here. You can see some street lights. All the X maybe duplicate
this a few times all the Y. Let's see if I duplicate
this D Y and maybe rotate this Zt color these
streets which I see here. Okay, maybe something like this. And now, if I go to
shade the editor, if I click here to emission, let's see if I said this to 50. Okay, I'm whole time in
EV, which is not good, so let's switch these
two cycles and GPU. Let's now maybe bring
this to 50 these samples. We want to speed up this a lot. Okay, so this is zero. This is two. We get some right here and this
is I don't know, maybe 20. And this is with this noise. Okay, so you can clearly see difference between
before and after. So this is one thing I use for lighting and the next
one is volumetric cube. And in this case, I will just copy this one I used last time
and we can see what I do. So this is just
cube which cover C. And let's now go to copy object. And let's paste this here. So we just cover the whole scene with
this volumetric cube. And let's see. And you can also maybe
create this effect if you just cover half
of this scene. So this look also nice. Okay, I will keep this
light this fade effect up. And let's see, first, you
will create solid cube. So you need set this as bound. So by default is solid. It will look like this, but you want to see
this in viewport. Let's a this to bounds. And let's see what we have here. So I create new material and I create this principle volume which go to volume not to surface and I change this color. So again, copy this. If we now play with
this, you can see how this affect our scene. We basically change
tint with this. Let's make this greenish color. Okay, so density is 0.008. I think we can
increase this strophy. It will make little glow effect
around these lights here. Not so visible, but
this effect is here. And one thing which
is important here. So if you set this to zero, you will basically not see
this effect because it is pretty dark and you
don't have enough light. So you need to increase
this emission strength. And if I go with a very
big value like this, you will see how this effect. But last time I go with 0.004. Okay. You can increase
this a little. But this is value
I used last time. So 0.0 004. Okay. And now, this emission also affect a lot, so you can see
effect we get this.
21. Importing Industrial decoration assets: Now play with Industrial
decoration Asset Peck. So we build one assets here with the same
modeling techniques, I also build a lot of this. And I share also
this peck and I also made tutorial how I made more
of this, not just this one. Okay. So you can see how this look I made 127
of these assets, but you can see how this look
and here is home container. But I also have a lot of similar structures in this
industrial decoration. So we have a lot of pipes here. Cables, all these wires, and a lot of these things we can use in scene like this one. And hold this part
here in foreground just for industrial decoration,
actually not whole. So these neon signs are from
my neon sign asset pack. So we have one,
two, three, four. And we have two shops from
my shops, asset Peck. So this one is here, and I think another one is
here. I think just these two. So, I also have this uh shops. Okay, I'm not sure why I also
get the neon signs here. I mess this my Asset browser. I need to do this from start. So because I moved
to another computer, I mess all these folders, but this is not
important for now. So let's now back to our scene, and let's build let's place this industrial decoration
here in foreground. First, I will hide
this from Port. If you cannot find this here, now it's easy, but if you have a lot of
these things here, you can just press can
just press full stop on Numpad and vendor will
navigate to this object. Now I will just hide
this from viewport. This is not what I want. I now cannot see
this in viewport. One thing we can do here maybe just disable
this from selection. So now this is here, but
we cannot touch this. Okay, not so important. Let's now build some
maybe platform. We want to put
these objects here. I do this last time just to make my navigation
easier inside blender. So you can see this plane. Let's see where I put this. Okay. Let's now open this blender file and I will just maybe go
with mesh plane. Let's now go to
shade the editor. Let's call this Blue. Okay. Now I will
go to POL display, and I will just make this
bluish ep display color. Let's see what I do last time. I place this here. Okay, I have all these assets
which intersect now. This is not so important. We can maybe move
this to about here. And what I done last time, I just go to my asset browser. Let's go to Industrial
Decoration and let's now start building this down. I have this bigger structure, so I want to use this now. Let's start with this one. This structure is
pretty complex. Okay. For this, I will not use Link. Let's now append
reuse data here. So we can append this in
our scene. We can use Link. Let's see. If we use Link, you cannot move this for now. But if we now go with because this object read everything from this original Blender file, which is if you enable
this edit link library, which is this Blender file. So to be able to move this, we need to move this here, and then we need back
to our original scene. But we can also use
library override. So if I go with RClick
Library override make selected content. Now I actually can
scale this so you can see this blue values
are actually overrides. So we can maybe we can now
move this rotate scale. And this have a
lot of advantages. We don't store this
object inside our scene. So this object can be
very heavy and big, and this is actually stored in this blender file
we can find here. Let's move this. So this is actually stored in
this blender file, and we keep our blender light. But let's now back to layer. So this is advantage of
use this important method. But I don't care too much. I have a pretty okay computer. I can handle all the memory. I go back this to a and
reuse data in this case, and a lot of these
are just slow polyts. Let's see how I place
this last time. To about here. Okay, now, all this process is just placing assets in
scene. Let's see. So I need all these
structures here, actually, so I will maybe
place this one here. Okay, I think I didn't apply rotation in original
bender file, but I will not care
too much for this now. Let's maybe place
this structure here. I want these ts. Let's see where I didn't
use this last time. We have these tires here. Let's place this here. Here's the 90. Okay, we get similar results
like last time, maybe alter DX duplicate this. And now I think we have
space for our container. So it should be somewhere here. So let's now grab our container. Let's place this here and let's now maybe scale this a little. Make this bigger, and let's
place this maybe here. So I made this look like
coffee bar or something. So I add also the
neon signs here. We have people sitting
here and this guy inside, we can do also this now. So I will make this even bigger. Let's place one, maybe here. And we can use this
log to pred cursor. So if I click here, I can now just place origin here and
it's shift right click. But we talked about this before. And now, where I place origin, lender will navigate to this
area with your scroll mouse. So shift right click because
we work in this area here, we want origin here. Okay. Now I will go with old DX, duplicate this one more
time to make this bigger. Now I will add some light inside because we cannot
see anything here. Shift A, let's go with
light point lamp. Okay, I will maybe choose
some orange tint here. If you want, you can click here, use notes and black body. So we get this kelvin
temperature here. Let's plug this here. And now this blender ignore this so we can make
this to white. Let's see where is
our point lamp. It is here, you can see this
color temperature here. Let's sell this maybe 100. I want to place
this inside this. So I will go maybe
with about 300 and it's still it is still
a little orange, but not too much, maybe 250. So when we go up, we actually
go closer to bluish tint. So if we go with maybe 7,000, we get this bluish tint. But when we go down, we get
this orange tint, maybe 2000. Okay. And we can maybe
increase this even more. We actually want to put
focus in this area. This is too intense, so maybe 3,000 and
maybe here, 100. Maybe she DX place
another one here, but maybe with lower
value, maybe just 30. What I also do last time, I also place a few of these
area lamps in this area. Now this is almost
completely black, but you can also see
some lights here. Okay, this is from one
store or shop here. I think here we
have one area lamp. We can do this easy. If you just go with shift
right here, shift A, and maybe small area lamp here. You can see this
effect maybe 40 Si, maybe we can place one here. Okay, you can clearly
see this effect, and let's maybe just scale this.
22. Neon signs: But what I do last time, I will quickly go to
my shops Asset Tech. Okay, here we have
this Apotech shop, which I can now just
bring this in our scene. And let's place this here, maybe scale this down. And I do same last time
so you can see this. We also get this
nice neon sign here. We can maybe import
this one on top. Let's try set origin to geometry and maybe scale this down. This light is too
intense, maybe just ten. Okay, let's now continue maybe add some more this
industrial decoration. We have all these
small lights here. We can maybe place
this one here. If you want, you can maybe reuse this for
fence or something. So if you maybe plug this here, this can create this
fence look or X. Okay, we can see something
here if you want. I think I have whole
structure here. Okay, this structure here. So this is just part
of this object, but I separate this and save. In Act browser, we can
maybe now reuse this here to make more
space for our guest. So this will be like race
for this coffee bar. And if I go with all the X, we can get this
fence look effect or the Y L Z t or the Y. Okay. And let's add
even more details here. We can also play these
antennas or satellites. Maybe here, this will
hit more detail. So we can see this antenna, maybe this satellite here. You can see all
these details here. And I also place make
this subway here, which don't have too much sense, but I think I use this
structure for this. We have this glass shader here. I also want to put
maybe some point lamp inside to see some details. You can see this light here. I think we get this
orange tint because this structure here is orange. Yes, we have this orange inside. So this is reason why we
get this orange tint here. But if we maybe add
some bluish tint here, maybe we can get
opposite effect. Okay, I don't want too much
focus here, maybe just 20. All this is not so important, but one thing is important, this neon signs because
the add a lot to the seed. So we have this one,
two, three, four. We already this
with these shops. Let's now create this effect. So I will go to neon signs. And let's see. I
want this coffee. Okay, here we have this coffee. Let's place this here, scale this a because we
use this append use data, we can change also. Value here. So
this is intensity. If you say this to 100, it will be even bright. But I'm not sure if I
play with this last time. Let's just place this here. And let's see what next. I also have another reddish, which is barber shop. I also like this one. Let's see. Where is this. Okay, here
we have this barber shop, and maybe we can
stick this here. Irvine 90 and now x night. Let's isolate only this to see which direction is opposite. So RZ, 180. RZ, 180. Okay. Now I need We hundred 80. Okay, I made little
mess with this, but let's see how I want this scale to make this bigger and this actually looks good. And I also have this
subway. Let's see. If I go search with Subway, we can find this here. And I place this one
here X minus nine. Now, this is correct. Okay, and let's now
add a few more. We can also add this burger
here where is our coffee bar. Maybe just scale this x -90. Actually, you can just
stick on this place here and you will get it will line up with
pace you place. Let's maybe place this here
and we have correct rotation. You don't need mess
with these shortcuts. I think this is enough. So you can spend whole day
just playing with this, but it will I don't want to take your time doing repetitive
23. Rendering: Now for rendering,
let's see what I use. So for sure, we need underlying path go here and
we need this miss pass. But this you need tell blender from where you want
this missed pass by default. And you can set this here
by default is five to 25. But because we have
a big scale scene. Actually, in this first 20
meter, nothing happened. So maybe here is 20 meter, and we have our city
which go or to here, which is maybe about 120 meter. You can just place cube. And scale this cube. Let's see. Actually, here is 120 meter, but you can see that we cannot see anything
behind this building. That's the reason why I
use these values here. Let's back to our thing
to show you what I mean. So if we now enable
if we go here. Actually, I think Evan
go to material preview. Now, this can take some time
to load all this texture. And now, if I go
here under combined, send this to miss. We can actually preview
this miss pass, and you can see, by
default, let's see, first time maybe
enlabel this or no, if I now go to World
Properties Miss Pass, you can see that we
actually get this range. If I now play with this
value, we get this range, and we want to start maybe from 20 because
nothing happened. Nothing happened in this area, and now we need more range
to get all these buildings. Here. But I don't want too much, for example, if I said
this to maybe 1,000, I will get all this range, but later in compositor, it will be hard with color ramp twig between
these two values. So that's the reason why I last time go with
this value here. Maybe I can increase this to 200 to get these buildings
in background also. With 400, we can see all
these buildings here. But I will try
stick to maybe 200. Okay, I do compositor or post processing
in after effects, and you can see
before and after. And I will show you
later what I do here. But I think most important
thing is this fog here, and we will do this in
blender. Let's see. So we have all these fog layers. This is when I disable this
actually this source of fog. This is actually what
I get from blender. And because this part
with fog is so important, I will show you how you
can do this in blender because some of you do
everything inside blender. I do this in after effects, but I will also show
you all these layers. If, for example, use
DaVinci resolve, you will see that all
this is very simple. So now we want to
go to compositor. But before we go to compositor, I will just make
this to combine. We can just go to
solid preview for now. Let's save this
and let's see from these passes we want miss pass, and last time I use maybe glossy direction
and ambient occlusion, but we will see this later. For now, we just
need this miss pass, and let's now
increase this render here maybe 300 to
get more details. For final render, I
will go to maybe 1,000, but this will be okay for now. Okay. I will now save
this and render image. After rendering is done, let's now go to
compositing tell. And let's see, first, I will close this timeline down and I will press
N to close this. And now we can click to use node and with
activated Backdrop, we can preview this here. But let's see if I
want to do this. So you can preview this
Control Shift and click here, this node with V and V. You
can zoom in or Zoom out. But I think I don't want
maybe this newer node. So I will do this I will
deactivate this backdrop. Actually, I want this VR node, but I want to maybe
split this window here and open here image
editor and UR node. Now, we have clean
workspace here, so I don't want this mess here, we can preview what
we do here on left. Most important thing
in this composition is to separate the foreground
with background. So you want high contrast. In this case, we
want foreground, black and bright background. And we can do this
with mixed node. Let's see what we can do here. We can go with mixed color. Mixed color and okay, this composite node,
our render results. So this is what we get if
we search here for render. Result. But we will plug this later when
we finish everything. So we now look viewer node. And what we can do here, we can plug this in first input and second
input is this white color. So this is before and after. And for factor, we can
use our missed node. So I will go with color M. And if I now plug this here with
Control Shift and click here, we can preview this. Now we can basically
choose range here. And to preview this, we can actually plug
this two factor, click Shift click Control Shift and right click to
back this node, and we can actually
see what we get. So because we want
this greenish tone, we can maybe choose this
greenish tint here. And now, this is
actually with this, we can control opacity
of this layer. So you can see that we now
bright this background, and we can basically
choose range here. This is a very
simple thing you can do to separate the gground. But what I do last time, I will keep this effect, but maybe very subtle. So if I go completely to black, we don't have any effect here. But when we add
some whitish color, we actually put this
second input here. Okay, last thing, what I do, I use Deptan field to
brow this background. We can do this now, so you just need
the select camera and let's now add
dept field here. And let's put in focus
maybe this object here. And let's can preview this
even in solid preview. So if I click here, I can
enable this deptan field. So you can now see this
effect directly here. Okay, this is too intense, maybe value of one. And you just need
to re render this, but I will show you how we
can do this in compositor. Let's see. If I go with
another mix, color, this will be first input, and this will be
even second input. And now, if for second input, I will just use Burt
version of this. So I will go with Blue and if I said maybe this to 300,
let's see what we get. Now, this background, whole
image is actually blur, so we have this slide there. But we can again use
factor for this. We can duplicate
this and we can use mist and let's plot this
here. Let's see what we get. If we now add this is
actually transparency. So with this value, we actually control
transparency. So this is this brow effect, and this is with this
very intense effect. We can actually put
some in foreground. So if we go to here, we actually add some
br effect here. But let's add a
little blow effect in foreground and a lot
of this in background. Okay, and if you now select
everything and press, this is before and
this is after.
24. Post-processing: Actually most important
thing I do here, you can see in after effects. I made this with folk overlays, and I will share this link to
download all these assets, the folk overlays here. So this is from one YouTube
you can search his name, and you will for free download all these four K or five images. Let's now report this
inside the compositor. Okay, in this blender file. And now I have this image here. Let's see what we can do. If I now go with Shift track, we can preview this image here. You can see this image is big and we need scale
this to render size. So if I go with scale, I can set this to render size. Now, we stretch this image, but we won't fit this. And let's see what
we can do here. So this is our last node, and we can again go
with mixed color. This will be first input. This will be second input. Let's control shift or just plug this here.
Let's preview this. Now we can choose what we
have before and after. One thing we want to do here, we remove this black color here. So we need set this to
screen blending mode. So this is now just over, we keep this fog but
not this black color, we remove this with screen. And let's see what
we want to do here. Maybe scale this even more. With this, you can
place this imposition. So this is actually X axis. This is Z axis. You can type here maybe 0.05, or you can play with
this virus here. I think I want to also
scale this again. So you can just
duplicate this shift D, scale this, but now relative. So now we have this slider, wescroll mouse down, select both of this and
with holding shift, we can move this slightly. Maybe two. Okay. And let's
see what we want to do. Now, we want, again,
this miss to control. Let's set this to factor. We control depth of this
scene with this miss pass. Let's place this
behind this structure, but in front of
this building here. And how sensitive is this mis pass also depends
on these values here. If you have a problem
with this slider, you can also change these
values maybe here to 150 and you will get
more control. Okay. I like this effect, but let's maybe move this down. And let's see what
I also want to do. Maybe blur a little This image texture is pretty
sharp, maybe. Let's see. Okay, this word. Let's
maybe just five, a little this, and maybe
this scale is big. And one thing I also want to do I want color this
to greenish tint, maybe with color ramp. Let's see if I said this
white color to greenish, yes, I get this I want this ish, yellowish and greenish
tint, something like this. And now we can with
this also with this, we also control opacity. So if we go more to black,
we fade this effect. If we go over to white, this is pretty intense. Okay. But what I do last time I made here in after effects, one, two, three, four, five, six of the overlays. In after effects,
this is pretty easy. You can just move this with
T. Okay opacity is 100, but I also control opacity
with this miss passes here. So you can see here if I slide this, let's preview everything. So with this slide there I
basically control opacity. Actually, same with color
ramp here in Blender. Like this slider with color m. In after effects I
just use layers. We don't have color ramp,
but we have layers. Okay. So what I do, I basically made few
of these layers. So what we can do,
we can go Shift D. Let's again go
with mixed color, this will be first input. Let's see, this will
be second input. And now we can we need to
set this again to screen. And now we can
change this texture. So maybe this one. Let's see how this look
like we the effect, let's see where I want to
place this maybe here. And let's now. We can also play with
opacity with this slide. But let's see. We need again again want to use this miss pass as factor here to place this
in background. Or we want separate this
because we don't want to affect both of these with
just one color m. So let's just
what we can do here, we can go with shift right
click to make this re route. So we can maybe place this here. We don't want every
time, take this. We can just take this and we
can now use this as factor. Okay, now we control only
this miss pass with this. So what you can also do, you can select all
this Control J, make this one group, and
you can maybe call this let's call this miss folk two. Folk two, this is Control J. This is folk one. Folk one. Now, it is a little
more organized. Let's play this here. And let's now we can
also go with Control J. This is like folk
two factor f two. Okay, you understand point. This is composite node.
We don't need this. Now this is plugged here and we can withFolk two factor
control, this folk two here. Let's see, maybe we want to make look that this
is more in distance, so we want faith this effect. Okay, you can see that
we fade this effect. And we want maybe, let's see, put this
more in distance. Okay, now this is more
subtle and more in distance. And let's see this scale with
this we control position. Let's make this more bigger
and maybe more in A. Let's bring this little down. Maybe 0.2. Let's make
this bigger. Maybe two. And maybe on X axis,
bring this here. Okay, I want to make this
smaller, not bigger. Maybe 1.5. And now I will fade this a lot
with this color m here. This is saying what I
do in after effects, but I just use six
of these overlays. I see that here, I make this mask. So
let's see what I do. If I delete this mask, I maybe get too much effect in this area where
its restaurants. So what I do, maybe I just make this mask and delete
to remove this area. And now I think I invert this
to keep this area clean. But we will go through
this after effects file. Later, let's see what I
want to do in blender more. So I didn't do last
time this in blender, but let's see what we can
do here to improve this. So let's make more space, maybe some globe effect.
25. Post-processing part 2: Let's maybe scale all the down and maybe
glow or glare effect. Okay, we have these
tricks which look nice, but not too much. Let's pay this a lot. And sometimes you don't have too much control with these
sliders, what you can do. You can just go
with mixed color. Again, this will be second input and first input will be what
we have before this glare. Now we have more control
with this slider here. So these streaks, you can see
that this is very intense. This is before, so very intense. Now we can move this to about here to keep
this very Saka. But I want duplicate this
shift D, place this here, and I want maybe more like bloom effect or
ghost, not ghost. I don't like this.
If you like this, you can also this let's
see Bloom fo glow. Let's see difference
between foglow and bloom. You can make multiple
layers of this. I like this foglow more. So we can again Shift
D. This is first input. This will be second input, and this will be first input. Now we can again choose how
much you want this fact. Okay, let's now see before and if I select all this and press to
mute all these nodes, this is before, this is after. But I do this last
time in aftereffects. So let's now jump
to aftereffects. So you understand
point how to do this. We want to get this effect, we want more of this folk
to cover all this area. So we want more of
these overlays, but let's quickly see what
if I scale these to two. So I'm a little lazy to
duplicate all this may moreover, let's here, so I
will just type here, too, and you can
see this effect. Clearly, Let's see. These sliders here
are so important. And this part here, we control with this slider. So this is just color
overlay, not fog. Let's see if I make
this more intense. No, this color lamp here control this overlay with just color. So we can put more
this greenish in background to separate the Okay. I think this don't have
sense to tweak this value because if I want to do
this for final result, I will spend maybe a
whole day tweaking these settings and adding these overlays and
all these effects. But let's now skip this. So this is before, after. Let's now do this
in after effects. Let's now jump to after effects. The first thing I will do here, I will disable everything so we can start from bottom to top. Okay, so this is what
I get from Blender. And let's see what
I have also here. So this is ambient occlusion. And this one is emission pass. So I also go to my blender file, and here under layers. I also extract this. I also select this glossy direction ambient
occlusion and emission. So let's back to here.
So this is a mission, and then This is
my first result. Sometimes when I think I get
something, I export this. So this is final
two, three, four. So you can see progress. And this is without
industrial decoration. I export this for
my YouTube video. This is number seven, so
I think this is last one. So you can see that I made a lot of version
until I'm happy. This is glossy direction paths. This is miss pass,
and this is solid. Okay. Let's open
after effects file. Let's see what I do here. I do here what I do in Blender. I blow this with
Gaussian blur 300. And let's see, this
is not so visible. I use only 5% of this. So opacity is only five, but you can see effect I get. I just make all the
little more soft, but only 5%. Let's
see what is this. I think this look like
ambient occlusion. So this is ambient occlusion, I should have this here. Okay. If we sent
this on top of this and if you use soft light here, you can get more details. You can basically get
this ambient occlusion. So if you now bring this
down before and after, but you can use maybe just 10% of this or
what you can do, you can use this only
in foreground here. Only I don't want to put
details in background, so you can use mask here. So this is same, like
factor in blender. This is same, like we take this and plug this to this factor. So let's see, in after effects, this is called Roma mate. So let's see. I think I have
this miss and missed one. Let's preview this one.
Okay, they are very similar. So if I said this as luma
mat and enable this, you can see that this
effect this effect is more visible in foreground
than in background. So this is before and after. But it is still visible
in background because this color is this color
is not completely white. Let's see what is next. So we have glossy direction, which is with glossy direction, we highlight this glossiness. So you can especially see
on this background here. Let's see. Maybe I have
some mask here now. Glossy direction, we
want set to screen, and if I now go with opacity, you can see before and after. This affect mostly
this background. So let's see how this mask look. So this is glossy direction. Okay, I think I use, I use also this mask here. So if I remove this mask, you can see this effect. So this is before,
this is after. And if we now use this
mask, so missed one, and let's see if I invert
this, how this look. Actually, in this
case, I use this to highlight silhouette of
these buildings. I see now. But let's see with invert. Now we highlight
basically everything. This is also not so important. I keep maybe just 10% of this. And now, this is what
we do in blender. So this is just fog overlay. And you can see this one is just 50% with this mask
here, which look like. So with this mask here, we put more of this
effect in background. And only 50%. So we get down this. Let's see if I can
isolate only this part. Yes, you can see this in
background. Let's see. So this is first one.
This is second one. You can see how this look, and let's see this one. Look pretty similar.
In some cases, I just duplicate
this with Control C, Control V to make this
effect more visible. Okay. I think I
like this effect, so maybe we can duplicate
this a few times. Okay, so this is let's see, same and this one here. Look a little different color. Maybe, yes, this is what I do. So I paint this in
different color. You can, for example, change
color here with tint effect. This is same like we do in
blender with color ramp. Let's see if we colorize
this to orange, you can see effect we get. Okay. This is red.
I call this red. Let's see why. Okay, I think
I want great globe effect. I want to put focus
over this area, and I don't like this tin. So what I do, I just, like, make mask to avoid this area, which I want to put in fogs. And now it's opposite, so I want invert this mask. Okay. And you can now
see before and after. It affects this area here, but not this container. And let's see, fog
ten, this is, I think, different texture of fog let's see if I duplicate
this few times. Okay, and film convert
is just color grading, but with paid addon. So I buy this a few years ago. This is before,
and this is after. Basically, you can let's see, opacity is just 40%. You get this film look
with this addon and you can choose here camera type. And you can now see
how this affect. You also get this film grain
and everything this set on. It is not so cheap, but
it is one time purchase. So if you want, you
can search on Google. I think I pay this
100 euros on sale. And all these are
just black and white. And if we go down
back color here, this one here is just
a little more grain. So if I increase this to two, you will see this grain effect. You get this grain effect
with after effects for free.
26. Post-processing part 3: These effects here are
very simple to make, and I think they add
a lot to our scene. I will disable this
over so we can see this is before and after. I will now show you how I do
this. So I will delete this. So this is with this, and this is when I
delete this Okay, what I do here. I just go with solid
color. So new solid. And I want this red color. It's okay. And now we just
get this solid all this. And if I now set this to screen, we will be able to
see behind this. And now I just want to create
globe effect with this. So what I can do, I can
just make mask here. And now we have this effect. And all thing I need
to do now is with M, create this mask feather. So we have this feather, and if I now said this to 20, we basically smooth this. But maybe I want to go to 50. And this is actually
before and after. We make this fake glow effect. And this is not
physically accurate. You have better glow effect, but this look stylistically,
I think, pretty nice. So we get this orange
reddish tint here. And I think I want maybe
change tint of this color. So just tint and I will place this here and I will maybe change
color of this. So this is completely red, but I like this orange tint. Okay, so this is before
it is too much reddish, now, it's more like orange. Now I can press to
bring opacity down. I like this effect, so I will keep
maybe 80% of this. Okay, we can place this
down. And let's see. Okay, I still have this overlay. And let's say this too. Let's feed this and
what I do here, I also add here green. So what we can do. Again, new solid this time, I want green effect. Okay. And now everything
will be green. But if you send this to
screen running mode, and now we can mask
only this area here, and this is what we get now and twice to
feather this mask. And now I will send this to 50. I will bring opacity here, maybe to 40 because I want
to put this in focus, not this one too much, but this is before,
this is after. And you can note
here. Same effect. I also do same here and
maybe this yellow is here. Let's do this yellow. Again, very simple new solid. Let's say this to yellow. Okay. And screen. Let's now place over this
yellow area here twice. Mask feather to 50 and
T for opacity, 50%. Okay. And this is before
and this is after. Let's see next. So film convert green lots. So I don't use this. I tried this, but I don't
use color correction. This is just lumtic color. You have this in any
graphic editing software. So basically, let's
see how this look. You can basically play
with this temperature. So this add more orange tin, add more bluish
tint tint on left add green tint and
right add purple tint. Saturation, you know what
saturation exposure. If I said this to 1.5,
it will be more bright. I go down here, contrast. So basically, I play
with these values, and then I compare
before, after. Before, after. Maybe we
can keep this maybe. So this is only 50%, but if it said this maybe 20, this is before and after. Okay, and here what we have. So we don't have nothing here. And these lots,
let's enable this. So this is something from time to time
download from Internet. Let's see how this look if
I search here for lots lot. We have this applied Color lot, and I download this from. I'm not sure where, but you
can find a lot of these lots. And so this is actually
Color presets, which another people say
on computer and with cube format and if I
now bring this here. Let's see positive.
Let's bring this on top. Now, you can see it
before and after. So these lots actually
make this more blue. And I can now apply another one. Let's see what this does. Okay, so we have this effect. And I think all these
have names by movies. So you can actually I think in Photoshop or any graphic
editing program, export lot. For example, you import
one sequence from movie, and then you take like colors
from that movie. Let's see. So all these are
actually movies. For example, we can import
this lot blade runner, and you can see that we get similar colors from that movie. But you can see
that we multiply. Actually the effects
we to this down and this don't work as we expect. I think you need export if
you want to use these lots, it have more sense to export
this from Brandera image. So with any colors and then you apply this
color lot here. But if you like this, you
can maybe 20% of the or ten. In after effects,
you can do this. You can make new
adjustment layer and lumetr with lumetri color. You have all these
lots by Adobe. So you can play with these lots. But I think down under Creative, you have a lot more. As this also lots. So you can play with this
and see what you like. For example, if you
like this effect, you can maybe bring this 50. This is before and
this is after. Okay, so this is
actually all I do here, and this is my final result. And I hope you learn
something new. In this tutorial, you can see that all these
effects are very simple. Nothing you don't need, learn too much to do this, and you can easily recreate
all this inside blender, except these lots and accept this pay they don't
like film convert. But one thing I forget I will share in this
YouTube video here, I took how to do completely post processing
inside blender. So you can you will
see here what we have. Here, I also show you how to import this gray
overlays put over this. We have a lot of notes here. We have a lot more nodes
than you can see here. So big node three. And I made this tutorial, and I said this as public. So you can see that now.
This is not public, but I don't have too much
interest for this video. People don't want to
look too long videos. So I make this public. And now I will also
share this link with you or if I forget,
you can type this. And if you want to learn more about compositing in Blender, you can watch this video
so 1 hour long video, and you can learn how to do
all this inside blender. This is all for this tutorial, I hope you'll learn something
new and see you next time.
27. Finale: One thing also, these two
guys are just from Mixamo. So if you go to Mixamo. So misamo.com and you can
search for characters here. I think I upload my characters. I have some human
assets on my computer, but you can maybe use
they look a little weird, but you can use
maybe some of these, and then you go to
animation and search for maybe sitting
pose like this one, and then you can download
this and import in blender. So you can just go to download. I use this FBX 7.4. I'm not sure why, but
this work for me if you go to I will send this
to 24 frame per second, and let's download this. So all this is free. You just need to make profile. Okay. Now I will open Blender. Let's open new Blender file. Let's actually import
here. I will go to Layout. Let's now go to import
BX, bx and download. Let's see where is
my download folder. Here is my download folder, and now we can import this. And before you click
anywhere, it is here, but I think it is too
small. Maybe not. Okay. Sometimes they can be too small when you import from mix. But I think now this is
about real world scale. Let's see if I now go with RZ, if I now press play, you will see here in
timeline that we have animation here,
horizontal split. Timeline, you can see
that this is animated. If it's like this bone,
you can see that we have all these keyframes here. You can even expand this. We have more than
1,000 key frames here. You can expand this if you
want longer animation, but this is really nice. You can quickly make
animation from this. For example, just put
two or three people here and you can just
animate this camera if I place this here and set let's press I here to
animate these keyframes, maybe rotation a little, and if I place this here, I can make drone
shoot or something. Let's rotate this on Z
axis. I, I, let's see. If you have this,
I think I don't have here this camera shake if I add on because this is a
new version of blender. I need to reinstall this. You
can add some random shake. So this is how this will look. And WT, we can change
interpolation mode to linear. Okay, so this is just
a quick example. I think we can make
this faster if I. Let's go to here. And let's press N. Rotate
this maybe like this. And this should now be faster. So we can even move
this about here. And let's see if this
low in random preview. It is not so easy because
we have this volumetric, and this is not so easy seen, but let's see what I can
do here. If I press play, And let's see now without volumetric effect,
how this will work. Okay, now, this is all for this tutorial and
see you in next one.
 šime Bugarija