Transcripts
1. INTRODUCTION: Hello. Many bladder courses cover the basic
things like modeling, texturing, lighting, or in
general scene creation, and I've made a few
of them myself. But not many courses go deep
into scene organization. When working on small
or simple scenes, this might not seem
very important. But as more details are
added to the scene, it becomes large and complex. Without a proper organization, your blender file can
quickly become heavier, slower and harder to manage. That's where understanding
how to break a scene into layers
becomes important. Not just to keep
things organized, but to keep your viewpoint
and render fast, stay flexible and gain much more control later
in the compositor. For example, we can re render only the layer
that we changed, saving massive amount of time. So this is a course about layers, scenes, passes, toggles, open, EXR, and how they all work together in a
blender compositor. Here is another example. With a proper setup, you can completely transform the look of your render without re rendering from
realistic to stylized, even pain style looks all done directly in the compositor
with just a few sliders. Along the way, we will also cover topics such
as light linking, groups, the difference
between import methods, library overrides, and more. We will also talk
about how to move your renders into other
compositing software like After Effects or Lavin resolve and how to set up
color management correctly. This part is optional because we are using Blender compositor
as the main tool. If you already know
the basics of Blender, this might be the next step that completely changed
the way you work. This course includes
15 lessons in about 4 hours of step
by step content. But the course is not
everything you get. Since we add more details
to the scene with my Goode modifier setup
super scatter on surface, I decided to include
it in this pack. Scatter on surface is a
new modifier that becomes Brander primary scattering
tool since Brander five. However, it comes with one drawback it is
empty by default. But super scatter on surface, my version of the modifier fix is that you get the
same modifier but fully populated with high
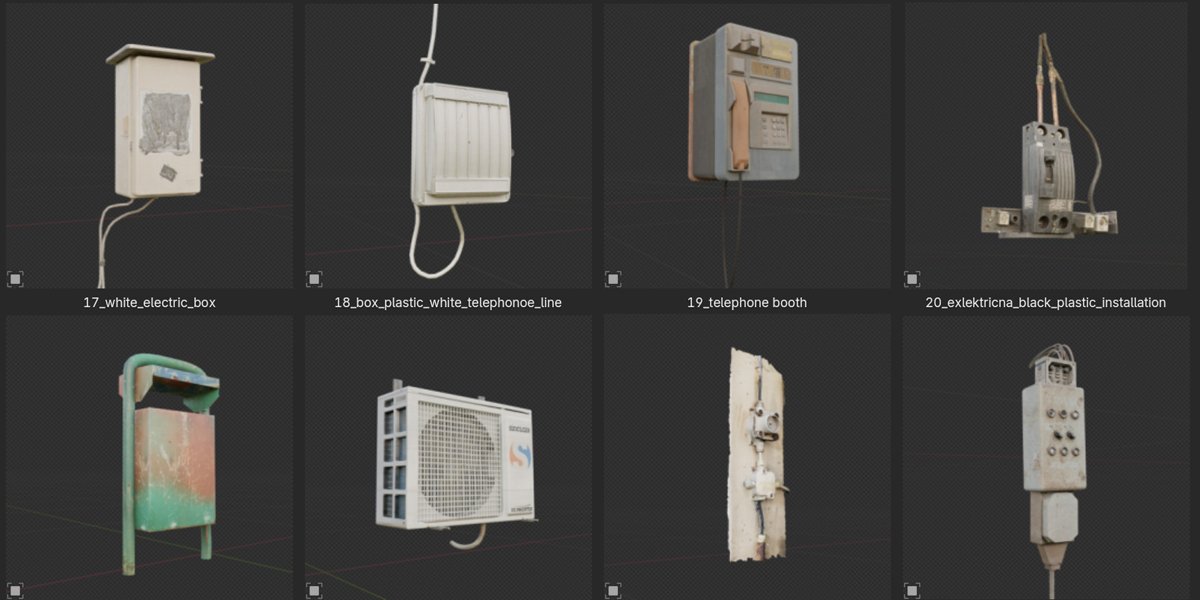
quality PhotoScan assets covering over 20 categories. See more information about super scatter on surface
in the following video. In addition, you will also
receive ten details trees as gifts that you can save in the asset browser for
your future projects. Of course, the project
files needed to follow the tutorial
are also included.
2. DEEPER INTRODUCTION: Come to first part of tutorial. In this part, we will
talk about how I organize this tutorial and
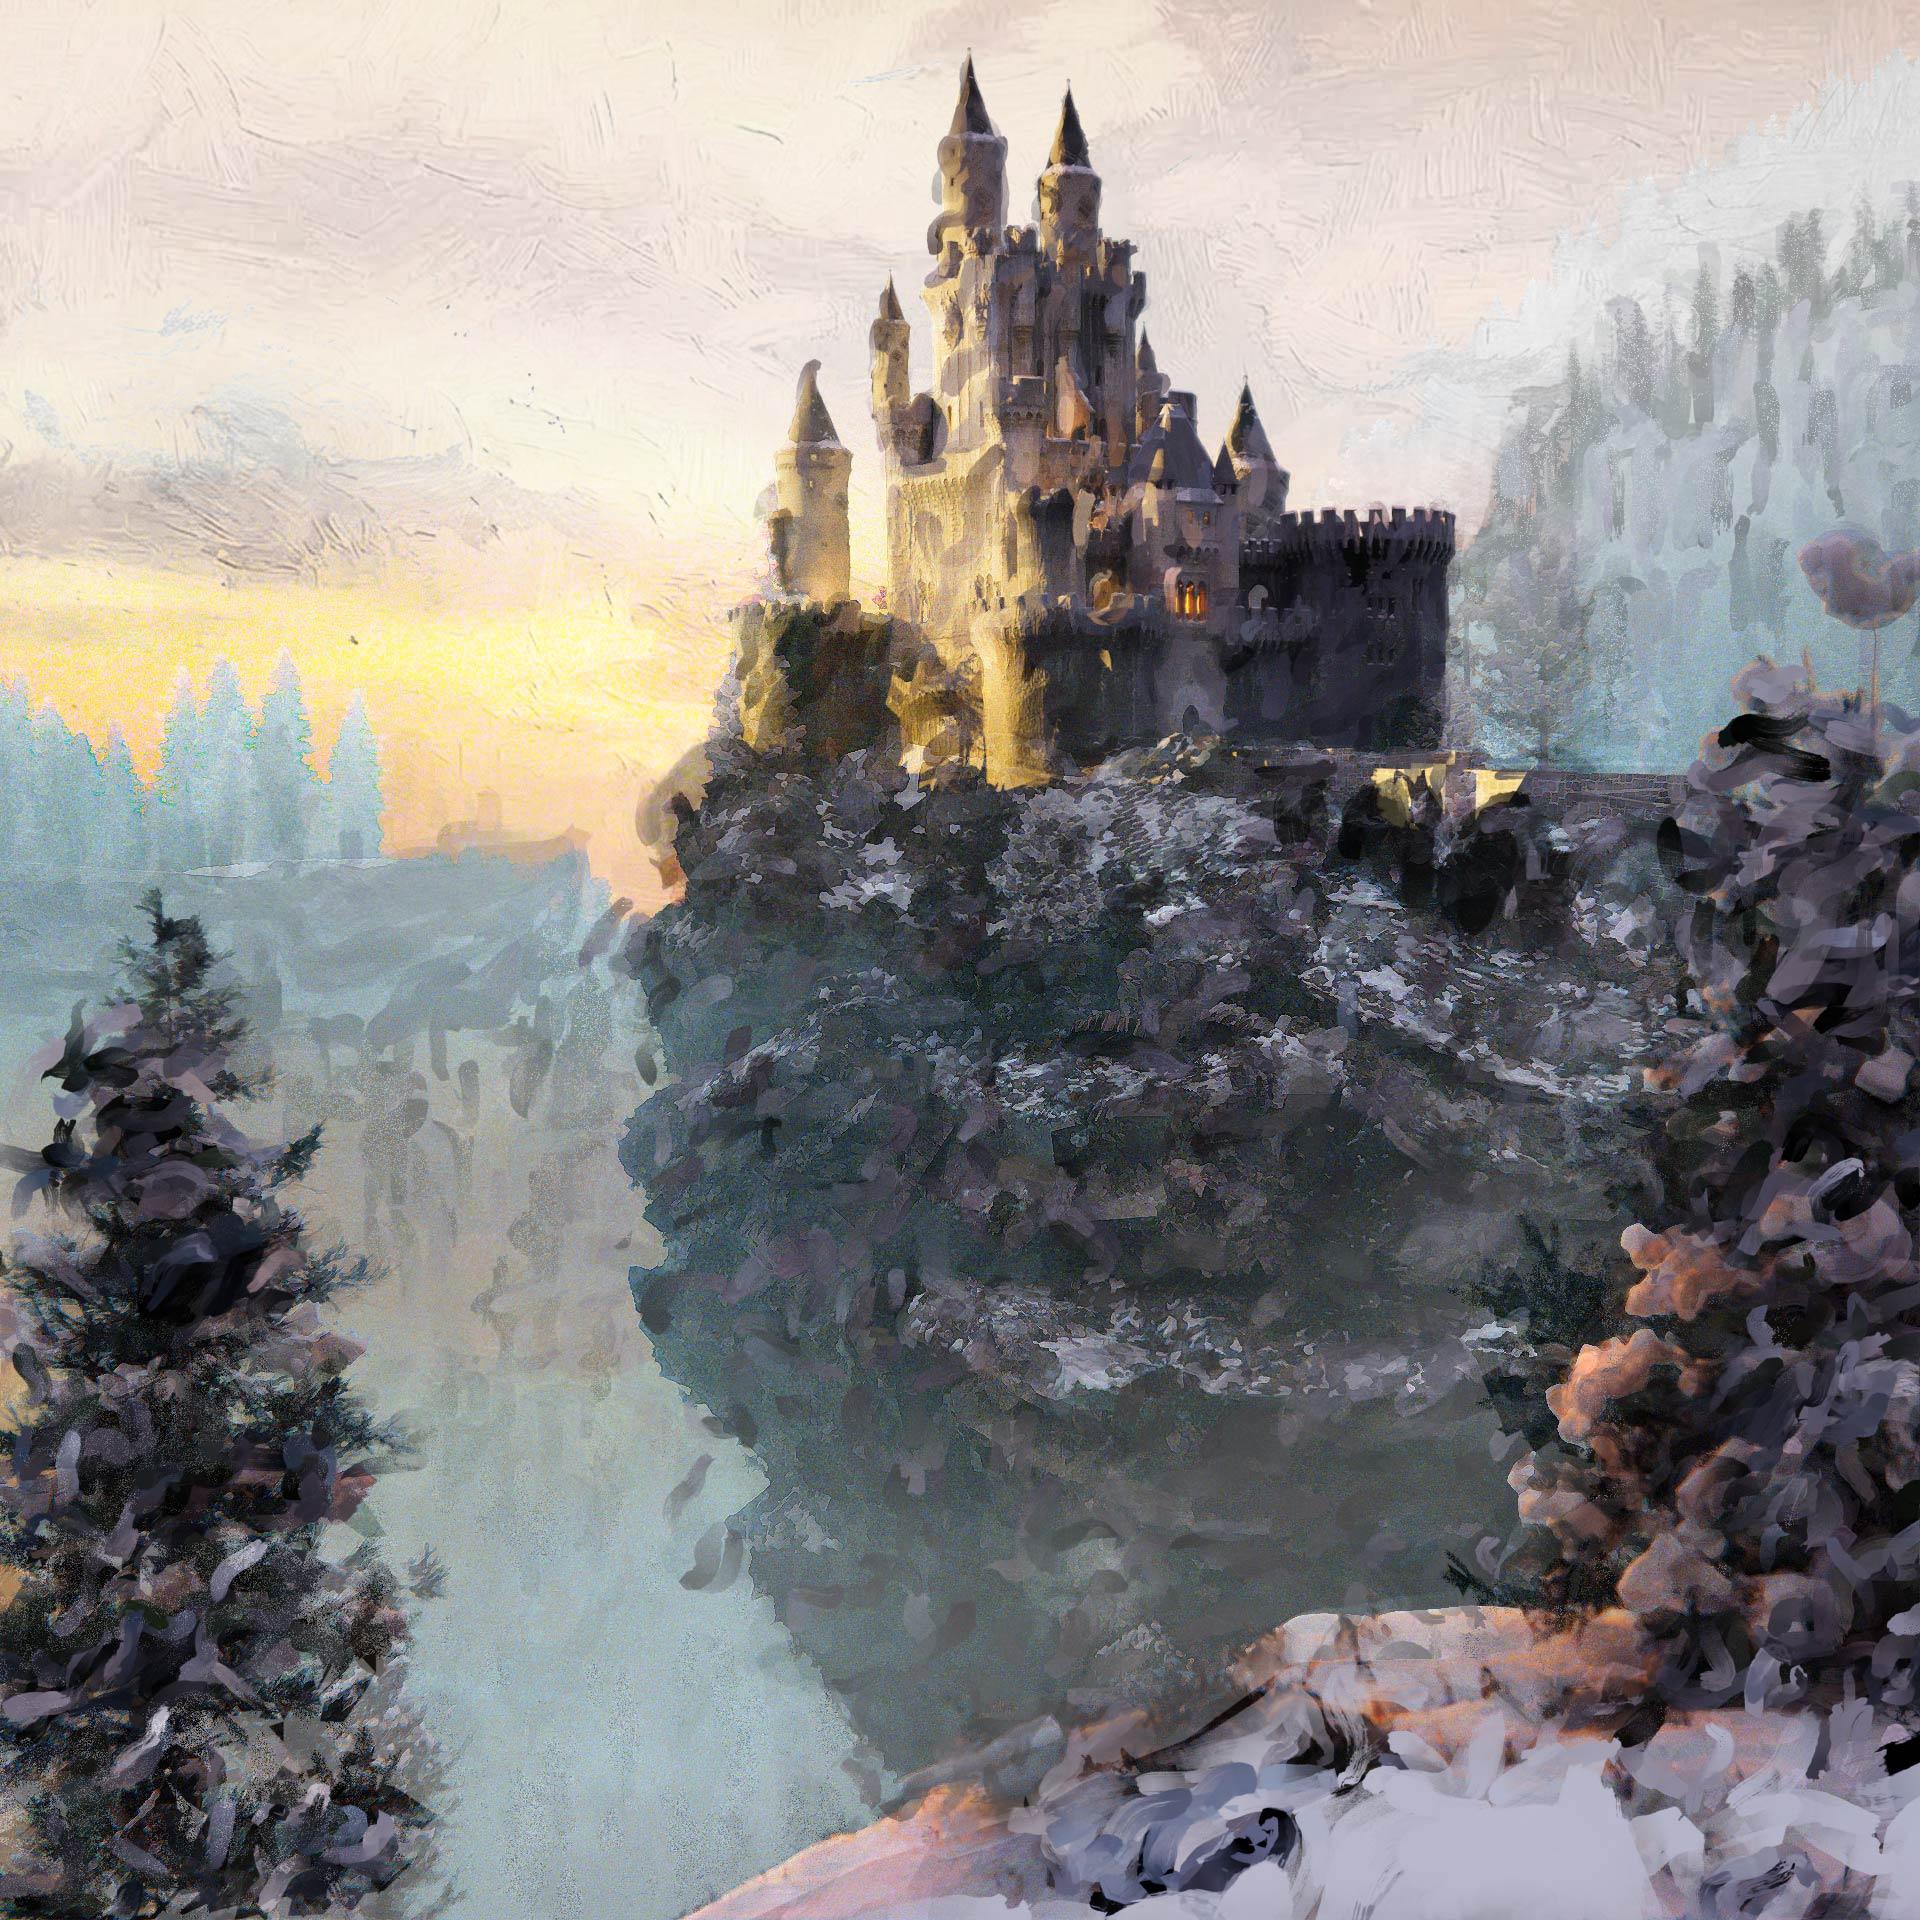
how I imagine this tutorial. This is file I made, and this is what you can
expect from this tutorial, I think we will have
about 14 chapters. So first one is organizing
object into collection. This looks like not so
important thing and very easy, but it is very important. In this example, you
can see how this looks. So we have all objects
inside, seeing collection, and later this is how this
look when we organize things. It is not only about keeping our outliner more
clean and nicer. It is about layering
or organizing things to make our job easier
later into compositor. Collections are also necessary for creating layers and
toggling groups later, you can see here how
these layers looks like, and toggling is all
these options here. So we can turn on all
these options here, and you can see that we have different checkboxes in
different collections. Collections are also important for clicking and
like groups later. You can maybe understand
better what I'm talking if I show you my open XR file. So we have here all layers, and then I separate
these two background, and we have background paint
here. So another layer. For example, I have castle as, so we have castle here
and we have castle paint. And with this slider, I can
later decide maybe I want more realistic type of
render or maybe I want this paint to look and I
can with just one slider, choose at the end, what I want. So we have for ground. Then for ground paint, we have separated HDRI. I also separate these trees. Then we have separated
only volumetric, so we can later decide how much we want this volumetric effect. This is one of my final results. You can see that I
created a lot of these final results because it is when we organize things, it is very easy to just move some of these
sliders and get completely different result
like this one or Okay, I have too much on this, but you will see later. If you go to these
vendors for which I didn't use any of
these paint effect, it should be more
realistic result. Chapter two will be toggles
and what are toggles? These are check boxes
which enable or disable a specific behavior or visibility or
function in blender. And we will talk about this
in one of these chapters. Next one is layers. Later, we will create
different layers. I will go to layout here. You can see how this look. We have here only cliff. Then we have maybe only
castle paint layer. This is only cast layer. And you can see how this work, we basically just with toggles, tell Brander what will be visible in each of these layers. The layers, we basically split one big render into
smaller parts, and later we can back and combine everything
together into compositor. And with this, we
have more control. Under individual parts. Next is Blender
compositor basic. We will spend a lot of
time in this tutorial to compositor because this
is compositing tutorial. So what is compositors
place where we can combine layers
into final image, and we can also adjust or
play with individual layers. We can also relight
our scene with help of groups or linking. And what else we can
do in compositor, we can also add, of course, color correction effects
and similar things here, but we will also talk about
this in different chapters. Let's see what is next next is compositor render layers
and file output or open XR. I will show you how we can save all this data into one file,
which looks like this. So this is one XR file, and we have all this
data inside this file. We can very easy
access to this data. And we don't need re rendering
everything, for example, if we just need change
this, for example, castle paint effect, I
can find this here and I can just click here and I can render only this layer here. You can think of scenes like a separate project inside
the same blender file. So we can composite or later extract data
from that scene, and we can use that data
into our main scene here. I will show you later in
one practical example, what are difference
between sins and layers. So I will not go deep for now. Next is passes and
what are passes. Basically, our final render is also called combined render. You can see here combined why combined because
this final render is actually combined of
individual pieces which Blender calculate separately
during rendering process. And when we combined, all these pieces we get combined
render or final render. I will show you how this look. For example, we can access ambient Ocluson Shad
of catcher background, which is actually HDRI. And we have a lot
of this. So glossy, indirect glossy,
color, we have also. For example, miss pass here, we can access these different
pieces into compositor. And we can use these pieces to manipulate
our final result. Next part is adding details with super
scatter on surface. So this is external
addon this is my addon, and I think depend where you get this tutorial may be included
in your project files. Before you buy this tutorial, you can read I this
is included or not? And what is super
scattered on surface? I will share this
project file with you, so we will work with this. But you can say this
is without details. In blender, main
tool for scattering is scattered on
surface modifier, so we can access this here. But this scatter on
surface is actually empty. We just get empty cubes. But I created
different version if I access I can access this here, so super scatter on surface. With this, I basically get scattered on surface
but not empty. I will reduce this number 2.1. I will just quickly show you
how we can add trees here. So if I spread this window, this is actually Asset library to which I access
with this modifier. For example, I know that
we have trees here. We have a lot of assets here. You can see how
these assets look, but I know that I
also have down trees. Trees are actually 71, and I can now just type here
71 and I will get trees. If I go to render preview, we can see that we get trees. I need click here
Align rotation. I think to rotate these
two world Z axis. And now I will pin this
here. So I don't lose this. If I now change this to 72, I get different tags, different trees, type of trees. These are glob pool
background trees. I also have trees for
closer to camera, which are this one here, and I think I will also
share this with you. But we will talk
about this later. I just want to quickly show
you what we have here. So 73 is different collection. This one more with snow we have different
collection here, and then we can play
with all these numbers. If you want more trees, we can also randomize this to make this bigger or smaller. And you can see on left, we basically quickly add
more details in background. And let's see what are next. So light linking and groups. So what are light
linking and like group? Usually every light
affect everything. But because this
is three software and this is art, we can
tell Blender, Okay, I just want light salam to
affect this castle here, and we can set this
with light linking and groups and we can access this data into
Blender compositor. And next is light paint
add on, which is optional. To get this painterly effect, we can also use something
which come free with blender, which is this guahara effect. You can see how this cook. Okay, I play with
these colors here, which is maybe too much. So this is if we
sell this to zero, this is basically final result. We have this sharp
filter which I add here. So it looks a little weird. But with this, we can get
this painter, a side blender. But then I explore a
little and we have this live paint filter addon, which is not my add on. And it is not so expensive. I pay this, I think, $10 or something, and
this is optional. I will show you how
I work with this. And if you want to buy this, you can use this
as optional addon. I decided to make one
chapter about this addon. If you want, you can watch this part or you can
also skip this part. So this is actually optional. Let's see what is next from blender to other
compositing software. So I will show you
how we can combine all these layers not only
in Blender compositor. We will do mostly
this here, but later, I will also show you how we can combine this
in after effects. So you can done
compositing blender, but you can also do this
in another software like after effects,
DavencRsolve or Nuk. Let's see what is next upend
link pack library overwrites and edit link libraries. So when you import
objects into blender, you need to know that there
is different import options. And this is important
for optimization. You don't need upend everything into your blender file because your blender file can become
very huge, very quickly. So we can use different
import options, and I will show you
what are benefits. And then you can use different these important options and how you can control
your objects. For example, when you just link your objects into scene
and not just a pen. Okay, I think we go through
all of these chapters, and this is all for
the first part. In next part, I next part, we should start with organizing
objects into collections.
3. ORGANIZING OBJECTS INTO COLLECTIONS: Let's now start with Chapter one organizing objects
into collections. For this, I prepare
this blender file. So this is Castle CN and
this is how this look. This is a simplified version of my blender file because
I don't want to make heavy scene for
you because some of you don't have
a stroke computer, and this is my system. If I go to every
preferences system, I have this GPU. And I have problem little
when I recording this. Sometimes when I hit
render my obvious start, I go to chat GPT, and I ask what can be problem, and hat GPT suggests
me to say this to. Basically, I said this to
Blender, less priority. So I hope my obvious
not lagging anymore, but hopefully Blender will work also correctly.
We will see later. Okay, so this is
simplified version, so we don't have any details. This cliff here is
basically just cubes. If you go to edit mode, you can see we have basically
just stretch cubes. This is not completely
beginner tutorial. So in this tutorial, I will not set the scene step by step, but this is very simple scene. So we have here foreground. Okay, I have enabled
this measure tool, which I don't know
how to remove now, but I think this is annotation. So if I go with N view, annotation, so I
think it should be. I enabled this before because I want to show you
measurement here. So when you do big
scale scenes like this, I think most important thing is to use real world proportions, which in this case, are big. For example, we
have here camera, and we have this
thing in foreground, which is basically some
kind of cliff with snow. And here we have 1 meter. So this part is 1 meter, and then we have
next three here, maybe 3 meters from camera. And let's measure now this. So we have to this castle
or cliff about 200 meters, and then we have this
cliff in background, which is this one here, 300 meters and this one here, which is maybe 400 meters. This is actually how
my final result looks. This scene here is
without details, so later we will
also add details. And for this, we will use mice, super scatter on surface. Later I try to get
painterly look. This is only with
Kuvahara effect, which is available for free
in blender compositor. And he made more and more test. Maybe this one is maybe
less worse than other because we can clearly separate this castle
from background. All these here are a
little too messy for me. But I think this is
not so important. We are not here to make
most beautiful render ever. I think it is a good example for what we want
practicing here. We want practicing here, everything I mentioned before. Let's see what else
I prepare for you. So we have here
eight free trees. This is from Smart Tree ASA PEC. This is ASAPC in which you can build trees which are intended
to be close to camera. I basically create eight trees and share this with
you if you want, replace these trees
in foreground or maybe use for your
next projects, and how you can use this, you can just copy this
address of this folder. You can go with Control C. And we can do this
new vendor file. So I will close this one. I will open a new blender file, and now we can go
to add preferences, five pads, click here plus, past this folder here. And now, okay, I do
this before, I think. So I will remove this one. I can now rename this. Now we can sell these two. I think Puck is
worst option here. You can use Link or append. We will talk about this later, but I think for this purpose, we can just set this
important method to append. Now we can go to
save references, and now we can close
this blender file. And what you will get if you open next time when
you open Blender file, you can find this in
your ASL browser. So AL browser eight freers. And I created version, main version and
low poly version. So let's see difference. You can now just maybe create play And if you, for example, import this version
here and this one, if you now go to edit mode, this one have 11,000 vertices. This one have maybe 33,000. So it is a little heavier. It has more details. For example, if you now
go to render preview, I will switch this to cycle GPU. I will now create
better lighting here, but because we are in cycles, you can also find this option, we can now load this
new high texture, multiple scattering, which is available only in Blender five. Okay? Now we can maybe
make this sun lower, maybe strength a little down and we can play
with sun rotation. You can see then things here. We have more details
here on these trees. We have more leaves on
this high quality version. Let's maybe bring this one here. So depend. This is too close
to your camera, you can choose high quality, but in other cases, just choose low poly because you want to save some
memory and render time. Let's see this one. Let's bring all these different
trees inside our scene, so you can see what you get. We can maybe bring this in background because
they are huge. We have here how much
ten different trees. And all of them have snow, but I will show you if
you don't need snow, how you can remove this. For example, you
can select one of these trees with Numpad slash Q, you can isolate this object. So this is one tree
and how we can remove snow. There
is a few options. First is to go to Edit mode. You can select here material and just click Snow
material and select. Now you select only Snow and
just press Delete vertices. Now you have Tree without
snow. This is first option. Second is just to go to
object data properties, and you can select
different part of trees, for example, snow,
go to Edit mode. Select and delete. You can also select, for example, leaves,
select delete. Now you have only this. You
can also select branches. And now you have
only this trunk. But if you want to get much more trees and much
more functionality, you can search for my
Smart res asetPeg. This is just very simplified
version, then quick trees. Okay, I'm not sure
why here we have ten, so I need to rename this to ten. But let's now talk
about what we are here. This is this castle C. So I
will close this vendor file, and let's open this one. First, if you want
create backup of this, you can go with Control C, Control, we duplicate this. But you can also create
increment of this. So file, say incremental. This is very good option. I use this a lot because
when you click this, you actually stay in this blend file, this
new blender file, but you also always create backup of old
one of fold version. Okay. So we are now here and
we can now switch to cycles. So I said this to cycles. This is port render 22, the render is 100. We have this camera here. Now, we need to put
this in collections, and these collections will
later be render layers. So we need to think how
we can organize this. I think this is pretty easy. We don't think too much. We have here foreground. So this should be
our foreground. I want this select box. I'm not sure when
I move this to B. So hold your mouse and
you can select this box. But I will enable
these screencast keys. So I think I have this here
show screen cast keys, and I will make this very small. But you can always stop video and you can
find what I'm typing. For example, when I type
A, you can see here. Okay, so we have the
foreground things in which I will include
this tree here, and I can now press to
create new collection, I will press M, which is shortcut for creating
new collection. Another way is to
click here two plus, and you can here
create new collection, which is a little
annoying because you don't know where you
create this collection. It is here. One thing I forget I will go
Control Z to undo this. One thing I forget to tell you only difference in
your Blender file is that you will not find this. I put this in startup
Brander file, and this is my super scatter
on surface modified. This is something you will not
find in your Blender file, but this is not important. Let's now start
creating collections. So first, I will select
these two objects, press and new collection, and I will call this
foreground. Foreground. Okay, now we have these two objects inside
this collection, and I will also add this object. You can just select Object M
and now select for ground. Now we move this
object in for ground. Camera will stay, I think
inside scene collection. Let's see what next. So we have castle
and this cliff. Let's go with cliff.
And let's see. We have also these trees. I think I will include
this in cliff collection. So I will set both
objects and I will create a new collection
I will call this Clif. And if you want to
simplify your job now, you can just disable
this in viewport. Now, you will be able
only to select objects, which we didn't assign
to any collection. So now this will be castle, so I will call this Castle
and now I will hide this, and we have these
lights inside Castle. So I have a bunch of
point flames here, and for now, assign
this to new collection. I will call the
lights inside castle. Maybe we can put this
with castle collection, but let's make it
like this for now. And let's see what we have here. Here we have things
for background. So we can here, you
can see this healing. Background, this cliff here and cheese which we
don't have for now, but we will add them later. So and bagram. We can now also hide
this collection. Let's see what we
have what is rest. And we only have
these two cubes, which are basically
volumetric cubes. If you go to shade the editor, this one is just emission, very small amount of emission. And this one is actually real volumetric created with principle volume with
all these values here, we have a little
emission strength here. And now we can select
both of these and we can now create new collection, I will call this volumetric. Okay, now we can also hide this and now only camera is
visible in our sea.
4. TOGGLES: Let's now go with next chapter
which should be toggles. For now, I will make
this in viewport. So this is actually Okay, this is now team of next
chapter, so toggles. So what are toggles? Toggles are actually check boxes that enables or disables
specific behavior, visibility or function
in side blnder. Now we will go through
all of this one by one. First, I will enable
all these toggles. You can see them here.
Let's see what is first. One is exclude from view layer. This is actually
most important for this tutorial because we
will work with layers. So when we have
multiple layers here, we can exclude or make this visible inside of
separate layers. For example, we have here view layer and we can call
this everything. So this will be one layer in which I will include everything. And this layer will be
actually just for test. So later when we combine all these separate
pieces I want, check is this same when we
have everything included. So in this everything we want, keep all these checkboxes. But just for test, I will
show you how this work. For example, if you
disable for ground, we will now exclude this from
render in this layer here. For example, if we click here, we now exclude clip from
rendering in this layer. But we will practice
with this later, so I will not talk
too much about this. Next one is selectable. This is just for viewport. For example, if you click here, we disable foreground
for selectable. This is now what we get. We cannot select anymore
these objects here. If you now back this,
we can now select this. For example, let's
say we want to select all these lights here, and it is very hard to
select these lights. But what if we now remove
castle from selectable. We can now just jug this and ok, let's now also remove this
volumetric background. Now we can and also cliff. Now we can very easily select
all these slides because we disable everything
else from selectable. You can see if I now go with G, you can see all these lights. Okay, so this is selectable. Let's now back all this. And let's see what is next one. We have now hide in VUPort
and disable in VUPort. If we now select this
cliff and if we now click Hyde in UPort and
disable in VUPort, visually we get same. But in background,
it's not same. I think only difference is
what blender calculates. For example, if we just hide this in UPorblender still
calculates everything, but it is just not
visible for us. But if we disable this in UPO blender save this object
from any calculation. My English is not best. I asked check GPT. Hiding UPort hides the
object only visually, objects still exists
and works in the scene. Modifier still
calculate, physics, still calculate, constraints
still calculate. So you can think of this
don't show me this right now. Next is disable in UPort but it does completely
disable object in VUPort. Evaluation, modifier,
do not calculate, physics do not simulate
constraints do not update. So all this is not
important for us. So all this is not important
for us, but just know. So only port I think is
that affect performance. This hide in
viewport is minimal, and disable is a
big improvement. Let's now see next one. So just to know if
you disable any of these icons here and
if you press F 12, you will see that in render,
basically nothing happened. So we will calculate
everything here. I think my blender is now very, very slow because
limited blender here. But not so important. For now, we will see
in render preview everything because we have
enabled this render preview. So this is only
important for render. And let's see. Okay, so I get my render, and you can see that everything
is visible in render. So we now get to
this render icon. Let's now back
this visibility in VUPort and this
render visibility. So this affect only render. For example, if we
disable castle. I render, we will be able to see this castle
here in Viewport, but if you now press F 12, you can now see that we exclude
this castle from render. Let's see what is next
toggle next is hold out. For example, if we select
this castle and okay, we need to select
this collection. And if you click here,
we will actually make mask these objects with objects
inside this collection, which is this castle object. So basically with this mask, and we will later see
for what is this useful. And next one is indirect. What is the purpose of this? Let's say, let's
make one practice. For example, let's say we
want islet only castle here. So I will remove
for ground leaf. I will actually
remove everything. I will just leave castle. So remove this
background volume meta. And let's see, we
now have castle, but this is not the same
castle like we had before. We don't have any lights here. You can maybe not that
this castle is less bluish and it is more
clear than before. That's because before we have the volume metrics which
indirectly affect this castle. So you can see that
if we, for example, enable this volumetrics,
you can see how this affect the coals of this castle and lighting
and everything. But we don't want
these volumetrics to be enabled in this
collection here. In this layer here, we want only two because you can see that this affect everything
else, not just castle. We have different color
in sky and background. So what we can do here, we can enable this here
and we can now click only affect this object
only indirectly. So if I click here,
you can see now, this is before, this is after. You can see that now this
still affect this castle. You can see how we change
this color of castle. But this now don't
affect anything else. We don't have physically these volumetric cubes
inside our seal. If you disable this, you
can see that we have these volumetric tubes
inside our seal, and this now affect everything. But we just want to
affect our castor. So I will enable this and I will click here indirect only. Okay, what else
affect our castle? We have lights here, but this is emissive tubes which are
part of this object. But we have these
lights inside castle. We can also set
this as indirect. We can basically use this
without this because these point lamps are not physical objects.
They are not mesh. So basically, it's the same if we click here
or without this. But for example, if we
enable this cliff indirect, only let's see, maybe this
clip affect this castle. Let's see what
happens if we enable this indirect only for clip. Okay, we can ignore this part
because this will not be later visible when we put this clip collection
in front of castle. But let's see if this
affect this castle. If I look this part, maybe we will get some ambient
occlusion or something. Let's see here. Probably we get some small ambient
occlusion here from this cliff. But I think this is
not so important. We can ignore this
because I make this I want simplify
these things a little. This is very subtle. So we now go through all
these togal options, but we will later practice
more with these togal options. Basically, you will see how we can work this in
practice in next chapters.
5. LAYERS: Chapter is layer. So we
already have one layer, which is called everything. So we want here this
layer enable everything. So I want everything make
visible here because we want compare later when we
put all layers into one layers with this one in
which we have everything. So what are layers? With layers, we can separate big scene into smaller parts and later back all layers
together into composite. So with layers, we
can get more control, and we can get more options
later in compositor. And we can also speed up Port and render
performance significantly because we can later
because we can later re render only layer in
which we made changes. So we don't re render
everything. We can later. Only for example, if we make
changes to this cliff here, we can re render only
that layer there. We don't re render everything. But you will see
all benefits later. So we can start with
creating another layers. Let's now create first layer. So we already have first one, but let's now create second one. So I will call this for ground. Okay, we have a
few options here, new copy and blank. If we go with copy settings, we will basically copy
all these settings here. If we go with new one,
I think everything will be enabled
like we have now. For example, if I have disabled these things and if I
go with copy settings, I will basically get a new layer with copied, all these settings. So this is, I think,
all the difference. I can call this foreground For ground and I will
back to everything. So I want back all this. And I will now go to foreground. So what we want,
enabling for ground, accidentally, I already
create what I want. But let's say, what we have something like before,
we don't need cliff. Cliff don't affect
this indirectly castle also light castle also, background, also. And let's see. The volumetrics, I think
also don't affect. Only reason is that this part is outside this volumetric cube. So this also don't affect. We can disable this also. Now we have only this trees and this part here
in foreground. This was very easy for
ground. Is just for ground. We can now go with new one. I will go with copy settings, and I will call this cliff. So for cliff, I will disable this foreground enable
cliff Let's see Castle. Let's see is this
effect indirectly. So this before this effect because we have this
ambient occlusion. So I will keep this as
indirect only before, after. Lights inside castle. Let's see. If you enable this and
click Indirect only. So maybe we get some very
small lights here. Not sure. A wrong button, C. Okay, so I will remove this. This is not so
visible background. This don't affect this. So I will remove this and
volumetrics of course, affect. I talked about this before. This is before, this is after. You can see how this
change this color. In this point, we get where
this hold out is important. For example, you can
see all these trees. If you think cital
this is not possible. For example, we have this scene here and only these
trees are visible. This here. Trees behind
castle are not visible. So we need click for
enable this castle here, also as mask or hold out. And you can see
what this creates. You can see that
we actually mask some trees which are
behind this castle. We don't have too much of this because I mostly put
these trees here, but we actually hide
some of these trees. And without this button, we will actually later
when we combine this, these trees will be in front of this castle which is
not case in our sea. So this is very important. In this case, we want to fight some of these
trees because they are behind this castle here
behind this wall, actually. So without this hold out, these trees which are behind this wall will actually be in front of this wall,
which is not the case. So this is where this
holdout is very useful. You can see this tree here, this small tree is almost
completely behind this wall, and without this button, it will be in front
of this wall. Okay. And we can
move to next one, which is so we have foreground
cliff next this castle. So we can I will
go with new one. I don't want copy the setting, so we can call this castle. Okay, for castle,
foreground doesn't affect this castle. So forgot. Disabled cliff, let's see. Let's first disable
this so we can later check this hold out and
indirect only background. Background affect. So volumetrics
affect indirectly. So we will enable this.
So this is before. This is after you can see clearly here before and after this color of this castle, let's see what else affect. So we have this cliff. If we enable this and send this to indirect
tolling, let's see. So this affect indirectly. If we look this wall here, you can see clearly before and after we get this
ambient occlusion, especially in this area. So we can keep this and
lights inside castle. We can just enable this. We can also click indirect. Only in this case, it's same because
these lights are basically transparent objects
that are not real mesh. So we have lights inside castle. For this will not create layer because this is
not visible background. So next one is background. One, background. Let's see for background, foreground doesn't
affect in any way, cliff castle also lights inside Castle background is visible and volumetrics affect indirect. So before and after. Basically, we now
set all layers, and we can now check them. So this is everything. This is how our render should look like when
we combine everything. And let's check the next one. Foreground, cliff Castle Bground I forget one volumetric. You also want create layer or volumetric. So I
will go with new one. I will call the
volumetrics and now I can basically
disable everything. So only volumetrics
will be visible, and you will see later when we re render this how
this will look like. Okay, I need to disable
this collection because I have this no here. Now, when we set all ys, we can now render this
and in next part, we will go to compositor. So you can go with renderimage. And you can also know
that now blender render each of these
passes separately. So first blender
render everything, and now this foreground, now we have this cliff. And you can access all
these layers also here.
6. BLENDER COMPOSITOR BASIC: Hello, it is a new day here, and let's continue
with Tutorial. So yesterday, we stopped to this Chapter four Blender
compositor basic. After rendering or F 12, we should get some images here and we can now go
to compositing. So here we have compositing tab, and now we can click New. And we get new compositor. Okay, I get this 001 because last time I
already cal here, so maybe I can just close this one and load this one here. And my first recommendation
is to go here under option and set this to GPU because this should be
much faster than CPU. We don't see now
anything because we don't have this backdrop. But even when we
enable this backdrop, we still don't see anything
because we need viewer node. You can go with viewer node, then you can plug this here. But you can also just go with Control Shift and left click
to get this viewer node. And this will be shortcut. We will lose f. So if
this don't work for you, that means that you
have no Wrangler, you need to go to preferences, add ons and just search
for Node Wrangler, and just be sure to
enable this here. This checkbox. Maybe you
need to get extension first time because like they move
these dons to extensions, but this is from old version, and they keep both for now, but must be somewhere here. But I think, you know, this if you are not
completely blender beginner. So with, we can open
and close this tab. And you can now work like this. But my recommendation
is to split this window because we want have clear preview of these nodes and also clear preview of this viewer node
here or this render. So when you see
this small cross, you can just split
this to middle and now we can resend here. Now, this is composite node. We can just switch to
not here to viewer node. Okay, we need switch
to image editor here, and now we can load
here viewer Node. Now, we don't need
this backdrop here, so we can now work on
right and review on left. And how we can access
to all these layers. We can just go here. So this is for ground, cliff, castle, background
and volo matrix. We cannot sell this
to everything, but we have one problem. If we now close
this blender file, we render this again. So we don't save these
renders anywhere. So they are just inside
this Blender file, and if we just close this, we will render this again. So we need prevent this, how we can prevent
this, how we can store this data outside
this blender file. We need to save this in
open XR file format.
7. COMPOSITOR RENDER LAYERS AND FILE OUTPUT (OpenEXR): We'll make space somewhere
where I want to save this. We can create maybe
render folder. And I will copy this
address so we can now back to our Blender
file and we can now go with file
output file output. And now, let's see where groups. Okay, I think here under nodes. We can now create
new file output. So by default, said this to multi level
EXR, which is good, but I think we need
float because this will be too much information
and too much data, but not too much benefit. And we want sent this to DW AA, because this file format will not lose too
much information, but it will be
significantly smaller. If you want deep
explanation about all this, this is do I recommend. So you can watch this video. But this is I think best
setup for us for now. Now we can start
plugging outputs. So we have here, everything. So this is lay everything. We can now plug this here
and we can now rename this. So this will be everything. I like the upper case. So everything. And let's see what is next. Next is to get next, we actually need to
duplicate this CD, and we are inside scene. Here, for now, we don't
have another scene. So we have this default one
and next is foreground. What we can do now we
can click here two plus. You can click here to plus
and call this for ground. We can now plug this here. And we can do this
for all these layers. So for cliff, we can actually plug this here and then we
can rename this to Cliff. Next one is castle. And next one is background. And last one is volume matrix. Okay. And just to be clear, now we will save
this in somewhere on our computer to save
this from re rendering. But of course, you
can always start your compositing here so
you can go with alfo. You can skip this part,
but just to show you, you can now maybe
plug this For ground, this is not visible because
we said this to one. And let's see. This
is foreground. This should go to foreground, and then we have cliffs. We can set cliffs. But you don't get
what you expect. And the reason for
this is very simple, because we don't have
transparent background. So in all of these
layers, you can see. When I preview this, in
all of these layers, we actually have this HDRI here. Which is not correct. We actually want
transparent background. So we need to fix this problem. You can skip this part
this just for preview, but I will show you what we need to do. It is very simple. We can go inside any of
these layers and we need to enable under film
here transparency. I will go to render preview so you can
see before and after. You can maybe be
confused because we mostly see these volumetric, so I will disable this for now. This is So this is before we
have this HDRI background. This is after without HDRI, and we can now back
this volume metrics. And now we come
to one part which you need to understand
when you work with layers. Only this checkbox here, this row here actually is
inter pedded to other layers. So only this checkbox here, is not connected to
all of these layers. For example, if you disable
all these layers here, you will see that you do
same in the renders here, which is not what you want. So only this row here actually is different
in all these layers. So for example, if
you click in layer, this checkbox, this will
not affect other layers. So you can see it still
how we said before. To explain this
better, for example, if you know in this
everything layer, add, for example,
one massive cube. Which is somewhere here, you can see that in
all these layers, we actually add this queue. So everything else, except these check boxes are
connected to other layers, and you need to be
careful about this. So because in this
everything layer, disable this or enable
this transparency, we also do in all
these layers here. So to repeat everything, each of these settings you
change on any of these layers, you will affect other layers
except this row here, which is independent
to other layers. And because we change this transparency now
to all these layers, we need to go to render image, so we need to render
all images again. But if you want, you can make test, for example, if you click here, you will
render only this layer. Let's see what will happen
if you just click here. Okay, we now render only
this layer, and let's see. We have this transparency
background here, but we still didn't
fix this part here. So you can click all
this one by one. But in this case,
it's much better to re render all
these layers again. And you can see that with
this, we actually fix this. So we have here cliff and we
have this foreground here. For example, if we switch this
we get what we don't want. So we basically put these
trees behind these cliffs. Okay, you can skip this
part because we will do after moving this to EXR, but I will just quickly show
you in another example. So we put these
trees foreground or this foreground on placent
we have cliff Background. Next should be. So this should be foreground
and we have castle. Was castle is here. This should go in background. Okay. And you understand point. Now we just need layering. All these layers we
render separately. But I will stop here
because we want to save this in open XR file because we don't want to
re render everything. Every time when we
close our blender file, we want to save this
and we want just render layers on which we made changes. Okay, so now I can
delete all this. We have our file output. We also delete our viewer node. If you want back, you can
click on any of these layers. And now we just need to
set folder where you save all these or
just one XR file, but all these layers. We can click here, Enter, and that's basically all. You can now play with
render settings. I set this by default to 100. You can also play with all these settings if you
think you need to change this. But now I think I just need
press F 12 to render this.
8. COMPOSITOR COMPOSITE LAYERS TO FINAL SETUP: Okay, we are done
with rendering, and I didn't do this last time. I work in this blender file. So what I do, let's see. I just move this inside
this blender file. And let's just
quickly check this. Okay, see this work but
if I think a little, my recommendation is to move to completely new
blender file because this blender file will become heavier later when we
add all these things, and it can be a little laggy. So I think we can try with just completely
new blender file. So we can go with
click click here. This is basically
the same you move this XR file and all these
data to new software, for example, After
Effects or DawncRsolt. So you can think about
this like we are opening new software and new
compositing software. So if you click here, we have new compositing
software and we are independent with
these projects here. We don't need this
timeline because we don't do any animation and
all this one is here. And we can now bring this open xR five format here
into new Brander five. Okay, we need a quick new here, and we can first save this. So we can call this
just composite. Okay. Now we can bring
our EXR file format here. And you can see that
we basically get same. We get in this blender file, but we have completely
clear and new blender file. I don't think this
affect anything, but I will say this to GPU, but this part here affect But this thing
here affect a lot, so be sure to set this to GPU. Okay. Now I will do
same I do before I will split this window to
half image editor, and you will no. So we can preview on
left what we are doing, and here I will disable this bound And we now switch to
this Chapter five or six. So compositor and layers
to file out put open XR, compositor composite
layers to final setup. We will now start
with this part. So we now need just layering
this to make all the sense. Okay, this is what
we get by default. Actually, I think we
don't need this for now. Let's place this here and
let's now start layering this. So we have background. Okay, I have different order, so we now get this
alphabetic order here, but it is not a big problem. So we can start with
any of these actually. I think we can maybe
start with foreground. This have made more sense. Alpha over. So this is foreground should
go in foreground. And next layer here
actually should be cliff. So cliff should
go in background. Okay. Now we need to
duplicate this with CD. This workflow is
new for me also. So sometimes I need
1 second to think about little but everything
is logical here. So we have now this layer here. If you just up and you don't
know what you do here, you can always go
with Control Shift and click to preview this. Okay. And now you know, we have the foreground cliffs
and next should be castle. So here we need castle. So castle should
go to background, and this should be in
foreground of castle. And we don't see anything now because we are previewing
this note here. We preview this one. And next one should
be background. So this should be foreground and background should
be in background. And the last one is volumetrics. Let's see what we have
with volumetrics. Volumetric should go in
foreground, I think. Now, we should compare this
with everything layer. So I can duplicate this here. You can duplicate
this if you want. This is everything layer. And let's see this
same like this one. This should be now
same it is not safe. I think something
is volumetrics. So actually, it looks like we have one
over over all these. But with volumetrics,
we actually have we should have steps which affect
these objects here. I will show you in my last
project how this should look. This is volumetrics should look, and we actually have
I will show you here. I will again duplicate this. This is how our
volumetric looks. And I think we mess
something here under. Okay, this is a new Blender file or just compositing bunderFle. So now we need to fix this to our main blender file where we actually work with
this project. Let's see. So we have this
volumetric layer here, and we actually enable
all these layers, and we need set
this to hold out. For example, if I set this for ground and if I set
this to hold out, you can see that
this layer actually affect differently
the volume metrics. So we need to enable
all these layers, and we need all
these to hold up. What we need to do now, we need to go to compositor and re render this
volume metric. Just click this button here. So I will close this here and let's now see if
this updates here. Not for now, let's
see where is problem. I will reload this blender five. Maybe this is problem. So first time we go
with Save and revert. So actually, reload
this blender five. Okay, and you can see
that we get live update. So if you don't
change in real time, just be sure to save
this and revert. Okay. Let's see this
now looks better? I think this now
should look better. We'll just brief this
volumetrics here. Okay, now we can compare. This is everything
and this here. We get very small change. I think this is let's see. So this is this is everything. And Okay, we get
very small change, but maybe we need to set
something to indirect only. Maybe these cliffs in background
affect this object here, but I think this is not
so important for us. It is very subtle change. So again, this is everything
all airs enabled, and this is after we composite. You can see change
here three to one. We have very subtle change
on lighting on this. I think some of these lights indirectly affect
this thing here, and we should fix
somewhere here. Maybe on cliff stuff, we need to enable these lights inside castle. Us indirect. Okay, I will try with this, but this is not so
important for now, just to know where is problem. So we have very
subtle change here. So we are now into
compositing Blender five, and we miss one thing. You can see that we
miss this cgDRI, how we can enable this. This is little tricky, so it is not so easy as you expect because we are now here. And if you think, Okay, you can skip this part. You can think, Okay,
I will get new layer. I will call this HDRI. And this is what I do last time when I first
think about this. And I can now
disable everything, and I can just go to
render properties. And remember, our HDRI is actually disabled here
under film transparent. Okay, I will enable this
layer here and I can now go to compositing tab and
I can go with Chip D, send this to HDRI, and I can render this layer. This is from HDRI Hen, and I will just show quickly you can find this here under
world setting this one. But let's back to
our compositor. Okay, now we have our HDRI
and we can composite this. But let's see what happened. Now we Okay, because I
didn't re render this, we still don't see this KGRI, but next time when
you render this, you will see this KG. So we actually go one step back. Before we fix this to set all these to
transparent and with this we make HGRI to
all these layers, not just this one where we want. So this is not solution, so I will remove this layer. I don't need this. I need
back to transparent. We need another solution, and searching for this problem, I found that a lot of other
users have same problem. To prove this, I
will go to YouTube. This is Ryan King art, do about layering in a
few of these comments, I found that people
have same problem. So for example, this
one, if I want to say, here is the RI visibility of
the image and nobody replay, I think I replay this comment. I also search for maybe
three or four videos, and in all of these videos, I found same problem. People ask how to save
HDRI for background. You can see in this video, Ryan just put this blue
collar on background, but he lose HDRI here. And I found two
solutions, actually. First one is sins. So we now comes to these scenes.
9. SCENES: I said before that all these
things you do in one layer actually affect all these
layers except this row here. We cannot just
disable transparent from one layer do not
affect all layers. We will affect all layers, but we can do this in scenes. So now we come to the scenes
and we can now click Plus. We can now create
completely new scene. If I now click here, we actually get completely
new blender CN. It is the same like you
go with new Blender five. This is not useful
for us because we want to copy all these
settings from last scene. So I will close this scene here, and let's see what we
have next copy settings. With this, we actually
get empty blender file, but all these settings are
copied from last blender file. So you can see all these
values are copied. But we don't need this.
We have now linked copy. Let's now first talk
about full copy. So with this, we actually
get full copy of this. But there is one problem. For example, if I
change this number to 120 and if I now go
to my first scene, you can see that this
number is different. So every time we change
something in our main scene, we need to go to this scene
01 and change same number. So now comes to okay, I will remove this
for now, delete this. We now come to this most
useful thing, in my opinion. So we have now linked Copy. So we basically link to scenes. For example, if I
now change here, number of 100, 20, and if I go to
first scene, Okay, there is one thing this scene actually is
copy of this scene. So if I, for example, here, go with 130, and if I now go to this scene, Okay, I know what is problem. When we work with linked object, not all data are linked. So this data are
independent with this data, but some of the data are linked. So I think everything
we do on this area and shader are linked. And
we can now check this. For example, if I
go to this scene, we have this world
tab and this HGRI. We have this number,
I will copy this because I want this. If I for now, set this maybe to ten. And you can see that this
affect lighting in our scene. If I now go to n01, you can see that this
value here is linked. So for example, we
can set this to 50, and we can now go to SN here and we have here
50, which is great. So I will back this number. Here, and we know now that these values here
are actually linked, and this is actually what
we want. What we can do. Now, this data are not
linked, which is great. So we can basically, okay, control the undo.
Sorry for this. We need to go to another scene, which I will call HDRI, HDRI, and we can call
this layer HDRI. And now, what I
want to do I want. I also have all these layers in this HDRI, which
I don't want. I just want one layer in
which I will say my HDRI. So I will remove volumetrics, remove everything here
DRI. I don't want touch. I will remove background. I will remove cliff
Castle and Cliff. Okay, now I have only
HDRI layer here, and I don't need see anything. I just want see my HDRI. And now in this HDRI scene, I can disable this
film transparent, and I should get this, but we changed this number. And now you can see this is independent with
my original scene. So we didn't affect
this layer here, and we still have
all these I didn't affect this scene here and we still have all these layers. But when I switch to DRI scene, I have only this HDRI layer with disable this transparent.
This is what we want. And what we need to do now, we need back to our main scene. And we need to go
to compositing. So we have completely
different scene, which is called HDRI, but we can still
because this is in same Bndle this BnderFle, we can still access to this data from this
main scene here. So we can go to compositor, we can create new one or
you can duplicate This one, we can now set this to HDRI. So we switch from scene to HDRI, C, and we can set this to HDRI. And let's see what happens
if we now render this. Okay, and control shift
left click to preview, and you can see what we have. We can for test just render
one of these layers, so we have this background, and now nothing should change, and you can see that this works. So you see that we don't have our HGRI here, which is good. This is actually what we want. Now we can save this data here, file output we can
plug this here and under we should select this here and we can
rename this to HDRI. And if we now go to our
composite Brander file, let's see if I go
with Save and revert. Okay, I didn't get this KGRI. I think in this case, when
we change this file output, we need maybe re render
everything again. But this is case only when
we change this file output, when we add new outputs here, we should re render
everything again to update our open xR. But for example, if you just change render some
of these scenes, you don't do this. Render image, let's
see what happened now. After re rendering
and reopening, this can go with file revert. But okay, I will go revert. But what you can
do, you can also go with file, save incremental. We now create another
version of this composite. One, because if you
want back to this step, you can always open. Open this blender file. So we actually make backup here. And you can see that we
don't see anything here, but we don't lose any
of this information. We actually just need to refresh this with Control
Shift thanly here. And now we get this HDRI, which looks like this. Looks how it should look. Now we need to composite this
at the end of this chain. What you can do, you
can go with Shift and right click on mouse, you can just drag this and
create this re wrote node. Okay. Now we need
one more Alpha O. Just to check is this
recording correctly. And what we need now. This should be foreground and here's DRI is
actually background. It should be last
one. Now we get this. Let's see how we can now get
benefits of this workflow. Now this look a little messy, but let's make more space. And let's start with first one. So we have here cliff
and foreground. Now it is a little hard
to tell which node, which one, so we can
maybe put this in frames. I think a shortcut is F.
If you so this not frame, this is label. You
can call this. So first one is cliff. You can see Clif,
Cliff and for ground. Now, we know that this input
here is actually cliff. We can check this
if, for example, go with simple node like
hue, saturation value. And if we now change this hue, you can see that we
affect now only Clif. Okay, I will delete this. I think if I go with text, I will delete this, but also remove this
connection with maybe shift x. Let's see. Control X. Yes, Control X, keep
connection, but delete this. We can now maybe try play with simple Kubahara effect
which comes with blender. This effect should cover this image to painter
Look, let's try. This, for example, if this actually size
is most important. Here. If you say
this bigger number, you will get this effect here. This is little you can see that. This little slow down. I'll see. So it is
not so simple effect. If you go with bigger number, this should be even slower. Now it's fast. But if you
go with value of 100, this take a second to calculate. So it is not so light effect. It is pretty hard for calculation just to
keep this in mind. But I watch a few videos
about this effect, and this guy recommend
this setup to get even more painterly effect. If you want, you can
watch this video, but I remember what this guy do, and we can try now
replicate this to get maybe even
better look here. So he put this first
one to value of eight. And before this, he put this diamond sharpen
effect and also after, and then he mixed this with bigger value of
this quara effect. We can create this
if you go with filter and if you said
this to diamond harter, he put this to 0.3. You can preview this
how this effect. For example, with value of ten, we actually get this
sharpen effect. But let's back to 0.3. If you want to back our view, we can just click
here to let us know. After that, he put this to one. So value one. And now I will make more space
as to scale this, then he mix this
with bigger value here with Kubacaraffc
bigger value. But now is this one
effect is floating. We need to plug something here. So we want cliff to affect
this so just make this cliff here and now go with
Mix mixed color. Now we plug value
A with value B. So this is actually value A, and this is Value B,
only this effect here. But he mix this alve
so you can see here. Let's try do same. 0.5. Okay, but now we have big notes three
here and if you want, for example, put this
effect to four ground, we need to duplicate
this and put this here, which is not practical. So I will put this in group. To do this, you need
to go to Control G. And now we put this
in group and with tab, you can go inside
group or outside, or you can just click here. And I will rename this
to CV for uvahara. Okay, but I still
maybe sometimes want change some
of this value and I don't want to go
inside this group. So I can expose
some of this value. I think it can be useful. We can expose this slider here. And this size of Kubacara
is most important. So I will expose this one, but we also mix with this one. So I will expose both of these. And now we can easy see. So this is before I
don't like this look, I want to maybe go more on
this right size, maybe 27. And we can also try
with smaller numbers. So if I go with two
and ten, let's see, this look or if I go with
bigger numbers like 12, 60. We get this effect. So let's back to
numbers like before, maybe eight and 30. Okay. So this is
before and after. And what we can do now, we can now maybe put this in
this layer. So very easy. Chief D duplicate this here, and now we get same effect
on these trees here. Maybe we can go here
bigger numbers. This is obviously too much or maybe smaller numbers
to display here. You now start, see
benefits of this workflow. But let's now just
frame all of this and rename to make this little
easier to understand. So this one is actually
cliff for ground. And this one is castle. So I will maybe for now, just call this castle. So we know that we
have castle here. If you want to rename this, you can press F two now, not F F two. Castle first input. So I know that this castle
is like this first input, I don't need L where
these lines go. We can maybe rename all this. So this one, let's see. So Castle is now second input, and now this go to background. So this is first input
is now background. Background, first input. Okay, let's see. But we have next
background first input and second input is HDRI. This one is volumetric,
second input. So volumetric, second input. Let's see if we now
play this value. You can see what we get. We
actually choose how much we want this volumetric
effect here. Okay, what I do I put all
the inside this label. So I will call this
volumetric second input, and this one is here DRI. If you are right, first thing. Okay, now we can a little
better understand all this.
10. ADDING DETAILS WITH SUPER SCATTER ON SURFACE part 1: Now start playing with
another chapter here, adding. So we go through scenes passes, adding details with Super
scatter on surface Modifier. I have a complete guide for Super scatter on
surface Modifier. If you go to my website. You can find here
all my tutorials. But if you type here slash SSS for
Superscatter on surface, you can find all these
instructional videos. You can watch them for free. But it is very easy. So when you download my
Super scatter on surface, you get this folder,
this Zip file. You need to extract this Zip
file, and I do this here. And now you can just copy
address of this folder Control C. For this, I will open new Blunder file. Then you need to go
edit preferences. File Pat, click here plus, past this address here. I already do this
and you need to set this to link and
say preferences. Click, say preferences,
I will not say these preferences because
I already do this. And then you get this. I will show you in second, under your Russell browser, you get this folder, super scatter on surface. And to install this ad on, you need just drag this here. So this is plain scatter, we will just use plain scatter. Okay, I think this is I say
important method to append. So that's why this is slow. So you need to set this to link, but by default, you
set this to link, so you just need drag this here. Okay. And then when
you have, for example, when you select this object, you can search here for
super scatter on surface. So you don't have only
scatter on surface. You have super
scatter on surface. But when I made one mistake, I said default value to 20. For example, when we
have this big object, I just search for super
scatter on surface. This can be heavy
for your computer. My computer can
handle this because this density value is in correlation with
size of this object. It is not problem when I will remove this. I
will show you now. For example, if I have one
small cube, which is this one. If I go with super
scatter on surface, it is not heavy because
small object will have a small value of these objects
because this is density. This is not number. For example, we don't have 20 of these assets here or these instances here, and I will go now
with Control Z. This is just for test. Because
this object is very big, we have too much of
these instances. And how you can prevent this, you can go with geometry nodes. You can go with
Geometri nodes because this super scatteral surface
is actually geometric nodes, and you can for now disable this please disable this
for second and we can outlod this super
scatteral surface and set this value to
maybe 0.1 for now. Now we can enable this. And now we get assets here. But first assets is
actually the soil, and by default,
this is asset zero. And by default,
we get this soil, which is very tiny because
this object is very large. The scale is one which is good. We actually want scattered trees so you can see we have
all these assets. For example, if you
set this to six, this asset here to six, we get tiny grass here,
you can see here. But this is huge object. This is big, like
100 meters and more. So only huge objects
will be visible here. And for example, if you need
the bag trash or something, you can type here S 55. This should be a little bigger. But we actually want trees. So 71 is first these are
low polar trees, actually. And you can see that
we cutter trees, but the follow normal
of this plane here. So we want little
adjust these values. So you can adjust
all these values. I set some of these
values as default. For example, you
don't want to change this scale too much because
we will get massive trees. These trees are already
about dimensions. So you can play this a
little. We also have this. I also put this scale offset. Scale randomness here. So some of these will be
bigger, some of these smaller. If you play with this value, maybe 0.6 is good
value for randomness. I also said this rotation. 360 must be always, but this X and value can
play with these values. But let's now this
aligned rotation. So when we check this, it
will follow world Z axis, it will not follow normal
of this plane here. So this is before now this follow this normal
of this plane, but trees should follow
like world axis. And we also have this
rotation, X and Y. If we send this to zero, we will line up all these trees maybe for trees,
five or something. Now we can play with acts. So this is we have here Act 71, which is the CD spring.
Maybe want snow. So 73 is snow variation. So these are super
low poli trees intended for these
purposes, background trees. You can see all of
the cave just four vertices and multiply
with few rotation. So all of these c
maybe I don't know. 64 vertices one tree. So this is Asset 73,
which is this one. Let's see how this look.
I think this is good. Maybe we can set this to. We can combine
multiple of these. For example, if I said this to 05 and if I now duplicate this, be sure to change seed because now they are in same places. They overlap. Now,
if we change seed, we get another seed and we
can maybe add this 176. We can say these two. Maybe 0.1. These are more like pine trees. Maybe more this 0.2. Okay, now we add
much more details. And this is now only on
display. What happened? Let's see what
happened if I select all these objects and
this one last object. So we will basically join these two object to
this one. Control J. Okay, now apply all these two. Okay? This is not what I
want. I will go with CZ. I will join these two objects. So these two should
be one object. But I will not join this one. I want here maybe only
few of these trees. So what I can do, I
can go to Edit mode, and I can maybe
select only a few of these phases. Maybe like this. I will go with S D, Save DZ, and P separate by selection. Now, this is completely
separate object. I can make origin to
center of this geometry. Now I can go with super
catteron surface and set this 2.1 because trees are massive
and 76 this pine trees. And again, align rotation. We have a few trees
on this cliff here. Maybe we can make
these trees a little bigger 0.5, 1.5, like this. And now you can play
with this number. If you want more trees here, we can increase this
number maybe 0.15. We can hide always
this in Wuport. I think we have too much trees maybe on this area which don't
have too much sense. What we can do, we can just
maybe delete these phases. Okay, now we should get
less trees here. Maybe 0.1. And I will bring
this little down. We see this edge here. We don't want to see this GZ
shift to move this slightly.
11. ADDING DETAILS WITH SUPER SCATTER ON SURFACE part 2: See what we need to do now. We now need to go to compositor, and we need re render, but only this foreground layer because we play only
with foreground. Not foreground, but
I'm saying background. So we need rerender
only background here. After re rendering this, we are now in compositing
one bender file. You may need to reopen this
source file, save revert, and you should control shift than click here and you
should get this update here. Okay. Let's now continue
with adding details. I will add more details on this cliff and also foreground. I will just do same so I will
open working Blender file. This is compositing Blender file and this one is
working Blender file. I will switch to layout, and let's now
select cliff layer. I will select this cliff. And again, I will go with
super scatter on surface. My recommendation is to go with geometry nodes and then disable this and then add
scatter on surface. Because this is a big object
and it is little heavy. I need to spit this up, I need set this to one. Now I can add cliff assets
here, which I also have. I have stone assets. It will still look good if, for example, add big stones. Let's try this so we can add asset 21, which
are these stones, and this will not help too much because we
want to make this bigger. I can maybe just
isolate this here. Transform and if I said, for example, this to ten, this is what we will
get.This obviously not good, so we can go with cliff assets, which is just for
these purposes. So I have here 67
to seven, I think. So asset 67 should
be this cliff. But because this is very huge, I want to make big offset between small assets
and huge one. So I will set this to 20, and you can see what we get. But I will now go with
randomized scale, and I will go with
this all to 0.9. 20 too much maybe
12 or something. So this is before,
this is after. I think this is too
much of this maybe 0.2. Or even 0.1 density. This is still too big,
maybe six or eight. We can, of course, combine multiple assets I
will increase number. Here, we can maybe send this to we can shy maybe
another asset. 68, let's see how this one look. This one is smaller, obviously, so we can maybe
increase this Okay, maybe this one is not bad. So let's say this to Turkey, and we can play
with this density. This is before, this is after we obviously
get much more details. I will also try 70. This one is much bigger, so let's go with Maybe this one. We can maybe keep this one. So this is before
and this is after. You know what we need to do. I will say this and
under compositing, we have here cliff I will
render only this layer. You can see that this is
very fast, only 10 seconds. If we need re
render whole scene, it will be much slower, maybe, I don't know, 30 seconds. And later when we add even
more and more assets, it will difference between these two methods
will be very big. So I will now go to
my compositing tab, and we didn't get update
here, so we need again, file, say file, the we and
now you get our update here. Okay, so this is
now clip assets. Obviously, we need to separate this cliff with background. Now, this is a big mess, but we will play
with this later. Let's now add some
assets for ground. So I will open for ground layer. I will select this object. This is small objects, so I can directly with super
scatter on surface here. We can bring this here. So we now import Act zero, which is this soil. I will show you how
this look, for example, if I increase this to 200, I have this soil. We can go with 600 maybe. And now I can, for
example, duplicate this. I will change here seed. And for example,
if I need grass, I can go with acid number seven. And basically, I combine this
grass and this soil here. This grass here is not high quality assets until
we click to high quality. Then we get grass with even more details
and with better shader. But this first one is much
faster than this one. So depend of your purpose, you can always switch
from low poly to high quality with
just one checkbox. But we are not here
to put grass here. We want to put snow here, so I will remove this one. I will go with maybe ten. I just want to add
some details here. Maybe we can add let's
see what we have here. Some leaves or I think I have
ivy or something here, 29. Maybe some ivy over leaves. This have more sense. Something like this. We can also use this masking option
to paint over this. I talk about this more detail
in instructional window. I will not use this for now, or even better solution is
to use this curve scatter, so we can basically draw
with this curve properties, you have this curve
drawing tool, you can basically draw. Okay, here, scatter
curve we can maybe quickly so this is how this
curve Scutter actually looks. So this is curve Scutter. And we have all these options. Okay, not so important. For now, you can watch
this video on this link. Let's back to our scene. So we had these details here with the super scattern surface, I will duplicate
this change seed. Let's see what else I can add. I don't know. We
can add anything. We can add a few stones. So I will go as 20. This is too much
stones or rocks. Um, maybe 21. Maybe this one. I will try blend this better
with ground so I can go with I have here surface
offset or something. Okay, I can move this down. And there is one option
if we click realize instances we can put over this, and then we will get also these
leaves over these stones. Okay. But I will
go with maybe 0.5. Now, you basically get
more details here. One thing I forget include this tutorial is how
we can add snow. So we have one free addon, which you call real snow. You can enable them
to edit preferences. But I will talk
about this later. So I will just add here. Real Snow, so I will not forget
to talk about this later. Now we are more
details, and you know, but we will do we will say this compositing and
foreground, which is here. Really under this, this
should be very fast. Maybe just 10 seconds. You know that we have
in film enabled here. You can change
this if you select camera, under that field, you can also play with
these values here, and I put Castle Object
as focus object. Of course, you can change
any of these values. So we now need to
go to compositing one save revert and we should get all
these details here.
12. PASSES AND MORE: Not so happy with
the volumetric, so we can maybe play
with this little more. So we have this volumetric
here and this slider. And let's see, I don't
want to remove this. I want keep this but maybe add another layer of this.
So what we can do? We can go maybe with mixed
color here. Let's see. I think this should
be layer one, and we can grab again these volumetrics and this should be maybe layer two. Okay. And now I will
go with RAM here. M and let's preview this
control sheet, left click. Maybe I want to add even more
of this missing background. You can change this value
here to bigger number, for example, three to
make this more intense. And what I need to do now, if you go all to one,
you can see we basically get black and white image.
This is not what we want. So we need different
blending mode. Here, we need this to lighten
or screen blending mode. I think T screen. Let's see actually
what we get Now, this is factor for
this miss one. This is factor for
this miss two. And also, this affect a lot
where miss will appear. So we can basically
isolate castle. So this is volumetric pass. This is not miss pass. Just don't be confused. We will later play
with miss pass and we will see what we can
get with miss pass. So this is just volumetric pass. But we can still try, use this. So this is before after. You can note one bug
here or problem, you can see this line here. You can note that this
doesn't include our trees. And I think you know
where is problem. We need back here. We render this volumetric pass. We basically re render
this background pass, but we didn't this volumetric, so we need go to compositor and render this volumetric pass. After reading, you can see that this mispassed
work correctly. So now this includes
these trees. We basically now get
one more controller. It is not perfect,
but if you want, separate more of this
background with this, you can use this and we
also have this slider here. We also have this slider. We can basically add as
much layers we want, so we can basically maybe add
another layer which should be so we will combine this
one with maybe another one. Okay, so I will add
subtle volumetric effect or this castle to do this. I need something like this. And we can now plug this here. We can sell this to screen. It is already screen, and we can add subtle volumetric effect
on this area also. Actually, I want to
include this part here. So control shift, and we can
play with this slider here. Okay. Now we can
just rename this a little or put in
frames or label this. So this is volumetric. This will be volumetric ground volumetric ground. It will be easier for
us when we rename this. So this will be
volumetric for ground. Volumetric class. Okay,
now we have three sliders, so how much we can always to the sliders
later adjust all settings. This is point of this
tutorial action. We can now include passes here. So let's see how we can do that. We can back to
working bender file. And in this step, everything, I will
enable these passes. I think these options are not connected with other layers. We can check this quickly. For example, if I
go to foreground, you can see that
this is disabled. This option here is not
connected with different layers. But we need this
only on one layer. We don't need this on
every of these layers, so we need to enable
this just once. Okay, now we can go
here on the combined. We can, for example, select miss pass to see how the
miss pass look. This miss pass depend
on this number. And you can see that I changed this number by default
is 5-25 meters, but we have much deeper seams. So I said this to zero to 1,000. Let's see what
else we will need. Basically any of this
can be useful for you, but I will maybe select just a few ones
which I usually use. So most of this I
will not use for now, now, we have light tab, we have glossy direction. You can use this to
increase glossiness. I usually play with this option, but I think in this case,
it is not so useful. So you have diffuse. So this is basically color. If you want just affect color. I will actually suggest
one tutorial if you want, go more deep with these passes. No. This one from Jacob. If you're interested, how to use Blender and for VFX, you
can follow this guy. He have a lot of good videos. But this is about multi passes, so you can see how this look. But I think basically
he followed this form. So this is actually Blender get this composite
or final result, how blender get
this final result. The blender basically, I
said before the blender basically combine all these
passes into one combined. And if you want, break this, you make this formula. So you basically need to add diffuse direct plus indirect,
and then you get color. But you can also go in
opposite direction. You can separate
all these passes, and then you can affect only maybe diffuse
indirect without this, or you can maybe
affect only this color passes without affecting
any of these passes. In this example
here, you can see how he basically extract all these passes and then make all these passes to get
basically this combined node. But then you have access
between all these layers. For example, if he want to just change color without affecting glossiness and other things, he can just place
algeB curves here, and then a I think now he
will affect only base color. He will just make this kitchen
more brighten or darker. But I think this is
too deep for you, especially when we work
on artworks like this. We don't need to be super
precise with all this, if you want, change
color of this cliff. You can always just go
with hue saturation value, and you can just
change this here. In this line here. So the point is that I
will not go too deep. With this, I will
just enable what I think it can be useful for us. We can maybe drive with
this glossy direction. Volume. I'm not sure. We have principal
volume in this subject. Let's see. Okay. This is all
how I structure this scene. This object here is not volume. This is if I go to shade the
relator, this is object. This is emission pass. So we can access this cube
only with emission pass. This one is volume. So if you select this object, we have reciple volume. So basically, if I
enable this volume, direct or indirect, I
will just see this cube, which is not super useful, so I will skip this
Now we have emission. With emission, we will
get emission from this cube and maybe this light here because I have
emission cube. So again, not useful
for us environment. Okay, I will show you
what we can get with this Before when we create
this HDRI scene, I say that we have two way to get access to
this background, and this is second way, maybe more easier way
than we create before, but I also want to show you
how we can work with scenes. So ambient occlusion
can be useful. Shadow catcher,
we don't need for this scene and cryptomat we can basically select or isolate any of these objects separately. But for this, we don't
need in this case, we don't need this because we already separate
all these layers, and I don't see any of this
object I want to separate. So I will just go with mist, glossy direction,
environment, tab inocluson. Okay, and what we
need to do now, I will say this and I
will go to compositor, and this is you can
see difference. So this is on this
layer, everything, and you can see that we get
these four passes here, but we didn't get on
these other layers. So we just need to
render this layer here. After rendering, we
actually do this. We need to plug this
into our open XR here. So we need closer direction, environment, ambient occlusion. And I think one pass, I forget which is
the noise theta. Okay? We can find
somewhere here, the noise data. Okay, this one. I think I will not
use noise albedo, actually normal and
the noise depth, I will just use this albedo. I think I need to render this again because I add new passes, so I will render this again. After rendering, let's
see what we have, I will close this render and we are now in
compositing tab. Let's see what if I revert this. We still didn't get
all these things, but let's see where is problem. Because we had new inputs, probably we need port
this Again, here. And here we have, actually, we get this inputs here now. So maybe you just need
slide this inside, blender and then we get this inputs here or
these passes. Let's see. So this is amblentoclusion,
environment. Glossy direction,
denoising albedo is down. Blender arrange this
by alphabetic names. So that's the reason we have Albedo denoising albedo down. Okay, let's see
what we can do now. One thing you can do,
I think we can just duplicate this and
move this here. You don't need always move these sliders here because
we can put this here. Let's see what can
be useful here. With ambient occlusion,
we can basically extract this ambient occlusion and we can basically highlight
ambient occlusion here. So we can go with mixed color. And if we said this to one, let's plug this here. For this, usually
in after effects, I use soft light blending mode. Let's see how this look here. Okay, maybe this will be more useful when we add
the paint filter later. For now, is not so useful. If you like this look, you can always play with this. And of course, you can
put this in any in separate layers because we
separate all these layers. I will skip this for now, let's see, glossy direction. We can with this
increase glossiness, but for this, I usually
use screen bending mode. In this example, this
is also not so useful. Let's now plug this environment. So with environment,
we basically get this with environment, we basically get this HDRI here, but we extract this here, so we don't need this now. Here we extract this
HDRI with another scene. This is probably easier way
to get this environment here, but for now, we don't need this. Okay. I see that I
forget Miss pass, so I will re render this again, and I will back and I
will back to this in mit. So we don't need this
environment here. I will plug this here
and this took over. But I don't see this miss here, so I will again, just obviously we need to slide this to refresh
this blender file. So you can see after
sliding this here, we get this missed pass. Let's see how this pass look. It looks similar
like volumetric pass because it is in this case, similar because we have this emission cube which
cover all these layers here. With this missed pass,
we can do a lot. We have this very noisy image, so we can use the
noise image here. Let's see. I think just the
noise if you plug this here. Okay, this already works. I'm not sure why this
is not black because we have these trees
use Alpha value. We have plain with Alpha value, and this is little annoying, but it is how it is. Okay, and now we can
go with ramp again and we can play with
this slider here. I will show you example where
this mispas is used later. I will maybe show you
paint filter effect. But with you, I will also
share this pain sky. This is what I create with
this paint filter addon. If you don't want
to buy this addon, I will also share with you a few overlays which I
created with this addon. For example, we can
now start playing if I now bring this image here. So you can inside
blender composite or bring any files from outside. So you can bring
any images here, and we can now maybe
use this for e BRI. Okay. And let's see
why why this is faded. That's because of
these sliders here. This volumetric here is probably what effect
to make this faded. If you want this and make this volumetric effect
doesn't affect this guy, we should just set
this in first place. This HDRI is actually
in background. So we can just put
this in foreground. How we can do this, we
can go with mixed color. This will be like input A
and this will be input B. So now we have what
we have before, we have what we have
after or this input, second input is this sky, and we can factor use miss pass, and you can see what we get. So we don't want
any area between. We just want isolate
this completely. But maybe for this, we
can use environment pass. Let's see how this will look. So this is how this
environment pass look. And if we go through color ramp, we basically get sky in background and we
get everything else. Now, if I bag this, you
can see effect we get we basically put this
now in foreground. So this is now in foreground, but we tell blended
with this mask, Okay, make this foreground layer, make this foreground
layer transparent. Where is this black color. And we get this effect. Now we can maybe change to
this one or what you can do. You can combine these two. What if I go with
this is sky two. What if I go with sky one, and I don't know. I can maybe multiply
this or I don't know. You can do everything you want. We can maybe just use
one of these for factor. For example, if I
plug this here, if I go with Trump I can basically make
mask which will tell, where this black color, use this first input
or second input, where is white color,
use this first input. And you can basically review
how this look when we play with this sliders here. Okay, and then you
can go further, you can go with
Shift click to make reroute here and you
can go with hue, saturation value no, then
you can change color with this Then you come back to these sliders and you can play basically whole day. If I start playing with this
tutorial will take too long. So I just want to show you
technical aspect of this, how this works, and then you can spend more time
playing with this. So basically, you can
do whatever you want. But I think after a few tests, I think we don't make this too saturated because then we
get complete mess here. And we want to put maybe
focus on this castle. And to put focus on this castle, I will show you
another technique like linking and groups. So we basically want to put focus on this castle
with sun lamp, but without affecting
all these layers here. You can just press F
you can call this sky. Sky textures. We can scale this. Just to show you, you don't
need this paint filter. You can basically any
sky texture for this, I have a lot of these
sky clouds textures which I download before. And let's see, just
for test, what look, we will get if we just port
here real sky texture. And you will get one problem. This image is big. You
can go with scale. So scale node, and you can
set this to render size. You can basically stretch
this to render size. Okay, I know there is problem because we
open new blender file, this doesn't match
with our render size. I need copy these values here. Now, this will fit
to render size. Okay, this look so bad, so I will maybe play
with another one. I don't know. You can play
a whole day with this. I will just now make this here.
13. LIGHT LINKING AND LIGHT GROUPS: Now put this castle more
in focus with Sun lamp, which affect only this castle. We can now go to lay everything, and we cannot go with Shifte
and add light Sun lamp. Okay, we don't see too much because maybe this is
not strong enough. So I will send this to maybe, now we see some effect, I will use the heat. And now I will location of this sun is actually not
so important because sun is infinitely far
away from the scene, even if you put this
close to castle. So rotation is only
important with sun. And I want to make
this part in shadow, but I want to highlight
this part here. So I will go with
maybe numbe seven, so we can look at
this point here. Maybe Y. Eric and you can
play with Eric and Hermar. And, of course, RZ. I like some of
these shadows here, so maybe something like this. Okay, I should bring this down. And now I can play with Z. Something like
this, and maybe we can increase this even more. Okay, now, I want this
sun affect only castle, how we can make this. So we have sun in
this collection, and this affect
all these layers. For example, if you go to Clif, you can know that this
also affect cliff. Now we can select the
sun lump. And let's see. In some properties, we
can just find here. I think in some
properties, let's see. Under shading, we have
this light linking. We can create new one, and we can now add basically just castle
in this light group. And with this, we
basically tell this lamp this lamp that this can affect only this
castle, nothing more. But with this, we will not get new pass inside
blender compositor. We can add like this,
but I want overlay, so I can later control how
much I want this effect. So for this, we need
great light groups. And let's see how we can
create light groups. I think this is under layers. So under layers, we
have light groups heat. We can create new one and
we can call this sun. Okay. And now we select
this sun here back to properties and somewhere
here, like linking group. We can basically assign
this to this light group. Okay? Now, this
should be enough. Let's see what we get if
we go to composite intel. Yes, we get this overlay here, and we now need to re render this I didn't get what I expect. You can see that this affect also other objects, which
is not what we want. So what we need to
do we need basically change to castle collection. We cannot do this
in this collection. So we can go to Castle now, we have s here. Now, what we need to do we need this object and
under light linking. We need to put this castle here. This is now not visible, so it is like before. Reason. The reason for this is that we only
have this castle, so we don't see that this
doesn't affect other objects. And now what we need to do next, we need to go to layers here. View layers and light groups. So this is what I create before. So we need click Plus. You can call this,
Castle sun or something. Now, we need to select this sun again, and sun properties, object properties, we need
to find here light groups. And we can load this
light group here. Now, we need to
go to compositor, and we now need
rerender this castle. And you already can see that
we get this layer here, but we just need
to re render this because we need to
load new data here. We need just overlay not cast. And this is already
done in 9 seconds. Now we can check what we have here and we get what we expect. Okay, but now we just
need to plug this here. And now we can go to I will this and now we
can go to compositor, and we can extract
this data here. But let's see, first we need load this here to
refresh this XL fa. Unfortunately, it doesn't
work how I expected. I will show you why. Let's see. We have here this
combined castle sum which work how we expected
this is what we want. But there is one problem we
also affect this castle here. I don't want affect
this castle here. So we need to tweak
a little this. We actually put this
in one collection. So I will put this sun
in sun collection. Now, I will disable this
on this castle layer. So this now doesn't affect this, but we also get this in all these layers because
everything is connected. So we can disable this
sun in all these layers. This doesn't affect
these objects because we put this
sun in light group, which affect only castle, so it is not visible here. But for any case, I want
just disable this sun in all layers and
also volume metrics. Okay. Now what I will do now, I will go with Castle and I will duplicate this collection.
With copy settings. Castle Sun. So we will basically
create new collection. And here I will enable this sun. Okay, now I can render
only this layer here. So I will go with
compositor and we can basically just
duplicate this Shiv deal. This is HDR ICM, so we need main scene, and I need Castle Sun. Now, after rendering, hopefully
we will get what we want. So I will render this. Let's see. We will extract
only this pass here. This now works. Now, I
will plug this here. Okay. I will, for
any case just rename this combined Castle Sun new one because I want to sure that we will not
get old version. Let's see. What if I now
go to compositing tab. I need let's see, five S five revert. This is not new
version. Let's see. What if I for this here. Composite cluster sun. It is not new version. Let's see. Maybe I need
to render everything. I I will be sure if I re
render everything again. So I will do this now. Now finally, after I reload this file here, we
can delete this. We get this new
combined castle Sanu. Now we can check
all these layers. So Castle is okay. We don't have Sun lamp here. Let's now check
combine Castle sun. You have only this
sun overlay here. And let's see how
we can use this. I will delete this
and we have here cliff castle first input. Let's see how we can use this. So we can go with mixed
color mixed color here, and this first will be casi. Let's see why this
is not visible. We should move this
to left because we have this white overlay here. Now, instead of
this white overlay, we actually want to
bring our XR here. And now we want to plug this
combined castle sun here. And now we should
get overlay here, but we increase factor here. But we should not mix this. I think we should add this
because this is overlay. Basically, you can
choose what you like. But I think mix is
not correct here. Yes, because this part
will become darker, so we need to add
this overlay here. We also lighten this because
this is part of this castle, but we can maybe fix
this with mask later. Okay, let's see what we now
add the uvahara filter here. This is effect we get. And we can always. We actually just get one more
controller here. We can now play with
this slider here. Maybe we don't like this
effect, maybe we like, but it is all about having control over
all these composition. And because of this uakara
this is a little slow. This effect is pretty slow. If you disable this with M, we can work much faster
practically in real time. Some effects in vendor are heavy for calculation,
and that's how it is. Okay. But it looks better
with these effects. We don't have this
effect on background. Let's add this here we have
background on first place. And now we have this
effect also on background. But because we want to keep
more details on Castle, which should be in focus, I will play with this
number maybe 322. So we can keep more details
on cast with this light. And maybe we can
keep less detail on this foreground to bring
this out of focus. This is foreground. So Cliff is first
input foreground. The second input, you can
maybe here with a big number like something like this.
14. LIVE PAINT FILTER ADDON: In this point, we can maybe start playing with live
paint filter addon. So this is not my add on. This is external addon and
I will share link with you. So if you want to
buy this addon, I will not give you full
instruction on how to use this addon because this is not my addon, but I will share. But I will show you
a video in which you can find all information
about this don. My recommendation is
to watch that video, but you can skip that video because it is not
so complicated. I think even if you
follow my instructions, you can get good result. This part is optional. I think with this add on, we can get better better paint look with this
uvahara effect. But this is optional. So first, when you download that add on,
you just need install. This is like classic
installation. For add on, you need
to go to install. From this, then you need
maybe I have this here. Okay, you will get file and
you just need I will try. Search here. Okay, I don't
have this add on here. I moved this in another folder, but just inst that
add on and you will get this live paint filtereda. You just need enable this here. And when you press N, you get this add on here. But let's just for test testing
this in new blender file. So I just need Select Object and we can switch to
material or render preview. Maybe we can go to
cycles just quickly. And here I will load
the sky texture. I need to go to GPU. And now I have this
light paint filter don. And when I select this, I can just make new and we will get And I think we need
to be in camera preview. So now you can see
this effect here, and then all this later is
just playing with settings. So this is basically resolution. I think I will try
change material here to make this more visible. I'm not sure why this
is not visible here. Okay, let's try play
with settings here. We have this bomb strength. You can see this effect here. Clearly, we can maybe shift this hue saturation and value to see this brush stroke better. And we have a lot of
other options here. You can feel background. This will also use HDRI
and paint over this HGRI. For didn't load any HGRI, but by default, you have
this scene preview. I'm not sure where is this now. Okay, this is in
material preview. It looks a little better. So we have this in weld. I think when we change this, this also follow this. And maybe one of important option is this
brush stroke length. So if you want smaller
brush strokes, you can just make this
value smaller, bigger. Okay, for example, if
you add new object here, we need to apply to
new object here. We can call this monkey, and this should also work. Okay, now we get
new settings here. We can play now with
these settings. And this also react with light. For example, if
you go with Slim, this should also
create some shadows. Maybe we have some
settings here. I'm not sure. Cast shadow
but we don't have any plane. Okay, I will not continue
playing with this because we will practice in
our main file here. So we are in Castle S one, and let's now add this
maybe on this cliff here. So I will open Clif flare. And for this, I will
create new one. I will click here
and copy settings. Let's go with cliff paint. Let's see what I need for now. I think I need to do one thing. This will not work
with this debt field. So I can disable this for now. And let's see if I just go with Li paint
filter and if I click here, I want okay, I need to
do one thing before. I play with this. I
apply my modifiers. So we have this super
scatter on surface. So I apply this. So I need to realize instances
and apply this modifier. Because this will not
work with modifiers. And let's see if I now, I will call this cliff. And we get this paint effect. Now we can just
play with settings. So I will select this and
here I have settings. I always put this
bump strength to one I will say this to one. I will go with 0.3 here. If I said this to hold out, this should remove this
background, so we will see. Okay, this hold out actually
remove this castle. So we just have this filter over and everything
else is transparent. So this holdout is
basically this button. We talked about this before. And we have here viewport
and render dest. This is actually most
important thing. If you increase this number, we will make this more dense, but this will be even
heavier for calculation. This looks good for me. So por density is 11
render densities. So when we hit render, we
will get even more details. And let's now go to compositing and let's
save this layer. So what we need to do Shiv D, this is seen, which is okay. We need cliff paint. And now we need to
render this layer. Okay, let's see what
we get. This is good. So we can save this later. But you need remember
what I talk before. When we create new
layers or folders, it will appear in
all collections. For example, if we go to
collection everything, this is not problem because
we have here everything, but I will disable this for now, and it will be in all
these collections. So we need to go in all these collections
and disable this. I will disable this
clip collection. In foreground collection. In castle collection. I dissemble this paint
filter in collection. I keep only in this
paint collection. Now we can render this. This is how this
look. This is good, and we can call this
we can plug this here. Now we have this image name,
which is not what we want. We call this cliff paint filter. And now we need to re render this and we can then jump to
this composite blender five. Okay, I forget
recording my voice, so I will remove this for now. So basically, nothing
happened after re rendering. Let's
check my voice. After re rendering, I just move this into this composite
to refresh this file, and I get this
cliff paint filter, which looks like this. So looks like how we expect. And now I will back
all these layers. Because this is a
cliff paint filter, this first input is cliff. We can mix this here. So mix color, and we can
put this to second input. Now, we basically
have this overlay. So this is before,
this is after. And I'm not so happy
with this result. I think we have too big
brushes and too much of this. So I'm trying to play
with these settings. I reduce this brush
stroke to maybe 1.4 to make this smaller. And I will decrease resolution. So we have resolution to 12,
which is maybe too much. So ten should look like this, so we can maybe just
keep this more subtle. Okay, now I need to go to compositing and I need
just re render this layer. I'm not sure why now this
become not more transparent. This we now get this
black background. But I think if we
send this to screen, we should still keep
this paint brush here or lighten
these strokes here, but we will remove
these black colors. Okay. So this is before
these strokes here. So before and after. I think I will not continue with adding like this
become a little slow. I can now spend 1 hour and add this paint filter
to all of this layer. So this is cliff paint. Now I need like duplicate
this and create castle paint layer and then add this effect to castle
play with settings. I think I will do this
maybe without recording, and I will save all
these overlays. And then I will share
these overlays with you. So instead of saving
this in open EXR, I will share the separate
images like I do with this overlay here. So point of tutorial is just to show you new
techniques, and what I use, it is not point to repeat the same actions over and over because this tutorial
will take too long. But I think we get a
lot with this overlay. It looks much more like
paint, artwork than before. So with M, we can mute. This is before,
and this is after. One thing we can maybe practice now is
masking in blender. For that, I will disable all the uvahara effect because I see that this slowed
down my compositor, and let's now open
a new tab here. Horizontal split, and
we can open here. I think image editor
and under image editor, we have mask option here. First, I want maybe highlight
this castle here so we can make another mask
over this castle here. One thing you can do, you can
maybe load here, er node. And we can create new mask. So I will call this castle mask. I know that there is shortcut to create mask I don't know, control, right click or something so you
can drap your mask. But I forget how to do that. So we can maybe just
create circle mask, which is down, and
we can go with G, place this mask here. Now, of course, you can play
with these candles here. But I think this
is already okay. And we also have here feather. If I resf now. I don't use this
feather because we have blue uption in compositor, which is basically feather. So we can use this here. And now we have this castle
mask, how we can use this. Let's see. We have this sky
and I want to highlight this area here even
more. What we can do. We can basically duplicate
this one more time, CD, and we can plug
this also here. Now, let's say, this bottom
one will be even brighter. So if I said this to three, let's preview, actually this. So if I said this to one, it is less bright,
but I will know. So these 23 let's see if we can maybe make more saturated
and maybe more reddish. Maybe something like this. You
can always go even further here with mixed
color mixed color and maybe add I don't know, reddish color here and sell
this to color blending mode. So only color affect this. And now we can maybe go closer to color we want here
and what we can do now. I will now back this last node, and we can select this mask. Search for mask
and we can select this castle mask which
looks like this. And what we can do, we can now mix these two with G, we can move this mix
color node here. And now we can use this
mask as factor to tell Brenda where we want this effect and where we want this effect. Okay. But we need feather
this or smooth this. We can do this with blur effect. We can all we need very big
number here, for example, 300 or even more like 600. Maybe if we invert this, let's see if I want
reddish sky but I want. So this one is reddish. I want this to be brighter. So I want highlight this tassel. So if I said this to five, you can see this logging effect. Or maybe we want, like
what we have before. So I want say this to one and this one to five or something. And I don't like this color, maybe yellowish
color or something. Okay. This is, again, about playing with all these options. It is about what you like. So we can maybe now make this darken this sky darken and
this even more bright. But this is too much. Or we can maybe just
make this white. Let's say if we said this here, maybe we can paint this guy, maybe to bluish color. But this will not
affect too much because we need more
saturation here. And we also shift this hue. 0.5 with default or
actually this color. But we need more saturation
to see this color here. And now what we get if we now
play with this mask here, you actually update
this in real time. Okay. Now, we basically put
more focus on this castle. This is what we have before. Okay, not this is
what we have before. And this is after. So this is too bright. You can also go with SX
to scale this mask on Xaxis and I will desaturate this Okay. Let's now back
our Kuahar effect. So we have one here. I
unmute all these effects. Now we have one more
thing to control. I want to keep this subtle. Let's see if we paint
now these two red. No, I think I want
keep saturation to zero and maybe
increase her light. We can also shift hue on
this light on castle. I have one Lahara effect here. This is for this background. So it is very easy. We have castle and castle effect should be here. There is castle. Okay, here is actually castle, and this sun effect on
castle should be also. There is this castle
effect. Let's see. So this is basically input B. We can increase this even more, and let's see if we change hue. Actually, I think better
ways mixed color. Mixed color, and then we can set this to color rending mode. And now we can basically
paint this sun tint here. We can shift this even two or to one Okay. But I think this color of background should match,
maybe this color, so we can go with Control C, and now we can pay this here. Now should this color
match this one. But I don't like this effect, so we can bring saturation
closer to more to left. And let's see this factor
is also too intense.
15. PLAYING WITH EFFECTS, COLOR CORRECTIONS, AND MORE IN THE BLENDER COMPOSITOR: Hello, it is new day here, and I prepare something for you. So yesterday, we stopped with
this light paint filter. But because all the setup to get all these overlays
takes some time. I decided to make them
without recording. So I actually just
rendered these overlays, and we can now put these overlays over
this composition here. So we have here
background paint. I actually make two versions. So this one is less dense with smaller brush,
this one is bigger. Next one is castle paint, and this one is cliff paint. I think actually, we
create this cliff paint in tutorial yesterday and this
one is foreground paint. We can now try import
this in our scene. So how we can do this. Let's see first one.
So background paint This should be very easy. So we have we need fine
background layer here. Okay, here is background first. So we need to put
this overlay here. We can maybe go with this one. And we can now go with
mixed color, actually. So okay, not mix, mixed color. Mixed color and we need
to plug this here. So this will be this
is now input A. This white color is our input B, so you can see that we
get this gray overlay. So we need just plug this here, and now we get this overlay. So if I go to left,
this is without. If I go to right,
we get this okay, I'm not sure why, but this
have black background. Okay, we mix this actually, because we have this
transparent background, we should just go
with Alpha over. So I will go with Shift X to remove
this but keep connection, I think, for Control
X. Okay, Control X. Let's preview this. So we should go with Alpha over because this
is transparent. Alpha over, and I'm not sure
why I delete this overlay, so I will bring this
in our scene again. So this is background, so this should go in foreground because we
want to see this here. Okay. So you can now
see this paint effect. Let's see this
first version with bigger brush strokes.
So this one. Okay, maybe we can keep
this one or first one. Of course, I will
share this over with you if you want
to play with this. Let's see what I prepare next. Next one is castle paint. So we can put this over Castle. And of course, let
me show you here. I'm not sure how to
remove this preview here. This Kuvakar effect still
affect this background, so we can remove this with M. This is before. This is after. We can just play
with numbers so we can bring this to about
to some lower values. Let's found now castle. So there is castle. Okay, this castle
here, I'm not sure. I think this is castle, but we didn't add any name
here. Let's preview this. Okay, here we have castle, but I forget to add this
label so we can it castle. Okay, now we have this castle
with this Cubajara effect. So we can maybe mix this here. Okay, this is castle plus. Yes, of course, this is
castle plus this cliff. So we need to plug
this overlay here. And let's see. So we have this castle paint. This is very easy, so Alpha and we should plug
this in foreground. Okay. Now we have
this paint effect. This doesn't match too much
with this sun overlay. So let's see where we
put this sun overlay. I think this thing here
is our sun overlay, yes. Maybe we should put this sun overlay after
this, or maybe no. I'm not sure, but
let's see how this looked before and after. Okay. Let's see what is next. Next is clip paint. I think we are
ready to add this. So let's see where Clif is here and we plug this cliff
paint filter here. So we build this inside
this open XR file. In this case, I actually render this in PNG, but
practically same. So we have this cliff overlay and let's see what
next for ground. Let's see where is foreground. Cliff is first overlay and foreground, this
second overlay. So here, we can go
with Alpha over, plug this here and now this
should go in foreground here. So this is if I press M, we can see before
and now is after. And of course, we can
choose how much we want of this opacity of this
foreground layer. Okay, and we can now see
everything together. One thing I think
is important here. We need to separate these
foreground elements from these cliffs here. I think we can do best
with miss pass here. So we actually need to make
more depth here in this sa. Now, this is a big mess. We don't know that this is tree. We don't know that
this is cliff in background because
everything is connected. We can put something between these two layers somewhere here, but I will not do that. I think we can maybe do this
with miss pass or something. So I will go with
shift right click, so we can make one reroute here. And let's see what we can do. We have here this open XR, and we have here a
lot of this layers. So this is miss past, and this should be good enough, but because of these leaves which have transparent shader, this mispas doesn't work, how we should expect. But let's see what we can do. Now with Trump,
we can twig this. Yes. But I always get this
transparent part here. Let's try to go with the noise. Okay, now this look good. Let's see if I move this here. Let's see what I
actually want to do. Let's move this here. I think I want go with
mixed color mixed color. And if I said this to
input B, this to input A, and now what we should get, we should get this white color
here is actually overlay. So everything, what is black, it will not be visible
and everything, what is bright will be visible. So this part will
be more visible. This part will not be visible. So we actually get what we want. We separate this for
from background here, but I don't want to
affect this castle. I want to keep this
castle in focus. So we need mask here. I just want maybe this area. And we can create new
mask to create new mask, we need click here, and I will call this maybe after maybe after cheese. So just to know what
you're selecting, it is not important and now
we don't have any mask, we can go with art Nu and I
will now scale this mask. We can shape now this mask. I want maybe this area. I want cover this area here. So with G, you can move this And let's now load this mask
here so we can go with mask. And now I will select
this after cheese mask. And let's plug this
as factor here. Now, we should get okay, let's see where is problem. Problem is that this is
black and white image, and we should set this
to screen blending mode. So we should tell Blender,
Okay, ignore blacks. So black color is value of zero and white
color is value of one. So we need to set
this to screen, maybe ten or some of these
blending modes from this part. Let's see, ten. No, screen. So just set this to
screen blending mode, and we just need now blue this. We can label this
miss after trees. So we know, what is this? Let's go with Blur. So Blur effect, and let's
now say this to maybe 600. So we need a very
big number here, and this is before. This is after. I need pressm on right side, not on left. So before, after. And how we can now control this. I think if we now remove
these white colors, this effect will fade. So basically, we can control
with this slider here, but I think this
is not practical. Like later, I will forget that this is
controller for this. So we can always go with
another week color. And this will be input B and
this before this effect. So this one will be input A. And now we have
this slider here. Again, this, we can label
this with F miss after. Now we have this
controller here. And of course, you can always in real time, play with mask. So you can see that this
update when we play this mask And this blue also affect a lot. If we reduce this to maybe
not 20, or maybe 200. We will get more
sharp edge here. So maybe 400 is good. Okay. Let's increase
this effect, and let's cover maybe
hold this tree. Something like this. Now, you can see that it is much easier to read
this composition. So now we know that
this is foreground. We have here Cliff and we
have also background here. I don't like this guy, but we play with this a lot.
Let's see what we can do. We can maybe start again. So first time, we just go
with this overlay here, which I share with you, second
time, we go with this one. Maybe we can use this one. But for this, let's
move this a little. We can just use two
hue saturation. Hue saturation value. We can plug one here. We can duplicate this one, and we can bring
saturation down. Maybe this one not. And I want this second
one more bright. And now we can let's see. I need to plug this here.
We can mix these two. So let's go with a control shift and right click and
we can set this to. No, we don't need
to set anything. We just need to use this mask. So this castle mask, you can see this mask
here as a factor. Okay, this is now result. So if we now brighten
this even more, we should get more bright
parts over this castle. Or we can maybe make
this more dark. And this saturation
is also important. So when we have a
lot of saturation, we can play with hue. So if we want yellowish tint, we can maybe copy here
this yellowish tint. Maybe this one more
to reddish color. No. Or what we can also do, all the mix with mixed color, and we can maybe put some
color here, for example, blue. So now everything
should be more blue, and we can now set this to color blending mode because we just want affect this color. So now we control both of
these with this overlay here. But again, this
is all up to you. We are not here to spend
whole day tweaking settings, we are here to learn how
things work in compositor. Okay, we can choose
this baby blue collar, and I think this musk
is maybe too big, but we don't have too
much offset here. Maybe we can make more offset. To put this castle in focus. So you can play
here with aX, a Y. If I just mute this, you can see before,
and this is after. Okay. But again, more
sense that we have this sunset color on sky because we put
this overlay here. But if we make this
part like golden hour, but this part bluish. We can also do that
maybe with new mask. So I will maybe call the sky
and let's add square mask. Let's see what we can do now. If I place this here,
there's the scale. And what we can do now, we can go with we can
just duplicate this CD. What if not where I put this
I need disconnect this, and we have now new mask. Okay, we need to select this. Sky mask and we get this. Now, we now we need
blue this, of course. We now get this maybe 400. And let's see what
we can do now. So we can duplicate
this with Shift D, and we can now make
this maybe blue. And now I will plug this here. Now we can mix these two together with shift right click Control
Shift, right click. And what if we now
plug this mask here? Okay, now we get this
effect. Let's see. I think if we go over,
this will not work. Maybe we need to go
900 or something. No. 500. Now we get this effect,
which is nice effect. But let's see. What
if I copy this color, pace this color here. And if you know, just
darken this and make less saturated. Okay, why? Nothing is visible. When we go closer to this
color, it is less visible. Okay, we can actually
create this effect. I will bring saturation. When we play with
this, yes, actually, when I move saturation
closer to zero, we actually fade this effect. This is probably because of this color branding
mode or something, but not so important. Let's just choose
some different color. Okay, I think this
is nice effect. With this mask here cast a mask, we can still put this we
can put this more in focus, so I will bring
this up a little. Not too much. Let's again see what if
we go with blue tint. I think I will now stop
with Blender compositor. I will try to get
the best result, and I think I will share
my final result with you, but we can now continue
with next part, which should be from Blender to other compositing software.
16. FROM BLENDER TO OTHER COMPOSITING SOFTWARE: Should be from Blender to
other compositing software. In this part, I will
show you how I use after effects to do similar
what we do here. So instead of Blender
compositor, another software. So instead of Blender compositor another software and my software of choice is after effects. But of course, you can also use DaVinci Resolve or
any other software. I think process is similar. You can find on
maybe on YouTube. How to transform
color management from blender to another
software which you use. So we can open blender
and after effects sorry. And let's see how
we can do that. I will go with new project, new composition from footage, and I will load this say XR use in our a blender compositor. You can now see that
everything is black because we have
this XR file here. But in this file, we
have a lot of layers. How after effects we know
what we want extract here. So keyword is extract you
can search for extractor. So now we need this here. Here is EffexPanel, so
I will bring this here. Now we have all
these layers here, and I will choose
this main layer, which is all layers. And you can note one thing
here that color don't match. Here is why this happen. Blender, by default uses
filmic, you transform, linear workflow, open color OCO. After effect doesn't
support filmic, use different gamma handling
as XR files linear, but without blenders,
you transform. So basically, we need transform
our color management. Here is how we can do this. So I select the all layers
and we have these layers, but we can basically
select any of these. For example, you can
see that we have all these layers we
have in Blender. Okay, let's select
this background, and I will select
this layer also in Blender so we can compare
or see difference. Let's see background. Colors from after effects
should match these colors. Let's see what I do last time. This is extractor, but we need one plugin which is
called open Color IO, and I will create new layers. So I need to put
this layer over. So this layer will affect
everything which is under. I will rename this open IO, and I will now load
this plug in here. This plugin is not by default. In after effects,
you need to download this from Internet,
and this is free. You can just search
for Open Color IO, and you will find this on
first result on Google. But if you have any problem, you can always go to YouTube and you will find
instructional window. It is very easy. You just need a few clicks and you can
install this for free. Now, I will bring this here and let's see what
I do last time. Next thing we need to do we need load Blender OCO
in after effects. So how to do this, you need to go to your PC, RC and program files. You need find Blender here. So Brander Foundation
and logically is to go to Blender five. But there is one problem
I will show you later. So here we have a
under co management. So you need to open
all these folders and under Color management. You will find this OCO file. But there is one problem. I load this and it doesn't work. So I ask AI, what is problem. And here is answer. So when loading lender
five OCO file in the open Color IO plug in for Aftereffx the following
error appears I get this error by this
cup and Blender five uses a new OCO configuration that includes built in transform features and
new ACS out transform. However, the OCO plugin for Aftereffects does not fully support these new OCO features. So I understand that because Blender five changed
color management and Aftereffects does not support that new
color management. And then I ask what
I can do to fix this and I get answer that I can just load OCO from
older blender version. So I will go with Blender 4.5 and I will load
this one here. Now we just need display
this from LinaRg 709, which is somewhere
here to this SRGB. And now we can also change this view transform like we
can change here in Blender. Okay, I think I use
standard or filmic. There is no big difference. I think you can choose
any of these you like. And now this should match
what we have in Blender. Okay, I close this composite
tab, this one here. So I think this now match
pretty good or perfectly, but I change the tree, so we have different trees here. I need I need to re render this. But because I apply
this modifier, I get different trees here, but this is not important. I think this should be standard, and now this should
match perfectly. Okay. Now we can start compositing
in after effects. We can call this. Let's
start from the beginning. Let's see. We should first
import maybe foreground here, and I will rename
this to foreground. Foreground, now I will duplicate
this and this should be cliff because Clif
is next layer, and we should now
choose here Clif. Cups look to refresh this, but we change order. Actually, this should
be foreground, should be on top,
which have sends. Next should be castle. So castle and let's
now select Castle. I need to always refresh
this. I'm not sure why. So castle should be
under cliff here. And next should be background. Background should be lost, and we also need HDRI here. So we can call this HDRI. And we do here everything we
do in Blender compositor. You can see that this
is a little easier. So we have all these mess with these nodes because
this is node based. This is layer based. This have also some advantages, but I think I'm a little
faster in after effects. Let's see what we can do now. Of course, we can choose this. So here's the RI. We can choose maybe this paint
layer or we can make this to here's the RI and maybe here, we can choose this paint layer. Now we can just with
T, choose opacity. We can blend these together. We can of course, use
different bending modes. And each of these will
add different results. I know that there is
one shortcut to quickly skip between these
blending modes, but I don't know which one is. I think I should Google. I will show you how masking
works in after effects, it is little easier
than in blender. We can just grab this tool. And for example, I can
select this part here. Okay, I know why
this don't work. This masking don't work
because of this extractor. After effect see this
as not as one layer, but as many layers. You can see all
these layers here. I think we need to precompose this or just put this in folder. And now we can mask this folder with
all these layers inside. For example, if I want Mask this part, I
can just do this, and now with MM, I can open the properties
and I can feather this. We do this with blue
effects in blender, but here is with this feather. Of course, in blender, we
also have feather option, but I didn't found that option because I usually do
this in after effects. Okay, we can also maybe
load this paint filters. So background should
go over background. We have here background, so we can put this
over this background, and we can also play
with this here. We can set maybe these two
different blending modes so we can see what we will get. Okay, I will give this
to normal and we can now do all things we do
in Blender compositor. So cliff paint. Let's set this over Cliff. For ground paint.
This should go here. Let's now try make
this mist effect after this foreground. I need to duplicate this
XR because we have here mis Mist caps to refresh this
and let's miss pass here, which looks like this. I will now isolate this
by clicking here and we can after effects in blender, we usually use color m, but we have here levels. Now with levels, I will
push this a little. Something like this, but we have same problem with this
transparent part here, but this is not important. For now, I can now just say
this to screen blending mode. And we get this effect. Now I can just create
mask here over this area. And with twice, I can
create feather here. Basically, same process
but in another program. Let's now bring opacity all
down, maybe just a little. And of course, we
can change color. In all these layers, let's
try paint this cliff. We here, we can go with you can search maybe
for cue saturation. Actually, we have this here, but lumaar color is
main tool in after effects for color grading. So we can basically play
with all these values. We have all these curves here, so we can affect any
of these channels. We can basically play whole
day with all these tours. Let's see how we can
highlight this castle, same as we do in Brander. We need to put
this on this HDRI, but we have two HDRIs here, so I will precompose this or I will put these
two in one layer. So we can call HDRI, and we can now
duplicate this HRI too, but I will rename
this DRI more bright. And now I will go
with lumetri color on this layer and I will
basically bring exposure up, something like this, or we can play with all these options. Now, I just need mask,
which is very simple. I can just bring this here and I have this mask and I
can increase feather here. This is before and this is after we do similar in Blender. I will stop here because this is not after
effect, Tutorial. This should be blender Tutorial. I just want to show
you how we can bring color palette from blender
to after effects if you use, for example, after
effects for compositing. And we have maybe
just one chapter which I additionally
add here actually too. So we can go with append link, pack library overwrites,
edit link libraries.
17. APPEND, LINK, PACK, LIBRARY OVERRIDES, EDIT LINKED LIBRARIES: Let's now open completely
new blender five. And now I will delete all this and I will
just load plane here. So this will be our ground. Maybe I will switch to
GPU and I will load this sky texture here
with my below sun. So we have a little
better preview here. Now, I will open
as a browser and I will load these eight
fridges. This should be ten. But for now it's eight. And let's see what
is the difference between link, a paint and pack. So by default, this is set
to follow preferences. And what is follow preferences, that's what we set when we add this collection
in Asset browser. So if you go to edit
preferences, five parts, you can see when we select this import method is
this is what we set. We said this to append. So the follow preferences
is actually in our case, a pend and how you know
that this is a pen. If you jrag this
and move this here, you get this yellow cube. So you basically get option to put this object
where you want and why you get this option
because this object is now physically in
this Blender file. So this file is not saved. So let's save this one desktop, and we will see that
this tree is actually physically here because
these have 12 megabytes. But let's now do different. I will now go with Link. I will open completely
new Bender file. And I will do same. We
don't need this HDRI. We just want to do this quickly. So as a browser, H import method set to link. Okay, I will delete all this and create same plane as before. And now, when we link this
inside this blender file, you can see that we don't
have this yellow cube. So basically, we cannot choose
where to put this object. And we put this object here and why we put
this object here. Every time for example, every time we put this object, it will always be here. Why? Because this is just linked from another
brander file. And in that blender file, this object is in
this position and we cannot move this
change position. We cannot do anything here. We cannot go to edit mode. And if you go to Blender file, you can see that
this is just link to this blender file,
which is this one. So in this blender file, this object is stored. Let's see what will happen
when we save this on dest save I will call this link. You can see that
this blender five is actually big 1 megabyte, which is default blender five. Even if you save
empty blender five, it will always be 1 megabyte because this is how big
is default blender five. Let's see difference. So
with this append object, we can basically do everything. We can edit this. We can rotate, move, scale. We can edit materials, modifiers because this
object is physically here. But with this, we
cannot do anything. We cannot even move this. You may ask what is purpose of this because we
cannot do anything. We actually can do with
library overwrites. If you now go with right click Library over make
selected content. Now we get permission from Blender to overwrite some data
from original bender file. For example, if I press N, you can see that if I move this, we can overwrite this data
from original bender file. And how we can move.
We can do some. We can do limited things, but we can do main things we
usually do in object mode. We cannot go to edit mode, but we can do a lot of things
we can do in object mode. For example, we can
even edit modifiers. For example, we can
play with modifiers is this object modifiers, we will be able to
play with modifiers. And we can also
duplicate this with D. So this is advantage
of this link option. Even if we have millions of
these trees, for example, I can go with D Y, shift let's see, shift
to duplicate this. We can link another tree
here, for example, this one. Now we can override this one. Library overt make selected
and content all D Y. Shift, we can create
millions of these trees. We can basically load
all these trees here. And if I now save this,
let's see what happens. We still have vendor
file of 1 megabyte. It is a little bigger because vendor store this data here, this blue data, this one. So it will always
be a little bigger for maybe a few kilobytes
but nothing more. But if, for example, append here, a lot
of these trees. So this method is set to append, if we do this you will see what will happen. So if I go with save this blender file will
very fast become very big. You can imagine if we create whole forest with these trees, it will become very
heavy, very quickly. With this link option, if you don't need
to go to Edit mode, change mesh this tree or change shader, you
can do everything. You can usually do
in object mode. And you can have whole
forest for 0 megabytes. So you can save a lot of data. But what if you
need, for example, change shader of this object or change mesh of this object. You can do in original
Blender file, and here is one shortcut. So we have these
edit link libraries. So this is one small addon
which comes with blender, so you need to go to edit
preferences and search here. Edit link libraries or maybe
here under get extensions. And now what we can do, we can select this object, and this add on will
be here, under item. When you press under item, now, if I one disclaimer, you need to save
this blender file. For example, if this
blender file is not save, you will not get this option. Now, we can with one click, go to original Blender
file where this is stored. So one click, we are now
in original Blender file, which is this His. And now we can select
this object, for example, if I go with EX extrude this. Now what I need to do I
need to be in object mode. Now I can just with one click return to original Blender file. We have check this out of save. Blender will save these
changes and we can with one click back to this
working Blender file and we get these changes here. I will now undo this. I will back here and let's
go with GX to undo this. Now I will return to
original vendor file. Actually, this should be
working blender file, and this is where
this tree is saved. Okay, that's basically all. We have one important
option, which is pack, which is worse option here
because if you use this, you actually append
this object here, and then you pack all shaders
in this blender file, which will make
this blended file even more heavy than with a pen. So if you go to Shader, I think Blender will
pack all these textures. Okay, this is no
shader, but let's see. Yes, you can see
what Blender does. Blender actually pack
all these shaders inside this blender
file, which is crazy. This is same, like
you go with file. External data and pack all resources in
this blender file. If you don't know
what you are doing, just don't use this PAC option. So basically, this is different between link append and PAC. This PAC is new option
in Blender file before we have link append
and append reuse data. We are almost done
with this tutorial. Last thing is this real snow addon because we work
with snow scene, I will show you how
this addon works. Basically, you just need
enable this in it preferences. Under add ons, you
can search for real snow real snow or get an extension and you
can enable this for free. Now, what we need to do, I will create here
a few objects, maybe Suzanne and
maybe these tours. Okay, what we can do now, I will go to maybe render preview cycles to
see this effect better. And switch this to GPO. Okay, how we can add Snow. Just select this object, press and and there is
real snow. Okay here. Now, this coverage is actually how much of this
area we will cover with this. If I said this to 100, this should cover
whole this area, but not this one because this use like
normal this object, it will always add snow on top. I get these errors,
but this just work. I'm not sure why I
get these errors. Let's just paint this to black
to see this effect better. Okay. But be very careful with this addon
with this add on, we actually get two modifiers. First one is subdivision. If you go to this mesh, you can see that this
is already very dense, and plus we have this
subdivision here. So just remove this. You don't need more measure than we get. And we also have this
decimate modifier. This is actually good
modifier because with this, we actually remove
some of the mesh. If you go crazy, you
will get this effect. You can basically choose how much you want
these vertices. If I if I apply this now, we get this mesh here. So let's now add snow here. Coverage, if I bring this down, I will now get less
coverage here. We basically few of these snow balls's now maybe
add more height. So this is how this is
actually height of the snow. If I go crazy, I will get big snow but
if I go with lower value, I will get small snow here. Let's now maybe go with
coverage about 20%, and let's see what we will get. Select Object. Okay.
This is barely visible, so we can add more snow here. Okay, and last one is this Zan. I will show you how we can
import this to our scene. Let's say we want add
snow to this scene. You need to be careful. This object is very
big and if you apply this modifier
to this big scene, you will actually create
millions of polygons. What you can do, you can also maybe copy this object here, and I will close this one. And I will open blender file. We can basically just
paste this object here. And you can try with apply
this to this very big object. I will try and do this now. Let's see what will happen now. Real Snow. I will go with smaller number here
and let's click here. You can see that this is not
so easy for my computer. This take too long, so
this is my recommendation. You can just go to Edit mode. I C, and phase selection, you can just select
some of these phases. Or areas where you
want this snow, we can now go with Shiv D, and I will go a little with just to make easier to select
this object later. So P separate by selection. Now we can add this
snow on this area here. Now, this should be much faster. We get the snow here, but let's remove this modifier. You can use this
decimate modifier, but we can also remove this. You can remove the snow with mesh cleanup
decimate geometry. And we can keep only 10%
of this with value 0.1. Even 0.05. Now you can see how much
vertices we have here. This is massive. This addon can be very heavy, but you need to be
careful with this. This addon also can
be very useful. What we can do now because
this is on the same position, like in this Blender file, we can just copy object and we can bring this
optimized object here. And if you go to Rando preview, this will look nice. Okay, we need to bring this little down because we bring this plane, little up JZ. And I overkill with
this coverage. So I said this 2.9 or something. So this doesn't look so good, but this is how this works. Okay, this is all
for this tutorial, thank you for watching and thank you for your support
and see you in next one.
 šime Bugarija