Transcripts
1. Main Introduction: Hello, my name is most often a sorry. I'm an engineer and artist based in Toronto, Canada. And an aside and make videos regarding the creative process are an investment for my YouTube journey was stumbling upon thumbnails and making thumbnails was something I was taking for granted for a longest time until I discovered the power of making custom thumbnails. Thumbnails is the first thing you see on YouTube is a thing that grabs your attention. And moving forward in your YouTube journey, your stomach is going to be your style. You're gonna make an aesthetic that is unique to yourself and your work. So in this course, I'm going to take you step-by-step on how I create my own thumbnails from my YouTube videos. So step one, taking your own pictures cannot stress this enough. Picking your own pictures for your thumbnails will put you way ahead of the competition. You're gonna make something that is unique to your style and unique to your story. Step two, we're going to set up your picture to be YouTube ready by using Photoshop or camper. Step 3, edit your photo and export to YouTube. I hope you find value in this course. And if you have any questions, linear comment, or send me a direct message, I have my YouTube channel link to my profile, and I would love to connect with you.
2. Introduction: And so in this class I'm going to show you how you can take pictures for your thumbnails and how you can edit them into YouTube. Basically, this is going to be a step-by-step on how I would edit one of my nails for my next videos in YouTube, first impressions is everything. When you search something on the title bar and go ahead and click, would you notice first titles or to someone else? If most of you pick thumbnails, then there you go. First impression is everything. If you find an thumbnail that is related to your content, then you go and read the table. If they both match, I click on it. That's how I usually do it. I'm pretty sure that's how you do it. To try to take your own pictures for your thumbnails. And that way it's very relatable. And you can also create your own style when you go to a big YouTube channels, didn't you know that the older thumb there look very similar because they use the same style and you want to keep your style very similar. So if something pops on someone's feed, their realized, oh, this is so and so's thumbnail. Because you want to distinguish yourself from other creators by following your own system and find your old creative design.
3. Why Bother & Common Mistakes : Why should you care about thumbnails anyways, you know what? Youtube usually gives you a three snapshots from your video. Do you use for your thumbnails? But guess what? These are 90% of the top performing videos have custom thumbnails. So why would you hinder yourself to try and grow by just doing that effort? And it only takes like 15 minutes to 20 minutes of your time to train craft the best thumbnail. And you don't want to go overboard because this is just a first impression. So you want something that is interesting so people can click on it and relate it to your video. One of the common mistakes I see with a lot of beginners that the don't actually spend time on their thumbnails. And it's kinda of like an afterthought. They would finish taken their video. And when these start editing the remembered, oh my God, there is a thumbnail. So they go in and take a screenshot from their video. It can still work, but it's not ideal because when you take a picture, the picture will actually enhance your whole video and basically give the viewer an idea of what this video could be. And I'm going to help you try and get the best thumbnail edited and uploaded in your YouTube.
4. Taking Pictures: It's time to go and take the pictures for your thumbnail. Try and make it something that is not to click baby, but something very genuine and something that you can always come back in edit later. So for example, if you're trying to take a picture of yourself, try and take minimum thin pictures because maybe in the future you can use that same picture for another thumbnail and you can have that in your library saved up on your computer. That way you can minimize the amount of time you can take pictures and maximize the time behind a computer to edit more videos. So let's say I wanted to talk about this light for my video of this, I'm going to say I want to do an aperture MC review. So I can just turn on and do something like this or do something like this, something like this, or maybe something like this. And I can even turn it on and setup the colors if I wanted to. Yeah. And spend as much time taking your picture because this is your first impression. Try and make it as best as you can. In other, we finished taking all the pictures that we want for our video. We're going to go ahead and take it down to the computer and edited.
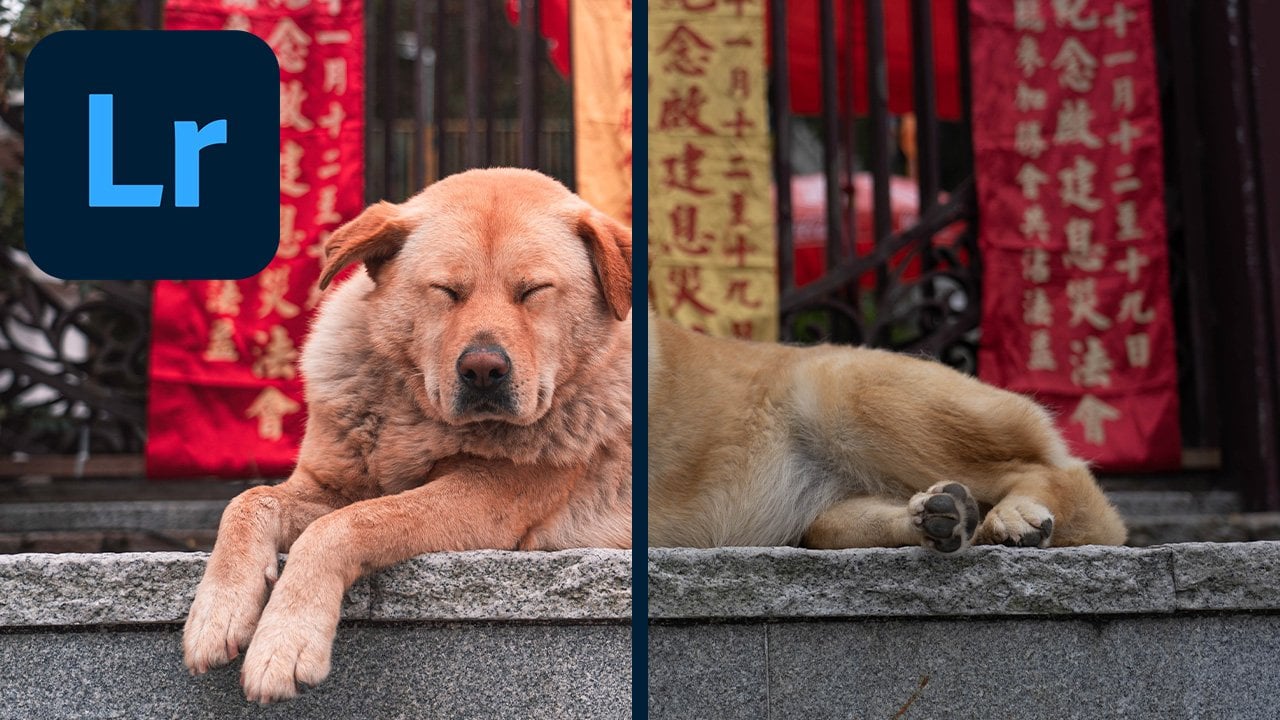
5. Lightroom Edit (Optional): So now that you get your picture from the camera to your computer, time to go and edit it. And since I took my pictures in rough, I'm just gonna go and let him real quick edit the picture and go head and Photoshop. If you're new to Lightroom. I've already made a course in sculpture to tackle everything about it. So I recommend you guys check it out. And for this one, I took like 13 pictures that kind of allude to what I wanted to do with that review. And I'm kinda leaning towards this picture because it's not like crazy like that one or this one. Even though I've seen a lot of YouTube videos, get a lot of views for those, but it's really up to your preference. I want my child to be a little bit timid and slightly professional, so I want to keep it that way because I've already have some presets. So I'm just going to slap in a preset that I, that I want. I'm just going to edit that a little bit slightly to get it to the look that I want. And I think this is way too. Just go a little bit with the saturation. And one last thing, I want to go into my split tone and change something in the shadows. Here we go. And my highlights just going to make it a little bit more orange. So this is before and after. And my kinda liking this so much. Now that we're finished with the edit in Lightroom will do that and I take it down to Photoshop.
6. Canva Edit (Beginner): So Canada is another solution to make thumbnails for you too, because it's free and you don't have any subscriptions. So you can just go ahead and create your account. But for now I'm just going to create a design. And you can just do the already have a lot of customizations in there. And you can just say YouTube. And it's already preset for everything that you need. And you can use that for Instagram, you name it. It's a very fantastic tool and something definitely on the budget. So because we already took our picture shop, just going to upload it. And then I'm going to use it in there. There we go. And now that I have it ready, you can go on the side, you can add some elements or texts or even background if you want. But for the, for this one, we just want to make it very, very simple. I want to add a text so you can go and go through everything that they have. So I actually want to have something that is very like bold. I kinda like this one. So I'm just gonna go with that. And the best part is it's customizable. So I can just say MC Lite. And there we go. It can control the size MC. And I want to have review to be honest, on a different it's just C and I like this one, so they just go, I accidentally put it twice, so I'm just going to go and press Delete NSF, some NSA review. And the best part is if you don't like that color, I can just select a different color. So just going to go with this one and look at that. And you can just select the whole thing together. Isn't that awesome? And for this one, we can even change the colors as well. So I can just keep it the same way. Okay? You can even change the font. But for the time being, I just want to keep it the same way. Okay? So this is one way you can edit it thing that tax option is very, very good to use. Just make sure whatever you choose is not the have the propionate. And unless you want to go into the subscription-based. But this is a fantastic tool for anyone who wants to start a YouTube channel. And you can get something on the budget and go ahead and make your thumbnails look spicy.
7. Photoshop Edit #1 (Intermediate): Now that you've got your picture from Lightroom thumb to edit it in Photoshop. And the thumbnail dimension has to be 1280 by 720. Once you have that, then press Create. And now that you have the picture, it's so much easier if you have the picture and drag it into your Photoshop. And that way it's going to be exactly at the dimension that you set it. Then you can just drag it, but make sure when you drag it that you have this lock in. If it's not locked in, is going to start to stretch it, which something we don't want. Or you can press Shift while you drag, and that way it's going to drag it with you. There we go. And now that this is in, it's time to edit the thumbnail. So I'm going to show you two ways. The first way, most people just leave the thumbnail the way it is or the picture of the way it is and just add the text. Or some people don't even add text. So this, the way it is, is actually a good thumbnail for this video. But let's just say if you wanted to add some text, so you can just go into here and press the text. And I would just want to say MC. And I'm just going to create another one. They say light. And you can go in and change the font that you want. But I usually like the Anton funds. I try and keep all of my fonts consistent. I use Anton for all of my thumbnails just to keep that consistency. So you can have a font over here and you can have the font over there. The only place I don't recommend to you to have the font is down here because usually what YouTube does, it puts down the thumb of the video or the lens of the video. So I don't recommend putting anything in this corner. So usually up into these two sides is very good. Or put everything on one side. What I usually do is I just go into a create, a rectangle and do something or here. And you can just go and drag this one behind and select a different color. So for this one I'm just going to select black and now it's just going to be very, very good. So now it's going to pop that text out. So I can just say like MC Lite review, right? View. And I can have that in here. And I'm going to move that on top. And to help with that, I can just create another block and put that in there. And just to keep it a little bit poppy, I can just change the color of so I'm going to change the color of the text to black just to give it a little bit of pop. So this is how it would look initially. So what I really like to add is if you go down in this section and select selected colors. And I make sure that the Selective Colors is underneath the text because I don't want to change the colors of the text themselves. And I'm just gonna go through each of those colors and change it slightly. Because I noticed that my skin tone has a little bit more red. So I want to change that and dial it down a little bit. So but I don't want it to be too ready. I want it to be darker, so I'm going to add a little bit magentas. And when it comes to the yellows, I'm gonna give it a little bit yellow. And when it comes to the yellow itself, I want it to be a little bit flat. So I'm just going to give it a little bit more blue for the magentas. And for a cyan. Think I'm going to give it a little more cyan for the sign itself because it's overpowering my cheek. So I want to see if I can dial that down or maybe I can enhance it to make it look better. So actually when you add a little bit of magenta looks really cool. So if you can see before and after, see the colors are a little bit more defined, a little bit more bold. I'm just going to jump into the neutrals to control the whole image itself. So I'm going to add a little bit of cyan. Take the magentas back to get it a little bit more green and slightly yellow to give it a little bit of mood. I think my thumbnail is ready to go. So this is terminal number one.
8. Photoshop Edit #2 (Intermediate): So in this step, I'm going to show you how you can separate yourself from the background and you can add a text behind your face. So make sure that you have your layer selected. And I added and color layer here just to show you a demonstration on how it works, let's just go into Select, select a mask. This food. Pretty much just let you choose what you want to select to cut out. So I'm just going to drag with the mouse all the areas that I want. It doesn't have to be perfect because you can adjust it later. But just keep in mind that this tool is not perfect either. It will do a probability of what it thinks is good based on the contrast of the picture. And see in here it's already added more than I wanted, but I'm going to keep it. And that's C. C, and I'm trying to get more. But I think this is decent enough. Okay, then I'm going to press OK. And now it's gonna show me an approximation of what I want so I can just press Control X and cut. And I'll have that in a separate layer by Control V. And I can use that later, which is pretty much good enough. Or if you want to refine it further, you can select the Lasso tool and press. You can press Alt and remove. And by DC, the minus sign, you can actually refine that and remove anything that you don't want from the cut. And the best part is you can just press Z to zoom in and then go back to the Lasso to have very, very precise cut. And let's say you messed up something. You can just press the Shift button and add that back in. So this tool is very, very effective, but the problem with it is it's very time-consuming. But once you get the hang of it, just play your favorite tunes and takeaway. For this one, I just want to add a little bit of this because it wasn't too perfect. Go. I'm just going to remove this x then we added more than a one. But it doesn't have to be perfect unless you want to add a completely different backgrounds. But now that I have this one selected, I'm just going to press Control X and control V. And this is how basically will look. I can have this background color to, let's say black or white, or this color or whatever you want, right? But I just want to show you something. Now that we already have it, I'm just going to try and move it approximately where I have it. And now that I have this, I can add a layer. And I'm just going to say MC Lite review. And if you can see that it's already behind my my, my render selected the color. So that's how most people do it this way. So let's just say I wanted to keep it, this one like that, life review and can add this in here, MC. So that would be one way to do it. But I don't like how this one looks. Based on the render and based on the text location. I don't really recommend doing that. But this is basically a demonstration of how you can add a text behind a render. Now let's say you actually wanted to change the color of your background. So since we already done that in, in, in the last step, we're just going to add that in here. And I'm just going to add this here. Just adjust that. And you can see this one is not perfect, so I have to go in and take it out. So you can either go into Select a mask. But like we've done before, sometimes it's not perfect. So it's really up to you. See, when I go in here, it automatically selects it. So I don't want to use that. I'd rather just go in and select with myself. It's a lot easier to do. So we're just gonna go with that. And once it's done, now you have your render ready. I can just change that background to anything I want. So you can go to your favorite stock image website and just get the picture that you want. Just want to add a bokeh in there. Just going to put it there and do the same thing. There we go. And I can just add this back in here and see a review. But I want to adjust that a little bit. So I'm just going to change this one to here. Or you can just add that right there to make it all cohesive. And I'm just gonna changes when down to make this a 23. I'm going to try and make it match that. Okay, So we'll get in same thing with here, just going to change this size by. And we're good to go. So by pressing Control T, He can select and adjust the height and the width of your rectangles. And by selecting the group, I can press control and move the whole thing together. I'm just going to move this one slightly. And I think this one looks pretty solid. If you want to enhance it a little bit further, you can go into and make a new layer. Press B for brush. Select, right-click to select the soft round, or you can just go in here and select your brush. I like the soft round for the pixel size. I'm just gonna do it 50 and actually maybe a 150, okay? And then I'm going to select the color. So I'm just gonna go in here, select the cyan color. And I'm going to change the layer mode to overlay. And we see the overlay kind of gives it a little bit more color. I'm actually going to increase that size a little bit. And to contrast, I'm going to put a red color on the other side. So I'm going to put that in the background in here and at the bottom to give it a little bit of mood. And I'm going to switch back to the blue because the blue is coming from here. So I'm just going to change that a little bit and just add them the red slightly around and go into the capacity and change it to 29 percent. And it changed the color slightly. But this is how I would edit my picture for my next review. So now just press File, Save As, and select JPEG, and I'll call it thumbnail. And there you have it. That's that's how you edit a thumbnail in Photoshop.
9. Outro: You made it this far. Congratulations you first the course. Thank you so much for going through all with it, and I hope you found value. If you have any questions or suggestions, just leave me a comment or send me a direct message through email or on any social media platforms. I would love to connect with you. And please take it. And remember, just take it one step at a time. We all can get. And remember, take it one step at a time. And I have linked all of my presets and all of the stuff that I used in the project section. Until then. I'll see you next time.
 Mostafa Nassar, One step at a time