Transcripts
1. About the Class: Creating beautiful art is
easier than you think. With just a few everyday
objects like a cookie cutter, heart shaped bowl,
and even tape, you can create beautiful
watercolor designs effortlessly. Hi, R name is Chol. I'm a watercolor artist, content creator, and a
Skillshare top teacher. I have been painting
with watercolor for over a decade now, and my artivols around painting watercolor flowers in a
loose expressive style. My goal is to break down
challenging techniques into a simple and step by step process so that anyone can
create beautiful art. In this class, I'll
show you how to paint gorgeous watercolor cards for special occasions
like Valentine's Day, anniversaries, thank you cards, or simply to brighten
up someone's day. You will learn how to create elegant heart and
floral designs, lay your vibrant colors, and add a touch of gold
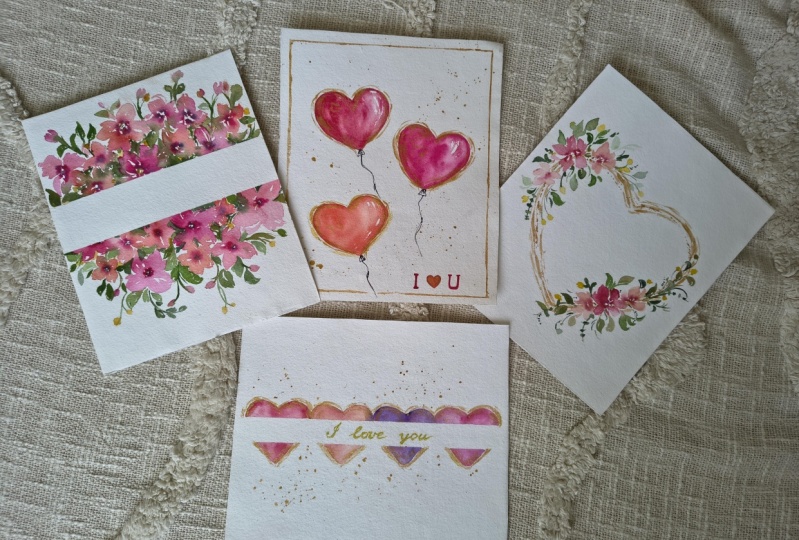
for that extra sparkle. We'll work through four
unique projects together, including the whimsical
heart shaped balloons, a beautiful heart
shaped floral wreath, a string of hearts, and
a vibrant floral border. The cards will be painted in
such a way that you can put a greeting or just a few
words to customize it. Don't worry if you're new to
watercolor because I will be guiding you step by step so that you can paint along
with confidence. By the end of the class, you'll
have the skills to create your own personalized cards for any occasion or maybe even give them to a
special loved one. So grab your brushes
and let's get started.
2. Class Overview: Hi, so welcome to
the class overview. So this is a very
exciting class. It's a short class just
about an hour long, and the cards that we will be painting are about less
than 15 minutes each. So all the projects are
very doable and I'm very confident that you can
create them with ease. I'm also excited because you can definitely customize
the projects, change the colors, add a few
more elements in the design. So you can give these
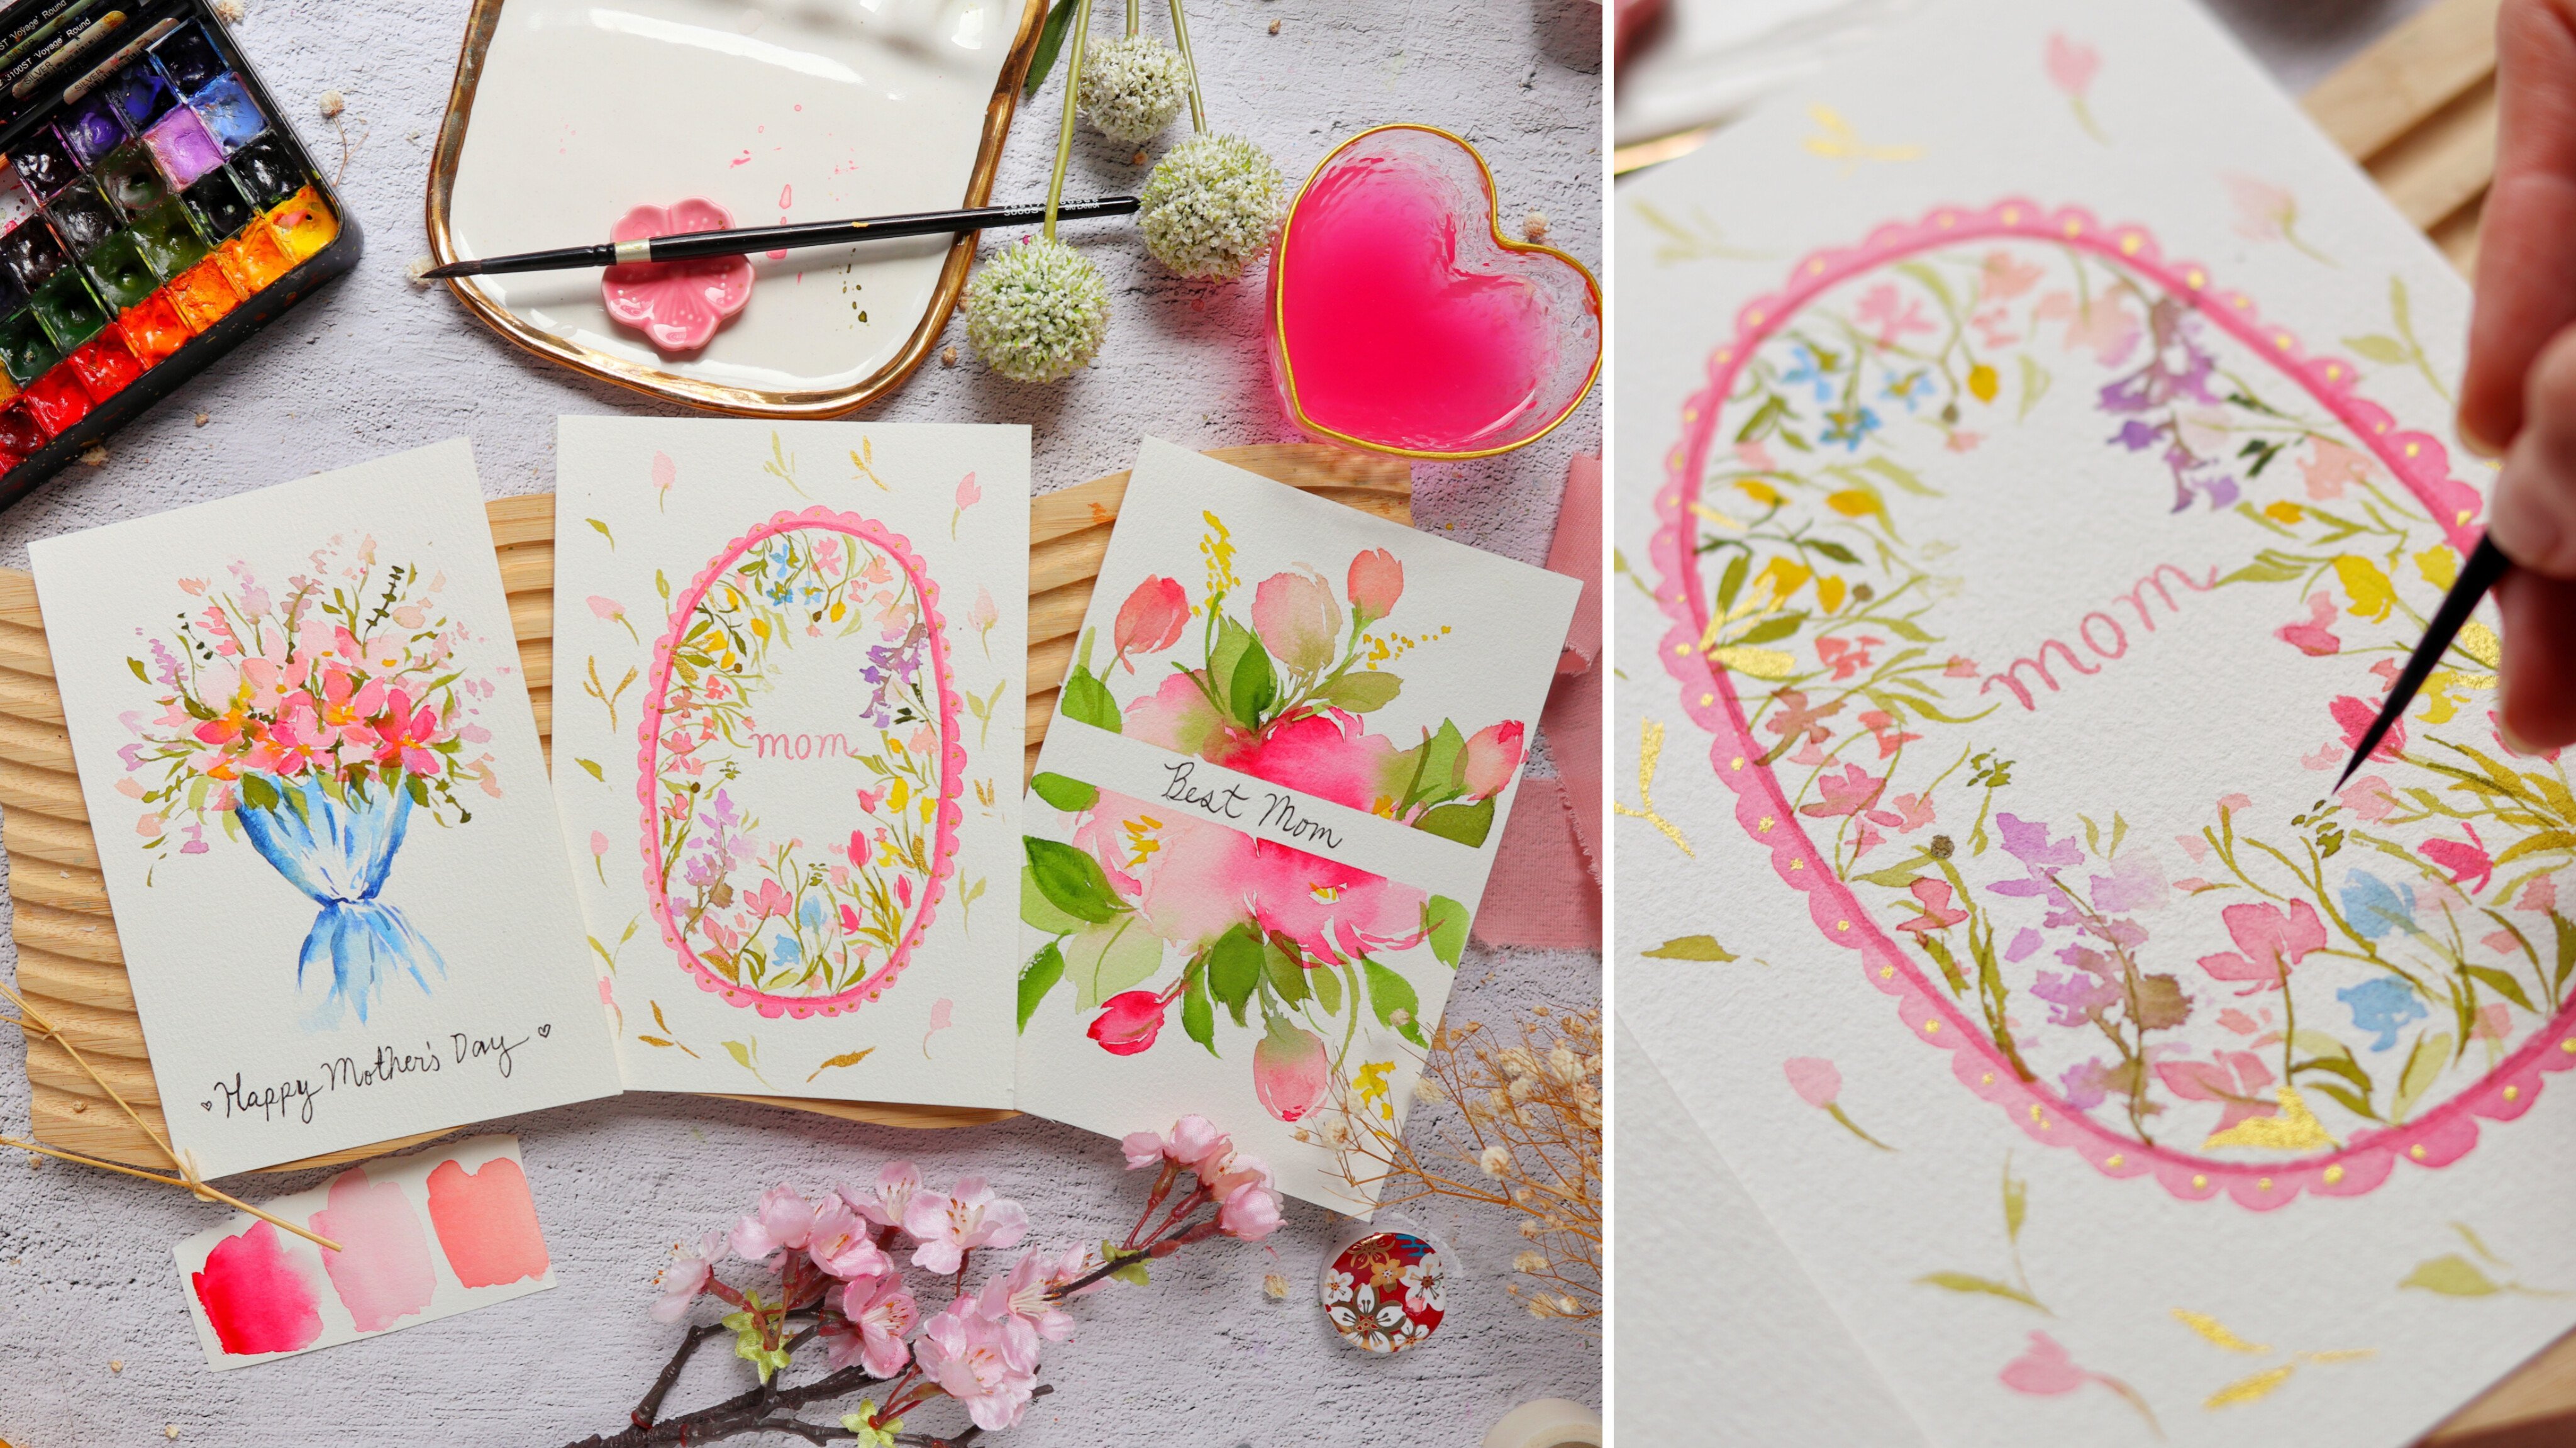
cards for Valentine's Day, Mother's Day, and a lot of
different special occasions, and you can give them to
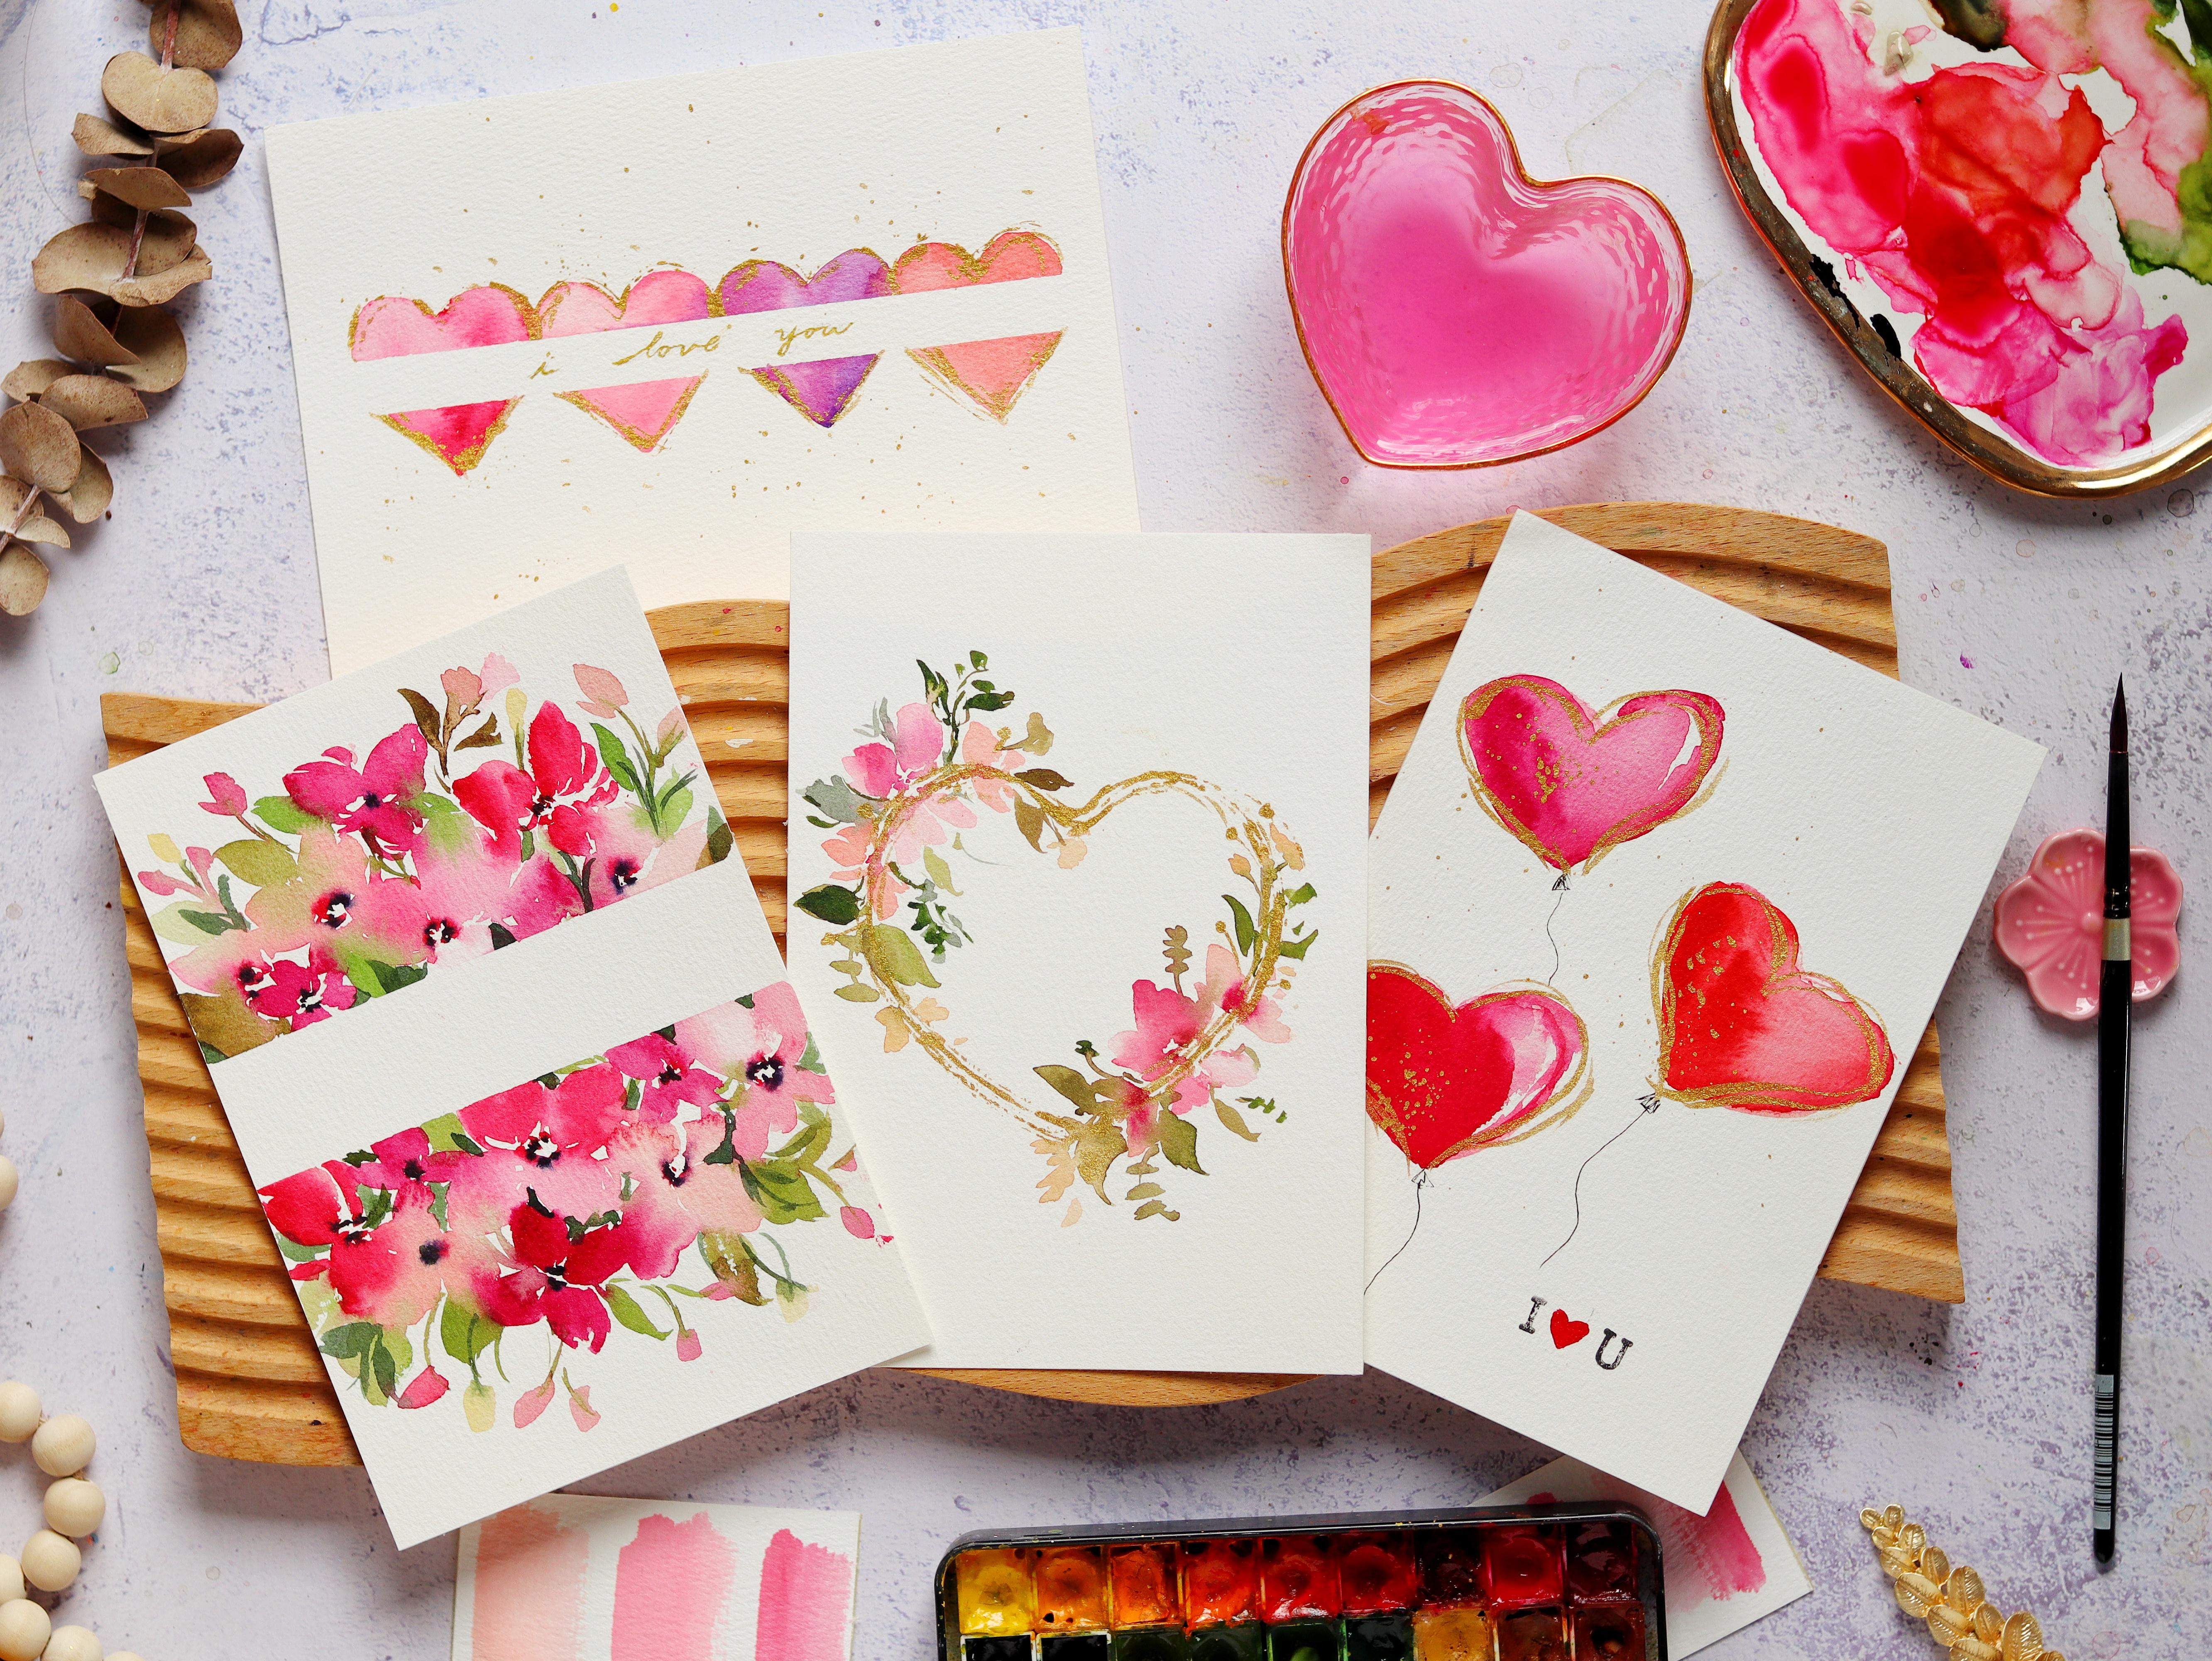
your loved ones as well. Alright, so let's check out the projects that
we'll be painting. For the first project, we are going to paint these
heart shaped balloons, and we're going to free
hand the heart shape there, but you can also use
a cookie cutter. Then we'll put some
nice gold details. Next, this is, I think, my
favorite out of all the cards. This is a beautiful, heart shaped wreath with
some loose florals. For the third project, I call
this a string of hearts. We're going to use
cookie cutters to put the hearts
beside each other. For the last project,
we're going to paint this beautiful lush
floral border, and in the middle, you can
also write some greetings. Alright, so that's
it for our projects. Now let's move on
to the next video.
3. Materials: Test. Alright, let's talk about the materials
that you need. For this class, I'm going to be using this Au Hong Academy. This is 300 GSM in thickness, and the size is five by 7 ". So this paper that I'm using is in a watercolor block form, which means that all
the sides are glued, except for this small part
right here where you can use a palette knife to slide off one sheet once
you're done painting. So we are using the
cold pressed paper, which means it has a little bit of texture just like this. So because we're
doing a quick class and just quick and
easy paintings, I decided to use a
student grade paper, but this honestly resembles
artists grade paper so much. And I think it's just really affordable and has
a good quality. So I do recommend you using
this Bao hung Academy. But, of course, feel free to use any paper that
you have at home. So because we're doing
these smaller paintings, we are also going to
use smaller brushes. So this is the silver
brush, black velvet brand. If you want to do
some fluffy florals, then you can use a larger brush, like a size eight round brush. But if you want to do
some smaller details, I would suggest using the size two and size four round brush. The reason why I love
using this brush for my floals is because it's very soft and it
absorbs a lot of water but still keeps
its pointy tip, which is really important
for those tiny details. Okay, so next, let's
talk about paint. I am using the Shinhan PWC, but of course, you
can use other brands. This is in a tube form, but I just poured it into small half pans that
you can see right here, and I just place them
in this small palette. In this class, we're going
to use more of reds and pinks and also a little bit
of green for the leaves. But you can also change the color palette
of the projects. Alright, so, aside
from this paint set, we also need a mixing palette. So I have here my
ceramic palette from the brand pottery by Ellen. It's on Instagram,
and I just got this beautiful mixing palette,
but you can, of course, use ordinary plates or
even plastic palettes. That's completely fine. Now, for the gold paint that you
can see right here, I use the brand Kura
takes Dari colors, and I use this specific shade. So this is 903 yellow gold. And I just love
this set so much. You can see the huge dent in the middle of this pan
because I use it a lot. So aside from this, I also recommend this Kura
take gold mica. So this is in a liquid form. It's very convenient to use. So just use whatever is
more convenient for you. So this is a fun class
because we're going to use different objects such
as this cookie cutter, which we are going to use to stamp the shape of the heart. If you don't have
this cookie cutter, you can just simply draw
the shape of the heart. I just thought it would be
fun to use different objects, and I'm also going to use
this heart shape bowl. So we're going to use
that for the wreath. You can also customize this. If you don't have this
hard shape wreath, you can go ahead with
a round shaped bowl. That's also a good idea
to create a wreath. So you can also see that
in some of the projects, you have that nice clean edge, and we achieve that
by using a tape. I'm using this washi tape
that I bought in Japan, but even the printed ones that you can find in stationary
shops, you can use that. I also sometimes use the
regular masking tape. From experience, I noticed that washi tapes are more gentle on paper and doesn't tear your paper when
you peel it off. Of course, we also need
a jar of water and some tissue paper
just to blot out the excess paint in our brush. Alright, so that's it. Now let's move on to the next video.
4. Tips Before You Start: So in this video, I'm going to share some tips before we start. And first up, we are
going to just try to practice how to stamp
this heart shaped bowl. You can find a
round bowl as well. So what we need to do
is grab some color. I'm using permanent rows. You can use other colors to practice and just create
a small puddle there. Make sure that the paint is
a little bit thick so that it's going to stick on
the rim of this bowl. If your paint is a bit watery, it might just flow to
the sides of the bowl. So our goal is really just to
get the shape of the bowl. So in this case,
it's heart shape. So we want a nice heart
shape on the paper. I'm just going to stamp
it, press it a little bit. And once I lift this bowl, you get a nice heart shape. So if you want a
little bit of texture, you can try to stamp
the bowl a couple of times on the same surface. So you can see here, you have areas where
there are no paint. It's going to create this
nice, like, rustic look. I honestly like the
uneven look of this. So this is useful later on when we do the
heart shape wreath. So if you don't have a heart
shaped bowl, don't worry. You can simply draw the
heart shape using a pencil, and then later on, you can just fill
in the center or maybe just do the outline
using a dry brush technique. So another object that we will be using is
a cookie cutter. So you can see in
this cookie cutter, there's a thicker side, which is, like, the handle, then another thin side, which is what you use to stamp on the cookies to get the shape. So we want to paint on
the thicker side so that the paint will really
stick on this metal outline. So again, I want a
nice thick paint, but still it should
be slightly watery. And then we are just going
to stamp it on the paper. So just lightly press. All right, so if you notice
we don't have a solid line, and that's completely fine, you can just go back in and just stamp this
cookie cutter again. You can, of course, paint the
rim of this cookie cutter again and press it on the paper so that you have
more color on the paper. So you can definitely
do this with different cookie cutters,
different shapes. So it's just a fun idea for you. So now let's move on to painting some simple flowers like in this project that
I just showed you. So because we want some fluffy
petals for this project, I'm using a size
eight round brush, so I just grab some pink color. This is permanent rose, and we're just going to paint
some four petal flowers. So I'm just going
to do one on top, maybe one on the side. So I'm really pressing
my brush to create a broad stroke and just
going up and down. And then we can leave
the center open. Now I just want to fix
some parts of the flour, and I'm going to rinse my brush, and then we are going to
paint some more petals. So what we want to achieve here is to create those
beautiful blends. Now we want the petals
to slightly touch each other so that the paint flows
into one of the petals. Alright, so this looks good. Now, let's add a darker petal. Alright, so we just want to really lightly touch
the edge of that petal. Just go to create
another petal here. And then I just want them to just blend in
with each other. And also, in this
type of technique, it's nice to change the
values of the petals. So you can see, some are
lighter, some are darker. Now, this is going to create
a beautiful contrast when you bunch up all these
small flowers, right? So let's try another one. And you'll notice that
this previous petal right here is already dry. They are not bleeding
into each other. Sometimes that happens, and
going to show you how you can try to blur out
or soften the edge. So first, you need to just rinse your brush and then
tap the excess water. You can blot it out
on a tissue paper and lightly touch the
edge of this wet petal. And you'll notice
that we are able to soften that edge
using this brush. So just keep cleaning your
brush in a tissue paper. So you don't want to introduce too much water in this edge. So I'm just trying to clean
some edges right here so that it doesn't form
some uneven blooms. Alright, so these are simple
tips that can definitely help when you are
creating the projects. So now let's move on
to the first project.
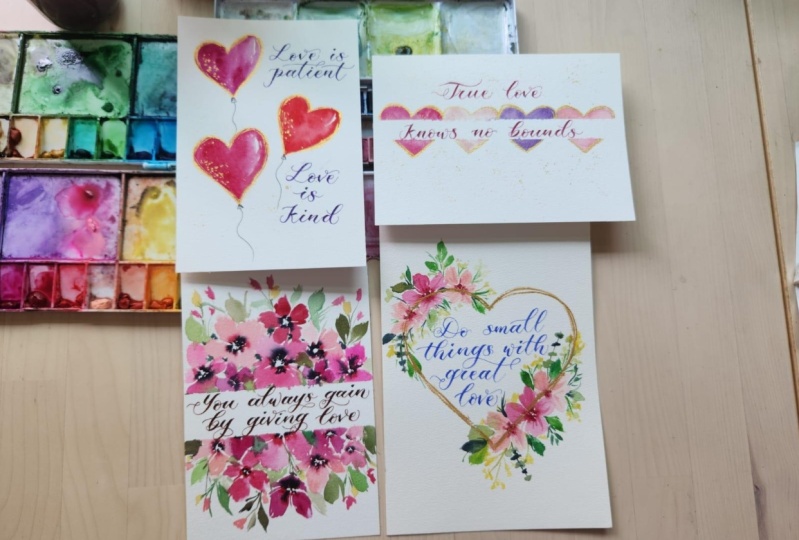
5. Project 1: Heart Shaped Balloons: Before we start, here are
the colors that you need. For the first project, we're going to paint these
heart shaped balloons, and you can actually vary the colors and also the
size of the hearts. So let me give you a brief
overview before we start. First, we'll need to draw
three hearts on the paper, and then we're going to
grab a pink or red color, and just going to
fill in the hearts. I'm also going to leave
some white spaces for the highlights so that
it doesn't look flat. Next, we're just going
to draw the strings of these hearts
using a micron pen, but you can also use a black paint and use your
paint brush to do this. So I left some space right
here in the lower right, and you can put a message there. You can use a stamp, or you
can simply write a few words. I just think it looks
cute if you use stamps. So here I put the
letter I and U, and then in the center,
I'm just going to paint this small cute heart. When the heart balloons are dry, we can grab some gold paint, just to add some sparkle. I'm using a small brush to just draw an outline and
also some small dots. Just to keep it simple, I'm going to do the same
design on all the balloons, but you can definitely
change it up. You can also use
a white marker or a white gouache to add
different patterns. Alright, so I'm just
going to splatter some more gold, and that's it. Okay, so let's start painting. Alright, so let's grab a pencil, and we are just going to
lightly draw three hearts. We'll start at the bottom. And I want this to be kind of a wonky shape and
irregularly shaped heart. So I'm going to do about the same size for
the three hearts, but definitely you
can change or vary the size depending on how you
want to place the hearts. So right here, I'm going to do three hearts that are
diagonally across each other. So I want them to be in
different heights just so that it looks more
pleasing in the layout. Okay, so let's fill this
in with some color. I'm using permanent rose, but you can definitely change up the colors in this project. So we are going to
fill in this heart. I'm going to do
the outline first. So we're not really
going to be strict about where to start when you're
filling in this heart. Personally just like to
draw the outline first, but I make sure that my
paint is quite wet so that it doesn't dry up fast and
leave a bold outline marking. So you can see right
here, I just grab some more water from my jar, and I'm trying to
blur out the edges of the heart shape
on the inside. And then I'm going to leave
some white spaces for the highlights so that it
doesn't look too flat. Alright, so let me just grab some more paint and going to add some darker areas on one side of the heart and maybe a little bit
on the outline. So in a way, I want this to
be like, an irregular heart. I don't want it to
look too perfect. So another option for this
project is to actually use the cookie cutters so that
you'll get a nice heart shape, or you can use the
core of a tissue roll and kind of try to fold it to
turn it into a heart shape. Okay, let's move on
to the second heart. I'm using this permanent red. So we want to really change up the colors so that it
looks more interesting, filling it in on the left side of the heart and
grabbing some water. And then we are just going
to blur out that side. And you'll notice that
one side is lighter. The other side has more color. So I decided not to use a cookie cutter in this
project because I just figured that some of
you might not have cookie cutters at home
that is heart shaped. So you can simply just draw
the outline of the heart. But later on, we will have
some projects where we will use objects to create
these heart shapes. Okay, so I'm just going to lift this part using a
damp brush and just absorbing the excess paint on the right side so that I have a little bit
of a highlight. Alright. Next, we're going to
use the color crimson lake. Again, you can use
different shades of pink. You can also use magenta. You can even add a
little bit of purple. I think that will
look really good. So I'm using a size
four round brush so that it's easier to
paint this small heart. So let me just grab a
little bit more paint straight from the
pan into the paper. And I'm adding this while
the heart is still wet so that we get some
beautiful blends. All right. So my goal is not to create an even surface on
the heart shape. I want some parts to be a little bit lighter for the highlights. So while waiting for
the hearts to dry, we're going to grab a pen. This is a micron pen, and you can use ordinary
ball pen as well. So I'm going to do the strings, and then you can just
draw a triangle first, then draw some lines
on the inside, and then you can draw a
curvy line for the string. So what's great about using a micron pen is that
it is waterproof. So if, for example, I suddenly want to paint
on top of this string, it's not going to smudge. Alright, so this is
an optional part. On the lower right side, I left some space there to write a message where you
can stamp. I love you. I think it looks pretty cute. So again, use whatever
you have at home. If you don't have stamps, you can simply write down a message or a word
on the lower right. So I'm using this
stamp right here, and you can use any
stamp, of course. So my plan is just to
stamp the letter I and U, and then in the
middle, we're going to just paint a small heart. A Alright, so it's looking really good. And now we want to
add a little bit of design on the heart balloons. I'm using this gold
paint by Kura take. And you can find the supplies in the projects and
resources section. I'm just using this
small brush here, but you can use any brush. And what I'm doing here is I'm creating some outline
for the hearts. I'm doing several layers of
the outline for the heart, and then we can put
some small dots of gold as designed on
one side of the balloon. Alright, so this is
also a good way to hide some flaws in the painting. So if there are areas in this heart shape
that you don't like, you can cover it up
with this gold paint. So when you're
doing this project, try to look for a bold
paint in your palette. So I use red here, and you can see that the
gold paint really pops up if the background is quite
dark or a bit more opaque. But at the same time, it
doesn't look flat because we added some highlights on the
right side of the heart. Now, let's just finish
this last heart balloon. Now, some people like it
to be a clean painting, but I personally love
adding some splatters. So I'm going to add
some splatters of gold, and you can also use your
brush to add some small dots. Okay, so let's tilt this paper, and you can see that
beautiful sparkle from the gold metallic paint. Okay, so that's it for
our first project. Congratulations for
finishing this video. I hope to see your project in the project gallery
section of the class. Now let's move on
to the next video.
6. Project 2: Heart Wreath: So before we start, here are the colors
that you need. In this project, we
are going to paint this heart wreath with some
soft and loose florals. Let's do an overview before we start
painting the project. So for the heart shape, I am going to get this heart shape bowl and
paint some gold on the rim, and then we are
going to stamp it on the paper to create
that heart shape. If you don't have this
heart shaped bowl, you can simply paint the heart
outline using your brush. Now we're going to paint a
cluster of small flowers. These are small, four, five petal flowers, and
using a nice pink paint. Then we're going to
add a dark center, and we're also going to
add some more leaves. So diagonally across this, we can paint another
set of flowers, and I'm using the
same color palette. Then we can add a
darker center and add some more leaves and fillers
to make this look very lush. You can definitely
customize the palette, depending on the
recipient's preference. So if she likes some blue
flowers or purple flowers. So to make the heart shape
stand out even more, I'm going to stamp it again
after painting the flowers. Alright, that's it.
Let's start painting. Alright, so I am
using this heart shaped bowl to create the
outline of the heart. My paper is just five by 7 ". And just in case you don't have this heart shaped
bowl, it's okay. You can just draw the outline of the
heart just like this. Alright, so for the first part, we need to use this gold paint. You can see a huge
tent in the middle, and that's because I love
using this paint so much. So a tip for you is
to add a few drops of water in this pan and let it stay for maybe
a minute or two. Just let it soften so that it's easier to grab this gold paint. So I prefer getting
quite a thick mixture, and then I'm going to paint the rim of this
heart shaped bowl. If you don't have a
heart shaped bowl, you can simply use an
ordinary round shaped bowl. So again, we want it
a little bit thick so that it doesn't just
fall off to the side. And now I'm going to press
my bowl onto the paper. Alright, so I love that we have some nice dry edges there, and it's not a clean line. So I'm going to stamp
my bowl a couple more times so that I get a beautiful texture because
I love that rustic look. So if there are spaces
that you want to fill in, you can simply use your brush
to create some thin lines. Let's prepare the colors first. I am going to use permanent rose and also
the color shell pink. So shell pink has a little
bit of white in it. That's why it looks opaque. If you don't have this color, you can just simply
add a little bit of gouache to your pink paint, and you can also add a little
bit of yellow as well. So I'm using this size
four round brush, and we're going to start
with this main flower. So I'm going to paint
about five petals. This is going to be
a bigger flower. And we're just going
to do a cluster of three flowers. All right. I'm just going to rinse my brush and grab this shelping color. You'll notice that I'm
really just, like, stamping my brush
and moving it up and down to create these
nice fluffy petals. So in order to make
it look softer, you need to add a
bit more water. So I'm just going
to grab some water and kind of fade away some areas and blur out the
edges to make it look softer. And while the flowers
are still wet, I'm going to grab this permanent rose just straight from the pan, and it's supposed
to be really thick. We're going to add it in
the center of the flowers, and you'll see a
beautiful contrast. Alright, so it's looking good. And now we want to just prepare our greens so that
we can paint faster. So I have your sap green with a little bit of
this burnt umber. Next, I'm going to
just grab sap green, and then we can
mix another color. Let's grab some sap
green and sepia. So this is going to give us
a nice deep green color. Alright. Let's start
with sap green. I'm going to paint a thin line as a stem and then paint
a couple of leaves. So usually you like to start
in between the main flowers. Alright, let's grab
this olive green color, and then we can start adding more some
more leaves rather. So you can definitely add
some thin stems sticking out, and you don't need to add
the leaves right away. You can just put the
stemps first and just add some fillers
on it later on. You can vary the
shape of the leaves. So here I'm going to
paint some eucalyptus. So I just painted the
stem and maybe paint some small round leaves and then go to rinse my brush to
create just a lighter color. So that's what you
want in a wreath. We want to change the values of the leaves so that some are
darker, some are lighter. Now, I think we need
a darker color, so I grab some indigo
and add it to my green. And then we're just going to add this color to our wreath. And to give that nice dainty
vibe to this painting, you want to add stems
that are slightly curved. If you'll notice most of the stems that I paint
here are curved. They're not straight lines. That's going to help
give some movement to the leaves and the stems. So right here, I just grab
a little bit of yellow. You can use yellow ochre
or permanent yellow light. And sometimes I like adding a little bit of yellow
to brighten up an area. But if you want a
different color combination, that's
completely fine. To give this more contrast, I'm going to grab
some dark green and add it in
between the flowers, you'll see that there
are some white spaces in between the
flowers and leaves. So I'm just putting some small
dots of that green paint. Okay, let's move on to
the flowers that is diagon across the first
cluster that we did. I'm doing the same pattern, and we're going to paint a bigger five petal
flower first. Again, just move
your brush up and down to create some
nice fluffy petals. It doesn't have to
really look perfect. We do want those
nice jagged edge. So here I'm just grabbing a little bit of
shell pink again, and just going to stamp my
brush to create small petals. So you can also use just
the tip of your brush. Right, so I'm just stamping and just moving
my brush up and down, and then you can introduce
more water to the petals. So I just have this wet brush and I'm painting over
some of the petals again. Then it's grab some permanent
rose straight from the pan, and we're going to drop this in the middle of the
flowers while they are still wet so that you have that nice soft blending
in the middle. So if you want really
more contrast, you can use indigo, as well. So it's now time to
add some more leaves. Again, I'm starting in
between the flowers. I'm painting some leaves. And sometimes I try
to let the leaves touch the wet petals
because I think it's really pretty
for the two colors to blend in each other, right? So using the tip of the brush, I'm creating some
nice curvy strokes that are a little
bit more extended. Okay, so let's just
grab some more leaves. I'm going to let it climb
to this side of the heart. So just paint some more stems. So for me, it's best
to paint the stems first before you
add a leave so that you don't overwork
the whole wreath because you can add
more details later on. Alright, let's just
create some eucalyptus. I'm just stamping the
side of the brush to create these oblong
shapes or oval shapes. Okay, so I think we need to add a little bit of contrast
and I'm going to add indigo so that we can
create a nice dark green color. I'm going to paint a few leaves. And then you can also
add this color in between the flowers
for the small gaps, or you can add some fillers, so you can use the
tip of the brush and just create some small
markings just like this. I do love adding these
small markings that look like there are small
leaves that are dancing. Okay, so we can now add a
little bit of this yellow. Just press your brush onto the paper so that it will
look like a small petal. Alright, so I'm just
grabbing some greenish yellow and just painting
some round shapes here. And this is just a nice filler. You can use a different
color for this part. Alright, so it's
looking really good. We're almost done, and
I'm just going to grab my heart shape bowl again and
paint some gold on the rim. And we're going to stamp it
again on this wreath just to make that heart shape
pop up even more. Okay. Press your
bowl onto the paper. All right, so I think
it looks really good. If you don't have this bowl, you can simply use your brush. You can dab it in
tissue paper so that you'll get a nice
dry brush technique. Right here, I'm using my brush to just add some more lines. Alright, so we are done. I hope that you
enjoy this project, and I'm excited to see what
you'll write in the middle. It's a beautiful soft wreath
with some gold in it. So you can definitely
make this your own by changing the colors and
adding some more fillers. And I'm really
excited to see what you can create
from this project. Alright, so now let's move
on to the next video.
7. Project 3: String of Hearts: Before we start, here are
the colors that you need. Okay, so this is
our third project, and this is what I call
a string of hearts. So these are hearts that
are beside each other. And I use the cookie
cutter for this project. So let's do a brief
overview first. Okay, so this is in
a landscape format, and I'm going to put a tape first in the middle
of the paper, and we're going to
use these hearts to stamp the shape of the heart. So for this paper sheet, I'm using five pin 7 ", and I can only fit in
four heart shapes. Depending on the size
of your paper and also the size of the heart
that you're going to paint, you can put in more hearts
or less number of hearts. And also, if you don't
have a cookie cutter, you can simply draw the
shape of the heart. So after painting
the heart shapes, we're going to do
an outline of gold. So I am going to stamp
this cookie cutter again, I'm going to do it a
couple of times so that we have a little
bit of texture. I'm going to add some splatters
all over this painting. You can for skip this part if you don't
like some splatters. Then once the painting is dry, you can peel off the tape. And then we have this
nice clean border where you can write
any greetings, any words that you would like. All right, so let's
start painting. Okay, so we have our paper
in a landscape format. You can also do a
portrait style. But for this one, because I
wanted to put in more hearts, I decided to make
it in landscape. So I'm going to put a
tape in the middle. I'm using a washi tape. So this is a tape that
I bought in Japan. But if you have those
printed washi tapes, you can also use them. If you don't have this tape, you can also use
the masking tape. Alright, so I have
here my cookie cutter, and I'll be using
the thicker side of the cookie cutter to stamp
the outline of the heart. So first, I'm just
going to try and figure out how many hearts
I can fit in in this paper. So I'm going to just draw some guides so that I know
where to put them later on. So if you don't have
this hard cookie cutter, you can simply draw the
shape of the heart. Okay, so let's start with
this permanent rose. You can use any
color that you want. I'm just using pink here. I'm going to just mix this thick mixture and paint it on the rim of this
cookie cutter. Now I'm not expecting
the paint to retick on all the sides of
this cookie cutter, and that is completely fine. Then we're going to
stamp it on the paper. I did put some guides, a little bit of dots
there if you can see it, and then just press
your cookie cutter. And once you lift it, you can see an outline and
then go to rinse my brush. So we're going to pull in
the colors from the outline. So you do have to work a little bit fast
because you don't want this outline to dry up
and cause some hard edges. I'm also using a size
four round brush so that I can easily paint
those small spaces. All right, so we are going to switch to a different color, and now we need to wipe our cookie cutter because we don't want the colors
to mix in with each other. I'm gonna grab a new color. So this is called
Brilliant pink, and brilliant pink is
a pastel pink color. If you don't have this color, you can use white
watercolor and add a little bit of red
or permanent rose. You can also use white gouache
and some pink watercolor. Okay, so I'm just going to press my stamp or my
cookie cutter again. And then once you lift it, you have that nice outline. So rinse your brush and
just add in some water. So right here, I'm
just going to pull in those color to the center
to fill in this shape. And don't worry if you have some jagged edges around
this heart because later on we can try to cover that up with a gold outline. All right. So I'm going to grab
a little bit more of that pink and just add it
in some areas of the heart. And you'll notice
that I'm not making an even layer of color. Some areas will be a
little bit lighter. Some are darker, right here, I just grab a little
bit of permanent rose to have that darker
pink in this heart. Now let me fix this patchy area. So I have a clean
and damp brush. Just going to lift that area
and add some more paint. And we do want the hearts to touch beside each
other a little bit. It's sort of there,
blending with each other. Okay, so let's just grab
some permanent violet. You can use other
violets in your palette. Okay, so we're going to do
this similar procedure. We're going to stamp
the cookie cutter. And then we're going
to rinse our brush, make sure that it
has clean water, and then we're going
to just spread that color and going to let it touch that pink
heart a little bit. Now we can grab a darker
permanent violet, and then I'm adding it towards
the edges of the heart. All right, so I think we can
add a little bit of pink. So I'm just going to drop
in some permanent rose. I think it will look
a little bit better. All right. So now we're going to switch to the last color. I'm using a brilliant pink, but we're going to
add a little bit of yellow ochre to make it
look a little bit peachy. So we want some really nice, sweet colors for this project. Okay, so we're going to do the same procedure again
and stamp this heart. Now, you can also try to vary this project by
using a different shape. You can do an oval cookie
cutter or a round shape, maybe do a string of balloons
for a birthday card. So sometimes when
you're stamping, you get a little bit of puddle, and you'll see in the lower right there was a
small puddle there, and it will cause the heart
to look a little bit uneven, and that's okay because
we can try to cover that up later on with
some gold outline. So I'm going to add a
little bit of yellow just to make it look
more like peachy. So wait for the
hearts to become dry, and then we can move on to
adding an outline of gold. Okay, so this is the
queer tarry colors, and you can put a little bit of water before you start painting. Let it stay there for
around a minute or two to let the gold soften so that it will be easier
to grab the paint. Okay, so I'm just going to paint the rim of the
cookie cutter again, and I'm going to stamp
it on the hearts. So now we'll get
some jagged edge. And it looks quite uneven, but I think it's going to give this painting
more character. And if you're not
satisfied with that, you can go ahead and
stamp some more or use your brush to add or
fill in some of the areas. All right. So to make
that dry brush technique, I am going to grab some gold, and then we are going to dab this brush and tissue
paper just like this. So now we got rid of
the excess moisture. I'm going to paint on
the edges of this heart, and you'll see that you have kind of a dry
looking stroke. So it's going to give this
heart more character. Right, so let's do this
for the other two hearts. I'm going to try
and stamp again. And if you have any mistakes
that you did, it's okay. We can try to cover it
up using this technique. If you notice the tape
is still on the paper, so we're not going to
peel that off yet. Okay, so now it
looks really good. I'm going to add some
splatters of gold. But if you don't like splatters,
you can skip this part. Okay, so let me grab
some more paint and making sure that my brush is quite damp so that I can
splatter some gold on the paper, just lightly tap your brush. Okay, so this paper
is already dry, and now you can start
peeling the tape, and you can see that beautiful
sheen from the gold paint. Okay, so when you are
peeling your tape, try to keep it as
close as possible to the paper so that you
won't tear the paper. So you notice that this washi tape is really
gentle on the paper. Even if I pull it like this, it's not tearing up the paper. I'm going to go
ahead and just add some more gold details
along the hearts because I want to fill in some white spaces to really
show the nice clean edge. Alright, so I just drew
the word, I love you. And I am going to top it off
with my gold metallic pen. So this is from the
brand Nibal signal, but you can use
any metallic pen. So you can go back and try
to make the letters thicker. But if you'll notice, this
is a little bit mate, and I think I prefer
something shinier. So I'm going to go ahead and
just paint on top of this. I'm using the
kurretaktai colors. And let me just tilt my paper. You'll notice that the word love is sparkly and the
word is still mate. So I'm just going
to paint the word again with some more
of that gold paint. This is definitely
just a preference. You can also use any metallic
pen that you have at home. Alright? So I think
this is a nice, minimalist look, and you can definitely create this
for any occasion. So I hope that you
enjoy this project. I hope to see your paintings in the project gallery
section of the class. Now let's move on to
the last project.
8. Project 4: Floral Border: Before we start, here are
the colors that you need. So we are now on to
the last project, and you're going to paint
this beautiful floral border, and you have that nice white
area there where you can write a greeting or
some thoughtful words. So let's do a quick
overview first. I'm using this washi tape, and I'm doing two layers because I want a thick
band in the middle. Alright, so now we're
going to add some florals, and these are going
to be very simple, five or four petal flowers in different shades
of pink and red. We want the flower petals
to bleed in to each other. So it's going to look
very soft and flowy, and I'm working quite fast while the flowers
are still wet. I'm going to add
some nice leaves. You can see that it's
blending in with the petals. And then, of course,
we're also going to paint some more flowers towards the
bottom part of this card. And you'll notice that we have some bolder florals and some
lighter colored florals. So we want to mix those
up in this composition. Alright, so now I'm just going
to add some more leaves, and I'm filling in
all the white gaps. And if you notice,
I did not fill in the entire paper
with flowers. I still wanted to leave
some white space towards the bottom part in the
top part of this card. And then when the
painting is dry already, we're going to peel
off this tape, and it will reveal
a nice clean edge. So now we're done and start
painting this project. So I'm using this five
by seven inch paper, and I'm going to put tape
right here in the middle. I'm using this washi tape
that I bought in Japan. But if you have some
printed washi tapes at home, you can also use that. You can also use a masking tape. What I notice with
washi tapes is that it's more gentle on the paper, compared to a masking tape. And I'm going to put two
layers of tape here so that we have a nice big
gap in the middle, and you will have more
space to write on it. So the first thing
that we need to do is to prepare our colors, I'm going to use permanent
rose and carmine. So I'm also going to grab a little bit of
that burnt sienna. And you can add that to our permanent rose or to
any pink in your palette. I will give it some warmth. Okay, so we are ready. I'm going to use this size eight round brush because we want some nice fluffy petals. I'm going to grab my
permanent rose first. And I'm going to paint
some petals right there, near the edge of this tape, and it's going to
lightly touch the tape. So I'm going to
rinse my brush to create a lighter pink, okay. And then we're going to paint
some more near the tape. So you can see that
I actually overlap my stroke onto the
tape, and that's okay. So we also want a darker flower. I'm using carmine, and you'll notice that it's a
more intense color. And then we can add
some smaller flowers right there and just let the petals bleed
into each other. Alright, so I'm going to use this color with a little bit of Benziena and you'll notice
that it has that peachy tone. I'm going to paint it right here and between
the two flowers. I'm going to intentionally let the petals touch each other, let it bleed into each other. Alright, you can see that
beautiful bleed right there. It's just so nice. And then we're just going
to grab some more pink. I'm going to paint
it right here in between the flowers
again and the white cap. So you can try to
change the values. Some can be a darker pink, some can be a lighter pink. Alright, so sometimes I also just rinse my
brush in the water and use whatever is left on
my brush to paint the flower. So I am alternating the flowers. You'll notice it in the middle. The flowers are quite
light in color. So now I grab some carmine and it's a bold color or a
more concentrated color. And I made sure to put it near
the light colored flowers. Alright, so I'm using
a smaller brush, and then we are going to grab permanent rose or
any dark color. You can put it in the
middle of the flowers just to give it some
contrast and some depth. So when you're doing
a cluster of flowers, it's important to create this nice dark center so that
the flowers will pop up. So right here, I just grab
a little bit of indigo. We're going to add it in the center while the
flowers are still wet. So we actually need to work a little bit
fast when it comes to this project because we want the flowers to still
be wet as we layer it. Alright, so we are
going to leave it at that and start
mixing our greens. Go to mix sap green
and burnt umber. So you can mix all the greens
you have in your palate. You can also add some
indigo or sepia. So I added some brown in my green to create
this olive color. So you can start adding the leaves or small stems
in between the flowers, and you'll notice
those white gaps. So at this point,
it's best to use a smaller brush I'm
using a size four. And I'm letting the
leaves touch the petals, as you can see right there. Just letting them
bleed into each other. It looks very, very soft. So if you want to fill in
the entire page with floras, that's up to you. But for this painting, I decided to leave some white space just because
I like that negative space. You can see that beautiful
bleed of green and pink. It's just so nice. We're
using this 100% cotton paper. So that's why it's easier
to achieve that technique. And then now I'm just
adding some small buds. I'm just pressing my
brush onto the paper. I'm attaching it to the
stems that we did earlier. So I'm just using the
colors that I have on my palette just to make
it look more cohesive. Alright, so let's move on to the flowers at the bottom
part of this tape, and I'm just going to
paint on top of this tape, just to imagine that the
petals are behind this tape. So now I'm just rinsing my brush to create a lighter pink. Alright, so we're using a
size eight brush so that it's easier to create
these fluffy petals. And then we're going
to grab some carmine, going to paint some
smaller flowers. So you'll notice that
we are trying to also vary the size
of the flowers. So when you're doing
the cluster type of a composition like this, it's important to also vary the size so that it looks interesting and
it doesn't look flat. Alright, so I'm really
just trying to press my brush and move it up and
down to create the petals. And for me, it's easier to start painting from the center, and then I'm going to go
around the main flower. Okay, so I'm using this
color with some Bziena. And as I'm painting the petals, I'm making sure
that I let it touch the previous flowers
on the paper. Let's rinse or brush, tap the excess water. And you'll notice I still have a little bit of paint left. So I'm going to use that and then maybe add a
little bit of color. So now you have a lighter
petal and a darker petal. Right here, we need
to add some contrast. So I'm using a
really bold color. So it is up to you if
you want to change the color palette of
this project, right? So it's really nice to see
those beautiful bleeds again. And sometimes I will
intentionally put drops of paint in
between the petals. So I'm using a size
four round brush now, and I'm just going to grab a little bit of this
permanent rose. I'm going to add it in the
center of the flowers. Again, the flowers are all
still wet as I'm doing this. And then you can grab a
little bit of indigo. So this is straight
from the pan. It goes into the
flowers so that we have a nice thick paint. So when you do this, the
paint is not going to spread all over the place
because it has a thick mixture. So we're going to leave it like this and move on to
adding some leaves. So I'm using sap green
and some burnt umber. I'm going to add
some leaves right there in between the flowers, and I'm making sure I add
some color near the tape. So when you peel the tape, you have a nice clean line. So again, look for
the wet petals, and that's where
you add the leaves. Just let them blend
in with each other. I Okay, it's looking good. I'm just going to put
some more green spots in the white gaps. And then now let's
rinse our brush and grab a little bit of this pink and just press our brush to create
those small buds. So it's okay if they look irregular in
shape, that's okay. Alright, so this mixture
is sap green and indigo or you can use sepia. So what I'm doing now is I'm adding some
really dark color in between the flowers so that it will look like
they are shadows. It's also going to help make the flowers
pop up even more, and it makes the
painting look fuller. This is also going to help
create a shape for the petals. I'm just going to add it right
here and between the gaps. And just continue adding it. Of course, it depends on the
composition that you did. You can try to add layers
of darker leaves as well. And Okay, so I think we need
a pop of color. I'm going to add
some yellow buds. So this is just
permanent yellow light. You can grab other colors
or you can leave it as is and just use an all
pink color palette. Okay, so once the
painting is already dry, you can start peeling the tape. So we have two layers of tape, and I'm going to take
out one layer first. You can do both right away. All right, so you'll notice
that nice clean edge. And that's because we added some green spots
in the white caps. That's just gonna
help it fill in those white gaps and
create a nice clean edge. Alright? So I'm just going
to peel this last tape. Alright, so we are done. Congratulations for
finishing the last project. I hope you enjoyed this one. You can definitely do
some more embellishment. You can even add some
gold details if you want. So this is just a great
card that you can give to a loved one as you can
write a greeting the middle. I'm excited to see
your projects, so I hope to see them in the project gallery
section of the class. Now let's move on
to the next video as I share my final
thoughts with you.
9. Final Thoughts: Congratulations on
finishing the class. I hope you enjoyed
learning how to paint watercolor heart and floral
designs for the cards. From vibrant floral borders to whimsical heart
shaped designs, you've learned how to use
simple tools, layer colors, and add elegant details like gold accents to make your
cards truly special. Now it's your turn to take these techniques and
make them your own. Experiment with colors,
add some personal touches, and create cards that reflect
your own unique style. Feel free to upload
your projects in the project gallery
section of the class. Under the Projects
and Resources, you can find the submit button so you can upload
your project there. And don't forget to share your
projects on social media. You can use this hash tag, and I would love to see them. And also, it would
mean a lot if you could leave a review
for the class so that other students may know how this class help you in
your watercolor journey. Thank you again for joining me. I'll see you at my
next class. Bye.
 Joly Poa, Watercolor Artist