Transcripts
1. Creating Resin Coasters with Visual Texture Introduction: Hello, welcome to creating posteriors with visual texture. And if you're thinking
of looking at that title and wondering what in
the world it means. I mean, texture. That is within layers of
residence so you can't actually feel it,
but it's visual. I'm going to show you
how to create coasters out of found objects
around the house, recycled objects, things from packages
and that sort of thing. And show you how to
create Coasters with them and create texture
within your resin. I'll take you through each
step of the process from how to figure out how much
resin you're going to need, how to measure and mix it, as well as how to pour
it, remove bubbles, and add your layers and inlay your objects to create the
texture between the layers. I'll cover simple tips and techniques throughout their way and show you some of the things I have learned
throughout the process. I'll show you how to de
mould and how to trim the excess off of your coasters
so that they look pretty. And then I'll show
you how to clean up your tools in the
simplest way I found.
2. How Much Resin will I Need: All right, so sometimes,
especially if you're using a 3D mold for say, a costumer, that it's not square
as hard to tell exactly how much
resident you're gonna be using or needing. If it's a square, there's a very easy
calculator on most epoxies website most approximates
the resin that I am using. And you can use
that to calculate how much revenue
you're going to need. But if you have an odd shape, this is a super easy way to figure out how much
you're going to need. Fill it with water in
Florida to a measuring cup. And then you'll be able to
see right from the side exactly how much revenue
you're going to need to make. I tend to make just
a touch more simply because some will stick
to the inside of the cup. For poster mole,
That's an odd shape. I can fill it with water. Just pour it into the cup, and then you'll know how much
you're going to be meeting. So super simple and easy trick, but it's gonna save you a
lot of heartache and a lot of wasted resin
because resonance more residents
expensive enough when you are experimenting and
trying to figure things out, you don't need to
be wasting it by making the wrong
amount for your moles. Just make sure
after you've taken all the water out that you
dry all the drips in there. You don't want to be
pouring resin into a mold that has some water drips because it's going
to affect the cure. So just make sure
that once you've done that and once
you've measured that, you dry it out completely.
3. Mixing & Measuring your Resin: Now that I have figured out
how much resin I'm meeting, I'm using most epoxies
and I have a Part B. Part a. You need for this
particular brand, you need equal
parts of each one. I am going to pour. If I need 200 milliliters, I'm gonna do 100 milliliters of part a and then a 100
milliliters of Part B. It's much easier if you have containers with
measurements on the side. If you do not, you can use a scale, but it's not equal parts by weight when it comes to a scale. So you'll want to make sure to follow directions for that. That you're weighing each amount correctly because each
part doesn't weigh the same amount per
volume or whatever. I don't know what the actual
term rate the second is. Alright. I've got equal amounts there. If at any point you
actually touch the resin. Don't do that with hands
without gloves on. So I'm going to
put some gloves on so that I am not
touching. All right. So according to the
resin directions, this has to be mixed
for three minutes. While I'm mixing
it, I make a point to scrape off the sides
and scrape off the bottom. And then I also scrape off
the side of my mixing stick. It is silicone covered, so it once I'm done
using this and I put it aside and it cures on here. I can just pick off
the resin so I can keep using this every
single time I make resin. I don't need to get
new sticks each time. Speaking about the gloves, make sure that you follow all the safety precautions for the resin that
you were using. Respirator gloves, make sure that you're protected,
protect your surface. I also tend to work
rate your side, my sliding door and anytime
I'm working with resin, I have it open so that there's
a fresh source of air. I liked this resin
because it has low VOCs. I don't smell it at all. So if it's colder outside
or in your house, your resume will be a
little bit thicker. You may want to put it
in a sink of water, the whole jug in
a sink of water, warm water, hot water. In order to thin it out. You'll notice that
while I'm mixing, I'm getting some bubbles. In order to not have those
bubbles in your project. You can take your
container and put it in some hot water before you pour it so that
they rise to the top. And then I also use a heat gun in order to remove the bubbles that have
risen to the surface. I tend to not put my
cup into some hot water because I just
removed the bubbles once they're in my mold. But if you're wanting to remove as many as possible ahead
of time, you can do that. The other thing I tend to do is before I pour my
residents my world, I'll let it sit for awhile. And by little while, I mean
a couple of minutes so that a lot of the bubbles
will rise to the surface. And I'll use my heat
gun to remove them. Just to reduce the
amount that are going right into my project. You'll notice as I'm doing it, I'm constantly scraping down the sides of my container
as well as the bottom. And scraping by
mixing and spatula. I always put the timer on my stove on so I know
exactly how long. That way I don't get distracted. Sometimes you can actually see
like when you first start, you'll see some
striations in there. And it gets to the
point where you can actually see that they're
not there anymore. So you know, it's
mixed up enough. But sometimes like
I've got a lot of bubbles in mind right now. So sometimes having a clock to know that you've mixed it the correct amount of
time and not under mixed it for sure is helpful. Alright, so I'm going
to let that sit for a couple of minutes to let
some of those bubbles, bubbles rise to the surface
and I'll see you again. I will start pouring
into our mold.
4. First Resin Layer: All right. So this has sat
for a few minutes. I'm gonna take my
spatula out of here, lay it down, and I'm going to divide this evenly
between my moulds. Now you can see that
this mold is not one of the modes that
I use to show you how to measure how much revenue
you're going to need. Only because go ahead, grab the other one to show you. This gets evenly
distributed between the four molds and we're
filling them up halfway. We do not want this
to fill up entirely. Because we need to
fill this up halfway. We need to do what I'll show you in a
minute for the texture. And we need to let
that set before we add the rest of the resin. In order to finish
the technique. Make sure that it's all
the way to the sides. If not, use your spatula to push it into the corners of the mold. Then we're going to use our heat gun to
remove the bubbles. And we need to make sure that all of the bubbles are removed before we add the
texture to the center. I'm just using a heat gun. This emits heat, it
blows it a little bit, but I've got it on low. It's really not blowing it a
lot when I put it on high. You can see that it
really blows it. But we're just using the
heat to remove the bubbles. You could also use
a spray bottle with isopropyl alcohol
that would work as well. If by chance you see bubbles that are
clinging to the mold, get a toothpick and release them so that they
raised to the surface. So I'm just going to go pause a minute and
get the two feet. So once you have your toothpick is actually quite easy to see. The ones that tend to stick
to the surface of the mold. You'll find them
at the bottom and you'll also find them
along the edges. And typically just in case there's ones
that I'm not seeing, I will take my toothpick
and I will run it along the crease just to
remove them all. If by chance you miss one and it cures with bubble
in the surface, you can just pour
a thin layer of resin over top to correct it. You haven't ruined anything
if you happen to miss one. It's just nice to correct to catch them before you
get to that point. Just making sure any of
these ones that are still caught in there are going
to rise to the surface. Now for the fun part, we're going to add the
Saran wrap that is going to create this texture or the cling wrap wherever
you want to call it, you're gonna get
some clean route. Typically, I wouldn't have my
molds altogether like this. I would separate
them a little bit so that there's a bit of space. Just wanted to make sure
that they're all in frame. I'm going to start at
the center and lightly press out what I'm trying to do by doing it that way as
I'm trying to not to get bubbles stuck beneath
the cling wrap surface there and I can see
one right there. I'm just going to push
that out of the way. Easier to push them out of
the way while you see them, then wish that you
would notice them and didn't miss them. Now, having said that, sometimes the bubbles
look really, really cool. If you like, if you have any gotcha bubble and you
like the way it looks, it's not all is not lost. For instance, there's
a bubble sitting. This one, trapped
a few in there. But they do look
kind of cool once we add the mica powders to them, they do have a
cool look to them. If by chance you liked
that look and you want to have them in there. By all means, I'm seeing
Hubble bubbles in here, but I'm just going to leave
them to get a look like this. I did this with my Saran wrap. I have it all scrunched up. But what you could
do if you wanted, you could do it kind
of lines like this. And I went almost
looked like waves. One big bubble there then
I'm trying to push out of the way and it's
not wanting to pop. So all I can do or what I can
do is I can lift it up and then pop it with my
toothpick there. So I'm going to make this
one have some waves to it. Because I think that
would be a fun look. In order to get a
look like this. I'm just taking a
piece of bubble wrap, putting it down, pressing
it into the resin. There is gonna be a halo
around the edge like this. There's no way to
get around that. That's just the way it is. There's no possible way to make sure it is their
rate to the end. It just wants to lift
the plastic anyways. Once you've got good
contact, leave that alone. I thought it'd be interesting to have half smooth and
half with the bubbles. So I took a piece of
bubble wrap and I just ripped it till I had
to look that I liked. I'm going to try that
with this one here. See what happens there. Then I have a piece of
really big bubble that up. We're gonna try this one just to see what happens with that. Now this one obviously
is going to have bigger a bigger halo
around the outside. But that's okay. I'm just interested in
seeing what happens and I'm actually going to
put this on top of it. Actually, I'll put one that's as big as the cluster on top of it, just to hold it down because it seems to
want to lift it up. Now we have to let
that cure completely. So I always do 24 hours. I think you might be
able to do 12 hours, but if the resonance at all sticky and you start to
pull that plastic up, you're just going to get
goopy resin coming out of it. So I like to wait
until it's completely, fully cured and I don't
have to worry about the possibility of
ruining my coaster. And no need to cover most of these up because you're not going to
have dust falling into them. But with the technique
that we're using, we're gonna be putting
another layer resin on top of this afterwards. We don't necessarily have to
worry about protecting it, but I'm going to leave
it just like that. And we'll see you tomorrow
once they've cured.
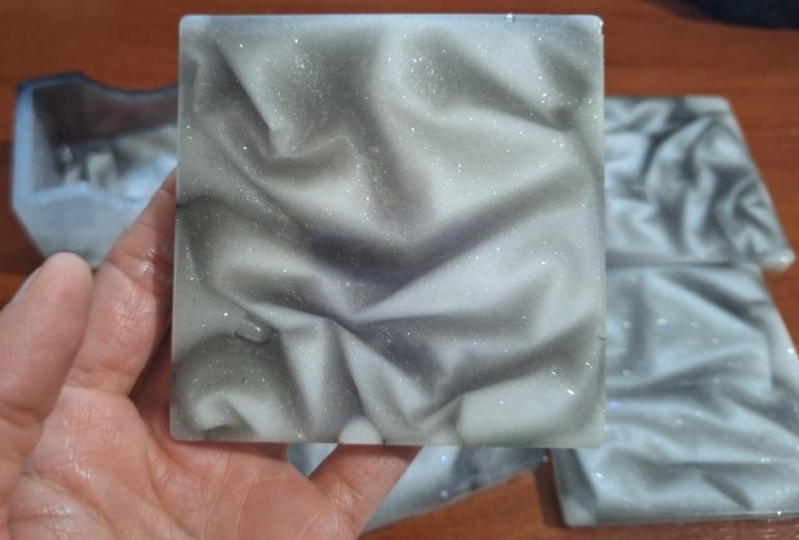
5. Adding Micas between Resin Layers: All right. It's the next day. Let's see what we've got here. So all you have to do is lift up the plastic off of the resin. Now, if you've, if
the resident has folded or whatever over the
plastic and sealed it in, you may not be able
to take it all out. Take out as much as
you possibly can. And sometimes it's hard to
see exactly where it is. I ended up getting
a fold in here which kind of trapped the edge, which is why it
ended up breaking. I have most of it off. Saran wrap is almost
invisible on here, so it's a little
bit hard to see. That itself doesn't
look like much, but we're going to add
some micro powders. And that is what's
gonna do the magic. Now I'm taking my
bubble wrap off. One's coming off much easier. Lots of texture in there. Now this one here, I may get a line in here from the plastic being
trapped in there. I was prepared for that. Ended up not being as bad as
I thought it was gonna be. But that looks really neat
with the different texture. And this is the one
I'm super interested in seeing what happens. Very cool. All right, so now
let's try our micas. Now, these mike has, have a little bit of an
iridescence to them. Let me show you on the
coaster. This one here is just a gold mine that I used
from a different company. And it looks really
cool. It kind of looks like gold tissue paper. But the ones here that have some iridescence that change
from one color to another. This is freely. Lights don't
really show it off as well. All right. I gotta
turn my stove. For some reason. The light in here doesn't show
the different colors. As well as I was hoping that
you are destined to Quizlet. I mean, this happens to be a color that
I haven't used yet. So what you're gonna
do is you're going to open up your mic, a powder, take a little piece
of plastic off, or they're going to
use a soft brush. When you're starting out, you don't need to worry about excess because you're
going to just be spreading it around once
you get to the end. When you're not, you don't
have as much surface to cover. You're going to tap
your brush off so that the excess goes back
into the container. This is going to
stick to the resin. Then when we put our
next layer on it, it is what is going to make that texture really, really pop. We go, Let's put the
lid on that one. This one here I'm going to
do with the fuchsia color. We're trying to get that Micah into as much of the cracks
and crevices as possible. And I'm clearly trying to
be too fast because I'm getting lots of it in
those little wells there, but I can lift it up from those to move into the next one. I went to worry too
much if there's a section that doesn't
get the Micah on it because some of those parts where it misses the mica is what adds the
interest, in my opinion. The coasters. If by chance you have a
lot of extra mica in there that's not being moved. You can go like this
and just dump it out. Then this one here I'm
gonna do with this one. It's called green,
but it kind of has a bit of a purply pinky color as well as the green kind of drawn to anything that has any opalescence to it at all. So that's why these
colors I love so much. I love when you have colors that shift into
a different color. It could be because I'm born on October and my bursts
tone is an oval, so I'm just drawn to
those type of things, but that I think it's
gonna be really, really neat when it
comes out of the mold. For when it comes out of
it? Yeah. When it comes out of the mold after I've
put the next later on. Part of the magic of this
is adding the next layer. The next layer is a
coat of black reason. This one I thought I would try something a
little bit different. I'm going to do two
different shades of blue because I
wanted this to look a little bit like water. I think if I use a couple
of shades of blue, it might look like that
a little bit more. We shall see. I'm gonna do one
part a little bit darker and then one part
a little bit lighter. Go and then let's
look at this one. The funny thing is I've
used half of these powders, but it seems for this class I'm choosing all the
ones I didn't use. Resting. This one's a
little bit lighter, a little bit more
on the green tone, which I think is going
to look really neat. There we go. We've got Micah is on
all of our posters. I'll see you in the
next video when we are ready for the next step.
6. Adding the Second Resin Layer: Alright, so the next step is to add a layer of black resin. I have the resume
already mixed up. I mix it exactly the same way
as the first-quarter resin. The only thing I did
differently what this one was, I added some black
acrylic paint to it. This paint has a lot
of pigment to it, so I really only added
a dollar up to it. It didn't need any more
of that than that. You'll notice I don't have
gloves on my hands and that's because there's no reason
for me to touch the resin. If there was any chance that
I was gonna be touching it, I would have gloves. Now I want to scrape as
much as I can out of there. Then I'm going to
spread this around. I want to make sure that
it gets to the edges. I'm just using the same
mixing spot tool that I used with mixing it. Once. I've got it all spread, I'm gonna take my heat
gun and I'm gonna remove any of the bubbles that
have risen to the surface. Now this one, especially
some of the resin, has gone outside of the
mold for that first layer. I'll show you in the
next or at the end, how we can trim that off. I think I might need to make
just a touch more resin. I made a little less than half because I was thinking that when bubble wrap and stuff like that
pushed everything up, that there would be a
little bit more full. But this one I can see it's
not quite full enough, so I'm gonna make another
small batch for that. Small batch for that. But before I do that, we're going to use my heat
gun on a low setting. Remove any of the bubbles
that come to the surface. And I'm gonna be doing that
for probably about the first went the first
half an hour or so. Any bubbles that rise to the
top, I'll be popping them. You'll notice when you're
using the heat gun, that the heat from the heat gun also
heats your revenue up, thins it out, so
you end up getting more bubbles rising to the
surface through that as well. When I mixed my next
little tiny batch to add some more to this, I'm going to add a touch
more to that and not because I can see points from where the bubble wrap and the surround wrap poked the resonance a
little bit higher. I'm just going to
fill up just a touch more to try to cover those. We'll see you in the next video when we are going to be demoing. Just popping in after adding that extra
little bit of resin. There's a little
few little pokes up from inside from the first layer, but
I'm going to leave them. And the reason is if I
fill this up too much, it's going to start
pouring over the side, which doesn't help anything. So the way to solve this, once everything is completely done and once we've
trimmed or wherever, we can add another
layer that goes just to the sides on the cured coasters. So for right now, some of those are going
to have to stay. Otherwise, we're going to create new problems
for ourselves. But you can see this one here. You don't see all the
different holes there. It's completely filled up,
which is what we want. We want to make sure we've got everything filled properly. And you'll notice some
of the excess mica is float to the surface. That just happens and I kind of like what happens
to it when it does that. It starts making this really
cool pattern in the back. Which I don't mind. Once again, if that's
something that bothers you, you can add an extra
layer of black ones. We're completely done. But I don't mind that. To me, it's on the
bottom of the coaster. You're not gonna see it anyways. But I kinda like the
pattern it makes. I will see you in
the next video.
7. Demolding and Trimming Coasters: All right, We're
ready to D mold. Like those two colors. Still a little bit. Like I wanted them
to be more wavy. It's still got some
lines like this, but it really like that. You'll notice I've
got some resin on the outside here that went
over the side on my mold. And I just have this
little tool here. It makes it super easy
to trim that off. Easier to do it here so I can
see exactly where to do it. So it's just a little blade
that's got a curve to it. Not so big that if I put my finger in it that I
cut myself or anything, it just removes the resin. Now a shape like this because
there are so many jags, jagged edges to it, because it's not
smooth or something, will be a little
bit harder to do, but you can see how
nicely that turns out compared to about there. And it's also much easier to do this rate when you've demoted, when the resonance still, like it's cured, It's
still a little bit softer. Once it's had a few days to sit, it becomes more hard and
it becomes harder to trim. I would definitely do this
earlier rather than later. Here's my other one from this one's from
earlier this week. This one here is a
little bit harder. This one has been sitting for I think I did it about
four or five days ago. So it's a little
bit harder to do. It's not what will
still trim it, but it's not quite as easy as this one here that I've
just pulled out of the mold. Now let's do these other
ones and see how they turned out. That looks really cool. You see, I don't know if you
can see what the camera, how there's a bit
of a goal sheet, but there's also a bit of
an orangey sheen to it. And that's what the
iridescent micas do with it. Just makes it look so
much more interesting. I like how that turned out with the jagged edge like that. To me, that looks so
much more interesting. But you can see that
those micro powders look beautiful even on the flat
resin in-between there. You can really have fun and play with the
textures with this. Love how that one works too. We love it. There is a couple of bubbles
in there that got caught. But because it still is enhanced by the micro
sellers, I don't mind them. I think they make it look
a lot more interesting. Look around your house, see what non porous
plastic things you can do, that you can create different things of texture
within your coasters. Now, one thing to keep in mind, and I don't actually
have one, you know, those mesh bags that fruits
and vegetables come in. You could inlay that in here. And you would see the national, you would get some
texture from that. But because it's not
a solid surface, you wouldn't be able
to pull it out. What would be
something that would be embedded within there. But that could be a
really cool look. That one, I think there's so
many opportunities for that. Good. Have lots
of fun with this. Cool. There's a little tiny bubble right here. You can
see that there. So the way to fix that would
be to make a small batch of clear resin and
then pour it over the surface and only
push it to the edge, don't have it flow over. And then that would seal
that right up there. And then the same
for this back here. What these ended up being
was tiny little bits of plastic that had
not gotten torn out. When I was moving removing
the plastic the first time. I was pushing some of them
in and some of them stayed in once the resin
got tacky enough. But obviously some
of them didn't. So the way to fix this
same as the front. You can mix up another
batch of resin. Clear if you didn't mind
seeing the micro powders here and then just do
it just to the surface. I would do that after
trimming completely though. Or if you wanted to cover up what Michael powder
floated to the surface here, you could do a layer of
black resin that would completely cover
these little bumps. And it would also cover any of the Micah powder
that floated there. But loving how those look. If I was to make it for
a set for something, I'd probably use all
the same colors. But for this, I just like using the different
colors because I love seeing how they
end up turning out. And unfortunately, the
light here doesn't necessarily show off the
color shift at its best. I find out in the bright
sunlight does it, but it is winter here. We've had gray fog for
the last several weeks, so have fun with it. Have fun seeing what's around
your house where you can add texture with your coasters.
8. Cleaning your Resin Tools: Cleaning your supplies. Now here I'll do one with
the black so you can see it. This one. When I made that extra
little batch of black, I ended up having some left. And typically I'll put that into a different mould because
that ends up being a waste. But you see how even
with the silicone, you have these little drips
all around the side here. This is the best way that
I've found to remove it. I have a roll of duct tape, just got it from
the dollar store. It doesn't need to
be anything fancy. I roll it around my hands
with a sticky side out. And then I use my fingers on
the inside to lift them up. So you'll see how
this side is so much cleaner than
that side there. You just keep doing that until
you've got it all clean. Now you'll probably need
more than one piece of duct tape for each one. Because at some point it
does lose its stickiness. But you see all those
bits and pieces there. It is so much easier to do that than to sit here picking each and every single
one of those out, that's gonna drive you nuts. I mean, it's possible to pick each and every one of those out. But this I found
is the best way. I've tried doing it with the clear packing
tape and I just find it doesn't have
enough stick to it. This silver duct tape
works so much better. The silicone tools. You just try to find an end. It does peel off, but I do find with these, these tend to be a
little bit better, like I just did this did this
second pouring yesterday. So this is still a
little bit soft. I tend to find that if it's
waited a couple of days, this is a little bit
crispier and it's easier to crack and find an
edge to pull it off. But the great thing about
having silicone tools is you just pick off the resin. Then you can use
your tool again, if you use wooden chopsticks or wouldn't stick or whatever, you can't really use those over too many times because
sometimes you'll get tiny little bits or dots
of resin that are cured. But when you mix
up the next batch, they will come off and they'll start mixing in your new piece. And it does affect
the Finnish simple as pulling the little things off until you've got
it completely clean. Then when it comes
to your moles, if you've got a little boat or a little bit of resonance here, picks off super easy. If you've got, I'm just going to cut off a tiny
piece of duct tape here. If you've got some
Micah on the side, you'll if I rub it,
it doesn't move. But if I take a piece of tape, often all lift straight up. Mean it that way. Some other things
don't really matter, like the microbes that are on the outside
and on the back, It's not going to affect
the future of it. But if it's something
that bothers you and you want to take it off, you can just use a
piece of duct tape and use the sticky side
of it to remove that. Then your tools are you ready
to use for the next time?
9. Creating Resin Coasters with Visual Texture Thank You: Thank you so much for
joining me for the creating two posteriors with
visual texture class. I hope you learned a lot. I hope you had fun
through the process. And it is inspired you to
look around your house at what non-course objects you have that you can use to create texture
within your posters. Hope to see you in a
future class soon.
 Artsy. Island Girl, Teacher