Transcripts
1. Introduction: Do you want to develop racing game with Unity? Hi, my name is Donald, and today we will discover how to create racing games with Unity 3D. We really learn how to develop car controller and how to implement it in a real game. Racing games are super popular. So why wouldn't we do eloquent? This class, we will cover three main topics. Really learn how to setup car controlling humanity, how to write code for it, and how to add user interface to the game. With this knowledge, you will be able to start developing your own games. You can also join my Discord server to connect with other students and share your work. So if you are willing to learn Unity fundamentals and start game development journey. Welcome in my class.
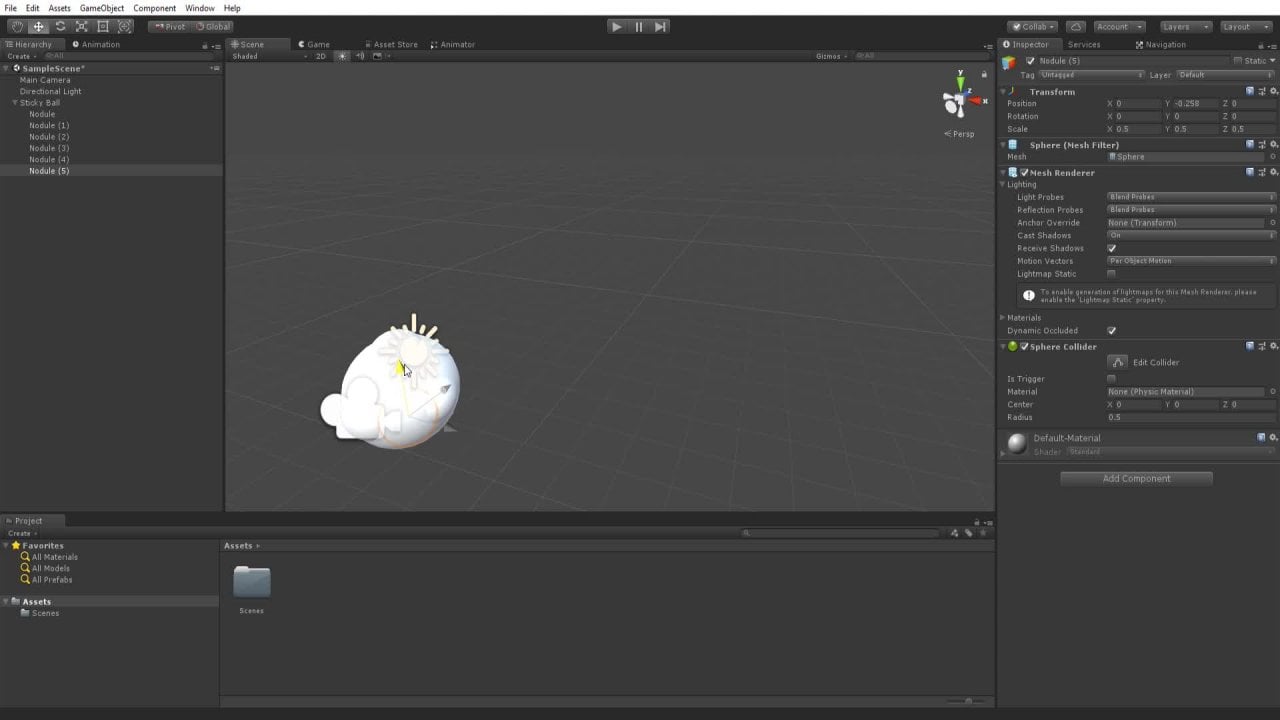
2. Player: Hello and welcome In my class. Today we are making racing gaming unity. Let's create new project and name it something like a racing game. While unit is preparing a new project, I would like to show you what we are doing today in this class, we will develop simple car controller from scratch, and we will use it in real game. You can download vehicle and track from Unity Asset Store. I will provide links in the description. The goal of this simple game will be to complete the track as fast as possible. We will also create a timer so we can compete with our friends and family. Later, you can upgrade discard controller and use it in your game as it offers you a lot of freedom when it comes to modifying. So project Israeli, and first, I would like to rearrange the windows. I prefer one column displaying the project window. And also we don't need console window right now. All we have at the beginning of the sample scene, our main camera and directional light. Later, we will create more since 104 Main Menu and so on. Let's add new 3D object to the scene cube and name it ground. Our vehicle will drive on this cube, so we need to scale it up. I will set X and Z to 256. We will be using this ground object to develop a prototype of our car controller. To make it work, we need to create new ground layer and we will add our cube to that layer. You can use any empty slot. I will use Slot 8. Then we need to go back on ground object and set its layer to ground. Now we are ready to add the player, create new empty object and name it player. For the graphics, we will revisit the Unity Asset Store, where you can find thousands of free and premium assets. We are looking for a treaty vehicle that can be used in R Again, you can use pretty much any acid vacuole like. But if you want to follow this tutorial and make exactly the same game, I will provide links to the acids I'm using. I will download this free pack because it has a lot of different and customizable cars. Once you download the assets, we still need to import them in the project itself. To do that, we need to open Package Manager, which can be found under Window Package Manager. Then open my assets and you will see every single asset back that you have downloaded from Unity Asset Store. Find the package with vehicles and import it in the project. After that, we can find them, used the graphics from imported package, open it up, find folder called examples, and use one of the vehicles from the folder. I'm going to use bundle, drag it to the scene and place it inside of the player object. As you can see, I need to reposition my player. So I will select the player object and adjust the position of it. So we have graphics, and now it's time to set up our player, select player object and add new 3D element to it. This time, we will use sphere. In fact, our car controller will be moving this sphere around and the body will follow it. I will increase the radius of sphere collider to one. So we can detect collisions with other objects. We can also turn off Mesh Collider to make our sphere invisible. To move sphere and player around, we need to attach a rigid body on it, which gives the objects some physical abilities. I will change the mass to 70, drag and angular Jack to four. Set interpolation to extrapolate. This will make movement of entire player objects mortar, and change collision detection to continuous. We need to add one more empty object to the player. We will be using this object to detect on which layer are really driving. I will name it ground check. Plays this object at the bottom half of the player. And later, if you have any problems with detecting outliers, try to reposition this object since it may not be placed correctly right now. It really depends on your graphics and sphere size. For me, this should work. I hope. Finally, we can start coding, select our player and add new script called car controller, and double-click on new component to open up the script in Visual Studio, we will write code in the next video. And after that, you will have a fully working car controller that can be used in a real game. So see you in the next video.
3. Controller: We are back and it's time to start coding our car controller. In the script that we have created earlier, we need to declare some variables. First one will be public rigid body. I will name mine RB. This will connect to a rigid body of the sphere with the script. Then we need a bunch of public float variables forward and the reverse speed. I will set values to 105. And of course you can change these values anytime you want. Next term, strand, or how hard our car can turn in the corners. Gravity force is quite self-explanatory. Jack radius, and the drag will affect our car depending on the surface. And lastly, max will turn to rotate the front wheels of our car. After that, Let's declared to private floats, speed input and turn input. We will store user input in those variables and other private variable. This time we need Boolean to check if the rival is grounded or in the middle of the jump, then we need to tell our script which layer in the game represents ground. That's why we are making these wearable public. Lastly, three public transform variables. Ground, check left, front wheel, and write front-wheel to connect. We're clip art with descript. And that's it for the variables. We can move on to the start method, where we need only one line of code for now, we will set the parent of our rigid body to be noted, which is the second part of making the movement of entire player object smoother before we have already set interpolation to extrapolate. Now, let's move to the update function. Have a lot more of coding to do here. First, with each update, we will reset speed inputs to 0. And then we will check if the user is pressing any of up and down buttons. In the first if statement, we are applying forward speed multiplied by 1000. That's in the case when user wants to go forward. If user is pressing down button, we need to apply a reverse speed again, multiplied by 1000. As I said before, you can always change these values to your liking. So we have spit input, but we will apply it to the vehicle later in another function. Now, let's make our vehicle able to turn real store user input from left and right buttons to turn input variable. And right away we can rotate our reoccur. But I want to make sure that we Achilles grounded when we are trying to rotate it. That's why we are gonna use another if statement, checking if we are grounded. And if we are indeed grounded, we can irritate the car. We need to make use of our mat here. As you can see, I am multiplying everything with vertical input here. You may ask, why isn't vertical input for speed? And you are right? But we want to make sure that we're curl is on irritating when we are moving forward or backwards and not when we are standing still. And that's the easiest solution. Turning the wheels is quite similar, but instead of rotation, we are modifying Local Rotation. First, we will rotate left front wheel. And then we can copy this line and to replace left front wheel with right front-wheel. Finally, we are setting the position of player to be equal to the position of rigid body. That's it for the update function, all the rest will be written in their fixed update function. What's the difference between update and fixed update functions? Update function is called to once per frame and fixed update is called exactly 50 times per second. So when we want to apply some heavy physics to the objects, it is recommended to use fixed update. First, we will declare a re-cast h02 edible called heat. In this variable, we can store information about objects we collide with you. We'll see why this comes handy. Then we will shoot invisible array from our grounds, check in down direction. And if you hit anything, we will store information about this object in heat wearables. We need to tell how far we want our rate to go. And exactly for that, we have check radius variable. And lastly, we need to specify for which layer we are looking for. So in short, if we hit ground player is grounded, we will have our value of true. If not is grounded will be for us. I also want my vehicle to have same rotation as ground layer under the vehicle. And that's where we can make use of the heat wherever we will set rotation of player to be same as the rotation of ground layer. Then with the last if statement, we will check if we are grounded. If yes, and if we are trying to apply forward or reverse speed, we can finally make use of spit input from the update function. If you are not grounded, then we need to add gravity to the worker to drag it down. And that's finally it for cart controller script. I really hope you're still with me because all the hard stuff is done. And now it's time to see cart controller in action. Make sure you save the script and go back to Unity. In the unity, we still need to connect the script with some car components. First, drag in the sphere on first empty slot, where we need to reference to the rigid body. Then we need to tell which layer represents ground. And for that reason, we have created ground layer earlier. Next, dragging the ground jack. And finally connect front wheels with the script. Find which release front left and which is front right. Then drag them in on the last empty slots. And that's it. Cart controller should now work. We can of course, test it out. You will see that camera is currently not following the player, and we will fix that soon. But controllers seems to be working and wheels are also turning, as you can see. So controller is ready if you have any problems, try rewatching the reader or send me a question. In the next video, we will make a camera followed the player. So see you then.
4. Camera Follow and Mini Jump: Welcome back. It's time to discover how to make camera follow the player. Right now, main camera is fixed at one place. But I wanted to follow the watercolor when we're driving. And that's really easy to do. We will use built-in package called Cinema machine. Again, we need to open Package Manager. You will find it under Window Package Manager. Then display all the packages in Unity Registry and look for cinema machine. Click Install and wait until packages ready. After that, you will find cinema sheet in top toolbar. Select first option, which is create virtual camera. These new virtual camera will take instructions on what to follow and how to follow it. Then finally, your camera object in the hierarchy. I will rename mine to virtual camera. Then we need to specify which object we want to follow with camera. To do this, just drag the player object to two empty slots where we can tell which object we want to follow and which are object we want to look at. After that, we had a lot of options to modify the camera. We will slightly change the point of view to have a better look on the car and truck. Go under body and adjust follow offset. You will need to play with two values to find the best view for your game. I think that for me, Why can be between 34 and z around dam or 12? And that's it for the camera. Now, go and test it out. As you can see, my camera is following the player and I can finally drive around these boring cube. But we will soon have a proper tractor race, don't worry. You can also see the movement is not so smooth as we want it to be. Luckily, there is an easy fix to that problem. In project window. Create new physics material, and name it however you want. I will simply leave it as it is. Then set friction to 0. And now we can apply this material to Box Collider of ground object. With that dime, the movement of the car should be smooth. Tested out. And wallah car container works perfectly. We have smooth car movement and can finally use it on rail track. But before we continue, I would like to test one more feature in this car controller. If you remember, our controller has the ability to adjust angle of the vehicle to the angle of the surface. So let's add mini jumped to the game to find out if it works. We can use 3D cube. Again. I will rename mine to jump. Then we need to scale it up. I will set X and Z to 10. We also need to modify extra rotation, and of course, we need to adjust position. And just like that, we have a jump tested out and it seems that everything works fine. Now, I will remove this jump object and make another run by the bigger end with custom material. So it will be more visible. Just create new material, set custom color and applied to the jump. You will see that I forgot to set layer of the jump object to be ground. So that's why I'm losing speed on the jump. Just set layer of the junk objects to be ground and everything will work perfectly. Finally, we have fully working car controller ready, and it is time to use it in a real game. And that's exactly what we'll be doing in the next video. So see you then.
5. Simple Main Menu: Important part of any game is main menu, and I will show you how to make one. Of course, this menu will be very simple with only two buttons. But after that chapter, you will be able to also create more complex menus. So let's get to work. Right now. We are in default seemed also called sample scene for the main menu. Great new senior project window and name it manual. Double-click on it. And we can see new empty scene, just like before. Switch the view to 2D because menu will be two-dimensional and we can start adding elements to the screen. You will find on unnecessary elements under User Interface or short UI. First, we need to add Canvas, which will serve as a base for other elements like background and the buttons. You can rename it or just leave it as a canvas. It doesn't really matter. Next element, which we will add on Canvas is image. This will be our background. You can set color of the background to any color you like. For me, this dark gray will do the job. We also need to stretch our image to cover the whole screen. That's for the background. You can of course, add your own custom image for the background or play with colors. Now, we need some buttons. Again, go under UI and find element called button. My menu will have two buttons, play and exit. This will be my Play button. I want to remove source image, but it is not necessary. You can leave it if you're like. I would also like to have different highlighted color for when user hovers over the button with the mouse. Let's go with threat and said navigation of the button to non press Play. And let's see if button turns red when we go our RET Mars. And indeed it does. Great. Right now, this button is kinda small and I want to resize it. Let's tweet to 200 or 300 and height 200. Okay, we still need to change the text on the bottom. If you extend the button, you can see that text is separated element. And if we click on it, we are able to modify everything from color to size and font. This button will display simple text saying play. Font-style will be bald and font size, let's say 50. I want to have center alignment on both axes and color of the text will be same as color of the background. To get second button, we can simply duplicate Play button, right-click and select Duplicate or press Command Plus D on keyboard. Then set position of the second button. Of course, we need to rename it and we need to change the text to exit or quit. Just like that, we have two buttons and we are ready to add functionality to them, which means that we will be coding. Again. We're going to create new script called Menu Manager. We can create new empty object, which will serve as a menu manager. Or you can also attach the script to any object in the hierarchy. I prefer first option. Once we have Menu Manager script, we can start coding. Whenever we want to work with scenes, we need to import Unity engine dot sin management. This allows us to load two different seems from the script. We can remove both of the default methods because we don't need them right now. Then we will create new public method called Play button pressed. It needs to be public so we can later use it inside of the Unity Editor. When user will press Play button, this method will be called and it will load our game screen or sample scene. We will see when using Scene Manager dot load scene, we can best in exact name of the scene we want to load, for example, sample scene. And it needs to be wrapped in quotation marks. Instead of the name, we can use index, which I will show you later how to get or how to find out the index of each scene. But I will not use any of that. Instead, I'm going to get the index of active sin, which is manual. And in this case, I will simply load the next scene in the hierarchy method, which will be called when the user presses the exit button is even simpler. Again, it needs to be public. Mine is called Exit button pressed. And the only line of code goes like this application, not quit. And that's it. But these will not work inside of Unity editor. It only works when we export the game. That's why I'm adding debug dot log to see if button works, save the script and go back to Unity. We need to connect these two buttons with functions we just world select Play button and add new onclick event on the list. Then dragging the object with Menu Manager script. In my case, that's menu manager object and find Play button pressed method. Repeat the process with Exit button. But of course this time select Exit button pressed method. We are almost done. I still need to show you how to add scenes to final built and how to get index of each scene. For that purpose, I will create new games seem to show you how to operate with multiple scenes. Later, we will not be using this exact scene. So you can just watch me demonstrating this process. Go under File Build Settings. And you will see that our list of scenes in build is currently empty. I will add menu and game to this list. As you can see on the right, each scene has own index starting from 0. So if I want to load, let's say menu, I can simply type in 0 in Scene Manager and menu will be loaded. We can now try if everything works. So close the window, we will come back later. Press Play, and let's see what happens when I press exit. Exit button pressed message, which means that exit button works. And if I press Play, GameScene is loaded and great. Mainmenu is working with that done, it is finally time to add relay race track to the game. And that's what we will be doing in the next chapter. See you then.
6. Race Track!: It is finally time to add a real race track to the game. So far, we have developed fully working cart controller. And it would be nice if we could test it on a race track. That's why we will visit Unity Asset Store once again and we will try to find a racetrack or roadway for our game. I will use package called race tracks, which comes with two maps. And I really like it. But of course, you can use any package you want. Don't be afraid to explore all available assets on Unity Asset Store. Maybe you find something for your future game. Once you choose your track, don't forget to download it. Then we can go back to Unity. As before, we need to use package manager to import a race track into the project. Open Window Package Manager, my assets. Find your package and imported my package costs which do already prepared scenes, and I will use one of them for my game. The scene I will be using is called spring track. This map is huge and I assume it will take player three to four minutes from start to finish. I also plan to add a timer so we can compete with our friends, but we will do this later. First, we will add current seem to the build settings. And at the same time, we can remove game scene from the list because we will not be using it. We also need to add all seen objects on ground player. That's how our car controller works. Finally, time to add to the scene. We have created player before, in-sample sin and we can reuse it. We don't have to create new one from scratch. Just go to sample sin, select player, and drag it to the Assets folder. This way, we will create prefab is an object that can be reused as many times as we want. Then go back to our selected track and simply add player prefab to the scene. Just like that, set rotation. And we are almost done. We still need to add virtual camera, like we did it in the first scene using Cinema machine. We already know how to set it up. So let's do it. We want to follow the player and use same offset values like you did before. And now, moment of truth, will it work? Press Play. And after a few seconds, we can see our car controls are working properly on a real race track. Great. Again, movement of vehicle is not smooth as it should be, as we are still getting some friction from the road. But good news is, we can use physic material that we have created at the beginning of the class. Bad news is we need to apply physics material to area and each scene object that has any kind of Collider, and that can take some time. So I will fast forward this part. Okay, we are ready to try again. This time, everything should work properly. Press Play, and we finally have fully working car controller with smooth movement. Maybe it doesn't look so on the camera, but that's because I'm screen recording and my computer isn't really that powerful. I hope you are controller works too. If not tried to repeat the previous steps or send me a question, we will find solution together. In the next chapter, we are going to add a timer to the game, and I'm already looking forward to it. Sea.
7. Start, Finish and Timer: When we have basic mechanics ready, it is time to add some user interface into the game. We will begin with a timer. Whenever we work with user interface, we need to switch scene view to 2D, same as we did with menu. We need to have base for our use an interface. And for that we are going to use Canvas. I will rename my canvas to you, but it is not necessary. You can leave it as it is. Then on Canvas, we will add takes that will display time. I will move my timer texting top-left corner. And of course, adjust the appearance of each to your liking. My text will be in white color. Font will be bought. Font-size 32 and alignment set to center. I would also like to have a second text which will display a record of the track. To do that, I will simply duplicate Timer Text and then move the record text down below. Don't forget to rename second text and maybe choose a different color. I want my record texts to be in red color, but this is completely up to you. Now, we need to create an empty object which will serve as a game manager or a game handler. You can name it whatever you want. We will write the game handler script, which will take care of timing and saving our record times. So create new script and open it up. First. If we wants to work with user interface, we need to import Unity engine wi. Second, we need to declare some variables. We will begin with two public text wearables, Timer, Text, Entry record texts. Those will store text we want to display in a game. In this game, past-time, enter record time. Then we need to declare to private float variables, timer and record. Those will store actual time values in float forum. Default value of timer is set to 0. And last variable will be private boolean called timer running. This variable will be used to start and stop timer, and we'll have a default value of force. Those are all the variables we need. And we can continue with start method. The start method, we will lock mouse pointer to game screen to prevent it going of the screen. We can do that with one simple line of code, setting Pointer Lock state to locked. Then something a little bit more complicated, but I will try to explain everything along the way. When GameStart, we want to check if we have any saved value for record time. Because if we have, we can display it on the screen and player will know what time he or she needs to beat. If not, we will set the records were able to 0 because we are operating with simple data. We have only one flow to edible. Actually, we can use blur perhaps to save it. We can save different values under specific keys which we need to specify. And because we are saving record time, I will name my inky record. You can name it whatever you want. Just be careful when spelling. And if you need to access sampler prefs key multiple times, it would be good practice to declare private string comparable with key name and then use this variable instead of typing key name again and again. In the first if statement, we are checking if we have existing record key and if we do, we are applying its value to record variable. If not, we are simply setting character to arable to 0. Before we jump in the update method, I would like to declare new method called display time, which will also take flawed parameter called Time to display. In this method, we will take float wearable with our current time and we'll display it in specific format using our timer text. We will divide time to display wherever in minutes, seconds, and milliseconds. To get minutes, we need to divide time to display where wl by 16, because there are 60 seconds in one minute of course. Then to get seconds, we need to use modulo operator. Again, we are dividing time to display variable by 60, but this time we are getting the rest of that operation, and this represents our seconds. To get milliseconds, we need to multiply time to display by 1000 and then divide it by 1000. And the rest of that operation represents our milliseconds. We are again using modulo operator. Now to display those values on screen, we need to specify format of Timer Text. On the first place, there will be minutes. Second place is four seconds, and third place, four milliseconds. Between minutes and seconds, there will be colon, and between seconds and milliseconds, it will be dot. In the update method. We will use if statement to check if timer is running. If yes, we will add time to time are available and display a new time. If not, we will simply display time on the screen. Of course, we still need a way to start and stop timer. That's why we are going to create two public methods. One to start a timer and to and to stop timer. In the first one, we will set the timer running variable to true. In the second one, we will set a timer running valuable to force and make sure both methods are public, so we can call them from other scripts. We're also going to create private method to display a record time onscreen. Mine will be called the display record, and it will take float parameter called her record. To transform a record parameter in seconds, minutes, and milliseconds. We can copy code from displayed dye method. Just make sure you replace all the variable names. Instead of time to display, use a record and instead of timer text, we need to use the records txt. Then go back to start method and below if statement called display a record method with the record variable as a parameter. So when GameStart record time will be displayed on screen and we will know what time we have to beat when we finish the race. We want to check if we have set new records. We can use stop diamond method for that because this method will be called exactly when we pass the finish line. With each statement, we will check if our time is better than the record time. If it is, we will save our time as a new record. We will also save our time as I record when we first tried to raise this track and our current record is 0. After IF statement, make sure you call display records function once again, Dan save descript and returned to unity. As you can see, we have two new empty slots in game handler, one for timer text, and one for record text. Make sure you connect both UI elements with correct slots. Okay, so our timer is done. Only thing missing is a trigger that will start and stop the timer. Basically, we need some kind of start and finish line. For that, we can use simple 3D cube, scale it up and adjust the rotation. I will set x to 22 y 210. This group already has a box collider, which means that we can detect when we're cold pass a star client. Just make sure to set collider to be triggered so vehicle can go through this object to make it invisible. I will turn off the mesh renderer. As part of the startup object, I will add two pillars on each side of the road, so player will know where restart. I will use 3D cube again, but this time I need to scale it down. I will set X value to 0.1. Move first billion on its position. Then we can duplicate it and we have our second pillar, four other side of the road. Please book pillars on correct position and to rename them if you want to keep a project organized. Now it's time to add functionality, select startup object, and create new script called Start or something like that. Then open it up. Delete both of the default methods because we will not be using them. This script will only have one job to start the timer. And to start the timer, we need to call start timer method inside of the game handler script, which means we need a public reference to the script. That's why we will declared public game handed variable. You can again name it however you want. Mine will be called the game handler. If you remember, Box Collider on this object is trigger, which means that when we will collide with Start object On Trigger Enter method will be called. And there we can call start timer method using our game handler reference. That's all for the start script, save it and returned to unity. We have a new empty slot and we need to dragging the object with game handlers script. In my case, that's Game Manager object. Just like that, we have connected game handler which start line, and we have our weight to start our timer. Speaking of a game manager, I will rename it to game handler to avoid any confusion. To stop timer will repeat all the steps. But instead of start timer, we will call a stop timer method, duplicate start object and reposition it. Not too far because we will need to test the timer if everything works as it should. Rename the object to finish and to remove start script. We will create new script called Finish. Coat will be very similar to start script. Only differences. We are calling stop timer method. That's it. Save the script and go back to Unity. Make sure you connect finished script with gaming handler. And we debt dimer should be done into working. Of course, there is only one way to find out press Play. And we will see, yes, it seems that our timer is working great. And to record time also works as it should. Of course, I don't like currently out of text elements almost in the middle of the screen. So let's move them. We can attach timer takes to top-left corner and to record takes to top right corner. For now, you can adjust this layout to your game, but for now, this will do great. Now what we can make this race a little bit longer. So let's move finish line further down the road. You can move it all the way to the end of the track. But for me to test it out, That's enough. Otherwise, this chapter will be too long. As we made this race longer, we also need to clear player a, perhaps because current track record was set on much shorter track and it would be impossible to break. To clear player prefs, go to Edit Clear all player prefs and press Yes to confirm. And that's it. We have made simple game with basic Car Control on which you can build on another task. But I believe everything is working as it should be. My game is currently a little bit laggy. But that just because of my computer having hard time around and community engine and screen recording at the same time. I hope everything works in your game. If not, try to repeat steps taken in this chapter, you can send me a question anytime. I'm always happy to help.
8. Class Project: Together, we have created mini racing game using our car controller. For the game, we have used attract from imported package, tried to make another mini game using second track from imported package or import completely new package from Unity Asset Store. We have also created a really simple main menu with only two buttons. Tried to add more buttons. For example, button for track 1, second button for track two. We have developed symbol car controller with basic mechanics. Tried to upgrade this car controller with advanced mechanics and experiment with different values or declare two variables. If you have any questions or problems, ask me here, are joined the discord. And that's it for this class. At this point, I'm inviting you to check my other classes. I have created tutorials on how to make platformer, first-person shooter, and third-person game. Link to my masterclass is down below. Thank you for watching my class seal in the next one.
 Domen Rajterič, Game Developer