Transcripts
1. Introduction: Hi, I'm Ziad Thrace and I really love making seamlessly
repeatable packets. But it is a pretty hard
skills master. It. You're doing it by yourself. I've made loads of people. In this tutorial, I'm
going to show you how to make different types of repeatable patterns in the contributing free
software. That is Greta. So are you ready?
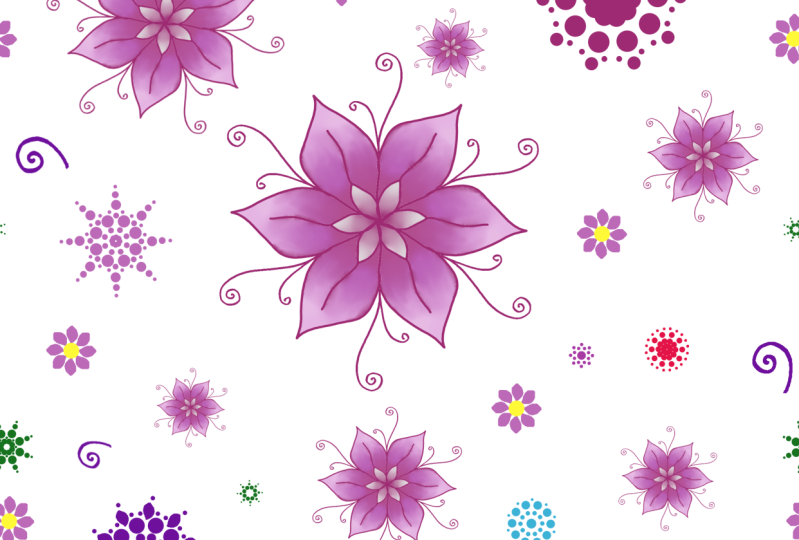
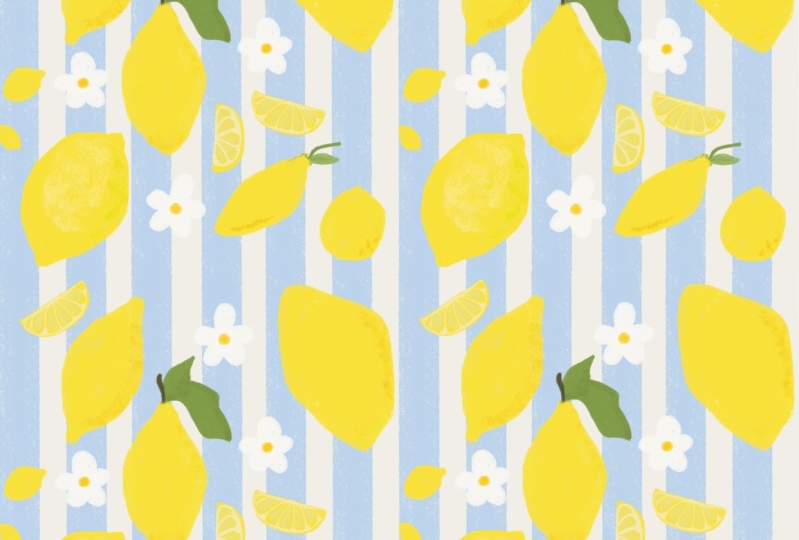
2. Types of Patterns: So there are three types of package I'm going to
show you how to make. First type of pattern
is repeating motif tab. This is where you have loads
of smaller little images that are in this new
repeatable and your wet. The second type is a seamless
edge connected pattern. This is where it's
one image that stretch to all corners
of the canvas. And I can connect seamlessly,
endlessly, forever. And it looks like
it's just one image no matter how many
times you repeat it. And the third is a Latin repeated around
the center point, sort of like a
snowflake or power. Each lesson focuses on
one of the three types. Okay? So feel free to mix
and match any of the techniques that
he replied to me, it's an excellence
to make your own. Awesome. Anyway,
Let's get started.
3. Repeating Motifs: Hi, welcome back. Okay, so for starters,
we're going to apply a creator and create a new file. You're going to want to remember how many pixels are
in your document. So make it an easy number. Minus 2 thousand by 2 thousand. Number can be anything.
And then I have to be I just that I couldn't
get enough detail in there. Okay. We want to draw this
middle area of the canvas. Don't even try going
over the edges, gonna get to that later. So my repeatable
pattern is gonna be all these little flowers. I'm going to draw a
small little flowers here and there and
little embellishments. Please excuse my drawing. I'm drawing with a mouse, so it's a little bit shaky. What I enjoy about repeatable pattern is that
miserable to be easy. Anybody can do it.
You don't even have to technically
be able to draw, to be able to make
beautiful art. And seconds is that it looks really cool with everything
lines up so nicely. And you can do any art style. You can do funny, fun pink flowers like I'm doing. Or you can use swords. You could do trees,
you could do cats. You can do anything
that you enjoy drawing, that you're good at
drawing could even do letters if you want to do that, don't involve any drawing. That's what I really enjoy
about the future blocked. It's also great for if
you happen to print your own fabrics or if you want to sell your
designs on red bubble. And they have a repeatable
pattern feature. So you can just repeat your
patterns all the way on top, leggings and backpacks,
mosques, if you'd like. I think it should be
repeatable patterns are just really cool and fun. If you're wondering what
shortcuts I'm using, I've already set them up to my own customized shortcuts
that I use very often. I have a separate
tutorial on my Skillshare that talks about the whole setup of setting up your own Peter. It also talks about animation. So feel free to go back to that tutorial if you'd
like a little bit more in-depth knowledge on how
to use, please in general. But otherwise this is
mostly about cathedral. You can, as you can see, I'm just slowly spreading out a piece of flour and just
filling in the spaces. During this part of
your design process, trying to figure out how busy and cramped
you wanted to feel. Do you want a lot of space, even a little bit of space? You want lots of big items. Folding was lots of very
small dots or lines. That's really up
for you to decide, but you should decide
that roundabout. Now. If you have an element that
you'd like to duplicate, just circle it with
the lasso tool and right-click and
say Copy to mu there. And then you'll have that
exact shape on the new layer. Copying and pasting the icons. It was a very easy way
to fill up the space. Okay, now that I have
enough items, well, this part of the process, we're going to offset
the image, right? So as you can see, I have
multiple layers going on here. You don't actually
have to merge them all together like you would
certainly other functions. And it will do this
to all of the layers. It's doing it to
the entire image. Now we're going to
fill in the border, which of course is
about to become our center because we're going
to offset them it, right? The first thing you
do is you click on the Image tab and then
scroll down to offset. Now, this is where
it's important to remember what size up Canvas. It's also still here
at the bottom of our entire window if you want to remember what pixel sizes. So mine is remember two
thousand, two thousand pixels. So when I offset my image, I want it to be a thousand
pixels by a thousand pixels. It's also easier if
you're using a square because then you don't have
to figure out which one, which one is the x-axis and
which one is the y axis? There is only one
option for offset by x divided by two
comma y divided by two. So you don't have to
worry about that. And don't worry too much,
but I don't want to pick. Okay. But a boom, you will notice
that the older home drawings have been split
up into different quadrants of our drawing. Right? And you'll also notice
that the middle T section, metal cross-section section
blank, a little bit empty. And that's because that's
what used to be our borders. So if you divided this
up into four sections, the bottom right is
now where the bottom, top left and the bottom left now is to practice
and vice versa, right? So you've kinda just pushed it up and go
over the corners. And now we can draw in
middle school that Olin. And then you can offset it
again, and you're done. Put it back in the
original position, but it's and repeatable pattern, so it actually doesn't
matter where you start off. Okay, right. So I have this pink flower and I'm kind of
thinking of putting it around the edges because it feels like there's
empty space there. But just remember to not
go out of the borders. Because if you go
out of the borders, then it won't connect properly when you offset the image again, when
you try and repeat it. So if you want to put something that's nearby the borders, just oxygen image again, find that blank space
and put it there. Because otherwise it's not
going to line up necessarily. And to prove that those does in fact make a repeatable pattern, I'm going to do hate
this layer four times. Hide the original
artwork so that, that doesn't get
changed in size. And just push each of
these into a corner. And there you go. You see it all lines
up. Really nice. You can't even tell
where this enough. It's really great. And there you go. That's it. Super-duper, easy. I'll see you next video. Bye.
4. Seamlessly Connected Edges: Hi and welcome back. Okay, so let's start by
creating a new file. I'm also going to make
this 1 two thousand, two thousand pixels
of 200 DPI or PPI, but it's the same thing. Okay, so let's say
you want to make a repeatable pattern and you want all of the
edges to connect. You don't want it
to be little images that all flow seamlessly. You want lines that connect. That's completely
understandable. We can do that here too. So what I'm going to
do is I'm going to create like a blob like pattern. And we'll see how
that connects up. So let's start off by looking at this in the
most simplest way. At the moment,
we're just going to connect left to right, right. You can see I'm not fully
connecting them to the edges. And that's because I don't know exactly where they
should be connecting. Now that I've done my base
three lobbying shapes, we're going to go up to
Image, offset, image. Same thing as last time. Now you can see my
lines quite nicely. So we're going to start by
connecting the first two. They are quite easy to see where they
should keep connect. Okay, Now if you look at
this one here at the bottom, Let's just pretend that it is
further down and it's more difficult to see where these
lines are connecting, right? And it's going off the page. It's mixed top and bottom. That's fine. That's
not actually an issue. So we're gonna go to
Image, offset image, but now we're not going to
offset by both axises, right? So when you offset by x axis, you are offsetting the
left or the right. Right. We just want to shift it up. And if we're going
up or up and down, we're going on the wire
because the y-axis goes down. So the only one
we're going to add a number to the y-axis. And that number is again, half the height of our drawing, which in this case is
2 thousand pixels. So it's 1 thousand pixels. If you want to get
it back to the original state that was in, you're just gonna have
to do this again, right? So you can offset it normally. But it's still not going to
be the original dimensions. So we're just going to get
rid of all that x-axis again. And now we're back
to where we started. But this only connects
the left and the right. Let's say you want to connect stuff on the top and the bottom, and the left and the right. That's fine. We're just going to
make it a little bit more complicated
this next step. Alright, so we're going to start by filling this whole
page with squiggly, okay, from top to bottom, I want to see them
all over the place. They can even connect
to the edges. That's actually fine. That'll give us a closer
estimate to where they're supposed to connect any
offset the image again. Now that I've gotten
here to the bottom, you'll see I'll just
leave that a little bit open a bit because I'm not entirely sure where I want those lines to connect. Right now it's time
to offset our image. Now you can see where my
lines was trying to connect, but they were very far. That's fine. We're just going to
erase them back a little bit and then join them back up. Nice. Now I've offset my image again and I want to
see what it would look like, all joined together in a
repeated style, right? I'm going to duplicate it four
times and drank connected. But when I select it,
you can see there's all these little bits hanging off the edge
of the canvas, right? Oh, wow, white. This is not break if we want
to resize it because those things are gonna
come along and change the size of our
repeatable pattern. Not good. So what we're gonna do is we're going to select the square, select two up there,
rectangular selection. We're just gonna go
around the edges, right when I start
away from the edge. And as you bring it
down towards the edge, you'll see it'll snap
along that line. And then once you've
selected that entire edge, you're going to hit the
backspace or delete button. I can't remember which
one it is right now. But I think they do both work. And what you're gonna go around and do that for each side. Then you'll see when you
click on it at the end, it's just perfectly
contained on the canvas. Now we can duplicate
our art layer four times and you can push
it into your hard luck. Okay, I think this is
looking pretty cool, but I want to add some color. So first of all, we're going to create a layer right below it, because it's gonna
be a little bit difficult as that if
the layers above. But I want to use the
paint bucket tool. These are really lovely, straight, thick, solid lines. There isn't any gradients
or anything going on. So it would be really
easy to just soft colors and don't want to drop
in on my drawing layer. So what we're gonna do is we're going to get
him a paint bucket tool. I have marshaled pepsin K, and then you're
gonna go over here. You see next to my color wheel, there's a tiny
button at the top. Two options. Click on Tools, Options. And then we're going to select reference all layers, right? Sample all layers. You can of course edit
back to just current layer so that when it colors in it only color some on
the current layer. But if it's sampling
all the layers, it is looking at what's
on every single layer. And it's not going to color it in what it sees on
the other layers. So it is seeing those borders
of the black line art. But it's not going
to color in on the blog an odd layer,
which is really great. Now I can have my
colors on one layer and my line art and another. Just do remember to set
this back later on. Otherwise you might have
some difficulty coloring in. Okay, Now when
we're coloring in, I'm trying to avoid
the edge pieces just because it might make
coloring and look messy. And I might not see, select
the correct left and right. These are puppies
and bottom piece, especially because so blobby. And there's so many
smaller little pieces. We just wanted to
keep the middle color offset the image again. We can go around and do
the middle again, right? So offsetting the image is
really great in Prieto, the tools both very well because you can do it
to the entire image. It will do it to all the layers. If you have ten
meters, 50 layers, it doesn't care, it
will do it to all of them so that your
image stays the same. I know in a couple
of other programs, I think it's Procreate as well, is when it offsets the image. It will only do it to
one layer at a time, which is a real pain. So it's a really useful
tool to use and Greeter. Now remember to stay within
the edges of your canvas. And then when you
wanna do the edges, you offset the image so that that repeatable pattern isn't upset by these little
gradients that get handled by the edges, right? So remember to always
work in the middle. And if you want to
work on the edges, just offset your image again. Okay, and there you go. Go ahead and have some fun and I'll see you
in the next video.
5. Repeating Brushes: The next important tool
in your arsenal of making repeatable patterns is using this funky little brush up here called the
multi brush tool. So select color, then
go into two options. You can see it's popped up, this cross in the
middle of our drawing. And that's because you're going to be drawing
over this line. So at the moment
is just duplicated my brush and moved it slightly to the left and to the right. But that's not what we
really wanted to do. We don't want it
to do translate. So you can see he's got
brush smoothing, distance. We're not going to focus
on that right now. I want you to scroll down
and go to type music. Mine's currently on Translate. Whatever I'm drawing and
translate it up down left side. Just a little bit.
That's not what we want. So we're gonna go to any of these other ones.
They're all really cool. So let's start with symmetry. You do want it to
show the origin. If you don't, the
lines kind of go away. You can, of course draw
without the origin. But I feel like it
helps you to figure out exactly where
your lines are. Going to overlap. This one is symmetry, so you can see it just
takes whatever I draw here and copied and pasted, copies, paste, and
turns it right. So this can have some really cool overlapping
types of effects. This is really nice
for flowers as well. I've just drawn
this in this way. It looks amazing. So this
tool is really great. Let's take a look at
what the other ones do. So also you can
change the brushes. The brushes up here,
it says six and you can see it's divided
into quadrants. So if you look at more, Let's make it eight or nine. And then you can see
it just adds more of these divisions, right? And you can even make
it more whilst two drawings and let's
make it a nine to 11. And you can see, it
looks a bit weird if you change midway, you can
totally change with wet. Let's take a look at some of
the other ones I have here. We have a lot of cool brushes. We've got mirror. Of course. You're going to tell it
if you want vertical or horizontal or both,
which is really cool. So make sure to murder it. This can be a bit
tricky to work with, but makes very nice symmetrical. You can also see we've
got the rotation. So let's say you want your lines of division to be a cross by the
coordinates, right? Let's go to 45. Yeah. And today you can do
a lot of cool stuff. Next one, we've got three. I've already shown
you translate that just multiplies your brush. Look about very cool stuff. Snowflake. I think Snowflake is very pretty and I feel like you can't
go wrong with Snowflake. You can't really
make an ugly design. You can also move the
origin if you want to. So let's click on
move. And then you can see you can just click and move it around your
canvas and listen. You want to start in
the corner? Right? Let's add some more brushes. Not 50. Let's say 1919
seems like a good amount. And then this would be great if you were doing
like dot art, for example. You wanted to do
some digital data. I think it looks great and
you can see it's like a lagging a bit behind my mouse. It's having some trouble
with this many divisions. But yeah, oh, and then to reset that sent it
to the Middle East. Easy peasy. Last one
is probably translate. So you draw a little bit, you can see nothing
is happening. Doesn't matter if you're
across the origin or not. Nothing is happening.
The brushes and broken. Just very weird. So Garvey had two sub brushes and you're gonna click on Add. And now add is activated. So let's say I want
one over here, over here, and over here
for some other reason. It's going to, no matter
where I put my brush, duplicate it, and move it to
wherever I put these dots. Right? Now you need to remember to de-select add because
we want to draw now. And I'll start it,
start right here. And you can see it has
copied all of these brushes. So you're active brush. You see this dot in the middle. It is in relation
to all of them. So if I draw here, you can see it draws next to
the little dots. If you want to put three of them right next to your brush, you're going to have
to pretend this is your brush when you busy
place in those dots. I'm not really sure what the
applications for this one would be, but its parts. So have fun. I've met loads of
repeatable patterns, and I hope you have
enjoyed stops. And the next little video I'm going to talk about the class project if you'd like to join. Okay, Bye for now.
6. Project Time: Hi, it's me again. Well done on
completing the course. So right now it's time to
make your own project. It's up to you. And the people using any of the three techniques or
parts of all of them, make your own
seamlessly repeatable. And when you have completed it, please posted as a
PNG project section. I'm so excited to
see what you guys make and please
remember to have fun. Okay, Bye.
7. Thanks: Thanks so much for coming
along in this tutorial. I really hope you learned
a fun, cool, new skill. If you really enjoyed it,
I hope you'll send it to somebody else you
think who also enjoyed. Anyways, I hope you
have a lovely day and a great time making all your seamlessly
repeatable patterns.
 Xiathoras, Artist