Transcripts
1. Introduction: An animated map doesn't just
show where something is. It shows why it matters. Dynamic map animation
helps your audience instantly understand
location, scale, movement, and story, whether you're
breaking down a city, highlighting a region or
zooming into a single landmark. A well designed map
animation adds clarity, depth, and a lot of visual
credibility to your video. My name is Niel Wag.
I'm a video editor and motion graphics designer. Over the years, I have used map animations in client
films, city explainers, and travel blogs
to give audiences a wider understanding
of the world on screen. In this class, we are taking map animation a step further. You will learn how to create full documentary style
geographic sequence, the kind you see in premium explainers and well
produced YouTube videos. We will start with
Google Studio to build a clean cinematic
camera movement, then move into
Adobe After effects to add region
highlights, vector maps, text elements, blending modes, and polished details that make the animation truly
professional. This workflow will instantly
elevate your storytelling. By the end of this class,
you will be able to create polished cinematic map
animations that bring your stories to life and help your audience see the
world the way you.
2. Class Orientation: I'm so happy to welcome
you in this class. There are so many map
animation tools out there, but most of them are very hard to learn or very expensive. So in this class, we are going
to use Google Art Studio, a free browser based
animation tool. You don't have to install
anything, just request access, and you usually get your
approval within 24 hours. Odd Studio gives us a
lot of ways to create, customize and export
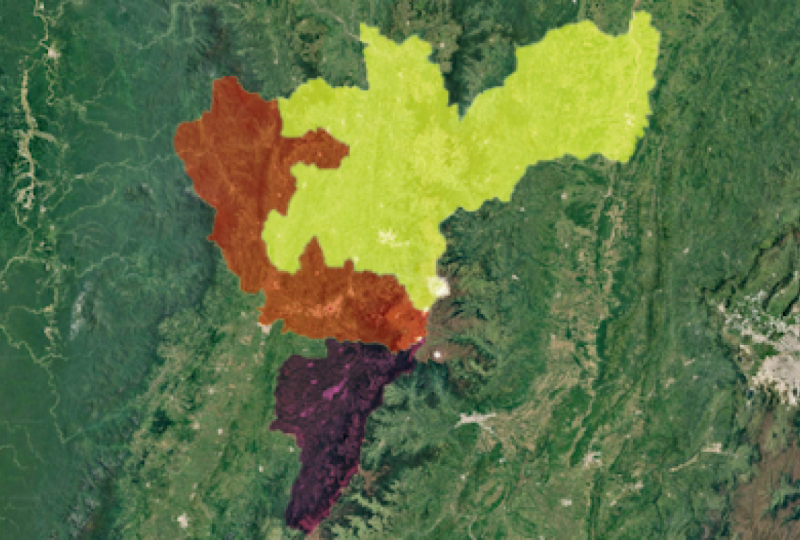
beautiful map animations. In this class, we
are going to build the complete Tokyo Region
map animation together. This is the same visual style I'm using for my
recent YouTube video, and you will get the
exact map layout as an editable Illustrator file. This class leans more toward intermediate to
advanced map animation. If you want a full walk through of Google
Out Studio Basics, definitely check out my
first class where I break down the foundations of map
animation step by step. So get your tools ready, and let's start creating your documentary
style map animation.
3. Getting Started: In this lesson, we will set up our project in
Google Earth studio and build the main camera path for our Tokyo Region
map animation. This will be the backbone of everything we do later
in After Effects. Let's open Earthstudio by going to earthggle.com slashTDU. You will see a few options. You can create a new project, open an old one, or browse
the QuickStart templates. For this class, we won't
touch the quick starts. For now, simply
click Blank Project. A project set of
window will pop up. Give your project a name. Mine is Tokyo Region
for this demonstration, but feel free to name it after the city or country
you'll be animating. You'll notice here, Earth Studio also lets you choose
moon and Mars, which is adorable, but
since we don't have regional maps of Mars yet,
let's stick to Earth. Next, set your
composition dimensions. If your aspect ratio is locked
from the previous project, unlock it and switch
to 1920 by 1080, which is ideal for YouTube
style documentary animation. Under duration, I will
choose time code instead of frames and set it
around 30 seconds. You can always trim later, but giving yourself room helps
avoid editing headaches. Let's keep the frame
rate at 30 frames per second and then click Start. Now here, you will see two different preview
screens at the top. These are called viewports
in Google Earth Studio. The left viewport
shows the track point, your camera's point of interest. Think of it as the anchor, the camera will always
revolve around. The right viewport shows
the final camera view. This is exactly what
you'll see in your render. This dual setup is extremely helpful for controlling camera
movement with precision, especially when you're creating
smooth map transitions. Below that is your
timeline where all your attributes and
keyframes will live. Every camera movement,
including location, altitude, rotation
can be animated here. You'll also notice that there is this button called
Add attributes in which you can
find more attributes that you can animate inside
Google Earth Studio. We will keep things simple
in this class since most of our design work will happen later in the Arabia Afterefacts. Let's search for our location in the search bar
at the top type Tokyo and Earth Studio will
jump straight to the city. I will adjust my view until the region that I want to
highlight is centered. You can zoom, tilt or adjust the altitude
until it feels right. Now choose where you
want this moment to sit in your timeline. I'm placing my playhead
at around 12 seconds, which acts as the middle
anchor for my animation. Once your camera
view is exactly how you want it, click add Keyframe. This locks in the
current camera position. What I'm going to do now is move my playhead forward
to around 8 seconds. Then I will raise the
altitude a little bit. When we play this back,
you will see a slow, clean zoom towards Tokyo. These keyframes will
become the foundation for the map animation we refine
inside the after effects. Let's move on to building
out the rest of the motion. Now that our first two
keyframes are set, let's continue shaping
the full camera movement. I'm going to move my playhead
to around 16 second mark. And in a search bar
type Imperial Palace. This location is important for our after effects
work later because the Imperial Palace becomes the hero point of our sequence. So think of this as
the moment where the camera finally zooms
into the heart of Tokyo. This view is a little
too Zoom dens, so I'm going to adjust
the altitude until I can see the entire
Imperial Palace area. Er Studio has already created
the keyframe for us so we don't need to keep clicking at keyframe again and again
when we do the movement. I'm going to create
the same smooth Zoom here that we used
for the Tokyo city. This will give our
audience a little time to understand what's happening
in the map animation, and it will also not
look too static. Now, let's watch the
animation so far. We zoom into the
wider Tokyo region, straight into the
Imperial Palace. This feels great, but
viewers still don't know where we are unless we
show them the bigger picture. So let's pull back and
establish the country. Go back a few seconds
on your timeline with the playhead and
let's search for Japan. Odd Studio will zoom out
to show the full country. I'm going to reframe Japan, so it sits nicely in the
center of my viewport. Notice how you're only
keyframing camera position, not pan or tilt. It's because we are not
rotating the camera, just moving smoothly
along the path. Now move a little earlier
in the timeline with the playhead and zoom
out even further. Far enough that the camera
reveals the global context. It's always nice to give viewers a sense of where
the journey begins. I'm pulling back just enough to show a portion of Asia and Europe before the camera begins
its travel toward Japan. I think I'm going to
make the Tokyo and Imperial Palace key
frames a little shorter. Since we have done a lot
of work in our project, let's save it so
we don't have to worry about losing
anything up until now. You can press Controls or
go to file and then save. A pop up will appear
asking you to name your project and
choose where to save it. You can change the location or even create a new
folder if you want. But in here, I'm
just going to save mine inside my main
projects folder. Your project will be
saved in the Cloud, so you can come
back to it anytime. Let's play back
the full path now. We reveal Japan,
zoom into Tokyo, hold briefly to highlight
all the regions, and then push into
the Imperial Palace for the final close up. Now you have the full
camera move from the global view to the Tokyo
and the Imperial Palace, ready to use in your animation. In the next lesson, we will add track points so that we can attach labels and graphics perfectly in the
Adobe artefacts.
4. Track Points: Now let's make this animation usable in Adobe After Effects. We need to create
track points in Google studio so that
we can attach graphics, texts, and pins to the
exact location later. Think of track points as the anchors that keep your
graphics stuck to the map, even when the camera is moving. Since this is not a
three D animation, I'm only going to
create one Trackpoint. Let's go to the point
in our timeline with our playhead that is zooming
in on the Imperial Palace. Once you're right above
the Imperial Palace, right click on the palace
and choose set Track Point. O Studio will instantly create a track point for
that exact location. I'm going to rename this and remove that one in front
of the Track Point. This will act as an
anchor for any labels, highlights or graphics we add
later in the after effects. Now we are ready to render. Click on the big render
button at the top. You will see the render
setting s panel appear, along with a preview
of your animation. Choose your output folder, keep the name as is or
modify it if you prefer, and click Allow when your browser asks for
permission to save files. A studio gives you two main
ways to export your work. Option one is render as video. Use this only if you want the
animation exactly as it is. No after effects, no
additional graphics, just something quick to show
someone or upload directly. Option two is render
as image sequence. This is the option we need. Image sequences will give you the highest quality,
the most control, and most importantly,
the ability to bring the animation into after effects
with full tracking data. So go ahead and switch your render type
to image sequence. Dimension should already
match your project settings. For the frame range,
I'm selecting zero to 600 frames because my sequence
is around 20 seconds long. You can adjust this based
on your own timeline. Next, you will see
attribution settings. Google Art Studio requires you to include
their attribution, but you can position it so it doesn't interfere
with your animation. I'm placing mine to the
bottom left corner. You can also simply drag the Google Earth logo
if that's easier, and the text will sit neatly
along the lower edge. Also, make sure your text alignment
matches your placement. If your attribution sits on the left, choose left alignment. If you move it to the
right, switch it to right. Below that, you will see
option 43d tracking data. Select after effects
because we will be importing all this
into after effects next. For coordinate space,
keep it on global. This keeps the tracking
data stable and predictable once we start
building the graphics on top. You can also choose map style. Exploration adds important
roads and points of interest. And when you choose everything, you can see local
businesses as well. Clean gives you a simple,
unobstructed base layer, perfect for documentary
visuals because we will be adding our own labels
and highlights later. Since we don't need any clutter, keep the map style set to clean. Finally, texture quality.
You can use normal, but I strongly recommend high, especially if the
animation is going into a documentary or
polished YouTube video. It makes a noticeable
difference. Once everything is
set, click Start. Or Studio might ask you if
you want to save changes, hit save, and the
render will begin. One important thing
to remember is to not switch the tabs or close the browser
while it's rendering. Or Studio pauses rendering
the moment you click away, so keep the tab active until the sequence
finishes exporting. Great. Now, your main location has a track point attached, which means after
effects exactly knows where the point is
in the three D space. In the next lesson,
we will import this entire setup
into the Adobe After effects and start
turning it into a beautiful and
polished map animation.
5. After Effects Setup: It's time to bring everything
into the after effects. This is where we move from
rock camera movement to a true design environment where we control
every visual aspect. What I'm going to do is go
to File Run script file. I'm going to find my Tokyo
Region folder and select the dot GSX file that
Earth Studio has exported. Click on Open and as
soon as you open it, after effects will
automatically create a brand new composition with your full camera
movement, three D camera, and the null objects linked
to the track point that we created earlier and
the text layer for Tokyo. Now that the main map is
imported into my project, I also need to bring the
Illustrator vector map that we will be animating. You can download that from the
project resources section. Let's go to the Project panel, right click and choose
Import, then file. Select the Illustrator
file that you downloaded from your
class resources. Click on Import and you will
be greeted with this pop up. This window asks what
type of import we want. Footage or composition. We don't want
footage because that would merge everything
into one layer, and we need each layer separate so that
we can animate it. Select composition
and click Okay. Let's open this new
vector composition. We can see all the
region layers here. These layers are rasterized only at their
current resolution, which means if we change the dimensions,
they will pixelate. We want vector layers that stay sharp no matter how
close the camera gets. To fix that, select all the
layers by holding Shift, right click on them
and choose Create. You will see a few options here. Select create shapes
from vector layer. I'm going to keep
all of these layers selected and then move them up in my timeline so that
they stay grouped together. You'll notice that all of our old illustrator layers
are now hidden underneath. Since we don't need those
original layers anymore, I'll select them all
by holding Shift, and then hit Delete. Now, as you can see,
after effects generated clean infinitely
scalable shape layers. Let's go back to our main
or studio composition. I'm going to place my
playhead where Tokyo City is clearly visible in
my main map comp. I want to hide the text
layer for a moment. Click on the little
eyeball icon on the left side of the
layer in the timeline. This turns off its
visibility for now, but you can click the eyeball again anytime to
bring the text back. Now, drag your vector
shape layer comp above the Tokyo text in
the timeline and place this layer where
our playhead is. We also need to turn this vector layer
into three D layer. To do that, click on the little cube icon
next to the layer. It needs to exist in the
same three D space as the Earth Studio camera for the tracking
to work correctly. Now we will need to parent this column to the Track
point null object. Since this null was created
by Google Earth Studio and it holds the exact
three D position of Tokyo, once we link our
vector map to it, the map will move
perfectly with the camera. To do this, look for the parent and link
column in the timeline. If you don't see it, just toggle the switches at the
bottom until it appears. On the vector layer, grab this little pick whip icon and drag it straight to
Tokyo Null Object layer. You can also use the
drop down for this. The comp is now parented, but it looks like it has
disappeared. That's normal. It's actually just
extremely tiny relative to the scale of the
Earth's studio environment. To fix this, I'm going to open up my vector comp settings. On the left side of the layer, you will see a small arrow that expands all the attributes
that we can change. I'll click that to
toggle it down. Then open the transform
section as well. Here you can already
see the problem. The anchor point position and orientation values are all mismatched and nothing
is setting at zero. So the first thing I'll do is set the position to all zeros. And then set all the
orientation values to 02. Now the comp is still tiny, but at least it's centered, which is exactly what we want. From here, I can
simply scale it up until it becomes
visible and then use the position controls
to align it until it sits comfortably over
the central Tokyo. The beauty of
converting it to shape layers is that you can scale
it as much as you like, and it will stay
perfectly sharp. Let's play this part back. I'm going to move
this ahead a bit, so it will be easy
to animate later. Now our map is placed, tracked, and ready for animation
inside the Tokyo region.
6. Vector Map Animation: In this lesson, we will
animate our vector map so that each district fits in and
out in a clean sequence. This gives your audience
a clear understanding of how city is divided and makes
the whole region feel alive instead of static. Let's open the
vector composition. This contains all of your
map district layers. Before animating
anything, I like to organize the map layers
in a logical sequence. I want to begin the animation from the lower part of the map. First comes OTA. Then Setageya SugiamiNakano,
and North Tokyo. Then I'll bring this section along the side, the East Tokyo, followed by the older part of
the city, and then finally, I'll reveal the central Tokyo
as the final highlight. Once the layers are ordered, select all of them
by holding shift and press T to open Opacity. I'm going to move
the playhead to around 20 frame mark and then create a keyframe here by toggling on
this stop or icon. Since all of our
layers are selected, this has created
keyframes on every layer. Then move back the playhead to roughly ten frames and then
set the opacity to zero. This will create
a smooth fade in animation for every
district layer. Now, let's jump back to
the main composition, place your playhead exactly where you want the map
to start appearing. Then double click
on the vector map because the playhead in
both compositions sync, you can easily see where the fade ins will land
inside the larger animation. So let's sequence these
reveals manually. I like doing this
by hand because it gives much cleaner
intentional timing. The last district to appear
will be Central Tokyo. So I'm going to select both of these keyframes and then
pull the second one forward, so it lines up exactly
with my playhead. Then I'll repeat
the same process for the old Tokyo layer, but I'll stop a few frames earlier to create a
nice staggered reveal. I'll continue doing this
with the next few layers, moving each set of keyframes slightly so they appear
one after the other. Even though OTA is the last
district in Mayer stack, it will actually be the first one to appear in the animation, which gives us a clean bottom
to top flow across the map. Go back to the main composition, and let's preview it. You'll see the
Tokyo's districts are appearing one by one,
clean and elegant. Now, let's make them
disappear in the same style. Go to vector composition. Select all your
opacity keyframes, copy them by holding
Control and C. Move the playhead to where
you want the district to start fading out and paste. Now to reverse the
exit sequence, the first to appear becomes
the first to disappear. Right click Choose
keyframe assistant and click on Time
reverse keyframes. Now, let's preview it again. These fades are a little
too slow for what I want. When the districts fade out, I want the movement to feel
quicker and more energetic. So let's fix that. I'm
going to select all of these keyframes and shorten
this spacing between them. This keeps the fade
out effect but speeds up the overall timing. Let's review that in
the map composition. I love the animation, but right now it still looks a little flat and a
bit amateurish. So to make it feel
more polished, I'm going to add
a blending mode. To do that, I'll go to Mode's
column in the timeline. You will see that
the blending mode is currently set to normal. If you don't see the
mode panel at all, just click on the small
toggle buttons at the bottom of the timeline until the blending mode
options appear. Once the mode panel is visible, I'll open the drop down
menu next to my layer. There are many blending
modes to choose from. So I'm going to
scroll through and see which one works
best with the map. Some of them barely
make any difference and multiply makes everything look
way too dark for my taste. So I'll keep testing a few more. Overlay already looks
pretty because it blends the color
nicely and adds depth. But I'm also going
to check hard light. And actually, the hard light
is looking even better. It brightens the map, keeps the shape of our vector
layers clear and helps the whole animation feel
stronger and more professional. This completes our Tokyo
District animation. In the next lesson, let's
create an outline around the Imperial Palace
using the trim paths.
7. Trim Paths: In this lesson, we will add a small advanced detail that really brings
the scene together. I'm going to outline the Imperial Palace
region using trim paths. Before we go ahead and
do any other animation, I want to save this project. So I'm going to hit
Control S to save or you can just go
to File and Save. Now, whatever we have done by far is saved in our computer. Now let's go to the
Imperial Palace part and create a new Shape layer. Right click on the
timeline and go to New and choose Shape layer. Once that's done, I make sure
the Shape layer is actually selected and then I click on the Pentool from
the top toolbar. You can also just press
G on your keyboard. On the right side, you will
see the Pentool properties, and you will notice two
things fill and stroke. For this outline, I don't need
any fill at all because we already used the solid layer earlier in the Tokyo outline, and filling this shape would
just cover up the map. So I'm going to click on
fill a little menu pops up. Then I will select none. You will also see other
options including solid color, but we don't need
any of that for this step. I'll just hit Okay. Then I'll do the same
with stroke settings. If your stroke is
not set to anything, click on stroke, choose
solid color and confirm it. This is what creates the visible outline
in our animation. After that, I can change the stroke color to
something bright. Let's choose yellow
because I want the palace boundary to glow
a bit and really stand out. Click Okay, and then I'm going to adjust the stroke with a bit. I'm going to carefully draw the outer boundary of the
Imperial Palace grounds. I don't need to be perfect, but I try to trace
the greenery and the general outline so it
feels neat and deliberate. Once I'm done, close the path
to form a complete loop. Now, let's turn this
shape layer into a three D layer by
hitting this cube icon, then parent it to the
track point null object, just like we did
for the vector map. Now, it suddenly
flies off screen. That just means the transform
properties have changed. Let's just adjust it so the path sits
correctly on the map. I'm going to open the
transform properties of the shape layer by
clicking the little arrow. And right away,
you'll notice that deposition values are a
bit all over the place. So let's reset them by typing zero for all
the position axes. The orientation is
also not correct, so I'm going to hit zero
on orientation as well. Now, this made the
shape visible again, but it's still tiny and not aligned with the
imperial palace area. So the next step is to adjust the anchor
point and the scale. Let's go to the scale first and start increasing it slowly until the outline is roughly large enough to match
the palace region. Don't worry about
getting it perfect yet. We can always tweak
it again later. I will go to the
anchor point and move it so that the outline
shifts into place. This helps line
up the drawn path with the actual
palace on the map. I'm going to fine tune
each of the path points so the outline hugs
the palace grounds as accurately as possible. Now we are ready to animate it. Let's go to the content
section of the shape layer. Here, you will see a little icon that looks like a play button. Let's click on that,
and there it is. We need to add trim parts to this shape layer so that we
can animate the outline. So I'm going to select it. Once the trim parts
has been added, I will twirl down the arrow
to tweak its settings. I will move my playhead to
the moment where the camera has fully arrived at
the Imperial Palace. This is where the outline
animation should begin. At that frame, click
the stopwatch. I can write beside the start
value to make a keyframe, then set the value to 100. I'm going to move
forward a few seconds and change the value to zero. When we preview this, the outline draws
itself slowly around the Imperial Palace almost like someone is tracing
it for the audience. It feels very documentary
style and adds a little nice guiding
moment for the audience. I want the stroke to
look visually smooth, so let's refine it a little. I'll go to the shape layer and under the contents,
select shape one. Here you will see the
shape properties, including the stroke
color and stroke width. You'll also notice
two very important settings line cap and line join. These control how the ends
and corners of a line look. They can be sharp, flat
or nicely rounded. For this animation, I want everything to feel
soft and smooth. So I'm going to set both of the line cap and
line join to round. To make this outline
look even better, I'm going to add a
soft glow effect, just enough to have the
imperial palace subtly pop without overpowering
the rest of the map. I'll start by selecting
the shape layer, then going to the effects and
presets panel on the right. In the search bar,
I'll type glow. And when it appears,
I'll simply drag the glow effect onto
the shape layer. Now it looks quite harsh by
default, so let's soften it. I'm going to bring
the glow intensity down and gently increase
the glow radius. This spreads the glow out, making it more of a
soft highlight rather than the bright neon outline.
Let's play this back. This simple outline will give your audience a
clear frame around the landmark and make the final
zoom in feel intentional.
8. Text Animation: Now that our Outline animation for Imperial Palace is done, I want to add a title that clearly tells viewers
what this location is. We already have a text layer
that was automatically created by Google Earth
Studio for the Track Point. We are just going to use this. I'm going to move
this text layer a bit higher in the timeline so
it's easier to work with. It's already in
the three D space and already parented
to the track point. So we don't need to worry
about linking anything again. Right now, the text is hidden, so I'll unhide it by clicking the little eyeball icon
next to the layer. As soon as it appears, you will notice it's way too big for the Imperial
Palace area. To fix that, I'll select
the Track point text layer and open its text properties
from the panel on the right. The size is set to
very high by default, so I'm going to reduce it
to something much smaller. I'm going to reposition
the text slightly above the outlines so it doesn't overlap with
the shape animation. Now I'll change the text
itself to say Imperial Palace. Let's use the scale
and position controls to place it exactly
where I want it. Since it's attached
to the track point, it will stay perfectly locked to the palace as the camera moves. Next, let's change
the fill color of the text to match the
color of our outline. Click on fill and then select this eyedropper tool and it will exactly pick
the correct color. Before animating the text, I want it to feel
like it's rising up from behind the
Imperial Palace outline. To do that, I'll create a mask. With the text layer selected, I'll grab the pen tool
and draw a boundary around the text and then follow the shape of
the palace outline. This doesn't have to be perfect. It just needs to cover
the text area so that the animation looks like it's emerging from behind
the palace boundary. We could use a preset here, but I want this to
feel more hands on. I want you to understand
the basics of text animation and not
just dragon drop effects. So let's build this
one step by step. First, I'm going to twirl down this little arrow
on the text layer to open up its properties. Then I'll open text
and you will see this little small icon that
looks like play button. That's the animate button. This is where all of the text animations
begin in after effects. I'll click on Animate, and from the list of options, I'm going to choose position. Soon as I do that, After effects creates a range
selector for the text. This means we can now animate how and when the text moves. Before animating, I want to line this up with
our palace outlines. I'll select the shape layer, press to reveal the
keyframes and find the last keyframe where the
outline finishes drawing. This is exactly where I want
the text to start appearing. At this frame, I'll go back to the text layer and create
a position keyframe. Then I'll move the keyframe a little forward
in the timeline, just a few seconds and adjust the position
of the text downward, so it animates upward
into the place. Right now our animation feels very slow,
which I don't want. So I'll grab this final keyframe and move it slightly
earlier in the timeline. That immediately
speeds things up. I'll also tweak the
position value a bit so that the text settles
nicely around the center. This feels much more natural. To smooth everything out, I'll right click on the
last keyframe, go to Keyframe Assistant
and choose Ess in. Now I'll open the graph editor. This is called speed graph, and it helps you control how fast or how slow your
animation plays. I want my text to appear
quickly at the beginning and then slow down as
it settles into place. Let me show you how
to set that up. Inside the speed graph, you will see a little handle
on the last keyframe. All I need to do is
grab that handle and drag it gently forward
the first keyframe. As I do that, you will
notice that the curve starts forming a
small mountain shape. This shape tells after
effects to start the animation fast and then
ease into the slower finish. Now when I preview it, the movement feels much
more natural and polished. To finish off, I want a subtle drop shadow just to separate the text from
the palace outline. I'll go to effects and presets, search for drop shadow, and then drag it onto the text. I'll increase the
opacity and softness, so it looks clean and cinematic. That's it. Our
Imperial Palace label now feels beautifully
integrated into the map. I am really happy how
this has turned out.
9. Sound Effects: Sound is the final layer that brings map
animation to life. We will add subtle ohs, reveal and gentle ambience that makes the whole
sequence feel polished. Right now, I'm going to
pull up our timeline so that we can see this space
underneath our animation. This is where we will add the sound effects
because at the moment, our map sequence is
completely silent, and sound can make
a huge difference in how immersive your
animation feels. So here's what I'll do. I'll go to the Project panel, right click, choose Import. File and then open the sound effects folder included in your
class resources. Inside that folder, you will
find a few audio clips, things like marker
sounds and Hochs. I'm going to select
all of them and click Import so that they
show up in my project. Now that they are here, let's
start with a sound that adds a bit of tactile
feedback, the marker. I'll grab one of the
marker clips and drag it directly
onto the timeline, placing it on an empty space below all of the visual layers. On any audio layer, you'll
notice a small speaker icon. Clicking that mutes the audio, clicking it again, unmutes it. This is great when
you want to check your visuals without any
sound distracting you. If I twirl down the audio layer, you will see an audio section. Inside that is audio levels. This is where you
control the volume. You can even keyframe
it if you want the sounds to fade in or
fade out over the time. Below that, there is waveform. When I toggle it open, after effects shows
the actual audio wave. I use this all the time
because the waveform is much more accurate than what
you hear during preview. If something needs
to hit exactly on the outline animation
or camera movement, I trust the waveform visually rather than relying
on audio playback. Here's a really helpful shortcut if I select an audio layer and press L, that is twice. After effects instantly
reveals the waveform. Pressing LL again, hides it. This saves me from opening and closing menus for
every few seconds. Now you'll notice that there are four versions of
this marker sound. But based on my timing, the third one feels
like the best match for our Imperial Palace
outline animation. To remove the remaining
three audios, we need to trim it. To do that, I hover my
cursor over the start of the audio layer until I see those little arrows
pointing outward. That's after fix telling
me now I can trim. I'll drag the edge
inward to shorten the clip to exactly the
portion that I want. I'll do the same
on the other end, so the sound ends cleanly. Once that's done,
I'm going to drag the audio clip forward in
the timeline so it lines up perfectly with the moment the Imperial Paris outline is going to start getting drawn. Let's play this back. And
yes, this sounds perfect. It adds a satisfying
tactile cue that makes the outline animation feel intentional and grounded. The marker sound is a
bit loud by default, so let's soften it. I toggle down the audio
properties of the layer and lower the audio levels until it blends naturally
with the animation. That's really the workflow. Find the moment where
something moves, lands or reveals and pair it with a tiny sound effect
to bring it to life. I'm going to repeat
the same process to the entire timeline, adding subtle clicks, Hushes or texture sounds wherever the
animation calls for it. You don't need to overdo it, sprinkle the sound wherever
it enhances the motion. With just a few audio touches, your map animation now
feels ten times more alive.
10. Finishing Touch & Export: Now that all the elements of
our animation are in place, let's add a finishing
touch before we export it. The first thing I check
is the motion blur. Map animations can feel a little stiff if everything is
perfectly sharp all the time, especially during the
first movements or Zooms. To enable motion blur, I go to the motion blur
icon in the timeline. Looks like these three
little overlapping circles. Once I click that,
it will turn on the motion blur
for all the layers that need it by clicking the same icon in
each layer's row. Now, whenever something
moves quickly on the screen, after effects will
automatically add a subtle blur to the motion. This makes animations feel much smoother and more natural and it removes that stiff
cutout look that happens when the objects
move without any blur. Motion blur is a small switch, but it adds a huge amount of polish to the
final animation. After motion blur, let's work on some color and
contrast adjustments, especially over the Tokyo map. Sometimes studio map imagery
can look a little flat compared to the
crisp vector shapes that we have added on the top. To fix this, select
your main render layer, go to effect and then
color correction. Select lumitar color,
and now you'll see its full set of controls appear in the Effect
Controls window. I want you to go to the
part of the timeline where no vector layers
are blocking the view. This will make it easier to
judge the color changes, then toggle down the
basic correction. Now I'll slowly
adjust a few things. First, I'm going to increase
the contrast just a little bit to bring out
more depth in the map. Then I'm going to add a
tiny bit of saturation, not enough to make
it look cartoonish, but just enough to make the
colors feel more lively. Next, I will scrub back
in the timeline to the moment where Japan
is clearly visible. Here I'll raise the
exposure slightly. Instantly, the map stops
looking flat and washed out. It becomes brighter, clearer
and much more cinematic. You can really see
the shadows and highlights are
separating nicely now. The map is looking a bit
too blue for my taste. I'm going to warm
it up by moving the temperature slider toward
a slightly warmer tone. And just like that,
the whole scene feels more balanced and natural. Let's review it. And yes,
this looks beautiful. Now play back the entire
sequence from start to finish. This is your final pass. Look for tiny issues like text that appears
a frame too early, pins that sit off corner, or opacity fades that
feel too abrupt. Tweak anything that
feels even slightly off. The goal is to make the whole
animation feel effortless, even though you put a lot
of work behind the scenes. Now that our animation
is complete, we need to export it so you can add it to
your documentary, post it on social media, or simply share it with friends. To do that, we will use
Adobe Media Encoder, which gives us better presets
and cleaner compression. First, I'll go to
the composition menu at the top left
of After effects. When I click it, I'll
see two export options. Add to media encode a
Q or add to render Q. The renderQ method is a little more technical and
not as flexible, so I'm going to choose
Add to media encoder Q. Once Media Encoder opens, you will see your composition listed with several
settings next to it. The format, the preset, and the output file location. I'll click on the blue
text under the output file to choose where I want my
final video to be saved. Next under format, I'm
going to select h.264, which is perfect for the kind of map animation we created. Lightweight, high quality, and ready for YouTube or
social platforms. Then for the preset, I'll chooe match
source high bit rate. This ensures we export at the same dimensions we designed and keeps
the animation crisp. Since our project doesn't
include captions, I'm going to deselect
export captions so Media Encoder doesn't waste its processing time on
the things we don't need. Before I start the export, I'll take US maximum
render quality for the best final look. I also like to double check the bit rate under
video settings. Usually values around
ten to 12 MBPS, perfect for this
style of animation. Then click Okay. After that, I'm going to click the
small green Play button at the top right of
the media encoder. When it's done, you will have polished cinematic
Tokyo Map animation complete with regional reveals, smooth movement, a
highlighted Imperial Palace, and all the visual
storytelling elements that make documentary map
sequences feel alive. Your map animation is now
complete and exported. Ready to drop into your documentary YouTube
video or social post.
11. Wrap Up: You have reached at
the end of this class. If you have been
following along and building your animation
step by step, you should now have your own documentary style map animation. I'm so excited for you. I hope you enjoyed
creating it as much as I enjoyed teaching it. I will be making more
classes like this, so check out my
Skillshare profile. And if you want behind
the scenes, tips, more tutorials, follow me
on YouTube and Instagram. Please don't forget to share your final project in
the project gallery. I would love to see
what you've made. Your project can also inspire new students who join
this class later. We have covered a
lot in this class. We started with the
Google Earth Studio, learning how to
set up a project, make camera moves at track
points and export our map. Then we moved into Adobe After Effects
where we added shapes, pins, texts,
district highlights, advanced outlines,
and color polish. The end, we created a clean, cinematic map animation that looks great in documentaries, travel videos, and even
short form content. I've added a PDF in the resources section
with helpful shortcuts, after effects tricks for map design and notes
for Earth studio. Feel free to
download it and keep it with you as you
make more projects. Thank you so much for
learning with me. I'm really proud of
how far you have come, and I can't wait to see the map animations you create next. All the best, and I'll see you in another class very soon.
 Snehal Wagh, Filmmaker