Transcripts
1. Welcome! Start here: Welcome to After Effects
plugin creation with HAGPT I blad and I'll guide
you through building your own custom Adobe
After effect plugins, even if you've never written
a line of code before. In this course, you'll create a real After Effects plugin, install it as a panel and
launch it using ChatGPT. We start simple why
plugins matter, how to save time
and money and how AI makes it possible
for non coders. Then we build a textures plugin. Step by step, you'll install
it on Mac or Windows, turn scripts into
dockable panels, and keep your tool one click
away in your workspace. See how creators
use custom plugins, then create your own plugin. I recommend watching
videos in order because every lesson builds
onto the previous one. You can control the volume and the playback speed
of every video to learn at your own pace. If you get stuck with
having questions, be sure to drop them below. Just make sure to
check the existing questions first because there's a good chance that the
question you want to ask has already been
answered in detail. At some point, you'll be
asked to leave review. Please wait until
you've had a chance to really experience
the material. Your honest feedback
helps me improve the course and better serve
you and future students. By the end, you'll
have a working plugin inside After Effects. Plus the skills to create the new ones anytime
you need them. You'll be able to follow along
easily, build confidence, and walk away with the
tools you can reuse, share or integrate into your
project or client work. Let's jump into
the first lesson.
2. Why Plugins Matter and How ChatGPT Transforms After Effects: Video, I'd like to discuss
a list of these topics, and if you don't want to
listen to these topics, you can skip to the next
video where I'll just show you how to create the plugins.
But let's discuss this. First of all, the current
plugin landscape, there are websites
like video copilot, AE Scripts, and I use both of these platforms because
those are really great. Some of their plugins are free, some of their plugins are paid. Use both. For example, there will be an Effex
console where you can search different effects
quickly in After Effects, that would be text evo where you can animate
the text easily. That would be deep glow, which is definitely better
than what After Effects has, although I don't
use the deep glow. These already exist, but if you want to create something custom, something super niche that sometimes doesn't exist.
That's the first issue. Second issue, it's
pretty expensive. I was like $30, deep glow, I believe is even $100
and something you can do now is create
these plug ins yourself. I should mention that if we break down by the definition
what the plugin is, then plugin is something that's written differently
from the script. You can pose this
video and take a look, which will explain it a
lot better than I will. But to 95% of the people, plugins and scripts basically
will be the same thing. Now, it's especially
very good with the latest update
of ChatGPT five. If you watch this in the future
and there's ChatGPT six, seven, eight, whatever, it's
going to be even better. But with latest HGPT update, it became unbelievably
good at coding. Basically, when we write
script, we need to code. Even if you have no coding
experience, this is Perfect, because I don't have any coding experience
and I'm able to create these custom plugin. Now, the whole reason to create this plugin so that you can do something custom or
you can do something a lot faster, a
lot more creative. You can earn more money
with that. So that's great. Even if you use a
free version of ChatGPT you can still do it. Even more interesting is that if you create
something super great, then you can go
ahead and sell that. So it's like benefits and
benefits just all around. Now, we'll say that it's
not super easy to create that and you'll see that in
the example D will give you. But it's a very interesting
opportunity that's just about to explode and we'll see what people do with
that in the future. So anyway, if you
have any questions, let me know, better than that, let's jump into
the next video and create how custom
After Effects plugin. GPT, so you
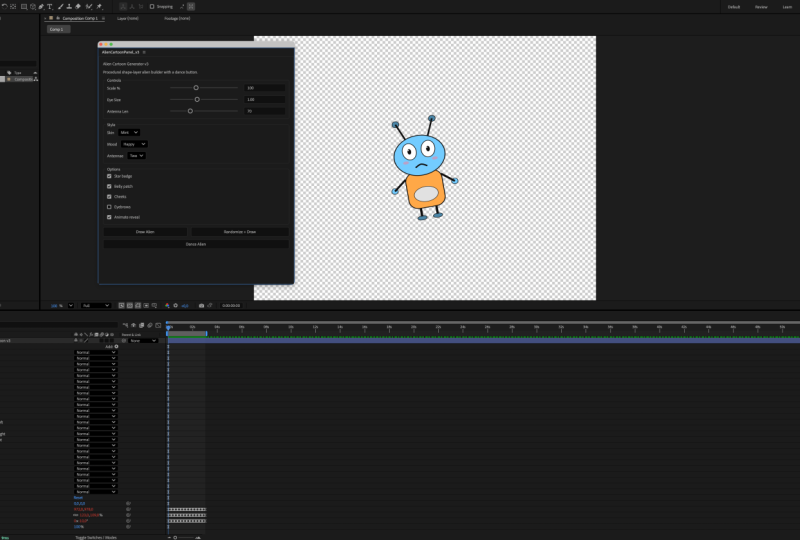
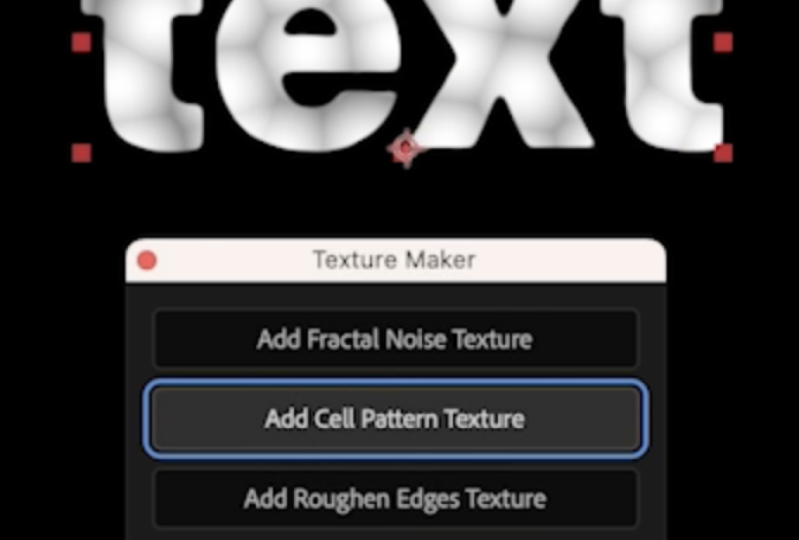
3. Step-by-Step Project — Building and Packaging a Textures Plugin: In this video, let's create our custom After Effects
plugin for ChatGPT. We want to use these
four textures. So we want to create a plugin that's going to be
kind of like a pop up, a UI pop up that will be able to just
click on the button, it's going to apply
these textures. Now, I will say that
sometimes I struggle to give HIGPT the
right instructions. You can actually ask ChatGPT to create the instructions
for the HNTPT. By the way, I'm using
the paid version of ChatGPT and I think
with the free version, you have a little
bit of limitation on the number of
requests you can give to HGPT so that it uses kind of its latest
and the best model. So if you get that
message pop up just wa a couple of hours or
potentially like a day, and then come back to that and then you'll
be able to do it. Although you can still do it
with the previous version. So even if you run out of this kind of the
very best model, you run out of the
credits for that or the time or the
number of requests, whatever that's called, open a new dialog and then you'll be able to do
it the whole thing. So in order to get
the best results, I'm going to ask
this HAGPT to create instructions for the ChatGPT so that you can
write this script. HGPT, I need you to write instructions for
the HGPT so that this ChatGPT will write custom after effect
script specifically, we needed to generate a script that will
have a pop up like a UI panel that we'll
be able to dock later so that we have four
different buttons that will generate
different textures. And detectors that we need are going to be with
fractal noise texture, green texture, cell
pattern texture, and roughen edges texture. You can see that I've written it in the very beginning
of this message. So go ahead and create
the instructions so that ChatGPT can
generate the script for us. Then just press on Send. By the way, another hug, instead of just rising
everything by hand. You can give
instructions by voice, and then it will turn into text. I found that works a lot
faster than me typing. Like, it would take
me a lot longer to type this and then
to speak it out. Now, I don't always get the best results with the first prompt. Sometimes I have to go back and forth a little bit with IGBT, but not a problem at all. Okay, you can see pretty
detailed, really good results. Now, if you want your ChatGPT to be this brutally
honest and truthful, you can leave a question in the Q&Iection discussion
section below, and I'll give you
the instructions on how to do it super easy. But, you know,
ChatGPT is always, like, very agreeable with you. And so if you don't
want to be that, then you can make it a little bit more,
like, straightforward. Okay, great, Let's
copy everything, so I'll come to the very top
and I'll copy this part. The reason why I'm
copying just the top part is because I'm not
able to copy here, so I'm just going to
copy the top part. Then I'm going to copy
this and paste this in. Then I'm going to copy
this part as well. And I'm just going to paste
it back into this ChatGPT. Copy. And now let's copy
this part at the very end. And let's run the script. It's going to take
some time, definitely. It's not super fast, especially
with long instructions. A couple of comments
about ChatGPT is it's always great to create custom ChatGPT because
custom ChatGPT are a lot better than
general ChatGPT. But custom ChatGPT,
first of all, you have to have
the paid version. Secondly, it does
take a little bit of time to set exactly
what you want. First of all, to identify
exactly what you want. Like, that's the hardest part. Usually, it's
pretty easy to give instructions once you know exactly what you need and
what's going to work. But if you don't
know, you have to go back and forth with ChatGPT asking to create this super
great custom ChatGPT. And it started doing it. I mean, even if
you were a coder, that's still quite a
bit of code to write. So even if you're coder, you can still use this
method super grade. Okay, so first of all, give me a code without the
downloadable file, and we should ask you, give
me file to download JSX file. The JSX is the file
format that we need. Perfect. Now let's just
click on the file, save it to download.
I need saved. Now I'm going to
open After Effects, and I'm going to
select our layer, select whatever layer we want. And we need to write a script. So if you go into
Flect Run script, you can actually put a
shortcut for yourself. In my case, it's option R, but I can also just click here. Or instead of just going into the menu, I can click
on the shortcut. So I'm going to click on
it, and then I'm going to run this thing. And as you can see, it
created our texture maker. So if we click on one of
those, m. Interesting. So, it actually creates I'm
not even sure what this is, but if we go into
the effect control of whatever layer it's created, then it does have the
necessary effects. So it's grain does
have the grain. Cell pattern and
add roughen edges. Perfect. It did exactly
what we told it to do. Aside from it now creates this
new layer, which is great. We can just give it instructions to customize it a
little bit further. HBT, great job. So we have our Do I pop
up with four buttons. We have our effects applied. However, when I
click on the button, it creates a new layer
that has the effect on it. However, I don't need to
create the new layer. I need to apply the effect to the selected layer that I have selected After Effects.
Can you do it? Actually, we shouldn't
ask it to do. We should just tell
it to do stuff. Make necessary changes. We can close the script and
we can delete this part. At the same time, I'm
also going to delete the script. Move
it to the trash. Another tip I will
give you is that when you go back and
forth with Chachi PT lets you create from scratch
and sometimes you have to do it like ten
times or 20 times. Sometimes it gives the
downloadable file name. So this link here, it gives it the same name, and you can ask to generate a
new name every single time. So for example, in this case, it would be texture
Maker, texture Maker two. And so with each new file, it would give you
like the next number. So three, four, five,
the list goes on. And it's also a
little bit easier for you because you can
always take a look at your downloads and
then just select the file that has the
the biggest number, which is going to be
the latest number. I will say as well, that
I tried to replicate some of the already
created scripts, and it was doable, but it's kind of difficult to do something that's
difficult, I would say. It's not necessarily, difficult. It's just it takes a
lot of time because sometimes ChatGPT tries
to jump ten stairs, and then every single
step fails and you have to take it like every single
small piece at a time. So, for example,
I tried to create the text animation, like, similar to text evo animation and something that was doable, but I had to work on
every single step. So first of all, apply certain
effect or apply certain, like, animation, then
create a keyframe, then make that keyframe smooth, then apply specific in
is out in After Effects, and it's a long way. I did, like, dozens and dozens of variations of the script, then I had to go back
and forth with ChatGPT, for a couple of days was brutal. Eventually,
I just gave up. I was doing the progress. I just I took a lot of
time to do the progress. Link doesn't work.
I'm not table. Oh, actually, it does work. Interesting. It's not
highlighted in blue. Okay, so let's run the script. Select it. And let's
select our text, and let's give it a try. Add roughen edges. Interesting. Rough on ages. Why does it add
the fast box blur? This one grain. This one's good. This one. Okay? What
about this one? Why can we why were
not able to see it? Let's try to apply this
effector ourselves, and let's see the
difference. Cell pattern. That in hundred same 601. 60600. Okay. And then
this s zero and zero. Si. It's our conditions. So now the fun stuff begins where we just
have to go back and forth with haTiPT and try
to identify the issue. So this one is one,
zero cycle, okay? Okay, great job, ChatGPT. We definitely make
progress. Let me give you some feedback
so we can improve. First of all, the text
the layer that I apply the texture maker on has the deposit of
35% all of a sudden. The rough and edges effect also adds the fast box
blur effect to it, which is I'm not sure why
we should get rid of that. Next, the add cell
pattern for some reason, it becomes super it
just becomes black, and I have no idea why. So I need you to customize
the settings so that the control pile comes settings so that
this doesn't happen. Then when we go and
apply the green texture, opacity goes to 46%. I'll send you a screen. You
can see there's the box that appears behind the tax, which
just doesn't help at all. And then when I apply
the fractal noise, opacity goes to 61%
for some reason. So let's go ahead
and change that so the capacities have 100%. Hmm. I even blinks a little bit. So it's like it has
the expression. What if we get rid
of the expression? And the opacity
has the expression pasteurized time 12
value random minus 33, which we shouldn't have it. I'm saying that we
shouldn't have it, but this is something
that you can do. You can also customize and create custom
expressions like this. ChatGPT is actually pretty good at creating
custom expressions. I mean, you have to go
back and forth with it, but you can create
interesting stuff. If you didn't know
After Effects, like, you can basically write code in After Effects in
all the expressions, and that's why you can run
scripts and After Effects. But I have no idea how to write code or anything
similar to that. So I can just ask ChatGPT so that you can
create it for me. Okay, so we have something
new. Let's take a look. And actually, let's just delete the whole text layer so that it comes like it's the original. So I'm going to write the
text, put it in the middle. Let's run the script and
apply. Rough and ages. Perfect. Okay, so
the cell pattern texture, dark, fractal noise. I actually really like the
roughen edges texture, which is pretty good. However, it has some
interesting effects to it, as well. So this is great. Then cell pattern texture. There's still something about
it that just doesn't work. What if we set reset
here? Okay, so it works. If we put this one to zero, so let's open every single part about it and then
press on reset. HBT, so roughen edges are
great. Fractal noise is great. Now, let's work on the cell pattern texture and
add grain texture. The cell pattern, if the
effect apply, it turns black. However, if a press
on reset in the fct control panel then
everything works perfect. Specifically what I'm saying the changes are the
evolution changes, it goes from 520 when it pres reset so it's
supos to zero. I'm saying that the size has
to be 12 it has to be 60, although I don't
think the size has any effect on this,
but who knows? And then also, instead of
the contextual lighter, it goes into contrast. I think this should be somewhat customized so that
basically let's put it to the almost like factory
sets from the gin and further will be able to do. So that's about
the cell pattern. Then it's about the
at grain texture. I'll send you a
screenshot so that you can take a look
at what's going on. So I'm just going to the shot as so they can
see what's going on. Then we can also ask you to, let's say, add a button
to delete these effects. And in the next video, I'm also going to show you
how to make this constantly appear in your UI
of After Effects. So it's going to be like a panel that we can
dock somewhere, and then you'll be able to just have it
there all the time. Great. We made changes. Let's download it, download it. And let's open After Effects. Let's close this,
delete the grain, then run the script. So cell pattern. Perfect. Grain texture to puns. I'm not sure about the
grain. Okay, great. Actually, to make
our lif easier, let's add green effect. And let's also add a button to our UI so that
we have three ect. And we have a new button,
which is going to be go to delete those efects.
Go ahead and do that. We are nearing the end of this. Download, download. Delete, run the script. Select number four, open. Perfect. Perfect. Perfect.
Okay. Great. What if we add two and then
press and delete? What if we add something like, I don't know, like
glow, for example? It's man it a little bit bigger. And then delete? Mm. Interesting.
Oh, let's select. DoletTlet. Very well done, very well done. So now, it only deletes these effects and doesn't
delete the effect, for example, the glow
effect, doesn't delete it. It only deletes these three when they're applied, and perfect. So that's how you do it. This was kind of
straightforward, but sometimes you might have a little bit of
challenge to do this. Try to stay calm because I know sometimes you might
lose your head with this. Try to stay calm at
if things don't work, try to just break it down to very small steps that from a
little bit to a little bit, little bit, little bit,
and then after ten steps, you get to where
you wanted to go. So if you have any
questions, let me know. Other than that, let's go to the next video and
create a dockable panel.
4. After Effects Plugin: Import Templates Instantly with ChatGPT: Hello, hello. In this video, I want to show you one
script that I created with GPT that saves me just an unbelievable
amount of time right now. Specifically, it's
with dynamic link between premiere
and After Effects. I think it's going to be
just asier to show you. I'm not going to show
you how I create that because you already saw
that in previous videos, it's just like one of the
future video updates where I'll show you something for
inspiration for you to see maybe, you know, maybe you can really improve your workflow
through this as well. The way it works with dynamic
link, you select something, right click replaced with
After Effects composition. And I have to just go through
this every single time. Okay, let's go to desktop
and save the project here. Because when I was
creating videos, I would go into I'd
literally have to go into, where is this
templates, come here. And so this is the template
I have for After Effects. And every single time, I'd have to open it and then drag it here
and then open it. And basically, this is kind of the final thing
that I was going for. Now, it was unbelievably
knowing to every single time, having to go into the folder and then dropping
that into the project. So a solution I found, as you can see I have this pop up here called
Import template. And I have the set
and the import. Basically, I ask GPT, Hey, how can I solve this? And then I came up
with this idea. So with one button, I set which template I need
to use, basically. The second button is I have
to click on Import and it's going to import that
template every single time. So let's say I delete
this and delete, okay. So once again, we have our sequence here, we
have our graphic right. We don't have this big
small frame anyway. We don't have this
temply here, right? And when I click on Import, my arm is here and
clicking the mouse. Yeah, there you go.
It was imported. So I didn't press Command set. Just wanted to show
you that. So it's going to import this
every single time. If you ever worked with
templates, oh, my God, it's going to save so much time, and then you don't have to
have only one template. You can have many templates, one of the ways
that can be done. You know, just doing it once is not such a big of a problem, but then doing it like
20 times per video. Let me show you, like,
a very quick example. Okay, so this is kind of
where I was going with this, and I would in order
to create this effect, I'd have to use the
template every single time. Just want to share that quickly. By the way, please let me know
and applaud your project. What kind of templates you use? Because it's such an inspiration
to see what you guys do and for me to be able to improve my workflow and hopefully this
helps you, as well. So anyway, let me know the
project or in the Q&A section, and if you have any
questions, let me know. I'll see you in the next video.
5. Installing & Docking Your Plugins Like a Pro: In this video, let's
create a dockable panel. Basically, in order to
create a dockable panel, we might have to customize
our JSX file or our script, and then we have to put
it in specific location. If you're on Mac,
applications After Effects, then scripts, script UI panels, and on Windows, program files, Adobe Adobe After Effects, support files, script,
script UI panels. Now, it might be in a
slightly different location. The final folder
that you have to find is the script UI panels. On my computer, the location
is slightly different. So I have to go into
applications then After Effects, then search for scripts, and here we get the
script YUI panels. And then I have to just literally drag and drop
our file over there, like so, and I have to put the
password so that it works. Just find script UI panels. And now we do have to restart After effect so that
it can properly work. Create new composition, and now we need to
go into Window, and here at the bottom, we will have a texture
maker selected layers. Perfect. Now, you can see it already comes as this
interesting panel. Now, all we have to do is put in specific location like if we want to
put it on the right, for example, and now we'll
just always have it here. Even if I quit After Effects, I'm not going to save it, open After Effects, there you go. Now, it's just always
going to be here. Now, if you want to
change the name of it, we just have to go back
over here and change it. Let's call it texture maker and just put space
over here, like so. Because I'm making changes, I have to put in the password. Let's quit it, open
After Effects again. Now we have to run the
script again. Texture maker. It's going to appear, put
it there on the right, and it would be good to go. So that's how you can do it. Now, I also faced an issue with After effect
sometime in the past where it would
create a Joy panel. But then when I added it into the folder and
went into Window, ran the script, the
UI panel appeared, but the buttons did not appear. And so I had to just
literally go back to HGPT and ask it HIGPT, explain the whole situation, then just asked it to double check the script,
double check the script. I went ahead and do it,
and it worked perfectly. And you can actually
go ahead and write this script,
this script over here, which you'll be able to find in the downloadable
resources section to make sure that it properly
creates your UI panel. And then let's say you
want to get rid of that, just close the panel over here, and if you want it to
disappear from the window, if you want to
disappear from here, just go ahead and get it out of the script panels folder
you'd be good to go. So if you have any
questions, let me know. Other than that, I'll see
you in the next video.
6. How a YouTuber Built and Showcased Custom Plugins: In this video, I like
to break down what's possible with After
Effects scripting. Specifically, I'll be using
scripts by Jake and Motion. So big shadow to him, he created this, I'm not
taking anything from him. And you can actually go and
download it from his website. All you have to do is you just have to search for
Jake and Motion, and then you have to go
and search for this video, which is ChatGPT is my
favorite After Effects plugin. So go ahead and
click on this video and then go ahead and
click on download my script Scriplet and presets and then you'll be able to go ahead
and download it. When you download,
you'll get this file, and I do recommend you
reading the terms of use, which is going to be
the two files here. There's a lot of stuff here. If you want to run script
with the shortcut, you have to press Option
Command apostrophe on Mac or Alt Control
apostrophe on Windows. And here you have to
search for Run script, and then you can put a
shortcut for yourself. I M's case, it's Control R. So I'm going to press and
Control R to run Script. Let's open Jake in motion, and let's run a
make line script. So let's make a line, and it's going to make a
line super fast, super easy. Basically, instead of you
having to go here and then making a line,
let's say, like so, then having to go into,
you know, the stroke, putting a solid color, making it more than putting it
exactly in the middle. Instead of doing all that,
you can quickly run script, and that will be super fast. Then when you dock
it, for example, like here at the top,
super easy and super fast. Now that we have three texts, I'm going to press on
Control R to run it, and then reverse Layer order. Click on Reverse Layer Order. Okay, let's select all three of them and reverse layer order. Once again, very
interesting way to do this. This very last one doesn't work. I cannot say that these scripts
are super useful for me, but if you want to learn this, go ahead and explore it. I think it's interesting.
It's quite early. We can already create some very advanced scripts with this. But where is getting started, and then it will just come
to people who can really, really utilize this and
have enough patience to sit through this and
create incredible scripts. If you have any
questions, let me know. Other than that. See
you in the next video.
7. Capstone Challenge — Plan, Build, and Launch Your Own Plugin with ChatGPT: Video let's talk how to create and launch your own plugin. First of all, make a crystal clear decision what you want. The more crystal clear it is, the better the results
are going to be because there's not
going to be ambiguity. You'll know exactly
what you'll create and you'll tell ChatGPT
exactly what you want, then ChilGPT will be able
to help you with that. If it's a little bit ambiguous, ChatGPT might make
decisions on your end. You don't necessarily
want to do that. Make a crystal clear
decision what you want. Next, create instructions. You can either directly
tell to ChatGPT or you can ask ChatGPT to create instructions
for ChatGPT. Either create it yourself
or ask Cha TPT to help you. It gives you code, make sure
to ask it for the JSX file, then go ahead, open
After Effects, run the script and
see if it worked. If it didn't work, go back to HGPT and tell it to
solve the problem. A quick tip, send
it screenshots. If you're going to run it as
a script every single time, make sure to create a shortcut so that it's a
little bit faster. Go back to After
Effects and go back and forth with ChatGPT
until it's going to work. Once it works and if you want to install it as a dockable panel, go ahead to the folder where
After Effects is installed. Search for the path and
put your plugin in there. Once that's done,
just go into Window, open it up and make
sure to put it, so it just stage on the screen. If you have any
questions, let me know Bad than that. I'll
see you next video.
8. Last Step!: Congratulations to you.
You're nearly 100% done with the After Effects plugin
creation with ChatGPT course. There are just two
small steps you need to day. First, take action. As Kafuci said, a journey of 1,000 miles begins
with a single step. So if you haven't already, take your first step by creating
your first plugin. All the best information
in the world means nothing if you
don't act on it, and even small steps lead
to massive outcomes. Lastly, if you found
value in this program, I would really appreciate
if you could take 60 seconds to leave
you honest feedback. I will be immensely
grateful to you, feedback will massively help future students in deciding
the best program for them. Although this
course is complete, your journey has just begun. I'm excited to see
you plug ins online, so be sure to keep me and your fellow students posted.
Here for your success. So if there's anything
you need, don't hesitate to reach out and
give a section below. Thank you again for choosing
me as your instructor, wishing you all the
best and looking forward to seeing you
in future courses.
 Vladislav Sateev, Video Editor