Transcripts
1. Introduction: Hey guys, welcome back. In this workshop I'm going
to show you how to create the cinematic Randall
NVDA for SketchUp using a simple 3D arrows
model from John LOTRO. I choose step-by-step on
how to set up the model. You can see this is SketchUp
seen every set up the model, the landscape, and so on. And we create some nice renders. You also create some
renders for Instagram, where you can create some
cinematic renders like these using the fog effects
in media for SketchUp, also produce different
lighting scenarios using light mix. So you learn quite a bit in this quick masterclass workshop. And you can use the power of 3D within SketchUp to
create awesome renders. You don't need 3ds Max anymore. All you need is just
SketchUp and 3D. I'll see you guys in
the next video. Cheers.
2. Cleaning up the Model: Hey guys, welcome
back. In this video we're going to
download the model, set it up, and then take
it forward or legs. I'm going to use architect
centimeters for this workshop. I'm going to delete me Raj, delete those SketchUp model. And if you click on
Home button here, you can see that these
are near edges materials. If you want to clean
SketchUp file, then all you need to do
is go to Extensions, good extension of arrows. So it's for clean up. And then go ahead and download
and install this plugin. So once you've downloaded and
installed cleanup, three, all need to do is go to
Extensions, cleanup, click on clean, then click on clean up with the
default settings. And you can see all
those materials go away. Now if you only use
this template in your future ketchup workflows, then go to File, click
on Save as Template, call this SketchUp clean. And then you can also set it
up as a default template. Also make sure to mention the meters and then
click on Save. The next time when
you open SketchUp, you'll find this plugin
without the SketchUp figure. So SketchUp clean meters. But you can also load
in certain stuff that you probably use
in most projects. And that'll be easier
instead of loading them up each time you open SketchUp. Now let's bring in our model. So let's go to
Windows 3D videos. I'm going to use John
loot drops model. So this is the model that I'm going to
use, diamond cabin. So click on that. Click
on Download icon. Yes. Just place it in
the center of the scene. Once you've placed it, we can go ahead and clean up
this model a bit more. So I'm not going to be
using any of these trees because they wouldn't look
nice in the renderers. Let me just go to tags and see if there's a separate
tab for trees. That isn't. So all I need
to do is enter the group, select all these trees. Hold Control on your keyboard
to select multiple trees. And then press the
Delete button. Let's see if there's anything
else that we need to delete. This looks good. And all you need to do
is go to Extensions, clean up and glucagon
clean with last setting. So that would delete
the materials from the trees as well. Now we can go ahead
and save this file. So press Control S to save
and do a name for your file, and click on Save. All right, so we have
a model ready to go. The next videos, we will
start setting up the window. Since you guys in the
next video, Cheers.
3. Using Pureref : Hey guys, welcome
back. In this video shows you how to use pure tiff, which is an awesome
plugin to add fences and use those references before you start with your
end-all workflow. So you just had to pure F.com, click on get Bureau
of then download it. If you're using Windows or Mac. We can select the customer mode, set it at 0, and then
click on download. Now if you want
to help them out, I would highly recommend
that you give them some amount as well
because this plug-in or the software is pretty
useful and used by a lot of CD artists to
create that renders. So once you've installed, you can open PRF and you'll be introduced
to this blank screen. Now if you want to add stuff
into this blank slate, all you need to do
is for example, if I'm going to go to
Images, Google.com, search for, for
this cabin vendors and wait for something hazy. So let's copy this. You can just right-click copy. And then you can just Control V and it would
paste it in place. Now I can use this
as the reference and as a backdrop before
I start to render. The goal for this Randall is to create an atmospheric scene. So you can see, I've
collected images where there's sort of a fog
in the background, then I like this
bushes in front. So maybe we can implement
that in our own scene. And I liked the camera
angles as well. So we have a nice
scam language during this guy. By Twilio. There's also some waterbodies, so we can sort of try
and implement all of these elements in our Endo. Know what I Louis, I
sort of minimize this. You can also press Control a and then make it
smaller together. There's couple of useful options in the order that you can use. But the basic stuff, Just to add your images,
make it smaller. You need to right-click
to move them into orbit and then the scroll
button to scrolling. Once you scroll in, let's make it even more swallow. And now what I'll do is I'll open SketchUp and move
this to the corner. You're allowed to control a, to select all of it
and make it even more. Swallow. Make this smaller. And then I'll press
Control D. So this would make it kind of locked in the corner
of your screen. So if you press Control D,
this will lock this window. And now when I use SketchUp, I can always see
what I want to do. And it's a great way to
reference your stuff as well. If you're using two monitors, I would highly recommend placing this window on the other monitor and then working with
SketchUp or late. So that's how you build F. This is a quick tutorial
for you guys. I will be adding a
detailed tutorial on various other options you can do with bureau, for example, if I go to pure ref now, yeah, and then press Control
D and then that would make it go away. But if you want to
lock it, you just need to open press Control D or the other option is that you right-click and you
go to settings. It has various options here that you can
play around with it. For example, you can
arrange them optimally by pressing Control P back
and optimize as well. So let's try some of these. So if you press control, period, it would
optimize everything. If you press control and if
you press control shift P, then it would pack
them all together. So that is a quick tutorial
into using pure ref, which is an awesome plugin, which I would highly recommend
you guys to use as well. Once you're done setting up
or bagging abidance together, just press Control T to lock it. Make sure you are in PRF
and then press Control D, then altered LOC it,
and then you can go ahead and use SketchUp or let. So those quick tutorial to PRF, I'll be creating a
detailed tutorial, which you should
really check out on my YouTube channel later. Now let's stack in the
scene setup the views, setup the landscape, and so on. In the future videos, I'll see you guys next video. Cheers.
4. Setting up the Camera Views: Hi guys, welcome
back. In this video we'll set up the views. So first thing what
I'm going to do is setup a view from the front. So let me just draw a line
from this midpoint here. Gonna be a reference line
and drag it out to you. We can place our camera
at this point here. So let's go to camera, position camera
and place it here. Alright, that looks good. I can also use the
middle mouse button inside of Albert down a bit so that it's looking
up towards the house, which would make it a
little more dramatic. Alright, cool. You can also hold Shift and
the millimoles button to pan. And then you can bring
it down a bit more. And now we can delete this line and we can create our scene. Let's go to scenes and click
on the Add Scene button. And now I need to
update the scene a bit. So let's make it a
2 perspective to make the lines perfectly
horizontal and vertical. And then right-click
and click on Update. Now I'd like to
see how this fits with some compositionally grids. For example, the rule of thirds. So let's go to our asset at all. Let's go to Settings. Let's touch on interactive. Use our dx and I
use the Nvidia AAA. Like I always mentioned
the previous workshops. If you have an older system, stick to CPU and stick to the VDD and ISO for the
rest of the course. My kids have an
RTX graphics card, so I'm going to stick
to our dx and in video. Let's go render output
and such on safe for him to see how much of the
renders being rendered. Also genes aspect ratio from 16 to nine to face
the full landscape. Finally, you need to
change the field of view. So I'm going to press Z and I'm going to change
it to around 35. So it's sort of really
highlights the house. So you can see that
zooms in and is absorbed by the building.
So that's what I want. And now I'll just right-click
and click on Update. Now let's run an
interactive render. So this is our house. John Locke drop zones. So let's add a background
to this image. So let's click on
those layers button and click on background. And click on Browse to
Lord EXIF image file, which you will find in
the exercise files. So click on Grid to from
your exercise files folder. Click on Open and make sure you click this
as foreground option. So this would bring it in front. Alright, so now what
I want to do is placed his house in the
middle of these two grids. So let me do that by moving this window to the right and moving SketchUp
window to the left. And I can press hedge on
my keyboard to activate the hand tool and then
simply orbit on top. So this feeds more
composed because the place to a building
right in the middle of the scene and there's
equal spacing for this guy, for the
ground as well. So once you're happy with this, right-click on scene one
and click on Update. Now we'll add this
to this to VFB. So you can see that this is from simple exercise that I use. So I need to change the folder. So let's go to
Options, VFB settings, click on history, make
sure you click on Enable. Let's change the folder. So I'm going to go to
the exercise files and create a folder called VFB. And click on Select Folder, click on save and close. And let's add this
to the history. If we also need to do is make this a 2 perspective and
drag it down a bit more. All right, looks good. Now I can just right-click
and click on update. And we'll use this view for
the rest of the course. You can also set up other views, for example, in
beef from the same. These grids definitely help you compose your handles better. So I'll create a scene
for this as well. So right-click on scene
one, click on Add. Let's, we've created two of our compositions,
which looks good. You can also add this
to the history VFB, and we can proceed
with the next video. I'll see you guys
next video. Cheers.
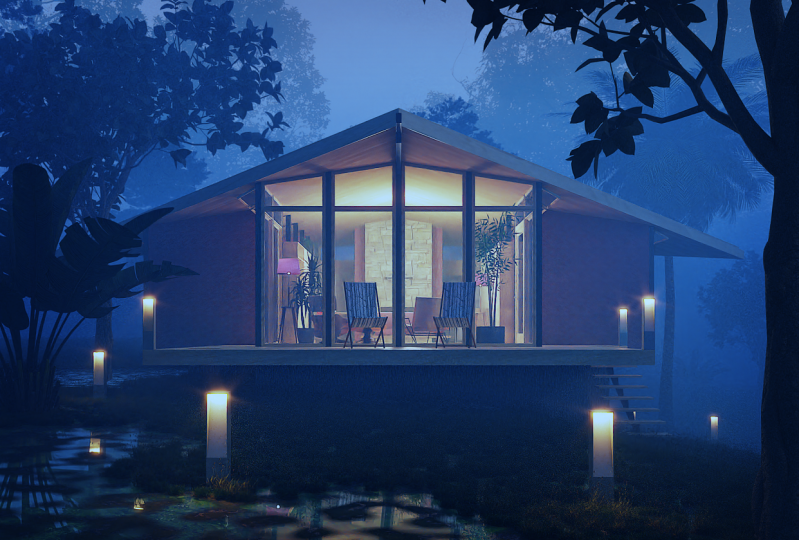
5. Setting up the Natural Light: Hey guys, welcome
back. In this video, we'll set up the lighting
in our scene and we're going to use environmental
fog and set this up. Let's go to assert at all. Go to Settings, and let's
adjourn volumetric environment. So there are two types of
volumetric environment. One as aerial perspective. In one environment to the fog, aerial perspective
generally adds a forgotten or missed
in your scene. Whereas there's more options and environmental fog where it adds particles such as
dust noise and so on. So you can select
environmentally ****, you can play around with both. And if you feel that a real
respect to works well, then you can go ahead with
the aerial perspective. But for this workshop, we
will be using environmentally select environmental forces that are various options here. So the main two options
is the distance at night, which basically denotes how
bad valgus from the camera. For example, this is set at thousand meters and the
height is set at 200 meters. So the fog would be at a distance of 1000
meters from the camera, and the height would be set at a distance of 200
meters from the ground. Now the color is the
color of the fog. You can change
this to maybe blue or orange depending on your
mood and your artistic taste. Emission is how much late
default grid Emmett. You can make it more
brighter by making this emission color white, dark. If you want a darker fog. And emission multiplayer
is increasing the intensity of the fog within the intensity
of the color. So let's run an interactive
render and tweak the settings and see how it
has an effect on the scene. So let's run the
interactive render. So now you can see that
we've added some fog. You can see that the focus is up to a height
of over 200 meters. So let's play around with
these settings here. I'm going to move
this to the radio, the SketchUp window
to the right, and really a frame
buffer to the left. So now let's change the color. You should also note
that this color is affected by the
sunlight colors. Well, that's why you
see some dust you. So let's make this
kind of orangeish. So and I wouldn't becomes
more orange in color. And if you make it more blue, you can see that it merges
with the sky color there. Let's keep it wait. If you want to increase
the brightness, then of course you can
increase the emission. And then if you change the
emission multiplayer to say, for example ten, you'll
get a brighter fork. Now let's play
with the distance. So you can see that
the distance set elaborate thousand
meters from the camera. Let's set this about
five centimeters. So now it becomes more foggy. It should be noted that the
fog is actually affected by the sunlight and the
GA in the sunlight, which basically
means how the latest bounced off from the surface and is scattered
through the fog. Now if you want more scattering
of the light in the fog, you can search on something
called scatter GA. So now you can see
that the light is even throughout the scenes. So this latest scattered
evenly throughout the scene because of
something called GA bonds. And in this case, with the scatter
bones is set out for. So basically what it means is that the lake would
fall on the wall, for example, bounce off
from the wall, it default. And then bones four times within the far fewer genes
is to say eight. You'll have more scattering of the light within the scene, so forth should suffice. Now let's change the height. For example, if you set
this at a 100 meters, you can see that the
fog aid comes down. This is set at three
meters from the ground. So there's not much of
a fog in the scene. So ideal height would
be around 100 to 200. That said this, about 300. And I can see that it's
completely enveloped by the fog. Maybe we can set this at a 100, playing with default
because also being more artistic till you find the
right light in your scene. Alright, This looks cool
where we have nice bug in the render when we add more
lights, trees and so on. That Endo would pop. Alright, so I'm
going to stick to these values for now and I'll change this as we
progress with the vendor. Next is effect. So you can see that it gets affected by various
elements here, which is the camera trees, the background and
the secondary rays. Gamma rays is the main light
ray which hits the surface. So if I switch this off, you can see that no default
goes away completely. And secondly, this
is the second, third light bounce
from the main room. So you can see that really
doesn't affect the scene. And a fake background is if
you don't want the fog to be affecting the
background and you can switch off a fake
background as well. But ideally, you need
to keep all three of them on for a good
part to stick around. And finally affected by, you can make this fog get affected by only certain lights. So you just need to click here and click on Select plates, and then select the
appropriate light. In this case, we just have
our sunlight in the scene. For now. We can leave all, let's pick on. You can also, of course,
play with the camera. You know, for example, if you want a brighter scene, you can search on
camera and change the exposure value to
say, for example 12. That would make it a
more brighter scene. So if you change
the values here, so if you make this 12, then of course you
would need to change the values here is well known. For example, if I
set this to 600, then that would make it a bright, foggy
interactive render. So you would need to first
set the right camera value. But in most cases and
architectural renders, a value of around 14 works well. If you want to see the exact
aperture, shutter speed, and ISO of this value, you just need to go to advanced
camera parameters here. And you can see that
the ISO changes. So let's set our aperture
value of four here. That would make it
more hazy and we can leave the shutter
speed to around 200. This is also playing around
with those values here. We should want to make
it more darker than you would need to increase
the shutter speed. So that would make
this even more darker. It's almost as working with
a real-life DSLR camera, where you need to tweak
the right settings to get the lighting in your frame. So I'm happy with
this layout setup where we have enough hears. And now when we had more lights, like the interior
lights and so on, either end, we'll pop. So I'm going to add this
to the history of MI and proceed with the rest of
the videos in the course. I'll see you guys next video. Cheers.
6. Using Trees to tweak Lights - Vray Scatter: Hey guys, welcome
back. In this video, we're going to
make this lighting a little more better
by adding trees. And you can see that
from this window. Also, if I did a before and after from
the previous window, you can see how much
of an effect there he is as on the scene. So it's always nice to add an environmental fog to make your renders most
cinematic in nature. You can see that
this ground is kind of more brighter than
the rest of the scene. So you can make this
darker by adding certain trees and also certain
elements in the scene. So let's first start off by
adding arteries in the scene. So let's go to chaos muscles. You can update girls cosmos. If there is an
update available for you to lab date in
the background, Let's go to 3D models, vegetation, and click on trees. These are the various trees that girls cosmos has to offer. But in our case, since
we have a forest, Randall and since
we were trying to replicate more of a
winter style forest, we're going to add some
coniferous trees in our scene. We can add those red spruce. Simply click on
Download, click on Add. Now if you'll see this option where he will add the trees, you can just simply closed scales cosmos and
open it up again. Then you can add it
into your scene. Alright, so already please, NRC. Let's see what these
are called as well. By the way, if you want a dark the default or you
can drag it to the right and darker color
that red spruce 010203. Now there are two ways to
scatter teeth in SketchUp. One is the native 3D scatter
surgery. How to use that? So for that I need to
explore this model. Right-click, click on Export. Now we have this eight separate, the three separate as well. And you should also
note that for this to work in various Gatto, you do not have an
option to exclude objects like you do in scattered
tool by Lyndon software. So you would need to draw order, make your topology in
such a way that it has openings and that would avoid
any trees in these areas. So let's start with
various scattered tool. All you need to do is
select this object. And then from your relay
utilities toolbar, you need to click on
Scat or selection. The student make it
a scattered host. And now we can add the
scattered objects as well. Do that Goliath's
head to their toe. And then first
select your trees. Go to your scatter
geometry from Louis the acid at Udot and
click on add guests. So now you can see
that it scatters these trees all-rounder surface. Now the density is a little too much so I can reduce this. So let's try 0.1. Bind one feels a bit too
much as well, so 0.05. That looks good.
You can also change the probability
of certain trees. Now I liked of Red Spruce
one a lot more than others. I'm going to reduce the
probability of these two. Let say 0.1.05. I can
further reduce the density. All right, This looks back over. You can see the trees are
scattered all around the host. Now you can play around with
these settings as well, where you can rotate the
trees to a certain angle. Also scale them up to make
it even bigger. Radius it. So 0.9 to 1.2 is a good scale. And then you can also
reduce the number of trees that you want in your scene by reducing the preview percentage. Now if you don't
want it to ease to intersect with each other, then you can switch on
collision detection, and then the TAs will intersect
with each other as well. Finally, you can play
with the seed value to change different
orientations of your trees. So maybe C2 works well. I have some space for
the camera as well. Don't want to go with C2. And now there's no
option to generate. It'll actually show up once
you're on interactive render. Let's go to Scene one, and let's see how this
affects the scene. Alright, so now you can see
that the entire scene gets a lot more darker because of
all these trees around. And the reason is because it's not scattering the
light onto the face, it's sort of blocking the light. So what you can do is you can go ahead and go to settings and
you can make this brighter. We're reducing the
shutter speed. Now you can see that it becomes
a little more brighter. And you can also notice that the light is falling
on this side of the wall is because
there's some trees you're blocking the
light towards the house. Let's try to fix that as well. So I'm going to stop
the interactive render, going to add this
to the history VFB. And let's check our
scatter settings again. You want to see
the scatter again, you just need to select the host and click on scatter viewer. So now you can see
these trees here. So you can see that these trees you're blocking the light, especially are a lot of t. So it's also important to understand the angle
of the shadows. So let me just switch this off for a bit and such
on the shadows. So view shadows. You can either change the
shadow angle to make sure that the latest
falling on the house. You can't really switch on the scatter viewer and then see the shadow of
the tree is because it's an odd generated the
tree on the object that's generated as a proxy view which opens or LEA in your
weekly interactive. So if you want to see
this, so for example, these two Easier or
blocking the light falling on the hose. So you can either
Chandler shadow settings or you can
remove some trees. So let's start with changing
those shadow settings. I'm going to go to
the shadows here. So you can see that's
the evening sun. And you shouldn't
need to know where the evening sun is as well. So this is the NADH, so this is why in the shadows
falling this way. Let's maybe make it more to the known or genes though month. That is. So now you can see
the shadows are shorter. So we set it at
our own June where the shadows overhead and
not too long in nature. So let's use these settings. So let's go back to Scene one. This changes to June and
then update the scene. And now let's run
interactive render. You can see that it's
back to being hazy. And you can see a lot of nice light coming into
the scene as well. So that's pretty cool. Let's add this. Today's
through here p. So that is one way,
maybe not too hazy, so maybe we can change it
back to maybe September. Let's see how the shadows are. Shadows. You see some
light like this. Looks cool. Update the scene. Let's
run interactive render. This looks better. We have more dramatic
lighting in the scene. You can't see the
light deal because a lot of trees are
blocked at late, which is our late, but that
is the focus on the housing. So that's what we need as well. You can see these three shadows falling on the others as well. Alright, so and always stop the interactive render
this to this GFP. Now, sometimes happens where you don't see the
preview of the law, but it's actually there. So if you switch
on a and B here, you can see the difference
between the previous dose. Alright, so I like
this lighting setup and we can proceed with this. So right-click and
click on Update. You can go ahead and change
the orientation of the trees. We can maybe remove these
trees here as well. And just choose the
various categories. So let's switch on this and
let's change the seed value. So let's go to the asset editor. Go to scatter your G
and the seed value, maybe try three this time. I like this seed
value, which is seven. We add some trees here and we have some trees
covering the whole thing. They should work well. Let's check that those
seed values as well. Seed 15 also looks cool. Alright, so let me
try with seed 15. Go back to Scene one and
run interactive render. I didn't like this branch you're jotting out
into the scene. So I'm trying out a
different seed value. It's an a. You can see there's
more light in the scene because less of the trees
are scattering the late. Maybe seed 15 doesn't work well, so let's try something else. Let's maybe try 77. Looks nice where
there is some light. It makes the bone dark. And that is light
entering from the side of the scene as it I'm
happy with seven, and we can proceed with lighting number seven
or seed value seven. I'm going to stop the
interactive render. We're going to proceed
with the rest of the course with this
lighting setup. So I'll see you guys
next video shows.
7. Adding Artificial Lights: Hey guys, welcome
back. In this video, we're going to add some
artificial lights in our scene and make the
scene look much better. So this was the render that we got from the previous scene, which looks pretty
cinematic in nature. So now we need to add
some lights in the scene, especially the interior lights, some lawn late as well. So to start off, what I'm
gonna do is I'm going to select this material
using the bucket tool, which is B, and
I'm holding Alt on my keyboard to sample
paint material. So you can see it's
called material. Can change the name
of the material. Yoda is when someone will
call this a class material. And then that will
change an acid, a dog. So if I go to my settings, you can see that it changes
the glass material. So let's make this
a glass material by increasing the reflection too full and increasingly
refraction to full. So this would make
it a glass material. If you want, add it
into this class, you can change the full color. If you move the
slider to the right, and then that will make
it more bluish in nature. So let's just move it a bit. So there's a little bluish
class tent on the material. Know what I'll also do is in the bottom we have an option
called can be overridden. So I'm going to switch this off. I had when I had an
intact or Endo with material override on this
medial border and get affected. So we'll go to Settings, go to material over
eight and so on. You can see that all the
machines get overwritten by this color material
except for the glass. Now if everyone has seen one
in London, check the render. You can see that
our glass material is not affected by
that material on it. So I'm going to add
this to this to VFB. Start off by adding
some interior lights. Let's see if there are any
tags to switch off the walls. That is on a great
job, the roof as well. Now we can play some lights. Start doing those as well. The best way to light up your interiors by
using a sphere late. I'm going to add
the sphere light from the video lights toolbar. Click once, click twice
to place a sphere late. And also make sure
to mood on top. So I'm going to paste
once you later. And I'm going to
copy this violate using the Move tool and
place it here as well. So we have to see your
lights in the scene. I'm going to change the
settings of the shear layer. So let's go to Window, go to Settings, correlates, go to sphere late and click on options and make sure
those sources invisible. You can also increase
the size here, so you can make this
bigger or smaller. We won't be changing any of these settings because
we will change it in the light mix on red so a
place to store your lights. Now, I'll go to my asset
return ADA late mix. So let's click on read elements
and click on light mix. Now what I do is place a
rectangle laid on our video. So let me just click on
rectangle right here. Click once, click twice to
place a rectangle late. It should be facing
from the top. So I'm going to move
it on top first, maybe the bottom of this object
here, and then rotate it. I'm using the arrow keys
to change the angle of the rotation or the orientation
of the Rotate tool. And then I'm moving it up. Make sure none of
these lines are intersecting with any
SketchUp objects. Right? You can also hold Control
and Alt to sort of move this light uniformly
from the center light. And then I'll go
to assert a toe, go to rectangle light, switch off the source for
this rectangle later. What I'll also do
is I'll change to a directionality so there's more light falling on the chairs. Finally, you need to go to
settings environmental fork, and then you need
to select which of these later getting
affected in the scene. So click on select plates. I'm going to select sunlight and rectangular late
because it's placed outside the sphere layers
and save the scene. So I don't want it to
get affected by the fog. You go back to Scene. One, can see all
the tags come back up because that is
switched on in the scene. And I'll run in
interactive render. It. Now I go to Source late mix. I'll increase the value of
the rectangular light at, say, let's make it ten. Now you can see that sort of effects that the entire
front part of the scene, and we can also
change the color. So you can click on
the color option and make it sort of warm. Then we can also change the values of the
sphere light inside the window that switch off
the rectangular light. So you can see that sphere
light inside gets lit up and let's change the
values here as well. You can also increase
them a bit more, make it more brighter, or you can add more lights
in the scene. That looks good. Now, when I switch on the
rectangle late in front. So to add some extra noisier. So that's not ideal. So maybe we can just reduce
this value, may be 22. And that looks better on it. What I'll also do is a lot just to photographic composition of the Randolph
because you can see more of the ground
and less of this guy. So I'm going to stop
the interactive render region only
use the hand tool. So I activate the
hand tool and then simply just move it up a
bit, then update the scene. So let's run in Tracker. And again, we can move
it a bit more up. And this looks a little bit better than the
previous composition. We can add some lights
on the ground as well. So I'm gonna go to Windows. 3d. Arrows. Search for boatloads, is going to add the first molar late and place it in the scene. So now what I'll do is
I'll just more than please use the move and copy tool to place this at various points on the ground. You can also have control twice. Then you can place
this anywhere in the scene without having to
get it off the Move option. All right. Hopefully
this is a competent. So now if I add a
light to one of these competency toward
Adelaide, to all of them. So let's enter the group. You can see that we can
select this object here, which is a circular glass. So you can enter this
competent, select this group. So you can see it
selects a group of all the similar competence. And then we can click on
Convert to mesh late. So that would make
it a light source. And I'll go back to skin one. I'll go to my acid and
it will go to Settings, go to the render elements
and co-relate mic settings, and then change the group by in digital age two
groups for instance. And what this will
do is instead of listening out each
late one by one, it will group these
lights brain instances. So I'm going to click
on Group By instances, and I'm going to run
an interactive render. It's an all you can see
these Bowl ads coming up in the render as
well, which looks cool. And we can change
the values here. So let's say if you change
the mesh late to save ten, so that will make
the bullet late more brighter and altering genes the color of the
bullet late, make it warmer. And then we can exchange the
rectangular late as well. Maybe not use the
rectangle late as much. Just keep it out on two genes. The color to warm
increases fewer late, and then make this
warmer as well. 20 works better. Now what I'll do is
I'll add some layers. So let's add exposure layer. Let's increase the
exposure a bit more and make it brighter. And if you see that there are some highlight
bonds in the area, then you can deduce dilate bonds and increase the
exposure a bit more. You can also increase
the contrast. Let's add a curve, sort of make it boost the highlights and the
shadows by making an esco. And I can also try switching on the lens effect to just
boost these late TO fairly, you can add a weight balance
and make it either more warm render or more
cooler temperature. And just keep it in the middle for now
and change it later. While it's Will you please start artificial lights as
well, which looks nice. And I'll finally see
it as late mix out because I don't want to
keep changing the value 0. So click on save and
call this light mix. And click on Save. By Leah does to these two VFB. And let's do a before
and after January. The light makes only works when the abiotic mantle
is not activated. Alright, so we've made good
progress in the Endo sofa. Now we'll start tweaking the materials and set this
up for our final end up. See you guys next video. Cheers.
8. Adding Grass with Vray Scatter: Hey guys, welcome
back. In this video, I'm going to add the grass in our scene using the
VTA scatter plug-in. Alright, so NVDA scatter, you can't really add two
different compositions like you do in scatter to which I will be explaining
in another video. So what you need to do
is move this object up. So I'm going to
select this host, use the Move tool and move
it up by 0.01 meters, which is around ten. To move this up now and
right-click and click on export. Now you can see that
line goes away, which means it's not a
scattered object anymore. Let's hide this. But this is
still a scattered objects. So we need to select
the scattered object, can click on the edges
here to select it, and click on F2 to hide. Or you can go to Edit and
click on Hide as well. So now we're going to add
a new scatter object, selector host and click
on Schedule a selection. Now we need to add some grass
elements into our scene. So let's open chaos cosmos. Let's go to 3D models,
which station? Floss grass and rocks. And then you scroll on
the bottom and find some nice glass elements. I'm going to bring
in Vegas seven, the scene, and six as well. Let's see if feeding
grass eaters good. Yeah, we got to
eight. There's more thick and that's what I need. So you have two elements. Now we'll just go
to our accelerator TO called a geometries. I'm going to rename this
because this is scattered tree. And I'm going to rename this because this is scatter graphs. Alright. Now let's
add our guess. Select elements first, and
then click on Add guess. It's an a, you can see it starts scattering on this ground. There are a few settings
you need to change. For example, here, I
would like to scattered objects to follow along
the normal of the surface. So there's change
the orientation on the world up to a long normals. So now you can see it
comes on the slope is red and let's increase
the density to say dorky. So now you can see that
it scatters pretty evenly along the entire surface. You can leave the rest
of the settings as-is. And now we can go back to Scene one and run an
interactive render. Alright, so now you can
see bluegrass elements. Let's switch off the
material lower rate. So let's switch off
interactive render, glass or Toko to settings and switch off
material over eight. And let's run the
interactive render in the frame buffer or in
the SketchUp window. So you just need to click
on the viewport render you. And now you can see the
grass in the scene. How cool is that? We may have to
increase the density. Let me stop there and
let me also switch off volumetric environment because I want to see the material better. And let's go to scatter
graphs and increase the density may be to 40 and render with
very interactive. I generally prefer using
really interact with, but you guys can use the
viewport render as well. So now you can see that the
grass material comes in. It looks nice and gives a very realistic field
to the render as well. Then you can see the
lighting in the scene. If it feels a little too much, then you can reduce the
lighting and say, look good. And we can see that
there's a lot of shade in this part
of the render. I would like to bring in
some light into the scene. Now let just say John
Doe environment as well. So let's switch off our
interactive render settings and such on the
volumetric environment that's around the
interactive render. Settings seems to
have been changed. So we love to do the
odd to start again. Let's switch on scattered GA to scatter the light
throughout the scene. And let's see in the distance, get a more foggy effect. Now you can see that
there is no light here. Even if I switch off
the environment light, you can see that it's covered by the police surrounding
this house. So what I'll do is I'll stop the interactive window and I'll go to my scatter settings. And then sort of reduce
the density a bit more. Keep it around 0, and see how this has an effect
on the scene points. If one seems much so 0.001, that seems to have reduced
the number of trees. Let me just try. 0.005 is okay. Now there's hardly any
trees in the scene, so maybe bring it closer. 0.009. Let's turn interactive render. It seems to be the same. So to stop that Endo, you just go to the top view for better understanding
of the trees. Let's bring this down to 0.005. Alright, so that's definitely
reduce the number of trees. Alright, 0 to, let's
see how this looks. That switch on the fog as well. Make sure the lights are only affected by the rectangular, the sunlight and the mesh late. I agree. So now you can see
there's some light on the ground as well. I would also recommend
that you removed the scatter for trees and place the trees manually so
that you can sort of add some shadow effects on
the ground here as well. Or you can use the existing
scatter of the 3D trees and additionally play some trees to add some shadow
effects on the Chrome. I can do that quickly
to show you guys. So I'm going to switch
off the 3D preview of the scatter element because it's a little CPU intensive. And let's move these
trees in place. Going to move on here, let me see how the shadows
are falling in places. Well, so you can see that the shadows are
falling this way. So I'm going to play
some trees this here, and maybe play some
crazier as well. So now if I switch on shadows, you can see that it covers
that part of the ground. Let's go back to Scene one. Maybe move the tree a
bit more in the frame, the shadows and see if it's
falling on the ground. It is. You can see that it falls on this part
of the ground here. I'm just going to
move it out a bit. Alright, that looks better.
Let's go back to Scene one. Let's run it under view-port. Now you can see that we have my shadow effect on the ground. Now if you want to
make the shadows most often, you can
do that as well. Just go to your light settings, color sunlight, and just change the size
multiplayer to say three. That will make the shadows off. Let's go back to Scene one. And we have a final render. You can go ahead and increase the density of the
grass as well. So for example, just go to our scatter settings your grass, and let's increase
this to say 50. And now if you run
interactive render, you may have to
increase it a bit more. Let's increase the
probability of FieldGlass eight because
it's slightly bigger. So we can reduce field R7
to say maybe point one. Then let's run it. And now you can see that most
of it is covered. So far, a few patches urine then you don't have to
worry too much over these patches because I'll
be showing you how to use a mask material and create some green moss in
your land as well. Alright, so in the next video, I'm going to be using
the scatter to plugin by Lyndon software to use
the trees and grass. Because that is more
creative flexibility with scattered through as
it has a lot more features. And I will be showing to
you in the next video. If you do not have the software, you can skip the next
video and jump to the final lighting and final
render of this workshop. So I'll see you guys next video. Cheers.
9. Adding Trees with Skatter 2: Hey guys, welcome
back. In this video, I'm gonna be using the
scatter to plug-in two scattered trees and
grass in our scene. So the first thing I'm gonna
do is delete the top plane. We already going to
use the downplaying. You also need to delete
these cat objects. So let's open answered at all. Let's select Scatter tree
and click on Delete. Alright. So first let's create
the recomposition. So click on the
composition and tutorial. We're going to create
a new composition called the street composition. Let's select the whole so click on big surface to
select the host. Click on that again,
select the host. Now you can see the
different points that it's going to
scatter the tree. These are quite a lot
of points for trees. So we will have
reduced the density. So we can drag the
slider to the left. So that you can see that definitely reduces the number
of trees on the plane. And we can also add
objects to exclude. But first let's just add
just scattered objects. So click on this button, you'll create your objects
and select all the trees. If you selected the
trees, three of them. And you can see that
still feels a little too dense so we can reduce it. We can also create a mask. And Moscow the areas where we don't want to see the trees. So let's click on
Add a paint mask. Let's increase the mass size. And now when you start painting, by clicking and holding,
you can see that trees are created early on
this painted area. But if you click on
the Exclude object, then it would exclude that
area and not add trees. There are cooler that. We can also scroll to the
bottom and set the scene. For example, if I said just seen one switch on,
exclude monetizable. You can see that none of
the trees show up here. How cool is that? I can also
increase the camera offset. So you can see that this
is the camera point here. If you increase
the camera offset or sort of degrees that
make the value mode, you can see more number of
free showing up in the camera. Again, definitely reduce
the number of mask to easier by using
the clipping plane. So the switch on
distance clipping and reduce the distance. So let's keep three is up to about 55 meters,
which looks good. And we can of course
reduce the density. Now you can see we have
only these mini treats, which is perfect for leucine. Now we can also randomly
rotate and scale. So let's click on random
scale transformations. And scalar from a d11 Burundi equally on all
three coordinates. And then we can also randomly translate if you want to
bring the three down. And so on, are more the x and y-coordinates and
honorably rotate as well. You can rotate it didn't
0 to 360 and mode. So let's just keep
it a little 3 16th. You can also of
course, either be gammas in case you want
to hide certain trees. So if I click on B2 Moscow, and if I add it, add to it. You can see that those
please go, goes away. Similarly close to
the camera as well. So what I will do is
I would switch off, exclude non-visible NL, add
a mask to hide some trees. So let's go back, click on Edit. Let's just create Hamas debt
that on the camera as well. So somewhere here. Now the latest falling from
this direction. So maybe I can just
delete the two easier. So now you can see that we have more flexibility with the trees. Once you're done. Instead
of clicking Generate now, you can click on
Render Only mode. And these trees will only show up in the interactive render. Let's click on Generate array
to regenerate the trees. I didn't mix some changes so that there's more
trees in the scene. Now let's run the interactive
render before we proceed. Let's go back to Scene one. Now I can draw this
tree, of course sometimes a new
generated to ease our grass in scattered to it adds that object
to the origin point, which is 000 seconds.
Right-click unlock. Let's go back to Scene one, grassland to go to settings and take on
the endothelium tract. We've got quite a lot
of trees in the scene. Let's adjust them a bit so we can remove
these kind of trees. Stop the render. Let's see
where the shadows are falling. So you can see that
these trees are creating a big shadow here
so you can remove those. Alright? So I'm going to select all of these
trees, what to say? And I'll open the composition
editor and click on Edit. Can see there's some
nice light coming in. Let's maybe edit the mask. So let's go to the mosque here. And since the shadows
falling this we're just going to easier and
easier as well. Alright. So we have one then
some trees around. Let's see how this looks. Click on Generate,
go back to Scene one, render 3D interactive. So now you can see
there's lesser shadows, are hardly any
shadows on the ground and owns pretty bright. So we need to adjust
the settings. So let's make the
exposure value 14. That will make it darker. And let's move it to ease
around the house a bit as well. You can see that it's sort
of engulfing the house. Click on edit your trees around. Me, add some trees here. So we can just click
on the eraser tool and then delete some of these
mass to add the trees. Right, so added some trees. And click on Generate and
go back to seeing what. Let's run in drag to
render in the viewport. Let's see, you can see
that the houses and golf B-trees know tweezer that so you don't see
shadows on the ground. Now if you want to
see long shadows, you can make the shadows logo. So that would work better. We can do that as well. So I'm going to change
the shadow settings. Let's go with shadows
here and make it longer. But you will see
the shadows update. Can see it becomes rather
315 seems a bit too much. So let's keep it. Forty six. Forty three. Twenty three, looks good. Let's go back to Scene
one. Update that setting. So let's change this to 14. Now you can see that we
have some nice shadows on the ground as well. So
we're getting there. The scenes industry too dark. You can of course adjust
the environment settings. So let's go to the settings
here and maybe change this to 700 or even 800. And you'll see
more of the house. And then of course, if you need softer shadows on the ground, you need to stop sons settings. So you can increase
the size multiplier and that would make
those shadows off to want to save this file because you made
good progress so far. 19, We made a few set of where decent
lighting setup as well. You can see that Agassiz's k, so the composition
is coming to life.
10. Adding Grass with Skatter 2: So now I can add some
nice glass to the scene. We've already added our objects from the kiosk, cosmos slavery. If you haven't added it yet,
taking this call together, cosmos n3 models vegetation
as grass and rocks. And when you scroll
to the bottom, you find these field glasses. What I'll also do is add some of these mexican weather droughts. So just add that in. Then golfing that. It's more to the side. And let's see if we need
maybe this as well. Alright, great. And maybe even these
giant feather grasses. But first a will
scatter domain grass, which is fields as 78. So let's select the host again, create a new composition
called this class composition. Select doest. And I'll let select the grass. So click on the scattered
objects, select these two. Now you can see it
starts scattering. So let's increase the density. You can see that it's sort
of just scattering this way. So if you want to
scattered along the slope, all you need to do
is go to binding and make sure the normal
is up to a 100 plus it. Now you can see that
starts getting along those slope is or even
give it to around 89. To keep it up to a 100. You get that nice
scattering effect. Let someone to do the
same for the grass. So I want to exclude
non visible objects. Then we'll click on scene
one, exclude non-visible. So now you can see it reduces and also switch on
distance clipping. Reduce the dissonance, further. Increase the field of view. And it is the distance
that looks better. Now of course, I can
increase the density. I can also tend to really scale. Let's increase the
scale size to see 150. And we translate
randomly rotate. Let's increase the
density of bit more because I see
some badges yet. So let's make this 50 maybe. Let's increase the
size to about 100. And let's click on Generate,
regenerated our grass. Now let's go to Scene one. You can also sort of a
mosque god. Certain regions. Maybe if you don't want class around this area,
you can do that. So let's do that quickly. Let's add a mask, excuse the size of it. So I'm going to draw a pathway
from you around the house. Once you've done that,
click on inward. Let's add a mask again. Sono, you can see that it's
added the grass around. So you just need to click on inward and the grass goes
away in those areas. It's further add the mask.
Great, It looks good. So let's click on Generate. And what I'll also do
is move our fingers. Also the gamma point, and move this away. Let's click on scene one. And let's run an
interactive render. Before that, let me just
pull this in place. Then I'm going to move it down and see what kind of
an effect we get it. So that's what I'm
interactive render notion. Definitely see that last change. Some nice graphs in the scene. Let me just lock this and
move this to the side. Slope, the camera orientation. And now what I'll do is
I'll move these in place. So now you can see
some of that glass coming into the frame, which is pretty
cool. Down a bit. Maybe by 0.1. I like that effect. You can, of course move away
from the camera as well. Let me hide these. Now you can see some
of the grass in the scene, which looks cool. Let me just bring it back. Delete these,
maximize the window, go back to Scene one and
open the frame buffer unlocked or you stopped a really interactive and
re-render the scene. Alright, so now you can
see that end up better. Let's move these. Don't
like it like this. Just sort of coming
out from the class. So I vendor's company lives. And next few videos we'll set up the materials and then
set up the final Nando. Don't forget to add
this to the history VFB is I'm going to
stop the window. Go to my history
VFB, then add to 0. I'll see you guys
in the next video.
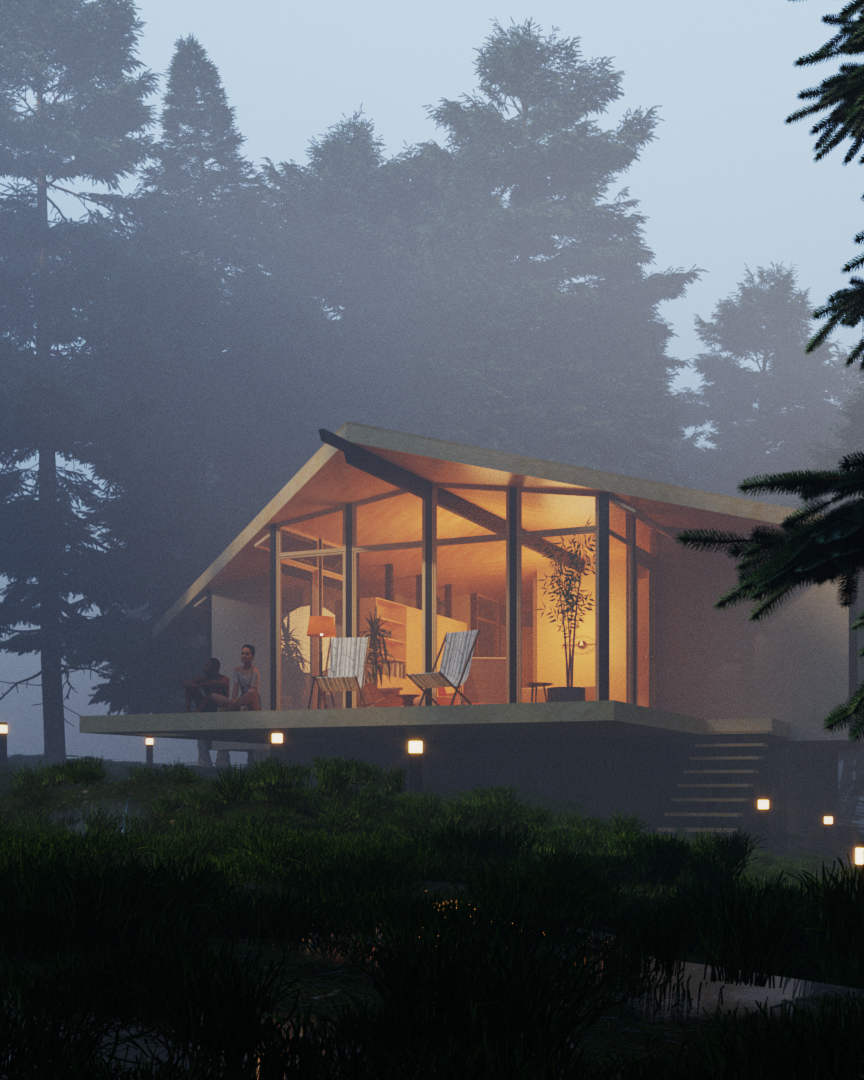
11. Adding a Stream Effect in the Scene: Hey guys, welcome back. In this video I'm
going to show how to create the green algae
material or maybe even like a soda
stream water material and then add it to our scene. To start off, I'm going to
open after that though, I'm going to right-click
on my tools and click on blend material. Renamed the scholars blend
mean the bed material will have two or three more materials based on a base material
and a coat material. So let's create
the base material. Right-click the
concentric zany endless. Call this blend mean blend base. That is, Let's create
another material. Rename this and call
this blend code. Right? So the base material, I'm going to make it sort
of grass texture material. Or what we can also do is we can use this material which
is vegetation, honey local. Use the bitmap, you know, I forgot to say the bitmaps. I'm going to quickly see that
so-called extensions file, but editor, want to select
all of these materials, click on archive and repacked. Create a folder called maps. We're going to see
these bitmaps there. So now what we can do
is I can copy this, go to my blend base material, be AS220 and the next slot. Now let's go to the main
and then main material and add the blend base
to the base material. And let's add a
code. So the code is going to be a
reflective material. So let's add some reflection
and refraction this, so this would make it sort of
reflective water material. Now let's add that to the code. So let's click on Add code. Let's add blend code here. I can see it makes a deflector. I just want some parts of the ideal to be
reflective and not all. So I can add a Moscow. Click here and let's add
a noise, a material. We can increase the
frequency to make it bigger. And we can increase
the amplitude. So the white parts
would be reflective and the black parts would
be less reflective. Alright, let's try
something like this. Reflection being applied only on the green part with them. Alright, so now we need our play those plant-based
material on the ground. So let's select the ground. It was the bucket tool.
Make sure it's blend mean, and then apply the material. Now you can see
that it's applied. Let's increase the size. So let's go to Edit, make it to meters. And what I'll also do
is I click on tripe renal production work so that the UEs are
mapped properly. Does looks good. Now let's run our
interactive render. Before that, I need to create a stream using the
composition Editor. So let's go to Composition
Alto, photographs composition. I'm going to create
a stream that flows around this part
of the class site. So let's edit the mask, making about two
meters long and simply drag a selection like this
from one end to the other end. You can see that we
create a nice stream. Now let's see how this
looks in the scene. But don't forget to
click on Generate. Let's go back to Scene one, and let's run our
viewport render. You can see that green
grass material or that most material on the model. Zoom out. Let's sector
composition editor for the gas. We may have to
increase the density because you can see those
patches here and there. So let's increase the density and also reduce the
field of view on gender. As I've just starting
material a little bit, which is a blend main material. Let's make the base
material the water minute. So let's change this to blend. I'm going to rename
these scholars water. Let's change the code medial to the base material.
This looks better. Name for it. So now you can see that we have green material blender on top of a water medium,
which looks nice. And we can of course, adjust the settings to see
more of the green material. All right, so now let's
go back to Scene one. Let's hide this for now. And let's don't know
viewport render. This looks much better. Can see a stream flowing
through as well, but some patches you are
in the green angrier. Let's see how this looks with
all the environment lakes, and it will switch off
the environmental fork. And now you can clearly
see the automated. Let's go back to Scene one. We could maybe add more, add, make this dream
a little bigger. So it seem more of the
stream and then the grass. So you can do that quickly. Let's go to Composition editor. Click on gas composition edited. Let's edit down mask. Let me just make this bigger. Let's erase some of
the mask because I wanted to see more of the
grass at the background. You know, you have a
small stream flowing in. Alright, let's see
how this looks. We can definitely see
some water in the scene. So let's run interactive render. Now this looks pretty cool. Green alga effect as well as to John Doe, environment fog. We have the reflection of
the light on the interior. Elizabeth, how cool is it? Let's switch on the
environment or fog and then run interactive render. I may want to adjust the
green moss material a bit because I don't like this
texture showing up like that. So let me just stop the render. The materials. Select the green coat material. I'm going to move this. I'm going to just select
some green from here. That looks better. We can of course add a bump
to it. You gotta bump. Let's maybe add some
noise frequency. You can see that
nice bump there. Maybe reduce the bump. You
have a nice bumpy material. Let's run interactive render. This seems a little
too saturated, so we can just go here, make it darker, and we try adding a material from
girls cosmos instead. Let's go for this
grass tree roots. The grass tones and sticks. And let's add that to the code. Let's run an
attractor and again, alright, so I'm happy with this. Maybe it looks
better than before. Lollies get into the habit of
using realistic materials. You can always also
learn from how chaos cosmos have created
that materials, for example, this may together you
can see that just as a bitmap and also has a bump map and some
reflections as well. Reflection maps. I don't like the spot,
so maybe I can just delete that part from
the competition editor. And maybe just
erase some of this. But let's click on Generate. Go back to Scene one and see how the composition looks in scene
one. It's going to delete. Someone, asks you, because I want to see
more grass in front. And then I'll create
a mask again. This is a CPU intensive process, so you definitely need
a good system to create glass materials or
grass and 3D SketchUp. So I'm happy with this. Let's
see how it looks in Z11. Can see some grass in front
and then the may to use them. Then the stream there. So let's click on Generate. Let's run the
interactive render. This looks cool. Maybe just bring the grass down a bit so I can see
more of the one, so you can do that as well. Let's go to the
competition editor again and bring it down to C
minus five, minus two. I could bring it
down a bit too much. So maybe minus one, minus 0.1. Let's see, minus 0.3. Maybe. We should do the trick. Let's click on Generate
and interactive window. Now you can see a lot more
extremes in the scene, which looks pretty cool,
sort of like a grassland. I'm going to leave it like this because I liked this effect. Some grass patches with some streams in
the scene as well, and some reflections of
the house or cooler. Then I'm going to stop the render and add
this to the history VFB. The next video we'll set up
the architectural materials and then we'll set it up for the final you guys next video.
12. Create Architectural Materials: Hey guys, welcome
back. In this video, we're going to set up the
architectural materials and also adjust some of the
materials in the scene. Are they to start
off with already is the size of this
garden lamp, ya, because it's about six inches or 150 m. So enter the group, select the entire object, use the scale tool and
simply scale it down. Now it's around a 100
MM or four inches. That looks much better
because that was sort of being the focus in the scene. And what I'll also
do is move this in a bit because it's right
in front of the camera. Right. Now we saw with the materials, Let's start with
the food materials. I'm going to use the
bucket tool and Alt on my keyboard to
select these materials. A quick way to select materials. And then I just need to open the material settings and
add some reflections. That's all you need
to do since this is a architectural renderer, you don't really need
to add too much details in the materials because
it won't be seen as well. So for the fabric material, you can add some sheen to
add that fabric effect. So now if I make this
a fabric preview, you can see that you get
that fabric material. So let's quickly
go ahead and add reflections to all our
materials in the scene. What I'll also do it now. So you can see this is
a repeating pattern. It won't be seen that Endo, but if you want to make the pattern sort of
random in nature, you can just open
the atrial setting, diffuse texture slot,
go to text replacement, change to the UV channel
to mapping Source. Click here and click
on uvw placement. And then in the bottom
you can change this to stochastic tiling and give
us see them on the suit, randomize the texture
on the scene. Now I'm going to go ahead and
adjust all other materials. Ready enough reflections
in the scene Noel create my lamp material. Yeah. So let me just create
a two-sided material. Right-click on material
and click on two-sided. Rename this column, this mean. Now I'll apply a material.
Let's go with orange. You can use any
material laterally. If you want to make
an Walsh opaque, you can drag the
slider to the left. And if you miss drag the
slider to the right, that would make it more
translucent or transparent. So we'll keep it close
to the transplant side. And then we'll apply
this material on though is once you apply,
just click on aaa. An objection to the UEs are
applied uniformly as well. You can click on Type planar
prediction was sphere, and then you always will
be applied uniformly. Now ordeal also do is
enter those group was, let me just rename
all the lights. So we have a sphere late, which is the room late. And we have this
rectangular light, which is also called as
though that formulate. This is an extra light
which we can delete it. Let me just check this
material as well. So it's a simple materials. Let's just make this
material or mesh late. So we can make this a group, select the group and click
on Convert to isolate. This would make it a layer. Let's rename that late. Call this lowland plain
view added or dilate. So let's go back to Scene one, and we'll add this to
the materials as well. And let's click on gender
which we interact with. Alright, so SketchUp crashed. Hopefully it's Halo
version of to fail. So sometimes this happens
with SketchUp crashes. Make sure you've always
saved before you're done, you interact, do renders. You can see it's
recode the file. So make sure you open
the recovery phase. I'm going to save this file out. And you can notice
that again after make few changes which are made
in the last five minutes. Now if you want to
change the number of times it auto sales, you can just go to
Windows Preferences, go to gender,
switch on autosave. And you can save this to maybe
keep it at five minutes. So you can also give it a
two minutes, three minutes. But I think family
should suffice. Let's quickly change the
settings for all of these again. Some reflection to our basement
material wall as well. And now let's just go
back to Scene one. Save this file, then go to settings and on
an interactive render. This looks pretty cool. We can set this up for our final end. On the next video. I'll see
you guys in the next video.
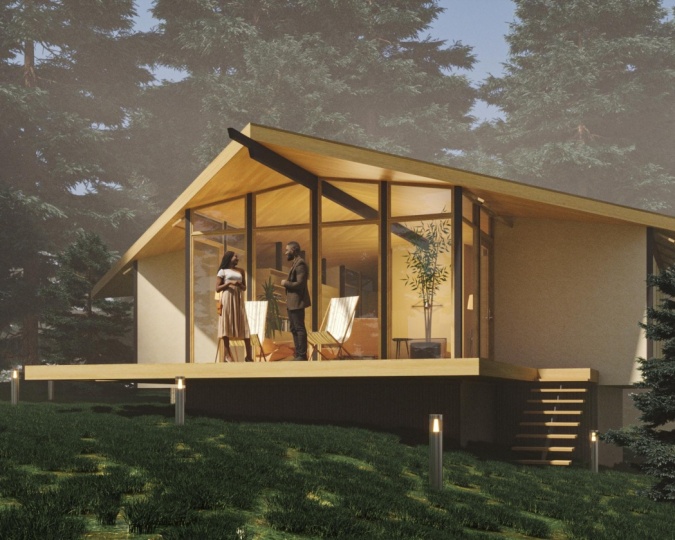
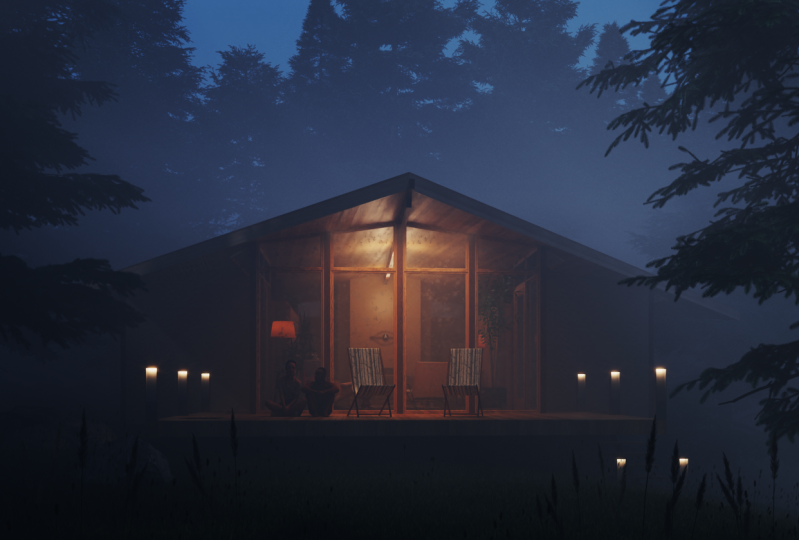
13. Adding Render Elements: Hey guys, welcome to our final
few videos in this course. Now, we're going to set
up the file and OB flat. I'm just going to
add some additional elements like for example, the human figure, just
to add that leaf, extra leaf and do the render. So I'm gonna go to the
girls cosmos library called 3D models people. And let's go for
setting this time. I'm going to download Hideki. Looks pretty good. I'm
bringing a little bit, so let's bring into
their sum here. And then springing,
it takes place on x2. Let cool. So we
have two models and the scene two love birds, right? So let's go to Scene one. Now. Let's run an interactive render. Alright, so now let's play
with the source light mixture, so the sunlight looks nice, but let's try going
for the darker scene. You can see that
this makes the scene darker, which looks pretty cool. The reflection on the
ground looks nice as well. And let's play with
the environment late. Know for example,
if I make this too, can see there's more
fog in the render. Let's keep it at around two. And again, let's change the environment later
to make it more darker. Soda for night, NOT increase
the latency to say 20, to make that brighter. Hello. This is what happens when
you switch out the sunlight. So let us switch on the sunlit and let's
bring in more fog. So that's called uracil
are Dakota settings, volumetric environment, and
change this to maybe 600. So now there's more
fog in the scene. Let's remove some of the trees
around the house because they can't really see the detail of the architectural element. I'm going to stop the
interactive render. And this time what
I'll do is I'll go to my composition editor click
country compositions. And instead of generating
random generator models. So now we can see the models
and we can delete the ones which we don't need into the
group and maybe delete this. Let's delete some
of these as well. You can see more of this guy. Maybe some of these
similar, the ground debt. It's Ajahn, the shadows
and see how this looks. You can see some
layering happening. So maybe I can just
move one tree inside. Alright, so that's quite a
lot of lighting in the scene, which is always nice. Make sure to switch off
shadows before you're moving stuff because it's a
little bit CPU intensive. Alright, let's go to seed one. Let's maybe just move
these trees around. So you can see more of the sky. Switch on the shadows. You can see some shadows here, smooth as in a bit. Work the scene one, check
all the shadows again. Alright, that looks nice. I would like some shadows
in the foreground as well. Let me see if I can add
more this. A better way. Now I think they
should work with. So we have a nice shadow
effect like this. Alright, let's see how
this render looks. So let's run interactive
render. This looks pretty cool. We add some light coming
in onto the house. Like what I'll also do is increase the distance of
the Enlightenment your fault, but they'll also
increase the height. So let's keep the
store owned by a 100. We have more even
fog in the window. Make sure these later non-affected way
that's fairly high. It looks good. And now we can now
relate a bit more. So we have a sphere
lets you misled that is to the lamb plate. I'm
going to make it ten. Make an orangeish. Such others who are late. You
can see those lamb plates. Let's keep on the street
lights in the scene. And what I'll also do is make them Waterman
late, more brighter. This looks nice. Let's add some additional
layers as well. For example, maybe
a filmic tone map. And let's reduce the
opacity of this. It's not too much. Also, of course, increase
the lens effect to get that light effect
on our floor lamps there, which looks cool. Let's also change
the zoom effect. So maybe let's try 30. You can see that this tree is
overlapping with the rule. So let's move this to Yogi. Enter the group on the
street a better way. Similarly, these
trees, all right. Of course I increase the
length of the shadow, we're making it more longer. I'm gonna move it to 45. Let's go back to Scene 145, the scene and run the
video interactive. That looks really nice. Now we can send it out
for our final end up. I'll also try creating
additional views. So let's go to s2. Let's place our view again. Want to place multiple
views in the scene. Let's click on the Zoom maximum. Alright, so now let me
just place my camera. This will create a scene. We can have seen two
is seen as well. It looks nice. It looks better. So let's run this entry again.
This looks pretty cool. We have some reflections off the wall on this stream here, which looks pretty cool as well. Maybe to show more of the sky. Make it 2 perspective,
then update the scene. You can also try
bought it handles. So for example, it has changed
this to post portrait. Now you can see a
lot of the sky as well as G in the field of view. So let's maybe go back to 30. And such on two-point
perspective. Maybe update the scene
and running injector. That looks pretty cool as
well with the night sky. Maybe show more of the ground. Can also of course, which
on the background here. Let's clean the house to
the center of the scene. And now you can see it better. Can also of course, zoom-out. And this looks pretty cool. Let me stop the render,
update the scene. Now we'll set it up
for our final render. So let's go back to Scene one. Now you guys can go
ahead and render either portrait or
landscape Brando. Just make sure you change
the settings here. I'm going to go for
16 to nine this time. Get a nice big cover for
the course page as well. Go search on two-point
perspective is on the hand tool and sort
of show some of the sky. And let's run
interactive window. That looks pretty cool. I
can see a lot of the trees, the sky, and how
settings in the center. I could bring it up
a little bit more, but sort of crop or the sky like to see
this k in the scene. This looks pretty
decent. Let me do that. Just it a bit more
subtle touches. Just making sure that window is sitting right in the
center of the frame. Alright, so I'm happy with this. I'm going to run a final render. So I'm going to stop the render. You will see this file out. I'm going to add
some brand elements. Let's add a reflection
and element. Let's add a fraction. You can add self
elimination if you want to change the background
in Photoshop. And you can add background
as well to change the background if you're
using the environment late. And let's add crypto matter
and element to change the materials and atmosphere, to add additional
atmosphere in the window. Let's set the render settings. This time we're going
to use our dx and NVDA for the final render
because it's faster. And I'm going to set
this to 1920 by 1080. Now you can either use the
progressive render mode by switching over interactive and just keeping progressive on. Make sure that the
quality is high. Plus you can set
the timing as well. So for example, if you
set the time limit, I can maybe set
it to 15 minutes. You'll get a decent vendor. Of course, the longer
you set the time dove, better clarity render you get dry one to enter with
the bucket render mode. And if it's taking too long, I will switch to the
progressive render. So switch off progressive for now and use the
bucket render mode. Bucket render mode can
take longer upwards of one hour to two hours
depending on your PC system. Finally, the save this file. Under 18 to know, forget to update your CNAs. Otherwise you'll have to go through the entire
process again. So I'm going to quickly
adjust my camera again. Like I said, just
with all the settings again. And it looks perfect. You can see that this is how
our finder window will look. Do that, of course
it has to handle. So once you do the final end, although noise external,
I should go away. And it should look
something like this. So once you're happy
with all the settings, just click on Render button. Make sure to save
before you render. Click on Save, then smashed. I don't know what I'm
going to come back once the render is done and then
do some post-production. So I'll see you guys
in the next video. Cheers.
14. Post Production in Vray Frame Buffer: Hey guys, So the
renderer is finally done and now we can do
some post-production. You can see that we have
a nice clean lender. We use the bucket render mode. And you can see if
you go to stamp, it took about 35 minutes
to render the scene, which is in 1920 weight NAT. And then I'll let
alone we can use late mix and set up different
lighting scenarios. For example, if I search on rectangular ATO and that will just light up the slide here. There's no noise as
red light switch off the background because we don't need is the
surrender as is. So I like the settings, so
I'm going to save this out. I'm going to call this one. Let's switch out the sunlight. So you can see we have a nice, gloomy sort of a setting
which is also pretty nice. Or maybe you can also reduce the sunlight is to get
that blue means an effect. Alright, so let's
see if this ODE late mix on the score to. Then of course, you can
add additional layers. For example, you can
add the white balance. We already added a white
balance and then we can sort of make it more cool. This looks pretty cool. I'm making more warm thing, making it more
cool, looks nicer. And you can also say John Doe, sharpening effect and
sharpen the render bit more. Finally, the lens effect, if you want to increase the intensity of these
layers here, I'll call it. Alright, so once you're happy, can again save this out, can also save the tree preset. So I'm going to say this
call this preset one. The light makes setting as well. Let's underscore three. Now to do the composition
of post-production, you can see that we have
different elements. Since there is a fall grander, render the fog separately, then the grasp materials
here separately. Unfortunately, we didn't
get the hose materials. Now if you want to get those
materials and you could add the multimap and element or Endo again to get
those materials. Then we had a background
in case you want to change the background color,
Photoshop and so on. Then we also have
the atmosphere, add additional
atmospheric effects. I like to switch on RGB effects results
to the final render, and then I click onto composite to start with our
post-production. So first thing what
I'll do is add the reflection refraction layers on top of this glass material. So I'm going to right-click, create a new layer and
click on Render element. I'm going to select
the reflection and element reflection. So you can see if
I switch this on, just adds that extra
reflection in the render. Similarly, let's add the
reflection and element as well. So let's affliction. You can see that it adds that extra reflection on the
water material, I would say, is if you wanted to
reduce the effect, you can of course, where
every single values. Then we can also add the
atmosphere and elements. Right-click. Couldn't new Leo,
recommend element. And let's add the
atmosphere and element. Once you've added
the atmosphere, you can see there's more
atmosphere in the seed. You can of course,
also multiply this. So for example, if I
click on Multiply, that would multiply
the random element. But in this case, ad should work well, or even
soft light should work with. Let's add this to add. You can see X dot my
sphere in the scene. Looks nice. I can also play the legs here. Now for example, you
want to make this, want to show more than sunlight. You can do that as well. So you get those guardrails
entering the scene. This is the sphere late. You're late as is the sunlight. Make this one. Now you can see we have a lot of nice late entering the scene. How cool is that? Some guardrails and leucine. Finally, once you're
happy, you can click on Save and save this window. If you want to
produce their effect, you can also change
the color to a darker and then you
get reduced effect. And then of course, you can
reduce the intensity of this and see what the result is, what it also amplifies
certain lights in the scene, for example, this fuel
ATO or these mesh lights. So let me just go
back to RGB color. Let's go to Mesh late. Let's add a new brand
elements Right-click code and you click on Render element. Let's say you add the mesh late. So you can see that
Booster Mesh late. You can also add the sphere late in this case, that
would work better. And then of course you can increase the intensity
of too late. I want to see. If you want to do some further
post-production. You can add a lot
fail, for example. So let's add that file
will look up table. Let's load a lookup table. You can see that we
have these Kashmir. A lot fails that we got from the Internet.
So let's load this. You can see that
that's just adds that extra fog effect in the scene, which
looks pretty cool. Let's add an audition,
a lead fail as well. So let's add another
lookup table. Let's load, for example,
number two can also change the position of
these landfills so that it's applied
on all the tags. So now it becomes super dark. So if you want to reduce the
effect on the entire scene, then of course you can
reduce the effect like this. And you can also change
the blending mode. For example, if you
keep it to soft light, make it dark, Lighten,
works better, right? It adds fog to the interior. Obscene. This looks nice and this will be the cover of a render as well. Click on Save and
college number four. Let's open those files. Different vendors that we will
create with this workshop. Sort of cinematic and sets
the mood in the scene. And so I would highly
encourage you guys to set up different other
views and create renders. Later we come to the
end of this course. Please do share your work in the class assignments and please do leave a review if you
found this course useful, I'll see you guys in the next
workshop and cause Cheers.
 Manish Paul Simon, Architect | 3D Artist | BIM Expert