Transcripts
1. Class Preview: Would you like to learn
how to create high visual 3D flow plan renders for
your interior spaces. 3d Flow Plan rendering
is a great way to create high visual impact and is much more appealing than a 2D sketch, better visualizes the color, elements and design of a space. This course, I will take
you step-by-step and modeling and rendering and
awesome looking 3D flow plan. With SketchUp 2022,
3d5, and flex tools. We start off with importing our CAD drawings into SketchUp, learn to create our walls. Then we will learn to add
doors and windows using the super useful plugin
called flex tools. Create railings,
place our furniture, and then we get into the
rendering part of the course, wherein we will set the camera, set the lights using a simple lighting system,
adjust the materials, and finally, batch render out our various scenes
of our 3D flow plan. By the end of the course, you will have the right
skillset to create amazing 3D flow blend renders, which will help
enhance your business, Gettier and most importantly, helps in marketing
your projects. Now without further ado as you in the course and say, Cheers.
2. Before We Start: Hey guys, welcome back. Now before we start
with the workshop, I'm going to show
you the software and the files that you need to
work with in this course. The main software, of course, is SketchUp 2022, which is the latest
version of SketchUp. You can simply open
this link, sign-in, and then follow the
step-by-step process to download the setup and install
the file to your computer. You can select either
the Windows version if you're using a
desktop computer, or you can select the Mac if
you're using a MacBook Pro. Now once you've downloaded
and installed SketchUp, you can click on
the second link, which has really fight
for SketchUp and you'd get a 30-day
trial for 3d5. Same goes with SketchUp as well. You can follow the
step-by-step process Again, you will have to
sign in and download the setup and then
install it step by step. It's a fairly simple process. And finally, we have
flex tools as well, which is a bonus plug-in that I will be using
in this course. It helps in creating those
and Windows super-fast. And I use it a lot in
my projects because it helps me see I have a lot
of time in the long run. I will be showing you how
to use Flex tools and leverage all these tools to
model Firestore in schedule. You can also go ahead and join our Facebook community group, which has over 4
thousand members. And you can feel free
to ask questions, interact, share
your work and more. In case you're not on Facebook. You can also join
LinkedIn discord channel. Now, brief on our
exercise files as well. We have a fight for each of
the lessons in this course, and we have a start
and finish file. So start is basically what happens at the
start of the video. Finishes what is the result? From finishing that video? You can start from any part
of the course, but ideally, I would suggest
that you start from the start and work your
way towards the end. So now I'm gonna show you the various shortcuts that I use in SketchUp 2022 so that you can follow the scores quite easily. So I'm gonna open
SketchUp Pro 2022, and I'm going to select
architectural millimeters, which is the units that we're going to use for this workshop. You can also select
architectural inches if you're more comfortable with
the inches units. So let's select the
architectural millimeter. This is how my sketch
up interface looks. And these are the
plugins that I've just installed into SketchUp, which is the plug-in and
also the flex Tools plug-in. If you don't find these plugins, just go to View Toolbars. And then you'll find flex tool. And if you scroll to the bottom, you'll find the
variable bias as well. In case you're wondering
how to install flex tools, just go to the Extension
Extension Manager. Click on Install
Extension and then simply install the RBC file, which you've downloaded
from their website. The new interface, we can
see that we have a new orbit that this is neat edge
who works at SketchUp. Now I'm going to
quickly show you Adobe shortcuts that I use. Let me just make
some groups quickly. Led to the main shortcuts
that I use his height. So if I select this object, I can press F2 to hide. If your function keys
and hard-working, you can also assign Control
plus one to height, and then Control best due to unhide or Control
plus 321 night, I use F2 to hide
if three dominate. And if I select
all in height and then press effort at night, all the objects in your scene. The other shortcut which I use to quickly go to the plan view, suppress all W to switch between perspective
and valid projection. And then I press Alt Z to go to the plan view and Alt F
to go to the front view. This way, I can model
faster in SketchUp. Another cool shortcut that
I use is that if I enter this group and press
J, you can toggle. Visibility is also
super useful because sometimes you may want to
hide the rest of the models and then start
modelling in SketchUp. One last short guide,
which I will show you is of course, x-ray. If I press it switches
on x-ray mode. And they said helped
me move stuff more accurately and
sketch up as well. Then of course, the main shortcut which I use
a lot as groups. So if I make a rectangle, you're selecting
the face and edges. And then by clicking and
clicking on my group, I just select the faces and edges and press G
on my keyboard. To make a group. It does
actually for competence, but I've changed
it to make groups. Now this is just my
personal preference. You can choose your own
preference, shortcut preferences. And if you want to change,
you can change the shortcuts, just go to Windows, click on preference, select shortcuts. And then you can start
assigning these shortcuts. So the first one is height. You can see that F2 is Rena saying this simply click here, press F2 or control one. So let me just assign
control one plus one. And then unhide Hall
is controlled two. And last PRO three. And then of course we have
hydrous to the model. So you can say in jail
and also makes you, but it's okay So that
it saves the other do shortcuts which I
left is main group. So let's go to group. You're the last one is
make group those ING. And then we have
X-ray, x dash ray, and then X-ray shows up here, which is why I'm not given
x because that is useful. Another shortcut, these
are the main shortcuts that you would want
to use in SketchUp. Then once you've
assigned all of these, you can press Okay. Now in the latest
feature in SketchUp, there's a new feature
called search for tools. So if I click here, you
can search for any tool that you use in your sketch
after interface, for example, if I search for light, you can see that you
can also search for the plugin tools within
this search feature. So it's pretty handy in case you're not
using certain tools. You can simply search for them
by clicking on this icon. You can also press Shift S, which is the shortcut for
this search tool feature, and then It's for your
favourite shortcut. Now if you'd like
to learn more about the latest tools
in SketchUp 2022. You can check the
free watch new in 2022 on my YouTube channel. Now this is all that we need
to tackle this workshop. So let's jump into
the next video. Import our autocad drawings. Make the walls clear
the doors and windows, then placing our furniture. And finally create 3D render. I'll see you guys next video.
3. Import CAD into Sketchup: Hey guys, welcome
back. In this video, I'm gonna show you how to import autocad drawings into
SketchUp and also set up a project before we start modeling and
rendering out Afro pen. First thing you need to do
is select the right units. When you open SketchUp,
I've selected architectural millimeters and I
will be working with millimeters for
the rest of the course. Now if you're more
comfortable with inches, you can select inches as well. So I'm going to select
architecture in many widows. This is how SketchUp looks. You will be seeing the
Vireo toolbars if you've installed correctly and
the flex tool as well. We have neat edge in the house who the new
OTF for SketchUp. So I'm immediately needed. And what I'll do is I'll pledge the materials because
if I go to home yet, if I go to Materials and
click on the Home button, you can see that
this, these materials remain which is part of
the ridges of attaching. Just go to Windows,
modelling full. Go to Statistics and
click on purge unused, know all the materials go away. Later. Now we can import our CAD
drawing into SketchUp. So go to file import. What I've done is
add the main file, which is our partner project. Then I've sort of
separated out the walls, the external walls, the internal walls, and the furniture. It's a fairly simple
process to do an autocad. Now if you don't use AutoCad, you can use any other
CAD software as well. Not since this is
a SketchUp course, I will not be showing that, but you can use
the existing files from this exercise files. So we can start with
importing external walls. So select external walls
and click on Import. These are external walls. Let me just check the dimension. I'm going to use a tape
measure tool and you can see that it comes in
exactly at 160 MM. Sometimes it may not
come in that I'd skill. In that case, you can
enter this group. Then you can use the
tape measure tool. So plus dy, then you
need to press control. So now we can see
that the changes from the create guide mode to measure mode with the
measure more done. Now we can change the
scale of this drawing. Let's say you want to change
this from 160 MM, 100 men. Then you need to just
measure that once, click once and click the second name and then
type in your value, which is going to be
100 MM and press Enter. Now if I click on Yes, you can see that the entire
CAD drawing changes and all the walls at a 100 is the same forward
inches as well. So if I press Control
and then change this to, let's say six inches. So it can type in six
inches and press Enter. And then you can
scale it back again. It's back to six inches,
150 to eight minutes. Now let me just
undo control Z to undo because it's coming
at the right scale, which is 160 MM. Navigating our button,
my external walls. Let's see if it comes in
any materials or tags. Comes in just one deck,
which is perfect. Now let's import
another CAD drawings. So let's go to File Import, select internal walls,
and click on Import. You can see that it comes in, but it doesn't sit
in perfectly scene. So what you can do is you can
select altogether drawing and just move it to
that corner there. Now it's fits in perfectly with the external walls as well. These are the two CAD
drawings that we need. You can go ahead and import
furniture running as well. If I say like
furniture and click on Import brings into
Phoenicia driving as well. The furniture
drawing also has to be fixed, relocated better. So select this end
point and just move it. It sits in perfectly and we can sort of hide
these furnitures, blends and internal
involved and so on. Now what I'll do is I'll move these plans out so we
add the external volume. Let me just move the
furniture out as well. Now instead of going
ahead and then creating your rectangles again
and then pushing it out. We can use an awesome new plugin called an adult face creators. Just go to Extensions
who arrows, then searchable and edit. These are plugins developed
by a developer called route. She's awesome because
he's developed a lot of useful
plugins for SketchUp. You can click on Install and
then install this plugin. Once it's installed,
all you need to do is select a CAD drawing, go to Extensions
and then you'll get an option called an
adult phase creators. So just click on
that. And now you can see that the face is
created automatically. How cool is it? That helps in there using a
lot of work from the outside. And we do the same for these
internal walls as well. Select the internal
wall Code extensions. Ended up face veto, and boom, the internal
walls as being created. Now these are some extra
faces that they don't need. So you can enter this
group and then delete these edges. Because
I don't need that. I will be creating a
separate floor slab later in case some of
these don't show up, just draw a line on top and then we should
fill up perfectly. I don't really need to show
these as well. Let me do it. That's the balcony.
Can delete that. These are two separate
cases, which is fine. We don't need to
create phases for our furniture because it's fine. Imported my CAD drawings. And I will also
created the phases. Now in the next
video we will assign some tags and also
create the floor, the walls, and
windows and so on. So I'll see you guys next video.
4. Create Walls & Assign Tags: Hey guys, welcome back. In this video, we're going
to create our vaults. Now before I create the walls, I'm going to check the
bags of these groups. You're going to enter this group and select
this line here. Now you can notice
that this LN belongs to awol 1 sixth external tag. But if I select the face and say it has not been
tagged as yet, Let's select all the
faces and edges. Now we can use that tag pool. To assign the tag. You can click on
the bag Boolean, select a while, 18160 external and then simply
click on the face. And now it's been assigned. And you can notice it here. You can click on Color by layer to see if the
DAG has been assigned. Let's do the same for
these walls here. Let's enter the group, select all the faces and edges. Click on the tag board and
we'll assign this to a 100s. Select a while a 100, and then assign the tag. Let's check if it's
being assigned. It has. Now you can start
pushing out our worlds. Let's activate the bush tool by tapping P on our keyboard. We will have to enter the
group, push our groups. So let's enter the
group first and then activate the
push-pull tool, and then click once and type
in a value of 3 thousand MM, which is the height of art. Or you can type in
ten feet as earlier, if we're using feet and inches. Once you've given our dimension for one model which
is 3 thousand MM, you can do so for the
others as well by simply hovering on the
face and w flicking. This would give it
the same height of 3 thousand m and saves
you a lot of time. Let's just clean
up the geometry. So let's activate the razor
tool where tapping E. And then let's just
delete these edges here. Because those projecting out. Then this idea, and
we are good to go. Let's do the same
for these walls. Took a group, use
the push-pull tool and start pushing out these
walls, internal walls. That is, this is a balcony, so this will be at a
height of 1200 arrow, which is the standard for
apartment balcony heights. Railing heights in inches, it could be four feet. Finally, I'm just
going to select the swell and then
move it in place. It's, it's in perfectly
with the other worlds as good. This looks good. Now we only need three layers, which is our internal walls or external ones
and the furniture. So I'm going to delete
the other layer and move it to a
layer called GAD. You can create the DAG by
clicking on Add dagger, and then you can
rename this to cat. Let's Move in this
bottom Diageo. And then the field tags and elevation tags select
all these tags, and then right-click and
click on delete tag. And now we can move all of those to select Gad and Brazil, okay, but not delete
the entities, simply move it to the ganglia. Now you can see that some of
these objects or more to get some of these objects are still
in the airflow and layer. Let's move all of them to get. So enter this group. Select all objects. Now using the tag
Dolan's just going to click here and move this to gap. So that's the more simpler way, the most stuff into
different eggs. So now if I hide this
alder lines right, great. Now the next video we'll
create our doors and windows. Who manually and actually easier way by using the
flex tools plugged. Let's see you guys next video.
5. Create Doors & Windows with Flextools: Hey guys, welcome
back in the Sudan. Want to show you two ways to create our doors and windows. We'll start off with
the manual rip. The manually is of course, by fitting the lintels and then pacing or door from Judy autos. So if I enter this group, we can use a push-pull tool. And then I'm going to press
Control to make a copy. And now you can see that I get this sort of the door width in place with this
linear as well. Notes lot of students when they sort of move
this line on top. This happens when they
sort of move this lane. And that's because they're not making a copy of this lane, but you are either
moving the length. So what you would need to
do is select this line, but as m and then tap
Control on your keyboard. So that would toggle
the copy mode. And now if you make a copy,
It would copy the link. You can copy this 2100 MM. And we've created that lane which will also
separate the phases. Now we can use the push-pull
tool and then push those out to ones who pushed it out. There's one extra coffee SCR. Let's reverse this. If you see these blue faces always get into the
habit of reversing them. I clicked like Andra worse-case. Now we can place our door and we can place it from 3D shadows. So let's go to Windows, 3D shadows and search for dog. Now you can download
any of these doors EA, let's say for example, I'm going to download
this gender outdoors. So click on Download
and click on Yes. And then placed his doors. Then you left the road
Datastore by 90 would in place. Then we'll have to
also scale it down. Use the Scale tool and
scale it this way. Now the biggest flower limits when you're starting
to scale stuff, you can see that
this frame became bigger and this
frame is smaller. It's not dynamic in nature. You can go ahead and
use Live components. If I delete this doth, go to Windows 3D arrows, and I'm going to go
to my options here. Let's go to Properties advanced and switch
on lab component. Also makes sure that search for those in the modal window. So we can see we have
some different bulls-eye. So maybe let's select
residential interior. There's no configure option
because they're remote it you'll have to
configure the component directly within SketchUp. So let's click on Download
and click on yes. And its business door
null again, we left, rotate it by 90 and
then place it inside. You can't really scale
a lab component mode. You'll have to
adjust it manually to the vet tiered in this case is 1050 MM by 2100. Select a daughter, I click and click on Configure
low competent. So now we're to
connect to the server. The SketchUp is over that is. And then it'll show
you the various parameters for the door. So you can see that
board with right now is 7060 bootlegs. So let's change this to 1050 m m. Now the door with changes and then the
daughter height is 1100. And this is the other way
you can create a door. But then again, these
are a lot of steps. Lo and behold, we have
a new awesome plugin called Next tools. So let me delete
this door and let me just push this wall out as
well. Delete this line. Let me just simply
push this wall inside. So now we have a
clean wall geometry. Let's check if there is
no additional lines. Now what I need to do is simply
click on the door option. Then I can just place
it on the wall. What this does is it will
create an opening in the wall. And if I scale this to the edge, you can see that the frame
width remains and the door adjusts automatically and also adjust the opening
automatically. Another cool feature of this
plugin is that if I use this interact with
dynamic component and select this option,
select the door. You can see that though
the door swings, add strings to 90, and I can also click on this flip options so
that door flips inside. How cool is that? Now again, you can sort of adjust
this, this way. Another cool feature is
now if I create a section Blinn tools section plane and act via the
section plane on top. But as OK, and
then move it down. Select the section
plane and move it down and go to the top view. You can see that it comes in at nice sectional
details of the door, which you will hardly find
in regular confidence. Of course, the last future
which deleterious let me just deactivate the gut and believed the
section being revealed. He had the section plane
later on in the course. Another cool feature
is that, for example, you want to change the width of the door frame, width,
shattered thickness. All you need to do is select
this door, right-click, go to dynamic components and
click on competent options. Now we have various
options here. So you can lake in the
live competent doors. You can change the
width here as well. If you want like a proper width, you can dive in 1050, click on a play and then it
adjusts you automatically. And then of course you
have the wall width. So let's say this
is vertical wall, which is at 160 MM. And then you can give
the wall thickness, which is set at 160 MM. Then we can give
an inset as well. So you can see now it's
flush with outside wall. So let's say you
want to bring it in or move it in by 20 MM, type in 20 and click on Apply, and then the shutter frame
sort of moves in by 20 MM. There are some other
useful options as well. These are the main
options I use. You can of course, adjust
the width of the door. Blend view as well. So if you select this and move it down, you can see that the DOD with changes as well.
How cool is that? So flex tools are
super useful plug-in, our users are locked but modern fast add doors,
windows, and mode. Now let's go ahead and create the rest of those
doors and windows. Here you can see that
we have an opening and we would place a
glass balcony door. You can't replace our
doors as standalone, you can't do that,
but it's better to embedded wins inside of water. What I will do is first I
will create guides like this. So now that I know how much
the width of the door is, because even if I push this out, you can see that the
guide remains and I know read any BU scale
my daughter too loud. Let's click on this
sliding window door option and then place it on that wall. We also need to create
a lintel height. So this is set out thousand and two hundred and ten
thousand, one hundred MOM. Now I can select
this door competent press S on my keyboard to
activate the scale tool. If you don't find this endpoint, you can activate the X-ray mode and then press the scale tool. Now you'll find this endpoint
and now you can drag it to that edge and bagless
to this edge. Now one important
tip that I would give is that if you
have lines like this, you can see that we
have some cross lens. Let me delete this
guide for now. Now if I select this window, doors and taller scale
it to this edge, you can see that it's
overlapping the slain. So if I scale it,
then it doesn't work. The opening doesn't create. And the reason behind this is because this geometry
is not cleaned. We had this line neon. So let me just go back, undo and let's select
these lines and delete this line as well. This lane is it. So now
if I tried to scalars, so plus S and scale it out. You can see that it
scales perfectly. The frame width remains. The opening also gets created. So it's always important
that you clean geometry before you autoscaled stuff and please flex story competence in the art groups or competence. I'll know, I'll right-click
on this competent tick on dynamic competence and
go to component options. Now, I will remove
this base year, so this is basically the sill. So I'll select this
and change this to off and click on Apply
so the circles away. And I'll also give an inset
of around 50 MM because one, then there's a little too much. Jane, the wall width to 160 MM. Sometimes it's sort of got sold to make sure you give the
right wall with the cell. So in this case it's 1 sixth. And then click on Apply sliding door as being created as well. How cool is that? You guys can go ahead and play with the various Merger. Let's
say you want three. Sasha's, you can click on
three and click on Apply, and then it changes
to three as well. But in this case we can give to because of it
does not do much. So let's give two
and click on a play. That's a quick Tutorial
into the doors and windows. Now what I'll do is I go ahead and create the rest
of the doors and windows. You guys can do the same
as well for practice. And in case you get stuck
anywhere in the process, do reach out in the Q&A
section or on the discussions, and I'd be happy to
answer your questions. Now in case you want
to mirror the door, you can select the scale
tool and then click on this endpoint and type
in minus one presenter. Now we would flip
to the other side and then simply you
can move it back. Let her know LSU
in the timeline, which would be gone for
around five to six minutes. And then I'd see you
guys next video.
6. Create Railings: Hey guys, welcome back
in this video to create the floor slab and the
railings for our department. Before I proceed, I'm
quickly going to make a rectangle which is going
to be our floor slab. Then make this a group, give a thickness of
about six inches, then push it out to the edge. These are ducts,
so I will have to enter these groups
and make opening 0. So I just have to
make a rectangle. Datadog visibility. So now you can see that SOPA to the phases and then use the push-pull tool
and boosters don't. Similarly odors. Well, maybe we have a railing,
balcony railing. So let's quickly create that. All you need to do is make
a rectangle like this. Then make an offset. Then I will push
this to this edge. This edge. Make this a group.
And let's delete this lecture now we ever angle. And now I need to make
an offset inside. So I'm going to select this rectangle and let's
give an offset about 40 MM. Inside. Railings would be
around 20 mm thick. Know what I can do is I can move this line in-between DMM. Then I'm gonna make this
a group and push this out to about stage. Then bring it down by, let's say 15 MM. And then I'll make
this a competent is in so-called was called
lose railing one. And then I'll make a copy. So let's make a copy of
this and multiplying the two as delete the inside one. We have a gap debt. Now if you see this inside edge, you can escape that this toggle visibility
of the inside edge. Now let's select
this, this competent and move it by, say it. Then once you've moved
it, you can dive in. And that'll make an RNA copy. Select all of these and make
it a group, and then enter. Let's copy these again. Let's move this edge. Three should suffice
and then select this whole group and rotate it by 90 degrees
also make a copy. So tap Control on your keyboard with the rotate tool actuated and then moved in and then simply move this into this age. This is overlapping. You may have to delete
some of these groups. Let's delete. These can
be the one more one. Finally, we have our top rail. So I'm just going
to go to the VSCO, select this base,
make it a group, the mood on top. And do this group. And you'll have to make a rectangle and
delete these edges. Then push it out. Let's push it to this edge. So it's about 15,
MOM and we have our nice looking really good. This ended up being
a reading video. So you can create this really
like how it is created. It's a small space so
you can do it manually. You can use audio plug-ins like profile builder to
create railings. But since this is small in size, I've just gone ahead and
created it manually. And finally, I'll have to
make an open yard as well. So let's make a rectangle
and then push those down. Push this to the edges. Let's see you guys next video.
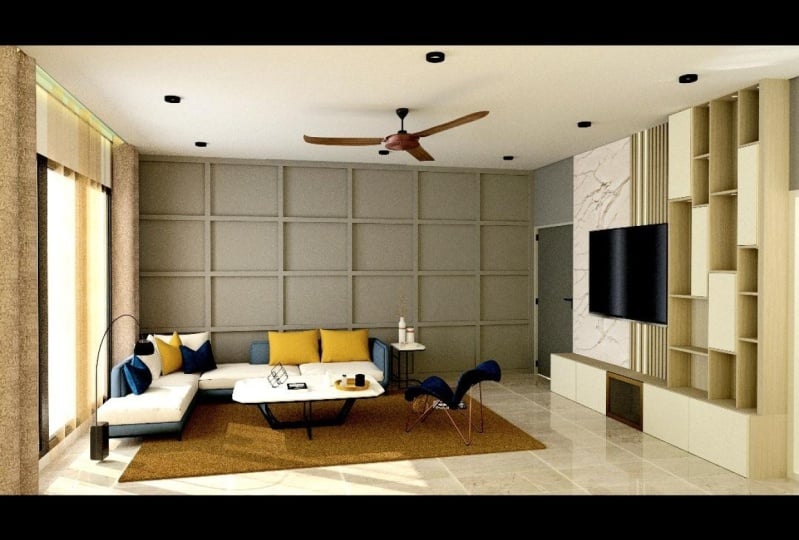
7. Place Furniture: Hey guys, welcome back. In this video, I'm going
to play some furniture in the apartment. And I'm going to
be adding it from an existing model which I created prior to
creating this course. So let me just show
you that model. This is a model and this
is designed by my fiancee, Alina Ball, who is an architect, an interior designer
from Kuwait. You're getting mad at soon. So that's a small use that I want to break
out to you guys. She's pretty good
at design and I'm good at rendering and
Presentation button. And I will be creating a 3D
render of this apartment. Now a few comments on
the design of the space. So she's kept it ready minimum, with few colors
that she's braided, which namely Brown's, the
greens and the grades, the grades jelly goes to
the floor, the wallpaper. And we have already cool TV
unit with some backboard. Then we also have a depot, some drug, some more
light and night so far. So far comes with a side table. This is like complete
unit and self area. Very cool looking
kitchen as well. So she's painted
different colors. We have blue and our yellow
sort of forgotten night, which will definitely add
some bump in the space. And configuration off the land is also looking good because
they have a David earlier, there's a lot of space for flexible movement
throughout the apartment. We haven't given too
much storage because that would make the space
a little too tight. And this is a very tight space. So there's Boolean
hospitals to keep a bed, some storage, and
some phony job. So each room has its
own sort of theme. So this room is
replayed with colors of blue and kept a main theme
of the apartment intact, which is by incorporating
the fluid throughout the entire apartment
and sort of having the same style for the
furniture and so on. The style that we chose
was Scandinavian. You'll see a lot of
Scandinavian type furniture. And it's already
simple apartment. Definitely could
go out on Airbnb and hopefully make some money
for the clients as well. It's always good
idea to play with yarn bathroom fixtures as well. So ideally, I would recommend that you
give a mood board for each of the space and then
start designing your rooms. I will be creating
a separate course on creating mood boards and how you can use mood boards to design your abide benzene. And if you guys
like me to create separate views for each of these rooms, I could
do that as well. This is drop a comment in
the discussion or Q&A, and I'll be happy to put that on the priority list.
I'll let her know. You can either
copy these models. You can open this model
from the exercise files, copy them so you can
press Control C. Go back to our main model Leo, and press Control V. You
can place it like this, or you can go to
Windows. 3d shadows. Then search for different
models that you can place into your apartment
based on your design, aesthetic and
design inspiration. What I'm gonna do now
is I'm gonna work with this model because we already had the
financial and paste. I do not have to really copy these models into our
new apartment model. It's pretty much the
same as you can see. We have the same windows,
doors and so on. So all you need to do
is set up that Endo for this Batman block. So I'm gonna say, oh ten, close this and start
working with this model. We'll start a fresh, I show you guys how to set
up the lights in this model and create
our 3D flow plan render. I'll see you guys
next video shows.
8. Set the Camera: Hey guys, welcome
back. Now we're going to start creating W's for our scene before we had under adult and also
set up the lights. Alright, so the first thing
you can notice that is that this view is in parallel
projection mode. And generally for 3D
isometric floor plans, It's better to give a palette prediction mode render than a
prospective lender, but it's all dependent
upon choice. In most cases you will see a ballot prediction window in
marketing plans and so on. So let's switch to
valid protection. You can press Alt
W or you can go to camera and click on
pilot prediction. And now we need to
place our section. Let's go to Tools and click on Section Plane and then
displace it on top. And you can call this plan view. Okay, and then you need to select the section
and bring it down. Just make sure it is cutting
through the windows, the doors, and the walls. This seems to be a good view. Now we can sort of zoom in. Then I can create
my first scene. So let's go to scenes and
create my first scene by scene. And now we can also adjust
that in dollar put n video. So let's go to our Asset Editor. We have an acid at dopant. Now let's go to Settings,
output and switch this on. So now we can see this iframe
and we can change this. Maybe we can keep one
is to one as well. If you want to render
for Instagram, give it a bit for it to update. Now you can see those lines. One is to May 1 not work
because there's sort or for longer plan. You may have to work with
forced to three picture, 16 by nine widescreen. So let's work with forests to
three picture because it's sort of crops off these
edges are plants. It's in perfectly
that zoom out a bit. We can see all the walls
and edges of our plan. Now we need to just
simply update the CDL. I click on Cn-1 and
click on Update. All right, so I've
created one view. Now let's orbit to the other
side. Create another view. Magazine that as I click
on scene and click on Add, give it a bit footer.html. Similarly, let's create
seen 34 as good idea to give it from all
sides so that you can see the plan from all sides. And your client
would be so Papi. To clear it for
cool-looking scenes. You can also create a flow
plan view if you want. You can just go to the
Camera Standard views and click on top of result, and then create a floor
plan view as well. We can use the same
lighting setup to render the floor plan. Renamed this called
the floor plan. And teens one to four would be, of course, your 3D perspectives. Let's go to Cn-1. See how this out, and see you guys in the next
video where we'll work on some lighting methods to light up our flow pens and
see you guys next video.
 Manish Paul Simon, Architect | 3D Artist | BIM Expert