Transcripts
1. Intro : Within the recent years, face filters have become such an integral part of
our social landscape. In this class was
actually inspired by Olivia Rodriguez
music video brutal, in which she showcases
some phase filters created through
Procreate five x. And in this class
we'll learn gesture, how that could be done. And I'll be your
instructor for this class. Hey, I'm Annie or lucid and the meaning behind the
Lucid for breve is twofold. One is clarity
through connection, and the second is light. So keep shining because
your spark sparks others. And I'm all about creating under the
suspicion statements. So whether it's when I'm
creating illustrations, designs, wonky lettering, gifts. I keep it lucid and didn't
regards to face filters, I've actually created several and one of my face
filters was actually featured on Instagram's favorite
effects for Pride 2020. So that was pretty neat. And on top of that, I created a Skillshare
class on how to turn more doodles into an
Instagram face filter. And that class is actually
a staff pick class. So if you want to check
that class out after this, be sure to do so. But in the meantime, let's just dive right in
and lead skit, lucid.
2. Project Overview: For this class,
we'll be creating a phase filter with
procreate five x. And here's what we'll cover. Ideation of face
filter, doodling, slash drawing and sketching, opening up, procreate
five x and a bonus. How to animate the face
filter and of course, how to export it as a
video or photo to share. Here are the materials
that we'll need. Procreate fives, an iPad and solace or Apple pencil,
paper and pencil. Your imagination and creativity.
3. Prepping: So since this class is all up to your creativity and imagination, I'll leave it up
to you on what you would like to draw
on your face filter. But maybe as a
starting off point, you can think about themes. So maybe your theme might
be food, maybe its peak. So filter, maybe it's
a bouba, phase filter. Whatever your theme is and
whatever you choose to draw, just have fun with it. Alright, so in order to begin, let's have an idea
on the direction of where we can go when we start
drawing our face filter. Since the face is
a special Canvas, It's not like a piece of paper, There's dimension to the face. What I would recommend is start looking up
some inspiration for maybe its face
tattoos or face makeup. For myself, I actually really
liked to start collecting these images and saving them
as a source of inspiration. Feel free to join me as I
begin to sketch and map out potential compositions I would like my face filter tab. And this suction is actually a really helpful exercise
in planning it out so that you get a good idea of what your face
filter might look like. Alright, so in this section, we have our paper
and our pencil. And we'll just sketch out some
ideas and compositions and just approximations on where we want to place some
of our elements. This part is really neat
because we get to play around and explore potential
ideas that come up. Alright, so we have our paper
and pencil in front of us. And at this stage we're
going to start sketching. And we'll sketch
out some ideas and compositions and maybe
even make some notes for ourselves so that we have approximately an
idea of where to place some of these
elements and of course, an idea for the direction
of our face filter. In order to get started, we'll just draw some
really quick faces. And the main point of this is that we know where the mouth, the nose, and the eyes are. Because this will be our Canvas. So I'll just quickly draw
six really wonky faces. You can do more or
you can do less. It's really up to you. And I'd just like
to write themes. And maybe one theme that
we talked about was food. So was it bouba? Pizza? Could be whatever. Maybe another theme
is popular culture. That could be emojis, maybe Smiley faces, frowny
faces, angry faces. So feel free to just start
connecting these words. And of course you can
look back at Gore, saved inspirations and see what people have been
doing over there. So if it's peaks them, maybe I'll have two pieces. And of course your face
filter could be really simple or really complicated. Maybe for baba, it's also to bulbous for maybe
you can add more. Maybe that looks really weird, but we can refine it as we go. Maybe for Smiley faces, we have a bunch of Smiley faces in
different colors and we can write notes to ourselves
of what we'd like. Sticker baba. What other things can we create? We can create Blobs perhaps. If we don't know what to create, we can always just
add some colors. We can even start
thinking about motion. If it was blobs and we can
make these blobs move. We can do that by thinking
about it in frames. So we have frame one, this is one blob. And maybe the second frame. This is our first one, but maybe it's starting to move. This is second frame. Second, third frame. This is kind of like let's make this make more sense.
Kind of starts moving. This makes sense to me, but might not make sense to you. But that's okay
because these are notes just for yourself. This could also
big than small. O. We can combine some ideas
so Smiley faces, blobs. We can do a blobby Smiley face. And we can do filter
with everything we can do takes Ababa and Smiley faces. And from here we have some
ideas and some direction. And in the next section
we're going to open up, procreate, and we're just
going to start drawing.
4. Drawing: Alright, so we did our
research and we created some sketch and now it's
time for the fun part. Let's go ahead and open
up Procreate fives. We have Procreate pulled
up in front of us. We can go into our
plus sign and let's go ahead and just click square. We have our square
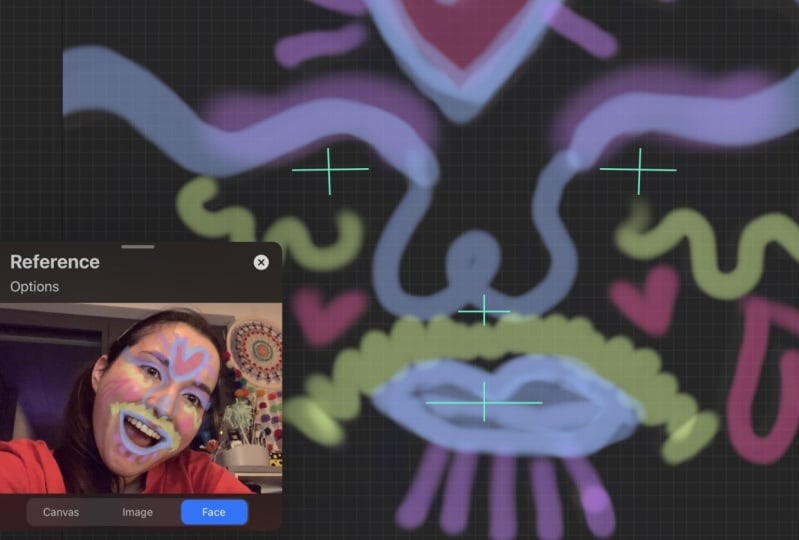
size in front of us. From here, let's go ahead, click into the wrench tool. And let's go ahead, go into Canvas and turn
on your reference. I have the reference box pulled up in front
of me and we can actually Move that
with the top part, so it can move that around. And let's switch from
Canvas interface. With face turned on. You can see your own face. And of course you can
see where the eyes are, the nose and the mouth. Hello. And from here, you can
see that wherever you go, the face filter also false. But right now this look, this look just not
flattering on me. So I'm going to
go into my layer, swipe that and we're just
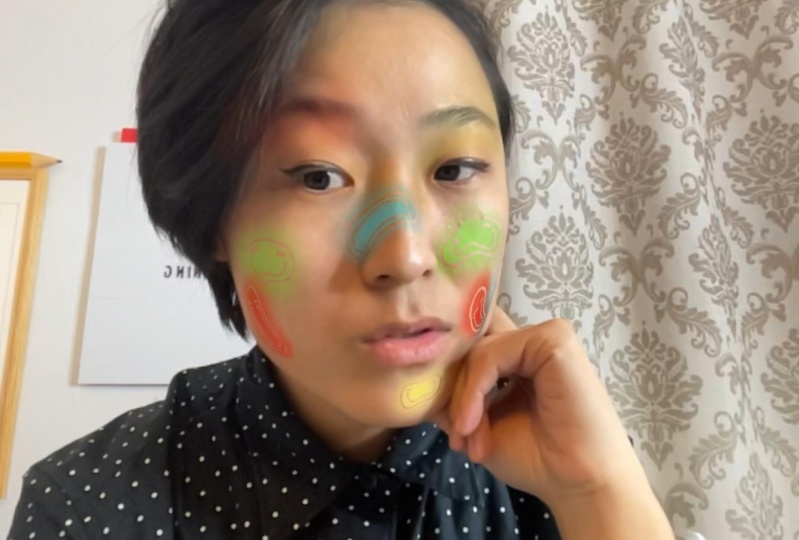
going to clear it out. As a little bit of a tip. I like to go into
my brush and use that soft airbrush
for a makeup look. For example, I'm going to do
a quick little eye shadow. You can see that my opacity
right here, not that high, which just means that it's more transparent
slash see-through. And of course I can go
into my layers again and click on n and just
make it more subtle. That's pretty neat. And I like to use that
for blush or eye shadow. So it looks a little
bit more natural. And with that, let's get started on drawing
our face filter. For myself. My theme is Smiley faces. For you, it could be
smelly faces as well, but just remember to add in
your own style slash flare. So let's go ahead
and begin drawn. I actually created
my own color palette that I'm going to
be referring to. You could do the same or you can just play around with
your own colors. For me, I like to do a little bit of a
limited color palette, so not that much color. That way it doesn't
look super crazy. Right now I have a blob and this actually looks really strong and I'm on a second
layer that way, if I wanted to, I
can move it around, make it bigger or smaller. And of course, I'll
lower my opacity. So you can see blue follows me around and I'm going
to make a mask. And did my mask. What I'll do is I'm going
to use the monoline, zoom in a bit bigger brush. We can even make
the opacity higher. I'm gonna do a squiggle. I'm just gonna that out. And you can see it's
happening on my face. Create a new layer
that way I can add in. Of course, I'm gonna make
that big Smiley face and this is really creepy Smiley face, but you can see that's what
it's starting to look like. Maybe if I want I can add a
news and maybe that's weird. I'm just going to
repeat this process. All right, So this is the
look of my basic face filter. You have some makeup
since Smiley faces. And of course I'm going to
refine this a bit more, but you get the idea. And for yourself, if you're still working on
your face filter, be sure to finish up with that. Because in the next section, we're actually going to learn
how to start animating. So with that, I'll
see you there.
5. Animating : All right, In this section we're going to learn
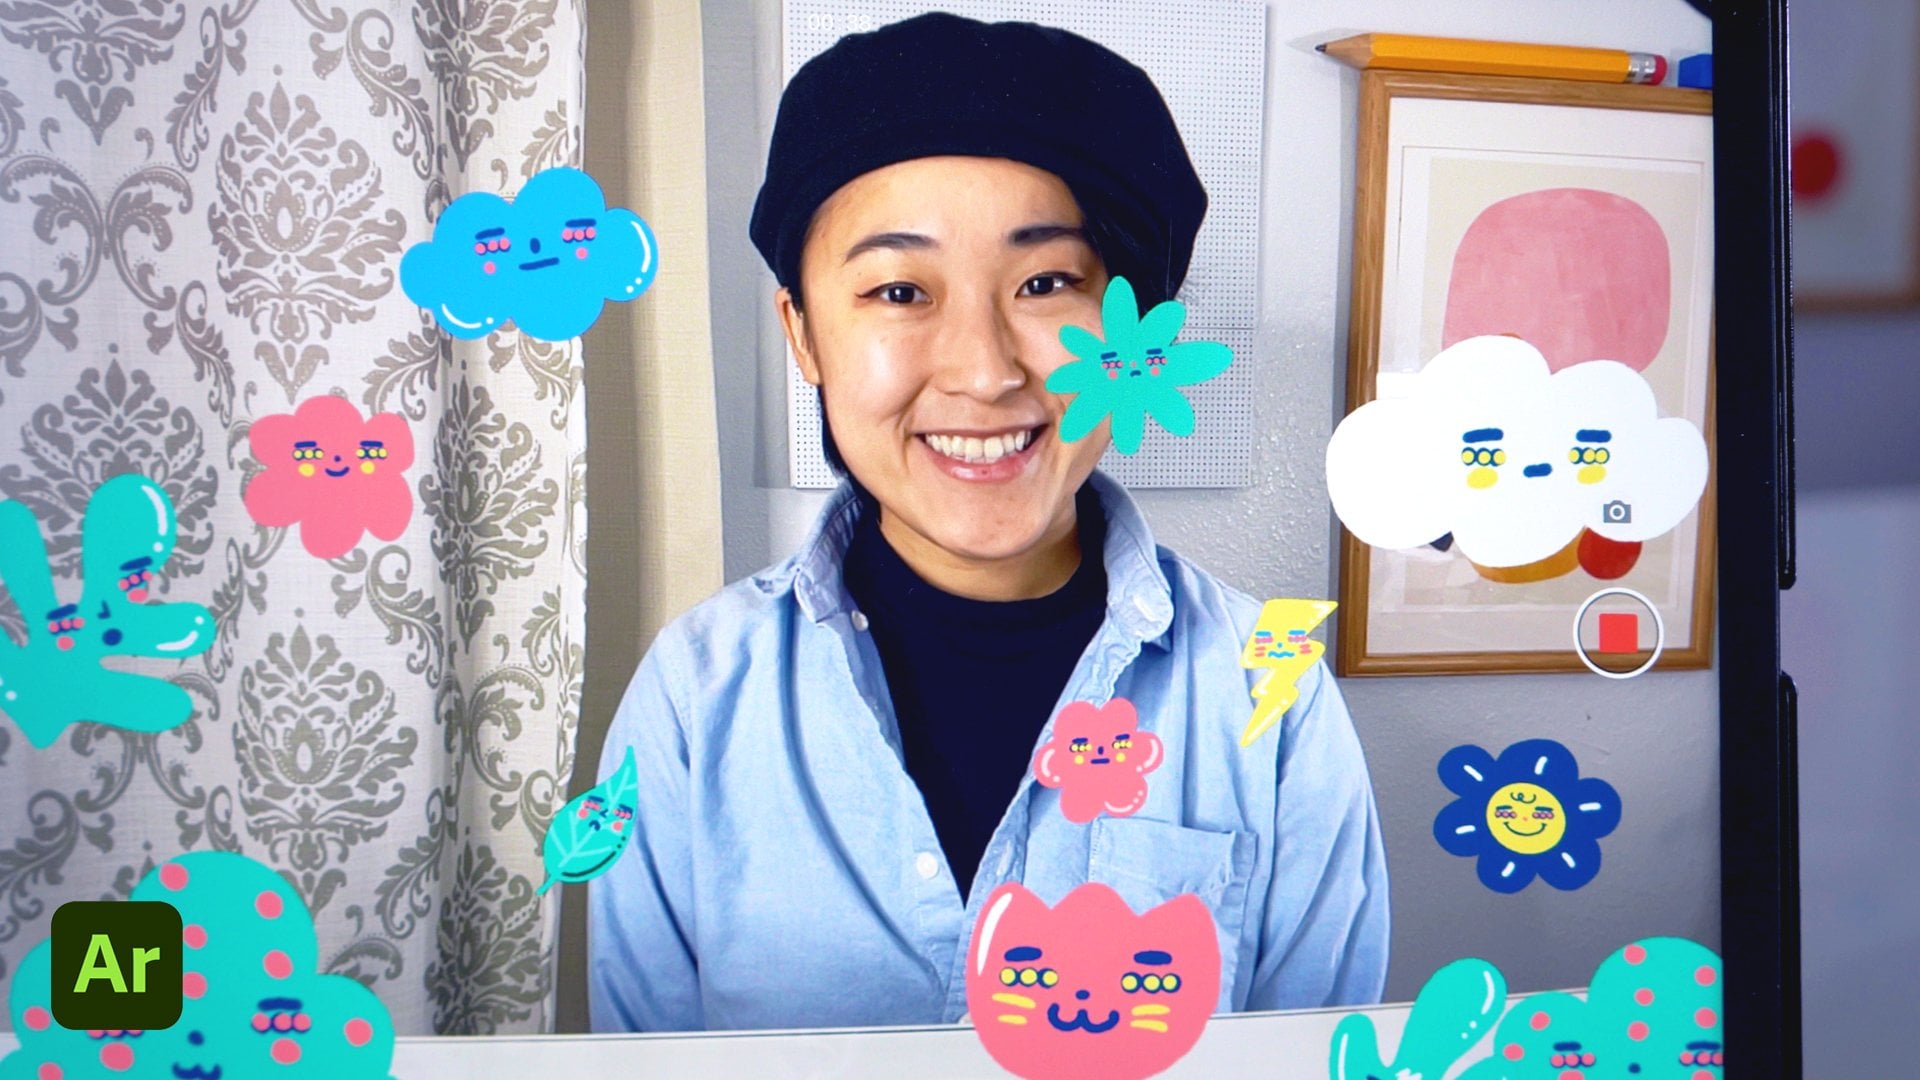
how to animate. And as you can see, I cleaned up my face
filter quite a bit. So there's more smiley faces
and I cleaned up my makeup. And of course, Let's go ahead
and learn how to animate. Let's go into our layers. And as you can see, have a bunch of layers. And with each layer I
have a Smiley face. And what we're going to have
to do is we're going to have to group these together
into one frame. And in order to make animations, we're going to need at
least three frames. Let's begin and let's
group it together. So for this, let's
call this one frame. And in order to group, what we're going to do
is we're just going to swipe to the right. As you can see here, we've highlighted all of these and we're going to go ahead
and click onto group. If we close that up, That's one group, which
is also one frame. So we can rename this
and we can just write 11 will be our first frame. And in order to see our frames, we're going to go
to the wrench tool. We're going to Canvas and
we're going to turn on. Let's turn on animation assist. We have Animation Assist on, and you can see the bottom, we have our first frame. In order to add a frame, what we're going to do is we're going back into our layer. We're going to swipe to
the left, duplicate. And this is our second frame. It looks exactly like
our first frame, but let's go ahead and
rename that for myself. This motion will just be
maybe it's growing bigger and smaller and OB really simple and I'll show
you how it's done. With my second one. What I can do is I can open it up and I can go into the layers. I can click onto this arrow. And what I can do
is I can click you in a form I could
distort a warp. Whatever you'd like to do. Go ahead and do so. If I wanted to just make this pulse make
it small and big, I can just make it a
little bit smaller. I can see a bit of
what it used to be, the size that he used to be. I'm just going to do
that with all of these. If you want, you can play with the warp tool so you
can kind of warp it. And here's another playing with the warp and I'm going
to make it smaller as well. So go ahead and do that
with each of your elements to distort it as well. Alright? So we have two frames and we can test and see
what that looks like. That's what it's
starting to look like. And you can go into
your setting and you can select
your looping type. You can loop it, which means it goes in a circle animation. Or you can ping pong, which just means it
goes back and forth. Or one-shot, which
just means they'll go from frame one to two. But let's go ahead and select our option as
loop or ping-pong. We can make it go faster or slower depending on our
frames per segment. So this too crazy. Make sure it's at a good speed. So maybe it's five, but if you want it faster, you can go ahead and push it. You know, more
frames per second. And with that, let's go back. And let's pause
this really quick. Let's create one more frame. Remember earlier I said let's
have at least three frames. That's a minimum number
that I think would be good. So I'm going to change this. Change this to three. And from there, go ahead
and do the same thing. So maybe gets smaller. Let's go ahead and
play this animation. All right, so that's how you can animate your face filter. And of course, feel free to animate it however you'd like. This is just one example
that's super-duper easy. In the next section, let's go ahead and share an export this out
to your friends.
6. Conclusion : So at this point we're
really excited because we've finished our face filter and
it congrats for doing so, because now we get to
export it and share it out with their friends
and hopefully maybe me. And in order to share it out, what we'll do is we'll go into our options
panel right here. And we have the option
of taking a photo or recording a video for me
because it's animating, I'd love to just record a video. This is me recording
the video and I couldn't do it earlier because I was actually screen recording. And you can see it's not moving. But if I click Play, you can see that my face
filter moves as well. I'm looking forward to seeing your super cool face filter. And if you'd like, you can turn your basic
phase filter into an Instagram or
Facebook face filter. And you can do so
by checking out my Skillshare staff pick class, how to turn your doodles
into a phase filter. And in the meantime, keep shining and stay lucid.
 Annie Liu, Digital Designer