Transcripts
1. Intro: Ar, according to Wikipedia, is an interactive
experience that combines the real-world and computer
generated content. In other words, AR enhances
our perceptual experiences by overlaying virtual slash digital content over the
world as we know it. Or as I'd like to say, let's, let's just call it magic
because it's this bridge from the visible to the
invisible slash, vice versa. And with magic, I know it's
probably going to feel like this medium is really intimidating and adjust
plane challenging. Because let's face it, when you think of AR, AR, that's the stuff
of the future, right? It's like sci-fi tech things
and all of those things. Those things can be hard. But in this class, I'll make sure
it's easy and fun. And in this class we'll learn how to prep your artwork for Adobe Aero and the basis
of how to use Adobe Aero. And to finally, at the
end of this class, you'll have the
opportunity to step into your creation in this
artist's meets art project. Overall, you'll get to play in a relatively new medium
that's still developing. All while realizing
it's fun, easy to do. And I'll be your instructor
for this course. Hi, I'm Annie or blue Sid. And for the sake of brevity and the meaning behind
lucid is twofold. One is clarity
through connection and the other is keep shining. Your spark, sparks others. And I'm all about creating under this mission statement While sparking this in others as well. So whether it's illustrations, Jeff's wonky
lettering, et cetera, I keep it loose. And in regards to AR, I've actually
dabbled in AR a bit. I've created a priority phase
filter that got featured on the Instagram gallery
of their favorite effects, garnering some million
or so Impressions. And I also teach
two classes here. So one is a staff pick
clumps where you can turn your doodles into a
phase filter using Spark AR. And another class is one
where we get to create and animate a face filter
in procreate five x. So it's a bit of
face filter things. And with that said, let's dive right in
and let's get lucid.
2. Project Overview: Class and project
overview slash material. So here's what we'll need and what to expect
from this class. This class will be stepping
into our AR creation. Think of it like an
artist's meets art type of project where your
work and yourself, you all both occupy the
same space together. And here's what we'll
cover in this class. We'll cover doodling, drawing, sketching, prepping our
artwork for Adobe Aero, importing that in setting
up our scene in Adobe Aero, and of course, how
to capture it all so you can save it as a
video or photo to be shared. So in order to make that happen, here are some materials
that we'll need. We'll need Procreate slash, Adobe Fresco slash
Photoshop, Adobe Aero, of course, and our
creativity and imagination. And the someone to help
you out to capture or if you're doing this
by yourself, a tripod. So with all of our materials
and what to expect. In the next section, let's actually get started.
3. Brainstorm: Alright, so since this class is all up to your imagination
and creativity, I'll leave it to you to figure out what
you'd like to draw. But as a jumping off point, Let's do think about things and, or topics that you like. So what's try to
think of some things. And you can follow
along at this part. You can grab a piece
of paper or you can be like myself and
just use an iPad. But whatever you choose, make your list of
favorite topics slash interests slash things
that you'd like to explore. So I have my themes and let's go ahead and start
thinking of some things. So maybe it's a mixture
of your favorite food. So I'm just gonna
write favorite food. And maybe it's
some cute animals. Maybe it's office supplies. Feel free to go as wild as
your imagination likes to go. And maybe even I'm going
to put nature as my theme. So we have a couple of themes. And keep in mind that these are going to be our
guiding points. So if something hits, so if we have an inspiration
that comes our way, feel free to just
capture that as well. Because as they say, our isn't so much about
thinking something up. Rather it's about capturing. So R is about getting
something down. And I like to think of this process as
recording and capturing. And it's just a
little tidbit that I learned from a book
called The Artist's Way, but back on track. So we have our list. And in order to make
this a bit easier, what we can do is we can start
narrowing down our list. So for myself, I think
I'll focus on nature. And of course
sometimes your themes slash what's in your
list will overlap. But I'm going to
stick with nature. And from there, Let's get rid of these other themes and let's focus on our one theme for my self is the
theme of nature. And what we're gonna
do is we're going to dive in a little bit deeper. So let's think about
what nature entails. So nature can have clouds. Nature can have grass. And on a similar note, flowers. And we can even go as far as to identifying specific
types of flowers. So have that there. And let's think of other things. Maybe rain, thunder. And this could even
have rainbow, leaf. What other things? We can have trees. We can go on and on and on. And I'm going to do a
little bit more of that. Alright, so once
we feel like we're at a good place with our theme, we can go ahead and jump
into the next section. And a reminder to that, regardless of what
theme you choose, do have fun with it. I remember that at
the end of the day, it's ultimately
what you'd like to create and share
out into the world. So in this step, we've just brainstorm
some ideas. In the next section, let's get to drawing.
4. Drawing: Alright, so we
have our theme and a general idea of what
to draw slash doodle. So let's get to it. In this section, we have the
choice of using Procreate, adobe Fresco, or Photoshop. And for myself right now, I have Procreate
opened in front of me. And this is a size of
2048 by 2048 pixels, which is a one-by-one ratio, which just means
it's a square size. And with that opened, I'm going to actually
doodle off of the list I've created earlier and turn
those into characters. And let's at least
have five elements. But I would encourage you to do more than five and to
hold you accountable. You can draw while I'm drawing. But of course, if you're
crunched for time, feel free to skip to
the next section where we'll begin to
export our elements. Alright, so now
it's time to draw. Alright, that was a
great drawing session. And here's a quick run
through of what I drew. And in the next section, Let's get this ready for
Adobe Aero and export it out.
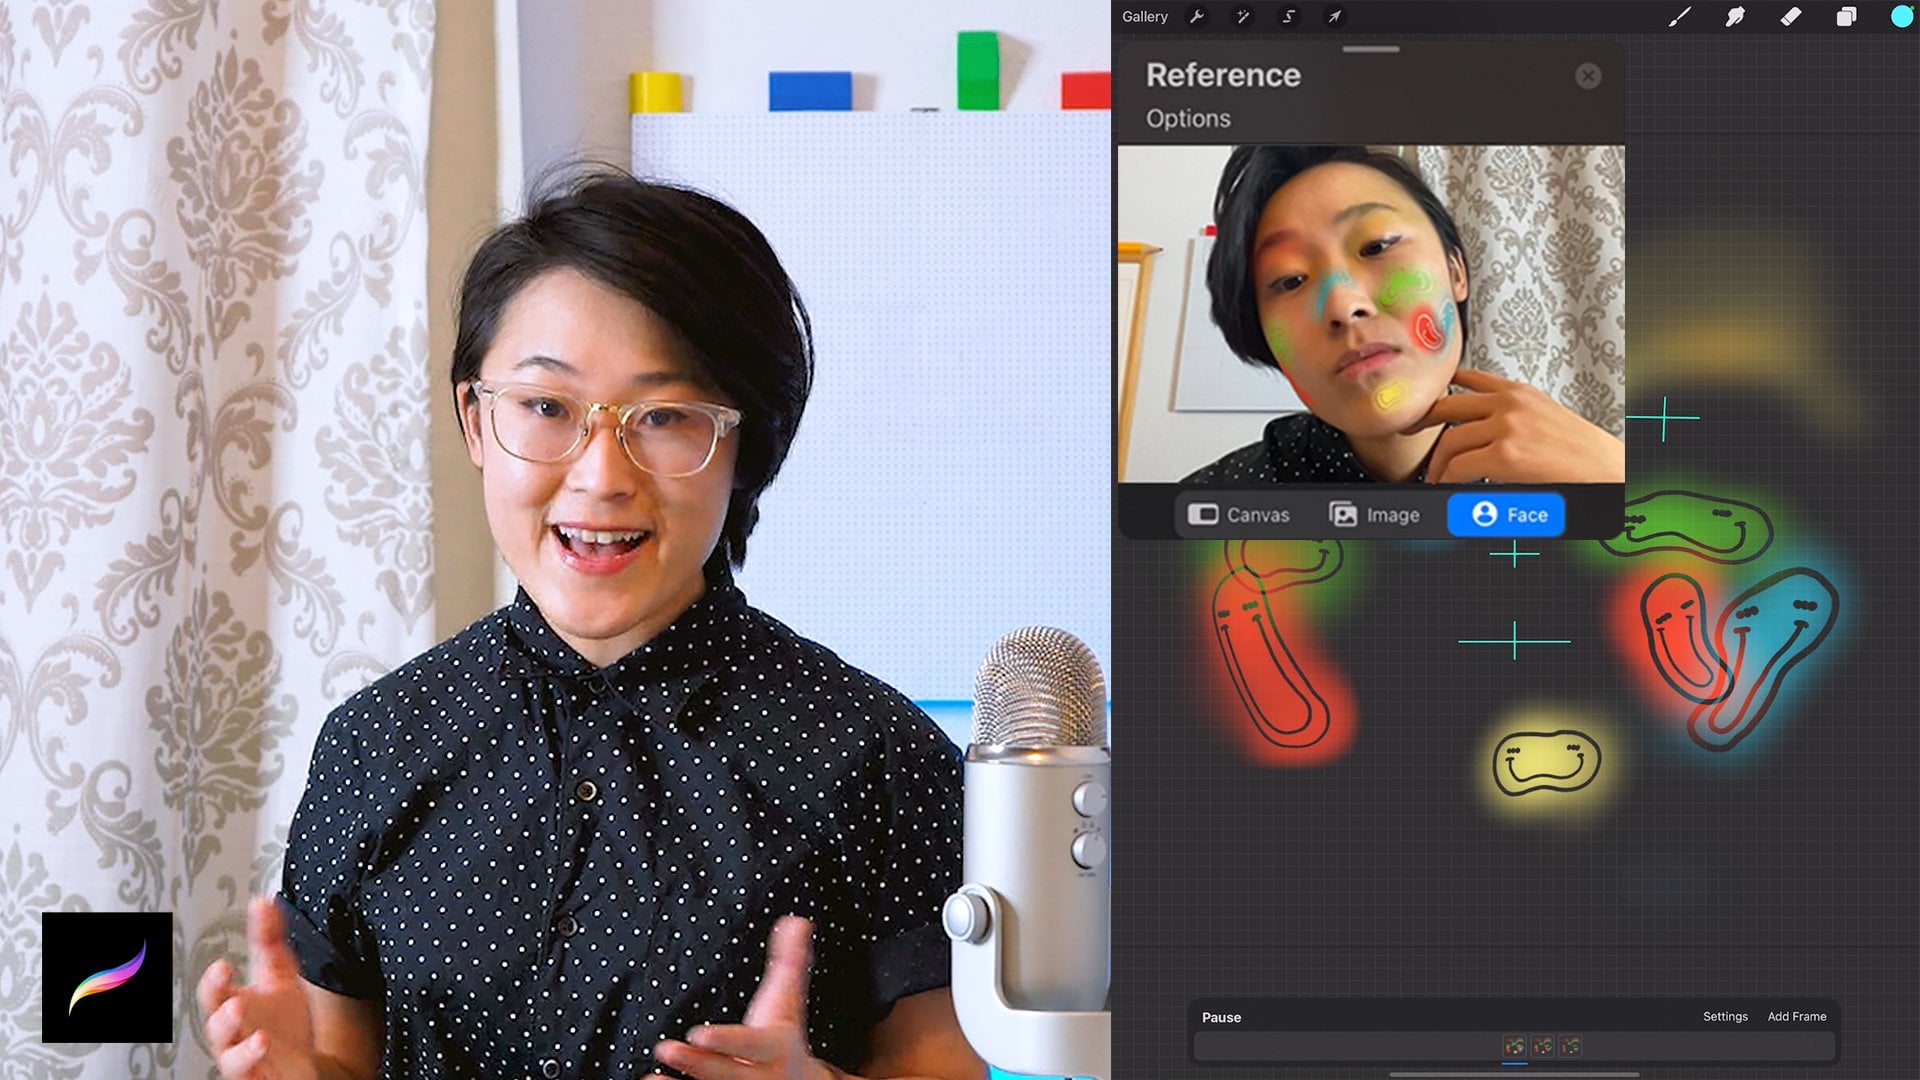
5. Prep and Export: A quick tip to if
you're using Procreate, is to make sure your layers
are in one group. So e.g. these are all groups right now. And inside my groups
are little layers. And in order to create a layer, what you would have to
do is you would click onto the piece that you want. So here's some eyes
and then I'm going to swipe to the right. Swipe to the right,
swipe to the right, swipe to the right. And it's already in a group, but I'll just show you
a group within a group. But if you don't have a group already and
you hit Group once, that I'll just create one group. So that's my new group. And this will help you
to export it as a PNG. Alright, so once you
have your group, this will make it easy
to export it as a PNG. And in order to do so, make sure your background
is transparent. So usually you'll have
a background color. If you see a fill
in your background, like what I have
right now with this, I'm just going to uncheck
mark the background color. And there you have it. It's now transparent. And from there, let's go
ahead and export this as a PNG will use a
wrench tool right here. And I actually have it as a shortcut on my little key pad. So I'm just going
to click onto that. And from there what I'll do is I will export it and
share it as a PNG. And I'm going to
click Save Image. That's how you can export
a PNG onto your photos. Alright, let's export
this really quickly. We've just exported
these as PNGs, and now they're in our photos. So if we go into our photos, these are all of our PNGs and we can go ahead and select
all of our artwork. What we'll do is we'll create an album where they get to live. And I'm going to
create a new album. And we can just name this
something like meats artists. So once we click into our
art meets artists folder, we have all of our
assets and this makes it so it's
easy and organized. And a quick note, if you actually want to
jump right into Adobe Aero, feel free to download
these assets for yourself in the
Resource panel. I've actually provided
that for you just in case you're in a rush and you just really want to
play with Adobe Aero. Feel free to play with these. And of course, feel free to
share it with me as well. So with that said in
the next section, let's go ahead and
play with Adobe Aero.
6. Adobe Aero Basics: Alright, so in the
previous section, we exported all of our
PNG's into our photo album. And now let's go ahead
and open up Adobe Aero. And that's right here. And we can use a iPad or our mobile devices into for
using our mobile devices, be sure to just
AirDrop or just send over your PNGs to
your mobile devices. Next, let's go ahead
and create a new file. And you can find that
with the blue plus sign. Now, it's opened up my
camera on the back of this iPad and it's
looking for a surface. And you can see right
now the surfaces it's found is
located on the wall. And I don't really want that. I want the anchor point slash
surface to be on the table. So what I'm gonna do
is I'm just going to go ahead and try to look for my surface. So I found a surface on the
table and I tapped it once. And now my anchor
point is this table. Alright, let's bring in
our PNG into this room. We can click on the plus
sign and we can click onto camera roll because
that's where we've placed all of our
PNG and assets. And it should be on the top. And if it's not, or if you want a
more organized view, you can go ahead and open up your albums and find where
you placed it and go ahead and click on the asset
that you want to place onto frame and go ahead
and just tap it once. And there you go.
You have your asset placed inside your frame. So what we can do
next is let's go over the basic ways in which
we can move this around, rotate it, and scale it. So first, let's go ahead
and tap that once. And with one finger
you can move it back way far or you can
move it really close. Next, we can use two fingers and we can
actually scale it up. And you can actually
use your camera and just see that it's
still in the shot. So have a really big or you
can make it really small. So it just depends on the way that you
want it to be sized. And the other thing too, is with your two fingers, you can even rotate it a bit. So you can a little bit tricky. Because it's a
little bit tricky. You can actually use the bottom tools right
here to fine tune it. So rotate. You can actually use
this and it rotates much better than if you
were using your fingers. The fingers is just a shortcut. And the other shortcut
two, is three fingers. And what you can do
is again, tap on it. And three fingers,
you can move down. You can move up. So go ahead and play with that. And with that basic
knowledge at hand, Let's go ahead and place all
the assets inside the frame. In the next section.
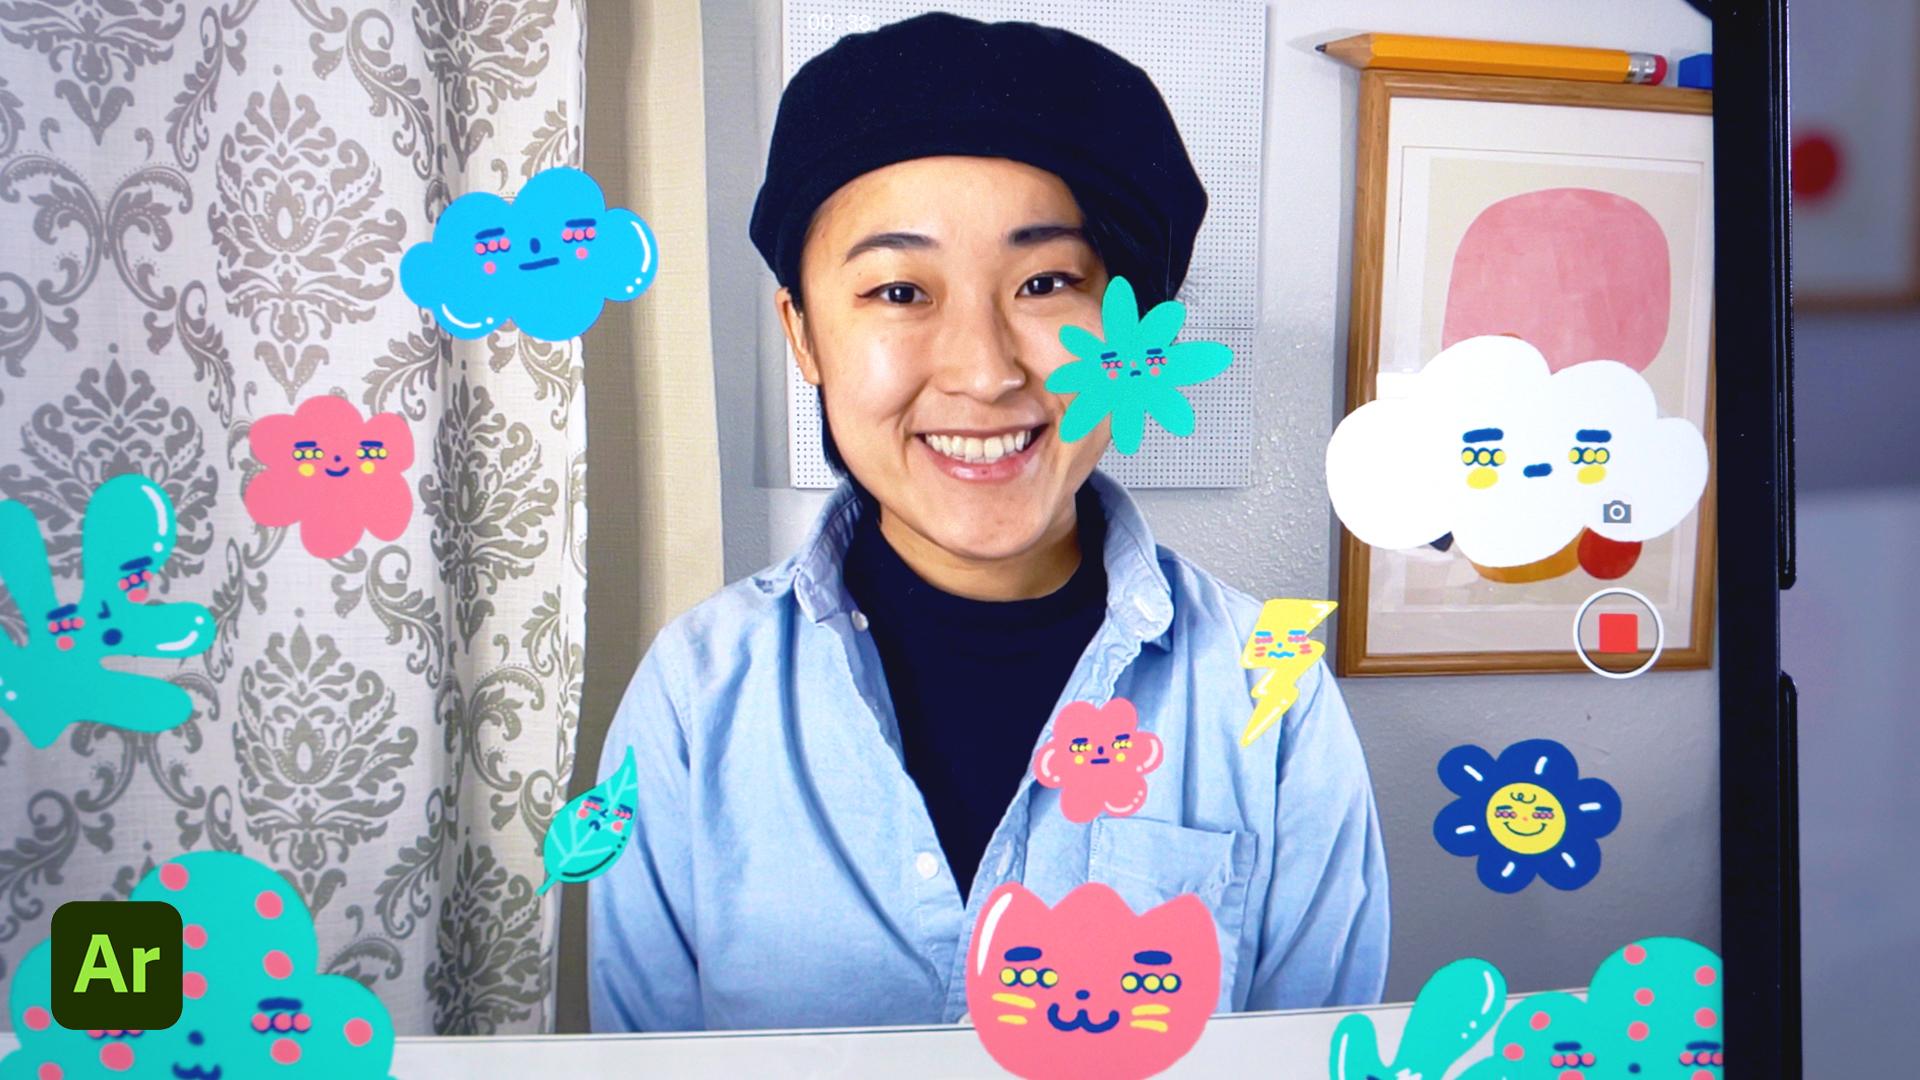
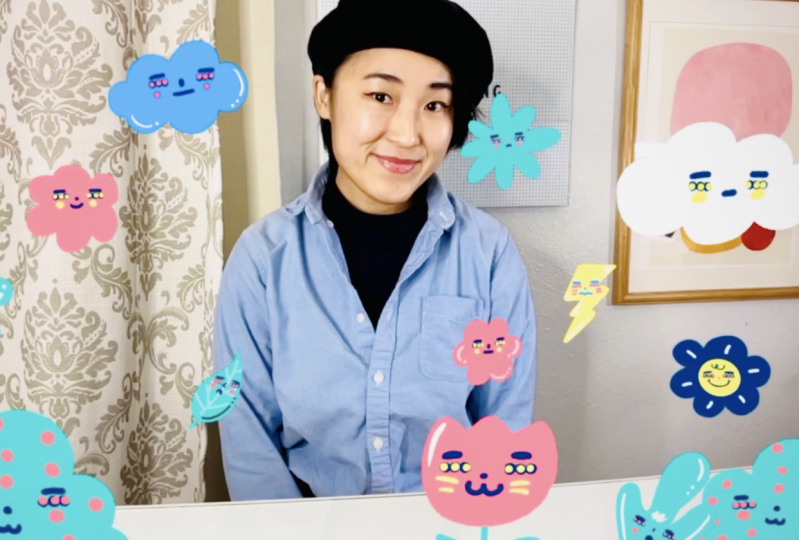
7. Composition: Alright, let's place our
PNG's into the frame and let's go ahead and make
a really nice composition. Alright, let's make sure that
we have a good composition. And in order to do that, let's first think
about the subject, which is in this case ourselves. And with that, that'll
be the focal point. And our elements
around it slashed. The PNGs could be smaller and it could frame
the main subject. And with that, let's also think about placement of these PNGs. So for some of my PNGs, it'll be in the foreground and others will be in
the background. Again, we can use
our one finger to push things forward and
to push things back. And we can have some elements
higher and lower as well. And this will help with the
spatial dimension of it all. So with that, let's get
to playing a quick tip. Be sure to leave a little
bit of room for yourself to stand in so you can be in the
same space as your artwork. And another tip, you can
actually go ahead and reuse some of your assets
as well if you'd like. So you can have repeating ones. And you can just place
that inside the frame. Alright, so we've placed all of our elements inside the frame. And we might be thinking,
alright, Any this, this looks just like me
painting over a 2D photo. Like what, what is
special about this? Well, this is the part that
magic comes into play, because once you start
moving your camera around, you can see that this is pretty magical because it's actually sitting where you've placed it. So some of the items
you've placed, it's far behind and
you can see that's what's happening when you
move the camera, right? The thunderbolt is behind the cloud because we've
placed it way in the back. And you can see items are
placed in the foreground. You can see items are
placed in the background. And I think that's what
makes this so special. And if you want,
if you go closer, you can see that some items we'll start to disappear as you
get closer, right? I'm not just shows you that spatially things are happening. And now here is the cool part. You get to be inside the
frame with your art work. But before we do that, let's learn how to add in
motion in the next section.
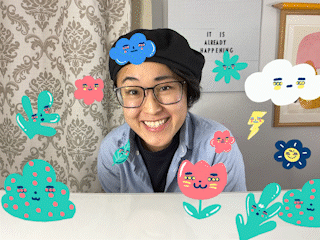
8. Add in Motion: Alright, so for this section, Let's just add in motion. And we can achieve this by
clicking into an asset, adding a behavior, and
let's add a trigger. So let's just do Start and feel free to play with all of
these actions as you please. And I'm just gonna do a spin. And of course, you can see you can even customize
it a bit more. And you can just check mark. We can keep adding on to our
animation slash behavior. So we can click into
another one and you can see the name of each asset so you can know which
one that you want. So you can select it
in order to move it. So for that one, I'm going to do a bounce. And let's go ahead and click Play and we can
see which one plays. Once we like that, we can just exit and we can
keep going as we please. And once we feel like
we have enough actions, we can go ahead and click Preview to see what
that might look like. In the next section, let's go ahead and
jump into the frame.
9. Get Into Frame!: So for doing this ourselves, let's find a way to get creative on how to prop up our device. So we can use a tripod
or like myself, you can find a little book stand and find a way to just prop up your iPad so that
it's fully upright. And with that, let's go ahead
and let's get into frame. And let's just take that video. And in order to take a
video on Adobe Aero, what you'll do is
you'll click into preview and we'll
prepare the screen. And as you can see, a red button has popped up as
well as the camera. If you click onto the red
button, That's record. If you click onto camera, you just take a snapshot. So let's go ahead and
try out the buttons. So that's camera. And here it is recording. And you can even record
with your microphone on. And I'll just do that. And you can see right now
it's starting to record. So I'm actually going
to jump into frame and just record a
video of myself. And I'll just go from there. Alright, I'm jumping into frame, but here are some quick tips. So make sure you take multiple
videos, at least three. And make sure when you shoot your videos that
after each shot, you move your camera
angle slash iPad around just a bit so you
can get different angles. And this will be super
helpful in the next section when we start to think of
creative ways to edit this. A quick note too, if you have someone
helping you film, this will actually change the outcome of what
it might look like. And here is an example of what it could potentially look
like either way though, in the next section, we'll start editing
this creatively as if we're going to
do this on our own.
10. Editing: In this section, let's talk
about editing while I edit. So we can use an
app like in shot, or we can use Premiere Pro, any video editing apps
slash software will do. And here are some
options to think about. So one, we could create a
fake boomerang by creating a video and then duplicating that video and having the
second part of that reversed. Second, we can compile a JIF. And the way we do this is from the different angles
of video that we have. We can look for a screenshot. So we can have one
screenshot from one angle. We can have a screenshot
from another angle, and we can have a screenshot
from a third angle. And we can have infinitely
more screenshots as well. And make sure we just
compile that into a JIF. And that's what
I'm actually doing in this video right now. And of course, the
third option is that if you have
someone to help you, you can actually just
do that and have the person step front and
have the person step back. And again, you can create
that fake boomerang effect. And the fourth option might
be just creating a video of the elements moving while you're also
moving in the frame. And that might be the
easiest option. With that. These are just a few
of the options you can think about while you do
your creative editing. And keep in mind, you don't have to
follow this exactly. You can mix and match or you can do something entirely different. Again, this is all up
to your imagination. And here are some of the examples of what
can be achieved. In the next section,
let's share.
11. Conclusion: Alright, so another feature to this is that you
can actually share and share a link and you can
name it however you'd like. And once that's created, you'll get this QR code. And with this QR code, you can share it to other folks. And I encourage you all to
share this link if you'd like. And what that congrats. We've just stepped
into an AR creation. And hopefully this was
easy and fun to do. And as always, I'm looking forward to seeing
what you've created. And if you'd like, please do share it with me here or on Instagram as to
what you've created. In the meantime though, keeps shining and stay lucid.
 Annie Liu, Digital Designer