Transcripts
1. Introduction Ex Libris: Hi, I'm Emily. I'm an artist,
printmaker, and educator. I run a small printmaking
studio called cooler, and my goal with the studio
is to be a gateway into printmaking and introduce
this fun art form to a broader audience. I believe printmaking is really accessible for beginners
and is particularly fun for those of you who may not be super confident with
your drawing skills, as there is something
quite magical with printed image and simple bold
design always look great. I've been working as a
printmaking educators for years, and I have developed
some easy curriculum to introduce you to the
art of block printmaking through a small project
that will give you a great insight into the key principle of
relief printmaking. In this course, I will
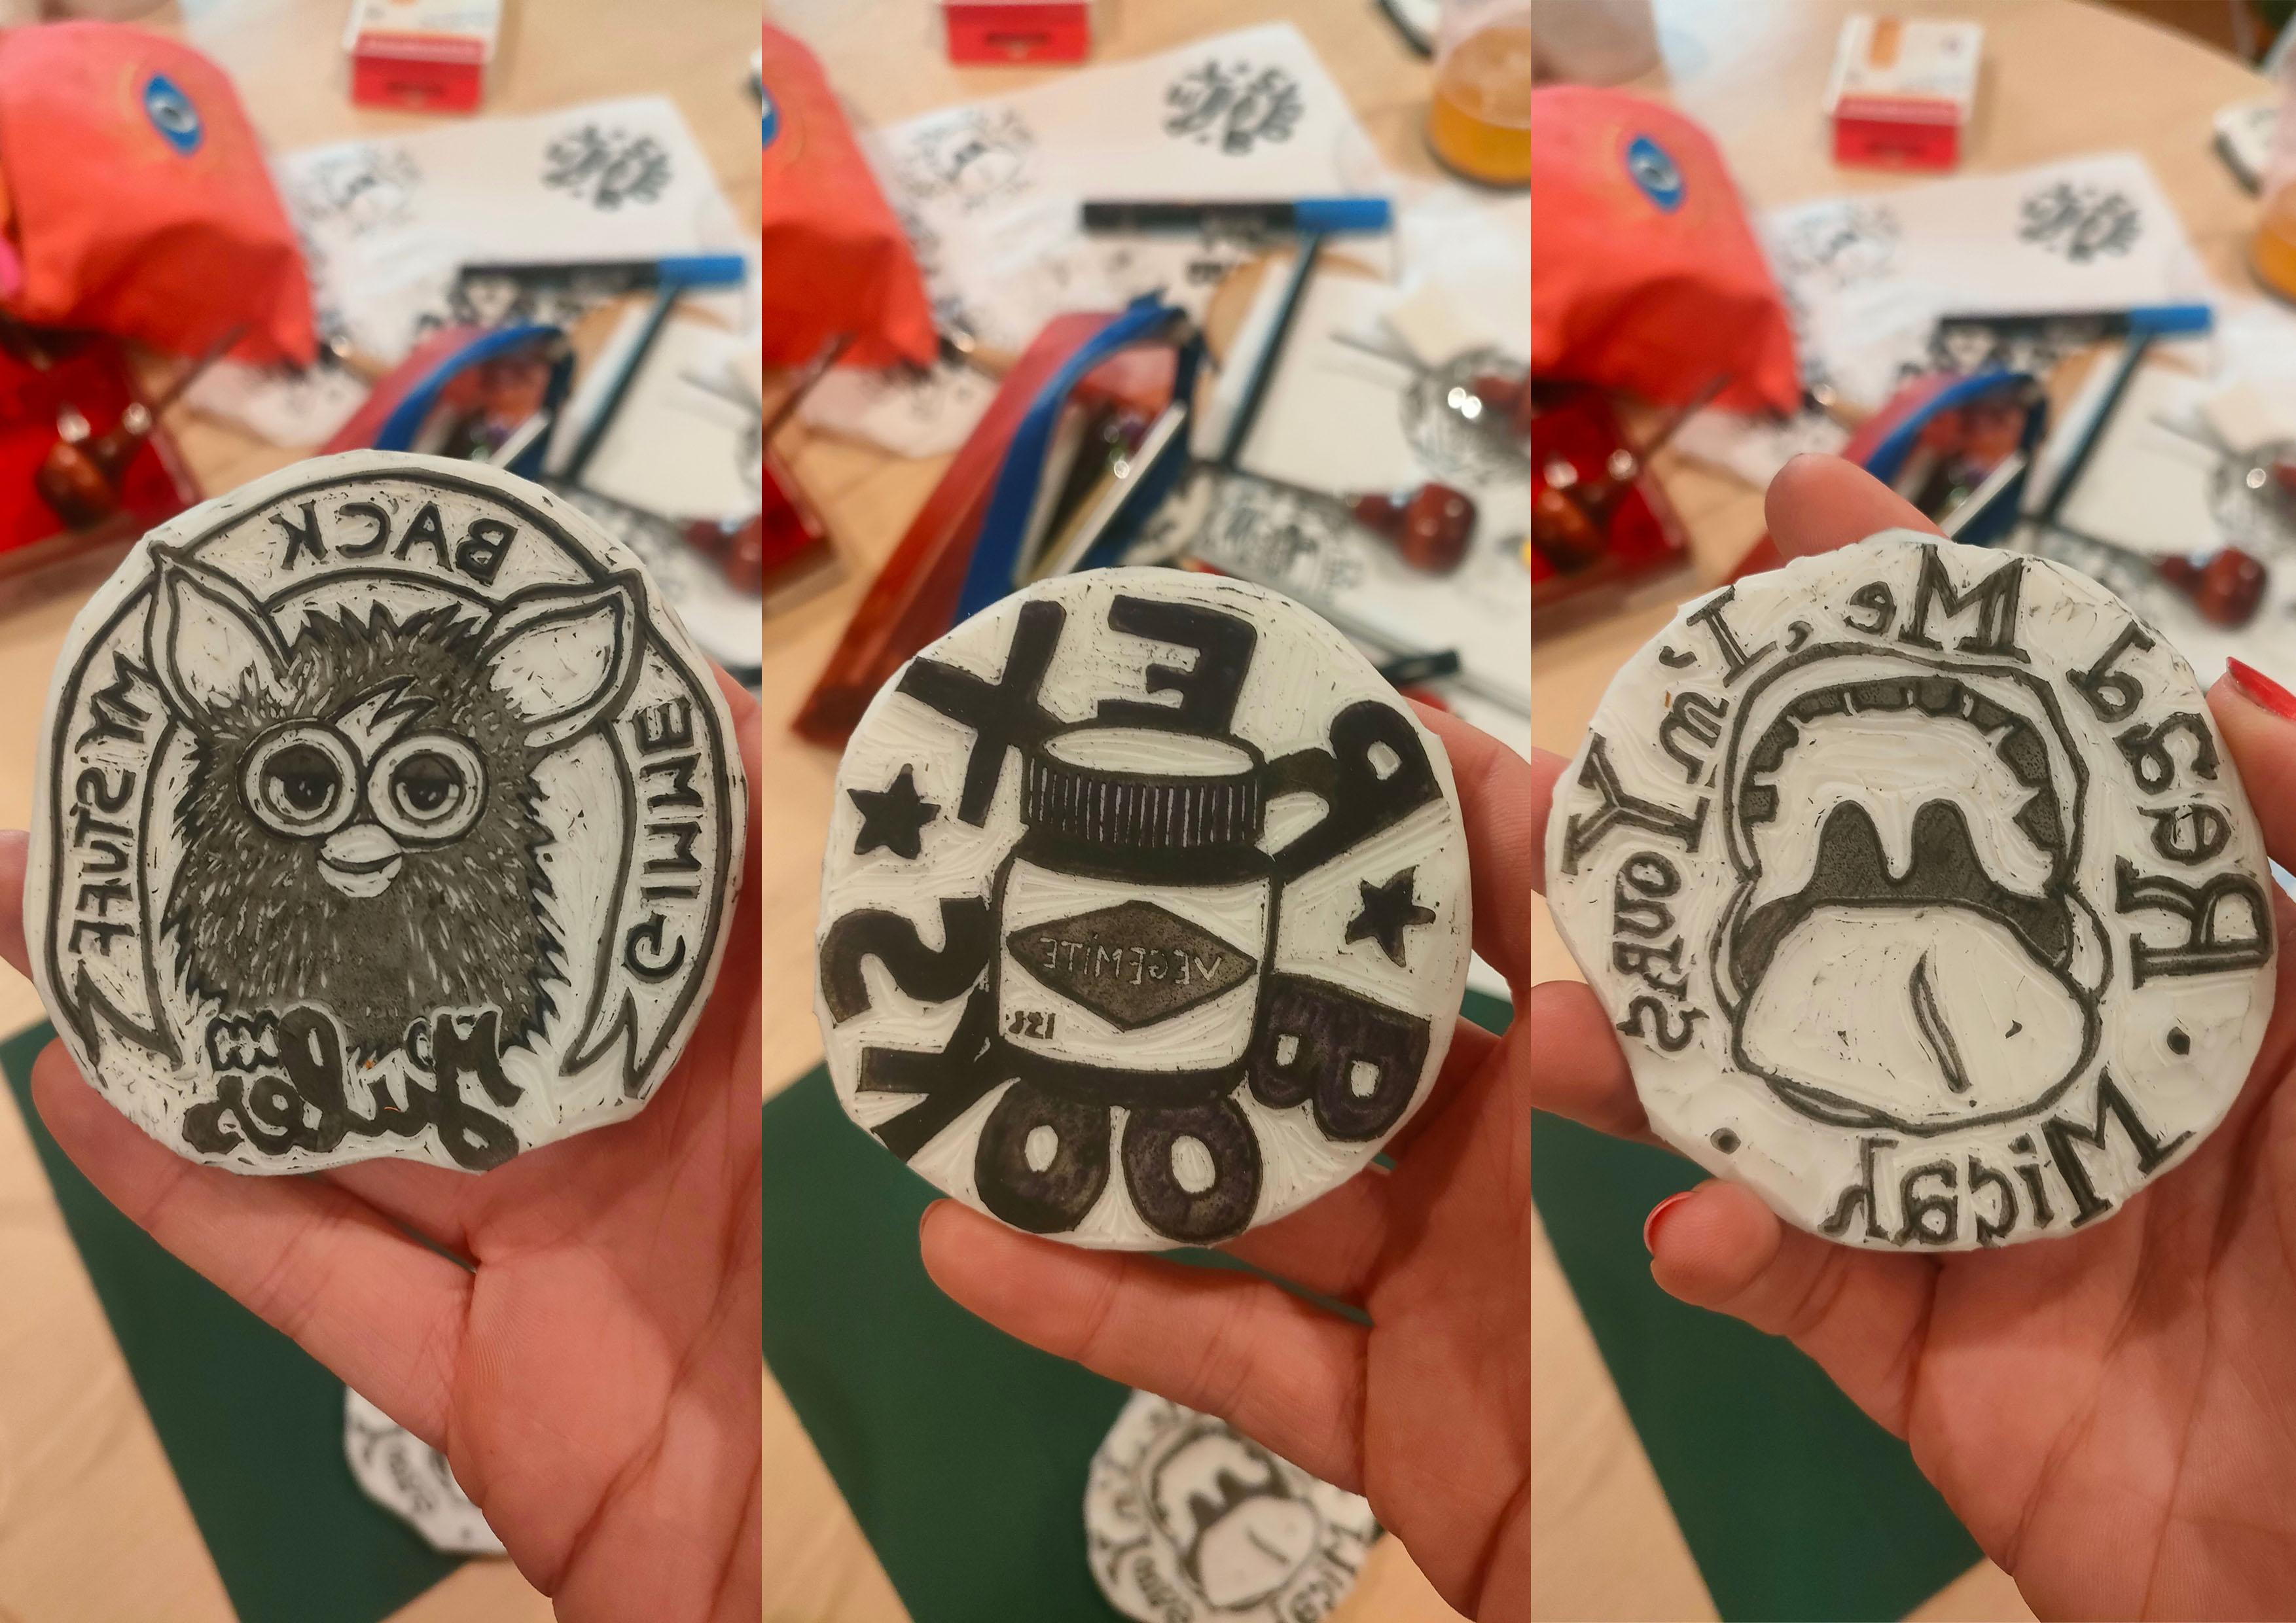
guide you step by step to create your own libris. Ex-Libris are personalized
books stamps, typically used by libraries to mark their book collection. And in this class, I will
teach you how to design, card, and assemble
your own libris to mark your own
book collection. This project is achievable in a few hours once you've
collected on the material, but it will provide you
with an understanding of the key concept of designing for stamps and printing by hand. This will give you the
autonomy to keep exploring block printmaking at home
with easy to source material. Let's get started in the
project and meet me in the next video to learn a
bit more about Ex-Libris.
2. More about block print: Printmaking is a broad family that encompasses
different techniques. Block print or
relief printmaking is the most ancient traditional
style of printmaking, and it turns out it's the
easiest one to start with. It's also the technique of
the printmaking family that is the easiest to do at
home with little materials. Relief printmaking
earliest example we have come from Eastern Asia in
China and then in Japan. When woodcarving was used as early as the fifth
century to create stamp for early
Chinese character and later to produce images, which has led to the
beautiful tradition of Japanese woodblock. It is only much later
in the West that wood blocks were used to create book plates
and printed image. And then 130 years ago, artists started to use nonum, a new material made out of cork, but was starting to get used to tile kitchens and bathrooms. The oldest example
of a linocut carved by an artist is
now 130-year-old, and the tradition of linocut has flourished to
the point that it is a leadle material carved today in the tradition
of relief printmaking. Other alternative includes
carving vinyl plates, sometimes called green lino and more recently Rubber block. If you ever carved
out your eraser at school to stamp
your composition book, you intuitively discover block
printmaking for yourself. Or maybe you've tried
potato stamp as a kid. It's the same principle. Carve your material to
create a negative image, then ink the uncarved surface
and transfer it onto paper. Pretty straightforward. In this course project, we'll
focus on carving rubber, which is the easiest material of the block print
family to carve. So it's a great place to start. You'll be able to focus on the design and learning
the key principle without the time
consuming process of carving larger lino
plate, for instance. But the principle remains
no matter the scale, so you'll be equipped for more ambitious
printmaking project.
3. Materials for stamp making: For this course, you would need some general art
supplies as well as some specific
printmaking materials. First of all, you would
need some carving rubber. Leading brands include speedball with their lovely
smooth pink rubber, but a lot of other brand exist, and I would recommend
looking for rubber that has a
smooth surface. Indeed, some bran have
a grainier texture, which I like less,
and some other more off white rubber
can be a bit crumbly. Some other like these ones have two different color on
the surface and inside, which can be great to see
how deep you're carving. Rubber can be quite expensive, and it's hard to find
alternatives to it. But some printmaker collects
large novelty erasers to print on or experiment with
non traditional materials. Make sure you share your
experiment in the forum. Then you will need some carving
tools, also called gouge. Again, some leading professional
brands include file, but despite having an all set up printmaking studio and
some professional tools, I find myself always coming back to those simple
affordable tools. Speedball also have this gouge with different tips
that you can change. It's affordable and
good enough quality and great to bring with
you to carve on the go. Whatever you use, make sure you have at least
two different gouge. One shape, and one U shaped one. They would create different
type of mark making, and just one of each
would get your long way. And that's it for
specialized materials. If you look at
entry level brand, you should be able to equip
yourself for $30 or so. You may also want
to get yourself some fine art quality ink pads. Of course, an office
inkpad will do, but for a better inking
and more prints, I would recommend fine
art quality ink pads such as the Tutti Kelo brand. The rest of the
material needed for this course are
basic art supplies. You will need an HB pencil, and if you can, ideally, a greasier one tells you
two B or four B one, but you can totally do
the course without that. You want to get yourself
a bold ink tool like a marker,
such as a sharpie. Sharpies are cheap and probably the printmaker
best friend. They help you design bold
black and white design, and the thickness of the line is comparable to what you'd be
able to carve as a beginner. You would want some
paper, nothing fancy, some A for paper from
the printer would do. And I'll be working
on a cutting mat with a pair of scissors, a box cutter, and a
bone folding tool, which I'll describe later, but is also absolutely optional. I will describe a variety
of option for you to assemble your stamp
onto a backing. You can use some ready
made object such as door knob or cod hanger
to create your stamp. But for this course, I
would describe how to use a MDF disc that I
got laser coded. I've included the template
in the resources, and you may be surprised
to discover that your local library has a laser coded that you can access
for an affordable cost. I would describe alternative
to this in assembling your stamp section of
this course. Okay.
4. Design research: I recommend doing a quick
Google image search for Ex-Libris to start
generating some ideas. Don't get too excited about
some very fine design that you might not be able to carve out for your first stamp. But keep in mind, any image can be adapted in
different ways for print, and in this course, I will
help you understand how. But doing a good Google
image search and building up a mood board is really part of the creative toolbox
or skill set. And there's a bit
of a myth amongst beginner that we creative, come up with ideas
out of thin air. But no, we all work
with reference images. The creative work may be
elsewhere on how you adapt it, transfer it to a different
technique or style, or even how your own
drawing style or lack of has altered and
transformed your inspiration. You can use Pinterest
or Instagram to tab and save your inspiration to
create a visual mood board. Or you can keep a visual diary where you print out
and doodle some ideas. Whatever works for
you and is easy to incorporate into your
workflow or busy life. And for this class, if you rip off an existing design
found on the Internet, by all means, go ahead. I always tell my student,
copy, copy, copy, steal as much as you can, as long as you credit who you
took inspiration from. But all artists
have started out by copying and you pick up so
many skills along the way. This course is first
here to equip you with the skill to get started in
stamp making and block print. We're here to discover
a process and workflow. So if your design
for this project is inspired by someone else, by all means, go ahead
and practice that way. You'll be surprised
along the way how your own original
ideas are going to start flowing
through the making.
5. Carving basics: All right, let's have a look at your carving tools or Guges. There are a lot of
brands available, but I like these simple ones. Whatever you're using,
make sure you have a V shaped one and a U shaped one that's
more like a scoop. Beware, they are sharp and
it is easy to stab yourself. Let's do a little demo for safety and to get to
know your carving tools. First, I hold my carving
tool with my whole fist, not like a pencil or pen. I then pop my index finger, my pointing finger, into
the gouge for better grip, and I go into the
rubber with a bit of a 45 degree angle to start
digging into the rubber. Once I'm in, I start to
straighten my tool more parallel to the block to prevent from digging a
hole through your rubber. You really don't
need to go too deep. As long as your nail get
caught in the groove, it will leave a mark
once you imprint it. Always carve away from you and not toward yourself to imit the risk of
stabbing yourself. I do recommend having
some band aid handy just in case I've cut
myself so many times, I have little V shaped and U
shaped scars on my fingers. Try and practice some straight
lines, some wobbly lines. And for an extra challenge, try and create a little circle. When doing so, I
usually find myself rotating my block
instead of my tool. Sometimes the rubber gets caught and you need to finish petting it with your finger, and that's absolutely fine. You are starting for
this course with the easiest material to carve
of the whole block family. Then after that would
come the vinyl, the lin, and then the wood. But the principles
stay the same. So once you've
completed this course, you would have the
key principle of block printmaking
and you'd be able to move on to carving larger print on
different materials. Let's come back to your V
shape and your U shape tool. They are going to be creating different mark onto your block. The V shape one tend to
create a finer line, especially if you stay
onto the surface. It's like drawing
with a fine liner. And the U shape one is going
to create a bolder line, so it's more like drawing
with a sharpie or a marker. This is going to
give you a feel of the different type of mark making you want for your design. But generally speaking, I
would recommend starting with your V shaped tool to contour the entirety
of your design, and then you can move
onto your U shaped tool to remove larger area
for white background. Keep in mind that it is
quite hard to keep a clean, crisp white surface in stamp making or in relief
printmaking in general, which is not necessarily
a problem in itself. Some of the background
may catch a little bit of ink and create some
beautiful texture, which are quite typical
of your stamp aesthetic. Why not embrace it? But since it's likely
that it would show, I would recommend being intentional in the direction
in which you're carving. Depending on your design, you might want to be carving
horizontally or vertically, or even in a radiating fashion. But if you really need
a clean white patch in your design, you
can still achieve it. The trick is not so much going
deeper but going smoother. You want to carve out
anything that is poking out, the crest created
by your carving. Beware that this can be
a bit of a rabbit hole. It's catching ink
somewhere unwanted, you carve it out, creating an imbalance
in your block, and then it catches in
elsewhere and so on. The edge of your stamp are likely to always be
catching unwanted ink. So usually we'll finish
off carving our block by beveling the edge of a rubber
stamp with a carving tool.
6. Cutting your block: You can design your libris in any shape, but
for this course, we are going to be working on a circular slam of eight
centimeter in diameter. Let's go ahead at
Prep our Block. Trace your eight
centimeter diameter circle with a compass or just
with a glass or jar. I'm going to be using
my MDF circle to trace my templates
onto my rubber block. Then we're going to go ahead and carve out this shape
with a box cutter. Depending on the
stickness of your rubber, you may want to
use quite a bit of strength or even stand
up for a better grip. Try to carve out
your rubber in one go to avoid irregular shape. And here, you now
have your block ready to design on and
carve out for your stamp.
7. Your design: G. Here are a few
example of elements that are commonly
found in stamp design, ribbons, bands, stars
or little dots. Often, your stamp would have a border element,
potentially including text, going all around or over
half of your stamp, and there would be
a central element that is more illustrative. This template is an easy one to follow
for your first time. Your name all around in a band or a ribbon and a symbolic, simple image that represent
you in the center. Let's talk about the lettering. You don't have to, but most stamps will
include some text, your name, brand, model, or any short message you
wish to have up here. Pay attention to example
in stamp design. Don't get too ambitious with the quantity of text you
include in your design. Letter are hard as you will have to individually carve them out. Consider something simple
like Jasmine's library or Fernando's book or just
your name and your surname. During this course,
I will constantly encourage you to
simplify your design. From experience, beginners
often get carried away with small details of font that you won't
be able to carve. For best results,
keep it simple. Block letters, simple
geometric shape. Silhouettes are great. Cats, birds, flower,
for instance. Let's get started on generating some idea
for your ex libris. The way I like to do it, I
like to start by tracing the outside of my libris to have a box or a
template to work from. Of course, you can design your libris in any shape,
but for this course, we're going to focus
on the project on an eight centimeter
diameter rubber block. I have my backing ready, so I'm going to use them
to trace my template. I'm going to trace
three or four circle to have option to test
out a variety of design. Having looked at some
existing design, you notice that debris often
have a few key element, text and an image, a central element, and a border. Try out a variety of each
element in your circle, a cat silhouette and the name
and the ribbon around it, for instance, an octopus and a circular border
with little dots. Just doodle a few simple
ideas with pencil into your template and
share those in the forum. They don't have to
be too polished. Just rough sketch
idea is fine for now. In the next video, we
will look at how to adapt your ideas specifically
for stamp design.
8. Designing for stamps: Now that you have generated
some design ideas, we're going to see how to
adapt it for stamp making. As we discussed, stamp
making is part of the broader family of block printmaking or
relief printmaking. Indeed, we are creating an image by carving
out some part of our block and leaving some
other uncarved or in relief. What we remove will appear as white or the
color of the paper, and what we leave
will stay in relief, catch the ink, and then be
printed onto the paper. This is quite unnatural
to us as we're more used to drawing with a black ink
tool onto some white paper. But here, we're
doing the opposite. We're creating some
white or negative space. It's almost like drawing with a white marker onto
some black paper. And you can practice your
stamp design that way if you wish to help
you get a feel for it. This is probably the steepest learning
curve of this course. But once you've done
your first stamp, it will all start to make sense. Any image can be adapted
for stem design. Take a simple shape,
such as a star. We tend to draw it as such with a black outline onto
some white paper. But if we do the same thing
onto our rubber block, we're going to endop with
something like this. If you wish to achieve
a white background, you're going to have to
carve out all of the white and simply leave this
black outline in relief. Most design end
up being a bit of a mix of black background
and white background. And in this course,
I encourage you to design a stamp that
has both elements. This will allow you to practice
both technique and get a better understanding of the key principle of
relief printmaking.
9. Transfering your design: After our last exercise, you would have
generated a handful of ex libris stamp designs. Now it's time to come into
one and start carving. You may have done the
hardest for now on, you'll be on rains. All the creative
workload is done, we're getting into production. Make sure your
design has a mix of black and white
background that will be achievable for you to
carve as a beginner. You can always practice
your design on a scratch plate or onto some black paper with
some white paint. You want to make
sure you understand what is going to be black or the color of your ink
and what is going to be white or the
color of your paper. Now that you're happy
with your design, it's time to transfer it onto your block so we can
carve it as a stamp. Nothing stop you from drawing directly onto your rubber block. Nothing even stops you from
carving directly into it. As a beginner, you can
experiment with carving doodles. Why not try it on your scraps. But for this project, I'm
going to show you how to transfer your design on paper
onto your rubber block. This has the benefit of flipping your design
in a mirrored fashion, which is what you
want for your stamp. Indeed, if you have
a look at some shock bought stamps or a
printmaking plate, such as a linocut, you notice that the
design is mirrored. When in printed, the design
flips back the correct way. Most of the time, it's
not too important. But for stamp making, the odds are your design
includes some text or letters. And this is really the
only case where flipping your design is crucial for the readability of
your stamp design. So let's get transferring. Grab your design
and go over it one more time with a two
B or four B pencil. B pencils are greasier
and leave a bolder mark, and they are perfect for
tracing and transferring. So take your time
to really rub in some pencil powder or
graphites onto your drawing. Now, flip it with the pencil
mark onto your block. I usually switch back
to an HB pencil as the tip is harder and
I just rub the back. Alternatively, you can
use a bone folding tool. It's a bit quicker, but
the pencil works fine, and you can see where you
already rub your design off. Make sure you really
hold the paper in place lest you get
a blurry transfer. You can have a peep and check that the design is
transferring correctly, but make sure to hold your paper with your
finger so it doesn't move. Here you are. Your design is now drawn onto the block
in the mirror fashion. I strongly recommend
going over your design one more time with a bone
marker like a sharpie. This will prevent your
design from rubbing off and disappearing
as you start carving. All you have to do is carve
everything but the sharpie. Remember, in relief printmaking, everything that stays in relief will catch the ink
and appear as black, and everything that is
carved out will stay white. It is a bit counterintuitive
because we're so used to drawing with a black
tool onto some white paper. But here we're doing the
opposite with our carving tool. We're creating white
or negative space. This is probably the
steepest learning curve of this course to get used to
thinking in a subtractive way, in a negative way. But once you've done
it for your staff, it will become clearer and
you can carry this skill into larger printmaking projects such as linocut
print, for instance.
10. Carving your stamp: All right. Let's get started
into carving your stem. As I said before, we will
start by using the V shaped carving tool to contour
and silhouette everything. Go slow and steady. It takes a little while to
improve your carving skills, so don't be discouraged. I was quite clumsy when I
started carving myself. But you can get some creative, energetic, rough design
that also looks great. Remember, in stamp making bold and simple design,
always look best. But to make progress,
nothing like practice. Make stamp for your friends, and in no time you
will get a level of control that will allow you
to carve some finer details. When I'm facing something
quite delicate to carve, I force myself to slow down. Remember, you can always carve some more, but
you can't put it back. Once you've silhouette
everything, you may have identified some larger patch that
needs to be carved out. Now it's time to switch to
your U shaped carving tool. This will allow you to remove some background elements and to create flatters
surface carved out. Some carving sets have
different size U shape, and you can get some
rather large ones that are useful when you
move to larger blocks.
11. Printing ! : Once you think you've
carved up everything, it's time for your
first test print. The odds are after your
first inking and printing, you'll notice some area
that needs some edits. This will allow you to see clearer what catches the
ink and what doesn't. When it comes to ink pads, I recommend getting some good quality ones
such as these ones. The office one can
vary in quantity, and although you can find
some really good one, they often have an
edge that prevents you from inking larger stamps. Also, unlike your
office stamps that you can squeeze into the
inkpad and onto the paper, I recommend with your
hand carve stamp being a bit more delicate
when inking your stamp. Indeed, our hand carved stamp are less
regular and it's easy to over ink the background when squeezing it too hard
into the inkpad. Instead, I recommend holding
your stamp in one hand and the ink pad in the other and gently dabbing them
against one another. Moving your block and
your pad constantly to create an even inking
through repetition. You want to see a shiny, even layer of ink all over
the surface of your stamp. A good inking will make all the difference when
printing your design. Once it's all shiny
and wet with ink, it's time to test
it onto some paper. Smooth paper works
best as you don't want too much texture or grain getting in the
way of your design. Brown paper is also excellent because the black ink
contrasts beautifully on it. All right, with confidence, lower your stamp onto the
paper and apply a firm, even pressure on it. Let's check. Not too
bad for our first test. Now I can see clearly
that some area is catching a bit too much ink
and need to be removed. This allows us to move on
to creating some edits. It's much easier to see now
that it's been inked once. Take your time and do
as many tests as you need until you get
a satisfying print.
12. Conculsion: That's it. We're done. You have your very own
personalized slippers. You can now stamp
your book collection, your record collection, and never lose an item to a friend. Also great for stamping
your card boxes with moving house or any item
you wish to identify. And this small project has now equipped you with all
the skills you need to start your journey
in stamp making and test out other style
of relief printmaking. Why not start building
a collection of stamps? I keep mine in jars, and I make one every
time I go traveling. I call them supumsmps. In my next course
available soon, I will show you how to
carve a collection of sushi stamps to create
a wrapping paper, and in a more advanced course, I will teach you how to create
modular multicolor stamps. I hope to see you there. Bye.
 Emilie Walsh, Dr