Transcripts
1. Introduction: Hey, there. In this
quick design class, we are going to be creating an Instagram carousel collage. That means that we are creating
several images that are all going to go on a collage
post on your Instagram, and they all blend
together and use different elements to look
really cute and aesthetic. This project has a ton
of room for creativity, but we're going to walk through it step by step to give you a starting point
and then you can make as many interesting
collages as you like. All you're going to
need for this project is a free Canva account. If you have a P one,
that's cool to, you can use all the
extra elements, but a free is all you
need to get started.
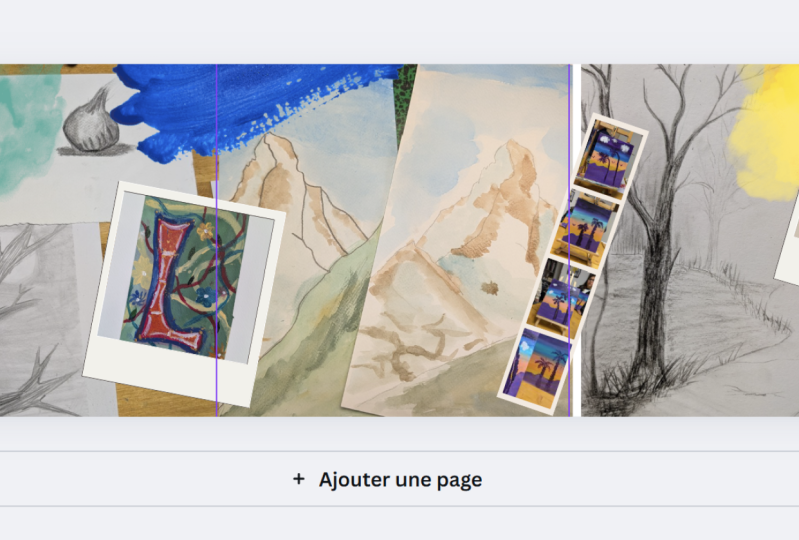
2. Designing Your Collage: This is what our finished
project looks like, just to give you an idea. In order to create
this in Canvas, we are using a
grid that is going to give us five pictures. If you want to do
more, I know that Instagram can do
ten or more now, you can make this even bigger. So what I've basically done, the file size is
5,400 pixels by 1080. Now, Instagram images are basically squares that are
1080 pixels on either side. So that's how tall
it is is 1080. And then for the width,
just times it by the number of post images
that you're trying to create. So in this case, I did five, which equals five
times 1080 is 5,400. As you can see, this is a
collage of lots of elements, and we're going to rebuild
this step by step. Luckily, I can just
add a page here, and we can have it as reference
and build it together, so you can see what
goes into making acute collage like
this from Italy trip. Now, first thing
is you want to add these grid lines in
order to make it clear where your posts are starting and stopping, so
you can kind of envision it. So the first step is you
want to have these rulers and guides visible on the
sides of your project. So we go into file, settings and show rulers and guides, so
that's checked off. Then go down to add guides, and this is going to let you set up these guides automatically, which is a lot easier
than dragging and dropping them when you're
trying to make things even. So we are looking to add custom. And for columns, we're
looking for five. This should be the number of posts that you're
looking to create. And for the gap, I'm going zero because we don't need
any space in between. Then we'll hit add guides, and now we have
these handy guides that will disappear
when we export, but are there for
the design purposes. The first step is to add in
your background pictures. So I've already added
these into Canva, but I'll just add them into this document and we'll
arrange them first. Okay, here's my stack of photos. I'm just going to arrange them, and as you may notice above, if I click They are not arranged specifically
to the gridlines. They end part way
through each one. Don't feel like you have to obey the gridlines when setting
up your background photos. Okay. So now we have all of our background
photos layered on. The next step is
I'm going to add in these photo frames that
look like polaroids, and we're going to find those in the Canva Elements library. Just going to search
for polaroid. And then we're finding them in frames here so we can see all. There's a couple of different
ones you can pick from. Feel free to use other frames. If you just want to
look for frames, Canva has tons of them that
look like different stuff, and you can have fun with these. But I'm just specifically
looking for the polaroid kind. Then I will just start
to arrange them. This one, for example, I'm
putting it overlapping, so it'll show up a little bit in the second slide on my carousel. I just think it's cute. I like to put some elements to cover some of the seams
between the photos. I think it just makes it look
a little bit more designed, but sometimes it
is nice to leave a crisp edge as well because
it leaves space for text, but we'll tackle that later. This photo frame has an orange background
which I don't like, so I've just clicked
on it, and I'm just going to
switch it to white. I like to rotate them all just slightly just to give it a
little bit more personality. I think it looks a
little bit more like a collage if everything
is not perfectly squared. Now I've placed all
the different frames, so I'm just going to pop
my photos into these ones. Just a note on this one
right here at the end. It actually has a
second photo in behind. I'm just going to use one of the others from the collection, but just don't forget to
put something in there. It is a little difficult to drag and drop so you
may want to o in. I have dragged and
dropped all of these photos into the frames. Next, we're going to start
adding some collage elements. Those are the flowers, the bits of torn paper, the statue, the little decorative
things that I basically just pulled out of the
Canva Elements library. To find them, I'm going to try searching first just flower. We're going to go into photo. And then I'm going to
use the filters here and look for free and cutouts only. That's going to give you items that don't
have a backdrop. As you can see, here's this flower that
I used in the front. You can have a lot of
fun playing around with this and decorating
it however you like. Other elements I like
to use are torn paper. I think some of these are cute. They also look
good to cover over little seams or just in
the background somewhere. My whole Instagram has a
little bit of a bookish theme, so adding a newsprint, it is on brand. Another element I like to
use are magazine letters. You can find these in
graphics, usually. Again, if you just
filter out just for the free ones or use
P if you have that. There's ton of these
cutout letters that's really fun for
collaging on Canva. I find that there's a
lot more cutout options if you are using a pro account. I've just gone and searched for Roman here because this
is a trip to Rome. You can see there's
tons of artifacts and items that are all
cut out I could use. If you are into
this in a big way, you may want to
consider a pro account just because it gives you a
lot of assets to work with. I'm just going to copy over the elements from the top
design to the bottom, so I don't have to
search for each one individually and then
we'll add the text. Okay, so here we are with all of our little flowers and
things copied over. As I said, I think adding
in these little stickers or these cutouts is one of the most fun parts of the collage. So definitely take your time and see what you
can make with it. The last step is to add some texts you totally
don't have to. You could also use
those collage letters, like I said, to spell out words. But I'm going to just
use this text here. This is a font
called Avalon Alt. And I just think it looks
sort of handwriting isis, and it looked cute for
the theme of my collage. You've used Canva before, you probably know how
to add a text box, but you tap T on your keyboard
if you're on the computer. Then you can just
add in your text. Let's just say hello from Italy. Now, if you find that there is a lot of stuff going
on in your picture, the text might not
be super clear. You can use different effects
to try and make it pop. One of the ones I like to use, I'm just going to hit
command A to select all that text is
effects and lift. Now it's got the lift effect on and I will zoom in so
you can see better. That's the lift at 50%. There it is at 100
and that's with out. If I wiggle it back and forth, you can really see it
puts a shadow behind that makes it easier to see
the edges of the text. Lift is really handy
for collage purposes. Now you can put text anywhere
you like, of course. I am looking basically for straight lines
where I can put it in and definitely not trying
to hit any of the borders. I don't want any of my text to be cut off based on the post, but that's just a
personal preference. I'm going to leave it here
just because you can see the example and now
we're done our design. I'm going to export
this as a PNG, and then we're going
to use another website to splice it up and then it
will be ready for Instagram.
3. Splitting the Images: This is the website that I'm using to split the
image. It's free. It's called Pine Tools, and the tool is is
called Split image. So you can use this URL.
I'll put it on the screen. I'll also link it in the class discussion if you need a link, but you can just Google
Pine Tools split image, and it should take you here. So I'm just going to drag our image here after
you've got this uploaded. We're going to click
on horizontally because that is how we are going to get it split into five blocks that are the
correct size and shape, and we're going
to change this to five because that is the
number that we've designed. After that, you split
image and wait for it to finish and then
download the Zip file, or you can download
them individually. And here we have the five
photos all split up. This is what just one
of them looks like. And yeah, so now they're
ready to go to Instagram. I hope you found
this project fun and creative and that you enjoy
making some collages. I hope that inspires you. Obviously, you can do a lot of different
things with this, but maybe those are the
starting steps to get you go. The cool Instagram
photo collage. I have lots of other classes
with fun Canva projects, so please do feel free
to check those out. And I would love
to see your work. So if you'd like to show us either one of
these pictures or take a screenshot of your Canva work space
and just upload that. If you want to show us
the whole thing all spread out, that would
be really cool, too. I'd love to see what you create. And finally, if you
enjoyed this class, please do consider
leaving me a review. It really matters a lot to help other students find classes that are cool and interesting. And I hope that you
found this to be one. Thanks for being here
and happy creating.
 Rebecca Wilson, Artist