Transcripts
1. Introduction: Hello. My name is Cherie, and I teach social
art and craft classes in a small country town
in Western Australia. And one of my most popular
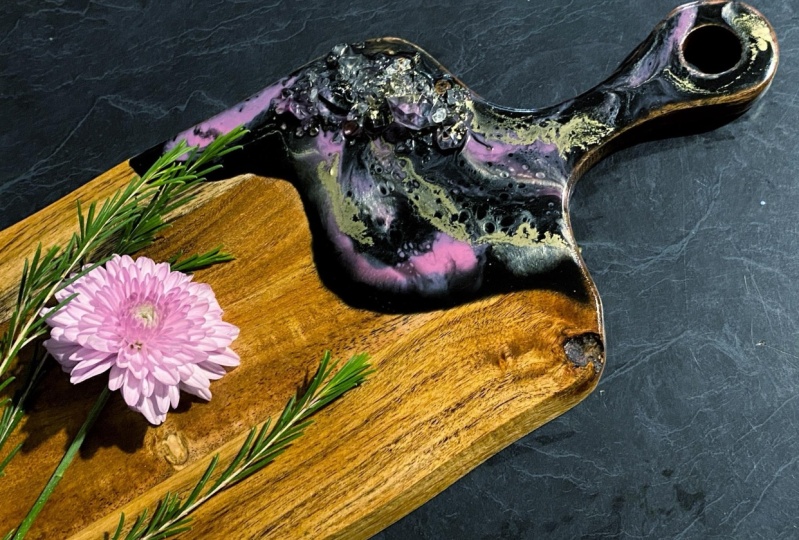
workshops at the moment are my epoxy resin cheese board
or sacuary board classes. So today, I'm going to
teach you how to do an abstract resin poor design on your very own cheese board.
2. Tools and materials: So first up, epoxy
resinous toxic, so there are a few bits
of gear that we need to keep ourselves safe
when working with it. You need a good supply
of disposable gloves. I use latex gloves because they're easy to get
hold of where I live, and they're relatively
inexpensive. Nitrile gloves are a better alternative if you can get them. They're more
resistant chemicals, and they're obviously latex
free if you have an allergy. You need a good respirator. You need good
breathing protection. You should be able
to just pop down to your local hardware
store and see what they recommend for indoor
painting, stuff like that. You need eye protection. So if your respirator doesn't
come with a mask, grab some safety glasses. Finally, if you get resin on your clothes, is not coming out, but you could spread it to your furniture and
other things like that. So it's a good idea to
wear an apron that you can then remove as you
move around the house. These are some of the tools
that we'll be using today. So first of all, we need to
protect our work surface. So I've got a plastic
tablecloth here. I like plastic because the
resin peels straight off it, so it's easily reusable. You can see though that I
like to double mine up. Resin can easily find a hole in the plastic tablecloth and
leak through to your table. So just by doubling it up, it gives you a little
bit extra insurance. This is an optional
one, depending on a few choices you might make a little bit later,
which I'll go into. But a roll of masking
tape could come in handy. A small spirit level will
be incredibly useful. When you first mix your resin, it has the consistency of water. It thickens up as you go, but it starts off
really, really runny. You need to make sure your board is as level as it
can possibly be. You'll need some stirs. You can get silicon stirs, so you just let the resin set and then you
just peel it off, and they're completely reusable. However, you may already have a stash of wooden ones in
your craft kit somewhere. And when there's so much stuff that you already have
to buy for resin, if you've got wooden stirs
around, go ahead and use them. I'd like to have a couple
of different sizes, so I use the big one for mixing the resin
at the beginning, and then I use the
smaller ones when I divide it up into colored cups. You're going to need
something to lift your cheese board up
off the work surface. Otherwise, your resin is
just going to run off the sides of your board and
it's going to form puddles, and then it's going
to set like that, which you don't want. Sees small plastic cups
from my local variety shop, but you can get quite creative with things that you
find around the house. Basically, all you need is something that will
lift the board up and will give you a
level stable surface. You'll also need a selection
of cups in different sizes. I start with two
medium sized cups, and this is what I
pour my resin part A and resin part B in. That's what I
measure them out in. Then I pour the part A and
the part B into a third cup, and this will be the largest cup that I
can possibly find. That third cup is
really important. If you're going to cut
corners, don't cut them on that big third cup. I'll explain more about
that a bit later. We'll need a bunch
of smaller cups. Once I've mixed my
big batch of resin, then I'll portion
that resin out into these smaller cups so that I
can add color to each cup. Here are a few more things
that will come in handy. Baby wipes or wet wipes
to wipe up excess resin. So kind of small craft knife, like a Stanley knife
or a exacto knife, that sort of thing.
And a heat gun. If you don't have a heat gun, a hair dryer would
probably work, but I've never actually
used a hair dryer myself. I've always had a heat gun. Some resin artists use a torch. For what we're doing today, a heat gun is just as effective, and it's much safer. And on to the materials we'll be using today. This
is the fun stuff. And we're obviously
going to need a cheese board or a sacuary
board to start with. This can be anything you find
at the shops that you like. You'll also need some resin. Now, try and get your resin from a reputable dedicated retailer. Cheaper resin often
doesn't work as well. And when you're
working with something actually quite toxic like resin, I don't know that I
want to take the risk on somebody ho cut corners
to make it cheaper. Avoid your famous cheap websites and research trusted brands. You can see that resin
comes in two parts. Part A is the resin, and P B is the curing agent. Different resins have
different mix ratios. This one that I'm using
today is a one to one, which means you
use equal parts of resin and equal parts hardener, and it's good for
thin surface level pores like what we're
doing on the cheeseboard. There are other resins
you can get that have a two to one or even
a three to one ratio. The for different
types of resin jobs. So for example, if you
were doing a deep pour, you would use a
different type of resin to what we're using today. Different types of resins
that you work with can have longer or shorter
working times, longer or shorter curing times. But this one to one is perfect for what
we're doing today. One to one is also much
more beginner friendly. It's obviously easier to
work out equal parts and get that exactly
right than it is to get a two to one
or a three to one. And with resin, it's critical that we get
the ratios right. Otherwise it may
not cure properly. You can also see they're
slightly different colors. The resin itself
is crystal clear, while the hardener is a
little bit more yellow. You can also see the resin has quite a thin and
runny consistency, whereas the hardener is a
lot thicker and glopia. It's like a glucose syrup. Now, we'll need something
to color our resin. Bear with me a minute. I'm just going to put
some gloves on for this. Resin colorants come in
a few different forms. You can get liquid dies. They're not super common,
but you can't get them. People also use alcohol
links to color their resin, but be aware with alcohol links. They do fade. They're
not light fast. I don't tend to use
liquid dyes very often. The once I have a
transparent die, and when I'm working on timber, I need the resin to
be opaque so that the timber doesn't come
and cancel out the color. You want the timber to
contrast with the resin, but you don't want to see the
timber through the resin. You can also get
powder pigments. So you'll just scoop up a
small amount of the powder. These are like micapoers. You can also use micapowders
to tint your resin, but you can also get
powdered pigment tint for resin that's
not micropowder. Resin pigment also
comes in paste for, and the pastes also
vary in thickness. You can see this one
from this manufacturer is quite thick and gloopy, whereas this one is
quite liquidy and runny. Now, these liquidy ones
can settle and separate, so they will need stirring
before you use them. If you find your pigment
paste is separated, it doesn't mean there's
anything wrong with the paste. You just need to give
it a stir. It's normal. Now, as long as you're buying quality brands and
not cheap stuff, there should be no difference
between the paste and the powders in regards to
how good a color you get. It'll just be personal
preference as to whether you like
paste or powder best. Those are the essentials. All the other things that
I'm going to go through now are completely optional. So I'll just get
the ones that we've already talked about
out of the way. If you don't use any of
the rest of this stuff, you will still create a
beautiful cheese board. So this is just if you want to take it a step further with
a little bit extra bling. So you can also get
metallic pigment powders. Now, you can mix these into your resin like a
normal pigment powder. But in my mind, they're
most beautifully used when you just float very tiny, tiny amounts on
top of your resin. It'll give you a piece a
lovely metallic shimmer, just a hint of metal. Here's an example of that gold floated on top of just
plain white resin. You can also get mica flakes. We briefly talked
about mica powder. These are mica flakes. They look a little
bit like fish food, and they come in
different colors. You can mix this
into clear resin or you can sprinkle it on top. These are my favorite
ones to use for es. They give a very subtle
iridescent shimmer without being over
the top obvious. Now we have glitter, obviously. You can mix glitter
in with clear resin. You can mix different sizes. You can mix different colors. You can get some really, really
beautiful glitter blends. You can add crushed rock
in different colors. I've also got some
gemstone chips here, which are a little bit more expensive than the crushed rock. But you can get some
really pretty effects on god style creations. I have a selection of
acrylic gem stones as well. You can get these from
the craft section in variety shops and get
them from craft shops. They come in different sizes. So you can mix and match with the different sizes to
get some really fun god looks. Speaking of God. You can also get these
actual pieces of crystal. I can't remember what
these shapes are called. And you can get crushed mirror, which is fun to use, too.
3. Prep your board: So resin is messy, and you need to protect
your work surface and your board as
much as possible. So you need a nice flat surface, and you need a well
ventilated space to work in, then pop a protective plastic
covering over your table. So position your mini cups
or whatever it is that you're using to raise your
board off the table surface. I usually find
that three forming a stable triangle is plenty, but if you would feel more comfortable using
four, go for it. So take your spirit level and
place it flat on the board. You need to check
that your board is as flat and level as can possibly be in all directions because it may be level
in one direction, but sloping in another. When you mix resin, you
first start working with it. It's not much
thicker than water. So imagine that
you're trying to pour water onto this
completely flat surface, and you can imagine if
there's a slight angle to it, then that water is just
going to pull off the side. You resin is going
to do the same. Take a fair bit of
care to try and get this as level as
possible at the start, and it will save you a little
bit of heartache later. I If your board is not level, there are a couple of
things you can try. You can try substituting
a bigger or smaller lift. If there's quite a significant
angle you need to rectify. If the lean is not
quite that steep, you can get one of your sirs, and you can just prop up one of your lifts,
if you need to. Otherwise, if it's
just a minor angle, you could even try moving
your board around the table. Some tables, particularly
these plastic trestle tables are
not perfectly flat, so you may find that
you've just got your board on a wanky
part of the table. Okay, now, it's important
for you to keep in mind when you're planning out the
design of your board. Although resin is pretty inert, once it's cured, it's not
considered food safe, particularly once
there's additives, like colorants and
stuff like that in it. So if you're making a
board for yourself, and you know that you're
definitely only ever going to put cupcakes in wrappers and stuff like that
on your board, then it's fine to put your
resin wherever you like. But if you're planning on
gifting it or selling it, or you're making
it for yourself, but you don't know what
you're going to use it for, it's really best to confine the resin to the handle
part of your board. So that the main center
part of the board, where the food is going
to go is free of resin. So you have two options here. You can make a straight
line like these, or you can let your
resin go where it wants to flow and give it a
more natural edge like these. If you want a natural edge, there's no prep you need to do. But if you want a straight edge, you need to grab
some masking tape and position the masking tape where
you want that edge to go. Now, my very strong
recommendation is that you do it
very, very wonky. If you're trying
to do it straight, if that's the look you like, you have to get it
absolutely perfect. If your straight line is
just a little bit off, people will be able to
tell, and it looks like you tried to go straight,
but you didn't get it right. Whereas, if you go
really, really angled, it doesn't matter how accurate you are with
your positioning, it's going to look
like it's on purpose. So make sure the
tape wraps around the sides and under
the bottom even, and then really try and burnish that tape into the board
as much as you can. You want to limit the amount of resin that's going
to sleep underneath. If you use this method, you need to make sure
that you remove the tape after the resin
has started to cure, but before it goes hard. Probably about an hour or
an hour and a half in, it may vary according to your
resin that you're using, but you want to remove it
after it stops being runny, but before it goes hard. Now, I remove the tape now
because for my demonstration, I'm going to use a natural edge. Now, finally, there may
be a last little bit of preparation that you need to do for the bottom of the board. As previously mentioned,
when you first mix resin, you first start working
with it, it has the consistency almost of water. So it's going to
drip off the sides, and if you don't do
anything about it, it's going to form
solid drips like this. This is a board that
I made one time, and I completely
forgot to do anything about the drips
as it was curing. Now, the only thing I can do about this now is to sand it. So you get an electric
sander and you sand it right back until it's back
to the level of the timber. But that is Wow, is
it a lot of work? It's so much work. If you're planning to sell these boards, then you will need to
finish it off with the sander to get it
looking real nice. But there's also stuff that
you can do before it gets to this point so that
it's a lot less work. What I like to do is I
like to grab some baby wipes and with it
sitting on its cups. Before the resin goes hard, while it's still sticky, you just take a wipe and with some firm
pressure underneath, just wipe the drips away. Now, if that's all
you do, you won't get a perfect
professional finish. But if you're making it as a gift or you're making
it for yourself, it's perfectly fine. This
is an example of it. So you can still see hints of where I didn't clean it
up exactly perfectly. You can still see
little bits of resin. But you can also see that
if you're giving it to your m or you're making it for yourself, it's perfectly fine. And if you are
selling it, you still need to send it back for
that professional finish, but it's so much less work. Now, one final thing
you can do is take some masking tape and rip
off a few smallish pieces, and you can completely line the back of where you
expect to be pouring. So you'd go all the way around everywhere where you think
the resin is going to drip, and you would let it hang
off the side a little bit. Now, you can see, I've let
the tape go over the edges. But you don't want to leave it like that because the resin will drip and it will
pull where that tape is. Then take a craft knife, an exacto knife, or a
stanley knife or a blade. And you just trim the excess so that it is
with the edge of the board. So there it is perfectly flush with the
edge of the board. So then you would do your paw. You would let the drips
form as they want to. And then before it goes hard, while it's still and sticky, you would peel and the
excess resin come with it.
4. Mix your resin: Now, depending on
your brand of resin, you'll only have at best 45 minutes to an hour
of working time. It's really important
that you choose your colors before
you start mixing your resin because you can't pause your working time while
you decide your colors. Resin pigment pastes are
incredibly concentrated. Now you only need a small
amount of color in your resin, for the amount of
resin that we're using a literal p sized amount
or less is all we need. So this is a liquid resin, so I'm just giving
it a stir first. Sometimes it separates. So I haven't even
really scooped any up. I've literally just
stirred the color, and the amount, I'll
scrape a little bit off. But basically what sticks to the stir is going
to be enough color. There you go, I've even scraped
probably half of it off. But this color is
so concentrated, that'll be enough
for what we need. This brand,
unfortunately, the color leaks and squidgs out the side
ale bit. It's a bit messy. I'm going to change my gloves before I touch anything else. Now, if you're new to
resin or new to art, or you're not super confident with colors and how
they go together. I usually recommend that people with these
abstract boards, people choose a white
base or a black base, and then two colors. That's not a hard and fast rule. If you are confident with color or you're experienced
with color, and you want to experiment,
knock yourself out. But if you're not confident
or experienced with color, then white or black
plus two colors is a pre almost foolproof way to make sure you
get good results. I've got another
liquid paste here. Again, I'm just giving
it a little stir as I know these ones tend
to separate a little bit. And that amount of color that's still stuck to the stick after stirring is going to be plenty for the amount of resin
that we're going to use. You'll want to use the
smallest amount of color possible to get the color
depth that you want. Because if you use too much, then it'll throw
off your ratios, and you may find that your resin remains sticky and it
doesn't cure properly. So start with a tiny amount of color and mix it in
with your resin. And if you find that it
is not opaque enough, or it's not the right
color depth for you, then you can add more Now, that plum purple that I used for my third
color is a beautiful, beautiful color, but
it's very very dark, so it won't stand out very
much against the black. So I've just got a fresh stir, and I'm just picking up a teeny, teeny little touch of
white to add to that plum. But always remember,
particularly with these resin pastes, that if you need
to add more color after mixing it in with resin, get yourself a fresh stir, because these pastes
are resin based. If you introduce mixed
resin to your paste, then you risk or having the
having the paste start to. So you risk losing
some of your paste if you introduce a stick that's been in the
resin into your color. Resin paste color paste
is really expensive. Don't waste it. Okay, now
I've got my colors sorted. I've got my black, which
I'm using as my base. I've got that beautiful plum with a touch of white
to lighten it up, so it shows up
against the black. I've got a shimmery
champagne color, which I'll just use sparingly. It'll be a nice contrast
color to the dark colors, but it's also a neutral, so it'll perfectly set off
that spectacular plum. When plastic cups used
to be freely available, this part used to
be a lot easier. You know, you could
put your part A in one cup and P
B in the other cup, and you could stand
them next to each other and get them really
close to level. So it's a little bit trickier
now with paper cups, but not impossible. And
I'll show you what I do. Even though these paper
cups are not see through, if you draw a line in dark
marker on the outside, even though it's not
showing up on camera, you can actually see through. So roughly estimate how much
resin you're going to need. You can go online and you can
Google resin calculators, and it will tell you an approximate volume
of resin that you need to cover a
certain surface area. So then whatever that
total volume is, you'll want half of it in one cup and the other
half in the other cup. So to do this, you
can fill a cup with the correct
volume of water, and then you can put a marker line where
the water level is, and you can do
that on both cups, and that should ensure
that the marker line is at the same point on both. Just make sure that you dry the cups thoroughly
so that there's absolutely no moisture in the cups when you
add your resin. However, once you become a
little bit more experienced, you'll be able to start
eyeballing quantities, particularly with these boards. If you have a little bit
more or a little bit less, then you can always
use the extra on coasters or on a second board
or something like that. You may find yourself just
eyeballing the amount. On the first cup, draw
that marker line. Then grab a wooden stirrer, put one end to the marker line, and then get your
marker and draw on the pop stick where the
bottom of the cup is. Then you'll get your second cup, and you'll line up
that marker line with the base of the second cup. Hold that in place, then grab your marker
and just put a dot. So move along a little bit, line the line up
with the base of the cup again and
put another dot, and then you can squish the cup slightly so that
you've got a flat surface there and join the two dots
using your stir as a ruler. Now, what you should have is two cups with two lines marking
exactly the same height. Now when I go to fill each
cup with Part A and Part B, I'll be able to see those lines through the paper of the cup. So my personal preference
is I always start with P B. Part B is always
thick and gloopy. It's like glucose syrup. And if you need to it's
harder to add a small amount. So whereas it's easier to add
a small amount of the P A. So I find it if I don't quite get the level exactly
right on P B, it doesn't matter
because I can adjust P A more easily than I can P B. So now that I have equal
parts of part A and part B, I'm going to pour both
into a third cup. Now the reason why I don't pour one into the
other is because you can't get 100% of the
liquid out of these cups. So if you can only ever get 95% of the liquid
out of these cups, it's better that you get 95% and 95% out rather than 95% of
one and 100% of the other, because we really do
need to be careful about getting these ratios
as accurate as possible. So I'm using one of my bigger staring sticks for this part. And as you can see, I'm using
every part of the stick to try and scrape as much of the resin off every part
of the cup as possible. So I'm scraping the side of the stick against
the side of the cup, and I'm scraping as
much of the resin off the bottom of
the cup as I can. Like, resins expensive,
you want to try and use as much as you possibly can and
waste as little as possible. So you can see I'm mixing this
resin on top of my board. I wouldn't normally
recommend it. If you didn't have to worry
about camera positioning, I just get your board
right out of the way. So you don't want to up by getting any resin drips
on it if you don't have to. Okay. Now you want to mix this resin together
for a good 3 minutes. Now that's not a
that's near enough. That's probably 3 minutes. It's a proper set your watch, set your time, go for 3 minutes, that'll ensure that
it's all mixed well and it's all like
chemically bonded. Now, you can see
I'm using the stir. It's like when you a cake, you scrape the spoon against the side of the bowl to
make sure that you get all of the flour on
the side of the bowl and it mixes in with
the wet ingredients. Le we're doing exactly
the same here. So give it a good stir
every now and then, scrape the sides of the cup, scrape the bottom of the cup, and make sure it's
all getting mixed in there. That's 3 minutes. I'm just going to this is a good thing about using paper
cups ratherthan plastic. I'm just going to
pinch that into a beak into a little spout so
that I can pour it. I'm just going to
pour a small amount into each of these colors. Now, if you can visualize
your design before you get to this point so that you
can imagine how much of each color you're going to
use. I've done a lot of these. I'm going to use more black
than any other color. I pour extra resin
into the black. I also know the champagne
color, the light color. I'm only really using
it for highlights, so I'm only going to use
a small amount of that. I'll only put a small
amount of resinin there. It can be a really good thing to save a little bit of clear in your cup and to not pour it
all out into the colors. So if you guess your
color amounts wrong, and you need some more black. If you underestimated the amount of black
that you would need, then you've got some extra resin that you can mix
more black easily. If you pour all the colors
and decide you want another color or if you decide that you want a
glitter mix or something, and at the start you didn't
think you were going to, then you've got that extra
resin that you can use. If you're going to add a
little crystal cluster as well with some crushed mirror
or some crushed stones. A little bit of clear resin
drizzled over the top, will help the small parts
stick to it as well. Now, when you're
mixing the colors, you don't have to mix
each color for 3 minutes. You only need to mix
it until the color is evenly and consistently
distributed throughout the resin. Okay, so I'm just gonna
go change my gloves, and then we'll be ready
to start pouring.
5. Pour your resin: In the process of
mixing your resin, you'll have mixed a lot
of air bubbles into it. This is unavoidable, but
we don't want them in the final piece because they'll detract from that glassy
look that we want. Before I pour the resin, I'm going to give each cup a quick blast with the heat gun. This will pop some of the
surface level bubbles. It won't get all of
the deeper ones, but it'll get the ones
close to the surface. Take your base color,
your black or your white, if you followed my
earlier recommendation, and pinch the side
of the cup so that you've got a good little
pouring spout again, and then just draw in the
outer edge of your resin. Then about half fill
with that base color, the rest of where the
resin is going to cover. Don't completely fill it. At half full should do. Now take your second color and form another
little pouring spout. Then just fill in some gaps. You won't put as
much of this color as you do with your base color. Some of this second color will
go over the exposed board, and some you'll
pour straight over your base color and repeat the process
with your third color. We're not overthinking the
placement of these colors. It's very, very
random at this stage. Now take the stirring stick from your base color and just use it. Where you've got gaps
between your resin drizzles, just nudge the resin
together so that you don't have any exposed
wood peeking through. I've got a section here where there is too much exposed wood and I can't tease the
resin to cover it. I'm just going to add
a bit extra resin. Next up, we're going
to grab our heat gun, and we have two slightly
different techniques performing two different
functions with this heat gun. First, I'm going to hold the heat gun directly
straight up and down. It's not going to move
the resin around. All this is doing is applying
a little bit of heat to the resin so that it
pops the bubbles. Now, my second purpose with the heat gun is
to soften some of those hard edges and almost give it kind of a marbly look. To do that, I'm
lying the heat gun on its side almost
as far as it can go. And just in small bits, I'm just using it
to push the resin. Once it starts to move, then I'll lift the
heat gun away and I'll put it in another section. Now it is possible
to burn the resin. So it's really, really
important that you don't hold the heat gun in the
same position on the same part of the
resin for too long. If you start to see smoke coming off it, move
that heat gun. Turn the heat gun off.
I'm going to zoom in a bit now because
I want you to see the impact that softening
the edges has ad. It's a really nice
marb effect now. If this is enough for you, you don't have to do the next step. It's beautiful how it is. But if you'd like to add
a little bit of bling, this is the time we do it. So I'm pulling out my
assortment of acrylic crystals, and I'm just going
to arrange them. So I'm starting with
the biggest ones, and I'm putting those in a
little cluster in the middle. And then I'm gradually
going to pull out smaller and smaller
ones and build them up around the outside and in
amongst these bigger ones. I'll add some crushed mirror, I'll add some micro
flakes maybe. And, there's no kind of instruction I can
give you for this bit. It's just you put them
exactly where you like them. I am taking my gloves off
for this bet because I find the smaller rocks tend to
stick to the fingertips, and it can be hard
to place them. But just be really, really
careful not to touch the wet resin with
your ungloved hand. As we start layering
on the smaller rocks, there's actually no resin
for them to stick to. So if you have set aside some clear resin
from your original mix, describe that now and
using your string stick, drizzle a little
bit over the rocks, and then give it a blast with the heat gun so that the resin thins and drips
down all the rocks. And that will give your like your crushed
mirror and your smaller rocks to stick to. You may find at
certain points that it becomes easier to use a clean staring stick to just spoon out your smaller crushed
glass and crushed rocks. So next, I'm going to float
some metallic pigment powder. So we're working in
the resin again, so I'm throwing
on another glove. Now every single resin piece I ever make without exception, I will always add some gold silver or copper
metallic pigment powder. I just love that extra shimmer. Once again, this is a
completely optional step, whether you've added
the crystals or not, but I just love it. I think it adds an extra
dimension to your piece. And you only need
the smallest amount of this metallic pigment powder. So what I do is I'll take
a clean string stick. And I'll snap it until I get a piece with some good
jaggedy pointy edges. Now, honestly, there is no
need to scoop this powder, literally just dip the jaggedy pointy
edges in the powder. Then you can either just
gently tap your stick so that small little puffs of
powder fall into your resin, or you can drag those pointy jaggedy edges
through your resin. Now, you can either leave those metallic pigment powders
exactly where they land, or you can grab your
heat gun and you can just separate the pigment
powders just a little bit. You're almost certainly
going to have areas where the resin has
dripped off the sides. It's almost impossible to
keep those sides clean. So the easiest way
to manage that is to pick up some of those
excess drippy bits of resin and wipe them along the whole side edge so that
e the resin is on the board, it looks like it's
overflowed down the sides. If you can't prevent it,
make sure that you make it look like it definitely
absolutely was on purpose. Finally, we're going to clear
up some resin drips and some errant resin
splashes that you may have got elsewhere
on your board. So take off your dirty gloves. Probably best to put
some clean gloves on. I don't here, but it's
best that you do. And grab some wipes. Wrap a wipe around
to your point of finger and applying a
good amount of pressure, press any you've got
resin drips that shouldn't be there or pigment powder or
anything like that. We're going to
clean up a bunch of the drips underneath
the board now. So pick the board up, try and hold it
level, grab a white, wrap it around your
pointed finger again, and applying a good
amount of pressure, just wipe along the edges
where the drips are. Drips will continue to form for a little while until the
resins starts to set. You may need to
repeat this process one or two more times. Stick around in the general
area and check on it maybe every 20 minutes or so
and just see if you've got any additional drips
that you need to sort out. Your resin board will now
need to sit in place for at least 24 hours
to cure properly.
6. Your project: Thank you for joining
me today on this class, and I really hope you
enjoyed the lesson. You now have all the knowledge
you need to safely make your own resin cheese board with your very own creative
and unique twists. One of my favorite
things about running this workshop in my studio is seeing how everybody who attends is given the
exact same instruction, has access to exactly
the same materials, and yet every board that's created is completely different
and completely unique. I would so very much love
to see the board that you create with what you
learn from my class. If you do end up creating
your own resin cheese board, please take a photo of it and upload it to your
project section. I'd love to see it, and
it will allow everybody else to take inspiration and give feedback
on your design. If you enjoyed this class, I sincerely hope you
joined me for another one, and I hope the rest of your day is as
fabulous as you are.
 Sheree Lowe, Artist and instructor