Transcripts
1. Introduction: Hi, my name is Sharilo
and I teach paint and sit parties in a small country town
in Western Australia. Paint and parties, basically social events
where you get to paint. They're not formal
painting classes. We take very simple but
effective techniques and we create a
finished painting. Start to finish in
a couple of hours. Even if you've never painted
before in your life, I've created a beautiful series of beginner level paintings. If you've never painted
before or you haven't painted much before,
this is just for you, being that I'm from regional WA, 3 hours away from Perth, which is the nearest
city, Western Australia. They've all got a little
bit of my culture in them. There's a touch of Western Australian country
life in all of them. If you're not from
Western Australia, I'm happy to introduce you to or give you a small
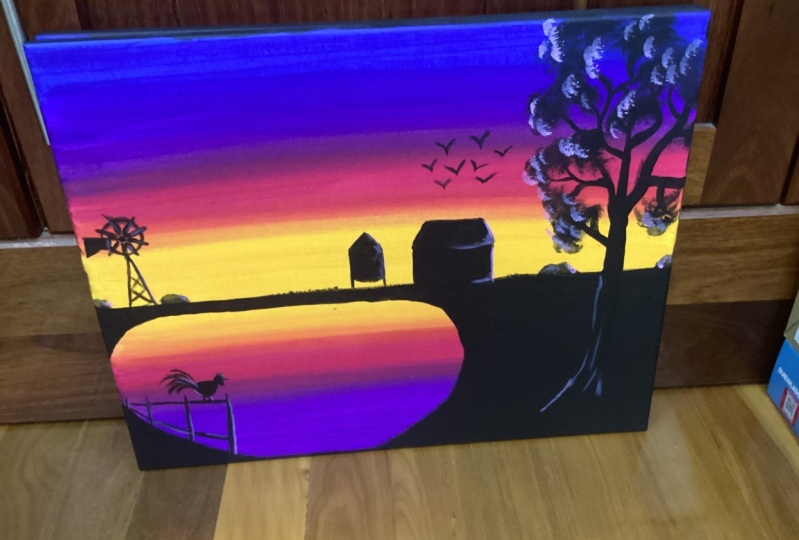
taste of my culture. This is my painting, Sip Train, the Ana series. This painting I call
Sunset on the Farm. It's a beautiful, vibrant
sunset background with a lot of very iconic
Australian farm shaped silhouetted
against that sunset. There's a lot of
different elements to it, all quite uniquely Australian
and Western Australia. The gum tree, there's the dam,
that Australian windmill, but we've also a shed, a water tank or a grain silo, and we've got a
chalk and a fence. Uh so, yeah. I hope you enjoy doing
this son with me.
2. Tools and Materials: In order to create
this painting today, this is everything
we're going to need. Obviously, we need a canvas
or something to paint on. The canvas size I'm using is 40 centimeters by
50 centimeters. But you do not have to use
one that big or that small. You can use whatever
size you like. Anything will work.
We also need brushes. I'll be using three
brushes today. The first one is, this is
called a Filbert brush. You can see it's
mostly wide and flat, but it's got this
rounded tip to it. Now, if you don't
have this style of brush, but you've got a wide, straight one that's not rounded, that will be fine
for the background. If you can find something
this shape though, for the trees, you'll find
that immensely helpful. Now, I'm also using
two round brushes, one bigger 1.1, smaller one. In this brand that I'm using, the large brush is a size 14 and the small
one is a size four. However, there is no consistency across brands when it comes
to paint brush sizing. Basically, just a big
one and a small one. You'll also need a jar of water. I just use old pasta sauce jar, whatever you have
in the cupboard that you're keeping because you fully intend to make jam or
sauce or something with it, but you never got around to it. Absolutely fine. You'll also need a
cloth so that you can wipe your paint, brush
on it when you clean it. In between colors, you
can use paper towel. But I prefer to create the smallest amount of
rubbish possible. I just have a chuck that I reuse and wash and reuse again. Now you'll also need
something, chooses a palette to put your paint on. Now you can buy like a
proper plastic palette, or you can buy palette paper. But I'm just using
a paper plate. You will obviously
also need some paint. Now if you're brand
new to painting, like it's going to feel like you've got to buy
a lot of stuff. And it's completely
understandable that you want to spend the least amount
of money possible. But try not to get the cheapest, acrylic paint that you can find. Now if you go to your
variety shops for paint, like your two buck shop or your pound store or
something like that, the paint is going to be
really, really watered down. If you're new to painting, you're going to be following
the lessons and you're not going to be getting
the looks you want and you're going to
think it's your fault. You're going to blame
yourself, but it's not you. It's the paint. Try and get something reasonably
decent quality. I'm using Global, it's
an Australian brand. In that brand, the colors
will be using white, warm yellow, cool red, cool blue, purple, and black. The paints you
have don't have to be called these exact things. That's completely fine,
but you want colors that look like this if you want to create something similar to my example painting.
3. Step 1: The background (part 1): We're going to
start this painting with the sunset in
the background. Now you can see
in this painting, I've chosen to use very bright, vibrant colors for
the background. However, we can't use
the paint directly from the tube because it's a
little bit too translucent. We need to add a tiny bit of white to make it more opaque, but we don't want to add so much white that it
lightens the color. You can see here, I've put a large blob of color with
a smaller blob of white. Now how much white you
actually add will very much depend on the particular brand of paint that you're using. I can't really tell you, put this much color with
this much white. You're going to have to
experiment with your own paints, but if you do want a more
pastel looking background, go ahead and add more
white to your color. Definitely, We're going
to start in the middle. We're going to start
with the yellow. Then we're going to work outwards towards
the darker colors. I'm going to take my
large Filbert brush or your large flat brush,
if that's what you have, your biggest brush, we're going to slot quite a lot of
color across this canvas. We want the biggest brush,
we have to do that. Go ahead and mix a yellow color. As I say, I've got
a big old blob of yellow and a
smaller blob of white. As I've said before,
I just want enough white to take away some
of that translucency, but I really don't want to
lighten the color too much. You also want to make
sure that you've got a decent quantity
of paint we want enough to play with and
you don't want to have to go in halfway
through and color mat. Then we want to work out
not exactly halfway, but probably like a third
up from the bottom. About a third of the
way up from the bottom. We're just going to slop this
yellow paint right across, all the way across,
maybe about five or 6 centimeters in depth. We're going to want
to blend this soon, and we need wet paint to blend. We'll need the paint to stay wet while we paint
the next color, the pink on either side. We need a good thick
amount of paint. Throw the paint
on like butter on toast or like jam on a scone. Really nice and thick. You also want to
make sure that once you've got the color
down on the page, you do big beautiful
brush strokes all the way from one
side to the other. Okay? And that will give you
a lovely, smooth finish. Now it's time to mix you pink again, just a little
bit of white. With that red, I'm not even bothering to clean my brush
there, just get on with it. Now, I want this pink to be the same level of brightness
or lightness as yellow. If you've gone for
a pale yellow, you don't then want to go for
a dark pink, or vice versa. Like if you've gone
for a dark yellow, you don't want to pale pink. Take a step back from your
palette and just make sure the level of brightness
of your pink matches the level of
brightness of your yellow. Think, I think that's great. So now we're going to go above
and below the yellow line. Okay, again, we'll check
it on nice and thick. Also, we're not too
bothered about how neat that join is between
the yellow and pink. We're going to tidy
that up in a minute. Don't stress once
again, nice and thick, like butter on toast, because when we finish painting this, we're going to work on the
yellow and pink blend. Then we're going to
paint some purple. Then we're still going to want the pink paint wet so that we can do the pink
and purple blend. Now I am going to
clean the brush. I've got my jar of water
off to the side of screen, and I've got my cloth off to
the side of screen as well. I'm going to give my brush
a rinse and then I'm going to give it a good old
dab on the cloth there. Okay. I want most of the
moisture out of that. Then without putting any
more paint on the brush, I'm just going to paint over that line where the
yellow and the pink meat. I'm going to do that
maybe three or four times and I'm just going
to see how it looks. I'm going to clean my brush. Now when we're blending, we always want to start working in the lighter color and then gradually move into
the darker color. Okay, if we do it
the other way round, then we're going to draw the darker color into the lighter color and
it's going to take over. Then with the clean brush that
I've dabbed on the cloth. I'm just going to repeat
that process another couple times until I'm
happy with the blend. As you can see, the pink is starting to
come down to the yellow. So I'm going to stop before
that happens too much, I'm going to clean my brush
and I'm going to start again. This time I might
actually pick up a small amount of yellow
to work back into it. So I'm not going to pick up
a huge blob like before. I'm just going to press with
the flat side of the brush a small amount of paint into the plate and just work it
into the bristles there. I'm just going to keep repeating this process a few times
until I'm happy with it. I'm cleaning the brush, I'm dabbing the
brush on the cloth. And that's really important. You don't want a lot of
moisture in your brush because that's just going
to remove the paint. We don't want to
remove the paint. Okay. Remove as
much moisture from the brush as you can.
Clean the brush. Often, there we go. That's brought a
little bit too much pink down, clean the brush. I'm going to add
a little bit more yellow paint now to try and counter that extra pink.
Just keep playing. Now let's move down
to the bottom blend and work on that now
before the paint dries again. When I'm happy
with the blend, which I am now, I'm going to
move on to the next colors.
4. Step 1: The background (part 2): It's time to move
onto our purple now. Make sure you've got
a nice clean brush. You've dabbed it on your cloth. Just like with the other colors, we're going to mix a little
bit of white with the purple. Ultimately, once we've
finished mixing it, we want the mixed purple
to be the same brightness, or lightness, as the
pink and the yellow. A good little trick is,
once you've mixed it, hold the plate away from
you a little bit and just let your eyes
go a little bit. Cross eyed, a little
bit loose and fuzzy. Make sure that
that purple is not significantly lighter or darker than your pink and yellow. We're going to paint our band of purple just above
the pink there. Again, nice and thick,
like butter on toast. Again, we want to be able to
blend this with the pink, so we need it to stay
wet for a little while. The same again below. Now what you might find as well, if you're doing this, can you see those start and
finish brush marks? We're not going to want this
in our finished painting, so make sure you're
not doing this. Make sure your brush is going all the way from one
side to the other. Big, long beautiful strokes. I'm going to clean the
paint off my brush, and I'm going to
dabble the moisture off my brush, onto the cloth. I'm actually going to pick up a little bit of pink paint here, then starting in the pink,
because we always start in the lighter color
and work up into the darker color
when we're blending. I'm just going to paint
over that join a few times then because I've picked up quite a lot of
purple paint on the brush. I'm going to clean my brush again before I do
too many strokes, pick up a little bit more pink. And we'll repeat the
process one more time, or as many times
as we need to get the blend so that
we're happy with it. Exactly the same process again for the pink and
purple at the bottom. Okay? And before that purple comes up into the pink too
much, I'm going to stop. I'm going to clean my brush and I'm going to start
the process again. As soon as you're
happy with the blend, we can finish with
the final color, which is going to
be our dark blue. Again, you're going to get
sick of hearing me say this, but just make sure that blue, once you've mixed it, matches all your other colors in terms of lightness or brightness, you don't want it significantly lighter or significantly darker, that there looks pretty good. Any white canvas that you have left, you can paint it blue. Pretty much repeating
exactly the same process that we've used for
every other color. We're throwing on the
paint reasonably thick, We're painting up to the purple. We don't really care that
much how neat the join is because we're going to
blend it in a short second, Then I'm going to clean all
the paint off my brush. I'm going to dab off
all the moisture from my brush onto that cloth. Then I'm going to pick up a
little bit of the purple. Starting in the purple,
working up into the blue. We're going to paint over that join line a few times
until we get a blend. If we need to clean the
paint off the brush, we're going to do that just exactly like you have with
every other color. So far, I'm losing a lot of the
purple at the bottom here, I've drawn a lot of the
blue up into the purple. So you can see
what I mean when I say that the darker color can
overtake the lighter color. I don't want to lose
the purple entirely. I'm cleaning the
paint off my brush. I've picked up some
more purple and I'm just trying to put
that purple back in. We still want to be
able to see the purple then. And not just with
the purple and the blue, but with any of the colors. With any of the blends, repeat the process as often as you need in order to be
happy with the blend. Now, once you've
done the background, we need the background to be
dry before we can move on. I've just got some brush
marks that I want to clean up in the blue. I'm just doing that
Now, finish up any last bits that you need to touch up and then take a break. We need this to be
completely dry. You can either put
a heat gun on it, you can take a hair dryer to it. You can go and have a break, grab a drink, something to eat, and just let this dry
naturally if you prefer. We'll see you back
for the next lesson.
5. Step 2: The landscape: Now that your sunsets
nice and dry, we're going to block in the basic shapes
of your landscape. Okay, we're going to paint
in this horizon line here, and we're going to paint
in the edges of the dam. For this bit, you can
use any brush you like. Like literally any brush, I'm going to use my biggest
brush so that you can say easily now when it comes to
painting the horizon line, we want it mostly straight. But don't stress too much about it being
perfectly straight. If we wanted it perfectly
straight, we would use a ruler. But we're not, we're
free handing it. It's allowed to look freehand. We want it natural straight, we don't want it
artificial straight. But we do want to
get a beautiful, crisp, clean edge on that. And the easiest way to do that is to add a
little bit of water to our black paint donkey brush in your water. If you want to go and get
clean water, you can. But we're working
with black paint, I'm not that worried. Donkey brush in the water then let some of those drips fall onto the plate
near the black paint. Then we're going to mix that
paint in with the water, as if we were mixing
two colors together. Just like when you're
mixing, you're yellow and white and
you're red and white. We're going to mix the black and the water in exactly
the same way. Now, that's pretty good there.
I don't know if you can see that very well
from where you are, but it's not super runny. It's not liquid liquid. It's just a little bit thinner than it was and that's perfect. Now, I've got a few
drips on my canvas. If the sunset paint was still wet, I wouldn't
worry about it. I'd just paint over it later, like I put a tree in
front of it or something. Because it's dry, we
can just dab it up. That's not a big deal. I'm going to put
this horizon line about a third of the
way up from the bottom. The natural impulse
is to go halfway. But trust me, if you go third
of the way, it looks much, much better than
if you go halfway, about a third of the way up. Now what we want here is
a lovely straight line. As straight as we can, without
overthinking it. Okay. Now, I don't know if you
can see that because I've added a fair
amount of water to my black paint that is quite translucent as not a big deal. We can just paint a second
coat over it later. But what we are getting
is a beautiful, beautiful, crisp, clean,
straight line there. Now we're going to put a
little dam in as well. So I'm just going to
go like that now. We do want a little bit
of land on this side, so I've got somewhere
to put out tree. Then we need a little
bit more land on this side so that we can put
the fence in the chicken. Now we're going to
color in all the land between the boundaries
we've just painted in for this coloring in bit, you don't need to use
your watery paint. You can use your
undiluted black paint. If you use your watery paint, you'll probably need
to do a second coat. Once it's dry, which is
fine, it's no problem there.
6. Step 3: The gum tree: The next bit we're going
to do is this big, gorgeous gum tree
here on the side. The gum tree is really the
focal point of our painting. We're going to paint it in first so we can position it
exactly where we want it. Then all these
other little bits, it really doesn't
matter where they go. They're almost filler. They can just go wherever they're needed or
wherever we leave room. But the gum tree is important. So I'm putting my gum tree
on the right hand side. That's where I've
left room for it. And I'm going to
have it starting pretty much right at the
bottom of the canvas. I'm going to have
it actually going off the top of the canvas
and the sides here. I'm not going to try
and keep the whole tree within frame like
it's a massive tree. It's right in the foreground. It's going to overflow
off our canvas. Now, the Australians among you or the Australia
lovers among you, you would have immediately
recognized this as gum tree. There's a few
characteristics that make this recognizably
a gum tree. First of all, we have
this long, thin trunk. Then that trunk separates into a lot of long, thin branches. Then we've got clumps of leaves at the end
of the branches. The branches are
very, very visible. It's not like an oak
tree or a Jacaranda, where the whole thing
is covered in leaves. We're going to start with
the trunk and the branches. For that, I'm going to use my large round brush,
the pointy one. If you've still got any of
that watery black paint left that we used for the
landscape. Grab that. We'll use that again now if you need to mix some are
go ahead and mix some more. Just grab some more water,
add a little bit more water, and mix it into the paint. We're really going
to want lovely, crisp lines when we're doing
the branches and the trunk. The watery paint is
going to help us do that then with my
beautifully loaded brush, And I haven't actually shown
you how to do that yet, have we really want all of that paint worked
right into the bristles, not just a little bit on the tip we worked all the way in. You can't see it because it's black paint and black bristles. That brush is loaded
full of paint. Now, I'm just going to roll
that brush along the plate. So I'm going to lay the
brush down nice and flat. I'm going to roll
it along and it's going to give me
that point back. Can you see that
beautiful pointy tip there? That's what we want. You may have a little
trouble seeing this with the black brush
over black paint, but I'm starting
right at the bottom. I'm starting with
a hint of root, then we're going
straight up the trunk. We're veering off to the side as we start
to run out of paint. We're slowly, slowly, slowly
lifting the brush up. That finishes in a lovely
pointy branch end. I'll load my brush again, and I'll give it another
roll to get the tip back. I'm going to come back to
the trunk here and I'm going to retrace my
steps just a little bit, but then I'm going
to veer off with another branch in a slightly
different direction. We run out of paint,
lift up and lift up, and lift up and lift up until
we get a nice little tip. I'm going to load
that brush again and I'll do that
little brush roll. Then I might start
separating some of these branches into
thinner branches. Retrace our steps on the branch, and then we'll just take it
in a different direction. Slowly, slowly, lift up
as we run out of paint. As we get to the
end of our branch, we're lifting the brush
so that it finishes in a lovely pointy,
skinny branch end. So remember we're
going to have some of these branches
going off the page. So we're not going to
focus on trying to keep the entire
tree within frame. That would just look
a little bit weird. It's okay for it to
go off the page. There's the beautiful
bare bones of your tree. Now that we've got the
skeleton of the tree, we've got the basic structure
of that tree there, It's now time to start adding
these clumps of leaves. To do that, you're going to
want your Filbert brush. What we're wanting
here is a big brush with a nice rounded end. Now a lot of the time
people come to my classes, they'll come to my class
for the first time. They're at pains to tell
me they're not creative, I can't even draw stick figures, therefore, I'm not going
to be able to paint. But what people don't often understand is that painting is not drawing
with a paintbrush. Okay. We're using these
tools to do the work for us. That's completely true here too, we're going to use the
shape of this brush, the lovely rounded shape that's going to do the hard
work of the leaves for us. Grab your cloth,
donkey brushing water, get all the paint out. And then I want you to
try and get as much of the moisture out on
the cloth as you can. So make your brush as dry as
you can without wrecking it. But you kind of
want a little bit of bristle separation there. I don't know if you can see it, but in my black paint here, you can see I've got a big
old clump of paint here. But then on the edges where
I've been using the paint, the paint is a
much thinner layer and it's starting to dry. That's where we're
going to draw it from. We're not going to dump it
in the big clump of paint. We're going to draw from
these thinner layers. We only want to pick up the tiniest amount of
paint we possibly can. We still want to see
bristle separation there. Then we're going to
use the shape of the brush and we're
going to stamp, we're going to stamp,
stamp, stamp, stamp, stamp, stamp, stamp. A
little clump there. You can see the shape of
the brush is giving us that rounded leaf clump look because we're not using
huge amounts of paint. You can see it's quite patchy
and that's on purpose. You can see the sunset
coming through the leaves, just like you would if
this was a real scene. You'll want to thicken up
the paint in some areas, like right there in the
middle where the branches are and where you've got more leaves right
there in the middle, it's going to be more opaque. You're going to get less of
that light poking through. But then around the edges here, you don't want that solid black. You want a lot of the sunset
color to poke through. We're just going to
repeat that process everywhere where
we've got branches, just with a small amount
of paint on our brush, we're going to stamp those
clumps of leaves in. Now, try not to make
it look too perfect. Nature is wonderfully imperfect. The best way to make it look not realistic is to make it
even and too perfect. Have some big clumps
in some areas and little clumps in others
and have it going wonky and off to the side
in some places and a little bit extra
leaves here and there. You don't want it too
formulaic and even remember this is a gum tree, you're going to be concentrating your leaves on the
end of the branches. You'll have a few random
leaves further down, but you're not going to cover
the whole top of the tree. While we're concentrating the leaves on the
end of the branches, they're not going to be only
on the end of the branches. There are going to
be some branches that are sticking
out towards us. There are going to be little
clumps lower down as well. And also keep in mind
that there's going to be some overlaps in our clumps, like each clump is not going to be perfectly
sitting next to each other. There's going to
be some overlap, so don't be afraid to
overlap your clumps. Okay. So I'm quite
happy with that and I'm going to leave that
there before I overdo it.
7. Step 4: The chook on the fence (part 1): Next up is the fence that the chicken is going to
be sitting on to paint that you want the smallest skinniest brush that you've got. We'll also need
some black paint, but we want that watered
down black paint. If you've used up
what you were using before and you need to mix some more, go ahead and do that now. Loader brush with
a good amount of black paint all the way
through the bristles, that paint brush roll that I taught you
earlier is going to be super important now because we're going to be working
on some fine detail. If we look at this
finished fence, can you see how
it looks like the fence is stretching
away from you? Let's look at these
vertical fence posts. This one here is
the largest one. Then the next one is
slightly smaller, and slightly smaller,
and slightly smaller. Now our brain
actually knows that these fence posts are
supposed to be the same size. By making them gradually
smaller as they go back, it looks like the fence
is receding away from us. I'm actually going to start with the smallest fence post first. Then each fence post to
the right of that needs to be slightly wider
and slightly longer. Now I do it in that order because if you mark
one of them up, you can always make your
fence posts bigger. But if you start with
the biggest one, and then you try and
make a smaller one, but you make it too big, you
can't make them smaller. We'll start with the smallest
ones and then move to the biggest ones
because we can more easily fix any
mistakes that way. We'll start with the
smallest one and make each subsequent one bigger, but we also need to make
them further apart. Let's say we paint that first
fence post and then we've got look at that one thumbnail between the first
and the second post. Then we go, that
looks like it'll be about two thumbnails between the second and the third posts. Then between the final
two post 123 thumbnails. Do you see what I mean there? Okay. So let's focus hard on getting these
fence posts right. Each subsequent post is
going to be wider, taller, and further apart with our watery black paint and our smallest finest
brush somewhere, nice and close to the edge here, we're just going to paint a
straight up and down line. Painting these fence posts
straight up and down is key. Please, please, please.
Whatever you do, Don't paint these fence
posts on an angle. Okay? You're going to want to, but try really hard
to resist that. You can see here on
the finished one, all the fence posts are
straight up and down. There's no angling there. Okay. My second fence post
is going to go about here. You can see that
slightly higher, we're painting it slightly wider and it's going down a little bit further to meet the ground. Then my next line is going
to be slightly further away, it's going to be slightly wider, and it's going to
be taller again. And it looks a bit skinny there. So I'm just trying to
widen it a little bit. But I'm just taking it gently, gently so as not to
widen it too much. This is what I was trying
to explain before. If I've made it a
little bit too thin, it's easy to make it bigger, but it's impossible
to make it thinner. There's our final 14 is
a good number I think, but you can fit in as many as the structure
of your painting allows for the
horizontal fence posts. What I want you to do if you've got a tablecloth
you can paint on, is I just want you
to paint a dot right here to the left of your canvas. This dot is acting
as your focal point, and I want every
horizontal line to point to that dot on the
bottom here as well. All of those lines are still going to point
to that same dot. Okay, so I'm just going
to reload my brush. And then, so we want
a nice thin line there and they're all pointing towards that same dot. And then my dot's
going to stay in the same place when
I go to the bottom. Just to reiterate,
when you're working on these horizontal fence rails, whether you're working on the ones at the
top or the bottom, by having both of them go
to that same focal point, that same dot, you create this really cool illusion of
distance and perspective. Now, having got the
basic positioning right, I'm just going to thicken
these rails up a little bit. These are a little
bit thin for me. They're definitely
not thick enough to support the chicken we're
about to paint on them, but we were just
concentrating on getting them going in
the right direction. I'm just going to spend
a little bit of time fixing the thickness
and getting that right now. Yeah, I like that. So that's my fence and I'm pretty happy with
how that looks.
8. Step 4: The chook on the fence (part 2): Okay, it's time for
the chicken now. Now, if you're a little
bit nervous about doing this, we don't be. I'm going to hold your hand and I'm going to
walk you through it. We'll do it nice and easy. We're going to set your
chock at the edge of the fence here, nice
and close to us. You've just loaded
your brush up with some more watery black
paint and you've done your sexy little brush
roll to get that pointy tip. We're just going to
paint three dots in the shape of a triangle. Next, you're just going
to join those dots, Then you can color in
that triangle as well. Now we're going to take this
straight edge triangle, and we're just going
to curve those edges. We want a lovely plump chicken. We're just going to round out each of those
straight edges. Can you see the difference
that's made there? We'll just do the same
for the other two sides. That's now a big, gorgeous curvy triangle that makes
up our Chuck's body. Now this pointy base
of the triangle is actually going to form
one of the chicken's legs. That's actually a
drumstick right there. Now just off to one side, front or back. Doesn't
matter too much. We're just going to throw
in another little triangle, which is going to be the
chicken's other leg. All right, let's load up our brush again and
do that magical twill. Okay, now we're going to do the chicken's head
and we're going to just paint a
little hook for this. Directly above the
right hand point of the chicken triangle. We're just going to go
directly above that. We're just going to
paint like a hook or a candy cane shape,
or an upside down, however you want
to think about it, but it's just one single
stroke with your brush. Don't overthink it. It looks like like a
beautiful swan neck. At the moment, what we actually want is a
fat little chicken neck. Where we've got this
arching upwards. At the moment we actually
want it curving downwards. Now you may not have this, I don't get it every time, but I've got a bit of a
residual triangle point. I'm just going to
round that out. Nobody wants a pointy
chicken breast. Now, I'm literally
just picking up the tiniest amount of paint right on the very,
very tip of the brush. The test, skinniest bristle
ends on the brush there. The tiniest amount of paint
that we can possibly pick up. We're just going to do a tiny
flick for the chicken beak. Then we're going to do
another little flick. Couple of flicks, the red
beardy bit under the chicken, then another couple of flicks
above the chicken's head. Yeah, really should learn
the parts of a chicken, especially if I've got
instructor on how to paint them that red bit on top of the chicken's
head. You know what I mean? Then to finish off your chook,
we've got to do the tail. Pick up a bit more watery
paint on your brush and do that brush roll then. I don't want you to think
about this too much, but just on this left hand point where the chickens bum is, you're just going to do some
big random curvy flicks. Don't overthink it, don't worry about where
you're putting it, just random in a few places until you have a fabulously
full and fluffy chos, tail. What? That's your
fence and your chock. Complete. How
clever do you feel? Now, it wasn't
even hard, was it?
9. Step 5: The windmill, silo and shed: We're moving on to
the windmill now. Once again, you'll need
your finest brush, the same brush that we used
for the fence in the chalk. And you'll also need
your watery black paint. If you need to mix some
more, go ahead and do that. Now we're going to try and use just the very tip of the brush as much
as we can for this. Now if you want to
follow along with the pencil first and just
pencil the lines in, you're very welcome to do that or just be brave and go for
it like this is just for fun. We're not painting for the
louv here to start with. We're just going to paint
the sides of a triangle. You can paint a guide dot
there if you want to. Then starting at that dot, I'm going to paint
very thin lines in a tall triangle shape, just like that, like that. You can see my line's going
a little bit wonky there. We're not going to
worry about it. Just like with the horizon
line, we don't care about it. Being perfectly
straight is freehand. It's allowed to look freehand. It goes with the
rest of the painting inside that triangle, we're going to
paint two crosses. Now we're going to paint one cross inside the top half and one cross inside
the bottom half. There's our bottom half cross, there's our top half cross. Like I've got a fat line and a skinny line, don't
worry about it. It's the charm of your painting. Okay? If you're trying
to go in and fix it, you're probably just
going to make it worse and you'll be even
more unhappy with it. Just leave it. It's hand painted, it's got
that rustic look to it. Yes, it fits with the whole
rest of the painting. Then a couple of centimeters an inch above
the top of that triangle, we're going to paint
ourselves another guide dot. Then I'm going to paint a
rough circle all around it. Again, we're not
going to care too much about getting
a perfect circle. We'll try and keep
the line as thin as we can and the circle
as round as we can, but we don't need it to look like we drew
it with a compass. Just that'll do, that's great. Then I'm going to pick up a big blob of paint on
the end of my brush. I'm just going to make a
big blob on that circle. And make that circle
a bit bigger. Now, I'm just going to roll
my brush on that plate to get rid of that excess paint from when I picked up that blob. Because I want my
point back now. We're going to do
this funny windmill. Don't actually
know what it does. Never land town, windmills work, but they all have this funny sticky at arm
from the middle there. From the top of the
circle out to the left. We're going to just do a
straight line now along the arm, slightly in from the circle. We're just going to turn
that into a rectangle. You can color that in. Then about halfway
along that rectangle, we're just going to
paint a little triangle. And then we'll color
that triangle into, in case there's your
funny windmill. Now we're just going to put, what are they, the
spokes of the windmill? These are literally
just going to be little flicks with the
very tip of your brush. It needs to point
back to that center, whether you flick towards the
middle or flick outwards. Every little flick needs to
be pointing at that center, circles a bit thick. I'll just thicken
these other ones up so that they work so they match. Okay. And there's our
windmill finally. We're just going
to finish off with the shed and the water
tank or the silo. Once again, we want
our small detail brush and our watery black paint. We'll start with
our shed because it's a super easy shape. We're just going to start
off by drawing a rectangle. Then we're going to basically give it the
old pizza hut roof. If that doesn't make
sense to you know, This shape has a name. I
don't remember what it was. We used it once
in grade four and then never used it
again in my life. But it's basically
a triangle with its head cut off is the shape
that we're doing up there. Then we're going to
color it all in. Oh, it's a trapazium. That's what that shape is. All right, so you just
painted a trapazium on top of a rectangle so I knew that wasn't a waste
of time learning that. Knew that would come in
handy in life anyway. Now, moving on to our water
tank or our grain silo. These are two different shapes and I'll talk you
through both of them. For both of them, we'll start off with
three little lines. These are the legs that the tank or the silo is
going to stand up on, roughly the same height and width and the same distance
away from each other. Now the two outside lines, you can extend upwards to form the sides of
the tank or the silo. Now for a water tank, we're just going to
join those two sides at the top and the bottom
with a curvy line. There's one curvy line and then the curvy line
at the bottom is going to go in the
opposite direction. Okay. And then you color that in and that's your water tank. Now if you want to
do a grain silo instead of this curvy top, we're going to put a
triangle on the top. Now if you're going
to do grain silos, even though my original
painting there was only one, you've got to put a few
next to each other, like no farm in Australia
has just one grain silo. That's ridiculous. We're nearly finished
now. As you can see, there's just two more
final things to do. We'll pull back the finished example painting to show you. You can see on these sides of the dam that's closest to us. I've actually texted them a
little bit with like grass. I haven't done that on the
horizon because if you look at the size of the
shed and the windmill, it's way too far away. You wouldn't see the grass on the far side of
the dam because it's the water that is C to us the grass would
be in silhouette. You'd just have that solid age. But over here on
our side of the dam where you've got the grass and stuff between
us and the water. I wanted to paint
that in super easy. We'll grab our old friend, the detail brush and
our other old friend, the watery black paint. Just using the very,
very tip of the brush. We're just going to do some really light fine little flicks. The skinniest very
end of the bristles there using the lightest
pressure you possibly can. We're just doing some very
gentle random airy flicks. Okay? They're going to go in
all different directions, so you're not going
to have them too, even all going the same way. You're going to
have them poking in whatever direction
they will feel like. You'll have a couple of
really high clumps and you might have a few bald patches
like don't overthink it, try not to make it too even just let it do what
it wants to do. Just flick all those bits of grass wherever they
feel like going along. This edge here and
this edge here.
10. Step 6: The highlights: The last thing we
have to do before this painting is finished
is to add some high lights. Now, let me pull my
finished painting in up close so you can see, can you see on the chicken here, we've got little bits of light
again on the fence here. It's not just a solid black, it's what we call highlighting. And you can see
it beautifully in the trees as well. Can
you see some of this? What this does is a really simple
technique and it just helps make the objects
look a little bit three D rather than just a flat black by having light bouncing
off certain parts of it. See here, just a
few simple lines help make that look three D by showing the light
bouncing off it. Now, literally,
any of the colors you've used in the sunset
will work for this. Whatever colors you have
left over from doing your sunset will be
absolutely fine. You may want to add a little
bit more white to them. If you've done
this painting over a couple of days and all your paint is dry,
then that's fine. Just mix them all,
whatever colors you like. I am probably going
to use the pink in the yellow because I
quite like those colors. I'm going to start
with the trees, which means I'm going to
need my Filbert brush, donkey brush in the water, and brush all the excess
moisture off on the cloth. Just like we did when we were
stamping with the black. Also, just like when we were
stamping with the black, we're going to pick
up the tiniest, tiny amount of paint. The tiniest, tiny bit. We're definitely
not going to drop the brush in a big
blob of paint. In fact, we probably want
even less paint than with the black, a small amount. Now we're going to
stamp the color over the black in exactly the same
way we did the first time. However, we're not going to stamp the high
light color all over. We're going to be a little bit strategic about where we put it. Now, we haven't actually
painted a sun on this painting. I want you to imagine
somewhere out of frame that the sun is coming
from over here. This is where our little
sun is going to come from. This is the direction that all the light is going
to be coming from. I want you to look at your
painting now and imagine all the things that
are going to get in the way of those sun rays, okay? If the sun is coming
from this way, this side of the windmill
that's going to get the light. It's this side of
the chicken and the fence that's going
to get the light. It's this side of the silo and the shed that's going to get the light and all the leaves
on this side of the tree, which is where we're going
to focus the highlighting, stamp, stamp, stamp, stamp. Now, I think I've got
a little bit bright in a few places there,
but that's fine. We can just go back over
it again with some black. I'm just taking each of
those clumps of leaves and just trying to
visualize where they're sitting on
the tree in relation to that imaginary sunlight. Now on the right hand
side of the tree here, even the leaves which are on the left hand side of the clumps are going to get less light because all of the clumps on the far left are going
to be blocking a lot of the light from reaching even the left hand side clumps on the right. Does
that make sense? Now, I'm going to pick up the small brush and then I'm going to use this
brush for the details, for the highlighting details on all these other
smaller components. Again, we're going to
pick up the tiniest, tiny amount of
paint, You see that? Then I'm just going to do
some light single strokes, just where I can imagine the light is most
likely to be hitting. You can see I'm not
painting the high lights on the same part of each
spoke all the way around. The light is going to be
hitting different areas of the spokes depending on where the spokes
are on the circle. The spokes on the left
here are going to be getting the light on
the outside edge, but on the right
they're going to be getting the light
on the inside edge. Okay, You're not highlighting the outside edge
all the way around. Now, a couple of strokes on your left hand lines
on the frame there. Just keep trying
to visualize where those edges are that the
sun is going to be hitting. We're not doing
solid lines here. We're not going to be
worried about being too precise or exact
with our lines. Like we're just trying to give
that suggestion of light. And you can stick with
your skinny brush or you can go to
your bigger brush. It doesn't really matter. But we're just going to
finish up with some lines on the left hand edges of your branches in
your tree trunk. Now, if some of those lines
are a little bit bright, while the paint is still wet, you can rinse the
paint off your brush and dab your brush on the cloth. And just with a damp brush, you can just paint over it. It'll just lift a small
amount of that paint off if it's way too bright. If you've gone in with really, really thick white paint, then you can just paint
over it with black paint. Remember, we just want the hint, we just want the
suggestion of light here. We don't want really bright white or light
colored lines here. Just really thin layers
of that light color. Now if you wanted to give it
a little bit extra depth, you could even go in with
a second and third color. I'm going over some of those highlights
that I've already done in pink with a
little bit of yellow. Now, now I did tell you this was going to be the last thing we had
to do on this painting, and I told you a
little bit of a lie, not on purpose, I just forgot. But if you want to finish, finish this painting, you can paint the sides
of your canvas. Okay? And that will just give
it a lovely finished look. You can see on my
finished one here, I've just gone around the sides with just a straight
coat of black. And you can see it really does give it a more polished
finished look. But other than that,
your painting is done. Now, I'm just going to
show you some close ups of mine so that you can just see what I've done with the
highlights if you missed it.
11. Your project: Thank you for joining
me for this painting, especially if it
was your first one. Your project now is to create your own sunset on
the farm scene. Now the absolute beauty of this is that you can take all
of the elements that I've shown you how to
create and you can put them into whatever order suits you. You can add more gum trees, you can move the
elements around. You can really create
your own scene. You can even, you know, having watched how I break down all these shapes into
very simple shapes like maybe even have a go at your own farm
shapes and see what you see, what you can create. With your new skills, please go ahead and
paint your version of your sunset on the farm using all the skills that you've
learned in this class. And then please upload it to the project section.
I'd love to see it. And then if you see
that any other students have uploaded a project, why not go ahead
and give them alike and leave a comment
with some feedback? I'm sure they'll appreciate it.
 Sheree Lowe, Artist and instructor