Transcripts
1. Introduction: Hi, I'm Irina Trzaskos,
assistant illustrator. Welcome to my little studio
to explore your creativity. In today's class, we will be painting a
beautiful collection of Zodiac art while practicing
our brush control. As inspiration for this class, I was looking for antique
constellation maps where the Zodiac signs are represented as
mythological creatures. I found this beautiful
Celestial Atlas from 1822, which is a public domain. We can use it as a
reference for our artwork. I want to find some
artwork, however, I'll leave you a link in the
resources for the class, so you can see the original
art which inspired me. All my classes are filmed in video types so you
can follow along. If you're new on this channel, thank you for joining. Press the Follow button on top, and let's get started.
2. Supplies: In this class, we'll be using
the following supplies. We'll be using watercolor paint. You can use any paint you like. I'll be using Artistro
Watercolor Paint. Specifically, I'll be using the turquoise color
which looks like teal. Also need water, paint palette, paper towel. Important, we'll need
watercolor brush. This is a synthetic
brush I'll be using. It says number eight but when you look at
it it's number four, closer to maybe four, maybe six.
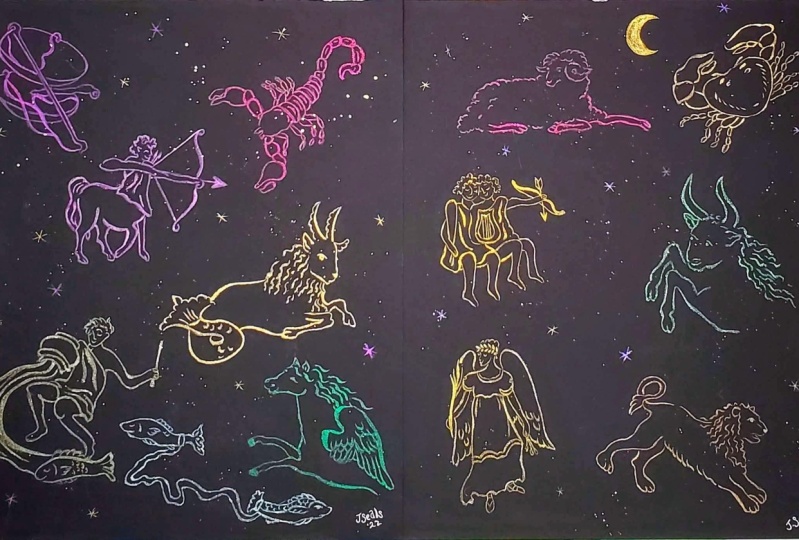
3. Class Project: In this class, we will be
painting 12 zodiac signs. The objective for this class was to practice brush control, and to discover what
your brushes can do. For best results, I suggest you not
to do any sketches, and just to follow the
lines as I'm doing them. However, feel free to sketch the templates which will be in the resources of the
class before you paint. If you want to really
practice brush control, then just start
follow line by line, which I'm painting
in each petal. We'll be painting
12 zodiac signs, and they're inspired
by Celestial Atlas, created by Alexander
Jameison in 1822. It's a copyright. It's a public domain at the
moment, so we can use it. I also modified some
of the drawings, like I made them younger. I didn't add the beards.
I think it's more fun. Some bonus besides
the 12 zodiac signs, I'll also be painting Pegasus. I can't wait to get started.
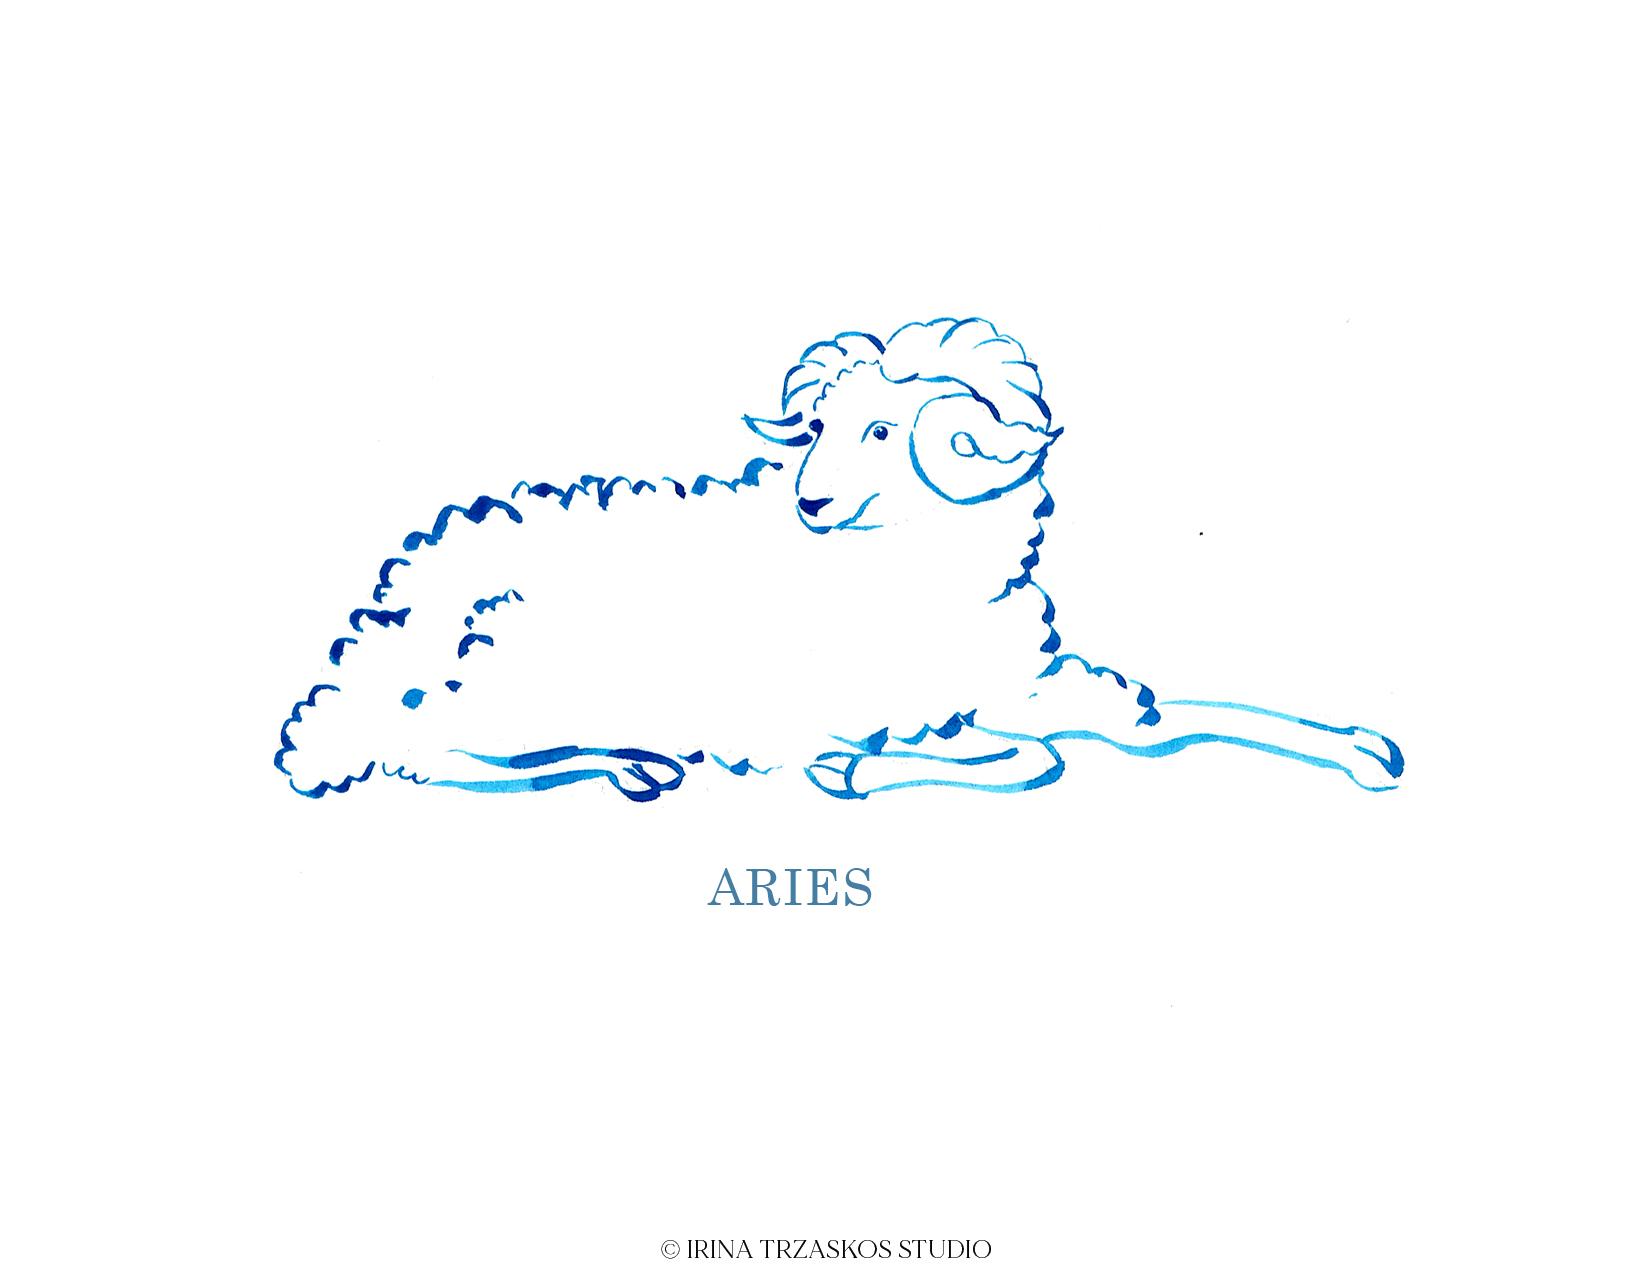
4. Painting Aries: In this video, we'll be painting Aries. It's pretty easy one. Mostly we'll be practicing our little wavy
lines for the fur. Usually, I start my
paintings with a nose, with the face of the animal. This is a nose like a little
triangle. Then we'll go up. Paint an eye with
the tip of a brush, holding it pretty closer,
have more control. Another eye here. Again, will be tip of a brush. Next, there are some wavy
lines on the forehead. We'll start curling this horn. Go to the middle, to the top again and this part. Add some lines here to
make it interesting. Here, we'll show a second horn like this. This lower part of the face. Here we'll have a foot, just two legs and hoofs. It's a little broken, it's okay. Here another one,
the [inaudible] one. This one will go forward. Now we can practice
a little wave lines. With the tip of a
brush or you can press it harder, doesn't matter. Don't look interesting, anyway. Try to shape her body
any way you want. On the neck, more of her here and here. Here's our ram and
Aries [inaudible].
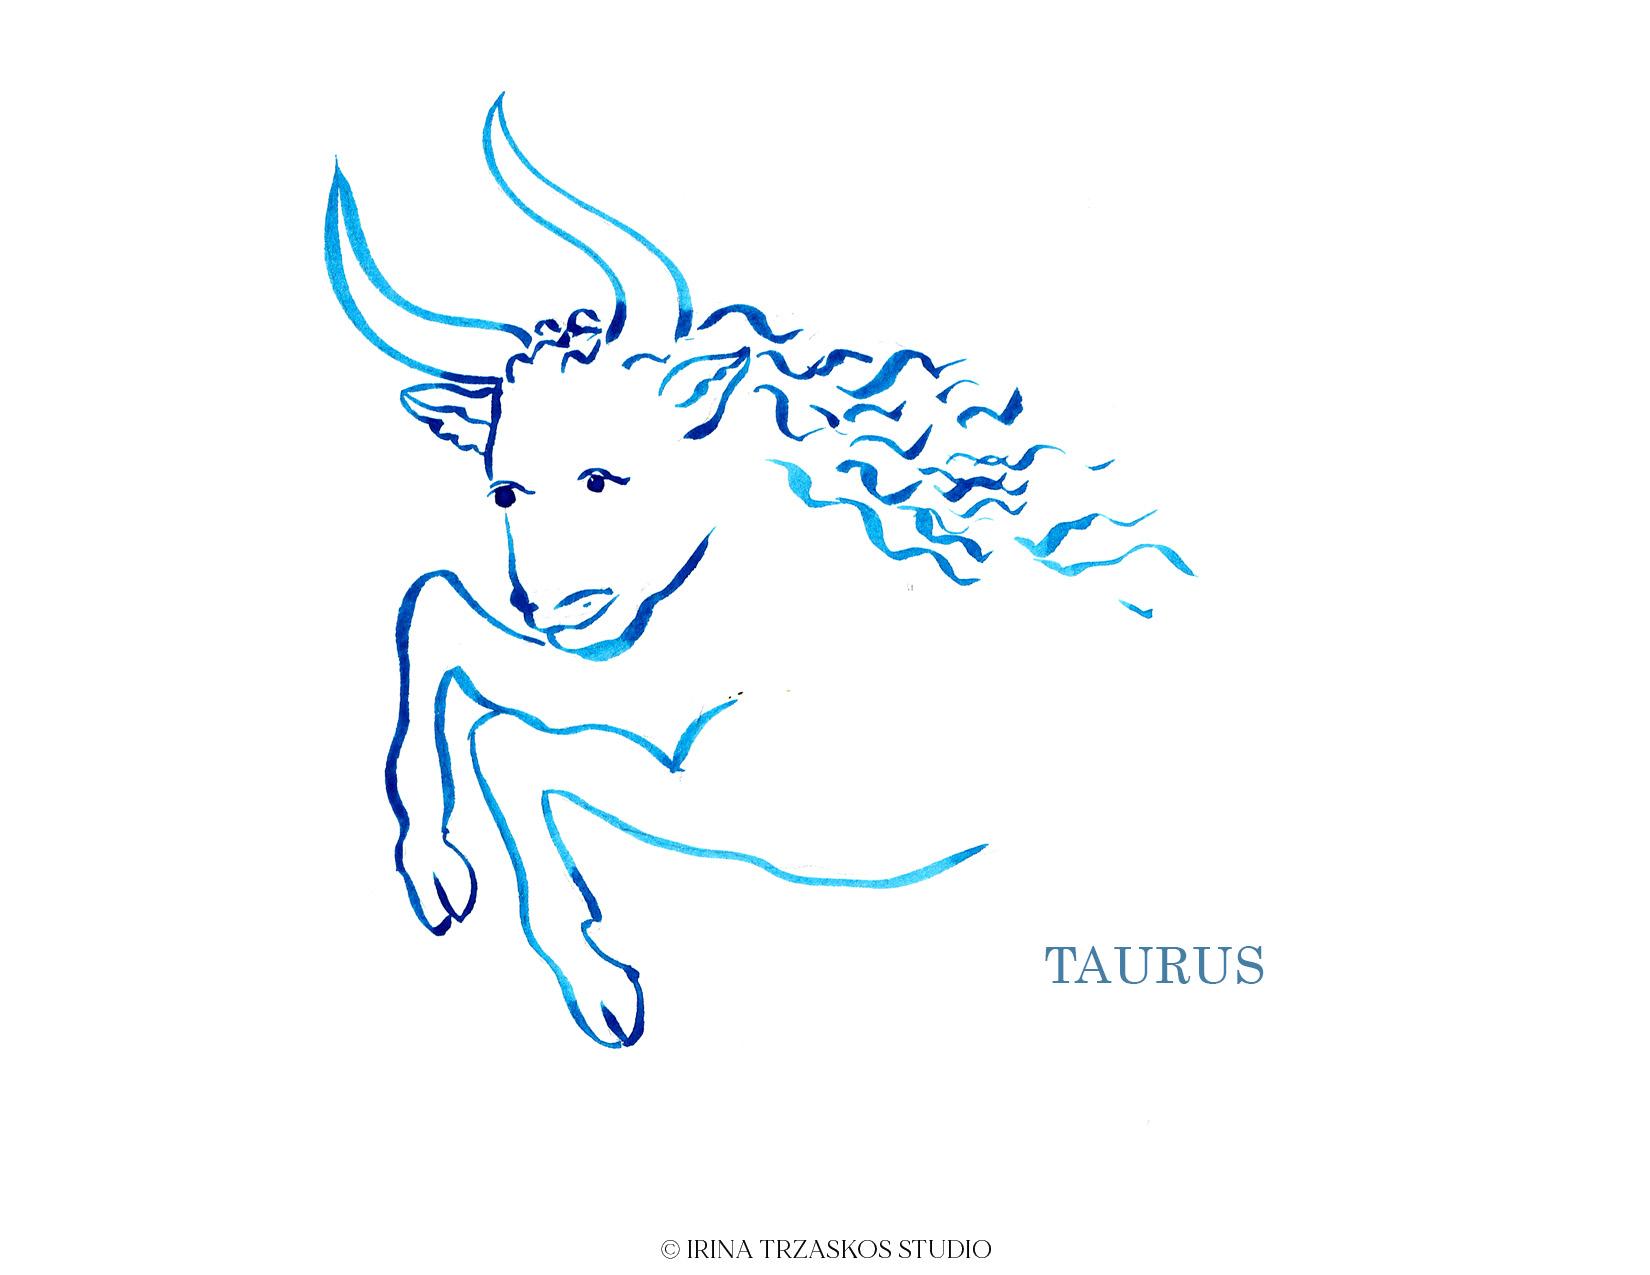
5. Painting Taurus: In this video, I'll show you how
to paint Taurus using watercolor like
artwork technique, and it can all be practiced
in color brush strokes. This one has some
wavy lines here, so it's a good opportunity
to practice some wavy lines. I'll start from the eyes. Remember the eyes of this constellation
are two big stars. That's why in this
artistic interpretation of the Zodiac sign, I also made big eyes. The ear with some wavy lines. Be practicing wavy
lines in this one. On top of the head, let's paint this horn with nice one line and second part of the another
one continuous line. The second horn, the same. You can see because it's
turned a little bit different, it's a different thickness
of the line too. Now let's paint the ear. The second ear. The nose. This part and there's
some more volume here. Other is the shaping up nicely. Let's paint the front
legs and that's all the legs we got in
this constellation. The second leg. Also a lot of different pressure
on your brush, all give you a different
thickness of a line. Here we'll have wavy hair. I didn't sketch it. Just do however you feel it. Make a bit eyelids so it
looks calmer. That's better. For hair just let's play. Some versions of
representation this side, it's coming out of
a form of a wave. Ocean probably so you
can paint [inaudible] I think this is
enough wavy lines, especially they're not as
beautiful as I was hoping. It's still looking great. This is our Taurus.
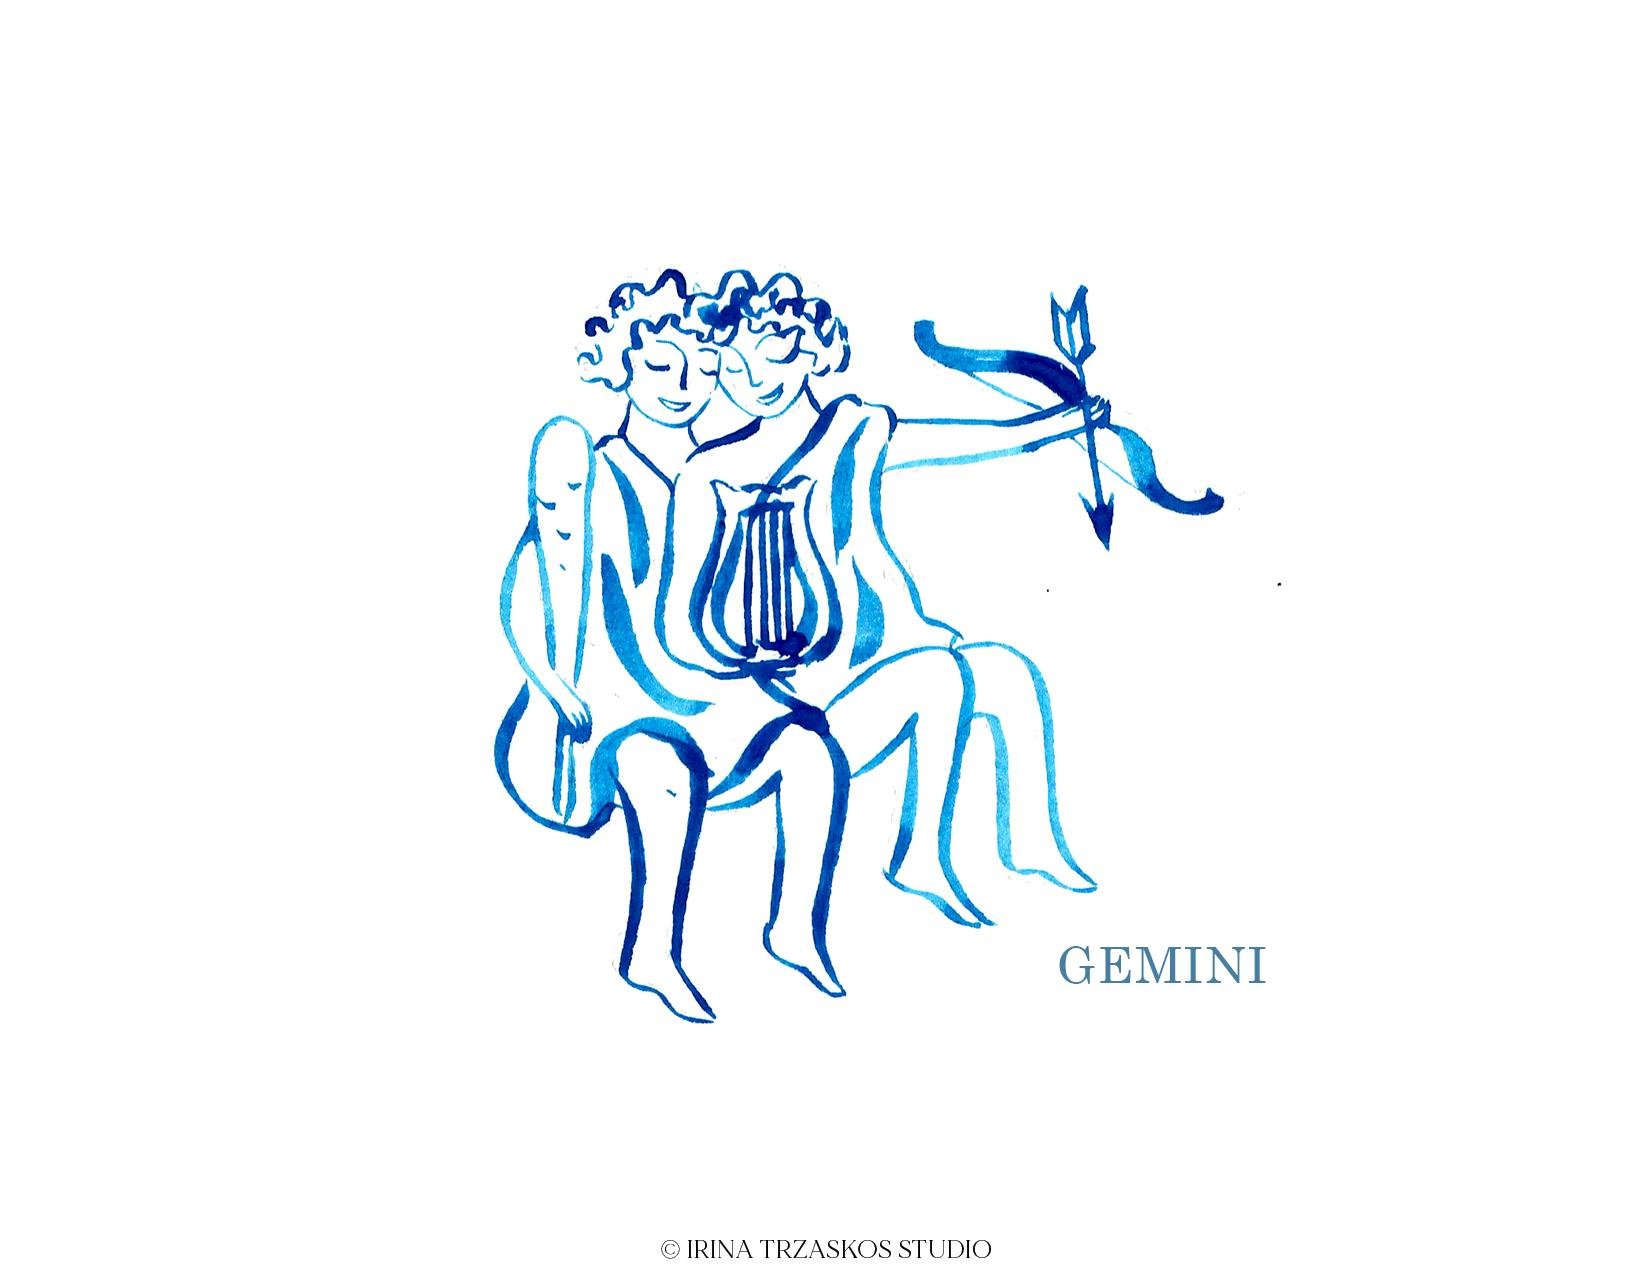
6. Painting Gemini: In this video, we'll be painting
Gemini and I made them smaller so we can now
have even more control, and see what our tip
of a brush can do. When we're working on
a smaller details, make sure you don't have too
much water in your brush. It's nice to work
on synthetic brush, which gives us more control
than softer brushes. Again, we'll start
with the nose, a little arch for the eye, the second eye and eyebrow. I'm still adding water to my paint because it's
not flowing enough. Make sure your paint is flowing. Some curly hair, which will
shape the face on the top, and another arch to
shape it on the bottom. If you feel your
brush is too thick, or it doesn't have a sharp tip, just pick a smaller brush. Let's add few more
curls and practice our curly lines. Like that. Let's paint the second face, we'll start with the nose curve, eyebrow, one eye
and the second eye. This one is a little too big, but it's okay. This smile. Curly hair to add shape to the face. You can make this one darker. By adding more lines, and a curve to add
the outer shape. Now we can paint the rest of this
boy's, boy or girl? I don't know what they
are. Gemini. You can see in watercolor line work, we usually use a lot
of curved lines. It's pretty much
never straight lines. They're all flowing and
beautiful, just like watercolors. Here we have arm, some Fingers holding a bow. Let's paint them bow. You can color it
completely if you want to. Let's add some contrast. Some field areas. The string, let's paint the rest of the arm. There is an arrow here, so here's our straight line. A few more straight lines
to finish the arrow. Nice. Now let's get back to the left because I'm
afraid it'll start smudging, ink if I'll keep painting
on the right first. There is a bat here. Arm and hand hugging it, and the rest of the bat. This one is holding
an [inaudible] Again, we're practicing curvy lines and if they're
not perfect, it's okay. Just go with it, and do not give up until you
finish the illustration. Then you can look at it
and if you don't like it, you can repaint it. But don't give up halfway. Especially with these kind of illustrations where
we paint, lines. Especially if it's
without pencil. Now let's paint the legs, and then add some more
lines to their robes. This part of the leg, the sole, the foot, add another curve
for another part of the leg. The second leg again. The foot, the sole, one curve and another one. Beneath this curve, the foot, and the last leg. Oh, this one didn't
come out great. Let's finish the robes, just a few lines. Here are detailed Gemini.
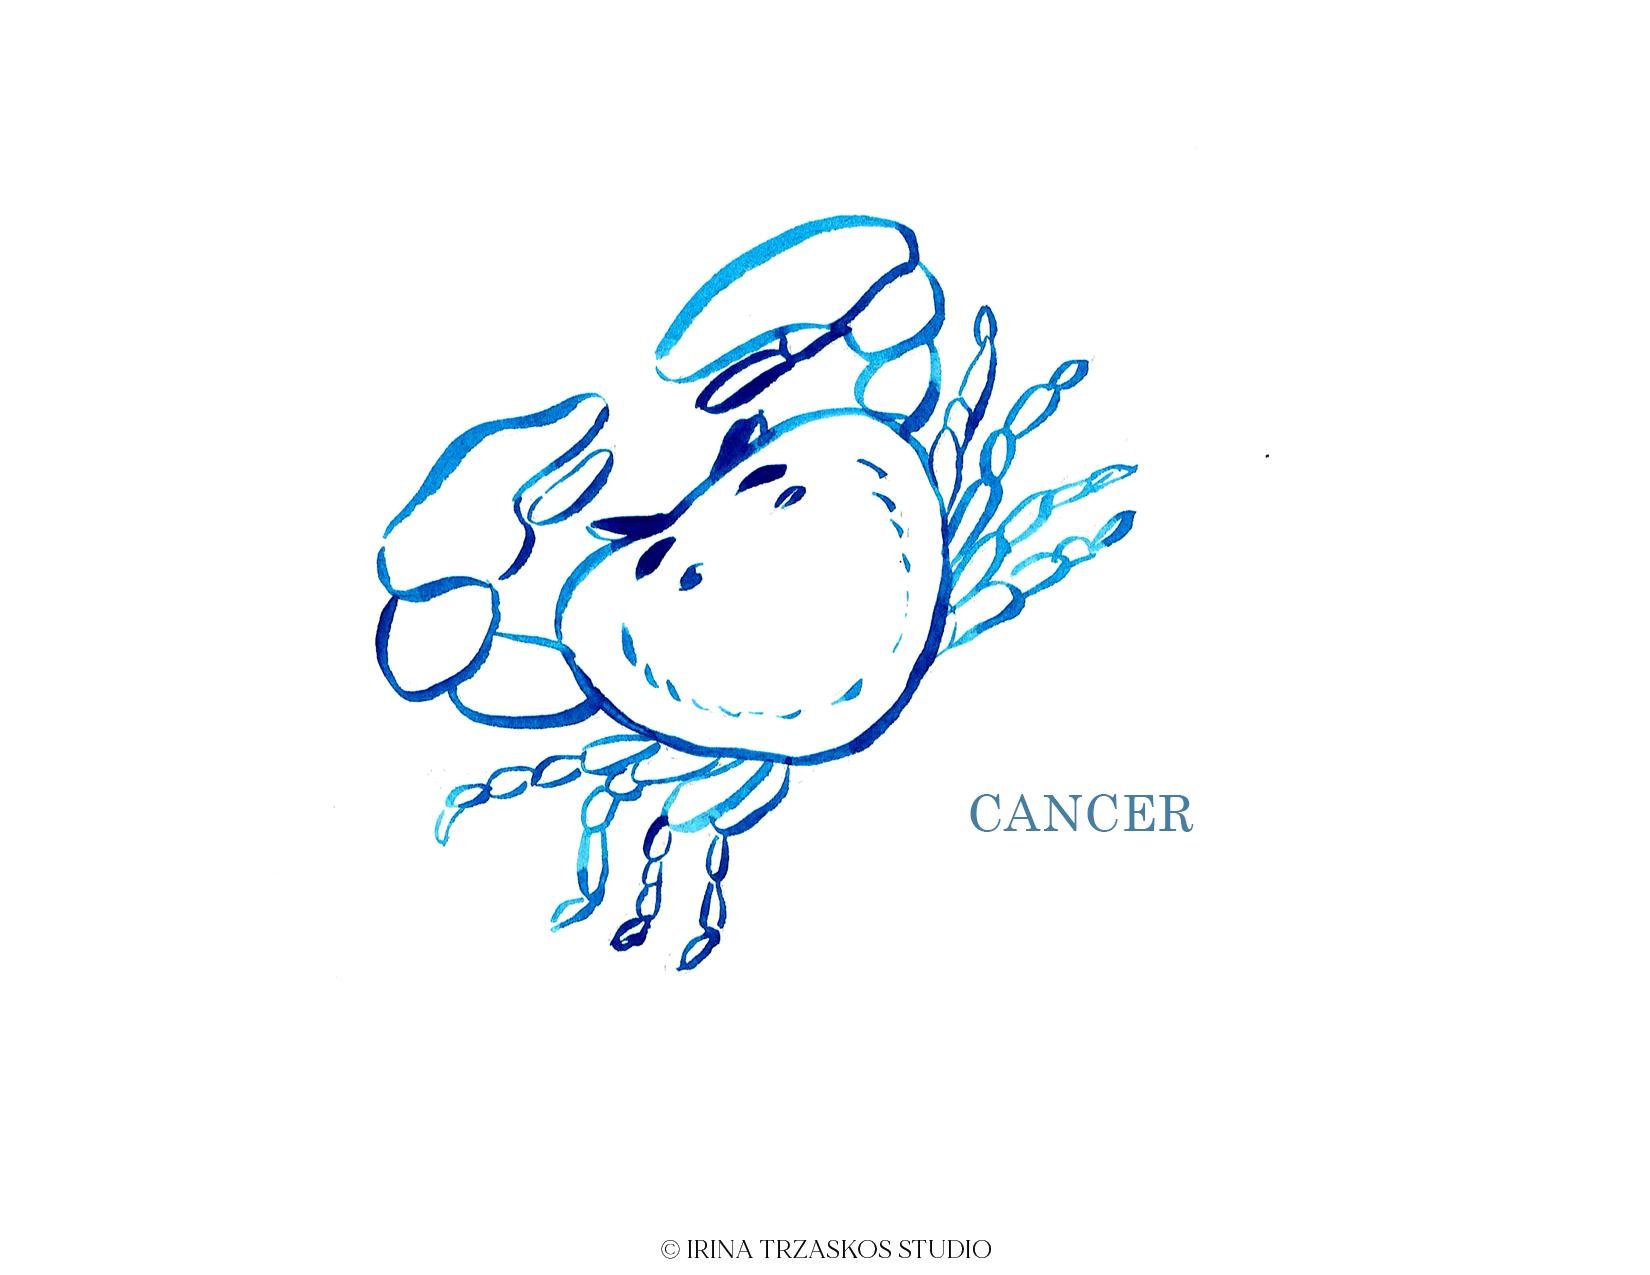
7. Painting Cancer: In this video, we'll be painting Cancer, the zodiac sign which
is represented by a crab looking creature
in the celestial atlas. It's fun to paint. It's nice. Brush control exercise, painting all the bigger
and smaller details. We'll start just from
the left to the right and we'll start with this claw. I have a small part of
a claw which is like an oval or a pebble and bigger part which I'm
painting right now. The same way on this part, although not exactly the
same but pretty symmetrical. Nice. Let's finish this claw by getting two more parts to it. Then we have a bean body, it's
almost heart-shaped. Refill your brush as needed. Once you feel paint
is not flowing, then it's time to refill unless you're
using a water brush. There are a few more details
I'm going to add here. So it doesn't look too
empty and few lines, so it's reflecting the
texture of this part. Now, let's paint
these little legs. Here, you can get creative and you can paint them in any
direction you want. This is pretty much an array
of small loops and ovals. This one let's go
down like that. It's nothing complicated, but it's a good brush
control exercise. Again, you can see
how your brush is moving in every direction. You can see how the line is changing depending
on how hard or how little you're pressing it and the same
thing on this side. We'll finish this
big claws first. Symmetrical objects are
always a good exercise. This one is not
perfectly symmetrical. Well, I said painting a creature
is probably symmetrical. But painting itself is not. But it's always good to
repeat the same half. Like this leg, I think
it should be a little longer. Add one more. This is our Cancer zodiac sign. I think it's very cute.
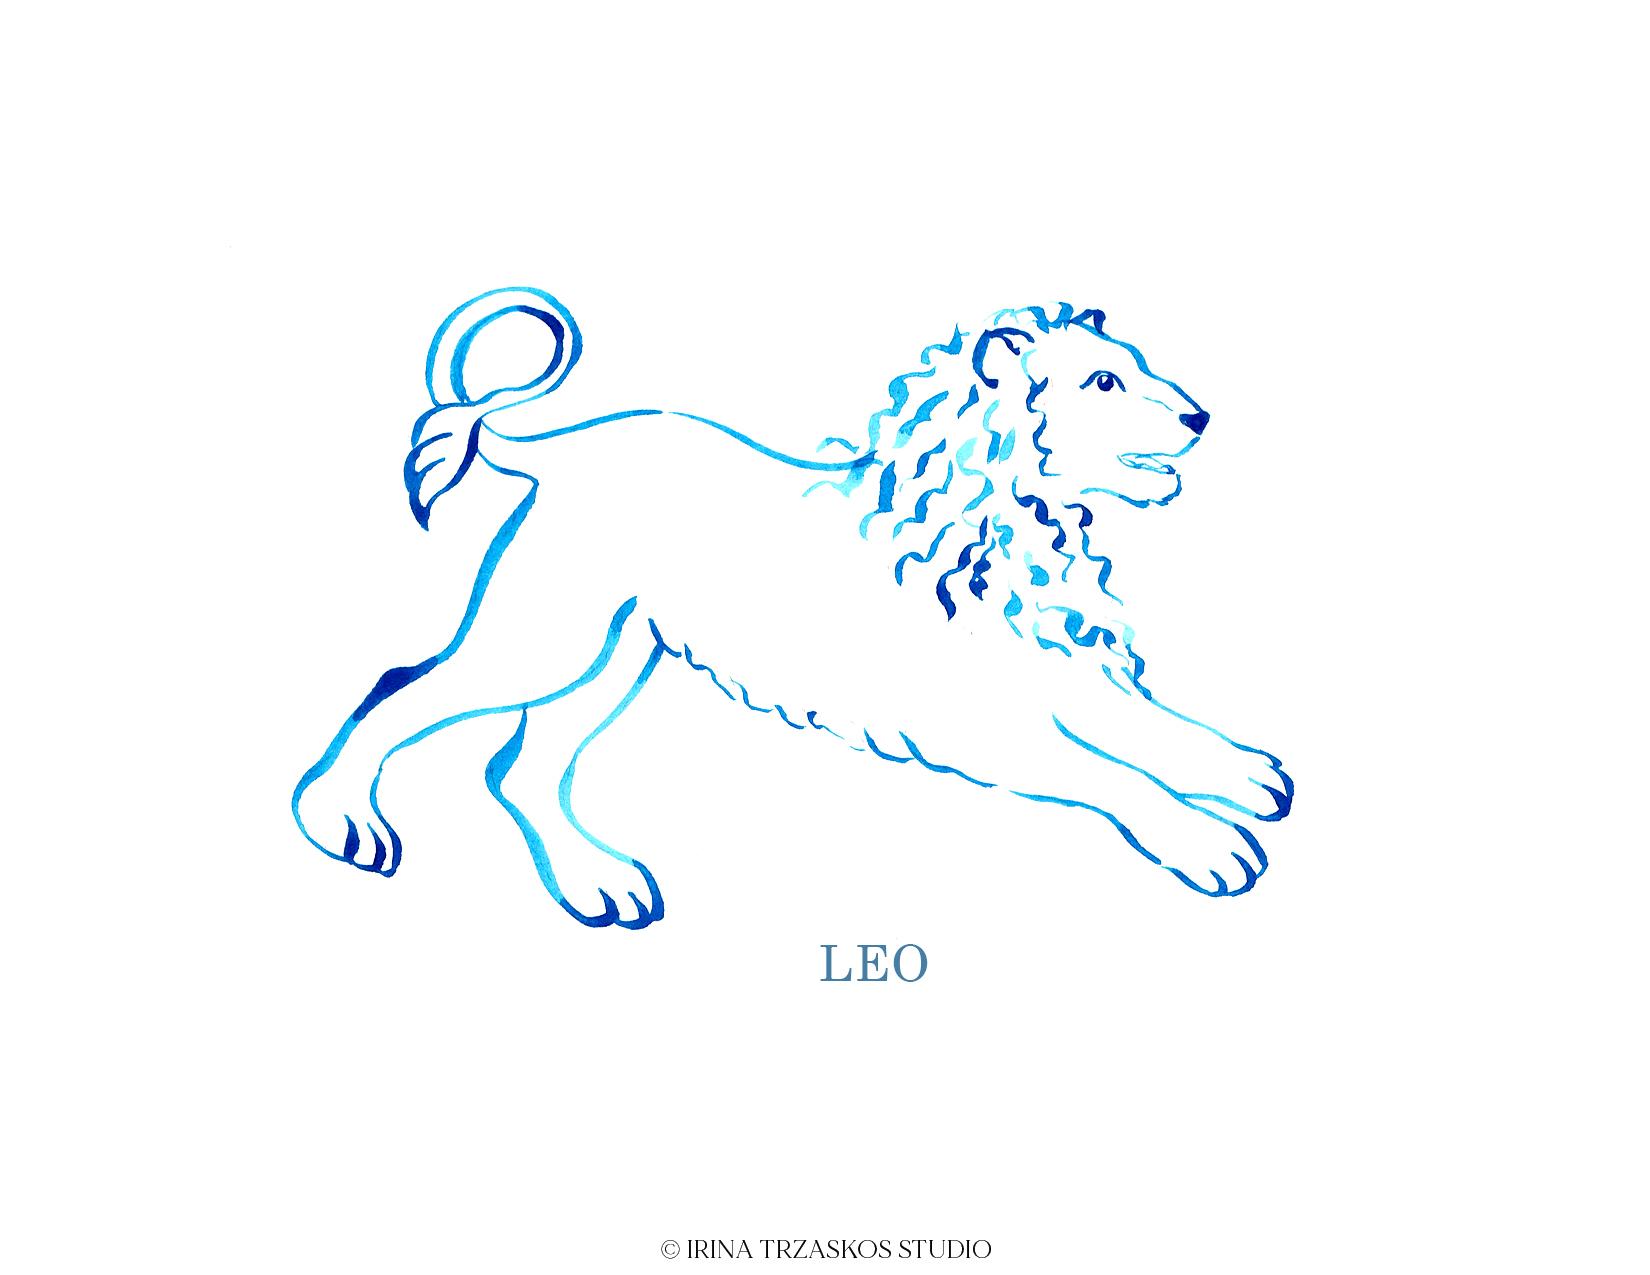
8. Painting Leo: In this video, we'll
be painting a Leo. The zodiac sign, which
is represented by a running lion and we
will start from the top left and we'll move to the right so we don't smudge our artwork for a better result and for a better control of the
brush and keep it close. Keep your fingers close to here, and make sure you have enough paint in your brush
for more flowing lines. Start to have a
tip of tail tail, one waistline, another one. This one shouldn't be sharper, one on top and another one. Now let's make this
shape inside of a tail and like this. The rest of a tail and back, but not too much because
we'll have here of a hair. Then watch so far to the head. This part, the back leg. Also, try to do as many
continuous lines as you can because they
look more alive. Another back of the leg. Here I'd like to make
some wavy lines, because there's fur and see we're
leaving some space. It also implies which
various of fur and hair are there when we leave some
space between the lines. They place some more room for interpretation.
Please pause. Next is, move to the face, to the nose, to the eyes, so start with the eye. In this front line the nose. If it's too fast for you, you can just pause the video. Just do it with your
own pace, do not rush. Some side of the mouth and
it is on the bottom part. Next, let's paint the ear. Something like this
and another one. Then it doesn't look like
a lion because it needs more wavy hair
here. Let's do it. This is at least fun
and also simple. I try to be careful
not to overdo it. It's even a mistake I'm doing, I'm making from all the same. But they have to go from different angles and a
little bit different. Like this. This is our Leo and
our running lion.
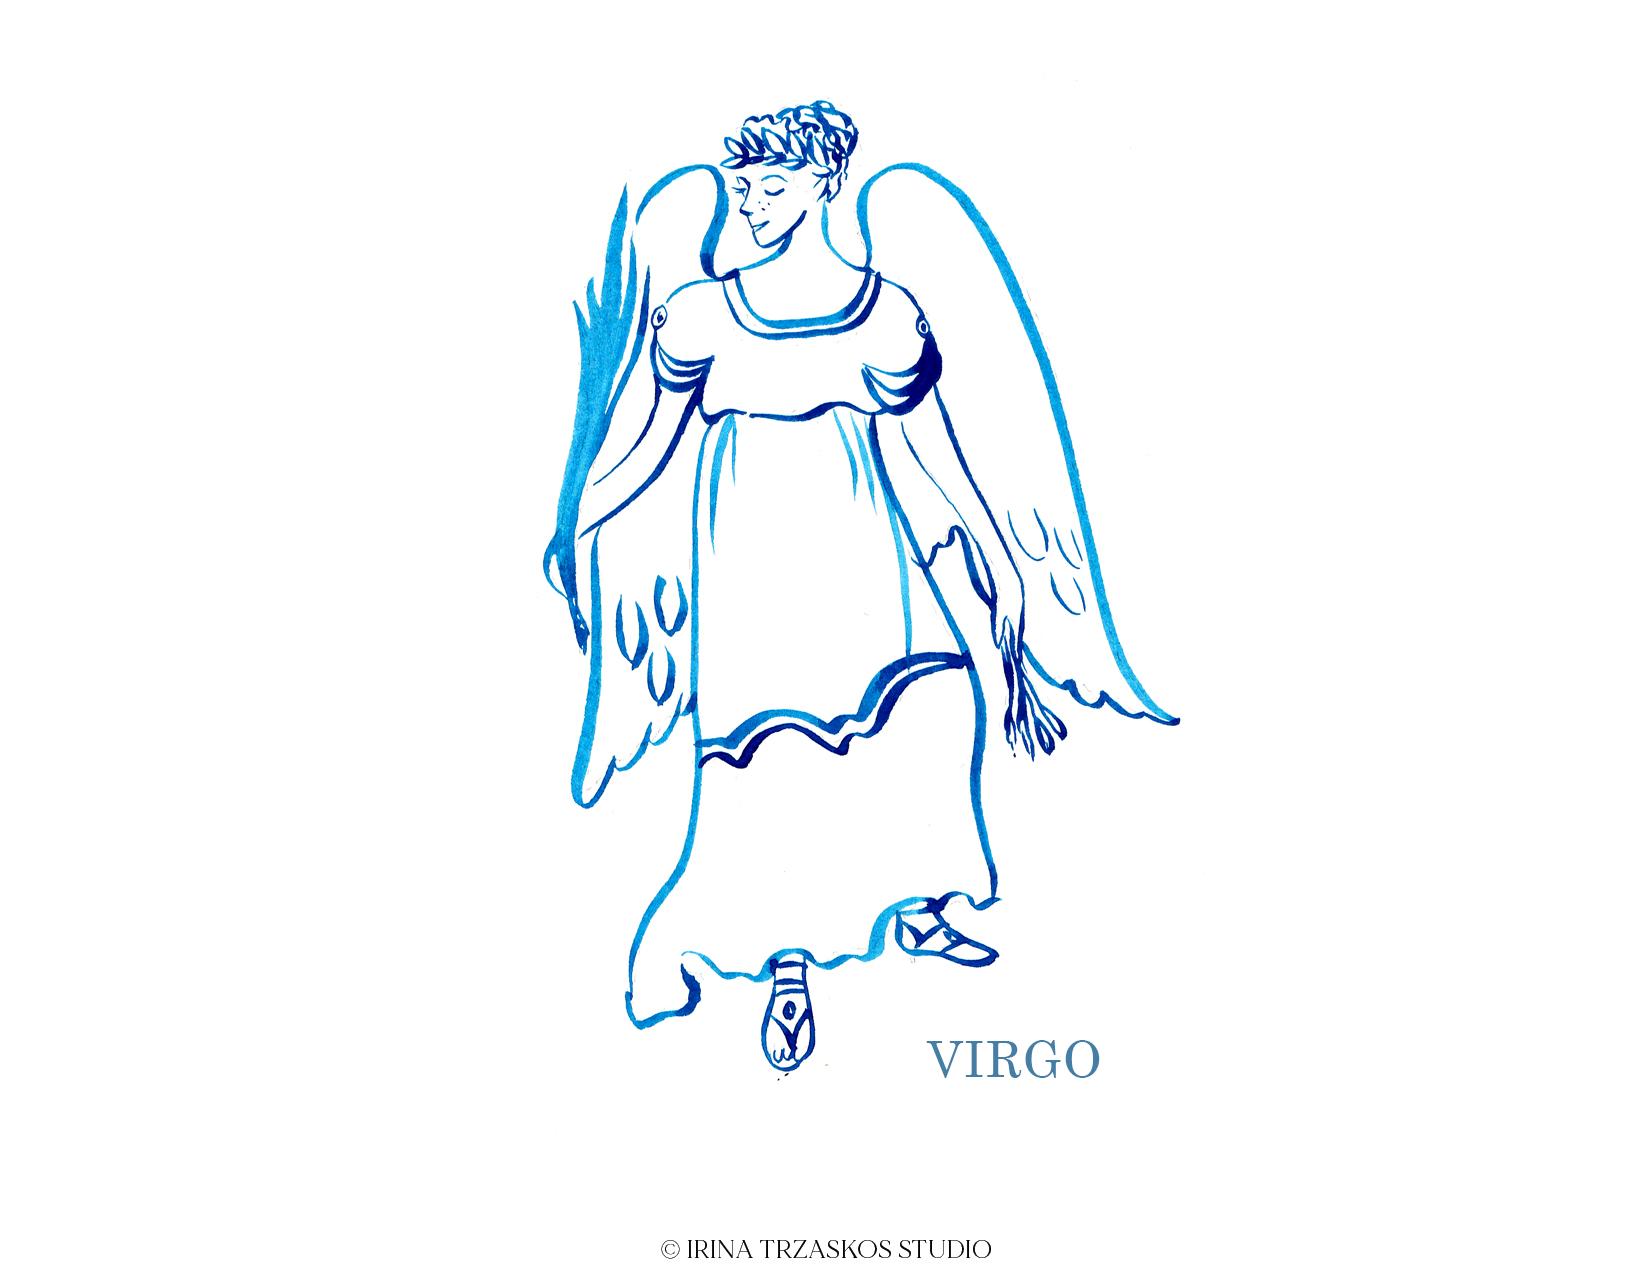
9. Painting Virgo: In this video, we will
be painting Virgo using the various
brushstrokes and again, discovering what
our brush can do. I did a very light sketch
and you can do the same. However, for best results
for brushstrokes, I recommend you to not use any sketches just to try
to do it all with a brush. I didn't do that because I
think it'll take too long. I wanted to have some guiding. Again, I'll be using
turquoise or teal color. You can use any color you want, whichever works
for your interior, or just use your favorite color. Once again, I'll be starting
with the face, with a nose. It's one little curve
on top for eyebrow and a line down and a
line on this side. Then let's paint
some eyelashes on this eye and a small
line like this. Let's paint a second eyebrow, a little arch and the
eye, another arch under. A little line down
and the smile. Something like this. Probably chin will have
angled line like this. You can make the lines thicker. However, It's nice to practice what your tip of your brush can do and you can see how close
I'm holding the brush. It's painting my fingers. This position gives you the
most control of your line. When you want more free lines
you would hold it firmer. Now, she'll have a
leaf on her hat. Let's paint some leaves. Let's add her some curly hair and practice some
curly lines too. Up and down. [inaudible]. It's nice to discover
what your hand does best. I want to add her some
dots for freckles. Nice. Next let's
paint a her neck. This will be an arched line here like this and
another line here. Neck line. Try to make it in one move and again try
to keep them parallel. Here she has some kind of button and the
same on this side. The top of the wings, it's a complicated curve
and you can see how the brushstroke is changing
when we change the position. This one made sense
to make it once. I did it, just make sure
you don't smudge it. I'll try to make sure too. Let's paint some
freehand fabric lines. Feel free to just add the
lines where it makes sense, especially if it's fabric. If it's not face
or leg or an arm, you can play a little with your brush add extra
lines or details, or even textures or patterns. Now let's focus to make
this arch for the arm. Like that. Second
one pretty parallel. She's holding something, her feathers are
something, some fire. This one [inaudible] probably
know what she's holding. Like that and here
we'll have her hand. This is under this fire. I think it's fire. Let's
paint the rest of this wing. We'll practice the loops. Let's paint this hand and arm. Trying to make it in one line. Again I'm stretching to make it to every tip of a
brush in one line. Not perfect but pretty good. She's holding some grains here, five of them. Again, it can be
creative and then something else goes
in her other hand. Let's get back to the dress. Let's make another wavy line
here and one parallel tilt. We can add some
lines here I guess. Add the wavy line on the bottom. Then one foot. I love painting with
some Greek sandals. Let's show the toes first, little loops and then the
center part like that, two lines here, one more line and a circle. Circles are hard to paint, but it's a very nice practice. And this foot, one, two, few more lines
and a bit of circle. You can add more details to
the wings if you want to. I probably would fill
first, here and there, but not too much, because I think it's
already enough for Virgo.
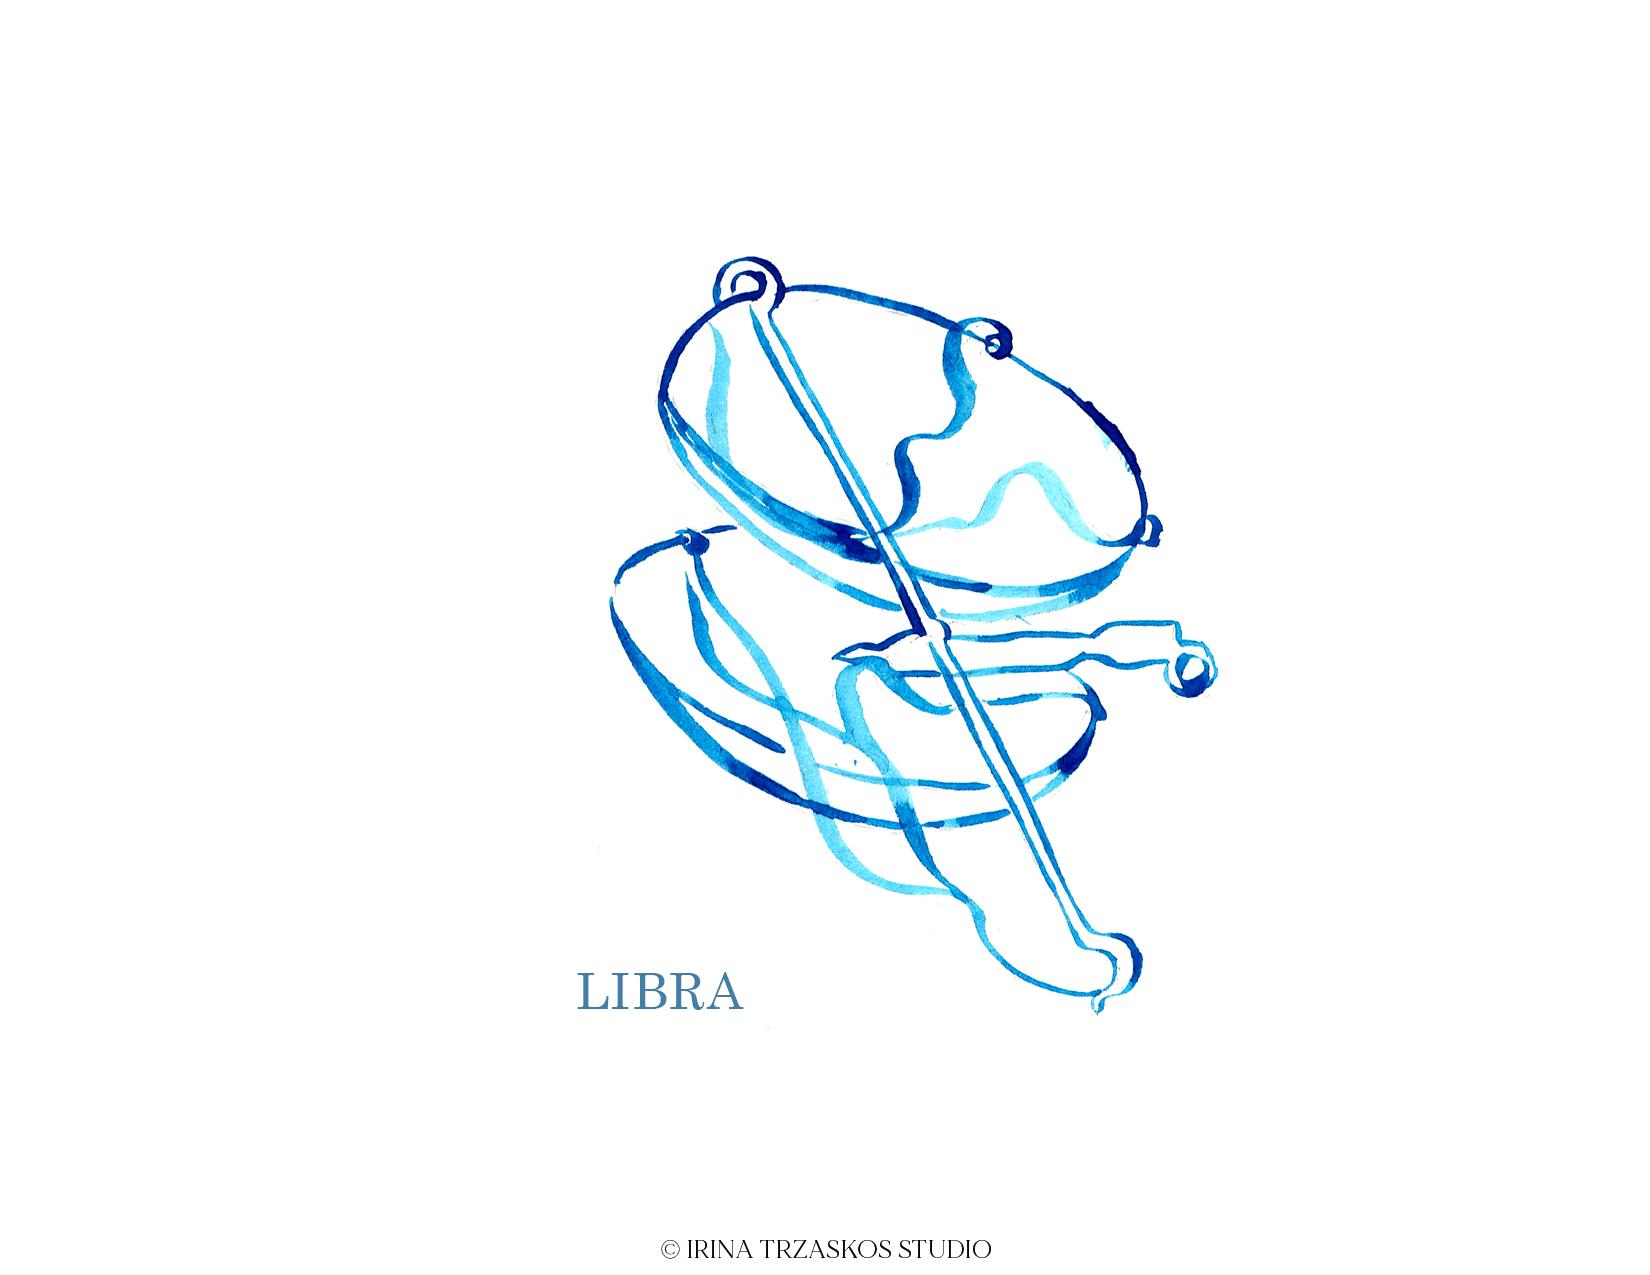
10. Painting Libra: In this video, I'll show you how
to paint the Libra, and here we'll be practicing
more geometrical lines, straight lines, and
perfect oval lines. Well, they'll probably won't
be perfect, but we'll try. Let's start with
this partial circle and put the oval
line next to it. With tip of a brush, let's try to draw a
straight, long line. Like this. Something keeps
interrupting here [inaudible]. Again. Here we have some hook. Now I need a parallel
line to this long line. Finish the hook. Next, I have this two
ovals, two plates. It's a good chance to practice. I smudged it. Don't do like me. Try to always go
from left to right, if you're right-handed
and from right to left if you're left-handed. I'm trying to fix it. The second oval. I didn't really more paint
[inaudible] anymore, so [inaudible] line
in watercolor from our geometric objects and
you can see it in my lines. Here, I have another
part of this Libra. Again, we need some
straight lines. It gets thicker here and it
has some adding on the end. Some complicated
construction going on there. Then has some chains or
straps which connect here. I think there is a second
one here and one like this. It's easier to paint because we just use around thickness of brushstrokes to give them this soft flowing
feel of straps. The same way here. One more and has another
drink here, and drink here. Here we need to make
this line continuous. This is our Libra
and watercolor.
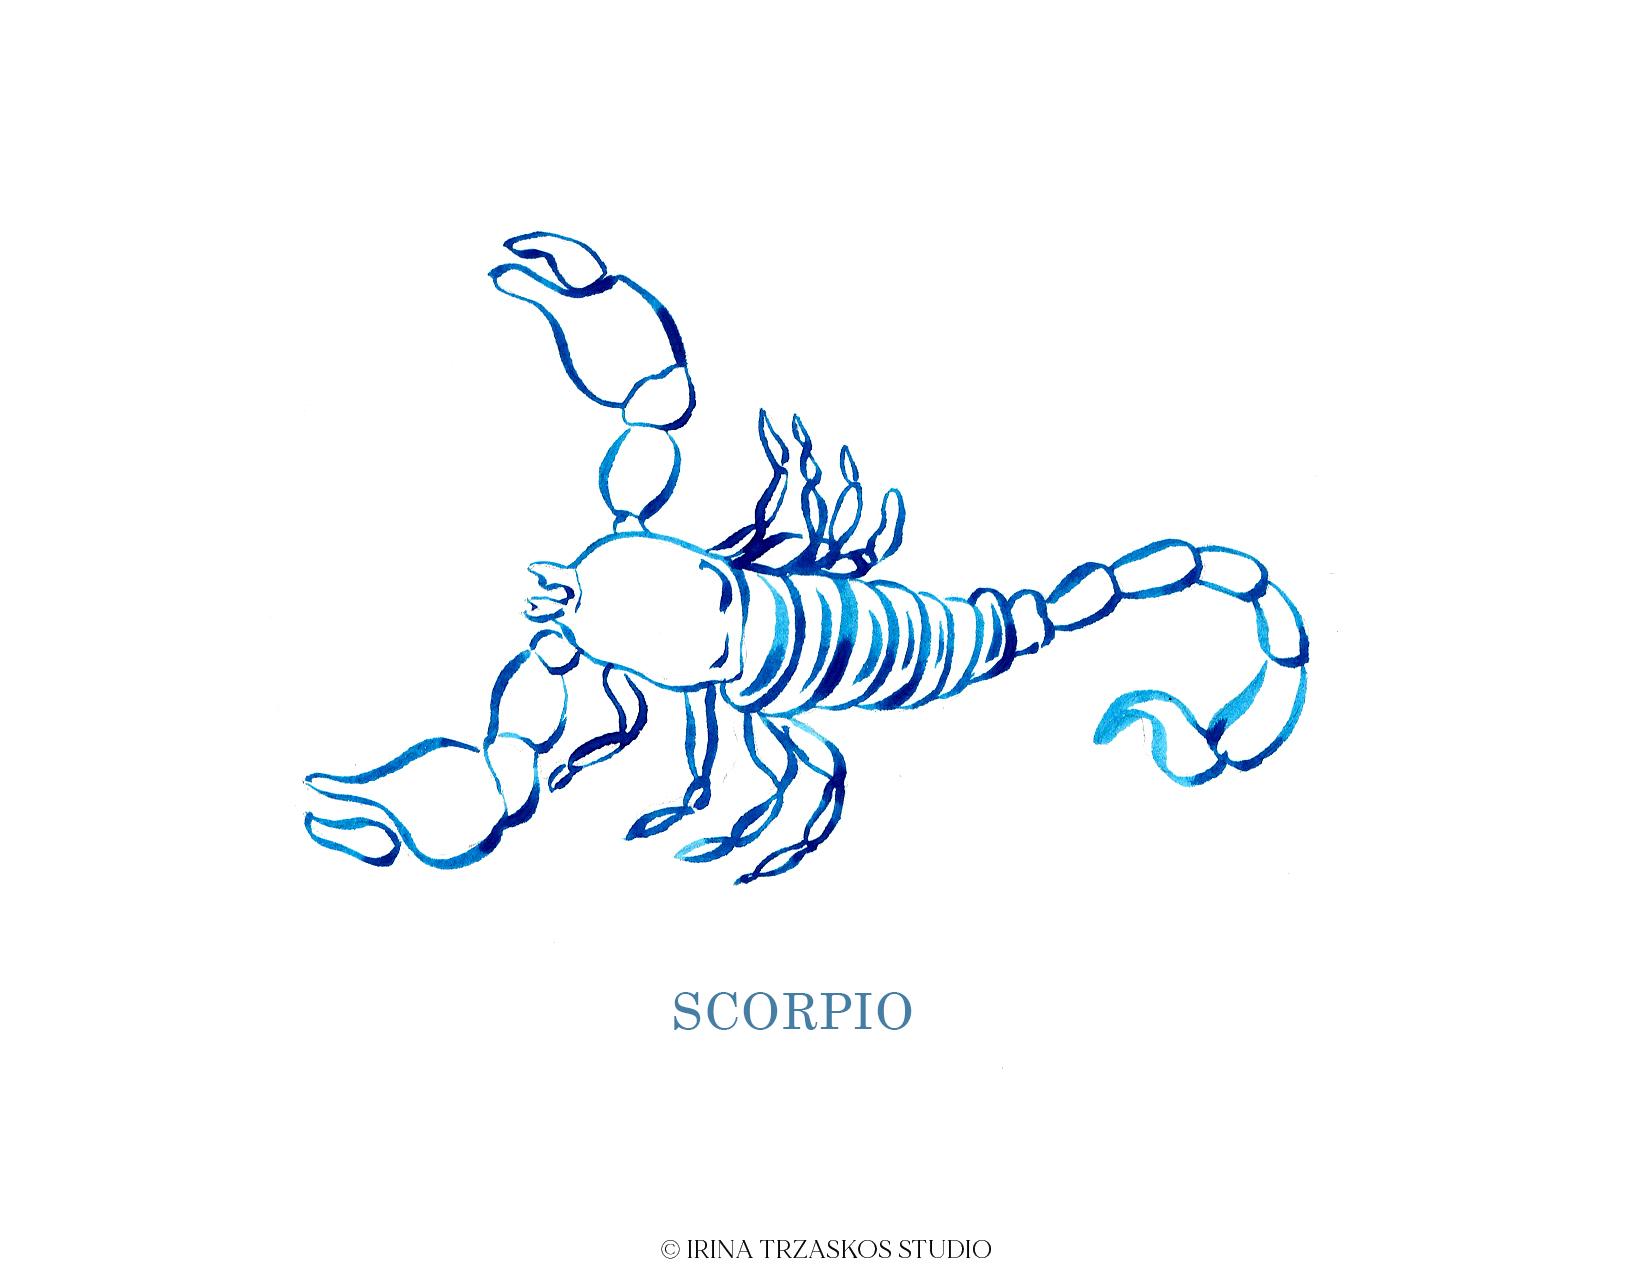
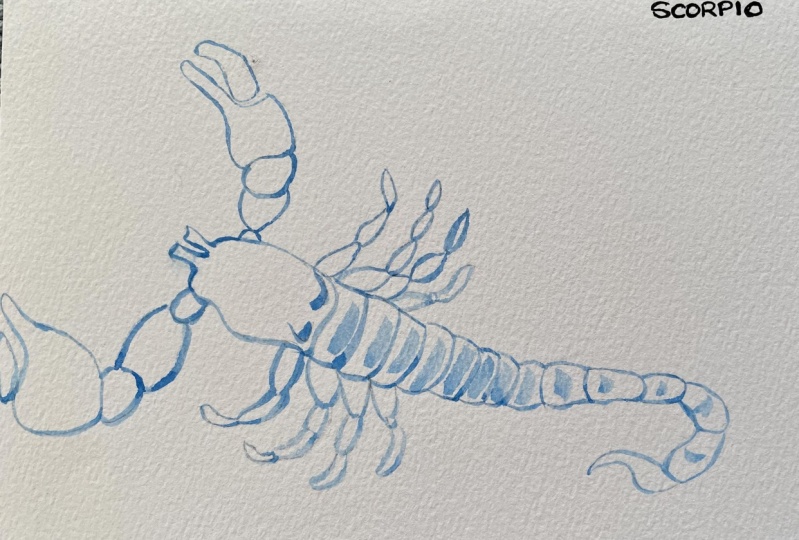
11. Painting Scorpio: In this video, we'll be painting Scorpio using what I call
line work techniques, and we'll be painting
a lot of curved lines, and thicker lines, inner lines to show how
nicely brushstrokes could be. We'll start from the top left. If you're right-handed and we'll move down to the right corner. If you're left-handed,
you should go in the opposite direction. Just to avoid a smudge. This is the claw. Here, you really can be also free with your
lines as you want. It doesn't really matter if one gets a little more
crooked than another. I suggest you also play with
the thickness of the line. By pressing more, we get a
thicker line and when we are barely touching the
surface of the paper, we will get a very
thin line, like here. Now I have this
part of the hand. We can add a few more
lines for texture. Now let's move to this claw. It's again one curved line, and now we're done, and we can modify it in
any direction we want to. This part of a claw is more interesting because you can see that wave and thickness of the line also will rise
because of the wave shape. Nice. Then get just
small little legs. That's how you really get to know the right
ratio of water and paint to paper and it's how you get to
know your brush too. If you have several
brushes to test or to try, maybe you have new brushes, you can always try
them too and see which one you like the most and which one gives what
kind of result. Then here we have a
bunch of curving lines, and I'll add another
line to each of them. You can change these legs, it doesn't really matter. You can point them in
a different direction. I'm just down-going to curve. My intuition tells me that
always following the sketch. We can all practice
some curved lines and you can try to
go in one direction, or you can go in opposite
direction or to two scopes. It's easier to go
down than to go up. It's easier to drag
the paints down. The tail is a series of a
little bit squared loops. The most interesting, of course, is the end of the tail. If this is too fast
for you just stop and repeat the line and
then continue again. This is our Scorpio. I hope you had a chance
to paint it with me.
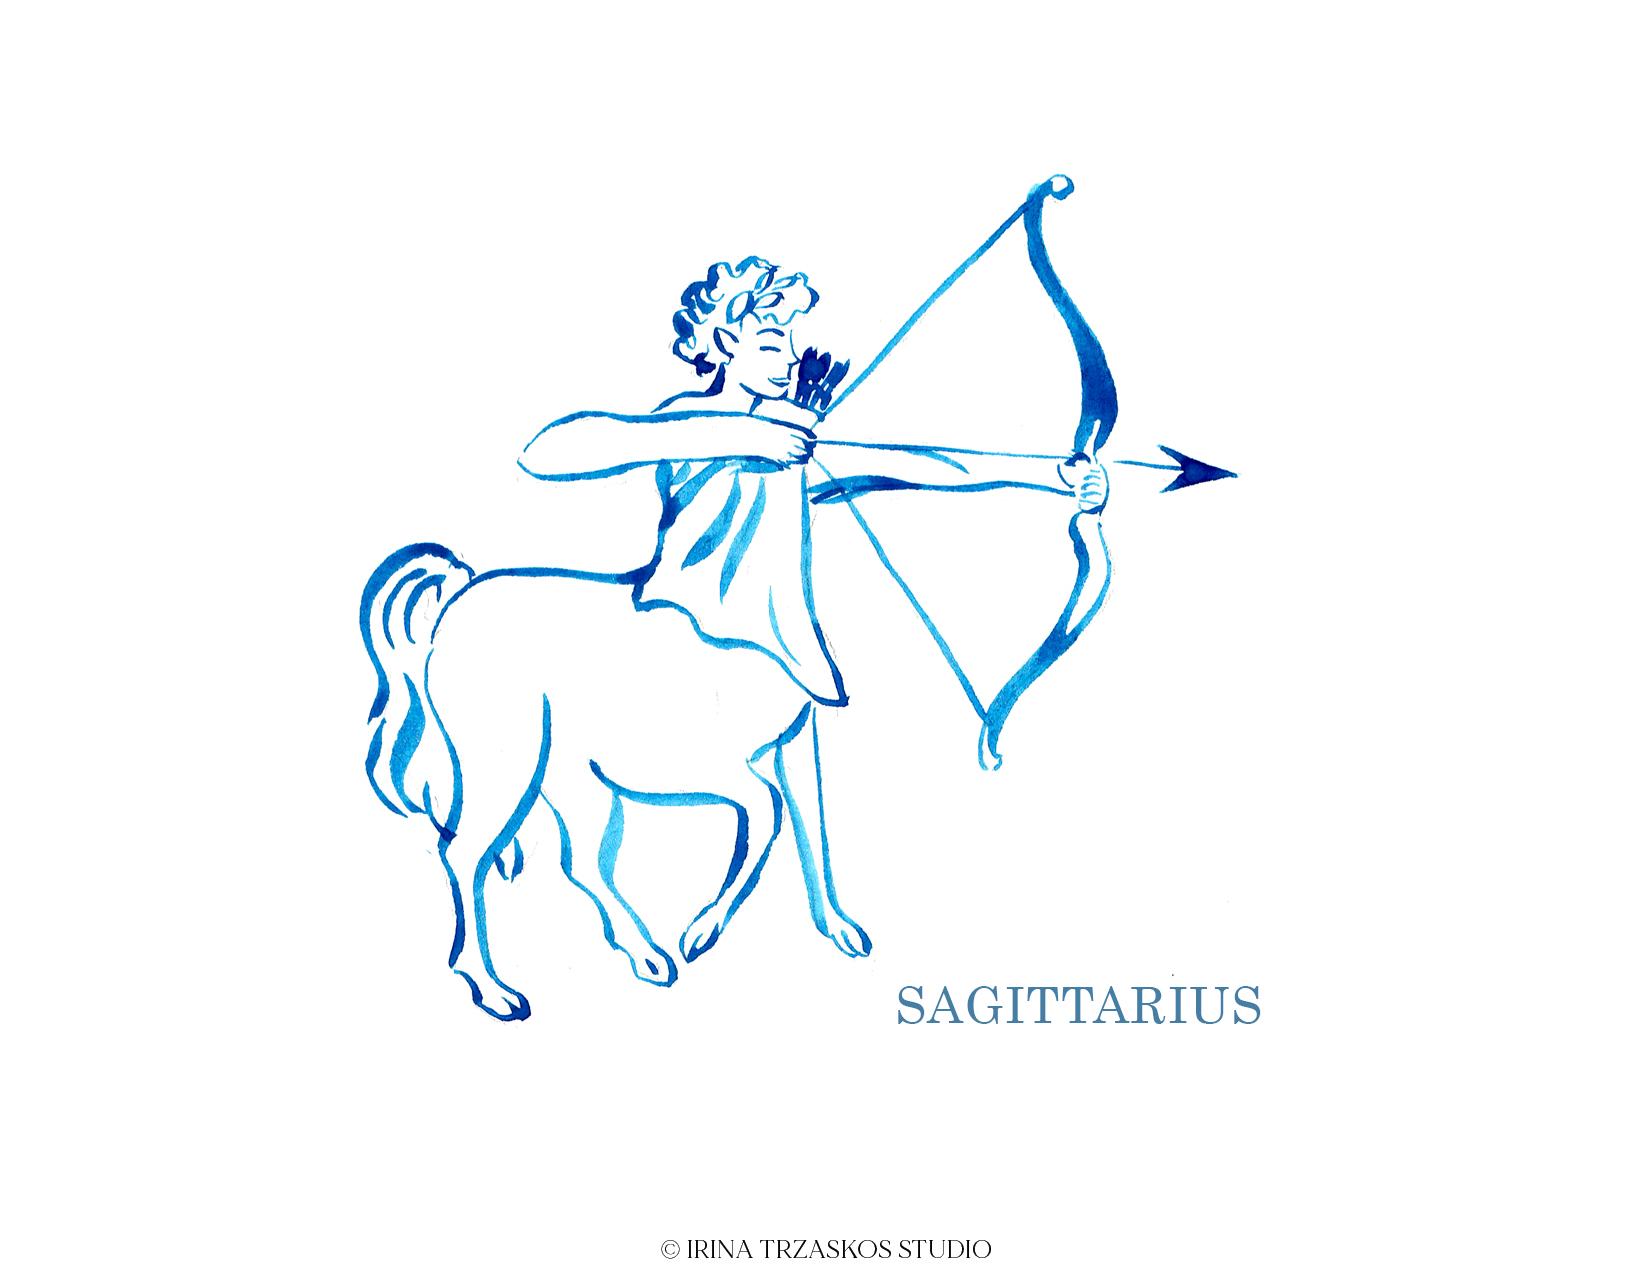
12. Painting Sagittarius: In this video, we'll be painting a Sagittarius, also using what we call line work and
practicing our brushstrokes. Again, I have a very
light sketch here. You can do the same
using the templates and the resources of
this class and for the best results try to just repeat the lines I
do without using any pencil for best results
of your brushstroke control, but not very subtly painting. Again, we'll start
with the face. This time I'll
start with the ear, which is a point here for some reason in my
painting, my drawing. Like that. Just two clear lines with the tip of your brush. Now let's paint the nose one curved line
and the little one, the eye and eyebrow. Original artwork had
this bearded old man, and I didn't like it so
I decided to sterilize it to match my aesthetics
of my painting style. Feel free to use mine
or the original, whichever works for you. Curved lines while
painting the hair, can also add some leaves
in here, glitter leaf. Nice, so next let's
practice with some straight lines of the bow, one up, one straight
for the arrow. Feel free to turn the paper if you need to if it's more
comfortable for you. Another one down. Let's finish this bow. Make sure there is a hand here, where he's holding it, something like that,
and another curve. Did a little too much watering here and you can see how these
two lines just became one. I think it's okay
it's beautiful. Add some more paint. Here we have another arm, we're still done
painting and this arm. Nice. So next, let's show some lights
here for his shoulder. Also, there are arrows, more arrows he is
holding in the back. I don't want to make it torsos, so I added him a little
rope here. A few lines. Next, I'll have a horse body, that's a small horse
so against the back. Curved back. Another curve from his
slag down and little hair. So you can see how
flowing the lines are when we're doing
them in one swoop. Again curve in one swoop. Add another little loop, not perfect, but it's okay. Now, of course,
the horse's tail. Here we can play
with the curves. This is our Sagittarius
in watercolor.
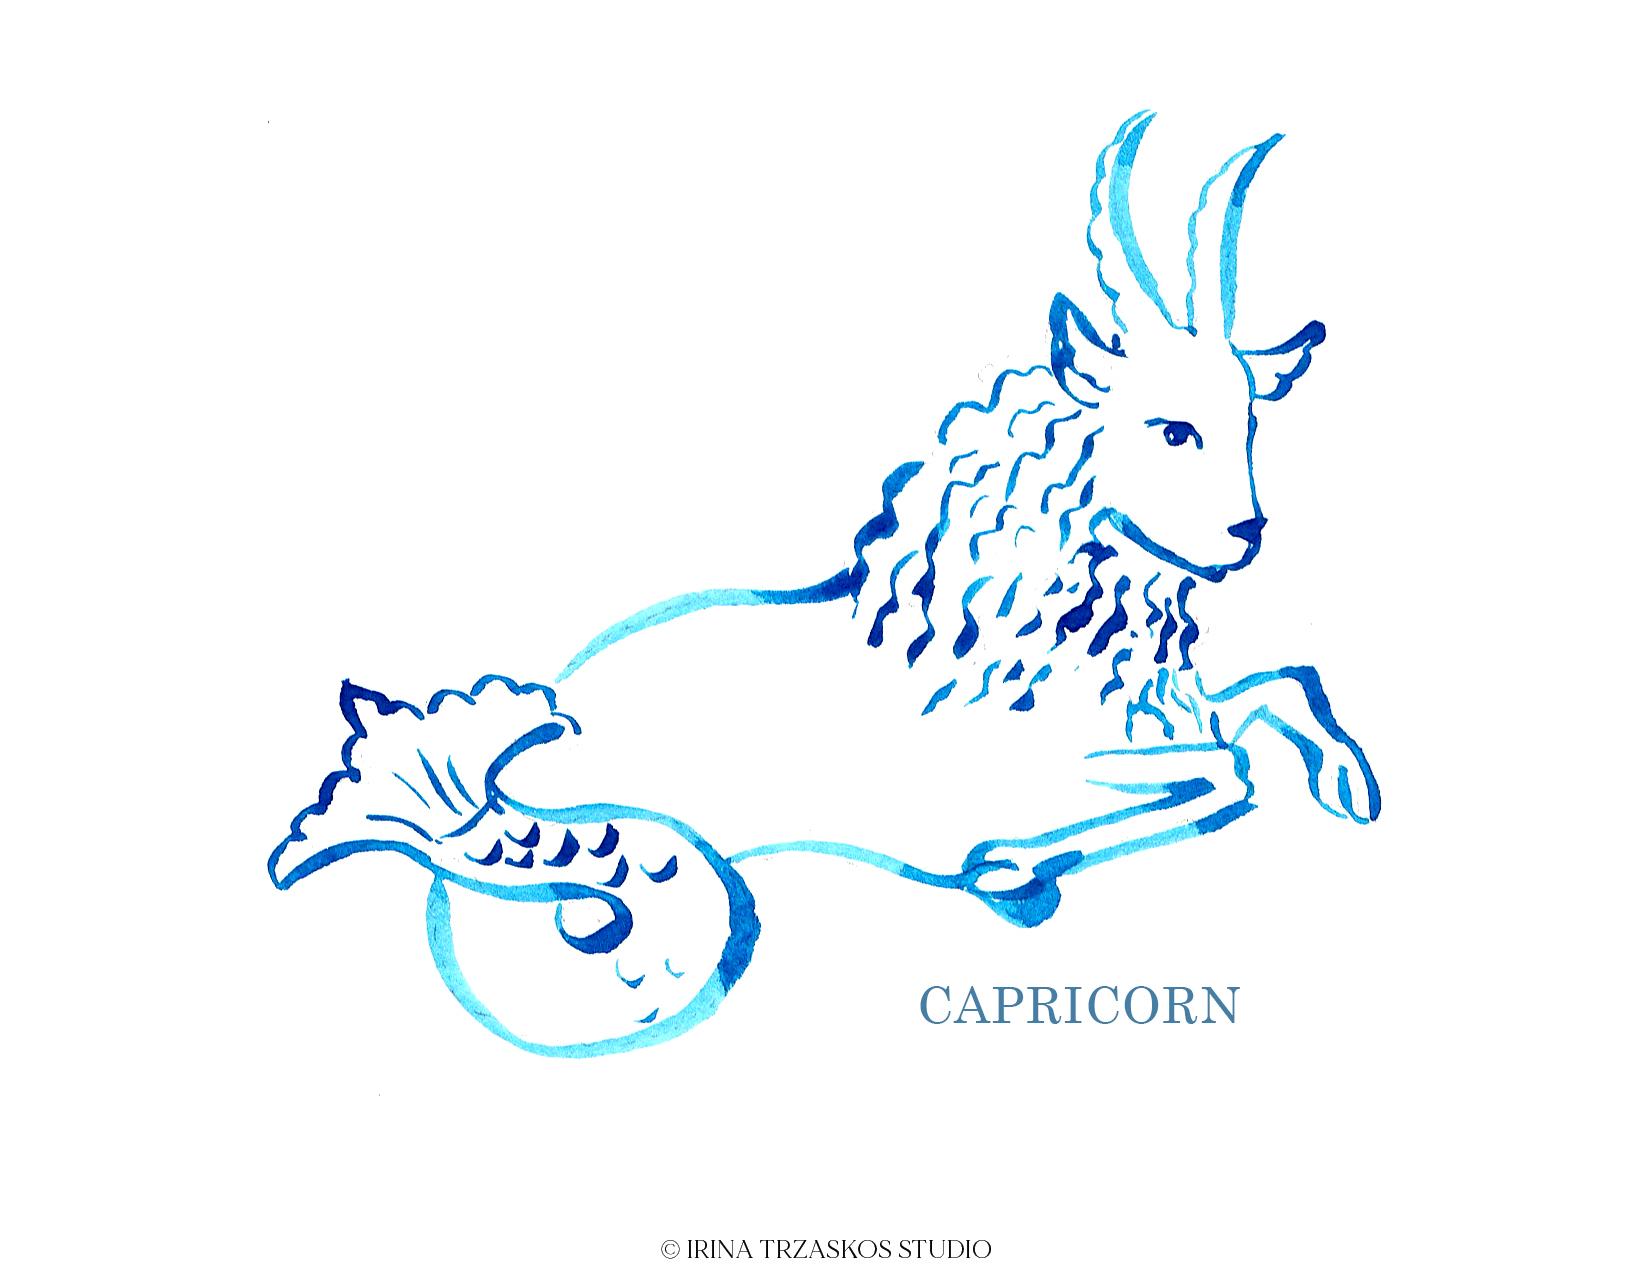
13. Painting Capricorn: In this video, we'll be painting a
Capricorn zodiac sign. It's a little goat
with a fishtail. We'll be using water color
in our technique again. We'll start with the nose, although it's not
too comfortable to paint from right to left
if you're right-handed, but I'll try that just
to match the artwork. Here is a line of
the nose going up, we have a little bit of bump, implying there is an
eye on another side. Here's another eye
which we can see. Next, we'll paint
the fore heart, and this middle here. I want to make some wavy
lines here like this. It's like a horn in one swoop, and here we'll add some waves, and the same one here. This side will be smooth, and this one will be with waves. I think this need more paint. Here we'll have
another ear like this. Then we'll have obvious a wave
here showing it's a goat, and it's a grown-up goat. A little more bottom
of the heart. Some wavy hair here too. Note that too much
water in my paint, as you can see, results
in thicker lines. Now let's paint his leg. I should have done
this line not as wavy, a little sharper corner. Now, this leg is like this. Nice. Here I will have the back. I'll continue this wavy
lines until the back line. Whichever makes sense. Maybe a few here too. Like this. I think this wavy lines
have to go more in here. Now I have to paint
the fish tail, and I'll start with the end
of the tail, which is pretty. It's a series of wavy
lines, like this. Then it goes in a
beautiful loop. The same, this part
goes all the way here. It's already good. You can add a few scales here if you want. You can have your scales
implying it's a fishtail. Or you can just leave it. This is our Capricorn
zodiac sign.
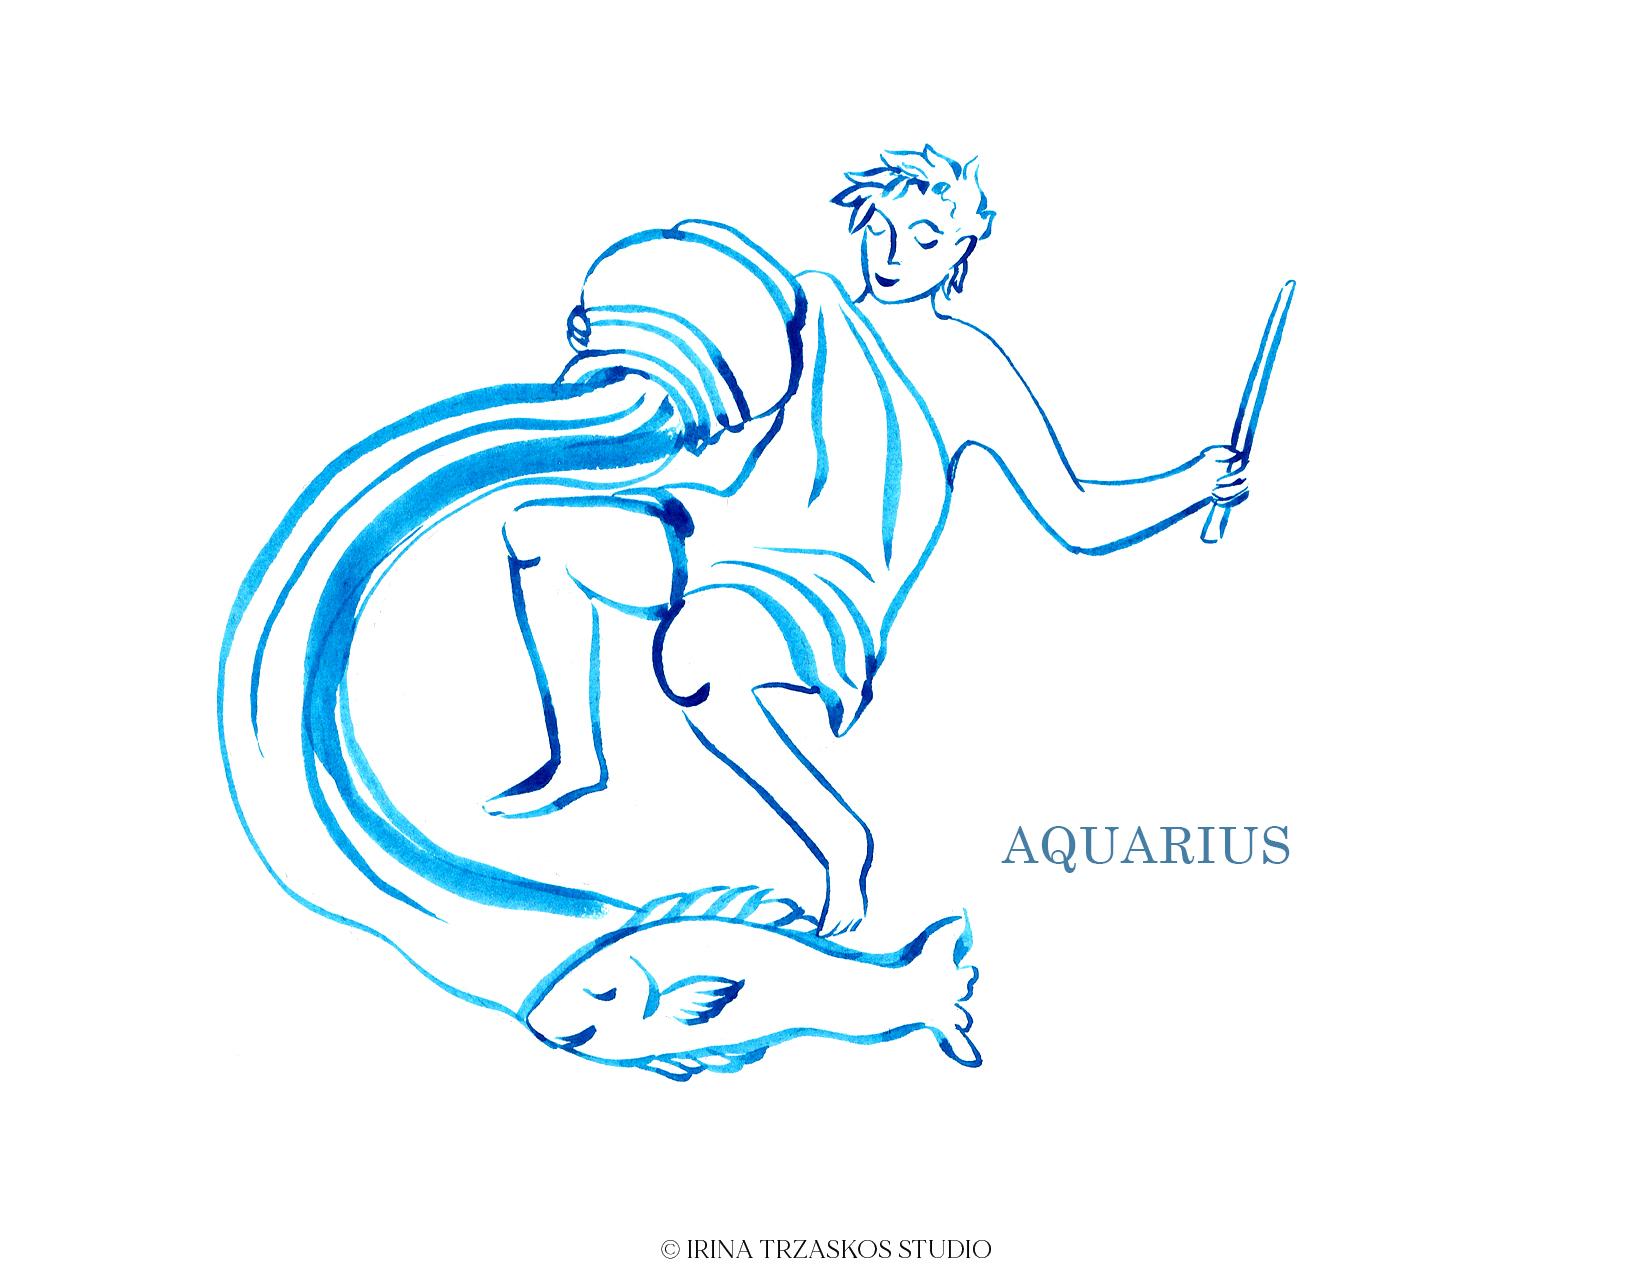
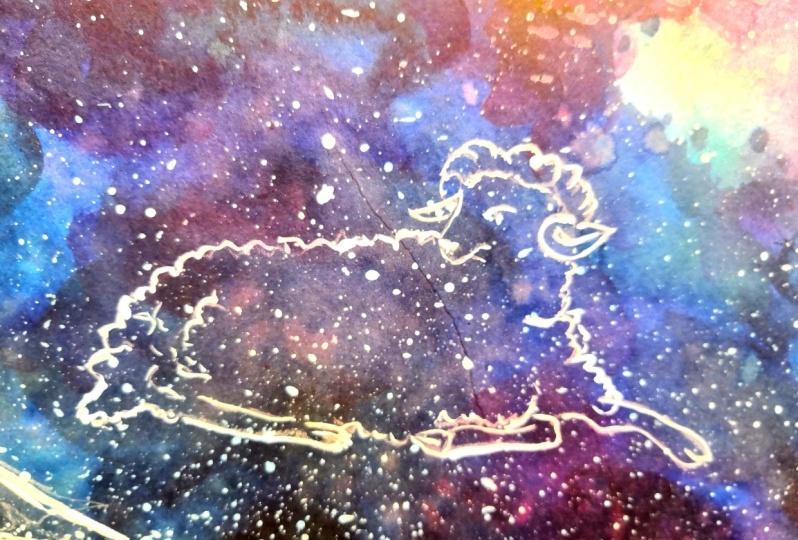
14. Painting Aquarius: The painting in this video, we'll be painting Aquarius. I'll be using turquoise,
or teal color. It's called turquoise
in this set. I'll try to do it
with one brush. However, I have other
size brushes on the side in case I met
some difficulties. Let's take some paint, bring it to paint palette. It's loaded with water. We'll start with the nose, so let's make a line down. Then one on the side like this. Next, I'll have the eye, the eyebrow, and the second eye. With a smile, that's why the sea [inaudible] Now let's try to
paint the shape of a face. Here will have a hair of
a leaves. That's not bad. Next, the ear with one loop, and then another like this. Now we'll move in this
direction with a brush, like that, and then the
opposite like that. For more control,
I say [inaudible], or holding our brush closer
to the hair of a brush. I'll try not to change
too many details, because I want to keep drawing the painting
pretty simple. [MUSIC] I think this is good. Next, we'll have a robe. [MUSIC] What looks perfect
for that, it's very flowing. Here, we'll have an
arm, and a hand. This part of the arm, and then our line up. You can see how the flow
of paint is changing, when we are changing the
direction of a brush. The fingers, not
perfect, but okay. He's holding some stick, or wand, or something. When you need more paint
you refill your brush. Let's add more details here. Then, let's move to this
part where we'll have water, and [inaudible] or
whatever this is. The big circular lines
are the hardest, so it's nice to practice. It's okay, just be confident and move along
if it's not perfect. The top of this
space, here we are. Once again, keep checking if your brush has enough
paint and refilling it. [MUSIC] Despite of the robe, now I have a big line to paint. Something like that. Now let's try a different
direction, like this. Refill the brush again, and let's add more
lines in this water. Try to notice which direction
you like painting more, and use it more in your artwork. [MUSIC] Now it's time to
paint this bottom part. Here you can get
creative with the lines, just whichever your
intuition tells you can add to the rope , something like that. For the leg, we'll have this line to the
knee, now the knee. A line down, a foot, a toe, a sole. This part of the leg, and this. We've got one leg, now
let's paint the second one. The knee, a line down, the foot, the toe. Let's paint a few more toes. This part of the leg, the heel, and this, nice. [MUSIC] Here was a
different constellation, which looks like a fish. I added that too because I
thought it's interesting. Let's paint a nice
smiley fish here. A line bottom. You can see how changing
the direction of the brush changes
the brushstroke. Most important is you to notice which direction you
like working for most, and you can use it
to your strength in your artwork and the top part. [MUSIC] I feel like I need a
thicker line here, wherever water is,
especially because we're using blue paint. At least I do, and this is good. This is our Aquarius. [MUSIC]
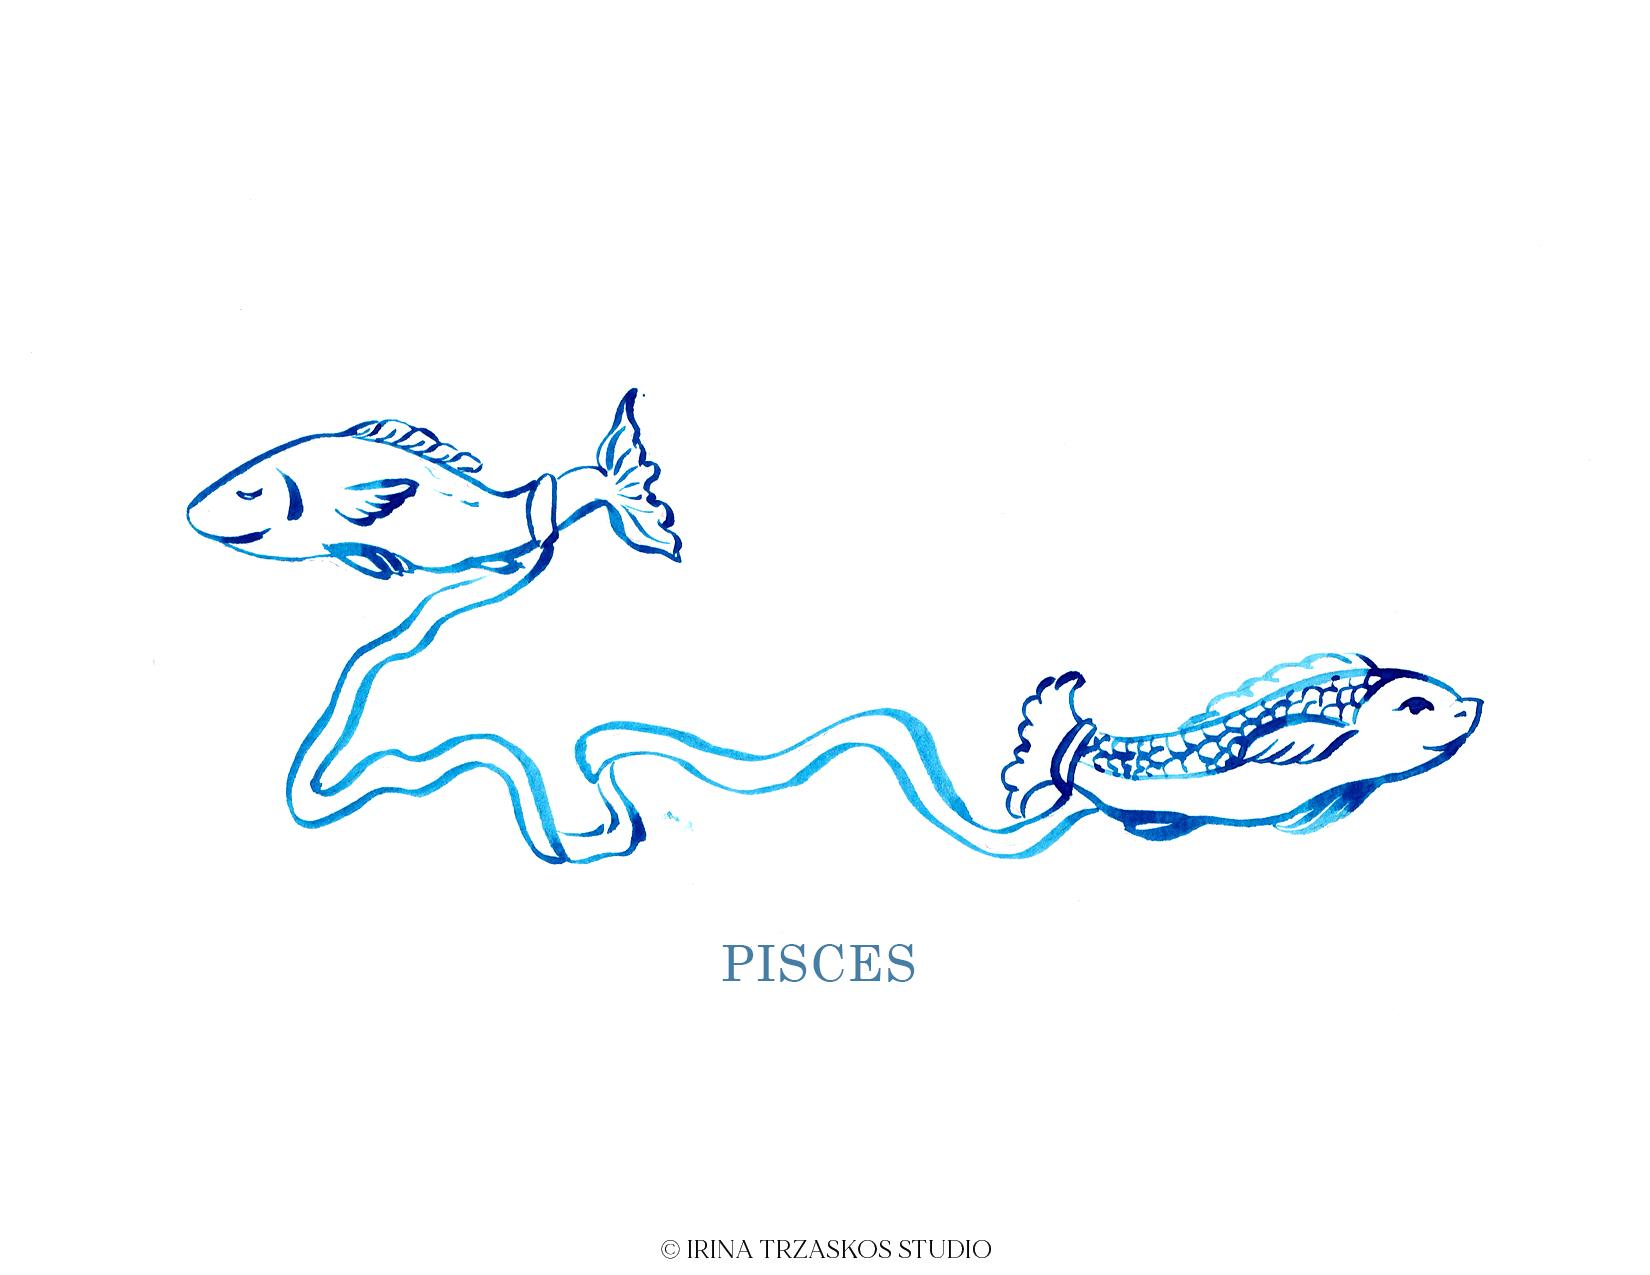
15. Painting Pisces: In this video, we'll be painting our Pisces. They are two fish
connected by a ribbon. In the classic representation
of constellation, this fish is usually looking up. However, I wanted to change
it artistically so they look both to the opposite sides. Here we'll try to add some more details and a
little bit of a pattern. Of course, the ribbon
will be of a challenge to the beautiful
aligned artwork. Let's start with the
nose of this fish. You can curve like that. Here will be the eye, the top. Here will be the ribbon, like this. The fin. One part over there. Now let's practice
some wavy lines. Here is the tail, and let's paint the
bottom. Here another fin. I think it's still called fin. Another one, and the bottom. One more here. All these little details
add so much interest. Just make sure I
don't make too many. Let's add some little
lines here for pattern with the tip of a brush
and some lines here. Nice. Now let's
paint the ribbon. Let's make sure we
have enough paint in our brush for that so we don't have to refill
it if I don't need to. Here's my ribbon. If it doesn't go in a
sketch, it's okay. You can come up with
your own shape too. There's a little smudge
[inaudible] Try to make a continuous line and another continuous line
as parallel as you can. Nice. Now let's get
to the second fish, which I'll have a
little more pattern. I need some more space here. Let's start with the nose
[inaudible] Eyes open here. She looks upset. Let's try to make her look more friendly like this. I'm trying to be careful not
to smudge this water part. Here we'll have another line which will separate the pattern from non-pattern
part of the body. [inaudible] A tail with a series of loops like that. Again, take your
time if you need to pause some of the video. Just pause it and work on your
fish as long as you want, and fin on top. Now sort the pattern, with
the tip of the brush, let's make small scales here. Start from the hat. It's harder to move from
the right to the left. If you need to turn your paper, you can turn it
any way you like, any way it's
comfortable for you. We'll start making our
scales a little smaller. [inaudible] like this. These are our Pisces.
16. Bonus video Pegasus: In this video, we'll be painting a Pegasus, which is also a constellation, but it's not a zodiac sign. However, it's a
beautiful representation of a constellation, and I would love to paint it, and it's a very nice
brush control exercise because of all the feathers
we'll have to paint. I will start with the nose, nose line, the eye, and then we have a ear here. You can see how
beautiful it is to change the width of the lines, it instantly gives it
this artistic feel. Here's another eye and
another line here. Finish the nose. The mouth, this line. The second ear,
also thicker line. The neck, one continuous line. This part, the legs. Just like with Taurus, we have just half of this
animal, just the front. Not sure if I should
have made this line, but let's paint it. I feels like it has
to be wider here; and this line. It has to have a wing and hair. For the hair, let's paint
some wavy lines here; not too many, just enough. For the wavy lines, it's better to take your brush farther from the hair so it has
more freedom to move. I think it's enough. Now let's make the outline of a wing. Make an S-like here. Try to make as many
continuous lines as possible. Here we have the bottom
feathers; just beautiful loops. Let's add another
layer of feathers, like this, and
finish it like this. Then this side will
have some more. This one should get entangled. Let's add a few more
lines for texture. This is our Pegasus.
17. Last Thoughts: Thank you so much for
joining me in this class. I hope you've
adjusted to painting. If you like the class,
please leave a review and upload the project to our
Project section of a class. I can't wait to see
your beautiful artwork and if you are sharing
your project on Instagram, please tag me so I can
see your beautiful art. I'll see you in the
next class. Bye.
 Irina Trzaskos, Watercolor Artist & Illustrator