Transcripts
1. Intro: This week we will be
looking at creating a visual language for our websites or our
web application. We will start by choosing photographs that
compliment each other and work well together
and how we can edit those photos a little too. We will identify the shapes that already exist within your
typeface, your logo, or any other elements
so that we can reuse or utilize these shapes
for other elements. We will choose an
illustration style that compliments the existing
shapes that we have. We will then try and figure
out textures that work well with this illustration
style and patterns as well. We will take a look at
gradients and how to choose or select an effective gradient
to work with your designs. And then finally, we
will choose a set of icons and talk
about how we can amend an existing sets to work with our designs rather than always creates a whole new set. The visual language
will normally be very, very subtle on a user
interface or website design, but can really add personality
and it is always there. So we need to be aware of it and working with it rather
than against it.
2. Photographs: So you've worked out your
colors and your composition, but as soon as you add a photo, it's going to change everything. It has its own colors, and it kinda has its
own composition too. If you don't have a
professional photographer or a good stock photo set, it's probably worth not
even using photos at all. You can buy a set
of stock photos relatively cheap like the ones
I have on the screen here. But they're not going
to have much character. They're going to use a very
standard color palette, very, very standard
compositions. There's not going to be
too much unique about it. And unless you can
spend crazy money on a professional photographer, this is going to cause
you some problems. Here. I've picked almost at random nine office photographs that just don't work together. These two have a similar style, but they're far
too orchestrated. One of them is posing
directly for the camera and the other picture
just feels disingenuous. It makes it feel cheap, fake, and not very trustworthy. Here's another
photo from our set. This looks a lot better. It's like an action shot is in the middle of
an important call. It feels more
credible like here's an actual hardworking person. This is called
sniper photography. It looks like they didn't
know the camera was there. And maybe we can
build a set with this specific style like this. Another one of these here, this could be quite a
nice set in my opinion, but we'd want to find more
photos in that style. Maybe we could create a kind
of sets of people talking, people having conversations
around the office. And again, it has a
more genuine feel. It doesn't look like they're
posing for the camera. Unfortunately, this set
of photos probably isn't going to look good in any website because
it's quite chaotic. There's a lot going on in
the picture and we spent a long time trying to balance the chaos and conformity
and our site. We don't want to add
an extra layer of chaos in a place where it
doesn't necessarily look great. However, we could
collect a set of photos in this style,
but crop them. So there's one single
central point of interest, or at least less going
on in the picture. By having a certain style or rules around how we
crop the photos, we can make them feel aligned
without actually having to get photos that
originally did feel aligned. Both of these photos have
a similar visual gimmick. They have these strong
repeating lines, repeating lines as a very common technique
in photography. And although it makes
these photos look really cool and it makes them
work well together, it might be too strong a visual gimmick to go
and put in our website under these strong
vertical lines might be messing with our existing
grid quite a bit. It would be better to
create a set of photos using a much subtler version of this photography technique. Both of these photos have continuous lines
and they also have the added bonus that
both of these photos rely on a central
pillar in the middle. It would be much easier to work these photos into our
existing composition and still be able to align that central line in some
way to our existing grid. So off the options
I've come up with to create a set from
the photos I had. I've chosen this style here. We normally have about 2.5
people in a conversation not looking at the camera with
a low depth of field E, the background is blurry. There's less chaos
in the background. And the poses look
natural enough that this feels like a reasonably
premium sets of photographs. So I've gone back out and I've searched some stock
photography websites, and I've found four
of the photos and cropped them to have
that same style. They all have two
people in the picture. None of the people are looking directly at the
camera or posing. They all have a low depth
of field and they're all deep in an
important conversation. The problem is they
weren't all taken in the same office
at the same time. So some of the white
balance is wrong. It feels like there's
different lighting in the different pictures. Now, don't worry if you're not a photography expert,
neither am I. But what I've done here
is I've just adjusted the white balance and made a slightly cooler white balance. I've added some blue undertones. It doesn't fix everything, but it was very simple
and now it makes all the pictures
feel a bit unified. It is, of course, not particularly
interesting and it may be these aren't
my branding colors. I don t know for this
exact set of photos. Let's try again, but this time with a warmer white balance. So this time we're adding
some yellow undertones. So this looks good,
but I think I can make it a bit more interesting. So what I've done here
is I've cooled down the shadows and warmed
up the highlights. It's called split toning. I've also added a
subtle purple tint. Maybe now I look at it actually, it's not that subtle, but at least you can
see in the video. And now I believe these
pictures are all looking good, but they also believed
like they belong together and maybe belonged to a brand. I've just created
a simple mock-up here that kind of
looks like a bank. Again, if I'm honest. And now you can see that this picture looks
quite good with these buttons and the text
and the other colors. But I could switch this out
with any of those pictures. And it's not just
going to look good, It's going to feel a line like it's part of
the same website. If we can't get good
quality photos, we might want to
just avoid using photography in our
web application or our website altogether, we generally want to avoid anything that looks
a bit too contrived, but also anything that
looks too complex. We only want very, very simple photographs on our website
because we already worked hard to make
sure there wasn't too much chaos when choosing
our sets of photographs, we probably want to have similar things going
on in the photographs, as well as it'd be
within a similar style. We can create rules for how a photograph
should be cropped, and also for specific filters we might want to put over it. Let's do that next.
3. Shapes: So here are some shapes, we've seen these earlier. They have some characteristics, or triangle has these
very precise points and might be used more
on an engineering site. A square is very balanced and would
maybe use them more in banking or something
that wants to look secure or authoritative. Circles are overall much
softer and feel like a whole. Probably used more
in well-being or sites that one to appear
calm in some way. I wouldn't read too much
into any of that though. Similar to believe in colors
mean different things. There's levels of
subjectivity here. And obviously these
aren't the only shapes. There are ones with more points, there are ones with
different angles. Pretty much infinite
number of shapes we could use to make up icons or just different
textures around our website. Each shape has
hundreds of variants. The thickness of the line. Does the line appear thicker
at one end than the other? Does it have rounded edges? Are the edges tapered? There are many more
variants just here. So how do we decide
which shape and how many shapes can be used in our icons and our illustrations? Well, similar to how the starting point
for our basic grid should be our typeface because it makes up most of the website. Possibly the starting point for choosing what shapes
work in our icons, in our illustrations should
also be our chosen typeface. This t is already
thousands of places around my website design
without me even trying. So let's make sure everything
else works well with it. So with my specific
chosen typeface, we can see there's a stark
contrast in linewidth. There's very thick ones and very thin ones used all
throughout the type. If I was to create
an icon that I believed would work well
with this typeface. I would ensure that it has this stark contrast in
line widths as well. This typeface also utilizes
a very specific angle throughout this very
specific curvature that you can see at the
bottom of the T here, which I'm just
demonstrating with this egg shape that
follows that same curve also use throughout
this typeface is this kind of taper
from thick to thin. It doesn't transfer
straight from a thick line into a thin line. It tapers off and it
never ends on a point. It always has a
slightly flat edge. As we look through all
the glyphs we see they mostly use all the same
linewidth shapes and angles. That typeface actually uses
the wedge shape a lot though. It's a very specific
shape for this typeface. So we could use this same shape in our icons or illustrations or any other graphical
language to keep everything feeling
a little unified. We'll talk about
creating icons and illustrations later
in this video. But these are the
shapes that we could potentially use to help
create those things. But remember, whenever we
pare things in our design, we always want there
to be an element of conformity and an
element of contrast. If we only had a
single typeface or if we had type faces that
didn't contrast too much, we might want to go the
other way and use shapes and a general illustration style that looks completely different. This website, for example, has a very similar
heading texts, but it has an
illustration style. It looks almost hand-drawn. It's a very simple illustration and there's nothing
else on the page, is just a completely plain
one-color background. The stark contrast between both the type faces and the
illustration style works completely fine in this
context because there's so little other contrast
on the same page. If we do have a typeface
that is quite complicated, we may want the visual
elements on the page to contrast that by being
particularly simple. So let's assume I have
these two typefaces here. Now the heading typeface
is quite complex. So in this instance, I would want the visual language overruled to be quite simple, but let's take some
of those shapes I identified earlier from the main typeface and use them for this modal
pop-up window here. So first of all, instead
of rounded corners, I thought it might
look interesting to have these slightly
tapered corners using the same
angle that is used from the wedge on the typeface. Next, I've added a
cross as a kind of closing button for
this modal pop-up. And I've chosen to use
a similar contrast in line weights that is used in the heading typeface as well, with the thinner line used
as a cutout across the x. And finally, I've added
a kind of gray swoosh at the bottom left of
this modal pop-up, which is the same swoosh angle that is used at the bottom
of the lowercase t, a, e, and many of the other letters I've
identified in this typeface. Now, I believe this
modal pop-up fits more with the style
of the typeface used without making it too
complicated or adding too much additional
contrast to the design. This is just one
very simple example of how I can use those shapes I've identified
from the typeface within a simple UI element. Similar to how, when
we talk about color, we're not just talking about a handful of color
names we have. When we talk about shapes. It's not just squares,
triangles, and circles. There's all kinds of
shapes that we don't even really have that
well-known names for. The qualities of these shapes
can change drastically by changing linewidth and
the qualities of the line. As we choose shapes
that we can use within the visual
language of our designs, we want to be aware of
how complex the shapes are in the typefaces
we've already chosen. If the typeface is we
have already chosen, have a lot of contrast within them and a lot of
different shape types. We don't want to be introducing too many new shapes
into our designs. If we started with some much
more simple type faces, we can probably add a lot
more contrast in the shapes. And we'll look at some examples
of this when we look at illustration and icon creation.
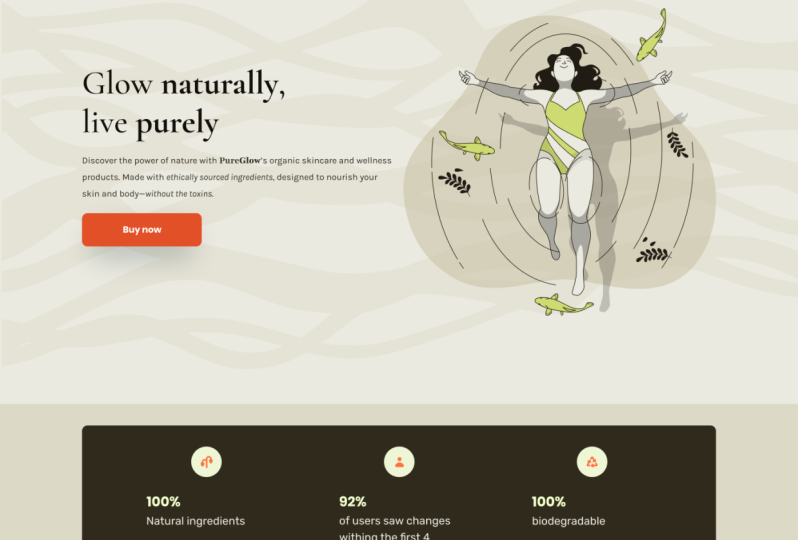
4. Illustrations: Because the topography for
this website is so simple, it means they can have a
bit more of a play with the illustrations and even
this background swoosh, this illustration
is quite large, it's quite complex, and it uses some texture on there too. None of these things would
be possible if it had a very complicated
typeface at the top, and of course, a reasonably
small color palette. And here is another example of some very simple topography, lots of whitespace,
which allows us to play around with illustration
a little bit more. I'm aware I'm showing a
lot of homepages here. So just to scroll down
and you can see a lot of the iconography and
subtle animations are much more complex on
this because it does have so much whitespace
and it does have such a simple typeface. And last example, this one also has a very,
very standard fonts. So it can use this very
scratchy, very realistic, hand-drawn illustration
style, and it looks great. The contrast between
these two things works perfectly because
there isn't too much color, there's not too much complexity
already on the page. So it's a nice
contrasting example to that last one we looked at. This has a slightly more
complicated typography, a slightly more complex color palette with the
background color here. And therefore it has a slightly less complex illustration style. So here is a design
I created earlier. You saw me create this, and I'm not particularly
happy with the illustration. I just shoved one in here
without thinking too much, I'm going to take this
illustration out so we can try and stick some
different ones in here. But before I do, one
thing I want to suggest is that your colors don't
have to be realistic. Remember, earlier, we
said that value is far more important
than hue when it comes to choosing colors
will that is especially true when we're figuring out
how to choose our Hughes, This guy has a green laptop, which is a little bit strange. You can probably see
that in the real-world, but you could equally have an illustration where
the sky is orange, where the person's
skin is green, where water is red. And as long as we get
the values right, they're gonna look good. But by playing with the hues, we can make it more interesting. And of course we can get our branding colors
in their can't way. So as we just talked about
when it comes to shapes, we might want to create
an illustration that is just a pattern of shapes. And so maybe instead I have these random colored
triangles and circles here. Now I've given myself a
challenge because the typeface we're using for
the display text here, It's a big complex, but it's also a bit geometrical. These geometric shapes I've added as an illustration here. I don't think it
works quite as well. And that's because
we don't really have any contrast between the display text and
the illustration. Although that means it
looks nice and uniform, it means there's
illustration isn't really adding anything to the design and
there's not really any visual interest here. So similar to one of the
examples we just looked at, I'm going to use a
hand-drawn illustration, but I'm going to keep it a bit
contained inside a circle. It's got a very specific
place it lives. Now I've chosen this
cat illustration for no real reason other than the fact that he
has these wedge is, and this wedge left foot and the fish on his white
board has a wedge face. And there's lots
of wedges in it, similar to how my typeface
has lots of wedges. So I'm being conscious of the
shapes from the typeface, but I'm not copying
them in the same style, so there's still
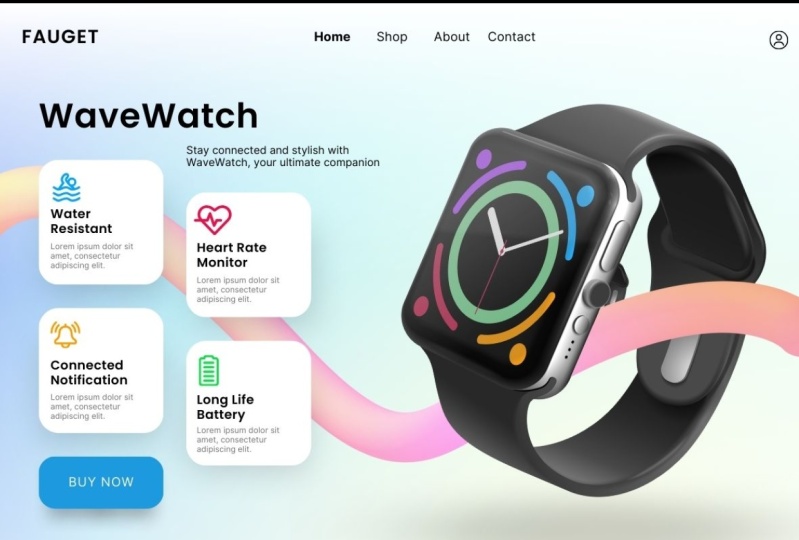
the contrast there. Now let's look at this design. A fresh, but this time we've changed the type faces
to something that realistically as more like
what you'll probably be working with an a modern
day web design agency. The typeface is
much more standard. It's very boxy, it's sans serif, and more than that,
it's overuse. So everyone's used
to and potentially board off seeing these
typefaces everywhere. This presents a very
different challenge now because for us to create an illustration that
works with these typefaces, it can be much more complex to get some
contrast in there. But also it has to be because otherwise this
design runs the risk of being visually monotonous and making our
users fall asleep. This is an illustration we used earlier in the
course that could work quite well here it's got this cool 3D style that's
very in fashion right now. And it adds a lot
of visual interest, provides a lot of contrast to the typeface and it fits quite
nicely into this section. A big downside is
that as I didn't have time to create my
own illustrations, and you rarely do. It's a very overused
illustration is a very overused illustration
style at the very least. So I don't really
want to use this alongside a very
overused typeface. You could be forgiven
for thinking you've actually already
seen this design. We might want to
instead just create something wild and chaotic. Otherwise, our
designers just looking far to conformed and boring. So to contrast that
I've just created some wild wacky shapes with no real conscious
reason for them. And personally, I
believe this makes far better contrast
with the topography. We can make this look more
interesting in a later video. But when we're talking
about textures and patterns and gradients, similar to matching
different typefaces. When we're choosing an
illustration style, we want there to be some
level of contrast between our existing elements
and the typeface, but we mostly want them to feel connected and some
form of conformity. The more clean and
simple the rest of the elements in our design, the more wacky and crazy
the illustration can be. And if we've already
got quite a lot of contrast in the
existing elements, we're going to want an
illustration that's a bit more contained and a little
bit less crazy.
5. Textures: Most web designers
are going to look at typography and color and maybe think about
composition or learn to improve their compositions
a little bit. But rarely are they going to think about what
visual language. And even if they do, it's normally in the
context of shapes, like we just talked about. However, the visual
language is always there, whether we think
about it or not. And just like if
we try and choose a typeface with no personality, just in the hope that we
won't be communicating anything by just
using flat colors, for example, was still very
much communicating something. This means most websites
are going to avoid even considering textures or
patterns or gradients. So we may want to at least consider adding these
to our websites or applications because it's
gonna be very easy for us to create a unique personality and a memorable web application. We could potentially
make it more usable by perhaps drawing more attention to an element
that's interactive. Like for example, when
we use gradients on a button to make it appear
a little bit more 3D. We could perhaps use
a texture instead. So we could sometimes
use a texture to make something look more
realistic or skeumorphic. And maybe sometimes people
want to interact with it. I don't think designers
talk about this enough, but I have a pen on my desk
right now and I often click the button on the back when
I don't actually need to. Like, no one ever needs
to click on that button just because something
about it feels nice. And we'll look at this
in the next module about animation a lot more. But if the button feels nicer, we're going to want
to click on it. Let's spend some
time looking for a texture that we think
works with our branding. Now, we may be tempted to just copy one that looked
good on another website, but we're trying to create a unique experience for
our marketing site here, or give unique personality
to a dashboard. So let's try and find
a unique pattern. We can search on
something like Pinterest. And people have actually
uploaded all kinds of different textures
and patterns on here. And we could use this
for inspiration, or we could perhaps just
copy some textures we found. We'll talk a little bit
about the difference between a texture
and pattern shortly. But first, I'm going
to look at textures. Now here is the design I
created a little bit earlier. And what about if I changed
this straight line into a cool hand painted texture
across the screen like this. Now personally, I think there's instantly makes it
look super cool. There was a boring
line across the page, and now it looks
really interesting, but this interest
draws our attention. It creates a huge amount of contrast in a place
which isn't very important and it's almost now the first thing I notice
on this page, remember, the only reason we have a different color in
the background as we scroll down the page to
break up the visual monotony, um, ideally do it with
some kind of rhythm. Therefore, the straight line in the background
where we change from white to purple is not particularly important
or interesting. And if anything, we want to draw less attention to it, not more. So maybe this is a really
bad place to use a texture. Something like the topography could be much more important. Probably the most
important thing is we can learn from
anywhere, at, anytime. So in my opinion, the best place to draw
more contrast would be too specific words
in this heading, making a little bit
of texture in here, probably the best place
we could put some. We could potentially also add some interesting textures to this weird illustration
of a cat I've got. Because we already have a certain amount of visual
interest in this illustration. We probably don't want like
a really harsh texture, really complicated
one like this. We could maybe
soften or simplify this texture so it's a
little bit less harsh. But again, it is a
background circle here. Perhaps this isn't the most important
place to put texture. So what I've done
here is I've directly added some texture
to the illustration. It gives it a bit more
of a tactile feel, makes it more
visually interesting. I've actually done
this directly in a drawing program so that
it looks very unique. I simply open the illustration
in Procreate on the iPad, chose a texture and
just scribbled some of the colors over some
areas a little bit. But this does very easily
add a unique texture. And this is now brand-new ball. I've got some other smaller
illustrations down here, almost icons, but a bit too big and complex to
be considered icons. I can now add the same
brushes and stuff are used on that top illustration to add a bit of
texture to these, which makes them
feel more aligned. Considering I didn't create
either sets of illustrations, it makes them feel a little bit more like they belong together. I have of course, already
adjusted the colors of these illustrations so that they look the same sorts
of colors to. Textures can be used
when we want to make our web application or
website feel very unique. We can even find a very
custom hand-drawn I hand painted texture or
even create our own and import them in and
use them in our imagery. It probably feels a bit too unique to be used for a
very corporate brand. However, for something
that's a bit corporate, we could still just use
textures quite subtly like I did with the cat
illustration in this very video. And because the visual
language is so unique, it means joining together
all our branded elements, all our different
visuals throughout the website then
becomes really easy. Every part of our website instantly feels
like it belongs to the same brand because
it's using a texture that isn't really used anywhere
else on the Internet.
6. Patterns: Now a pattern is slightly
different to a texture or a pattern is something that
repeats over a large area. This means they can
be used a lot more subtly in the background
of something. It means they can cover
a larger area obviously, but it also has a
development advantage, which is that it could be
a particularly small image or SVG that is repeated
over a large area. So the original image is very, very small and
very fast to load. So for example, if
we wanted to add a pattern to this same design that we've just
added textures too. Realistically, I probably
wouldn't do this because maybe there's
too much complexity in the design overall. Maybe I would again go for
this triangle wedge shape, which is now used
in my illustration, as well as my display typeface. So I could have a simple
repeating pattern using the slightly different
colored triangles. Now in this case, I
would suggest that this pattern does not
work because there's far too little contrast between the pattern
and the typeface. Not only do they both
use wedge shapes, they're also both
very geometrical. And for that reason
I feel I would need a little bit of contrast to make the pattern actually
add something to the design. Because currently, I don't
think this is adding anything other than some
unnecessary complexity, maybe similar to how we chose this hand-drawn cat at the top, we want some slightly more
hand-drawn triangles. Instead, if we had chosen a slightly more
humanistic typeface or something even hand-drawn, then the geometric triangles
might work a little better. But with all the sharp
triangles in the typeface, I believe the
hand-drawn triangles in the background here are
going to work better here. And notice I've added a little purple box
behind the text too, so we don't have
the distraction of the pattern being
directly behind the text. So a pattern will
normally be much subtler. It will be less distracting for a user because it will be
the same covering the area. It's also technically less work. It's easier to maintain, it's easier for the
web page to load. We can normally gets away with this more on something
more corporate or professional
looking even dashboard of our web application. Just to differentiate
it in some way, make it more unique and give it a slightly more premium feel.
7. Gradients: Gradients can be a very
easy way of creating some visual language
which is a little bit more complicated
than basic colors. If your branding colors
were orange and blue, there's probably lots of
companies out there with a very similar orange
and a very similar blue. But when we create a orange to blue gradient at just
a certain level, we might be the
only company there is using that exact gradient, which is going to make
our applications feel a bit more unique and be
a bit more memorable. I created this design earlier when we were talking
about shapes. We have this very boxy
sans serif typeface. So we really want the
shapes, the other shapes, the patterns or textures
we use with it to be very flowing and fluid. Working with a typeface like this can actually be
quite fun when you get to this stage because we've chosen such
simplistic typefaces, we can have a
little bit more fun with the visual language. So of course, we can add some subtle gradients to these shapes and the
entire background. And it's less distracting
behind this typeface because we have far more
room to create contrast. Notice these gradients
are basically between slightly
different shades of blue. We very rarely want
to choose colors at opposite ends of
the color wheel. In fact, if I, for example, wanted to create a
yellow to blue gradient, we already know that the middle ground is
going to be gray and we want to avoid getting gray in our designs
wherever possible. Our gradients should ideally not move too far around the
color wheel as a whole. This means that the
gradients we create will demand a little bit less
attention from our users. But it also means the
color in the middle of the gradient is still
gonna be kind of vibrant. A nice solution if we
did want to create a slightly more complicated
gradient for smaller areas, is that you can of course put a third stop in the
middle of your gradient. And this will create
something a little bit more unique for our brand, but also makes sure that
the color in the middle is still quite vibrant
and not to gray. Of course, in my example here, there could potentially be
some readability issues. We're only dealing
with three lines of text are so over the gradient. So it's less important here. But we do always want to
be mindful that even if the color contrast between the foreground and
background is good, if there is a lot of
complexity in the background, that's still going to make
it harder to read the text. Something like a gradient isn't as complicated as a pattern. And so it's normally okay. Every imaginable color
combination is already been used for a brand
somewhere online. It makes it very hard
for you to come up with a unique color scheme
for your brand if you're not going to use the other visual language throughout the rest
of this module. One thing you can do
is create a gradient. Gradients are instantly
more unique than just a flat color
and they're not much technical work
to add to a website. We still want these
to be subtle, so we almost always
want to use colors that are near each other
on the color wheel, which will also stop us getting a horrible gray color somewhere in the middle of our gradient. And if we are using a gradient excessively in our designs, especially if it's a background, we want to reduce the
amount of complexity of other colors and imagery
being used in the design. And we might want to increase the whitespace in other areas.
8. Icons: Icons can make a huge difference
to a web application. I know we're kind of
later on in this course, but do not underestimate
how important icons can be. They could easily have all the personality of
a logo to communicate your brand message and
yet summarize what something means in
a single symbol. This means people
can spot it really quickly before they start
reading anything on a page. You can normally find the Save button and the
attachments button. And icons normally translate languages and dialects way
quicker than anything else. Help people identify
where there is an icon. And to keep a coherent message, we want our icon set to all feel like they
belong together to. Now, unless we have a
particularly big budget, we're normally going
to buy an icon set and probably adjust
them a little bit. There are some very easy
to use completely free icon sets out there like
Font Awesome and hero icon. We're only really ever going to use these for prototyping. They don't really have the unique characteristics that we want for our icon sets. If we use these are
application very quickly, looks like ten other applications
you've already seen. But creating our own icon
sets is actually really hard. We want them to look
consistent across our site. We want them to work at
different sizes sometimes. And we need them to easily
communicate something. So you're very rarely going to create one from scratch either. Whilst we're browsing
for an icon set, we want to always keep those branding keywords in our brains, but we also want to be aware of what our typeface looks like. Again, because these
are always going to sit alongside some texts. We want them really to not have too much contrast with
the topography at all. Almost like they belong
to the typography. So if our typography
is quite geometric, we might want quite a
geometric icon next to it. If it looks hand-drawn or
has a humanistic element, we might want a slightly more
humanistic icon next to it. Or if like these two typefaces
I've been using here, one of them has a
lot of contrast, thick and thin lines. We might want to keep that
contrast in the icons. Whereas if we were using
the other typeface for our buttons and
general UI stuff, we might want to have an icon with a
consistent line weight. In my personal opinion, when looking for icon sets, you want to look
at the shapes and characteristics of
your typography, specifically the one that
will be used next two icons. And that is probably more important than your
branding keywords. Once you've bought an icon
sets that you have chosen, a free sets of icons. You'll often have 200 icons or some crazy number
like that in the set. You don't really want
to use all of them. You want to select the
ones which are going to be useful for the specific
application that you're creating. You'll use a subset of these
icons that you'll share with other designers or developers
when creating new stuff. When deciding what
each icon means, I normally find it useful
to go to Google Images and writing attachments,
icon, for example. Now for this, it's
relatively easy. Every single image that comes
back is of a paperclip. Sometimes a paperclip with a little plus or a
cross next to it, which probably means something
a little bit different. If you go to Google
Images and you search for something
like warning icon, and at least half of the
images are of the same icon. You kind of know that's a universally accepted
symbol for that thing. Because this is how
people have tagged their images on
their own websites. I can't think of
a single example where I've done
this and not found a pretty conclusive result for which icon I should
use for something. Once we have our icon
subset and we've decided what each
icon means to us. We're probably going to want
to make some adjustments. You rarely get an icon set
that works perfectly with your typeface and with
your branding message. Maybe you need to round
the edges off a little or have more thin
lines or something. A common problem,
especially if I had quite a unique icon sets
like the one I have, is that at some point
I'm going to need an icon that I just
don't have in this set. So for example, maybe
I need a save icon. This set didn't
have a save icon. I've done a Google
image search for Save icon and found it's
normally an old floppy disk. Now I've gone through the
original icon set looking for some shapes in
there that I could use to create a floppy disk. Then I can just make
some subtle edits, cutting out the
bits I want to keep and making some small
adjustments to them to create a new shape of a floppy disk without
creating any new lines, curves, angles, or any
of that sort of stuff. You'll also want to create
some specific rules about what color they can be and
what kind of size they can be. This is a very useful thing to document in your design system. So other designers working
on the same application, don't go and stick in icons in the wrong size or
the wrong color. A very common mistake
I've seen across different web
application designs is people using icons
for the wrong size. If you've got an icon, that's very simplistic and
you blow it up too big, it's going to look bad. This is like getting a very simplistic typeface and
making it a large heading. A very simple small icon
doesn't work large. It doesn't have the personality and the characteristics
to pull that off. Likewise, a very
complicated icon, one with more than one color, for example, isn't gonna look too good when you
make it really small. If you have an icon and it's
only 30 pixels by 30 pixels, you can't have different
line widths in there. It's just going to look
like a weird little mess. So we need to have
restrictions on how our icon sets can be used. And I'm very rare cases
on some applications, we might want a large
version of the icon and a small version of the same icon to be used
in different places. We want to choose an
icon set that matches our branding words and
our existing branding. But we also want our icon set to match the
topography that it will be used next to when
choosing our typefaces, we would rather choose one you pay for to get
something more unique and that's a
bit more professional and works in more circumstances. With icons. This is even more true because
you don't actually need as much money to get a
decent set of icons. We will want to create very specific rules
as to what sizes and colors these icons can be used throughout our
application or our website. So other designers
and developers don't go making them too big or too small when we already know
they won't work like that.
9. Summary: The illustrations,
photos, textures, or patterns we use
throughout our design, we're all communicate the
brand message further. We want to have a
coherent style that we use throughout all of our
designs for a single brand. If we've chosen a
strong typeface, we have a unique grid and an
interesting color palette. We should only need to
use our visual language very sparingly
throughout our design. The main places we'll use
visual language is on our marketing sites or our
application, the homepage, where we need additional
work to catch people's attention
and communicate the values of our brand. For a dashboard or an
admin section of our site, we will use visual language
much more sparingly, but this doesn't
mean it won't exist. Icon style, for example, may be quite unique to fit our brand and work well
with our typography. Every application has some
kind of marketing sites or homepage and About Us
page a contact page. These are pages that people
see when they haven't dealt with your company
or brand much yet. There are less familiar with the personality or the
meaning of the brand. Yet, these are the areas where our visual language
will be most important. And we'll want to
source illustrations or photographs that are
not only unique, but really communicate
who we are.
 Rob Sutcliffe, UI Designer / Developer