Transcripts
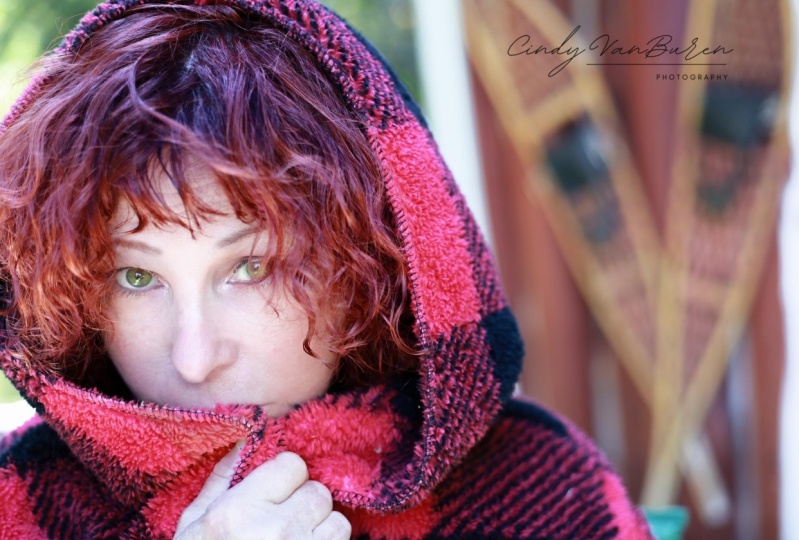
1. Self portrait class introduction: Hello, welcome. This is a very strange time. It's strange that I am wearing a mask, maybe also a lobster dress. And then I am coming to you from a tent. My name is Diana. I'm a skill share instructor and today's class is how to create a self portrait. I am a photographer and I'm coming to you from my home studio on the West Coast. I grew up on the east coast. I love teaching and I hope you enjoy this class as much as I've enjoyed putting it together for you. I thought it might be fun to do this self portrait class from my tent and my dress is a tribute to my hometown. So let's go, let's figure out how to make a self-portrait. Because if you are like me, you're spending more time home than you have before. And maybe that time at home could be a way for you to get familiar with your camera and also get familiar with you. A self-portrait is just a good portrait. Plain and simple are used to being behind the camera like I am. Are you curious about what it's like to be in front of it? You can take a portrait a day for any period of time that you choose. Let's begin by leaving the selfie behind. Self-portraits enable you experiment. Maybe you want to try some lighting. Maybe you want to try some different poses. Maybe you want to try your hand at styling. Maybe you just want to document a period of time. Maybe you want to get familiar with your gear before you start shooting in front of clients. Maybe you want to get really creative in the post-processing and you need a series of self portraits to create that. Self-portraiture is a way to get very creative with your picture-making. What you're going to need for this course is a way to take a photo, a stable surface, a timer. And if you're using a camera, it would be really helpful if you had a tripod and a trigger release some way to trip your shutter open and close it while you're not touching your camera so that you can pose a backdrop of your choosing or many, and a desire to get in front of the lens and feel comfortable. Self portraits also help you get to know a different side of yourself a little bit better. Let's figure out how to do this.
2. Project create your self portrait: The class project for this course is to create a self portrait. Remember, I mentioned leaving the selfie behind. Weather's a few ways that we're going to do that and use those skills to create our self portrait. Before we get started, make sure that you have figured out what you're going to use to take your photo. If you're gonna use your phone, gets your phone. If you're gonna use your camera, get your camera, it would be really great if you had a tripod. If you don't have a tripod, a stable surface will do elastic center books or however you figured it out. And you also need to figure out how to trigger your shutter without being behind her camera. So you need to be able to use your self timer or have a remote. If you are going to use your self timer on your phone or on your camera, the good news is that you don't need a trigger, but if not, you might want to pick one up. They range from 20 to $200. Amazon has one available for most camera brands, whether you have a DSLR or mirrorless or any kind of camera. If your camera has WiFi quite often you can download an app to your smartphone and trigger the shutter that way with the app, I find using the self timer a little bit easier. An inexpensive option. If you have everything you need right now to take a photo and you have a self timer than your set, we're ready to roll. You wanna choose your spot on coming to you from my tent. And I've used this as a backdrop for several self portraits over the last few days, virtually campaign. So you want to mark your spot as well. So before I set up my video similar to a self portrait, I made sure that I marked the spot that I was going to be sitting in, and I made sure what I looked like in the frame. It's really important when you do mark your spot that you think about your composition. Think about how you want to look in the frame. Think about your posing. Think about your facial expression. Think about your wardrobe. I wore this dress specifically to give a tribute to my hometown, which is famous for lobster. You'd want to think about the end result. What are you creating in the portrait? What, what's the mood you want to portray? What is the Vive or you're starting a project, just give this some consideration, picking a spot to start with at home in your living room, in your bedroom, your dining room on your back deck, wherever means you can start to take this project and move it anywhere. Once you figure out how to do this, once can take this show on the road if you find a stable surface for your phone or for your camera right now, my camera is on my tripod. Any kinda stable surface will do. If you are doing completely solo, makes sure that everything is nice and balanced. If you're not going to use a tripod or something stable to actually hold your equipment. If you have another person helping you, that'll be great because they can be your second set of eyes and a second set of hands. If you are using your self timer, make sure you set it to ten seconds. Two seconds isn't really enough time. Ten seconds is usually enough time. Mark your spot, create the frame when you're looking through the viewfinder, or if you're looking at the back of your camera or at your smart phone, What does that look like? Make sure that your have everything clean of clutter, clean lines, good composition, and then think about where you are going to be in the frame. Have that all set up, set your 10 second timer, and then the games begin to activate your self timer. You're going to have press your shutter on your DSLR or mirrorless camera. Or if you have a smartphone, you want to give that a top, wake everything out. Make it, make sure everything is alive and ready to go, and then get into the frame. If you're using a remote to trigger your shutter, think about a way to sort of camouflage it in. And I have a little remote for my Canon. It's above the size of my thumb. And when I do use it, I kinda hold it in my hand so that you can't really see it. Or maybe you want people to see it. Maybe it's part of your composition. This is your self portrait and you can create it any way you like. I'm just here to provide you with some guidance and maybe some ideas. If you are using your remote trigger, make sure that you have selected your remote function on your camera, your phone has a self timer, two, you might have a little tripod for your phone or you might have figured out a way to keep it nice and balanced and stable. The key with your phone when you are taking your self portrait is to remember your smartphone. Focus and exposure are married together. You want to make sure that you're comfortable with what those look like before you start jumping into the frame. Now I wanna talk about focusing. You may want to refocus your camera. If you are using a DSLR or mirrorless camera, you can switch to manual focus and put something in the frame roughly about where your head is going to be and focus on that and leave your manual focus on, leave that focus in place. And then if you are using timer when you have press your shutter, everything will stay together. If you are using your auto-focus, everytime you have press your shutter, your focus will change. That's why I suggest using your manual focus. So if you are using a DSLR or a mirrorless camera, you can do that. Some of the newer cameras with touch focus, you can flip out your screen, touch where you want it to focus. Set your timer anyway that you can find to set up, create a stable surface, and pre-set your focus inside of the composition you've chosen, you're going to have to jump into the frame several time. Each time is going to be a little bit different. So composition, figuring out your focus. The other things to consider are your exposure. And we're gonna talk about that a little bit later. But we wanna make sure that we choose a mode on our camera that we're comfortable with. That's going to give us a balanced exposure. You can choose your ISO and your shutter speed. Iso, I would suggest a lower ISO, like maybe 100 or 200, since your cameras going to be on a nice stable surface. And your shutter speed maybe one over 125. And then your aperture, the aperture is kind of significant because it's going to enable you to decide what you want in-focus. If you use a larger number of your aperture like f, F22, there's going to be a lot in focus. That is your field of focus. Anything below 5.6 to 0.8 for whatever is closest to the lens is going to be in focus and everything behind it is going to fall slightly out-of-focus. So it's going to depend on where you want your viewers attention to land. And hopefully you will share your self portraits with me here in the Project Gallery, as well as with the other students. So let's get set up and let's make some self portraits. Now comes the fun part. I've included ten different ideas for you to use to create your self portrait. They're included in the course page. So just to recap, you're gonna choose your composition. You're gonna make sure that you have your focus down. Make sure that you have your exposure correct. How are you going to trigger your shutter or you're going to do it with the remote, or are you gonna do it with a self timer? And then you're gonna hop in and out of the frame. Each time, I guarantee you you're going to learn something new that you're gonna wanna try and do the next time. So portraits are a lot of fun and I'm really glad you're here on this journey with, I'll see you in the next video where I list the ten different prompts you can use as inspiration for your portraits. Let's go.
3. How to make your self portrait: Welcome back. This is lesson one on how to create your self portrait getting in front of the camera and out from behind the cameras. This simple definition of a self-portrait is it's a portrait of oneself. So as a selfie, there's a difference that self portraits are well-thought out there. We're thinking about composition, but the lighting is a lot more thought that goes into a self portrait, then goes into a selfie. I love a good selfie and I've taken many of them, but I've taken them to remember a quick moment. And I'm usually either in an environment, been in before or maybe I'm with person I haven't been with before. Actually got to meet the rock once and yes, I did take a selfie with them, the self-portraits I've created, I've spent a lot more time thinking about and a lot more time creating. So that's the main difference. There's more time and more thought. Here are the steps we're going to take to create our self portrait uses a tripod or a stable surface, uses self timer or burst mode on your smartphone, user cameras, Wi-Fi, download the app for your smartphone so that you can trigger the shutter controller exposure and maybe even focus. Those WiFi apps are amazing. I have one for Camera and there are a lot of fun. Place yourself in a visually interesting environment like your tent and your studio. Refocus on where you're going to be. Arc your spot, use window light to the side. I have my window light coming in here from the side. Shoot your reflection. It's an easy way to prevent you from jumping in and out of the frame. Many times, you can see your composition, your facial expression, how your hair looks, or higher color looks. Experiment with facial expressions and posing. Use this as a way to document a period of your life. Maybe you're pregnant, maybe you want to take once a month to monitor your grow. What is the posing look like for that? Which is your expression looks like for that. And maybe I'm going to go on a 90 day camping IT venture here in my living room, which is my wardrobe look like for that, which is my opposing look like for that, which is my facial expression look like for that, put yourself into a landscape, take the show on the road, go outside, include your natural environment in any way you like. Maybe you have a special spot in your house or your apartment that's become a really nice little sanctuary for you. Maybe you wanna start there with your self portrait. Remove distractions. Make sure that there's a nice, clean backdrop. Think about your composition. Think outside of the box. It's attend in your living room. Use higher number F-stop or aperture or lots of detail. Fa F 11, F 16, F 22, everything is going to be very sharp. The lower numbers will have less detail. The closest thing to the lens will be sharp, and then everything around it will fall out of focus. With these steps in mind, we will create a self portrait that will get us outside of the selfie box. We've given a lot of thought to all of these steps. Since we've given all of this thought to all of these steps, let's talk about some camera settings to try. If you aren't using your phone. A might be using a DSLR or a mirrorless camera. Maybe your camera doesn't have an app where you can all the exposure and trigger your shutter or the focus. Maybe you have to do everything by hand. And if you are choosing your exposure, moving into P mode instead of auto mode is going to be really handy for you. In P mode, your camera will decide on the shutter speed and aperture. You get to choose the ISO, choose a lower number when it's really bright, or a higher number when it's really dark. For example, right now I have a lot of daylight coming in. It's actually one of the hottest days that we've experienced so far. I'm shooting during the summer, so I've chosen an ISO of 100. If I was choosing this later, I might choose a higher ISO. So you need a lower ISO, less sensitive when there's lots of natural light or you need a higher ISO to make your sensor more sensitive when there's less natural light. Does that make sense? Hopefully, play around with your exposures. The whole idea behind this is to get you comfortable. So experiment if you want to use P mode for a couple of exposures, and then you want to move into different camera modes and eventually get yourself to manual mode, practice, practice, practice. That's my biggest recommendation. That's how I was able to achieve what I wanted. And I guarantee you that is how you will achieve what you want as well. So that wraps up Lesson one. How is a self portrait different than a selfie? Thank you for joining me for this lesson. Thank you for coming along. Let's hop on over to lesson two, where we're going to learn what the key elements of a self portrait are. Are you curious about that? Come join me in less than two months, go.
4. What makes a good self portrait: Hi and welcome to lesson two. Lesson two, we're going to talk about the key elements of your self portrait. What are the key elements of a good self portrait? There are key elements that make us self portrait, what we call a success, makes it different than a selfie. Sometimes it captures action. Do you want to capture a specific action for your portrait? Are you set up for that? How do you want that action to Love? What does that composition look like? Do you need help? Is there an action you can show in your portrait Personally, I love a portrait that shows a little bit of puller, another key element to your self portrait that makes it a success interaction. How are you interacting with the viewer? Is your composition something that's going to interact with the viewer? And yes, you will show these to somebody. I guarantee you, you're going to be so proud of this project. You're going to want to share these self portraits. I did, and I do not like getting in front of the lens, but here I am your viewer within interaction draws them into your portrait. So think about how you want to engage the audience. Think about if you want to look straight at the lens, you want to look off to the side. You want to look off to the other side. It's up to you. This is your self portrait. A successful self portrait portrays emotion. What emotion to want to portray and your portrait, are you happy or sad? This is a very strange time that we're living in. How do you want to capture the emotion of living through a pandemic, going through a quarantine, wearing a mask every day. How do you want to portray that emotion? Portraying emotion and your self portrait is key to engaging your viewer. Another key to a successful self-portrait is eye contact. Whenever we look at an image of a face, the first place our eyes go is to the eyes in the image. So how do you want that eye contact to engage your viewer? This is all things that you need to consider in order to create a successful self portrait and to also engage your viewer. Do you want to include a specific object that helps you get through every day, provide a story. It can tell your story, it can help display your narrative. So think about these things. Do you even want to be in the portrait? Maybe you want to take a photo of something that eludes to you, something that has an idea of you. Maybe it's your shadow. Maybe you want to use your reflection in a window. Maybe your hand, maybe your eye, your, your foot, your arm, your leg, something that is germane to you that is going to tell your story. The key is to make the portrait as personal as possible. The key is to use it to tell your story. What do you want the viewer to know about it? So that wraps up less than two. We're going to head on over to lesson three and we're going to make our self portrait.
5. How I made my self portraits: Welcome to lesson three. Let's make a self portrait. I'm glad you're here, set yourself timer and hop into the frame. Is it really that easy? Sometimes, but usually off to give things some thought. Where do you wanna make your portrait? Where do you wanna put your camera? What do you want to? Where do you want to wear a lobster dress too? That might be fun. How do you want to pose in your portrait? Why do you want to make this portrait? If you're making this portrait to feature or document a specific milestone, how will you portray that in your portrait? Do you need help? Can you ask Someone's help? Here's how I made myself portraits. I took a self portrait or a day for a 128 days during the early part of quarantine for covert 90. I've shared some of those portraits in the project gallery, and I really look forward to seeing your self portraits shared there too. I basically set up my camera on a tripod and I look through the viewfinder to decide on my composition. I made sure all the distractions from the frame were moved away. I had a shower or wash my hair. Maybe I put on some makeup. I thought about the feelings that I wanted to portray in the frame that day, I used manual mode because comfortable in manual mode, my ISO was 100, my shutter speed was one over 200, and my aperture most often was f 5.6. I've used the exposure meter when I look through my viewfinder of my camera and there's a little guide on the bottom. It has a plus side and a minus side. It's letting you know on the minus side if the little arrow is heading towards that, that your image is underexposed. If it's heading toward the plus side, your image is overexposed. If you are using your histogram to balance your exposure, you want it to look like a bell curve. You want it to be a nice, meaty bell curve. A histogram is a digital representation of the lights and the darks in your frame and every image that you take, you can actually look at its histogram and you want it to have a nice bell curve to it. You want it to look like a bell if you're using your smartphone to take your self portrait, remember that the exposure and focus are married together. Unless you've found an app that you can use your phone, like a camera, and you can go in just the exposures to want to make sure that the exposure and the focus is what you want it to be before you actually start jumping in and out of your frame and creating your self portrait. If you have a digital viewfinder and you also have an app that you can download so your camera can communicate with your smartphone via WiFi. That makes things really easy because you can see your composition and quite often you can adjust your exposure from there as well. So take some time to figure that out because troubleshooting that and figuring out a system to use a remote app and to use a digital viewfinder will enable you to make some really quick and awesome self portraits. However, you decide to make your self portrait and do a few test runs. It's going to involve you running around and creating some really weird images. It's going to be a bit of fun. You'll laugh, I guarantee you'll laugh at some of the weird expressions that you capture. And also some of the weird things that your wardrobe might do. Or the weird compositions might capture, or even the weird exposures you might capture. The whole point is, this is your self portrait and you're figuring it out on your own. You're going to have some fun. You're going to be maybe a little bit frustrated at times. But this is what makes a self-portrait different than a selfie. You are putting a lot more thought and a lot more effort into creating this image. During the, a 120 days that I was creating my self portraits. Every day when I woke up, I thought about what the day ahead was going to be for me in quarantine. So what was my day going to look like? How was I going to use up my time? And I would slot in an idea for myself portraits somewhere amongst my day. When I got really good at doing them, I started to take my camera outside into different locations, live really close to a park and also really close to a beach. I made portraits where you couldn't really tell it was me. There was a lot of motion in the frame. I tried everything. I encourage you to do the same. I was doing my best to create a portrait that for me would mark this time in history. I encourage you to take a look at the project video, and I've also included a video with ten different ideas to get you started with your self portraits. You can take any of those ideas and make them your own. Thanks for coming along with me for Lesson One, Two, and Three. I look forward to seeing your self portraits in the project gallery.
6. Photographers who inspired my self portraits: Photographers that I use for inspiration, self portraits can be very empowering. Do a whole bunch do them for a period of time, do them to mark a time in history, do them to market time in your life that is very germane to you. Most of all, just do them. It's going to open you up to a side of yourself that you didn't know before and you're going to have a lot of fun. So let's get on to that list of inspiration. Mavis, CW is being ran. Tyler f. Stanley Kubrick, who could forget ham. Kelsey Williams, rag guru. The VM Meyer, George IOS determinant is find inspiration. Anyway, you can, it's everywhere. As soon as you leave your house every day. If you're a visual person, I promise you, you will find inspiration. Not a visual person. Maybe you will find inspiration inside a book that you're reading or inside of your lunchbox because your sandwich is a funny shape that day, or your orange or your apple. This practice can really help you if you want to pursue photography, it will build your confidence that we'll show a side of you that you never knew existed. And it will get you familiar with your gear. And it'll also help you figure out or begin to figure out your style. Photography is all about something coming from the inside to the outside and engaging your viewer. Self portraits are a wonderful way to do that.
7. 10 ideas for your self portrait: Welcome back. This video has ten different prompts to help you get started with your self portraits. If you're really stuck creatively and you'd like some ideas, I have ten ideas for you. So let's go through, let's start idea number one. Seek out new perspectives if you're racking your brain as to what to do with your self portrait. Start simple. Sometimes everyday scenes can be brought to life just by thinking of them in a different way. Find a picture perfect spot with decent lighting, window lighting on the side really helps experiment by creating the composition and positioning yourself in the frame. You can use a close-up to dry your viewers attention to a facial feature or a certain body part, and it offers a different take on a self-portrait. Number two, let your reflection show. We've all seen plenty of mirror selfies and don't overlook this for your self portraits, you can create a truly beautiful portrait using a mirror or a reflective surface. The key to a good reflection portrait is, ah, the viewer into the frame. So how are you going to use your reflection to engage your audience, to bring the audience into the frame. Even if the audience is, you pay attention to what is in front view, what is around you, or does behind you, cannot contribute to your composition. Can it make your self portrait more interests in these types of self portraits come with the added bonus of being able to see what's going on. You don't have to jump in front of your lens. There's no running back and forth. You can see your composition, which is great. Start looking at reflective surfaces. Start thinking about how you can incorporate those into your portrait. Interesting mirrors, puddles of water, reflections of shop windows. So if you can make an interesting portrait with your reflection, go ahead. Number three, get lost in a seed. If you want to move away from your basic self portrait, tried basing your composition around a unique landscape or streetscape that reflects something about you. Ordinary, everyday spaces can create a very interesting self-portrait. Number four, do a double take, double exposures. Let you combine two exposures into oneself portraits. The term comes from the days of film when you would actually take different exposures on one frame. So you would, WE exposed the frame. You would not wine your film. So with, in the digital era, you can definitely take as many exposures as you want. Some cameras are set up to do double exposures. Take a look at your manual and see if there's a setting you can set or you can create a double exposure and post-processing. Whatever you choose to edit your images in. There's probably some way that you can layer a few of them on top of each other. Your options are limitless. You can shoot the same scene or right-side-up, upside down, left side, right side, left. Whichever way you want, be as creative as possible. And remember that this is your portrait telling your story. So if a double exposure is going to tell your story and why not a quadruple exposure? Be creative. Number Five, play with shadows. Try playing with light and shadows to bring your self portrait to live. This works two ways. You can either work with light shapes to create patterns on you, or you can make your shadow, the subject of your portrait. You can have fun with fabric. Lace will make some really interesting patterns on your face. You can also have fun with foliage, tree leaves, branches, even a branch of ferns. That's when I tried my width. Have Fun. Number six, add drama with lighting. Did you invest in a lighting kit and you want to learn how to use it, you are a perfect subject to do that. And it's also a perfect opportunity for you to create a series of self portraits. Figuring out all the different types of light that you can create with your new lighting kit. Only as self-portraiture, a completely safe way for you to figure out your lighting. Your going to have a lot of fun and you're going to create a series of portraits, figuring out how that light falls on your face. Move the light closer, push it further away. If you have modifiers that diffuse your light, try them. What is the effect like? What if you move the lights behind you? What if you move them beside you? What if you put them behind the camera? What if you use some of the shapers that you use to create shadows on your lights. Try everything. You are your own model when it comes to figuring out your lighting. And it's a great way for you to create some really amazing, authentic self portraits. Have fun, MR. seven, look through the lens. What do I mean by that? Of course, you have to look through the lens to create a self portrait. What if you get a lens and actually use it as a way to frame you, what do I mean by that? Take one of your lenses and remove the lens cap and the dust cap from the back so you can see through it. Hold the lens in front of you with the front of the lens facing your camera or your phone. Move it around so that you are positioned in the center of that lens. It's going to be really handy if you have somebody to with this one or you can do it yourself, maybe with a mirror behind her camera. Try it in front of a mirror first, just so that you can see what I'm talking about. Leave your camera out of it and leave the composition out of it. And just hold the lens in front of the mirror with the front part facing the mirror and move it around and see where you are in the frame. And when you take the self portrait, if you're going to use that lens, make sure you have a nice, clean background. So the viewer or yourself is just focusing on what's happening inside of that lens. And you went to fill the frame with it too. That makes it a really interesting number eight and its great think outside of the box, Create a and literally unreal self portrait with a composite image. Maybe you can shoot a whole series of objects and combine them in post-production, using layers to tell a story that doesn't involve your likeness at all. Maybe you're a painter and you could put together a whole series of images that can tell a story of you making a painting. You can do it in post-production. Think outside of the box, get going. Number nine, Sant with black and white can not tell a better story. Do you like it more? Maybe you can combine a monochrome image with a color image and layer them and see what that story, like. Black and white portraits can be particularly strong when you use them to highlight contrast. You can also use strong lines and strong patterns in the portrait to tell your story. Working non-destructively is really beneficial in post-production when you're taking away or adding things to your image. So think about that with when you're creating a really high contrast portrait or really low contrast or dread. Or maybe your whites are totally blown out or you're blacks are really black. If you're making all of these adjustments on layers, it's easy for you to go back and look and see if that's going to better tell your story. And we're ten, Yay. Use color to enhance the mood. Create color casts by using gels over your lighting. Once a gel, it's kinda like a sheet of acetate that has a color cast to it. They come in any color imaginable and you can put them over your lighting to produce a color cast. You don't need professional lighting to do this. You can put them over a light bulb. You can have the same effect by putting a red scarf over land. Try it. You can blend any color of gel against a dark background. You can also use two of them if you do use them in opposite directions so that you can see they're contrast. It's so much fun and that is a lot of fun. And this is your portrait, however you want to create it. I hope that these ten ideas have given you some inspiration.
8. Outro thanks for watching: Thank you so much for coming on this self-portrait journey with me. I hope I've inspired you, and I hope that you've created some self portraits I can look back on and feel proud of. I hope you had fun and I hope you're inspired to create some self portraits of your own. I look forward to seeing them. Please share them in the project gallery. I've shared a bunch of my own. Give me a follow. I'm uploading one new course on month here on the Skill Share platform. And I would also love to have your feedback. Let me know how you felt about the course. Let me know how self portraits have changed your creative practice. Let me know, wow, self portraits have been fun for you or not so fun for you. I would just love to hear from you happy shooting and take good care until next time.
 Deanna Flinn, Photographer and Illustrator