Transcripts
1. Introduction to the course: Hello guys, my name is Nico, and in this course
we're going to be learning how to create a loop sci-fi animation using just Cinema 4D know
sagging adult. So we're going to go
through the whole process, to the layout for the projects, to the modeling, where to get these textures we're
going to be using. And also how to get the model for free and how tiny
the call center. Not only the cylinder which is coming to
be our workforce, but also the character
using a mix, some of which is also
a totally free app. So stay with me and let's
enjoy this course together.
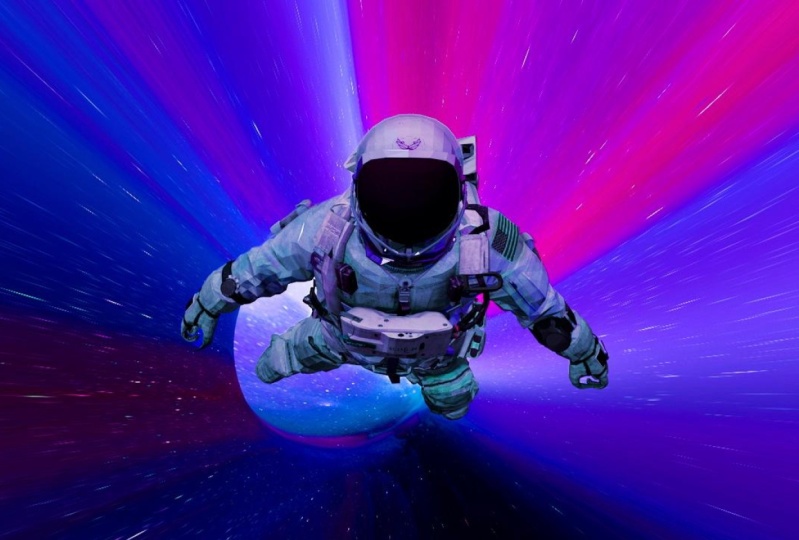
2. Project explanation : Hello again guys. So first of all, I want to give you
a little bit of an explanation of what
you are going to be able to create after
learning from this course. So here we have our loop video, which is ten seconds long. And the important
thing here is that this view is ten seconds
long because it's the time that this curve over here takes to go
all the way around. So you can see
this is coming all the way around and it's going to take ten seconds Exactly. So this can be, and that is because we want
it to be a looped animation. So after seeing this course, you will be able to change
the texture of this cylinder, which is the thin or the objects containing these stars
and space textures. So also you are going to be
able to change the character. Maybe for another character, maybe you want no character
here on your chest, one, these warm hall. Or maybe you want an, a spaceship or an object that is going to be
totally up to you. Since we are going to be downloading the character
from a site, a free site, where you will be
able to download this free assets from characters, to objects, spaceships,
and everything in between. So stay tuned and I'll see
you on the next video.
3. Scene setup and composition: Hello again guys, though here we are at cinema 4D and this is the first thing that
you are going to be looking at when you
first open the app. Okay, so just for guide you, here we have the Viewport. Here is where we're going
to be placed in the camera, the light, the objects, the characters,
everything in-between. In this next number
here we are going to be able to see the materials. Here on the left, you have all the selection
modes that we are going to be playing in later. Here we have some
effectors you're going to be using some later too. Here in this section
on the right, you're going to have
listed all the objects, defectors, cameras, and lights that we are
going to be using. This section over
here is to tweak all the settings
on the materials, the Jets and the cameras,
and everything else. While we got to do first is
to add the cylinder, right? So let's go to the cylinder
and we need to make this longer so we can give him
the bend option later. That is that effect of bending time through
this warm hole. So let's go over
here to the right. In height. Let's just change
the 200 for an 800. Okay? So here we have the cylinder
a little bit longer. And if you can't see these
polygons over the models, is because you need to press the letter N. And when
you press the letter n, you are going to be able to see all the different views
that you can get. So forgetting the polygon view, you just got to press the letter D. But in this case
we're going to be using the N and
the C. So here we have the model with
no polygons views. Okay, so let's go back to
the MD and we need to remove the top and the bottom right
to make this tube store. For that, we also need to make this object, this
cylinder editable. Let's go over to this icon
over here. Let's press it. Now we have unedited
editable model. So let's go to the
selection mode, which is the polygon selection. And let's go to this area here and breadth live selection. So this is going to enable us
to Big any polygon we want. Now let's pick the top and
let's bring the bottom here. We already get rid of
the top and the bottom. Okay? So now as you can see, we can go back to the
other selection mode here, the object mode. So we need more polygons
so we can bend it later. Okay, so let's go here to this subdivision
surface mode. Let's click it. And we're just going to
grab this and make it a children a child
of the subdivision. Now you can see that we have more resolution that is going to enable us to bend it later
to create an animation. Okay, So after banded it, we're going to be
placing a camera. So you have to go over
here to this camera. Then, as you can see, we have the camera
like right up here, but we needed inside
this or that, you just got to go and
select the camera here. Let's go to coordinate here. And we're going to
change this to 0, this again to 0, and this to 0. So now we are in the
model in the tube, but we are facing
one of the walls. So let's go over here. And let's press 90. And now we're going
to be grabbing the camera from here and just put in a
little bit backwards. So now here you have the camera. So we're going to breath here. And now we are in
the camera view. Okay, so if you move around in the view port during
with this check, you're going to
mess up the camera, so don't move around when
you have this checked. So in order to keep moving in the viewport
wouldn't be a party. You just got to uncheck this and you're
going to be able to move around without
disturbing the camera view. Okay. So inside the camera view, just grab the camera
and check it. I like putting it
here and now uncheck it and now you have
the camera. Okay.
4. Wormhole texturing and free assets : So now that we already added the camera and we have
the cylinder created, we have to start thinking
about two things. First of all, the character that is going to be
loading or object, which is going to be floating
through the cylinder. And also we need to
start thinking about the texture that we are going to be using on the cylinder. Okay, so let's do
the texture first. In order to create a material, we are going to be
handled here to Create. And let's do a new
default material. So double-click
in this material, and this is going to appear. The only check that we need
here is the luminance one, because we need
this MEC material. So let's check Luminance and less uncheck color
and reflected. So let's press luminous. And here under texture, we're going to be adding our
texture to the cylinder. Okay, so let's go to Load image. Let's go to the folder where
you have your texture. Here is the one that
I'm going to use. Let's press Okay. And now we are going to be
changing this to multiply. And in my case I'm going to increase a little
bit the brightness to, let's say, let's say 200, and let's see how it looks. Maybe let's go with 150. So now we have to apply this
texture to the cylinder. So just drag and drop it. And let's go to the camera
view and see how this looks. Okay, this is
looking pretty good, but this is not the render view. For getting the render view, we are going to be
heading over here. Let's press it. And here you have
the render view. Okay? So what one thing
you can do here to have this quicker is just grab this render and
picture viewer from here and drag it to
this corner over here. So you are always
going to be having, let me delete this previous
renders, okay, swirl. You're always going to
be having this render quicker, easy to find. Let me make this a little
bit shorter here, okay? Okay, so let's start thinking
about the character now. So let's head to one side, which is totally free,
called Sketchfab. Here, Let's go to the homepage. Here you're going
to be able to find any kind of models totally free. You also have some paid ones. But for the things that we
need every day, you know, like cars, maybe weapons and characters,
there are totally free. For example, let's go
to the search bar. I'm Brett has thrown
out character. Let's go enter always breath downloadable to get the
best ones on the top. And let's say we want to grab
one of these characters. Though. Keep in mind that
we are going to be animating this character. Use Mixamo. And in order to make someone to do that
automatically, we need to have the character
in a third time pulse. For example, this
one over here is a great post in order
to use with big sample. Or you can always use the T-pose the two boys post is one like
this one over here. Okay. Let's say for example, let me grab any
one of these ones. Let's say you want
this character here. So you're going to be able
to preview the character. Here we go. This is like
a fortnight character, but to download this,
it's totally free. Just go here. Always look for the FBX type
of format because that is the one that is supported both by Mixamo and for Cinema 4D. And just don't download the character, and
that will be it. Okay, so I already have
my character selected. So let's get over to
Mixamo and let's start modeling the character
and animate it.
5. Character animation using Mixamo: Here we are at Mixamo. Keep in mind, meet
someone is totally free. You can use suit which
whichever character you want. And you have a lot of different animations to use
to create the satellite. So let's first of all
show you how this works. Here you are going to be
having your character and then you just gotta breadth one of the animations
here that you want. Let's say, for example,
double-click there. And here you will have your
character dancing. Okay? So let's add our character here. Just go here to
upload character, and then just drag and drop your character in this
section over there. So we grabbed the FBX
and just drop it here. We wait for a couple of seconds. And that's just a little weight. We're going to be grabbing all the joints and
just selecting the place. It's where we have
the character's chin, the breast, the elbows. So mix some will do all
the hard work for us. So what midsummer
death is created automatically and a
skeleton to our character. So we're going to be able to
tweak it inside Cinema 4D. We're going to have all of these animations here
to download as well. So now we have our
character here looking to the front and we
just press Next. And acid told you, you just got to drag
and drop where, you know, you have the
breast, the elbows. Nice, and the groin. So you just had to leave
all these A-series. And after pressing next, you're going to have to wait. Let's take four,
between 25 minutes, depending on the amount of
polygons on the character. So let's press Next and
wait for the result. So here we are. We have the preview
of our character. Just press Next. And now we have our
character over here. Okay, so for example, if we grab this animation, we have our character
dancing over here. And you can just
download this animation. And you will have
it to use it in any program or app
including Cinema 4D. So we have to look
for that animation where our astronaut
is just flying. So let's press here. Let's look for a flight. And here we have the animation
that I used over there. But as you can see, the
character chest just fly away. So we need this to be still. So just check this in place. And now the character
is in place. Okay, so let's download this. Just pressing, download. You don't have to
touch anything here. Just downloaded a series. And here we have our download. Though, Let's random drop it to the folder of
our projects here. Here we are. Let's go to cinema 4D and let's add our character
and texture him as well.
6. Animating the scene: So here we are at Cinema 4D, and now we need to start animating and adding
the character. Okay, so first of all, we're going to start
animating the cylinder. Then we're going to
add the character, which is going to be also
animated as you know. And then we're going
to start animating that feeling of travel, of moving around, moving through this Warhol inside
this cylinder. Okay, so let's start
animating the cylinder. And for that, we're going
to be using an effector. So you can find detector
over here on the top. It's called band. So let's chose that. Let's drag and drop it and
make it a child of cylinder. And then let's go to fit
to parent over here. As you can see, it
fits perfectly. And now we are going to be
moving this a little bit to the top like that. And we can start
playing around with the strange with the angle two. So let's first of all
go to the camera view. And let's move this
trained until we can't see the other
side like this. Let's move this a
little bit lower here. A little bit more.
Perfect. There we go. If we move around this, we can see the other side. Okay, so let's log that view that go to the
beginning of the video. And let's breath here. And that will
generate a keyframe. Now let's go to the
end of the video, and let's do the same thing. So we have two keyframes, okay? Now we're going to
move the angle. So let's go again to the
beginning of the video. And under 0, just press. Okay, let's go to maybe 84. Now let's put another
keyframe there. Let's go to 170. Let's move this a little
bit more different here. Let's go 205 or five. And let's move
this a little bit. Another keyframe. And let's go to the end. And let's put this to the
end to add another keyframe. Let's see how this is animated. As you can see, it's moving
exactly as we wanted to do. But here you can see
that it's slowing down. It's like a stopping at the end. So let's go in to fix that. Now. Here it is, Saigon. You have to press it
and we're going to be heading to the timeline. Let's press here the effect. And here you have all that
changes that you saw when the moving around and the animation stopped at
the end and all that stuff. So we'll have to change that. So let's select these all. And just put here. Now, grab this as it is, and let's move it a
little bit around. So we have that
animation that we want. So let's try this now. As you can see, it's
a perfect loop. Now is a great time
to save the file. So let's press Control
and I'll let David this under the folder of
the we're working on. Let's put looked. And he mentioned sci-fi. Okay, so now we need to create this illusion that we are
traveling around and traveling, traveling through this
whole Warhol store. In order to do that, we're
going to head over to the material over
here in this icon. And we're going to create some keyframes for
this to happen. So let's go to the
beginning of the video. We're going to start
creating keyframes again, but this time for the texture. So let's start with a
thousand over here. Let's create a keyframe. And let's go to the
end of the video. And let's press 0. And let's create
another keyframe. So let's see how this goes. As you can see, we have this illusion that we are
traveling through the hole. Buddy? No, at the
end of the video, we have the same issue
as before that it seems that it's like stopping. So let's hit again
to the timeline. Let's choose the material. Let's go to Effects. Let's grab everything here. Let me just put this a
little bit like this. Let's grab everything
and press here. Let's try this again. I believe we are re fix it. So here you can see
that is no slowing down and it looks like
an infinite loop. Okay, let's save this again. Now we're going to proceed
to add the character. So for that, let's
head over to file. Over here, Merge Objects, and choose the file
with the name of the animation that you've
chosen inside. Mix them up. So let's click here. Let's leave this as it is. After a couple of seconds, you're going to see your
character in the viewport. If this pop-up appear
just personnel. And let's get out
of the camera view. So here we have the character. Let's try it and see
how this is animated.
7. Texturing : So here you could see them when we imported the character, it also imported some
materials, right? So this process from now on
is pretty straightforward. Just add for example two, let say to the helmet. Here you have all the
different maps, right? So let's go to the colormap and under texture, just grab it. Brexit, go to Load image. And when you unzip the
file from Sketchfab, you're going to get
a folder called texters or final textures. So under that folder, inside that folder,
you will have all the textures to
use for the character. Okay, so getting there and
we're texturing the helmet. So here we have the
helmet base color. Just select it and
put it over there. And we're going to do
the same for the normal. Just check it. Go to texture, load image. And the normal is always
this bluish purplish one. Again. Put it over there. And if now we do a render, we have the texture
on the helmet. So I'm going to do the same
process for everything else. Here we go to depend. Again, texture, load image,
plant-based color, okay? The normal texture load
image. Normal pants. Okay, let's wait for
the torso color image. You have to look for the colors. Here is a pretty scavenger
hunt, really fun. Here. Load image, torso normal k. Let's render and see
how this is looking. Perfect. Now let's go to
the strips image. Here we have the strips
with the normal to normal. Let's render. Perfect. Let's go
to the clubs image. The clothes are black, so that is pretty cool. Let's go to the normal
two. Loves normal. Perfect. And we just need to do the B by three now the glass
from this area. So here we have it. Here we're going to
be playing around with the reflection, okay? So as I mentioned, we're playing with the reflection and there is a pretty easy way to create that reflective
material that we need. And for that we're going
to be heading two layers, Add and c and d, g, x. So there you have it to
reflect the material. So if now we just close
this and refresh, we have all the reflections
they are for the helmet to. Okay, so now we're going to be heading to the render settings. And the final render.
8. Camera and/render settings: Okay guys, so here we are. And before I start setting up
the whole render settings, we're gonna do one
last thing that we need to change right now. And that is the reflections
for the helmet and the suit. Okay? So for that, Let's go
for each material. Let's say for
example, the helmet. Let's call it the reflectance
and let's add a new layer. Yes, so let's
change this to 20%, and here let's change it to 30. So we have change this value
here and the roughness. So let's go to Strips. Let's add dy, dx. For the strips are going
to do plenty per cent. We're going to change the
attenuation to metal. And we're going
to do a 30% here. And why we have
chosen metal here. That is because we want
the script to be black, and this keeps the color that we have in the layer underneath. So for example, if we
do a render tab here, we can see that it's
in a blackish color. Okay? So let's do
the torque now. Add g, g x. Let's do 20%, and here a 4D. And lastly, let's
go for the gloves. Yet again, let's do 20%. Let's change this to metal, and let's do a 40% here. But let's do a final render
the check. And there we go. We can see the light
reflecting in the stood, in helmet and in the
view or the astronaut. Okay, so let's tweak now the
render settings for that. We go over here to
this engine icon. Here we're going to
change a few things. Here you have the resolution. You can choose the
values as you please keep here in under resolution as 72 pixels inch and then DPI, we can change it to 300, is going to take longer, but that's up to you. It's very important
if you are rendering an animation to change this
value here, the frame range. So we're going from current
frame to all frames. And this is going to make
the render engine to automatically render from
the frame number 0 to 300. Okay, so that's all for
these values over here. So let's go to Save. We're going to change the
folder where we want to render. So let's choose
render over here. This one is rendered
tests that I did before. So let's put it here. Let's change the format
of each rendered to a PNG and the depth
is going to be a bit. So after we check the cameras, so we have pretty
much the same values as the default camera. We got it right
where we want it. And now we're pretty much
done for the render. So let's press Shift and r. And this is already
starting to rendering. So here you can see all the frames which
are being rendered. Let's wait for a
little bit to get a pretty decent
result for you to see what we have created here. So let's say, let's stop
it in the frame number 30. So here we go. As you can see, it's
rendering really quick since I have a
powerful PC. Still. Let's stop it here. And here you have all
the render path is. And also if you go
to the folder, here, you have all the random path is that we already have rendered. So there's another
way for you to render this in just one file. Just one file in an
MP4 as an animation. And from that you get to
go to this icon over here. Change the type to animation and the format to MP4,
and that's it. Press. Okay. This is going to be saved
in the same folder as you saved all the
frames previously. So save it there. And now if we go to renders, we have our MP4 file. Double-click here, and we're
gonna be able to feed. As you can see, all the lights
are reflected in the suit, in the helmet, and in the
before the astronauts.
9. Outro: So there you go, guys. I hope you have learned a lot during this course
because I really love and enjoy creating this for you to help you
improve your art. So remember, you can change the character for
any kind of objects and every texture of the warm up to a whole new
texture of your liking. So please, if you
loved this course, chat, give me a review
that would help a lot. And also if you want my feedback on the piece that you created, just leave it in
the project section and then we'll love to
give you my feedback.
 Nico Fernandez, Digital Artist