Transcripts
1. Intro: Where do you find joy? In nature? In art? Are you feeling joyful right now or are you anxious? Or maybe just tired. When you face the blank page, are you filled with ideas or is it hard to know what to do? Hi, I'm Anne Butera. The tagline on my website is art, magic and joy. But I'll admit, I don't always feel joyful. Some days I have neither energy nor inspiration when I sit down with a blank page. I've struggled through dark times in my life. But searching for joy and embracing creativity have kept me company and helped me make my way back to the light. I have a note in my studio that says creativity is self-care. In challenging times, we all need to take good care of ourselves. We need to invite more joy into our lives, more beauty, more fun. What if you could open a box and find creativity and joy waiting inside. After taking this class, you'll be able to. In the class lessons, I walk you through the process of brainstorming where to find joy and inspiration. I share a variety of techniques to help you identify and create your own unique dictionary of delight. Step-by-step, I demonstrate ways to create a beautiful, nurturing, inspiration deck no matter your artistic abilities and skills. Your deck will be a playful and beautiful way to invite creativity and joy into your days. The lessons are filled with many suggestions for how to personalize the process and customize the resulting deck. So will be tailored to your own style, intentions, and needs. If you're ready to bring more joy and play into your days and nurture yourself with creative self care, I'll see you in class.
2. Why Creativity and Joy?: I had this little spark of an idea to create an inspiring deck of cards that could be just for me, that would encourage me to look for beauty, that would encourage me to look for joy. The whole process would be a self-care for myself, my creativity, my joy, and I thought it would be beautiful to share that with you and encourage you to make your own deck. The whole process has been so fun, and I'm so excited to share it with you. But the reason I want to share it with you is because joy and creativity, and using them together, are transformative. I'd really like you to feel that transformative power and harness that transformative power. In these dark days, in these days where everyone seems to be struggling, anything that we can do to nurture ourselves and nourish ourselves and help us to not focus on the negativity in the news, but to focus on the beauties and the joys in life, I think that's so important. If any of you are familiar with my story, you'll know that back in 2011, I was having a really tough time. I was going through a really dark period of my life. My dreams of crafting a life around creativity had failed. My dreams of moving from the city to the country had failed. My marriage was falling apart. My relationship with my parents was really strained. We had just put to sleep first our ill cat and then our elderly ill dog. I was feeling really hopeless. I was feeling really dark, and I didn't want to feel that way. There were two things that helped get me through that time. One of them was being creative. I was still learning how to paint. I was still doing crafts all the time. This scarf I made during that time while binge-watching Downton Abbey. I was trying to look for the beauty in life through creativity. But also at that time, I started writing what I called the joy lists. I made that an everyday practice. I was trying to find some of my notebooks. I know I filled lots of notebooks up with joy lists, and some of them I couldn't find, but I did find a few. I would write down things every day, things that would bring me joy, looking for the small bits of joy, looking for the small bits of beauty in our lives, that can be such a transformative process. Keeping joy lists was another thing that helped me get out of the darkness. One part of my creative practice is writing in my journal, and I do that just about everyday to spill out ideas, get things out of my head, things that I'm worrying about or frustrated with. It's just something that has been part of my life for a very long time. One thing that I incorporated with my journaling was using oracle decks. The first deck that I ever used was the Soulflower Plant Spirit Oracle from Lisa Estabrook. I would pull a card and think about what it said and write about my feelings surrounding that. Then I also got Jessica Swift's Animal Allies deck. She has two of them. I also have the second one. She's also a teacher here on Skillshare. She's such an inspiration. But just playing with these cards, using them as part of my journaling practice, sparked an idea, what if I were to create a deck of my own cards? I'm hoping that the whole process of creating your deck will be a joyful one. Now that I've gotten that out of the way, I'm going to talk about what materials you'll need. So stick around for the next lesson, and then you can go gather your supplies.
3. Gather Supplies: I want you to gather some supplies, but I don't want you to feel like you have to go out and buy a lot of things for this class because that's simply not true. I want you to look around and see what you already have. Some things I'm sure you'll be able to find that will work for the class, I'm going to use watercolor paper for creating my cards. This is not anything fancy, this is the Canson watercolor pad. For this, it doesn't matter if the paper you use is lower quality. This is still nice heavyweight paper. If you don't have watercolor paper, you can use cardstock, you can use scrapbook paper, use what you have. Look around, you may have something. I just want it to be somewhat rigid, I want it to be strong and sturdy enough to use as a card. Other things that you could use, maybe postcards, if you have a collection of postcards, you could even take a deck of playing cards and reimagine them, collage things on there, paint on there. I'm sure everyone has an old deck of cards, maybe even something with card's missing that you can repurpose for this. One of the big parts of the class is creating a box for your card, and so I'm just using a jewelry box. Here's one example. Take out the fluff, and it's just a nice cardboard box that I can use to decorate. Craft shops are filled with things like this, but I'm sure you have some sort of boxes around the house that you could use and repurpose, maybe a box that no cards came in. Just look around and see what you have. If you don't want to use a box again, a jar can work perfectly well, or something like a berry basket, a different kind of basket. I also show this little strawberry jar that would be a fun place to keep your cards or if you have them on a different shape, that would be great too. I have this big box that I'm using for all the bits and pieces that I cut out of magazines. Cutting things out of magazines will be a big part of the class if you feel like that. Magazines, scissors, something to hold onto that. If you want, you could use a box like this to hold your cards too if you wanted to. We'll be decorating the box and the cards. I'm going to be using paint, just some craft paint. You can use watercolor, I like the craft paint, this acrylic paint, because it's pretty sturdy, it's matt, so it's not going to give a shiny surface. It's not going to be hard to cut through when we cut our cards, and it's also not going to be reactivated by water, so it'll have a bit more lasting power than, let's say watercolor. You'll be handling your deck a lot. To further decorate your cards, I show using some paint pens, other markers, you can use a calligraphy pen is what I use to write on my cards. You could use any kind of pens or markers or whatever you feel like. I really want this to be your own, I really want you to make it your own, so use what you have. I'll keep saying that over and over again. To cut your cards, you'll need a paper trimmer or you can use a straight edge and a blade, either way will work. If you want to use scissors, if you're confident in cutting with scissors, go right ahead. I wanted mine to be pretty uniform, so I measured and cut with paper trimmer and the blade. To make them a little neater and more fancy, I trimmed the edges with this edge trimmer. You do not have to do that. This is something else that you can pick up at a craft store. My dear friend Danielle, who is a scrapbooker, she and her sister had all kinds of cool stuff, and that's when I first learned about something like that and thought it was so cool. Use what you have to trim, decorate whatever your cards. Something else, I'm using Mod Podge to decorate my boxes. They could also be used for your cards. Inside my sketchbook, I take all the little bits that I cut out from magazines to create some inspirational spreads. You can use a glue stick for that, or you can use Mod Podge. Sketchbook is handy for this, for brainstorming, a journal is handy for brainstorming. What else do I have here? I used some washi tape for decorating my box. You could use washi tape on your cards. There are just so many alternatives and I want you to keep your eyes open, search around your house, find what is interesting to you, and use that because I think that will bring you joy. I want the whole thing to bring you joy, so the process of hunting down your materials and thinking about what you could use to create your deck, your box, all of it, I want it to be a creative, joyful experience. So don't feel limited by what I'm sharing here and throughout the class. I want you to go your own way and create a deck that's really going to be personal and tailored to your own needs and your own joy. Go out, gather the materials, and one thing, in the class project, when you upload it to Skillshare, I would love to see any kind of interesting or unusual materials that you'll use or find for your project because that will bring me joy. Go out, find your materials, and then we'll get started in the next lesson with some brainstorming. See you there.
4. Where Do You Find Joy?: I hinted at it already and now I'm going to ask you, where do you find joy? Take some time thinking about this. I know for me, going out in nature always brings me joy. No matter what this season, opening my eyes and paying attention to the world around me makes me happy, gives me inspiration. Whether I'm walking or playing with my dogs, or spending time with my toes in the grass. If I'm working in my garden. Anytime that I'm surrounded by flowers, that's when I feel joyful and inspired, and I'm curious looking around and discovering interesting things. Insects who are visiting the flowers in my garden, being curious is a great way to discover and find your joy. There's so much beauty in this world if you open your eyes and look for it. You'll never be at a loss for either joy or inspiration if you're paying attention. All of these are my joys including creating flower arrangements or painting the colors that I see, those things always bring me joy. Then as a botanical painter, taking those observations and painting them or drawing them that brings me joy and that joy brings me inspiration. Whether I'm painting or doing other crafting. I want you to spend time thinking about what brings you joy. What makes you feel joyful? What makes you feel inspired? I want you to really spend some time thinking about that for your own brainstorming. There are so many ways to do this, and I want you to do what feels right for you. One option is to write in your journal. Sit down and spend some quiet time with your journal and your pen and answer the question, where do you find joy? Maybe your ideas will flow easily, and you'll have lots of thoughts about where you find joy, what brings you joy, and what makes you feel inspired and take your time with this. But if the ideas don't flow, that's okay because there are some other ways that you can brainstorm. Another option is to spend time in your sketchbook. I'll show you a couple examples from my sketch books. This one was a fun page of doodles and words of all things that bring me joy. Sometimes I'll just write words with not many images, or I'll paint, it's a fun way to fill a page. I have a lot of lists of summer joys, you can create thematic joy lists and sketchbook pages. Another fun way to approach a sketchbook page is to think of things that will bring you joy if you're feeling crabby which all of us do from time to time. Something else fun is to look through the photos that you've taken, whether on your computer or in a photo album, and that's a really great place to discover the things and remind yourself of the things that bring you joy. You could even print them out and cut them out and glue them in your journal or your sketchbook. A really fun option for brainstorming, what brings you joy is to cut images and words out of magazines. In a way this is harnessing your inner child back when you used to like to play with scissors and glue. At least I remember doing that as a child. I loved to cut things out. Spend some time with your magazines, with your scissors and anything that catches your eye, cut it out and set it aside in your box or in a folder, and I want you to make this an intuitive process, so don't overthink it. If something catches your eye for whatever reason, cut it out and set it aside. Don't think or analyze or wonder, oh, is this a good thing for me to cut out? Just cut it out, set it aside, the more words and images you have the better. Because then you'll be able to pull from them. If you need to go back and cut more out later, that's fine. Maybe you want to do this process over a few different days. Maybe you want to put on some music while you're cutting or listen to an audiobook, or even put a TV show or movie on in the background, that way it'll keep you from thinking too much about it. Any phrases, any words, any images, maybe quotations, anything that catches your eye, cut it out, collect them all up and then once you have a nice collection of words and images, you can take some time to look at your collection, maybe arrange the images and arrange the words, maybe group them by theme. Because I'm guessing that some themes will start showing up once you have a big enough collection. Maybe you will see the same word popping up or the same intention popping up. It can help to sort things either by theme or maybe sort your words by a part of speech, and then take a look at your collection as a whole, it should bring you joy. Often you will see repeated ideas, and sometimes you'll find things that are surprising to you, and that's really telling whether your collection is pretty homogeneous or if you have some outliers, that tells you a lot about what brings you joy. Then once you have a nice collection of words and images, you can start putting them together on your sketchbook pages or maybe on some poster board, and you can create pages around certain themes, or maybe create pages that all have the same idea with words and images or maybe you will sort things by color or by intention, or maybe words and images that correspond to one another. You'll group together. However you want to arrange your pages, that's really up to you, and you can glue your words and images with glue stick or mod podge as I mentioned before. The whole process from start to finish will be fun or it should be fun, should be inspiring for you, and then maybe once you've created your pages, you can then spend some time writing in your journal about what you found and discovered when you put these pages together. I hope that now you're filled with lots of ideas and lots of inspiration. I want you to really take your time with this. Don't rush through the process of brainstorming. The more time you spend, the more enriching and inspiring and joyful the cards you create will be. But don't worry, we're now going to create our cards just yet. In the next lesson, we're going to be doing some painting, so I'll see you there.
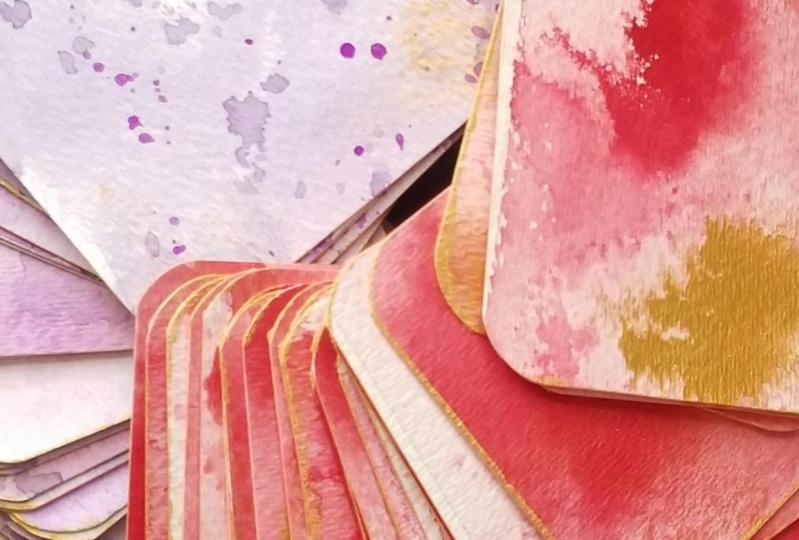
5. Create Decorative Papers: I've already mentioned that I want the whole process of creating these decks to be joyful and creative for you. Today, we're going to be doing something that is both creative and joyful. We'll be making the papers that we're going to use to create the cards. I'm going to be using paint, and I'll show you a few different variations that you can do. Do not worry about this being perfect, mine are going to be messy and fun. I want the process to be fun. If you don't think of yourself as an artist, that's okay. This is not meant to be intimidating, it's not meant to be anything that's difficult. Let's get painting. I really am excited to see what sort of papers you create to make your cards. I'm going to be using this Canson XL Watercolor paper, it's 9 by 12, and painting with Craft Smart Acrylic Paint. Any cheap acrylic paint will work. I'm just going to use a flat brush to smooth out the colors. This is a really fun technique. I'm going to start by squeezing some paint, a variety of colors on to the papers. Choose colors that coordinate nicely together. I'll wet my brush and then smooth out the color. I'm not trying to get a uniform color here, I want some of the different colors to blend and still show through. So just going back and forth until I like the way it looks. You could leave brushstrokes, you can let it be messy. I'm not going all the way to the edges because I know I'll be cutting the edges off. But I'm going to use a variety of colors. Choose colors that bring you joy. You could have your whole pack of cards be the same color, or you can have multiple colors. It's really up to you and what you find to be joyful. Have fun with this process. Remember that the whole thing should bring you joy, and it's okay if they're messy. It's actually better if they have interesting blending, if they have strange brushstrokes because that will really add interest to your finished cards. Don't put pressure on yourself, have fun, enjoy the process, and I think you'll surprise yourself by what you come up with. If you don't want to paint your cards, you can use pretty colored card stock or scrap-booking paper as long as it's heavy enough. This paper even has some glitter on it. I want you to use what you have. Or if you're painting, use different kinds of paint. Again, your cards should be unique to you, they should bring you joy. Whatever colors, whatever patterning, whatever you find joyful, use that as the basis for your cards. It should really be a reflection of you. I'm going to look through my sketchbooks for some pattern inspiration because I'm going to adorn my papers with a little bit more pattern. Looking at these pages, also, can give you some good ideas of different kinds of decorative papers you might want to create if you don't want to use just acrylic craft paint. You may want to use gouache, or watercolor, or markers. Anything, any media that you like using can work for your decorative papers, so don't feel limited by what I'm using, work with whatever brings you the most joy. Before I start adding my patterning, I want to test out different markers and pens, and see how they do on a painted page. I've got some metallic leafing pens, I've got a Sharpie here, and I just want to see what they'll look like. I'm using a test page, you can use a scrap. Not every marker or pen will work well on the painted page. Here's a white paint marker, a Sharpie. We want to have a nice contrast. I'm also going to try out some colored pencils. You want something that's not going to smear, so keep that in mind, as well. Of course, if you don't want to add more pattern or any kinds of texture, that's okay too, you can just keep it painted, or you can use paint to create another layer of colors or some other patterns. I'm really liking how these metallic leafing pens look contrasted on the page, so I know I'm going to use those. Let's get started making some patterns. I'm going to keep things really simple here. Don't feel a lot of pressure when you're creating this. Also, keep in mind that these pages are going to be cut into your cards. Another alternative would be to cut your papers first and then do some patterning on it. But I want there to be a bit of randomness in the look to my cards, so I'm going to do the patterns on the whole page before I cut them. I'm not sure how it's going to turn out, but I'm just going to trust the process, and I'm sure it will create some interesting effects, even if it's not what I had in mind originally. There's one page done. Again, don't worry about copying what I'm doing, don't worry about being perfect, don't worry about anything except, really, the process. This is such a forgiving way to create these pages and these cards, so just have fun. Make doodles. These hearts are making me happy. They're really joyful, they're really fun, so just simple things like that. I want the whole process to be fun and joyful. Another one of my favorite types of patterns is plaid. I am just going to draw some lines on my page and create a plaid look. I'm liking how this paint marker is creating broken lines. It goes with the way the colors are bleeding through, so you can see some of the green underneath the gold, and that's a really fun effect too. Let's see. How about some botanicals? So just a really simple leaf shape will create a lovely pattern. You can create the same type of pattern on all of your cards. You can use the same marker or pen for all of your cards, or you can vary things. Whatever brings you joy. It's totally up to you. So this white paint marker, this Sharpie, I think that'll look good on the darker blue here. I'm just creating some really simple flower shapes, just the hint of a flower. Most of my botanicals are very detailed and very realistic. This is going to be neither, but just a fun, almost polka dot pattern with these flowers. Again, the pattern's going to overlap over the edges a bit, and that's okay. I'll be cutting the edges off, so I'm not even sure what parts are going to be visible in our final cards, and that's okay. That's perfectly okay. Here's one more example to give you an idea of what I'm doing. Just some simple circles, really. So easy, and yet, it looks beautiful. Here's my collection of different painted papers. I think they look beautiful together. I hope that gives you some ideas for different kinds of papers that you can create or find to make your cards. In the next lesson, we're going to be continuing on the creative bent and be decorating our boxes. If you haven't already found a box or a container, go find one, and then I'll meet you in the next lesson.
6. Decorate Your Box: Hello again, friends. I hope you had a lot of fun creating your decorative papers, I know I did. Today, we are going to continue with the theme of decorating and create the boxes for our cards. For the boxes I'll be demonstrating, I'll be using these little cardboard jewelry boxes, but you can use anything. Maybe a tea box. This one is a wooden box. That could be a fun place to store your cards. This one wouldn't even need any decorating unless you wanted to. A berry basket is another fun choice and then I have this ceramic strawberry. You can find all kinds of cool things like this in thrift stores if you keep your eyes open or even just a plain canning jar. This one has a vintage lid, it makes it a little more fun. If you're not using a square or rectangular card, this could be even more fun. There are so many fun ways to decorate your boxes, and I'm going to use the inspiration from these water color palettes. Also, here's another example of one that I recently painted. It's a little too big to go on the top of my box, so I cut a piece of watercolor paper that's better size, and I will just paint some color on here. Watercolor is not going to work well on that cardboard box, so using a scrap of watercolor paper and then attaching it to the box is the best choice. I'm just going to use blues and I'm varying the intensity of color. Just lots of little blue swatches. If you already have water color swatches from classes that you've taken or from your own painting practice, look around and see if there are some that you can re-purpose, or spend some time playing with color to create one just for this project. Once that's dry, I'm going to attach it with mod podge. Mod podge is basically just a glue and I'm going to paint it on. I can get a nice cover of glue on here and make sure that the paper is attached on all edges and we can get it nice and flat. It'll also create a nice, strong attachment between the box and the paper. I'll set this on here and then to keep it nice and flat, I'm going to weigh it down. I'm just going to use a candle. You could use a soup can or whatever you have and let that fully dry. I'm going to use some acrylic craft paint to paint another example box. It's still the same type of jewelry box, a cardboard box. I've got some colors together, I'm squeezing them out on my disposable palette. I chose some colors that look nice together, some pinks and oranges and peach and red and white. I'm going to paint in a similar way to how I painted the papers. I'm just going to let the brush mix the colors on the box. I'll keep adding color and layers until I'm happy with how it looks. You can just keep adding as much as you want. If it gets really thick, that's okay. We're not going to be cutting through paper like we will for the cards. You could just keep adding more and more color. I'm only doing the top of the box because the way these boxes fit together, the lids and the bottom part of the box, I don't think it'll be very easy to open and close if I painted all around. If your boxes open and close more easily, you could definitely paint the whole thing. But it's totally up to you and your materials and the boxes you're using. I like the way that looks. I'm going to let that dry. You can see here's the bottom of the box. It doesn't fit very easily. It comes apart, but if it was painted, I think it would stick. But I do want to have some more decoration on my box, so I'm going to paint the bottom. You can decorate your boxes however you'd like to, and in whichever way brings you joy. Just as I painted the top, I'm now painting the bottom. This is just a really fun process and I want you to enjoy the process as well. Don't put a lot of pressure on yourself. Don't worry about anything being perfect. Just really enjoy the color and the paint and the whole process of painting. I'm using some mod podge to décor podge my box full of words and images that I cut out of magazines. You certainly don't need to do this, but I wanted to show you this technique. You can use this on the box for your cards as well. I'm attaching the words and images with mod podge, but I'm also painting the whole thing with the glue. It'll give everything a nice durable finish. I'm going to use the same technique for doing a little bit of collage on another example box. I've cut out some different shapes and colors of paper and I painted the box with some mod podge. Now, I'm just going to attach the papers to the top of the box. This is just similar to gluing them down. If you need to add some more glue, if you need to trim the papers, you can easily do that. While everything's wet, you can reposition the papers. I am using a little water to dilute the glue. If things are really wet while you're working, you can sop it up with a paper towel and just don't worry because it will dry fine. Make sure everything's nicely pressed down and then you can just create your arrangement, adding any more glue as necessary. You can use all fun papers, different shapes, different textures. I even have some watercolor paper shapes. Let's see. I've got these little half circles that I can attach here as well. Then to make the surface more durable, I'm painting some mod podge on top. Again, it will dry clear. If it looks white right now, don't worry. That will dry clear. It'll give a nice durable surface and make sure that everything is nicely glued down. I'm going to decorate the insides of my boxes too using some of these words that I cut out of magazines. I'm just going to attach them to the inside of the boxes with some mod podge, just like I have been showing you with the larger box and with the collage. You can definitely use other types of glue. You don't need to use mod podge, you could just use a glue stick, use what you have. But I think it's really fun to add some little messages to the interiors of these boxes. The mod podge will give them a nice surface. I'm going to add some to the bottom interiors and the top interiors. You could also write inside your boxes, if you would rather do that. Whatever will make your box the most joyful and fun for you to use, do that. I think my boxes are looking really fun, but I'd also like to add a little bit more decoration to them. You can see all of the little fun messages that I've added to the interiors. I know that then using my cards will be a joyful practice. I'm just going to take my gold leafing pen and just add a few dots on the sides of this box. I could also add some gold to the tops, if I feel like that or the bottoms. Any kind of extra decoration is a fun idea. Here's some copper washi tape, and that I thought would be fun along the edges of the box. You could cover your box in different ways using washi tape. I'm just going to fold the edges down. I tested out this box. This one wasn't too tight to begin with, so I think that little extra bit of washi tape will not get in the way of opening and closing my box. But it adds just one more element of delight to the box for my cards. Then finally, on this box, I'm going to write a little secret message in a heart. I'm just using a marker and I'm writing, create joy. Whatever intentions you want for your practice, you can add to your boxes. I hope that gives you lots of ideas for creating a fun container for your deck. In the next lesson, we're going to trim our cards. I'll see you there.
7. Trim Your Cards: Let's trim our cards. You want your cards to fit nicely in your box. I cut a sample here to make sure that the size that I was estimating was correct and it fits nicely. My box is three and a half inches by three and a half inches. I know I need it to be slightly smaller, so it'll fit nicely. I'm going to cut three and a quarter by three and a quarter. First I'm going to demonstrate using the paper trimmer here. My paper is 9 by 12, so I know I can fit two across and three down, just doing some math. I'm going to start by cutting my paper in half, just right down the middle. That's four and a half inches wide, and then I will cut off the edge to make this strip three and a quarter. Just line it up and then trim off the edge. This is now three and a quarter inches wide, and I can begin trimming the cards. I'm going to start by just trimming off a bit of one edge, and then I can come back and cut my cards so it needs to be three and a quarter, and now I have my square. Your card size and measurements will all depend on what size your box or container is, so you'll have to do your own math. I'm also going to trim these corners like I mentioned earlier, because I like the look of the rounded edges. Just using this paper trimmer, I can trim off the corners. You don't have to do this, and if you don't have a trimmer like that, that's okay. You can see that fits nicely in my box. If you don't have a paper trimmer to cut your paper, you can use a ruler and a blade. I'm cutting this on my cutting mat, and doing it in the same manner. I'm cutting my paper in half first, and then I'm going to cut the first strip here so that it's three and a quarter inches wide. That's cutting off the edge. If you want to line up your pattern, you can take that into account as you're cutting as well. If you're doing it this way, please be careful. I have cut myself before with X-acto blades. Now I've got my strip and I can start trimming my squares. It's a little more difficult and fiddly here to measure since I don't have quarters on my cutting mat, but it still works. I'm going to line this up, so it's halfway between the two squares, and that will give me three and a quarter inches. You can see that my pattern is showing up randomly on the cards. It's not going to be the same on each card, which I think is really fun. That's two more cards, so one more trim for these cards. That's a little bit too big. Actually, I did not measure correctly, so I can come back here, now making sure that it's three and a quarter, and cut off the excess. There you go. I've got three more cards. I'll do this with all of my papers so I have all of my cards. One option if you don't have a box is to tie up your cards with a pretty ribbon. If you don't want square cards, you can cut out different shapes. My shape punches are pretty small, so they would be tiny little cards, but really there are so many options and your imagination is the only limit. I really can't wait to see what your cards look like. I hope that you're ready to write your own cards. See you there.
8. Write Your Cards: Now that we have painted our papers, trimmed our cards, we have a box or other container ready to hold our cards, it's time for us to create the cards, write the messages. I want you to have fun with this, and I want you to remember that your cards are going to be for you. You can create whatever sort of deck you want to create. If you want your deck to be all about self-care, make all your cards about self-care. If you want your deck to be all about creating art, make your deck all sorts of prompts for making art, or writing in your journal, or having adventures, or maybe you need cards that are just affirmations whatever it is that you think you need, whatever kinds of things you're struggling with or feeling stuck about, that will be a good place to start for thinking about what to write on your cards. I'll walk you through my process and I hope that will help you when you're ready to write your own cards. Coming back to my sketchbooks, I can take a look at the pages I created with the things I cut out from magazines and use these as inspiration for what I'm going to write on my cards. Just looking around here, I can take a look. Some of these things are pretty general and you can definitely have general ideas on your cards. But I think it's more helpful to have something specific and actionable. For example, experience ordinary joy every day. This is a very general sentiment. If I can get more specific with that, I can create more helpful, useful card. I'm looking here at this picture of a picnic. I can create a few cards inspired by this depending on what my intentions are. One is simply have a picnic and I can even write the cards so that no matter what the weather, you can take a picnic, have your picnic indoors or out, use pretty blankets and pretty dishes and make it special. There's one inspiration. I could also create a sketchbook page based on a picnic. I could write a card that says fill a page with picnic illustrations. If I wanted to have a prompt for my journal, I could write something like, describe a fantasy picnic, or write about a joyful memory of a picnic that you once had. Those are great starting points for inspiration and they're great things to write on your cards. Now, one thing I see again and again on the pages that I've created are garden and flower themed images and words. I can create some good card prompts with something around flowers and gardening and things like fruits and vegetables. Flowers, one thing I know personally, in the summertime, I am much more likely to pick flowers from my garden and bring them indoors. But in the wintertime, I often don't have cards flowers in the house. A really beautiful nourishing prompt that I could use based on all of these flower images, is create a beautiful flower arrangement with flowers from the garden or from a florist. Something else that I could write that's floral inspired as fill a sketch book page with flowers or paint in sketch a page of flowers. Something else that might be beautiful is to describe a fantasy garden. That would be a great journal prompt or a great sketchbook prompt. Draw an imaginary garden. I've done that before in my journal and in my sketchbook, and it's really fun. Being prompted to do something like that is great. Right here looking at this barn with the quilt on it. I know I have two wooden panels that I've painted with Primer and my intention was to paint some barn quilts. I don't have a barn right now. I would love to have one someday. But I thought they would be pretty decorations for my garden. I never finished them. So my prompt could be create a barn quilt or create a sketchbook page with a quilt design. Or if I wanted to go even more simple, pick up a discarded, forgotten, procrastinated project and work on that. That's one way to go through pages that are filled with things from magazines and use that as a starting point for your prompts, for your cards. Also, you can do the same thing with SketchUp pages that you've written or drawn in. For example, here are two pages that I've shown you already. They have lots of cool ideas that I can work with. Here, color, full Joy. I wrote, what color joy today. Adorn yourself with joy. So something as simple as a prompt. Paint your toenails. That's a fun self-care. That's adding color and joy to your life. That could be a really fun thing to do. Other ideas here I have a little stack of books. It says stack of joy. I could have a card that says, pull out your favorite inspiring book and spend half an hour with it or whatever. Here's a camera. This is one of my little vintage cameras, I have a small collection. This could inspire a card that says, "Visit a secondhand shop and find something interesting." Or use your camera and go on a scavenger hunt for interesting images. Here I have all these little bubbles and a bottle. They're somewhere. Well, here's the bottle of bubbles. I could have a card that says go out and buy a bottle of bubbles and spend some time blowing bubbles. Here, these are all summary ideas. But I could do some sewing. I can says sew some shorts. I could sew shorts or a skirt or pants in the winter time or a top. Eat tomatoes they're not so good in the wintertime, but I could have something else like over here, eat ice cream sandwiches, stargaze. Definitely something that you can do no matter the season as long as it's not cloudy. That just gives you some ideas of how to go through your sketchbook pages and glean ideas and transform them into prompts for your cards. Before you write on your actual cards, it's helpful to make a master list of ideas of prompt for your cards. Spend some time with your sketchbooks, spend some time with your magazine clippings and your journal, and look through what you've written and what you found and what you've sketched and write out ideas, transform your ideas into prompts. I talked about how to make things specific, how to make things actionable. You want to be able to pull a card and have a prompt that will spark your joy, that will inspire you, and that will get you doing something. Get you doing something that's going to be fun, that's going to be nourishing, that's going to get your creative juices flowing. It really pays to take time with this. Take your time, go slowly, write out lots of lists if you need to. Then when you're ready, you can start writing your actual cards. I'm going to suggest one more thing that you can do before you start writing the prompt on your cards. That is to adorn them with some fun images. You can keep this really simple squiggles and doodles, just something to make your cards of that much more fun to use. We are so close to being finished. The last step to creating this deck of inspiration cards is to write the prompts on the backs. This should be really easy because you've already spend time brainstorming. You've already spend time writing in your journal and working in your sketchbook, and cutting images and words out of magazines. You let all those ideas do. You've let your thoughts coalesce. Then you wrote a master list. Taking a look at what you wrote in your journal, what you wrote in your sketchbook, what you drew, what images and words you picked out from your magazines. You've created a wonderful master list. What's so wonderful and beautiful about this is that you've created a list of prompts that will help you create a deck that's tailored just to your needs. Your deck will be nurturing and nourishing and inspiring. It'll be very personal. I hope you've really taken time with the whole process and enjoyed the whole process. Then just write your cards. If you have beautiful handwriting, if you are into calligraphy, in hand lettering, wonderful. If not, that's wonderful too. Your cards will still be beautiful and nurturing and perfect for you. In the next lesson, I'm going to talk about how to use your deck. I'll see you there.
9. Using Your Deck: Now it's time to use your deck, and I think it's really helpful to create a special ritual around doing that. Maybe you'll want to bring a candle, and light that as part of your process to make your time working with your deck as joyful as possible, and as special as possible, because you really deserve some quiet special time for you. Maybe light a candle, grab your journal or your sketchbook, and then grab your card. Now here's my deck. It is pretty big, it doesn't totally fit into my box. But even just looking at the cards, now that they are all finished, it is such a joyful thing. I'm going to guess that it might not be easy to shuffle your deck, but sorry this isn't too bad. If you don't use a lot of water when you're creating your painted pages, and if your paper is a nice heavy weight, like watercolor paper is, you should have no problem with your deck pages staying pretty flat. But you got a little bit warped, but that's okay, it's still definitely doable. If you weigh yours down, they will flatten with time too. While you are working with your deck, it's helpful as I said, to create a special time and place to do that. If you have a room that you are using as a studio, or an art space, or your selling room, or whatever it is, whatever sorts of crafts you like to do, go in that space, or maybe go outside, take a blanket and lay it in the grass. Right now my grass is covered with snow, so I'm not going to be doing that. But in the summer, believe me, that's where I will be. Take some time to shuffle your deck. Maybe spend some time writing in your journal first, thinking about how you're feeling, maybe what it is that's stressing you out, and then you can go from there. Have your tea with you, or your coffee, and then just spend time with your deck. When I've used oracle cards in the past, I spend some time shuffling, and they just send out a good thought and I ask my deck what it is that I need to hear. For me, a lot of these are creative things that I've written down. What is it that I need today? Maybe that's a good question to ask. Sometimes one card will stick out from the others, or will fall from the deck. I always take that as a sign that that's the card that wants my attention. That might sound a little woo-woo, but that's how I feel. I'm going to pull this card today because it was sticking out a little bit. My card says, fill a page in your sketchbook with sweet cottages. That will be a fun way to nurture my creativity, and I won't have to face a blank page and wonder what the heck I'm going to put on there. I hope that when you're working with your deck, it will be just as joyful and nurturing for you. Again, the whole experience of opening that box, looking at your cards, I hope that'll be so joyful. A few things to keep in mind as you go on with using your deck. Maybe after a while, depending on how many cards that you have, you'll feel that you need to add some cards to your deck. Or my deck I think has 40 cards in it, which is pretty big. Maybe you will want to take some out, or maybe you want to revise some of the things that you wrote on your cards, because they just aren't resonating with you the way that you'd like them to. You could make new cards, that's definitely an option, or you could paint over the things that you've written, and either collage, or decoupage, or even paint or use a paint marker to write your new message on your card. I'm hoping that this will be something that can live and grow with you. You can revise it, you can improve it, you can keep working on this and make it something that's really going to be of benefit to you. Maybe working with your deck, maybe you created a self-care deck, and working with your deck, you get an idea that you really wish it had suggestions or assignments for craft projects. Maybe you'll want to create a 2nd deck that's all themed around craft projects, or whatever it is that's speaking to you. So listen to your feelings using your journal, will definitely help with this, and make this practice your own, make it nurturing for you. Another really fun idea is to create a deck for a friend. As I was creating these cards, I had extras, so I put those aside and I thought what a great idea to give this to someone. Think about someone in your life who might need a little extra joy, or affirmation, or just a little more play in their life, and create a gift for them. Again, I want this to be nurturing and fun, and I want you to enjoy the process. I'd really love to see what you create. I know I've said that before, but I really think that you will have so many great ideas. You'll have so many beautiful papers that you've created, you'll have so many interesting ways to approach making a container for your deck, and I can't wait to see that. I also can't wait to hear how you're going to use your deck, so tell me all about it. Tell me what sorts of messages you're going to write on your cards, and what sort of original you will create around using your deck. Just know that your creativity is boundless and I'm always inspired by what I see my students doing. Thank you so much for taking this class with me. It has been a complete joy for me to put it together, and I hope that taking it and working through all of these exercises to create something special for yourself has been fun and joyful and a creative experience for you. I'd also love for you to follow me here on Skillshare. That way you'll always know about my new classes when they're released. You'll also know whenever I'm having a contest. So make sure you follow me here. Head on to my website, and you can sign up for what I call my joy letter. I love sending out my joy letter to my subscribers. I share bits of inspiration, I'd share things that I've been thinking about, things that I've been working on, my newest projects. Once you sign up for my joy letter, you'll have access to my free resource library, and there I have all sorts of goodies for you. So be sure to head over to my website as well. Thank you again for taking my class. I hope it's been inspiring for you, and I can't wait to be inspired by what you create as well. Until next time, wishing you joy.
 Anne Butera, Artist. Instigating creativity and joy.