Transcripts
1. Introduction: Hey, my name is Catherine and I'm a cowgilryb's
entrepreneur, and I've been an
artist my entire life. I have facilitated hundreds of large creative
workshops in my city. However, COVID changed things a little bit when I had to
pivot and teach online. My favorite definition
of an artist is the creative adult is just
the child who survived. I also call myself a
creativity activist because I passionately believed
that everyone was crazy to create in
their own unique ways. Sometimes you just have to
find what that is for you. Today, I will be teaching you
beat embroidery techniques you can use to create stunning
one of a kind reproach. I've been creating
embroidered be brochures for the
past four years now. I love challenging myself
to create unique to designs that I or
someone else will love. In this class, we'll go over basic beat embroidery
and stitching techniques you will use to
do on your roach. I will also show you variations for getting creative and having extra flair
to your designs. Finally, we will pull it
all together with finishing techniques and
apply a brooch pin back so it's ready to wear. By the end of this class, you will have learned the
basic techniques for beat embroidery that you can use
to create more roaches, embroider clothing
and so much more. Don't worry, no prior knowledge is
required for this class. It's perfect for the
absolute beginner that has never sewn or
made a stitch before. Being so glad you're
joining me for this class, let's get started.
2. Supplies: Before we begin, you are going to need the following items. Some felt, black, and ideally a color
to match your beads. A backing. You can just use
the same felt for this, or you can use leather
suede or faux leather. I really like this faux leather. Stuffing. This is chunky
wool that I just pull apart. But you can even
use cotton balls or anything that you'd
like to stuff it with. Beads, ideally two colors. I'm going to be using
this one for the lips. Now when it comes to beads, you can see here that
these ones aren't all uniform and perfect
sizes, they're cheaper beads. But it's okay, especially
if you're starting out, things won't look as perfect. But for the main lip area, I am going to be using these. These are higher-quality
beads, more expensive, but all uniform in
shape and size, and I'll just give a
cleaner look afterwards. These are size 10/0 and
the color is opal pro red. You'll also be needing
some sewing thread, two colors if your lip bead and your final trim bead
are going to be different. I highly recommend Gutermann, it's a very high-quality brand. It's cotton thread, it's
not going to break, it's not going to fray. If you only have polyester, that's fine too, but this is the one
that I recommend. You're also going to need
black embroidery thread. You'll also need some
brooch pinbacks. You only need one, but I just wanted to show you
they do come in gold and silver in
varieties of sizes. Some French bullion wire. If you don't have this,
you could always just use a coating that's metallic or
whatever color you'd like. You're going to need needles, two different kinds
if you have, one, a sewing needle which is a smaller denser needle,
and then another one, a beading needle which is
a thinner, longer shaft, where the whole matches the same width as the shaft for getting the
beads all the way down. You're going to need scissors. I highly recommend
a separate pair for paper and for
embroidery or threads. I can't even tell you how
many scissors of my moms that I've ruined because I used her fabric scissors on
paper when I was little. A sharpie or a gel pen
for tracing our template. Pair of tweezers, not 100 percent necessarily, but definitely recommend it, and of course, our template, yours will look
something like this. This is the original
one that I drew. Then there's some other
stuff that is useful, but it's not necessarily
you don't have to have it. Beading trays are also
really helpful for keeping your beads contained and lined up and not rolling
around on the floor. This little tool here, that's really good for scooping up beads if you drop them or you want to put them back
in their containers. Then if you want to get
really creative or just use some different things to add
accessories to your lips, you could always do fun
stuff like tassels. You could add pom
poms or pom-pom trim. You can always add some sequins
or even add some jewels.
3. Preparing The Template: [MUSIC] First we're going to start with your paper template, make sure that it
is printed out. The first thing we're
going to do is to cut out the paper
with the scissors. Make sure you're using
your paper scissors about your fabric [NOISE] or
embroidery scissors, it just really does the blade. [MUSIC] We are going to take the black felt and place your
cutout on top of it. I like to use a couple of pins when I'm working
just to hold it in place. It doesn't move around when I'm tracing or
when I'm cutting. Obvious you could
use a gel pen or a pencil crayon on the dark
felt to outline your lips. Just want to be sure that
you can see that off to cut it out. [MUSIC] You see how we have
this line down the center? I want to mark that
right now as well. Just to give myself a bit
of an idea where that's going to be center line. Now, we're going to remove the lips and we're
going to cut this out. [MUSIC] Now, depending on what you're
using for your backing, you can either use again, the colored felt that you're
using for the lips or you can use another swede, leather, whatever you want. I'm using this material. You are going to want to trace this on here and cut one of these
up for the backing. You can do it at the
end but I like to just get everything cut
out in the beginning. Remember this is
going to be the back, so make sure you flip this over this way so we don't
cut it the wrong way. Here again, we are
just going to trace. [MUSIC] Now, we're going to cut
out one and two. [MUSIC] We're going to take
our black felt. I just want to trace
along the lines here. [MUSIC] Then I want to complete
my center line. Now, I'm going to take my
colored piece of felt. This is again going
to be my lip color. I'm going to lay my
lips on top here. I'm going to trace them. [MUSIC] Just to see done a decent job. Should all match up here. Perfect. We're ready to
clump up these lips.
4. Plump It Up: So we've matched up our lips. I just want to make sure
that we extend the line. That center line I can
see it about here. I just want to lightly
draw it to make sure it's matching up and here. It's going to be important
for when we start beading. But for now, we're going
to plump up these lips. You want to take your thread, cut off a decent-sized
piece of that, and then you want to
take your sewing needle. I can show you here the differences between my
sewing and my beading needle. The sewing one, shorter, denser, something longer with the eye
the same rate as the shaft. So thread this with our thread. Going to tie a knot at the end. I like to do double
knots just to make sure that it's secured and
it doesn't slip through. We're going to begin with
the top part of the lip. We're going to start at the corner and we are
going to sow on the lips. Now I'm not going to sew the entire lip on the whole way. I'm going to stop when I'm
about three-quarters of the way so we can stuff this. It's still open, we can
still get in the corners. We need to make sure
that we stuff it. This doesn't have to be pretty, it doesn't have to be perfect. It's just doing a job, adhering the top lip
to the back end. [MUSIC] When I get to about the center of the lip, I'm going to start
stuffing to make sure that we can get into
those pointy areas. Whatever you're using, again, doesn't really matter. Cotton balls, whatever you want. I like to just poke mine
in there with my finger. Then I like to take my tweezers. This is where they
come in handy, but you could also use
your embroidery scissors to poke it in there
and pinch it. Pull the tweezers back out. Now, be careful with
your scissors that you don't cut her poking
holes in anything. But the tips of these are
nice and sharp and pointy. They can get into places that the tweezers may be a
little bit too tall to get. Really just want to stuff it. Make sure all that's filled in. Then we'll keep going. [MUSIC] There is about good. We don't want the hole
to be too small that we can't get the stuffing into it. [MUSIC] The sides a little bit flat. So I want a little bit more. I like to go to close it off up
and down a couple of times to make sure
that thread is secure. Then on the back, same type of thing. I'll usually just finish
with a double knot. Now we have the top part
of the lip stuffed. It's time to do the bottom exactly what we
just did on the top. [MUSIC]
5. Outlining The Lip: Now we have the
middle filled in. What we're going to be doing
is we're going to be taking our French Boolean wire or cording, so if you
have any cording or just a thicker ropy
thing can work. We're going to be
outlining the lips, so all along in the
middle and then along the edges
and it just gives an extra pop or definition. The stuff is really cool. I honestly didn't even
know it was called. I didn't look up the name of it and I just love this stuff. It's just so neat. The
wires is metallic. I'm going to show
you up close here. It is springs almost. All right, so we'll
start by measuring the length and then we're going to cut four pieces. If it helps you remember,
you could just lay out what goes where on your little lip template so
you know what's the top, what's the bottom after
you've pre-cut them. We're going to switch
back to a sewing needle. I already have mine threaded. I'm going to start with
the top inside here. Make sure that goes
right to the edge. Then essentially
because these are little springs there's
little gaps in between them. The thread is very fine. I'm just trying to
catch a piece of thread between one of those
little springs because once it gets
down between it, it will disappear and we're not going to
be able to see it. Kind of like that. If
you are using according, obviously, there aren't little
springs or gaps in-between. I would recommend using a
thread that is the same color. If you're using,
let's say, a gold or silver metallic cording, get a thread that matches. Otherwise, you're going
to see all the stitches along the thread and that's just not going to look as clean. After I finished the
top lip inside piece, I've moved along to the
bottom lip inside piece. Then I start sewing on the
top French Boolean wire. Then I'm going to
be moving on to the bottom French Boolean wire. All the same technique, just going along bit by bit, sewing it on, making
sure that the thread lands between the spring
so that it's hidden. Finally, here you can see that I am just
finishing it off. Just tying a few knots to make
sure that it stays secure.
6. Filling In The Mouth: [MUSIC] Now we are
ready to fill in the black part of the mouth. I'll just make it look a
little bit more crisper. We are going to take
our embroidery thread, cut off a piece. I'm going to be using
a bigger needle here for the thread, so I don't have to
separate it and it won't take as long to fill in. So I didn't tie a
knot on the back. I'm just going to pull
it almost all the way and then we're
just going to go down through and
back up a couple of times to secure it in place. Then essentially, this is
like painting with thread. You can think of it as
coloring in a coloring book, we are just going to try to fill in all the black
spaces. [MUSIC]
7. Adding Beads: [MUSIC] Now we're ready to add the beads and this is
why we've drawn a line down the middle because
we're going to be starting in the center
and working our way out. That way it just ensures that we get the straightest lines possible and it doesn't
end up all skewed. I have switched over to
the bling needle again. It's the long skinny one
where the eye hole is the same width as the entire pin shaft and I
have threaded my needle. The first thing
we're going to do is poke our needle up
through the bottom here, getting as close to this
edge without displacing it. Pull it up through.
Then we're going to add as many beads as necessary. I usually just put
a bunch on and then I measure how long this is. Probably one more. Perfect. Then going
to go right down through here, and we will pull. Now I'm just going to
continue that all the way down the right side and then I'll switch and re-thread here and go all the way
down the left side. Then we're just going to
do the same on the bottom. Here we have the
beading complete. Now we are going to be
[inaudible] the back.
8. Apply The Backing: Whether you're using the felt or whatever
for your backing, we need to match up
the pen back with it. I usually have the pin latch
on the right-hand side. We're going to mark
some holes when I flip it around to the wrong side. This is the way that
the pin would sit. Then I'm going to
take my sharpie and spot that I think
is pretty good. I'm going to mark where I
want to cut a hole there. Struggle that down, landmark
on this side over here. Now, I always recommend cutting a little bit less
than you think you need. Because we want the
pin back to stay in place and we don't want any gaping holes so you
can see what's behind it. I like to start with a
little snip like that. Take this out. Let me just
try to push that through. Nice and snug there. On the side also. You can either sow or glue the metal part and this part
onto the back of the brooch. For the fabric part, I'm going to be
using fabric fusion, which is glue for fabrics, and for the pin part, I like to use a hot
glue gun because it's fast and it
adheres very quickly. Now, I'm going to apply this fabric fusion just around and I have to
hold it in place. Don't want to go too
close to the edge. Don't want there to be glue, I'm trying to seal. Then I'll just push it down
and we will let that dry.
9. Practice: Blanket Stitch: I want to go over
a blanket stitch. I'll make it a little
bit easier to understand and see how to do it
on this piece of felt. I have two pieces of felts here and some larger beads
you can see a bit easier. First things first, when we're doing
this on our piece, we want to start in between the two pieces because this
is going to hide our knot. I'm just going to thread through here so
that puts the end. You can see when
we end up sewing it together that
knot is going to be hidden creating a
cleaner finish. What we're going to do now is we're going to
pick up two beads, and then I'm going
to come around and pass my needle
through there, my two beads are on like that. Then I'm going to take my
needle and I'm going to come up through only the second bead. Now, what that is going to
do is it's going to make this bead sit straight
up like that. You can see there. Now we're going to repeat this
process but with one bead. I'm going to pick up a bead, I'm going to pass it through and then I'm going to take the needle and pass it up through
that one bead. Now, you can see they're
starting to sit down in this little row
and face upwards. So it creates a nice little
uniform pattern of the beads. Again, I pick up a bead,
pass it through and pass the needle up
through that bead. One more time, pick up a bead, pass it through and pass my needle up
through that one bead. That is going to be
how we're finishing the edge of our lips.
10. Finishing Touches: Now we're going to be adhering the backing to the front by doing a blanket
stitch with beads. I'm going to be using
silver for the trump. What we're going to do
is we're going to start by passing the needle
through the back, and up through the front there. We're going to
trap it in between the backing and the
front so the knot gets hidden right
there, and you can see. So when the backing
covers that up, we're not going to
see the knot anymore. We're going to
pick up two beads. I'm going to catch the backing and a little
bit of the front, we're going to pull
those through, and then you're going to
take your needle and you are going to pass it up
through just one of the beads that's closest
to the right-hand side because I am going
left to right. You will see once I
pull this through, it makes that bead
stand straight up. I repeat, then I'm going
to pick up one bead. I am going to pass it through the back to the front felt, and then pass my needle up through the bead
that I just put on. We're going to just keep
repeating this process. To finish it up, I just went up through the first bead that was ever put on and then up through the last
one that I strung. Because we don't want a
knot to show anywhere, you can just feed the needle, pass it through underneath
here a couple of times to just
secure the threads, finishing that off, 2, 3, or 4 times, and then just
try to cut it really close. And there is your finished lips.
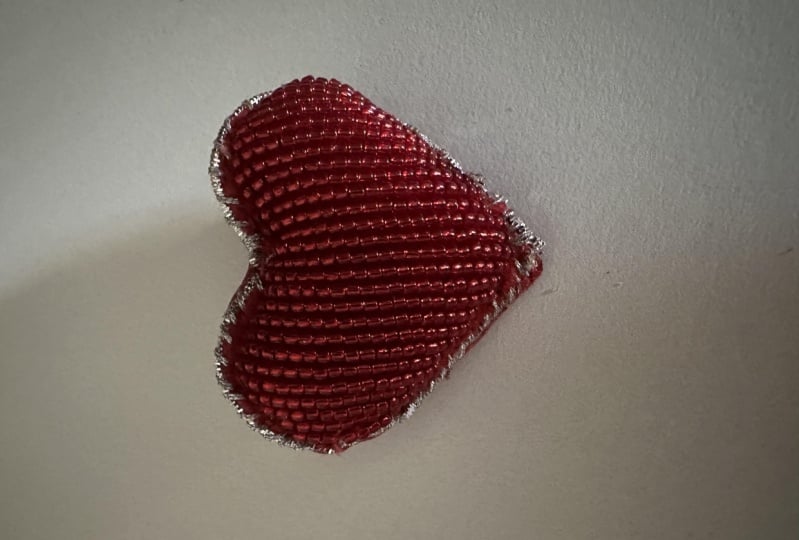
11. Final Thoughts: [MUSIC] Congratulations,
you learned how to make a beautiful bead brooch that you can use to
decorate your clothing, purses, hats, what have you. Post your final designs, I would love to see your unique take on the lip bead brooch
and what colors you used, and how you styled it. If you'd like to
learn how to make a different bead brooch, let me know in the
discussion below. I can always try to come up with a brand-new template and design for the class and
teach you how to do it. If you enjoyed this class, follow me on Skillshare
and Instagram. We are hands-on for
upcoming classes to keep helping you explore
your creativity. Thank you.
 Kathryn Kozody, Artist, Marketer & Creativity Activist