Transcripts
1. Intro to Mehndi: Hello, my name is Catherine and I make Calgary BCE entrepreneur and have been an artist my entire life. I have facilitated hundreds of large creative workshops in my city for the past four years. However, COVID changed things a little bit, so I'm pivoting and putting them online. We've fever definition of an artist is the creative adults, is the child but survived. They also call myself a creativity activists because I passionately believe that everyone is created to create in their own unique ways. Sometimes you just have to find what that is for you. Today, I'll be introducing you to the art form of Monday as Hannah. I've been practicing Hannah for six years now. I am completely self-taught, but have attended masterclass workshops to hone my skills. I've done it professionally at festivals, markets, photo shoots and private parties, similar to coloring books for adults or Zen tangles and allow the way Mandy provides me a meditative experience as I get lost into Flow, create and design. It also offers an incredibly supportive community and people from all cultures in countries at different points in their head, a journey. In this class, we'll go over a brief history of Pana and the cultures that use it today. I'll give you places you can find premium Hannah or powder. You can learn to mix yourself with a tried and true recipe. Little break down the handle designs, the basic techniques and building blocks you can use to create your own unique pieces will practice the techniques with henna drills and work up to free hand. Finally, I'll let you in on aftercare best practices for getting the deepest, most vibrant stain that will last. By the end of the class, you will learn the foundations of creating Hannah designs and how do I join yourself or someone else with confidence, no prior knowledge is required for this class is perfect for the absolute beginner. That's just curious about this ancient art form. I am so glad you're joining me for the art of Monday. You're going to love it. Let's get started.
2. Class Project: The project for today's class, we'll be creating a henna design on paper. Or if you feel up to it ahead. Planning and design out on paper first can give us the confidence when transferring the technique on to skin. It gives us some mental road map of where to begin and how the shapes were formed. When it comes to clean lines, practice makes perfect. Be aware that if you would like to dive right in and Hannah skin, the dye does not wash off. It will stain your skin for up to two weeks. Just keep this in mind in case you have any important events coming out that had on your hand wouldn't be appropriate for otherwise, you could use a commonly closed piece of real estate like your thigh. So no one will see it.
3. Supplies: Before we begin, you will need the following items. Intuited. My handy booklet, printed, Hannah, parchment paper, wax paper or clean wrap, tape, paper, towel and scissors. Some other items that are optional but useful are a plastic needle for fixing small details. Hyper fixed tape use for keeping dry hana on the skin to deepen the Spain. Alcohol wipes, which are great for getting a mistake off the skin quickly. I have a couple of quick notes on buying Hannah. The first thing is you always want to look for BEQ or body art quality. Hannah. This means it's intended to use on the skin and will stain the skin properly. Watch out for chemical cones are black Hannah, they contain nasty chemicals that can cause severe burns to the skin. Any colon that promises to rapidly see the skin likely contains chemicals. That being said, there is a form of paste that stains black and comes from a natural source. This is called Jaguar. It is completely safe to use and will make your head look like a tattoo. The two best and most commonly used types of Hannah or Jimmy LA and Rajasthani or Raj for short, some people prefer one over the other. Jamila can be better for making clean dots while Raj can work better for linework. And some people like to mix both to get the benefits from both of them. It really comes down to personal preference in your work. You may have also come across white Hannah or glitter header. These are not actually Hannah, but topical accessories to put on the skin. Glitter can be applied to what Hannah, but will only last while the paste is still on the hand. Wait, Hannah is a skin safe gilding piece similar to glue. It is applied on top of the skin and although it looks quite elegant, it will only last while the paste isn't disturbed. A great idea for photo shoots. So much for wearing around. You can find how to online from many places these days. But here are some of my recommendations. And the art located in Edmonton, Alberta, Canada. Henna caravan is in the USA. And Dragonfly Hannah, the East Coast of Canada.
4. What is Henna?: Monday is the Hindi word describing the process and art form of using Hanna to paint designs on the body to leave a beautiful state. We now use the word henna interchangeably for the art form and the piece applied to the skin. But Hannah is actually the Persian name for the shrub lasagna and dermis that the paste is made from. Hannah is native to Asia and the Mediterranean coast of Africa, but now thrives in warmer climates all over the world. Twice per year, Hannah leaves are harvested, dried, and ground into a fine powder. These leaves are what produce the beautiful red dye. So you might be wondering how does it stay in our skin. Hannah contains henna tannic acid, which bonds with the collagen in our skin cells and keratin and our nails and hair to produce the same. Henna is the oldest documented cosmetic. It is celebratory and often used for beautification of the body. But you might be surprised to learn that it also offers a host of medicinal healing properties. These include antibacterial, anti-fungal, anti-inflammatory. It can relieve muscle pain, headaches, and sleep problems like insomnia. It also can act as a cooling agent for the body to treat fever, burns, wounds, rashes, eczema, and skin disorders. And it is a potent natural sunblock.
5. History of Henna: Many theological references to Mandy exist throughout the world, basically anywhere that has a period of hot and dry weather and a history of Goddess worship has used Hannah. The widespread use makes it difficult to establish a date or country of origin. Inscriptions place Hannah use in Syria as far back as 2100 BCE. The Greek islands around 1700 BCE. The Egyptian dynasties from 1500 BCE, and cave paintings in India from 400 BCE. It was also rumored that Hannah was used by Cleopatra. Never TD Fatima, whose prophet Muhammad's daughter and Mumtaz Mahal for whom the Taj Mahal was built after. Essentially this art form dates back over 4 thousand years, is used in over 60 countries and spends six different religions. There are wide variations in design and application. Some distinct tented designs include Moroccan, Arabic, Polynesian, Indian, and Sudanese. And although Hannah is used in many religious practices and customs, it is not secret or religious in nature. Anyone that receives henna or practices Monday is a recipient of an ancient female art form. Probably the most well-known custom, Hannah, is used in weddings. In Hindi and some Muslim cultures, the bride's hands and feet are covered in the Monday before the wedding. Monday is a sign of status and celebration and one of the first gifts from husband to wife, sometimes the groom's initials or even hidden in the design to initiate intimacy on the wedding night. Like a sexier version of where's Waldo, where the groom has to get close and find his initials. Generally, the art form of Mandy is considered a blessing. Good luck and words off evil or the evil eye. For this reason, belly blessings have become popular with expectant mothers getting Mandy on their belly is to bless the child and the birth, as well as Hannah crowns for people battling cancer. It is commonly used in all female circles as a reason to get together, recover and support and give advice. In North America, I think we call this one time.
6. Before We Begin: What differentiates a great Hannah artists from a beginner? It's very simple. Practice. More you practice the more you build the muscle controlling your hands for accurate pressure when dispensing the hana from the tube, as well as learning accuracy and placement. Monday is very similar to a senior cake. Think of a nanotube as many piping bag and you are going to pipe designs on body parts instead of a cake. We will get into more details in the aftercare of your hana. But what determines the richness of your stain and how long it will last is how you take care of it posts application. Heat is a great accelerant for a dark stain. That is placing your hand on a hot and water model while you're doing Monday, if you live in a colder climate like I do, or do it outside in the sun. It's also important to note that different parts of the body hold a stain differently. You can achieve the darkest stain on the feet and hands, becoming less so the further you get away from them, drier skin tends to absorb the stain better. However, dead or flaky or cracked skin will cause your steam to look messy and patchy as skin cells fall off. Lastly, it should be noted the biggest enemy of a good Hannah stain is water. At no point should you try to wash the handle off unless you're trying to completely remove what you have done. Okay, Enough talking already. Let's get practicing.
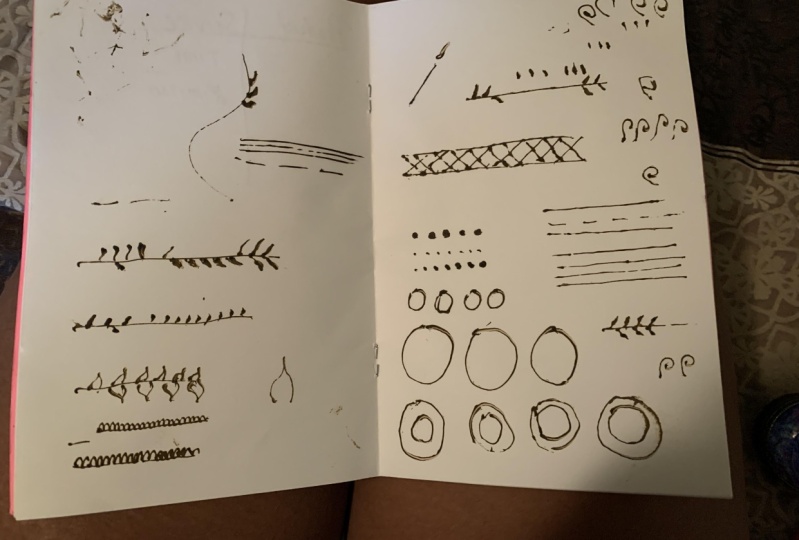
7. Henna Drills - Dots, Lines & Leaves: All right, So let's get practicing. You will see in your handbook the drill section, which looks like a whole bunch of basic shapes on paper. And you can either do your header designs directly on the people that you've printed off. Or what I recommend is either using a piece of tracing paper or parchment paper or even plastic graph to go over top of it and then just taped down. And so when you do the designs on here, it doesn't mess up your booklet unless you're okay with printing a bunch of pages that pi. But this is a way to practice a lot, not mess it up and toss these out after. Now, although finished Henan designs may look quite elaborate and complicated, they're all built from the same basic shapes combined and then repeated in different orders. So really the sky's the limit. You can do whatever you want. There are no rules, but this will help you organize in your mind the way that these elaborate shapes are built. And this is also a way to practice your muscle memory in your hands. The pressure control and accuracy of the shapes. I'm gonna go through the most common shapes that you will see in Henan designs. So we have dots, circles of all sizes. We have leaves, lines and sprouts. Vines. Line work is a main one that you'll want to practice a lot getting straight lines, straight. That's the biggest differentiator between a really nice header design and someone who's still working on it. Swirls, leaves in combinations. These little buds are posts. Then you start combining to make more elaborate shapes, as I mentioned. So some bursts, spirals, flowers and humps or bumps, zigzags, fish bones, patchwork, checkerboards. These are more in a very traditional designs. And then we'll start putting it together. So before we get there, I want us to try out some of these designs. You can take your parchment paper. I like to take my him down. Just holds it in place for me, make sure it's nice and flat. Okay. So now you want to grab your two look, Hannah, this is one that I ordered from head art. And it's a lavender cone. I believe it's Jamila Hannah. And something. You'll notice that sometimes if you meet your cones or you have your coenzyme around there, they stay well if you freeze them, but when you thaw them out or if they've been lying down, the oils can leak out of the top. So something that I like to do whenever I'm doing Hannah is always, always, always have a piece of paper, towel or a napkin on hand. And then obviously any kind of henna is going to stain your hands. So I link to wrap. Paper towel you can see here of waive some of it off around the top of this when I'm working because I don't want all the insides of my hand to be stained. So I'll grab it there like that. It's too bulky. You can cut it down. But if yours is not leaking out and you don't have to do this, it's just something to notice, like to give the tip of it in a pinch and then we're going to cut. It's always better to cut closer to the tip. So it's more fine, more narrow. You can always make it bigger but you can't go backwards. So if I kind of too far up and it's just big blobs and won't be able to get the fine or the details in my designs. So give that a cut. And then the napkin as well can double as a place to test this out because sometimes there's some oils that leak out first or there's a bit of stuff that's hard and at the tip, had to retake the top part of this because as I was putting pressure on it, the tropics floated. I key thing to note about your nanotubes is you want the top to be tamed very, very well, because when you do you put pressure, it's going to try to come out. The path of least resistance. And if that's not the bottom two is tiny all it's going to explode under the top. We can start on some dots. With a dot, you want to put some pressure and down, squeeze. And left. Put some pressure down squeeze. And before you left in the relieve the pressure and left squeeze and lift. Squeezing and left. Spray them live. So you can do bigger circles, you can use smaller ones. It really is just the amount that you're squeezing cabs. I like to try to keep my tube more in the circle. Have the hana spread out as you're going down. And you can get more of a uniform circle as opposed to just dots like this. You'll see, you'll see that as not what we want, the circles are not going to be uniform, they're not going to be circle. So before we jumped to a circle, I want to move on to the next sheet, which is our leaves and I've ions. So the leaves are combination of a dot with a drag. So we'll start like we just did. Let me put down the dot and the mud dragging down trying to do it's you guys can see it, but I typically work from the side when I'm doing designs. So and sometimes I use my finger actually as a crutch, especially on hands when you have a design already put down. You don't want to be putting your hand into the design and messing it up. So basically as you drag down screens down. So I encourage you to try these with me as we're going along. And I mean, you can get different kinds of leaves where they're more bulbous and one end or more thin. You'll see different artists have different kind of techniques for doing it. And some put long tails on the end. It's really up to you. So for the leaves with the lines, I start off, see, I actually have a little bit of that tip on there from doing it, I always like to wipe this off before I start. Another design. Because it just ensures that it's nice and clean. So I start with a line and drop it and then squeeze and fill it in and drag it up. So again, I'm going to wipe them off the line, drop and squeeze. So I didn't clean off my tip there and come clean. Those two started and I've got a little bit of a wonky tail on that. What are you doing? You know, big elaborate designs, these kinda details you're not really going to see. But it's a good habit to get into. And then lions. So lines hasn't really, really cool in that you later mark and then you can lift it up and later lying down, which I'll show you. So put your line down. I lift it. And then I drag and down, lift it. And then I drag and drop. And it's not so it doesn't matter much what happens on top here. So if I've stuff sticking out, not a big deal, whatever touches the skin is what the stain design is going to be like. So high that can also be pretty forgiving. If you have some lines that you're a little bit worried about, you don't think they're so perfect. When the hana peels off and the stain comes out, you will be surprised that it looks actually a lot better than human thought it would. And now putting the elements together that we've just learned, the leaves with the lines creates binds with an element like this. I like to start with my lines first. Drop that down. Starting to get a little bit like it to be really pressurize. I don't have to squeeze as hard in my hand. Muscles don't hurt. So there is a top of the line. If you have any parts that's showing off like this and you're doing it on my hand. I always like to take a little pin or you can do to small alcohol wipe and just quickly white but office in as you do it. That way, you're not going to have it steam the skin. And then down here we have variations. So if you wanted to do all kind of vine lines, goes up, goes down, and you carry on like so. Even enough room for the next one to come in and carried all the way down. And then you can get into practicing curvy lines. So again, it's laying it down this entire time. By Hannah is lifted from the surface. And I am just simply letting it collapse. And a pattern. I'm not staying on the paper. You're not gonna get as accurate lines. And then we can move down to spirals. So for a spiral, I will start with the thickest part. And then I would move out through the thickest circle out. And I find spirals, even leaves, the places that become really stylized. So yeah, it's gonna kinda be up to you on how you want it to go. If you like. The smaller circle in the middle. Are you like a fuller one with the lines closer together? Really up to you. What kind of design you like better. So now I can continue on down again. We've got the variations of combinations, leaves the spirals. And then these posts, or just a dot in the middle, dragging a line down. Or you can do line first and create the dot on top.
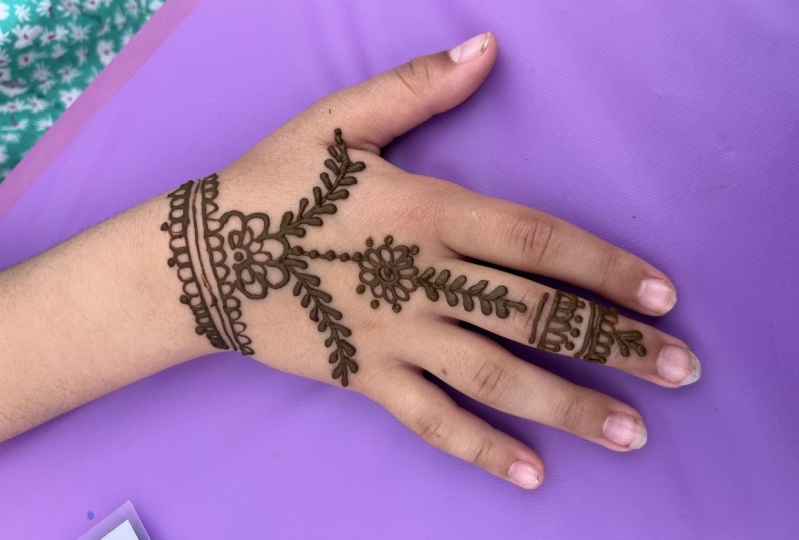
8. Henna Drills - Circles: So now I think it's a good time to come back to the circles now that we've learned how to do lines and circles in drawing, any form of art really are the hardest to do just because of the symmetry, the circular shape. There are tricky to do these again, we're using the same line technique and you're going to go and follow the shape. So it's really good to practice on ones like give me the circle. Because the more that you practice this on paper, the more muscle memory you'll build in the shape, right? Once we get, you know, like design's going around it, you know, it's harder to see when we've made mistakes. If there's, you know, some parts in your circle that have some lumps or bumps, you can always come back in. Do like a filler line to make it extra thick. And that can kinda smooth out some mistakes. But I also want to give you guys a bit of a hack for making perfect circles. So the cool thing about Hannah is like you saw before, how the lines, it'll stick to the skin. You can raise it up and drop it back down. Field any hand on the skin, Hannah attracts other Hannah. So what I like to do is put some Hannah sparsely around the rim shot glass so you can push that down lightly. Me fill it, hit the paper, lift it back up. And again because I had a little bit too much excess, I got these kinda strings here. But watch how easy it is now to do a circle. So I just make contact with some other Hannah. And barely even trying or being half as careful as I was. The homogenous naturally attracts the other Hannah. So again, if I was going to do this again, obviously I would do the last hana on the shot glass. I'm not getting all of these pieces in there. But again, if you are doing a deadline, maybe where you're filling that backend, you know, you're not gonna see it as much or you come back in on the outside and you fill that in thicker. So I encourage you to go through the rest of these drills. Then we've got combinations of lines, line work. And again, what makes it look really financially polished off is the symmetry. It's the spacing between all your lines. It's the line thickness. If it's all, even it'll look much cleaner. And then we get to putting it together. So now you can see the formulation of the different Henan designs. This is a really, really good tool for even building your own designs because you can see how they all come together. So you can start with something as simple as a line with some spirals. Add, add, add. Here's a small motif, your little Paisley. These are very common in Hutton designs. You draw the outline and then you start filling it in whatever way you want. And I recommend starting off with a pen rate. It's less scary. We've all used depend before. I'm figuring out your designs and then you can copy those designs with your hana Mandela's or really an easy ways to, if you get a creative block and you're like, Oh my gosh, I don't, I don't know what to do. The easiest thing to start with is a circle or a dot, right? You draw one, then add something to that. Okay, then I'm going to add bumps to that. Okay, maybe even add some more bumps me when add some dots. It's a really easy way taking basic shapes and just look through your drills and add some to build something bigger. Then we're on to sample borders. So borders can be what? Go around. Risks. You can have risks. Or if you did a motif like a PZ on your hand, the border could fill in these parts. And it's just straight lines that are filled in with different designs. Here are some that you can try copying with your Hema to put your product apart from people over top. Or you can create your own, take a piece of paper and draw your own designs out with combinations of designs we've learned. I also have included some motifs for you down here, a little flower motif and a Paisley for you to go either with your pen or your Hema. And you can fill in each of these different, they can be all the same to start free handing and getting an idea of what you would like to see in these motifs. Motifs, we eventually move on to your skin. Here is a mother, a motif. Peacocks are also very common. In Hannah designs, flowers, leaves. And then we get to the fingers. So the fingers are always going to be something a little bit less complicated than you see on the head. But design elements that you see in the hand, typically you want reflected on the fingers. So if you have kind of this checkerboard pattern somewhere on the hand, it's nice to bring up into the fingers. If you have mines, flowers, It's really nice. It makes the design link rate cohesive. So you've got some fingers here that you can create your own designs off. And then finally we get to the head. So I have an example here of one that I created. And then here is a hand for you to take and fill in. The way that you would like. This is planning then for your own skin. And I've included a couple more pages. Just free canvas, blank hands for you to get as creative as you want and create your own designs. And these are awesome for if you do fill these in here with your pen, just photocopy them before the create for templates for yourself.
9. Henna Drills - Freehand: Okay, so here is the motif that I created on the hand. I wanted to show you guys application on the skin. Let's give this a go. I'll probably start somewhere out here, build this part out, and then start here and build up. That's just how I do it. But today I'm going to just be doing the hand part and up. So I'm going to be starting with these lines. And there is, the easiest thing to do is to feel free to use. These indices. Is communicating to the, to the machine in the community.
10. Aftercare: Once your handpiece falls off, your tattoo can last up to two weeks depending on how you take care of it. Here are some ways to ensure you get the richest stain that lasts. Firstly, you want to leave the henna paste on the skin for as long as possible. Ideally, it's best practice to leave it on for six to eight hours with some people that leave it on overnight. However, let's be realistic here. This would mean not washing anything or pretty much doing anything with your hand for this length of time? My recommendation is leaving it on for a minimum of two hours. That is how long I left on my paste for this tattoo. And I'm happy with this color. Also know that the stain will turn out differently on different skin tones. Mine tends to look more brownish red, but on my palms it looks more burgundy, vibrant red if you do choose to leave it over night, I highly recommend you wrap it in hypothermic tape and put a glove on over top. If some of the piece flakes off in your bed or on your weight carpet for instance. It will permanently stain it. Also a great note if you're doing Hannah with kids, it's best to do it outside in the summertime so they can flick it off in nature. When the henna paste dries and you are ready to take it off, do not use water on it. Simply scrape the paste off into a garbage or use lemon juice or olive oil to remove it. Try and avoid water contact with your henna tattoo for the first 24 hours after you remove the piece. Again. Pretty tricky in this day and age. I was washing dishes right after I removed the paste and it didn't turn out too bad. Keep your tattoo moisturized olive oil is a great natural chemical free barrier that will seal the stain. The color will gradually darken over the next 24 to 48 to 72 hours, starting with a light orange color and processing to a dark orange, brown or reddish brown color. This is a sign that the henna paste is a 100% natural. The stain is dark. As soon as you take the paste off, it'll likely contains chemicals to make your Hanna last longer, avoid exfoliation of the area as Holsteins, the top few layers of the skin cells. Show it off. Be sure to take a picture of your hana and upload it to the project section of this course, as well as post and tag. We are hands-on on Instagram.
11. Bonus - Making Your Own Henna Paste: In the resources section, I've included a recipe to create your own Hannah from scratch. Here you will need to order henna powder, again, body art quality and cones from your supplier. You can also buy your own cellophane and make your own cones. I recommend going for clear cellophane as the metallic Salafi dye comes off on your hands from holding the tomb for long periods of time. I spent a long time finding a recipe that actually left a stain. Believe me, there is nothing more frustrating than spending all this time creating a beautiful design on your body. Only to scrape off the pace and find out it didn't stain at all. The key I found to releasing a great stain from the henna is the type of essential oil you use. I found the most success using eucalyptus oil. You can always mix others in like lavender for different aromas.
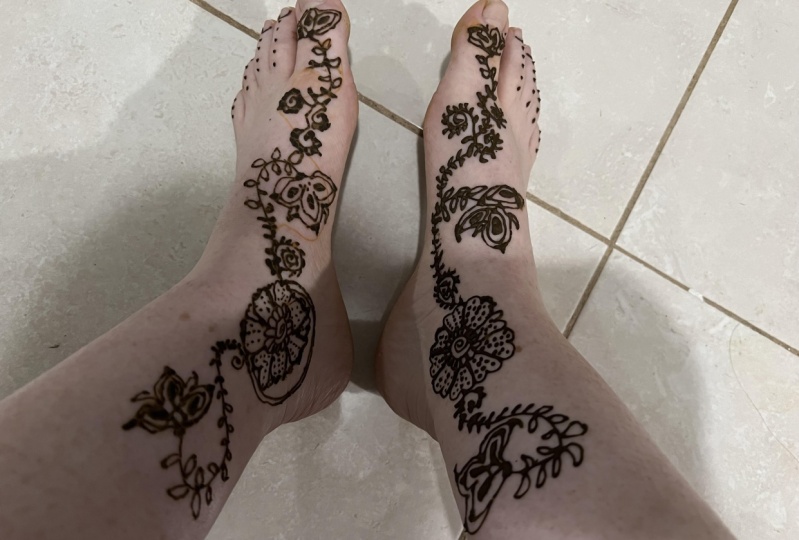
12. Final Thoughts: Congratulations, you've learned in ancient skill of the goddesses that has been passed down culturally for generations. Keep practicing and when you feel comfortable, ask a friend or a loved one if you can try some designs on them. Post your final designs, whether on paper or scan in the project gallery. I would love to see your own unique voice through Monday. Don't forget, Mandy can be done not only on the hands and fingers, but on any part of the body. If you enjoyed this class, follow me on Skillshare and Instagram for upcoming classes to keep exploring your creativity.
 Kathryn Kozody, Artist, Marketer & Creativity Activist