Transcripts
1. Class Introduction: Welcome to this class
on how to create your own three D Maze puzzles in Procreate. My name is Tri Hari. I'm an architect
by profession and a creative professional with over ten years of experience. In this class,
you'll be learning step by step how to create your own three D maze puzzles in the form of activity
sheets or activity books, which you can print it
out or share it online. Even if you're a beginner,
you need not worry on that. We'll be going about it step by step from beginner
to advanced levels. Everything you need as part of templates will be
available for you for free in the
download section below. For class prerequisites, you
might be needing a Procreate installed in an iPad and a styles preferably
in Apple Pencil. As part of class project, you'll be required to
learn everything from the lessons which
will be teaching and implementing all those
things and creating an activity sheet of a
three D Maze puzzle. I'm so excited to share
everything I know about creating your own three D
Maze puzzles in this class. I'll meet you in the
lesson in section below.
2. Class Templates: So as part of the free
downloads for the templates, first is the template for
the overall structure. This is template number one
where it's a simple cube. The next one is a
three cube structure, and then the six cube, and then the nine cube. Again, we'll be showing how to create multiple cubes
also if it's required. But for the sake of
this particular class, we'll be starting off with
single cube structure. The second template
is the two D mazes. In this particular template set, you'll have six sheets, and in all the sheets
in each sheet, there'll be 22d maze puzzles
with solutions like this. All these mazes will
be in PNG format. You can just copy and paste it in the actual template file. And then third template sheet would be the only
solution section. If in case you don't
want to create a solutions page
or would want to create on your own instead of
taking the template route, then you can opt
for this particular template where we'll be having 42 mazes in each sheet.
3. 3D Maze Puzzle Design: So now we will create
the three D maze puzzle. For that first,
open the base file. This is the base file which
you'll be using here. Now we will import the
two D maze puzzles. For that, go back
to the gallery, go to the second template
which I mentioned, which has no solutions. You can choose any
one of the sheet. We have three sheets
here. Then you have to copy this layer. Then go back to
the template file, which is a single
cube and paste. Then now you have received all the four puzzles
in the template file. Now, you duplicate
the base layer, and for the base
layer, you reduce the opacity to at
least 40 or 35. So that's visible, but
it's not very clear. Then go to the
solutions, uh image, duplicate that
also, and you have to create these four files
in four separate layers. For this, you first select one uh image and
then move it across. Again, duplicate it. The
first one and the second one. Yes. Both these puzzles are in two different
layers for you right now from the third sheet also, you take out one more puzzle. Now that's perfect. We have three different two D puzzles
right now and we're going to wrap it around the cube which we have
in the background layer. First, we will hide the two
mazes and we'll focus on one. Now you have to
select that layer, then modify, go to distort. If you press distort, all the four points you can
modify like this. Bring all the four points to the absolute corners
of the cube. To ensure the accuracy, always zoom in and see. If you zoom in, you'll find out that it's not
exactly accurate, you make sure it's accurate. Always do it in
the first attempt because that's the
best thing to do. Always be aware of the
entry and exit points. Yes. Now it looks clear. Check every single point and then you can move
out of the modifier. One particular puzzle is done. Now for the second puzzle, now we have here you notice that the entry point is here and
the exit point is here. For this puzzle, preferably the entry point
is in this phase, we'll see the other two files. This is not preferred,
we'll go for the other one. Oh This is okay, so we'll distort this
particular puzzle. Again, as I mentioned, ensure
all the four points are exactly accurate and be aware of the entry and exit
points where they are. You might have to modify the entry and exit points sometimes and that's
totally fine. Now again, Zoomin ensure
is exactly right. A Same with other two points. Yeah. Now, this looks good. Come
out of modify section, and then we'll go
for the third layer. Again, distort,
distort, same process. Again, check every
single point if it's right because once you
come out of Modify, you won't be able to
modify it exactly. So it's fist, you
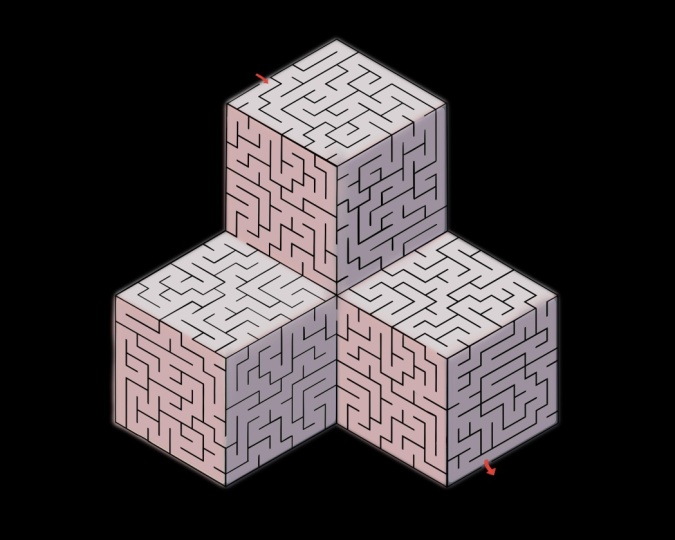
do it right away. Perfect. This is a three D
maze which we have created. Now we are to find
the solutions. In this regard, if you see, uh, the entry point is here
for this particular maze, so you can combine all these three sites and then erase certain aspects so that you can get
the entry points. This is clear and
the exit is here, clear entry for the main entry. Here in this point, we'll open up this hole so that the entry for the
top layer is clear. So we are closing off this particular opening,
which is already there. From here entry, exit, entry to the second cue,
exit to the third cue. Again, it goes here and
comes out like this. It's clear as of now for us. Now remove the background layer or hide the background layer
and your puzzle is clear. Now duplicate this
particular puzzle and try to create
a solutions page. For solutions page
first to brainstorm, you can see how the
whole solution is. Perfect. I got it
in the first try. This is quite a maze actually. Yes, I got it again
for the third cube, third and final cue,
again found it. Yes. This is a solutions page. You can make it more
clear, more professional, but always I would prefer that the hand drawn version
would be very good because it'll give you a sense of that it has
been done by hand, not by some AI tool. If you would want to combine, you can combine both
in the same file or you can keep it in
a different files.
4. Class Project: As we have seen in
the previous lesson, where we have combined
these two D puzzles and composed it into a cube and we have got a three
D maze puzzle like this. In a similar fashion as
a part of class project, you can follow something
similar like this or you can be more
creative and then use all the two D puzzles which has been provided in
the download section and use any template. If it's single cube or three cube or six cube
or even nine cube, or if you want to add on more, you can do so and
then post it on the project section below
for everybody to observe. Thank you so much for
taking this class. Actually, I hope you
enjoyed this class.
 Srihari Muralidhar