Transcripts
1. Introduction to the course: Hello and welcome to this course on crafting your head bands. Greet stylish, DIY head bands. This goes as all about how to create your own grade. You had bands. It is a step-by-step guide to greet your head bands and share ideas of making your own. So welcome to this goes, My name is Betty and I will be opposed to the drought the next five modules. So let me move on to tell you a little bit more about how the schools work and what you can expect over the following modules. This is an online course designed specifically for crafter. And it doesn't matter whether you are a complete to our intermediate gusto, we have split. This goes down to five individual video modules. Each module has a different style of had been that you can make. So before we go any further, I want you to go and find a quiet place where you can sit and make your head bands by taking the information that I'm giving you here on this course. It's a good idea to close things like Facebook and Twitter that have notification that pop up. We don't want any destruction. You can repeat the videos as many as you want just to make sure that you haven't missed it. At other thing. This goes have five modules and files module. I'm going to show you how to create a simple rec club headband. And then second module, we'll look at how to make an awesome Black Flag printer head bands. And the third module, I'm going to teach you to create a cross it back with a bow. In fourth module is to design your black beads ID band. And then first module, you will learn to make you beautiful, shining pink ribbon, fight and head bands. So a quick introduction about me. I'm talking to you, but it's nice to understand who I am and where I come from. I have lovely picture of me. I would do too. Grafton as a bachelor degree. Currently live in India and allow also absorb iron graph. Primarily allow suing, but I do loads of drawing, dressmaking, craft books, jelly making, candle making. Over the years, I've taught lots of different drafts, odd workshops to lot of different peoples of different age groups. I'm using my knowledge from over 10 years of learning to share with you. I'm giving you a fast-track way to make us some head bands that you don't want to have to go through. Some of the trial and error that I had to go through. What I am very fast making. This goes, isn't it? Three ethical codes. It is a practical course. I want you to just literally take away these skills, put them into factors. For queries or any feedback you can actually contact me at bit is often a gmail.com. So any queries that you have about the course, you can't quite think of something that you need. Don't reading. Contact me. And finally, I would like to say a massive welcome to this course. I'm really excited to be working with you. And j that goes, Let's get started.
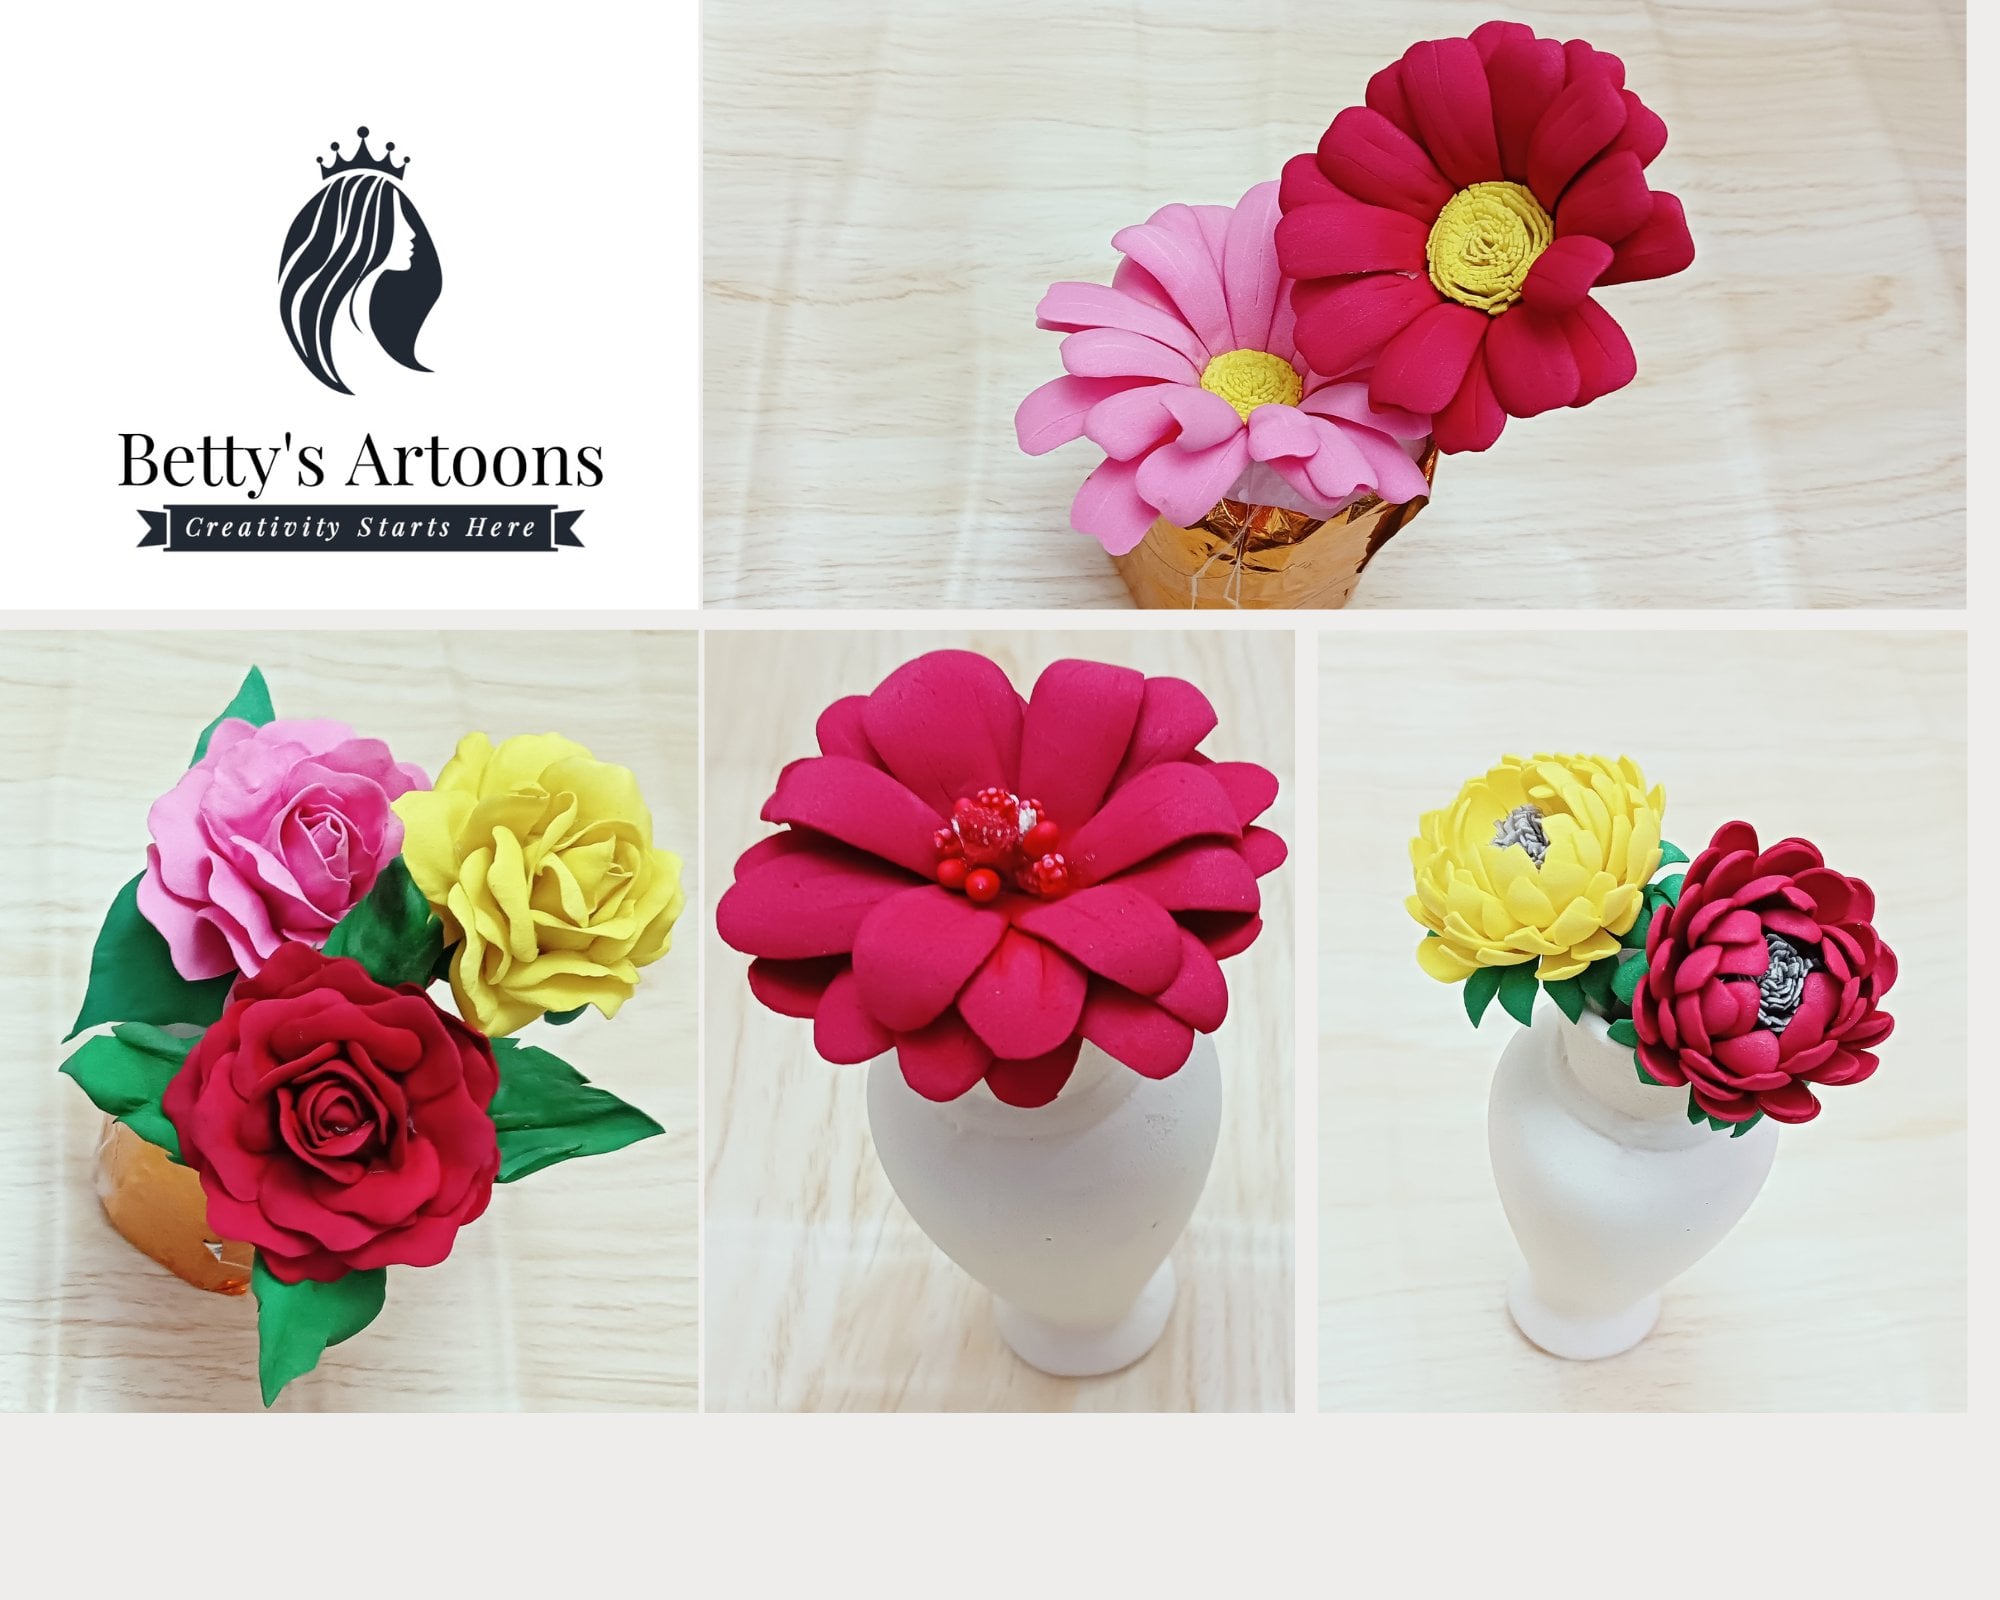
2. Create a Simple Red Flower Headband: In this video, you will learn how to make a simple red headband with red satin ribbon and some artificial class for this to go, one centimeter headband. Some Poland. Let's drag class 1.5 centimeter red satin ribbon. Scissors. You lie to. And part plugin. First. Take the red satin Durbin and light up the end of the sides. This will ensure the drag will not come out. Michaud and cut a small piece of ribbon to cover the bottom of the headband. Now it's time to paste it to the headband. I blend glue on both the side of the head band and stick the dividend to the headband. I'm doing this to govern the bottom of the headband. To do this, we'll show you in the upcoming Windows. This is one method of covering the bottom of the head back. Debit this on either side of the head band. And should do right up there, nce, ablate blue on both the side of the headman and stick that event to the headband. Now, the sites to seem that gap do done both sides. Anyway, I will cover those wild ruling the ribbon. Take this action driven. Happily the glue in one side of the head band and stick the ribbon. Now stopped drooling data ribbon. And thirdly through the head man that you will draw it slightly at 45 degree angle. This angle, and show that the ribbon will tightly fixed to the headband. Make sure you roll it tightly to ensure that turbine will not come out while using it. And make you look more attractive. Reading a redhead met gives you more confidence. And whenever you read, read ahead accessories, you'll often notice and you will be often seen. The almost complete the base of the head man. See the end of the ribbon with the head back. Can you see me using this kind of cut up as well in this video? Lights the end of the ribbon and stick it. Now, the base of the rubber band. Ready? Now let's take some red Poland to degrade the hand ban. Now, floss like a bouquet tied to the side of that headband. You can arrange the flaws like a bookkeeper or in stride length, as by Jag wish. And if SSIDs can make you look very attractive. For example, when you are wearing a red dress or a red lipstick, hair redhead Vandal go along very well. Even though the royal family of London is often seen wearing red headband. The variety of ways to wear a head band with sweat shirts, jeans, dresses, and even for malware. This necessary looks great on everyone. And walks for all had types. Here. I'm adding another one at the center to complete my Mockito. Whenever you add a red color hair accessories, you will often be noticed and you will be often seen very easily. Now, joined the floss tightly to the headband. Just draw the stem and seal it to the headman. Tidy. And headband is almost ready. Finally, take some full sheets and cut it into yourself and paste it to the bottom of the flask to hide the stem. The very first head band of the schools is ready. Now, here are some samples headband Using ways telecom nation and different degree two items. See this why I'm using different plants and the bot fly. Thanks for watching.
3. Part 1 - Make an Awesome Black flower Printed Headband: In this video, I'm going to show you how to read the flower headband using lactulose at interbank. While this, we'd have two centimeter head bath, black satin domain, some Bolen for the creation. Yeah, I guess the cell it cut off. And one centimeter dark black satin. First, take Bill, whole centimeter Landsat and Japan. Measure and cut a small piece. And Adobe's of measurement. Light of the aims of the ribbon now appear on the side of the head man. And stick never been BCE. This is an odometer to cover the bottom of the headband. Repeat the same for the other side of the head, back of the head man. Now steep go to the headband. Now, light up the ends of the ribbon and seal the gap. Make use up any holdup and light up the ends of the ribbon. And seeing the gap. Do the same for the other side of the head back. Now we have covered the bottom of the head band. Take once I do a dot, dot, dot black satin driven to roll the headband, Lou the backside of the headband and stick that event and start drooling. You have to pull it tightly, draw out the headband. Let you roll it slightly at 45 degree angle. This angle ensure that little bundle tightly fixed to the headband, trying to use ones and immediately went for ruling the base headband. This kind of data head bands use more beauty of the head band when we read it. This kind of black headband is about to become mine new staple. And if you opt into the drink, then you ask too. When I was little kid, my mom will then send me off to school without having me Julia, stretchy black headband and joke. You'd all that event ID so that it will knock them off by using it. I have almost completed at the end of that event and see it with the hand back. Now though based headband is ready.
4. Part 2 - Make an Awesome Black flower Printed Headband: Now it's time to date. The full centimeter black satin ribbon. To make the flap. For this take this will ascend to make that black set in DMF unfettered at the top nine centimeter. This nine centimeters is calculated as double the width plus 1 q. This is placenta me, Doug, what? Saturn domain. So foreign to 2, 8 plus 1, so nines and Demisto conduct. Now I play new mode that folder event in the suite to make a triangle. Next, glue on boldness and folded again. Light up the ends and stick it. I will show you that again. Center, we don't lecture, but less than nine centimeter. And a back. Light up the ends of the ribbon. Now on the aims. And then pull that event industry. Look like this. Again, I play mode. The aims. Likewise create a 12 by boats to create a soft. Separate the two groups of beggars plus 1, let five adults, and the second group, Let's seven per else. Let's take the five petals go and stop joined up like this. And stick that on top of them. Next one. All the fight, I don't like this. Now, apply glue on the front side of the ribbon. And structurally, I played you and draw the petals to form the center of the flower. Cent drop the plant is ready. Now. Next, repeat the same procedure. And John, But does follow the same procedure. And stick the better. Now applying new on the dense and join it to the center of that flap. Flap and draw it to the center of the flower. I have completed the first block, but the head back. Wow, it has come out really well. Now, let's take all the pebbles and JD presage. Presage. Stump. Now let us create this again, fluff. A 2.5 centimeter black satin. Got it at the top, six centimeter. And just like the previous plan, this land has been calculated based on the width of the ribbon. Here, the adopted ribbon, let's do 15 centimeter. So 2.5 centimeter into two plus one is 62 Edo. Let's see, procedure needs to be followed. Light of the ends of the event. Now update you on go That ends of their month. And hold letter bending this way. To make a triangle like this will update you on what the aims and folded. I will show you on the ends of that event and folded. And unfolded, scraped off to our petals to make a flop. So big the two groups of petals, the first group that five adults and there's again group, let's say, and let's take the fiber does loops and joined the guidance. And stick that they pronounce on top of that x1. All the five adults like this. Next, repeat the same procedure and join us. Seven bridges. Just follow the same procedure. The last month. Undefined side of this abdomen. And start drooling the petals to this center of the flower. There's a job if ladder straight enough. Now I blend glue on the pedals. And John net buildup sent off the lung to complete the leg and step it. Okay. Now we have the second clock ready. And it does the same way using the 2.5 centimeter Santander Bank. Now we have the three blasts reading. Next, take the form sheet and got a circle shape and bottom after clamp. Like this. Now it's time to attach them to the bottom of the flower and stick the whole sheet for the fluff. And Facebook. Now it's time to our data plan to the headband. Plus b is a big jump at the side of the headman and join the small floss addition to the big flop. Happy the blue. And that should do the headband, headband. The black headband to and does not in fact, on the rise. It has actually rising and it's not going away anytime soon. See how. Now at this moment, floss. While black arrows always mean, there's nothing wrong with trying out the other colors. Black head band is almost ready. In this stage, you can add new upgrade to d by placing some Boolean or reads at the sides of the flask. I'm not adding anything extra. You I like the way it does. Finally got home, she and Bluebird to the backside of the headband to cover the bottom of the flower. So, um, this sample had been using the same type of flower for your reference. In this headband, I have added whole lens and beads to beautify the headband debit. This type of white headband is perfect for any kind of functions. Thanks for watching.
5. Create a Cross Headband with A bow: This video, I'm going to show you how to create a gross headband using two different colors of saddened event. For that. Plus we need a one centimeter headband device and do EDA black satin domain. And a 15 centimeter Think center driven. Yeah, Leto. Yeses us. And a hot glue gun. First date the pink satin ribbon measure approximately six centimeter. And got the bees or prevent. The bottom of the head band. Light up the ends of the ribbon. And Adobe's of this measurement. Now it's time to face it to the headband. Glue on both sides of the head band, and stick the ribbon to the headband. This is done in order to cover the bottom of the head band. Repeat the same procedure for the other side of the head, banned glue, stick detriment to their head band. Now we have covered the bottom of the head man being certain domain. And the black satin ribbon. Remember to light up the ends of their event. Now base down black ribbon on top, on top of the pink satin demand like this. Next loop on the Mac side of the saddened event. And stick it behind the head band. And bays the end of the second domain to the headband. First row, being sad and urban. And take the black one on top of the pink satin ribbon. Now, roll the black satin Durbin and didn't need the pink one and pull that one down. Now, Ronaldo, being satin ribbon. And take the black one, row it. And bolder. Pink one down. Kindly pay attention to this step because this needs to, needs to be done drawing the making of the headband. And take the black one and bolder, pay one down tightly to ensure it will not come out while using it. Make sure you do not entangled that events. The black underneath the bank will pay one down. Yeah, headband does now. Ready? As you can see, it should be thoroughly. Let me show you that D is absorbed counseling. I think saddened. And the black one. And show you roll it tidy. Here, I'm using contrasting colors, such as pink and black to show the difference. But you can also use same color combination, pink and white combination, for example, go really well. Now we have almost completed the headband. Please stick to the baton till the end. Let's same baton needs to be followed. The pink underneath the black one and pull the black one down. Now, Royall the black one and meet the pink one. And the pink one down. This week. You have to do it. So loving and older. Black point. Now it's time to cut out the external part of that events. Like the ends of the ribbon. And applying glue on the ribbon and paste it to the headband. Took a head bath. Now pays the black one, lights up the ink and see that. Now the base of the head been a steady bad it straight away. Any formal way. These kind of pattern turbans look very elegant. These go really well with dresses and formal, but it looks really good on college-going students and teenagers. The maze headband does ready-to-wear. Next, I'm taking a full centimeter pink satin driven to make a bow. My show four centimeter. And got it. And the 4 times lambda, we just sixteenth-century top piece to make one side of the moon. The ends of the ribbon. Let my Sherman does four centimeter and 16 centimeter length. So in this way, to form a triangle at the top. Now for the ribbon to the top of the triangle, h. On either side. It looked at this. I will do it. Please be careful attention. Hold the ribbon this way to make the triangle at the top to the top edge of the triangle. Using a bend. Do it on the next side, and secure it with pen. Take the adult bees and do it in the same b plus make a triangle. The frank part of the sudden the woman should be under towel. Next fall the ribbon to the edges of the triangle and secure it with. The same, the other side and lift up. Now, mode that basis on top off one Nando and remove them pens, joined the dough pieces together and secure it with doping. Dopants. Now, hold the ribbon in this way. The first piece should be folded inside, followed by second BCE. Now it's time to remove that base. The more the bins start stitching the running stitch. Now we'll do the drag from one digit. In the similar way though, other side of the bowl. Carved Logan and stick the center spot to complete the ball. The ball is spreading space some degree two items at the center to hide this too cheap. At the center of the boat. And base the degree two items. Add this into this company example. Finally, pays the ball on that side of the head band. Take a form shape and based it when a double. The third type of head back out of the sample had been Vajrayana fence. In this admin, I have used black and white column, but black book. Thanks for watching.
6. Design your Black Beads Headband: In this video, you will learn how to create a black head back with golden beets. For this tikka, one centimeter head man. You had 2.5 centimeter black satin ribbon. In this video, I'm using a black satin ribbons. The next one will be 15 centimeter. Next item, Durbin. And we need one size that is one centimeter, one centimeter dot, dot. We need some mics. First. Let's cover the bottom of the head band. For this, take a one centimeter dot, dot, dot santander been like the sides as you shall measure and cut a little one centimeter saturn Durbin. You have to cover both the ends of the head bang. So back under the one-piece, the same size. Light up and seeing the ribbon ends. Now, apply glue on the head man and stick that event to the head man. I'm using dotted certain Durbin. You use a dot-dot-dot or plain soft underbelly. And the color was chosen matching the ribbon and the beads color you can use, which are all available for you. Now, do the same. On the other end, I played blue and stick the ribbon to cover the bottom of the headband. Hey, sit properly like the sides and seal the gap. Tab with the finger properly. Like the previous video, I will be covering this spot using the ribbon while roll the head band. Now it's time to start drooling the headband Using a 2.5 centimeter black sat in Dublin. For that, first, ablate the glue on the head back to the headband. The first really shouldn't be straight. Forward it at 45. And the angle that the brain will tightly fixed to the headband. Make sure you roll it tightly. Ensure that the ribbon will not come out while using it evenly. We haven't done most of the band. I would stamp to stick the end. I bled blue. And the aim and visa. Like to the N and C lip to the headband. Now the base band is straight. Next, take the beads and 15 centimeter saturn Durbin. The measurement of the full head man with the Wi-Fi centimeters out and DMF and make a double and cut it. Make a knot at the end. Take a needed that have a big open so that you can put the one end of the second event to the needle tool, put the beads into the needle and pull it all the way to the end. Instead the beans into the needle and pull it down. Make sure the reads with the headband. Keep adding the beats. Leave approximately six centimeter from the bottom of the headband and market at the site and sweat. Now, take the one end of the 15 centimeter, lacks Latin, German, and bases do the base headband. Now we have to start drooling the beads to the headband. Mock stamp trolling the debates. You have to roll it. This FAPE. It had the plays, the beat and the center of the head back. Next. Again, do it tightly. After that. Put the beat roulette and simply roll the satin domain aloe. To make it back. Next, add the beat to the headband. One liter on the SAT and urban next to make it died. Next, add the VDD. You'd have to, growing up. The NBA head back up. Make sure they're arranged in straight line. They almost done. Now it's time to quantize and do, it does act into mental that base head bang. Make sure that the beads are arranged. The glue. Saddened Durbin. And see that. Hello black head back. These other somato samples with different colors. I'm using. Like both pink and white. Thanks for watching.
7. Model your Shining Pink Ribbon pattern Headband: In this video, you will be learning how to create an awesome headman using a baton and driven and other decorative items for this taken up proximity to 15 centimeter head back? Yeah. Four centimeter things. Satin ribbon? Yes. A four centimeter thinks that in demand. Some fancy stone degree two items. Since this yellow I2 and a hot glue gun. Now, let's take a 15 centimeter pink dotted Santo Domingo to roll the head band. Now roll the head back, as I have shown you in the previous Reduce, I have growling my head man, and I have it ready. Now. Take the full centimeters ribbon and light up the ends of the side as we show, leaving some space at the bottom. Now, let's pull the band using one centimeter. And so again C. Now let's give this again phone using the same one centimeter gap. Now, let's call the third one in there, some low weight to fall and stitch the ribbon for the head band. Now, let's stack the chain. We have a one centimeter up yep. And stretch. It has a calming color associated with kindness. It is also associated with family and girly thing. Continue doing it is some low weight to cover the headband and shut the gap and stitching them. And now I will rebalance ready. Now it's time to stick that event to the headband. Stick that event to the headband industry. We are now done with it. Now. Let's take some degree to add them. To hide the center band of the stitching. You use whatever the material available for you. Let's measure it. Now, paste it at the center so that asymptote will not show up. Now gradually. As shown. Now, 90% of our head band does reading. But there's still something missing. So now let's create the fly, like I showed in the video of the black head band. To create it in pink ribbon to mass this headband. Let us take this flat on one side of the head band. Something good band is now really do add. This age of video chatting will be seen only wasted. We have come to realize that the head man has above to transform a lip T2. Now it is your turn to make a nice headband and transform. Your luck. Thanks for watching.
 Betty Dalmi, Artist that specializes in Art and Craft