Transcripts
1. Intro: Hi. My name is Tiffany expert, and I am a graphic designer photographer in the owner of Desert Bloom. Today I'm gonna be teaching you five different Sivori techniques using indigo dye. She Bori is a Japanese dyeing technique that involves folding, twisting and binding to create different shapes on fabric and to go die as a natural dye that has been used for years to die fabric. It's most commonly used today to Die Danamon Blue Jeans and it's also super popular. Um, in the last couple of years to die, things like pillow cases and T shirts kind of like what we're doing today. So I'm really excited to show you guys these techniques, and I cannot wait to see what you come up with.
2. Materials: all right. So before we get started, we're gonna need to gather a few things. The first is just indigo dye kits, which have gone Amazon for about 12 books. It dies up to 15 things. This is gonna have most of the dye stuffs that will need for this project. It comes with your into good I soda ash and your reduction agent with fuel mix altogether. I'll show you in the next video comes with a pair of gloves, and then it comes with too little bags of rubber bands. Um, on top of that, a few more things that you're gonna want to gather. I'm gonna be using the glass rocks. You could also use marbles or washers. Uh, also gonna be using this. Wouldn't Dow string and scissors for another technique and then some cardboard on top of all of these materials Theme. Next thing you're gonna need to grab, of course, is your fabric that you're gonna die. So I am using 100% cotton white pillowcases for my Kia. I'll include a link toe thes because they die really well. But anything natural and 100% con works really well. So gather all your materials and then in the next video, I'll show you how to set up your day
3. Setting up your dye: All right. So I have my gloves on and they have my bucket set up. You'll also need together three buckets. I didn't say that earlier. And a paint stick, but the first bucket you're gonna fill with water, and this is going to be to rent your fabric off before you dip it in the DI. The second bucket is full of die, which I've mixed on those three things which I showed you earlier. Um, and basically, you're gonna store it in a clockwise motion and then in a counterclockwise motion just to get everything mixed up really well. And this is actually going to sit for about 15 minutes, which will be perfect timing, because that's when I'm gonna be showing you the binding techniques. And the third bucket is for rinse. So you'll need to have your hose nearby so you can rinse off your items. There
4. Itajime Diagonal Accordian Fold: Okay, so now that we have our die settling, I'm going to start showing you the difference. Jubouri techniques. For the 1st 1 the only thing you're gonna need are your rubber bands in your fabric. We're going to start by doing in an accordion, fold on a diagonal, so I'm gonna start in. Actually, this corner, it's kind of fold it. Once you've got it folded up, you're gonna take your rubber bands and start binding. I would do them about two times around just so that their tight basically anywhere where you fold and put rubber bands. Those areas are going to resist the die and are going to be white. So these are all going to be a little wait. Lines do some different sizes to still have some thicker lines, and it doesn't need to be perfect. This is definitely a fun thing to experiment with. You can kind of tired brand wherever you want. All right, so this little bundle is done and ready to go
5. Kumo with rubber bands: All right, So we are ready to do our second she Boeri technique for this one again. All you're gonna need is your over bands and your fabric. This one is gonna look a lot like our modern day tied I so you might recognize it. But basically, you can take fabric at any point a lot of people like to do in the middle of what I'm gonna do it. We live it off center and just find it with a little rubber bands. And depending on how many lines you want, you can dio a few rubber bands. I am good with just three but riband on this one, and it is ready to go into the dye, Beth.
6. Itajime triangles: Okay, so we're ready to do our third chivalry technique for this swan, you'll again need your over bands and also some of your cardboard. I cut these into little triangle shapes, which once we fold this up, you can see kind of what shape you need to cut. But we're going to do an accordion fold first, and then we're gonna triangle according to fold it in the other direction. Okay, so we have our little bundle. I'm just gonna attack that peace under. And you're gonna take her to triangle pieces. You can see I pretty much just took the corner of my rectangle and cut it across so that it fit about this size. You put one on each side, and then you're gonna start finding with your rubber bands. And since this is ah, taller stack, it's gonna be harder. Teoh, double up on the rubber bands. You can do a few, but they might snap. So I'm just gonna mostly dio this one. Go around with my rubber bands, okay? And this guy is ready to go into the dye bath
7. Arashi pole binding: Okay, so now we're doing our fourth she bori technique. This one is going to be using our wooden dowel or your pipe, Um, and also your string and your scissors. So basically, this one's gonna end up looking like lightning, which is pretty cool. Um, we're basically gonna roll fabric to this down, and then we're gonna bind it with string. So Thai Little not to start. We're basically just gonna wrap it around pretty tight. It's gonna cut it off. Not. And then we're just gonna kind of push this down, squish it together, and then this guy is ready to go into the bath.
8. Kumo with found objects: All right. So we're ready to do our fifth and final chivalry technique for this one, or going to be using a rubber bands and then also our little stones or marbles or washers, whatever you have gathered. So basically, it's a very somewhere to the Thai Day one. You're gonna kind of pick some spots. You can do it and a symmetrical pattern, or you can do it at random. I'm gonna kind of do it at random. Um, but basically, you're gonna put your little stone underneath there. And if you want a larger circle, a larger ring, you can kind of do a couple bands like to. We're just gonna do this from different spots on our fabric. Okay, so this is ready to go into the dye, Beth.
9. Dying your pieces: All right, so we have all of our little bundles, and we're ready to go into the dye bath, so we're just gonna Prewett them first. So you just dip it in your first bucket of water, Not a little bit, and then you're just gonna drop it into the die. All right, So these are going to be sitting in this die for about 10 minutes. We'll come back and check on them then, and then we're gonna rinse them off in our third bucket. All right, so it's been 10 minutes. So we're now ready to grab our pieces out of the dye bath and rinse them off. As you can see, they come out green. Don't be worried. They're gonna oxidize in term blue. It's just what they look like after they come out of the diet. So we're gonna take our third bucket and just rinse this guy off pretty much until you can't Meaning are blue. I don't think about a minute. Okay, so this one is good to go. Um, you can lay it flat on concrete or grass. Um, concrete. Probably a little bit cleaner, but you can see it's already starting to change color a little bit, which is pretty cool
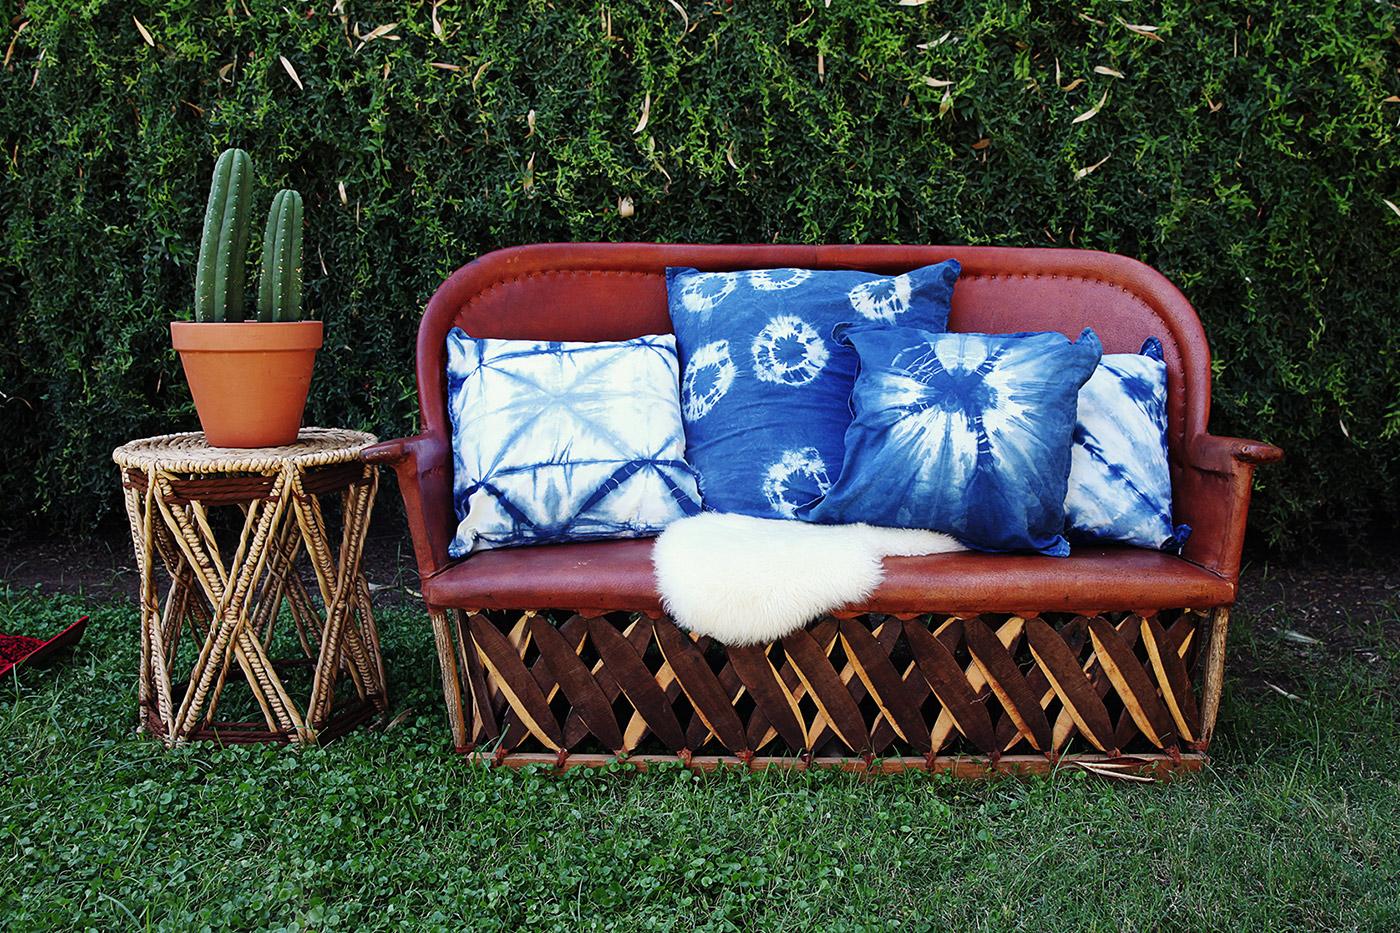
10. Conclusion: all right. So, as you can see, I am surrounded by beautiful blue pillow cases. I let them dry and hung them up and made a few more. Um, maybe at this point, you have created some pieces of your own, and I would absolutely love to see them. So if you want to take a picture of whatever you make and upload it to the class projects, that would be amazing. Also, if you want to take a picture of before what your little bundle look like before you put into the dye, I think that would be really fun for people to see. So upload those into the class projects and I will see you there also. If you want to learn more about me and my business, you can check it out at desert loom dot com. And I'm also on instagram that at Desert bloom. So thank you again so much, everyone. I can't wait to see what you guys make
 Tiffany Egbert, Designer, Photographer and Artist