Transcripts
1. Introduction and Overview : Welcome to this class on Cosmos
flower with oil-based to. In this class you will
learn to draw 14 easy, beautiful and vibrant
cosmos flowers. We will start with five
easy cosmos flowers. Then we will move on to Cosmos lovers with the background. Followed by three
realistic cosmos flowers. And finally, laptop as
well, Cosmos flower. We will start the class with basic concept of
drawing Cosmos flower. Then we will move on to
basic oil pistol techniques. Then we will move
on to two ways in which you can collect
the cosmos flowers. After that, we'll be painting nine vibrant and
colorful Cosmos flower. Then we will move on to sit
easy Cosmos flower with lighter shades of color
along with small buds. And after all this
preparation and example, we will move on to
the 14 projects, starting with five
simple competition of the Cosmos flower. Then we will move on to the Cosmos flower with
the background. After that, we will move on to the realistic Cosmos flower. And finally, lots of other
small cosmos lovers. Thanks for enrolling
in this class. My name is resolved. One thing, I am an artist from India and I'll be your
instructor for this class. See you in the next video.
2. Class Project : As for the class project, I would like you to draw any
of the 14 Cosmos flower. You can draw any of the
pipe, easy cosmos flowers. You can draw the Cosmos
flower with the background. You can draw any of that
realistic Cosmos flower. You can draw any of the
bunch of Cosmos flower. And don't forget to save your painting in the
project section.
3. List of Supplies : For this class, you
will need a pencil, an eraser, masking tape
for securing the people. Blending stump. Your lips. And tissue paper for blending. Ilp still paper, or any paper of more than 140 DSMB
will do the work. I'll be using a five and a four-sided people
of various colors. And obviously, I'll be stills. See you in the next video.
4. Sketches : In this video, I
will show you how I approach drawing
the Cosmos flower. I'll be sketching out the
guidelines for the flower, and I'll be showing
you different ways in which I draw
the Cosmos flower. For this first flower, I'm
starting with a circle for the center of the flower and drawing in the
petals of the flower. This is a very simple way in which you can draw
the Cosmos flower, starting with a circle for
the center of the flower, and drawing in the
petals of the flower, you can add six to
ten flower petals or as many as you prefer. It tastes to the
petals of the flower. Adding some dots for the
center of the flower. Now moving on to the
second Cosmos flower. For this, I'm starting
with a bigger circle, will act as the outline for the placement of
the flower petals. Drawing a smaller circle for
the center of the flower. And now growing in the
petals of the flower. That'd be good circle
that we drew earlier, act as the boundary for
the petals of the flower. To make them more easier, you can divide the circle into
four equal parts that will make the placement
of the flower petal more easier and uniform. Using this to circle, we can draw the flowers facing
in different orientations. I'll be showing you
four different examples of the flowers for this, instead of drawing the circle, arbitrary elongated circle or
ellipse, the first flower, It's facing towards the left, dividing the elongated circle
into four equal parts. This will make the placement of flower petals more
easier and uniform. The second flower is the
top view of the flower. The third one is facing
towards the right. The fourth and the final one will be drawing the top view, the planted, drying the center for this flower and
adding in the petals. While keeping the perspective
of the flower in mind, wearing the sequence idea of the flower petals and filling in the power button
inside this boundary. Moving on to the second flower, repeating the same, drawing, a smaller circle for the
center of the flower. And following the
rules of perspective, wearing the sequence
id of the flower petal and filling in the power
button inside the circle. Moving on to the third flower. Repeating the same procedure
during this entered for the flower and following
the rules of perspective, wearing the seep inside
of the flower petals and placing the flower petals
inside that bigger circle. With this, we're done
with our third flower, will be going to the
fourth and the final one, following the same procedure, drawing the center
for the flower and filling in the flowers petal
inside the bigger circle. So I've put in the final
Cosmos flower is ready now going in with a pain to
draw with the pencil sketch, starting with this
simple cosmos level. Adding details to
the flower petals. Moving on to the second flower, starting with
drawing the biggest circle with the dotted lines. Dividing the circle
into four equal parts. Bringing the center
of the flower. Now, placing the flower petals
inside, be good circle. I didn't details to
the flower petals. Moving on to the tag flower
during the outer circle. Dividing now to settle
into four equal parts. During the center of the flower. And going over the pencil
sketch up the flowers petal, wearing the sequence id
of the flowers petal. Adding details to
the flower petal. We learn through the food flour, starting with outer circle. Now to separate
into equal parts. During the center of the flower. Now filling in the
flower petals, adding details to
the flower petals. Were you going to do
the fifth flower, starting with the outer circle. Dividing the outer circle
into four equal parts. Bring out the center
of the planet. Now filling in the flower
petals inside the outer circle. Moving on to the fifth and
the final Cosmos flower, starting with outer circle. The inner circle, dividing the outer circle. And
appealing in that. Now let's spectral
inside the outer circle. When to Spoonflower, only
the side petals are visible. Now connecting this
tends to that lever. Adding some leaves to the stems. In their main painting, we'll
be adding more tiny leaves. Here is an example of the Bulge that we'll be doing in
their main paintings. With this, we are done
with this getting of the cosmos lover. See you in the next video.
5. Oil Pastel Techniques : The ILP still have
very price sensitive. With the ILP is still, you can apply two
types of prison. The first one is
the light prison, the second one is
the median prison. And the third one is
the highest amount of pressure that is used
to apply the ILP style determines how
much producer will be required to blend the colors, as well as different
overlaying techniques are used in case of
different races. Moving on to some
of the techniques, ILP, still a very
versatile medium. With the ILP style,
you can carry out many of the techniques that are
used in different mediums. Like you can do
hatching, crosshatching, as well as stepping
technique for the hatching. Simply draw the lines. For the cross hatching,
crisscross the lines. And that's what the
stippling technique create. Two small dots with the
oil-based still will be using hatching as well as the
stippling technique by drawing the cosmos flowers. We'll be using heading for
the petals of the flower. And we'll be using
stippling technique for the center of the flower. Leaning forward with
the blurring effect, put ILP still with
the ILP style, you can achieve very good
blurring effect, so forth. The blurring effect, I'm starting with drawing
the three circles. And I'll be showing
different tools that you can use to achieve
that blurring effect. For this, I'll be using mapping it and blending stump
to bled the outlines of the circle with the
first one going in with my finger and apply increase it to blurred outlines
of the circle. Going into the Q-tip
for the second one. And for the type when I'm going in with the
blending stump, letting the outlines of the
circle, the blending effect. Apart from these, you can
use a piece of paper glued to the same lighting effect,
drawing another circle. This time, I am going into that tissue paper but
keep the blurring effect. As it is clear and evident that this blurring effect
can be achieved by your finger or tissue paper. Now let's talk about
blending the colors. Blending of colors
depends upon two things. The first one is that
tools that we'll be using to blend the color. And the second one is the
initial pressure that we use to apply the color as well. The tools you can
use, Q-tip, blending, stump, piece of paper or
cloth, or your finger. Let's talk about depressor. I'll be drawing three circles during the first circle
with the light pieces. The second one with
a medium presser, and the third one with the
heavy pressure, so forth. The first one, I have to apply heavy preset to
blend the colors. The second one, I have
to apply a medium pizza. For the third one, there is no need to apply a preset
to blend the colors. Now let's talk about
the tools for this. I am drawing rectangles
with medium pressure, and I'll be using different
tools to blend the colors. The first one, I'm going in with my finger to
blend the color. For the second one, I am
going in with a Q-Tip. For the third one, I am going
in with a tissue paper. For the fourth one,
I am going in with the blending stump depending upon the situation
and the requirement, different tools are used. Blending stumps had
useful preseason, tissue paper or thing
that's obvious for larger areas and for most of
the time, Q-tips are used. Now let's talk about
blending two or more colors. For this, I'll be
using two colors and two ways to blend those
colors with the first one, I've already saturated yellow. Now going in with the blue and adding it just below the yellow. And put the second one,
I'm starting with glue, leaving some space and now
going in with the yellow. Filling white in
the empty space. Now going in with a Q-tip
to blend the color, I'm moving from blue to yellow. And as you can see, the police where blue is blended
with a yellow, a little bit of
green is farming. In case of blending, two colors, get no white in between. You have to keep in mind the
direction in which you add blending and use it about
reversing the order of lending. I have applied medium, press it to blend the colors with these weird and put
the plus two colors. Moving on to the second one.
The one with the white. And to blend two colors
with white in the middle, you don't need to pay much attention to the order
of blending the colors. Because the presence of
white in the middle act as intermediary between
the two colors. And that makes the
blending process much easier and smoother. Containing forward, let's
talk about creating gradient with the colors
for the gradient creation, I'll be showing
you two examples. Starting with yellow for the creation, the
first gradient. So as you can see, some
of the blue pigment where attached to my yellow cleaner. To avoid this, you have to clean your ILP still after every use. But after using it with
other color cleaning, my ILP is to live
the tissue paper. But this plus gradient, I'll be using yellow, light
orange, orange, and red. Now going in with light orange, adding water and on top of it. And find me going
in with the red. With these were done for laying the colors
for the gradient. Now let's blend the colors. In case of creating region, the order of blending
does not matter. You can start from top to
bottom or from bottom to top. And you can rebuilt order
of bleeding in between. With these, our first gradient is complete. Continuing forward. This time we'll be creating
gradient with high pillar, starting with green, I think turquoise blue on
top of the tree. Now adding, producing blue on
top of that turquoise blue. And now going in with a darker shade of blue on
top of that producing view. And by me adding
black on top of it. Now let's blend the
colors going in with a Q-tip to blend the colors
by applying heavy prison. The audit of blending
colors does not matter. In the case of
gradient creation, you can start from top to
bottom or from bottom to top. Applying heavy blizzard
to blend these colors. With these, we're done for
the gradient creation. Leaning forward with the
overlaying techniques, overlaying simply
misleading when color on top of the other some of
the things that you are, but keep in mind while
applying overlaying technique. But it's collateral
on top of its colors. For example, I am
starting with deep green, adding white on top of it. You can clearly see
the white is visible. But when I'm trying to
overlay yellow on top of it, the yellow is not eagerly
visible to you have to experiment with
the colors to see which colors are visible
in top of the other. Here the white is clearly
visible on top of the screen. You can also experiment
with different presets. Here I'm applying medium
pressure with a green. Novartis is still
clearly visible. Now going in with the yellow. As you can see. In this case also the yellow is
not clearly visible. Now, experimenting
with lighter colors, going in with the yellow is the primary layer overlaying
on top of the yellow. Now it is clearly visible
on top of the yellow. One thing to keep in mind, the darker colors are always visible on top of
the lighter color. One more example of darker color on top
of the lighter color, starting with yellow overlaying
Greenland top of it. The green is clearly visible
on top of the yellow. With this, we're done
for the techniques, the ILP still see you
in the next video.
6. Cosmos Flowers Coloring Demonstration : In this video, I will
demonstrate how you can sketch out the outlines
for the Cosmos flower, as well as to ways in
which you can paint. I'm starting with the pencil to draw out the guidelines for the flower growing and bigger
circle and a smaller one. Using the circles as the guidelines for drawing
in the petals of the flower. You can add six to ten
petals, whatever you prefer. For painting this
first flower will be applying heavy preset
to blend the colors. As for the colors, we'll be
using salmon, pink, and pink. That's what the leaves and
the stems will be using, olive green and lime green. The purpose of this
demonstration is to show you how two different techniques
are useful blending purpose. For the first flower,
I'll be using overlaying technique
and applying heavy pressure to
blend the colors. For the second flower, I'll
be using medium prison, but I'll be applying blending
tools to blend the colors. Apart from this, for
the first flower, I'll be using guidelines
to draw the flower. And for the second flower, I'll be directly drawing the
flower on the pistol paper. With this, we're done with the sketching section
for this painting. Now, let's paint starting with media law for the
center of the flower. Now going in with the pink, creating smaller strokes near
the center of the flower. Wireless near the outer
edges of the flowers petal. On top of this pink, I'll be going in with
the Salomon pink and adding it on top
of it by applying heavy pressure for
this first flower will be avoiding use of
anim blending tools. With these, we're done with
the pink now going into the settlement pink
and filling in the rest of the flower petal
with the settlement ping, overlaying this element
being on top of the pink, applying heavy pressure to blend the settlement
pink with a ping. With this, we are done
with the salmon pink, moving back to the center of the flower and adding some orange for the
center of the flower. And now I'm going in
with the burnt sienna and creating smaller strokes. Now adding this pink
on top of this element being using overlaying
techniques. And finally Lean
going in with magenta and adding it near the
center of the flower. To make the blending mode
smooth for the petals, you can add more
settlement pink on top of this magenta and
blend the colors. Adding some magenta near the outer edges of
the flowers better. With these, we're done
with that first flower. That's what the
leaves and the stems, I'll be using the red
green and olive green. Now going into the dead green, sketching out to stints with this third green and cleaves, adding a flower petal in
the settlement, pink. Now I'm going in with the
pink to add more details. Connecting this a
small flower bud to the stem and adding olive green
on top of the jade green. Adding tiny leaves
with the olive green. For the second flower, I'm directly
painting the flower. I'll be using the same
combination of the color, but instead of applying
heavy pressure, I'll be using medium
pressure and I'll be using a Q-tip or blending
stump to blend the colors, drawing out the guidelines of the flowers better directory and the pastel paper using
this light pink. For the second flower, we'll be applying the colors
with medium pressure. And to blend the colors, we'll be using blending tools. You can use tissue paper, your finger, blending
stump, Q-tip. I'll be using the
same colors that I used earlier for
the first flower. But instead of applying heavy blizzard to
blend the colors, I'll be using blending
tools to blend the colors. Now I'm going in with the
magenta near the center of the flower and adding solvent pink for the
rest of the flowers. Metal. Filling this element
being for the rest of the flower petals by
applying medium presser, whittling the settlement
being on top of the magenta. With deeds, we are
done with the pinks going in with a Q-tip
to blend the colors. Get really blending in the
colors with the Q-tip. If you went mostly season, you can use blending stem. Blending all the
petals of the flower with a Q-tip by applying
heavy press it. I think a little bit of orange for the center of the flower. And now going in with
the burnt sienna, creating small
stocks with a bunch of Ghana using the
stippling technique. That's what the
leaves and the stems, I'll be using dark
green and moss green. Sketching now to stems and
leaves with this green. Adding more tiny leaves, adding another small flower with Salomon pink and the bank. Now going over there dark
green with my screen. I was not satisfied with the magenta near the center
of the flowers metal. So going back again with the magenta and adding it near
the center of the flower. Now, going in a bit the
Q-tip to blend them magenta to the rest
of the flower petal. To make the colors more
smoother to blend, you can add bank on top of this magenta and then
blend the rest of the colors with these weird dendrite to
flower demonstration. You can clearly
see the difference between the two techniques. The first, clever use heavy
preset to blend the color. And for the second part will be used blending tools
to blend the colors.
7. Cosmos Flowers Different Colours Examples : In this video, I
will show some of the color combination
for your cosmos flowers. I'll be showing you nine
examples of the cosmos flowers. Put all this nine example. I'll be applying heavy
pressure to blend the colors. I'll be using blending
techniques and sometimes I'll be using overlaying
techniques to blend the colors. So let's just start
starting with pencil to draw the
outline for the flower. I'll be using YouTube
to blend the colors. Instead of Q tip, you can use your fingers or you can
go with a blending stump. Now let's paint
our first flower. For this first
flower, I'm starting with yellow for the
center of the flower. With the same yellow,
I'm skipping one side of the petals for the
centers of the flowers, I'll be using a combination
of yellow, yellow, orange, burnt sienna,
burnt umber, or black. So mainly, I'll be using a combination of
three to four colors. Generally, I'll be using yellow, orange, burnt umber, and black. But depending upon the situations
and the color harmonic, I'll be using different
colors to two. So for this first flower, we are creating smallest strokes with burnt sienna near the
center of the flower. Now going into with
them, correct? For the petals of the flower. Outlining the rest of the
flower petals with a red. We are done with
the red. Now going in with the olive brownie and
the center of the flower, creating a small strokes near
the center of the flower. Adding little bit
of yellow on top of the red food highlight going in with white, creating ladders
took as compared to the burnt sienna
that we use earlier. But these were done for
the petals of the flower. Moving back to the
center of the flower, adding Carmine, eating
smaller strokes with the Carmine put the
center of the flower. And now to finalize
the center of the flower, adding burnt umber. With this, we're done with our
first grade Cosmos flower. Moving on to the second
Cosmos flower for the center, I'm starting with yellow. Now going in with the
orange, put this flower. I'll be using yellow
and orange villain. Sketching out the outline for
the flower with the yellow. Now filling in the
yellow for the petals. If it's hard for you to directly drawn the paper and
you can start with pencil and drawing out the rough sketch and then
filling in the colors. With this, we are done
with drawing the petals of the flower with yellow
continuing forward with orange. Adding aren't near the
center of the flower, including small strokes with the orange near the
center of the flower. This time I'm using a
lighter shade of orange. And with these, we are
done with the orange moving back to the center of the flower and in
some burnt sienna for the center of the flower. And with this we're done for
the center of the flower. And to finalize our painting, I'm going in with the bite, creating bigger
distorts with the white on top of
the flower petals. And with this, we're done with
our second Cosmos flower. Moving on to the third flower, starting with
drawing the center. For this type of flower, I'll be drawing a pink Cosmos flower. For this tag flower,
I'll be using pink color and odd
in this yellow. Starting with pink to draw the outline for
the flowers petal. Adding more details
with the pink. And now doing it with iron, this yellow and
overlaying it on top of the bank with leaves. We are done with overlaying on a new skill on top
of that thing. Now let's blend the colors. I'm going in with a Q-tip
to blend the colors. Blending the ironies here
a little bit, the pink. Applying medium and
high protect to blend out and use
yellow with the pink. Blending the outlines
of the petals for the rest of the
ironies here along with these, we're done with the blending section
of this painting. Continuing forward
with the flower. I'm going in with
the burnt umber for the center of the flower, adding it on top of the yellow. And with this, we're done
with our third Cosmos flower. Moving on to the fourth flower, starting with yellow
to draw the center of the flower and outlining the petals of the flower
with a thin yellow. Adding some details
to the center of the flower petals with
the scene yellow. With these we have defined
outlays of the flower petals. Yellow. Now continuing
forward with the pale yellow filling in the rest of the flower
petals with the pale yellow. Now let's blend the color. Applying heavy pressure
to blend the colors. With these, we're done
with the blending section of this painting. Moving back to the center of the flower and in burnt umber for the
center of the flower. And with these, we are done
with our quote, cosmos lever. Moving on with the fifth lever. For this, I'll be
using yellow, green, and white, starting with the media literate or the
center for the flower. Now going in with a gray to draw out outlines for
the flower petals. Adding some details
with the crania, the center of the flower petals. And now I'm going in with white to fill the
petals of the level. And with these, we are
done with the whiteboard, the petals of the flower.
Continuing forward. Let's blend the colors. Blending the right with the gray going in with the burnt sienna for the center of the flower. And with December 5th, cosmos
love what is complete. Now moving on towards sits, squat most lava, starting with yellow to dark at
the center of the flower. Now going in with orange to draw the petals of the flower, as well as adding
details, the petals. This flower I'll be
using yellow and orange. And that's what
the scientist I'll be using, burnt sienna. Now filling in the
same yellow that we used earlier to the
center of the flower. With this, we are
done with the yellow. Now let's blend the colors with these two are done
with the blending. Moving back to the
center of the flower, adding some burnt sienna. With these over six
cosmos is complete. Moving on to our seventh lever. For this, I'll be using
orange to see in blue, sky, blue and black outlines of the flowers metal
with the proofs in blue, adding more details
to the petals of the flower with
the Prussian blue. Now going into the sky blue and filling in the rest
of the petals. Blending the sky blue with the
blue symbol using a Q-tip. Going into the black to add more detail to the
center of the flower. We learned that
the eight flower, well this I'll be using yellow, sky blue, and burnt sienna. Bring out the guidelines for the petals of the flower
with the Sky View. Filling in some of the sky blue near the center of the flower. Now going in with the pink and overlaying it on top
of that sky blue. Lending the sky
blue with the pink. Going back to the center of the flower with
the burnt sienna. With these are
eight cosmos lover. It's been just moving on to the ninth and
define new Cosmos flower. Starting with yellow to dark, the center of the flower. This ninth Cosmos flower,
I'll be using yellow, blue, and light purple, starting with rate to draw the outline for
the flower petal. As you can see, I'm only outlining one side
of the flower petal. I'm applying medium pressure
to throw out the outlines, but one side of
the scoured metal. And for the other side, I'll
be using the same rate, but I'll be applying
lower pressure. And with these two
are identical. The outlines of
the flower, metal leaning forward with
the produce in blue. And in this leucine
blue near the center of the clever bleeding
smallest Stokely, the center of the flower
with this bruising blue. I decided to add
some more details to the petals of the flower. I'm going in again with
a blue and creating some rigorous tools for the
center of the flower petal. With this, we are done
with the blue cyan blue going into the light, but, but filling in this light button for the
rest of the flower petals, overlaying some of the
light purple on top of the producing glue that
we've painted earlier. Let's blend the colors.
Blending the protein blue, light purple, and the red. Blending this return
to the center of the flower and I read
Tim burnt umber. And they use some
greens to add stems to the flower with the 79
cosmos flowers are complete. See you in the next video.
8. Easy Cosmos Flowers (light shades): In the next two videos are also more examples for the color
combination for the flower. Apart from this, I will so different orientation of
the flowers that you can draw so as to make things easy and faster
allergies kicking out with the pin and then
filling in the color. So I am directly starting with a pen to draw this case for the flower albatross
N6 labyrinth total to flower at a time, they will be facing in
different directions and indifferent orientation. This is also an easier way
to draw the Cosmos flower. For this lab, I'll be using blending modes to
blend the color. So I'll be applying medium
pressure to fill the color. I'll be using two
colors for upper level. For the first flower,
I'll be using oranges, yellow, and pale yellow
for the second flower. I'll be using Selmer and
white for the third flower, I'll be using pink
and lemon yellow. And for the leaves
and the stems, I'll be using two greens and into Greensboro
do their work. As for the Center
for the flower, I'll be using yellow and
black for this flower. I'll be using very less colors. I'll be using two
colors for the flour and two colors for the
leaves and the stems. This is just to show
you that you can get very beautiful and
bright Cosmos flower, even using two to three colors. With this, we're done
for the first sketch. Moving on to the second, the second power, this kid, one of the flower
is facing away from us. Moving on to the
Pavlov and Skinner. These were done with the sketching section
for this painting. Continuing forward,
let's paint the flower, starting with yellow for
the center of the flower, filling the center
of all pipe levers. Let's paint our class clever. Adding. I didn't use
yellow near the center of the flower as well as the in the middle of the flower petals. Moving on to the second power
with the oranges, yellow. With these, we're done
with the oranges, yellow. Continuing forward
with the pill yellow. I think this pale
yellow on top of the other nice yellow filling all the flower petal
by the orange, yellow. Moving on to the second planet
with this orange, yellow. With this, we are done
with the oranges, yellow going in with the black, put the center of the flower. Now, let's blend the colors. Blending this ordinance,
yellow with a pill yellow, blind heavy press it to
blend these two colors. Moving on to the second flower. With DC, we're done
for the flowers. Moving on to the
stems and the leaves, use any two green colors. So here I am using dark green and on top of this I'll
be using lime green. With these, we're done
for our first two levers. Moving on to the second flower. For the second flower, I'll
be using Zelman and white, starting with settlement, adding the settlement near the
center of the flower, as well as the in the middle
of the flower petals. Rating bigger strokes
with this element. Moving on to the second flower, the flower, which is
facing away from us. Adding the Selmer near
the center of the flower, as well as creating strokes with this in the middle of
the flowers petal. Continuing forward
with the white, adding this white on
top of this element. Now let's blend the colors. These three are done
with these two flowers continuing forward with
the stems and the leaves. Using to green for the
leaves and the stems. With this, we are
done with these two flowers and the stems. Moving on with the third
in the final flower. For this, I'll be using pink and lemon yellow,
starting with pink, adding it near the
center of the flower, as well as creating bigger strokes with this
pink for the flowers petal. Continuing forward
with a lemon yellow. Adding this lemon yellow
on top of the pink. Moving on to the second
problem with these, we're done with
the lemon yellow. Now let's blend the colors. Blending this pink with a
lemon yellow with this Q tip, a blank, heavy blizzard
to blend the colors. Moving on to the stems and
the leaves with the green. Using to green for the
leaves and the stems. Playing one on top of the other. Now going into the blackboard, the center of the flowers, the bees, we are
done with the math. It's clever. See you
in the next video.
9. More Examples of Colour Combinations : Like the earlier video. In this video,
I'll also show you some different color combination for the customers lovers. This time, instead of
starting with pencil, I'm directly starting
with the pen. Apart from the flowers, I'll be drawing in
somebody for the first escaping LB only
drawing to flower. For the second one, I'll be drawing when flower
with one bud. And for the Cytoscape arbitrary, one flower with two. But this time I'll be using
pink and light green, turquoise blue and white, and light purple with white. As for the leaves and the stems, this time I'll be using
only single color. For the first flower. I'll be using dark green
for the second flower, I'll be using olive green
and for third flower, I'll be using lime
green as well as Satan. I'll be using yellow with d squared. And for this, getting
the first two flowers. Moving on to the second power. I think the but-for the flower. With these, we identified
one flower in the bud. Moving on to the title sketch. Growing up the
deadline for the bud. And B, these were done with
one flower with two birds. And now we are done
for this kitchen, late Spain, starting with yellow for the center
of the flower. Now going in with the pink. I forgot to add details
to the flower petal. We're back again with a pen to add details to the
flower petals. For this first flower, I'll
be using pink with gray. With this, we're
going to read in details for the past two flower, moving on to the second flower. The second flower, I'll be using turquoise blue with white. And let's put the
leaves and the stems. I'll be using olive brown. Instead of this olive brown. You can use olive green also at any green,
whatever you prefer. Now moving on to the third power a bit, these were done
for adding details to the petals of the
flower moving metadata, let's wing back again with a pink for the petals
of the flower. Now going in with a light green, like the earlier demonstration. In this demonstration,
I will also use the blending tools
to blend the colors. I'll be using Q-tips and applying heavy pressure
to blend the colors. When these were done
with the light green, I'm going in with a Q-tip
to blend the colors. A blank heavy pressure to
blend the pink with the green. With this, we are done
for the blending in with the burnt umber or any dark seat to add ADTs to
the center of the flower. Now, going in with a dark green for the
leaves and the stems. And we're done for
our first two flower. Moving on to the second flower, starting with yellow for
the center of the flower. Now going in with
a turquoise blue, creating bigger strokes
with a turquoise blue near the center of the
flower and on top of the flower petals doing in with the white. And nobody links some of the white on top of the
turquoise blue. Let's blend the turquoise
blue with the white. Applying heavy
printed the blender turquoise blue with the white. With these were
done for the flower moving into the Flaubert's, but starting with turquoise blue and adding weight on top of it. Going in with the olive brown for the leaves and the stems. Instead of this olive brown, you could use any green. And with this we're done
for our second flower. Moving on to the third
and the final one, starting with yellow for
the center of the flower, with a light purple for
the petals of the flower. And adding this light
purple for the buds. Now going in with the white overlaying some of the white on top of
the light purple. Adding this white with
a bunch of the flower. Now let's clean white
with the light bulb. Blending the color for the buds. These were done
with the blending, leaning forward
with a lime green adding stems and the leaves. With this, we are
done for our flower. See you in the next video.
10. Blue and White Cosmos Flowers : For our first drawing will be painting two blue and
white Cosmos flower. I'm starting with the sketching out the outline for the flower. This is just a reference page. The purpose of this
case is to show you how you can draw
your own competition. Domain painting that we'll be doing will be different
from this one. Going in with a paint to add
more details to the flowers. For this painting will be
trying to flowers and birds. As for the colors
for this painting, I'll be using sky blue
and white for the petals, deep yellow, orange and
burnt umber for the center. Sky blue and white for the buds, and deep green and olive green for the leaves
and the stems. Now we are done
with the sketching. Let's paint. I'm starting with deep yellow for the
center of the flower. Now going into the sky blue, I'm using medium pressure to draw out the outlines
for the petals. I am just drawing out the one
side of the outline using medium presser and for the other side of the
outline for the petals, I'll be using very
light pressure here, the center of the flower. I'm playing medium presser and sketching out some strokes. Now for the other
side of the petal, I'm applying light pressure. With this, we are done for the outline for our
first Cosmos flower. Moving on to the second flower, I'll be following
the same steps, starting with deep
yellow for the center. Now sketching out
the guidelines, put the flowers petal using
medium and light bristle. Now, we are done with the flower moving on to the buds
before the birds. I'm just going small
strokes with a blue. Later on I'll be adding
bite on top of it. Now let's paint the flower. I'm going in with divide and applying medium pressure
to fill the petals. Doing the theme for the buds. Now let's blend the color. I'm using Q-tip to blend the sky blue with the white
applying hairy. But I said to blend
these two colors, instead of using Q-tip
to blend the color, you can use blending
stump or tissue paper. We are done with
the first lever, moving on to the second flower. Now I'm going in with the orange for the center of the flower. And now I'm going in with burnt umber for
the center flower. With these, we are
done for the flowers. Now let's paint the greens. I'm starting with deep green. Connecting saved to the
birds and the flower on the stems with a deep green. You can add or subtract
more leaf if you prefer, and adding more
details to the leaves. And with this, we're done
with that deep green. Moving on with the olive green, adding olive green on
top of the Deep Dream, not completely covering up the deep green that we
painted earlier. The addition of this olive green on top of
that deep drinks, drinks more variation
to the painting, as well as makes the
green mode vibrant. With this, our first
painting is complete. See you in the next video.
11. Pale Yellow Cosmos Flowers : For the second drying,
we will be painting to Cosmos flower facing
away from us. I'm starting with the
pencil to draw the rep, competition for the painting, drawing an oval for the flower. This is just a wrap, this case. The purpose of this
reference case to show you how you can design
your own competition. Now, going into the paint
to add more details to the platform since the
flowers are facing. Abby, promise, I'm starting with the point where the
flour mix the stems growing in the petals. Keeping the perspective
of flour in mind and batting the seep
inside of the petals. With this, go ahead and
put our first flower, moving on to the second flower. In this, adopt this case the second flower and
in the left side, but in the main painting we'll be drawing the second flower in the right side with these two
are done for this getting. Now let's paint. I'm starting with Romberg
withdrawing the point where the stem connects
to the flower. Now going in and drawing the
outlines for the petals. To add more details
to the flowers, I am creating strokes
with the red. And with this we're done
for the first level. Moving on to the second flower, repeating the same procedure,
starting with Romberg. No going in with that
rate to draw the petals. Completing the stems
with the raw umber. I forgot to add
detail to the petals going into Madrid to add
details to the second level. Now let's draw leaves
with the Rumble. With this, we are done with that almost moving into
the pale yellow, filling in the petals of
the Cosmos flower with the pale yellow applying happy place them in blending the red with the pale yellow. Pop up this be yellow, I'll be adding white later on. Filling in the pill
yellow near the stem. With this, we are done
for the first flower, moving on to the second flower, filling in the yellow by
applying heavy place it. As you can see by the
application of heavy prison, the ages of the raid has
merged with the yellow. And with this, we're done
with the pale yellow. Moving on with the olive green, adding details to the leaves and adding olive green on top of the addition of this olive
green on top of that armor, clipped variation and mix
the green look more vibrant. Now to finish our painting, I'm going in with the white and creating strokes near the
center of the flower. Now going back again with that, might be there but
required with detailer. Second painting is finished. See you in the next video.
12. Orange Cosmos Flowers : For our third painting, we'll be drawing an armed
Cosmos flower with two birds. I'm starting with pencil to draw the sketches
for the flower. Drawing an oval for the flower. Growing another
well for the bug. This is just a rough escaped. When we'll be
painting the flower, we will make
adjustments as we go. Going in with a paint
to show you that f is good for the
flower and the bug. If you are comfortable with directly drawing on the paper, then there is no need
to practice this. For the flowers, we'll be using. Yellow, yellow, red,
and white as well. The leaves and the
stems of the flowers, we'll be using olive green
and turquoise green. So let's start with the flower. I'm going in with the muddy
yellow to draw the center of the flower light around to
add more details on it. I'll be going with burnt umber. Moving on with the orange, growing the outlines
for the petals. For this flower, I'll be
drawing in tin petals, keeping the perspective
of the clever in mind and burying the
sequence id of the petals. Well, we've looked at the buds. Greetings stroke
near the center of the flower to create
more details. Now going into the
yellow and now adding it on top of the orange
by applying heavy. Pleased today we're
blending the ages, have the item with the yellow carefully filling in the
yellow for the petals. So with this we are done for the flower moving onto
the buds of the clavicle, doing the theme, applying high repressor and blending
the yellow and the orange. So we're done with
the yellow bone now, going in with the burnt umber for the center of the flower. Now let's add more details
to the flower going in with the rate at creating
small strokes near the center of the flower. Going back with the
yellow and blending the red with the rest
of the flower petals. And finally, going in with the white and creating
larger strokes. Adding my district through the parts of the flower as well. Now let's do the greens. For the greens, I'll be using olive green and
turquoise green here. I have already started with the olive green stamps to the flowers and the birds. It's getting old
outlines for the leaves. So we are done with
the olive green. Now I'm going in with
turquoise green, adding more details
to the leaves. And adding that color is green
on top of the olive green. I descend up this
turquoise green on top of the olive green makes
the green more vibrant. And these are iron Cosmos flower with two births is complete. See you in the next video.
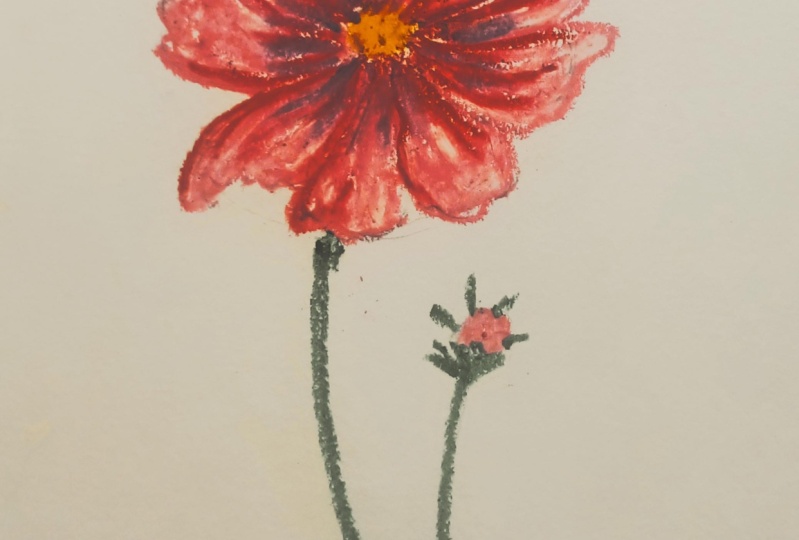
13. Three Red Cosmos Flowers : This fourth drying,
we'll be painting three Lake cosmos flowers. I'm starting with the pencil to draw the outlines
for the flower. There will be three
flowers in this painting. Apart from the two flowers, they're a little
bit three words. I am also sketching out the
guidelines for the petals. For the flowers,
I'll be using lemon, yellow, red, burnt
umber, and white. Now let's paint.
I'm starting with the yellow filling in the center of the flower
as well as the buds. Now going in with a
lemon yellow drawing, the outlines have the pencils that we established earlier. Moving on to the second flower and finding, moving on to
the Todd Glass MAS level. So out of the three bud,
this will be the biggest. I think lemon yellow near
the center of the flower. I'm applying medium prison. No, going into that red, the blank medium pressure
and filling in the petals. So we are done with the
rate for the first-level, moving on to the second
and the third one. Well, we went to the
butts of the problem. So we are done with
the red for now. Now let's blend the colors. I'm going in with a Q-tip to blend the red
with a lemon yellow. Avoid blending the red with
the center of the flower. Applying heavy press it to blend the lemon yellow with red. Let's blend all the
petals of the flower. On top of this rate, I'll be
going in with burnt umber, white and little bit
of medium yellow. Moving on to the second flower. Instead of Q-tip, you can use blending stump or tissue
paper if you're using P2P, but you have to
be extra classes. And now let's play
now a third level. With this, we are
done for the flowers, moving onto blending the
butts of the flower. So we are done with
the red for now, going into the burnt umber and adding it near the
center of the flower, I'm creating a small stocks
with the burnt umber. I'm using this burnt umber near the center of the flower to create a contrast
between the yellow, the center and the
rate of the petals. I think burnt umber to
the bigger been as well. Now going in again with a Q-tip to blend the
burnt umber with the red. Now moving on to the bug, going in with the media law and adding it on top
of the mountain. But and finally going in with a bite and
creating bigger Stokes. Adding white to the butts of the clever in blending a little
bit of white to the rig. And to finalize the
center of the flower, I'm going in with
the burnt umber and creating small strokes. Now let's paint the
green with the greens. I'll be using deep
brain, a lime green. I am starting with the
parts of the flower. And on top of this deep green, I'll be adding lime green. I think stems and the
flowers and the birds. And now it's a
lift to the stems. And on top of the steepening, I'll be adding lime
green later on. So we are done with
the deep green. Moving land with a lime green. I didn't this lime green on top of the deep ring a decent up this lime green on top of the deep lean meats
it more vibrant. Now to find the lies that
painting going back with a Q-tip to blend the
abs wherever required. And with this, we're done
with our fourth painting. See you in the next video.
14. Six White and Grey Cosmos Flowers : For this painting, we'll be painting six white and
gray Cosmos flower. Here. I'm starting with yellow to draw the
scientists of the flower. I'm using this muddy yellow
as the primary layer for the center of the cosmos
flower connect around. I'll be going in
with the orange. And on top of that orange, I'll be going in
with burnt umber, burnt sienna to add
more details to the center of this
cosmos flowers. And now moving on to drawing
the outlines of the flower, I'm going in with a light gray to draw the outlines
of the flower. As for the numbers
of the petals, I'll be drawing in
eight to ten petals. So we're done with
our first flower. Moving on to the second one. Let's sketch out
our third flower. Moving on to the food flour. Now, moving on to
our third flower and finding, blowing out the outline for the
sixth and the final Cosmos flower with d squared. And for drawing out the
outlines for the Cosmos flower. Moving on to the birth
of the Cosmos flower. Here I have started with
the Greek letter on. I'll be adding in the byte. Know going in with the white, applying happy place it to blend the white middle gray for the
birds of the Cosmos flower. Now let's paint
the Cosmos flower, doing in with the white, applying heavy preset in blending the outlines of
the green with the white, filling in the white for all the petals of
the cosmos lover. Later on to add more details to the petals of
the Cosmos flower, I'll be going in with the
gray on top of this white. Moving on to our
second Cosmos flower, apply heavy preferred and
blend the outlines of the gray with a white about the
center part of the flower. Moving on to the third
class MAS level. Now we're done with our
third Cosmos flower. Moving on to the fourth one, it's been diverted
Cosmos flower. And by ni, going
in with the white or the six and the
final cosmos level. With this, we're done for the flowers and the birds for now. Moving on with the greens here, I'm starting with
the mosque green. On top of this mosque green, I'll be going in
with the lime green. You are welcome to try different combinations
of the green. Now connecting stems,
the birds of the flower. Moving on to adding
leaps to the stems. You can add more leaves to
the stems if you prefer. With this, we are done
with the mosque green. Going in with a lime green and adding it on
top of the screen. Hey, listen up this lime
green on top of the mosque, cream makes it look
more appealing. Adding lime green for the
stems and the leaves. And with these, we are
done with the greens. Now coming back to the
centers of the flower, I'm going in with the orange
and adding it on top of the media law to find the light, the centers of the flower. I'm going in with
the burnt umber. Us not satisfied with the
centers of the flowers. So I am going in again
with the orange. With these, we are done with
the centers of the flower. And now, to finish the painting, I'm going back
again with a gray, creating smaller strokes to Grenier the center
of the flower. The addition of small
strokes near the center of the flower and gives a new
dimension to the flower. Bake it bows, and
look at your picture. And I agree, wherever required near the
center of the flower. Adding more gray to the
birds of the flower. And with these, we are
done for this painting. See you in the next video.
15. Blue and Red Cosmos Flowers : For this painting, I am using a purple color
Bristol paper, starting with
drawing two circles, the settlement being
further background. Now I'm going in with a pencil to draw the outlines
for the flower. I'll be drawing three flowers. Let's talk about the
colors for the background. I'll be using settlement pink, or in this yellow and olive
green for the flowers. I'll be using yellow
and burnt umber for the center, for the petals. I'll be using red, light, Proustian blue, ultramarine
blue, and white. That's what the birds, I'll
be using the same color, ultramarine blue, blue, white, and red for the
leaves and the stems. I'll be using light olive
green and the red green. Now we are done
with the sketching, adding some more salmon
pink near the flower. And now containing forward
for the background, I'm going in with
the olive green, carefully filling in this olive green near the settlement, pink, as well as the flowers. Now I'm going in
with the oranges, yellow and adding it near the outlines of the
settlement being. With these, we are done for the colors, for the background. Now, let's blend the colors. I am going in with a tissue
paper to blend the colors. When I am done with the
background painting in Florida, but let's paint the flowers, starting with yellow for
the center of the flower. Now I'm going in
with the right to draw out the outlines
for the flowers metal, keeping in mind
the perspective of the flower and wearing
the seed site, as well as the orientation
of the flowers petal. Moving on to the second flower. And finally, moving on
to the third flower. With these, we're done for the sketching the outlets
for the flowers petal, continuing forward with
the ultramarine blue. Adding this
ultramarine blue near the outer edges of
the flower's petals. Moving on to the
second flower petal. Now moving on to the
first flower petal. Now I'm going in with a sky blue and adding it
near the center of the flower are
what links some of the sky blue on top of
the ultramarine blue. With these were done
with the sky blue. Now let's paint the
bottom, starting with red, drawing the outlines of the
bud, adding ultramarine blue. And finally, going in
with the sky blue. Now, let's blend the colors. Blending the sky blue with
the ultramarine blue. I'm using Q-tip to
blend the color. Moving on to the second flower
in blending the colors. And finally, moving
on to hide clever. With these, we are
done for blending the sky blue with the
ultramarine blue, going back again with the olive green and adding it wherever required
in the background. Blending the olive
green to the rest of the background
that we just painted. And now to add more
contrast to the flower, I'm going in with
the policy in blue, adding this cruising below
near the center of the flower, adding it on top
of the sky blue. Moving on to the second power. Now moving on to
the third flower. And in this blue
similar to the bird. Now, we'll finalize the
petals of this flower. I'm going to divide and overlaying it on top
of the leucine Leu. With this, we are done for
the petals of the flower. Now let's add the stems and the leaves going in
with a light olive green drying the stems with the flower as well as the buds. I didn't leave to the stems. Now, moving into
the jade green and overlaying it on top of
the light or laboring. Going in with a settlement
pink to rectify this area. Blending the settlement pink to the rest of the background. Now for the center
of the flower, going in with the burnt umber and adding it to the
center of the flower. With this, we are done
for this painting. See you in the next video.
16. Pale Yellow Cosmos Flowers With Background : For this painting, we will be drawing three Cosmos flower. I'm using a gray
oil pastel paper, starting with pencil to draw the sketch for the flowers
as well as the birds. But this painting, there will be three flowers and three birds. With this, we are done for
the sketching section. Moving on with the colors, starting with media law to draw the centers
for the flowers. That's what the background
of this painting. I'll be using white,
light gray, and sky blue. Here. I've already
started with the white to avoid
mixing the colors, outlining the edges of
the birds with the white. This white for the middle
portion of the background. On top of this, I'll be
going in with a light gray. And finally, I'll be going
in with the sky blue. And now going into the light
green and all with links. So up the light gray
on top of the white. And finally, going into the sky blue at the third color
for our background. When we are done for laying the colors
for the background. Now let's blend the colors. I am going in with a tissue
paper to blend the colors. These were done for
the background. Now let's paint the flowers going in with a
pale yellow to draw the outlines for the
flower's petals. Keeping the perspective of
labor in mind and varying the CAP site as well as the orientation of
the flowers petal. Finding the outline
for the birds. With these, we are
done with the PLO going in and the oranges yellow overlaying this oranges yellow on top of
the pale yellow. Moving on to the second flower. I'm moving on to
our final flower. Adding this oranges,
yellow for the buds. Going back again
with the media lobe, what the center of the
flowers as well as the bud. Know, going in with the orange, this orange near the
center of the flower. And finally, to find the length, the petal for this flower, I'm going in with the
white creating strokes with a white near the
center of the flower. Living under the second flower. And moving on to
the third flower, creating strokes with a white. With these, we're
done with the petals moving back to the
center of the flower, going into the burnt umber to add more details to the
center of the flower, using the stippling
technique to create small dot for the
center of the flower. And with these, we are done with the flowers and the petals. Let's draw the greens, starting with the
brain conducting stands to the flowers
as well as the buds. I think a lot of leaves With these were done
with a deep green. Now going in with a Jet Green, adding this jade green
on top of that deep green and creating a dense
value to the leaves. I ended up with lots of jade green before I decided
to add some deep green. Now, going into
the deep green to create some texture for
the stems and the leaves. Blending some of the greens in between the petals
of the flowers. Going back again with the burnt umber for the
center of the flower. With this, we are done
for this painting. See you in the next video.
17. White Cosmos Flowers with Gradient Background : For this eighth drawing
will be painting pipe Cosmos flower
with lot of birds. So I am starting with a white pencil to draw out
the outline for the flower. In this painting, there will
be five big Cosmos flower. And apart from that,
there will be many birds. Moving on to sketching
the second level. Let's talk about the
colors for this painting. For the background, I'll
be using blues, grays, as well as greens, starting
with turquoise blue, followed by light blue. Then going in with a
light gray, light purple, lime green, jet green, yellow green, and
finally grass green. As for the flowers,
I'll be using yellow, white, light gray to add more details to the
petals of the flower. For the leaves as well as
the stems of the flowers. Emerald green. A little bit of prose in blue
and yellow, green. Apart from the scholars,
you are welcome to use whatever greens
or blues you have. Moving on to sketching
the third flower. While I'm sketching out the
guidelines for this flower, I am keeping the perspective
of flour in mind. Sketching out some of the birds. Moving on to sketching
out the guideline for the fifth and the
final Cosmos flower. These were done for this getting sex and
for this painting, moving on to the colors. Now let's paint our background. The background here I'm
starting with turquoise blue. Applying medium potato field is turquoise blue at the top
section of this painting. Now, the light blue, adding it just below
the turquoise blue, and overlaying some
of the light blue on top of the turquoise blue. Good, fully defining the
outlines for the petals so as to avoid mixing
up the colors later on. So continuing forward
with a light gray, adding it just below
the light blue, and I'll be all linked some of the slight degree on
top of the light blue. No continuing forward
with a light purple. Good fulfilling in
the light purple near the petals of the flower. With this, we are done with
the blues and the greens. Now continuing forward
with the greens, I'll be using red, green, yellow green, grass
green, and lime green. Starting with lime green, adding it just below the purple belt, going into that, that green carefully filling that did great in between the petals
of the flower. Moving quite red with yellow green adding it just
below the dead green. If you don't have
the exact color, you can use whatever
colors you have. And you are welcome to
try your own combination of the color for the background. And finally going in with a grasping adding it is
below the yellow green. And with these we are done for laying out the colors
for the background. Now let's blend the colors going into that tissue
paper to blend the color. Instead of this tissue paper, you can use blending stump
Q-tip to blend the color. I'm going into the tissue
paper as ADA is large. Blending the colors together
with the tissue paper. Carefully blending the colors in between the petals
of the flower. Good color blending
in the collision between the petals
of the flower. So as you can see,
we have created a beautiful gradation
of color and starting with the blue and
ending with the greens. And with these, we are done with the background for
this painting. Now let's paint the
flower starting with yellow for the
center of the flower. The petals. I'm going
in with the white. Later on, I'll be adding a little bit of gray
strokes on top of this white to create more contrast to the
petals of the flower. With this, we are done with
our first Cosmos flower moving into our second
white Cosmos flower. Moving on to our
third Cosmos flower. Now let's paint our code
quite Cosmos flower. Moving on to the fifth and the
final white Cosmos flower. Now let's create
birds With the Wind. Wearing the flip side in
the placement of the birds. You can add more
births if you prefer. With this, we are done
with the white for the flowers as
well as the birds. Going in again with
a tissue paper and blending that the banks near the edges of the flowers petal. Now I'm going in with
a light green and adding it on top of
the white petals, creating more contrast
with the white and the grades for the
petals of the flower. I think a little bit of light gray for the birds
of the flower. Now continuing forward
with the greens, adding stems as well as the
leaves with the green here. I've already started
with the emerald green. Apart from this emerald green, I'll be using a little
bit of blues in blue and put the majority of the sets and I'll be
using yellow, green, cleaning a lot of stems. Connecting leaves to the
stems with the emerald green, earning a little
bit of leucine Leu. Now creating a dense
foliage of green with a yellow-green
overlaying this yellow-green on top of
the emerald green that we use earlier for the stems
as well as the leaves. No carefully filling in
the greens in between the petals of the flower.
Wherever required. I think someone cleans
wherever required. I did some more greens
wherever required. When these were done
for this painting. See you in the next video.
18. Realistic White Cosmos Flower: For this line, drawing or painting a realistic
white Cosmos flower. As compared to the
other cosmos flowers that we have painted earlier. This one will be
bigger and tight. So I am starting
with pencil to draw the outline for the flower I'm using a grip is still paper. For this realistic flower, there will be many
layers of the petals. So when these two are
done with the sketching, so now let's paint our first
realistic cosmos Flavel. I'm starting with lemon yellow to draw the center
for the flower. Now I'm going in with a
gray to draw the outlines. I'm applying medium
blizzard and throwing it over the outline
that I drew earlier. As you can see, I'm not completely covering
up the outline. Strokes on that petal near
the center of the flower. With this, we are
done with that green. Now let's paint the white. Blank, medium pressure
to fill the white. Now I'm going in with a
Q-tip to blend the colors, blending the white with a grade. This is just to show you
how we will approach drawing rest of the petals
along with this white, if you prefer, you can use a
little bit of pale yellow. Now let's fill the white
for the rest of the petals. Good for rippling in the
white for the rest of the petals while trying to maintain the shape
of the petals. This will be our primary layer. On top of this, we'll be adding more Greece and white
wherever required. So I am done with
the white for now. Now let's blend the colors. Going in with a
Q-tip and applying heavy pressure to blend
agrees with the bite. Carefully blending in a bite with that leaves
for all the petals. I am blending the color. I am trying to avoid matching
the outlaid for the petals. Good, fully blending in
the white with the greens. This will be our first layer. On top of this, we'll be adding more Greece
and the white. But these, I am done with
the blending for now. Going in with white, again, going in with white to add
overt outlines of the petals, as well as creating more
taxes with the white. With this white, I am
providing a definite shape to the petals and gluten texture with a widening in the
center of the flower, as well as creating stroke in the middle of
the flowers petal. So I am done with
the white for now. Now let's focus on the center, going in with the
yellow and adding it on the left side
of the flower center. And now I'm going in and burnt sienna and creating
small strokes with it. Continuing forward to create strokes with that burnt umber. And finally, going in with Blackboard, the
center of the flower. And with this we're done with
the Center for the flower. Now going in with a gray and adding more details to
the petals of the flower. I'm angry wherever
it is required. And now I think I am
done with the flower. Let's put the stem
of the flower. I'm starting with olive green. Now going into deep green. Going with olive green
on top of the deep ring. Be get both and look back at your picture and add white
or gray wherever required. With these, our
painting is complete.
19. Two White Cosmos Flowers : For this paint drying, we'll be painting too realistic, whilst most flowered with birds, I am using that rate pistol
paper for this painting. You can use whatever color you have or whatever your pupil, starting with the pencil to draw the graph competition
for the painting, drawing the centers
for the flower, as well as indicating
the points for the bug. Now, let's paint going into the media law for the
center of the flower. Now I'm going in with the
white to paint the petals of the flower compared to the
last realistic cosmos. Where did this time
we'll be painting two semi realistic
cosmos flowers, keeping the perspective of
flour in mind and burying the seatbelt site as well as the orientation of
the flower's petals. With the same then
with outlining the sketch for the
first Cosmos flower. Moving on to the
second Cosmos flower, keeping the perspective
of Lover in mind and drawing out the
petals for the flower. With this, I'm done with this kitchen for the second flower, moving on to filling the petals
of the flower with bite. Then with the white
for the second flower, moving on to the first flower and filling in the
white but the petals. With this we are done
for the white for now. Continuing forward
with a light gray, I didn't get near the
center of the flower, as well as the outer
edges of the petals. After this slide, we will
be using dark green. With this, we are done
with the light gray, then tuning forward
with the dark green, adding this dark gray near
the center of the flower, as well as the outer
edges of the petals. Compared to the light
gray we added at the end, we'll be adding this dark
gray in medalists quantity. With these, we're done
with the second clever, moving on to the first
flower and adding this dark, rainy or the sideway regions
of the flower's petals. Going back with the bite and
adding it wherever required. Adding more yellow
for the center. Moving on to drain the
budget for the flower buds. Let's connect the stems to the flower as well as the birds. Going in with a green. Here
I'm using mosque green. Good, fully attaching
the butts to the stems. Now connecting flower
with the stems. And connecting the last
word with the stem. Now let's add leaves. You can add more
leaves if you prefer. Now, to make the greens more
interesting and vibrant, I'm going into the pistol green and adding it on
top of the screen. With this, we are done for the leaves and the
stems for now. Later on, I'll be adding
olive green on top of it. Moving back to the
center of the flowers, going in with the orange. With these, we're done with
the orange for the center, continuing forward
with the burnt umber. And finally going into the blackboard, the
center of the flower. With this, we're done for
the center of the flower. And to provide a clean outline for the petals of the flower. I'm going in with a Q-tip and blending the outlines
of the flower's petals, giving a defined
shape to the buds. And with this, we're
done with the Q-tips. And finally going
into the olive green and adding it on top of the
mosque green and the pistol. Adding more definition to the
birds with the olive green. And with these our teeth
painting has been, is to see you in the next video.
20. Pink Cosmos Flowers : For this, the 11th
drawing will be painting two pink
cosmos flowers. I'm using a blue pistol paper. You can use any other color
or whatever you have. Starting with pencil to draw the rough sketch
for the flowers. Let's talk about the
colors for this painting. For this painting, I'll be using a combination of the pink
colors. For this painting. I'll be using rose pink, iridescent pink, lavender and, and another variation of the pink for the leaves
and the stems, I'll be using dark
green and light green. As for the center,
I'll be using yellow ocher and burnt umber and
a little bit of black. I'll be using blending technique
to blend these colors. So I'm done with the
sketch. Let's paint. I'm starting with media law to draw the center
point of lover. Now continuing forward
with that rose pink drained outlined from the
flowers petals with those pink, keeping the
perspective of lava in mind and wearing the semen site, as well as the orientation
of the flower's petals. Lou, environment
to sketching out the guidelines for the
second flower's petals. Now let's add the colors. Filling in the pink
for the petals I am filling in this rule is being by applying medium pressure. Moving on to the second level. When we are done with
that was being put now, continue forward with
the iridescent pink. I think this iridescent pink near the center of
the flowers metal, as well as creating
larger discourse with it. Now adding a little bit of
burgundy me the flower center. Now let's blend the colors. Upon blending, I was not
satisfied with the result, so I decided to add
some more pink. So here I am using lavender. Going back again
with the Q-tip to blend the color carefully, blending in the rose pink, in a pink, as well
as the lemon death. For more precision of
the flowers petal, you can use blending stump. With these via blended the colored with
the first flowers. Moving on to the
second Cosmos flower. And repeating the same thing
with the second flower adding lavender near the
bottom of the flowers petal. Now, I'm going in again with those pink and then adding it near the center of
the flowers petal, as well as defining the outlines
of the flower's petals. Instead of this rose
pink, you can use white. Adding more iridescent pink near the center of the flower, as well as adding some
more iridescent pink near the outlines of
the flower's petals. No, blending the ages of this iridescent pink
that we painted. Just know, adding some more roasting. With these, we are
done for the flowers. Continuing forward
with the greens, for the stems and the leaves, I'm using light green
and deep green. I'm starting with a dark green, growing to instance
with the dark green. Now I'm going in with
the light green, leaves with the dark green. Later on, I'll be
going in with a light green on top
of this deep green. Now, I'm going in
with a light green. With these, we're done with
the leaves and the stems. Coming back to the
center of the flower. I think some orange. Now writing some burnt umber and finding, adding some blackboard, the
center of the flower. With this, we are done
for this painting. See you in the next video.
21. White Cosmos Flowers (small flowers): So for this tool triangle, the pending alert to
fight Cosmos flower. So I am using a violet pastel
paper starting with white. I didn't gray on top of
the white and red links and part of the white
with the green. Now going in with
acetylene blue, adding it on top of the gray. Now going in with the
ultramarine blue. And now let's blend the colors. I'm using a piece of paper
to blend the colors, using circular motion
to blend the colors. That's the density
of the white was decreased going in
again with the white. Now let's blend the right with these other background
for the painting is riding. Now, moving on to drawing
the centers for the flower. I'm starting with yellow. Let's draw some flowers. Now. I'm going in with white to add petals to the centers, adding five to six
petals to the flowers. Apart from these flowers, I'll be adding a lot of birds. I think small buds here. And then with this, we're done for the flowers, for the sky section. Now going in with
a deep green to add extends to the
flower and the buds. I'm using deep green. You are welcome to
use any other greens. Later on we'll be adding
leaves with a light green. And apart from the greens, that'll be using black also. Now moving forward during
mood centers for the flower, randomly drawing in the
center for the flowers. Now let's draw more flowers, adding more flowers
here and there. So as you can see,
as I move downward, I have increased the
numbers of the flower. I'll put the lower most
section of the painting. I'll be adding more flowers, adding some small
buds here and there. Now continue adding more
centers, but they may be alone. Now, let's paint mode
white Cosmos flower. After completing these flowers, I'll be adding stems. For the stems and the leaves. I'll be using beep green, grass, green, light green, a little
bit of brown and black. Now let's add stems
with a deep green than it instills to the flowers and
the boat with a deep ring. Going into the
grass green to add more stems and the
flowers and the buds, growing some leaves
here and there. But that glass screen. Now I'm going in with
the light green, adding more leaves here at mid. Now I'm going in with
the black and filling in most of the vector space between the flowers and the
board with the black. Addition of this black brings more diamonds into the
painting on top of this black, I'll be adding in the greens. If you prefer, you can use olive green around but
instead of black. So we are done with the black
going into the deep grown. And now I'm going back with the green and adding it
on top of the black, as well as in the other, back into space between
the flowers and the birds. Going back with a light green and o when laying it
on top of the black. And now to add more
detail to the center, I'm going in with
the burnt sienna. Some of the center
of the flowers were not Kigali visible. So I am going back,
but the media literate define the
centers properly. With this, I'm done
with the media law. No, going back with a bunch of yellow to add detail
to the center, creating single tiny stroke with the burnt sienna to add details to the centers
for the flowers. Adding more white votes
them up the flower, as well as adding more buds. These were done
for this painting. See you in the next video.
22. Colourful Cosmos Flowers : So this is our 13th and
the final painting. For this, we'll be painting
colorful cosmos flowers, like the earlier project. Instead of white Cosmos flower, we'll be painting a bunch of different colored Cosmos flower. And while retaining
the background also. So here I've already
started with white. Now going in with a glass tint. This time I am using
Khrushchev's artist ILP style. Now I'm going in
with the light pink, adding some more
light on the top. Now, going in with
the 3D scene pink. I didn't, I didn't just
below the iridescent pink, but all these colored, I'm
applying medium pressure. Now I'm going in with red. And finally going in with
acetylene blue for the top. Overlaying some part of the
white blood cells in blue. Now let's blend those colors. I'm using a piece
of paper to blend the color starting from the top, using set blend modes
to blend the color. Unfortunate to make
ambulance stopped working. What I did was just
blend it all the colors. Now to add some clouds, I'm going in with media law. I decided to dot two
clouds for this painting. I think pink just
below the media loss. Now let's blend the
colors sent the city a small person as compared
to the whole painting. I'm going in with a Q-tip
to blend the colors. Blending the pink for the media, and blending the rest of the
cloud with the background. Adding some more media
law for the Cloud, giving it more
diamonds currency. Now let's blend again using circular motion
to blend the yellow. But these were done
with the Cloud and the background
for the painting. Now let's draw some flowers. I'm starting with yellow to draw the centers of the flowers. I'll be doing a bunch of flower with the different colors. I'm starting with flushed into the flesh color for the flowers. Randomly drawing in the flowers as well as the buds
with a flat state. Moving on with the light orange. Now going into cerulean blue, you are more than welcome to try out different
combinations of the colored flowers as well as much with
the C2 in blue. Now creating flowers
with the white. Now going into the deep ring to add stem to the flower
as well as the buds. The new fiber to draw more
centers, put the flower. Adding more flowers
with the white. Here, I have got two different
colors of the white. One is more transparent
than the other. No drawing the flowers
with the sky blue. Moving on to drain,
flowered with a light pink. Adding more flowers
with the orange. No drain would flowers and
the birds with the violet continuing forward to
draw more flowers. And the birds with the magenta. Now going in with
the yellow ocher, going in with another
variation of the pink. Adding more flowers with a translucent white flowered if the light yellow. Now what I am trying is
to just fill the space. So we're almost done with drawing the flowers
as well as the bird. Moving onto the black
filling in there, most of them back
into space between the flowers and the
birds with the black. But they say I'm
done with the black. Now going back to
the deep green to add steps to the flowers
as well as the leaves. Filling in the
rest of the record displays with a light green. And adding the light
green on top of the black dot completely
covering up the black. I think some small
leaves here and there. Good fully filling in the light green in between
the flowers and the buds. No going in with the burnt umber to add more details
to the center. Some of the flowers at the
center, but not clear. So I'm going back with a yellow. Any more, white to some
of the white flowers. Now I'm going in with burnt umber for the
center of the flower. With these are typing, then the final
painting is finished. See you in the next video.
23. Conclusion and Thanks : Congratulations on
successfully completing this class on Cosmos
flower with ILP style. I hope you learned
something new and exciting through this
protein projects. If you have any
doubts or question asked me in the
discussion section. And if you have drawn any
of these 14 projects, please upload it in
the project section. And one more thing. If
you liked this class, please leave a review
in the review section and save your feedback
and sedation with me. Thank you again for
enrolling in this class.
 Vishal Munshi