Transcripts
1. Cook the Best Eggs: Boiled: Okay, I've become a raging
fan of boiled eggs. And I know that sounds
bland and boring, but they've secretly
got a lot going on. I mean the range of textures, hard and soft and
even half boiled, and then frying or
baking, or marinating, or pickling, and
then the curries. Y'all. We're just
getting started. Join me in my latest
installation of the Cook the Best egg series
with a comprehensive, deep dive into the wild
world of boiled eggs.
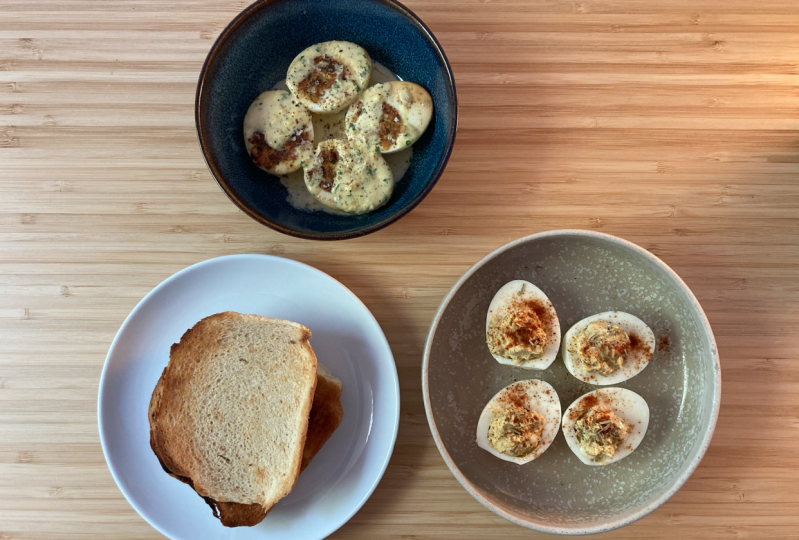
2. Class Project: Your Signature Deviled Eggs: Your class project is to share
with us your deviled egg. We talk about
customization options with spices and substitutions
and extra ingredients, and I'm looking forward to
see what you put together. Also use some of the
tips and tricks for easier peeling and share
with us what you tried, what worked, and what didn't. You can make a family classic, or a whimsical experiment. Of course, if deviled
eggs aren't your thing, share any of the other recipes, there's plenty to choose from, and I'm always curious about
unique cultural traditions. So if there's something you know of that's not in the course, please share so I can
explore for us all.
3. How to Cook Hard, Medium, Soft & Onsen Eggs: All right, how to boil eggs. We'll cover everything
in this one class. So use the time
stamps on the screen to jump forward to whichever
chapter you're looking for. Note that hard boiled and soft boiled take
different approaches, starting with hard boiled. Put eggs in a pot and cover
with an inch of water. Bring the water to
just under a boil. You want movement,
bubbles and steam. Turn off the heat and cover. And let's stand for 12
minutes for large eggs, 15 minutes for extra large, and 9 minutes for medium eggs. Now immediately move
them to an ice bath to stop the cooking and then peel them when you're
ready to use them. Unpeeled eggs are good
for about a week in the fridge and just a couple
of days if they're peeled, if they're covered in water, and replacing that
water each day, that's from a
texture perspective, not necessarily deterioration. This method cooks the
eggs evenly and gently. You're less likely to get that
green egg around the yolk, which is just sulphur from the egg reacting to
being overcooked. Not overcooking your
yolks means they maintain some moisture
and create silkier, deviled eggs, soft and
medium, or jammy eggs. In variations, we start by boiling the water
before adding the eggs, and I'm adding a
few tablespoons of vinegar to help make
them easier to peel. The vinegar helps
to dissolve some of the calcium carbonate in the shell and help
the white set faster. But some sources say this
doesn't make any difference. A teaspoon of salt helps
to solidify the whites quickly if they happen to crack and try to escape
from the shell, which isn't unusual
when you introduce eggs straight from the
fridge into boiling water, Carefully add the eggs cold from the fridge and lower the
heat to medium high. You maintain a boil, but not that rolling active
boil that could crack the eggs and start a timer for however long
you want to cook them. And I'll show you what,
76.2 6.5 minutes look like. You need an ice bath
to stop cooking immediately after removing
them from the cooking water. Here's the five minute
egg, very soft boiled. The outer whites are solid, inner whites are
cooked but liquid, and the yolk is very molten. I think this is what
they call a dippy egg. The kind you put in
the little egg stand and then dip strips of bread into a six minute egg has set
whites and very runny yolk. I think this one
is my preference. 6.5 minute yolk has set whites and the outer
ring of the yolk is set. The rest of the yolk,
thick and jammy, slightly runny, but
like a slow run, the seven minute egg, the outer yolk is set
and slightly yellowed, and the yolk is
not fully cooked, but not runny, but solidly
jammy, if you will. To show the importance of an ice bath, check out this egg. It was removed at the same
time as the seven minute egg, and it's almost a
full boiled egg, yolk after sitting
with its own heat while I peeled the others. That's the importance of an
ice bath to stop the cooking. Yes, you can do hard
boiled this way too. You just end up with
more rubbery whites, and the other method creates
more delicate whites. The difference between the
two methods of starting the eggs in the water
versus adding them once the water is boiling is one way brings the egg to
temperature with the water, creating a more even cook
throughout the entire egg. The other way of adding eggs to boiling water cooks
the outer edge of the egg first protecting the inside yolk
from being cooked at the same rate as
the outside white. Steaming is also an option. Some say it makes
them easier to peel, but it definitely makes
the texture silkier. Here are the steps and
timetables for that. You bring an inch of water to a boil with a steamer basket or a mesh trainer and add the eggs you cover and steam for
5 minutes for soft, or 7 minutes for medium, and 12 minutes for hard. It's basically the same time as boiling again immediately into an ice bath to stop the cooking. Now for the son egg, this technique is very
delicate and specific. Now if this is new to you, it's also like a
half boiled egg, or poached in the shell. It has silky whites that aren't fully set but
are fully cooked, and a very soft yolk. Essentially, we bring
water to a boil, then add lukewarm water to
reduce the temperature. Then turn off the
heat and gently add the eggs to the
water cover for 16, 19 minutes, and then cool
for at least 5 minutes. In an ice bath, when
you crack it open, it should slip right out. Sintomago is the formal name, and it means hot springs. The traditional method uses water heated through a
specific temperature, And then it gently bathes
the egg for like 25, 45 minutes, and then
cools for 15 minutes. You can use a rice cooker or an immersion circulator
or like Suvid to create ideal conditions to keep a specific low temperature
for like 45, 90 minutes. This is truly low and slow, but the Internet seems
to have figured out this workaround of boiling the water and adding
lukewarm water to it. Now this is usually
served in a dashi broth, but it can be used anywhere you'd use soft
boiled or poached. Now there are some tools and gadgets that can simplify
this whole process. An egg cooker like this
one steams the eggs. It uses this water measurer to provide exactly enough water for however many
eggs you're cooking, and allows for hard, medium, and soft boil options. Another unique feature is the pin that gently breaks
a hole in the shell, which helps them
peel more easily. And the cooker sets
an alarm to go off when all the water has
evaporated from the tray. The other setting here
is for little pans to poach or cook eggs
also with steam. Now, I love this thing,
it's how I primarily cook my eggs since
it is so hands off. Another option for the
son type egg is egg bath. It has also been cleverly
designed to slowly release boiling water over
just enough time to create that poached
in shell texture. You can choose how
much water to add and therefore how long your egg
bathes in the hot water. Now links to these tools
are in the recipe PDF. Now we'll explore
all the ways to use your deliciously boiled eggs and I'll see you in
the next lesson.
4. Peeling Tips & Freshness Facts: Secrets to an easier peel. Number one, an
older egg is easier to peel because the
membrane between the shell and the
whites is thinner and separates more easily from
the cooked egg whites. We determine freshness two ways. First, the date on the carton. These three numbers,
at least in the US, are the Julian date and it corresponds to the date of the hear the egg was harvested. Here's number 36,
which is November 2. I'm filming this late November, about 3.5 weeks later, a not farm fresh egg. And I deliberately saved these eggs so they would
be easier to peel. For this, we can say about ten days is enough to notice a difference
in an eggs age. The other way we determine
freshness is the float test, which is really more about determining if an
egg has gone bad, which will take a long
while because eggs can stay safe for four to five weeks past their expiration date. If they're stored in the back of the fridge and in their carton, egg shells are porous. Fresh eggs will sink
in a glass of water because oxygen hasn't had time
to accumulate in the egg. If it sinks but stands upright, that means it's not
fresh, but not bad. Some oxygen has found
its way into the shell, but not enough to
deteriorate safety. If it floats, there's too
much oxygen and don't eat it. Now, another method to make peeling easier is
to add vinegar to the boiling water
to help dissolve some of the calcium
carbonate in the shell, about a fourth of a cup. It does not influence
the taste of the egg. Also, using a spoon can help get under the membrane and
separate it from the egg, making the peeling
process easier. Baking soda can also
supposedly help because the alkaline helps the whites to separate from the membrane. But I've seen too
much contradiction on this one to confirm it. But it also doesn't affect
flavor if you want to try it. Cracking the shell in lots of smaller pieces helps because those larger bits create larger suction and can't
be peeled off as easily. Gently make lots of little cracks all over the
egg to get you started. Steaming rather than boiling is another trick that supposedly helps eggs peel more easily. And finally, making a small
hole in the shell also helps. However, some sources
don't recommend it as it could introduce
bacteria to the egg. So use at your own wrist
and happy peeling. I'll see you in the next lesson.
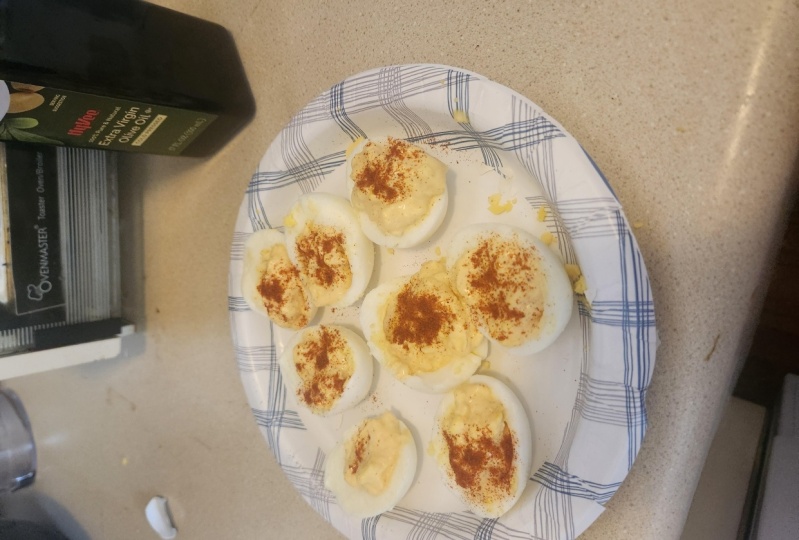
5. Classic Deviled Egg: A classic deviled egg. There is so much
room for variation. And it's really not
a recipe because some factions insist
on chopped pickles, some insist on a
specific mayonnaise. It's a taste driven ratio
that you make your own. But loosely, we remove the yolks and add a couple
spoonfuls of mayonnaise. And about half of that
amount of mustard, partial to Dijon, but yellow and even whole
grain mustard are options. I'd like to add chopped
cornichon and chives to mine for extra tang season
with salt and pepper, and mush it all together. When yolks are creamier, they will emulsify together
with the other ingredients, better making a silkier
mixture and not lumpy. Then taste and decide if you
want more mayo or mustard. Now if it's just for a snack, mixing by hand is fine. If we're doing this for a party, I may blend this with
an immersion blender, or a food processor,
maybe even some olive oil to fluff it up and add
even more smoothness. And then I might
use a piping bag to fill the eggs rather than trying to smush it
in with the spoon. Regardless, you'll
always have yolk mixture left over and
you'll want to add more visual interest
with a sprinkle of paprika or chopped herbs
like parsley or dill. Now we have added spices like tandorre spice mix
or Mexican taco mix. For something a
little different, you can cook up bacon or
panchetta and stir the head in, and even substitute cream fresh for some of
the mayonnaise. It's a classic recipe
because it can be as simple or as dressy as
you want to make it. And literally that's it
for a basic deviled egg. I'll see you in the next lesson.
6. Egg Salad Sandwich: Egg salad. It's having
a Renaissance moment. And good for it,
because it does not need much to be
highly satisfying. And it can be as crude or as polished as you
want to make it. We start with our
hard boiled egg to be chopped into small pieces. You can do this by hand if
you like a chunkier texture, or if you want a finer texture, peel the eggs and freeze
them for 20 ish minutes. So they harden up, then grate
them on the large grate. We only use mayonnaise, salt and pepper to mix together. Some people add mustard
and some folks like to use pi mayo because
it's sweeter than other mayonnaise and that
pairs well with egg. I'm using my usual mayonnaise and adding a pinch of sugar. That's literally it just stir it together until
it's all homogeneous. This can go on
crackers or lettuce, but most of the time we see it on bread for tea sandwiches. Find the softest,
fluffiest bread, like Japanese milk
bread or brioche, and spread a layer of butter. This helps to keep the bread
from getting soggy and adds flavor and spread
on the egg salad. Now to help a proper tea
sandwich stay together. We'll weigh down the
sandwich with a plate for about 5 minutes and then cut off the crust and
slice it in a half. Voila, a traditional
tea sandwich. Like with the other
recipes so far, exact measurements
are less important than taste and texture
to your preference. The measurements
are in the recipe PDF to get you started, that's it for
traditional egg salad. I'll see you in the next lesson.
7. Eggs Jeanette: Eggs, Jeanette, are
an upgraded twist on the classic deviled egg
by Chef Jacques Pepin, who named this after his wife. It starts similarly with yolks
being mixed into a paste. The recipe calls for milk
here, but I don't have any, so I'm using mayo
and olive oil to give a similar
creamy consistency. And we add finely chopped
garlic and chopped parsley. The mixture should
hold together, but also be soft enough to easily fill the eggs
and spread it flat. Don't mound it up like
a regular doubled egg. You should have about
two tablespoons of extra yolk mixture or
somewhere around that. And we will add mustard water, salt and pepper,
and then olive oil. We're making a dressing basically
now in a non stick pan. Heat, olive oil over medium, high heat and add butter, reducing the heat to medium. When the butter foams up, add the eggs flat side down. We want to brown
the yolk mixture, not necessarily the whites, because they just get rubbery
if they're overcooked. It doesn't take
but a few minutes to see the browning happening. And we'll gently remove them to a plate and drizzle
them with the dressing. To me, the dressing tastes a lot like a cesar dressing
with the garlic, the mustard, and the egg yolk,
even though it's cooked. And I even use the
extra dressing to dip a steak in afterwards, since it was so Caesaresque. This is nice when you want
something warm and light with lots of flavor and it
comes together so quickly. That's it for eggs, Janet and I will see you
in the next lesson.
8. Bengali Egg Curry: We're going to try a
Bengali egg curry. Some of the spices
are pretty specific. I'll do the best I can
with substitutions, starting with hard boiled eggs, make slits through the whites, and rubbing them with
turmeric and salt. Now this is a teaspoon of turmeric and two a
teaspoon of salt. It should be enough
for four eggs. Now, wear kitchen gloves
or protect your hands by wearing a ziplock
bag like gloves, because turmeric
stains quite easily. Heat oil in a medium
pan over medium, high heat enough to cover
the bottom of the pan. Cook the eggs in this oil, turning the skin
brown and bubbly. And this can help the
sauce stick to the egg. And it also might get dangerous. I had large pops of
oil in the beginning. We want a gentle fry,
nothing violent, and then you've got the urmoric
in the oil and you've got like oil popping out everywhere that's going to
stain everything it hits. So just be diligent and constantly cleaning when
they're mostly browned, remove from the pan and add crushed bay leaves or dried
oregano as a substitute. We're going to spice the oil, add a whole seed spice
mix called pant foron. I'm not sure I'm
pronouncing that correctly because I've
never heard it said before. The Internet tells me that
a reasonable substitute is cumin, thyme and mustard. So we'll give that a shot. And again, I'm using
whole seeds because that's a little more
traditional to the recipe. But use whatever you've got
when that starts to sizzle, add some chopped onion
and chilies that have been sliced lengthwise,
not all the way through. We're just trying
to open the skins, reduce the heat to low, and let the onions cook
until translucent. After five ish minutes, add grated or powdered ginger,
if that's what you've got. And chili powder,
stir this in and add chopped tomatoes
and tomato puree. We'll cook down the tomatoes
until they are pulpy and stewy Stirring and mashing once or twice to
speed up the process. Once they've cooked
down a tablespoon of coriander and garam Masala, it should be about a tablespoon of like both of them combined. So split that up
whatever you want. I did an even split and stir it in with
34 a cup of water. Now, I know it seems tedious to add spices a few at a time, like add some, cook something,
add some cook something. But we're building levels of flavor by cooking
them in bit by bit. If you like curries,
maybe double up this recipe and
freeze the extra bits, since it has so many steps. And that way it's only half
the work for twice the meals. Now, this is going
to seem watery, but you'll want
it a little loose and it will thicken a tad as you add the eggs and heat it altogether and it's
ready to serve. It is so fragrant flavorful. I'm personally not a fan of the texture of the
egg skin and I'd probably be happier
with this curry and a plain soft boiled egg. So keep that in mind. Truly hope you make the
effort to try this one. It's not too complicated, it's just a lot of steps, but that's how it
goes for curries. And that's it for
Bengali egg curry. Or Dim kasha. Dimo kasha. I'll see you in the next lesson.
9. Pickled Eggs: Pickling your hard boiled eggs, It's pretty straightforward. A brin and some time, every recipe calls
for pickling spice, which can be bought as a premix or you can
just make your own, which is generally what I do based on what I have on hand. Things like allspice,
black peppercorns, bay leaf mustard seeds, dried ginger, red pepper
flakes, cinnamon. And the amount you
use is also up to you and how big of a jar
you're trying to fill. I'm just pickling a couple of eggs to test this combination. So I'll use a crumbled bay leaf. About three allspice
berries. All right. Eight inch black peppercorns and a few mustard seeds and a sprinkle of ginger
to make the brine. We'll simmer
together vinegar and water with sugar
and a little salt. The amount of sugar depends on how sweet you like your pickle, but some sugar helps to
balance the vinegar you need a little and add your spices and other aromatics like
garlic or red onion. You can even add beet juice and bits of beets to add color, or turmeric to make
them very yellow. We simmer about 5
minutes just enough to dissolve the sugar and soften the onions if you're using them, then let this cool
for a few minutes before pouring it over the
hard cooked eggs in the jar. If the brine is still hot, let it cool on the countertop before sealing the lid and
storing it in the fridge. But basically, it'll
sit in the fridge for a few days to
soak up the flavor. And the longer it sits, the more flavor the eggs get. And they'll be good
for about a month if you don't eat
them all before, then if you use beet
juice to make them pink, the longer you let them sit, the darker the color
becomes and then the deeper the color
penetrates into the egg. It's pretty simple, but if
you like pickled things, this will be right
up your alley. So have fun making the
spice all your own. That's it for pickled eggs, and I'll see you in
the next lesson.
10. Korean Mayak Eggs : Marinating. Now, this is a much shorter process
than pickling the eggs, and we generally use soft or
medium boiled eggs for this. To demonstrate, I'm using a
Korean Mayic eggs recipe, which starts with
soy sauce and water, then chili and sesame seeds. I used Hell Pino because my store didn't have
any other type. And I definitely do not like the flavor with
everything else. It just doesn't mix. But it is better
than none at all. And it was educational
to experience how flavors can complement or contradict each other
in something like this. Then garlic green onions and then some type of
sugar like granulated, white or brown sugar, or corn syrup or honey. The eggs are peeled and covered
in the marinade and they sit for at least 8 hours in the fridge, they'll turn brown. And I rotated mine so they were somewhat a
homogeneous color. And then they're usually
served over rice. The marinade can be used for one more batch or reduced to
a syrupy sauce over heat. Most sauces I used
didn't say that it could be used over and
over again as a marinade. So maybe just two marinades. And if that's done within
a week's time because it's still fresh ingredients that can still go bad over time. So after a week, if you haven't used it, you
should probably discard it. But I also froze my marinade
after the first use, and then I'll thaw it
when I'm ready for this. Again, there are many
other variations of this for Chinese versions
and Japanese ramen eggs, but the technique is the same. The eggs only need a few hours to take on the flavor
of the marinade. And it fills up any basic
rice or noodle bowl for a small meal
or a hearty snack. And there's lots
you can do with it. And that's it for now, for marinated eggs and
Korean Mayic eggs. We'll see you in
the next lesson.
11. Bruleed: If you've been looking
for an excuse to use your kitchen
to or to buy one, this is it brulee
eggs and oh my God, y'all, it's as simple
as the jammy egg, as thick or as runny
as you like it. But I think it does help to have a sturdy white to
hold up to the flame. This is a six or 6.5 minute egg, and we'll sprinkle a little
salt on first because salt will help amplify the flavors of both the
yolk and the sugar, like a salted caramel. And then cover the top
of the egg with sugar. And don't skim on the
whites or around the edges because we want that
crunchy sugar layer to protect the whites from
getting rubbery in the extra heat plan for just under a teaspoon of
sugar per two egg or more, if you like, then play with the intensity
of the kitchen torch. You can get close to the egg for a deep burn or pull away
to get a lighter melt. Regardless, we like seeing bubbly sugar and browned areas and even some dark brown spots, just like a creme brulee. We're going for a crunchy
sugar topping that, after it cools for
a minute or two, we get to crack with a spoon, and it sounds wild, but the yolk is just right for something sweet and savory
and rich like this. This is my kind of breakfast, but it would be delightful
with cocktails. So get that torch go in
and sugar up some eggs, and I'll see you in
the next lesson.
12. Scotch Egg: Scotch egg, which actually
isn't Scotch, it's English. It's a soft or hard boiled
egg wrapped in spiced meat, then battered and fried or baked into a hearty,
delicious barsnack. Traditionally, it's
a hard boiled egg, but a lot of us try really hard to make it work
with a jammy egg. So I'm using a
couple of jammy eggs and maybe they won't
cook into a hard yolk, or maybe they will and
it will still be fine. After you've cooked your egg, Let's prep the meat to wrap the egg so we need flavor here. I have bought garlic and herb pork sausage
from Whole Foods. So I'll just remove it
from the sausage casing. You can buy breakfast sausage, which is also generally
already spiced or flavored. And you can buy basic ground pork and then add
things like garlic powder, onion powder, parsley, cayenne, whatever other seasonings
you really like. For one egg, we'll need a four
pound of meat or 4 ounces. Another reason why I
bought the sausage, these are already 4 ounces. I just need to figure out
how to roll the meat into a patty that will perfectly
wrap around the egg. Now, one of the recipes
I found in my research, it was suggested to
use plastic wrap. And this was super easy. Like deceptively easy, I've
never made this before, and this made it so much
easier than I imagined. Smash the ground
meat into a patty. And just kept testing to see if the patty would
wrap all the way around the egg and the
plastic wrap helped the meat agree that we would
all meat in one place. Then I just twisted it and
pushed it all together. Now I just need to
smooth it out a little so that the
meat cooks evenly. That's one thing you want
to make sure you do that. Your meat is even
around the egg. Now that my eggs
are fully wrapped, I'm going to let them
sit in the fridge while I set up everything else. We need an egg wash and
breadcrumbs to dip them into. Taking care to use one hand
for wet treatment and the other for dry treatment so
things aren't as messy. Please use a larger bowl. I have a bad habit
of underestimating how much bowl space I need. These are regular breadcrumbs. A lot of recipes
recommend using Penco. Then you can deep fry at 350 degrees Fahrenheit
or bake in your oven, or use your air fryer, which to me, seems the
quickest and easiest. Here we go, at 350 degrees
Fahrenheit for 12 minutes, and a pre heated air fryer. After 12 minutes, I was not certain they
were crisp enough, so I flipped them and
put them back in for another 4 minutes.
Here's how they look. I am confident they are cooked. Through a cut through
the center reveals eggs. This egg was super soft. It must have been
the six minute egg, and the other one is just right. So it must have been
the 6.5 minute egg. The meat isn't as
dark as I expected, but a thermometer says
it's at 01:50 to 160, which is good for pork. I am pleased with
this experiment. What do you think
that was easy, right? We hear a lot that
Scotch eggs are like really difficult and
people struggle with it, but that was easy. All right, that's
it for Scotch egg and I'll see you in
the next lesson.
13. For More Like This...: So boiled eggs are
pretty fancy now. Eh, my favorite is
the brulete egg. It's just everything I
love in a bite of food. There are more recipes to come, so turn on those notifications so you'll get the announcement. And remember to
actually try one or two of the recipes and
share them here. And ask me any questions. I check in here every day
and if you like my style, you can find the
rest of my cook, the best egg series
here on Skill Share, And you can find me on Youtube, but Cooking Companion TV and the Tiktok and Instagram
at Jenna G. Edwards TV. Now, thank you for
taking my class and I'll see you
in the next one.
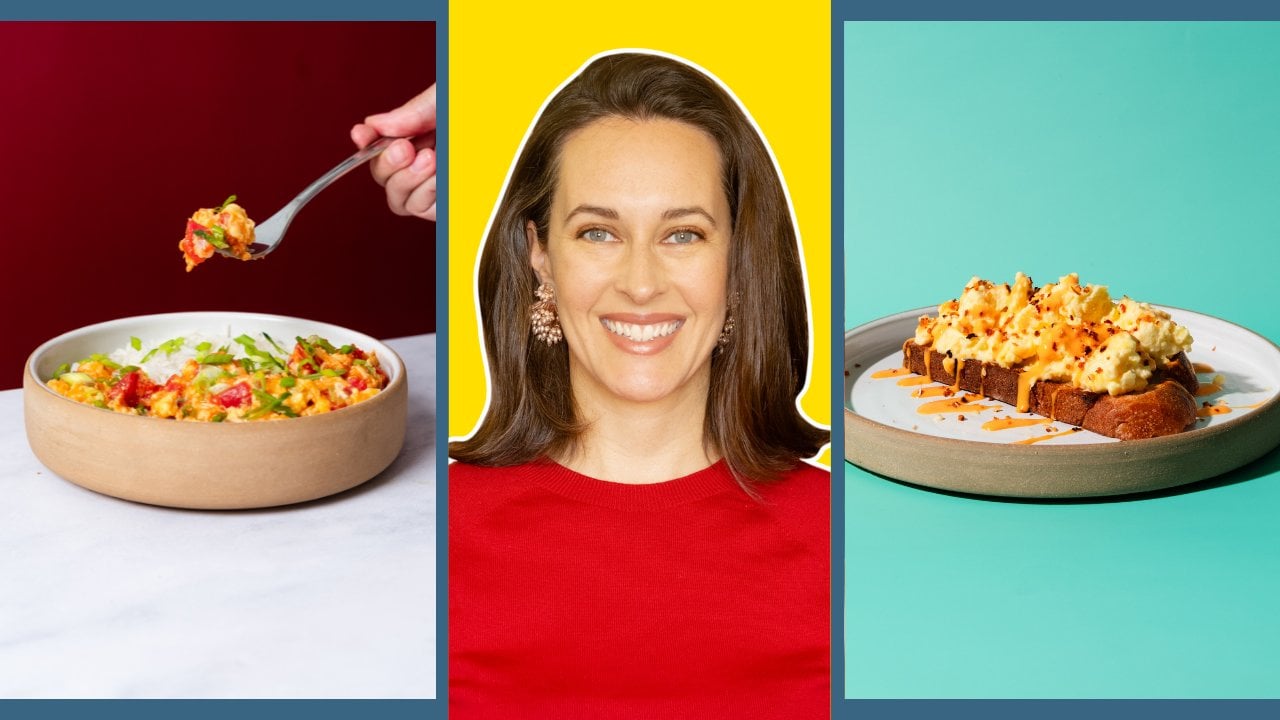
 Jenna Edwards, 'Cook The Best' series