Transcripts
1. Introduction google assistant: Able to learn how to receive
data from Google Assistant, how to use IFTTT protocol to connect to your
Arduino to the Internet. You will learn what parks and HTTP requests and
how to use them. You will also learn how
to speak and control. How to speak to and control your Arduino using
Google Assistant, using your mobile phone, Google Home device,
or any other device. Now, to be honest, this is one of the courses that we are making because there is a huge demand to the IoT
application these days. And by the end of this course, you will be able to turn
any device using Arduino into AI IoT device
and control it using your Google Home app on your phone or using
Google Home device. We want to control
different parts of an Arduino, like input, output pins, PWM,
serial port, and so on. By sending a string from Google Assistant to
Arduino's serial port. And we need to
specify some phrases for Google Assistant to
recognize what we mean. Then we will basically
make an applet and an IFTTT platform and
make a connection between Google Assistant
and our API database. After that, we will read
data from database by using a Wi-Fi module
and send it to Arduino. I'm sure that you will
enjoy this course. Can't wait to see you inside.
2. Google Assitant & IFTTT Applets: Now, let's talk about
Google Assistant and IFTTT be applets. Now Google Assistant is an
artificial intelligence powered virtual
assistant developed by Google that is
primarily available on mobile and smart home devices. Unlike the company's previous virtual assistant mogul now, the Google Assistant can engage
in two-way conversations. It can recognize your
words better than any devices and respond fast and correctly
to your commands. Users primarily interact with the Google Assistant through natural voice, through keyboard. Input is also supported in the same nature and
manner as Vogel now, the assistant is able
to search the Internet. Excuse you, all events and alarms are just
hardware settings on the user's device and short information from the
user's Google account. Google has also announced that the assistant will
be able to identify objects and gather visual
information through device's camera and support purchasing products
and sending money, as well as identifying songs. Now I F T, T, T, it means if this then that and
the abbreviation is IFTTT. It's a free web-based
service to create chains of symbol conditional
statements called applets. And applet is
triggered by changes that occur within other web
services such as Gmail, facebook, Telegram, and
Instagram, or Pinterest. For example, an applet may send an email message if
they use our tweets using a hashtag or copy a photo on Facebook to our
users archive. If someone tags,
I use an avatar. In addition to the
web-based application that service runs on iOS and Android,
February 2015, IFTTT renamed its
original application to F and released a new suit of apps called do
watch lists users, period, a shortcut,
applications and actions. As of 2015, IFTTT users created about 20
million recipes each day. All of the
functionalities of that do suit of apps have since being integrated into
our design IFTTT app. And we are going to use
this in our course.
3. JSON & WEBHOOK: I wouldn't help in web
development is Amazon augmenting or behavior of our page
or web application. With custom callbacks. Callbacks may be
maintained, modified, and managed by third party
users and the robots, or may not necessarily
be affiliated with that. But again, 18 website or application that's
had a ModPo was coined by shifts in 2007 on the computer
programming theorem. Now, in computing,
JavaScript Object Notation, or JSON, is an open
standard file format that uses the human
readable text. John Smith, that the objects consisting attribute,
value pairs, and every data types
or any other value. It is a very cold data format
for a synchronous browser. Diversification, including placement for it
somehow in some hydrogen ions. And we are going to use
radiation flip book on Jason in all. Maybe I and database to
receive that from going home. That's it for the introduction. Now, let's get to work.
4. Circuit Design: Hello and welcome to this
new lesson in which we are going talk about
the circuit design. As you can see in this circuit, we have an Arduino ball
and we have the ESP 82664, which is basically
the wifi module that will help our Arduino
connect to the internet. This module has more
than one connection. Now some people prefer to
connect it using two resistors. Other people prefer to
connect it directly. Now, in this case, we are connecting
this module two, as you can see here,
pin number three. Now, if you looked
at these pens, now this then let's
zoom in here. This is the power brain and it's connected,
as you can see, 2.33 volts, which is basically the power
rating for this module. Now the other pin is called the ground pin, as
you can see here. And this the black wire
connected to ground. Now, these two resistors are
used to pull up the line. And you can see here that
this is the RX line, which is basically
the receiver line. Now, let's see if our line will receive the signal
from pin number three. You can change this connection and remove the resistors.
For some module. That is a source are not needed, but for other clones, that is, the stores are needed. So some people prefer to
connect this pin directly to the pin number three or any other pen without
the tools of stores. Here you can also see that
we have the enabled pin and the power pin
shorted together, which means that we are
connecting the enable been as well to 3.3 volts. And this is basically
the connection. Now this lead is here
for demonstration. You can place it
on pin number 13 instead of 12 because
it has a built in lead. Now for the TX and RX, you can see from here that we
are connecting to this pen. Now, there are other
connections as well. Here you can see
the yellow wire, which is basically that expand connected to pin number two. Now, you might find other connections
like the TX pin is connected to the RX pen here. So let's move it. And in here there are expand is
can you explain here? So let's move it again. So now the final connection, the dx to the RX, the RX TX through
these two resistors. And you can see
that one of them is one kiloohm and the other
one is 2.2 kilo ohm, which is basically
a voltage divider. Now here we have the enabled pin and the power pin
connected to 3.3 volts. And finally, we have the ground here
connected to the ground. And we have two
resistor terminals. One is connected to ground and the other one is
connected to that. The explain here. That's it
for the circuit connection. I think it's clear. You need to make sure that
you have your ESP 8266 align this way and the pins on this side so that you can
connect it correctly. Most of the mistakes
happens because people hold it the other way and try to apply
the same connection. Thanks for watching this lesson. If you have any questions about this connection,
I'm here to help.
5. Web Link Setup: Hello and welcome
to this new lesson in which we are going to start the implementation
of our project. First of all, you need a device to run your
Google Assistant. And in order to know which
device is right for you, you need to go to our
assistant to the google.com. Now, you can see all the devices that
support the assistant. But in this project we
will make things easier. As you can see, you can
run it on your phone and your smart speaker on your
smarts play in your car, on your TV, on your laptop, watch, and other more options. So in this project, we will use an
Android phone device. Or I also have
around Google Home, which is basically a
small speaker that you can speak to like Amazon Alexa. Now, the first step
is to go to a website called IFTTT.com and
create an account. So let's do this like IFTTT.com. And in here, you can see this platform quickly and easily automate your
favorite apps and devices. Now, click on Get started. And you will create a free account using
our Google account. So click Continue with Google. And from here you can choose your Gmail account
to proceed with. Now, after signing in, you can click on my applets in the upper
corner right here, then click on a new applet. And in here we need to
create a new Applet. Now, these are the objects that we already
have on the system, as you can see, non published. So basically what you need to do here is to click on
the Create button. Now once you click
on the Create button on the upper right corner, you will see this. Now. You can add your service
as this new app. Let's click on this and
search for Google Assistant. Google Assistant, as
you can see here it is. Now, you have all things you can define on the
Google Assistant. As you can see, Activate, seen. This trigger activates an
AMC and when you say Okay, go will activate and see
number. So click on it. Now click in it because
it will ask you to connect with your
Google Assistant. And as you can see in here, it's telling you the steps. Now you have to
follow these steps in order to connect to
your Google Assistant. And these steps will be
done using your phone. Now, follow these
simple steps on your mobile device to
connect to Google, to IFTTT and create
Google Assistant. And email has also just being sent to your e-mail address
with the instruction below. First open the
Google Home app on your Android or iOS device. In the works with
Google selection or section under
Settings. And I fit. As you can see here. This
is the golden Home app, and you can find it on
Android and iOS Store. And you can click on
works with Google. Now, the settings icon from
your phone should be pressed, not your account icon on
the top right corner. So don't click on that account. Right here. You need to click on the Settings icon right here
on the middle of the screen. Now after you login to
your IFTTT account, by signing in and authorizing, you are allowing
Google to control your service via IFTTT applet. Then you can return to
IF2 and began creating and enabling applets using the new Google
Assistant Service. Now to make things more clear, Let's see this in action. Now. This is the App Store. Go to your app store and
look for Google Home. Now, you need to
download this app. As you can see, this is
the Google Home app. You will find the same app
with the same icon under the same name on the
Android Play Store. So you can download it on
your Android phone as well. Steps to be followed
are quite easy. All you need to do is to
sign in with the same Gmail account you use on IFTTT. Then we need to follow
the same steps. Now click Open and you'll be redirected
to Google Home tab. Click Okay. Click Okay again. Now here you can see my devices. I have Ashraf assistant, which is basically a
Google Home speaker that I can use to send
orders to Google. And you need to click
on the Settings icon, the gear icon on the
upper right corner. Once you are there, you can scroll all the way down
to works with Bogan, the one before the last. And in here, you can
see the ads or device. Actually, as you can see, a lot of services are available. So search for I, f t, d t, which is this. Now, once you click on it, to redirect you
to the IFTTT.com. Where do you have to sign in again with the same
Gmail account. I know it's a long process, but this is for
security measures. So click connect with Goldman. And once you click
continue with Google, you can login using
your Google account. Now, I will open the same link. I have problems with
the Safari ally. So I will open the same
link using Google. So let me now, once you sign in, you
will get the screen. This application will be able to access your Google
Assistant app. Let's click Authorize
and it will be authorized and you'll be redirected back to
Google Home app. As you can see, IFTTT is linked, which means that you
have done everything correctly and you are
ready to move forward. So moving forward, let's
go back to our app. Let's click back again. Refresh this page. Now, if this now, let's move on. By a login system. Click Activate. Now, as you can
see, it's already activated because we
linked everything. And what you need
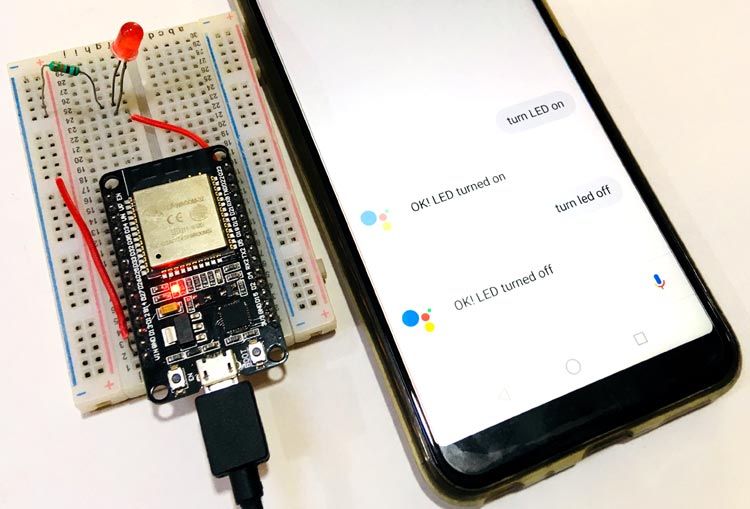
to do next is to configure this trigger activates an AMC and when you say Okay, go will activate seen him. Now, keep it short and simple. Don't include local Google or
activate on the scene name. And for me, let's say that
you want to say sits, lids of pin 13 to on. Just type it as your phrase and replace the pin
number with a hash. The hash sign is basically
the hash symbol. You can add more phrases
with the same meaning, like set PWM of painting 220 or turn on LED on pin one. Now, other response to that, the Google Assistant
can let you know that your command was understood and the necessary
action was taken. For example, the PWM is updated, the LED is on, and so on. So let's try this here. Let's say their lid on. Now, click create a trigger. And in here, you
can click on them that now when you are done and
you click Create together, you'll be redirected
back to them that click on ads and the vendor. And here in that
part of your ARB, if you have lots of
services to choose from, and you need to
search for Web hawk. Now, web hooks are basically the means
through which you can connect with your server. Now click on it and click
on make our request. This action will make a request to a publicly accessible URL. Requests may be rate limited, so you don't, you should
not send a lot of requests. At least wait an hour or two between each request
and the next one. Because this is a free version. Now omega o requests and
here, as you can see, integrate other services on I
fit with your DIY projects. You can create applets
that work with any device or add that can make or
receive our requests. If you'd like to build your
own services and tablets, you can check this, the probe guy that they provide. Now, once you click Connect, you can see that you are directed to the
configuration page. Here we have a lot of
options to make our request. This action will
make a web request to a publicly accessible URL. And this is where you
must place your API URL. Now we will cover this
in the coming lessons. But for now, what you need to understand is the following. First, you need to add
the server URL here. Then you need to set the
method to host not get. Then you need to select
the content type, which is basically
application slash json. After that, you should
add a body of content, something, something like this. Let's add a number and then add double bonds
then to double quotations. And between the two
double quotations, Let's close the curly brace. Now between the two double
quotations, two curly braces. And here are the number field. Now you can change
this with anything. So this number will be the
number fields and so on. You can add another ingredient. But for now, this is
everything you need to do. And you can create. Click
on the create action. We'll talk about this URL
in the coming lessons and how to create your own API
on a three-word posting. But that's it for
this lesson on IFTTT. Now when you click create
actions will ask you to at least until the ABI
and type this again. Thanks for watching this lesson. If you have any
questions about linking, I fit with your Google Home app and all of these stuff.
I'm here to help. Regarding the API URL. We will explain it in
a separate lesson. So don't worry about that. So that you can go
back and update this IFTTT request.
Thanks for watching.
6. API Configuration: Welcome to this new lesson
in which are going to make a project in order
to prepare our API. So go to io.Adafruit.com. Now in here, you can see
that the food platform and what we need to do here
is to create a new account. Now kind of click
get started for free to create an account. And you can fill in your details with whatever
details you want. Now, click Create Account. If you already have an account, you should click on sign-in
and simply click Sign-in. Now, I need to enter my email address or
username in this case. And as you can see, this is my dashboard. This dashboard you can
learn, you can shop, you can watch YouTube videos, or you can make an API. So what we are looking for here is to create a new dashboard
for a new project. So going back to our
old Adafruit.com, after signing in, will show
you a different platform. You can click a new device
from here or from here. Now, once you click
a new device, you will be redirected to this page where you
can choose your body. And as you can see, you have a heap options. Now, we are using
ESP eight to 66, which is basically
something like the spores. Now you can change it to ESP 32, S3, S2, or any other
board. And that matters. Now. You can search here, it to 66 and you
will find the ball. Let's choose board.
Once you do that, when you click the button below, a new tab will open to
assign that will install the necessary framework
for ESP eight to 66. So click here. And
in here you can see that we are having the firmware
for this ESP 8266 warm. And you just need to
install the software. Now, it will ask you to
connect your blog using USB and to automatically
recognize that connection. And once you have connected, you can click Connect. And it will ask you
for that so that it can upload the
code to your ball. Now going back here, you can choose the
easier option, which is the option that
will give us the API, which is the feeds option. Now feeds are basically places that gets data from
connected devices. So you can click new fields. And then here call
it golden Assistant. And click Create. Now here we have a new field, and this is the key
for our new field. Click on Google Assistant. And here you will see the data
sent by Google Assistant. Now, we have options here. Now as you can see here, we have the feed and form. You can click here
to give the API key we talked about on
the previous lesson. And this API key can
be used on your code. And here you can see digestion
record for more details. Has a lot of tags. Now you can change the
privacy in here to public. This is not something we recommend because of
security concerns, but since we are only testing, it's okay to share this feed. And this will make it easier for us to connect
with this feat. Now here you can see with hawks, with books that you connect your feed to the rest of the
web. You can click here. And in here you can
click to show or hide. You can click Create
and never expires. Date rate limit for a minute. Okay, data, sorry. Now five, we wanted
to never expire. And we can make it ten because we might send up
to ten values per minute. Now here is our feeling. Now you can copy this
link and you can go back to the IFTTT page
to paste this link. And in here, you can
add any hang reagent. We added the number
as an example. Click, click, click
Create Action. Can see that after pasting this, it's telling us
here that this is an unrecognized
ingredients around any text with the signs. To escape that. Now you
can click Add here. And you can add the scene name or activity that I will
choose the same name. Now, let's skip this. Now this scene name will be the same as the thing
that we will see. So click Create Action for now. Now, this will make
our request flip, continue, and click Finish. Now, the good thing about IFTTT is that allows
you to check. So click Check. Now to see what will happen. Now. This is the place where you can see they're coming in for
and, and according process, we will try to show you
exactly how data is sent here using our Google Home tab through Arduino and
DSP eight to 66. Now again, you can, this now is connected and
we will come back here to edit this applet and change
some of the parameters. But for now, you can easily go ahead and
start coding process. So let's move forward to this. Thanks for watching this lesson.
7. Coding ESP01: Hello and welcome
to this new lesson. And we'll try. I'm going to
start the coding process. Now we have two codes for ESP 01 and a code for
our Arduino board. We will start with
ESP 01 coding. Now click File New. And in here, we will start with importing
the required libraries. So hash include. We need that USB A22
66 Wi-Fi library. And we also need to include the ESP 8266 HTTP client. And lastly, we need to include
the Arduino JSON library. Arduino Jason. Now let's write the
Wi-Fi parameters. So constant pointers
to characters. As SID equal your
WiFi network name. And we need another constant. Pointers collectors for the
password, Wi-Fi password. Now, we are good to go, go inside the setup function. Start the serial communication at a 115,200 portraits. And here start
with Wi-Fi, again. In here start with
SSID and password. Now we need to connect
to WiFi or the line, the famous wild statements. Now, inside the wine. Wi-fi status is not connected. Then add a delay of 1 thousand
milliseconds. And wait. We will indicate to the user that we are trying to connect. So connecting. Now we are
done with the setup function. All of this is not new to you. We are only adding the
Wi-Fi and password, Wi-Fi name and password by including the libraries
that we will use. And then we are connecting
to the Wi-Fi network. Now the next step will be to
check if WiFi is connected. Now, if WiFi is connected, and we will check using
the very same line, which is the y, five states. Status equal, equal
Wi-Fi connector. Then we will create an object
of that class, HTTP client. So HTP HTTP client, call it HTTP, which is the
most common known name. Now http dot. Again, we'll take our API link, http, IP, domain name, ABI. I called. I will change this
link and the testing phase, we will do few modifications. Now, you need to check
their turning code. Now, if the HTTP
code is above 0, this means that we need to
start getting the response. So get the request response
payload using a string. So string payload
equal http.get string. Now, once you get the string, we need to print it. So serial print n. We will print the load on the serial monitor to see
if we have any errors. Once done, click HTTP and HTTP connection out
to close the connection. After that, we need
to add a delay. That's added 2.5 seconds
delay. And that's it. This is basically our
codes for our ESP 01. Now once we are done
with this coding, it's not a final code. It will be R code that we will modify
in the testing phase. So let's save this code. Now. Let's call it
VSB, A22, 66 cold. Now you can verify the code
and if you found any errors, you can fix them. Usually, most of those
are from the libraries. So you need to make
sure that you have the libraries included using the Sketch Include
Library option and go to Manage Libraries. And make sure that
you have the ASP into 66 Wi-Fi library and the ESP 8266 http,
your client library. Now if you looked at this URL, should be the Wi-Fi
library does not exist. So you can go again,
include managed libraries. And let's look for
the Wi-Fi library. Here. Esp 8266. Now as you can see, we
have a lot of libraries and most of them
support the sport. Now click Wi-Fi. As you can see here, we have the average and library and most of the other
libraries since Wi-Fi. But for me, I guess that the
ESPN 66 Wi-Fi larvae will work with the symbol
Wi-Fi integrated library. So let's check that. Now in order to
make sure that you won't fix any issues
that you might face with ESP boards
on Arduino IDE. You need to include
these two JSON lengths. So let's call it a USB-A to 66 Jason and go to
File Preferences. And in here, you need to
add a comma at the end. And the SBA to 66 line. Click Okay. Now you can go to Sketch. Include Library,
manage libraries. And we will write yes, P a to 66, ESP to 66. Now, you will see that we have more options now for the
ESP header to 66 board, we can look for this
to be a client, to see if you're with us or not. As you can see, ESP
32 issue TB updates. And it works with Arduino
ESP header to 66. Now we can solve this one. Let's close and now
remove this from the Wi-Fi Liberty League verify again to see if we
have any other arrows. Okay, Now, go here and
make sure that you will change the board
type BSP Editor to 66. And from here you will
see a lot of false. Now, mostly the one you will have is the genetic
code you all. If not, you can select the other module that
you have from this list. Now click Verify again. Now, we don't have any
arrows in this area. We have a spelling error here. Begin. Let's check to see if we
have any other arrows. Okay? Now, let's split it by again. Now I think HTTP code is something we need
to create as well. In here. Now, let's go back. Okay, We have there
she tb arrow here. That should be called
something we need to call. So click end's HTTP
code equal HTTP. Get. This is one
of the mistakes. Now here, initializing
algorithmic one of five class. Again. So let's go back to
the beginning line. Here. We'll have SSID and password. Now, let's bring this back
to ESP API to 66 Wi-Fi, liquid fire again to see if
we have any other errors. And I'm fixing the errors with you just to make sure that you can see how the
coding process works. Now I can edit all of these mistakes and
editing process of the video and show you the complete working code
without any problems. But I usually like to write line-by-line
and fix the issues with my viewers
to make sure that they know how to trace the
errors and how to fix them. So we are compiling again. Now as you can see,
it done compiling, we don't have any other error, so everything is in place. And this is the
ESP l 266 course. We included the Wi-Fi library, that should be client
library, that JSON library. We created two points or two characters for the Wi-Fi
network name and password. We started the serial
communication, we started Wi-Fi connection, and we made sure that
we are connected. Then inside the loop,
we are connected. We are creating an
object from the client. Then we are starting by
calling the ABI link and we are waiting to receive
the code from the API. Now, if the code is above 0 means that we might
have some error. So we are getting the string, which is basically the
response from our HTTP. And we are printing it on the serial monitor and
ending that connection. Again, this is not
the final code. We are working with this
together so that I can show you the edits that we need to do along the way in the
practical testing phase. Now in the next
lesson, we'll move on to the Arduino code. Thanks for watching this lesson.
8. Coding Arduino: Hello and welcome
This numerous ways in which we are going to start the coding,
our Arduino board. But before moving forward, you need to know how we are sending data
from ESP 80 to 66, which is the wifi module
and our project to arguing. Now in the HTTP code,
this if statement, if it is above 0, it means that we
are receiving data. So we need to read
this data using the GetString function and
store it inside the payload, then send it using the serial communication
to our Arduino board. Now it will be
sent as a payload, and then we will
end the connection. Now in the payload will be
received by the Arduino code. So let's see what we will do
on the Arduino code site. Now the first step
in the Arduino code is to define few strings. Now we need a string to
hold the incoming data. So we will call it
string input data. And let's make it
an empty string. We need another
thing called buffer, which is basically the
data waiting location. And we need to know whether that string is complete or not. So let's add a Boolean
variable, string complete. And as the poll who
will make it false? And do we need an ID? We'll talk about
that in a minute. We need more variables like F on buf buffer integers
to count the numbers. And we'll define an x that
we will later on use. Inside the void setup. We will receive start the serial communication by
writing Serial.begin 9,600, which is the default code rate, which is basically how to initialize theater
from vacation. And we need to
reserve 200 bytes for the input string, input string. For, in this case, inputs, let's say data to make it match the variable, but it's there. 200. Now, this line will
reserve 200 bytes for the input string or for
the incoming input string. Now, to make sure that
everything is aligned, we need to verify and save
our code. So let's save it. Let's call it Arduino code. Click Save. Now, we are done
with the setup function. We need to move on to the loop function in which we will print the string
when a new line our lives. So let's do this. First. We need to use an if statement. Inside the if statement, we will ask if string complete. Now string complete
means this function. So if it is true, it will
go inside the if statement. So we initialize it as false so that when
the thing completes, it will be true. So let's move forward. Now. Why do we will explain
everything in a minute. Now, f is below a 100. We need to add another if
statement inside here. Now inside this if statement
that is inside the while, we will ask if the input data, the sub string, if equal, equal IV of the incoming
data has the ID. In this case, we need to
write id equals true. We need to break
this if statement. After the if statement, we will increase the account
that if counter by one. So f plus plus. And after doing that, you need to make
sure that you are outside the while loop. Go and add a new line and ask if id equal, equal two. Now the idea is true. Then store the input string
or input data that actors. And in here, if blas, now we'll explain all of
these lines in a minute. Now after this if
statement, we will check. If inside this, if x equal, equal four, then in this case, we need to do the following. If will equal 0, which
is the first thing, then we need another while loop. Inside this while loop, we need to ask again, if, if it's below a 100. After that, we need
to do a few checks. Now, while f is below 100, we need to add plus equal nine. After that, we need
to add a for loop. Inside this for loop, we will add int I equals 0. I is below three bus the bus. Now here, if this if
statement will ask if the input data collector at it for blast I equal,
equal double quotation. Then make I equal three. The input data. If I hover buffer by using
the plus equals sign. Now, this is for
the if statements, for the false statement, sorry, once you are done with
the for statement at buff equal to integer, then analogWrite if you want
to write an analog value. And inside the animal rights, you can write the pin number, which you want to
write the value, and the buffer value, which is the final
value that we receive. After the analogWrite,
we need to break. Then after this while end line, you need to add if a blast, blast at the end, you need to make sure
that you have to. Now after that, if lots of blas, you have two closing
curly braces, then after the closing curly
braces best statement, we need to clear the string
to receive new strings. So input data will equal to string and string
will equal false. Now, as you can see, this is basically
the main function that we are using here. But we need to review
that curly braces. So we have this setup and
we have this for loop. So let's go back a little bit. Now, the first thing
is that if statement. Inside the if statement
we have a while loop. And inside this while
we have another F. And this is the closing
called f statement. After the closing statement, we have that plus, plus. Then we have the closing
for the while loop. Then we have a new f statements. If id equals equals true. And this is the closing folder. You, as you can see, now, we have another
if statement. Now, this f statement, x equal equal four. Now before that, we
need to make sure that we have closing curly brace for the if id
equals equals true. Then we have x
equals equals four. And here, if equals 0, then the wild or that
an opening curly brace, then we have F plus equal nine. After that, we have a for loop with an opening
and closing. Then we have these three lines. And then we have a closing, then we have fibroblasts, then we have two closings. Then we have the input
string clearing. And here we have the
end for our for loop. Now one thing that we missed is that the main IF statement here, the closing for this
if statement is basically down here. Not here. So we need to remove this and we need to make sure
that the closing for this if statement
is this one. Now, let's review the
curly braces together. Now here, this for
loop has disclosing. And as you can see, since this for loop
has this closing, we need to make
sure that we also have a good closing
of the if statement. Now we missed one of
the if statements here. Now here you can see
that we have while, if it's below a 100. Now, before writing all of this, we need to add an
if statement here, which will ask if the input data dot sub string
equal equal number. Now if it does equal number, then we need to add
curly brace here. And we need to close it
after the break here. So here we have to know
after this f plus plus, we need to close that
if x equals four. That's it. Now let's
zoom out a little bit. Now we have this
closing the void loop and everything is in place. Now we can also create
a function for Syria, Lebanon live voice
serial events. Now, Serial event,
as you can see here. Now, in here, we need to add the while loop to receive
the incoming data. Now, this one will have
the following theorem. The label. Now, to get the new byte, we need to derive the
following Dr. n character, or the input character
will equal casting the character of the
serial function. And to add it to the input
that all the input string, we can simply add input
data plus equal and char. And if the incoming character is a new line, so that flag, so the main loop can
do something about it. And to do this, simply write if in both character
equal, equal new line. Then in this case, string complete will equal true. That's it. This is our code. Now, let's combine to see
if we have any problems. But first, make sure
that we are changing the board arduino owner. Now we would sit and
wait to see if we have any spelling errors or
any other type of errors. Okay, so here we have the buff. Let's first check. That problem was not
declared in this scope. So let's go back and fix
this, splitting it off. Now we define buffering here. So let's chart to bath. Verify again. Now done compiling.
As you can see, we don't have any errors. So let's explain
what's happening here. Now, we are trying to control the number line by sending a
PWM value, let's say 128255. So let's say that Alice is
connected to pin number nine. And we want to set
a value of 155, this pen, this is a PWM value. That's why we use the analogWrite function
pin number line to write the buffer value. Now, let's work this backwards. Basically what we have
done here is we receive the incoming data
from ESP to do 66. Watch are basically
the number and the value itself that we
sent using Google Home app. Now, when we are receiving, we are making sure that we are
receiving the word number. And we are receiving
this ending. So we are taking the incoming values
and we are converting the incoming values by storing the values inside the buffer. Now after we have
the full value, which is basically the number, let's say a 128. We are converting this buffer to integer and we're storing
it inside the buffer, which is basically an integer
that we defined here. Now this path will
take the integer value and send it to pin number line using the analogWrite
function, then it will break. After that, we will receive the input data and make
it an empty string. And we'll bring back the string complete variable to false, so that we can wait
for a new string. Now the incoming string
is usually received. In here. We will keep
receiving and increasing the value until we have
everything inside the input data. And we are storing the
input characters one by one gradually
inside the buffer. Once we are done
using this for loop, we are basically converting this to an integer and
store it inside the bath, then sending it to the port. And this is how easy it is. Now again, here we have a serial event function that will receive the incoming data stored inside the input data. And if we received a new line, it means that we are done. We received everything and the input data is
ready to be processed. Now, the input data will be processed as
you can see here, here. Here, and here. Each of these
functions will help, let's say with data manipulation when it comes to strings. So it will stop at
specific character. It will make a substring by
cutting the number and taking the actual number of the
serial line that we received. So the input data will
be full line sit PWM, pin nine to 100, let's say. And we will cut the number and we'll start cutting the values one by one until we reach
the actual PWM value, which is basically what we
will send using this line. So this is basically lines
for data manipulation. Now, we are done with
the Arduino code. What remains is that
testing phase in which we will edit the
Arduino, the ESP code, and the API to, let's say, match our
needs for this project. Thanks for watching this.
 Achraf Mad, Creative Engineer